Templates are the reusable blueprints behind every consent form, membership agreement, or contract your practice sends. Build a template once in the document editor, then reuse it for every patient instead of formatting a document from scratch each time.
A template is a saved, reusable layout. When you send a template to a patient (or another signer), that becomes an individual document, which your team can track, manage, and reference separately from the template it came from. The setup covered in this article applies to reusable templates under Payments → Documents & Contracts → Templates, not to one-off documents you're editing after they've already been sent. For an overview of the dashboard, document statuses, and how templates and documents relate, see Documents & Contracts Overview.
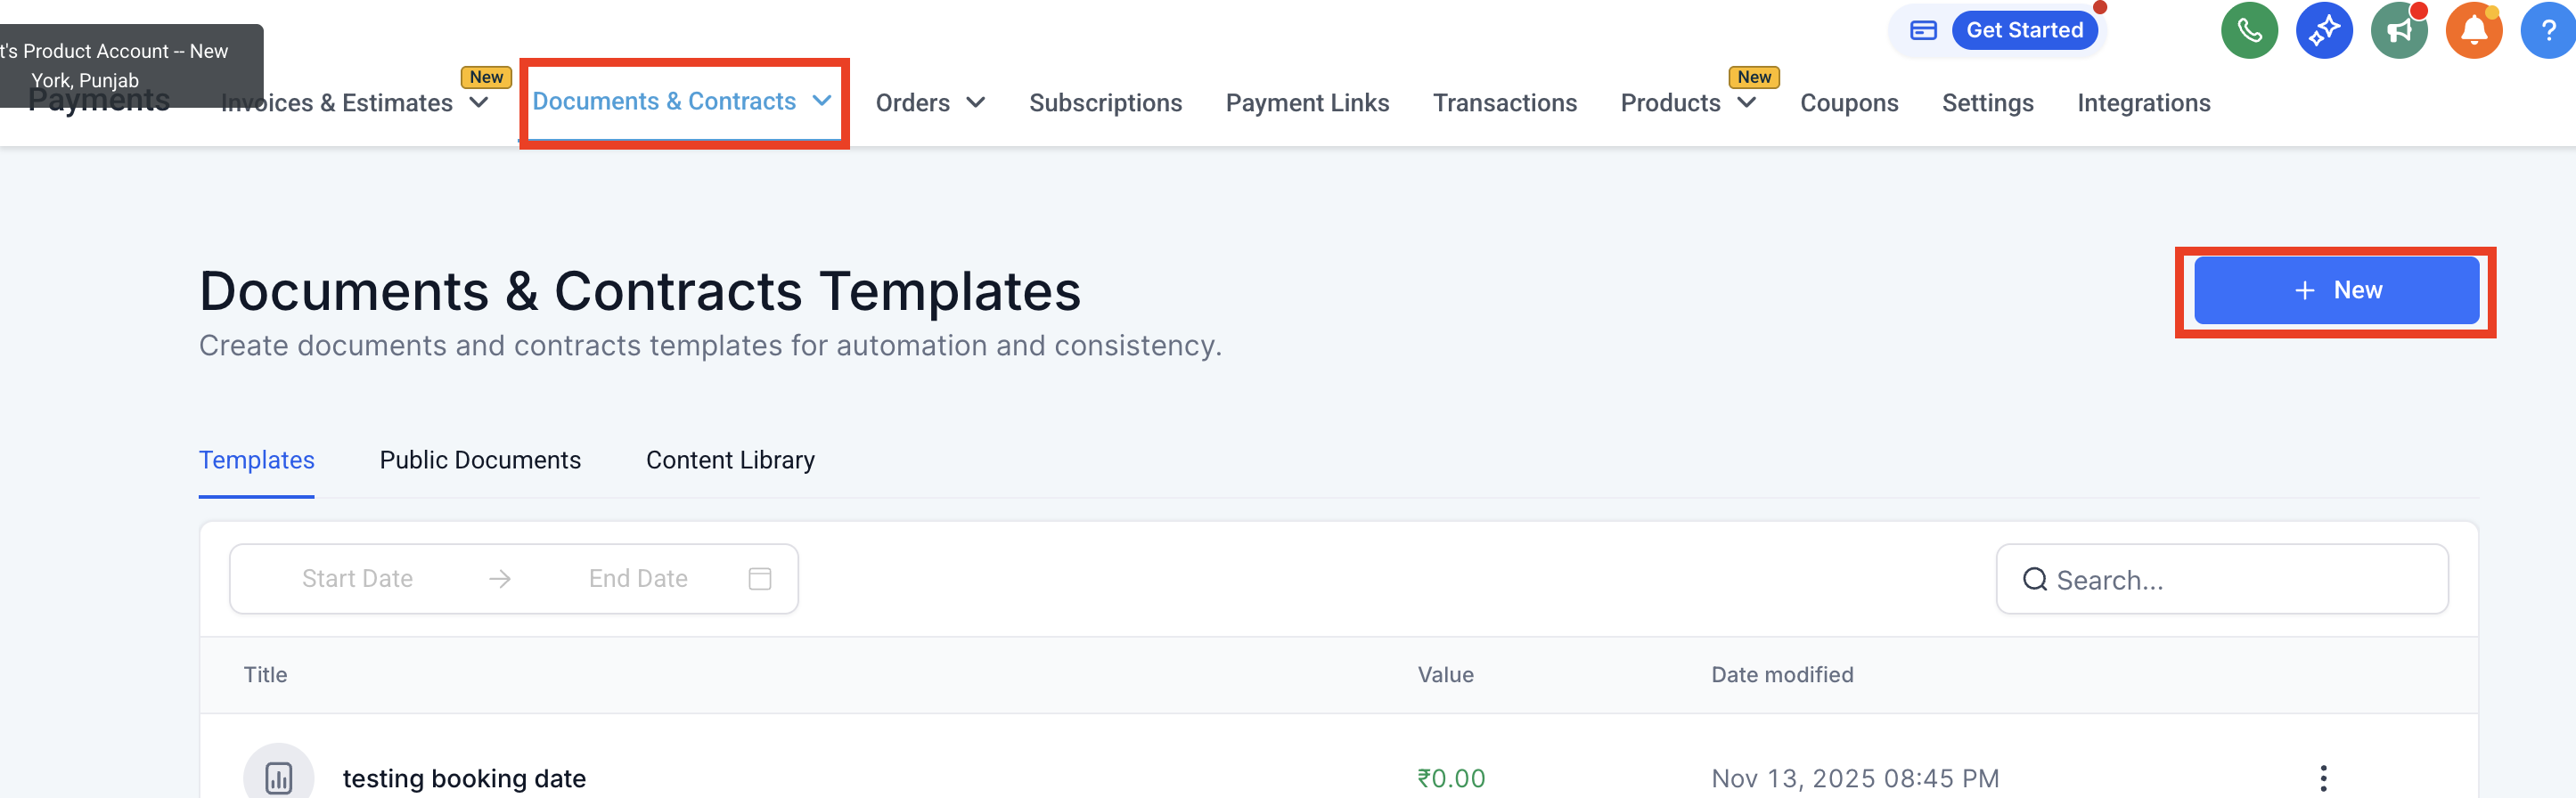
Open a template from Payments → Documents & Contracts → Templates → + New, or click into an existing template to edit it. Inside the editor, you build the layout by adding blocks such as text, images, tables, pricing sections, and signature or initial fields, then arranging them on the page.
To place two elements side by side instead of stacked, drag one element next to another in the editor. The builder automatically creates a split-column layout from the two elements. This is useful for laying out things like a logo next to a practice address, or a pricing table next to descriptive text, without having to build a custom table just to get a side-by-side look.
Detailed coverage of adding pricing and products to a template lives in Products, Pricing & Payments in Documents.
The Content Library is a set of saved building blocks inside the template editor. Instead of rebuilding a signature table, pricing section, or an entire intake page every time, save it once and reuse it across every template.
What it's good for:
Speed: assemble a new consent form or contract in minutes by pulling in blocks you've already built.
Consistency: keep your practice's branding, terms, and layout uniform across every document type.
Quality control: once a block is approved (legal language on a consent form, for example), start every new template from that approved version instead of rebuilding it.
To save an item to the library:
In the template editor, add or select the block you want to save (text, image, pricing, signature, or a full page).
For a single block: hover over it and select Add to Content Library.
For an entire page: open the page, click the ⋯ (three dots) menu, and select Add to Content Library.
Name the item clearly and confirm.
To reuse a saved item:
In the editor, open Content Library → Custom.
Drag the saved block or page into your template.
Adjust text, merge fields, or pricing as needed for the new template.
Saved items are managed from Payments → Documents & Contracts → Templates → Content Library, where you can rename or delete them later. Using a Content Library item doesn't change how workflows or notifications behave; those still run off the template and document status as configured elsewhere.
One thing to watch for: if you save a block or page to the library from a document that already has real patient information filled in, that information can be saved into the library item along with the formatting. Build library items from a blank template, not from a completed patient document.
You can attach supporting files (intake instructions, a pricing sheet, a signed-copy PDF, or a practice brochure) directly to a template or document so they arrive as real email attachments alongside the contract, rather than as a separate download link.
To add an attachment:
Go to Payments → Documents & Contracts.
Open the template or document you want to edit.
Click the gear icon (Settings) in the upper-left corner of the builder.
Scroll to Add Attachments and click Upload.
Drag and drop, or browse to select your file(s).
Watch the upload progress bar, then click Save.
Limits: accepted formats are SVG, PNG, JPG, and PDF; each file can be up to 15 MB; you can attach up to 5 files per template or document. Keep your total email size well under 20 MB, since very large attachments can affect email deliverability.
Attachments ride along automatically whenever the document is sent, whether that's manually or triggered by a workflow, so there's no extra step needed at send time. If you duplicate a template or document, its attachments duplicate with it. You can remove or replace them from the copy without affecting the original.
You can link a text or date field inside a template directly to a contact's custom values, so the field fills in automatically instead of the patient having to type it manually, and so the practice's contact record updates once the document is signed.
To link a field:
In the template editor, add a text or date field where you need it.
Add a recipient, then select the link icon on that field.
Choose the custom value to link it to. A single field can link to more than one custom value if needed.
Once the recipient signs, the linked field's value is written back automatically to the corresponding contact (or document) record, so your team doesn't have to update it by hand. To review everything a patient filled in across a document, go to the document's dashboard and download a CSV of the filled fields.
Contact custom values are the same for every document you send to that patient. Opportunity custom values let a single reusable template pull different information for each deal, such as a specific treatment package, quoted price, or closing date, even when it's the same patient with more than one opportunity on file.
Before you set this up, confirm:
The field was created as an Opportunity custom field (not a Contact field).
The relevant Opportunity actually has a value saved in that field.
The Opportunity is associated with the correct contact.
The template is saved before you try to select it in a workflow.
The contact has a valid email address, even if you're delivering by SMS.
If your template is used for more than one signer role, assign at least one fillable element to Contact before using it in a workflow; role details set in the workflow will override the template's defaults.
To add an Opportunity merge field:
Go to Payments → Documents & Contracts → Templates, and confirm you're editing a saved template (the URL includes /templates/).
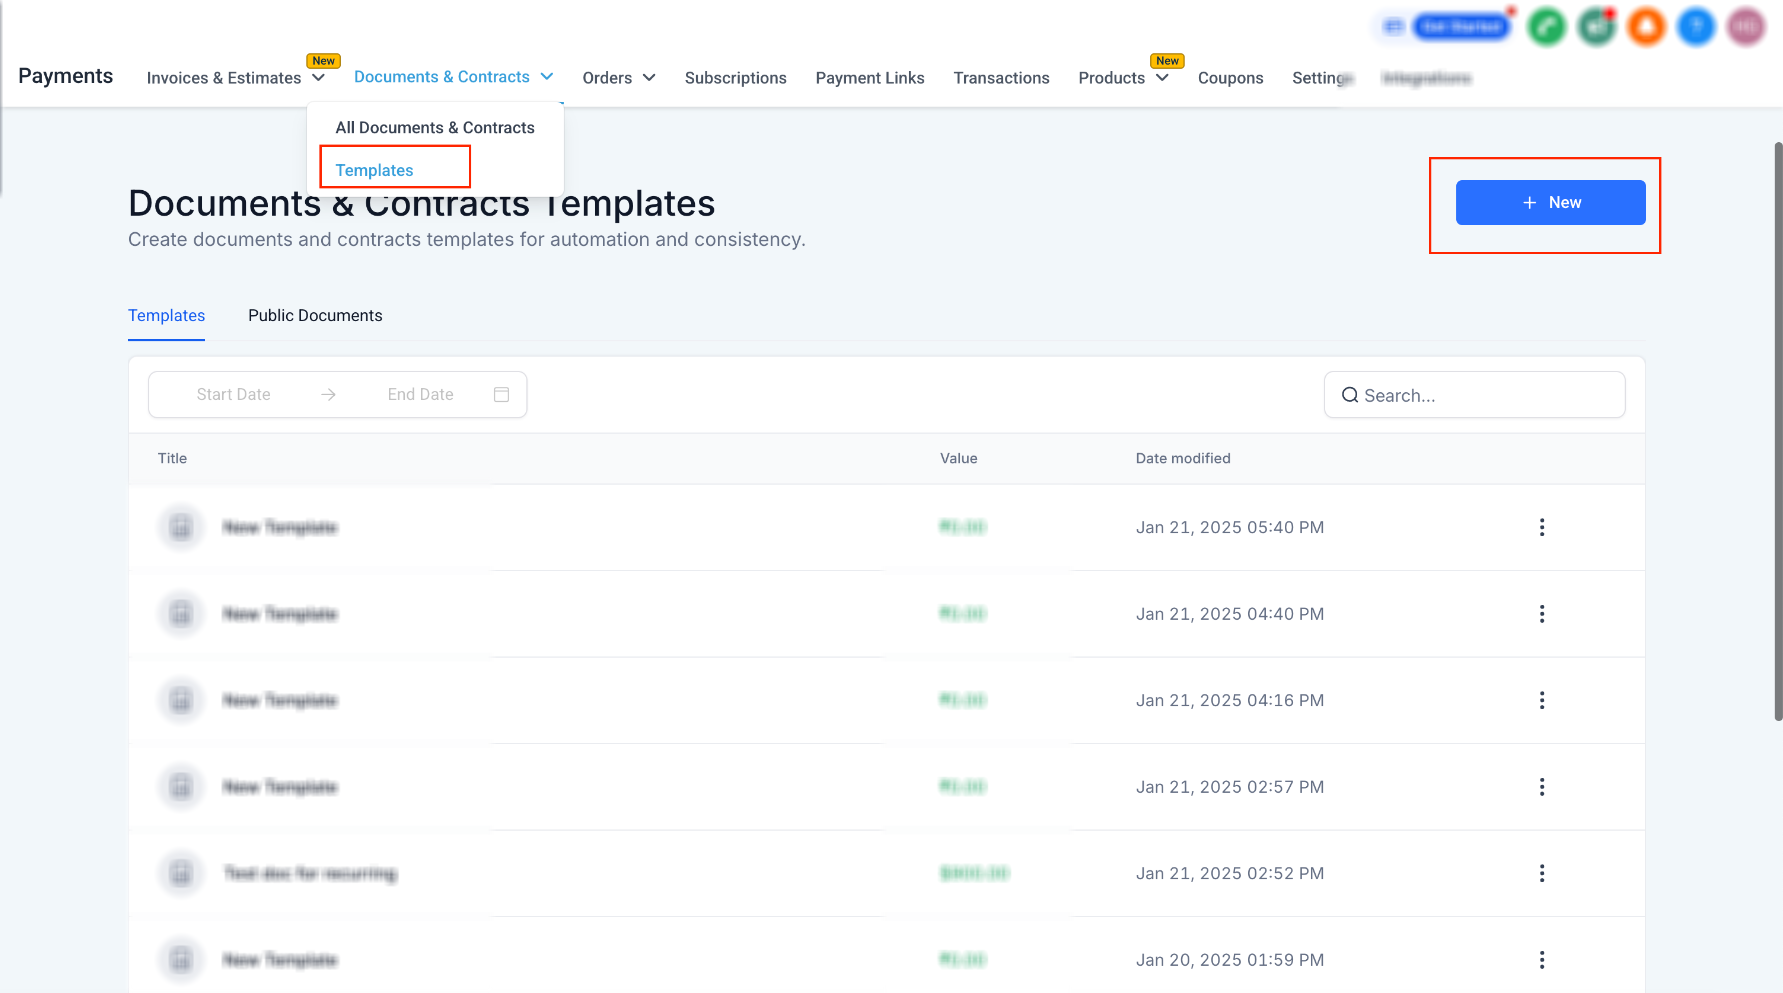
Add a Text block or Table where the Opportunity information should appear.
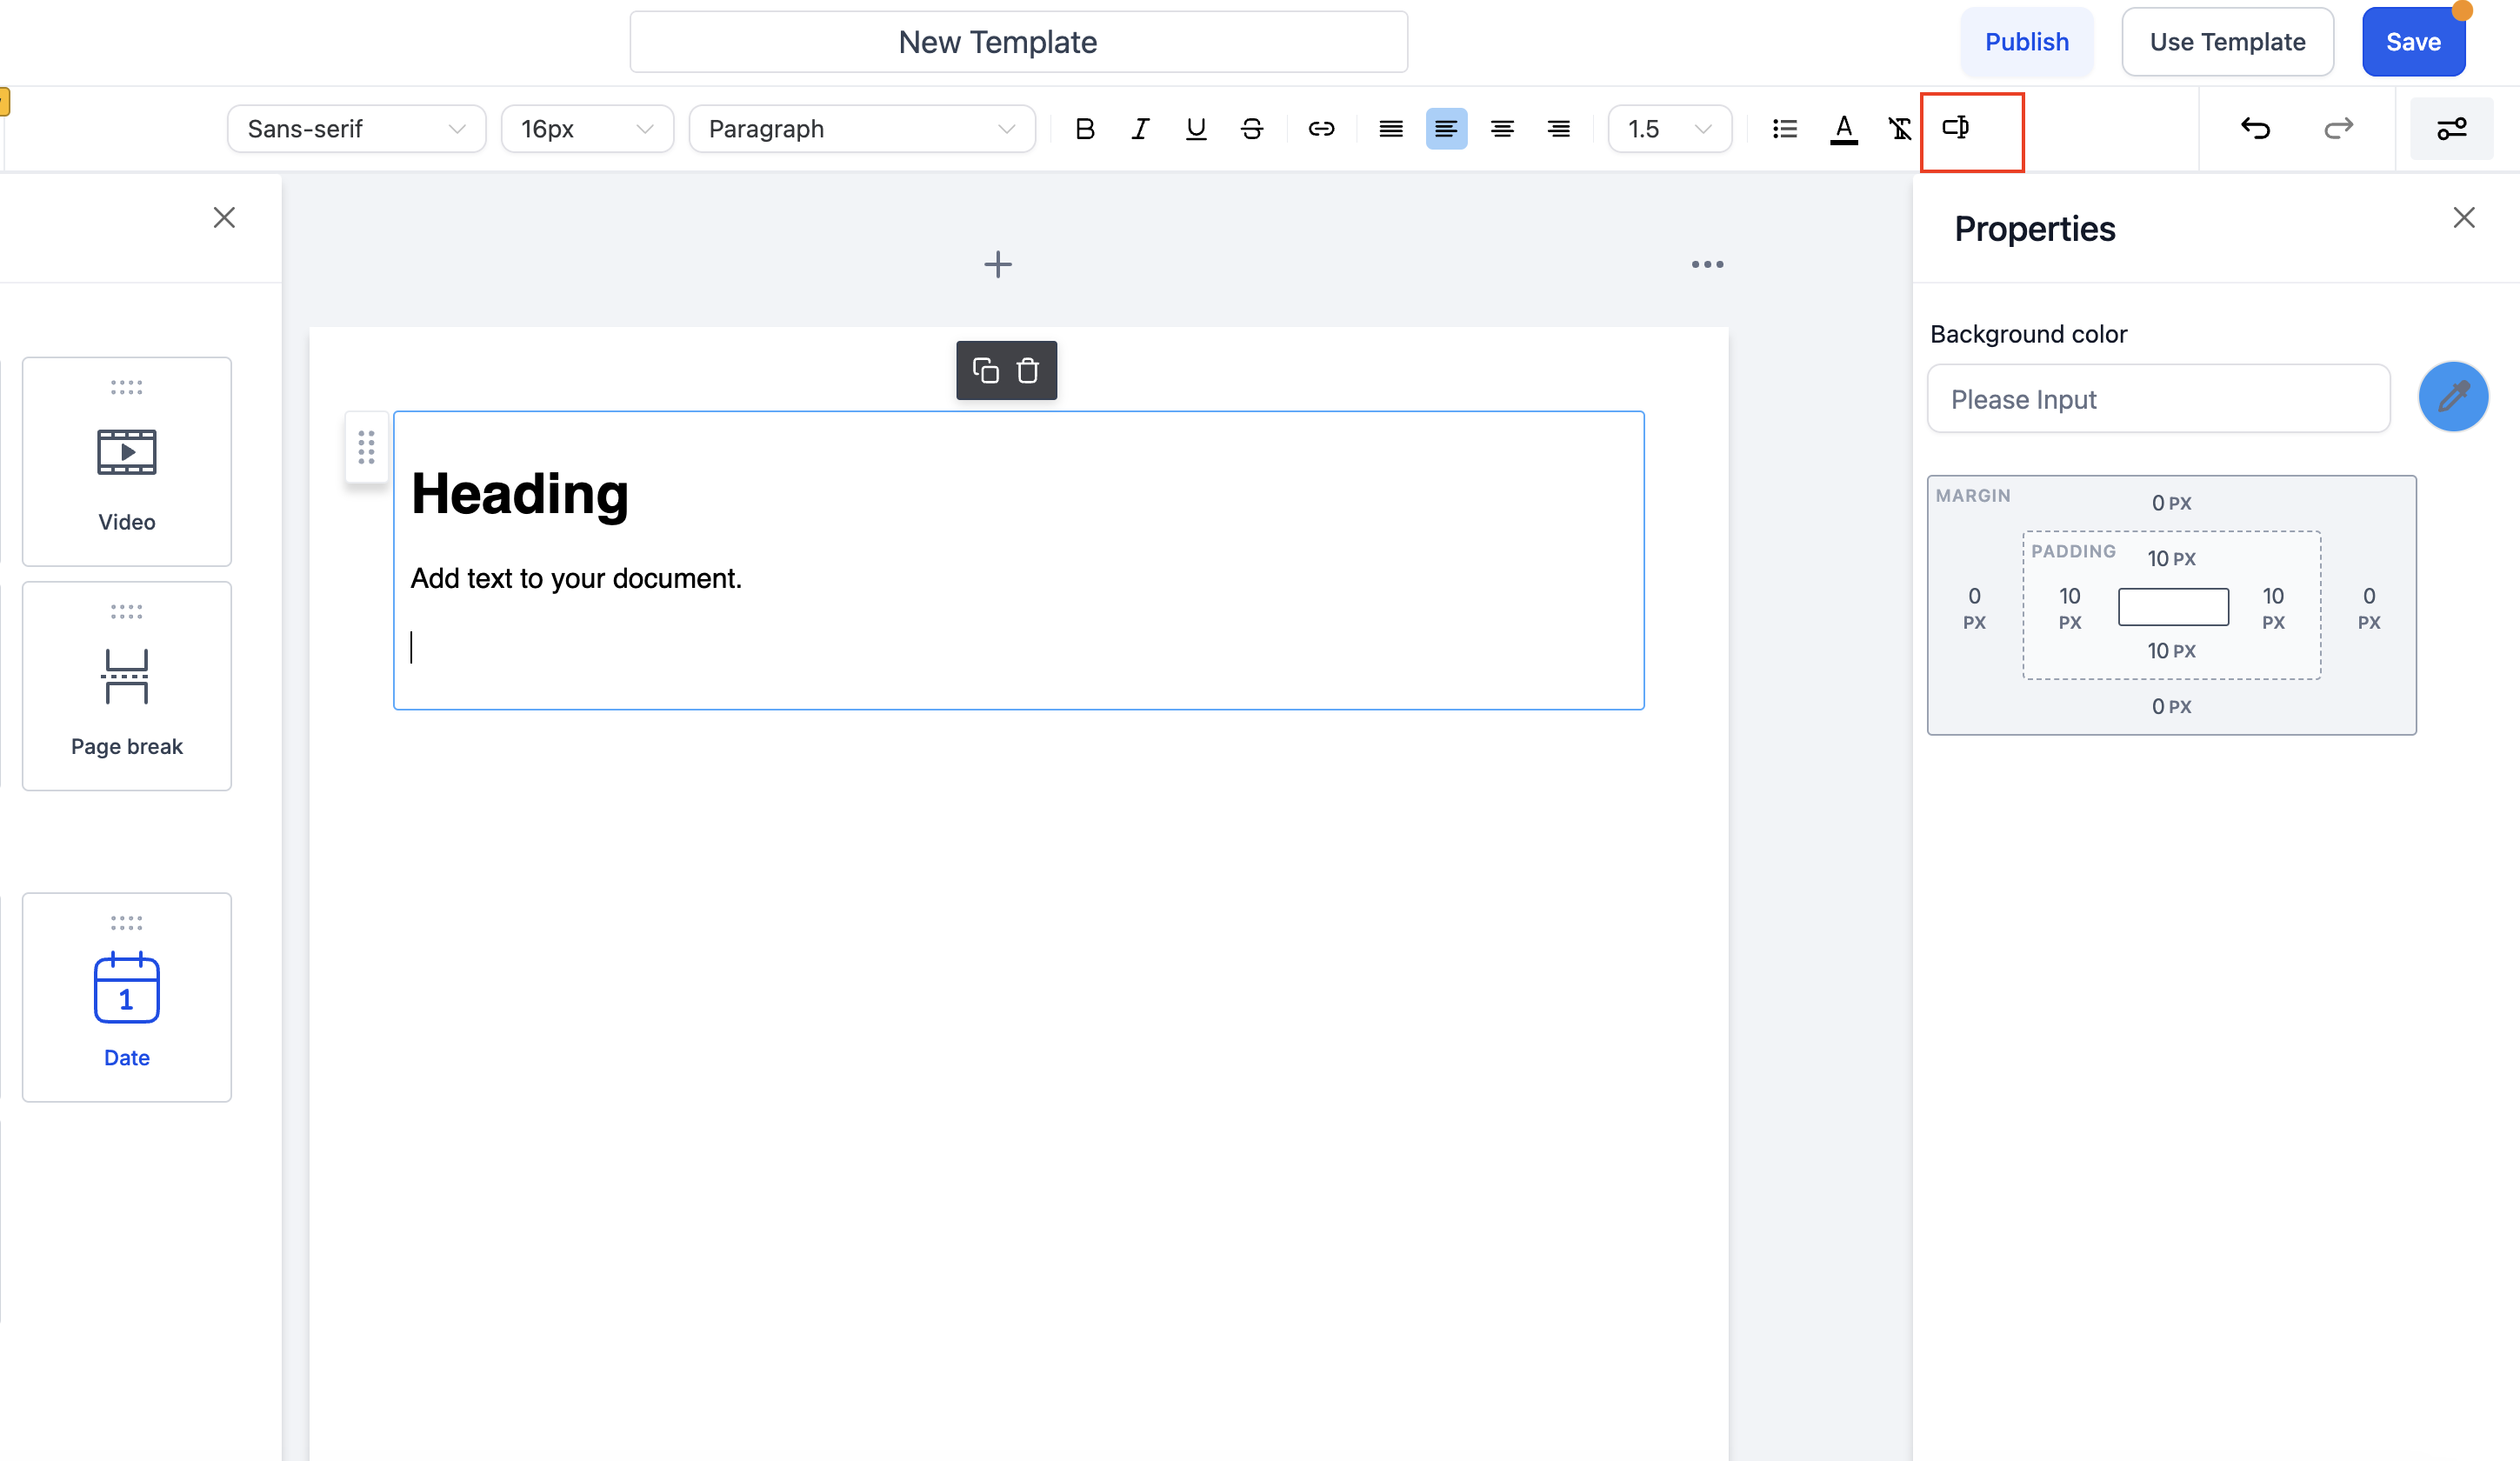
Place your cursor there and click the Merge Fields icon.
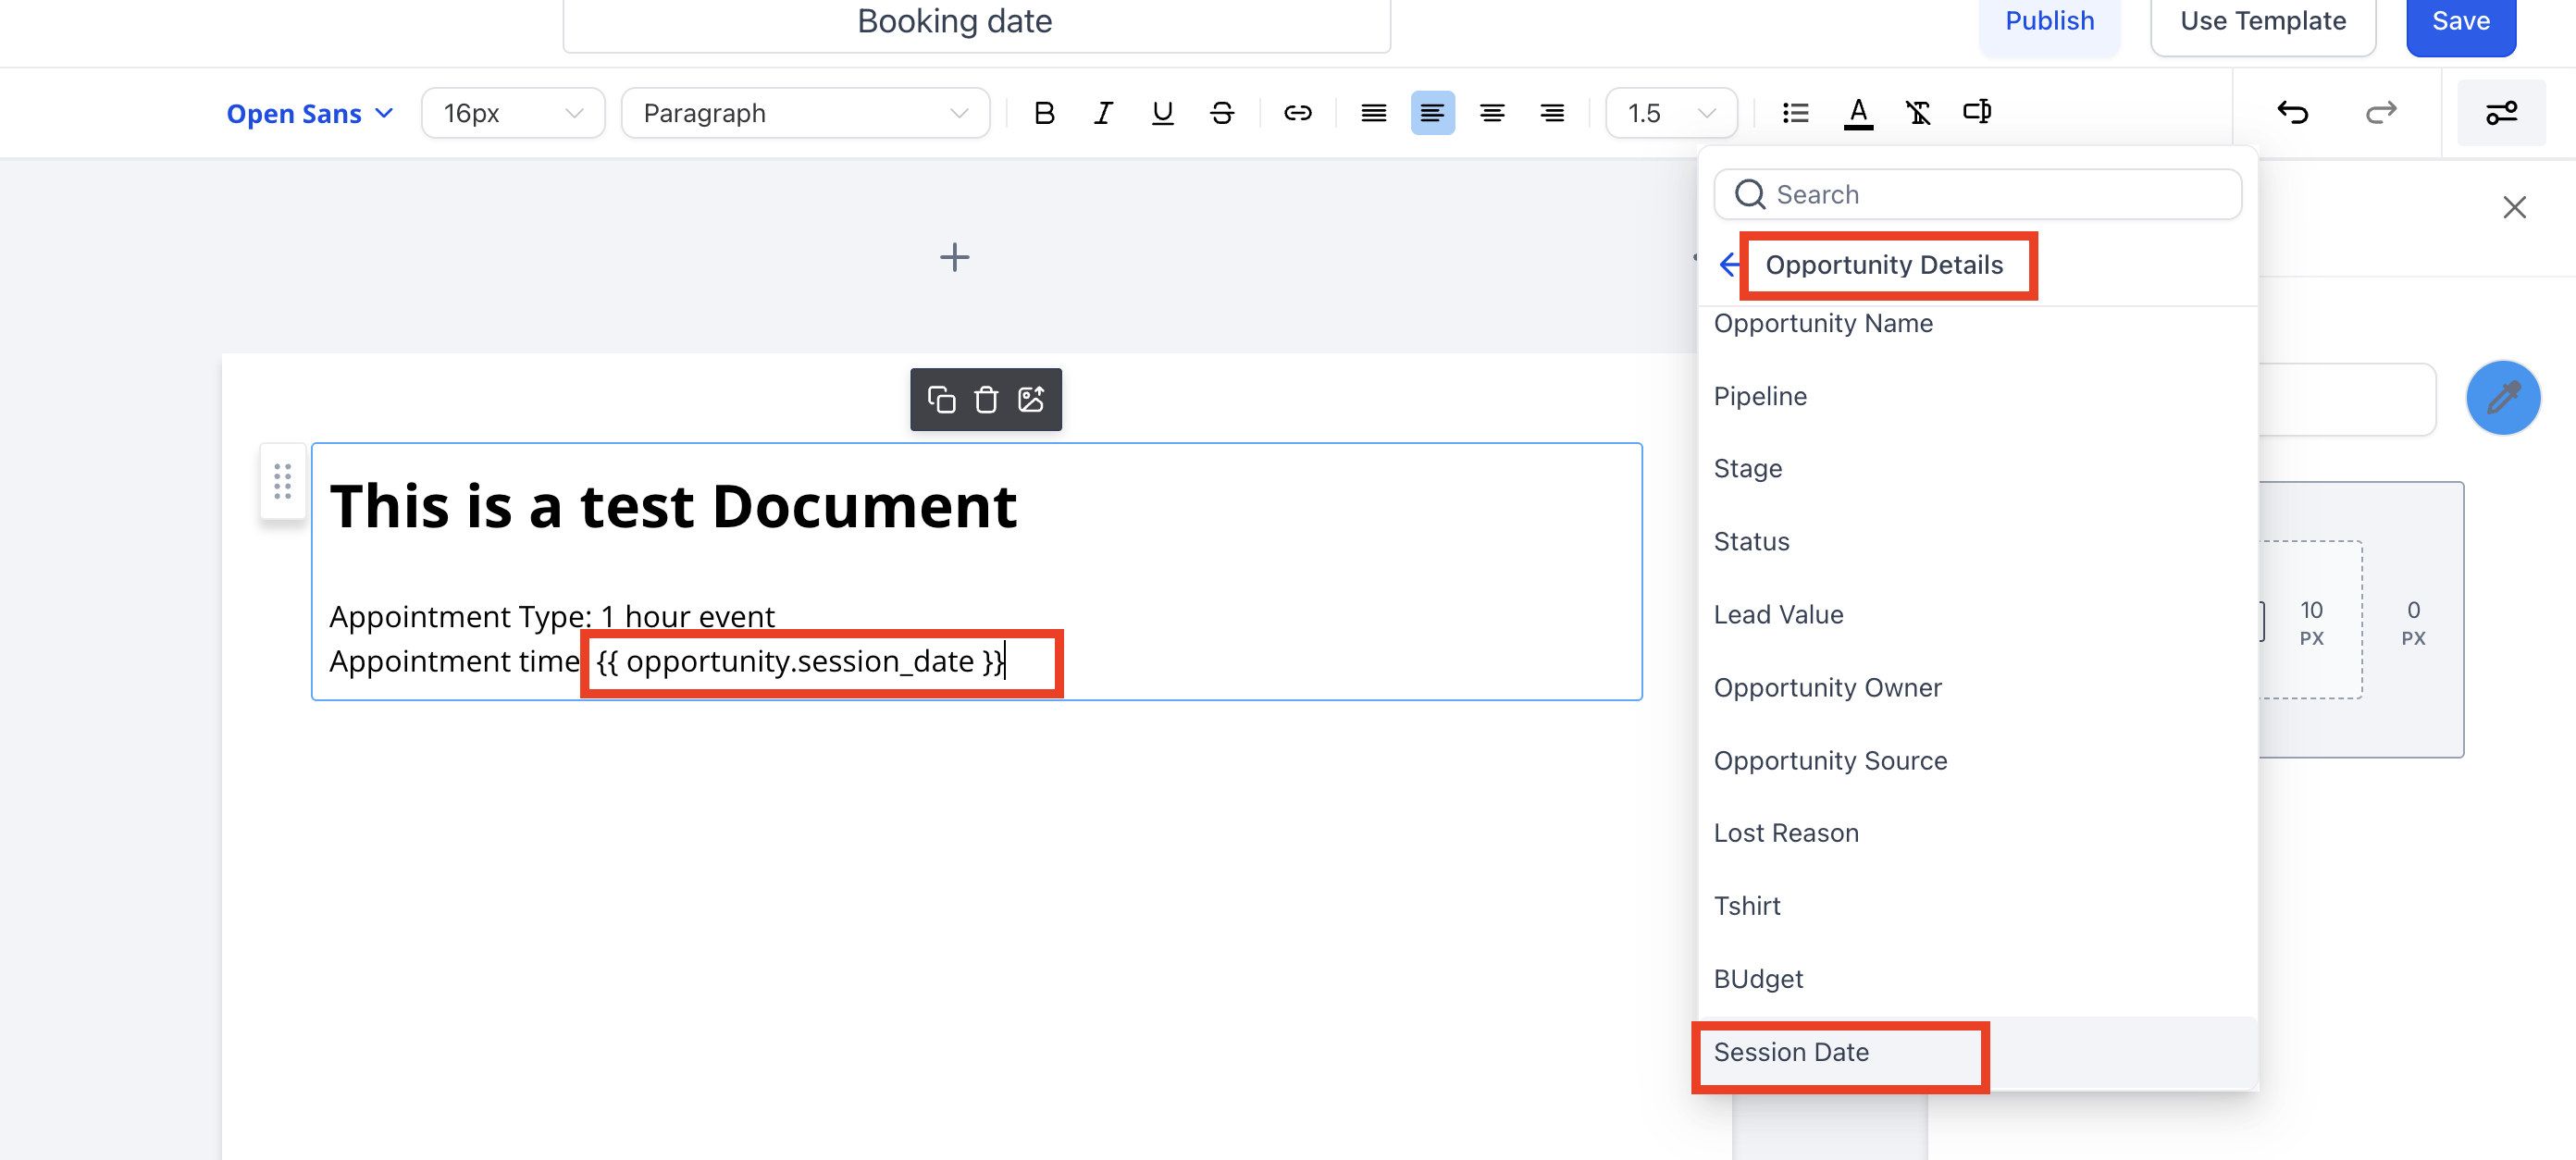
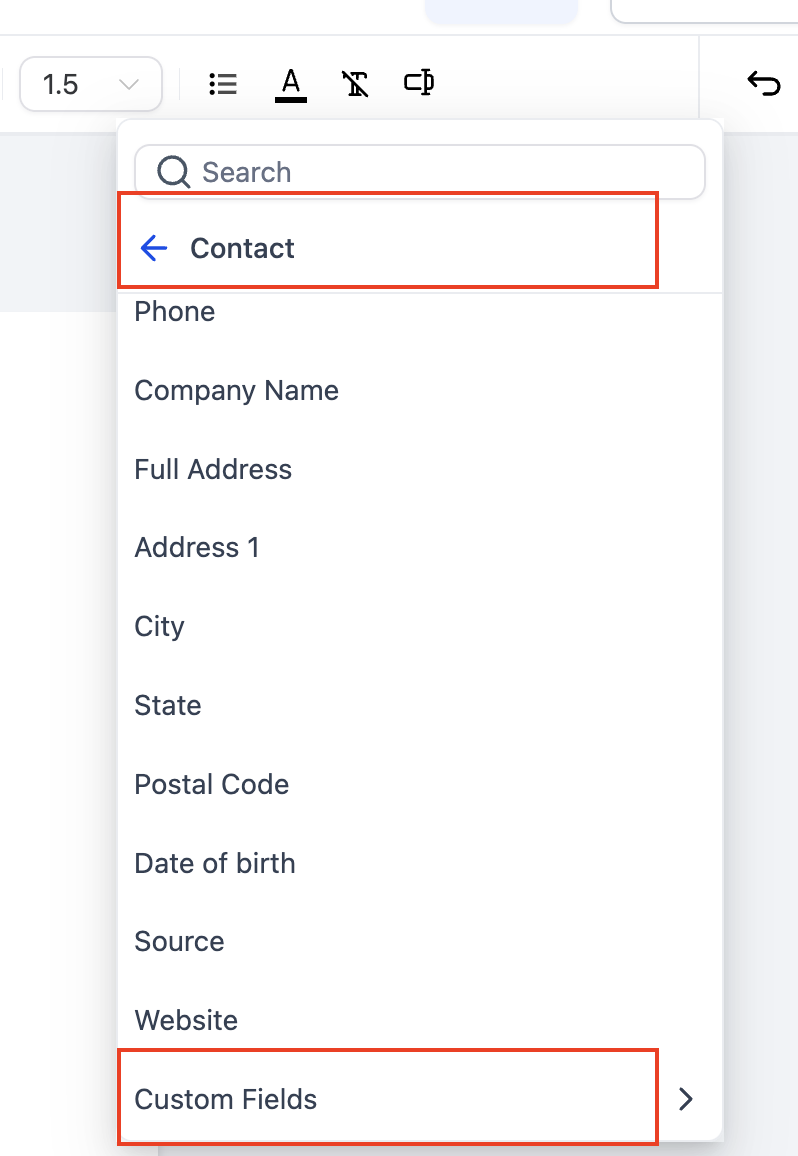
Select Contact → Custom Fields → Opportunity Details → [Field Name].
Confirm the merge-field token appears where you expect, then Save.
Always pick the field from the Merge Fields menu rather than typing a token by hand; the menu inserts the exact key the field needs.
To use the template in a workflow:
Go to Marketing → Workflows and open or create a workflow.
Add an Opportunity trigger that matches your process: Pipeline Stage Changed starts the workflow when an opportunity enters a stage, and Opportunity Status Changed starts it when the opportunity is marked Won, Lost, or another status.
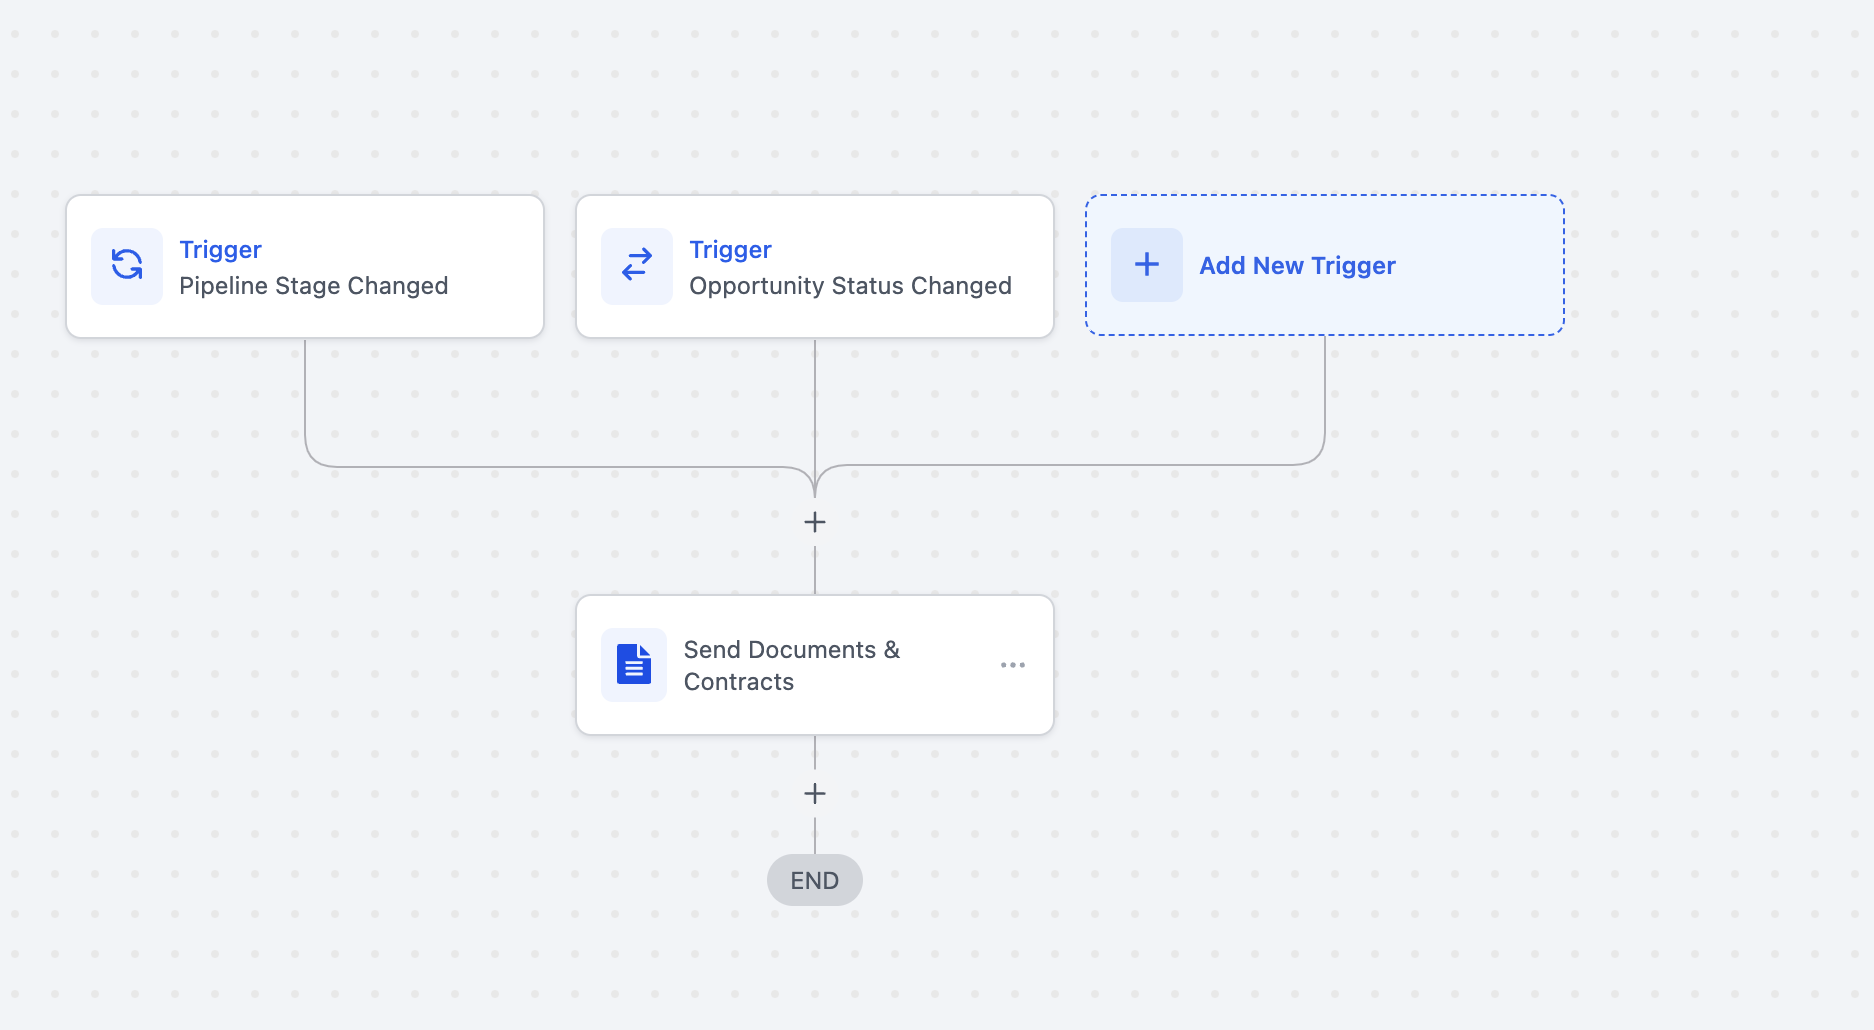
Set the trigger filters (pipeline, stage, or status).
Add a Send Documents & Contracts action, select the From User and your saved template, and choose Create as Draft or Send Directly.
Save the action and publish the workflow.
Use Create as Draft while testing so you can open the generated draft and confirm every field populated correctly before switching the action to Send Directly.
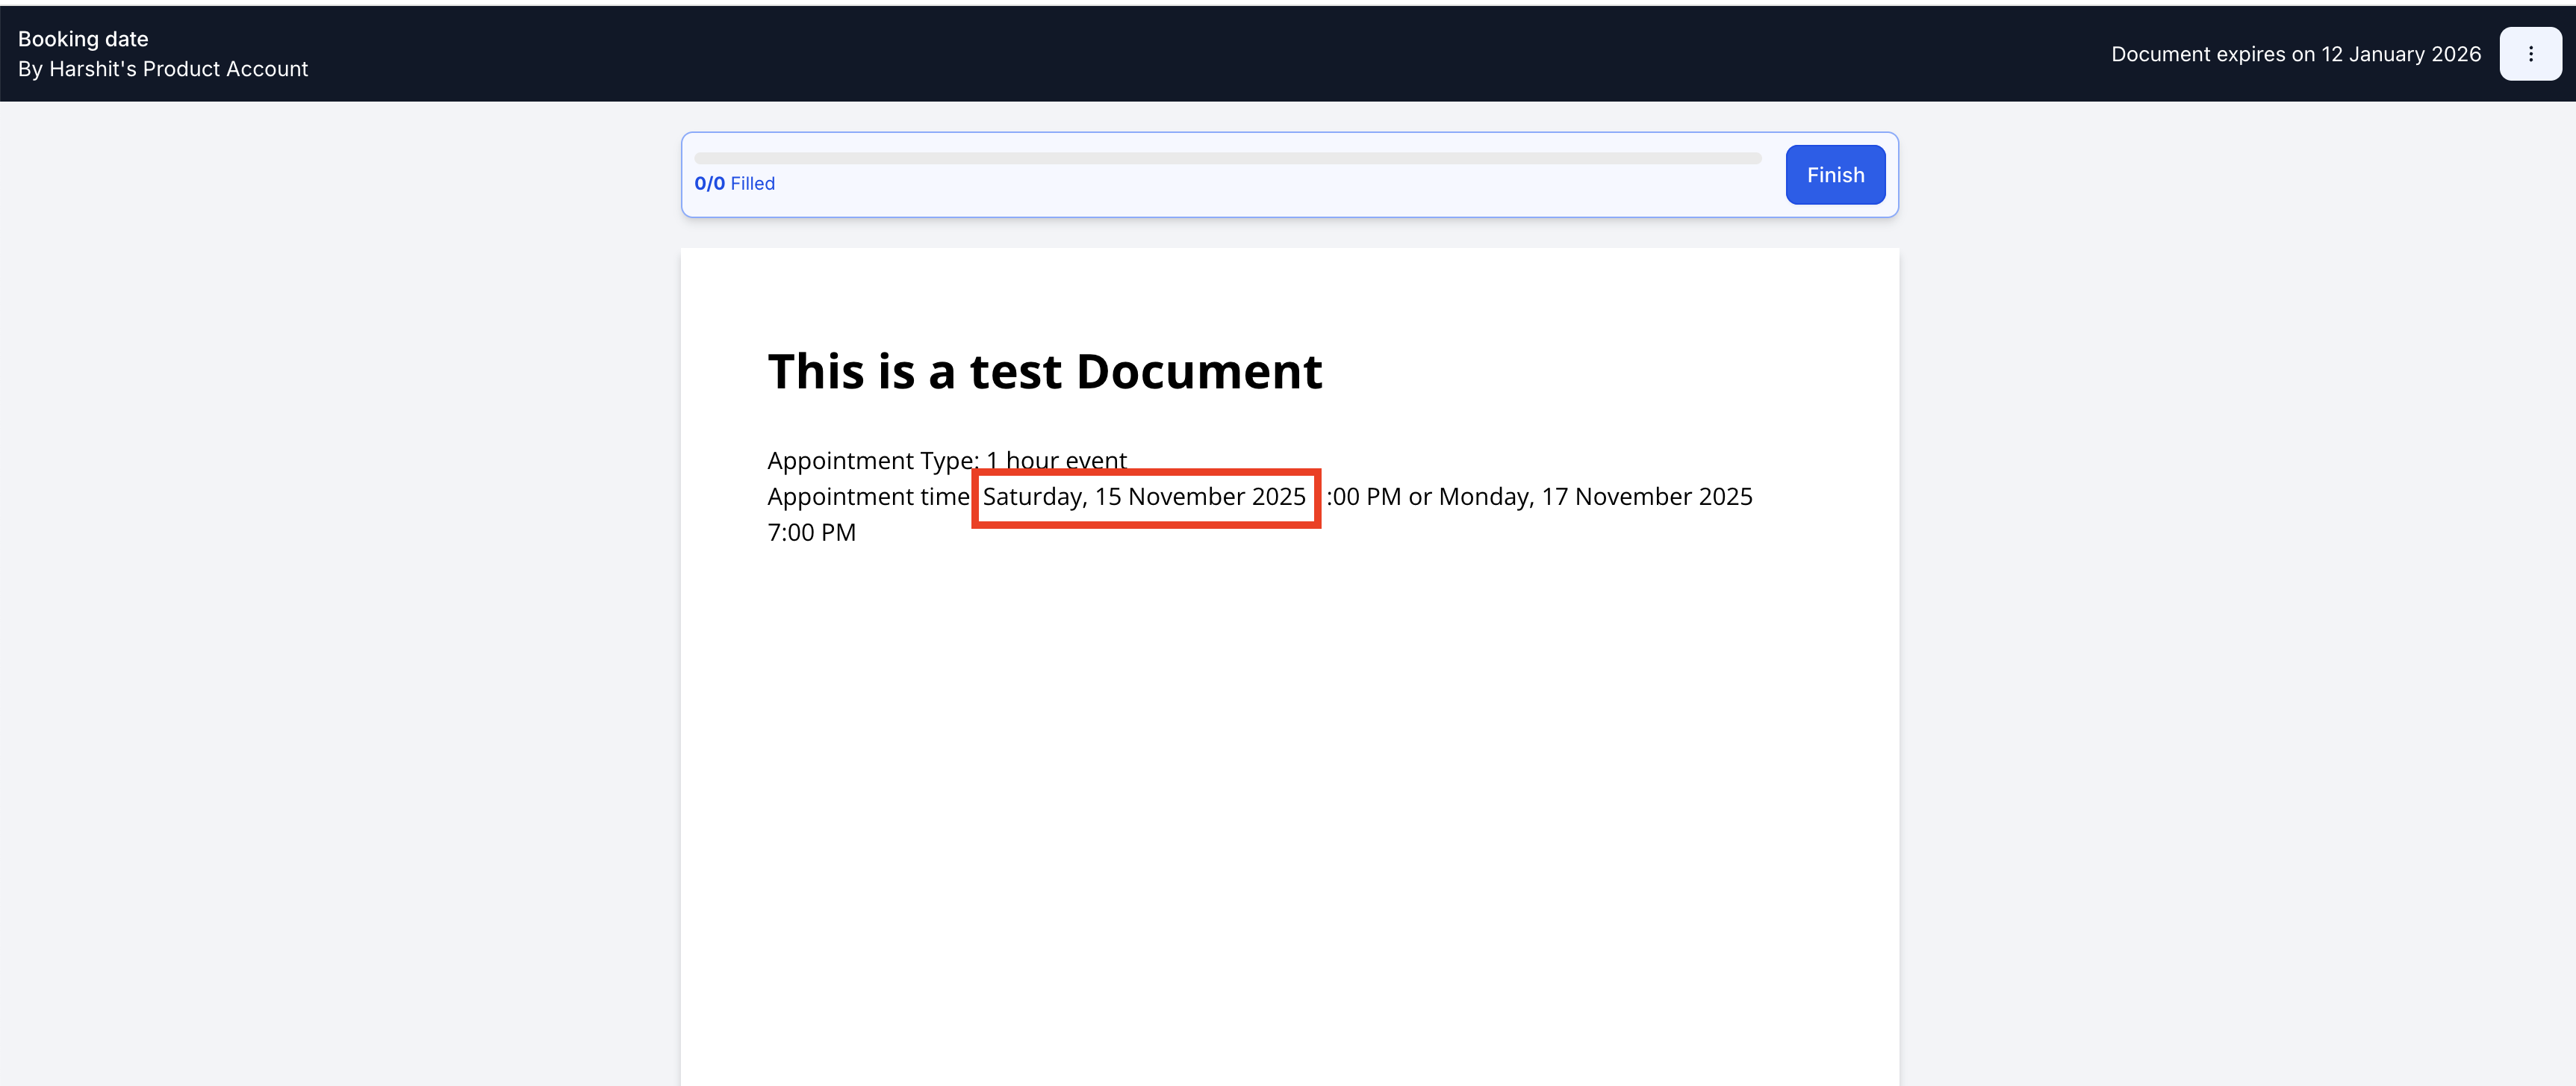
You can't drop an appointment merge tag directly into a document template; the Send Documents & Contracts action only pulls from Contact or Opportunity fields, not straight from an appointment. The workaround is to have your workflow copy the booking date into a custom field first, then send a template built to pull from that field.
Before you build the workflow:
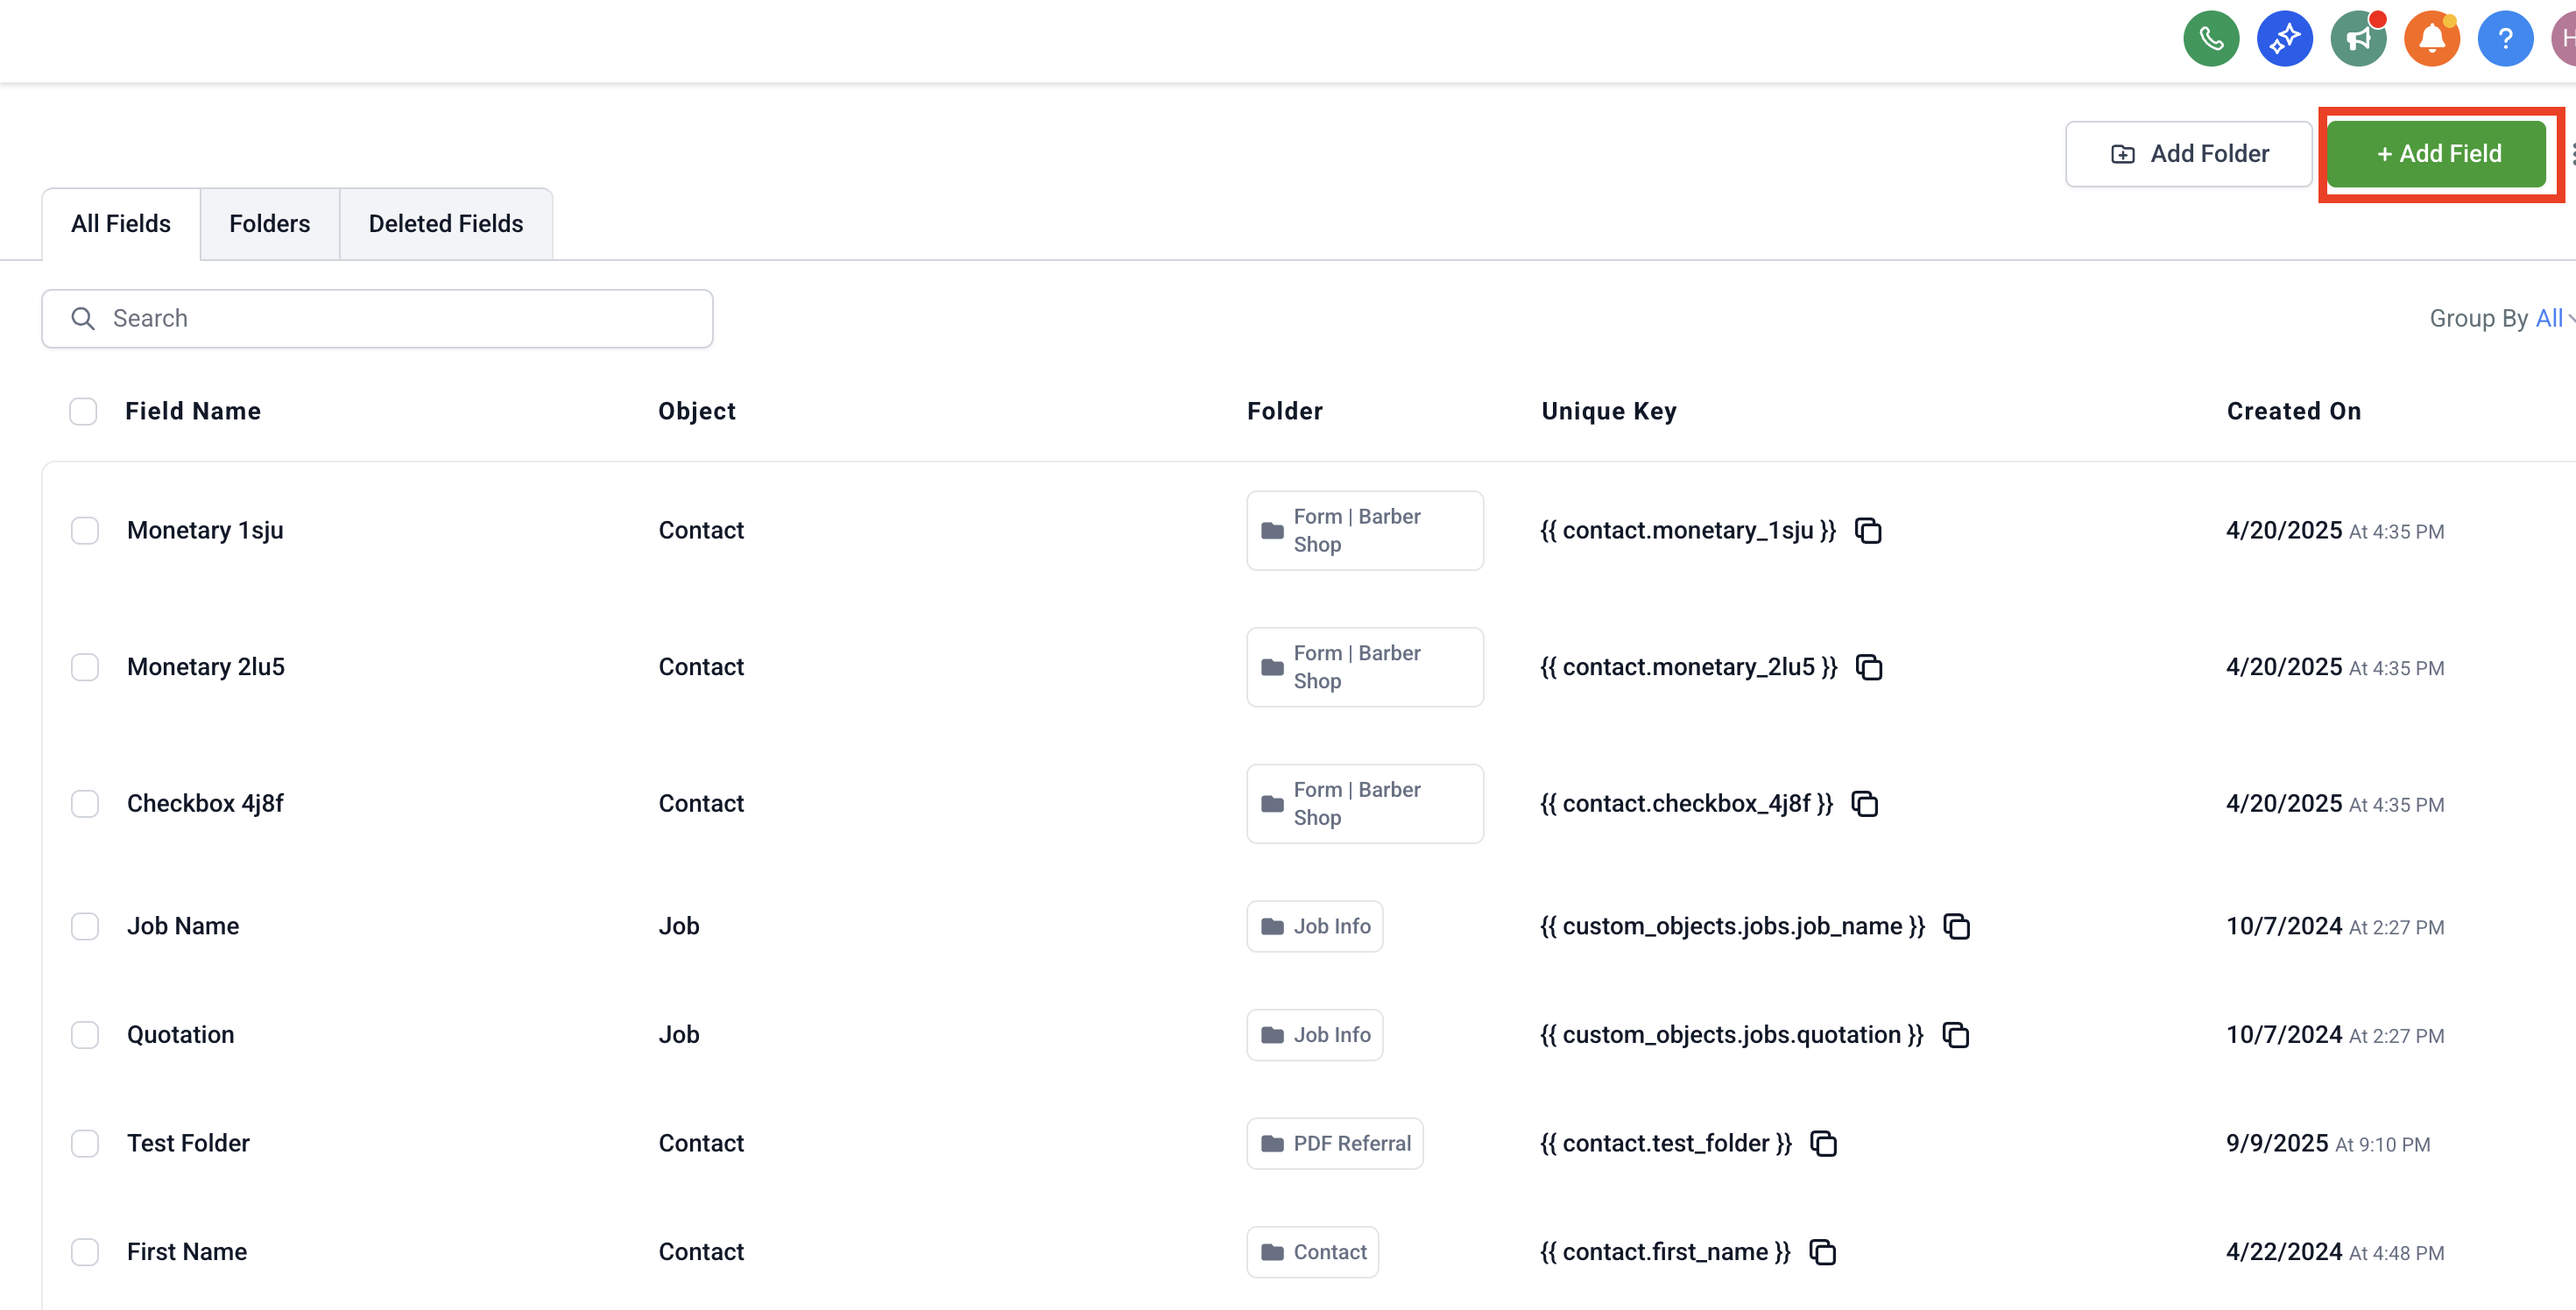
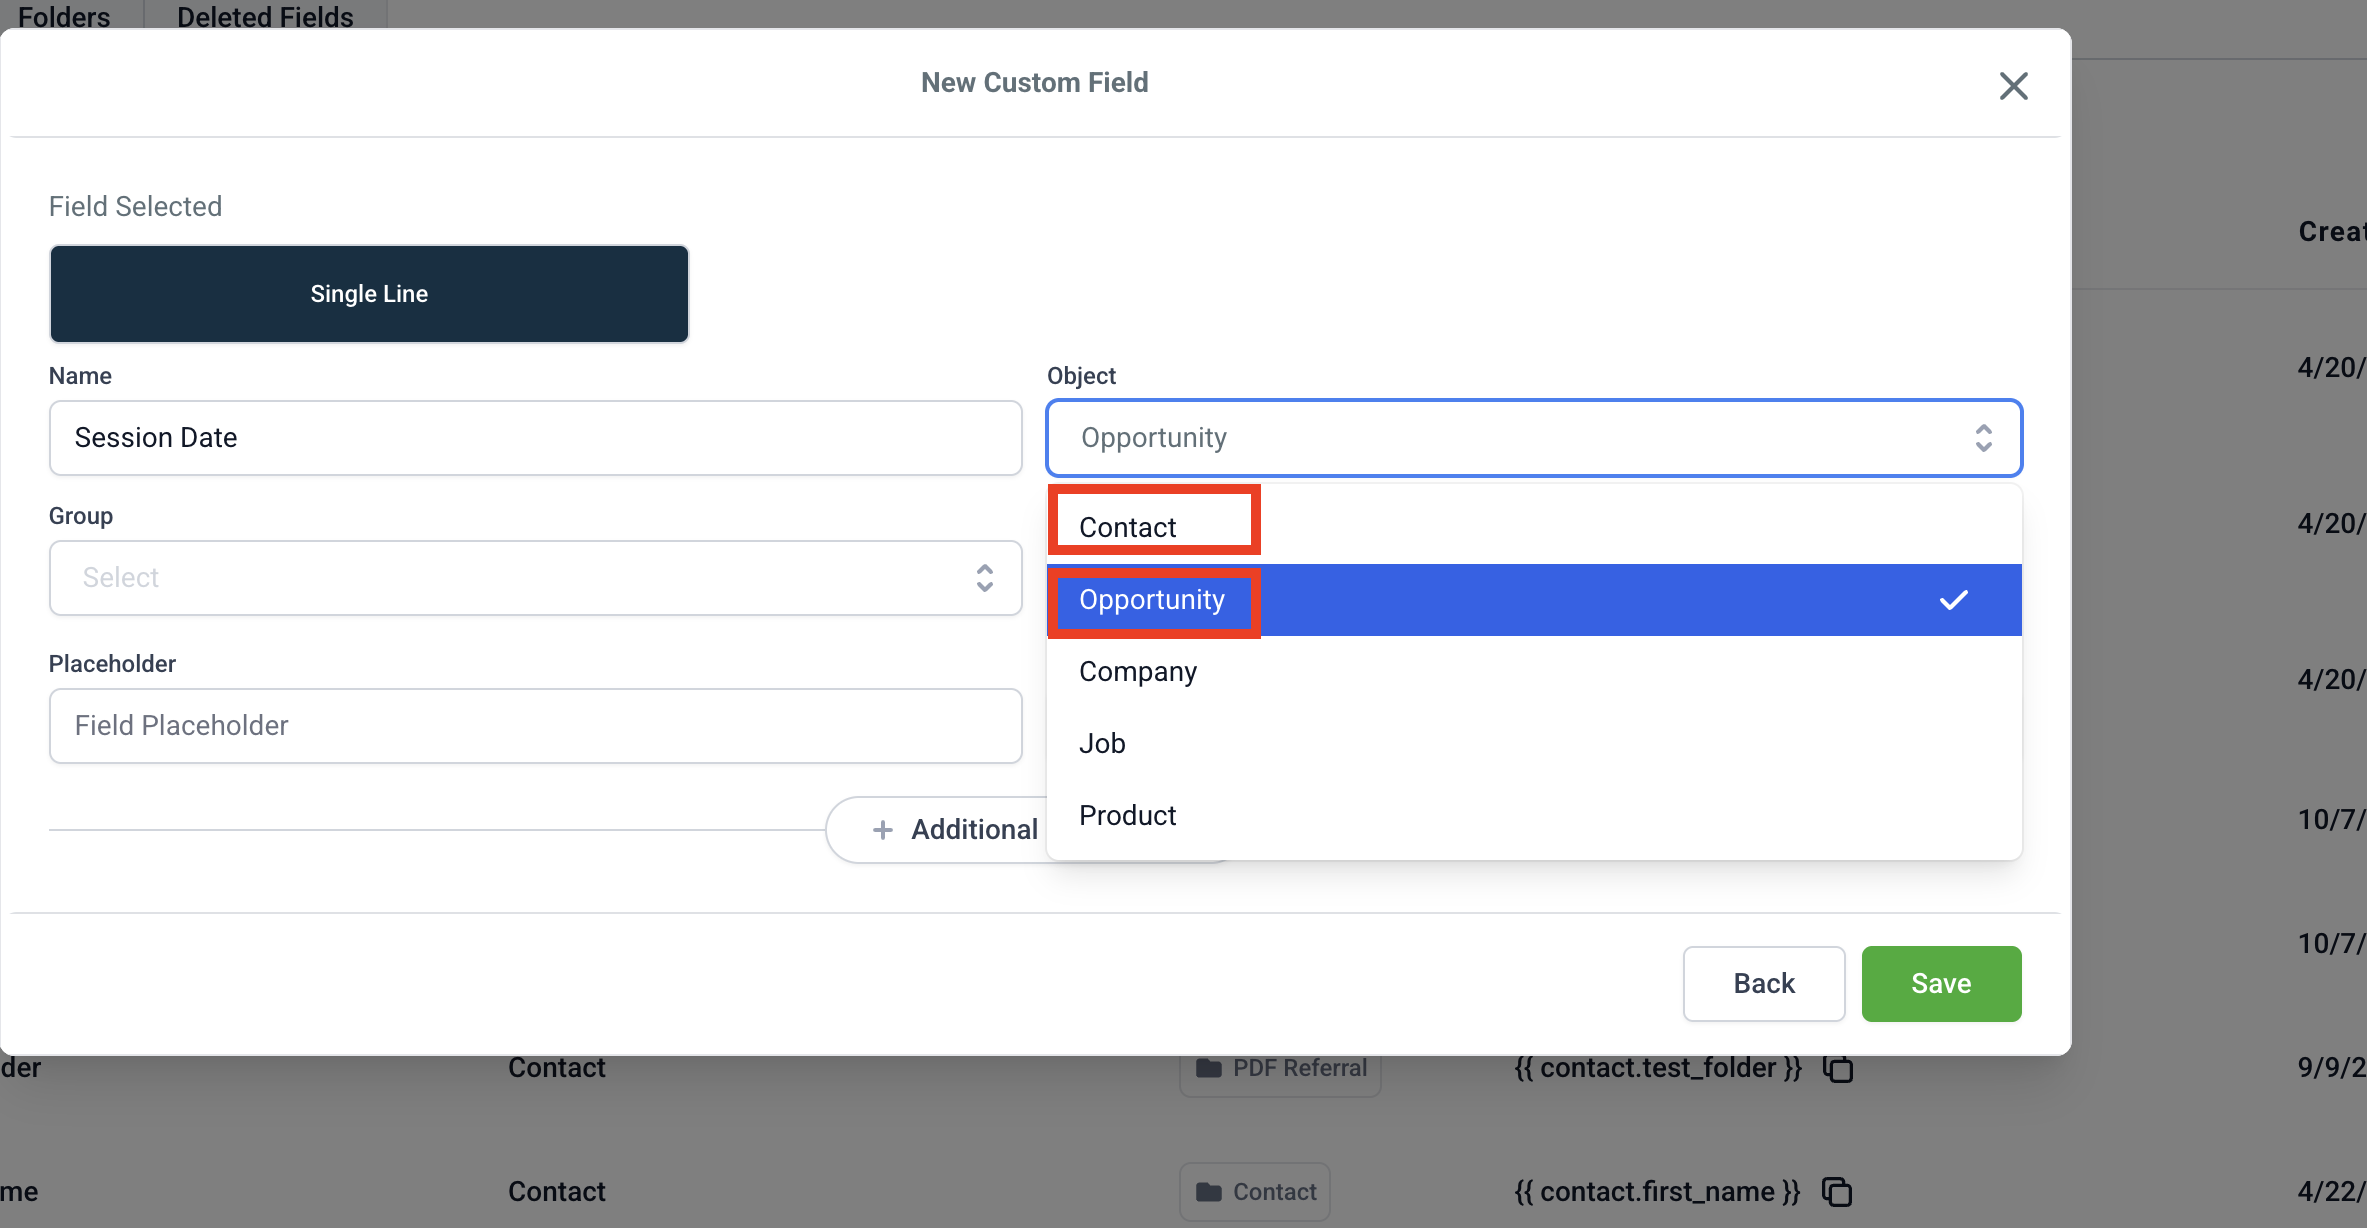
Create a custom field to hold the date: go to Settings → Custom Fields, click Add Field, and choose Contact (simplest option) or Opportunity (better if one patient can have multiple bookings). Set the field type to Text and name it clearly, such as "Session Date."
Update your template: clone your existing template or start a new one, and add the matching merge field (from Contact → Custom Fields or Opportunity → Custom Fields, using the Merge Fields menu as described above). Save the template.
Method 1: Contact-based (simplest) Use this if you don't run bookings through an opportunity pipeline.
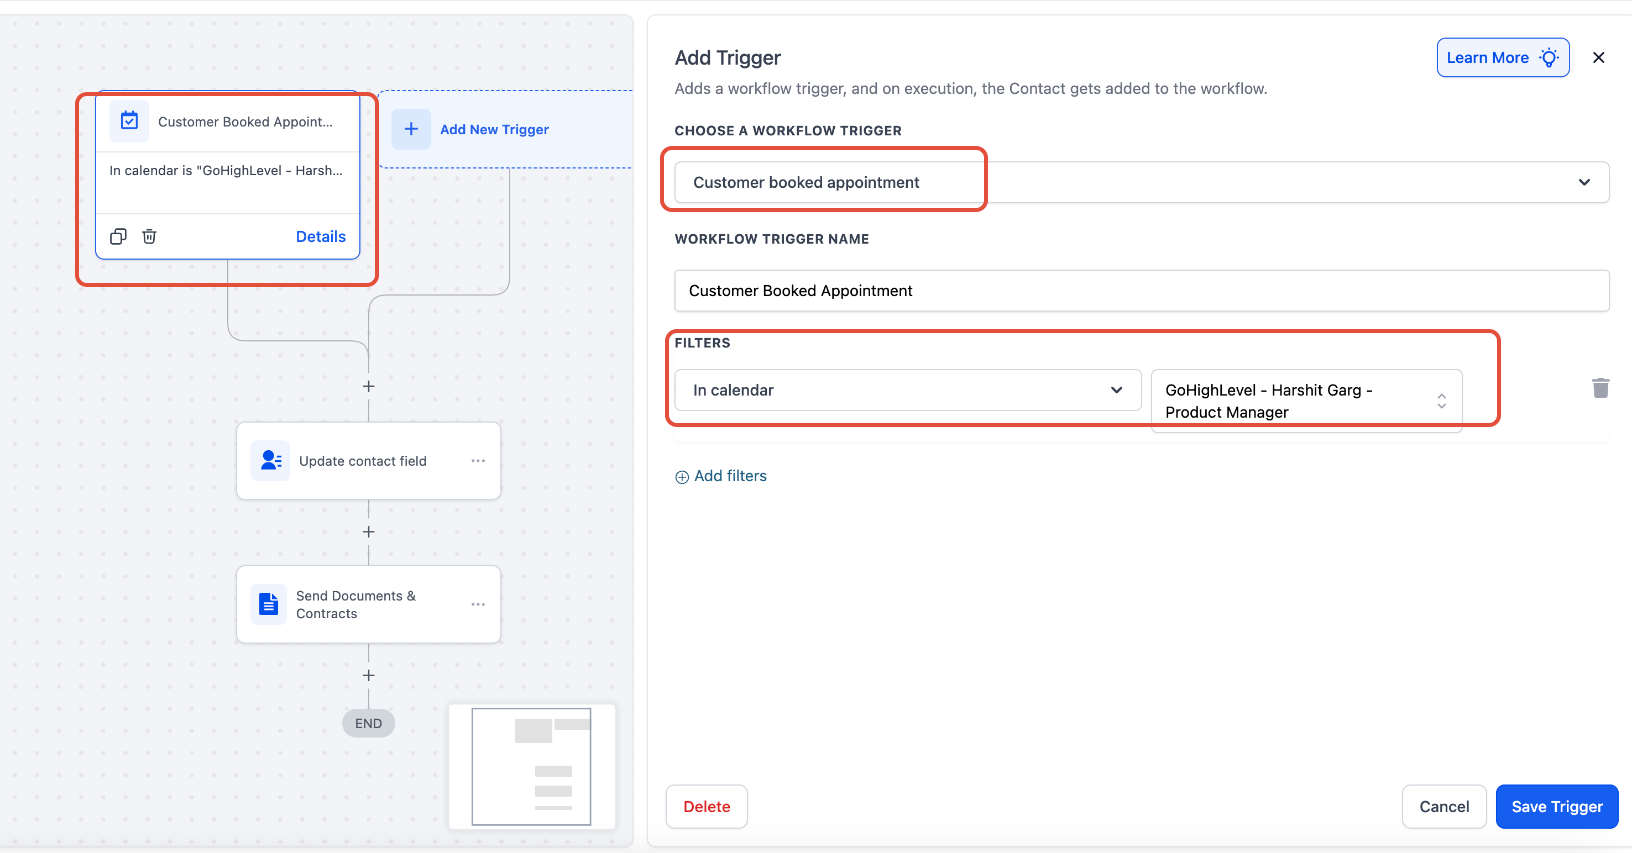
Add a workflow with the Customer Booked Appointment trigger. Optionally filter by calendar.
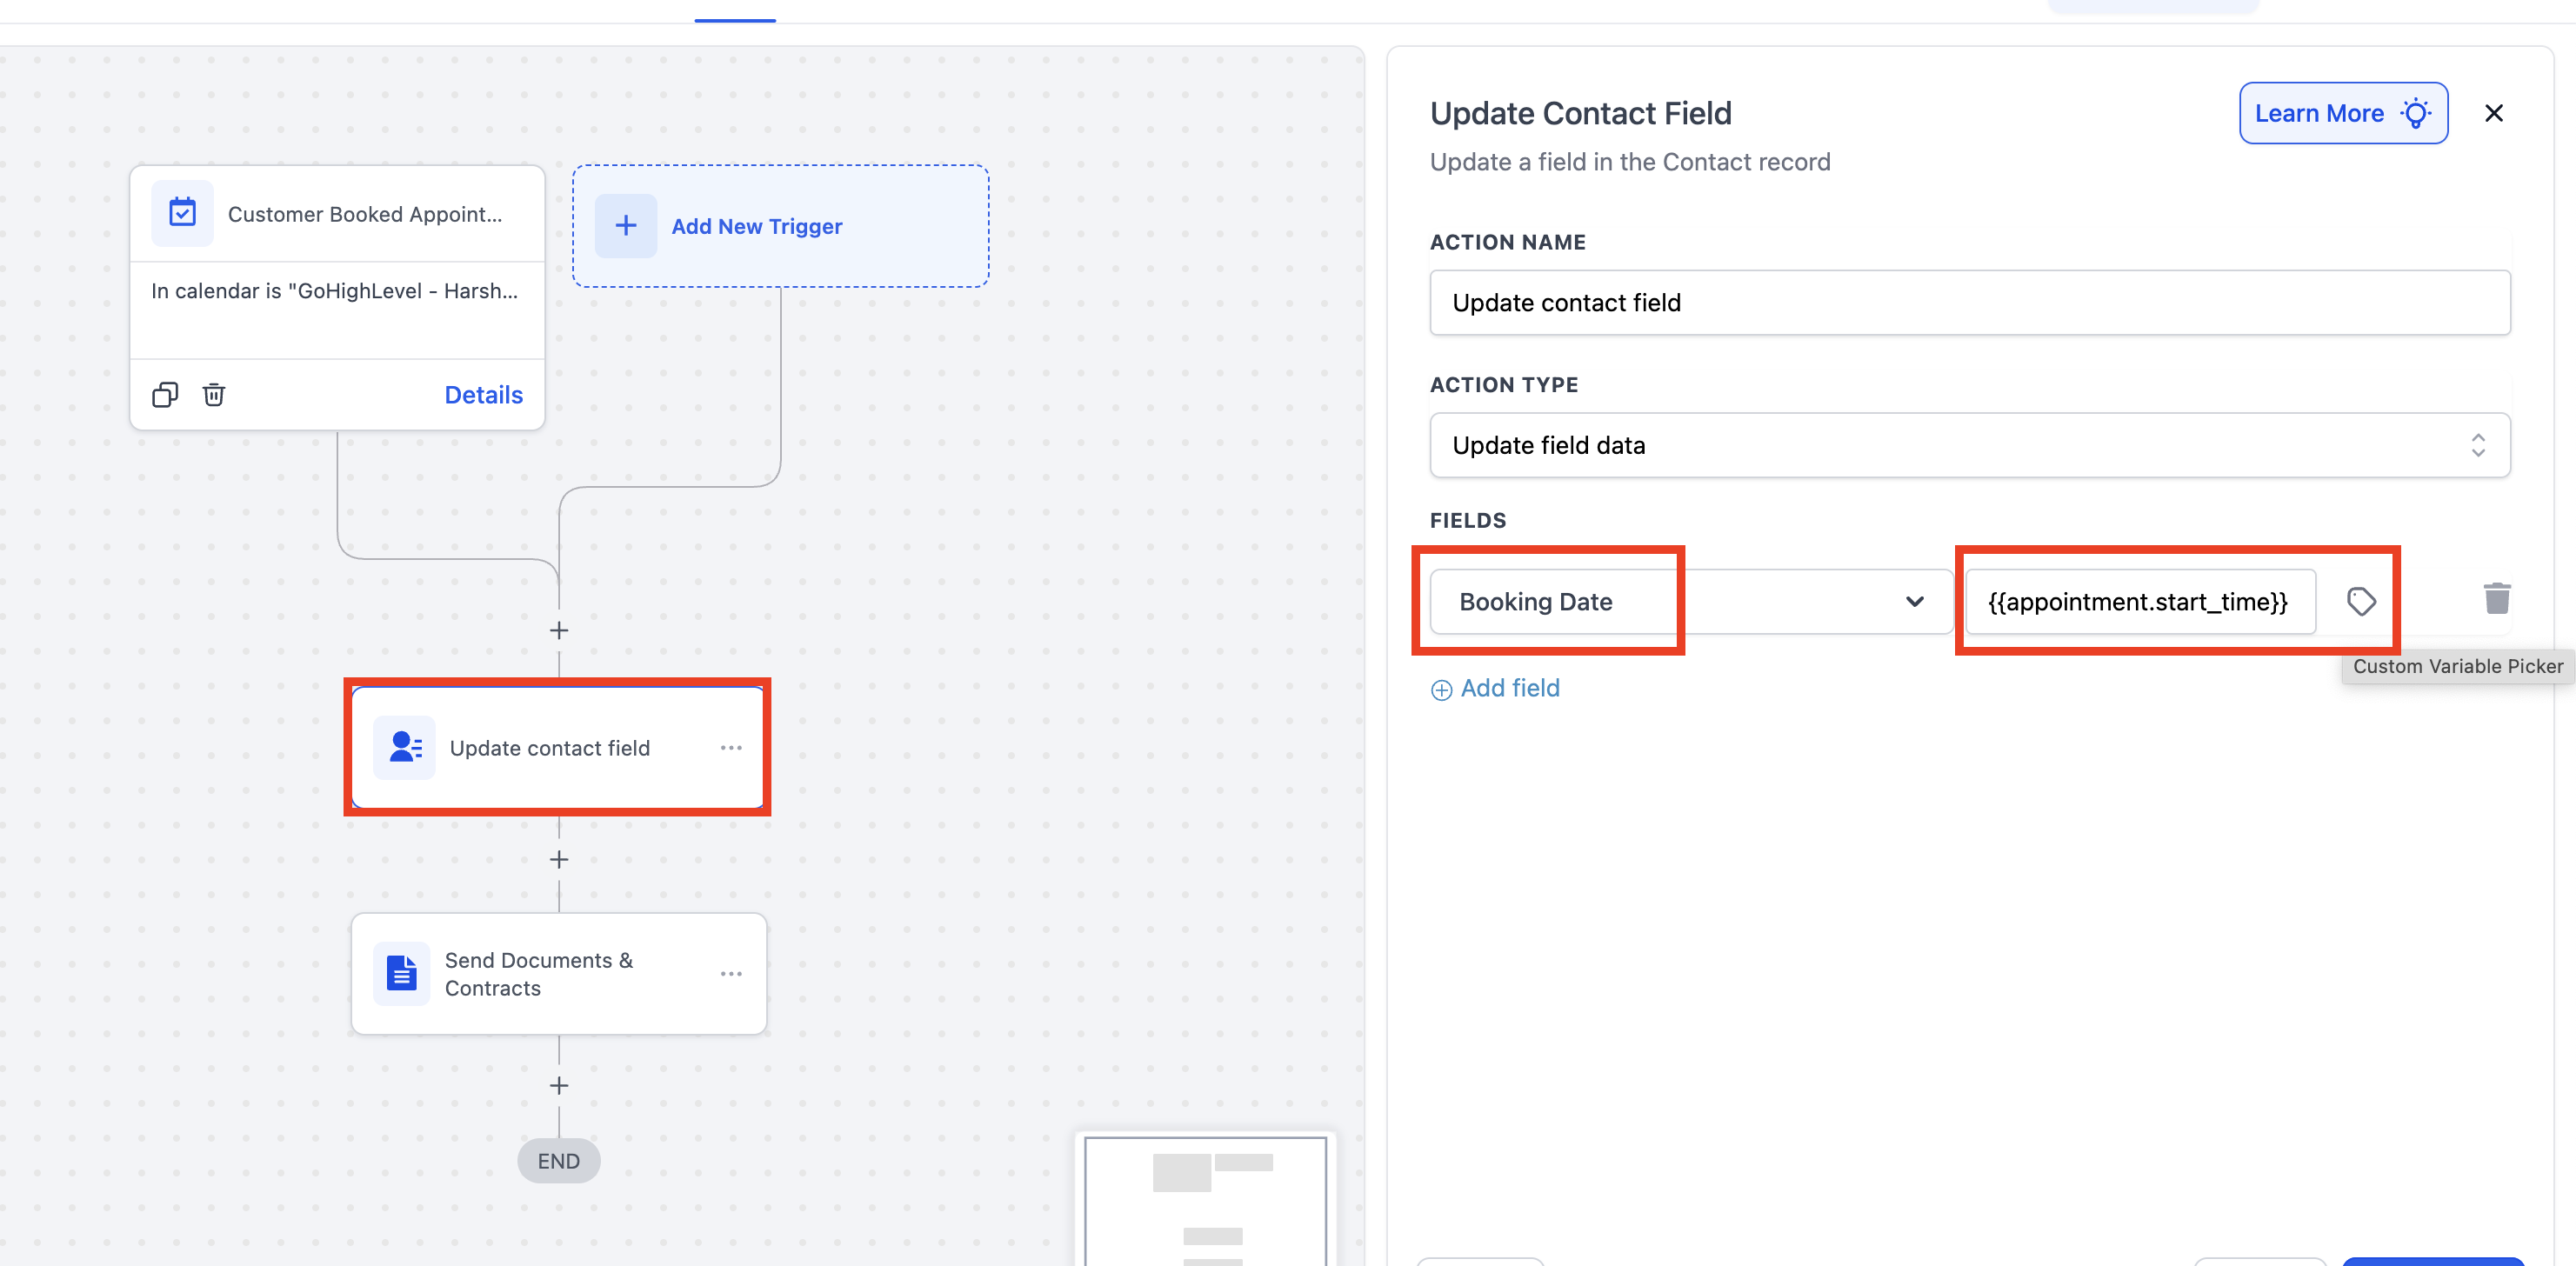
Add an Update Contact Field action: select the custom field you created, and for its value, choose Appointment → Start Time.
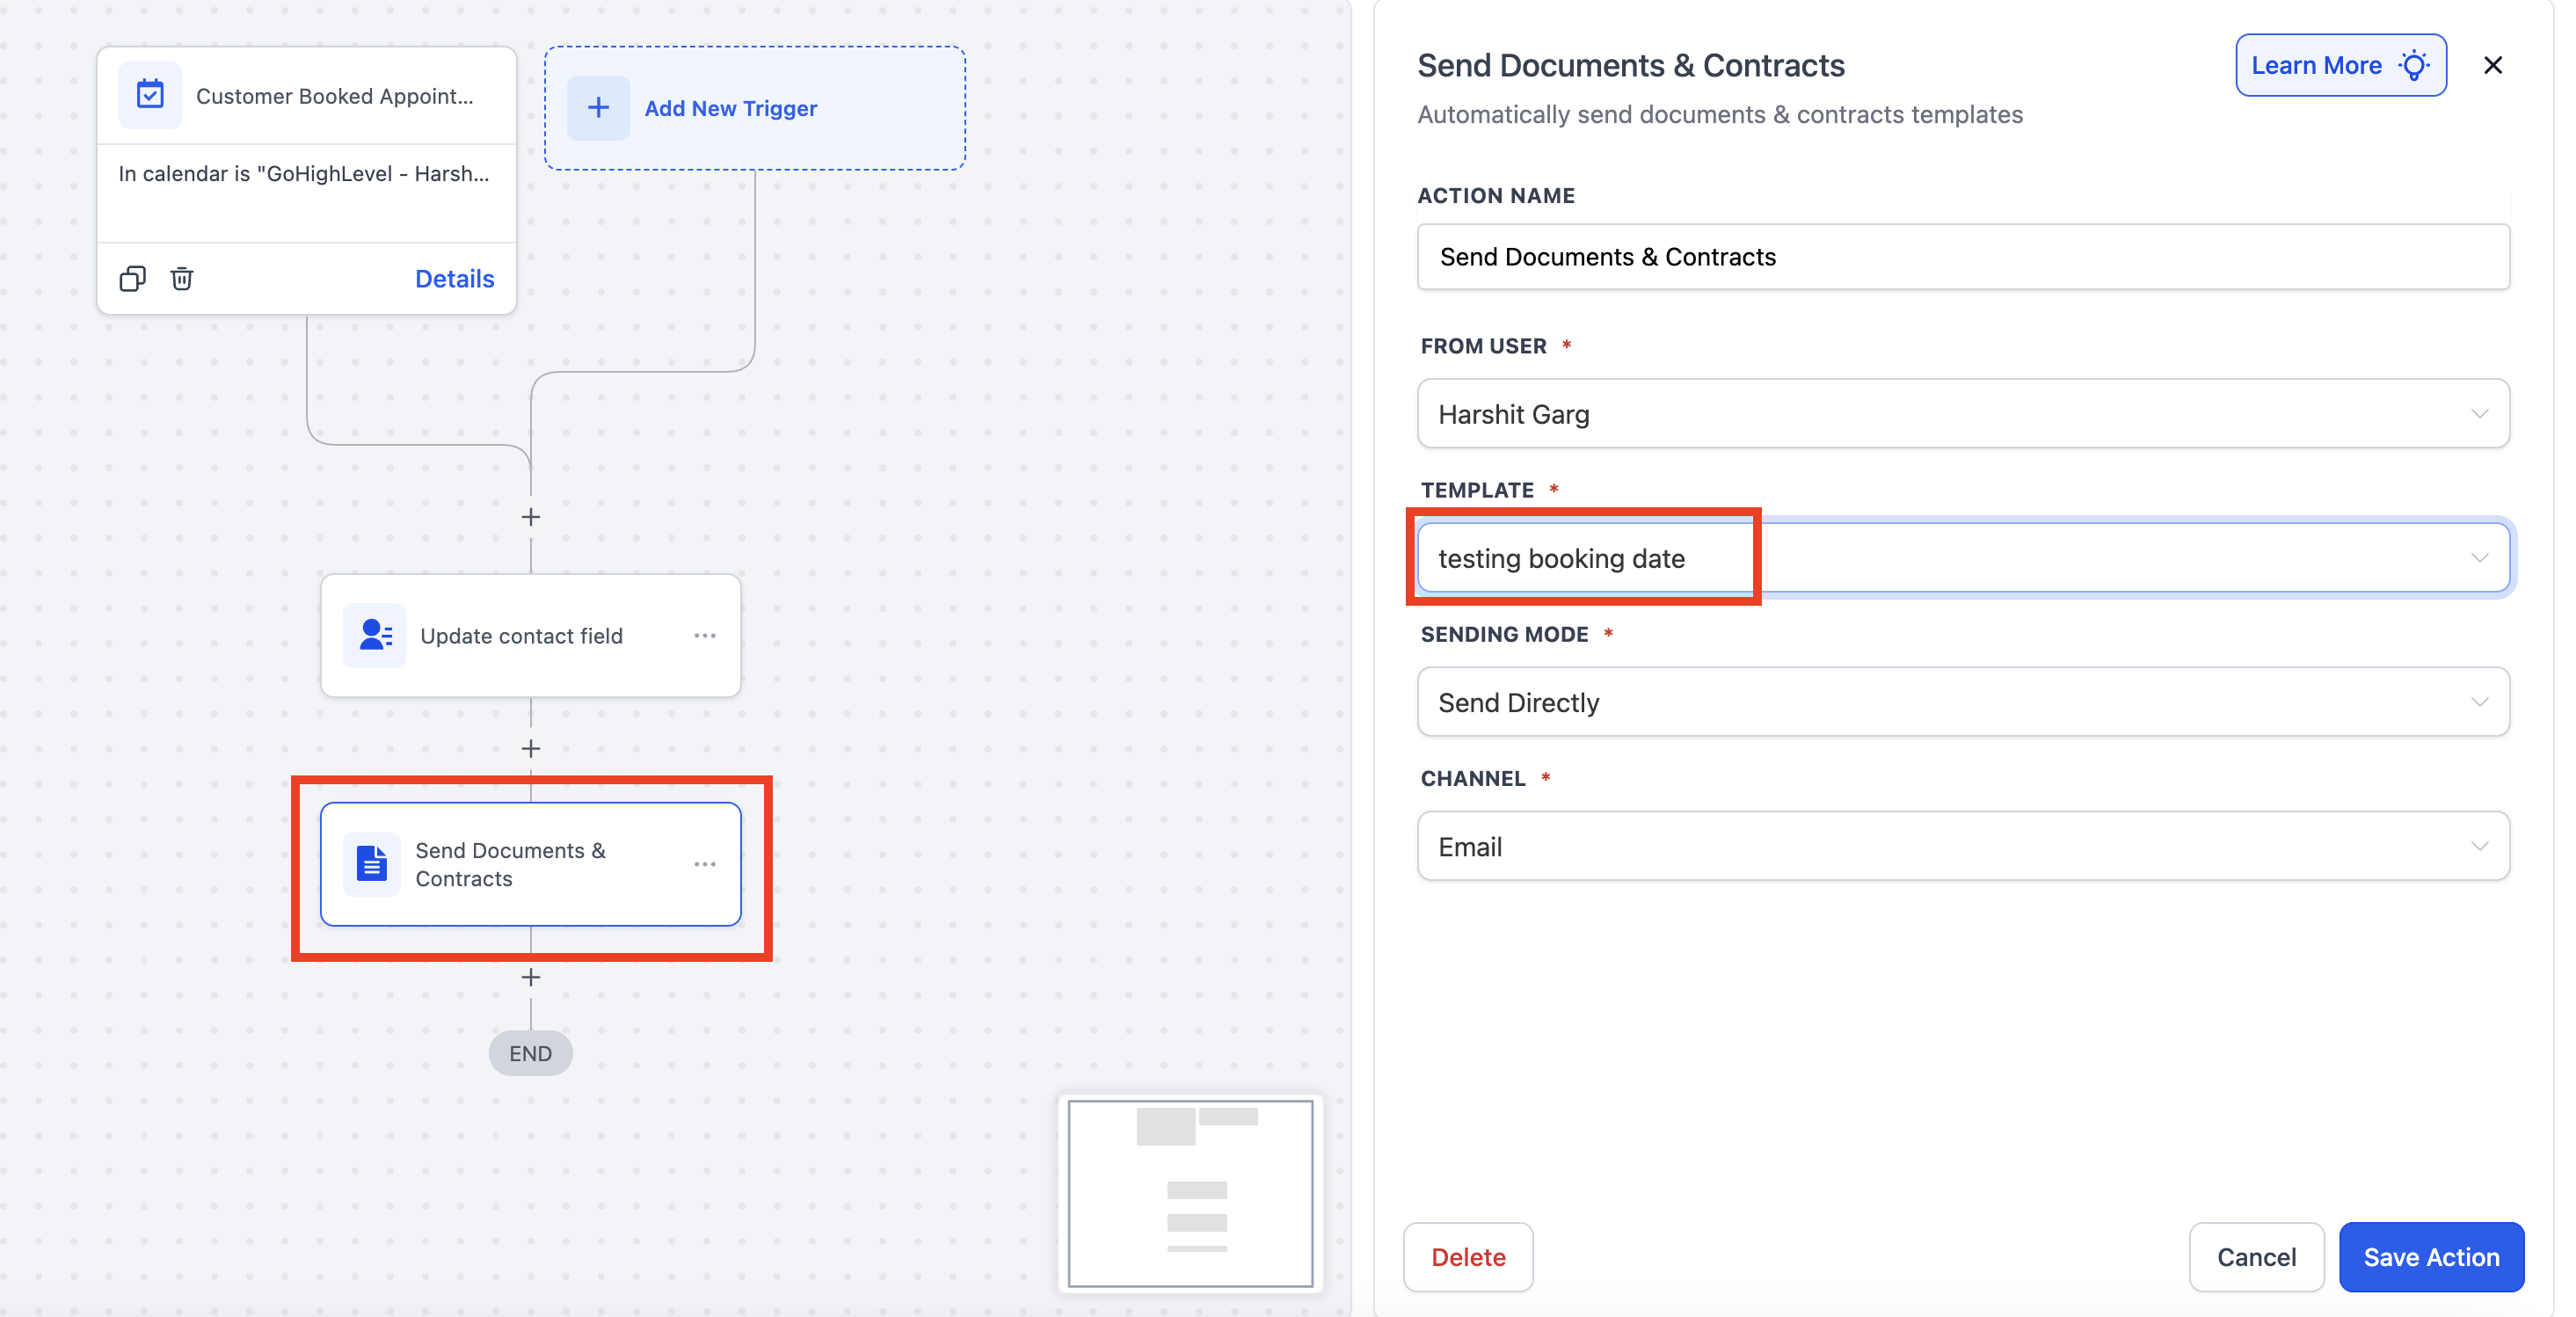
Directly under that step, add a Send Documents & Contracts action and select your updated template.
Save and publish.
Method 2: Opportunity-based (advanced) Use this if your practice already runs bookings through a pipeline.
Add the Customer Booked Appointment trigger, filtered by calendar.
Add a Find Opportunity action: set it to the most recently created opportunity, and add a filter on your custom field set to Is Empty, so you only update opportunities that still need a date.
On the "Opportunity Found" branch, add an Update Opportunity action, select your custom field, and set the value to Appointment → Start Time.
Directly under that step, add a Send Documents & Contracts action and select your Opportunity-based template.
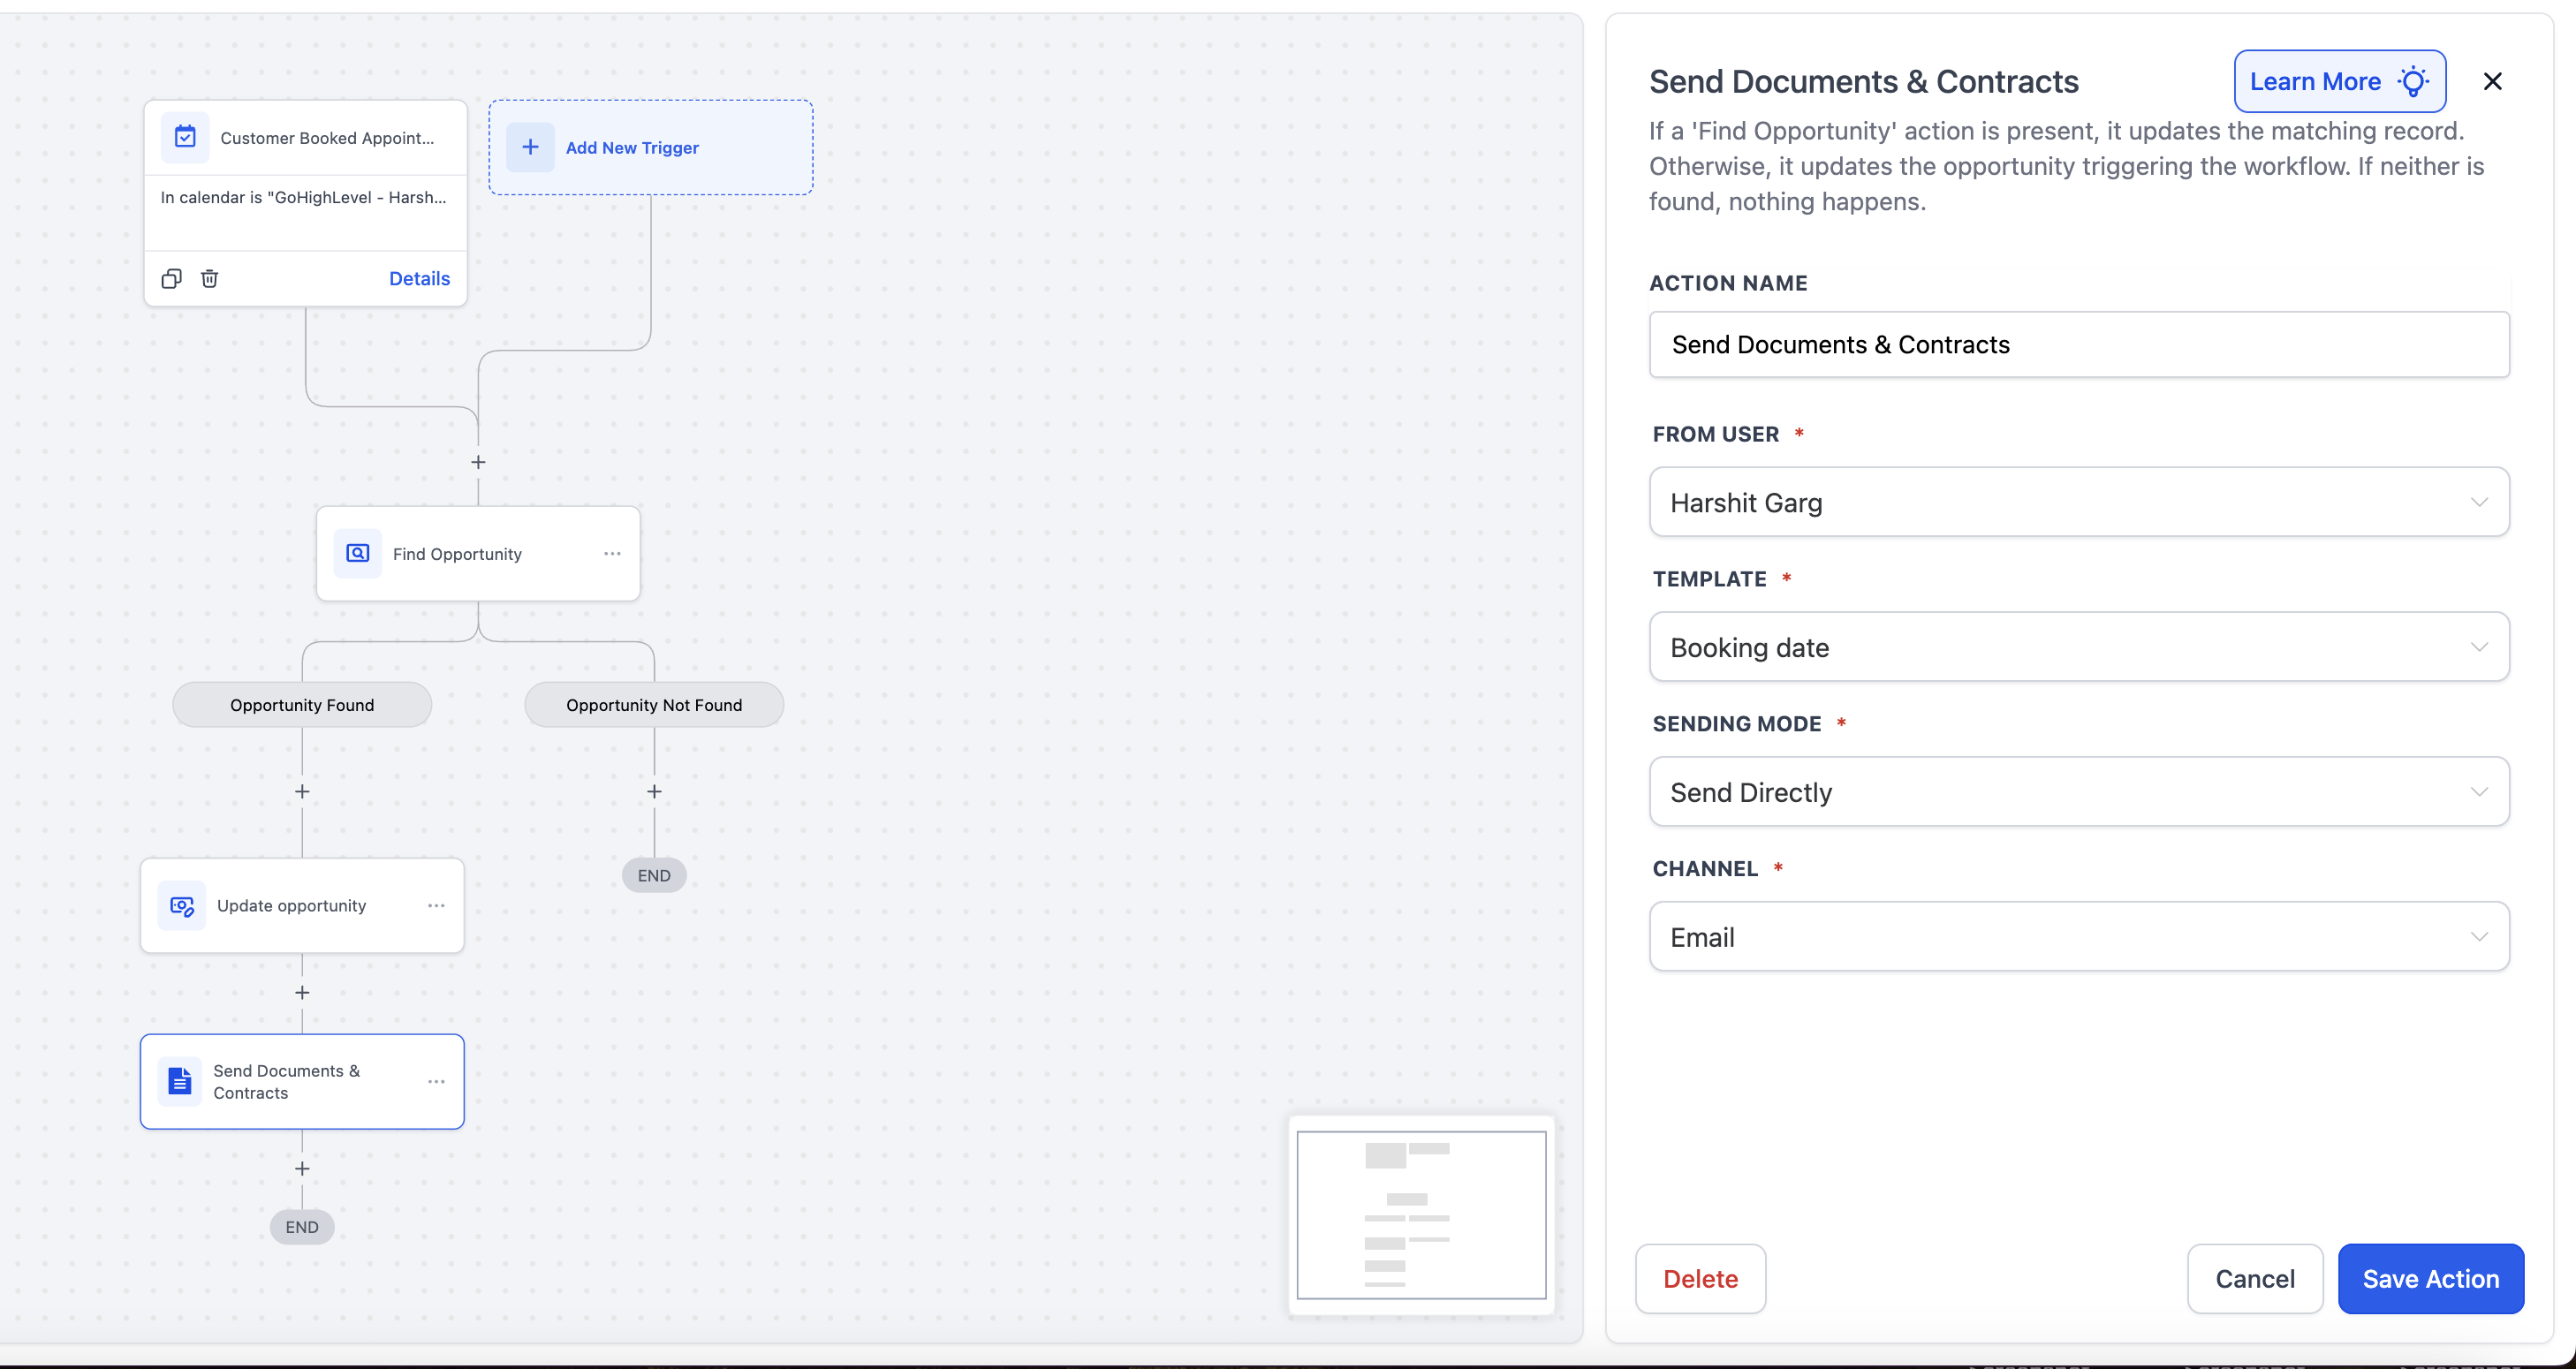
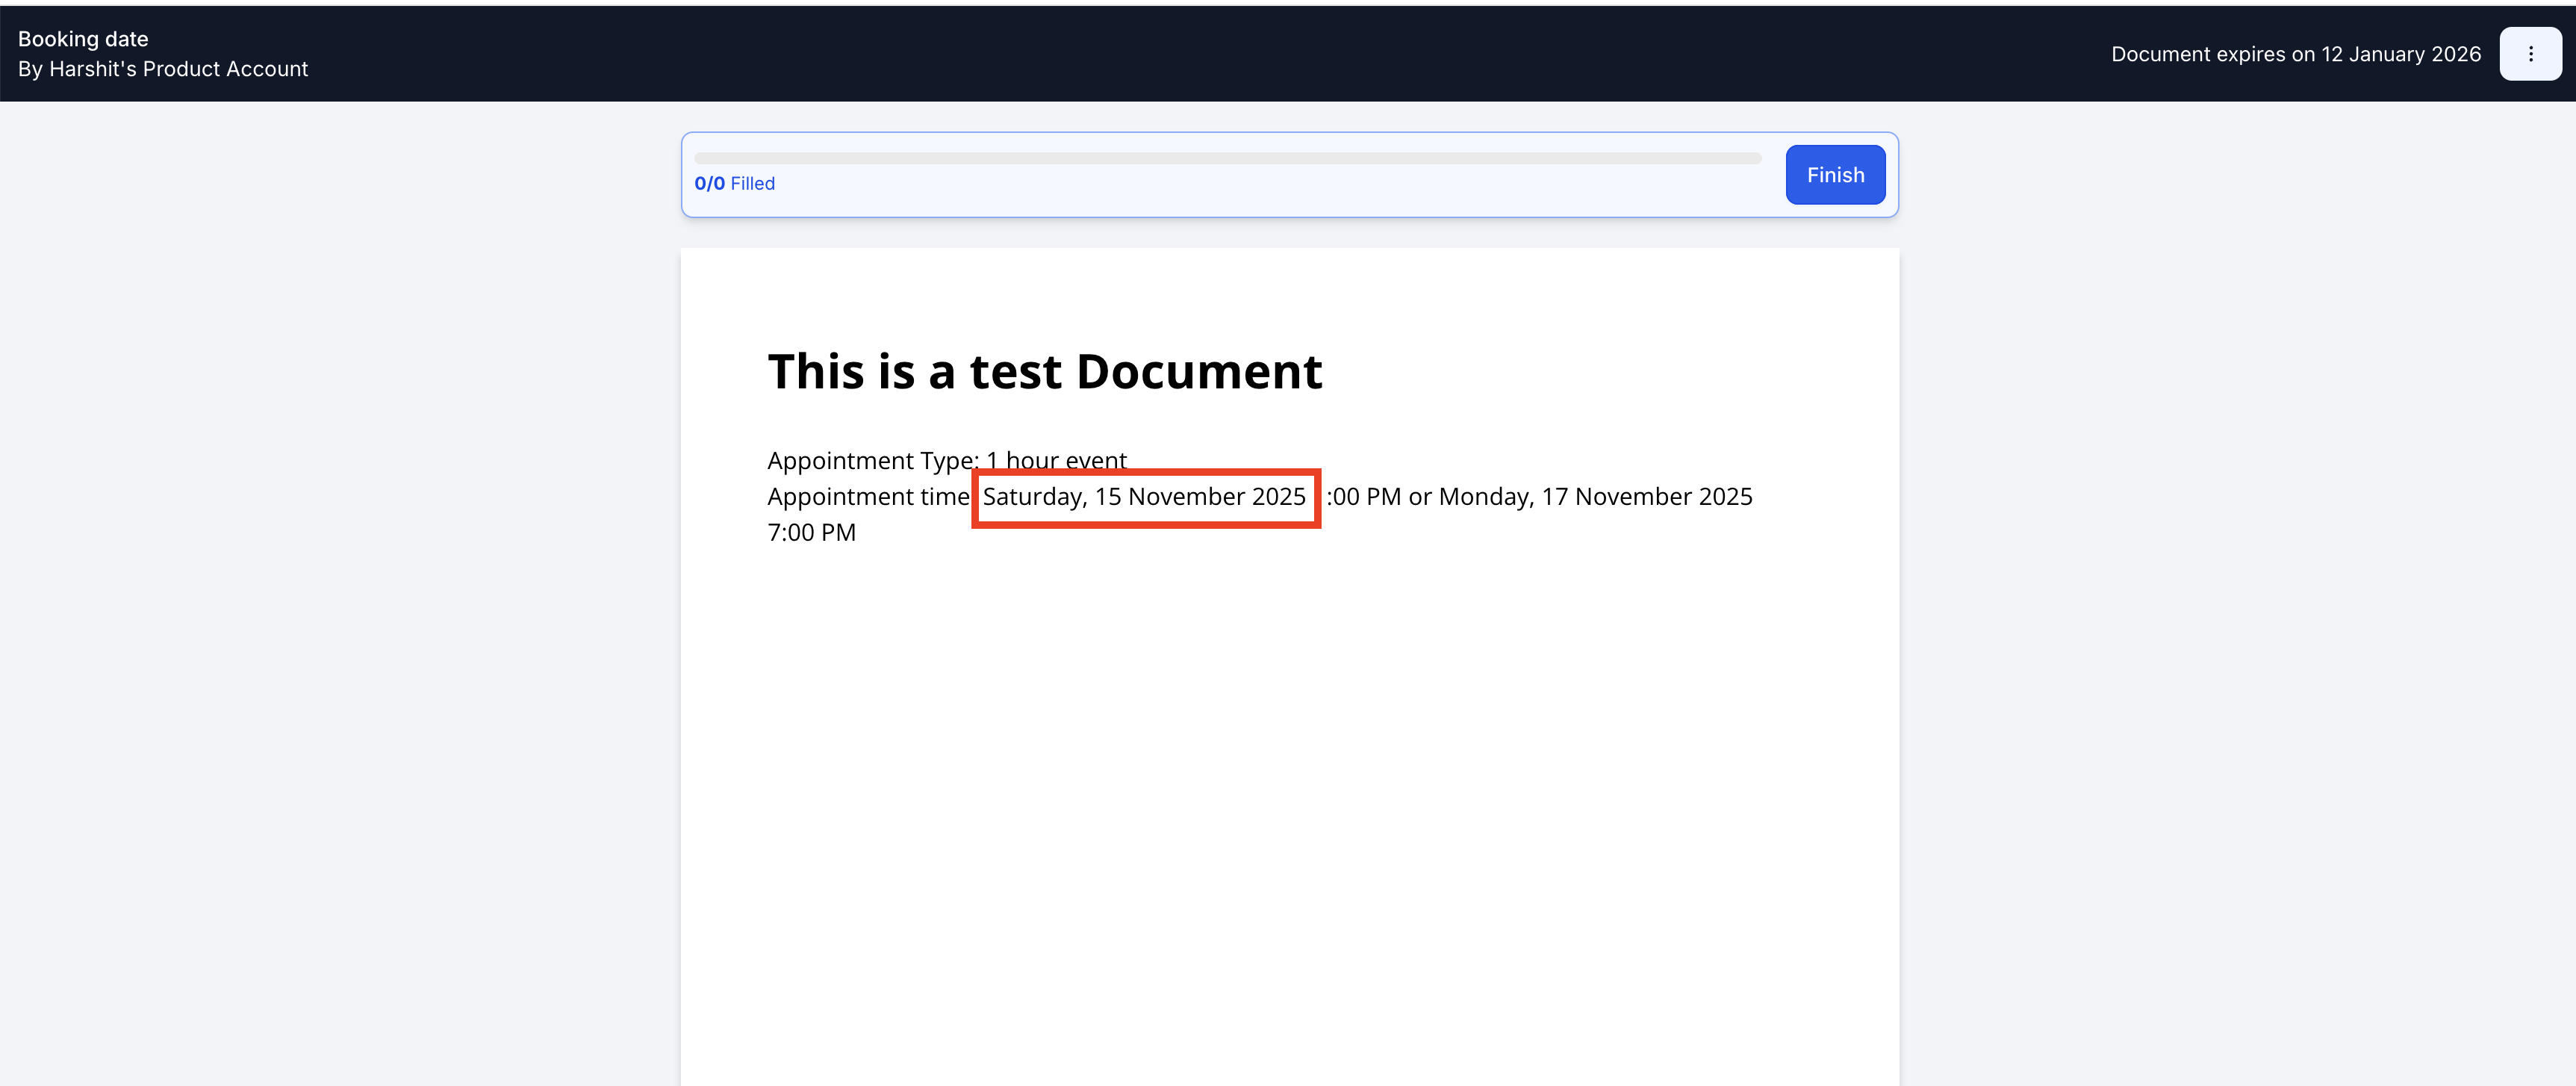
The order matters: the Update Field action must run before the Send Documents & Contracts action, or the contract will send before the date has been copied over. For the Opportunity method, an opportunity has to already exist for that contact when the workflow runs; add a Create Opportunity action ahead of the Find Opportunity step if one might not exist yet.
A common use case for a med spa is sending a treatment consent form the moment a patient books a consultation, prefilled with their actual appointment date and time so nothing has to be filled in by hand. For the full mechanics of the Send Documents & Contracts workflow action and the Documents & Contracts trigger, see Automating Documents with Workflows, and see The Workflow Builder for general workflow setup.
What's the difference between a template and a document? A template is the reusable version you build and reuse. Once you send it to a signer, that instance becomes an individual document that your team tracks and manages separately, without affecting the original template.
Can I attach a PDF or image to a template instead of only using the document editor? Yes. Upload up to 5 files (SVG, PNG, JPG, or PDF, 15 MB each) from the Settings panel, and they'll arrive as real email attachments alongside the document whenever it's sent.
What happens if my attachment is larger than 15 MB? The upload will fail. Compress the file or split it into smaller pieces and try again.
If I duplicate a template, do its attachments and library blocks come with it? Attachments duplicate along with the template automatically. You can remove or swap them out in the copy. Content Library blocks aren't duplicated automatically; you pull them back in from the library when you need them.
Can I reuse a pricing table or signature block without rebuilding it each time? Yes, save it to the Content Library once from a blank template, then drag it into any future template or document.
Why is an Opportunity merge field showing up blank in the generated document? Confirm the field actually has a value on the specific Opportunity that triggered the workflow, that you selected it under Opportunity Details (not a Contact field), and that you saved the template before the workflow ran.
Why is the merge-field token still showing instead of the real value? That's expected while you're editing the template. It should be replaced automatically when the workflow generates the document. If it's still visible in a sent document, reinsert the field using the Merge Fields menu and test the workflow again.
Which trigger should I use to populate Opportunity fields, Pipeline Stage Changed or Opportunity Status Changed? Use Pipeline Stage Changed if the document should go out when the deal reaches a specific stage. Use Opportunity Status Changed if it should go out after a status change, such as when a deal is marked Won.
Why doesn't my template show up in the Send Documents & Contracts workflow action? Only saved templates appear in that action, not individual documents. Confirm you built it as a template and clicked Save.
Why did my contract stay in Drafts instead of sending automatically? Check whether the Send Documents & Contracts action is set to Create as Draft rather than Send Directly, and confirm the contact has a valid email address (required even when delivering by SMS).
The date field on my sent contract is blank. What went wrong? Check your workflow's action order: the Update Contact Field (or Update Opportunity) action must come before Send Documents & Contracts. If you're using the Opportunity method, confirm an opportunity actually exists for that contact, adding a Create Opportunity action ahead of the Find Opportunity step if needed.
The old version of my contract keeps sending without the date filled in. Why? Open the Send Documents & Contracts action and confirm it's pointing at your new, updated template, not the original one it was cloned from.
