Contact actions are the workflow building blocks that create, find, update, organize, and clean up the contact records that move through your automations. They live under the Contact category in the workflow builder's action picker. This article is a complete reference to every Contact action: what it does, every field and option you can configure, the inputs it needs and the data it produces, when to reach for it, and the limits to watch for.
Most Contact actions operate on the contact who is currently enrolled in the workflow (the contact the trigger fired for). A few, such as Create Contact and Find Contact, are designed for workflows that start without a contact attached, such as those triggered by an Inbound Webhook.
The steps below are the same for every Contact action. Each action's own section then covers only the fields unique to it.
Go to Marketing > Workflows (the workflow builder lives in the Automation area of Aesthetix CRM).
Open an existing workflow or click Create Workflow, then choose Start from Scratch or a recipe.
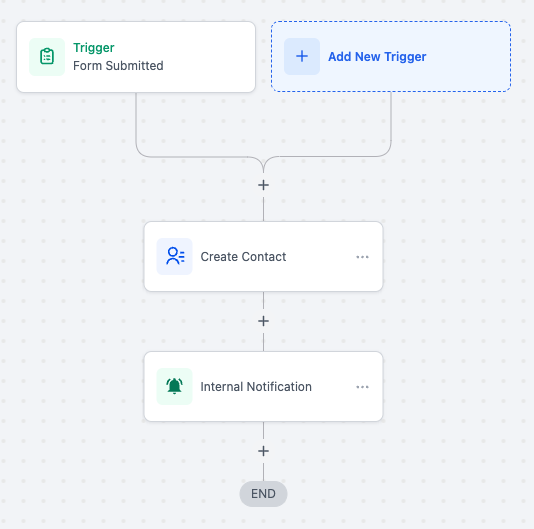
Add a trigger first. A workflow needs both a trigger and an action before it can be published; without both, you can only save it as a draft.
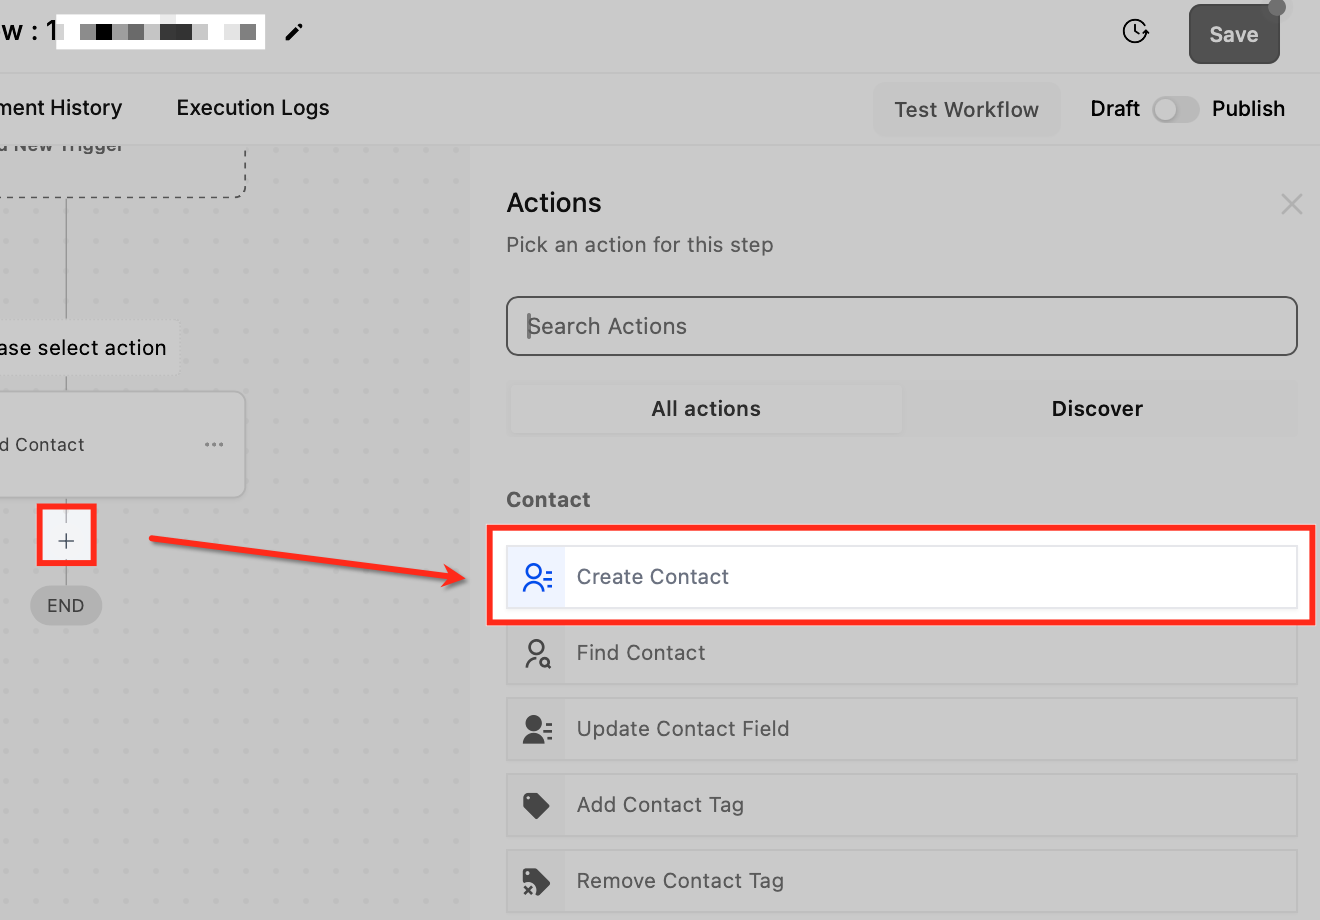
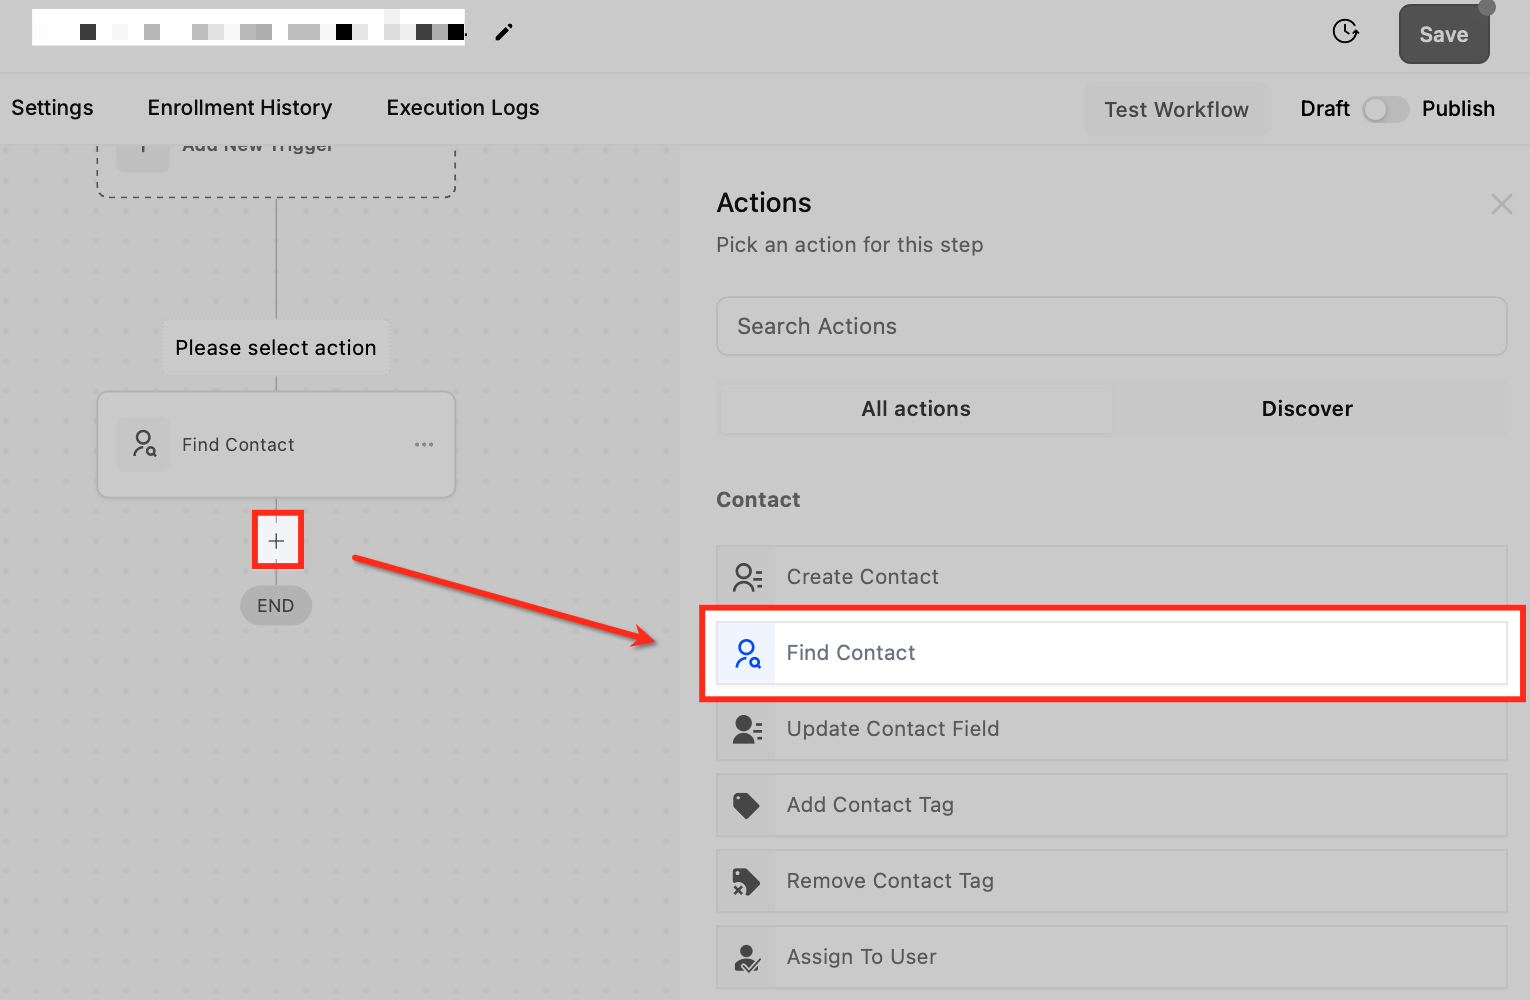
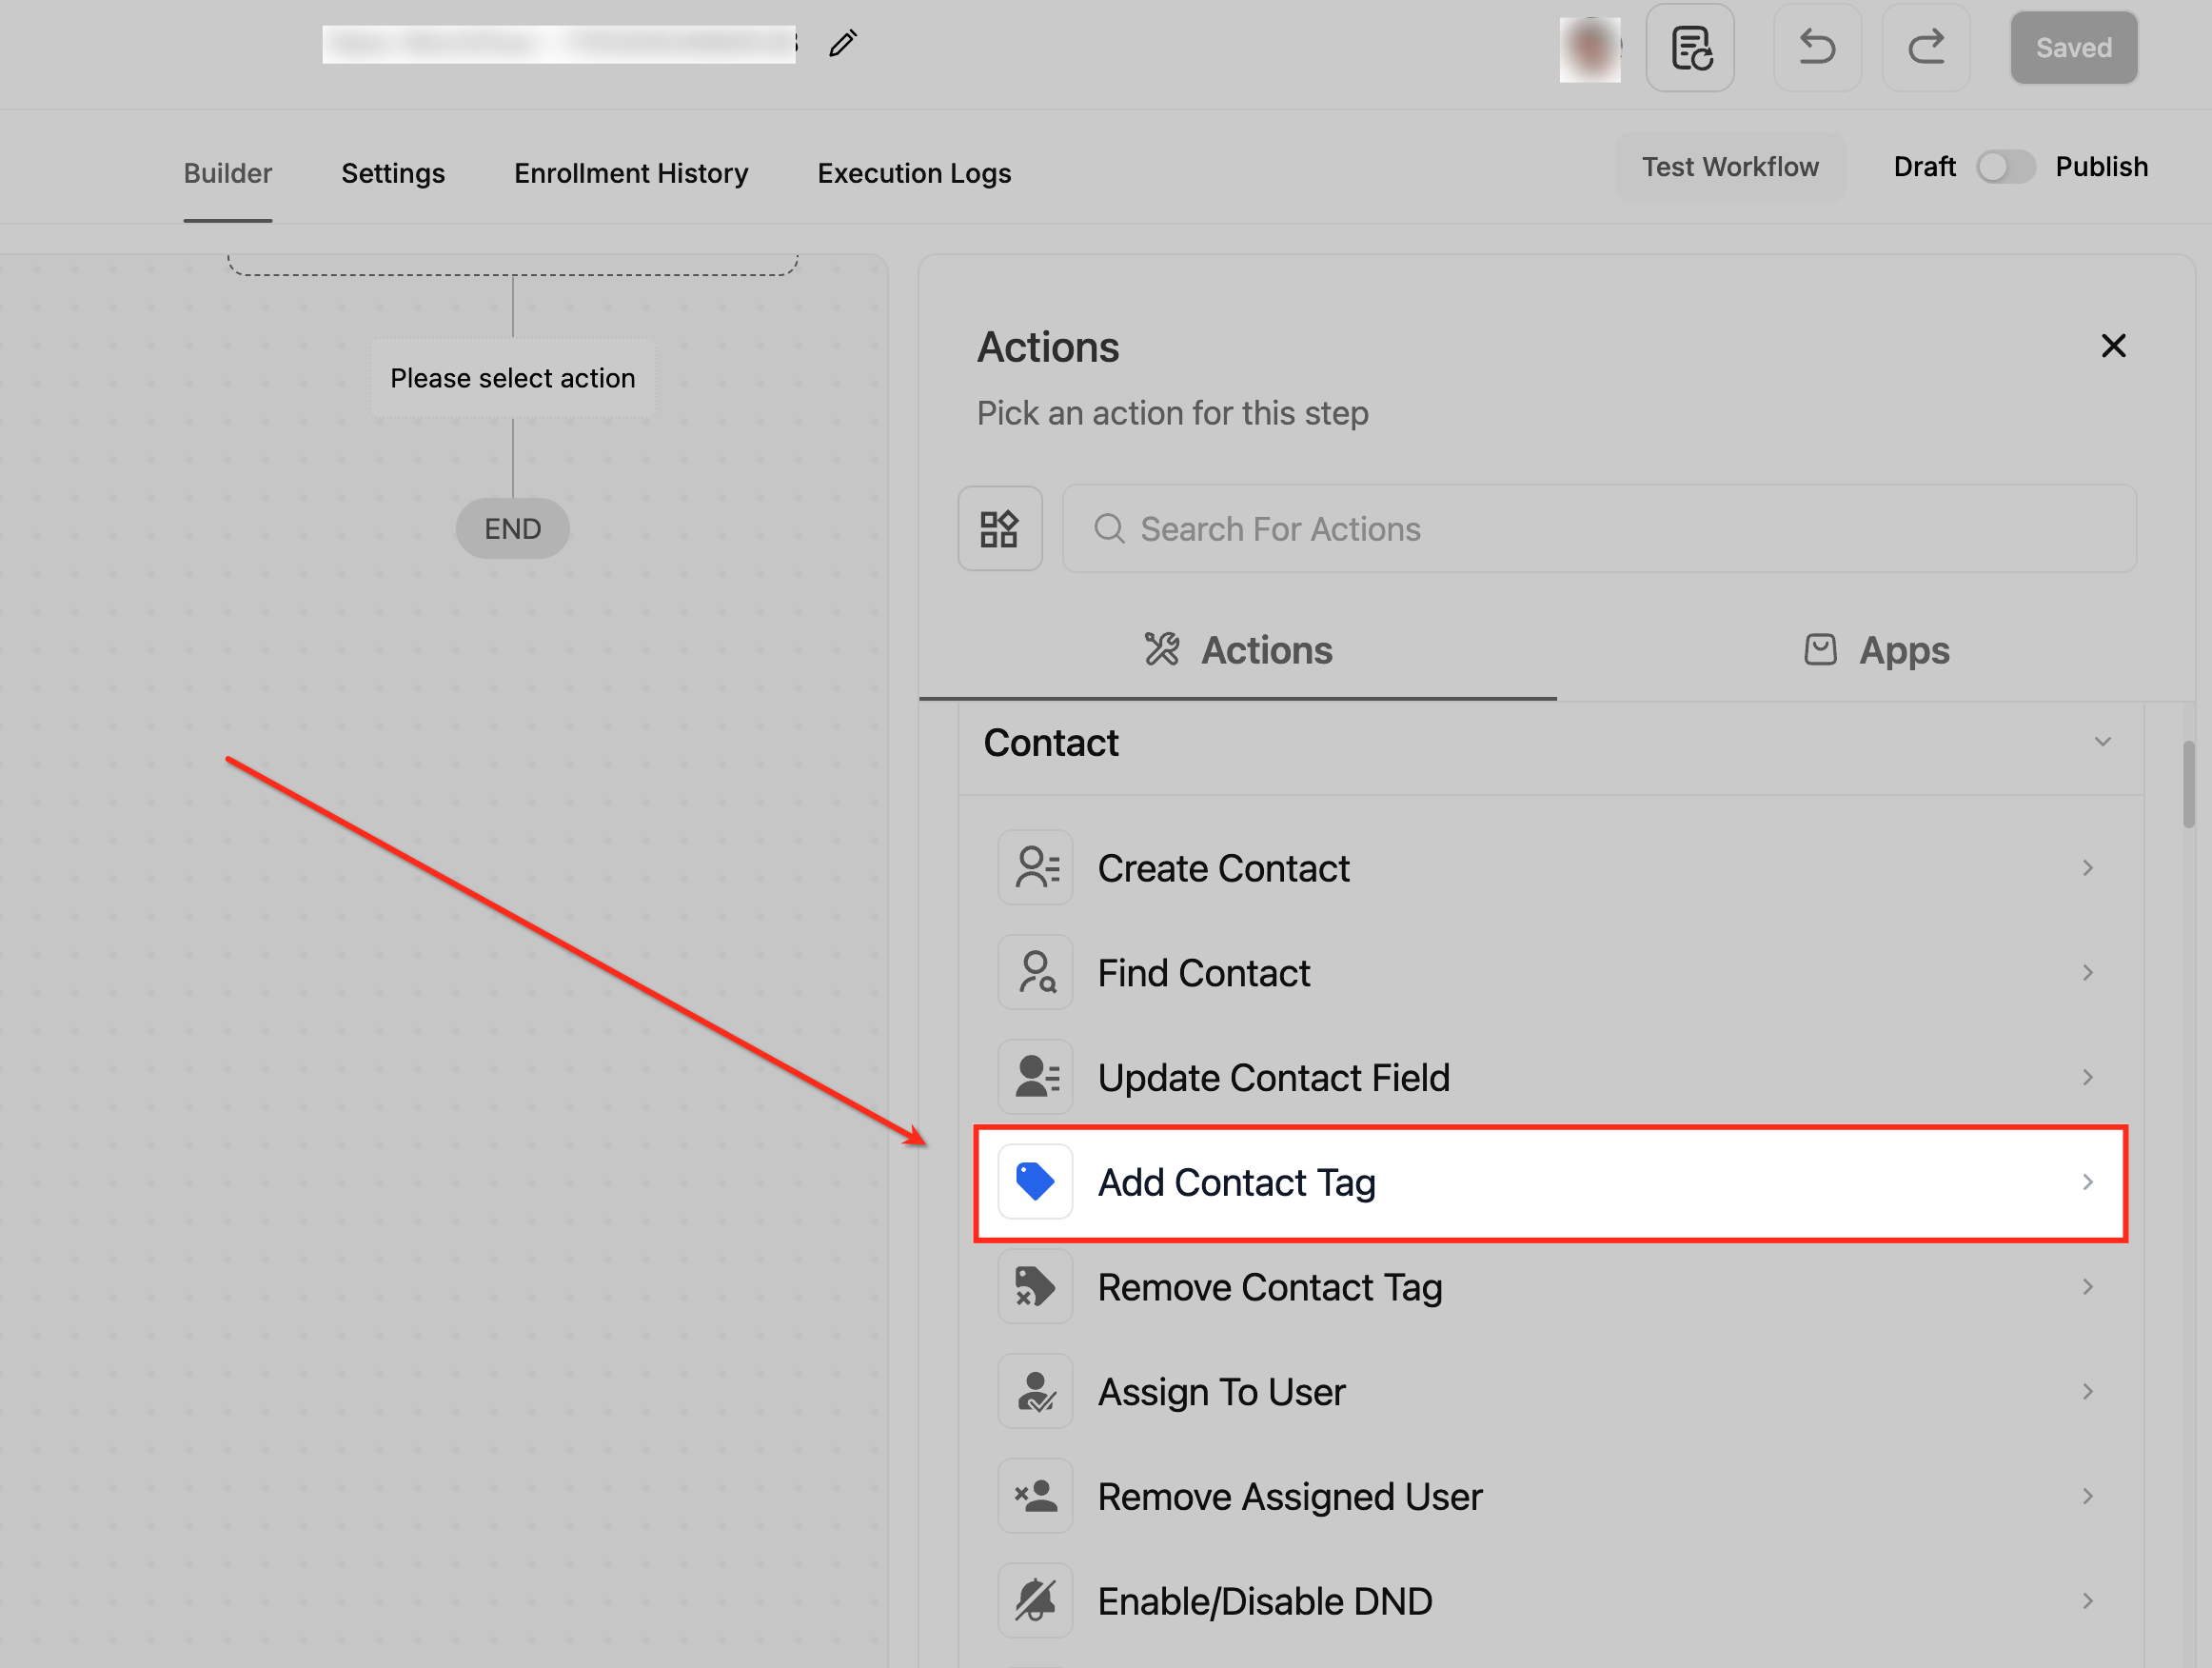
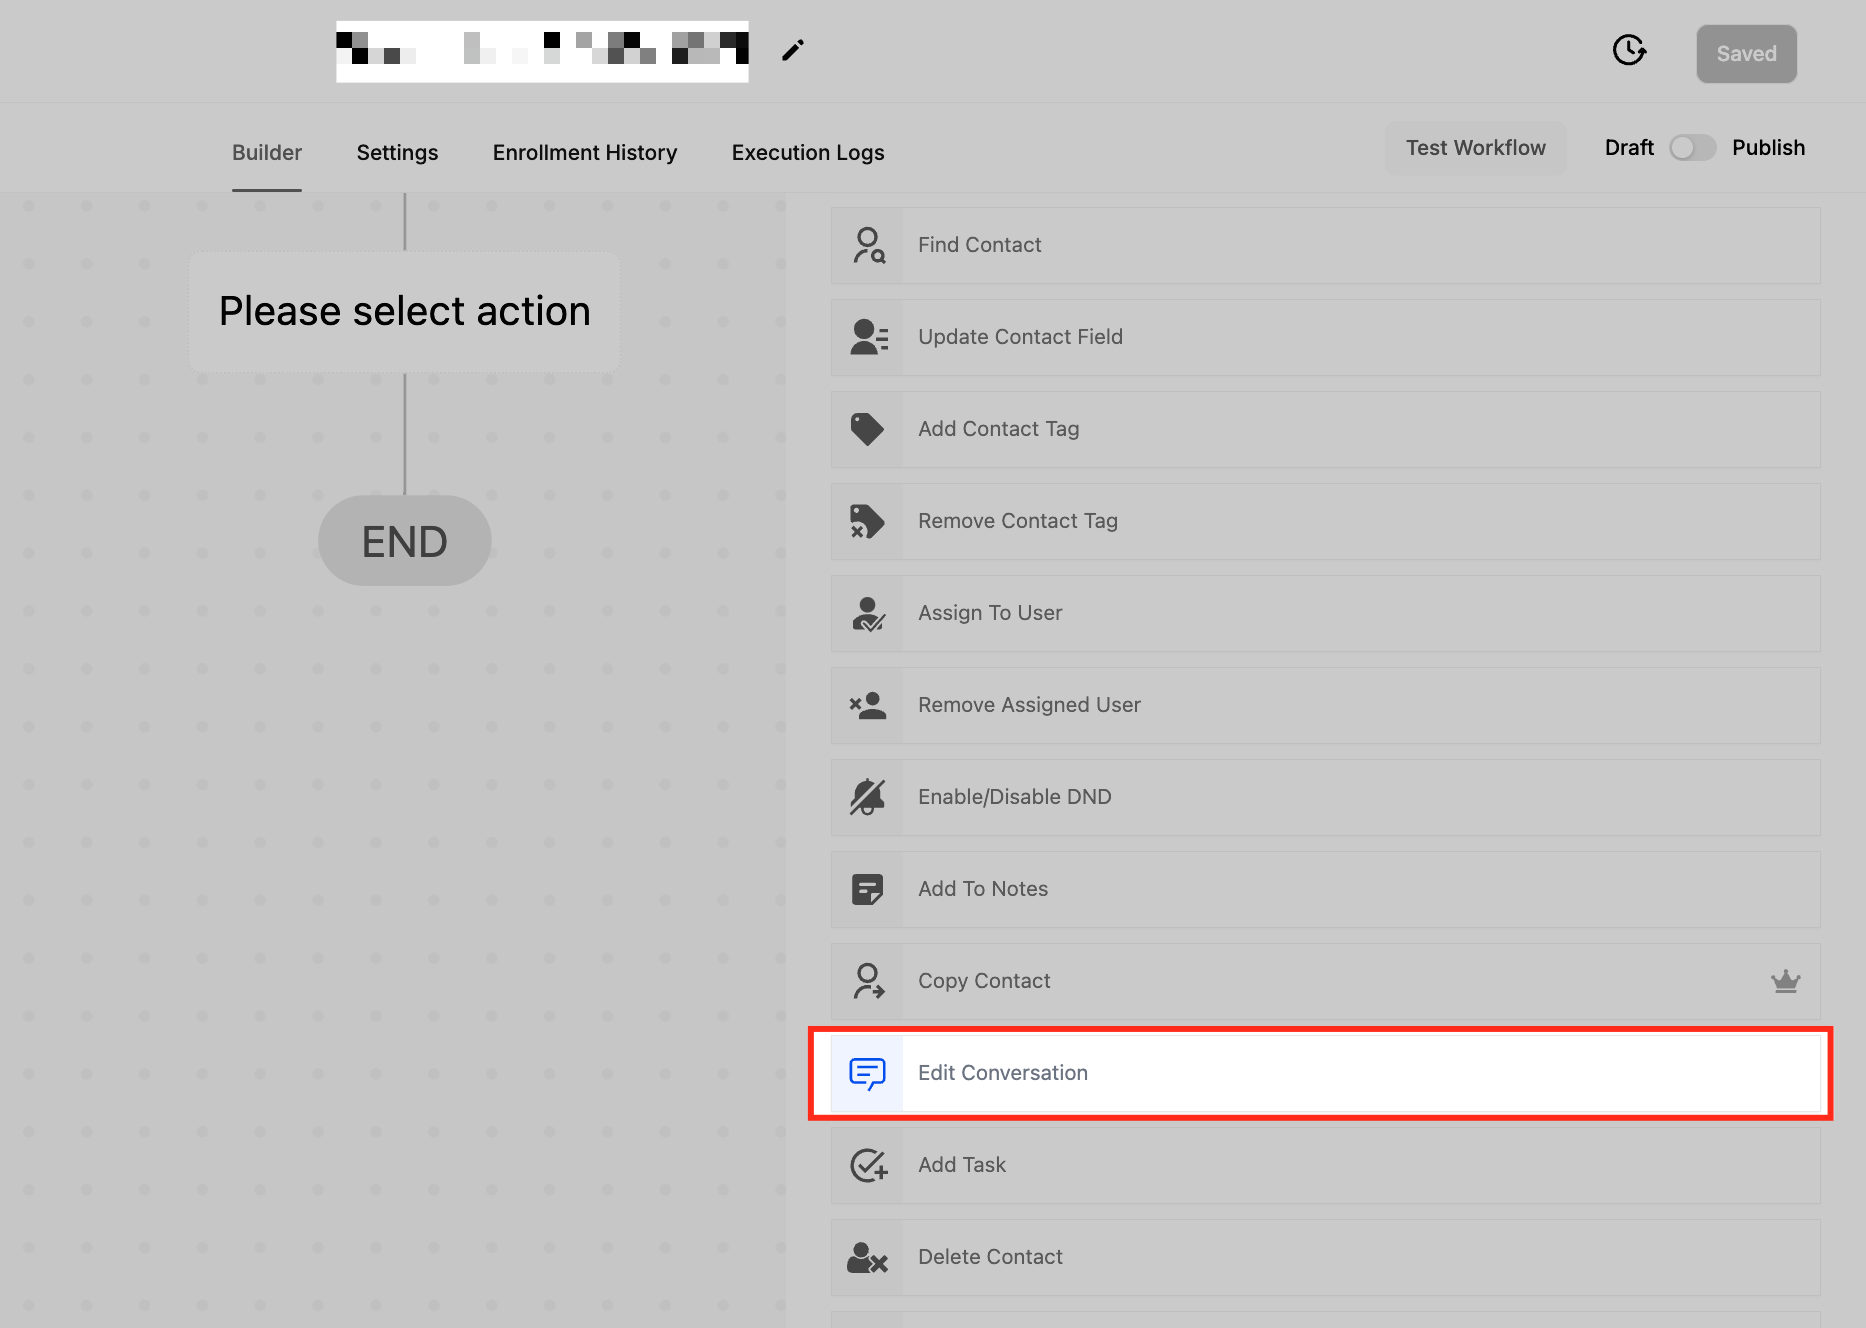
Click the + icon where you want the action to run and open the action picker.
Scroll to the Contact section, or type the action name in the search field, then select the action.
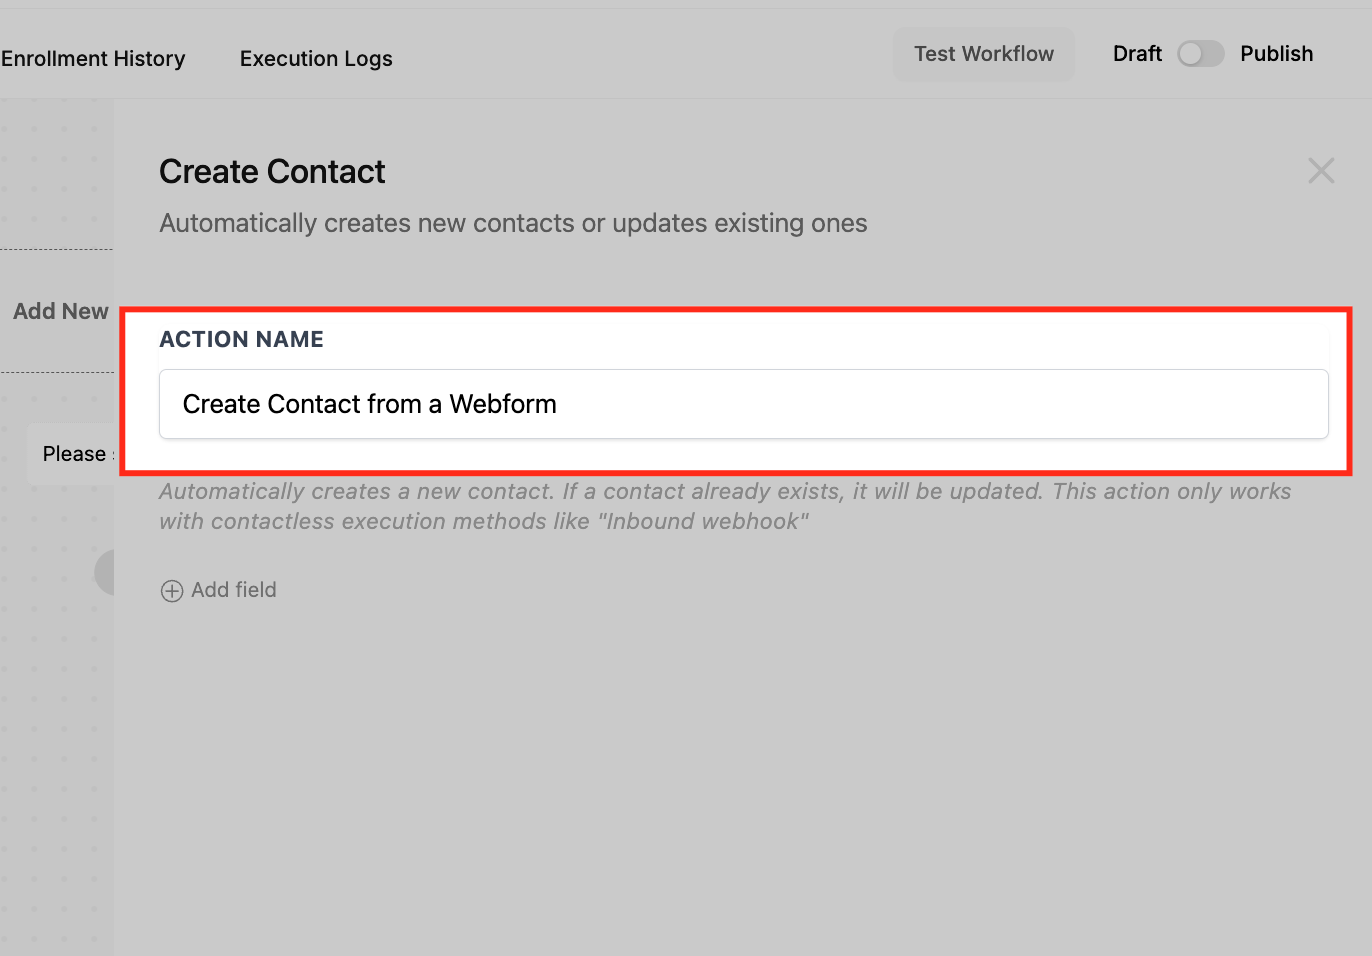
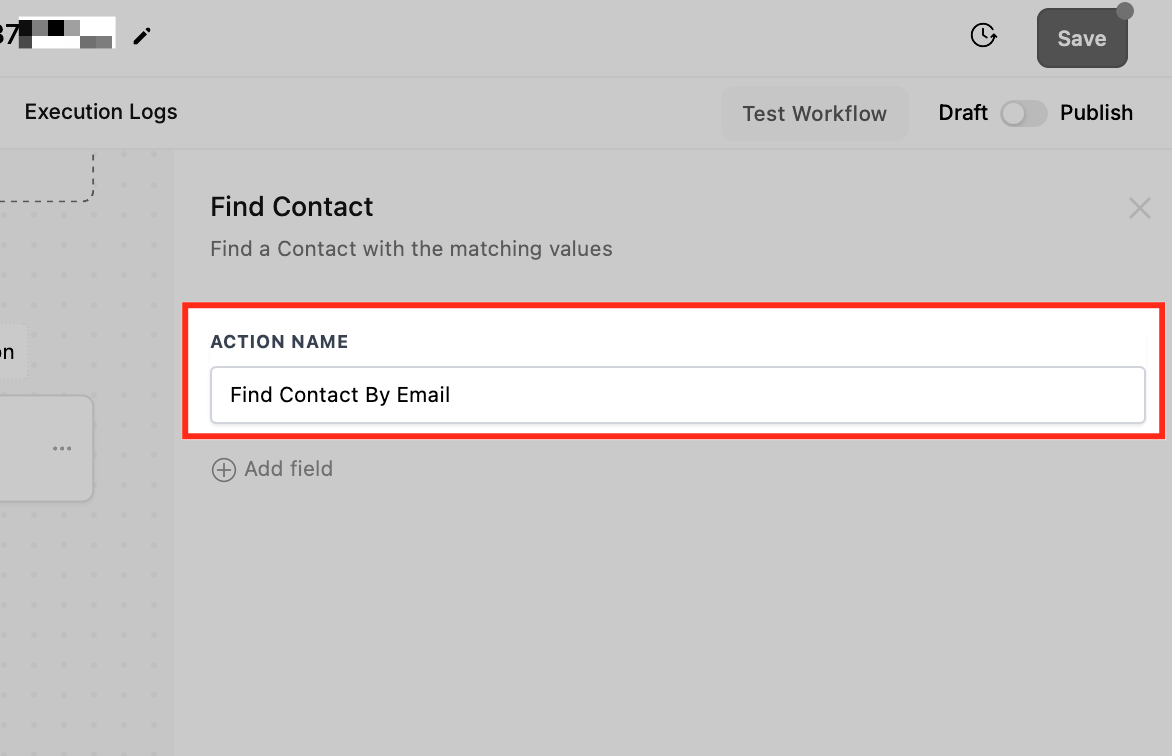
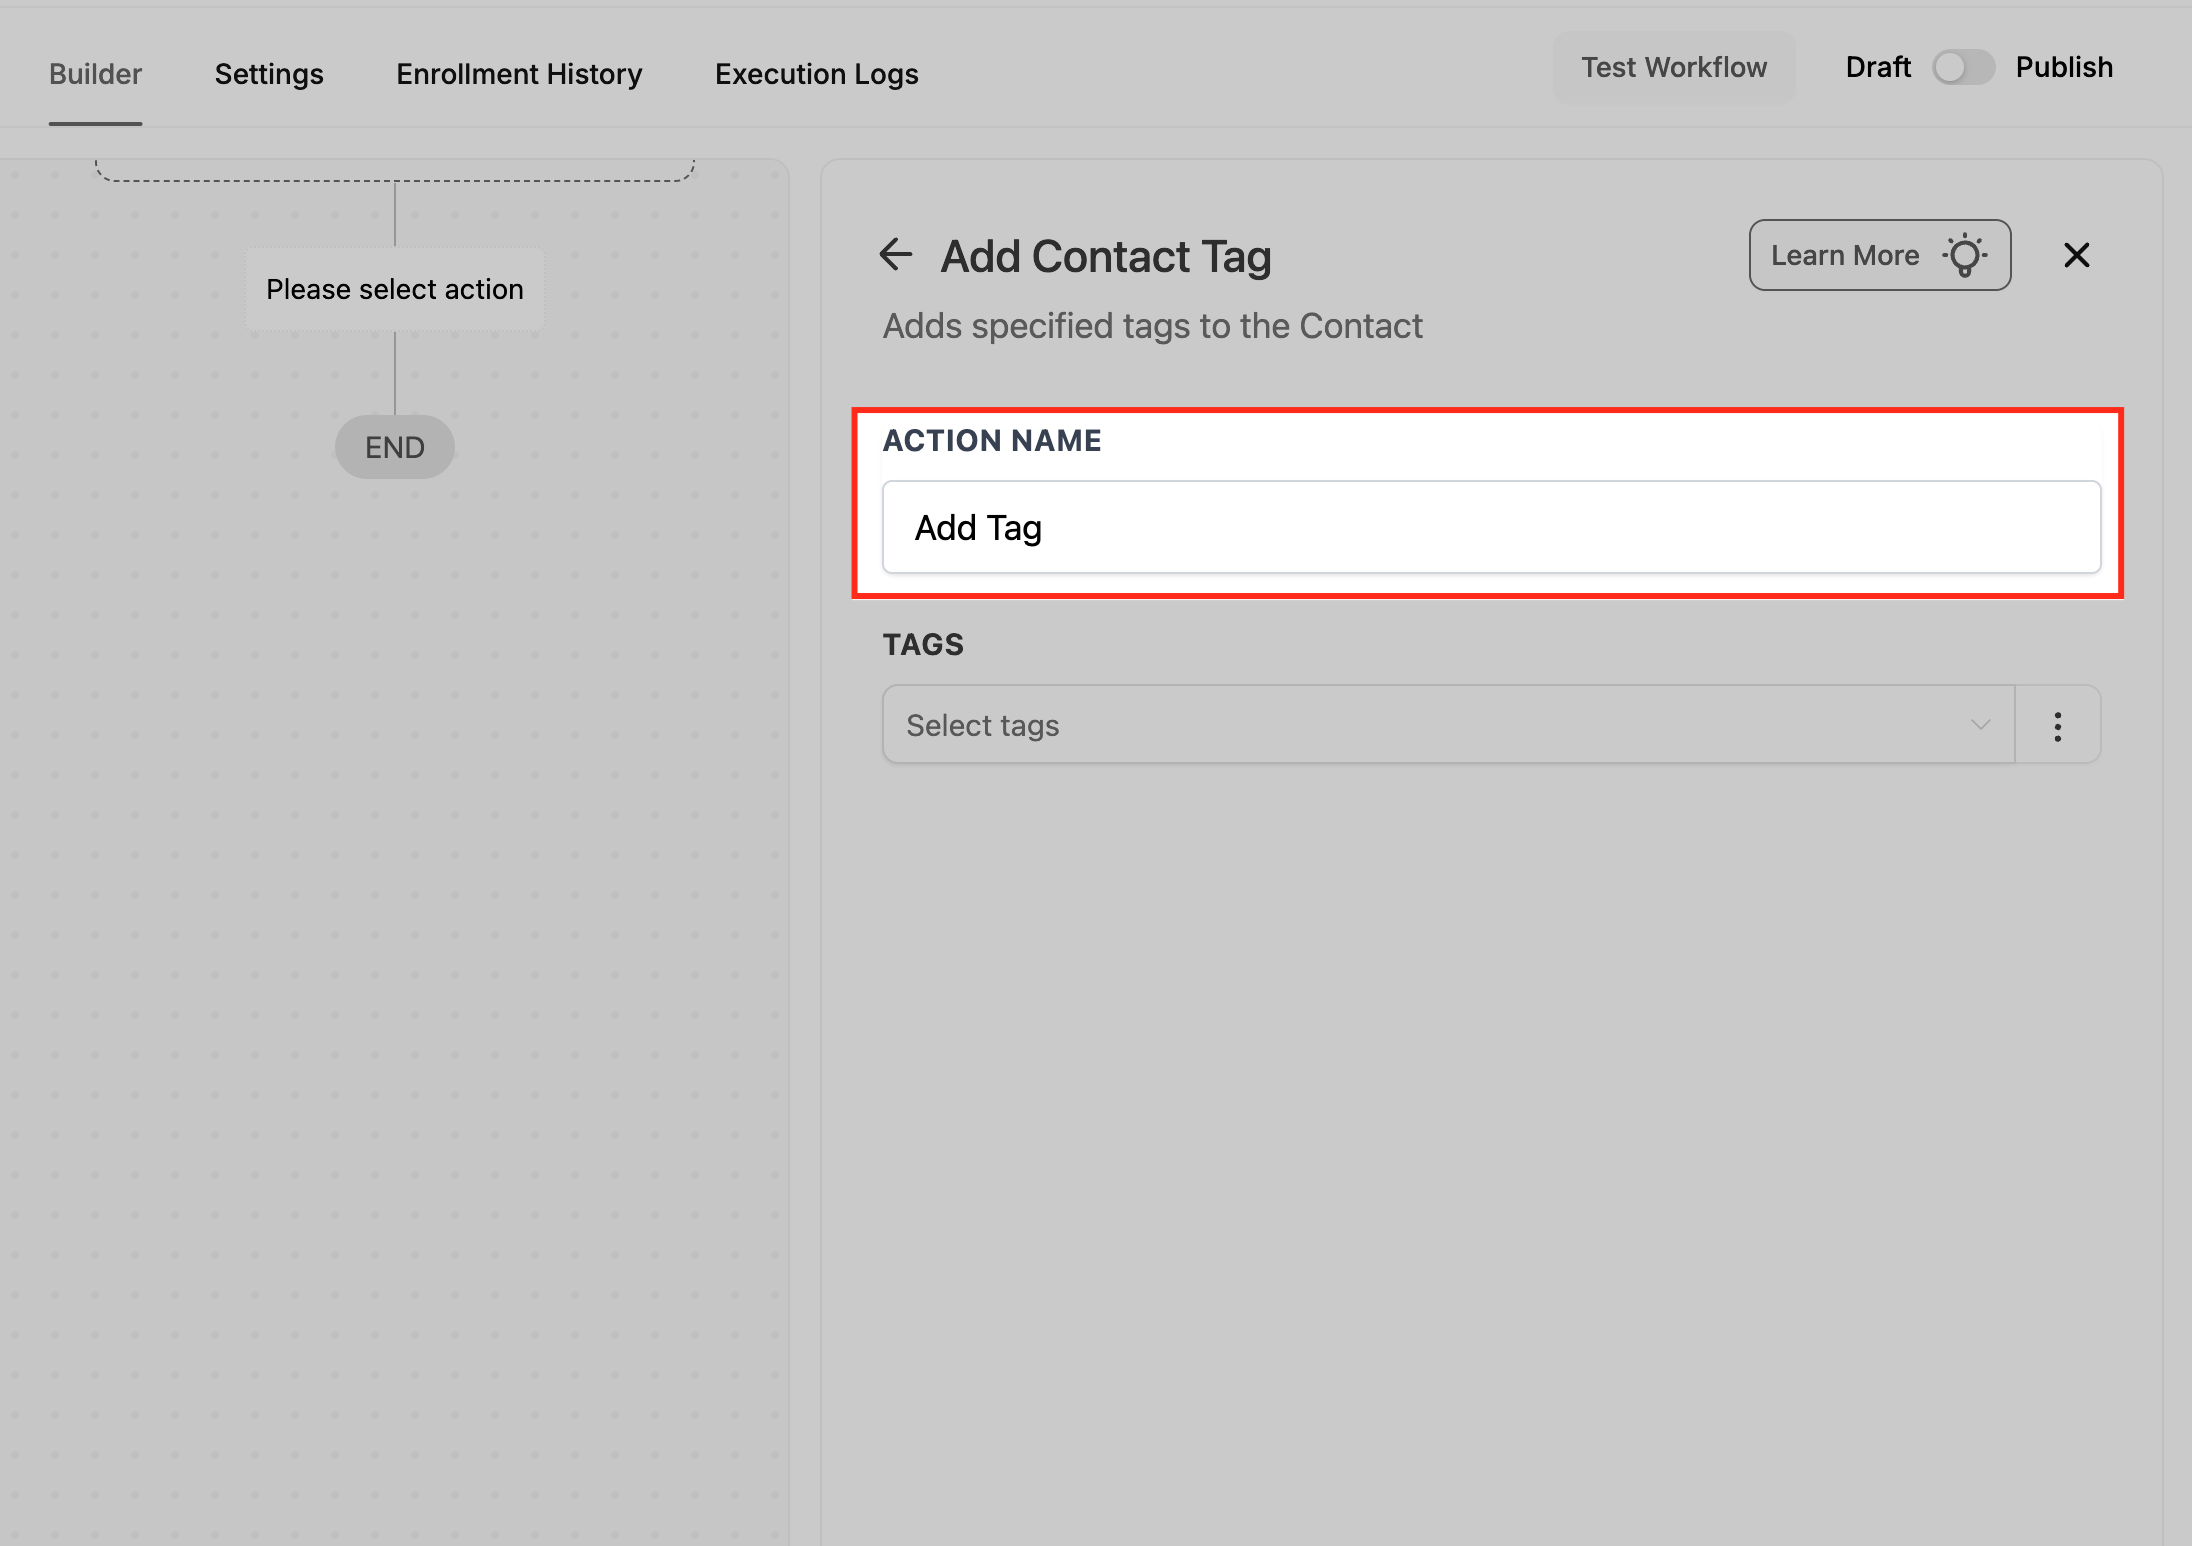
Enter an Action Name. Use a descriptive name (for example, "Tag New Lead") so the step is easy to recognize when you review the workflow later.
Configure the action's fields (covered per action below).
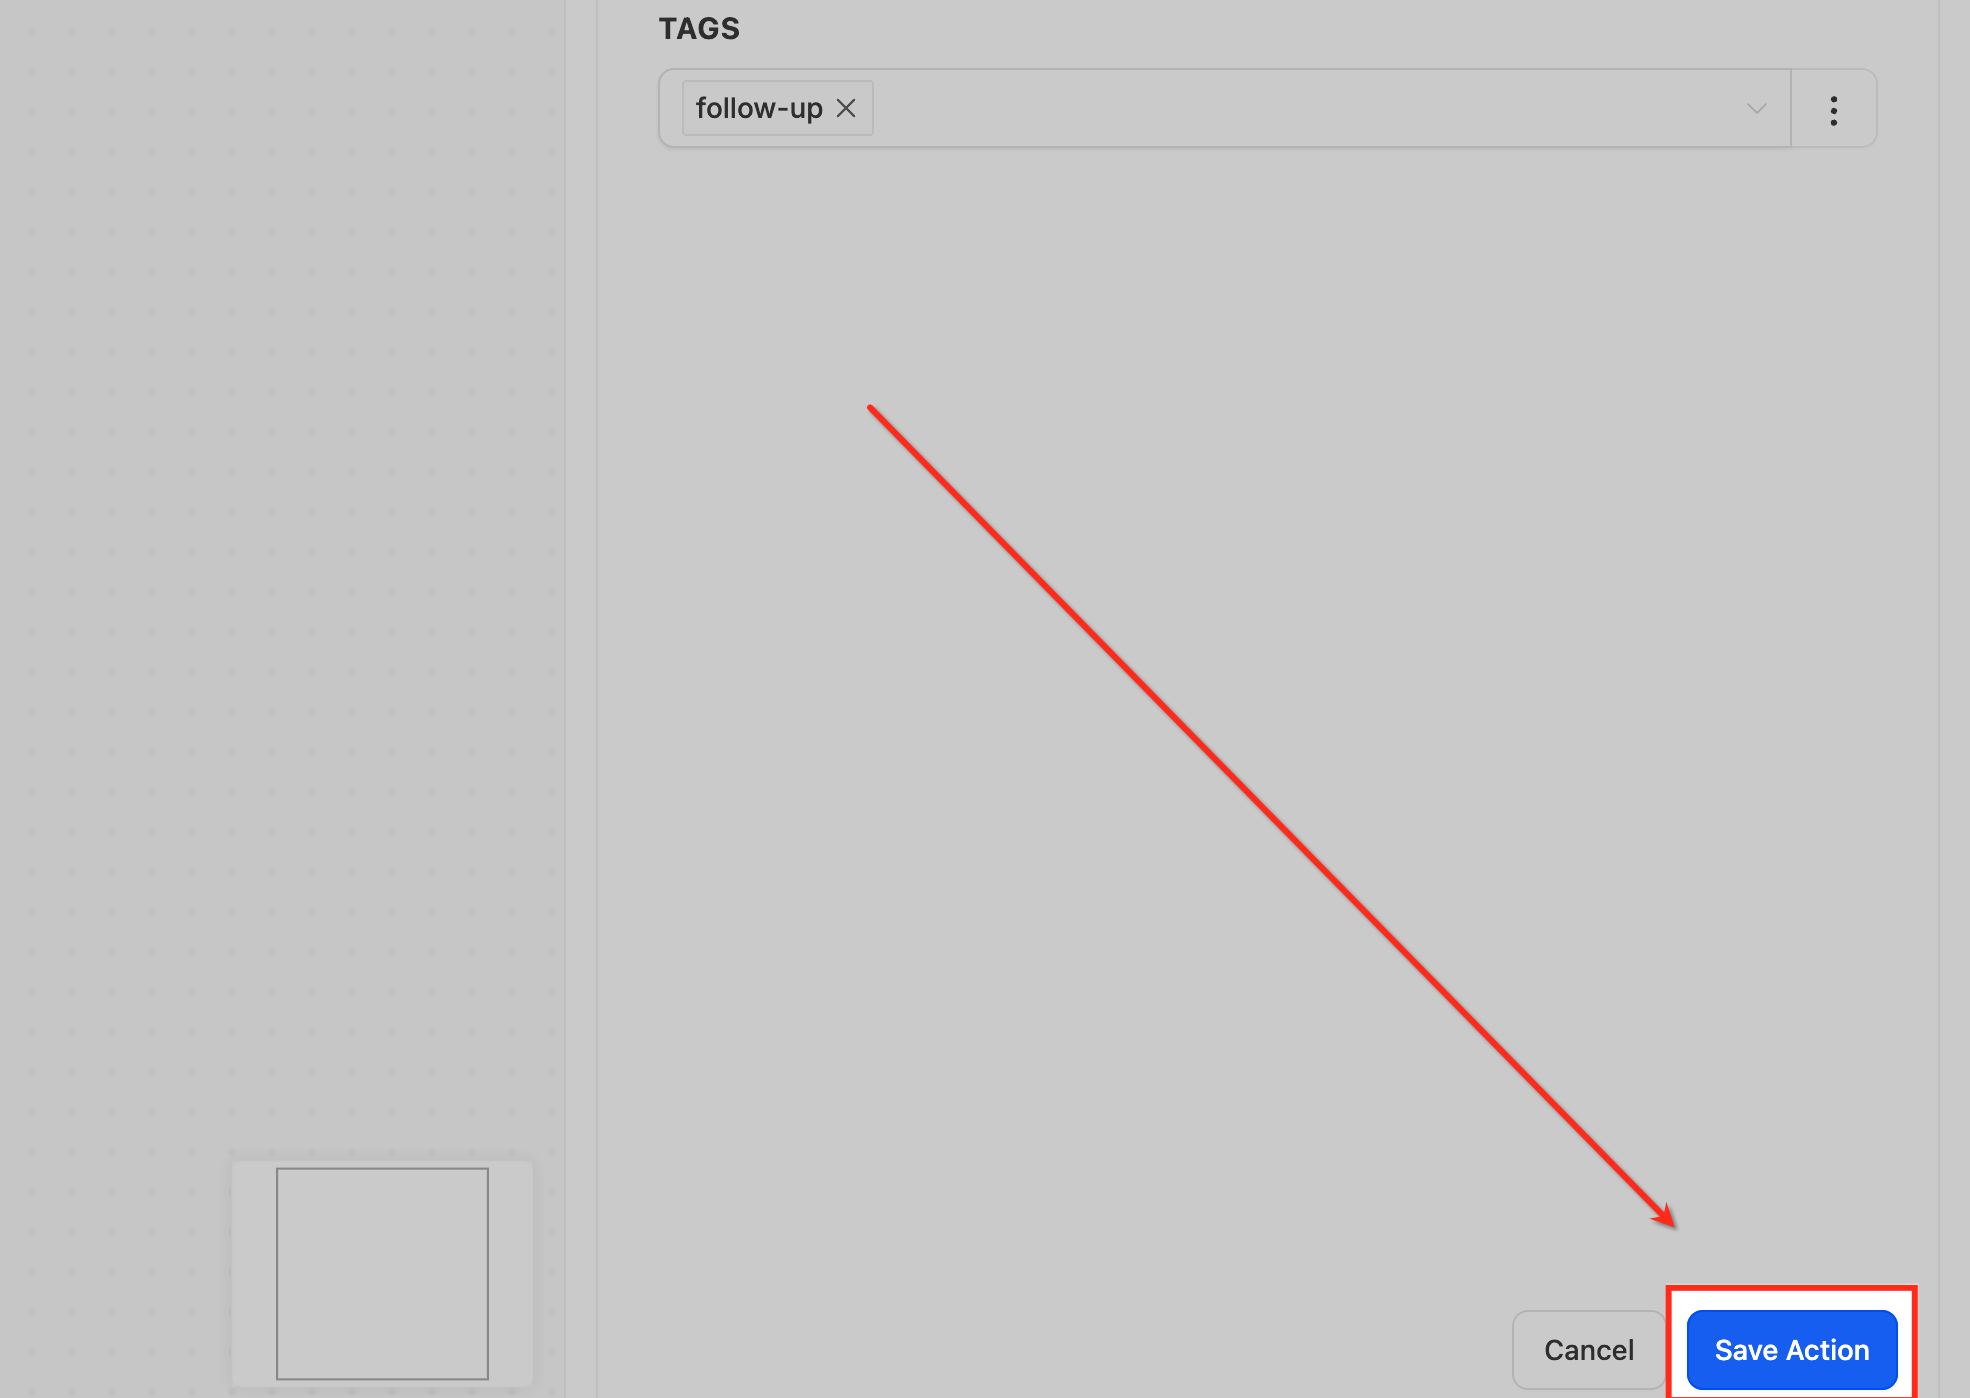
Click Save Action.
Test the workflow with sample data, then toggle it from Draft to Publish to make it live.
What it does: Creates a brand-new contact record, or updates an existing one if a match is found, using the field values you map. It is built for workflows that begin without a contact already attached, so a record can be created from incoming data and then acted on by later steps.
Configuration and fields:
Action Name: A descriptive label, such as "Create Contact from Web Form."
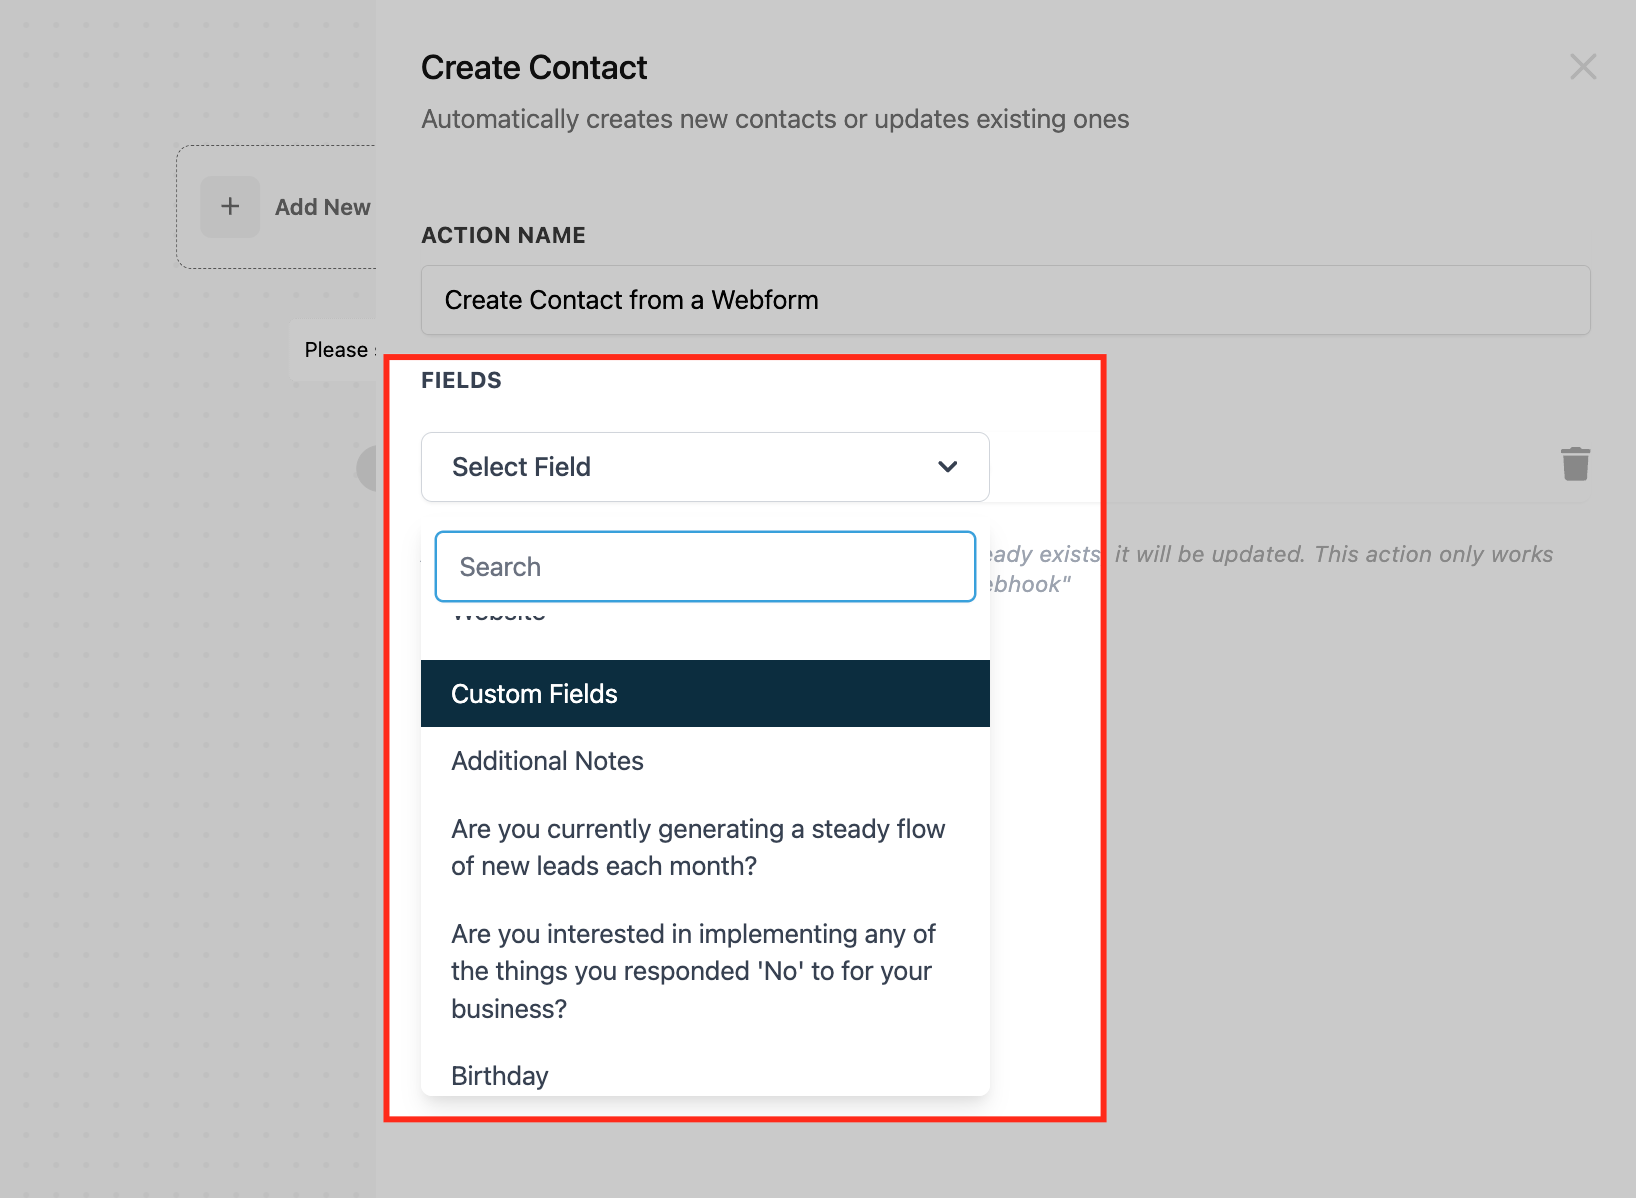
Standard Fields: Add any built-in contact fields you want to set, for example First Name, Last Name, Email, Phone, Address, City, Country. Each field can be set to a static value or mapped to a merge field (such as a value from an Inbound Webhook payload).
Custom Fields: Add any custom fields your account uses, for example Membership ID or Referral Source, and map a value to each.

Inputs it needs: Values for the fields you choose to set. At minimum, supply an identifying field such as Email or Phone so the system can match against existing records.
Data it produces: A contact record (created or updated) with the mapped fields populated. The enrolled contact for the rest of the workflow becomes this contact, so later actions can reference its merge fields.
When to use it (med-spa example): A prospective client fills out a "Book a Consultation" form on your site that is delivered by webhook. Use Create Contact to capture First Name, Last Name, Email, Phone, and a "Treatment Interest" custom field, creating the client record so follow-up actions (assign to a coordinator, send a welcome text) can run.
Notes and limits:
If a contact already exists that matches your identifying field (email or phone), this action updates that record rather than creating a duplicate.
Supports both standard and custom fields.
Pairs well with the Inbound Webhook trigger and premium app-marketplace triggers, which deliver the field data to map.
What it does: Looks up an existing contact in your database using the search fields you specify, then attaches that contact to the workflow so later steps can act on it. It is designed for workflows triggered without a contact attached but that carry identifying data (such as an email in a webhook payload).
Supported match fields:
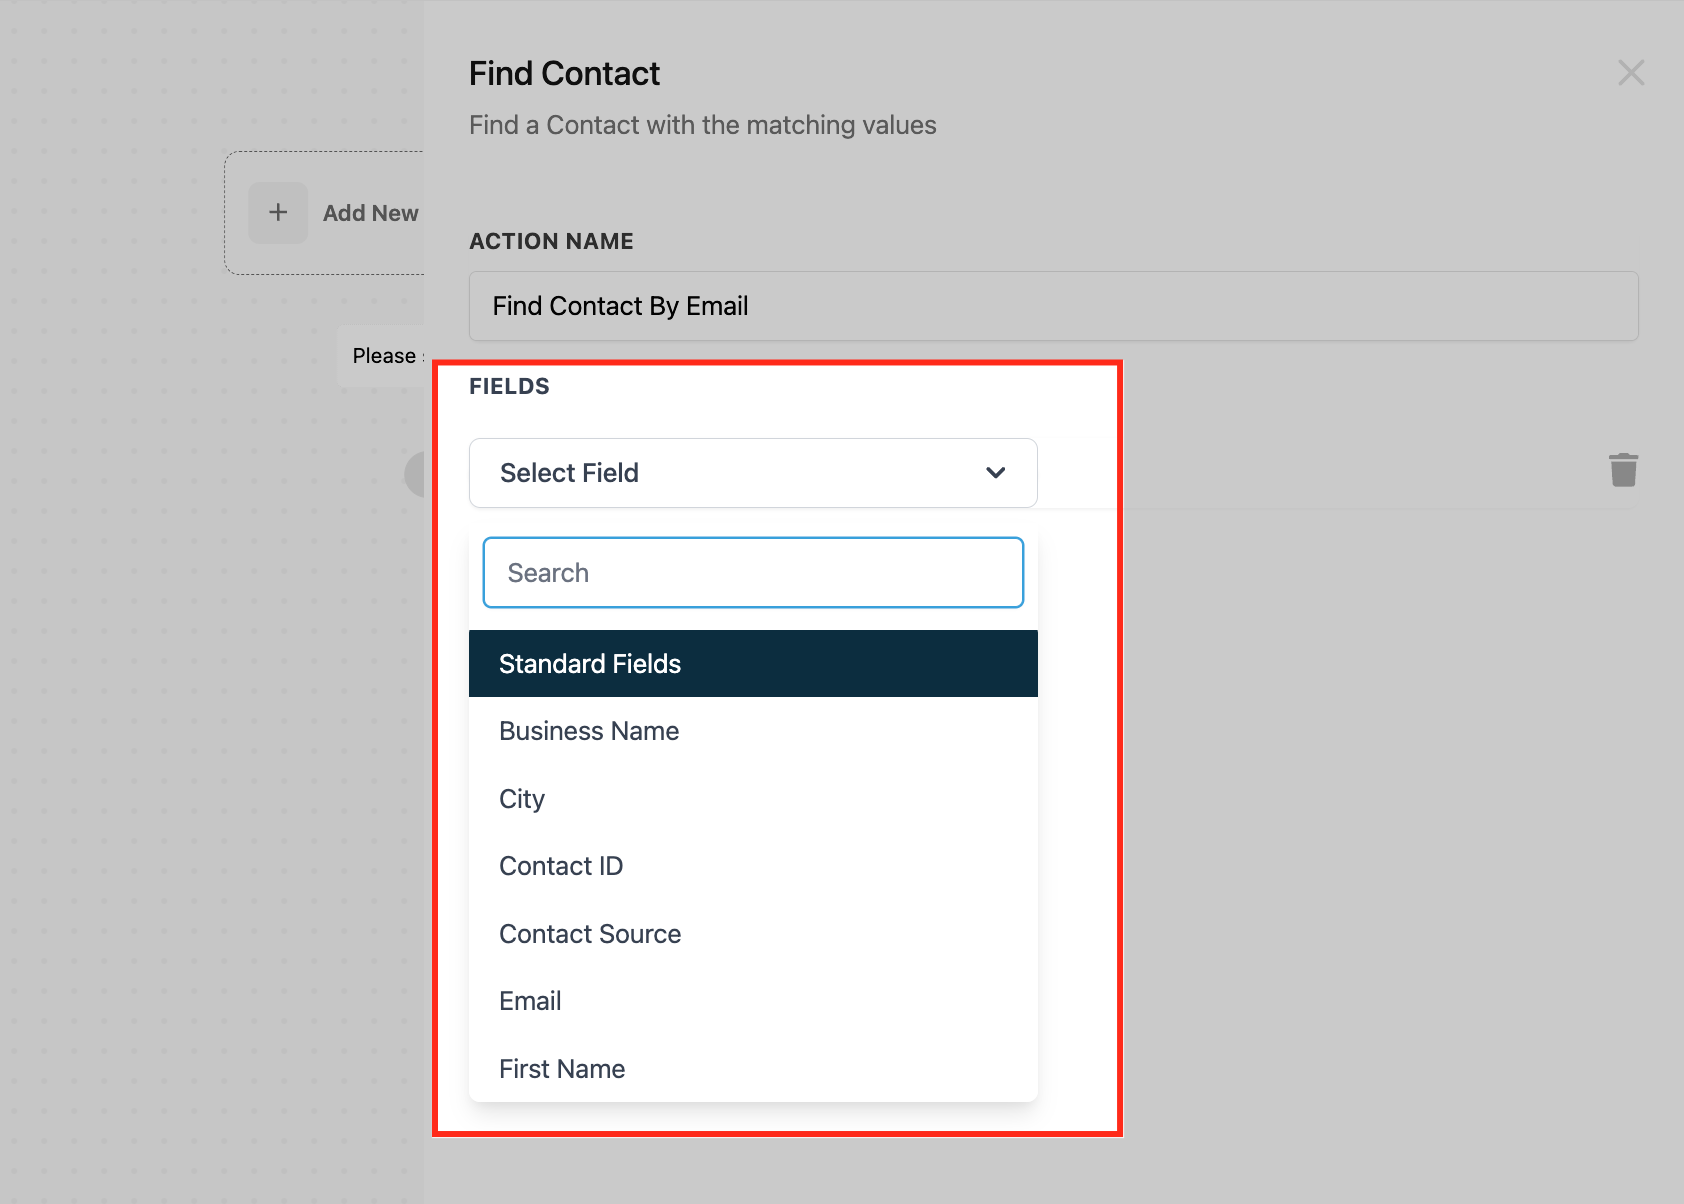
Standard fields: Email, Phone, First Name, Last Name, and more (chosen from the field picker).
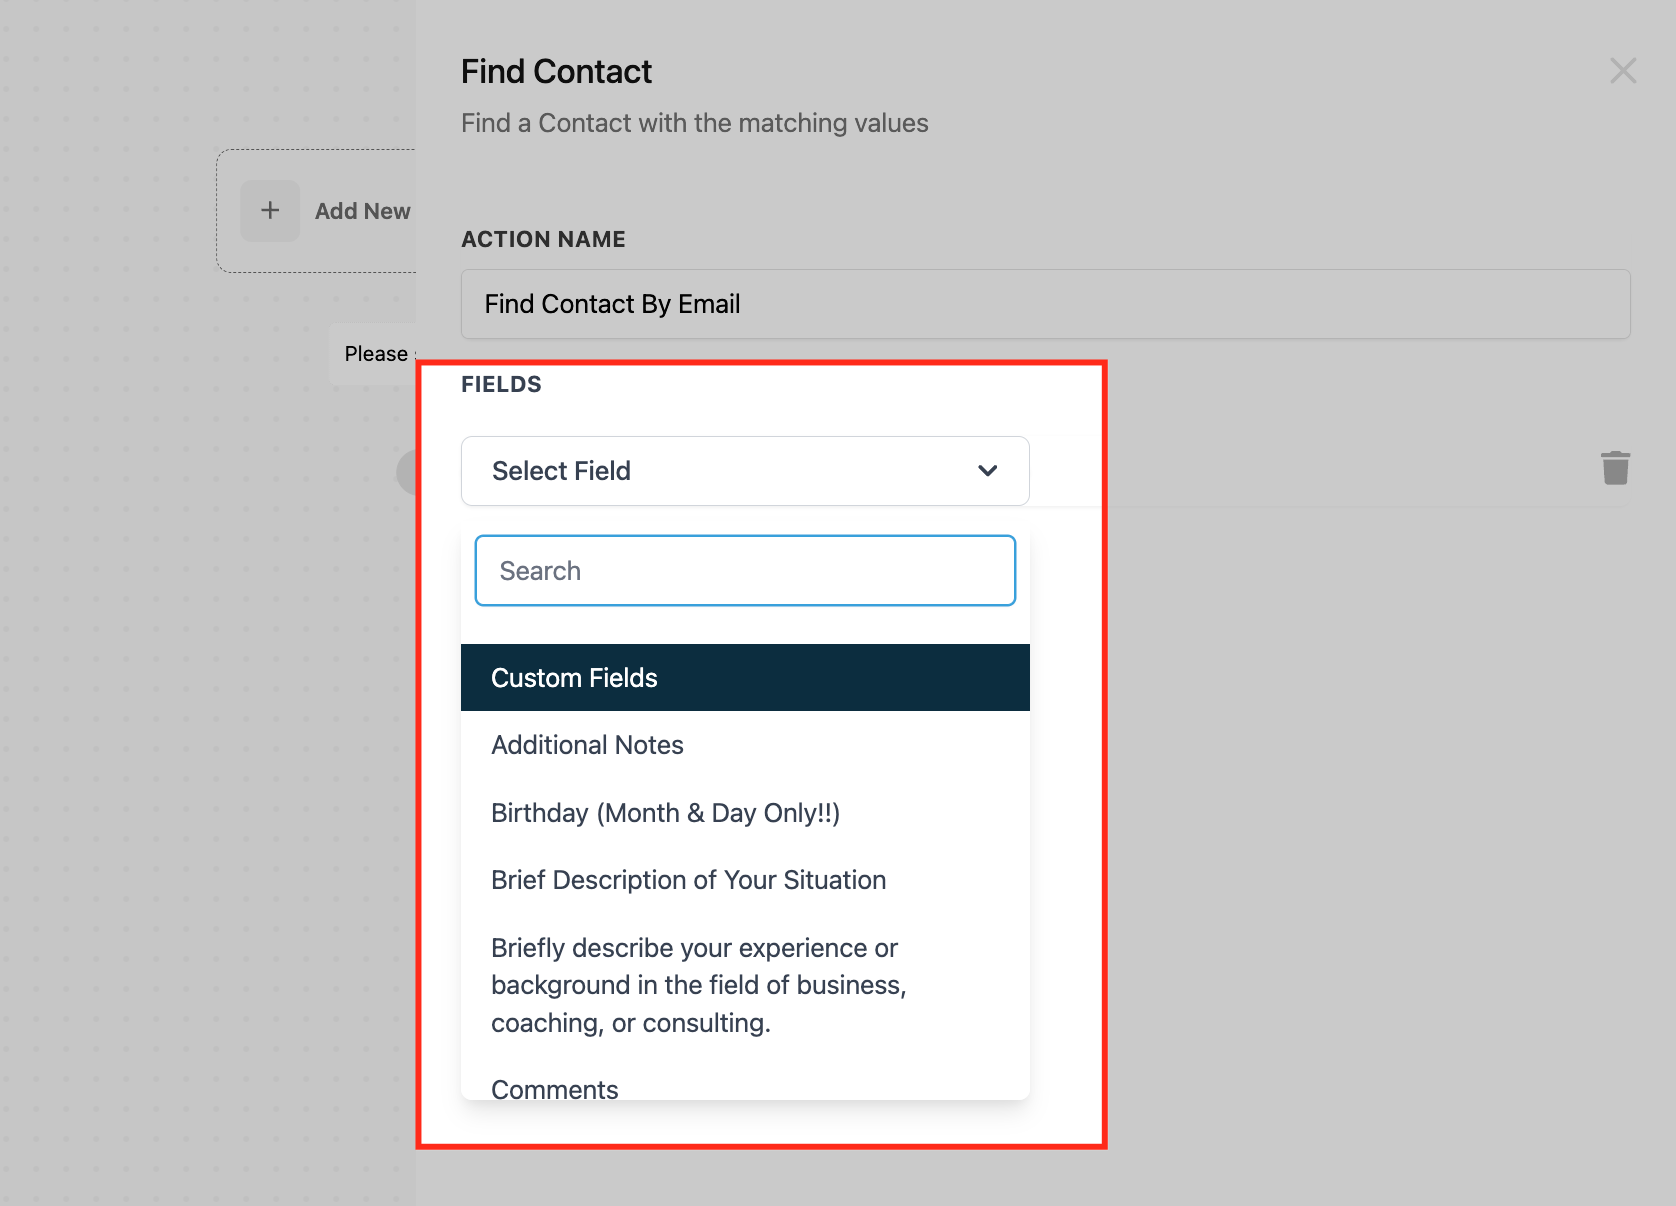
Custom fields: Any custom field you have created, such as Customer ID or Subscription Tier. The field must exist and be populated on the contact for a match.
External references: Map incoming webhook or app data (for example, a payment processor's Customer ID) to a custom field and match on it.
Matching logic and branching behavior:
AND logic across fields: If you specify multiple fields, all of them must match for a contact to be returned (for example, email AND phone AND a custom field).
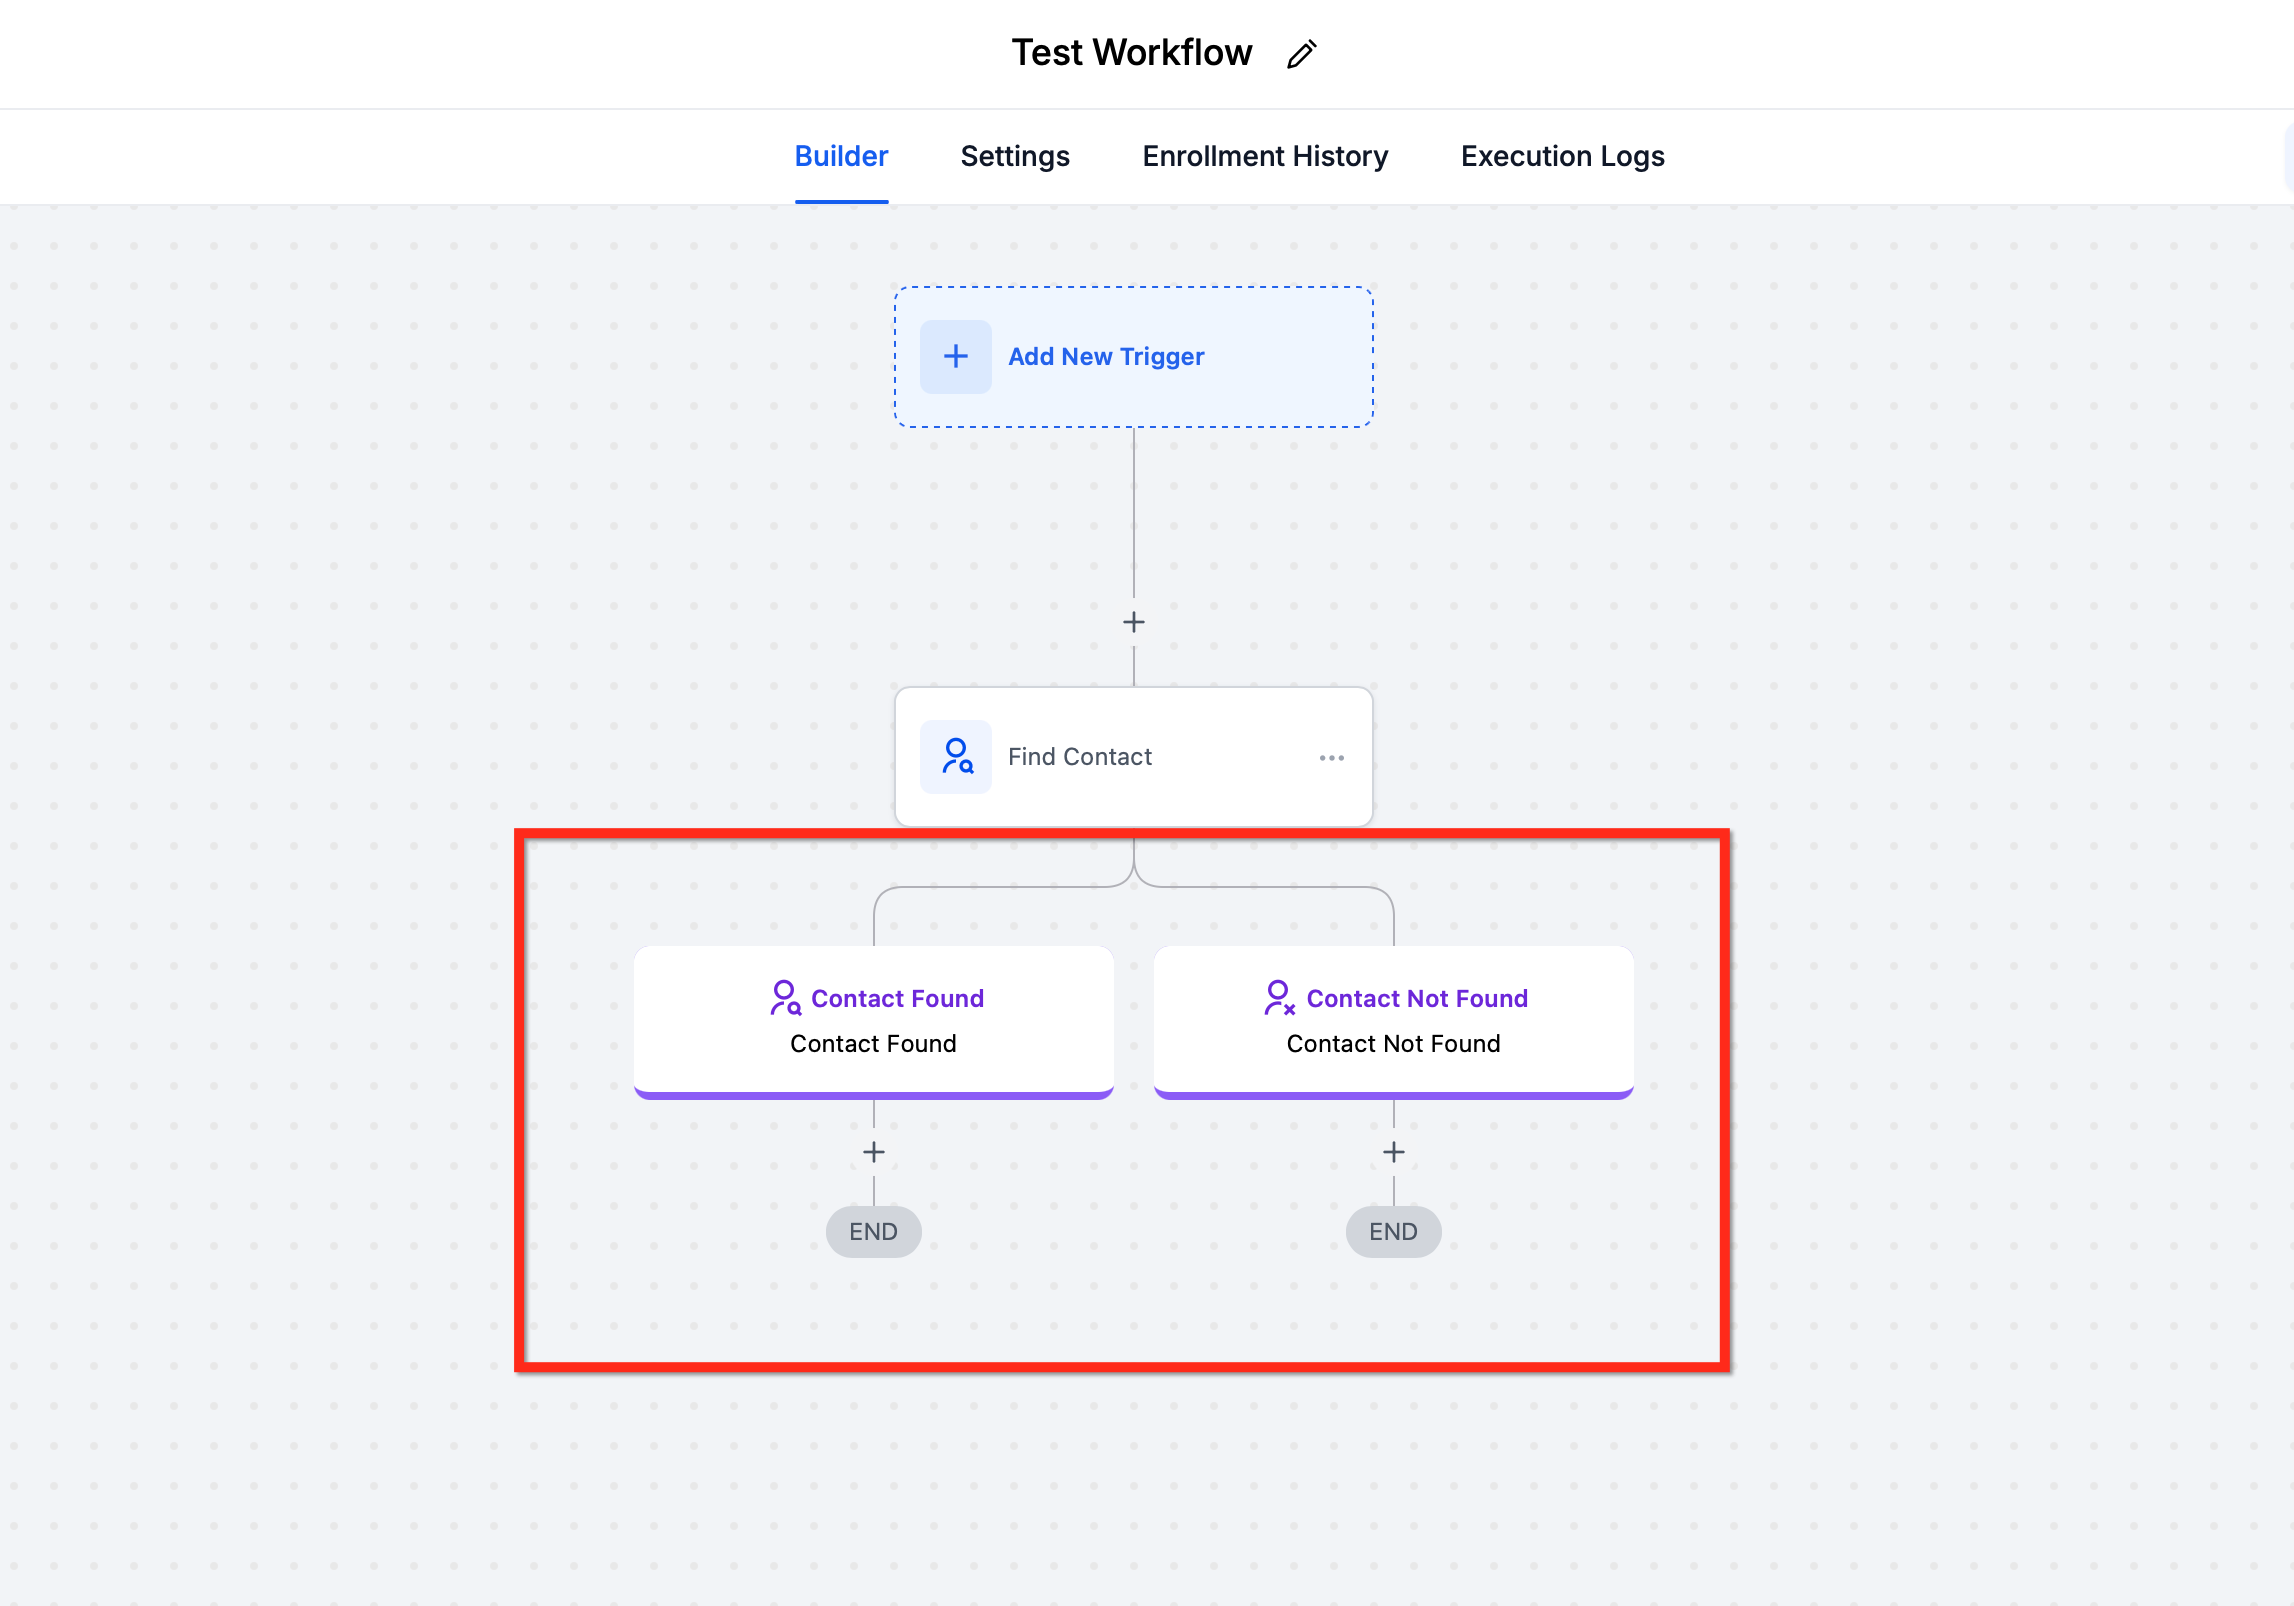
Branching: The action creates two paths, Contact Found and Contact Not Found, so you can handle each outcome differently (for example, update fields on the Found path; create the contact on the Not Found path).
Multiple possible matches: Tighten the criteria with more specific fields (add email or an external ID). Combine with your contact deduplication preferences and merge guidance when needed.
Configuration:
Add the Find Contact action and name it (for example, "Find Contact by Email").
Select Standard Fields: Choose the standard field(s) to match on, such as Email or Phone.
Select Custom Fields (optional): Scroll to your existing custom fields and add any you want to match on, such as Customer ID or Subscription Tier.
Plan branches: Build the actions that should run under Contact Found (for example, Update Contact Field, Send Email) and under Contact Not Found (for example, Create Contact).
Test with sample data, then Save the action.
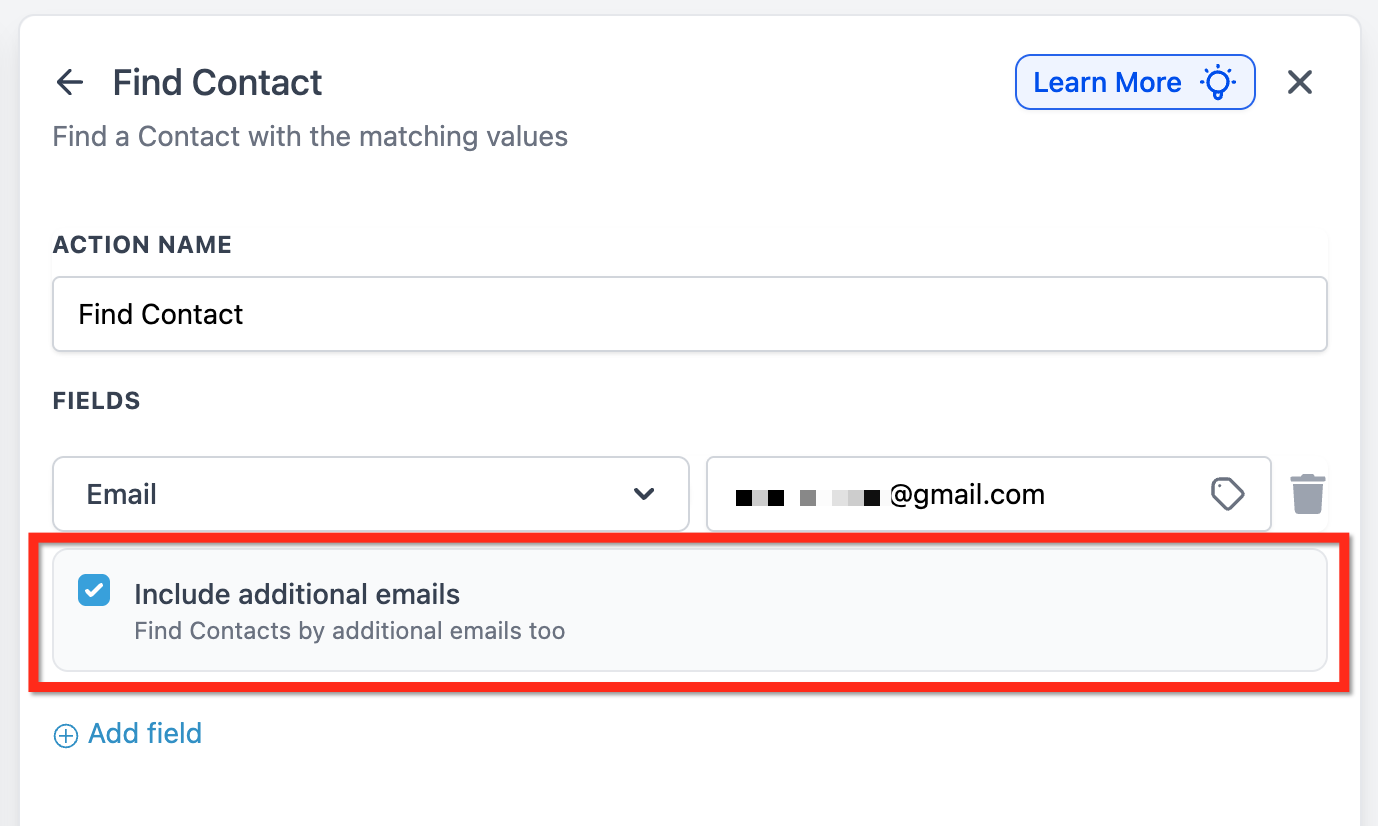
Include additional emails or phone numbers (optional): By default, Find Contact matches only the contact's primary Email or Phone field. If your contacts store additional email addresses or phone numbers, you can include those in the match: in Select Standard Fields, choose Email or Phone, then enable the checkbox under the selected field to include additional emails or phone numbers in the search.
Inputs it needs: At least one identifying value to match against (email, phone, or a custom field), typically passed in by the trigger.
Data it produces: When a contact is found, it is attached to the workflow as the enrolled contact and its merge fields become available to later steps. The action also sets which branch (Found or Not Found) the workflow follows.
When to use it (med-spa example): A booking platform sends an appointment webhook containing the client's email. Use Find Contact to match by Email; on the Contact Found branch, attach the appointment details and send a confirmation; on the Contact Not Found branch, create the client from the booking details and notify your front desk.
Notes and limits:
Best paired with the Inbound Webhook trigger, or with a premium app-marketplace trigger that passes the necessary merge fields.
Choose reliable, consistently formatted fields to improve match accuracy; unique identifiers work best.
What it does: Changes the value of one or more contact fields on the enrolled contact. It can set a field to a new value (static or dynamic) or clear a field's existing value. It also handles date-type fields with dedicated options.
Configuration and fields:
Action Name: A descriptive label.
Action Type / Update Type: Choose between updating a field with a value or clearing a field's data.
Update Field: Replaces a field's value with new information, such as an updated phone number, email address, or a custom field value.
Clear Field Data: Empties the current value of a field, leaving it blank after the workflow runs.
Add Field / Select Field: Click Add field, then Select Field to choose which contact field to modify. You can add multiple fields in a single action.
Value: For an update, enter the static value or map a merge field. For date-type fields, choose one of the date options below.
Date-type field options: When you update a date field (such as Date of Birth or an appointment-type custom date), you can set:
Custom Date: Enter a specific value in a supported format, such as MM-DD-YYYY (example 12-21-2021) or DD-MMM-YYYY (example 21-OCT-2021).
Current Date: Sets the field to the date the workflow runs.
Specific Date: Sets the field to a fixed date you select.
Inputs it needs: The field(s) to update and the value(s) to set (or the field to clear).
Data it produces: The selected contact field(s) updated or cleared on the enrolled contact's record.
When to use it (med-spa example): When a client completes a treatment, set a "Last Visit Date" custom field to the Current Date and update a "Client Status" field to "Active." Later, a re-booking workflow can read those fields to time a recall message.
Notes and limits:
Clear Field Data currently supports only contact custom fields. You cannot clear standard fields such as First Name, Last Name, or Email with it.
Use Clear Field Data carefully; emptying a field removes its data. Confirm you have a backup before clearing important fields.
What it does: Applies one or more tags to the enrolled contact, automatically categorizing and segmenting it based on behavior, source, or stage.
Configuration and options:
Action Name: A clear, descriptive label.
Select Tags: Choose one or multiple existing tags from the dropdown. The dropdown supports search. Selected tags appear as labeled items above the field.
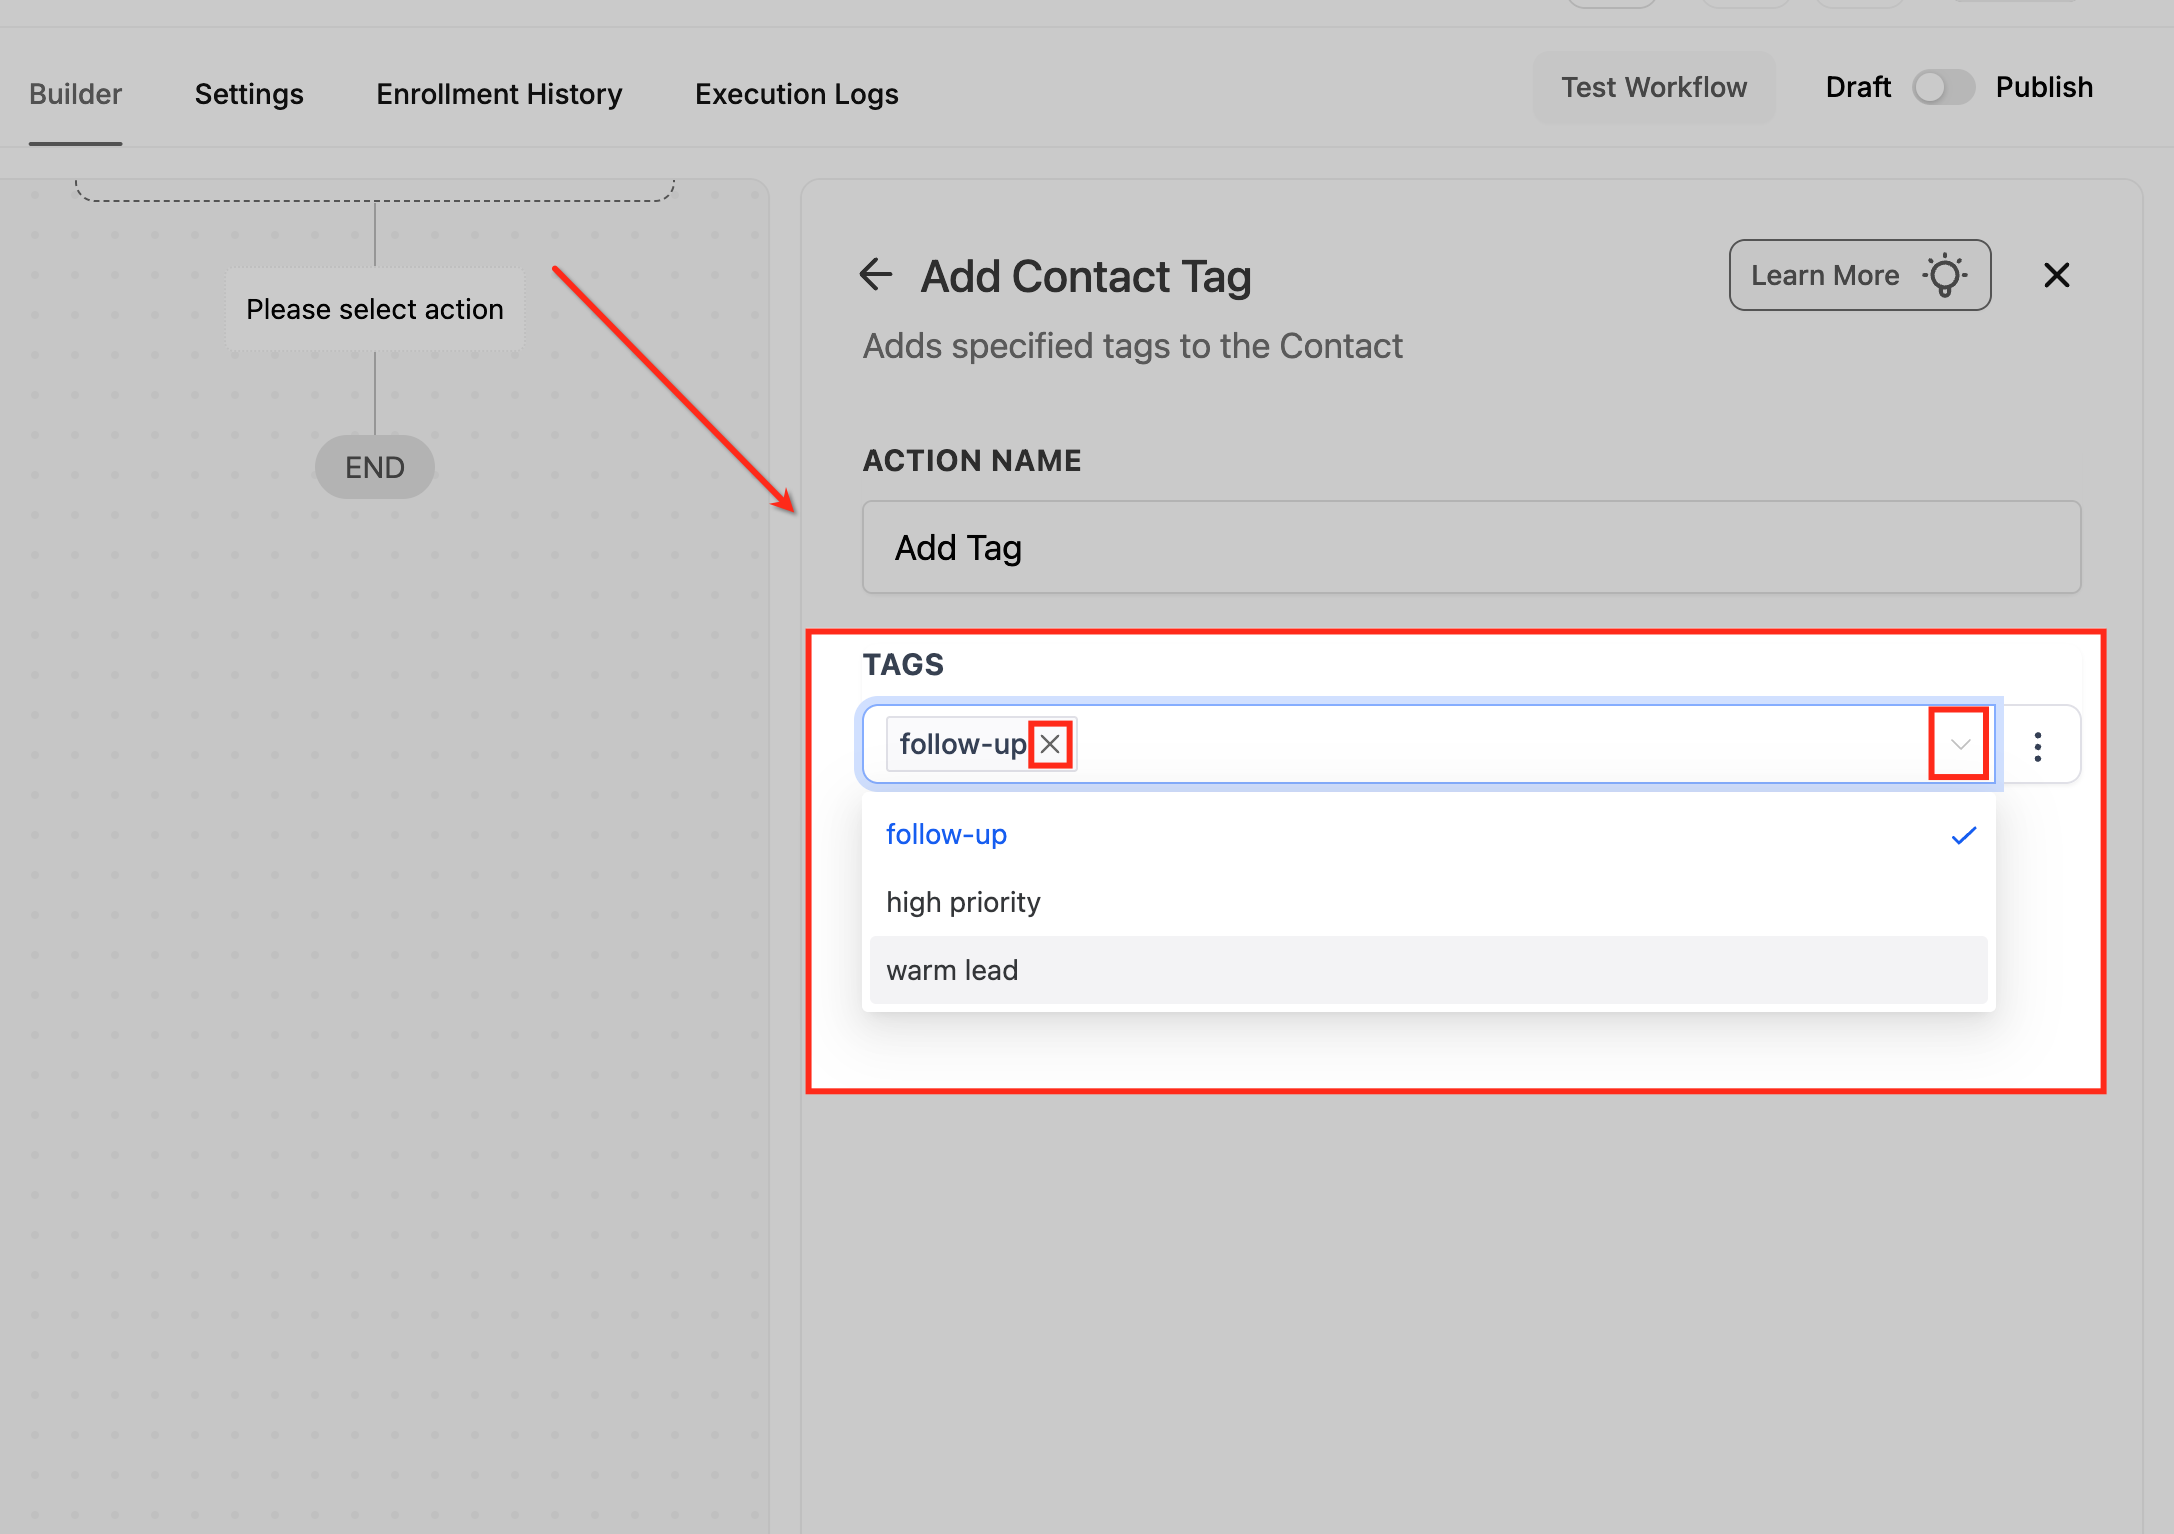
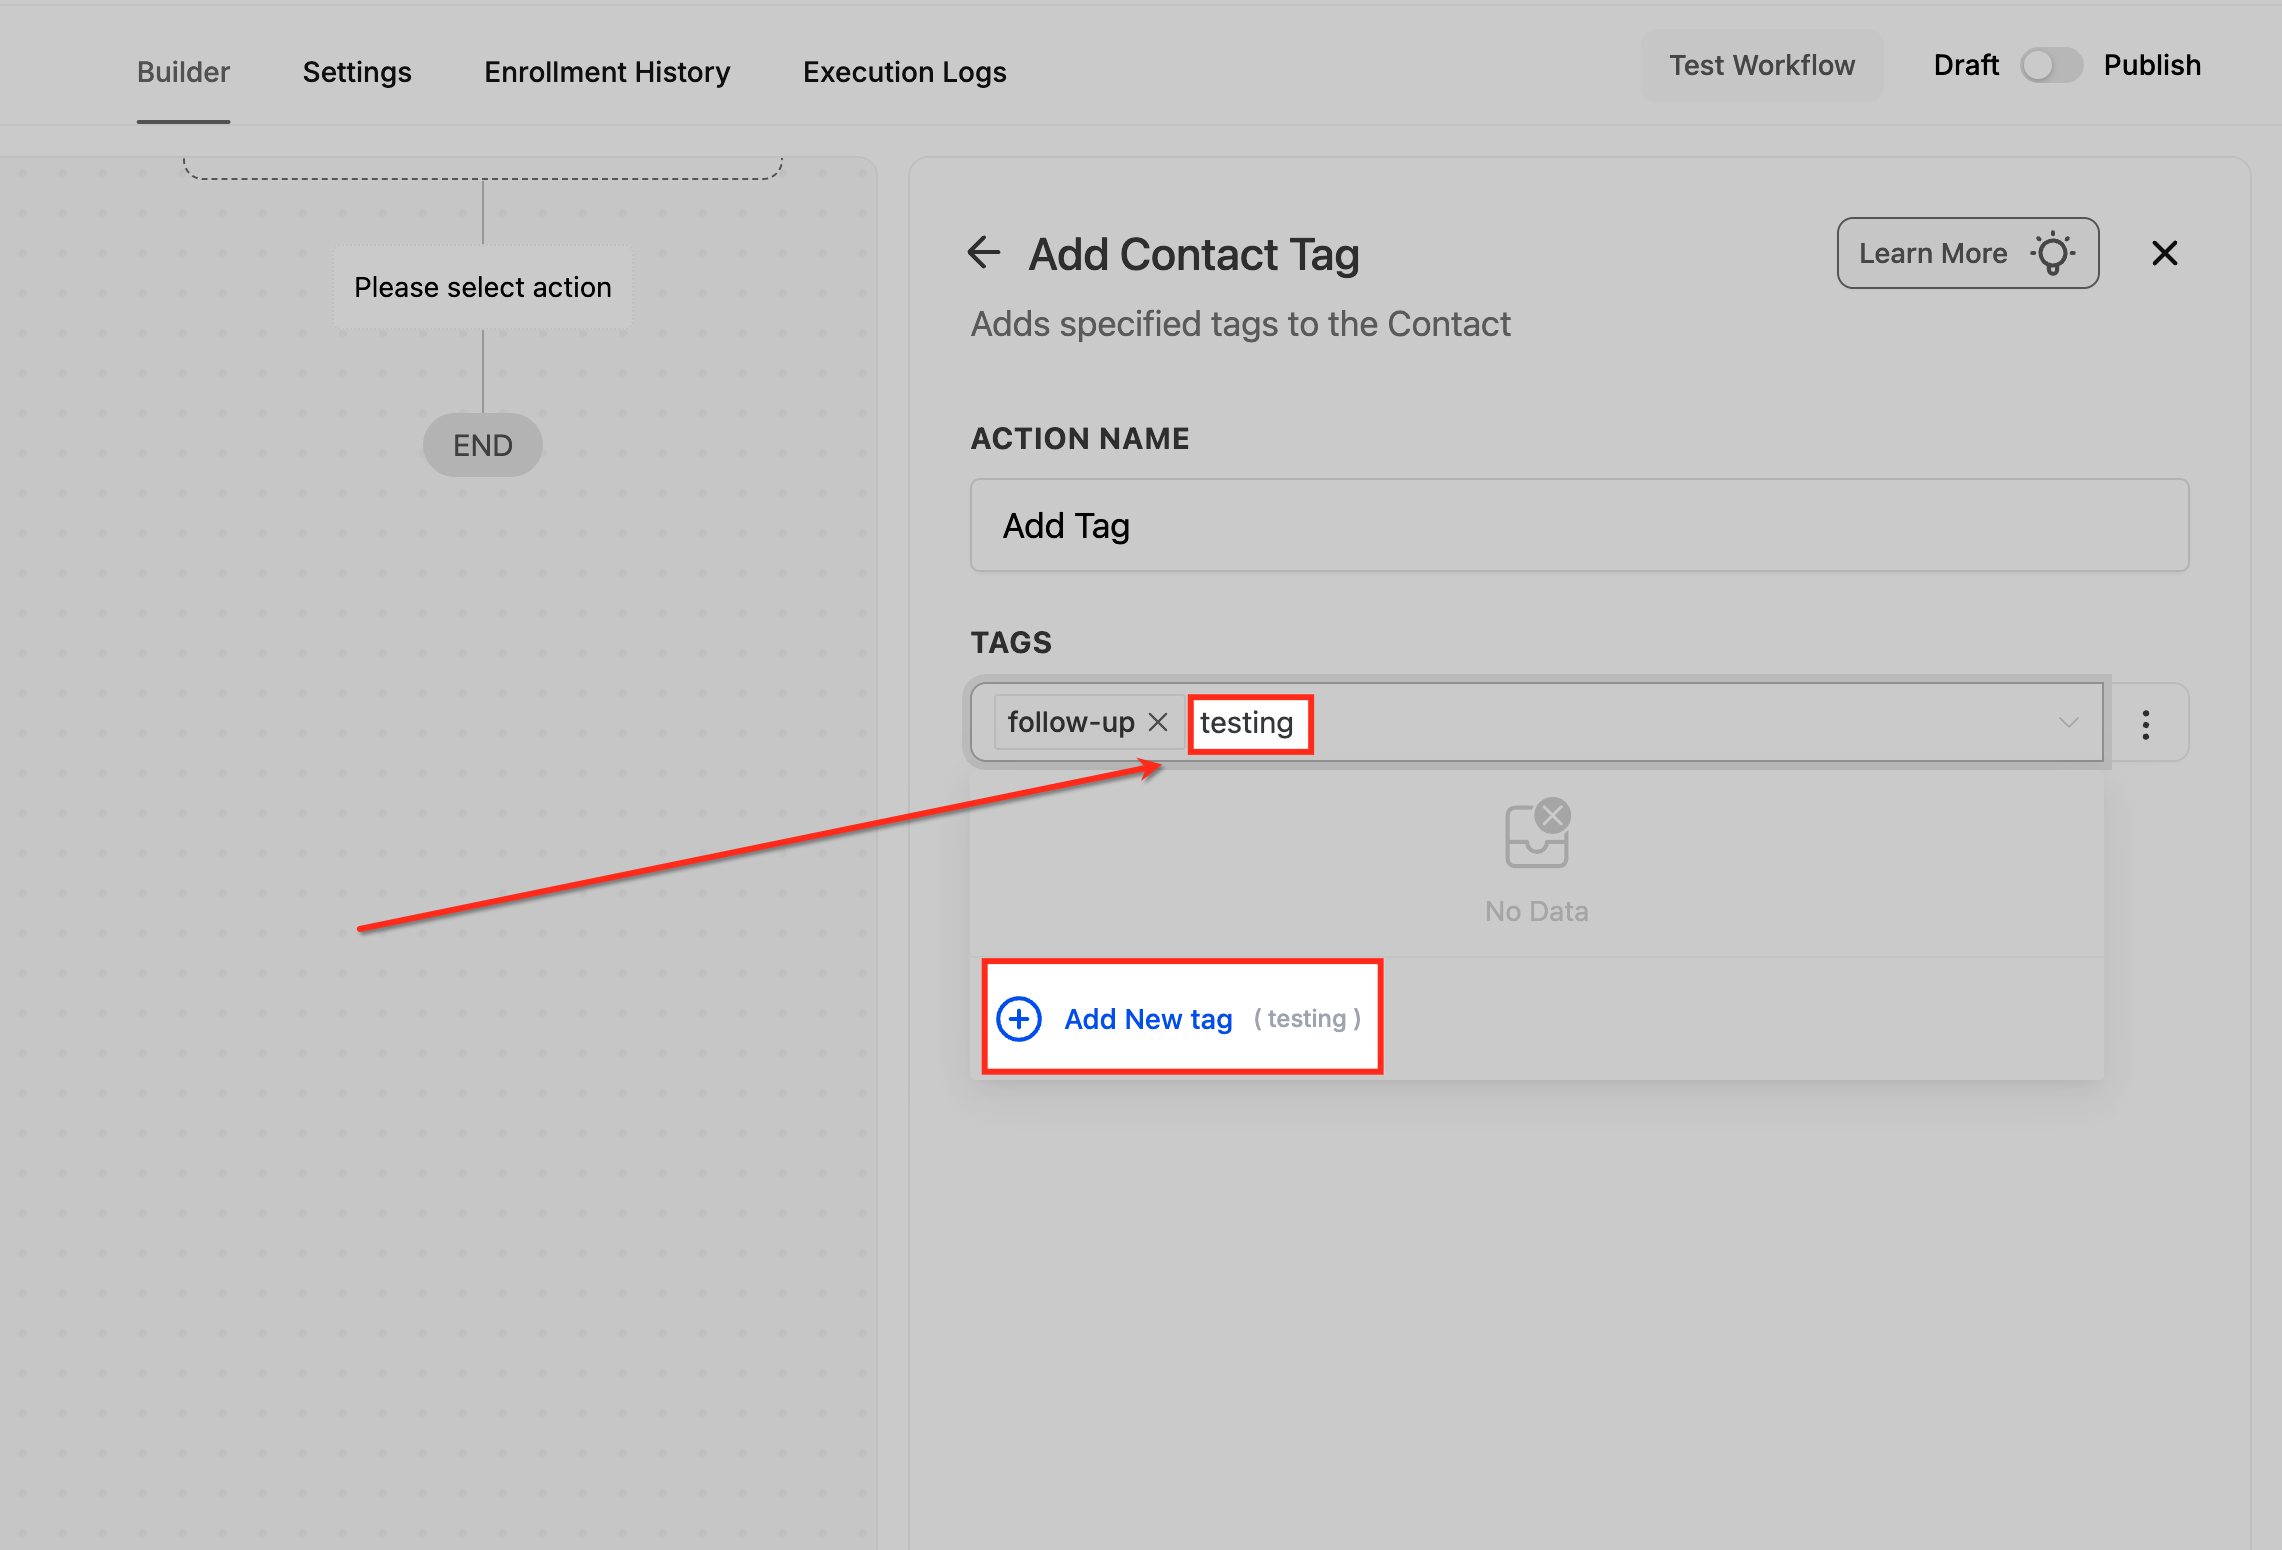
Add New Tag: If a tag you need does not exist, type its name in the field and click Add New Tag to create and select it instantly. New tags become available for future workflows and manual tagging.
Remove a selected tag: Click the X next to a tag to remove it from the action setup. This only removes it from the action configuration, not from any contact record.
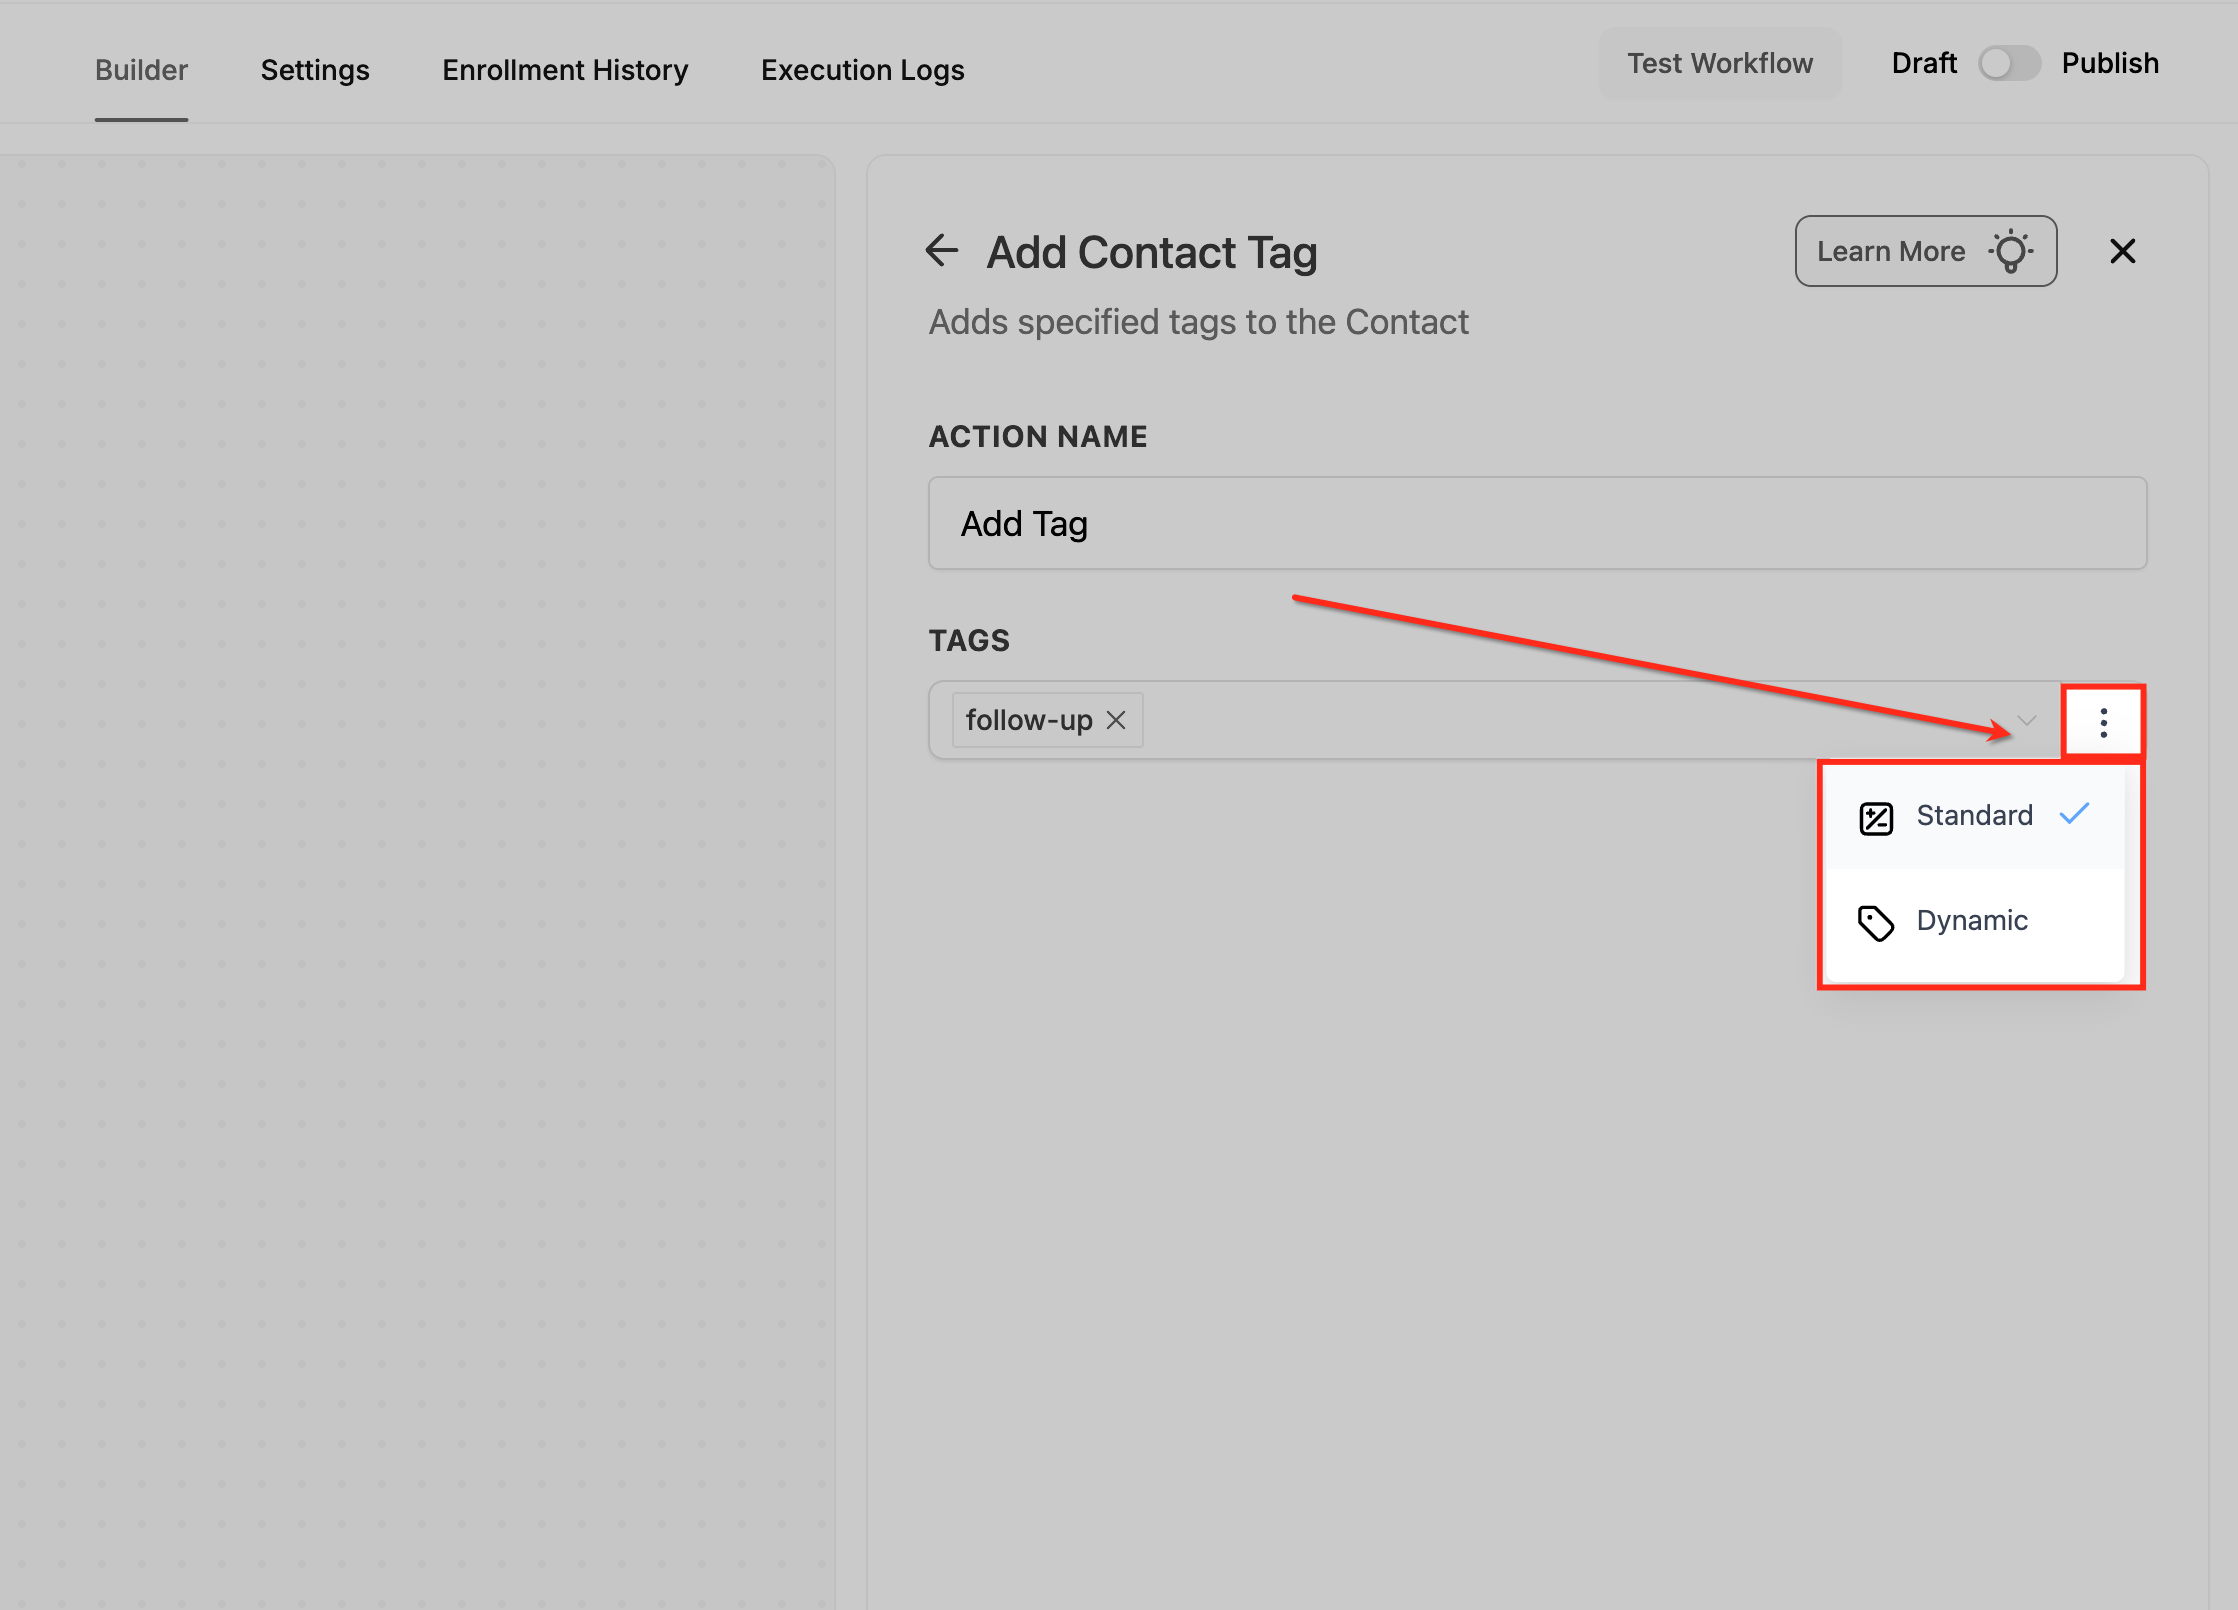
Tag Mode (Standard vs Dynamic): Open the three-dot menu beside the Tags field to switch between Standard (tags applied exactly as selected) and Dynamic (tags generated from workflow data, such as a merge field value).
Inputs it needs: The tag(s) to apply (selected, newly created, or supplied dynamically).
Data it produces: The selected tag(s) added to the enrolled contact. Applying a tag can itself fire other workflows that use the Contact Tag trigger.
When to use it (med-spa example): When a lead books a Botox consultation, add a "Botox Lead" tag so a smart list and a targeted nurture campaign can pick them up automatically.
Notes and limits:
You can add multiple tags in one action.
Tags are case-sensitive: "Botox" and "botox" are treated as separate tags.
This action only adds tags. To remove tags, use the Remove Contact Tag action.
The ability to create new tags depends on the user's permissions.
What it does: Removes one or more specific tags, or all tags, from the enrolled contact's record. Use it to update segmentation as a contact's status or behavior changes.
Configuration and fields:
Field | Description | Required |
|---|---|---|
Action Name | A meaningful name that identifies the action's purpose. | Yes |
Tags | Select the tag(s) to remove from the contact. You can select multiple. | Yes |
Remove All Tags | Toggle on to remove every tag from the contact. When on, the Tags field is disabled. | No |
Inputs it needs: The tag(s) to remove, or the Remove All Tags toggle enabled.
Data it produces: The selected tag(s) (or all tags) removed from the enrolled contact, changing its segmentation and which tag-based automations it qualifies for.
When to use it (med-spa example): A client tagged "Webinar Interested" after registering for a skincare webinar does not attend. Trigger on the no-show and remove the "Webinar Interested" tag so they stop receiving the engaged-attendee follow-up sequence. You might also add a "Missed Webinar" tag for a different follow-up.
Notes and limits:
Pairs well with triggers such as Customer Replied (for example, remove an "Interested" tag when a contact replies "unsubscribe"), Appointment Status Changed, or Survey Submitted.
When Remove All Tags is on, you cannot also specify individual tags.
What it does: Assigns the enrolled contact to one or more team members (Users). With a single user, every contact goes to that person; with multiple users, contacts are distributed using round-robin or a weighted split.
Configuration and fields:
Action Name: A descriptive label, such as "Assign to Front Desk."
Select the Users: Use the dropdown to choose one or more users.
Single User: All contacts are assigned to that one user.
Multiple Users: Contacts rotate between the selected users in round-robin order. For example, with Tom and Jane selected, the first contact goes to Tom, the second to Jane, the third to Tom, and so on.
Split Traffic (when multiple users are selected): Controls how contacts are distributed.
Equally: Distributes evenly among users, the same as round-robin (1:1, 2:2, and so on). This is the default.
Unevenly: Lets you set a custom ratio per user. For example, a 5:2 ratio sends five contacts to User A for every two to User B; User B receives none until User A has received five. With weights Alan 3, Bobby 3, Charlie 1, the first three contacts go to Alan, the next three to Bobby, the seventh to Charlie, then the cycle repeats.
Only Apply to Unassigned Contacts (toggle):
Enabled: Assigns a contact only if it is not already assigned.
Disabled: Reassigns even already-assigned contacts; the new assignment overwrites the previous one.
Standard vs Dynamic User IDs: In the Users field, Standard (the default) shows a dropdown of all users in the sub-account. Dynamic changes the field to a plain text input where you can enter user IDs directly or, more commonly, select a merge field from earlier in the workflow that contains a user ID.
Where to find a User ID manually: Go to Settings > My Staff. The user ID appears below the user's email address.
Assigning users dynamically: Use the Standard picker for simple, in-workflow assignment logic. Use Dynamic when assignment is decided by an external system. A typical dynamic setup:
Create a workflow with an Inbound Webhook trigger, a Find Contact action, and an Assign to User action.
Send a sample webhook from your external system with a user_id parameter and a contact_email parameter, and confirm the test request is received.
Return to the Inbound Webhook trigger, open the successful request, check the field mapping, and save the trigger so its query parameters are available later.
In the Find Contact action, map the Email field to the webhook's contact_email parameter.
In the Assign to User action, switch from Standard to Dynamic and, in the merge-field picker, select the webhook's user_id parameter.
Test under several conditions, then save and publish.
Inputs it needs: The user(s) to assign to, either selected from the picker or supplied as user IDs (Dynamic).
Data it produces: The enrolled contact's "Assigned User" set to the chosen user, which surfaces in contact records and reporting.
When to use it (med-spa example): New consultation leads should be split evenly between two patient coordinators. Select both coordinators, leave Split Traffic on Equally, and enable Only Apply to Unassigned Contacts so existing clients keep their current coordinator.
Notes and limits:
If Only Apply to Unassigned Contacts is off, an already-assigned contact will be reassigned (overwritten) when the action runs.
Round-robin rotates one assignment at a time; Equally split ensures users receive an equal number of assignments over time.
What it does: Unassigns the current user from the enrolled contact, leaving the contact with no assigned user.
Configuration and fields:
Action Name: A descriptive label, such as "Reset User Assignment" or "Clear Assigned User."
There are no other fields to configure. Once named, save the action.
Inputs it needs: None beyond the action name; it operates on the enrolled contact.
Data it produces: The enrolled contact's Assigned User is cleared (the contact becomes unassigned). Assignment history is preserved in activity logs.
When to use it (med-spa example): When an opportunity reaches "Closed Won" or "Closed Lost," remove the assigned coordinator so the client is freed for other workflows and the coordinator's active list reflects only open work.
Notes and limits:
Removing the assigned user does not erase the contact's assignment history.
Can be combined with multiple triggers (such as Task Completed and Opportunity Status Changed).
To reassign immediately after, follow this action with an Assign to User action.
The contact remains in the system, simply without an active assignment, and can be reassigned by any later workflow or trigger. Test before publishing so the action only fires where you intend.
What it does: Manages a contact's Do-Not-Disturb (DND) settings. It can enable or disable DND across all communication channels or specific ones, for either the Inbound or Outbound direction. (This action also appears as "DND Contact.")
Configuration and options:
Action Name: A descriptive label.
DND Direction: Choose Inbound or Outbound.
Outbound controls whether you can send communications to the contact (emails, SMS, calls).
Inbound controls whether incoming calls and SMS from the contact are allowed; use it to block spam callers from cluttering your pipeline.
Enable or Disable: Choose to turn DND on or off.
Channel scope: Apply the change to All Channels or to Selected (specific) Channels only.
The action supports these combinations: set direction to Inbound or Outbound; enable DND for all channels; enable DND for specific channels; disable DND for all channels; disable DND for specific channels.
Inputs it needs: The direction, the enable/disable choice, and the channel scope. It operates on the enrolled contact.
Data it produces: Updated DND flags on the contact for the chosen channels and direction. The change is logged in Conversations and activity logs as "DND Enabled by Workflows" or "DND Disabled by Workflows." (Manual changes log as "by User" and contact-driven changes as "by Contact.")
When to use it (med-spa example): A client texts "STOP promos" but still wants appointment reminders. Add this action to enable DND for SMS marketing only, while leaving email and reminder channels active. For inbound spam, pair the Contact Created trigger with this action set to Inbound, All Channels to block repeat junk calls and texts.
Notes and limits:
When a contact has DND enabled for a channel, the system automatically skips conflicting communication steps in any workflow (for example, it skips email steps for an email-DND contact while still running SMS or task steps).
For SMS and email compliance, enable the automated compliance settings under your Business Profile so opt-out language and sender information are added automatically.
What it does: Adds a note to the enrolled record. In contact-based workflows it adds the note to the contact; in custom-object workflows it adds the note to the custom-object record that enrolled. The note appears under the record's Notes section.
Configuration and options:
Action Name: A descriptive label, such as "Add Notes."
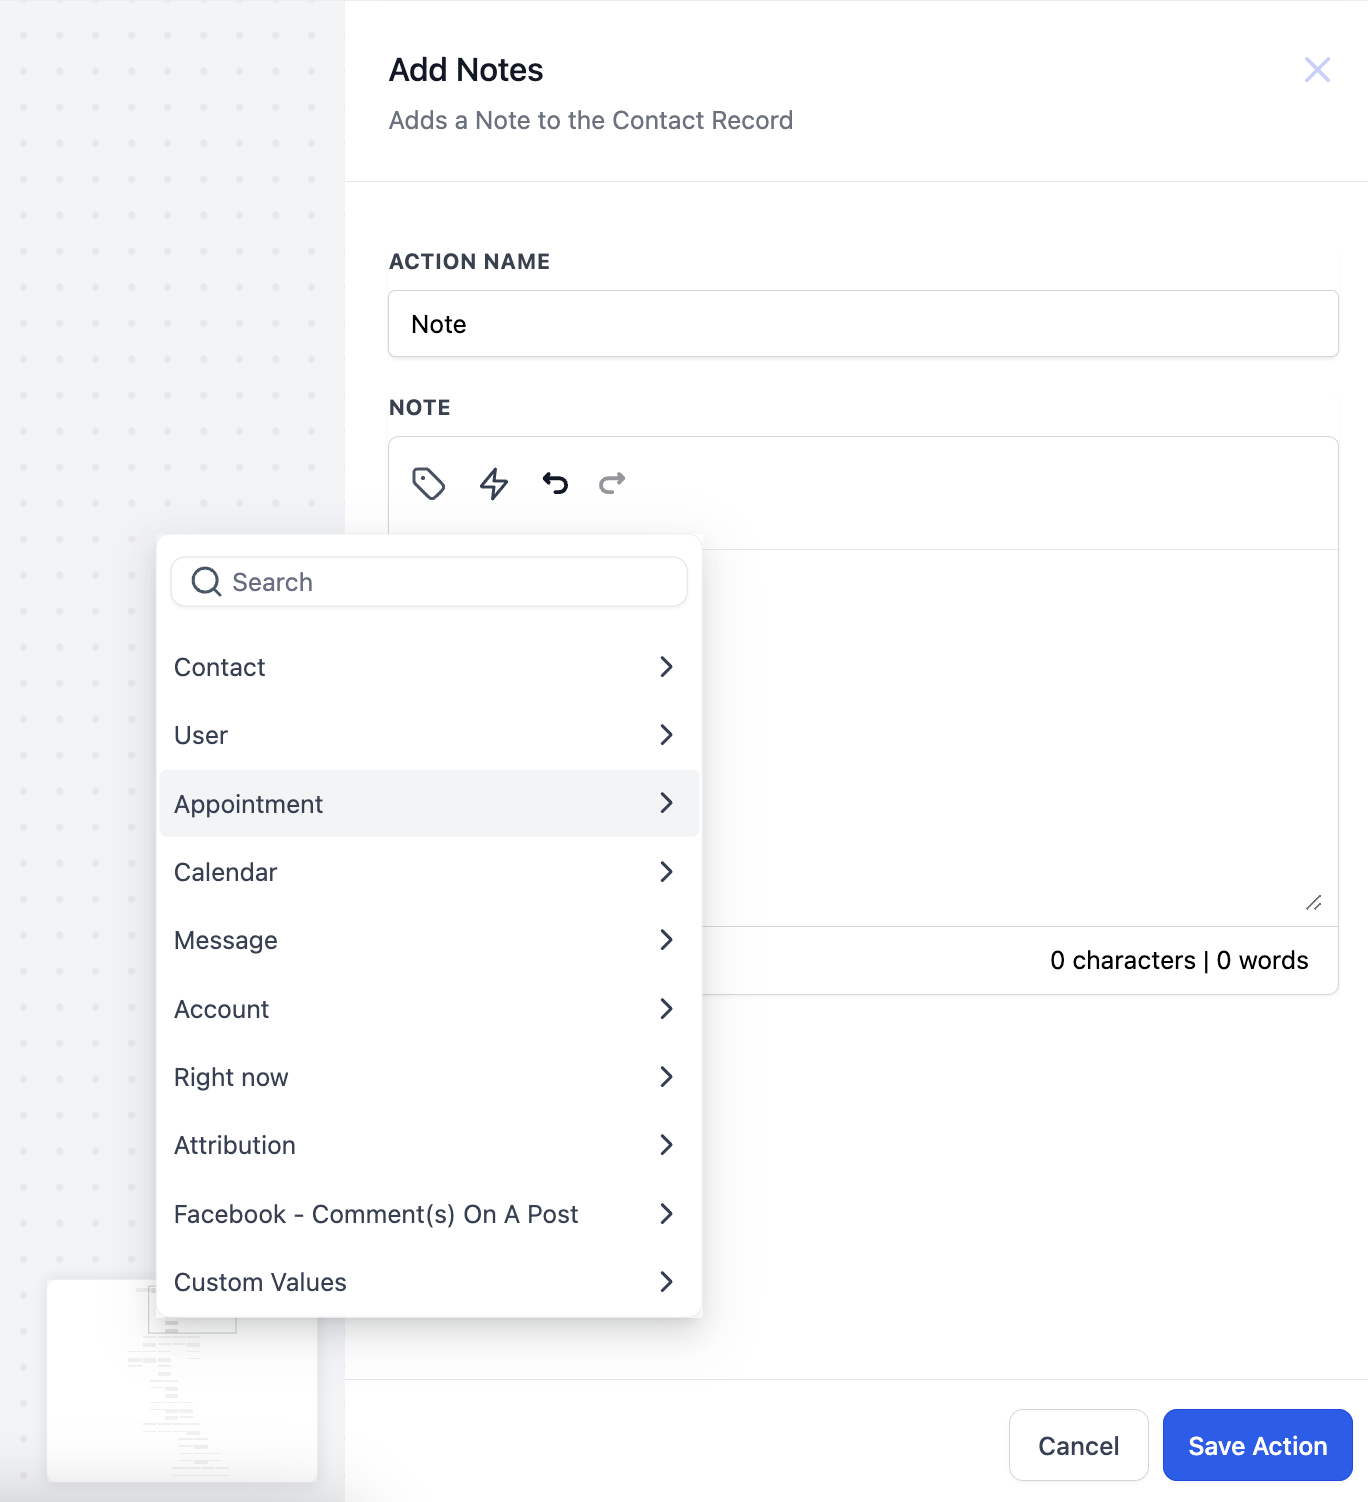
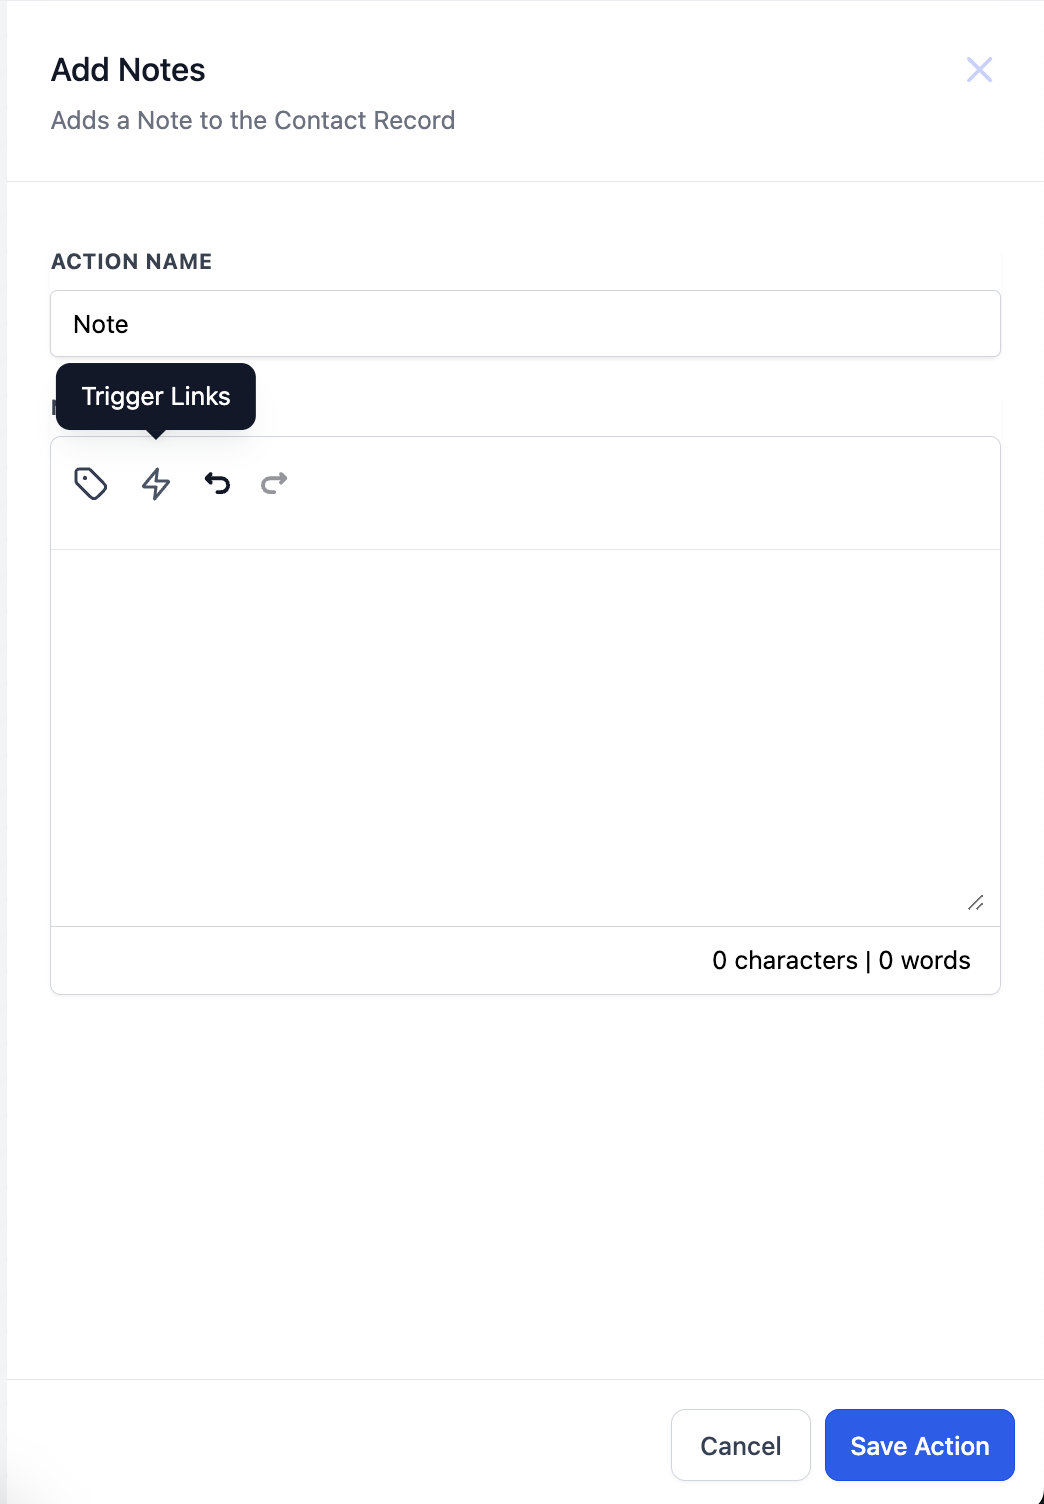
Note (text editor): Type the note text. The editor is a Rich Text editor supporting bold, italics, underline, strikethrough, bulleted and numbered lists, and hyperlinks.
Custom Values: Insert dynamic data with the custom-value picker (for example, contact or appointment details).
Trigger Links: Insert trigger links using the Trigger Links icon.
Undo and Redo: Available within the editor.
Note Title (optional): A title for the note. Supported in contact-based workflows.
Note Color (optional): A color for the note. Supported in contact-based workflows.
Inputs it needs: The note text (plus any custom values, trigger links, optional title, and color).
Data it produces: A new note saved to the enrolled record, visible under its Notes field.
When to use it (med-spa example): When a client books an appointment, add a note capturing the service, provider, and any pre-care instructions using the custom-value picker, so the front desk sees the context at a glance.


Notes and limits:
Note title and note color are not yet supported for notes added to custom-object records.
Both the title and color fields are optional, so existing workflows continue to work unchanged.
What it does: Duplicates the enrolled contact from the current location into another location you specify, so practices that run more than one location can share a client record across them. The original contact in the source location is left untouched while a matching record is created (or updated) in the destination. This is a premium action that incurs an additional charge each time it runs.
Configuration and fields:
Field | Description | Required |
|---|---|---|
Action Name | A descriptive label for the step, such as "Copy Client to Uptown." | Yes |
Select an Account | The destination location the contact is copied into, chosen from the account selector. | Yes |
Add Tags to Account | Selectively assigns specific tags to the copied contact in the destination, chosen from the tag picker. | No |
Copy Tags | When on, replicates all of the original contact's existing tags onto the copy. | No |
Copy Custom Fields | When on, transfers the original contact's custom field values onto the copy. | No |
Update Contact if Already Exists | When on, updates a matching contact already in the destination instead of creating a duplicate; when off, a new record is created. | No |
What gets copied: The core contact information always transfers. Tags transfer when Copy Tags is on (or you can hand-pick tags with Add Tags to Account), and custom field values transfer when Copy Custom Fields is on. The action does not transfer files or documents attached to the contact.
Inputs it needs: The enrolled contact, a destination location selected in Select an Account, and your choices for the tag, custom field, and update-if-exists options.
Data it produces: A copy of the contact created (or, with Update Contact if Already Exists on, an updated record) in the destination location, carrying the contact information plus any tags and custom fields you chose to include. The source contact is unchanged, and the two records are separate copies that are not automatically kept in sync afterward.
When to use it (med-spa example): A practice runs a separate location for each clinic. When a patient at the downtown clinic books a treatment only offered at the sister location uptown, trigger on the booking and copy the patient into the uptown location with Copy Tags and Copy Custom Fields on and Update Contact if Already Exists on, so the uptown team works a complete, de-duplicated patient record. Pair it with triggers such as Contact Added (optionally filtered by a tag), Tag Applied, or Contact Updated to copy VIP or cross-location patients automatically.
Notes and limits:
This is a premium action that incurs an additional charge per execution and may not be available on every plan; confirm availability for your account.
It requires access to both the source and destination locations to select the destination in Select an Account.
It does not transfer files or documents. A copied contact may still reference the original's files, which become inaccessible if the source contact is deleted, so do not delete the source contact when those files matter.
Copying creates a separate record in the destination; the two records are not automatically kept in sync afterward. Use Update Contact if Already Exists to refresh an existing copy rather than create duplicates.
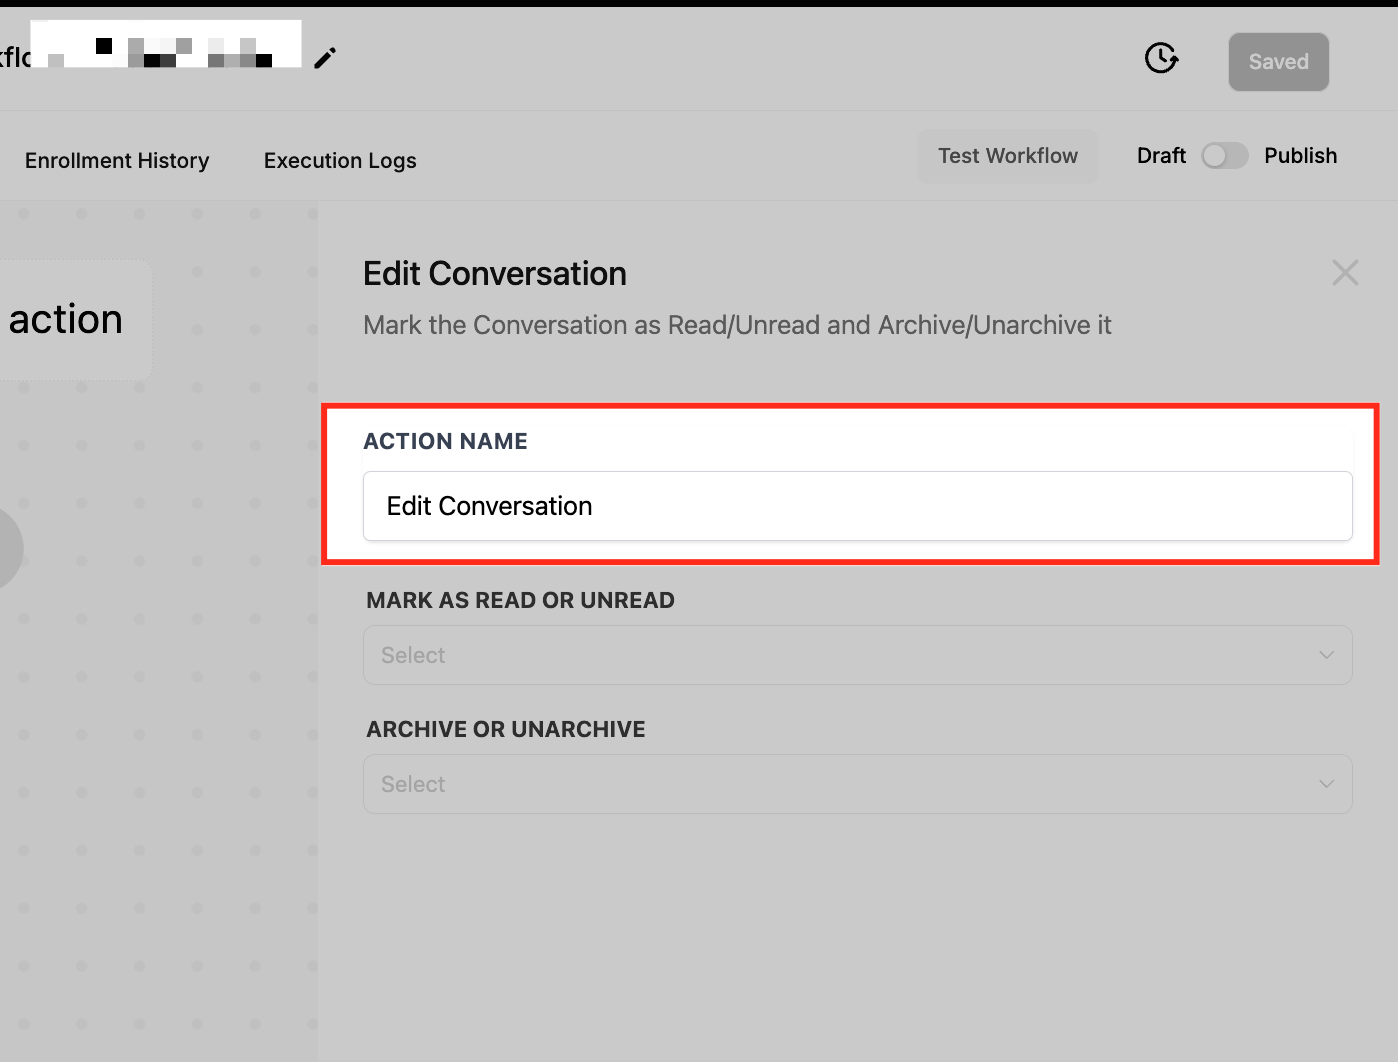
What it does: Updates the status of the enrolled contact's conversation in the inbox by marking it read or unread and archiving or unarchiving it, without anyone opening the thread manually.
Configuration and options:
Action Name: A descriptive label, such as "Mark as Read & Archive."
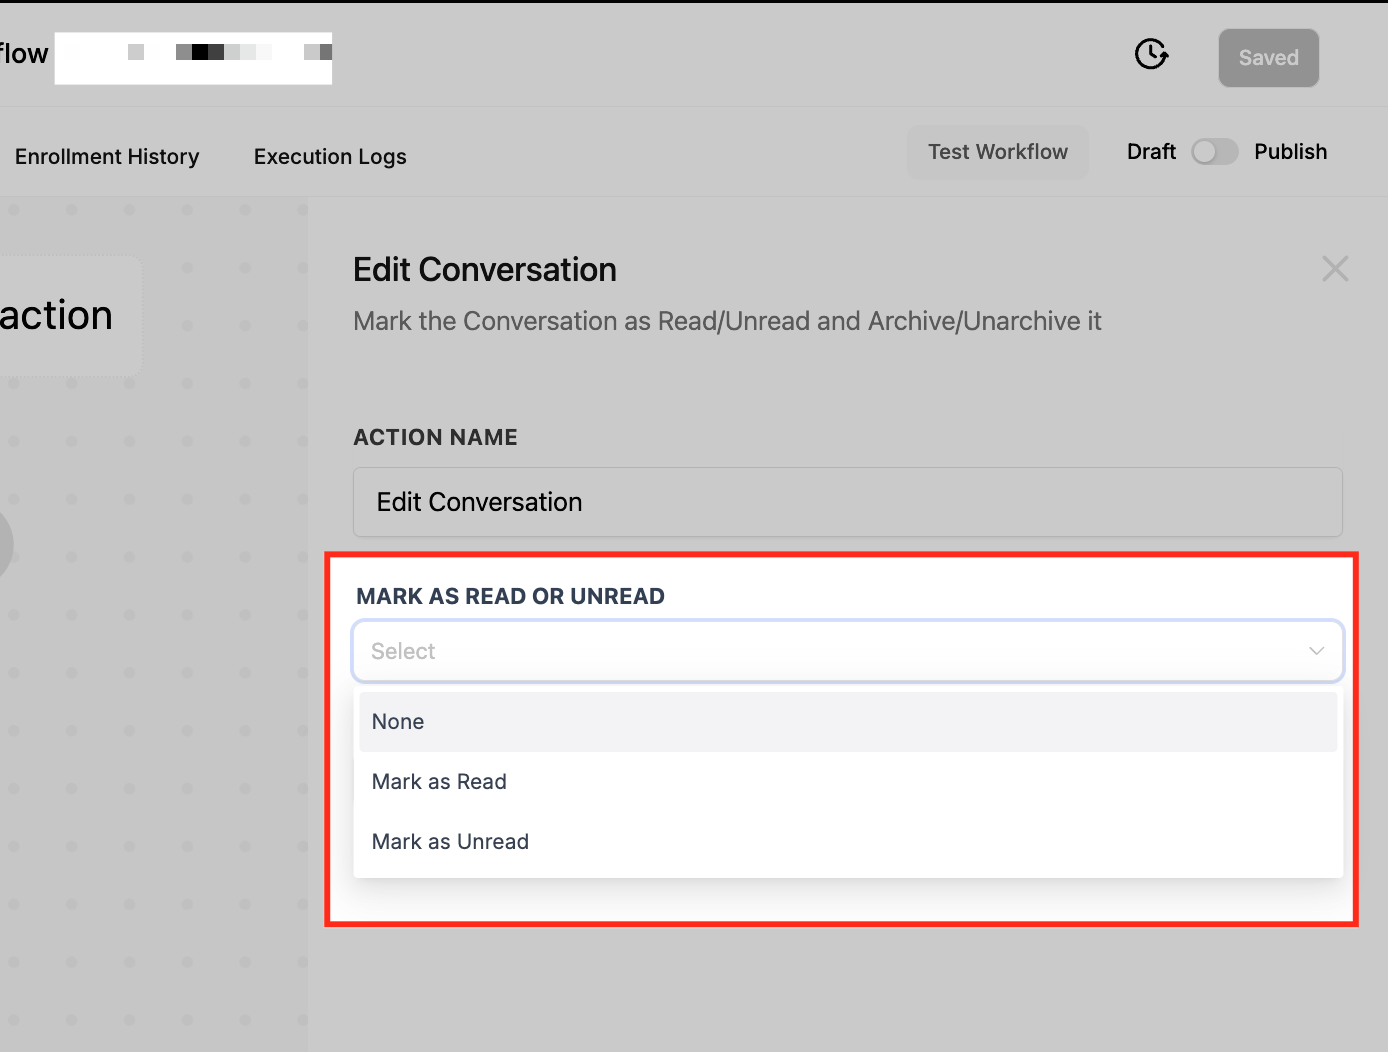
Mark as Read or Unread:
Mark as Read: Clears the conversation's unread state without opening it.
Mark as Unread: Resets the conversation to unread so it stays visible and brings back the notification.
None: Leaves the read/unread status unchanged.
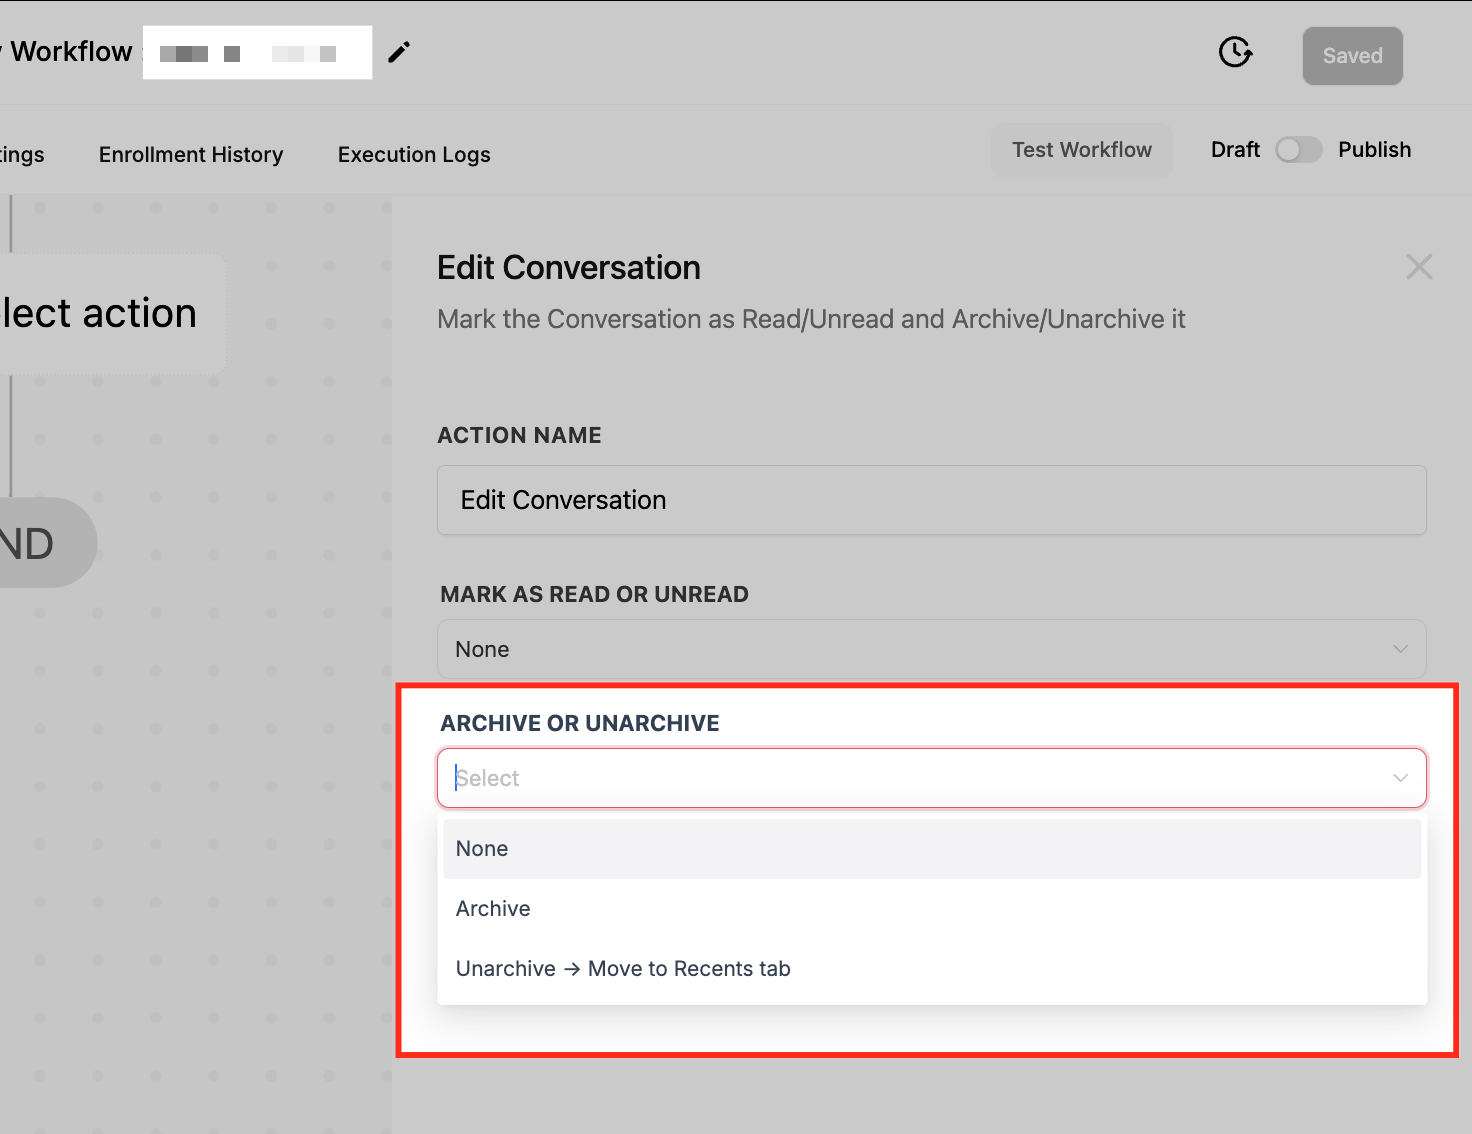
Archive or Unarchive:
Archive: Moves the conversation out of active view to keep the inbox uncluttered.
Unarchive: Restores the conversation to the Recents tab.
None: Leaves the conversation in its current state.
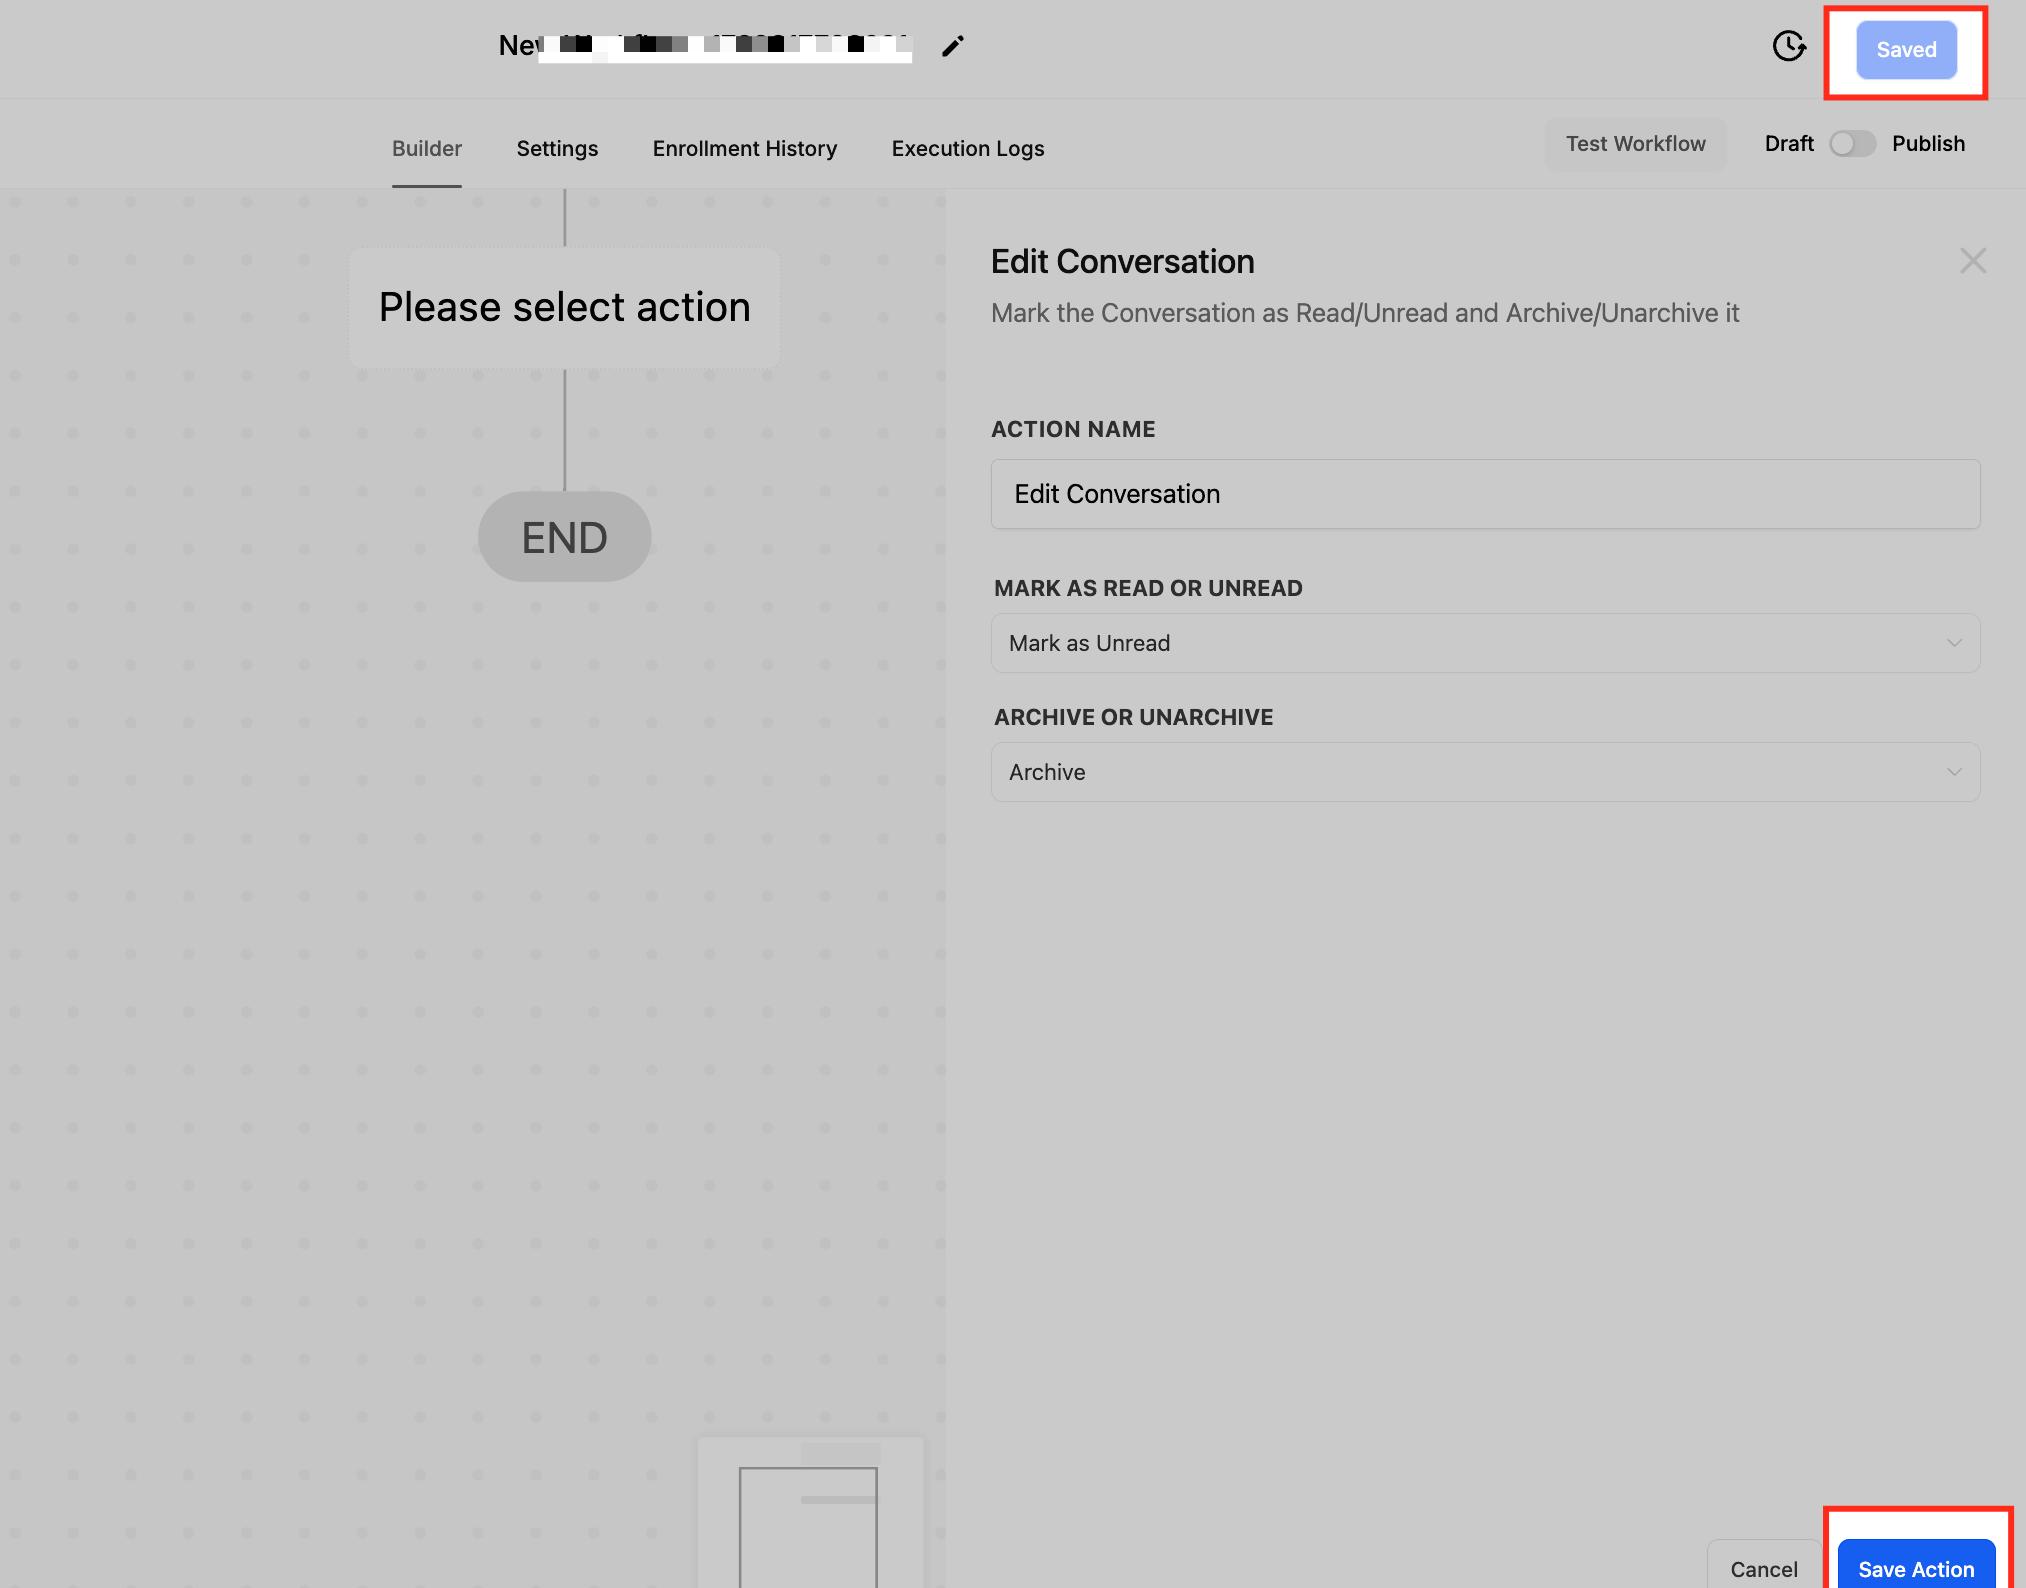
Inputs it needs: The read/unread choice and the archive/unarchive choice. It operates on the enrolled contact's conversation.
Data it produces: The conversation's read state and archive state updated in the Inbox. In supported inbox views, marking as read also removes the unread divider from the thread.
When to use it (med-spa example): After an Appointment Status Changed trigger marks a visit complete, archive the conversation so finished threads drop out of your coordinators' active inbox while remaining searchable.
Notes and limits:
If both options are set to None, the action makes no change.
It does not send a notification; add a separate notification action if needed.
It applies only to the individual conversation triggered within the workflow, not bulk conversations.
What it does: Creates a task with a title, description, assignee, and due date, attached to the enrolled contact, so a team member is prompted to follow up.
Configuration and fields:
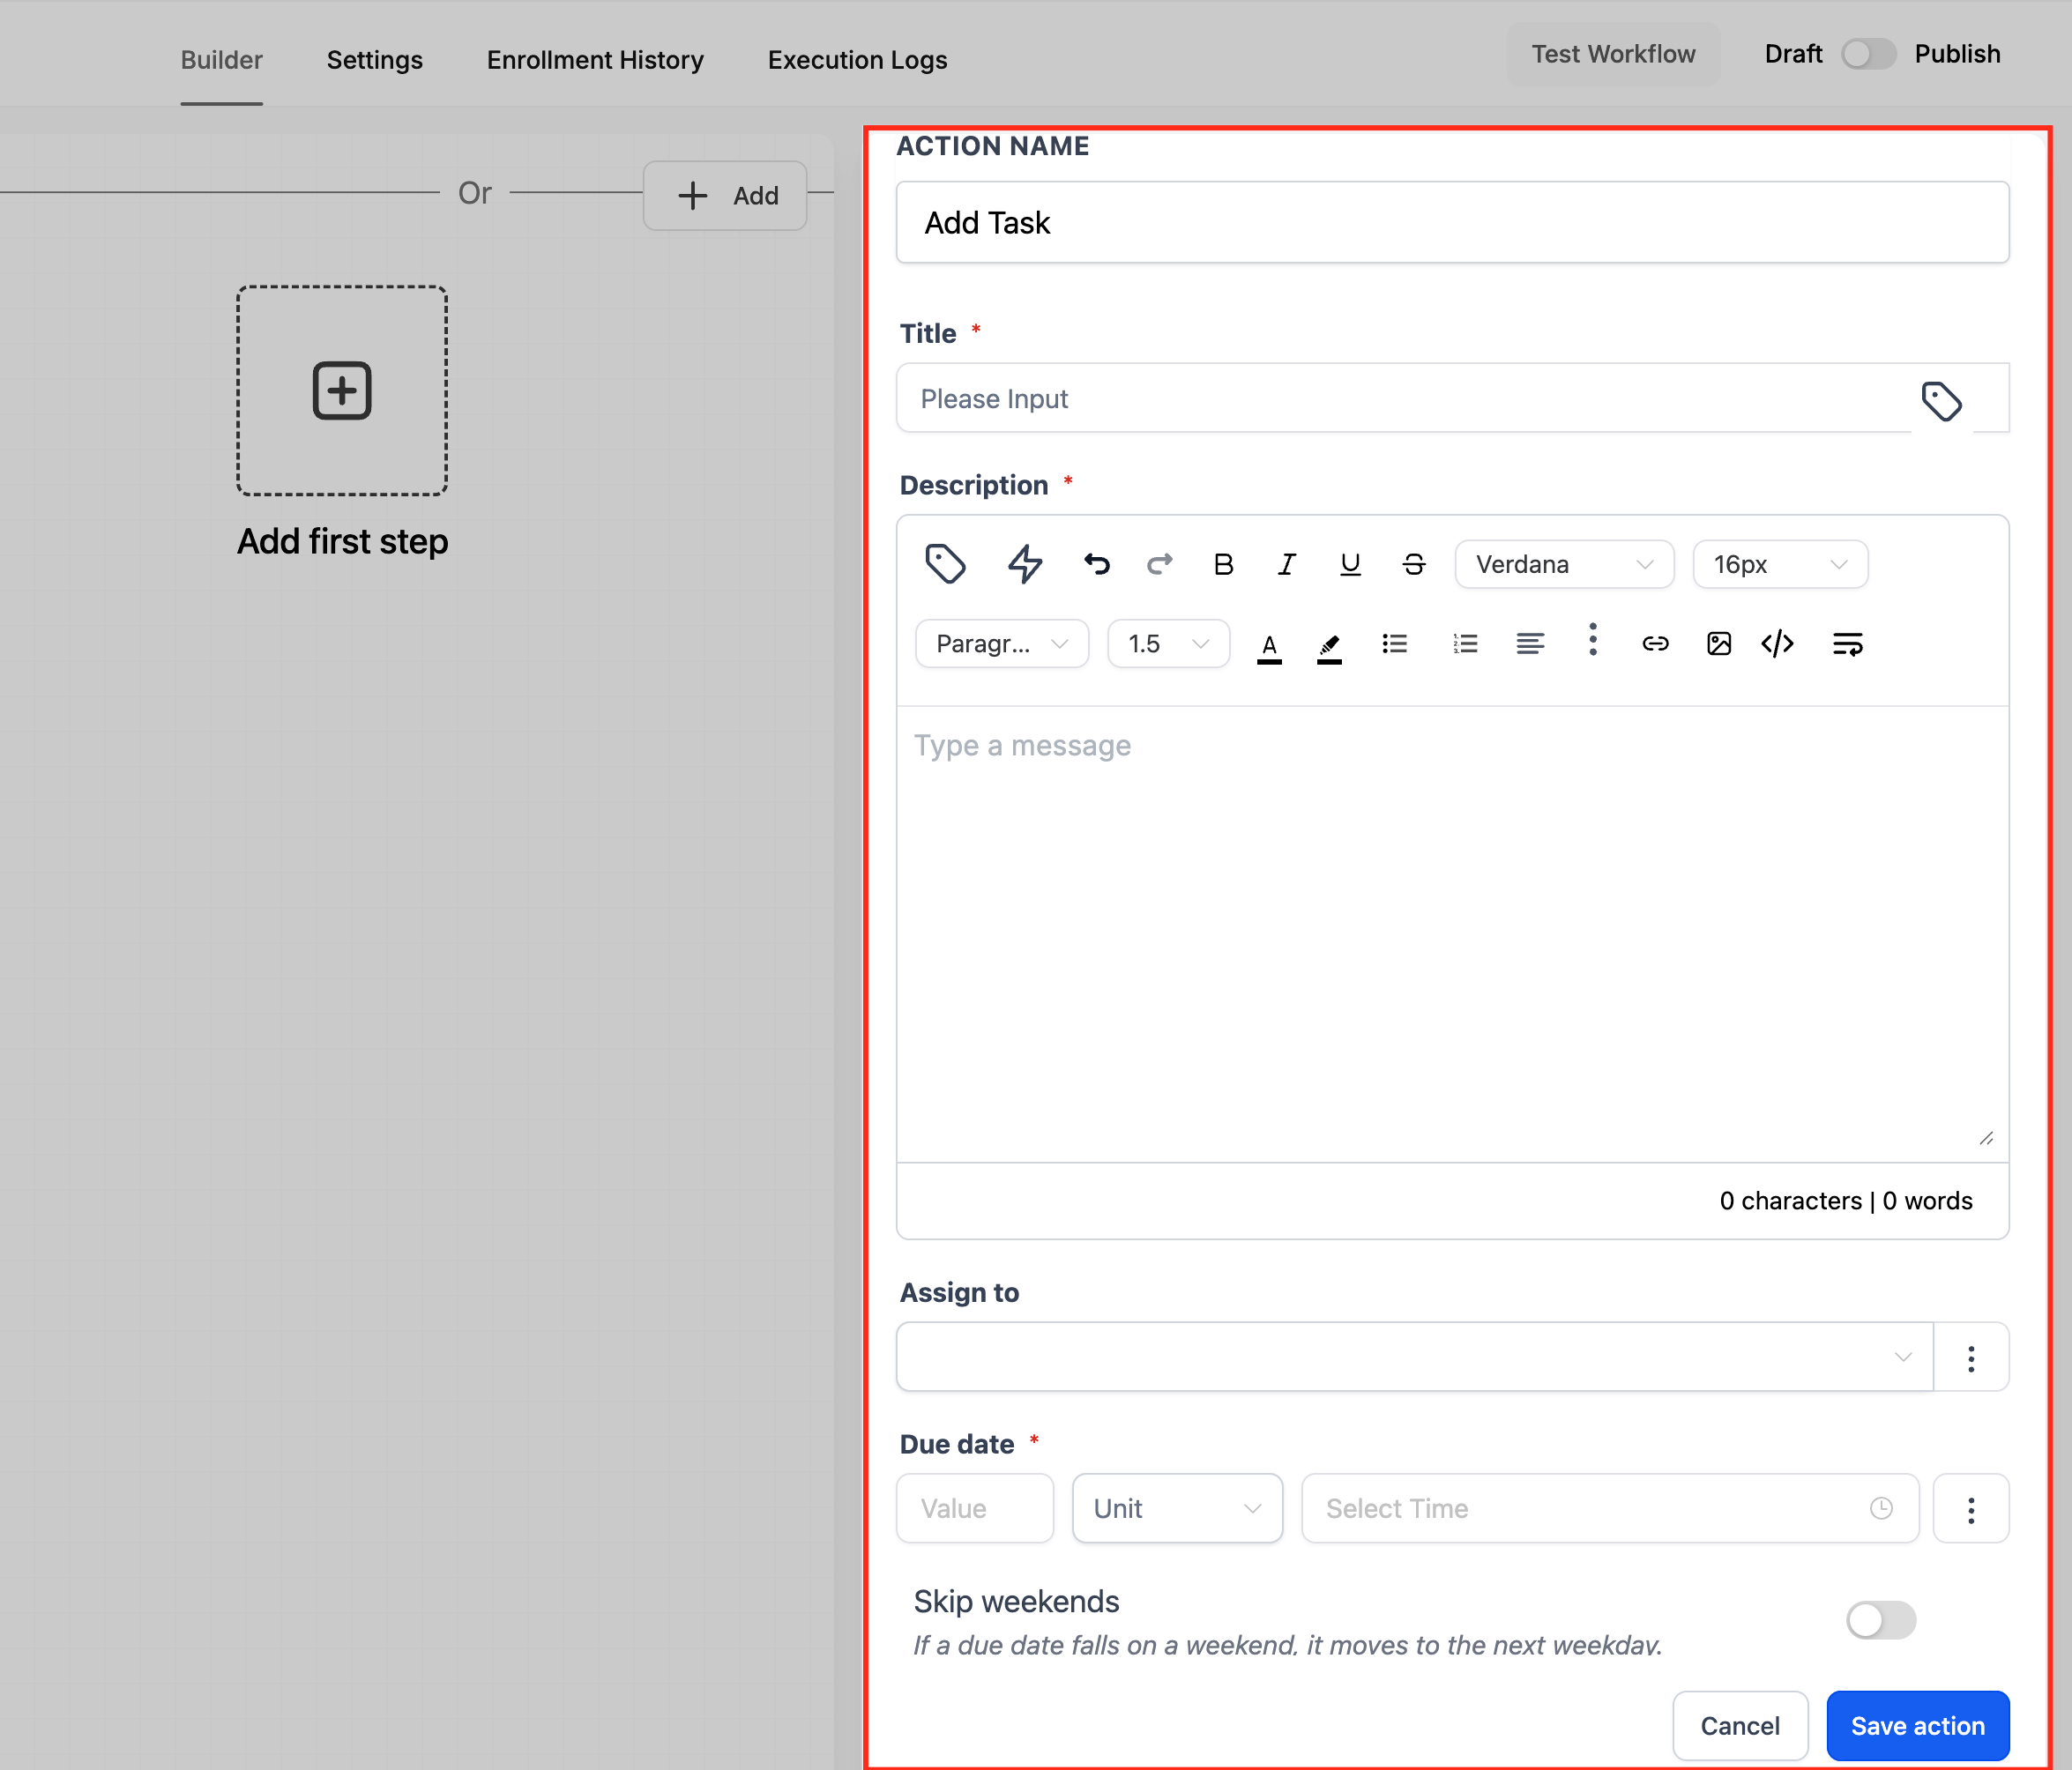
Field | Description | Required |
|---|---|---|
Action Name | A clear label, such as "Add Task - Follow Up." | Yes |
Title | The task title that helps users identify it. | Yes |
Description | Task details, entered with rich text (formatting is preserved). | No |
Assign To | The user who receives the task, chosen from the user list. | Yes |
Due In | A number plus a time unit (days, weeks, months, or years), or "Now" for immediate tasks. | Yes |
Due Time | An optional specific time of day for the due date. | No |
Exclude Weekends | Skips weekends when calculating the due date. | No |
A Due Date Preview shows the evaluated due date and time so you can confirm it before saving.
Inputs it needs: A title, an assignee, and a due-in value at minimum.
Data it produces: A task created and assigned to the chosen user, due at the previewed date and time, linked to the enrolled contact.
When to use it (med-spa example): When a high-value lead requests pricing, add a task titled "Call lead about membership pricing," assign it to the lead coordinator, set Due In to 2 days at 10:30 AM, and enable Exclude Weekends so the reminder lands on a business day.
Notes and limits: The due date follows the preview exactly, including the weekend-skip and due-time settings.
What it does: Permanently removes the enrolled contact and all of its associated data from your account. Deletion is irreversible from within the workflow, so configure it carefully.
Configuration:
Action Name: A descriptive label.
The action has no settings; it simply deletes the contact that is active in the workflow. Save the action once named.
Inputs it needs: None beyond placement in the workflow; it acts on the enrolled contact.
Data it produces: The contact record is deleted along with associated data, including conversations, notes, tasks, and activity history.
When to use it (med-spa example): A spam contact created by a junk inbound text matches your spam-detection conditions. As the final step of a cleanup workflow, delete the contact to keep your database clean.
Notes and limits:
Place Delete Contact at the end of the workflow or branch. Deletion is instantaneous and ends the workflow, so any actions after it will not run.
Triple-check the filter conditions that qualify a contact for deletion, test before leaving the workflow unattended, keep your own backups, and inform relevant team members.
A deleted contact can be restored within two months of deletion from the CRM, but associated data (conversations, notes, tasks, history) is not recovered on restore.
If you only need to stop a contact from progressing, consider the "Remove from Workflow" action instead of deleting.
What it does: Increases or decreases the enrolled contact's engagement score by a set number of points. The engagement score reflects interactions such as email opens, clicks, and other activity, helping you identify and prioritize the most engaged contacts.
Configuration and fields:
Action Name: A descriptive label.
Operation: Choose Add or Subtract points from the current engagement score.
Points: Enter the number of points to add or subtract.
Inputs it needs: The operation (add or subtract) and the number of points.
Data it produces: The enrolled contact's engagement score adjusted up or down by the specified points. Score changes can feed the Contact Engagement Score trigger, which can fire other workflows based on thresholds (using operators such as Equals to, Greater than, Less than, Is empty, and Contains Phrase).
When to use it (med-spa example): When a client clicks a link in your monthly specials email, add 10 points to their engagement score. Contacts who cross a high threshold can then be routed into a VIP offer campaign.
Notes and limits: Combine with engagement-based triggers and segmentation to automate follow-up, reward highly engaged clients, or flag low-engagement contacts for review.
What it does: Subscribes selected users as followers of the enrolled contact so they receive related updates, notifications, and activity alerts for that record.
Configuration and options:
Action Name: A descriptive label.
Followers: Select one or more users from the dropdown to add as followers.
Inputs it needs: The user(s) to add as followers.
Data it produces: The selected users added to the contact's follower list, keeping them informed of activity on the record.
When to use it (med-spa example): When a VIP client's record is created, add the practice owner and the lead injector as followers so both stay aware of that client's appointments and messages without being formally assigned.
Notes and limits: Followers receive updates but are distinct from the assigned user; following does not change ownership of the contact.
What it does: Removes followers from the enrolled contact, stopping selected users (or all followers) from receiving that contact's updates.
Configuration and options:
Action Name: A descriptive label.
Remove All Followers (toggle): Turn on to remove every follower from the contact.
Select Followers: If you are not removing all, choose the specific follower(s) to remove.
Inputs it needs: The follower(s) to remove, or the Remove All Followers toggle enabled.
Data it produces: The selected users (or all followers) removed from the contact's follower list.
When to use it (med-spa example): When a VIP client becomes inactive, remove the owner and injector as followers so their notifications focus only on active clients.
Notes and limits: Removing followers does not affect the assigned user or the contact's other data.
What it does: Automatically merges duplicate contacts while the workflow runs. It checks the enrolled contact against existing records using your chosen match criteria and, when a duplicate is found, merges the newer record into the older one so the workflow continues on the surviving record.
Configuration and fields:
Field | Description |
|---|---|
Action Name | A custom name. Defaults to "Merge Contact." |
Match By (required) | How duplicates are identified: Email (same email address), Phone Number (same phone number), or Email and Phone Number (both must be identical). |
Merge behavior:
The system searches for an existing contact that matches the enrolled contact on the selected Match By criteria.
If a duplicate is found, the newer contact is always merged into the older contact; the older record is preserved as the surviving primary, so historical data is not lost.
If the enrolled contact is the older record, the duplicate is merged into it; if it is the newer record, it is merged into the older duplicate.
If no duplicate is found, the action completes with no changes and the contact moves to the next step as-is.
Inputs it needs: The Match By criterion. It acts on the enrolled contact.
Data it produces: A single surviving (older) contact record carrying the combined data, with the workflow continuing on that record. Merge activity is visible in the Workflow Execution Logs.
When to use it (med-spa example): A client fills out a new lead form with the same email as an existing record. Trigger on Form Submitted and merge by Email so their booking history and notes consolidate onto one record instead of fragmenting across duplicates.
Notes and limits:
Email and Phone Number is typically the strictest match and can reduce unintended merges; the best choice depends on your data quality.
Goals may not work as expected if they were tied to the old contact ID before the merge.
Wait-for-reply steps can be affected if the email or SMS was sent before the merge, since the workflow may still be waiting on the original contact or message context.
Wait-for-email-event steps may not resume as expected, since the awaited event may still be tied to the old contact or message.
Trigger-link waits may fail, since tracking links are generated with the original contact and message IDs before sending.
If the surviving contact is already in the same workflow, the execution being merged ends.
If the surviving contact was previously in the workflow and Allow Re-entry is off, the execution being merged ends.
This action does not replace contact deduplication preferences (which reduce duplicate creation at the source) or the manual Duplicate Management and Merge tool; all can be used together. Test with sample contacts before applying to large workflows.
What it does: Checks the quality of the enrolled contact's email address in real time when the contact reaches this step, so you can route contacts based on whether the email is valid, risky, or invalid before sending.
Configuration:
Action Name: A descriptive label.
The action itself has no match fields to configure; add it, then save. Branching is handled by a separate If/Else condition placed after it.
How to set it up:
Add a relevant trigger, such as Contact Created.
Click +, search for and select Email Verification, then click Save Action.
Place the action before any email step, such as Send Email.
Add an If/Else Condition after Email Verification to branch contacts on the verification result (for example, the isEmailVerified condition).
Route verified contacts toward the email steps; route risky or invalid contacts to an alternate path (such as enabling DND or stopping the workflow).
Test the workflow to confirm contacts follow the expected path, then save and publish.
Inputs it needs: The enrolled contact's email address. Email Verification must be enabled for the account, and the contact must not be excluded from verification.
Data it produces: A verification result (valid, risky, or invalid) available to a following If/Else condition, such as isEmailVerified, which determines the contact's path.
When to use it (med-spa example): Before sending a welcome email to a new lead, verify the address; send only to valid addresses, and route risky or invalid ones to a path that tags them for manual review instead, protecting your sender reputation.
Notes and limits:
Email Verification must be enabled for the account before the action can be used in workflows.
It does not automatically stop the workflow; the outcome depends on the logic you add after it.
A risky email may be deliverable but carries signals that could affect bounce rate or deliverability; consider routing risky contacts to a separate path.
Verification helps reduce sending to poor-quality addresses but does not guarantee inbox placement, which also depends on sender reputation, content, domain setup, and engagement.
What happens if Create Contact runs for someone who already exists? It updates the existing record (matched on an identifying field such as email or phone) instead of creating a duplicate.
Which actions work in a workflow that starts without a contact attached? Create Contact and Find Contact are built for this. They are typically paired with the Inbound Webhook trigger or a premium app-marketplace trigger that carries identifying data such as an email.
What is the difference between Find Contact and Merge Contact? Find Contact locates an existing record and attaches it to the workflow (branching into Contact Found and Contact Not Found). Merge Contact combines a duplicate into the older surviving record. Use Find Contact to act on a known person; use Merge Contact to clean up duplicates.
Can I update or clear standard fields like First Name with Update Contact Field? You can update standard fields. Clearing data, however, currently works only on contact custom fields, not standard fields.
Why am I not seeing my added tags on the contact? Confirm you used Add Contact Tag (not Remove) and remember tags are case-sensitive, so "Botox" and "botox" are stored separately.
Does Remove Assigned User delete the contact's assignment history? No. The contact becomes unassigned, but past assignments remain in the activity logs.
Where do I find a User ID for dynamic assignment? Go to Settings > My Staff. The user ID appears below each user's email address.
Can I recover a contact deleted by the Delete Contact action? The contact record can be restored within two months, but its associated data (conversations, notes, tasks, history) is not recovered on restore. Place Delete Contact at the end of a branch, since it ends the workflow immediately.
Is the Copy Contact action available on my plan? Copy Contact is a premium action for copying a contact into another sub-account or location. Confirm availability for your account, and verify its exact options in the live builder before relying on it.
Where can I confirm that a contact was merged? Review the Workflow Execution Logs, which show merge activity for the action.
