Flow Agents are AI agents you build on a visual canvas by connecting nodes, so you control exactly how the agent starts, thinks, decides, and finishes. You find them in Aesthetix CRM under AI Agents > Agent Studio > Flow Agents. This guide covers the dashboard, the canvas, every node category, editing shortcuts, testing and debugging, and versions.
HIPAA caution: AI features in Aesthetix CRM are not approved for processing Protected Health Information (PHI). Do not put PHI into agent instructions, prompts, global prompts, variables, test messages, files, memory, or Knowledge Bases. Use general practice information only, and test with made-up data.
Flow Agents are a node-based builder where you drag nodes onto a canvas and connect them left to right, starting with a trigger and ending with an action or an end point. Unlike simple rule-based automations, a Flow Agent can interpret input, make contextual decisions, route conversations by AI intent or by rules, and use tools such as Knowledge Base search or API calls.
Managed Agents, built from plain-language instructions, are now the recommended way to create new agents. Flow Agents remain available so you can keep editing and managing agents you already built. Existing Flow Agents keep working, and any triggers already connected to them keep running. Whether to move a Flow Agent to a Managed Agent is up to your team; there is no requirement to migrate right away.
Flow Agents are different from workflows. A workflow follows predefined automation rules. A Flow Agent can interpret input and decide dynamically. They are also different from AI Studio, which builds websites and apps from prompts.
If you are scheduling appointments from a Flow Agent, remember that AI appointment booking works only with native Aesthetix CRM calendars, not EMR calendars.
Visual builder: design behavior on a drag-and-drop canvas with no code.
Hybrid automation: mix AI reasoning with predictable, rule-based steps.
Event-based execution: start agents from chat messages, form submissions, tags, and other events.
Flexible logic: branch with AI intent detection or conditions on variables.
Integrated tools: connect a Knowledge Base, search the web, call APIs, or use external tool servers.
Multi-modal output: generate text, images, audio, or video in one flow.
Structured data collection: capture emails, phone numbers, and selections.
Safe iteration: save drafts, test, and promote versions when ready.
In the left sidebar, click AI Agents, then Agent Studio.
Click the Flow Agents tab to see the list of flow-based agents.
The dashboard lets you view every agent in your account, check status (Draft or Published), see when each was created or last updated, organize agents into folders, create a new agent, and browse templates.
To edit an existing Flow Agent, click its name.
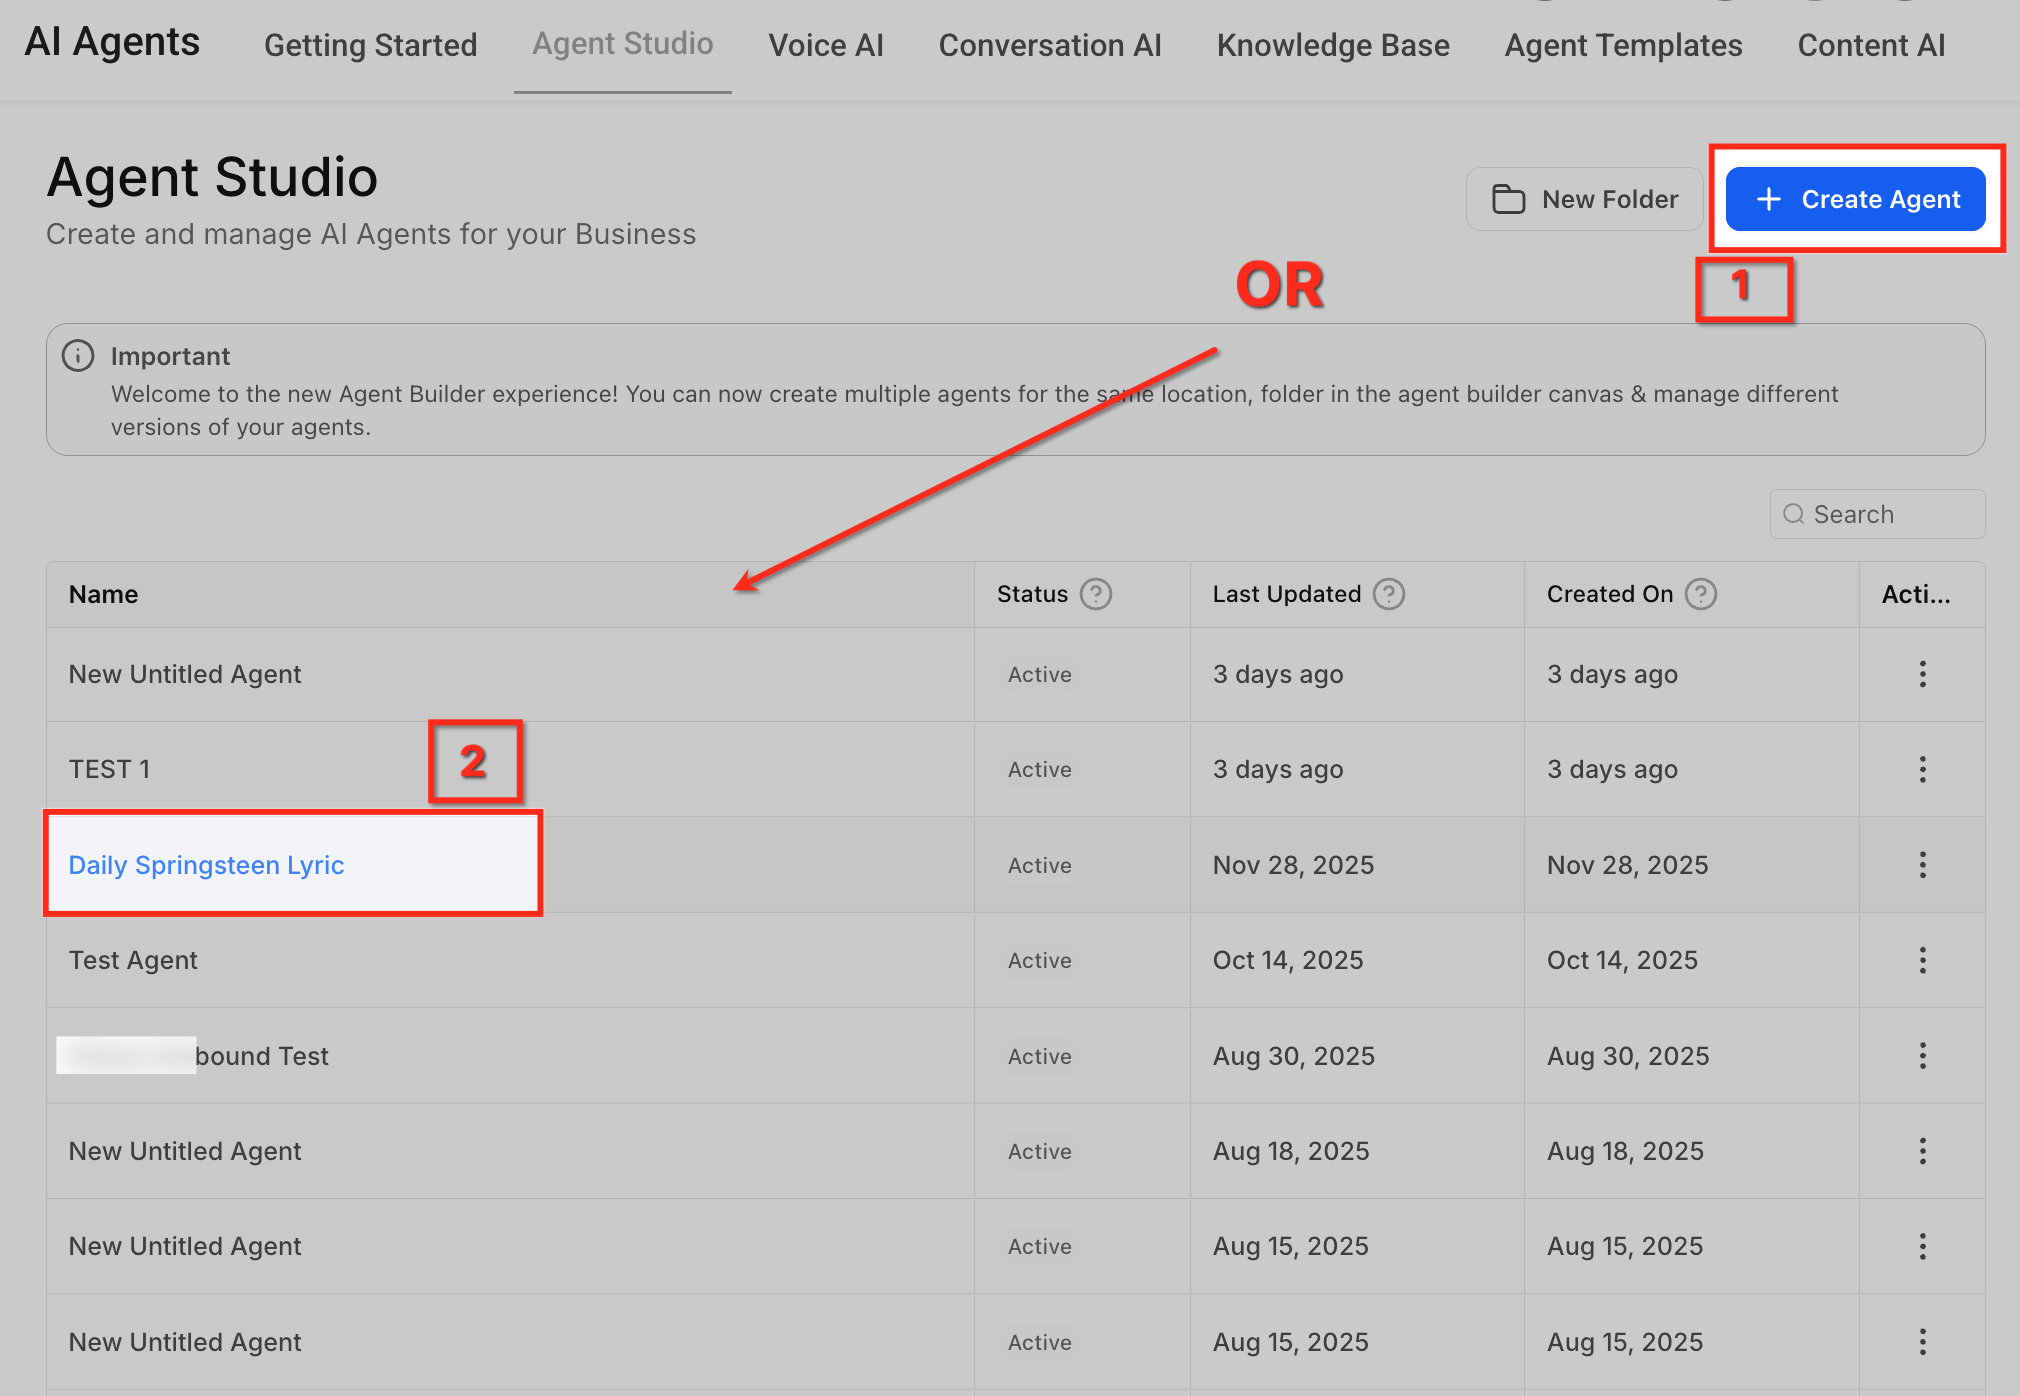
To create one, click + Create Agent in the top-right corner (if your account only offers Managed Agents creation, use the Managed Agents guides instead). You can start from scratch for a blank canvas, or use a template.
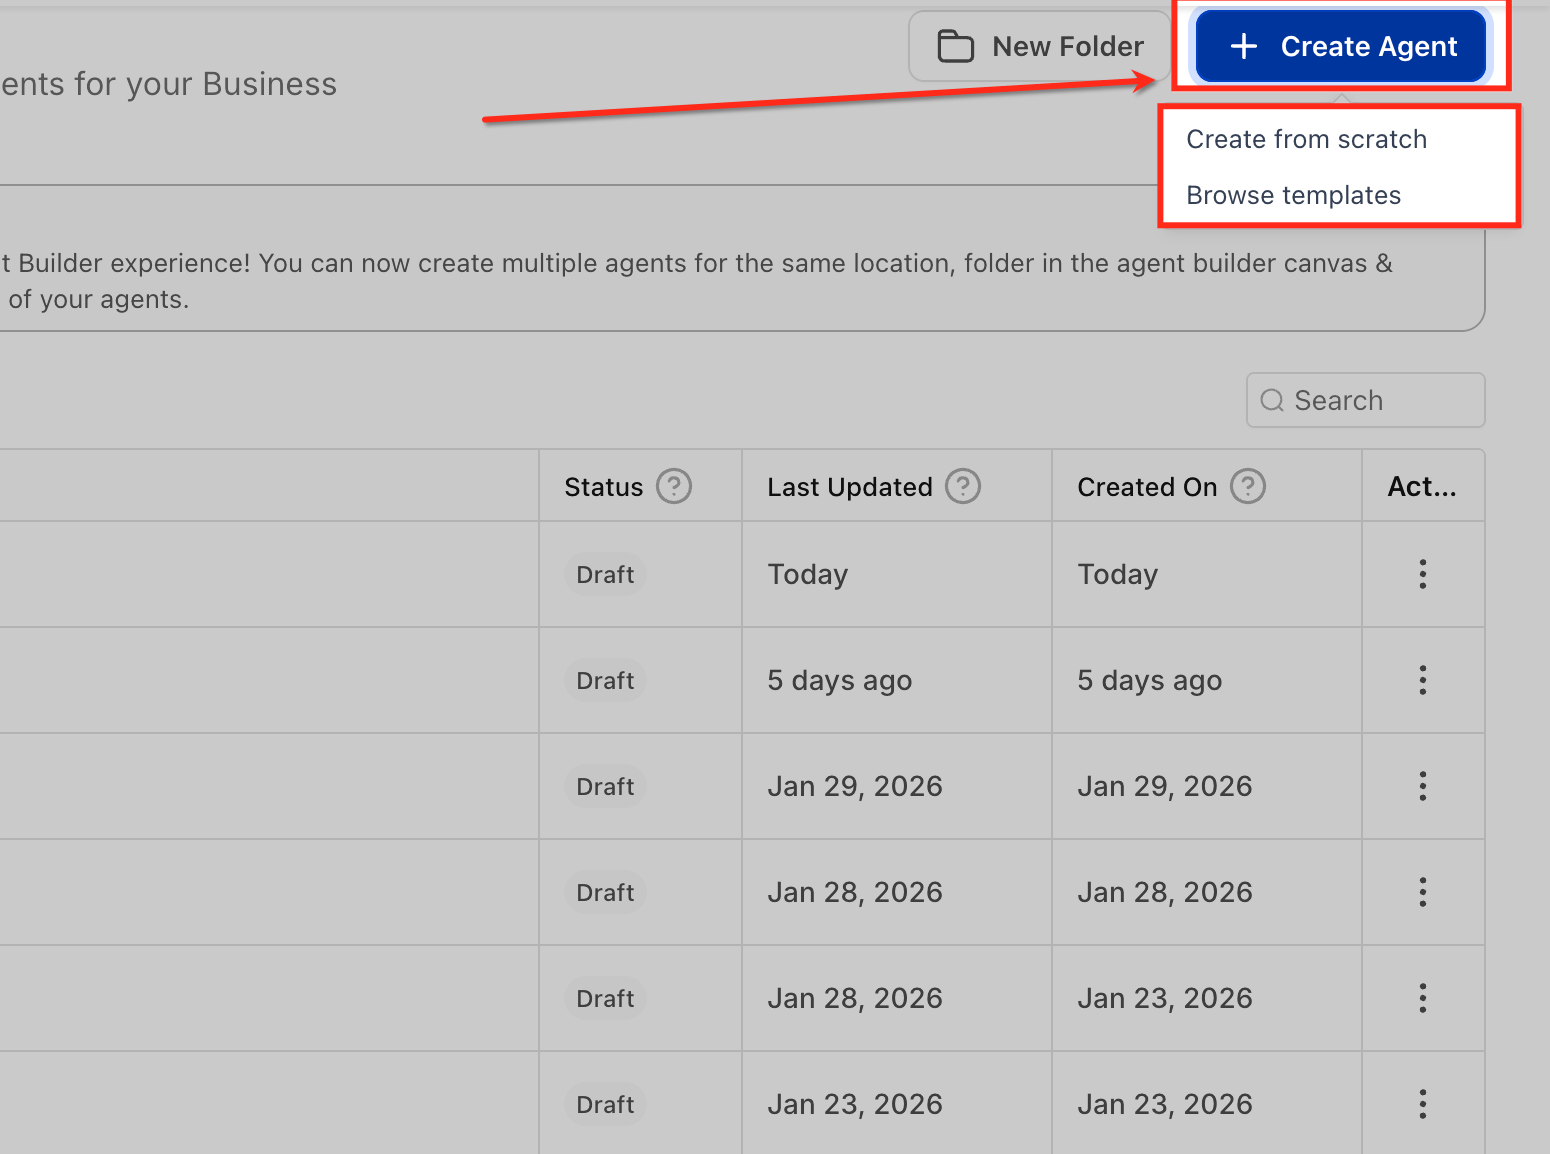
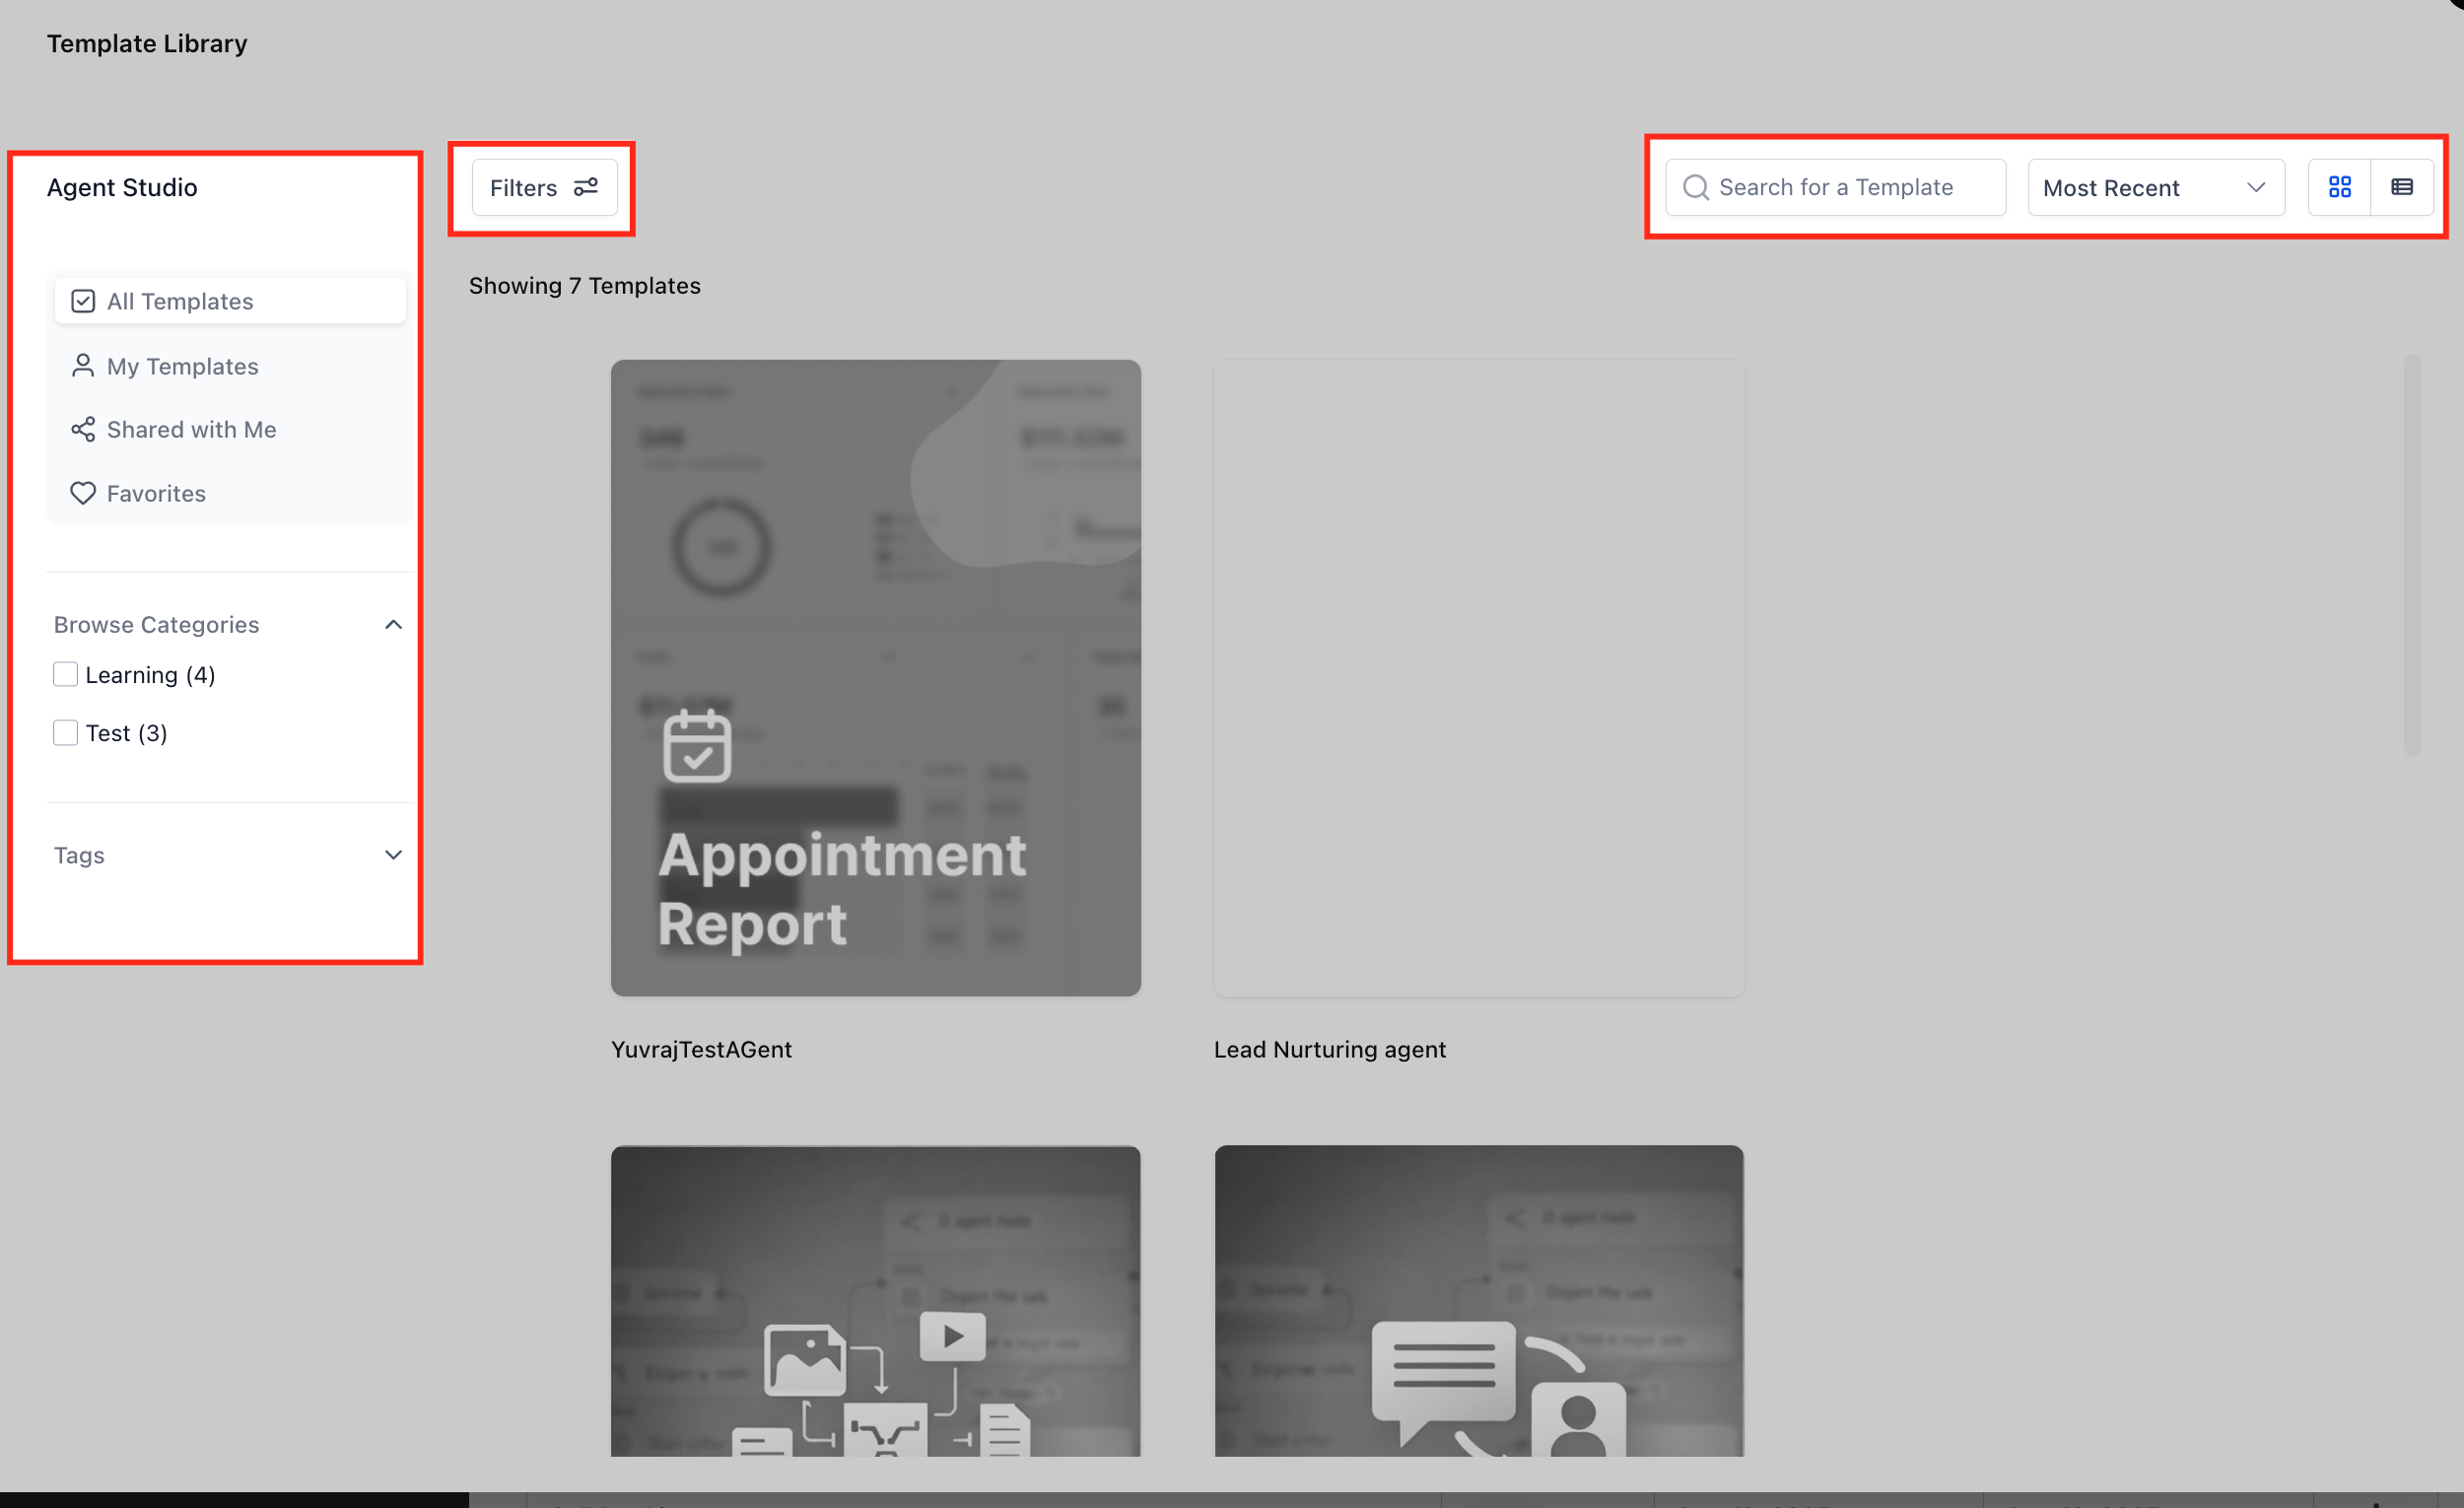
The Template Library holds ready-made agent blueprints for common use cases. You can browse categorized templates, preview how an agent is structured, install one into your account, and modify any part after installing. Templates usually include a trigger, AI nodes, routing logic, and actions. For first-time builders, a template is often the fastest way to see how agents are put together.
The canvas has three areas:
Left panel: the nodes you can add.
Center: the canvas where you arrange and connect nodes.
Right panel: settings for the selected node.
Drag a node to the canvas, drag from the small connector dot on a node to the next node to connect them, and right-click for context menus to rename or reorder items. Connections define how the agent behaves. If an edge has no condition, it simply continues to the next step.
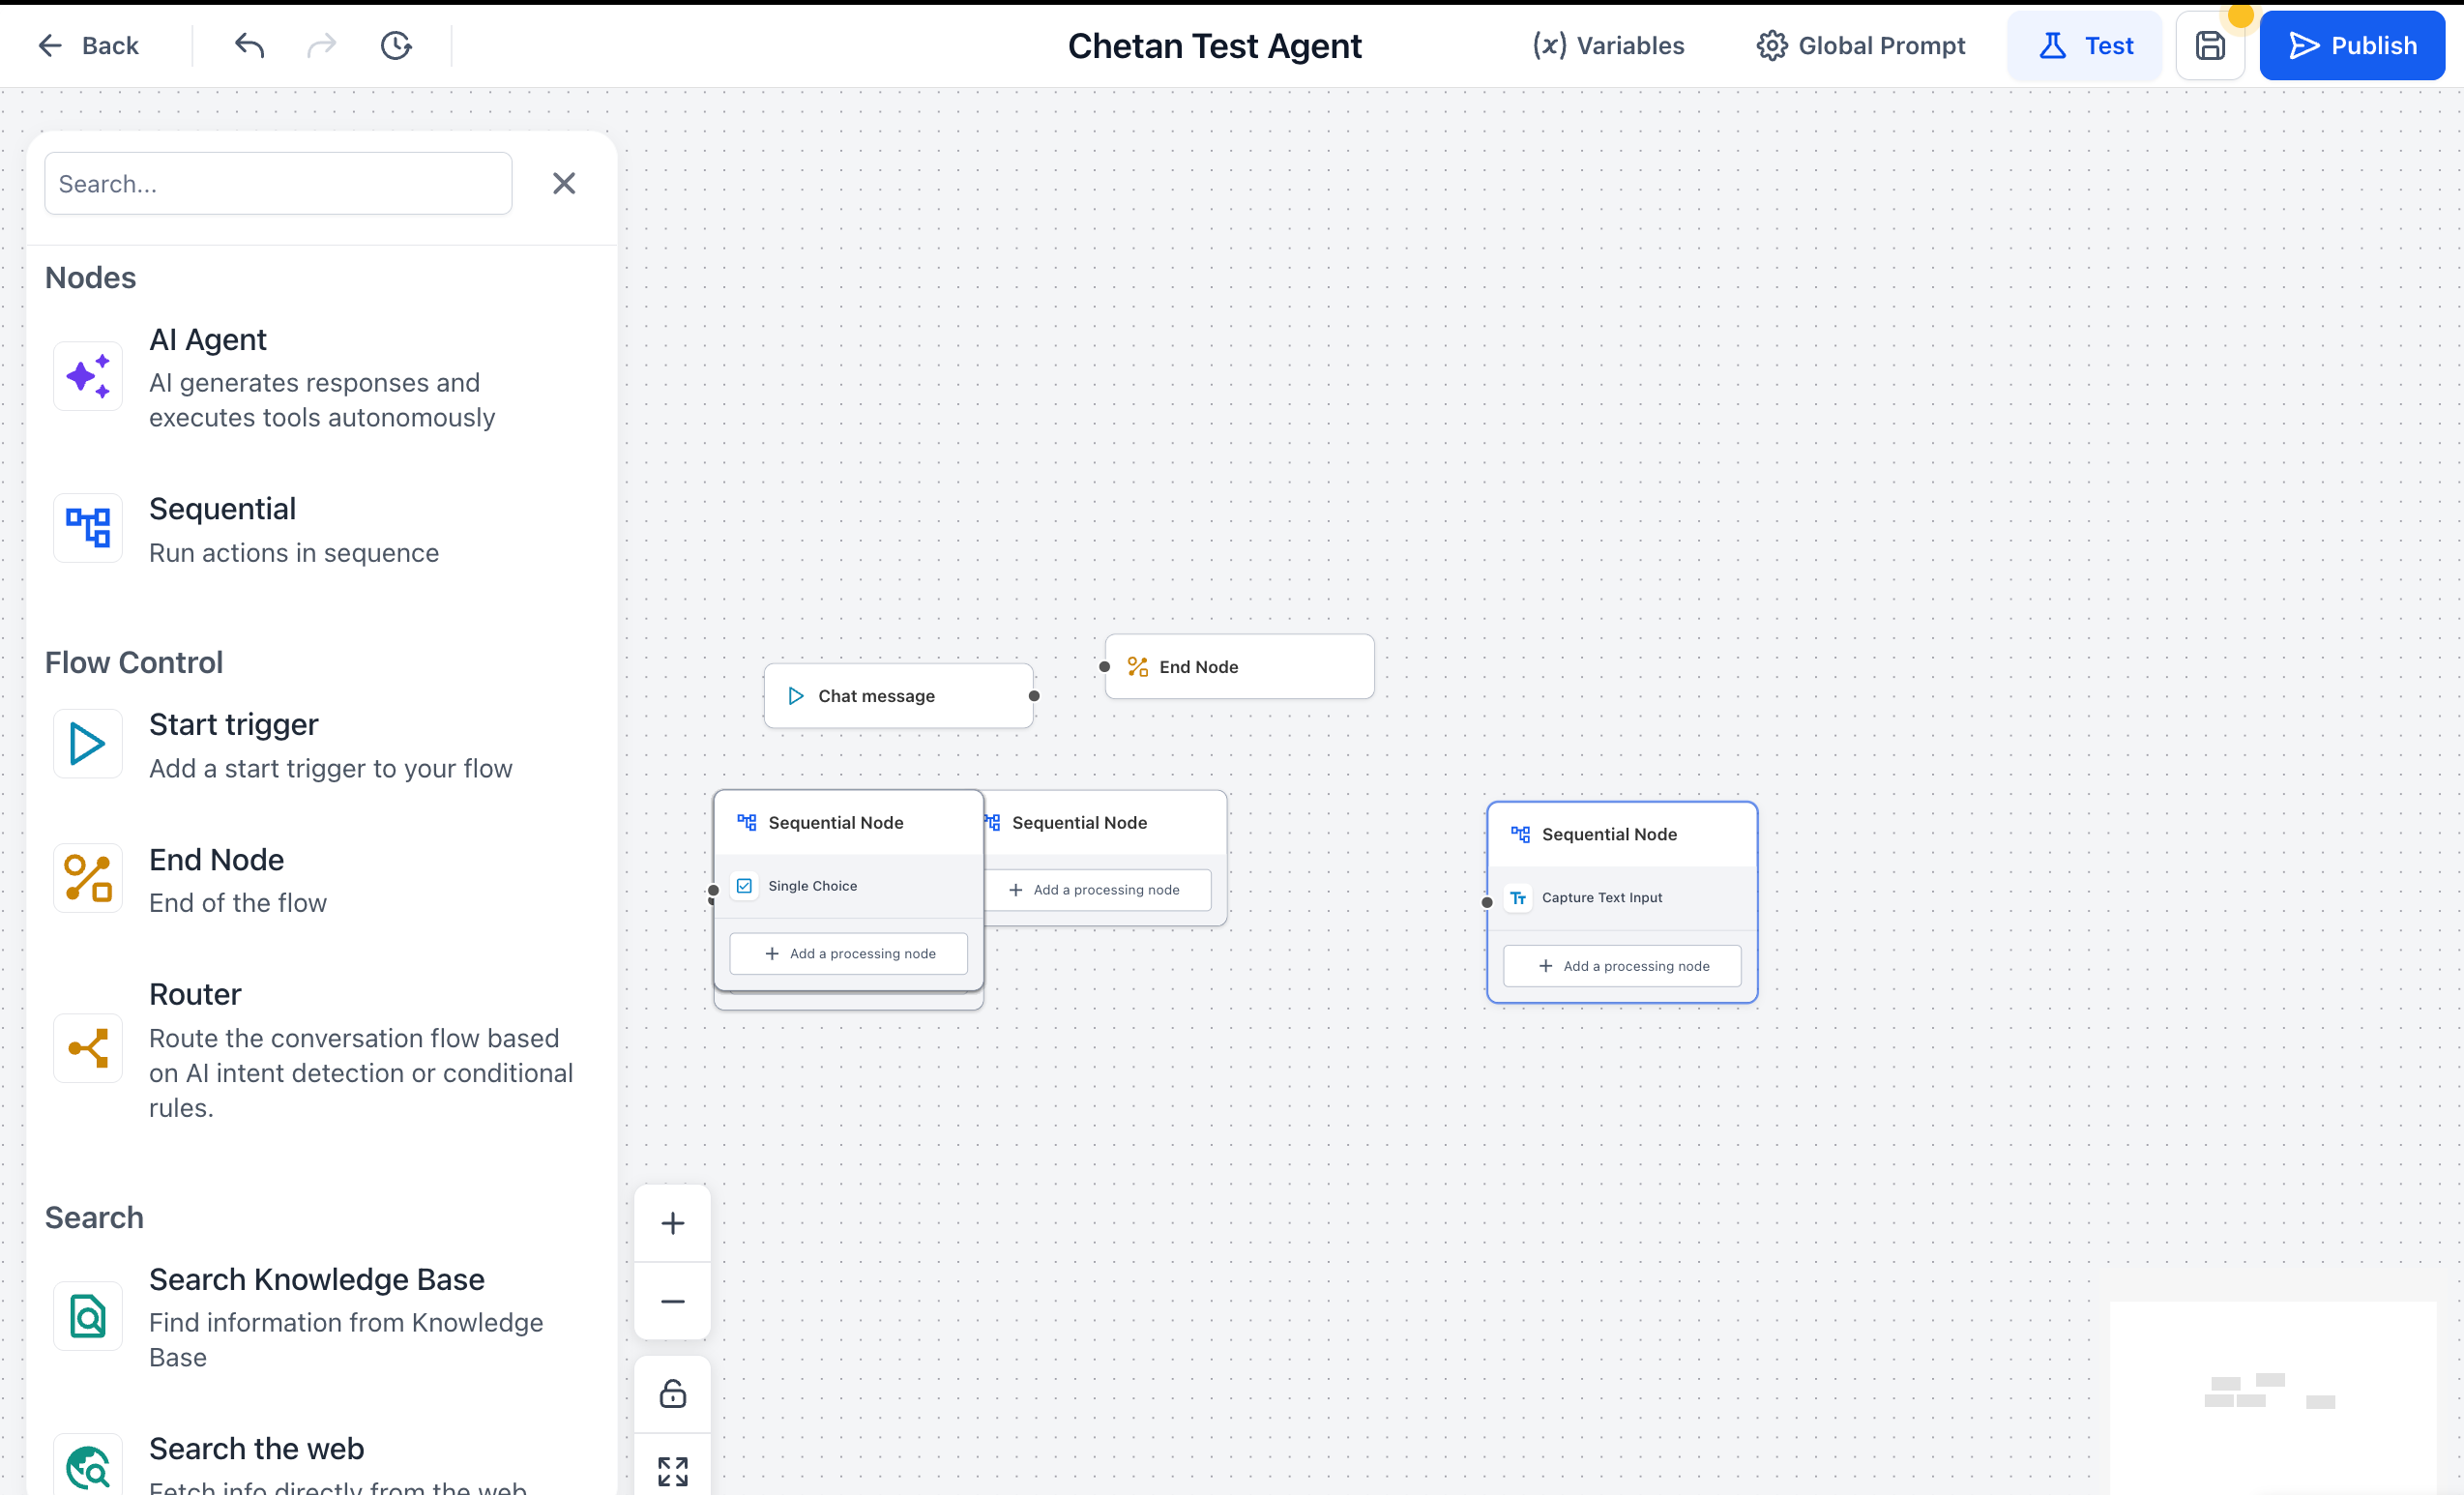
Every agent begins with a Start Trigger, which defines when the agent runs. Common examples are Chat Message, Form Submission, and Lead Tag Added. Without a trigger the agent never executes. See the Flow Agents Triggers, Variables, Workflow Action and Public API guide for every trigger.
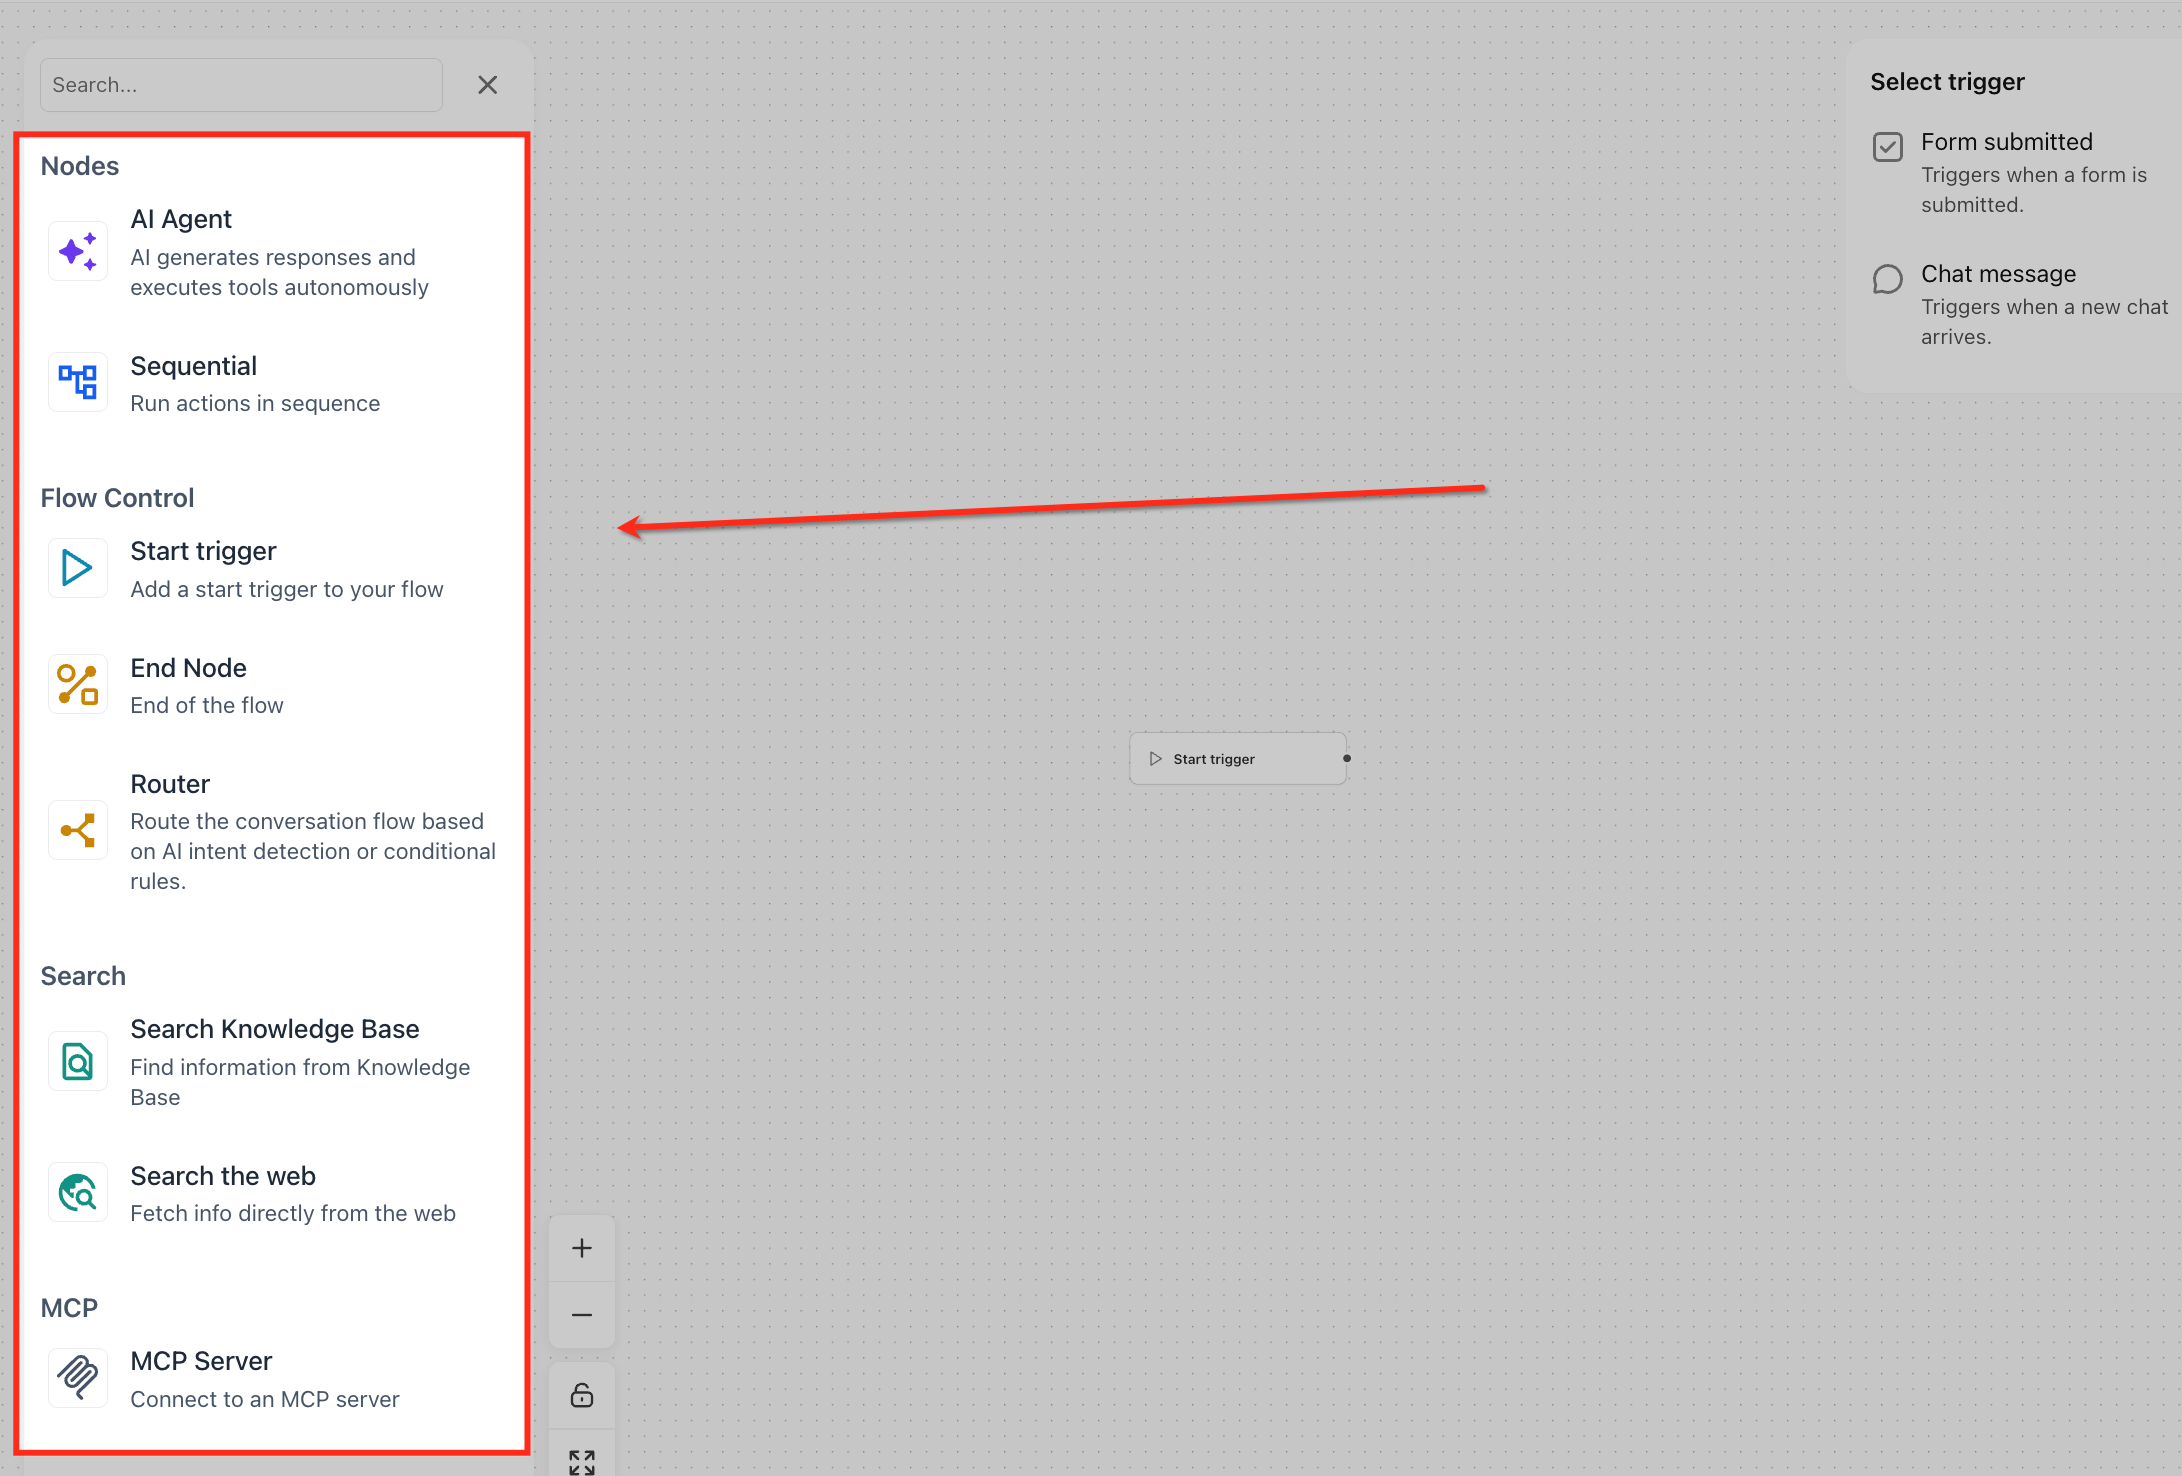
Everything on the canvas is a node, a building block that does one job.
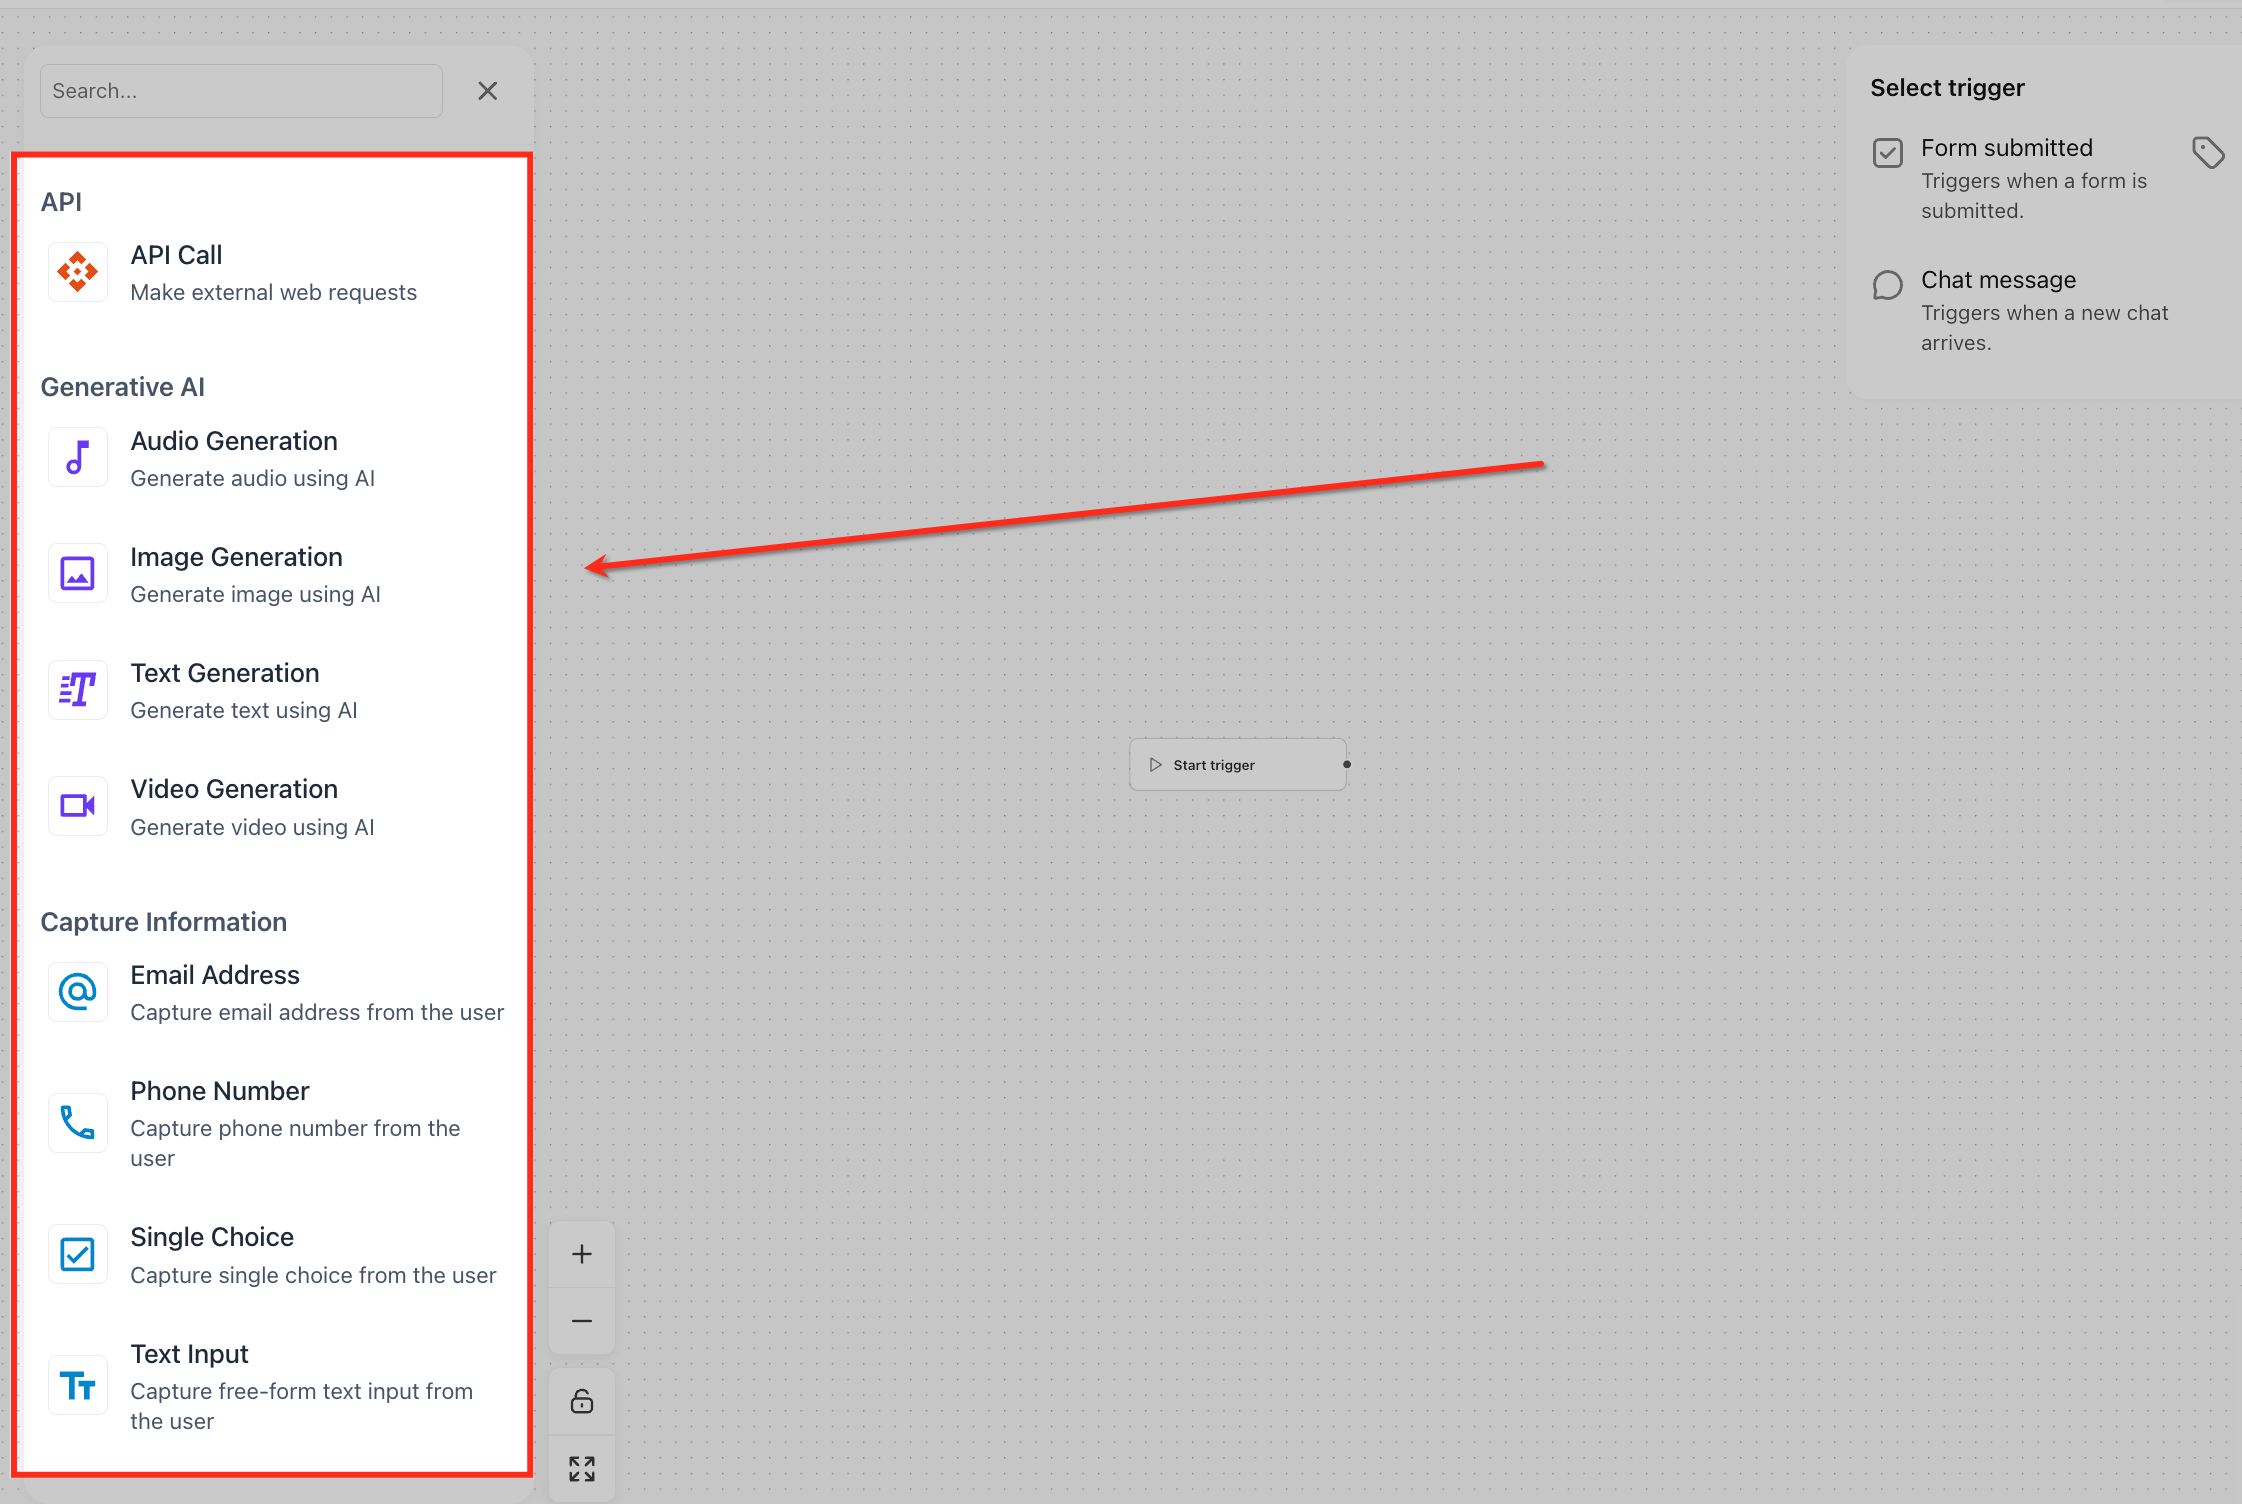
Node | What it does |
|---|---|
AI Agent | The "brain." Reads the incoming input, understands the context, and generates responses from your instructions. It can use tools such as Web Search, Knowledge Base search, generative AI, and external APIs. |
Sequential | Groups steps that must run in a fixed order, such as collecting an email and then sending a confirmation. Good for rule-based actions like API calls, validation, or webhook triggers. |
Router | Chooses between paths using conditions or AI-detected intent, like a decision point (support goes one way, sales another). |
End Node | Marks where execution stops. Once the flow reaches it, the interaction is complete. |
Search Knowledge Base | Looks up information in your connected Knowledge Base. |
Search Web | Gathers information from online sources when public or current data is needed. |
MCP Server | Connects the agent to supported external tool servers for specialized actions. |
API Call | Sends or receives data from other applications. |
Audio Generation | Generates spoken audio from instructions in the flow. |
Image Generation | Creates images from descriptive prompts. |
Text Generation | Produces messages, summaries, or structured written responses. |
Email Address | Collects an email address in a structured format. |
Phone Number | Collects a phone number in a standardized format. |
Single Choice | Presents predefined options for the user to pick from. |
Text Input | Collects open-ended responses. |
Tool nodes also exist for use inside agents: LLM (generates context-aware responses; configure prompts, parameters, and output handling), MCP tool (external tools through the Model Context Protocol), API tool (third-party services through APIs), Knowledge Base tool (answers from uploaded documents or stored information), and Web Search tool (fresh information from the internet). See the Flow Agents AI Agent Node, Knowledge Base, Web Search, API Call and Actions Tools guide for each.
Rule-based edges: instead of separate router blocks, edges themselves can hold logic. Write simple expressions such as orderTotal > 500 or use AI intent matching to decide which downstream node fires.
At the top of the builder, the Global Prompt holds overarching instructions that apply to every interaction: tone, personality, and rules. For a practice, this is where you put rules like "Be warm and concise. Never give medical advice or discuss individual treatment outcomes. Offer to connect the person with our team."
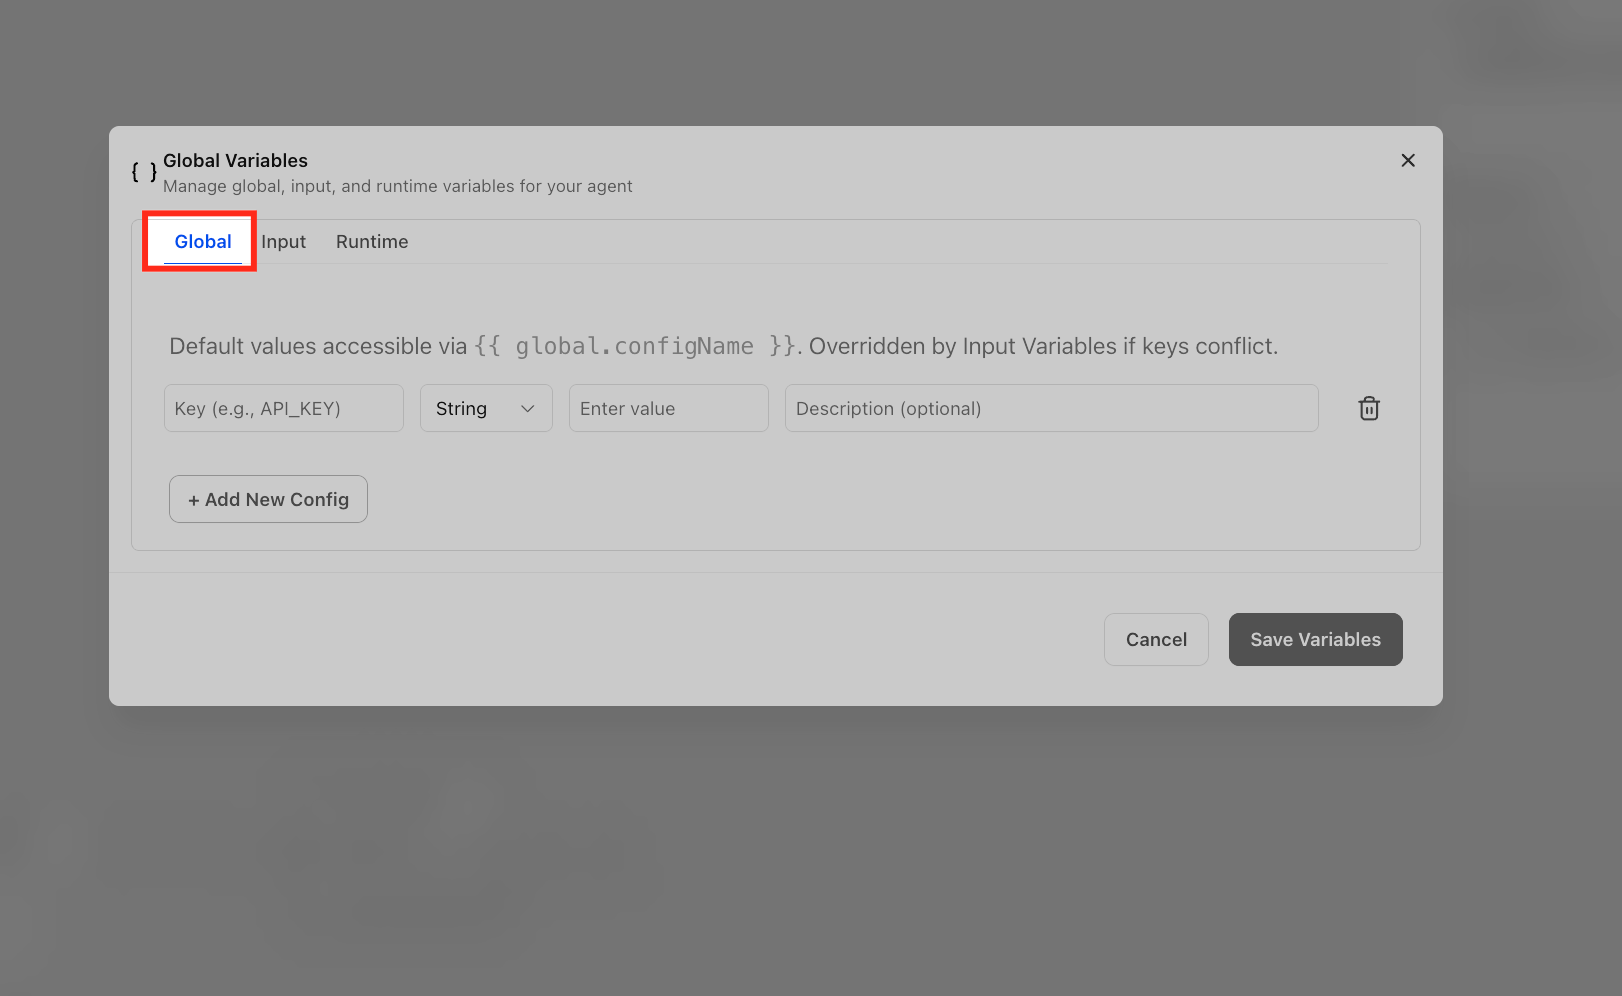
Variables are reusable placeholders that store information. Define a value once and reference it throughout the agent, for example the practice name used consistently across replies. Click Variables at the top and add values under the Global tab. Common uses: storing constants, passing user-specific data, and personalizing responses. Variable types include global, runtime, and input variables. Runtime values such as a location ID or user ID can be passed from the calling app or chat session. Do not store secrets such as API keys in places that other users can read, and never store PHI in variables.
Go to AI Agents > Agent Studio > Flow Agents and click + Create Agent.
Drag an AI Agent node onto the canvas.
Click the node and choose a model from the Model dropdown, then write a Prompt. Example: "You are a helpful assistant for our practice. Answer questions clearly and politely. If you do not know the answer, ask for more details."
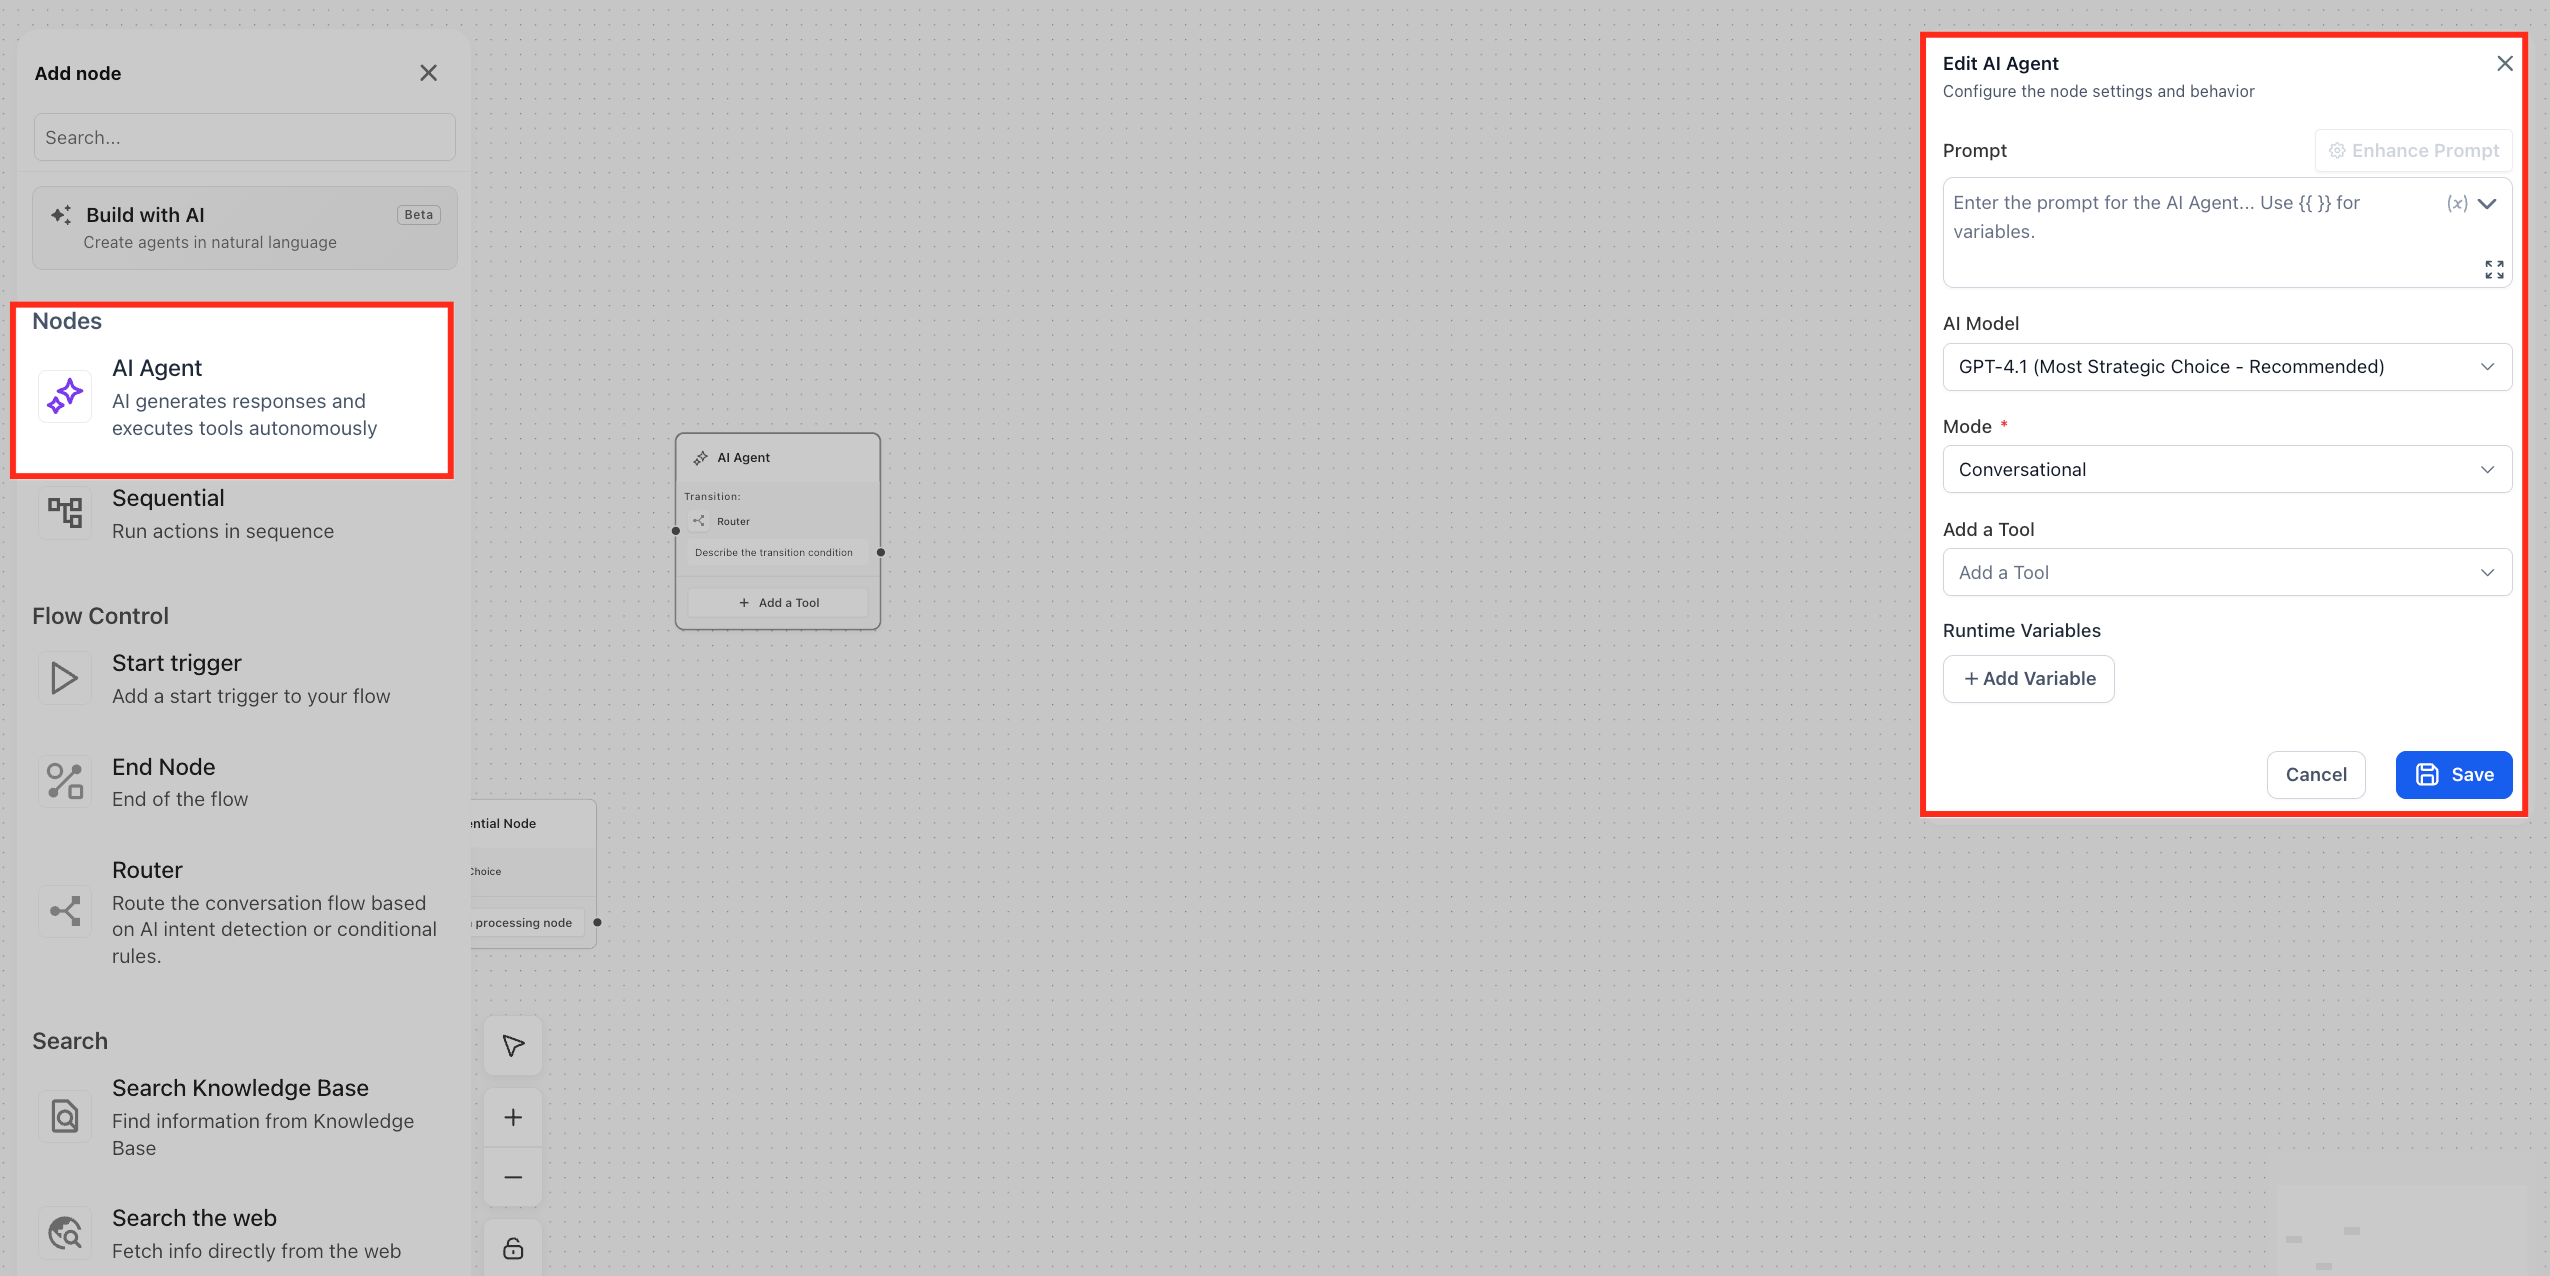
Connect nodes by dragging from the connector dot to the next step, or leave a single-node flow to start.
Add Sequential nodes where you need fixed, repeatable steps.
Add variables if you want reusable values.
Click Test and send a sample question such as "What services do you offer?" Review response quality, tool usage, and flow behavior.
Save, then publish (see Version Control below).
Copy, paste, and bulk delete are canvas editing tools. They work on selected nodes or sections, not on a whole agent.
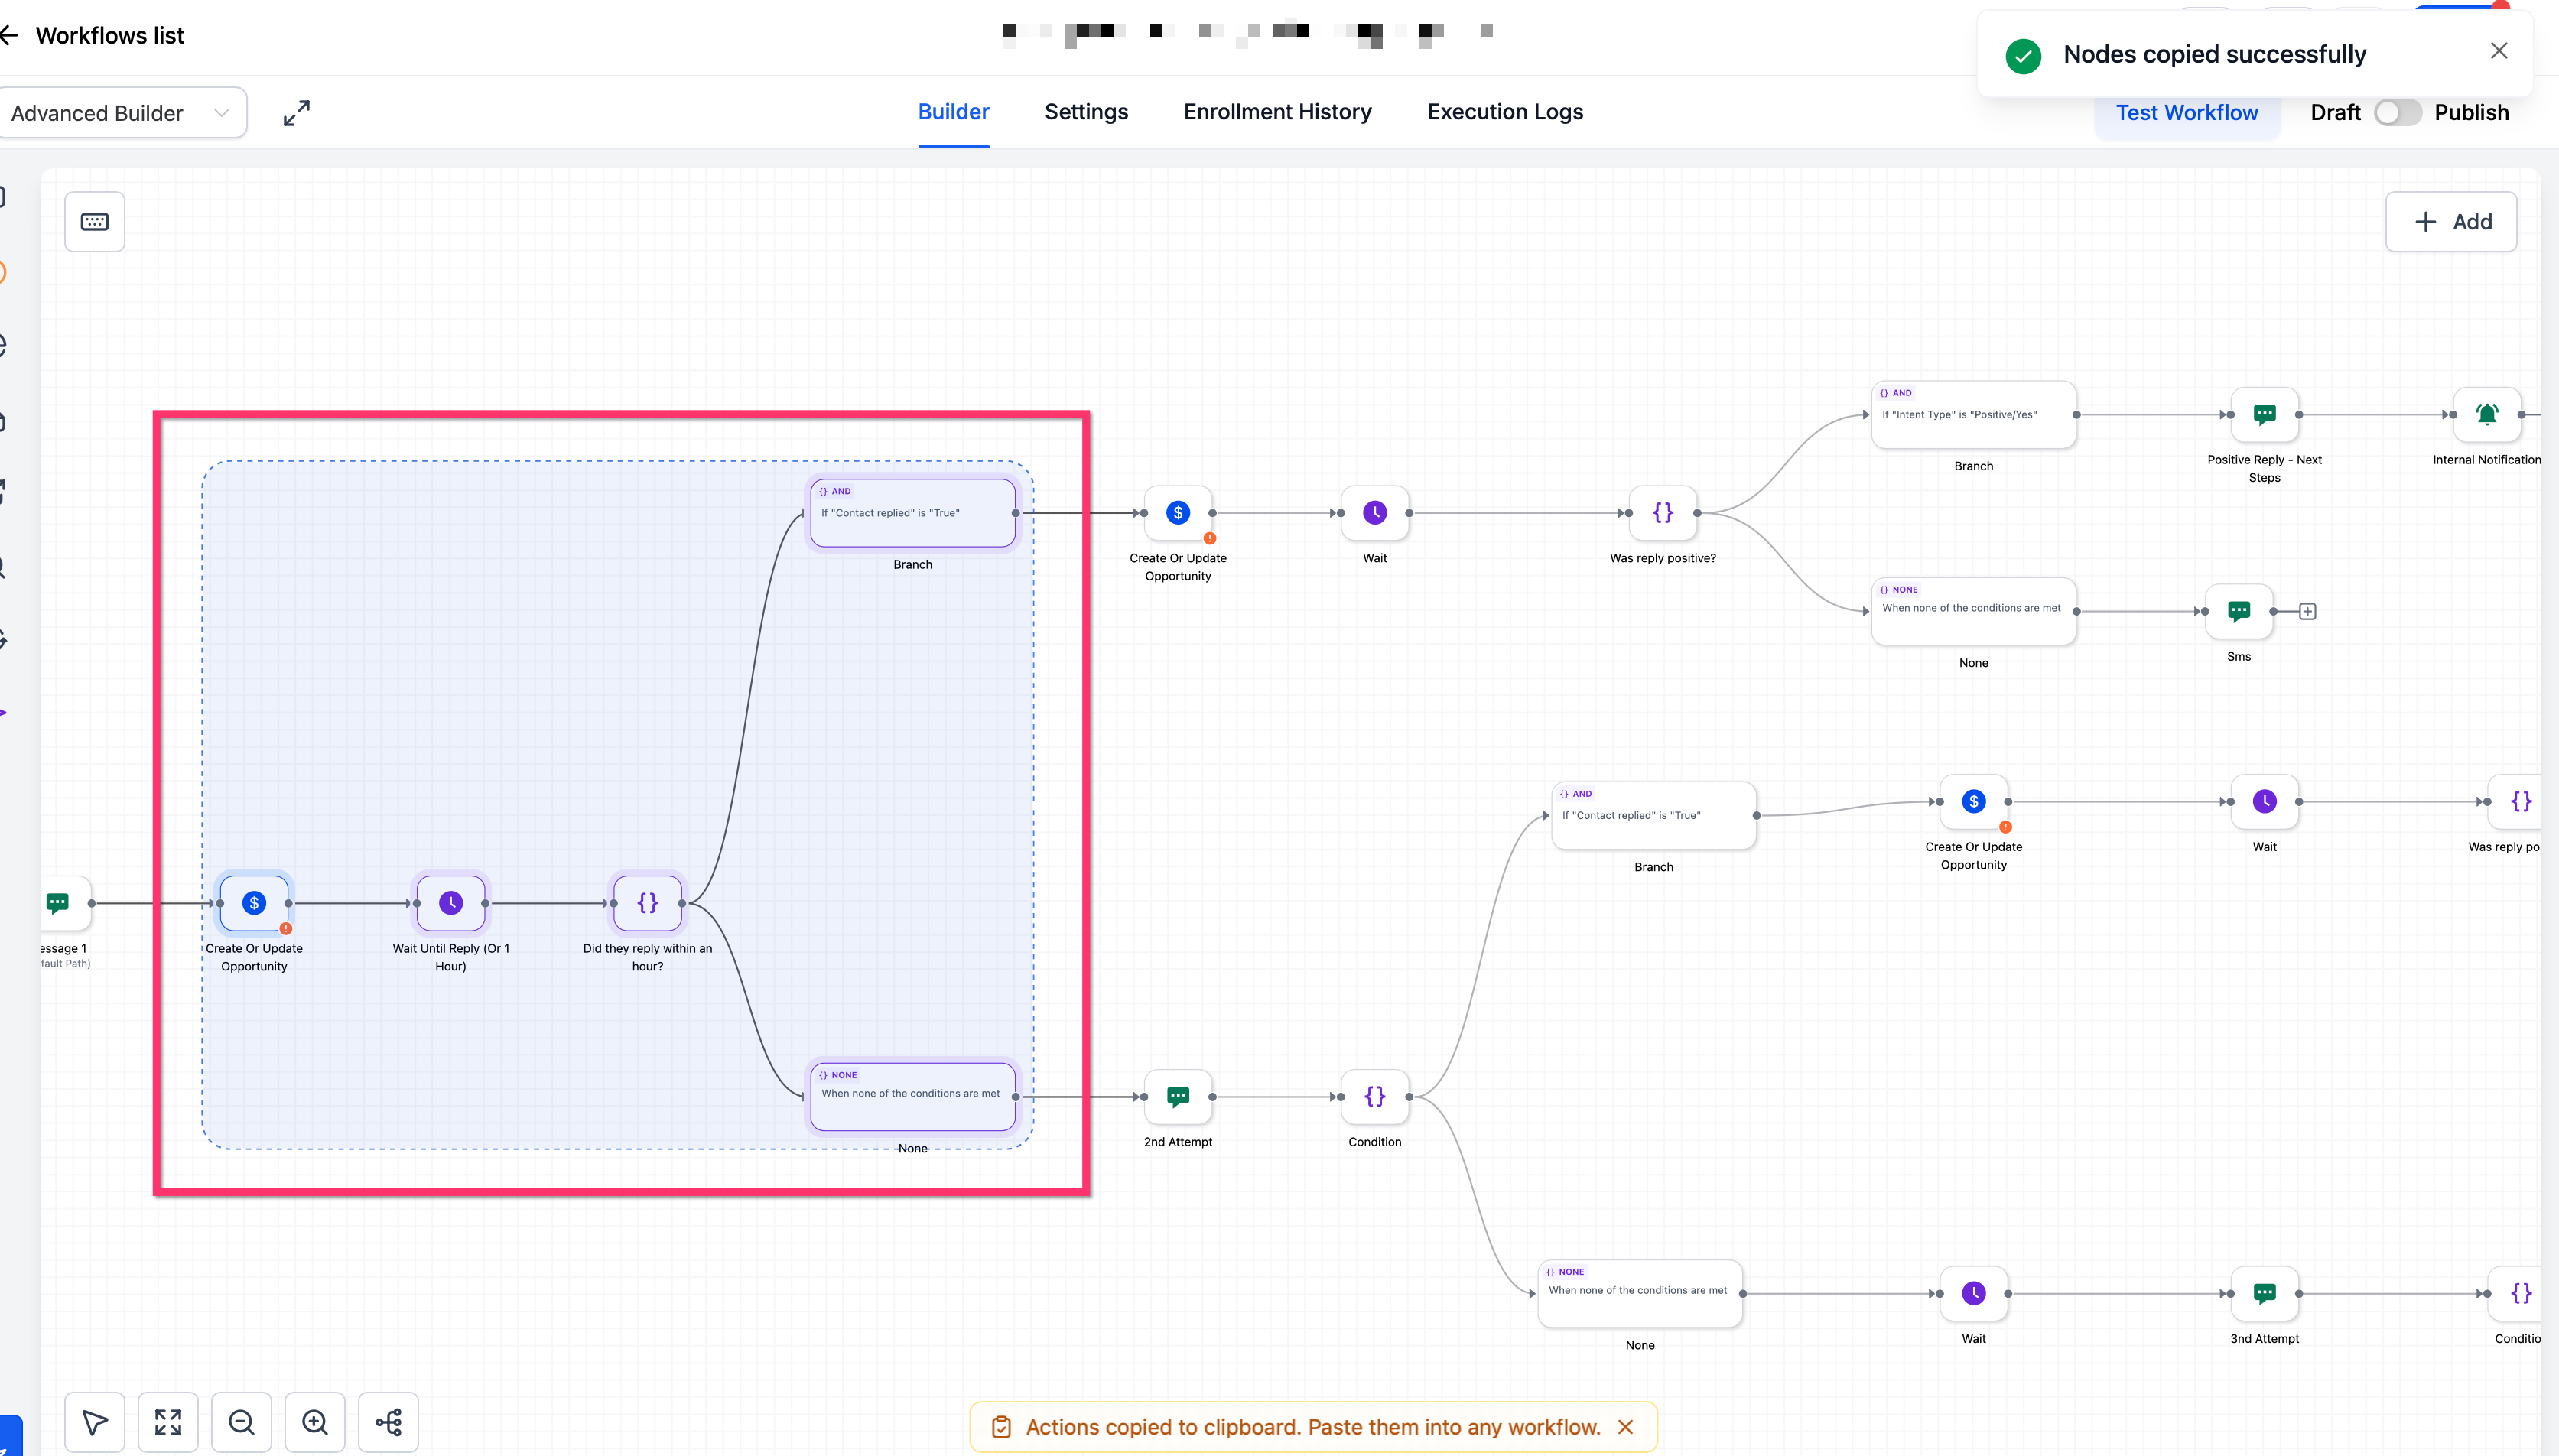
Copy a single node or several selected nodes.
Paste into the same canvas, or into another Agent Studio tab to reuse logic across agents.
Preserve connections between copied nodes when all connected nodes are in the selection. Connections to nodes outside the selection may need to be reconnected by hand.
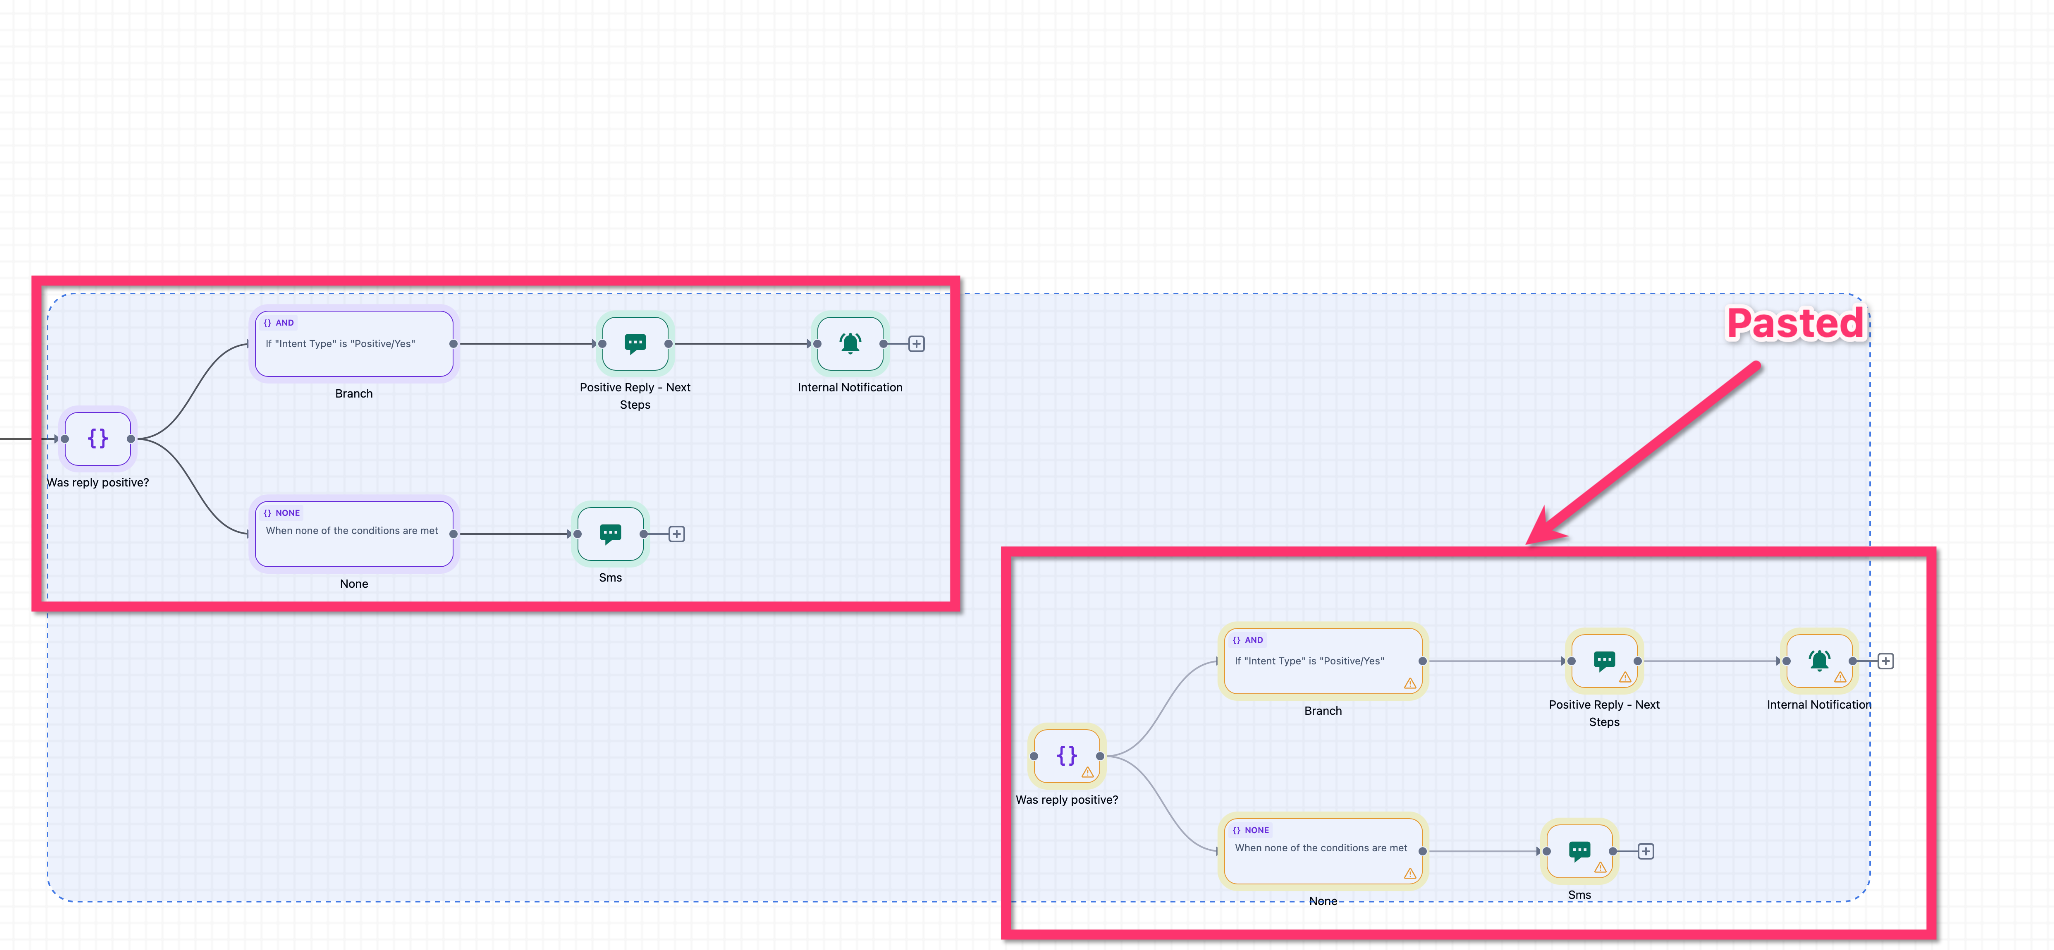
Give pasted nodes fresh unique IDs, so they behave as separate nodes from the originals.
Offset pasted nodes slightly so they do not stack on top of the originals.
Delete multiple selected nodes in one action.
You need access to Agent Studio and permission to edit the agent.
Open the agent in Agent Studio.
Select one node, or select several to copy a larger section.
Copy: Windows Ctrl + C, Mac Cmd + C.
Paste: Windows Ctrl + V, Mac Cmd + V. To paste into another agent, open it in another Agent Studio tab and paste there.
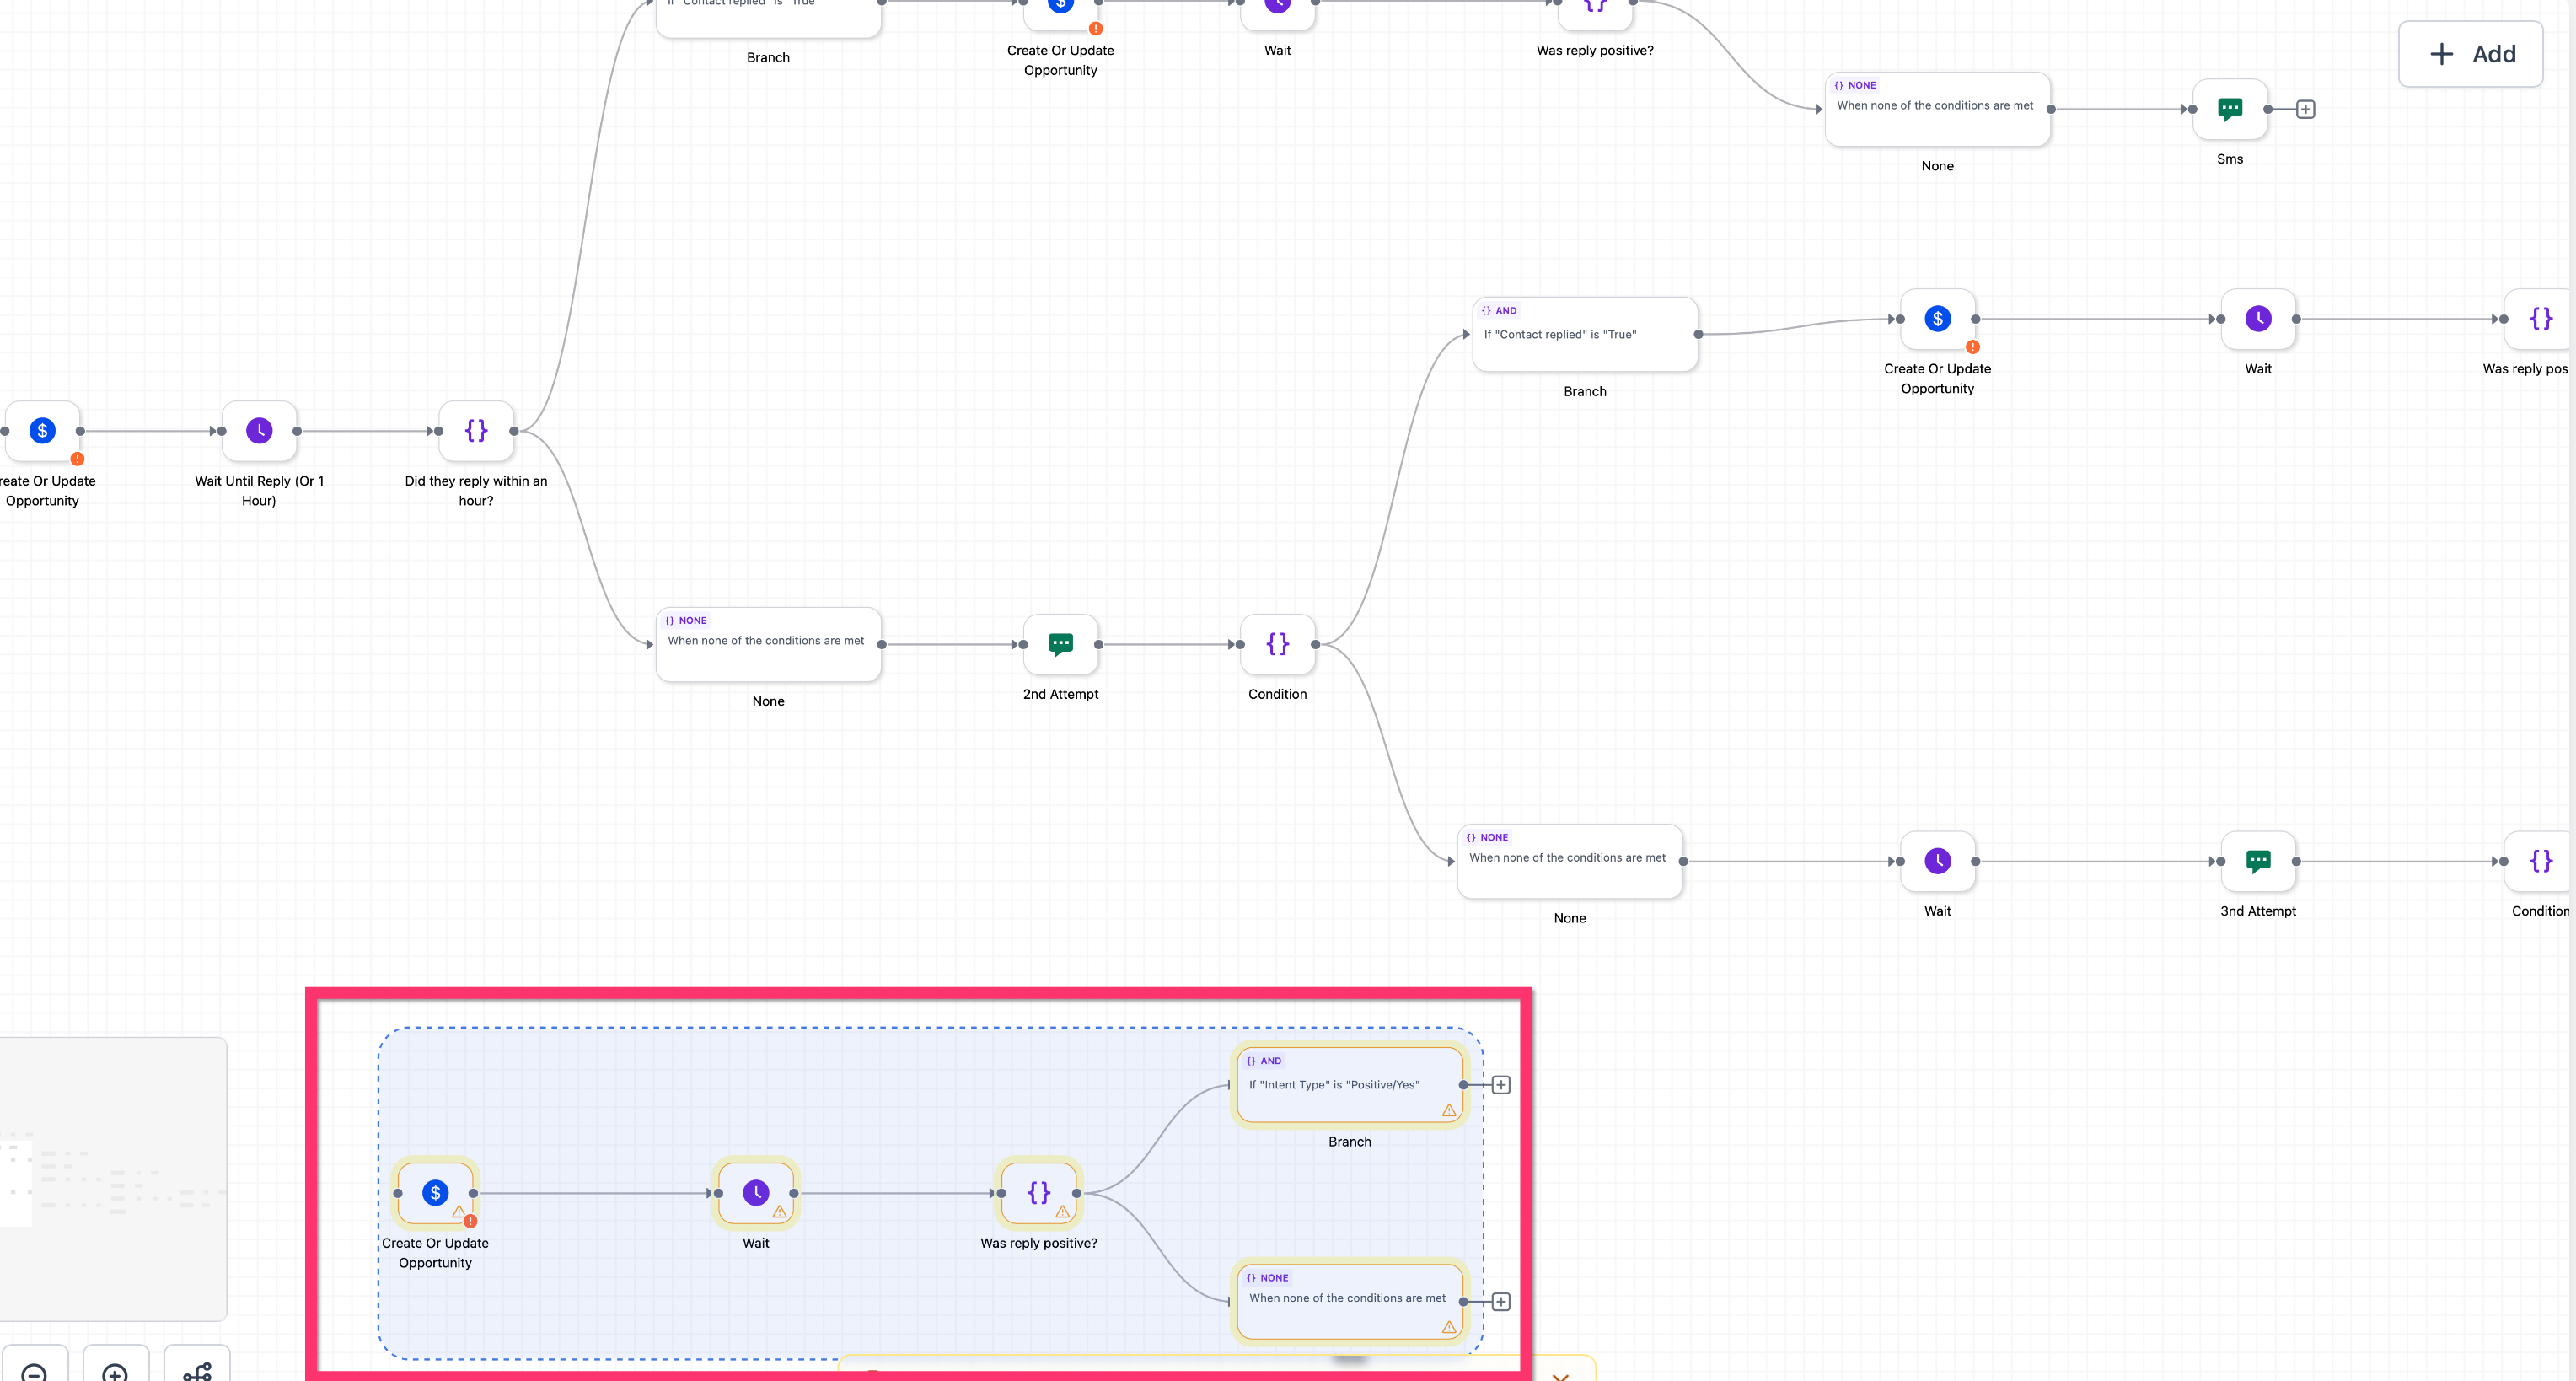
Review the pasted nodes and any preserved connections.
Change node settings or paths if the duplicate should behave differently.
To remove nodes, select them and use the delete shortcut available in Graph Builder for your device.
Save and publish after confirming the graph works.
Action | Windows | Mac |
|---|---|---|
Copy selected node(s) | Ctrl + C | Cmd + C |
Paste copied node(s) | Ctrl + V | Cmd + V |
Bulk delete selected node(s) | Delete shortcut shown in Graph Builder | Delete shortcut shown in Graph Builder |
A keyboard shortcut guide is also available inside the product.
Reuse a proven node group, duplicate a section for testing, rebuild a similar branch, copy a logic pattern into another agent, remove outdated branches, and clean up test branches after debugging. Review pasted nodes before publishing and rename duplicates when testing variations. To copy a complete agent, use the in-account cloning and sharing options described in the Agent Studio Folders, Cloning and Sharing Agents guide rather than node-level copy and paste.
The Message Execution Timeline and Chat Emulator give you full visibility into an AI conversation so you can find problems and slow steps before going live.
Go to AI Agents > Agent Studio and open the agent.
Click Test in the top-right corner.
Agent Studio scans for missing required fields. An orange warning lists the exact node and field to complete. It does not block testing, but fix it to avoid confusing runtime errors.
Click Start to launch the Chat Emulator. The Timeline appears beside it.
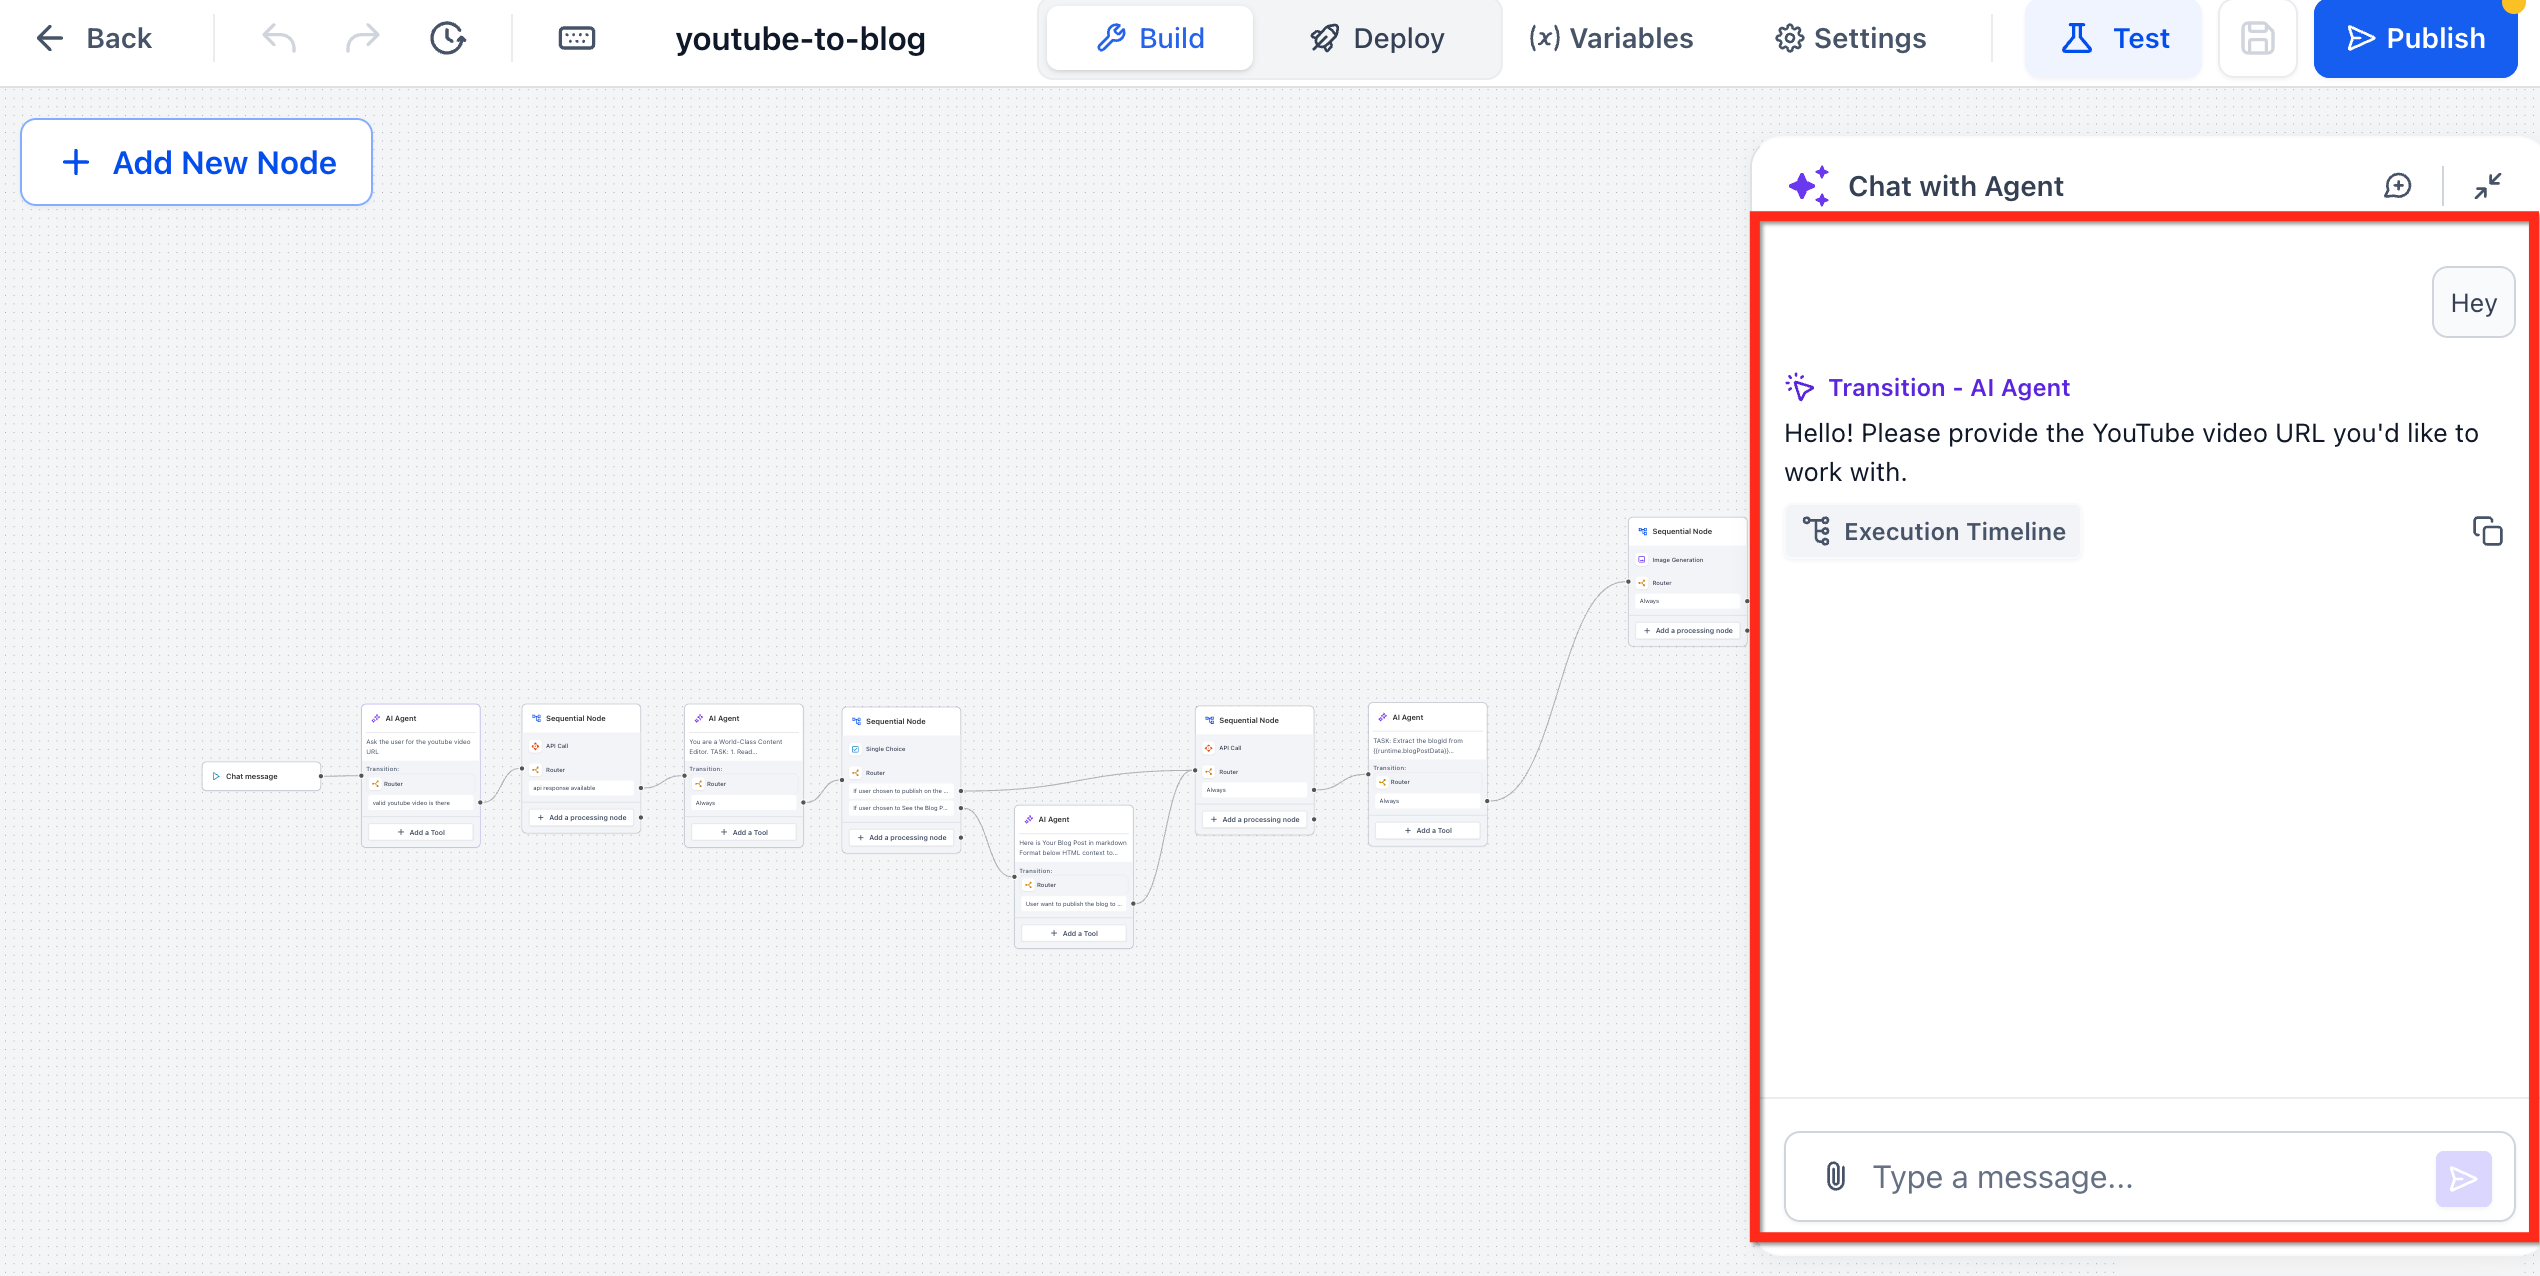
Send a test message in the emulator, or trigger the agent through the API.
The Timeline updates live as the agent runs and records each node transition, tool call, and model step.
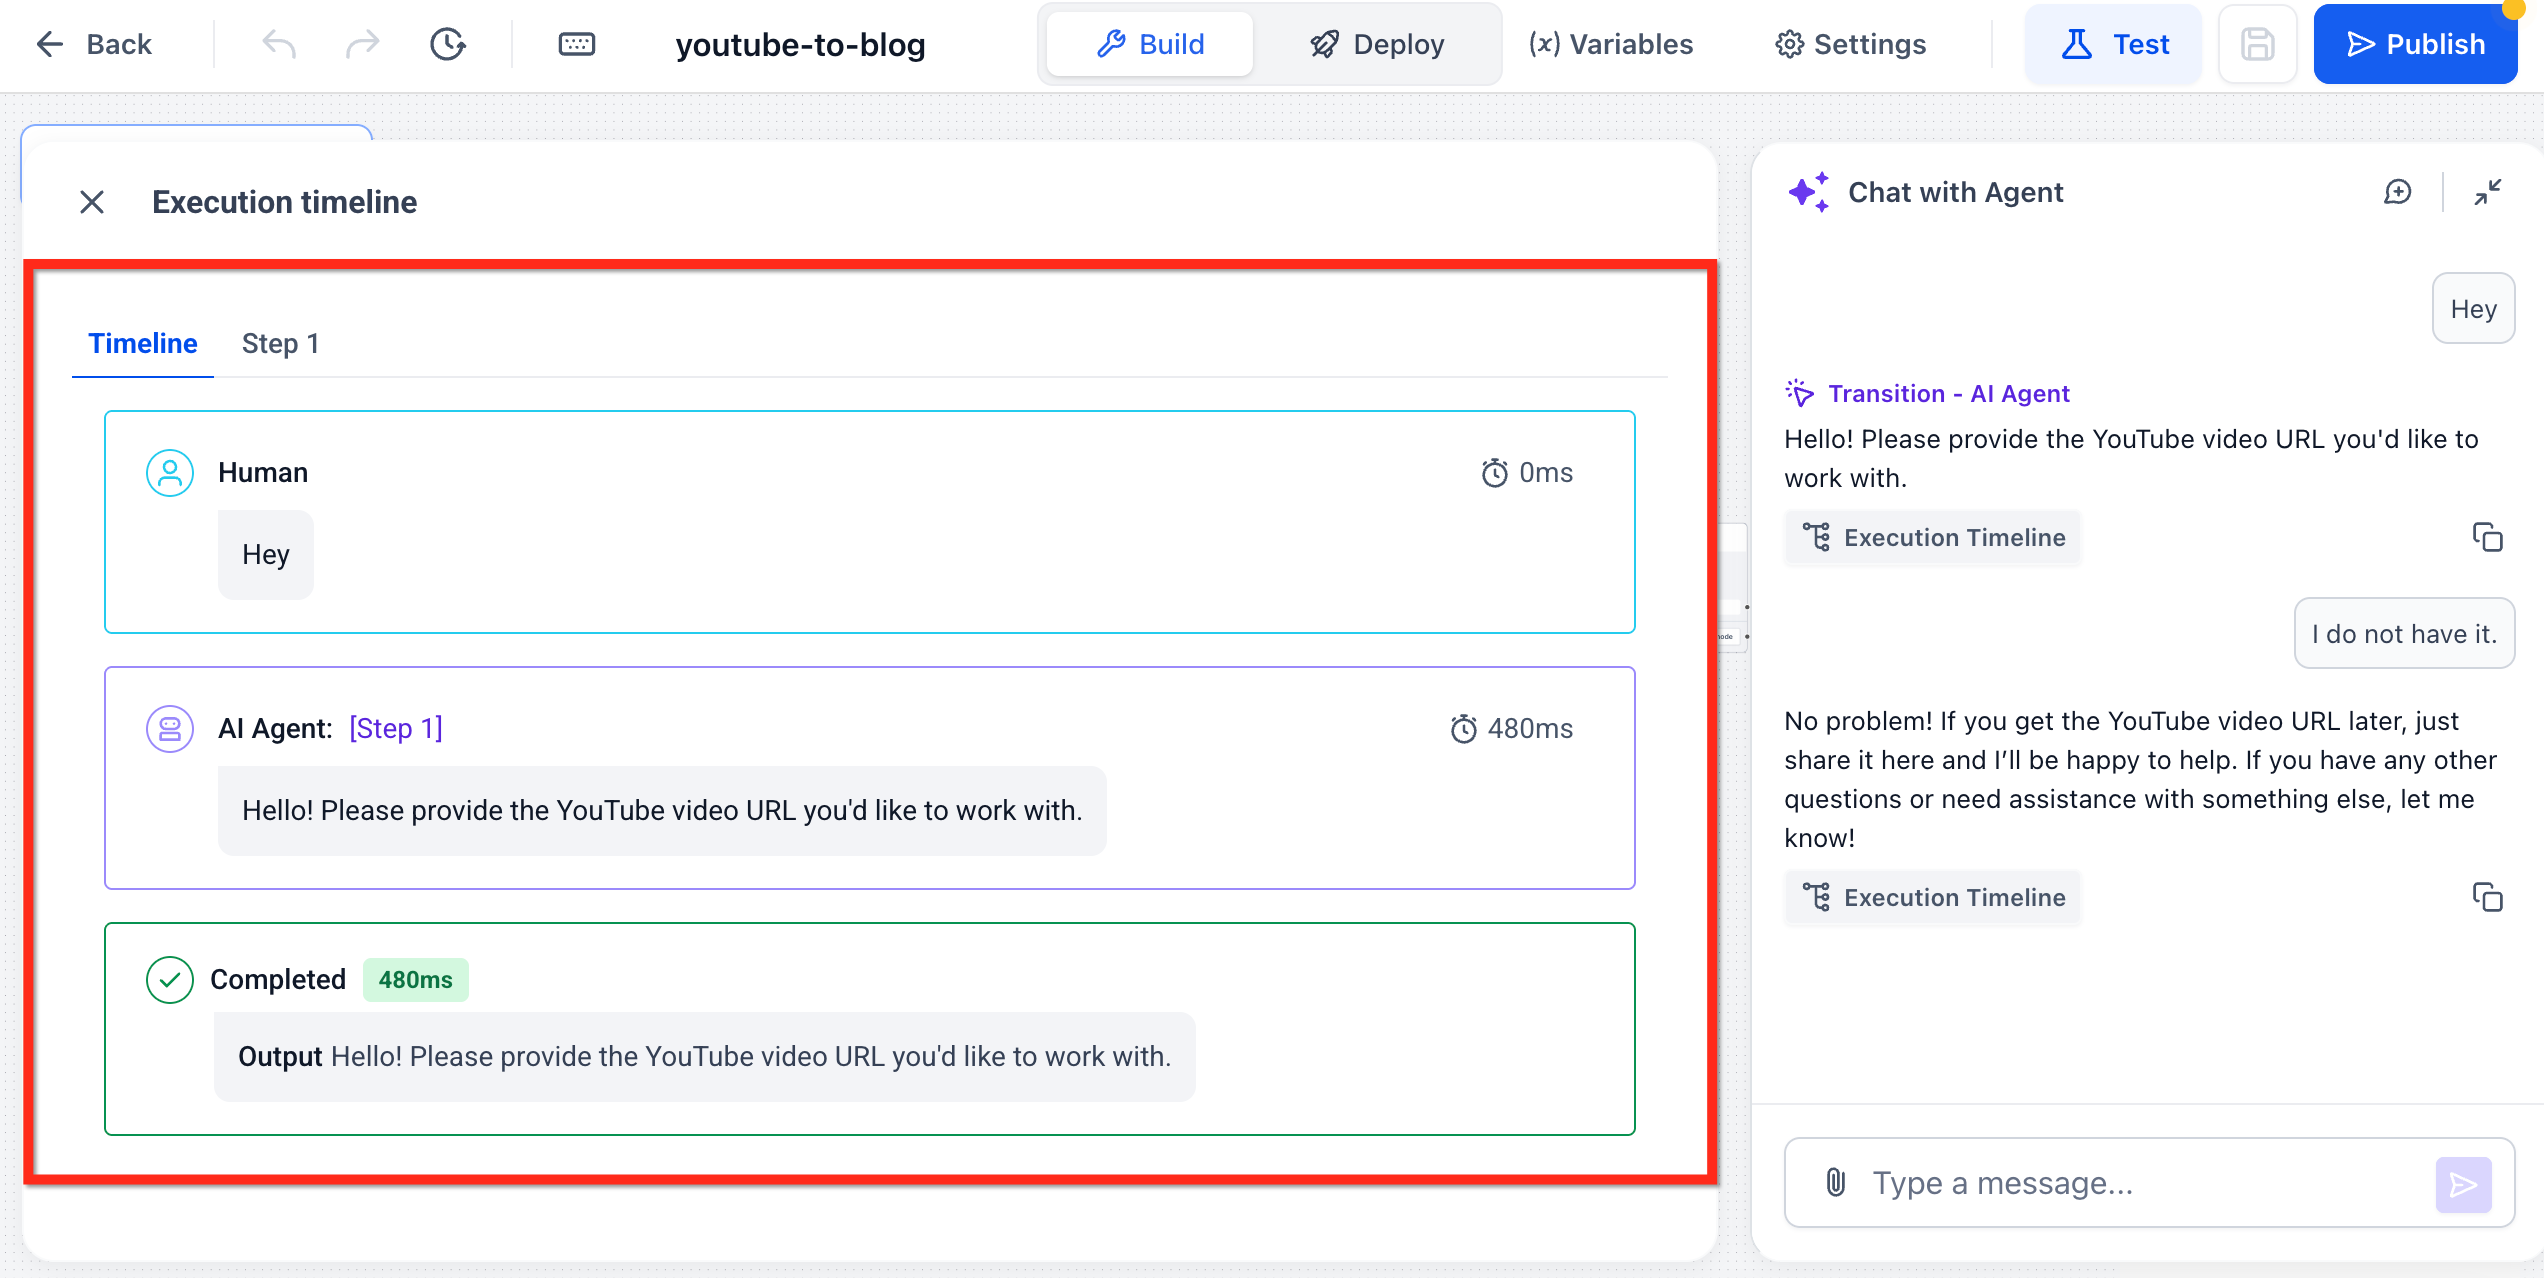
Event cards show the node name, model, input and output tokens, and execution time.
Latency badges are colored: red means slow, green means fast, so bottlenecks stand out.
Hover over an event to view raw JSON inputs and outputs.
Todo Manager: multi-step agent work is tracked as labeled tasks with dynamic statuses, so you can see which task is active and which are done, even when steps change order or new tasks are added.
Export: click the download icon at the upper right of the Timeline to save a JSON file of the full execution.
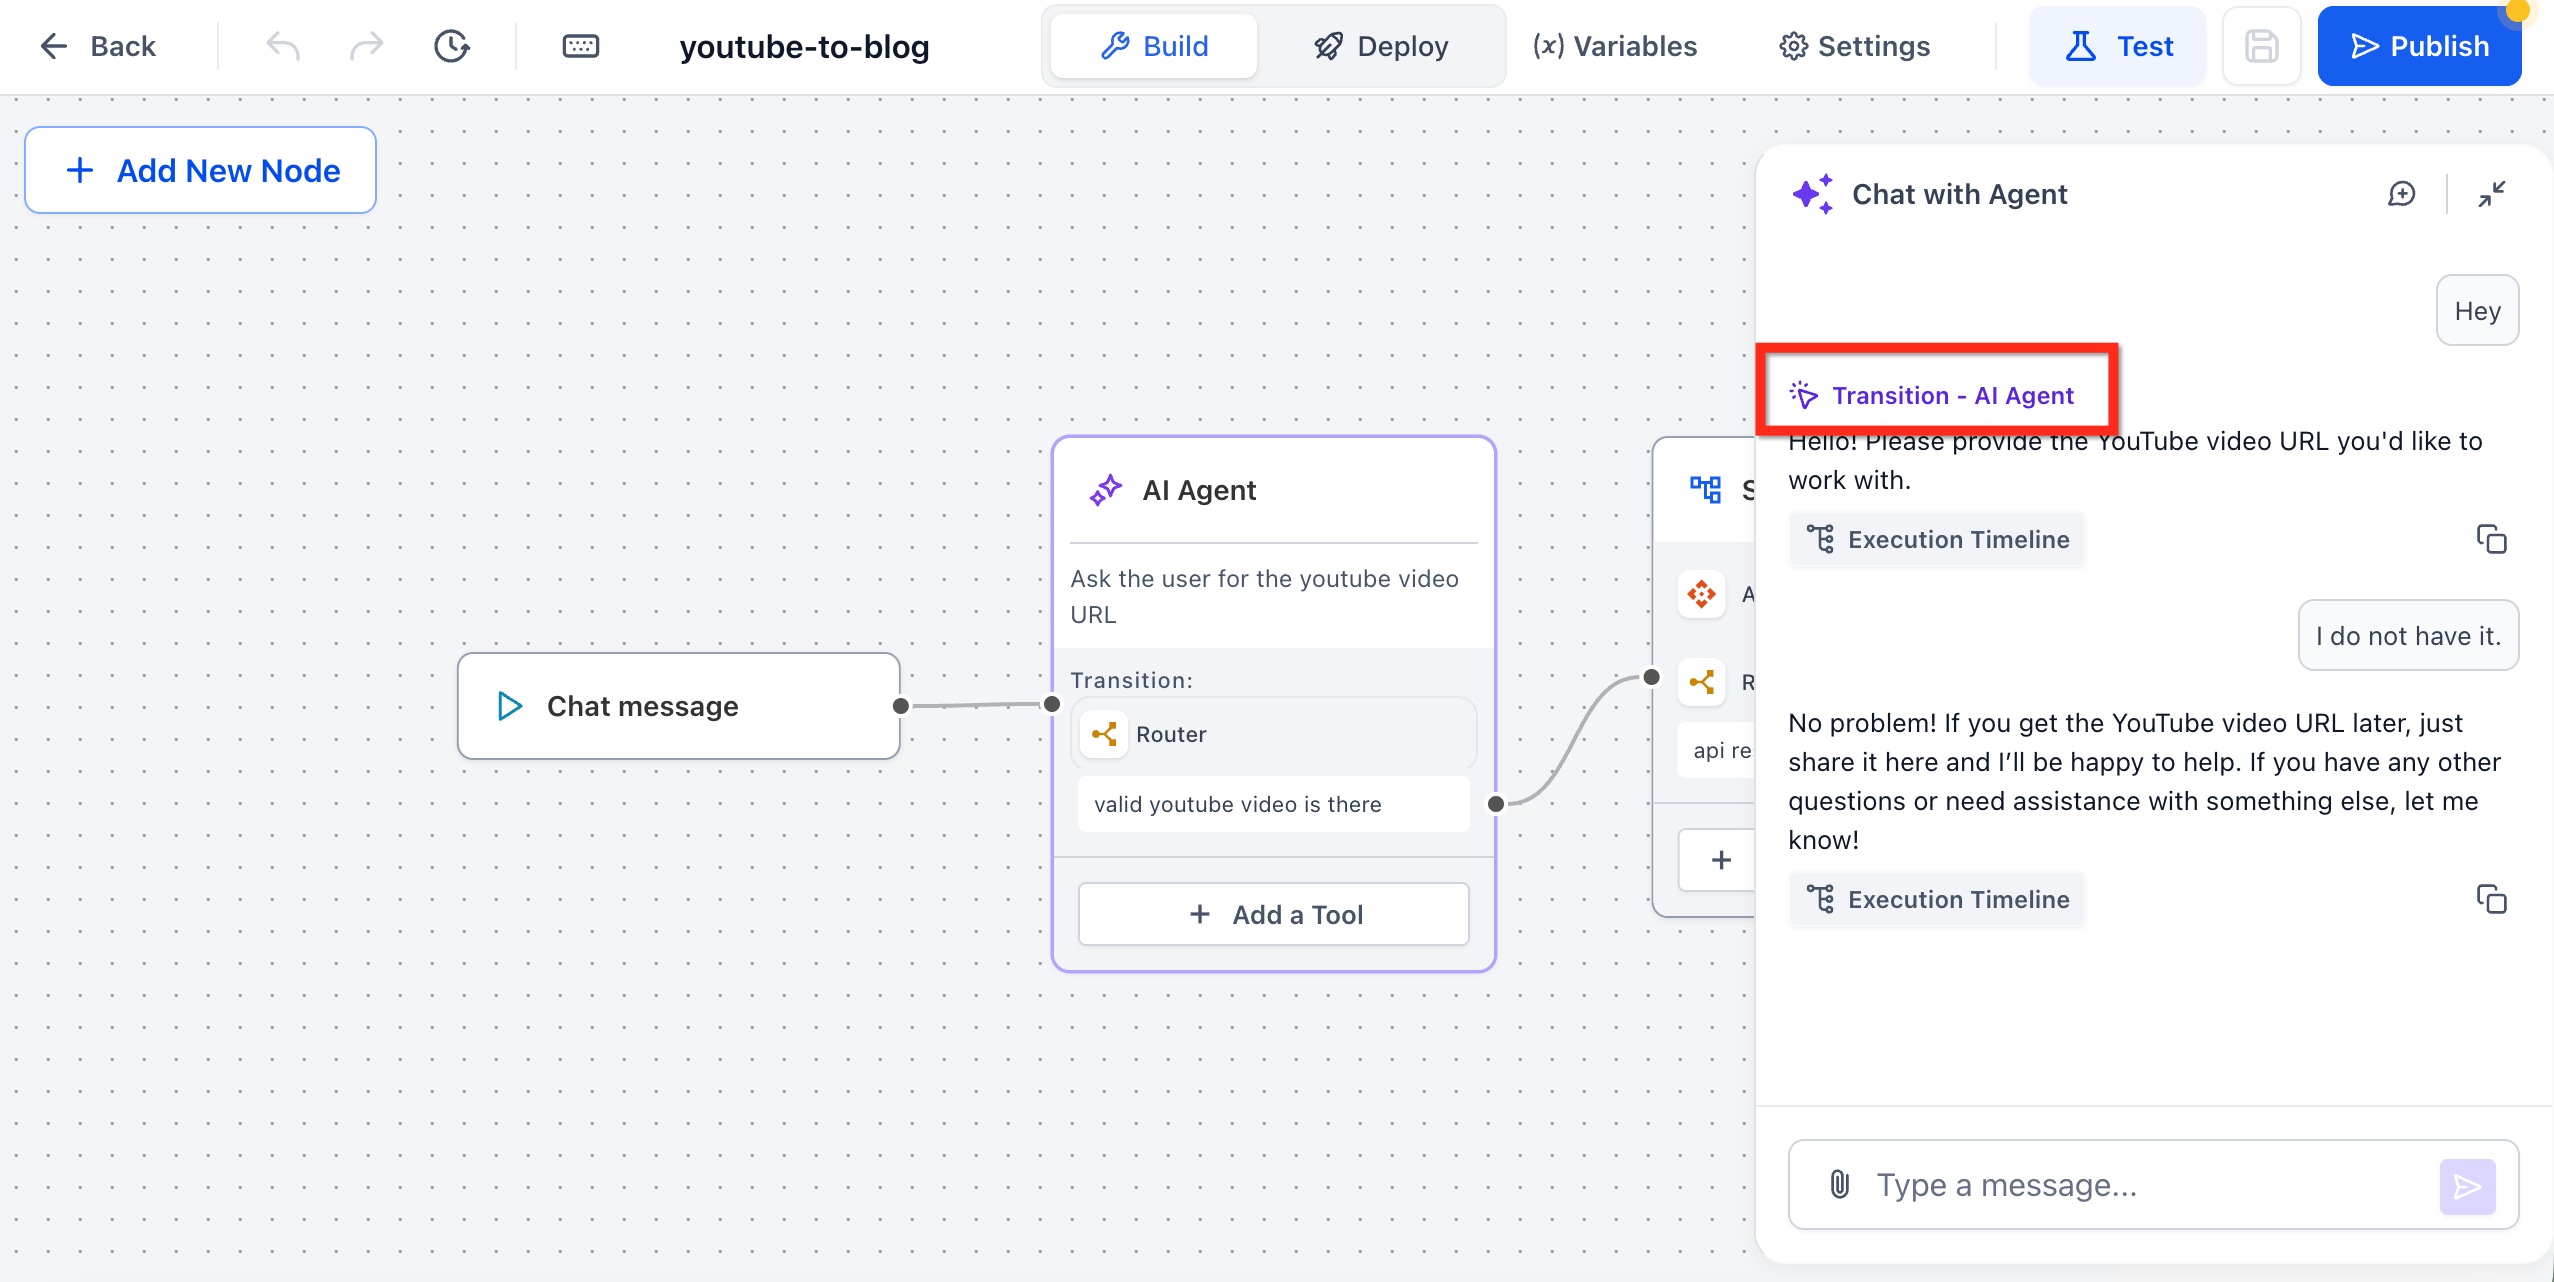
In the Timeline, each step shows a purple label. These transition labels show which node the conversation moved to. Click one (or the log card) to focus and highlight that node on the canvas so you can review or edit its logic immediately. The button appears only after the agent has been saved at least once, so it will not show on an unsaved draft.
Under each message, a metrics footer shows:
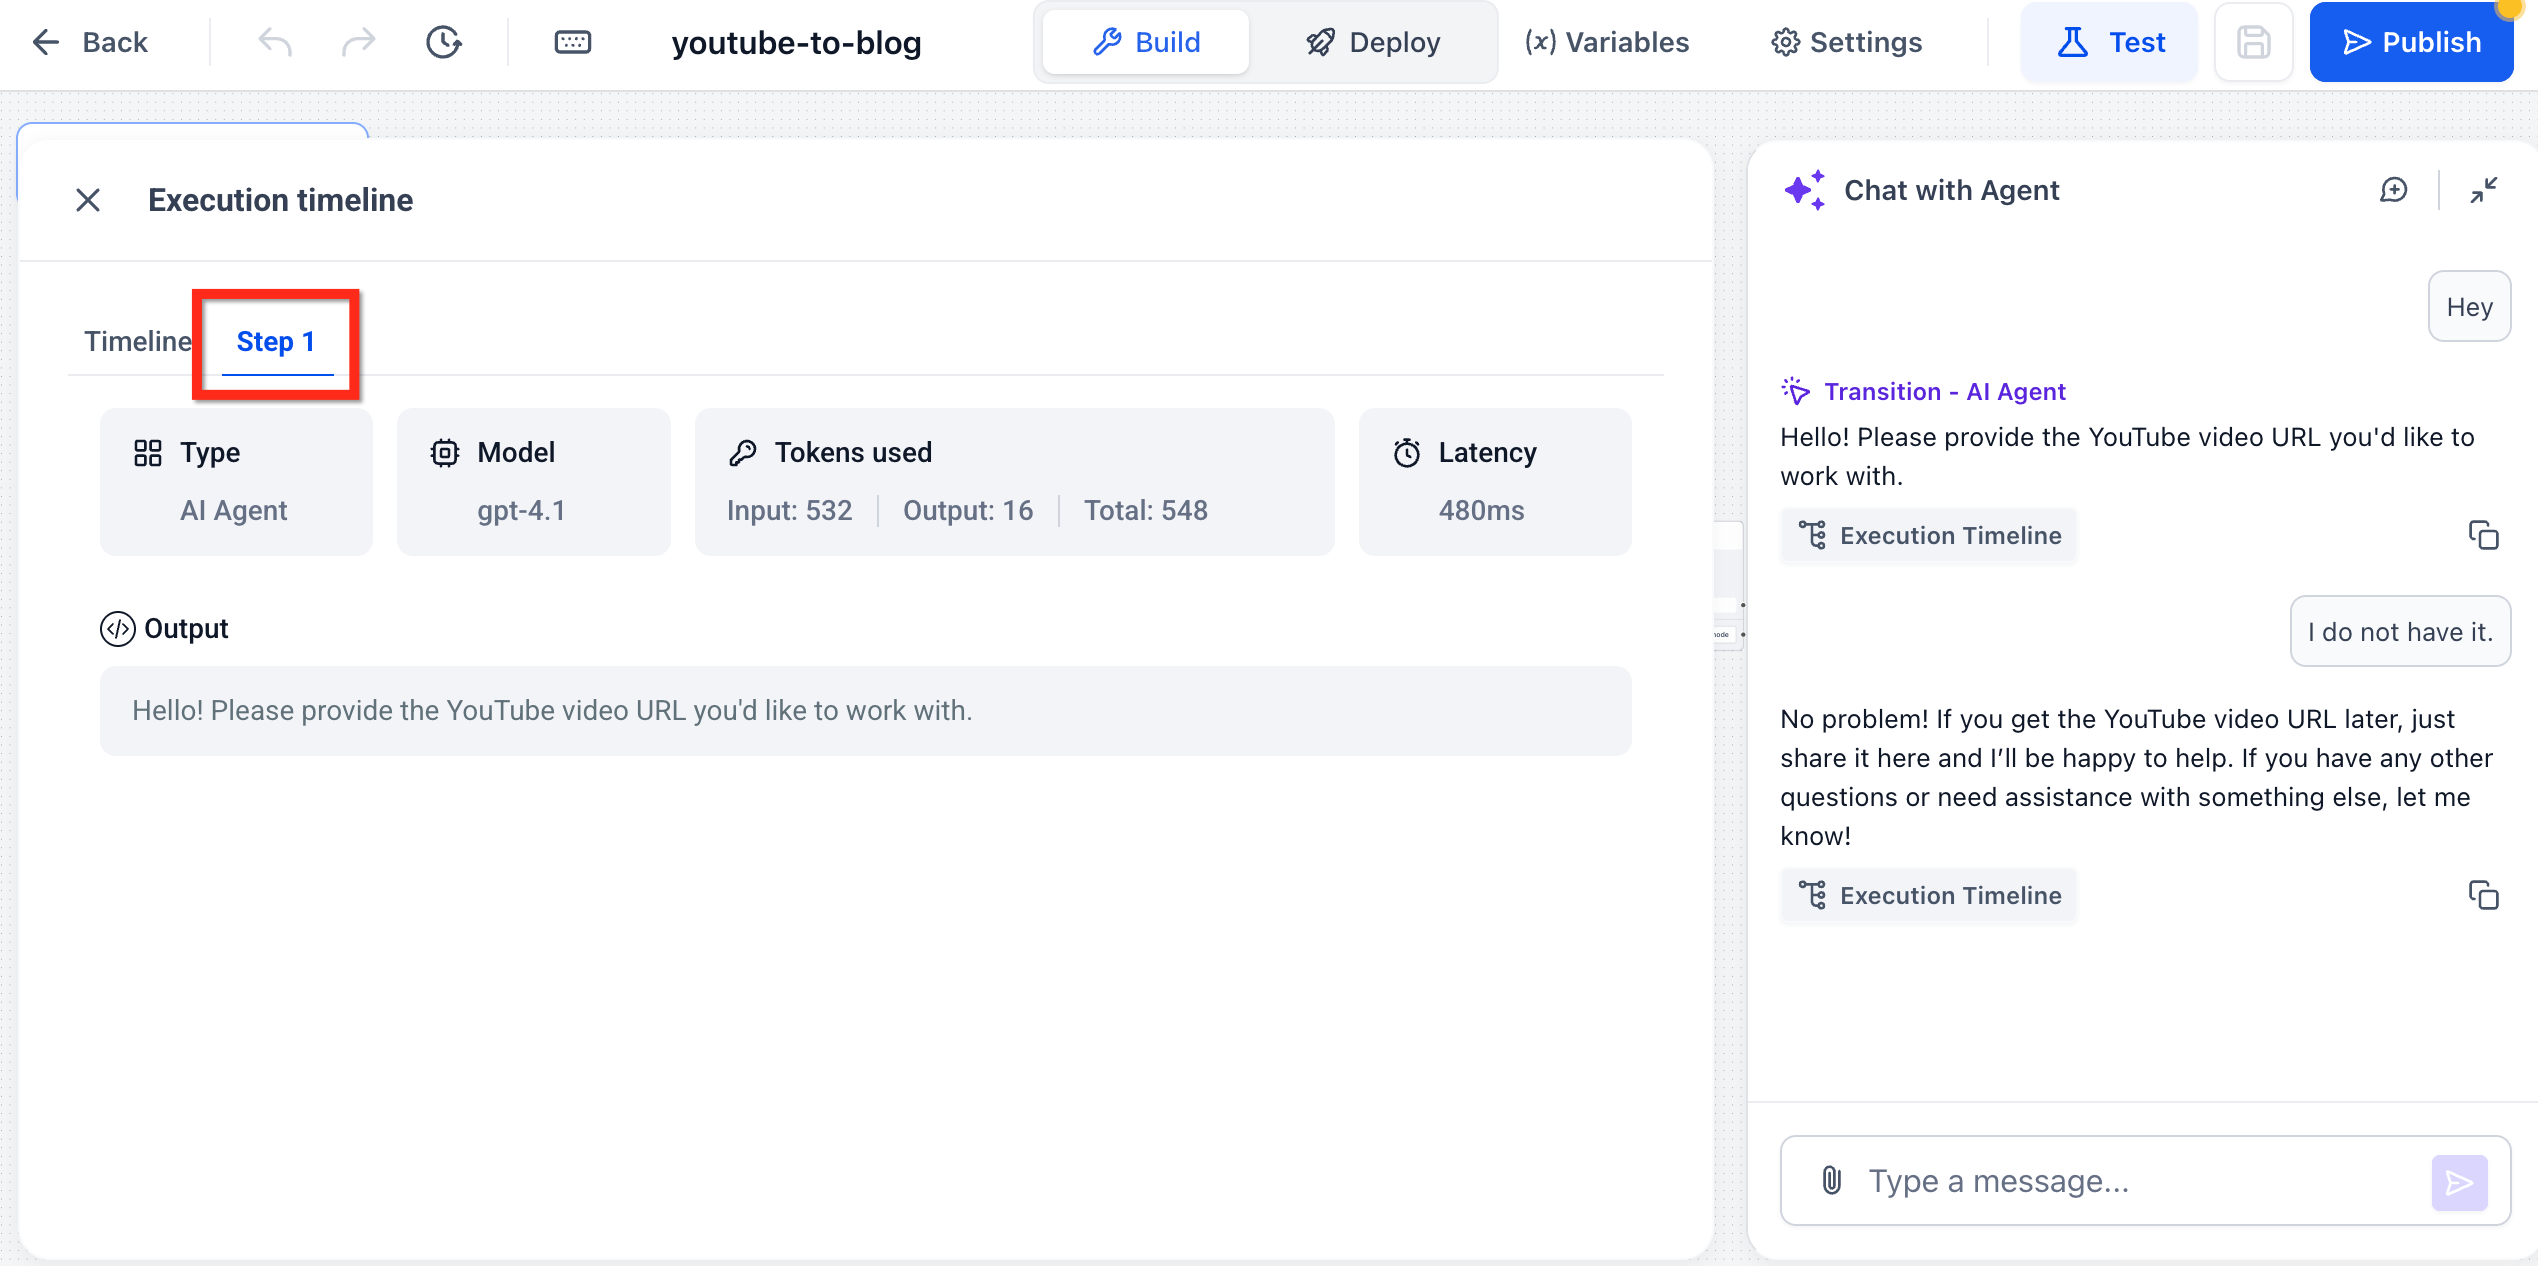
Model and version.
Input and output token counts.
Temperature, max tokens, top-p, frequency penalty, and presence penalty.
A total cost estimate, if billing is enabled.
Use this to compare efficiency and fine-tune prompts or tool settings.
A simulated chat window that mirrors real deployment. It is mobile-responsive, supports avatars, and has a Reset button that clears the conversation context and the associated execution logs for a fresh run. It sits side by side with the Timeline.
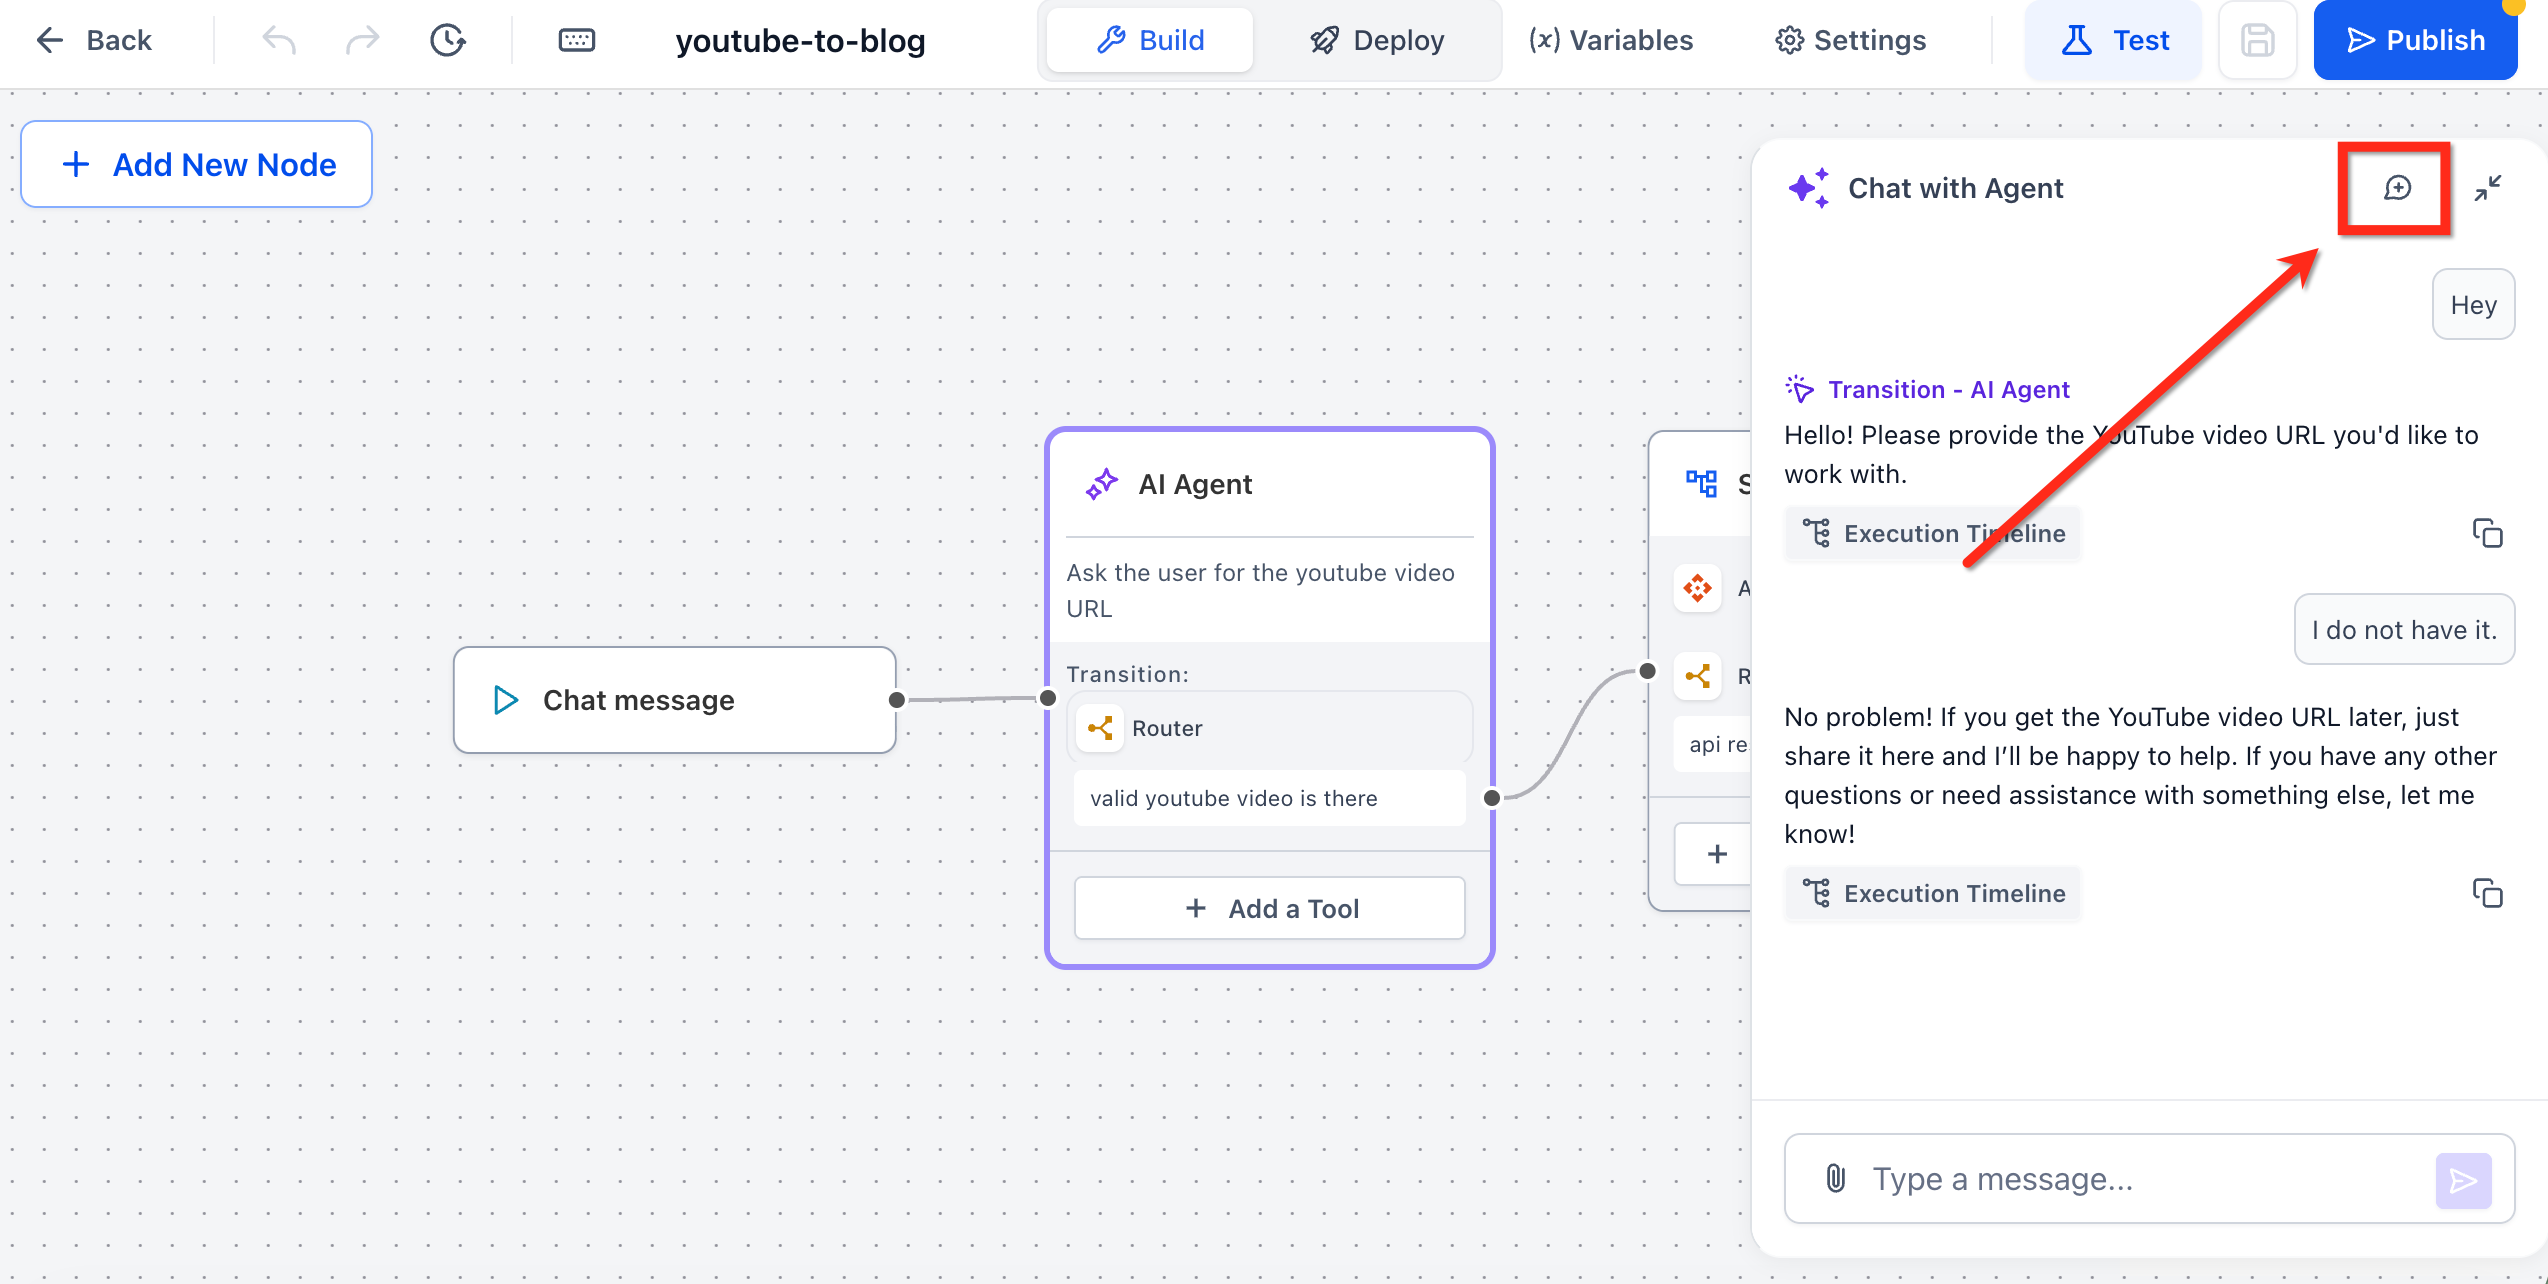
Run the conversation.
Read the event cards for node names, tool activity, token use, and latency badges.
Open an entry for detailed metrics.
Click through to the responsible node and fix prompts, variables, or logic.
Click Reset and run again to confirm the fix.
When the conversation behaves as expected, promote the agent.
The Timeline records metadata the model and tools already return, so it does not add token usage or cost. The same log view appears for Voice AI agents after a test call finishes. It is available on accounts that have AI Employee, the same requirement as Agent Studio.
Flow Agents use Draft, Staging, and Production so changes are tested before they affect live conversations.
Stage | What it is |
|---|---|
Draft | Every save creates or updates your working draft. |
Staging | Your work-in-progress version. Saving updates Staging without affecting live traffic. |
Production | The live version that runs for real contacts. A Production version is created only when you promote a Staging version. |
Build and test the agent.
Click Save and Publish to create or update the Staging version.
When ready to go live, promote the Staging version to Production (Publish > Production).
Deploy the agent.
An agent must be published to respond to real triggers. You can publish to Production with one click and roll back to a prior version if something breaks, with no separate version-control process. Only Production runs use tokens on live conversations; drafts and tests use your testing allowance. You can deploy to Ask AI, with other channels such as chat widgets and API endpoints being added over time. See the Agent Studio Agent Logs, Metrics, Monitors and AI Usage guide to track usage.
A Staging version must be promoted before the live agent changes.
Exporting an agent to another account is not available; duplicate within the same account instead.
Pasted nodes should be reviewed before publishing because connections to nodes outside the copied selection are not carried over.
Errors from external API calls surface in the run log. Use conditional edges to branch to a fallback node on error codes.
Can I still create new Flow Agents?
Managed Agents are the recommended way to create new agents. Existing Flow Agents continue to work and can be edited, tested, and promoted.
Do agents run automatically?
Only when their configured trigger conditions are met, and only after they are published.
How is Agent Studio different from workflows?
Workflows follow fixed rules. Agents interpret input and make dynamic decisions with AI.
Does every edge need a condition?
No. An edge with no condition behaves like a default next step.
Can one agent call another agent?
Yes. Place the second agent inside an AI Agent node as a sub-workflow, or trigger it by API from a Sequential node.
Is Knowledge Base data sent to the model?
Only the retrieved snippets are passed, not entire documents.
Why do I see a Missing Required Fields warning when I click Test?
One or more nodes have required fields that are empty. Open the listed node, complete the fields, and save.
Why do I not see the Go to Node button?
The agent has not been saved yet. Save it at least once.
Does resetting the Chat Emulator clear the Timeline?
Yes. Reset clears both the chat context and its execution logs.
Can I put patient information in a prompt or test message?
No. AI features are not approved for PHI. Use generic, made-up examples when testing.
