There are two ways to hand work to a published Managed Agent on purpose: from a workflow in Marketing > Workflows with the Invoke Managed Agent action, or from outside software through the Managed Agents API using Deploy to API. Both run the agent's published version, and both start from the agent's Triggers row in AI Agents > Agent Studio > Managed Agents.
Protect patient privacy. Aesthetix CRM's AI features are not approved for Protected Health Information (PHI). Do not put PHI into an agent's instructions, files, memory, knowledge or prompts, and do not pass PHI through workflow instructions, workflow data, attachments or API requests. Send only the minimum non-clinical details the task needs, such as first name, appointment time and general service name.
If the agent you invoke books or changes appointments, AI appointment booking works only with native Aesthetix CRM calendars, not EMR calendars.
The Invoke Managed Agent action lets a workflow pass a contact, workflow data and instructions to a published Managed Agent, wait for the agent to finish, and then use the agent's response in later workflow steps. The workflow keeps the predictable parts (triggers, waits, messages, branches) and the agent handles the parts that need reasoning, summarizing or flexible action.
A contact enters or progresses through a workflow.
The contact reaches the Invoke Managed Agent action.
The selected contact, configured workflow context, dynamic values and any attachments are sent to the Managed Agent.
The agent processes the instruction using its published configuration, tools and CRM capabilities.
The agent returns a response.
The workflow continues and can use the response in later actions.
An agent can be chosen in the workflow only if it is ready. Before adding the action:
Open the agent in AI Agents > Agent Studio > Managed Agents.
Add the Invoked from a workflow trigger.
Confirm it has the instructions, tools, Knowledge Base access and CRM capabilities the task needs.
Test it.
Publish it.
If the agent does not appear in the workflow action, the usual cause is a missing Invoked from a workflow trigger or an unpublished agent.
Contact information.
Workflow data and dynamic values available when the action runs.
Instructions describing the task.
Attachments the agent needs as context.
Dynamic values can be inserted directly into the instruction, so one action can send different data for each contact. For a good instruction:
State the task clearly.
Include only context relevant to the decision.
Describe the output you expect.
Use dynamic values where the instruction should change per contact.
Attach a file only when the agent must review it, and never attach clinical documents or photos that contain PHI.
After the agent finishes, its response is available in the dynamic-value selector for later actions. You can use it to:
Update CRM records.
Choose which workflow branch runs next.
Populate the content of a later message.
Pass information into another automation step.
Option | Where the AI is configured | Workflow role |
|---|---|---|
Invoke Managed Agent | In Managed Agents, maintained separately | Calls a published Managed Agent that has the Invoked from a workflow trigger |
AI Agent | Inside the workflow action itself (instructions, model, tools, memory, output behavior) | Creates and configures an AI step directly in the workflow |
Invoke Agent Studio Agent | In a flow-based Agent Studio agent | Calls an eligible published flow agent from a workflow |
Use the option that matches where your AI logic lives. For new autonomous agents, Managed Agents are the recommended approach, while existing flow agents remain available for editing and management. See the Flow Agents guide on triggers, variables and the workflow action for the flow-agent version.
Contact analysis: review contact information and return a summary or classification.
Branching: evaluate context and return which path the workflow should take.
Personalized content: draft text a later step uses in a message, for example a consult follow-up.
Record processing: interpret information before a later action updates fields or notes.
Attachment review: process an attachment made available to the workflow.
Complex handoff: delegate a multi-step reasoning task while the rest stays in the workflow.
Step 1: Configure the Managed Agent
Go to AI Agents > Agent Studio and open the Managed Agents tab.
Create or open the agent.
Set its instructions, tools, Knowledge Base access and CRM capabilities.
Open the trigger configuration and add Invoked from a workflow.
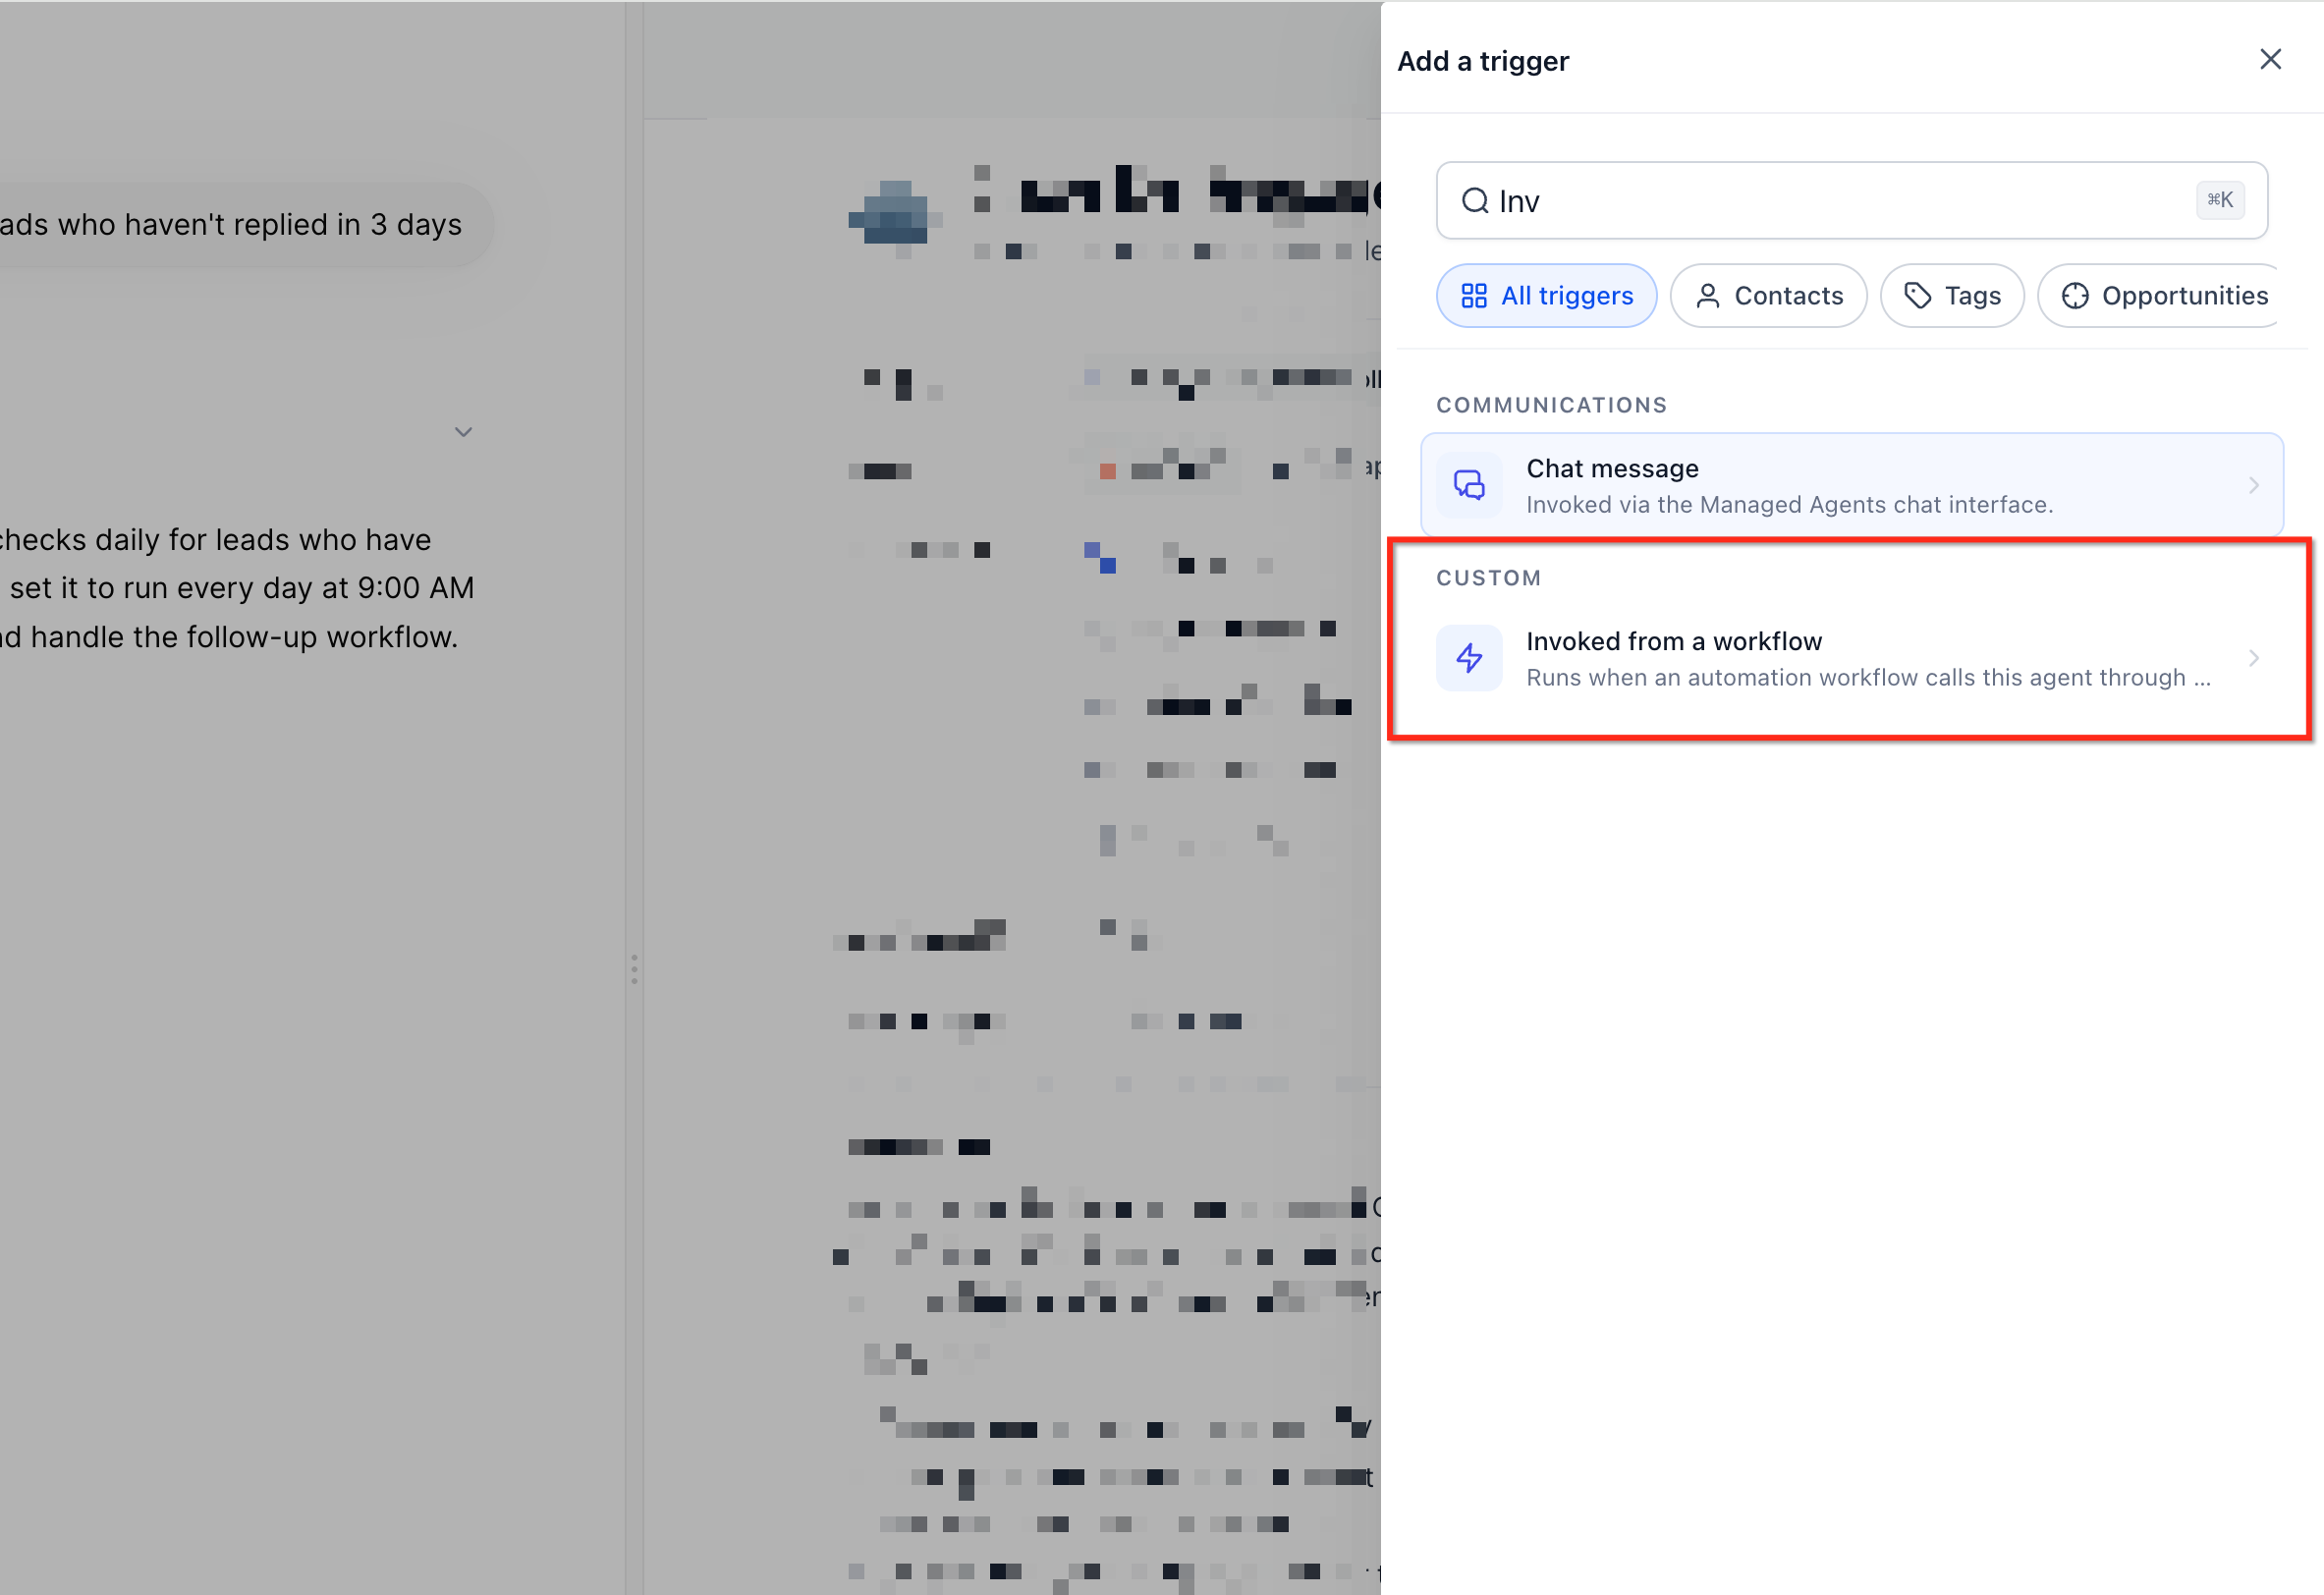
Test the agent, then publish it.
Step 2: Add the action to the workflow
Go to Marketing > Workflows and open or create the workflow.
Go to the point where the agent should run and click + Add Action.
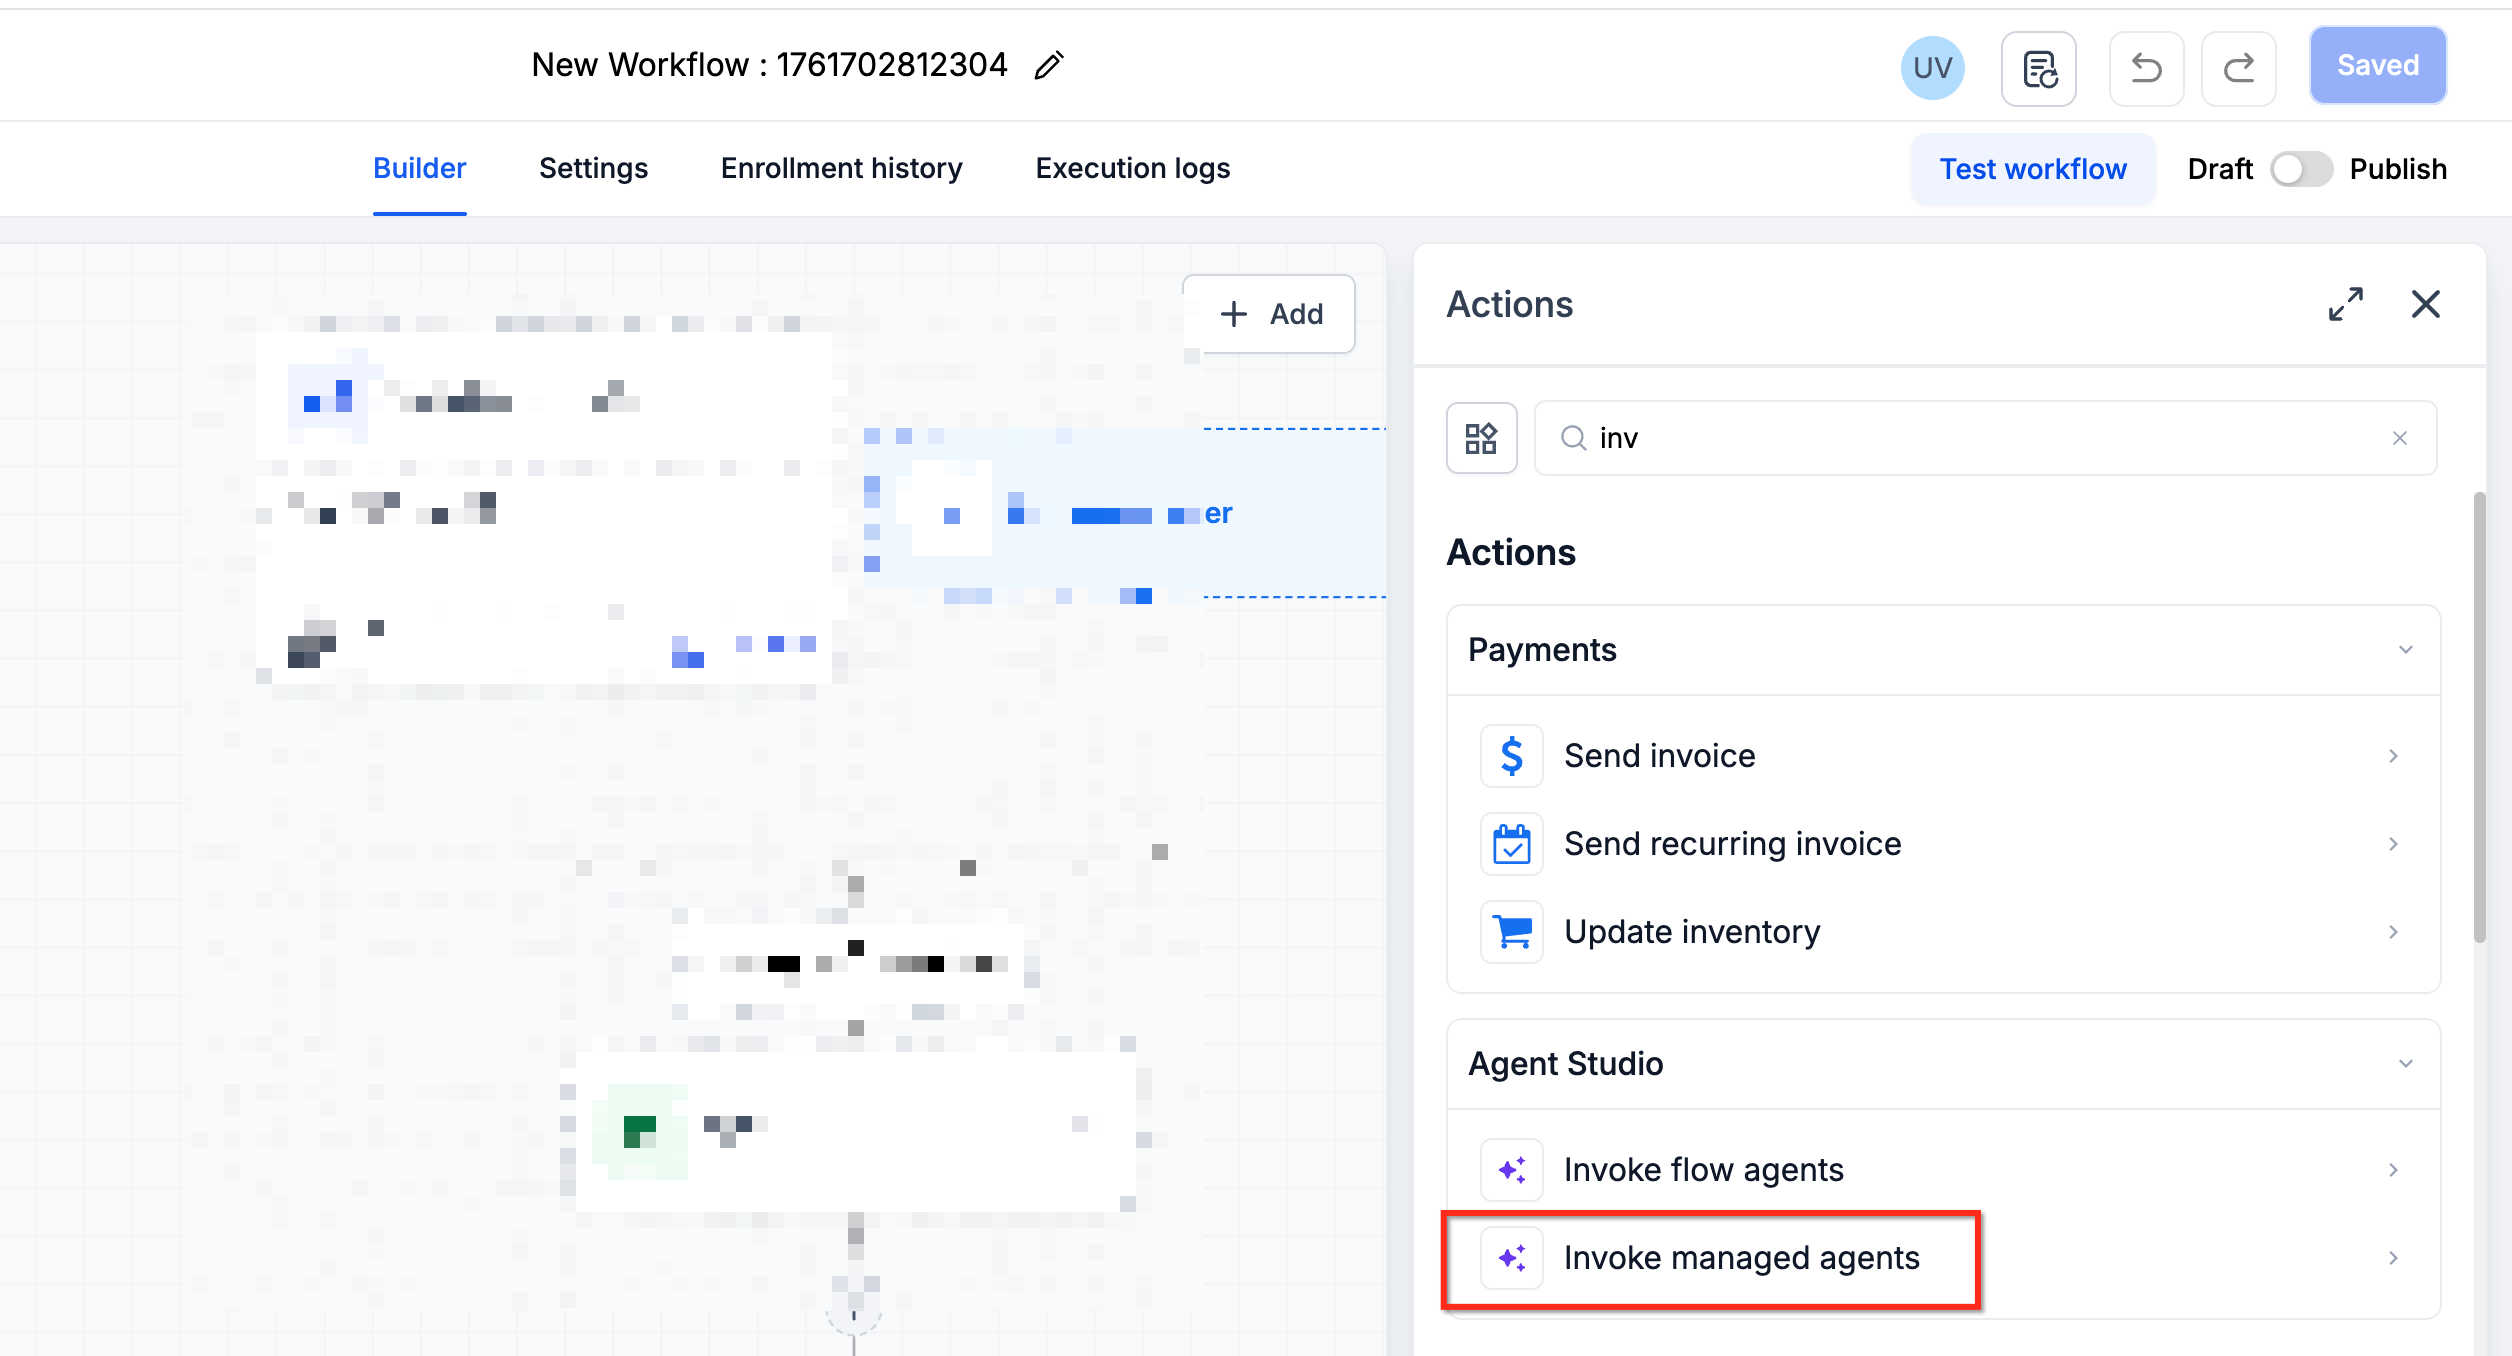
Select Invoke Managed Agent.
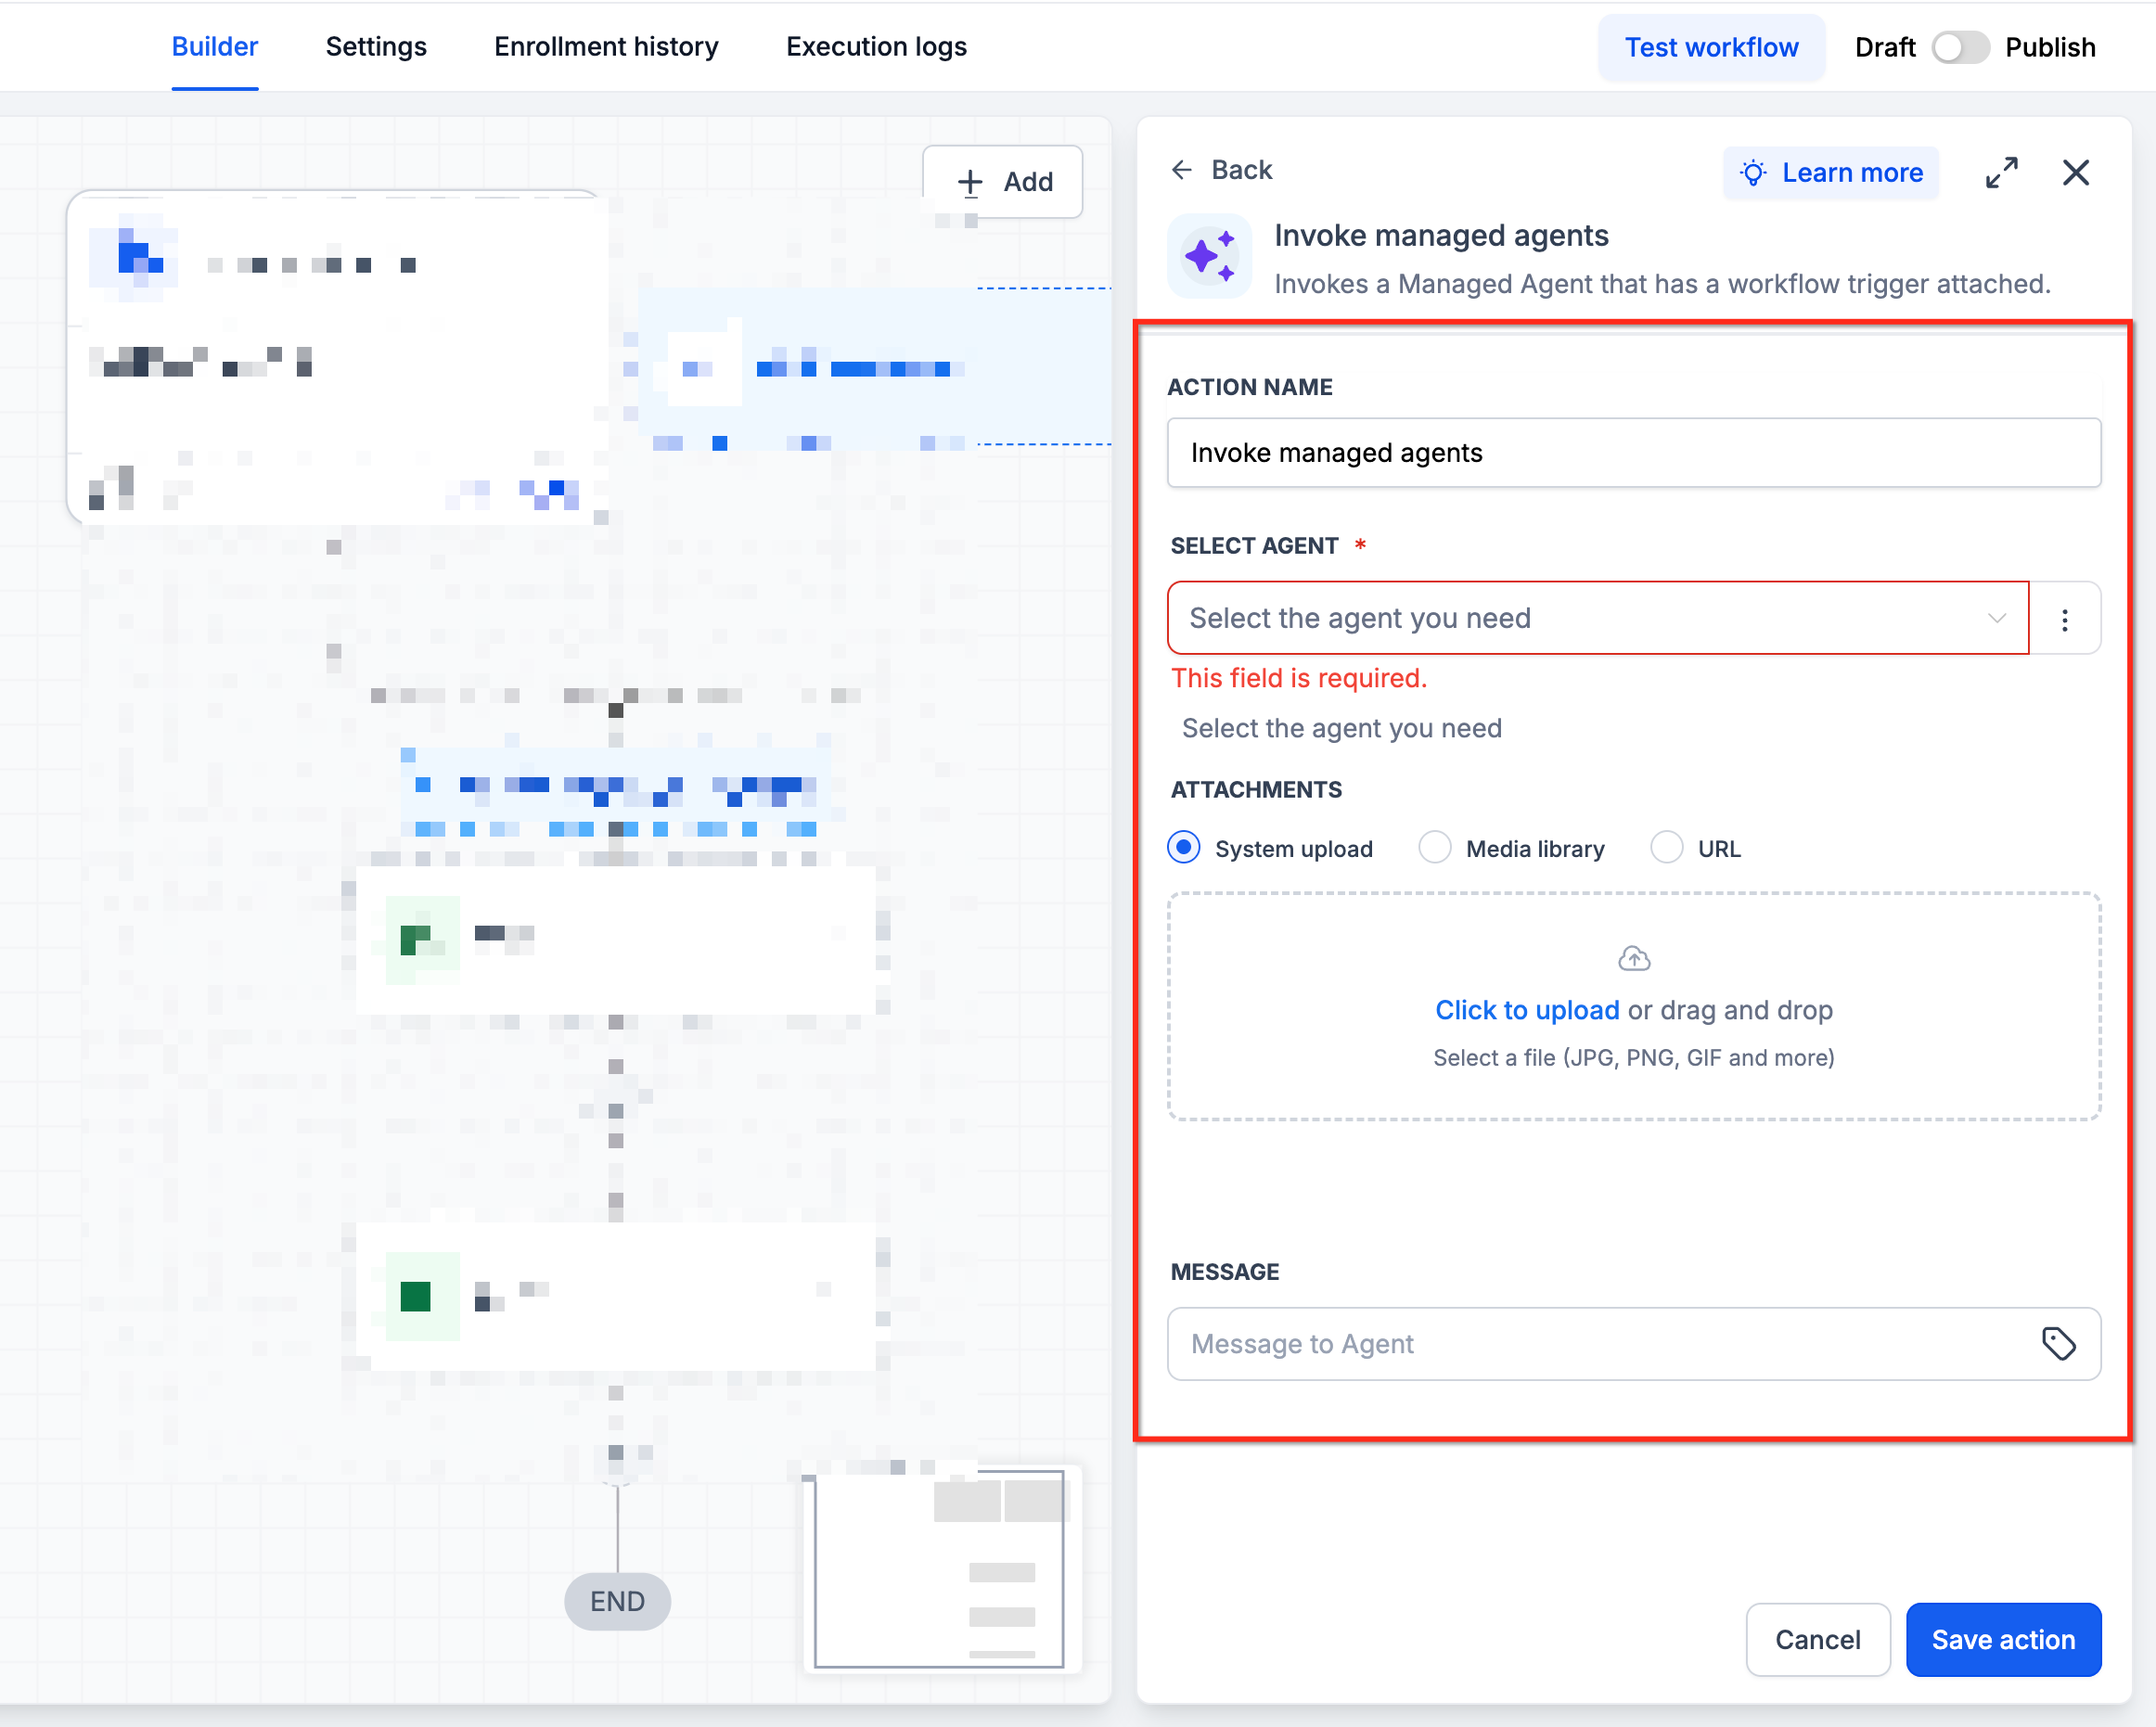
Select the published agent.
Step 3: Write the instruction
Enter the task, add dynamic contact or workflow values, include enough context for the desired outcome, and add attachment context if needed. Example: "Review the available contact information and recent context provided by this workflow. Determine the most relevant next action for this contact and return a concise explanation that the following workflow steps can use."
Step 4: Use the response
Add the action that should run after the agent, open the dynamic-value selector, select the response from the Invoke Managed Agent step, and use it in the downstream action. Add branching or record-update logic where the result should influence the rest of the workflow.
Step 5: Save, test and publish
Save the action, review the full sequence, test with representative test contacts (never real patient data), confirm the agent receives what you expect and later steps use the response correctly, then publish the workflow.
Deploy to API lets your website, product or backend application start and continue conversations with a published Managed Agent through the Managed Agents API. You configure access from the agent builder, then copy generated cURL, Python or JavaScript requests. The same agent can serve Chat, the API and other triggers at the same time, with no separate copy for external software.
Start API setup either way:
Open the agent and add Invoked via API from the Triggers row.
Open the agent's three-dot menu and select Deploy to API.
Both open the API deployment drawer for the same agent.
The trigger gives external software permission to start the agent through the API. It works alongside other triggers. API requests always run the published version of the agent. Changes you make in the builder do not affect API calls until you publish again.
A Private Integration token authenticates your external application. In the deployment drawer, click Configure cURL to:
Select an existing Private Integration token.
Create a new token without leaving the builder (new tokens have the required Managed Agents scopes preselected).
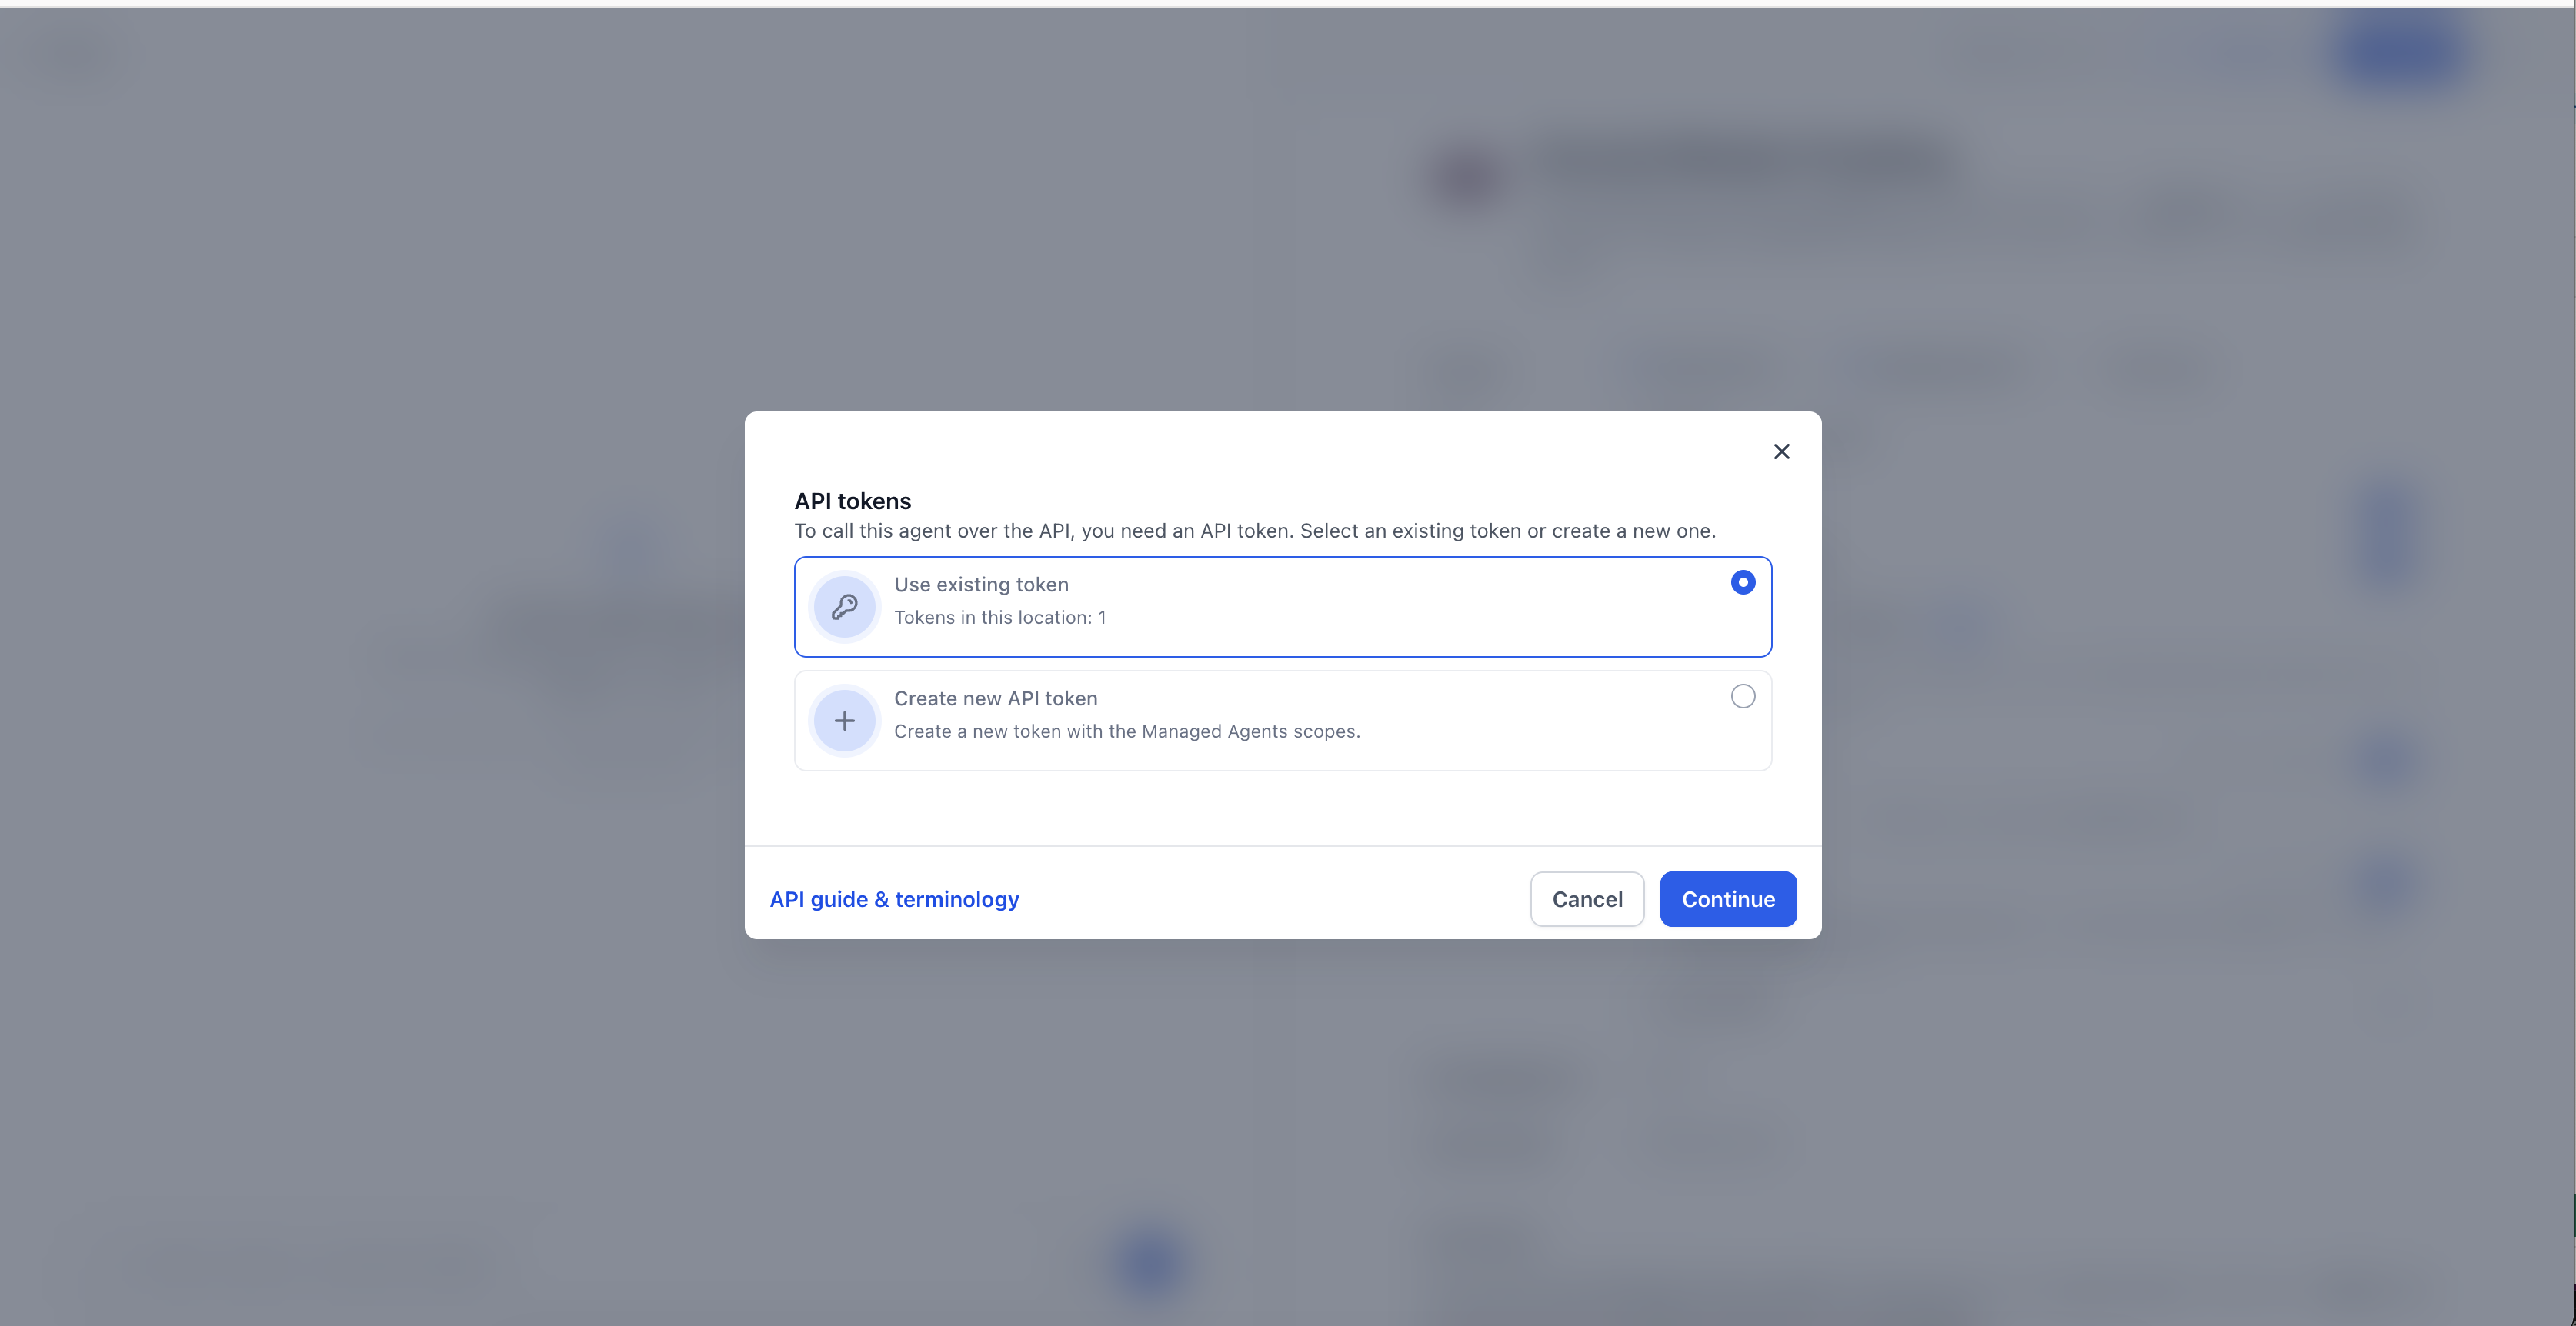
Add the required Managed Agents scopes to an existing token that is missing them.
Only account admins can create API tokens. If you are not an admin, the drawer provides a request you can send to your administrator, and you can still view generated code with a placeholder token so you can see the structure of the integration.
After setup, the configured token appears masked and the full token is never shown again. To get runnable sample code, you can paste your securely stored full token into the drawer. That pasted value is not saved. Store tokens securely and never expose them in public source code, browser-side code, screenshots or repositories.
Option | What it does |
|---|---|
Start a conversation | Creates a new conversation with the agent |
Continue a conversation | Continues an existing conversation by sending the |
Save the sessionId from each response in your application and include it in the next continuation request so the agent keeps its context.
The drawer generates samples for both starting and continuing a conversation in cURL, Python and JavaScript. Use the copy button beside the format you want. Because the drawer fills in the exact endpoint and body for your agent, copy the request from the drawer instead of writing it by hand. API requests go to the API host services.leadconnectorhq.com, which is expected and safe.
The generated requests share this structure (placeholders in angle brackets, replace them with what the drawer shows):
curl --request POST \
  --url "<endpoint shown in the drawer>" \
  --header "Authorization: Bearer <your Private Integration token>" \
  --header "Content-Type: application/json" \
  --header "Idempotency-Key: <unique key for this request>" \
  --data '{ <body shown in the drawer: your message, and sessionId when continuing> }'
The same request in Python and JavaScript sends the same URL, the same three headers and the same JSON body. Treat these points as fixed when adapting a sample:
Authenticate with your Private Integration token.
Include an Idempotency-Key header.
To continue a conversation, send the sessionId from the previous response.
Keep the token on the server side only.
The Idempotency-Key protects you from running the same request twice when a network problem or application retry resends it. The generated requests include one. When a request is retried with the same key, the agent does not execute the same operation again. Keep this behavior in place unless your own code already manages unique request keys.
State | API behavior |
|---|---|
Published | API calls run the published version |
Draft changes not yet published | Do not affect API calls |
Unpublished | API invocation stops and requests return |
Unpublishing does not delete instructions, triggers, knowledge or other configuration.
API-triggered runs appear in the agent's Activity tab with its other runs. When an API call misbehaves:
Open the agent and select Activity to confirm the request reached the agent and see how it was handled.
Check that the agent is published (a 404 usually means it is not).
Check that the token includes the Managed Agents scopes and has not been revoked.
Check that you are sending the correct sessionId when continuing.
Use Agent Logs for deeper troubleshooting. See the Agent Logs, Metrics, Monitors and AI Usage guide and the guide on Testing, Publishing, Unpublishing and the Activity Feed.
Invoked via API | Invoked from a workflow | |
|---|---|---|
Called from | Software outside Aesthetix CRM (your website, product, backend) | A workflow in Marketing > Workflows |
Uses | A published agent | A published agent |
Setup | Token, Deploy to API drawer, generated requests | Invoke Managed Agent workflow action |
Returns | An API response, with a | A response usable in later workflow actions |
One agent can have both triggers, along with Chat and other triggers.
Why does my Managed Agent not appear in the Invoke Managed Agent action?
Confirm that the agent has the Invoked from a workflow trigger and is published. Only eligible published agents with that trigger are listed.
Is Invoke Managed Agent the same as Invoke Agent Studio Agent?
No. Invoke Managed Agent is for Managed Agents with the Invoked from a workflow trigger. Invoke Agent Studio Agent is for flow-based agents and uses its own workflow-trigger setup.
Can the agent change CRM data when a workflow invokes it?
Yes, using the tools and CRM capabilities configured for that agent. Review the agent's permissions and instructions carefully before publishing, and keep fixed business rules in the workflow where possible.
Which version of the agent does the API use?
The published version. Draft edits do not affect API calls until you publish again.
What happens if I unpublish an agent my software is calling?
API calls return 404 until the agent is published again. Nothing is deleted.
Do I need a new token for every agent?
No. Choose an existing Private Integration token or create one, as long as it includes the required Managed Agents scopes.
What if I am not an admin?
Only admins can create API tokens. Use the request the drawer provides to ask an admin, and view generated code with a placeholder token in the meantime.
How do I keep context across API calls?
Save the sessionId from the previous response and send it with the Continue a conversation request.
Does the drawer save the full token I paste in?
No. The pasted token is only used to populate the sample code and is not saved. The configured token stays masked.
Can I send patient health information through the workflow action or the API?
No. Aesthetix CRM's AI features are not approved for PHI. Keep clinical details out of workflow instructions, attachments, API requests and the agent's configuration.
