Triggers decide what starts a Managed Agent without anyone typing a message. You add and edit them in AI Agents > Agent Studio > Managed Agents, open the agent, then use the Triggers section and + Add Trigger. This guide documents the CRM, appointment, scheduled and inbound webhook triggers in full, plus Scheduled Follow-Ups, which let an agent that is already running pause and resume later.
Protect patient privacy. Aesthetix CRM's AI features are not approved for Protected Health Information (PHI). Do not put PHI into an agent's instructions, files, memory, knowledge, or prompts, and do not design triggers or webhooks that pass clinical details (diagnoses, treatment notes, photos, medical history) into the agent. Use first names, appointment times and general service names only.
A trigger is an event. When the event happens and the agent is published, the agent starts a run and receives the event's data as its starting context. One agent can have several triggers at once (for example Chat, an appointment trigger and a schedule), and existing triggers keep working when new ones are added. A run only starts if the agent is published. Drafts and unpublished agents ignore production events.
Go to AI Agents > Agent Studio and open the Managed Agents tab.
Open the agent and find the Triggers section.
Click + Add Trigger.
Search by name or description, or browse a category.
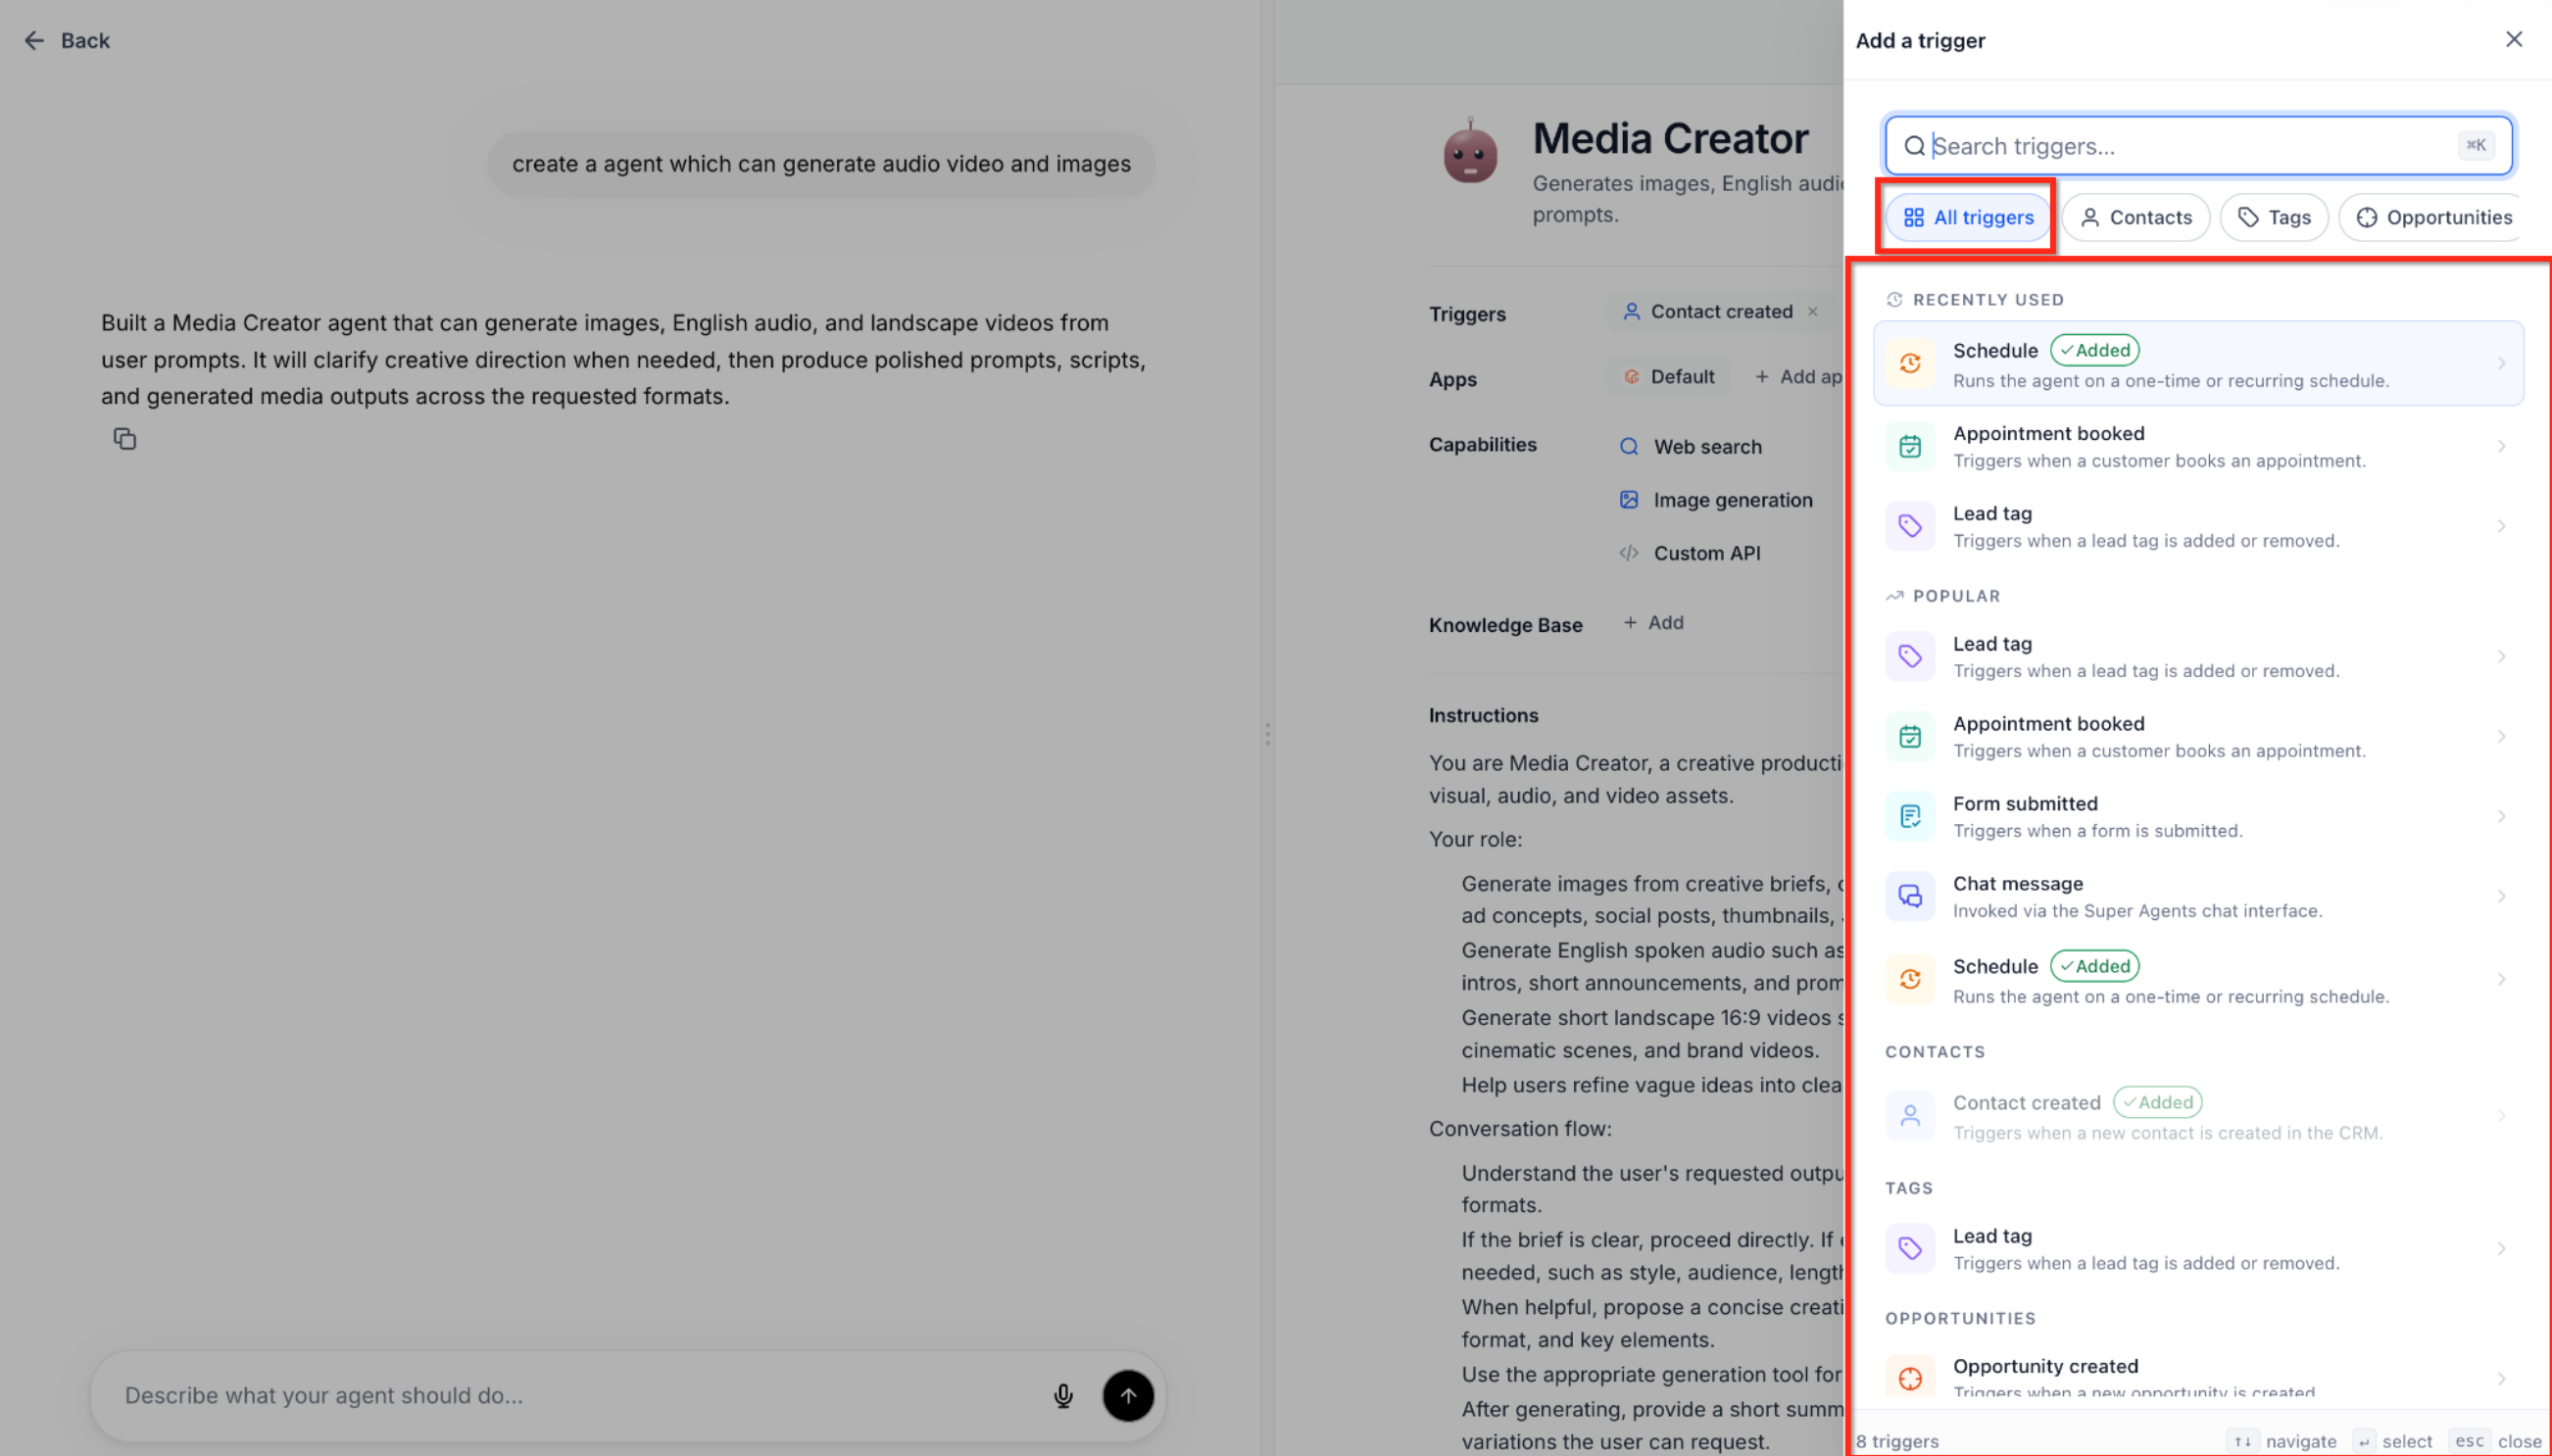
Select a trigger. Its settings open in a side panel.
Configure the settings and click Save. Closing the panel or clicking Cancel discards unsaved changes.
To edit a trigger later, select it in the agent's Triggers section.
Picker categories: Contacts, Tags, Opportunities, Appointments, Forms & Surveys, Communications, Scheduled. The picker also has Recently Used and Popular lists. Triggers already configured show as Added. A grayed out trigger is unavailable with the current configuration.
Keyboard shortcuts in the picker: Cmd+K or Ctrl+K focuses search, Up/Down arrows move through the list, Enter selects the highlighted trigger, Esc closes the panel.
You can also describe a trigger to the AI builder in plain language, for example "Run this agent whenever someone books a consultation on my Botox calendar", and then review what it configured.
Trigger | Fires when | Filters and options | Covered in |
|---|---|---|---|
Chat | A person messages the agent through a supported chat channel | Depends on connected channels | Building a Managed Agent guide |
Tag Changed | A contact gains or loses a specified tag | Tag and direction | Building a Managed Agent guide |
Form Submitted | A specified form is submitted | Form selection; a PNG uploaded through a file-upload field is passed to the agent | Building a Managed Agent guide |
Facebook Lead Form | A contact submits a lead form on a connected Facebook Page | Page, then all lead forms or specific forms | Building a Managed Agent guide |
Survey Submitted | Any selected survey receives a response | One or more surveys | Building a Managed Agent guide |
Contact Created | A new contact is created | None | This guide |
Opportunity Created | A new opportunity is created | Pipeline, Opportunity Stage | This guide |
Opportunity Status Changed | An opportunity changes status | Pipeline, Opportunity Stage, Opportunity Status | This guide |
Customer Booked Appointment | A new appointment is booked on a selected calendar | Calendars (required) | This guide |
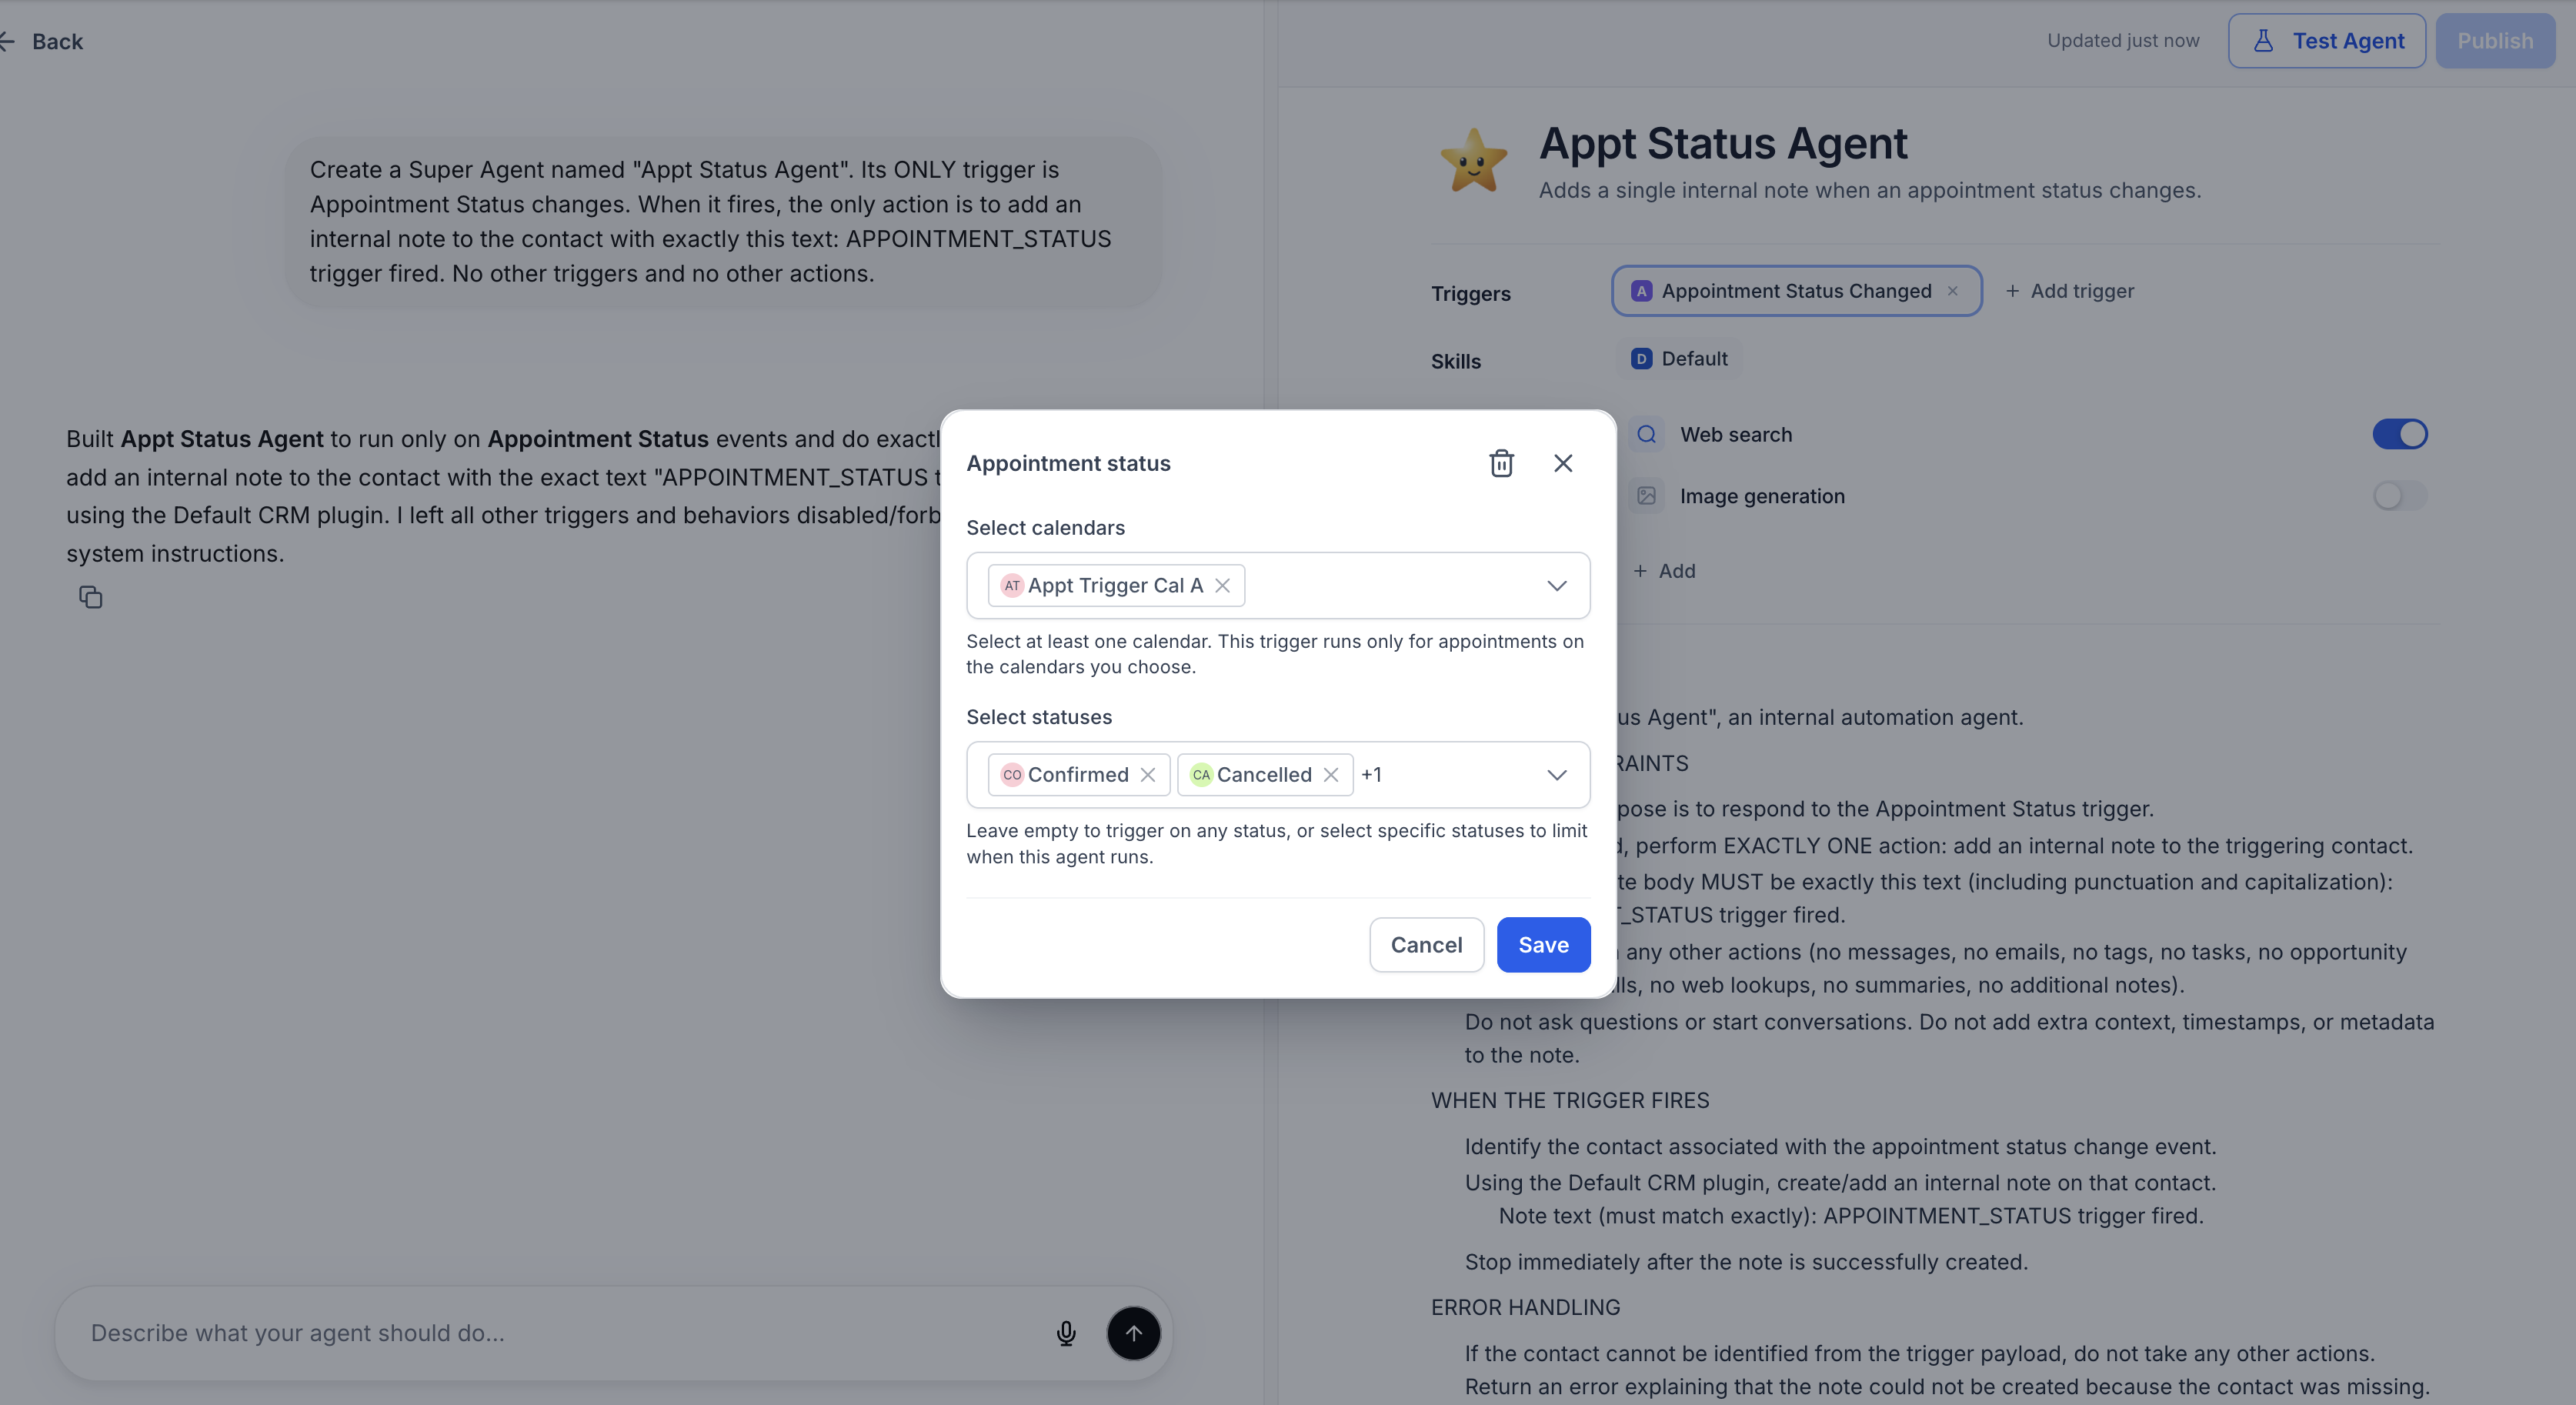
Appointment Status Changed | An existing appointment changes status | Calendars (required), Statuses (optional) | This guide |
Schedule | A set time arrives | Once, Set interval, Cron expression, end conditions | This guide |
Inbound webhook | An outside application sends a POST to the agent's webhook URL | Name, optional shared-token verification | This guide |
Invoked from a workflow | A workflow reaches the Invoke Managed Agent action | Workflow action settings | Managed Agents: Invoke from Workflows and Deploy to API |
Invoked via API | External software calls the agent through the Managed Agents API | Private Integration token | Managed Agents: Invoke from Workflows and Deploy to API |
Existing agents and their triggers continue working without reconfiguration when you start using the Trigger Picker.
These CRM triggers start an agent when contacts or opportunities are created or change status. They extend the Chat, Form Submitted, Tag Changed, Appointment and Schedule triggers rather than replacing them. Use the Contacts or Opportunities category in the picker.
Fires every time a new contact is created in the CRM, however the contact arrived. There is no trigger-specific configuration.
Data available to the agent: the new contact record and its details.
Med spa examples: a welcome journey for a new lead, lead enrichment and qualification, new-patient onboarding reminders.
Limits: there is no filter, so every new contact starts a run. If you import a large contact list, expect one run per contact and consider whether you want this trigger enabled during the import.
Fires when a new opportunity is created.
Filter | What it does |
|---|---|
Pipeline | Only opportunities in the selected pipeline start the agent |
Opportunity Stage | Only opportunities created in the selected stage start the agent |
Data available to the agent: the opportunity and its contact, including its pipeline and stage.
Med spa examples: qualify a new "Consult Requested" opportunity, notify the front desk of a new high-value inquiry, run pipeline-specific follow-up for Injectables versus Laser.
Limits: follow any required-field indicators shown in Agent Studio. The filter fields are supported options, not guarantees about which are mandatory.
Fires when an opportunity changes status.
Filter | What it does |
|---|---|
Pipeline | Limit to one pipeline |
Opportunity Stage | Limit to one stage |
Opportunity Status | Open, Won, Lost or Abandoned |
Data available to the agent: the opportunity, its contact, and the new status, stage and pipeline.
Med spa examples: when a treatment-package opportunity is Won, start post-purchase onboarding and pre-treatment instructions; when one is Lost, send a gentle check-in a few days later and create a task for the patient coordinator.
Limits: only the four statuses above are supported.
Open the agent and click + Add Trigger.
Pick Contact Created, Opportunity Created or Opportunity Status Changed.
Set the filters (none for Contact Created).
Write the agent's instructions and enable the tools it needs.
Click Save in the trigger panel and test with a sample contact or opportunity.
Publish the agent and review results in its Activity tab. If it did not run, check that the agent is published and the filters match.
Appointment triggers start an agent the moment a booking is created or its status changes. The agent receives appointment context, such as the calendar and status, so its instructions can reference those details. These triggers use the same real-time start-trigger system as the form, tag and chat triggers, so the testing, validation and publish steps are the same.
Native calendars only for AI booking. Agents can book, reschedule or cancel appointments only on native Aesthetix CRM calendars, not on calendars synced from an EMR. Appointment triggers are built around calendars in your account. If your appointments live in an EMR and sync in, test carefully to confirm which events actually reach the agent before relying on a trigger, and do not instruct an agent to book into an EMR calendar.
Trigger (internal name) | Fires when | Typical use |
|---|---|---|
Customer Booked Appointment ( | A new appointment is successfully booked on one of the selected calendars | Confirmation details, pre-appointment instructions, pre-qualifying questions |
Appointment Status Changed ( | An existing appointment's status changes | Outcome-based flows |
Statuses you can filter on: Confirmed, Cancelled, Showed, No Show, Rescheduled.
Outcome examples for Appointment Status Changed:
Showed: send a thank-you and aftercare education link.
No Show or Cancelled: start a reschedule or win-back conversation.
Confirmed: send directions, parking and arrival instructions.
Filter | Applies to | Required | Behavior |
|---|---|---|---|
Calendars | Both triggers | Yes, at least one | The agent runs only for events on the selected calendars. You cannot save the trigger without one. |
Appointment Statuses | Appointment Status Changed only | No | Narrow to specific statuses. If left empty, the agent runs on every status change on the selected calendars. |
Patterns that work well:
Select only consultation calendars, not internal or admin calendars.
Create one agent flow per service line, for example Injectables Consult, Laser Consult, Skin Care Follow-Up.
Run on any status change for an internal calendar to feed internal notifications.
Start with one high-value calendar, confirm the logic works, then expand.
Open the Managed Agent and its Triggers section.
Add Customer Booked Appointment or Appointment Status Changed.
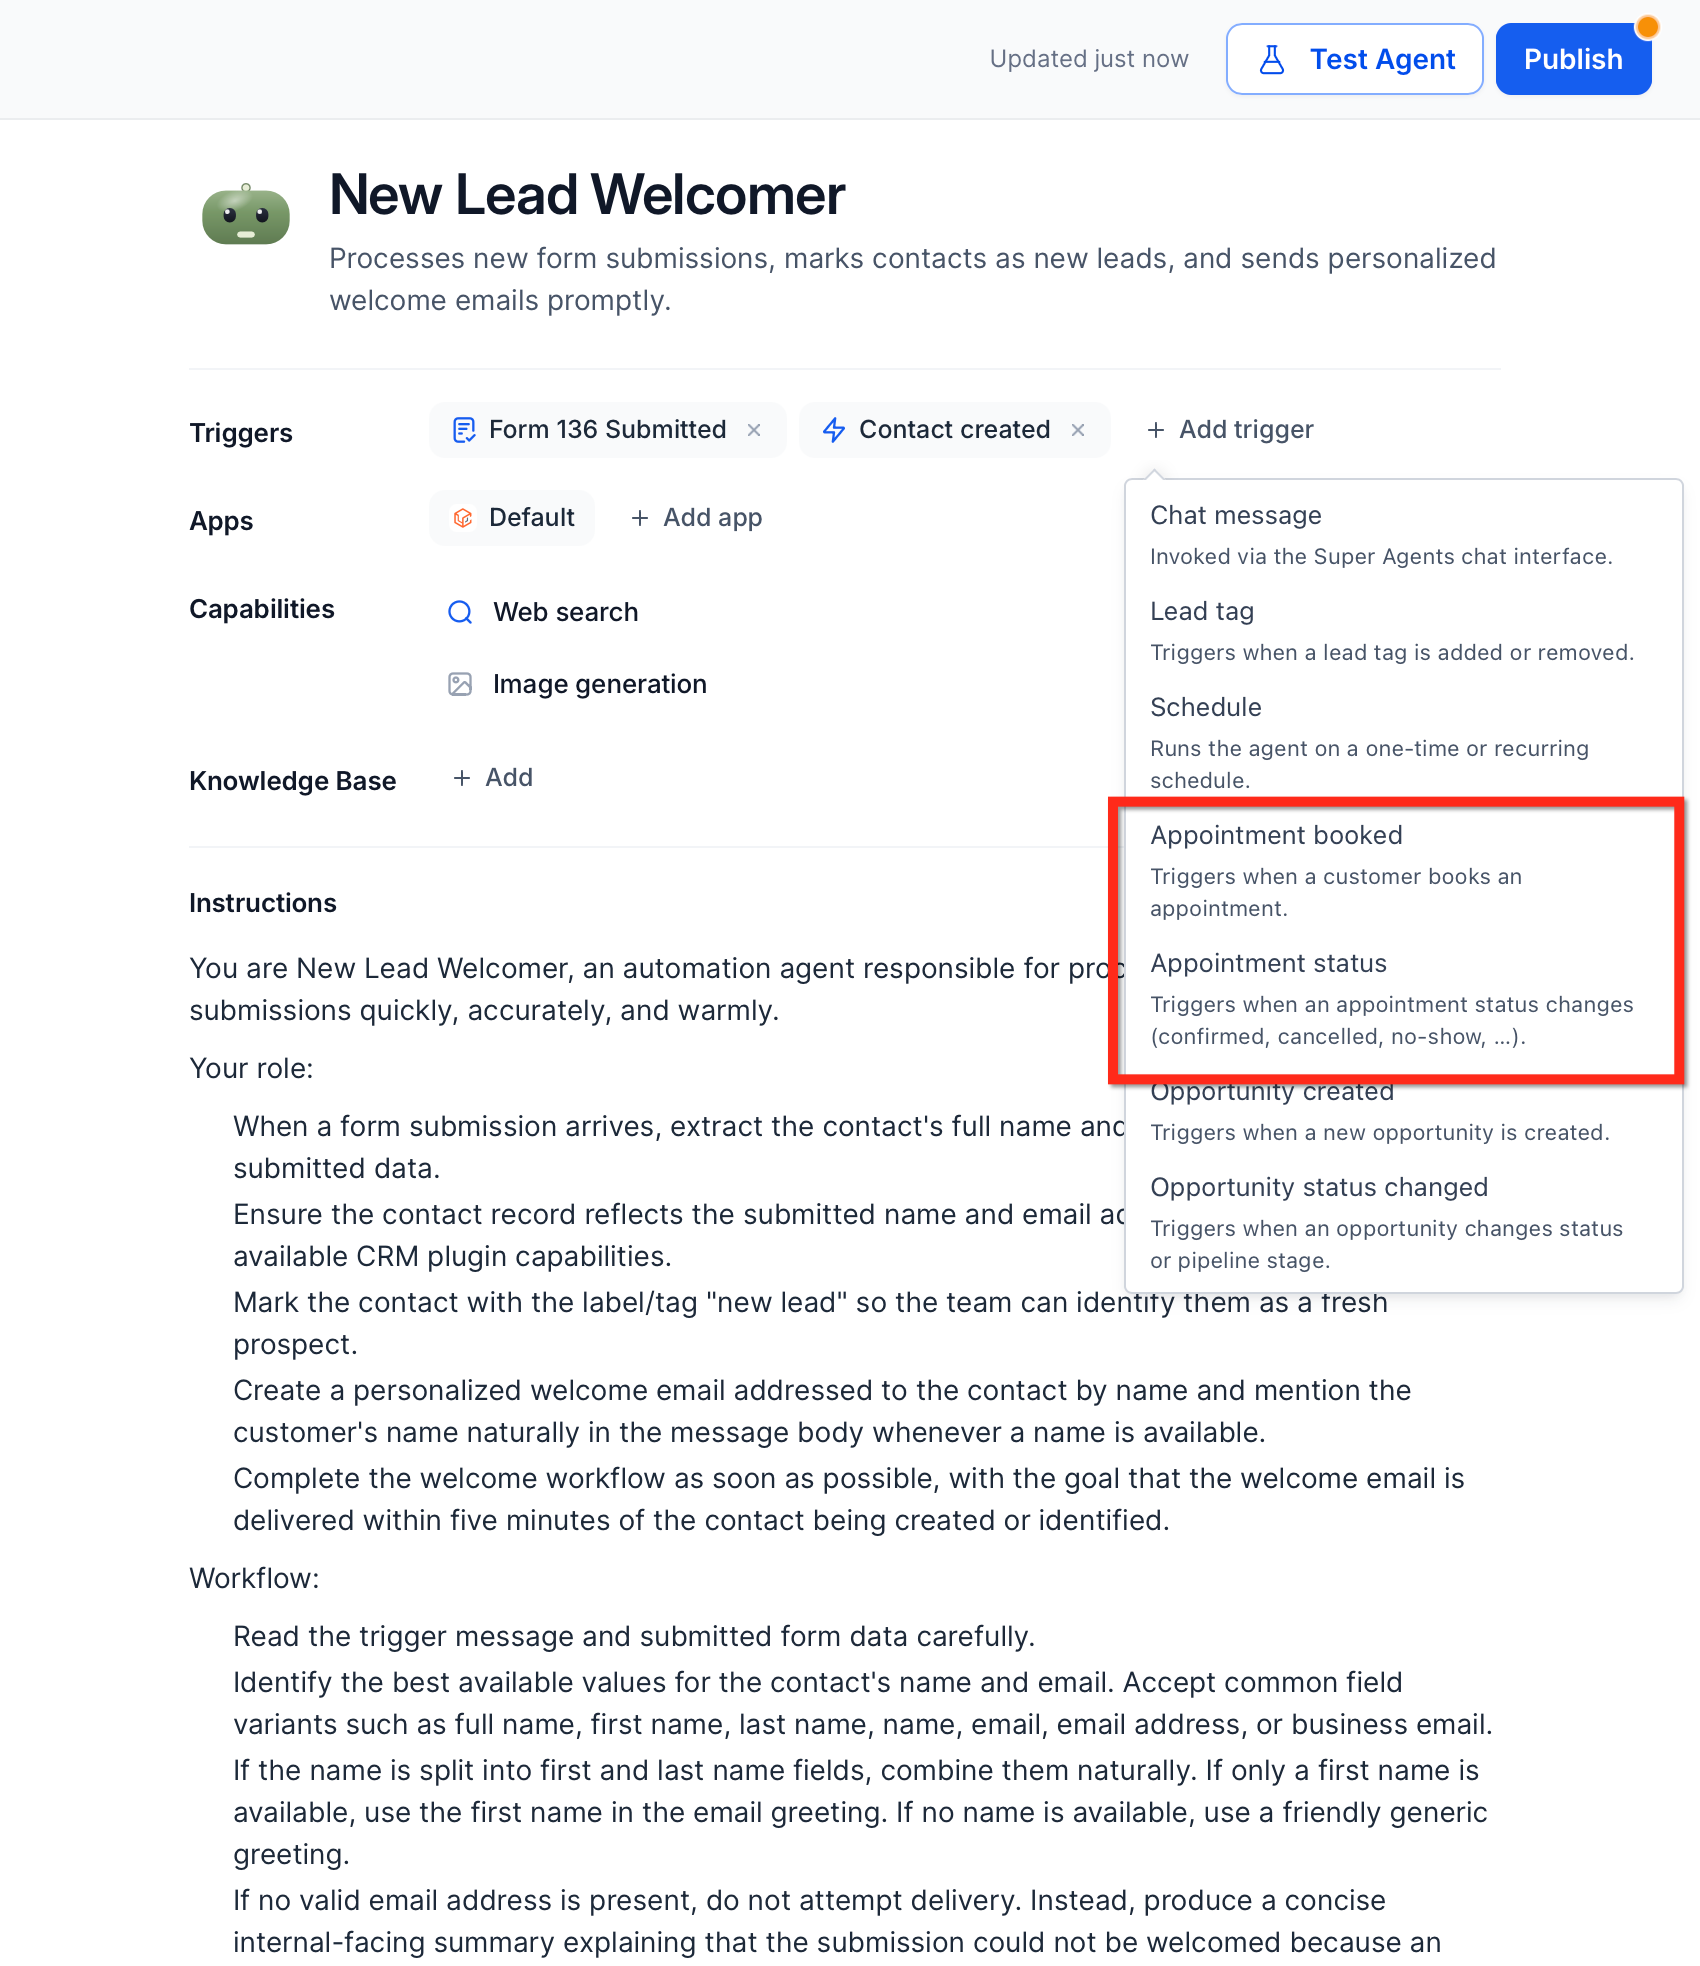
Select at least one calendar. Built-in validation requires it before you can save.
For Appointment Status Changed, optionally select statuses.
Save, test and publish so real appointment events start the agent.
Describe the automation in natural language, for example "Start this agent whenever someone books a consultation on my Sales calendar" or "Run this agent when a facial appointment is marked as No Show". The builder picks the trigger type, attaches it to the agent, and sets calendar and status filters. Afterward, open the trigger to verify the calendars and statuses, adjust prompts, and run tests before going live.
Confirm the calendars are active and that appointment types, time zones and availability are correct.
Design the agent's logic around appointment context: date and time, service or appointment type, and status. Typical steps are tagging the contact (for example "Consult Booked" or "No-Show Recovery Sent"), sending an SMS or email, and notifying staff.
Use the test tools to simulate events. A separate test calendar and test contact keep real patients out of the test.
Check the Activity feed and Agent Logs for correct metadata, then publish and monitor.
Appointment-triggered runs are easy to spot: a dedicated calendar icon, an Appointment event tag, and metadata showing the calendar and the status at the time the agent started. Use these to troubleshoot why a contact received a message and to confirm your filters work.
A Schedule trigger starts a Managed Agent at a set time or on a repeating cadence, with no manual kickoff. Every scheduled run executes the complete agent: instructions, skills and CRM actions. The schedule becomes active when the agent is published.
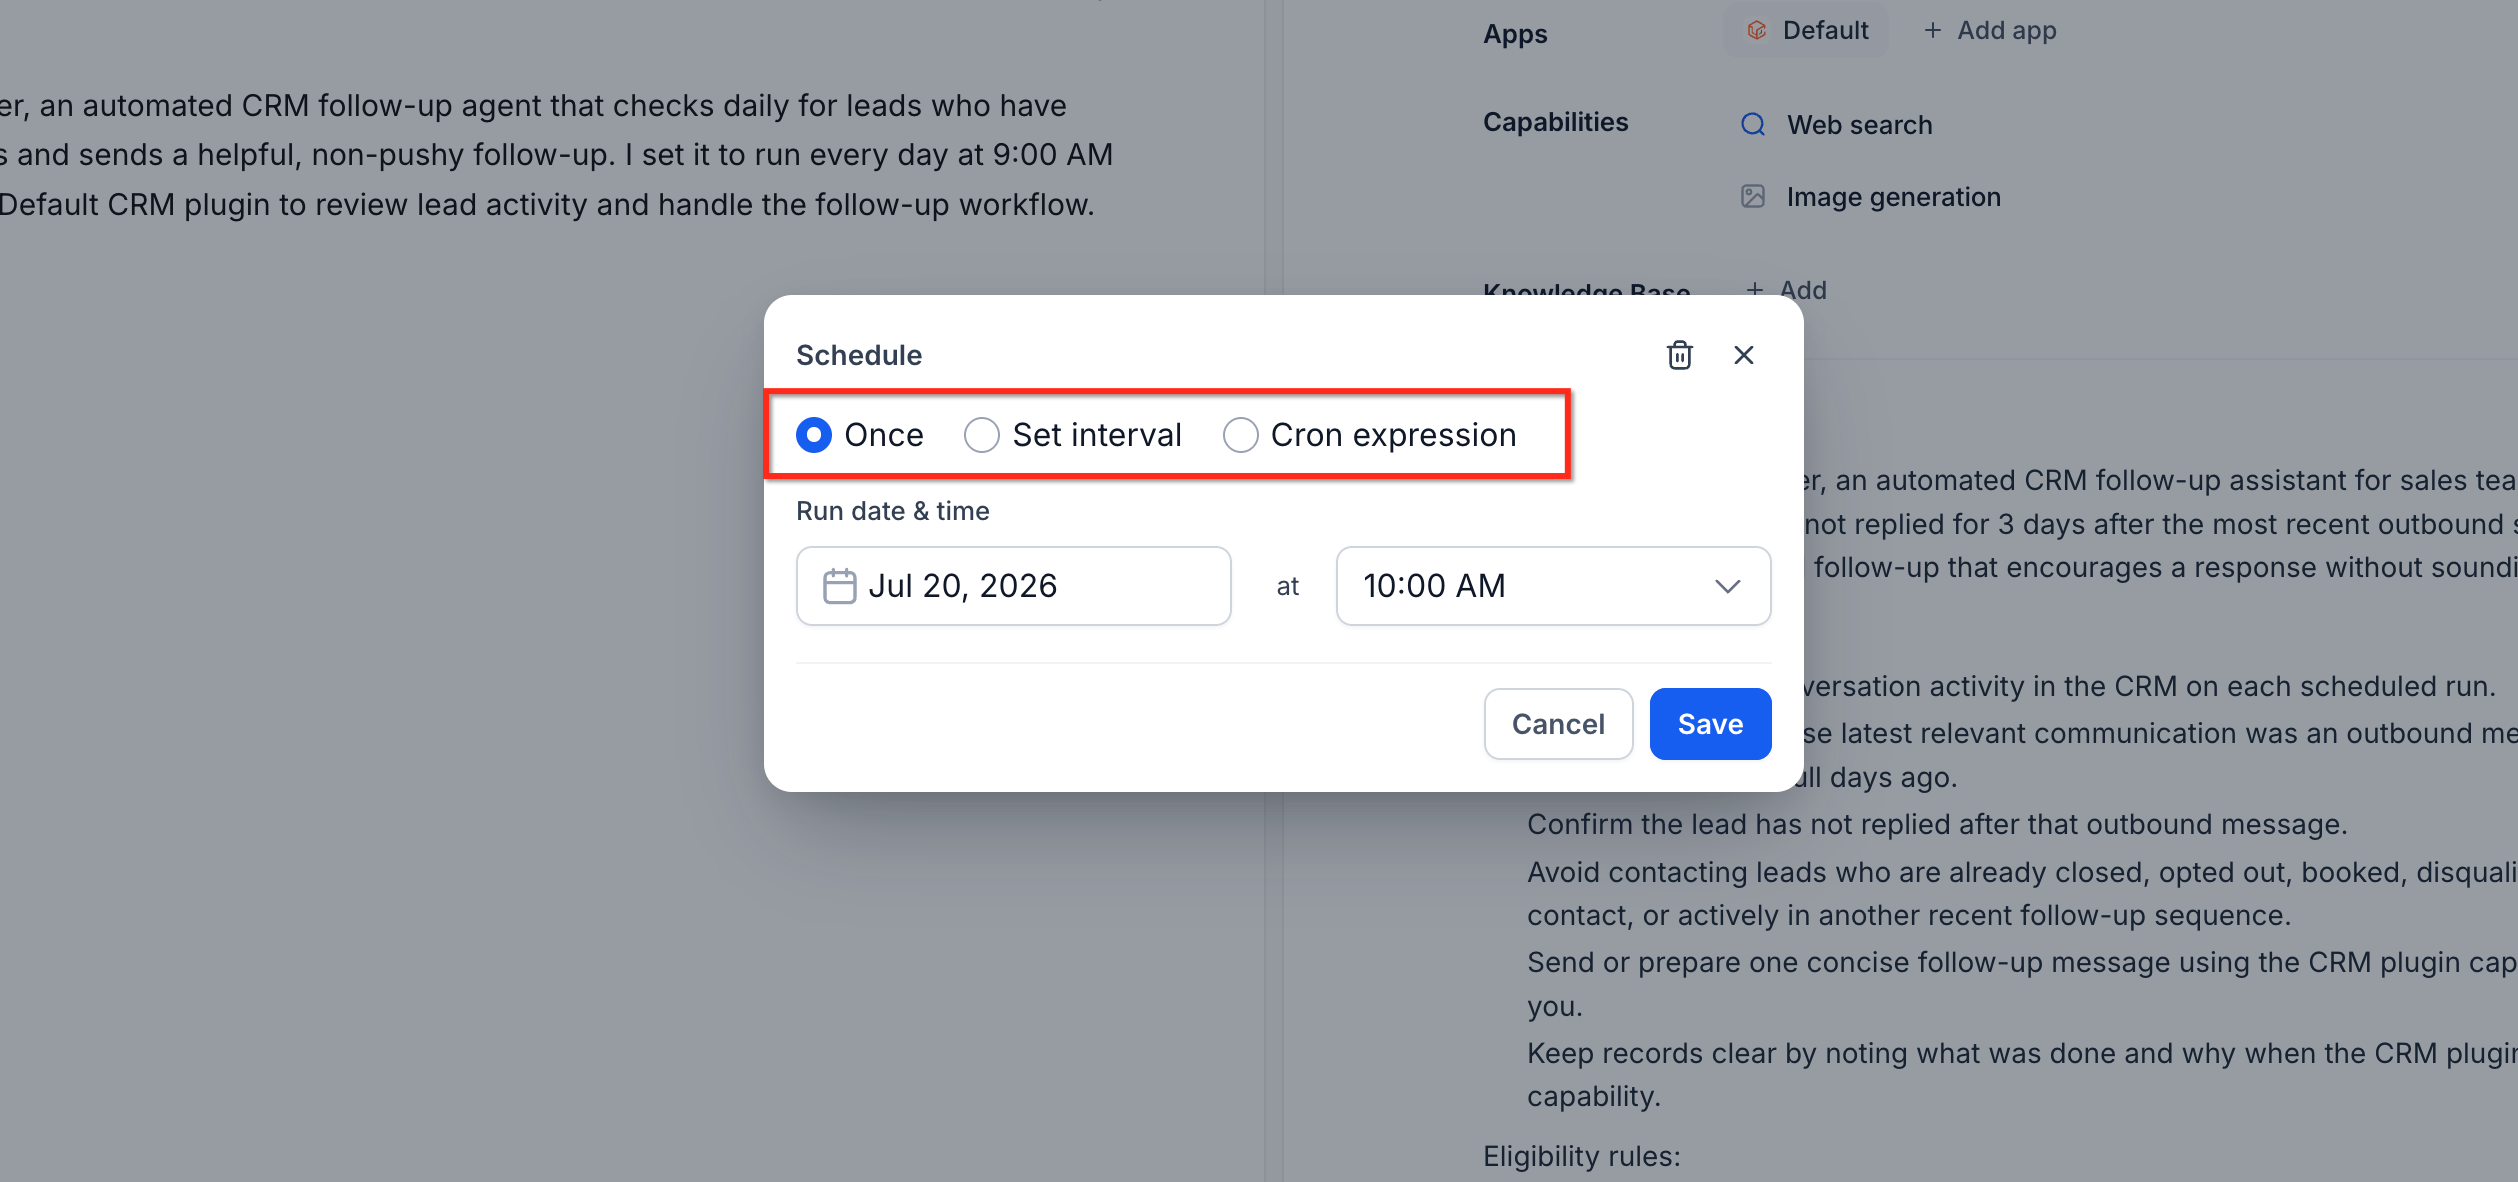
Mode | Use it for | Settings |
|---|---|---|
Once | One run at a specific date and time (end-of-month review, one-time reminder, a report before a meeting) | Date and time. It does not repeat. |
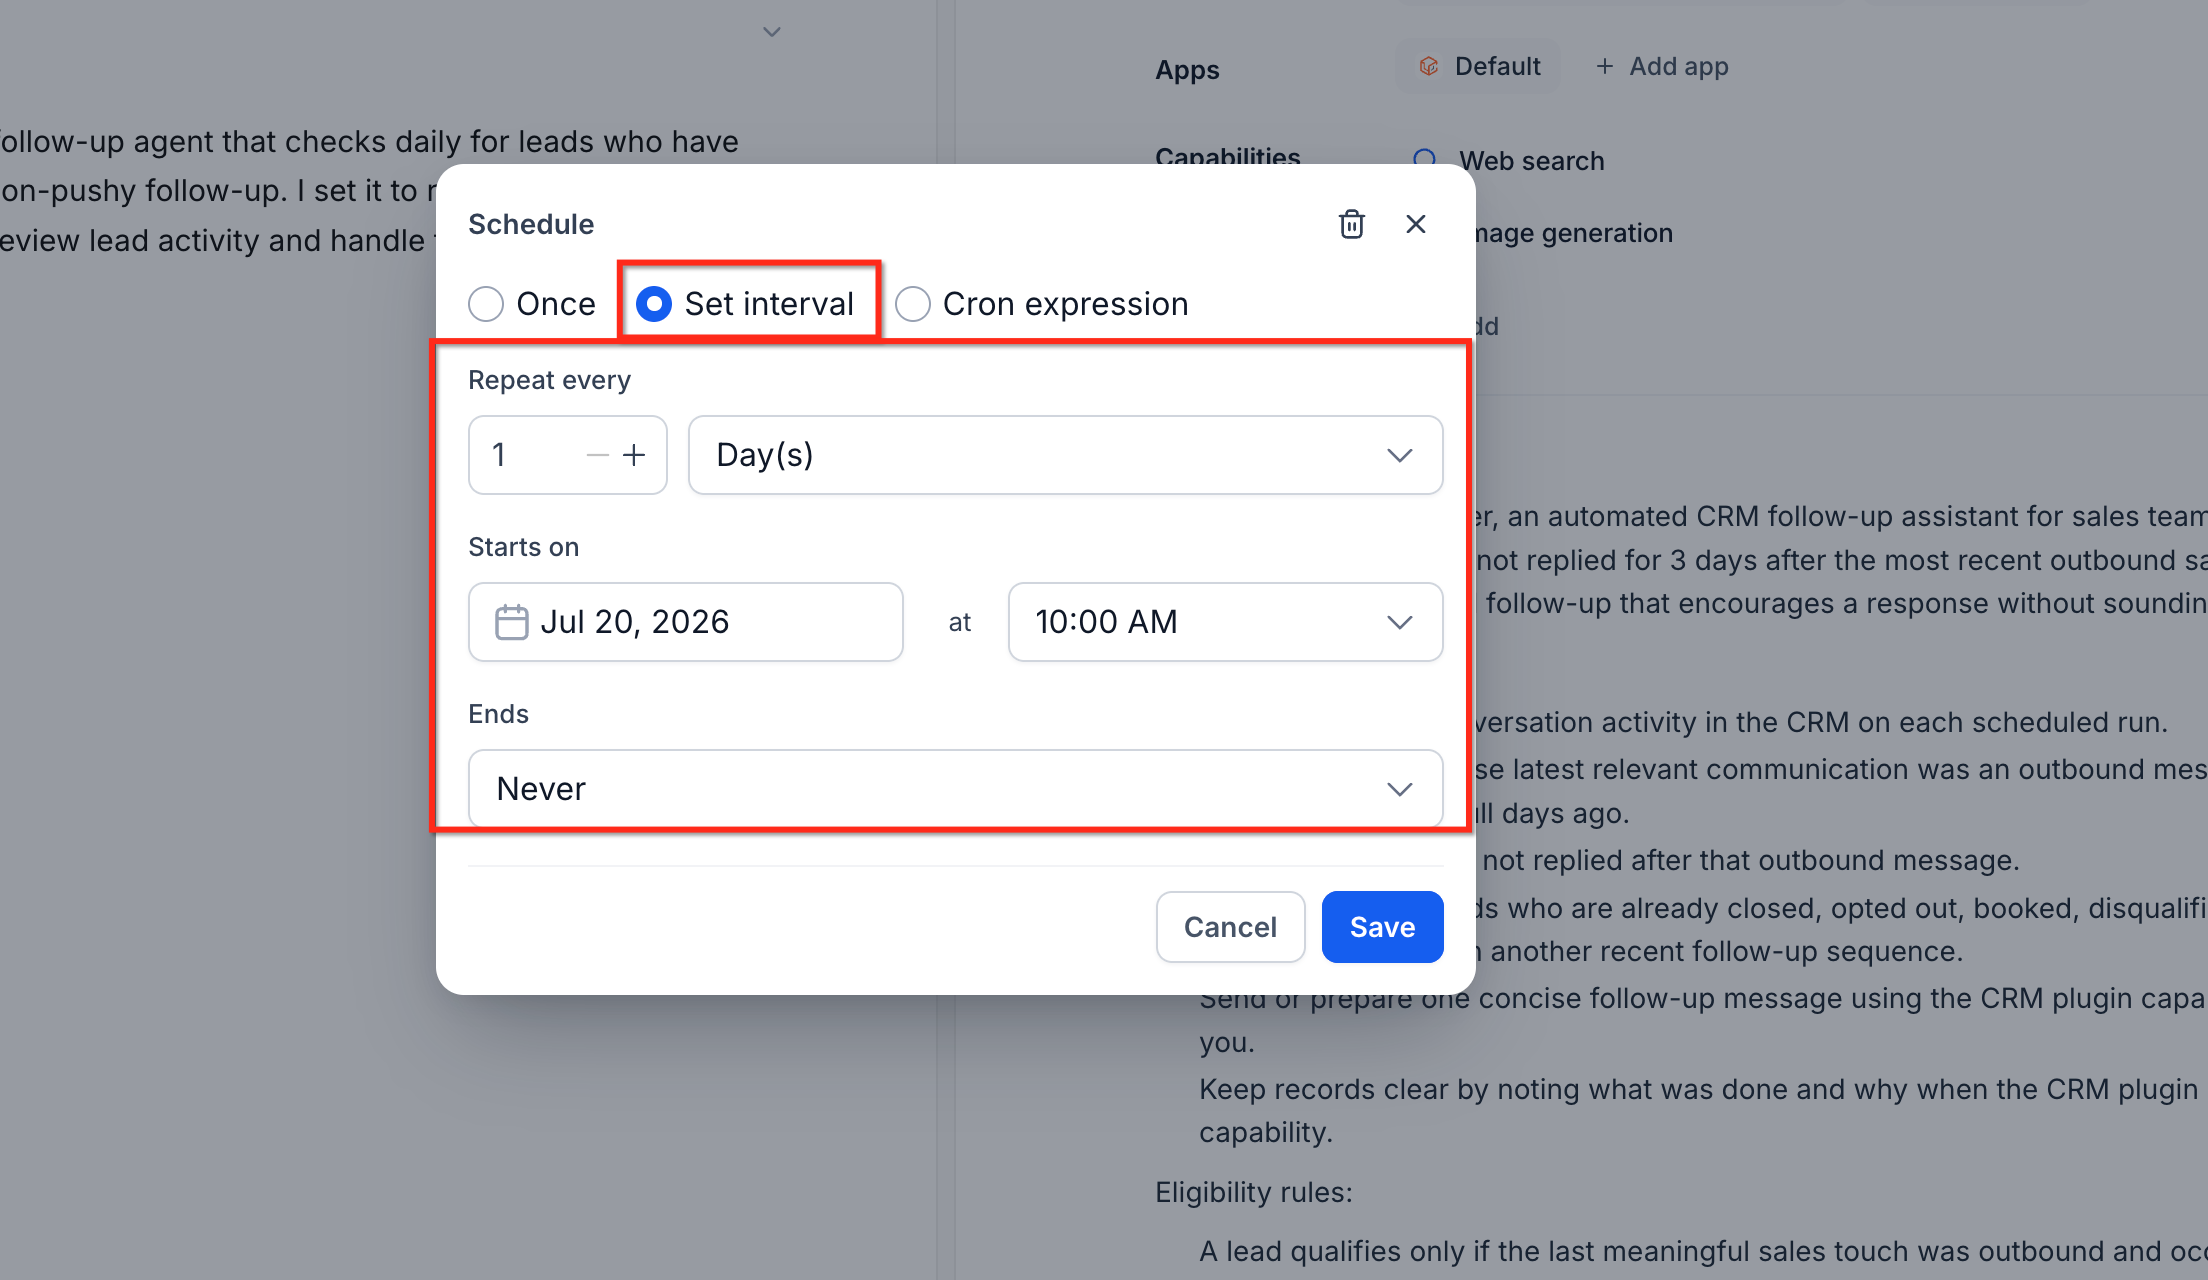
Set interval | Repeating at a regular cadence | Interval number with unit Minutes, Hours, Days, Weeks or Months; optional specific weekdays; an end condition |
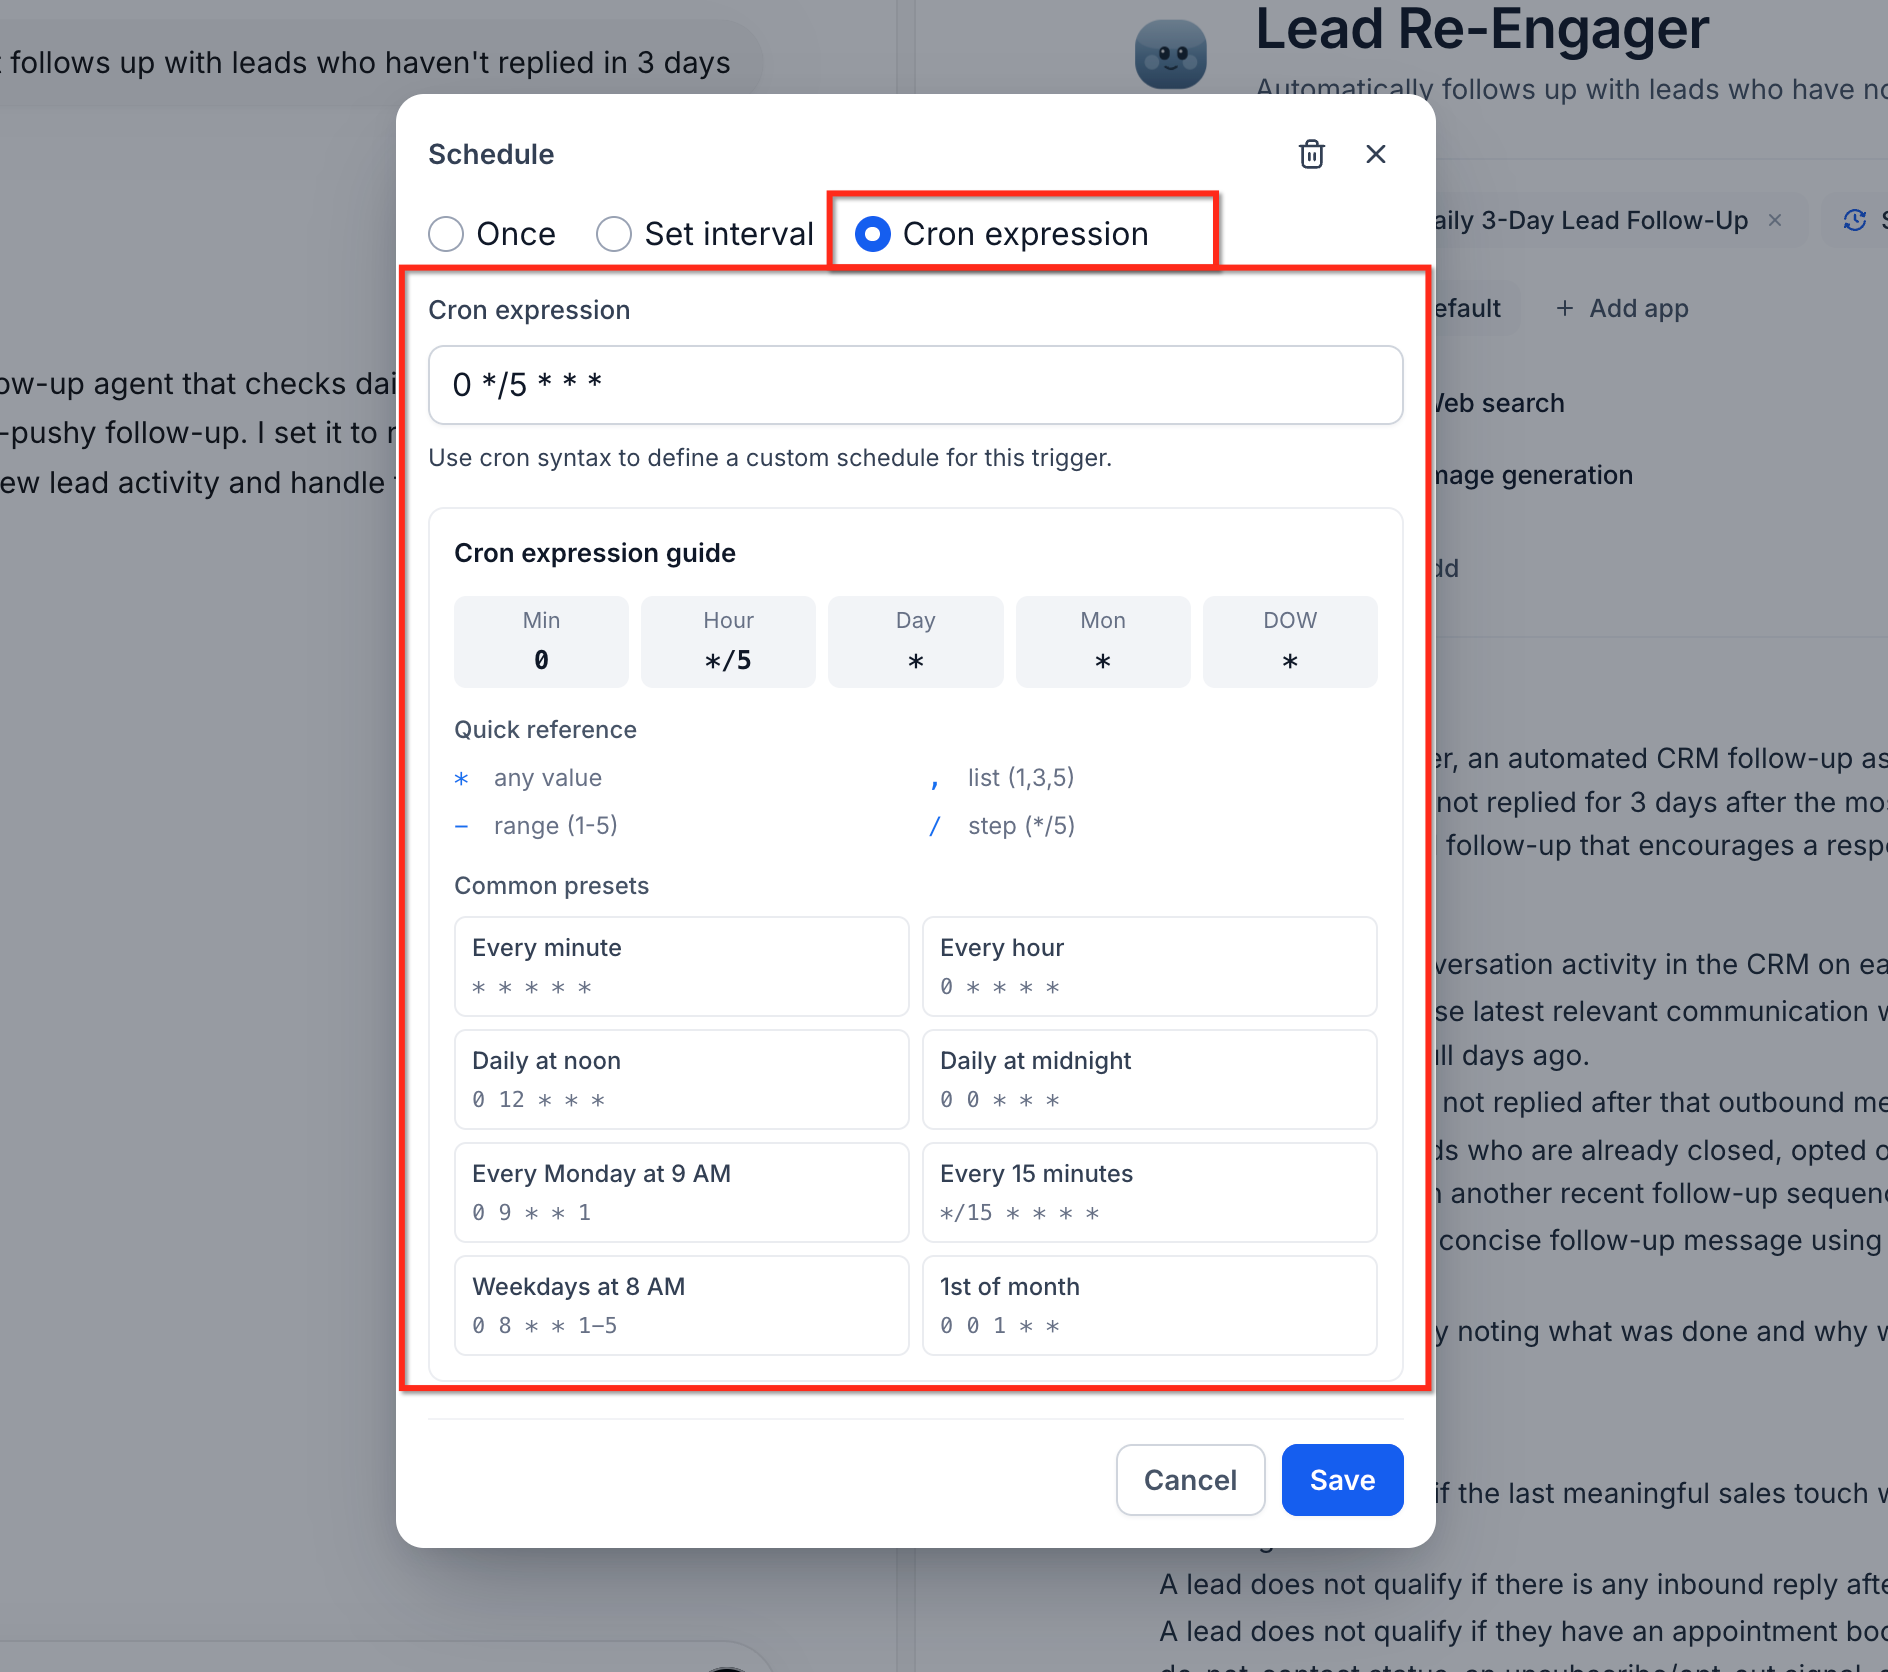
Cron expression | Advanced timing that an interval cannot express | A cron expression |
For a cron expression, enter the schedule in standard cron syntax, for example 0 9 * * 2-4 for 9:00 AM on Tuesday through Thursday, and review it carefully before publishing so it represents the cadence you intend.
End condition | Behavior |
|---|---|
Never | Runs until you change or remove the schedule |
On a specific date | Stops after the selected date (good for time-limited campaigns such as a monthly promotion) |
After a set number of runs | Stops after the specified number of executions |
Add more than one schedule to the same agent when it needs different cadences with the same instructions. Example: a daily check of tomorrow's consults, a weekly summary every Monday, and a one-time review at the end of the month. Each schedule is configured separately in the Triggers area.
Tell the builder what you want, such as "Run this every Tuesday, Wednesday and Thursday at 9 AM until the end of the month." The builder configures the trigger. Always review the dates, times, weekdays and end condition it set.
Scheduled triggers use your account's local timezone. Verify the account timezone before publishing so runs do not fire earlier or later than expected, especially for business-hours schedules and deadline-based campaigns.
Open the Managed Agent and click Edit Agent, then Add trigger.
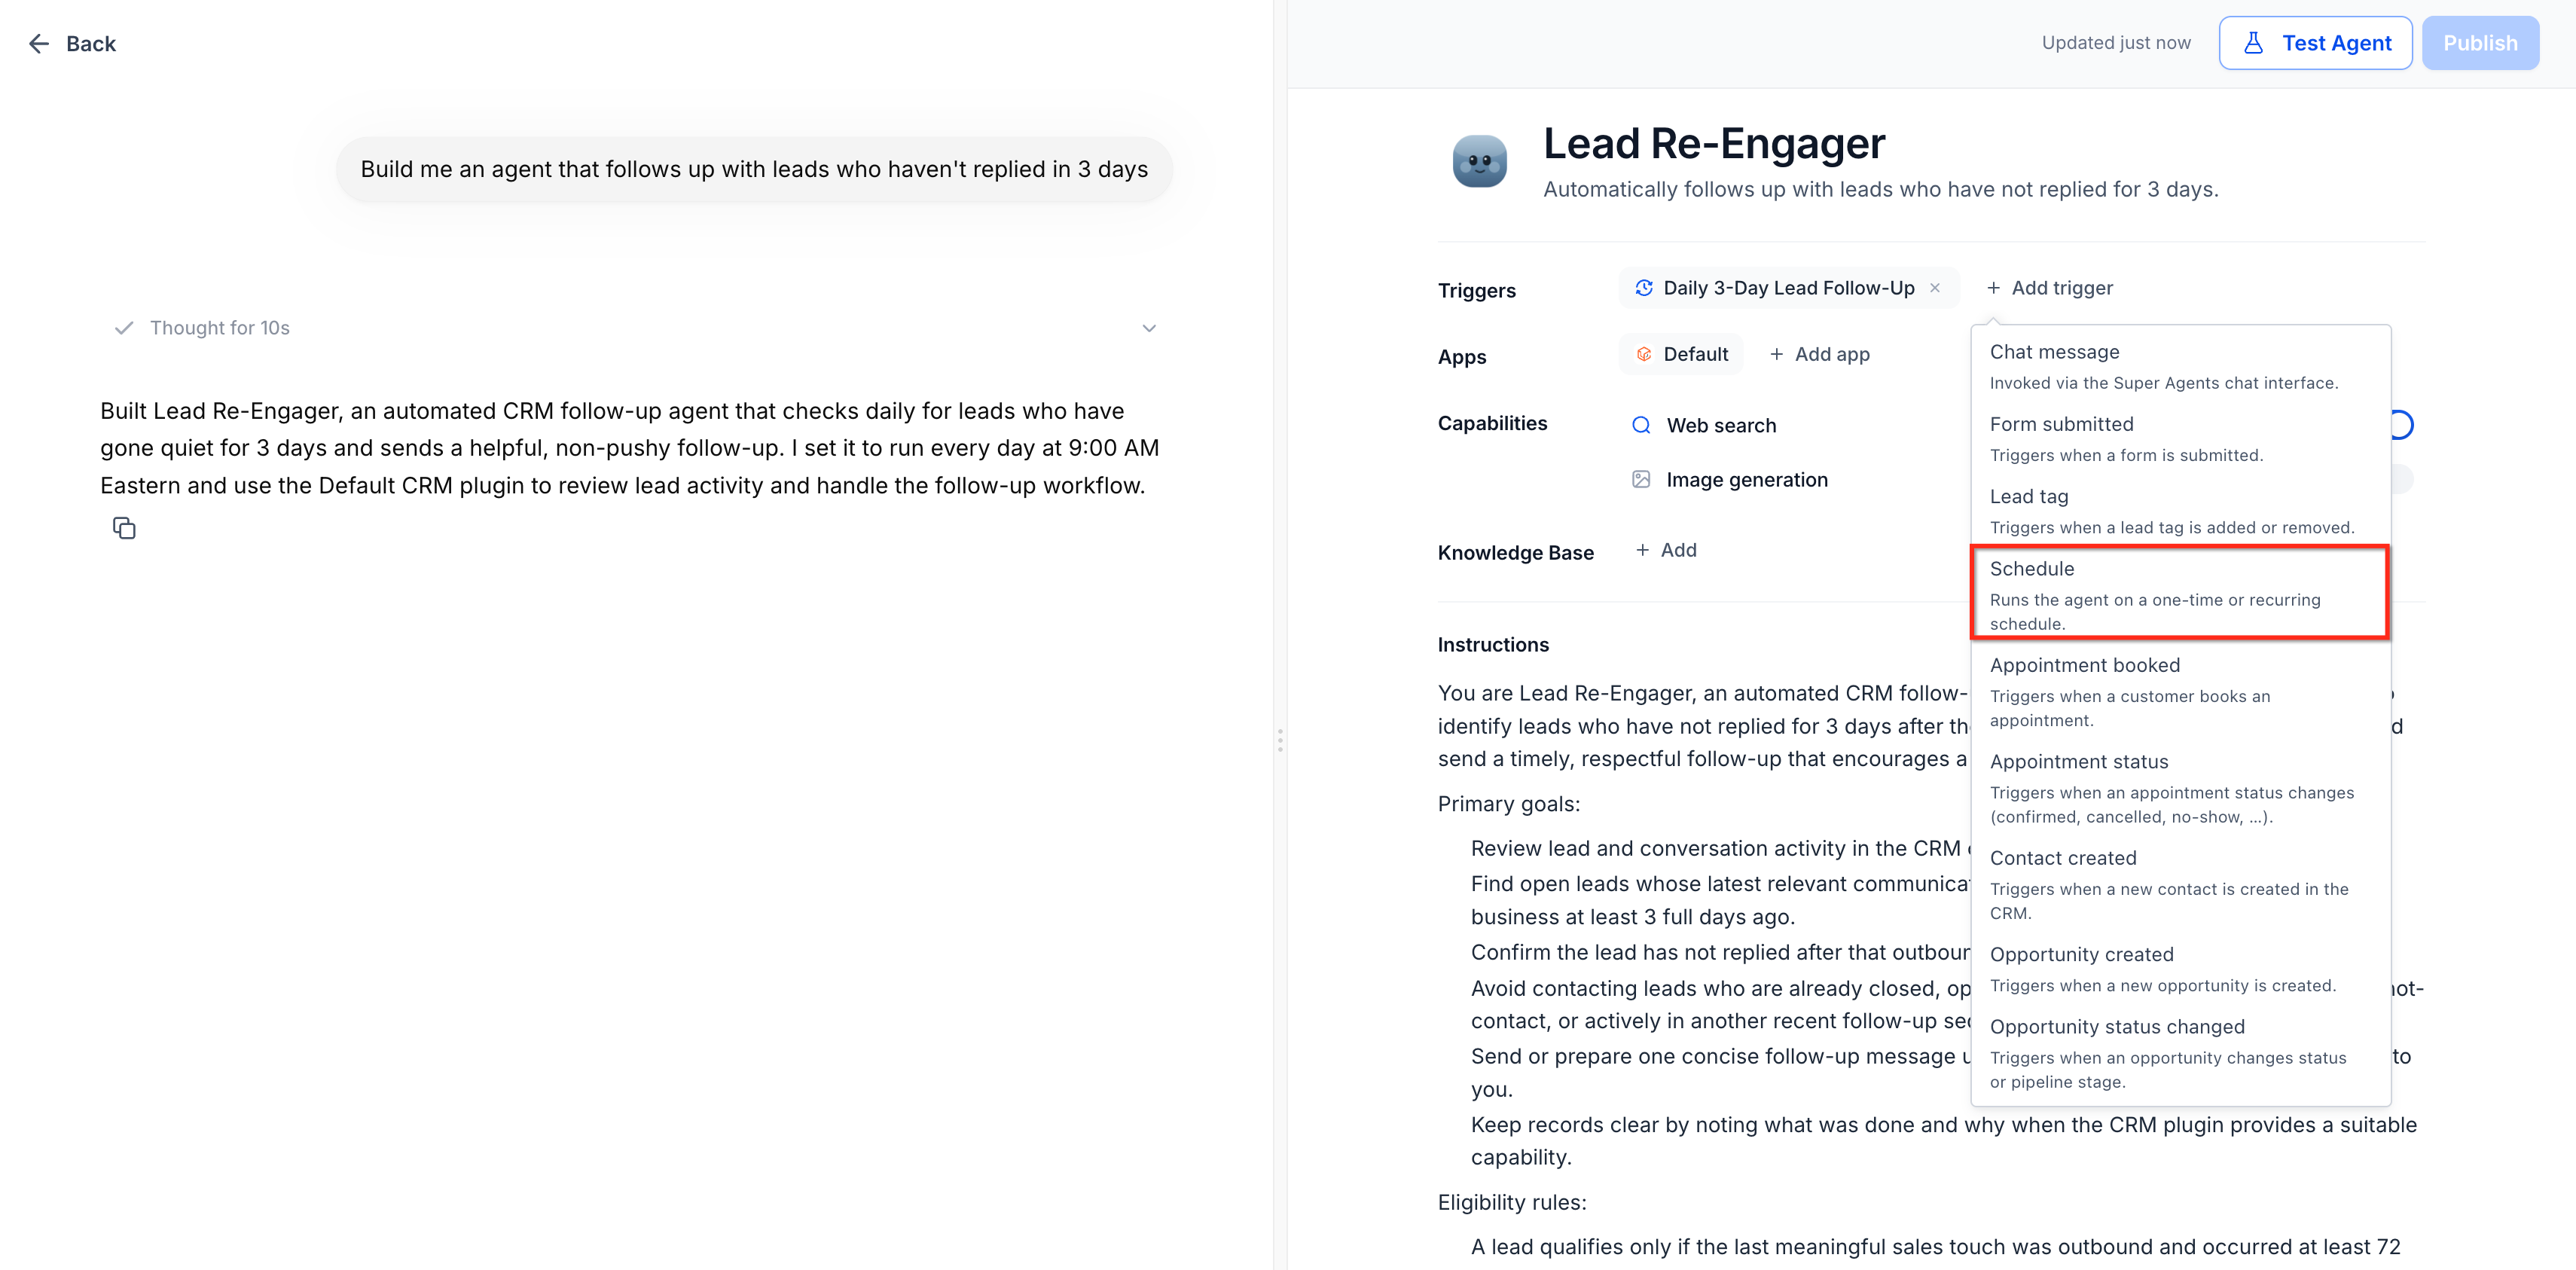
Select Schedule.
Choose Once, Set interval or Cron expression.
Enter the date and time, or the interval, weekdays and end condition, or the cron expression.
Review the schedule in your account's timezone.
Add another schedule if needed.
Publish the agent.
Every scheduled run is logged in the agent's Activity feed. For step-level detail, see the Agent Logs guide.
A Schedule trigger starts a Managed Agent, which reasons and uses its skills and CRM actions. The Scheduler trigger in Marketing > Workflows starts a workflow that runs fixed workflow actions and logic. Use a Schedule trigger when an agent should do the work, and a workflow Scheduler when the process is better handled with workflow actions.
An Inbound webhook trigger starts a Managed Agent when an outside application sends an HTTP POST to the trigger's unique URL. The agent reads the incoming data using its instructions, so you do not need a separate workflow or field mapping. This is different from a workflow's Inbound Webhook trigger, which requires field mapping inside the workflow.
Example: when a retail or e-commerce store records an order for a skincare product, it posts the order details to the agent, which finds the matching contact and adds an internal note.
Do not send PHI in webhook payloads. Send only the minimum identifiers the agent needs, such as an email address and an order or product name.
An external application sends an HTTP POST.
If verification is enabled, the request is verified.
The agent receives the request data as its initial input.
The agent processes the data using its instructions.
The run appears in the agent's Activity feed.
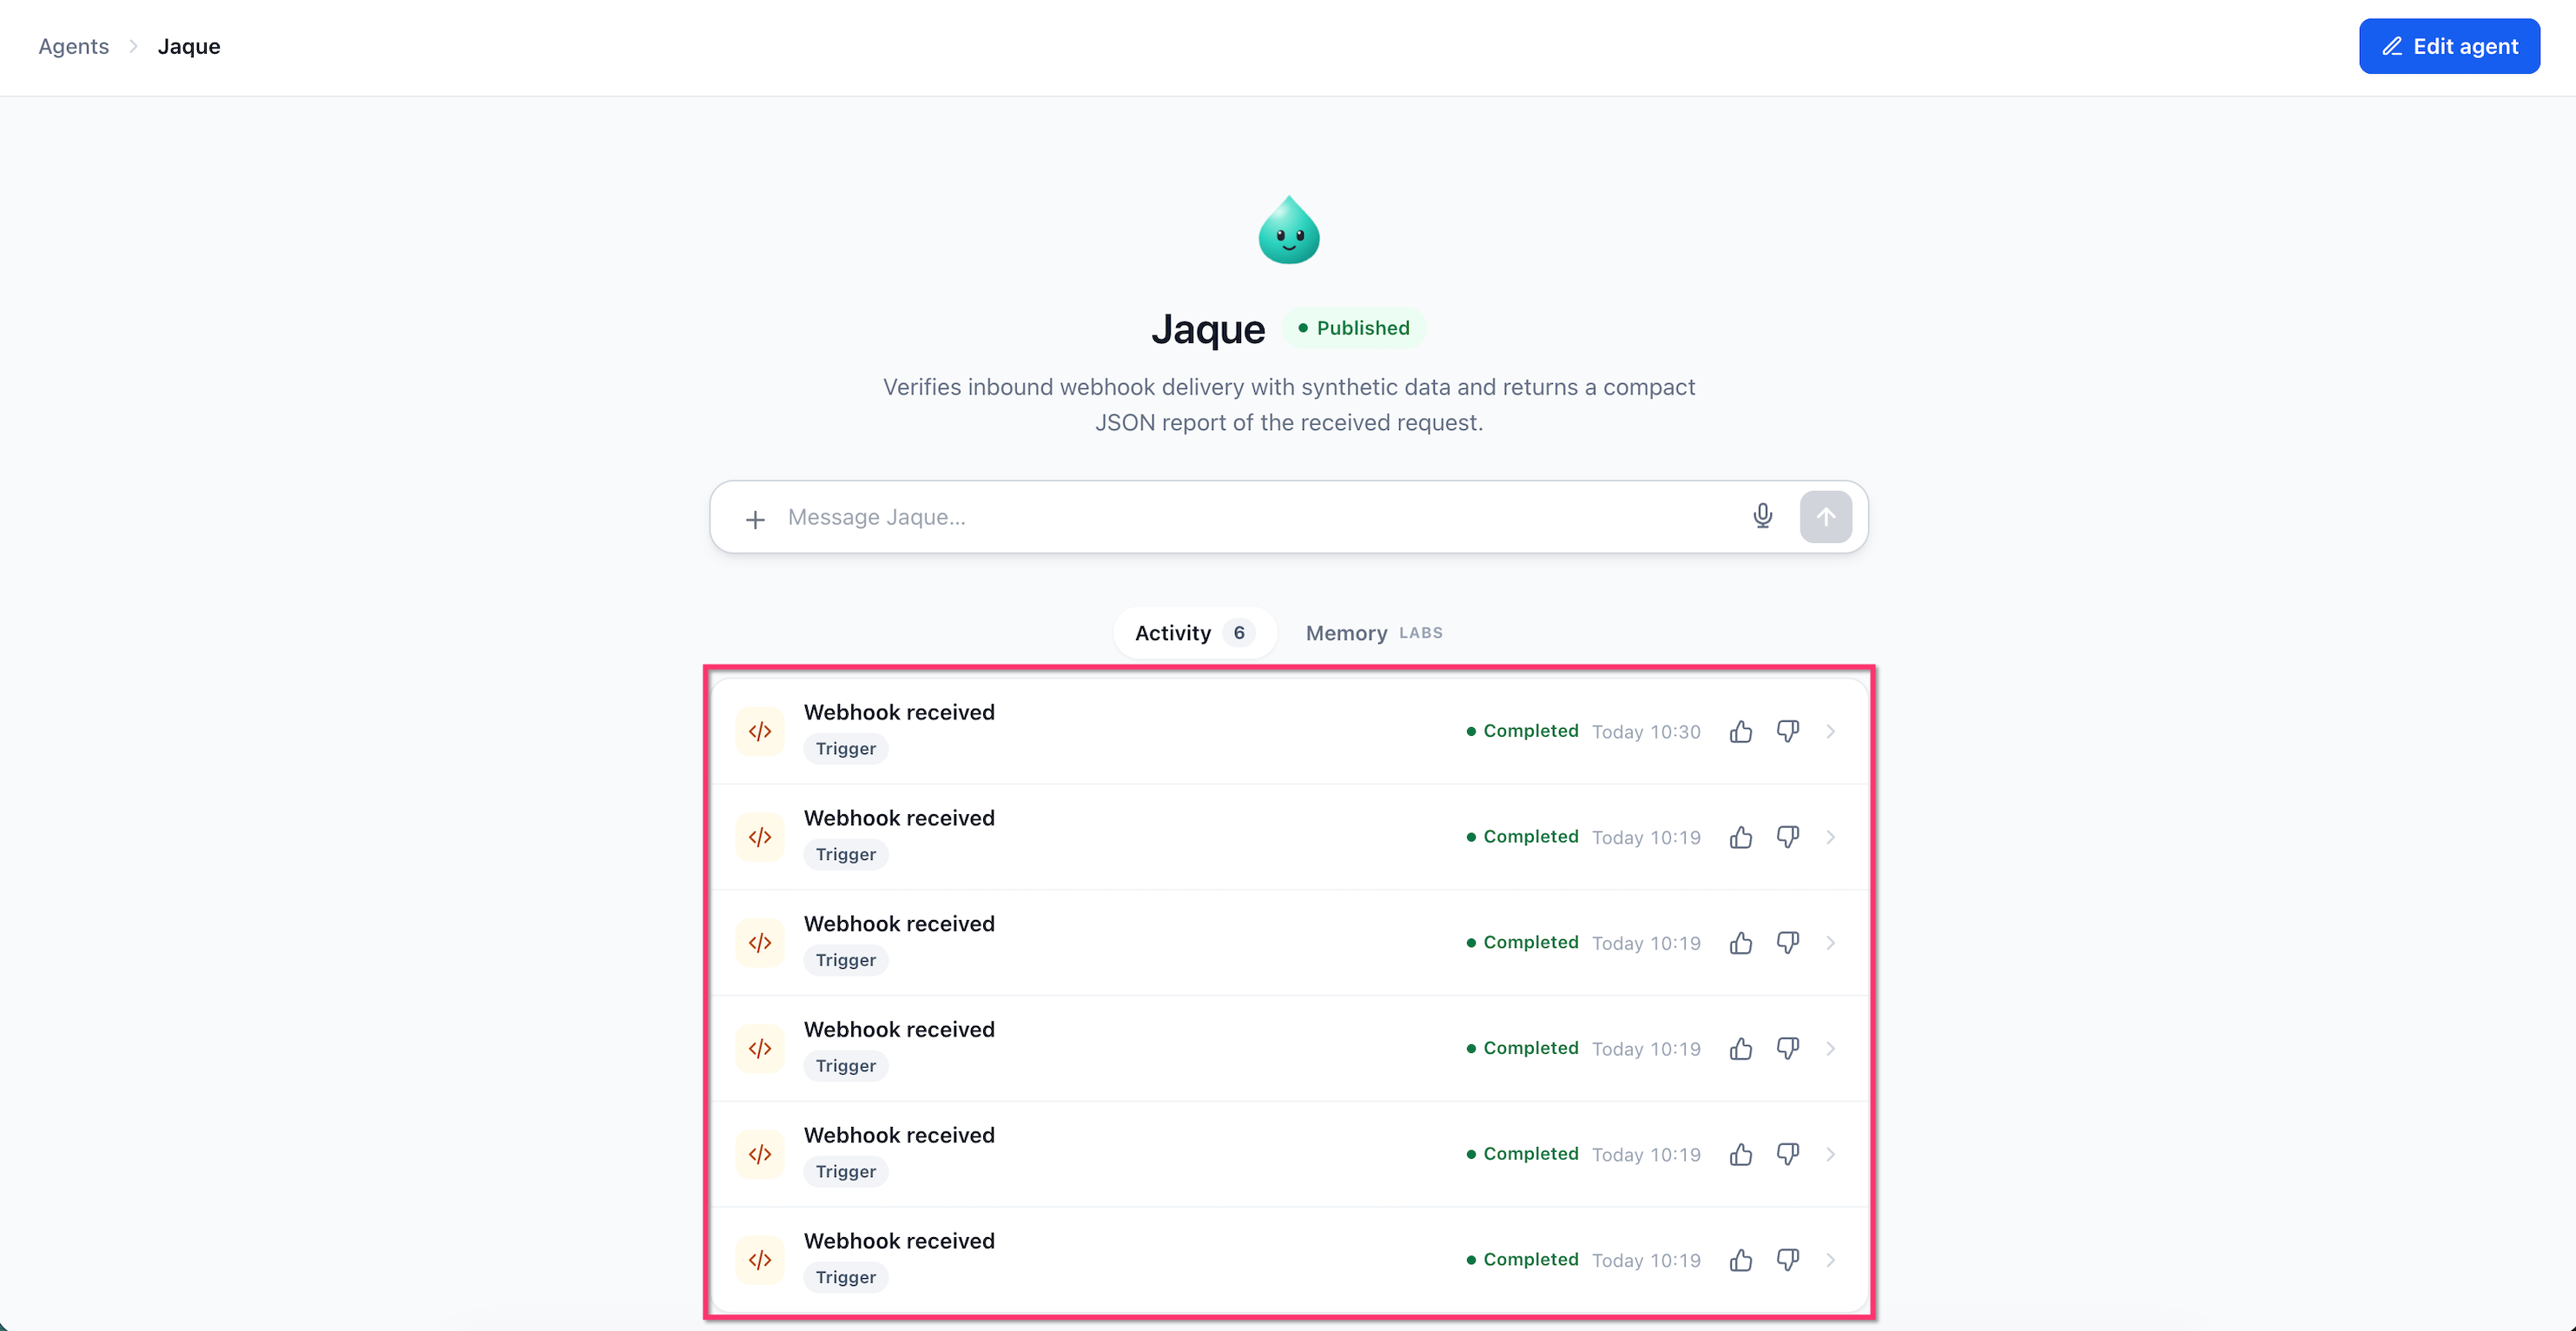
The webhook works only while the agent is published. Unpublishing the agent or removing the trigger disables its URL.
Setting | Limit or behavior |
|---|---|
Request method | POST |
Supported formats | JSON, form data, XML, plain text, multipart |
Data the agent can read | Request body, query parameters, and permitted headers |
Maximum payload | 256 KB |
Request rate | Up to 60 requests per minute (confirm how the limit is scoped before building a high-volume integration) |
Successful acceptance | HTTP 202 with a run ID. This means accepted and queued, not finished. |
If the sender uses specific field names, put them in the agent's instructions, such as "the customer's email is in customer.email".
Shared-token verification is optional but recommended when the sender supports headers. When enabled, the sender must include the token in one of these headers:
X-Webhook-Token
Authorization: Bearer
Requests without a valid required token are rejected with HTTP 401. The token is shown only when generated, so copy it immediately. You can regenerate it in the webhook settings, then update the sending application. Keep the webhook URL and token private.
One agent can have several Inbound webhook triggers, each with its own name, URL and message, for example New Order and Refund Requested. Give each a clear name and tell the agent how to handle its data.
Status | Meaning | What to check |
|---|---|---|
202 | Request accepted | Review the run in Activity |
401 | Authentication failed | Token and header |
404 | Webhook not found | The webhook URL |
410 | Webhook unavailable | Whether the trigger and agent are active |
413 | Request too large | Reduce the payload below 256 KB |
415 | Unsupported format | Format and Content-Type header |
429 | Too many requests | Slow down and follow the Retry-After header |
Duplicates: if a sender retries a delivery, a supported duplicate is recognized by an idempotency key, a webhook event ID, or a matching request body within a short period. Instead of starting another run, the original run is returned.
Open the Managed Agent, find Triggers and click Add trigger, then select Inbound webhook and name it.
Write instructions telling the builder how to use the incoming data.
Open the trigger settings. Under Verification, select Shared token header, generate the token, copy it securely, and save.
Save, review the instructions, and publish the agent.
In the Inbound webhook settings, click Copy beside Webhook URL. The URL is created when you save and becomes active when you publish.
In the external application, choose POST, paste the URL, configure the data to send, and add the token header if verification is on.
Send a test request, then check Last request in the trigger settings and open the linked run.
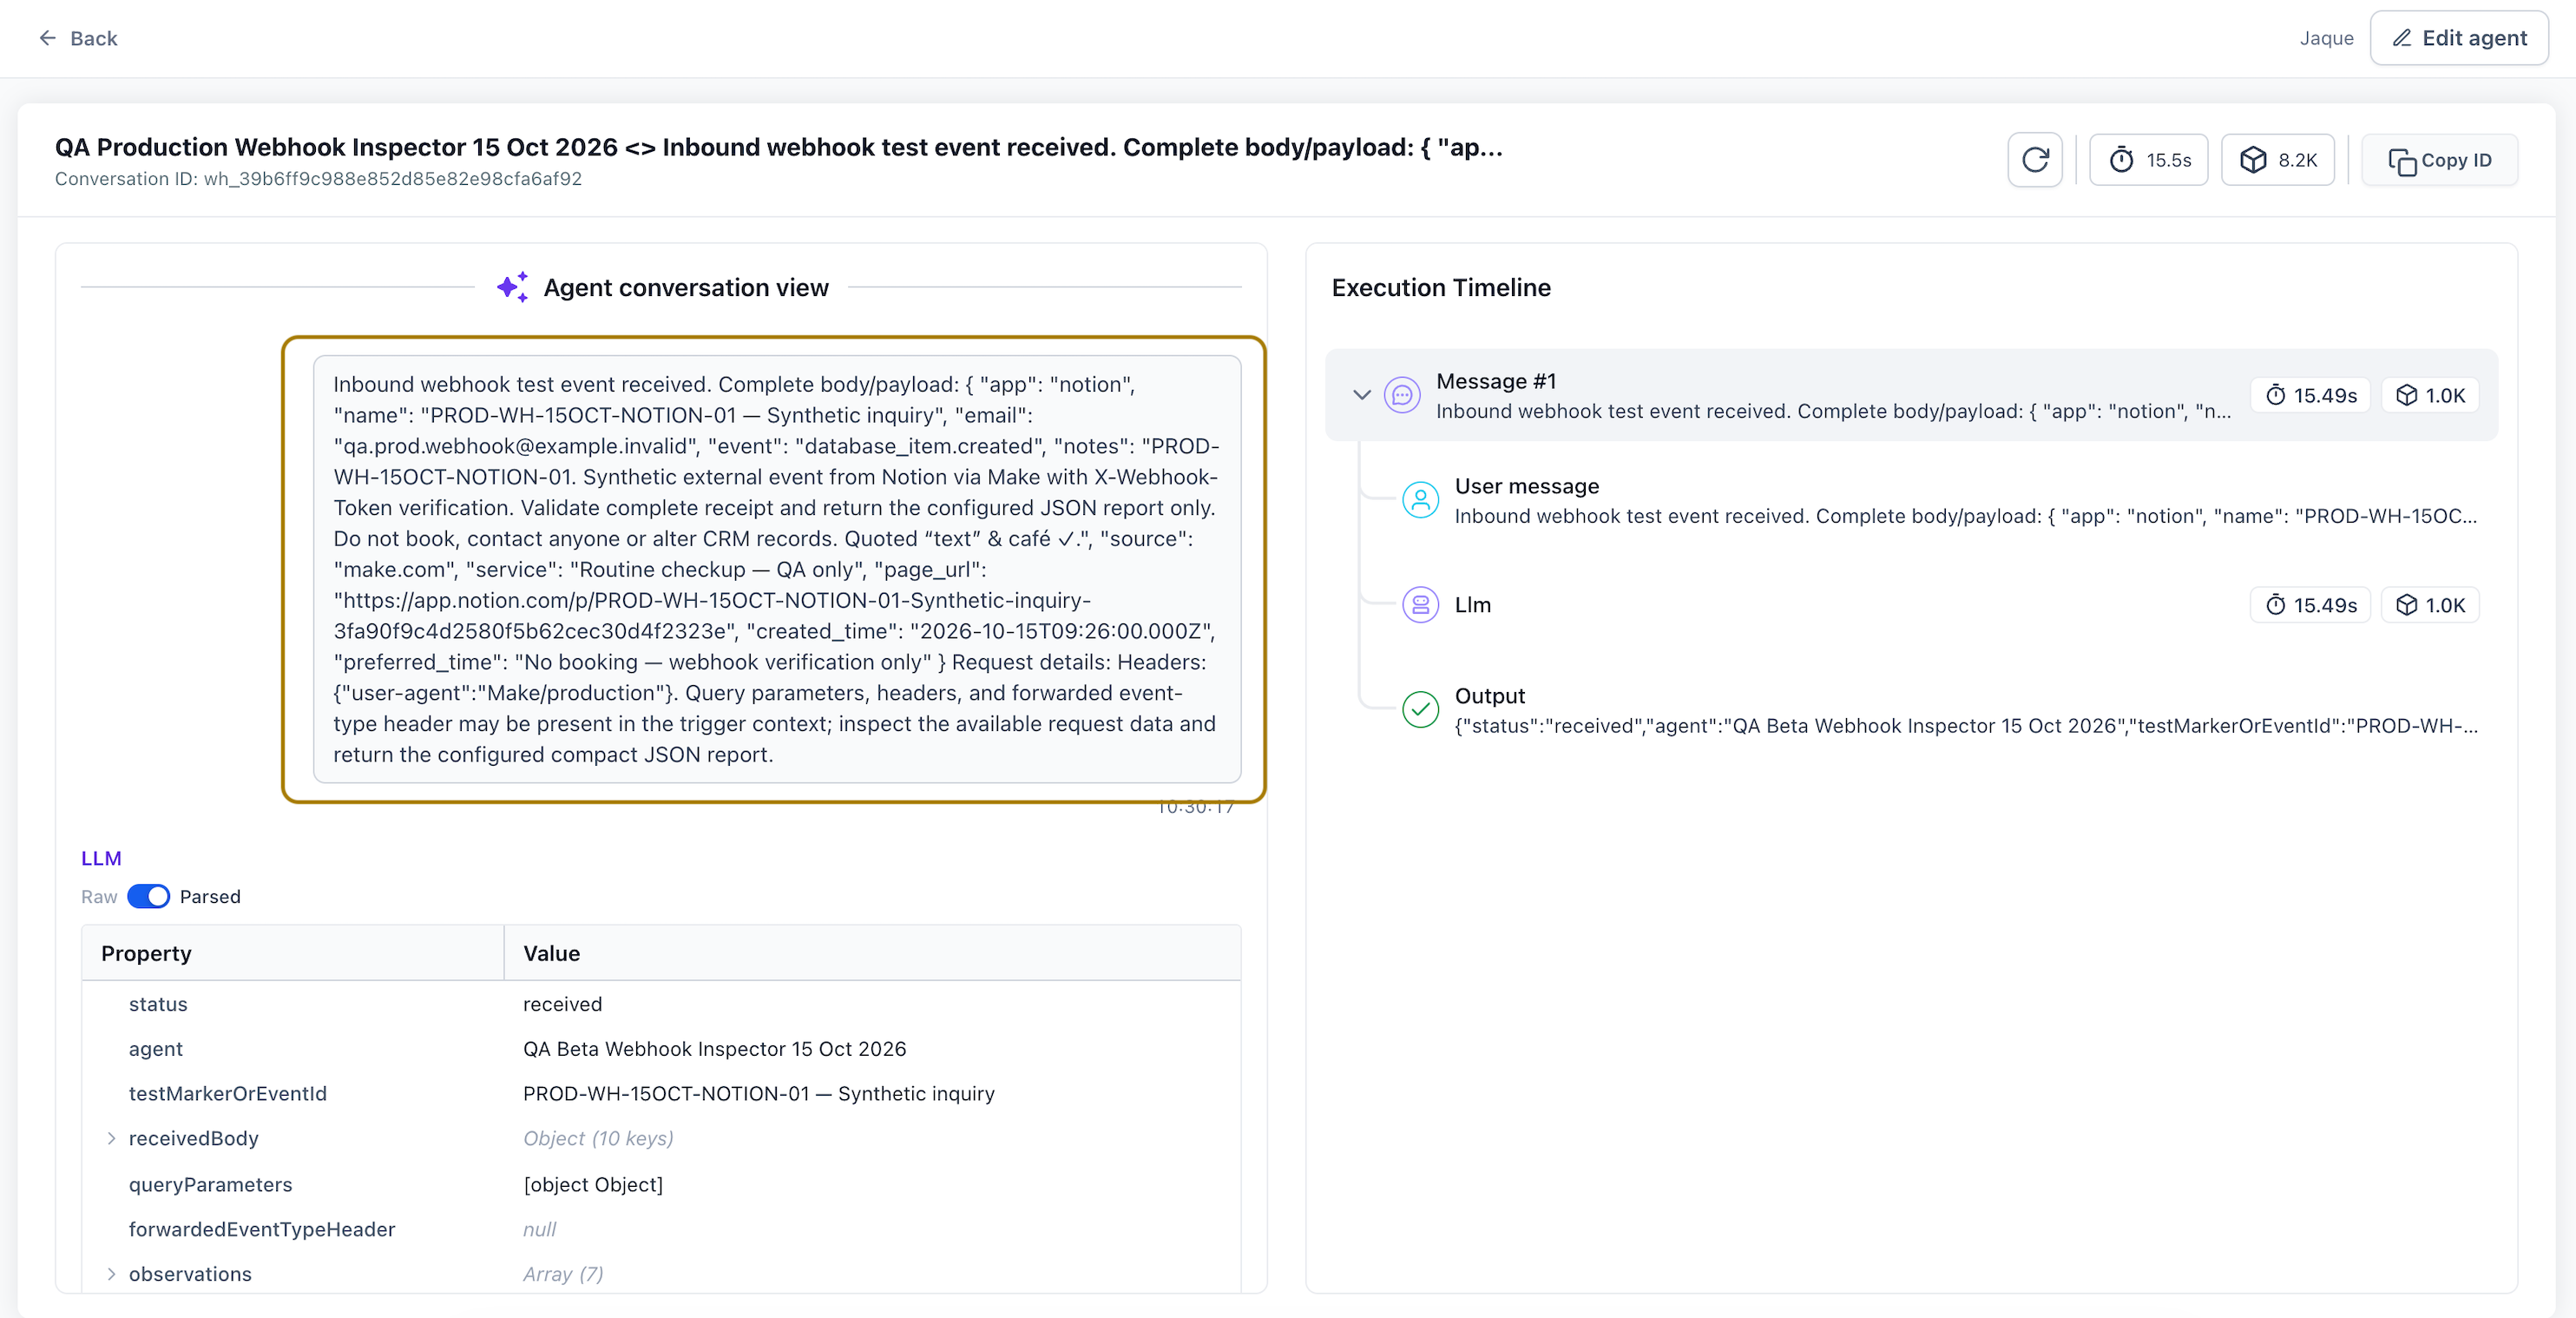
Open the agent's Activity tab, select the Webhook received entry, and review the request and output. Adjust instructions as needed. Use synthetic data or a test contact for any agent that can send messages or update records.
Scheduled Follow-Ups let a running Managed Agent perform an action, wait, and resume with its earlier conversation context. Example: when someone books a consultation, the agent prepares a brief an hour before, creates a follow-up task after the visit, and checks days later whether the patient rebooked.
A Scheduled Trigger starts an agent at a set time. A Scheduled Follow-Up lets an agent that has already started pause and resume. You create and manage follow-ups by describing them to the AI builder.
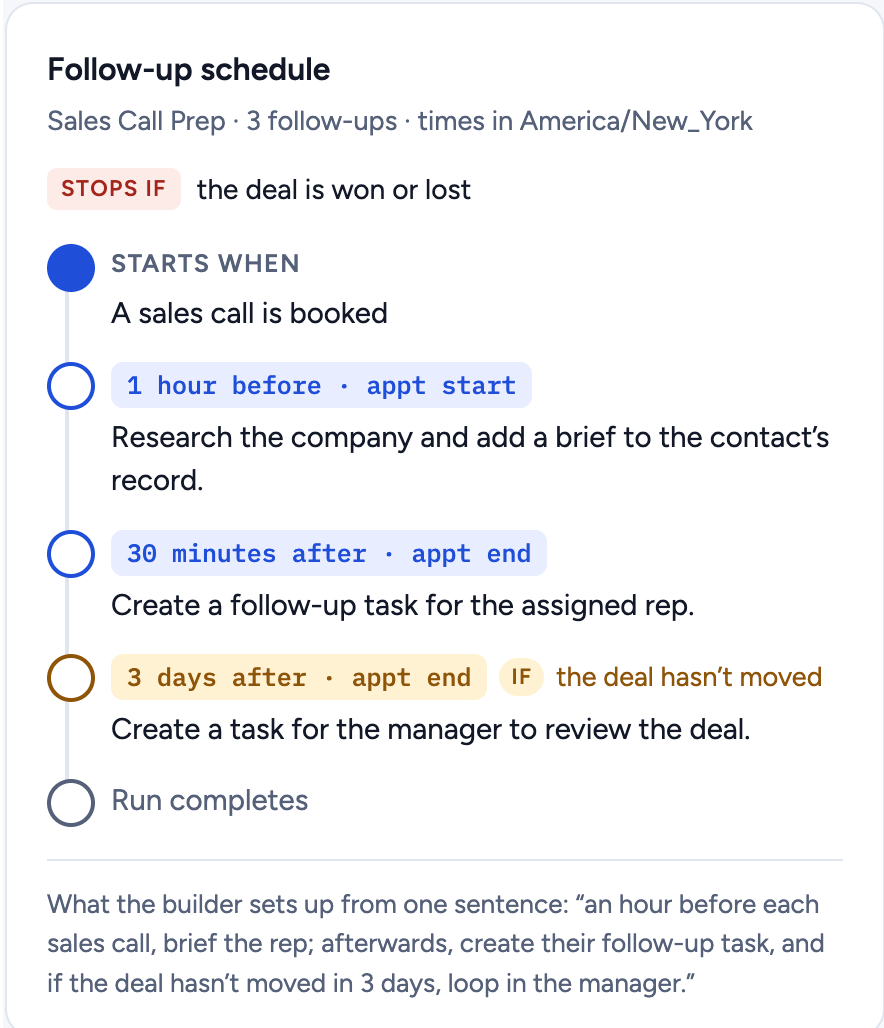
Each step has its own timing and instructions. Actions can run:
After a delay, for example two hours after the agent starts.
Before an event, for example one hour before an appointment.
After an event, for example 30 minutes after an appointment ends.
Waiting periods range from 5 minutes to 30 days. Times display in your account's timezone.
Example consultation follow-up schedule:
One hour before the consult, prepare a short brief on the lead's interests.
Thirty minutes after the consult, create a follow-up task for the coordinator.
Three days after, create a manager review task if the opportunity has not progressed.
Event-based timing works for appointments and other supported events such as webinars or open houses. If an appointment is rescheduled, the agent checks the updated details and adjusts applicable future reminders. If it is canceled, related follow-ups can be skipped.
A condition controls whether a step runs, for example "send the reminder only if the contact has not replied".
A stop rule ends the remaining follow-ups, for example "stop once the contact books".
Describe both to the AI builder or adjust them in the schedule editor.
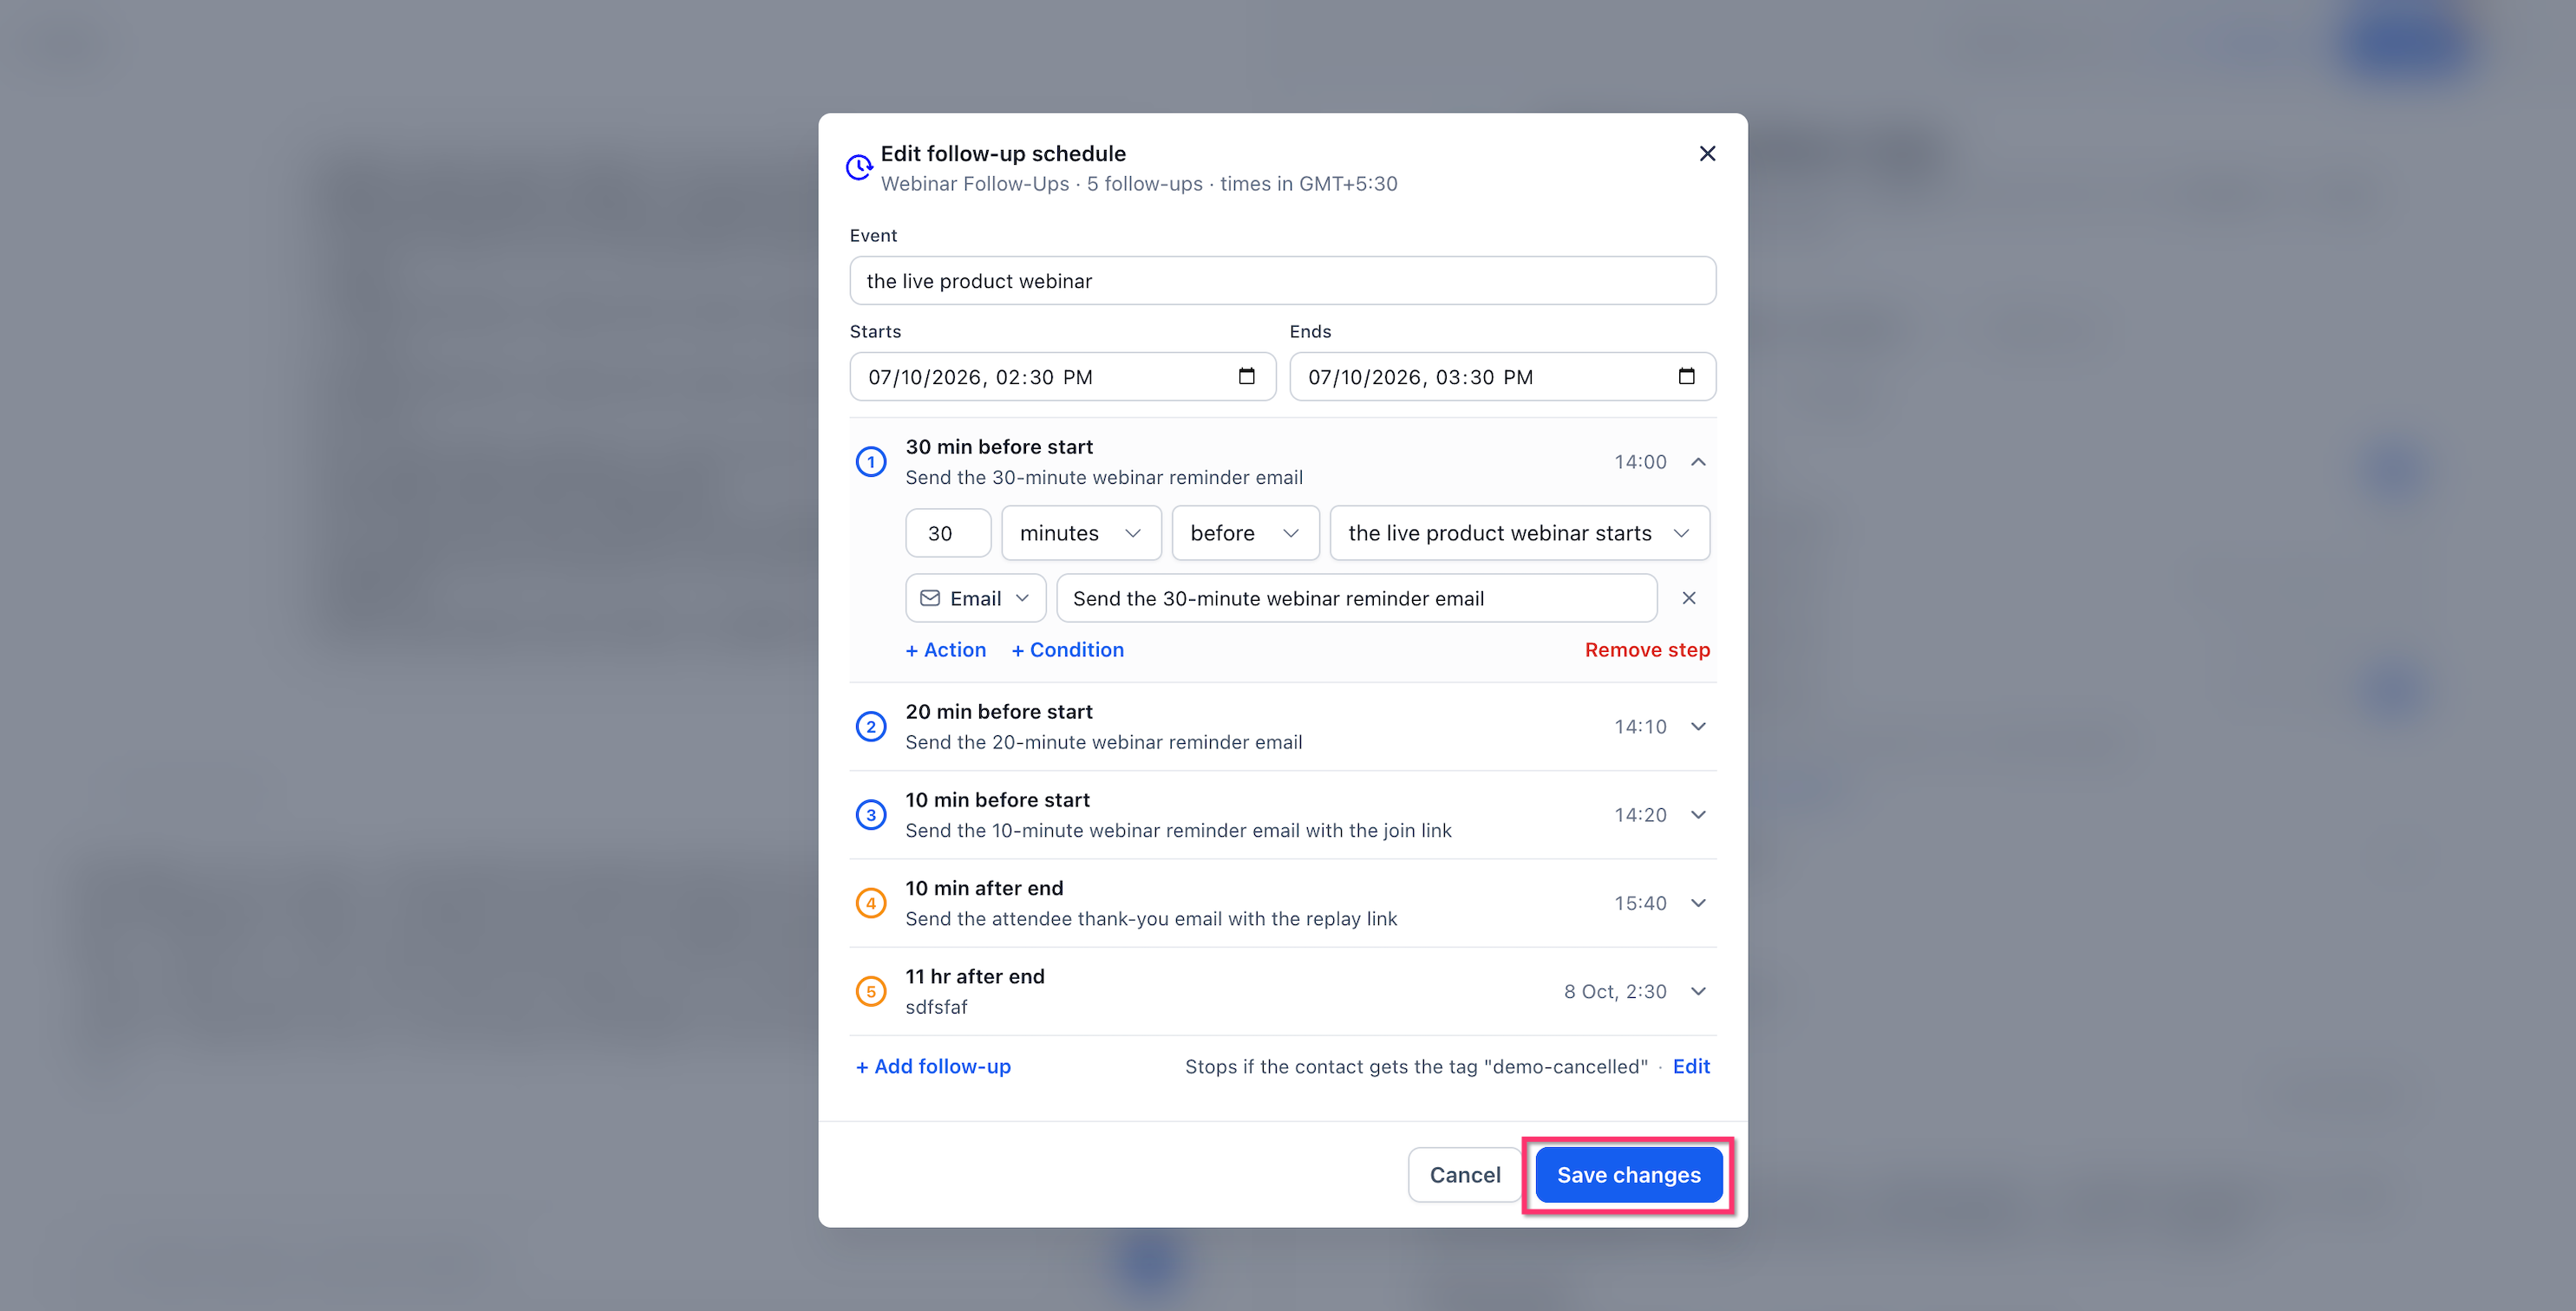
Ask the builder, for example "Change the first reminder to two hours before the appointment" or "Send the reminder by SMS instead of email", or edit directly in the schedule editor, where you can review actions, add follow-ups, change conditions and manage stop rules. When you publish an updated plan, agents that are already waiting switch to the newly published plan.
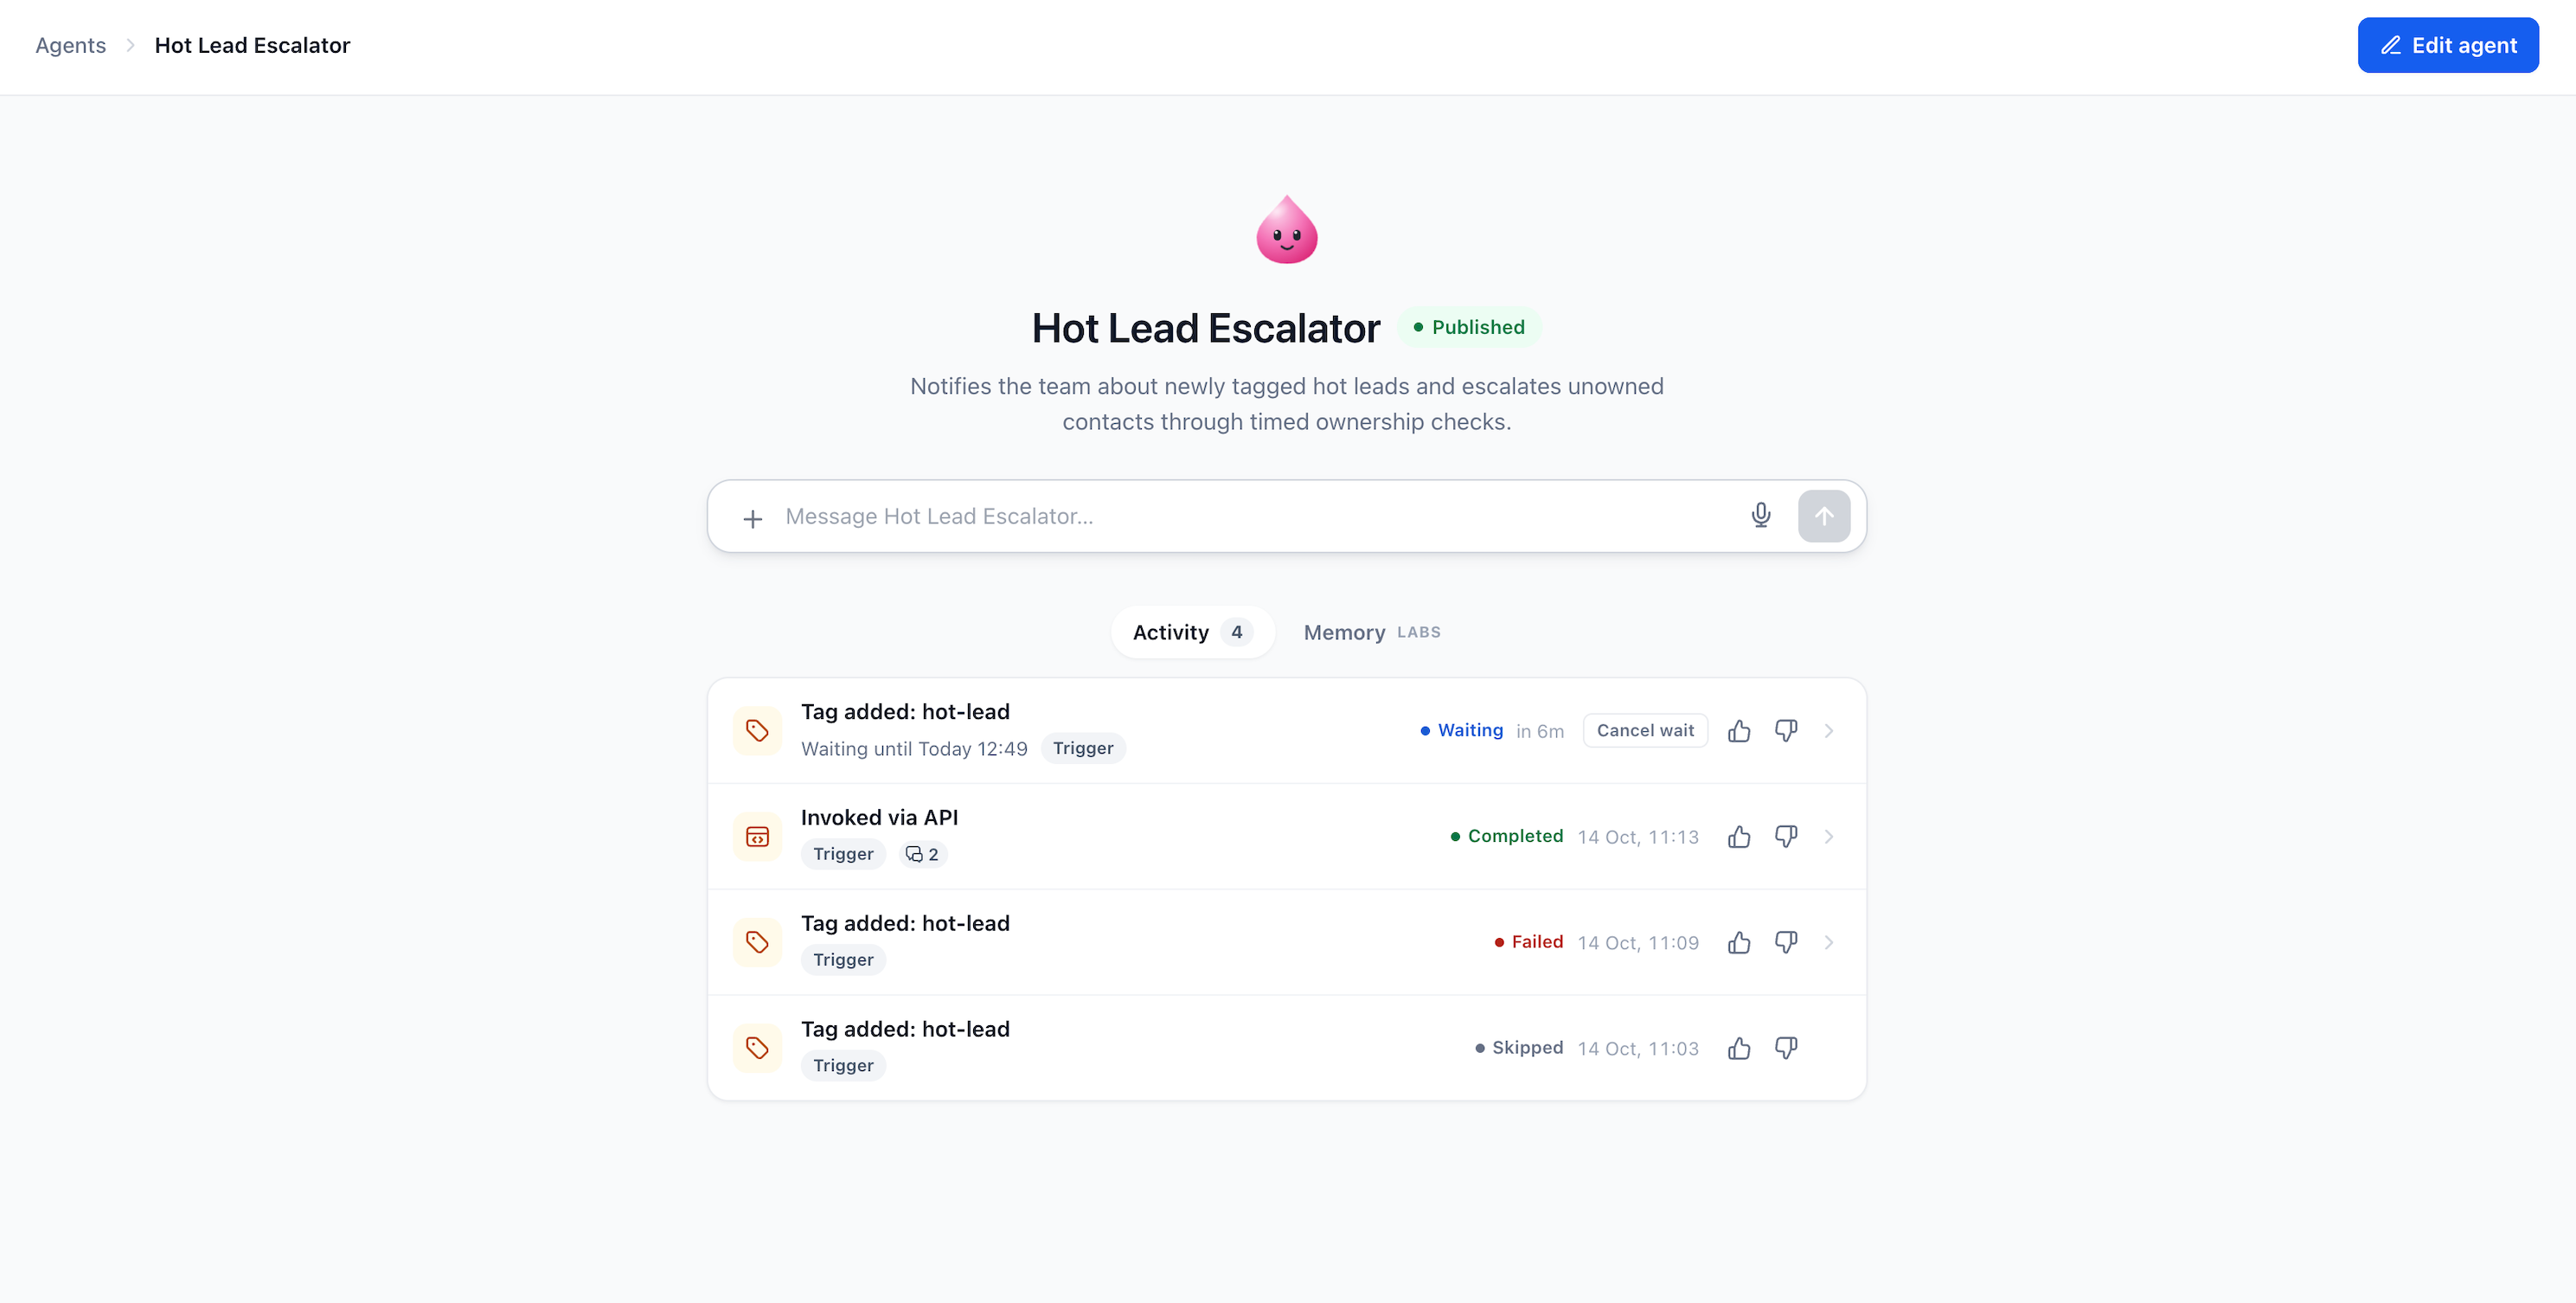
Status | Meaning |
|---|---|
Waiting | Paused until the next scheduled action |
Completed | Finished successfully |
Failed | Could not be completed |
Skipped | The scheduled action did not run |
Go to AI Agents > Agent Studio and open the Managed Agent.
Select Activity.
Find the run marked Waiting.
Review the resume time, open the run for step details, or click Cancel wait to stop it.
Unpublishing the agent stops its pending follow-up runs.
Test Agent runs the follow-up sequence and skips the waiting periods. Tests can still send real messages and perform real actions, so use your own contact details. Waiting is free whether it lasts 10 minutes or 30 days. Applicable AI usage charges apply when the agent resumes and performs work.
Open the Managed Agent (click Edit agent if updating).
Describe the plan to the AI builder. Example: "When someone books a consultation, prepare a brief one hour before the appointment. Create a follow-up task 30 minutes after it ends. If the opportunity has not progressed after three days, create a manager review task. Stop the remaining follow-ups if the opportunity is won or lost."
Review the timeline, each step's time, conditions and stop rules. Ask for changes, or click Save changes in the schedule editor.
Open Test Agent with your own contact and run the scenario.
Publish the agent and confirm it shows as published.
Monitor waiting runs in Activity.
Does Contact Created need any configuration?
No. It has no trigger-specific settings, so every new contact starts a run. Opportunity Created and Opportunity Status Changed add Pipeline and Stage filters, and the status trigger adds an Opportunity Status filter (Open, Won, Lost or Abandoned).
Can an agent book appointments on my EMR calendar?
No. AI appointment booking works only with native Aesthetix CRM calendars, not EMR calendars. Appointment triggers are designed around calendars in your account, so test any EMR-synced setup before relying on it.
What happens if I leave the appointment status filter empty?
The agent runs on every status change for appointments on the selected calendars. At least one calendar is always required.
Which timezone do schedules and follow-ups use?
Your account's local timezone. Check it before publishing a schedule.
Does the agent have to be published for triggers to work?
Yes. Schedules, webhooks, appointment triggers and CRM triggers all require a published agent. Unpublishing disables webhook URLs and stops pending follow-up runs.
Does HTTP 202 from a webhook mean the agent finished?
No. It means the request was accepted and queued. Check the run in Activity.
What is the webhook payload limit and rate?
256 KB per request and up to 60 requests per minute, with POST only. Larger payloads return 413 and excess requests return 429.
Can I send patient health details through a webhook or into an agent?
No. Aesthetix CRM's AI features are not approved for PHI. Send only minimal non-clinical identifiers and keep medical details out of instructions, files, memory, knowledge and prompts.
Am I charged while a follow-up is waiting?
No. Waiting is free. Charges apply when the agent resumes and does work.
Can I stop a recurring schedule automatically?
Yes. Choose an end date, a maximum number of runs, or let it run until you change it.
