Your store's checkout page is where a patient finalizes a purchase, whether that's retail skincare, a gift card, or a digital product. Aesthetix CRM gives you detailed control over what that page looks like and what information it collects, all from the Checkout element inside your Store Builder.
This guide covers checkout page presentation: layout, fonts, colors, text, field visibility, country selection, address auto-complete, policy consent, and the billing address feature. Connecting a payment provider and setting up your product catalog, taxes, and coupons are covered in the Payments collection, so this guide won't duplicate that setup.
Go to E-commerce and open Stores.
Create a new store or edit an existing one.
Open the Checkout Page editor and select the Checkout element.
All of the options below live inside that element's settings panel.
Set the fonts used across the checkout page:
Headline font
Card summary font
Headline font size
Card summary font size
Headline font weight
Card summary font weight
Sticky contact: keeps a returning customer's contact record attached across sessions.
New contact on every purchase: creates a fresh contact record for each order instead of matching to an existing one.
Validate disposable email: blocks checkout attempts that use throwaway email addresses, which helps keep your contact list clean.
Choose what happens after a customer completes checkout:
Go to website URL: send them to any URL you specify, such as a thank-you page on another site.
Go to page: send them to a page within your own site or funnel.
Default: leave the built-in post-purchase behavior as-is.
You can rename nearly every label and heading on the checkout page to match your practice's voice:
Contact details section: the section headline and the email field label.
Shipping details section: headline and labels for name, phone number, address search box, full address, country, and any other shipping-related headings.
Billing details section: the billing details headline and the checkbox label used for "same as shipping."
Payment section: the payment label, checkout button text, and footer text (for example, a secure-checkout reassurance line).
Policy consent section: the consent text customers must agree to (for example, a line linking your Terms and Conditions and Privacy Policy).
Cart summary section: cart headline, quantity text, coupon headline, mobile coupon code placeholder, apply-coupon button text, subtotal text, discount text, remove-coupon button text, shipping heading, and total amount text.
Setting up the payment methods themselves (AX Pay, Stripe, etc.) happens in the Payments collection, not here. See the AX Pay guide for details on accepting payments at better rates than Stripe.
For each field, set whether it is Mandatory, Optional, or Hidden:
Phone number
Address
Country (if Country or a related required field like State/Province is hidden, the Country Selection option described below will not appear)
State
City
Zip / Postal code
Some shipping carriers calculate rates from Address, City, and Zip/Postal Code, so keep those mandatory if accurate shipping rates matter to your practice. Reducing the number of required fields does shorten checkout and can improve conversion, but weigh that against the data you need to fulfill and ship an order correctly.
Full name validation: on or off.
Enable/disable billing address: see the dedicated Billing Address section below.
Show/hide shipping: turn shipping fields on or off entirely, useful for digital-product or in-office-pickup stores.
Address auto-complete: Google-powered, real-time address suggestions that reduce typos and incomplete addresses. It covers address, city, country, state, and postal code fields.
Policy consent: require customers to accept your Terms and Conditions or Privacy Policy before they can complete payment. When enabled, a consent line appears at checkout and the customer must agree to it before the payment button will process the order. Customize the wording under the Policy consent section described above.
Postal code and country requirements: these can be enabled or disabled per your payment gateway's requirements.
Notes at checkout: turn on to let customers add a note with their order, or turn off to remove the field entirely.
Coupon codes: enable or disable coupon entry on the checkout page.
Match checkout to your practice's brand:
Headline text color
Card summary text color
Background color
Payment button color
Payment button text color
Subscription field text color
Subscription field background color
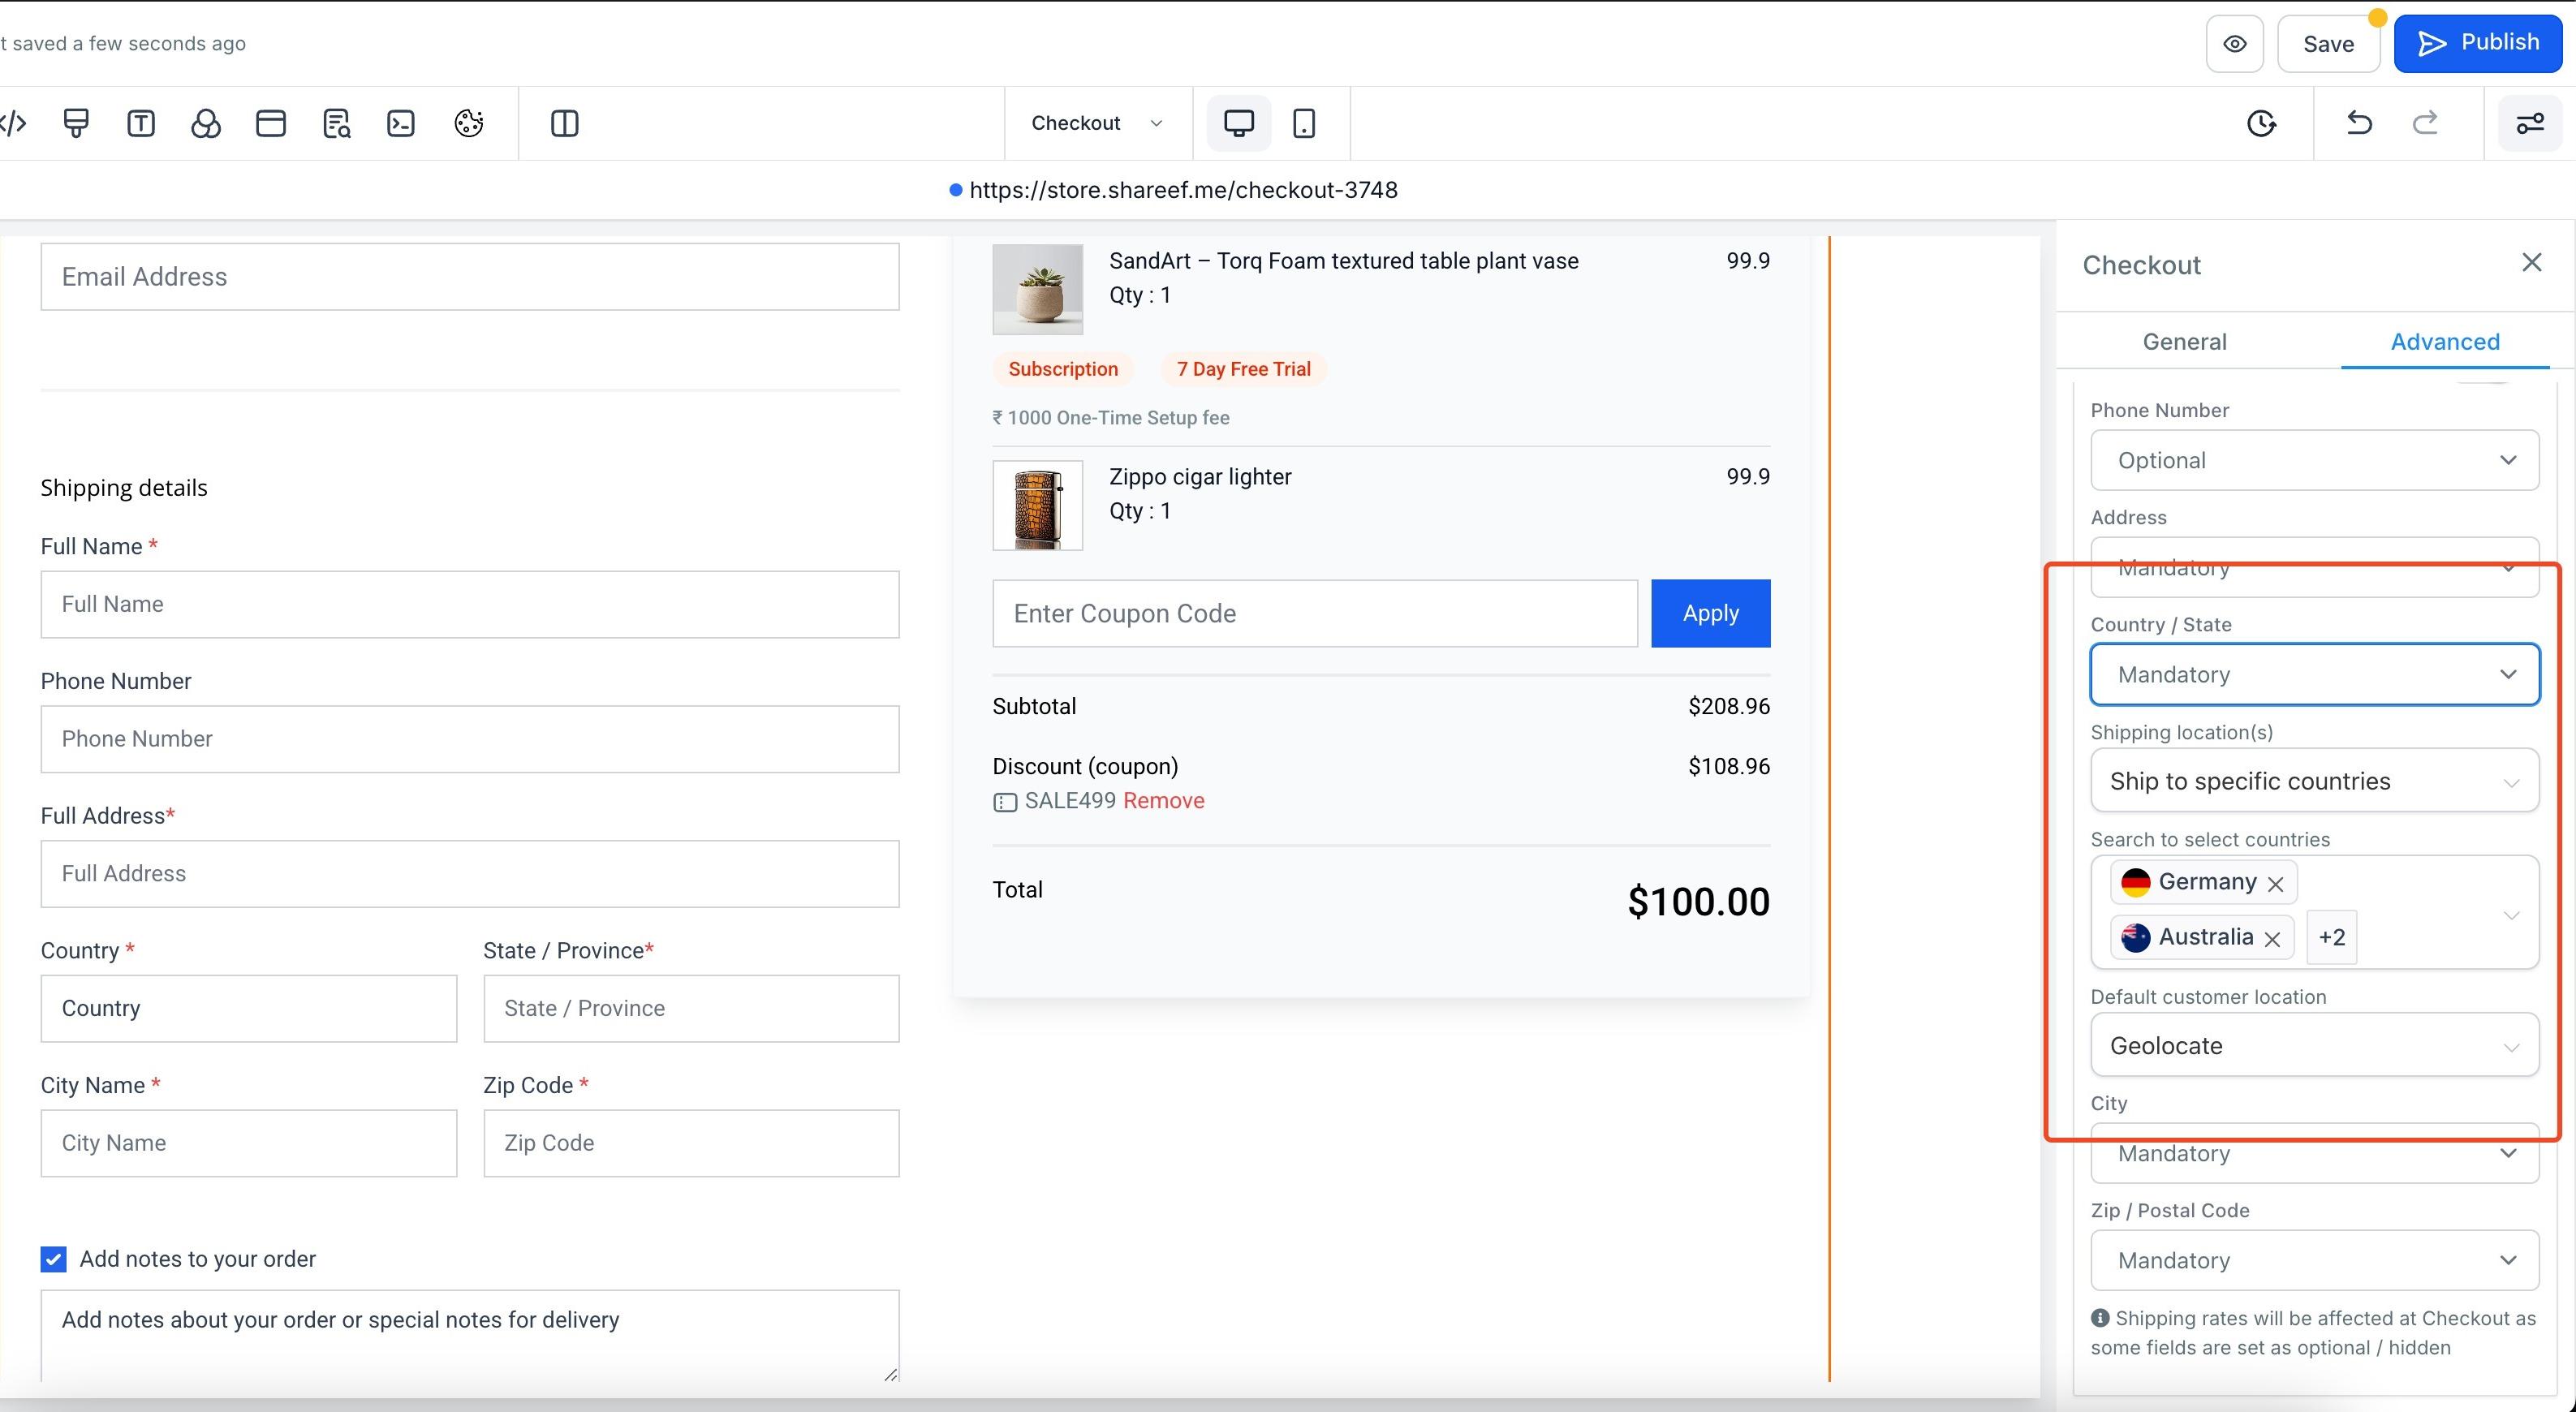
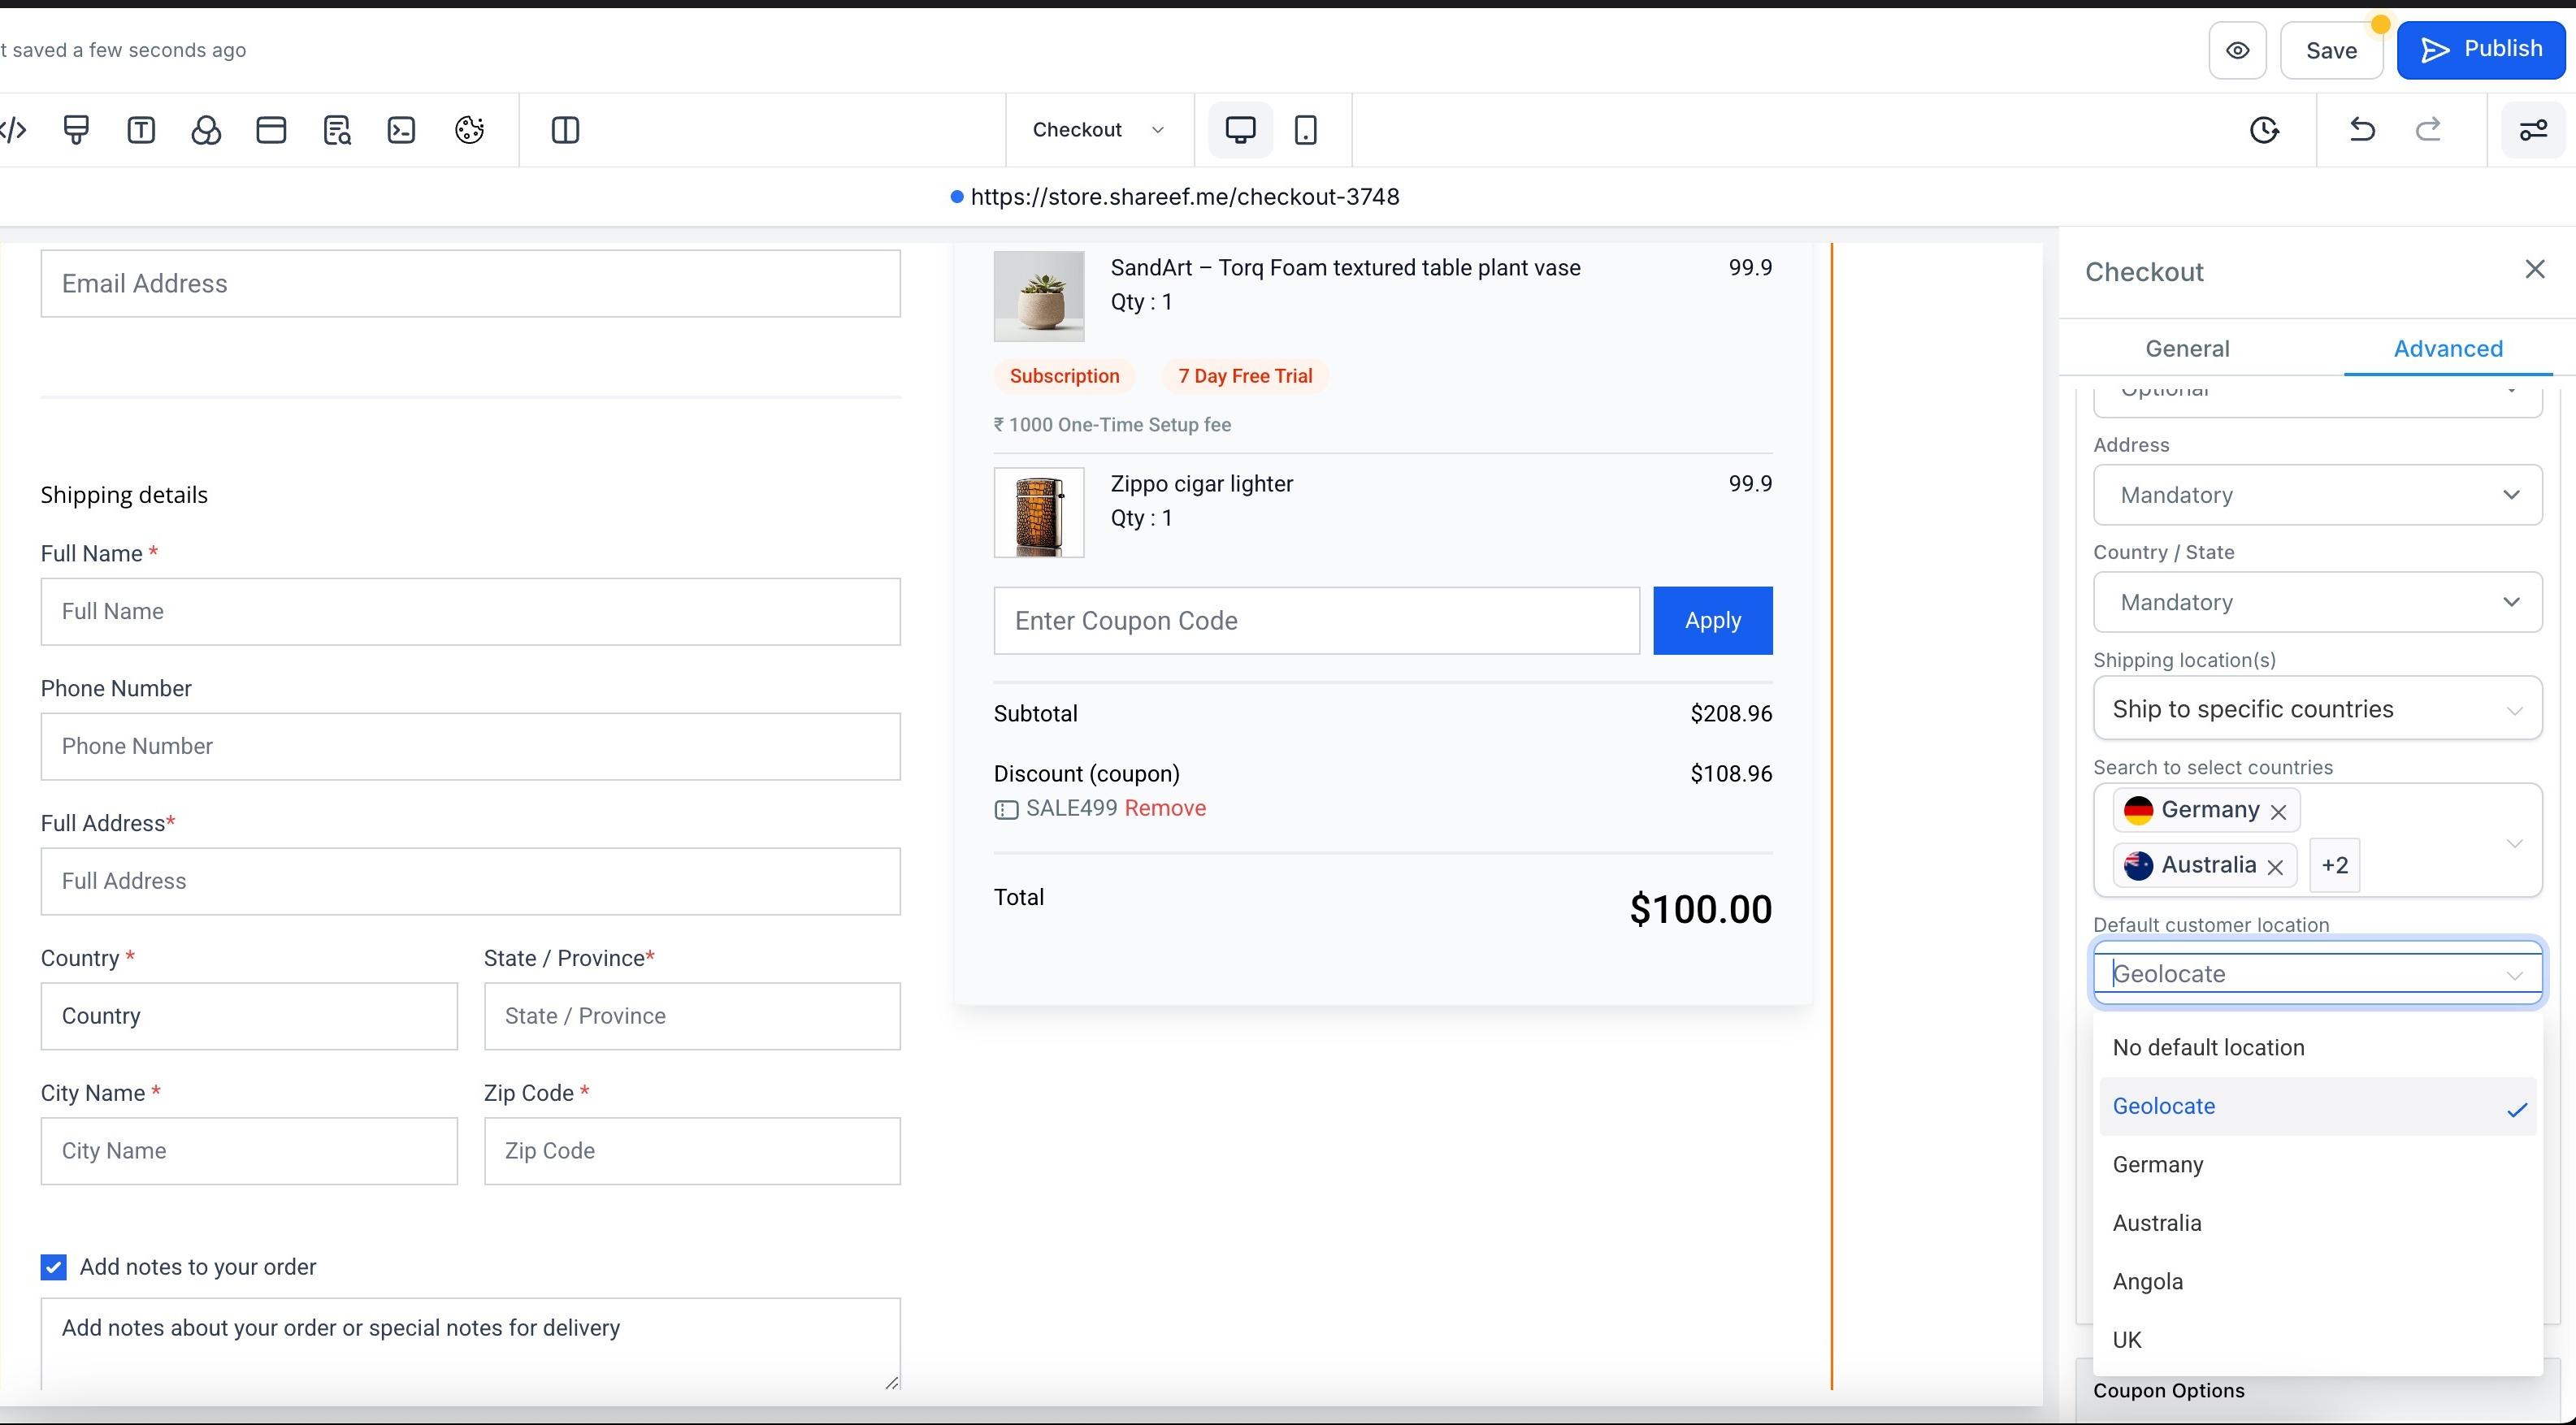
Country Selection lets you manage which shipping locations you'll serve and how a customer's location is handled by default.
Ship to all locations: allows shipping to any country.
Ship to specific countries: restrict checkout to a list of countries you choose. Only the selected countries appear as options. If you enable this but don't select any countries, all countries become available by default.
No default location: the customer must choose their country manually.
Geolocate: the customer's country is detected automatically from their IP address, giving a faster, more seamless checkout.
Show all countries: every available country is listed for the customer to pick from.
If Ship to Specific Countries is enabled, only that restricted list appears regardless of which default-location option you choose.
The billing address feature lets you collect a billing address separately from the shipping address during checkout, useful for compliance, invoicing, or simply keeping cleaner records.
Open the Store Builder and go to your Checkout Page.
Click the Checkout element to open its settings.
Scroll to the Advanced section and open Form Options.
Toggle Enable Billing Address on.
In the General section, customize the billing address headline text (for example, "Billing Information") and the checkbox text (for example, "Same as Shipping Address").
Click Save and publish your changes.
New stores have billing address enabled by default, with the related custom fields created automatically. Existing stores have it disabled by default and need to be turned on manually.
Contact Details
Shipping Details
Billing Details
Notes
Shipping Options
Payment Methods
Customers see a "Same as Shipping Address" checkbox that's checked by default, so most customers won't need to enter anything extra unless their billing address genuinely differs.
Once a customer fills it in, the billing address appears alongside the shipping address in several places:
Order Details: shown under Customer Info, separate from the shipping address.
Customer Access Center: included in the customer's order details view.
Contacts: both addresses are stored on the customer's contact record.
Packing slips and thank-you pages: both addresses display for order processing and customer clarity.
Order confirmation emails: the billing address is included automatically when it was filled in.
Billing address data only appears if the customer actually fills in the fields.
Billing address is not used for tax calculation. Taxes are still calculated from the shipping address, and tax setup itself lives in the Payments collection.
The custom fields created for billing address are system-generated: they can't be deleted or edited, and they're assigned unique keys (reusing a matching key if one already exists).
Why don't I see Country Selection on my checkout page? If Country, or a related required field like State/Province, is hidden under Shipping Details, the Country Selection option won't appear. Set that field to Mandatory or Optional (not Hidden) to enable it.
Can I limit checkout to specific countries only? Yes. Under Form Options, choose Ship to Specific Countries and select the countries you want to serve. Only those countries will be offered at checkout.
What happens if I enable "Ship to specific countries" but don't select any? All countries become available at checkout by default, so be sure to make your selections if you intend to restrict shipping.
What does Geolocate do? It detects a customer's approximate country from their IP address and pre-selects it, so the customer doesn't have to search for their own country manually.
Do live shipping rates require all address fields to be filled in? Yes. If you're using a multi-carrier shipping integration, customers need to complete all required address fields for live rates to calculate correctly.
Will reducing the number of required fields speed up checkout? Yes, fewer mandatory fields generally means a faster checkout and can improve conversion, but only remove fields you don't actually need for fulfillment or shipping accuracy.
Can I require customers to accept my Terms and Conditions or Privacy Policy before they pay? Yes. Enable policy consent under Form Options. A consent line then appears at checkout, and customers must agree to it before the payment button will complete their order. You can edit the wording, including links to your policies, under the Policy consent section.
Do I have to use the billing address feature? No. Leave the Enable Billing Address toggle off in Form Options and checkout will only collect a shipping address.
Can customers use the same address for billing and shipping? Yes. The "Same as Shipping Address" checkbox is provided and checked by default, so most customers won't need to enter anything twice.
Can I edit or delete the custom fields created for billing address? No. Those fields are system-generated once you enable the feature, and they can't be edited or deleted.
Why might a customer see a verification challenge during checkout? Store checkout is automatically protected against bots and automated submissions. That verification normally runs invisibly in the background, but a visible challenge can appear when extra verification is needed. The customer just completes the challenge and continues checkout; nothing they already entered is lost.
Where do I set up how customers actually pay at checkout? Connecting a payment provider, including AX Pay, and configuring your product catalog, taxes, and coupons happen in the Payments collection. This guide only covers how the checkout page is presented.
