The Facebook lead ads integration lets you collect leads directly from Facebook Ads and sync them automatically into Aesthetix CRM. Instead of manually exporting and importing, contact information from prospective patients flows straight into your CRM so your team can follow up fast. This guide covers connecting your page, mapping your form fields, and troubleshooting the most common issues.
The integration captures leads generated through Facebook Ads and imports them into Aesthetix CRM automatically. It benefits any practice running Facebook lead ads that wants to avoid manual data entry, and it is especially useful for smaller teams without staff dedicated to collecting and managing leads by hand.
Benefits include:
Automated lead capture: Leads from Facebook Ads import into your CRM with no manual entry.
Improved lead quality: Managing leads in one place helps you understand your audience and personalize your marketing.
Enhanced lead management: Track and manage every lead in one system with a full view of each prospect's interactions.
Efficient follow-up: With data captured automatically, your team can follow up quickly and prioritize by lead quality.
Increased conversions: Automating capture and improving management increases conversions and ROI from your ads.
Aesthetix CRM needs access to the Facebook Business Manager and Business Page you run your lead ad from.
The person integrating the page must be an admin of the Facebook Business Page and have Lead Access permission to access lead data (a Facebook requirement).
If you moved your page to the New Pages Experience, you can grant trusted people access to specific parts of the page without full access.
In Business Manager, go to the left navigation > Users > People. If the person integrating the page is listed, click their name to confirm their role is Admin or Employee. If they are not listed, add them first. Remember the Business Manager role is separate from the Page Role, and the Page Role must be Admin.
The New Pages experience is not available for all pages yet, so some pages you manage may still use the classic experience.
When you create custom fields for the lead ad in Aesthetix CRM, use one of these supported field types:
TEXT
LARGE_TEXT
NUMERICAL
PHONE
MONETARY
SINGLE_OPTIONS
DATE
DROPDOWN
RADIO OPTIONS
CHECKBOX
Navigate to Settings > Integrations and click Connect under "Connect your Facebook Account."
In the popup, choose the page you want to connect. Your integration should then be connected.
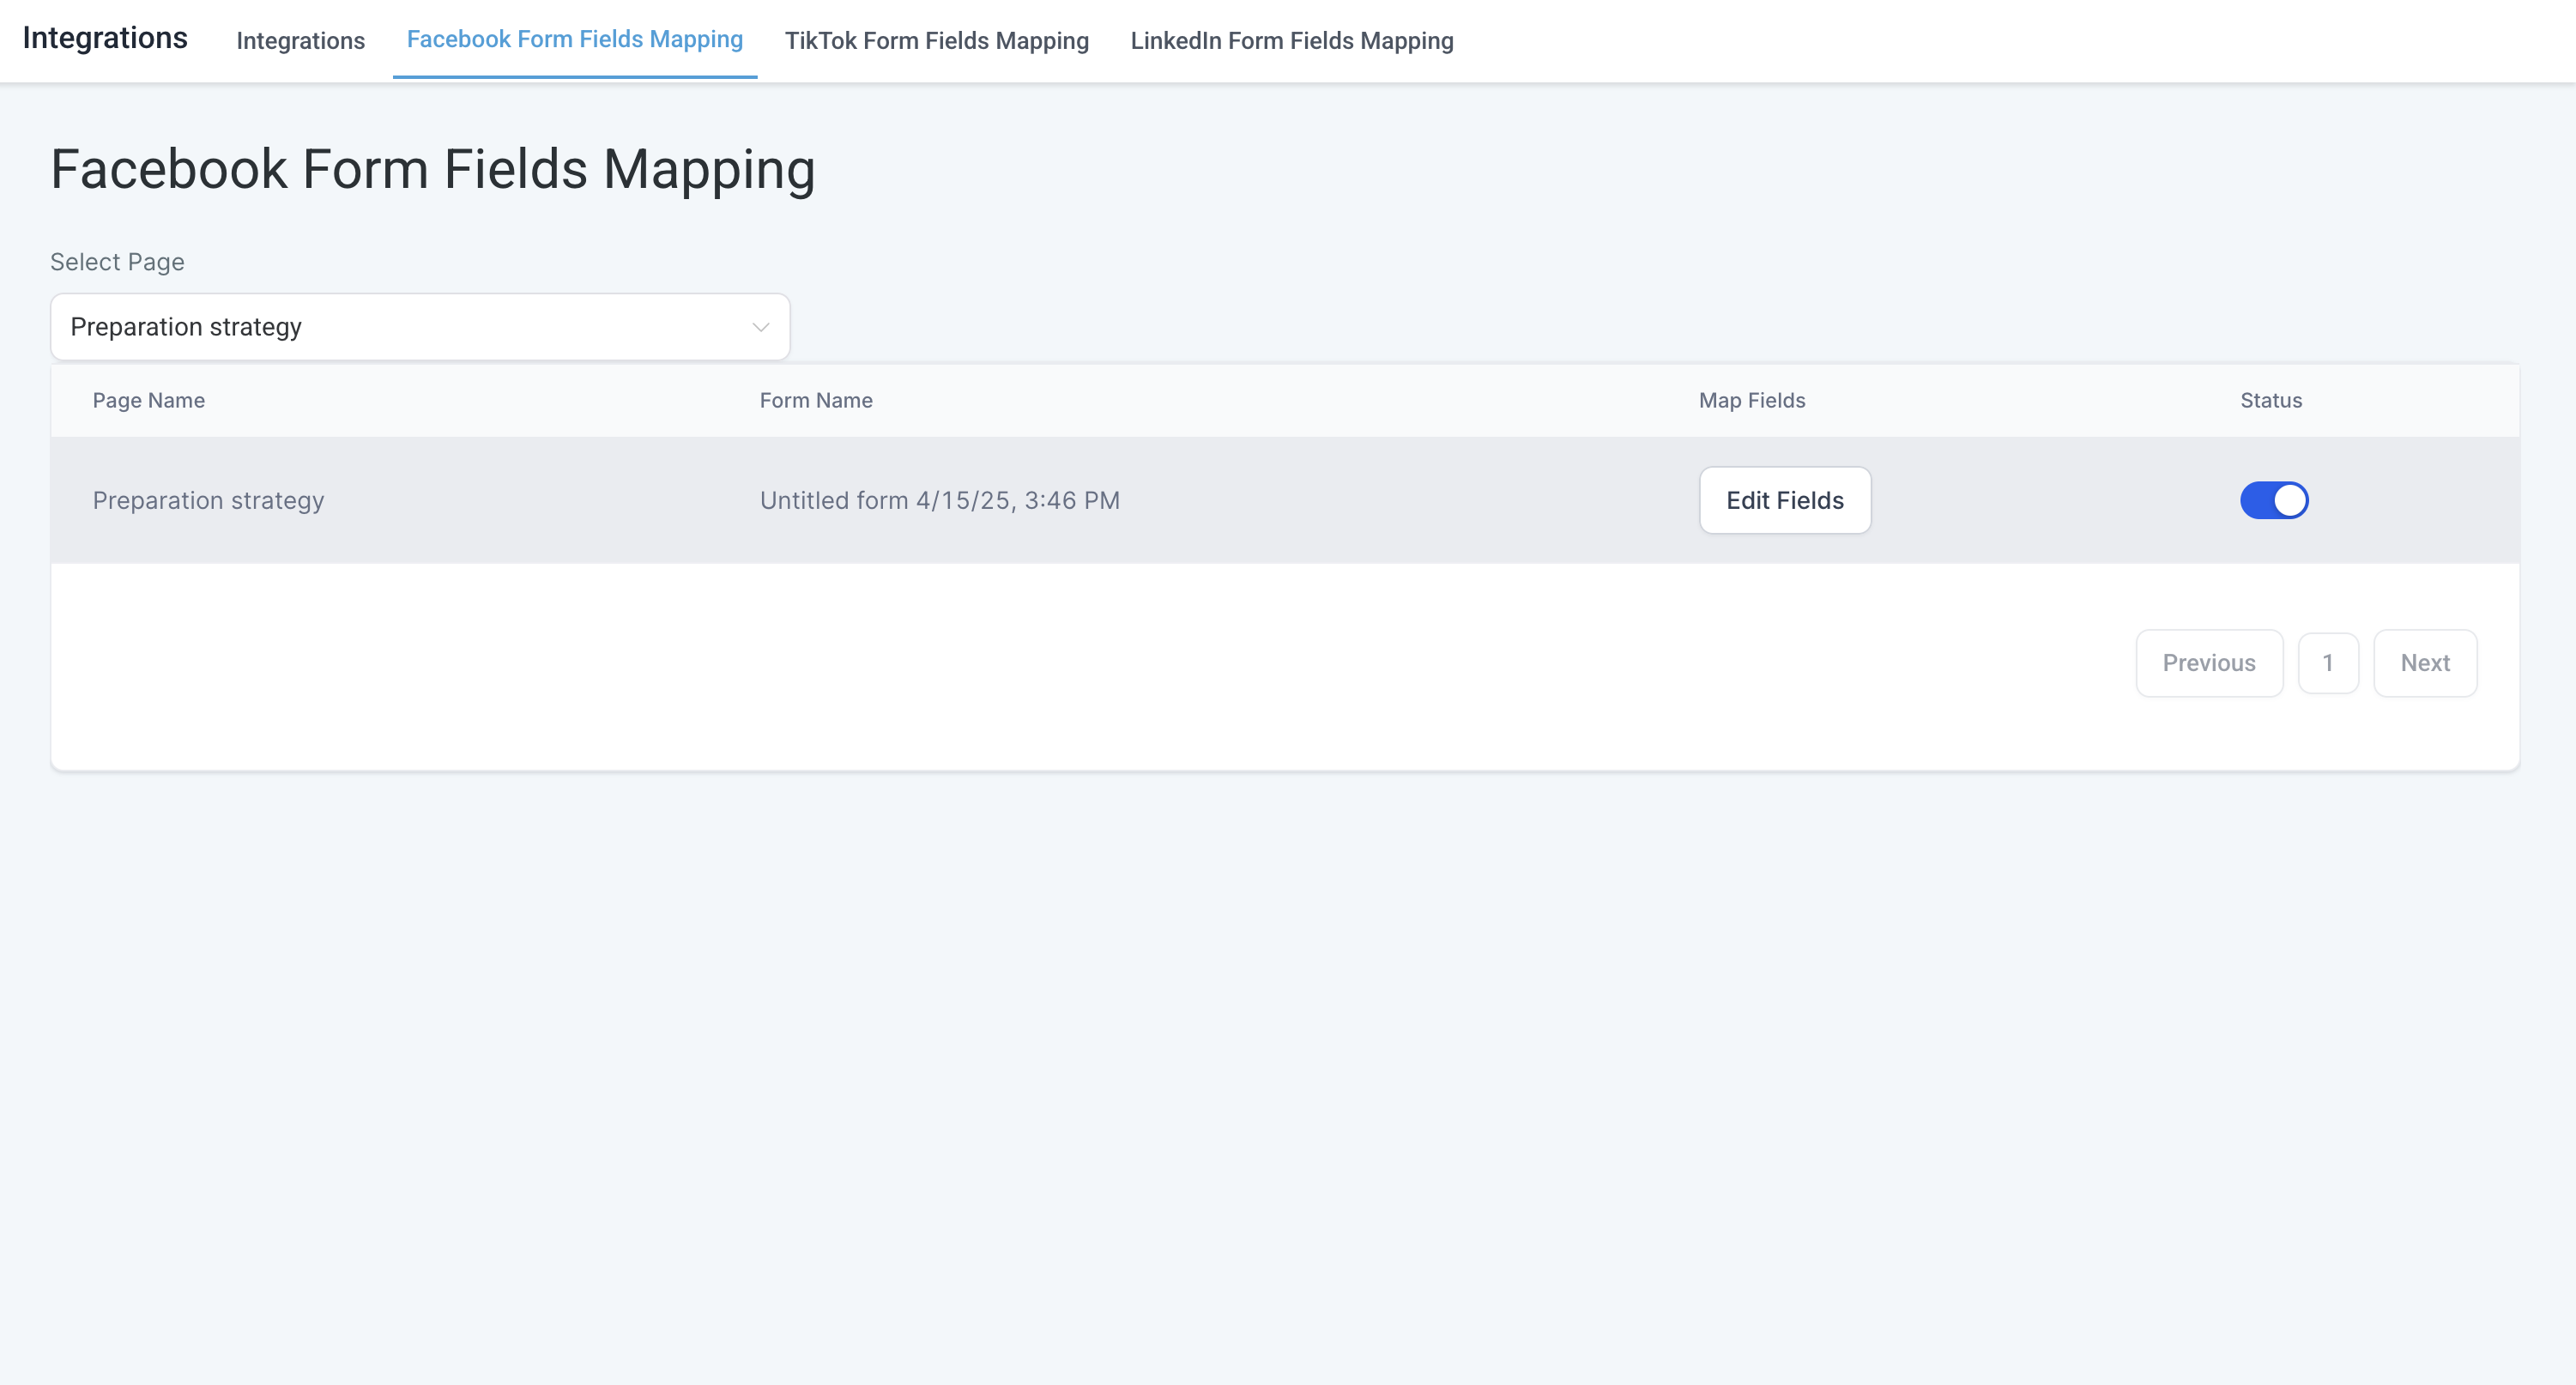
Navigate to Settings > Integrations > Facebook Form Field Mapping and map your desired instant form to the CRM.
Only the user who integrated the Facebook page will see that page in the dropdown, and they must be an admin of that page.
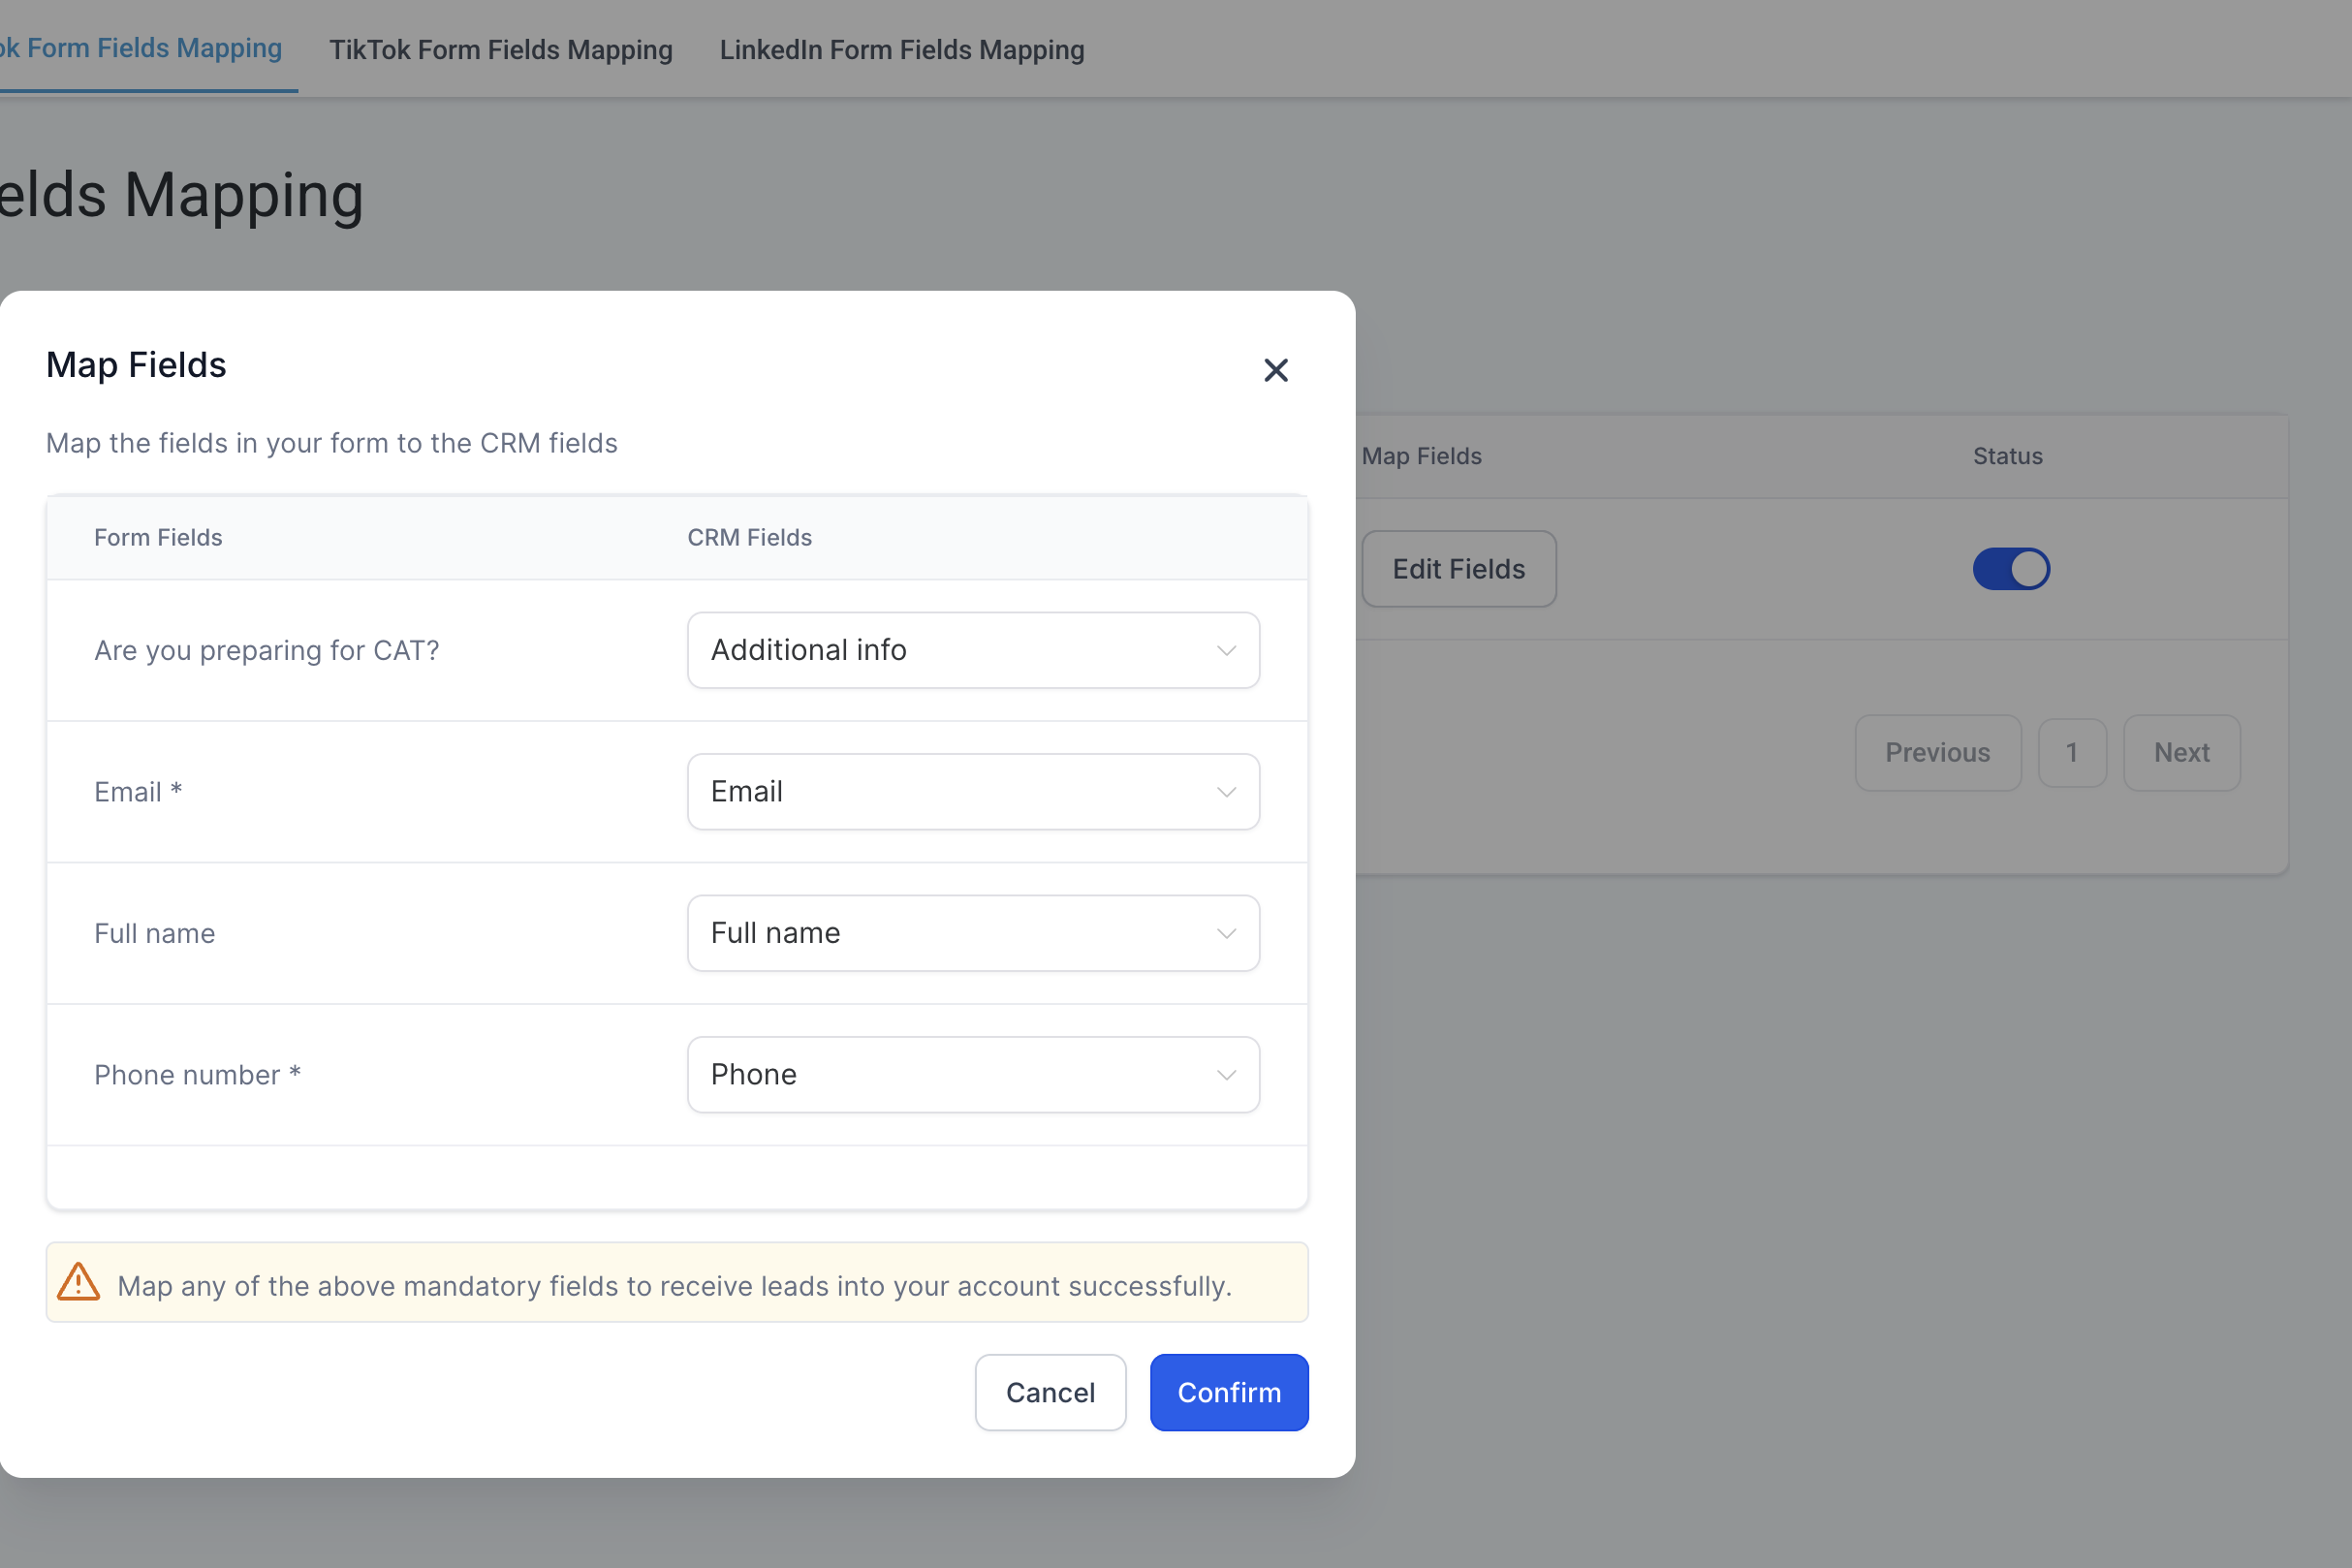
Field mapping ensures data submitted through your Facebook forms (name, phone, email, and more) flows into the correct contact fields, enabling seamless follow-up and automation.
Connect the Facebook integration with Aesthetix CRM (see above).
Once connected, go to Settings > Integrations > Form Field Mapping to map your Facebook lead form fields to fields in the CRM.
Standard fields are auto-mapped:
full_name maps to Contact Name
email maps to Email
phone_number maps to Phone
For custom fields, create Contact Custom Fields in your CRM, then manually map the Facebook form fields to the appropriate custom fields.
Once mapped, the status shows as active with the toggle enabled and the Map fields status showing Edit Fields.
The field type in the Facebook form should match the field type in the CRM.
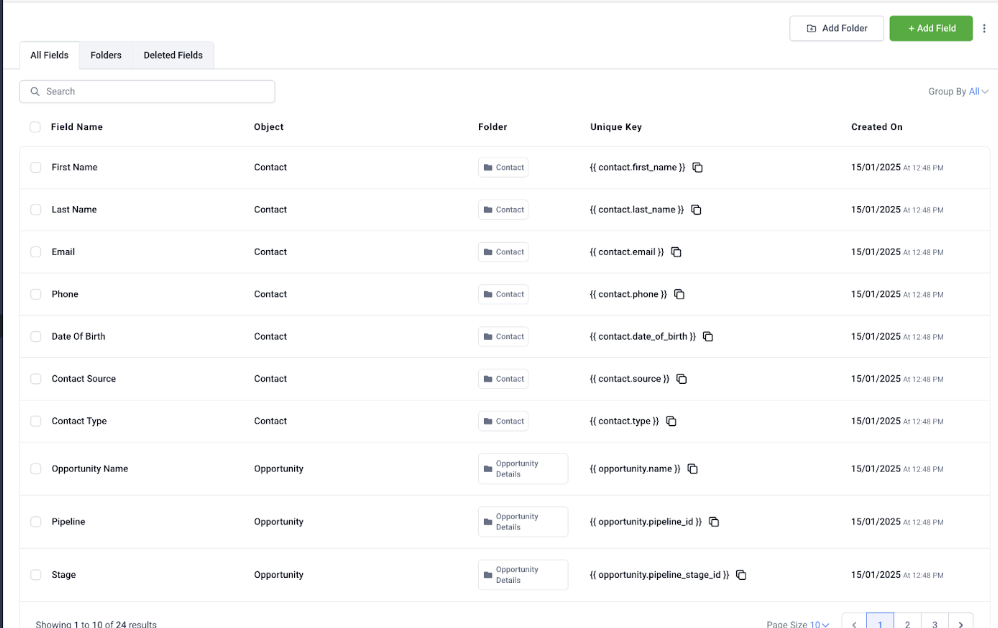
Navigate to Settings > Custom Fields.
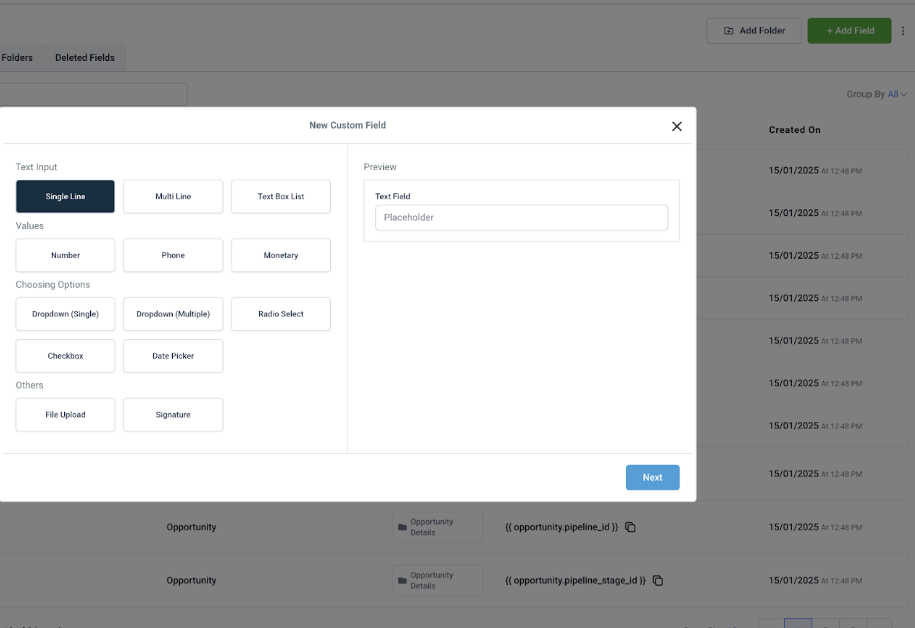
Click + Add Custom Field. Choose the object type (Contacts), enter the field name and type (text, dropdown, checkbox, date, and so on), and optionally group it under a custom section.
Save the custom field. It is then available throughout the CRM wherever that object type is used.
Supported custom field types when using Facebook lead ads include TEXT, LARGE_TEXT, NUMERICAL, PHONE, MONETARY, DATE, and single-option DROPDOWN.
We recommend not renaming field names in your Facebook forms after setup, as this can break the mapping on the Aesthetix CRM side.
If your lead ads are not making it into Aesthetix CRM, work through these checks:
Confirm you are an admin of the Facebook page.
In Facebook Ads Manager, confirm the correct lead ad form is selected and matches the one in your account.
In Aesthetix CRM, go to Settings > Integrations > Facebook Form Field Mapping and confirm there is a blue checkmark next to the form selected in Ads Manager.
If you are the Facebook admin, confirm Aesthetix CRM has access to your page.
Use the Facebook Lead Ads Testing Tool to check whether leads are being added. Choose the correct page and form, click Create Lead, then click Track Status until you get a result. If you get a failure, continue below.
When testing, confirm you can locate the App ID 390181264778064. If the App ID does not show or the test fails, our provider does not have access.
To restore access, go to Business.Facebook.com > Business Settings > Integrations > Leads Access > CRMs. If you do not find our CRM (listed as LeadConnector, our underlying provider) in the list, that is why the test tool returned "CRM Access has been revoked from Lead Access Manager."
To fix it:
In Aesthetix CRM, go to Settings > Integrations and disconnect your Facebook connection by clicking Connected, then reconnect by clicking Connect a Page and choosing your page.
Back at Business.Facebook.com, go to Business Settings > Integrations > Leads Access > CRMs, click Assign CRMs, choose LeadConnector from the list, and grant it access.
Run the Lead Ads Testing Tool again. Delete the existing test lead, then click Create Lead.
On a Success status, the test lead appears under the Contacts tab in Aesthetix CRM.
You can also integrate Facebook leads with a tool like Zapier or Pabbly Connect. Look for the LeadConnector app inside those tools. Account connection basics for third-party integrations live in the Integrations collection.
If you hit a page quality issue, raise a support ticket with Facebook. Switch to the Facebook page, go to your page's profile quality settings, and raise a ticket with Facebook if there is an issue.
The easiest way to find permission problems is to try to fetch the latest Facebook/Instagram message and the latest lead; the Facebook API returns an error if a permission is missing. In Facebook settings, check that all permissions are enabled for all pages under Business Tools and Applications.
Confirm the Instagram page is connected to the Facebook page:
Switch your logged-in user to the desired Facebook page and check Linked Instagram in settings.
Confirm messaging is enabled.
If the page is connected but your Instagram page still is not visible as an option in the CRM, do a hard refresh and try again.
Sometimes this happens because our app is not set as the primary receiver when you have multiple CRM integrations. Switch to the desired Facebook page and set the primary receiver under advanced messaging settings.
Check the following on the Facebook business side:
The user is added to the business (Employee or Admin).
The user is a Facebook Page admin.
The page owner matches the ad account owner.
Integration lead access is granted. If you are still not receiving leads, click Restore Default Access and check again.
An Instagram account can be connected to a single Facebook page. To connect or verify:
Log in to Facebook and click Pages in the left menu.
Select your Facebook page (switch to it), then click Settings.
Select Linked Accounts in the left column.
Select Instagram, then connect your account. If it is already connected, you can verify it here.
If you have 90 days from the time a lead submits their form to download it, and you can export leads directly from Business Suite as a backup. For the full export and manual import process, see the Exporting Facebook Lead Ads Manually guide.
Workflows: After leads sync and map correctly, the Facebook Lead Form Submitted trigger and your follow-up actions live in the Workflows collection.
Integrations: Connecting your Facebook account and third-party tools like Zapier is part of the Integrations setup.
Why are my Facebook leads not showing up in Aesthetix CRM?
The most common causes are not being a page admin, the wrong form selected in Ads Manager, unmapped form fields, or revoked Lead Access. Work through the troubleshooting checklist, confirm the blue checkmark next to your mapped form, and re-grant Leads Access if needed.
Do I have to be an admin of the Facebook page?
Yes. Facebook requires the person integrating the page to be a Page admin with Lead Access permission.
What is the App ID 390181264778064?
It is the app ID you should be able to locate when testing with the Lead Ads Testing Tool. If it does not appear, our provider does not have access and you should re-grant Leads Access.
Why do I see "LeadConnector" in Facebook's Leads Access list?
LeadConnector is our underlying ad provider, so that is the name Facebook shows for the CRM connection. Seeing it there is expected, and you grant it access under Business Settings > Integrations > Leads Access > CRMs.
Which custom field types are supported for Facebook lead ads?
TEXT, LARGE_TEXT, NUMERICAL, PHONE, MONETARY, DATE, DROPDOWN, SINGLE_OPTIONS, RADIO OPTIONS, and CHECKBOX. Match the field type in your Facebook form to the field type in the CRM.
Can I rename fields in my Facebook form after mapping?
Avoid it. Renaming fields in Facebook after setup can break the mapping on the Aesthetix CRM side.
Why are my Instagram messages not all syncing?
Our app may not be set as the primary receiver if you have multiple CRM integrations. Set the primary receiver under the page's advanced messaging settings.
Can I use Zapier or Pabbly Connect instead of the native integration?
Yes. Look for the LeadConnector app inside Zapier or Pabbly Connect to route Facebook leads into Aesthetix CRM.
What if I only need to pull leads occasionally?
You can export leads from Business Suite and import them manually. See the Exporting Facebook Lead Ads Manually guide. Remember leads expire 90 days after submission.
