When a prospective patient submits their information through your Chat Widget, the acknowledgment message is the first thing they see. It confirms their message came through, sets expectations for when your team will follow up, and gives them a way to reach you right away. This guide covers how to customize that acknowledgment message and how to automate replies whenever a visitor responds through the widget.
The acknowledgment (or thank-you) message appears immediately after a visitor submits their details. A clear, welcoming message reassures new leads that their information was received and that your team will be in touch.
From the left menu, go to Web Tools > Chat Widget.
Select Acknowledgment settings.
As you customize your acknowledgment message, a live preview shows exactly how it will look to your visitors. Every change updates instantly, so you can fine-tune the wording and appearance before saving and be confident it looks just right.
Make it easy for website visitors to reach you by adding your practice phone number or email address. Offering these options upfront lets visitors contact you immediately instead of waiting for a call, text, or email. This improves the visitor experience and can lead to more booked consultations.
Give your acknowledgment message a custom heading so it stands out. A unique, attention-grabbing title leaves a stronger impression on the visitor and reinforces your practice's brand.
Let new leads know their information was successfully received and that your team is excited to connect with them. Customize the message to be as personal or general as you like. A warm acknowledgment builds a stronger relationship with the lead and signals that their interest is valued. By reassuring them to sit tight and wait for a call, text, or email from your team, you set the right expectations and create a positive first experience.
Note: Keep the tone welcoming and human. A concise, personal acknowledgment reads better than a generic automated reply.
Beyond the initial acknowledgment, you can build automations that run whenever a visitor replies through your Chat Widget. Using the Customer Replied trigger in Automations, you can target replies precisely, route them to the right team, and send instant follow-ups.
The trigger uses a layered filter structure so your automation runs only where you intend:
Event: Customer Replied. The workflow activates when a visitor sends a reply message.
Reply Channel: All-in-One Chat. Limits execution to replies from unified chat widgets.
Scoped filters (dynamic). Once All-in-One Chat is selected, additional filters appear:
Chat Type: Chat Widget or Live Chat.
Specific Configuration: if Chat Type is Chat Widget, select the exact widget; if Chat Type is Live Chat, select the exact Live Chat configuration.
The workflow runs only when all selected conditions are met.
At least one Chat Widget must be configured.
You must have access to Automations.
If using assignment logic, ensure users or teams are set up first.
If using tags or pipeline routing, confirm your naming conventions are established.
Go to Automations > Workflows.
Click Create Workflow, or open an existing one.
Select Add Trigger.
Choose Customer Replied.
The trigger configuration panel opens.
Locate the Reply Channel dropdown.
Select All-in-One Chat.
Selecting this activates the advanced filtering controls.
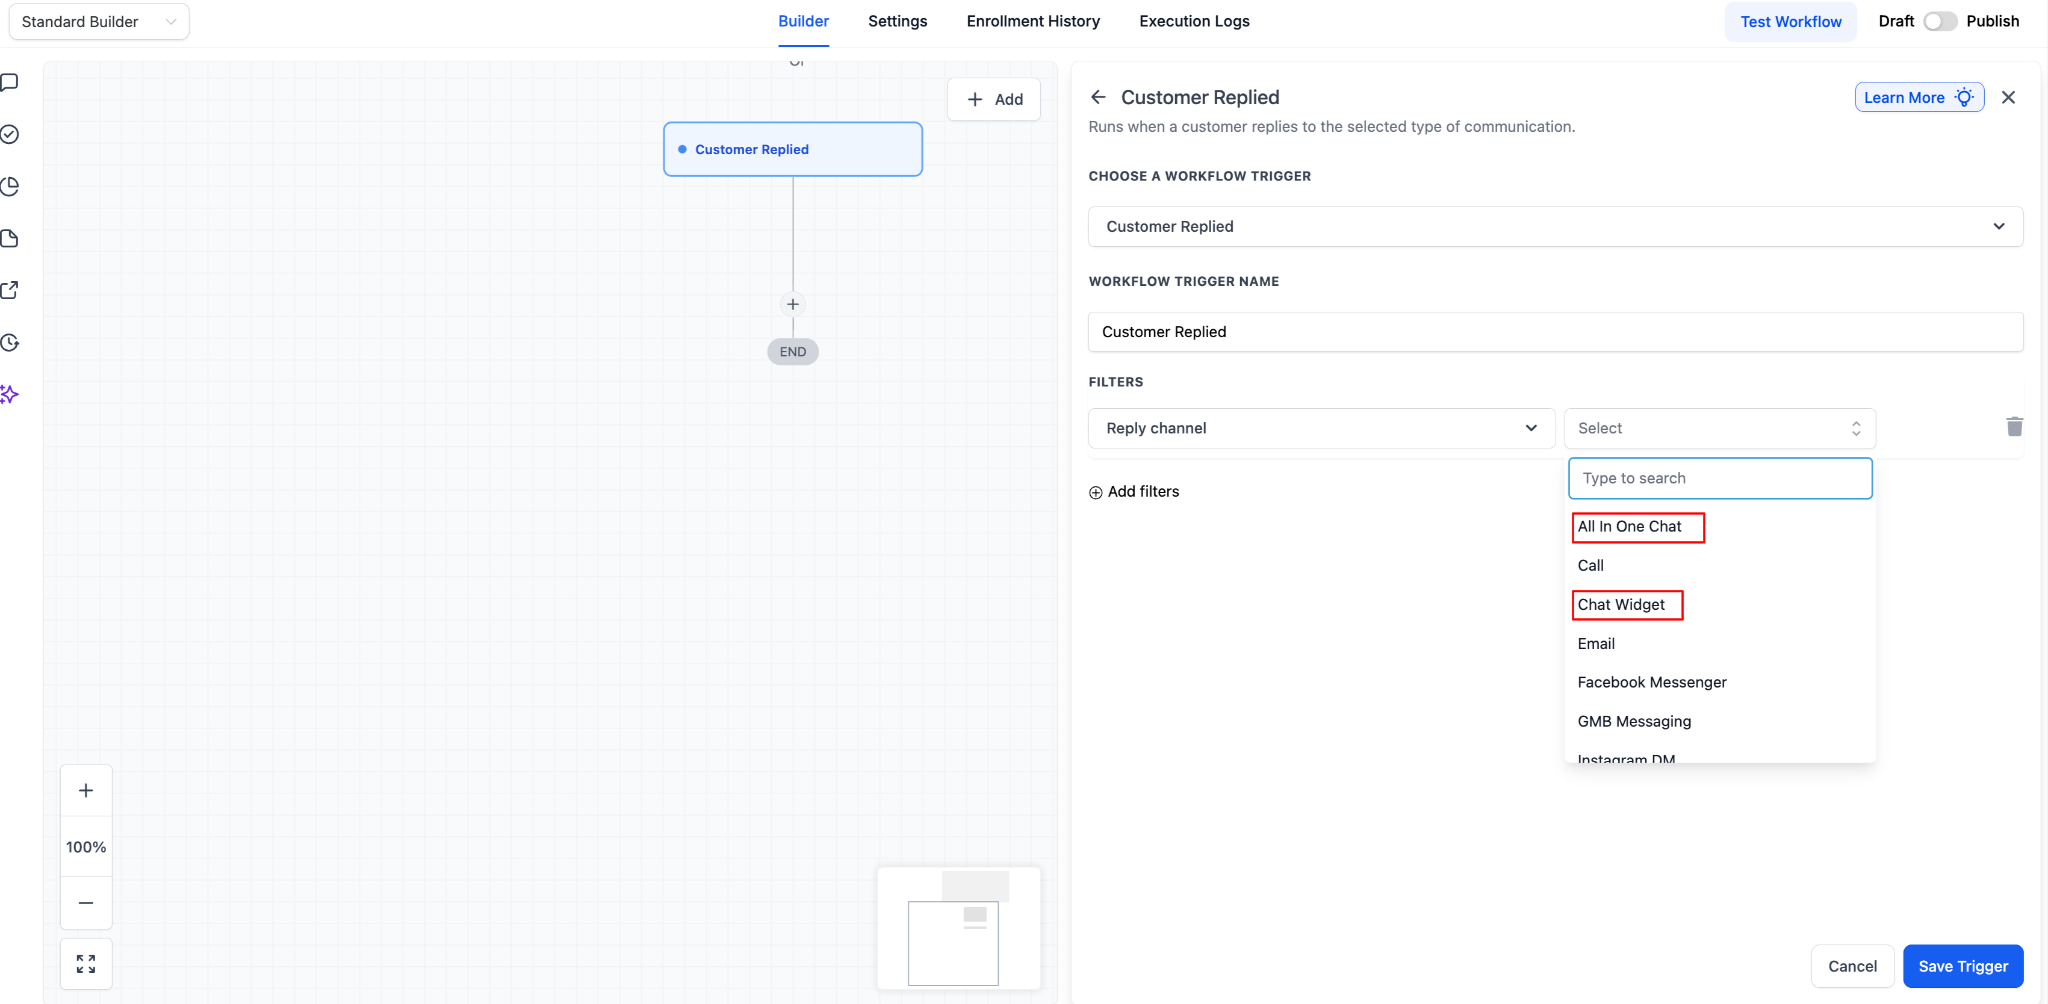
Under Chat Type, choose one:
Chat Widget. Use this to target replies that originate from the widget interface.
Live Chat. Use this to target replies associated with live chat configurations within the unified chat system.
Your choice determines which configurations appear next.
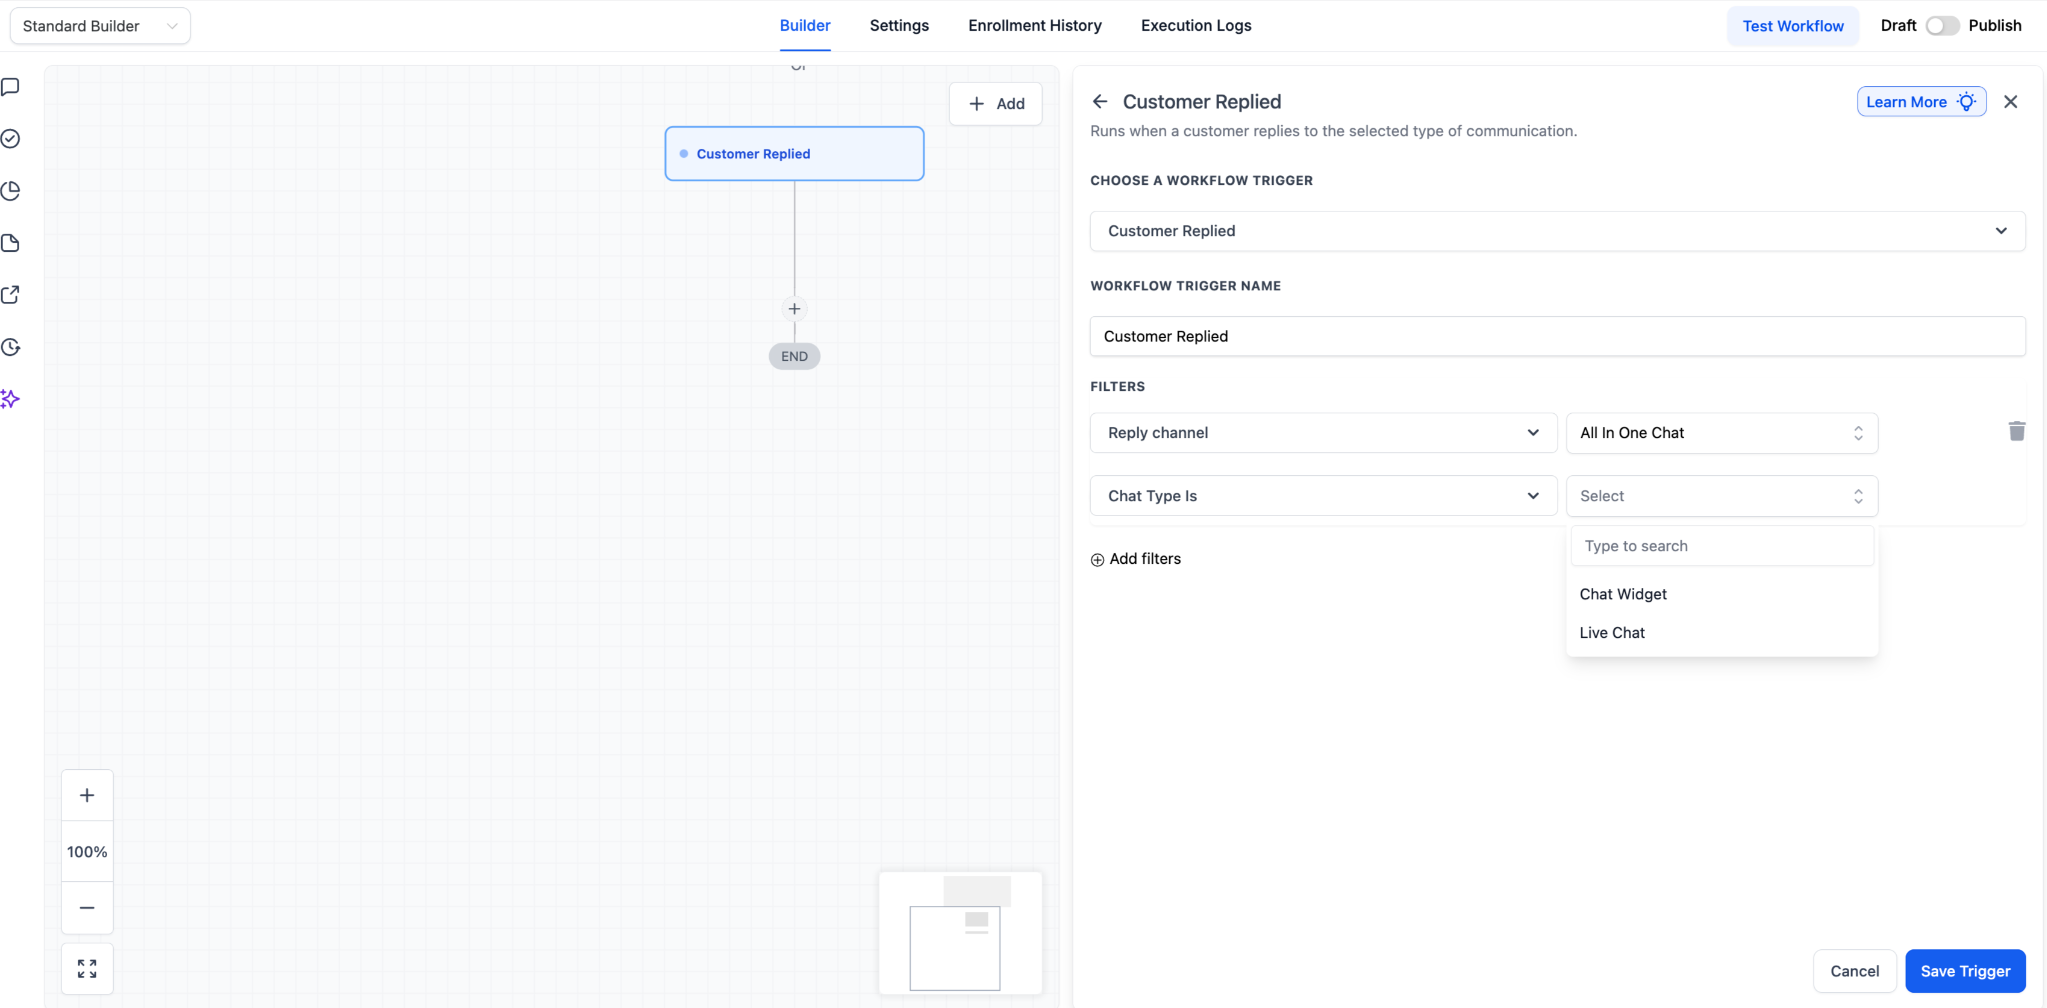
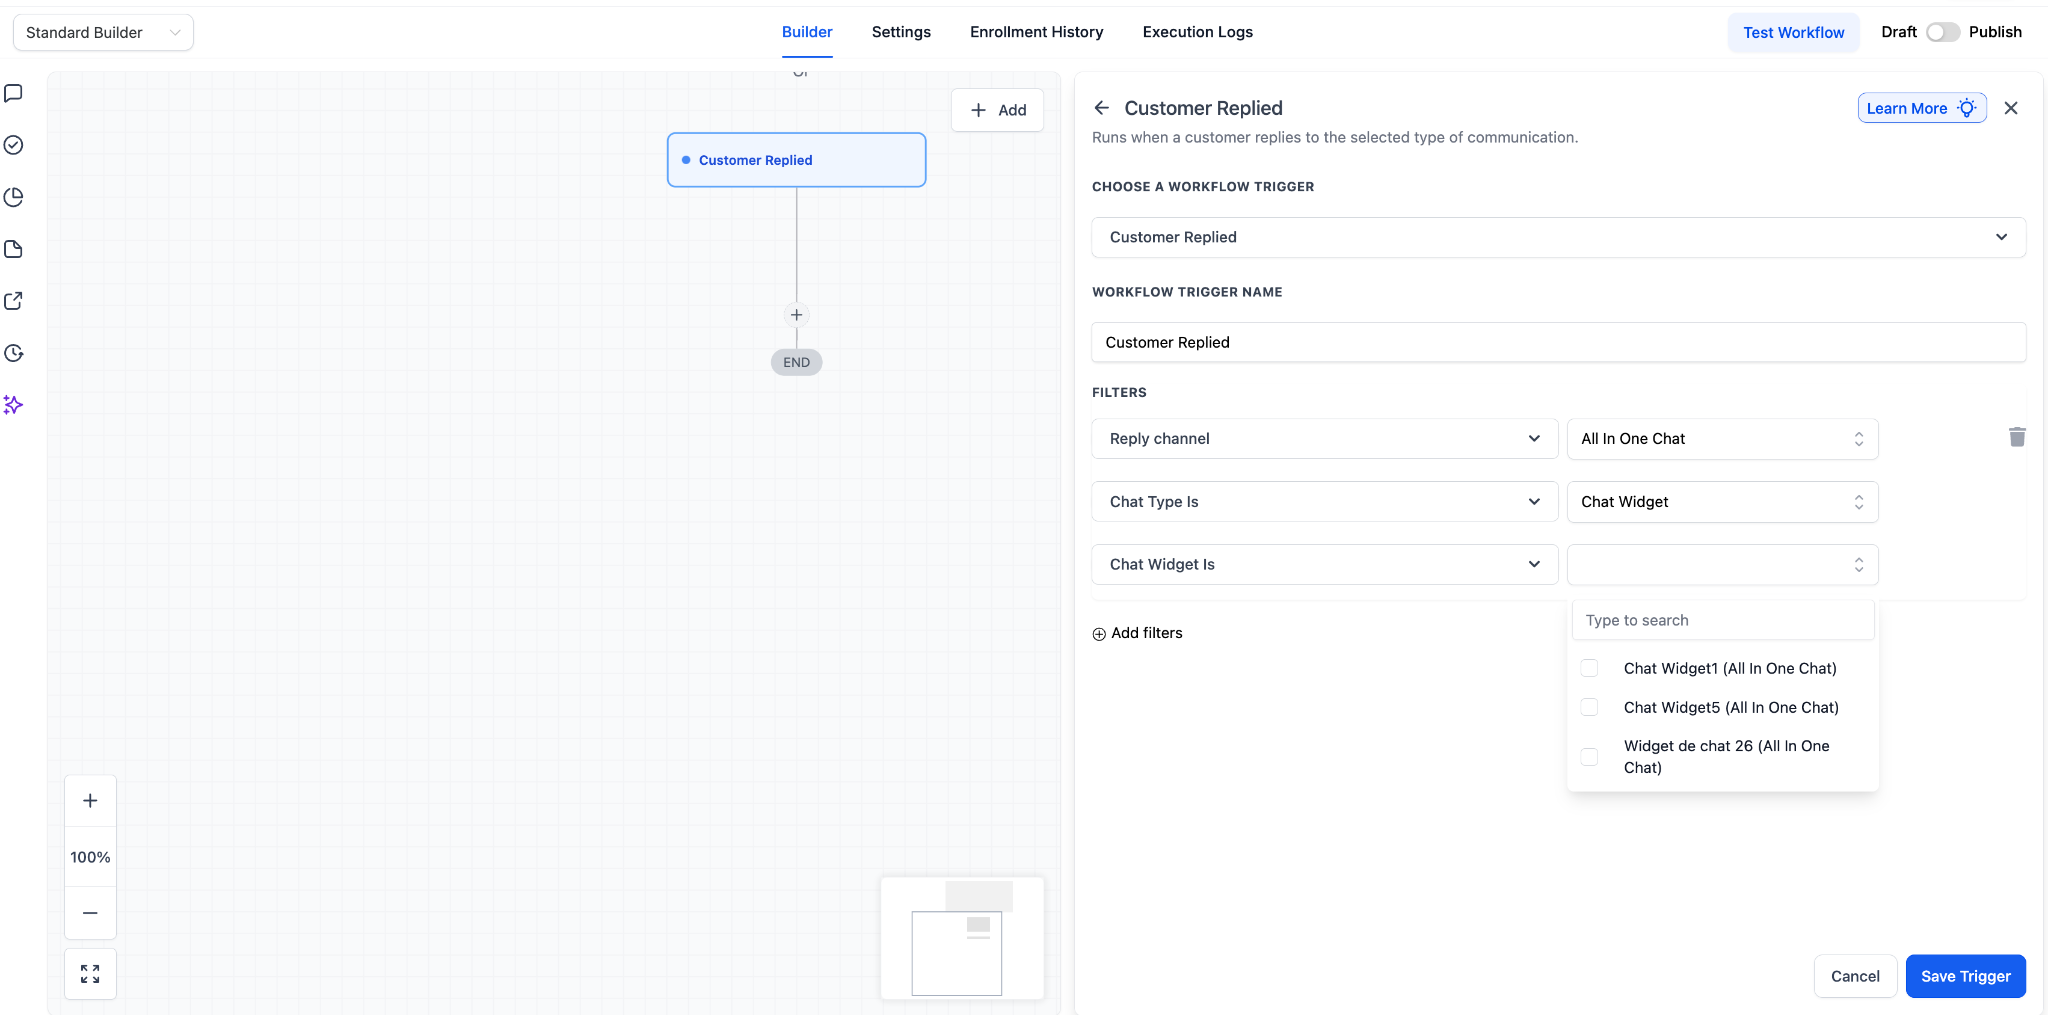
The final dropdown adjusts based on the Chat Type you chose. Only relevant configurations are displayed, so the workflow runs exclusively for replies from the setup you select.
If Chat Type is Chat Widget, select from the list under Chat Widget is.
If Chat Type is Live Chat, select from the list under Live Chat is.
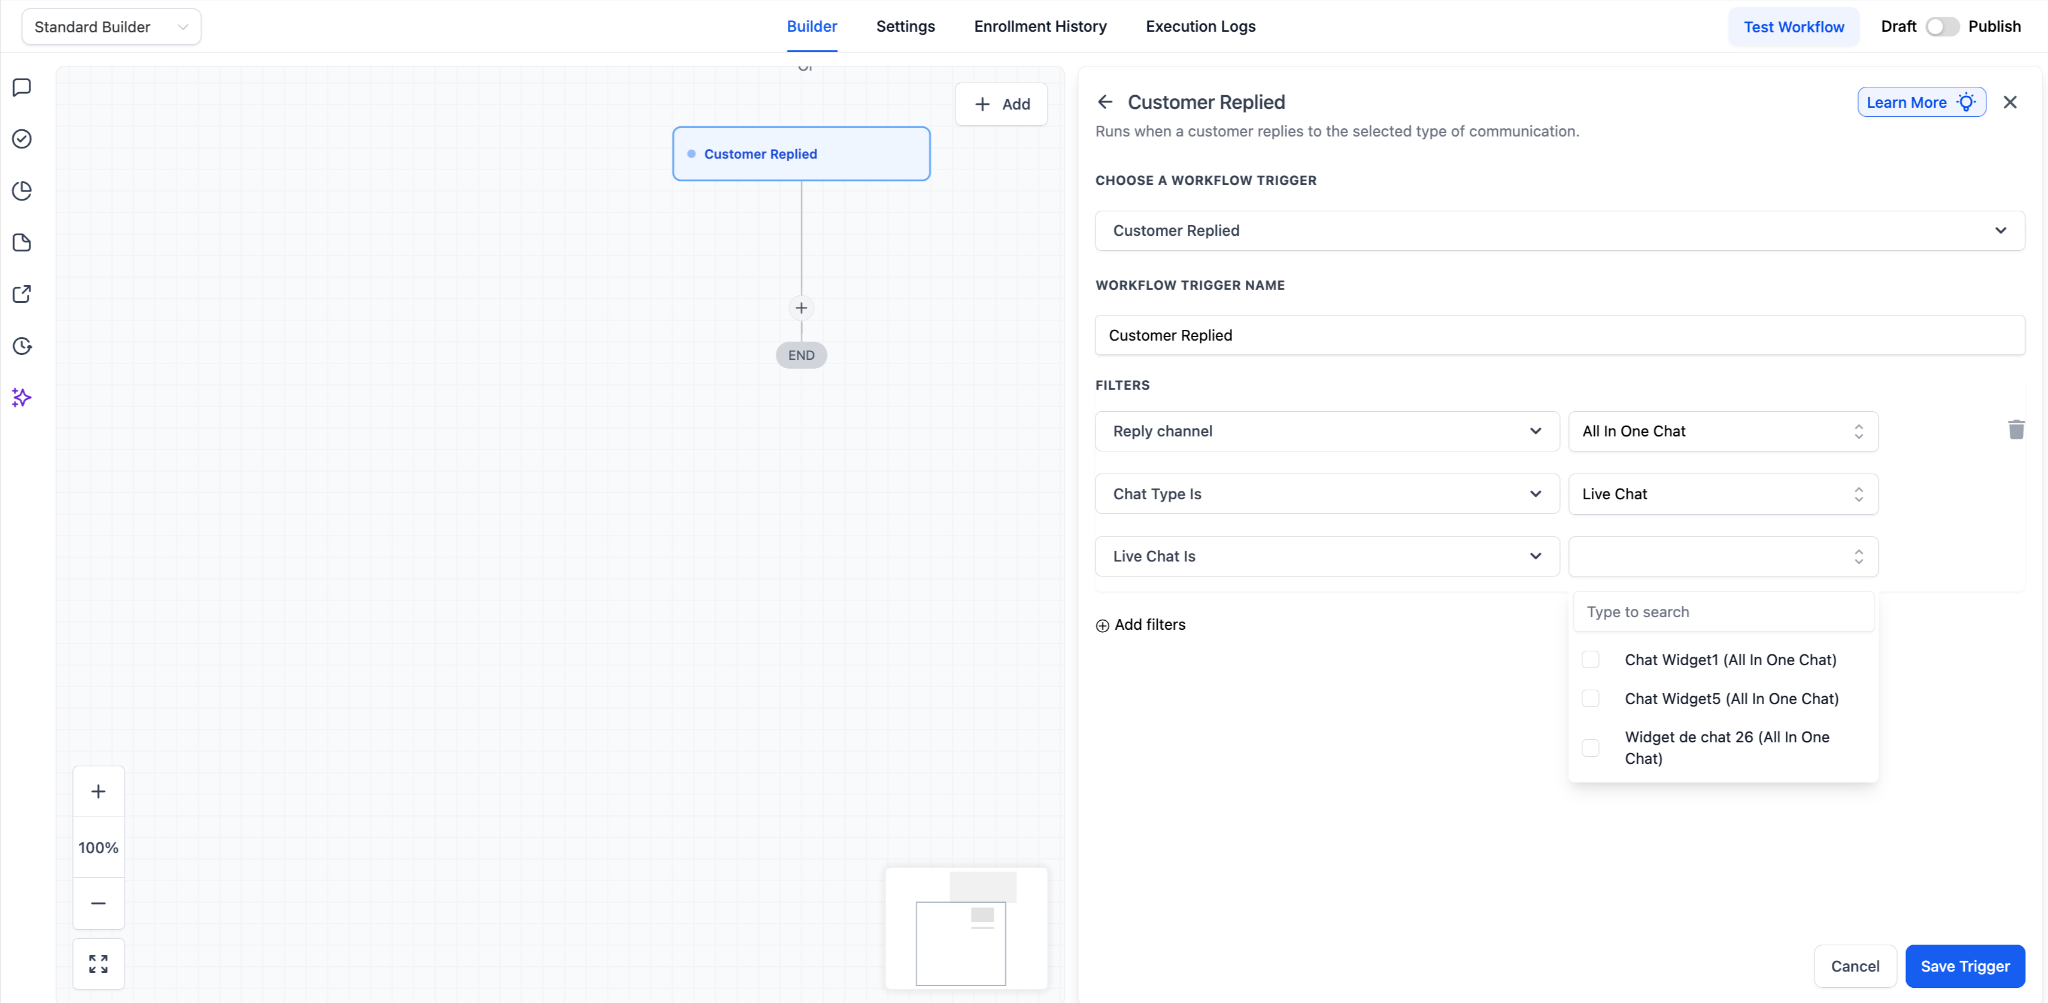
Click Save Trigger. The workflow is now scoped to visitor replies from the selected chat configuration.
These examples show how the Customer Replied trigger can be applied in real setups.
Send an immediate confirmation whenever a visitor replies.
Trigger: Customer Replied, Reply Channel = All-in-One Chat, Chat Type = Chat Widget, Chat Widget is = Support Widget.
Actions: send a message such as "We've received your message and will respond shortly," assign the conversation to a team member, add the tag Reply Received, and optionally create an internal task.
Best practice: keep the acknowledgment concise and human in tone.
Direct replies from different widgets to the appropriate teams.
Sales Widget: assign to a sales representative (or round robin), add the tag Sales Inquiry, create an opportunity, and send an internal alert to your sales channel.
Support Widget: assign to a support team member, add the tag Support, create a service task, and send an acknowledgment message.
This ensures routing happens immediately upon reply.
Notify leadership when replies come through a key widget.
Trigger scoped to: an Executive or VIP Widget.
Actions: send an internal notification, create a high-priority task, add the tag VIP, and escalate assignment to a senior team member.
Use replies to segment intent.
Trigger scoped to: your Main Chat Widget.
Actions: if the message contains "price" or "cost," add the tag Pricing Interest; if it contains "cancel" or "refund," add the tag Retention Risk. Route to the appropriate team and send a contextual follow-up question.
Escalate when a reply is not handled promptly.
Trigger scoped to: a Live Chat configuration.
Actions: wait 10 minutes, then, if no action has been taken based on your chosen indicator, notify a backup user, reassign the conversation, and send a message offering a callback.
When managing multiple websites, funnels, or brands:
Create one workflow per widget.
Name workflows clearly, for example Reply - Support Widget - Routing.
Maintain consistent tagging conventions.
Avoid combining unrelated widgets in a single workflow.
Always select the specific widget or configuration when multiple widgets exist.
Keep routing logic modular.
Avoid combining Live Chat and Chat Widget logic unless it is intentional.
Audit workflows quarterly to ensure there is no overlap.
Maintain naming standards for easy troubleshooting.
What is the acknowledgment message? It is the thank-you message a visitor sees immediately after submitting their information through your Chat Widget. It confirms their message was received and sets expectations for your team's follow-up.
Where do I customize the acknowledgment message? Go to Web Tools > Chat Widget and select Acknowledgment settings. A live preview shows your changes as you make them.
Can visitors contact me directly from the acknowledgment message? Yes. Add your practice phone number or email address so visitors can reach you right away instead of waiting for a callback.
How do I automate a reply when a visitor responds? Build a workflow in Automations using the Customer Replied trigger, set the Reply Channel to All-in-One Chat, and scope it to your specific Chat Widget.
What is the difference between Chat Widget and Live Chat in the trigger? Chat Type lets you narrow the trigger. Choose Chat Widget to target replies from the widget interface, or Live Chat to target replies tied to a live chat configuration within the unified chat system.
All-in-One Chat does not appear in the Reply Channel dropdown. What should I check? Confirm the selected trigger is Customer Replied and that at least one All-in-One Chat widget exists in your account.
My expected widget does not appear in the configuration list. Why? Switch the Chat Type between Chat Widget and Live Chat, and confirm the widget configuration exists and is active.
My workflow triggers unexpectedly. How do I fix it? Verify your specific configuration selection, check for duplicate workflows, and review any overlapping trigger conditions.
