The Client Portal gives your patients a single, secure place to engage with your practice online. From one branded login, patients can access their membership courses, view affiliate commissions, and connect with your practice, all under your own domain and branding. This guide walks you through setting up the portal, customizing its look, and helping patients log in and use it.
Note: The Client Portal is also the home for your memberships and courses. If you offer online courses or a membership program, patients access that content through the same portal you set up here.
The Client Portal is a patient-facing interface that acts as a centralized hub for everyone who interacts with your practice. It brings several capabilities together in one place:
Centralized platform: Patients can access their membership courses, view affiliate commissions, and (soon) participate in community groups, all from a single hub. Keeping these functions in one place makes it easy for patients to manage their relationship with your practice.
Custom domains: You can set up a custom domain for your portal for a more personalized touch. This strengthens your patients' sense of ownership and can increase engagement.
Brandable interface: The portal can be customized to reflect your practice's identity, including your logo, favicon, and color scheme, so patients get a consistent, familiar experience.
Improved communication and patient autonomy: The portal enables easy, secure interaction and empowers patients to take action on their own, which can increase satisfaction and retention.
Easy invitations: You can invite patients through the portal's child apps or by sharing the portal URL directly.
Online courses and education: Patients enrolled in your courses can access their lessons, track their progress, and (soon) interact with others in community groups.
Membership programs: Offer members a single place to access their exclusive content, workout or treatment plans, and progress over time.
Affiliate programs: Give affiliates one platform to monitor their referrals, commission rates, and earnings, which encourages them to promote your practice more actively.
VIP and loyalty programs: Invite loyal patients into a VIP experience where they can view exclusive offers and track rewards.
Event and program access: Share event-related documents, updates, and resources tied to a specific program or launch.
Streamlined access to information: Centralizing key functions and data in one place means patients can find what they need without navigating multiple platforms.
Improved patient autonomy: Patients can take action independently, which often increases satisfaction because they can resolve questions without reaching out for help.
Enhanced engagement: A shared hub (and, soon, community groups) helps patients feel more connected to your practice, building loyalty and retention.
Consistent brand experience: Branding controls let you deliver a consistent look across every patient interaction, reinforcing trust in your practice.
Easier onboarding: Instead of juggling multiple emails and platforms, you can invite patients to one portal where they find everything they need.
Increased credibility with a custom domain: A custom domain gives patients familiarity and increases the credibility of your practice.
Efficient communication: You can reach patients in one place, and they can respond at their convenience.
Your Client Portal is available out of the box, but you can personalize it by connecting a unique custom domain. A custom domain reinforces your branding and makes the platform feel like a natural extension of your practice.
To configure a custom domain for your Client Portal:
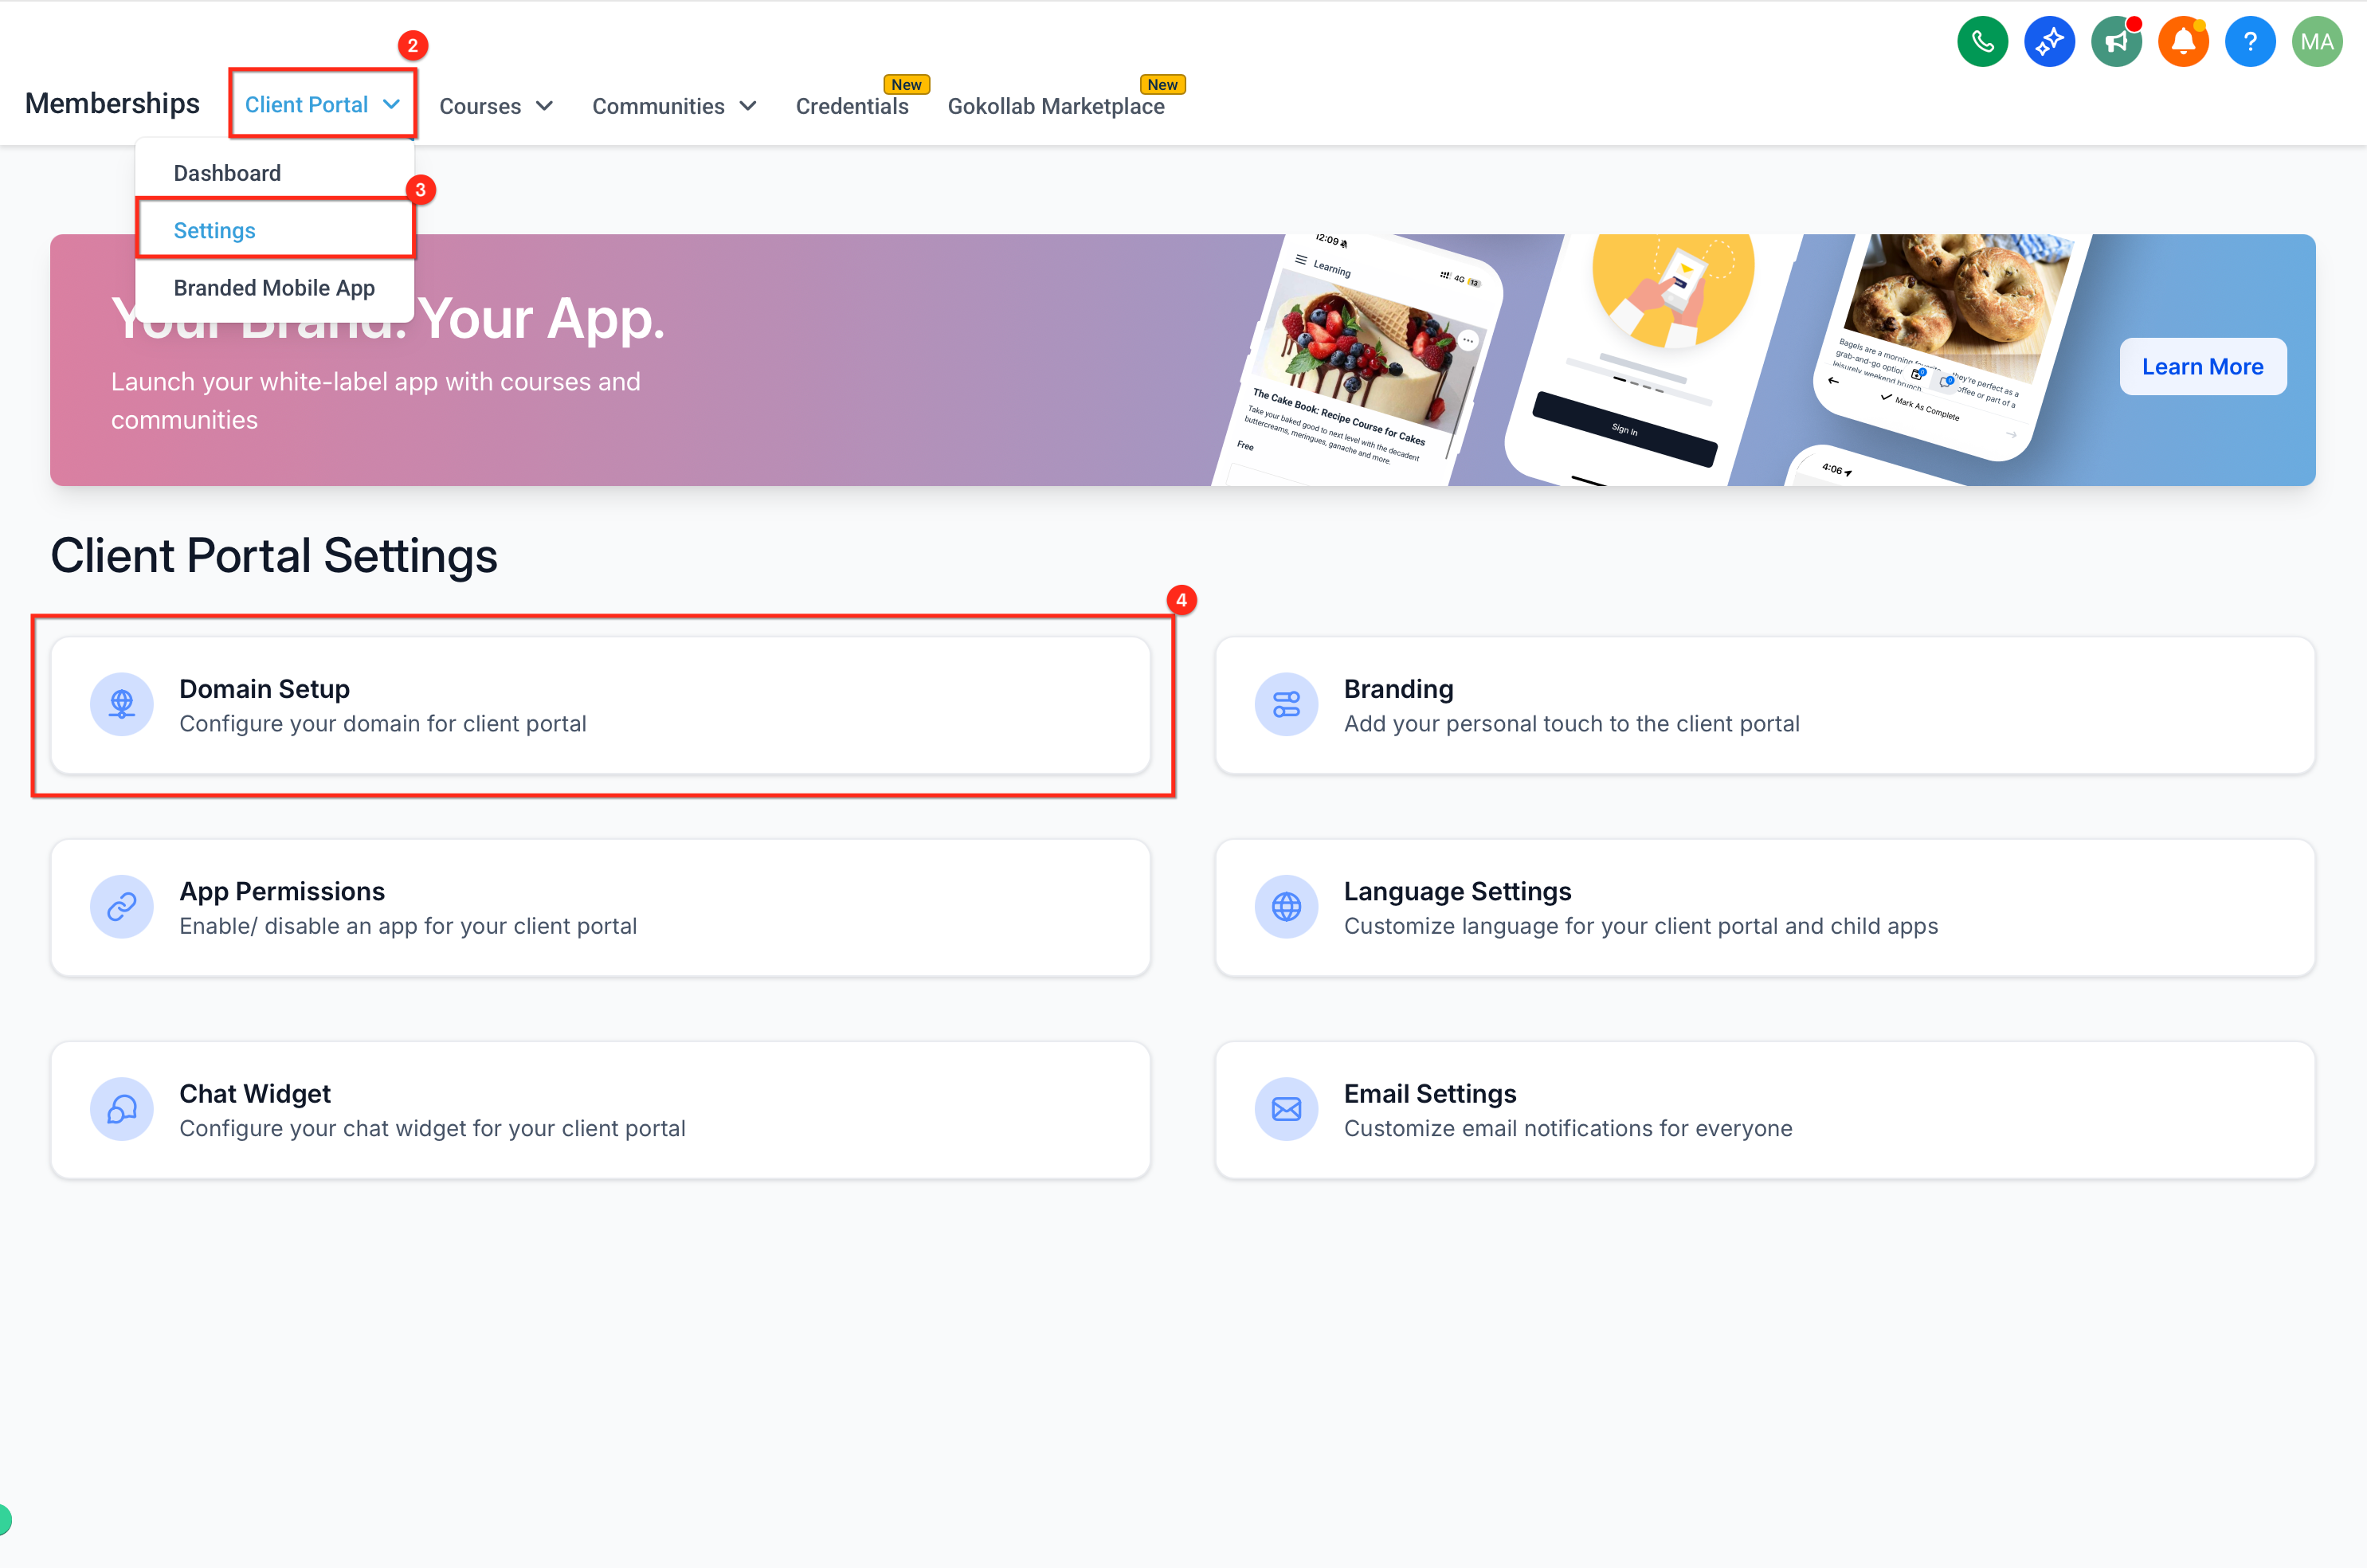
Using the left sidebar, navigate to the Memberships tab, open the Client Portal section from the top, and select Settings. Then go to the Domain Setup area.
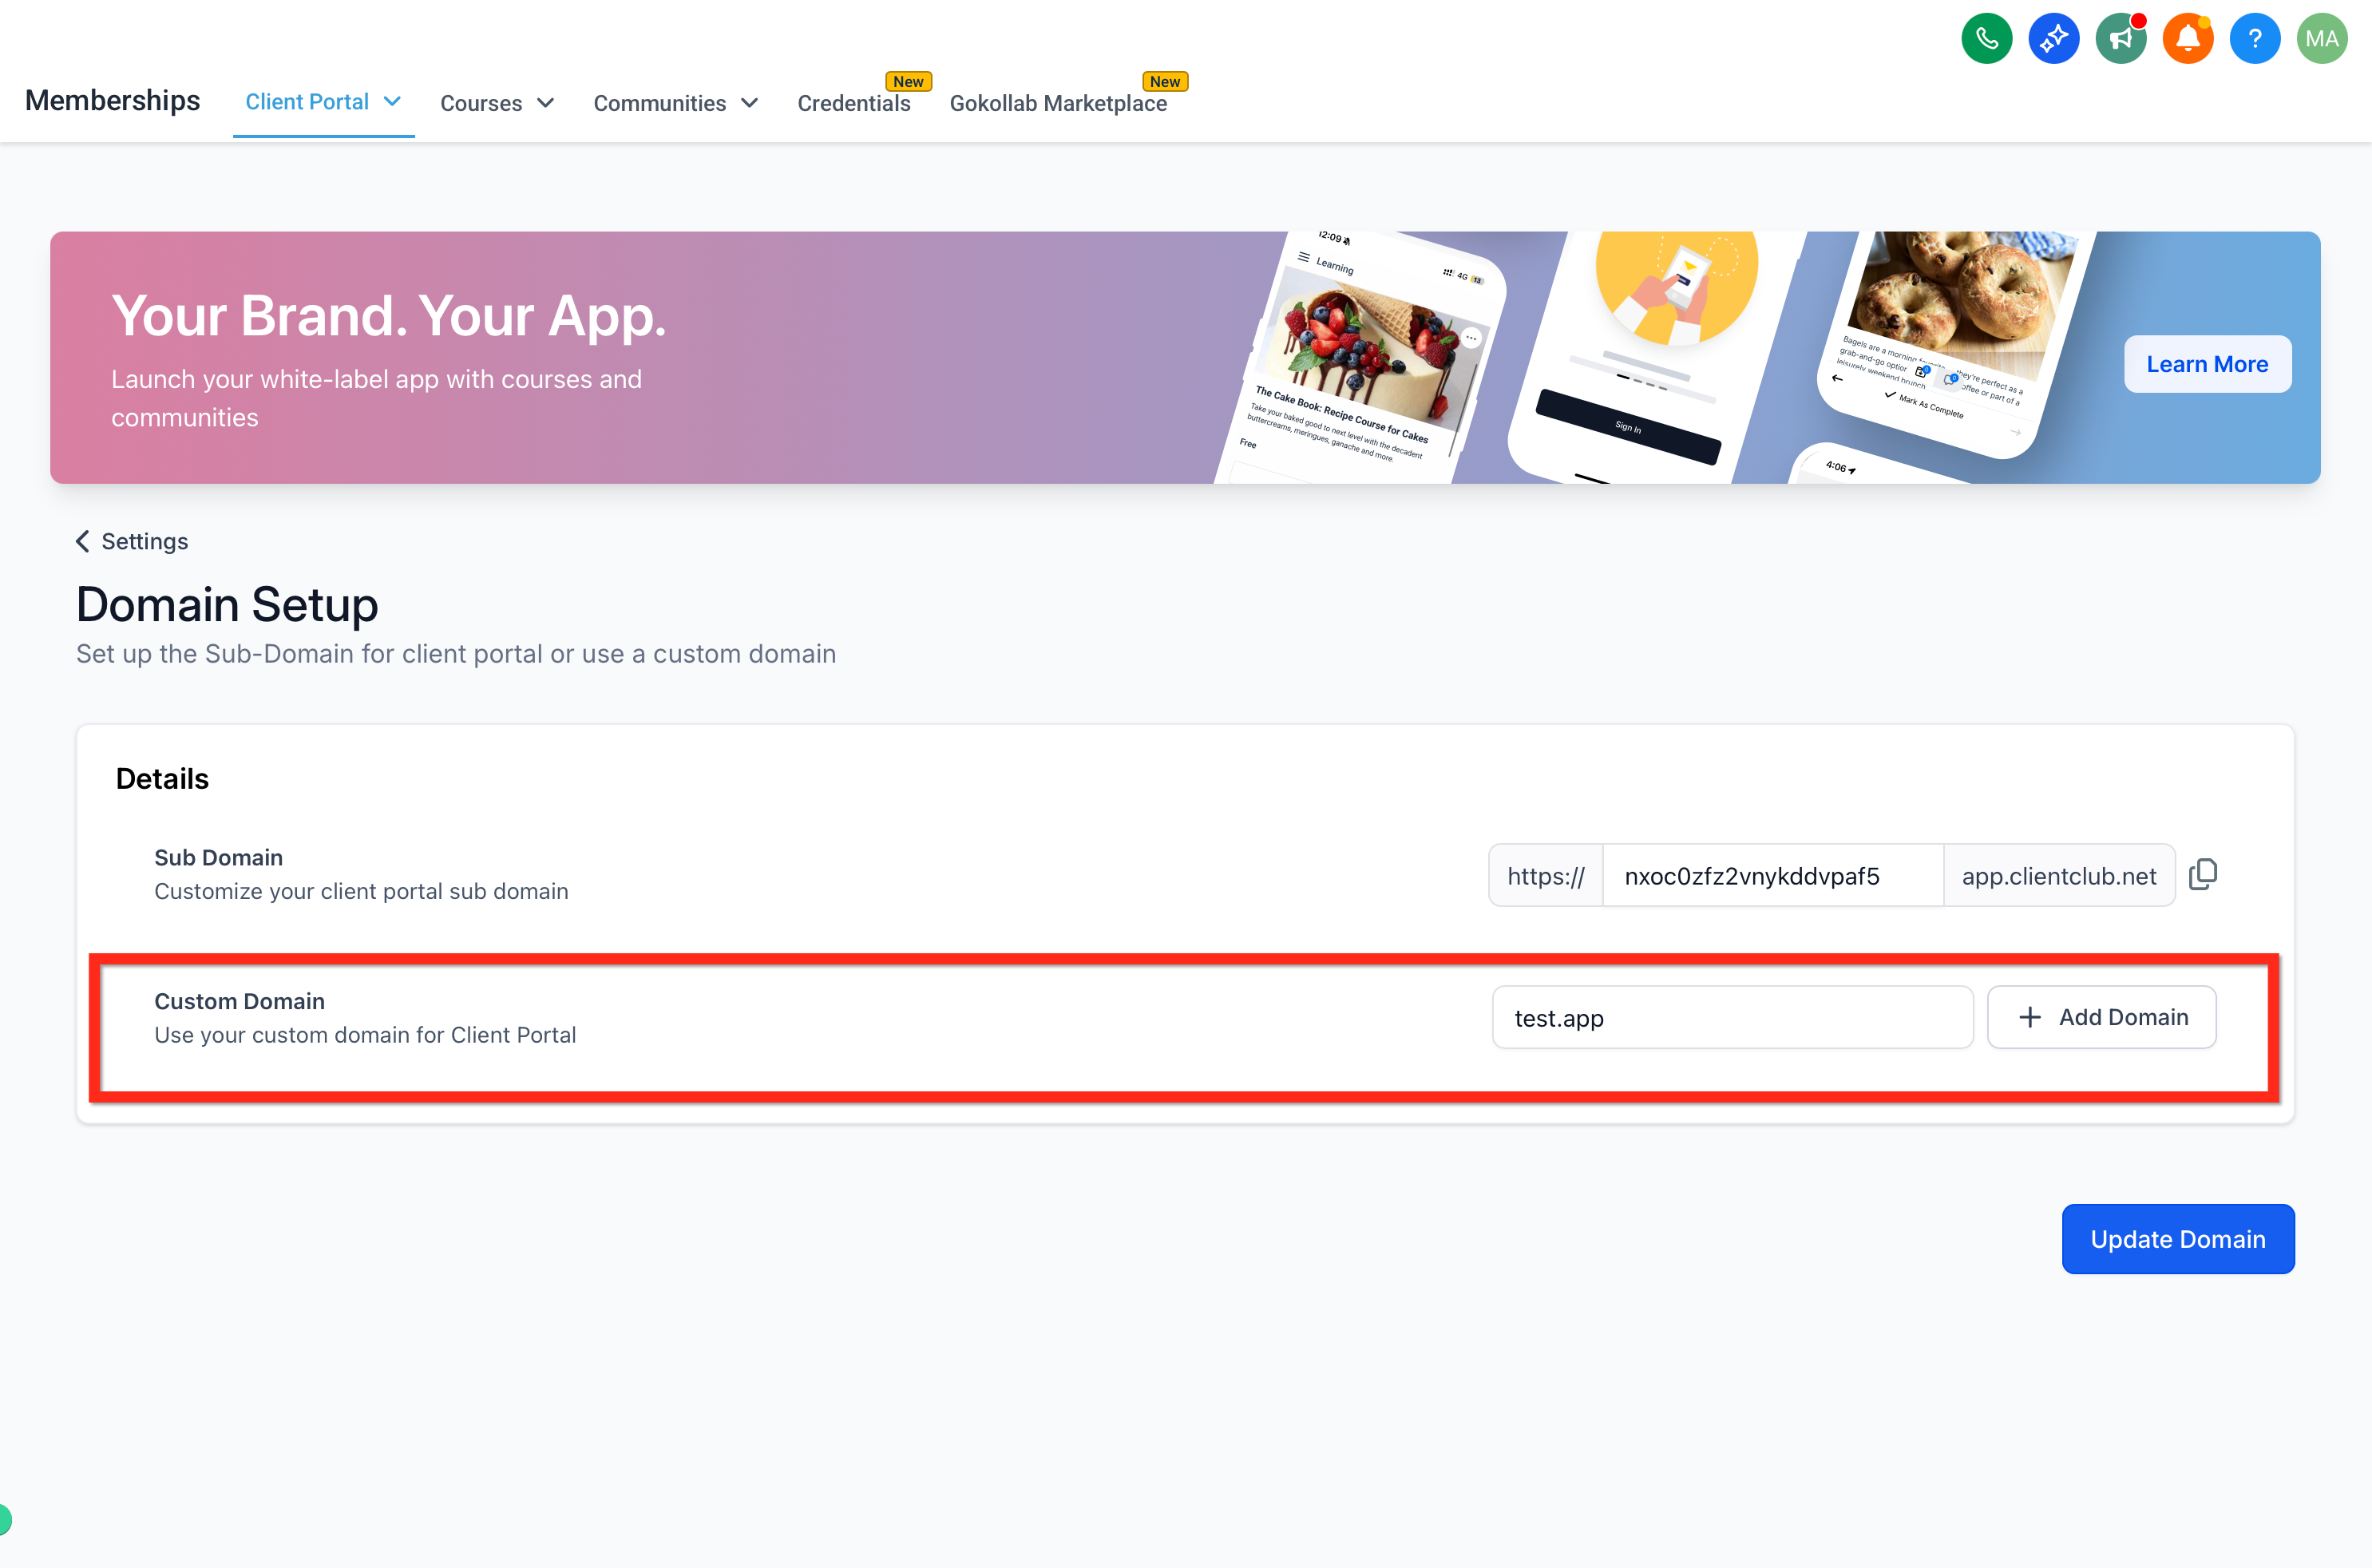
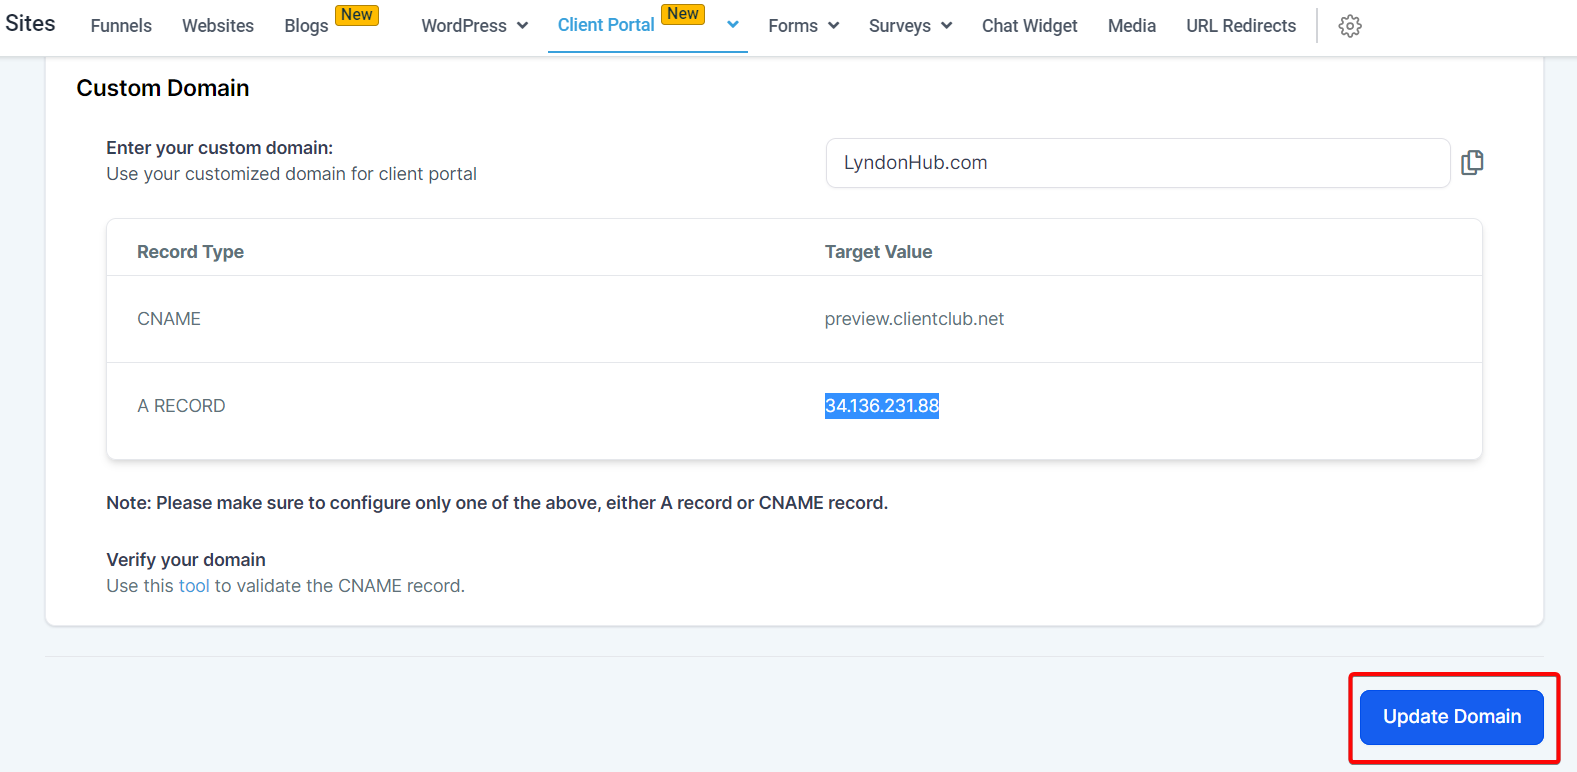
Click the option for a Custom domain and enter your desired domain name.
Before you can successfully set up an A or CNAME record, make sure you have configured your domain registrar to point to the specific IP address or server provided to you. This step ensures your domain correctly refers to your server so it can function properly.
An A record (Address Record) maps your domain to an individual server IP address.
A CNAME record (Canonical Name record) maps your domain (or subdomain) to another domain name.
Here's how to add A and CNAME records:
Log in to your domain registrar's dashboard.
Navigate to the DNS settings.
Find the option to add a new record.
Select the type of record you want to add (A or CNAME).
Enter the details provided to you: for an A record, this is the designated server IP address; for a CNAME record, this is the designated target domain.
Save your changes.
Different registrars vary slightly in their steps, so consult your registrar's help documentation if you need registrar-specific guidance.
Note: Be sure to replace any placeholder with the actual IP address or server information provided to you. Fill out this field accurately, as it is essential to correctly configuring your domain.
Once you have entered the DNS records at your domain registrar, allow a reasonable amount of time for them to propagate (this varies by registrar), then click Update Domain.
When you update your Client Portal subdomain or custom domain, visitors who use the previous domain see a domain-update notice with a link to the new domain, and they are redirected to the updated domain automatically after 30 seconds.
Note: DNS propagation time can vary based on the TTL set for the record, your ISP's update frequency, and geographic factors. As a general rule, allow 24 to 48 hours for DNS changes to fully propagate.
If you are moving from a legacy memberships setup, migrating to the Client Portal gives you a more unified experience for courses and memberships, and the updated settings make the migration prompts easier to find and follow.
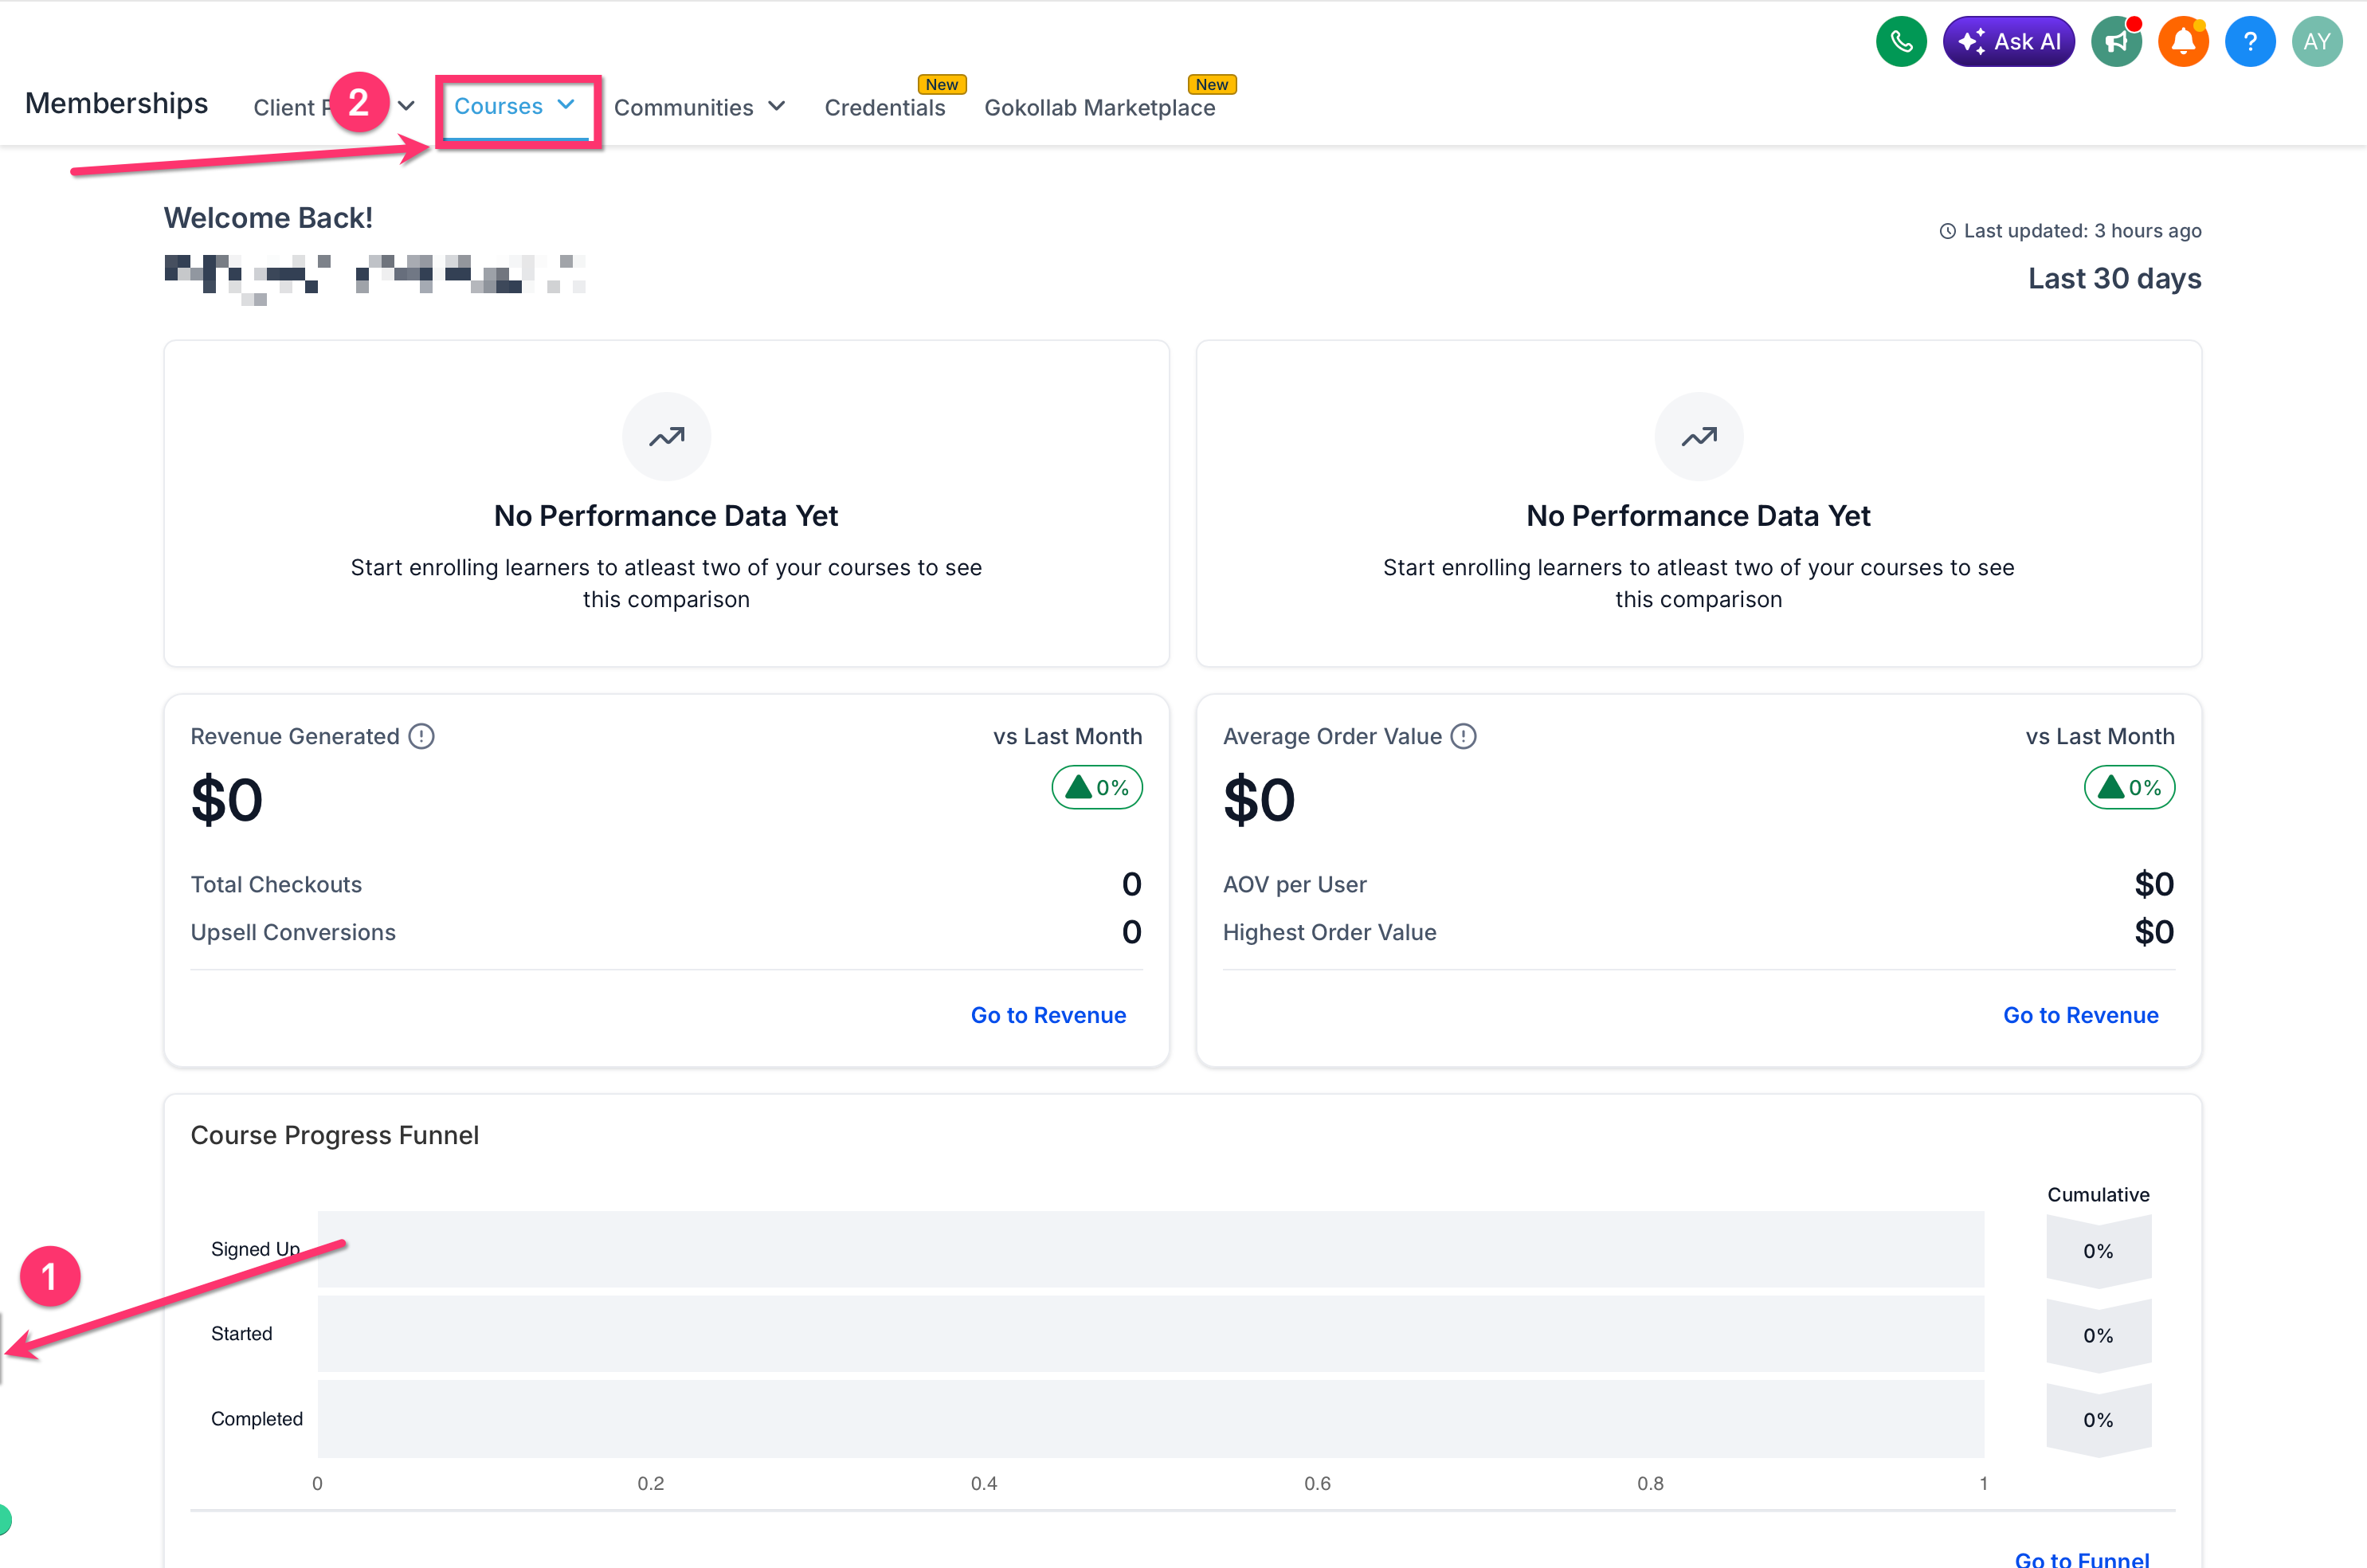
To start the migration:
Go to Memberships.
Open Courses.
Navigate to the settings area for your site.
Review the migration message shown in the settings interface.
Follow the on-screen steps to move to Client Portal settings.
Note: After migrating, review your branding, domain, email settings, and app settings to confirm everything matches your current setup.
To customize how your portal looks:
Access the Client Portal section. Navigate to the Client Portal section within your account using the left navigation menu.
Go to the Branding option. Once in the Client Portal section, locate and select Branding to begin personalizing your portal.
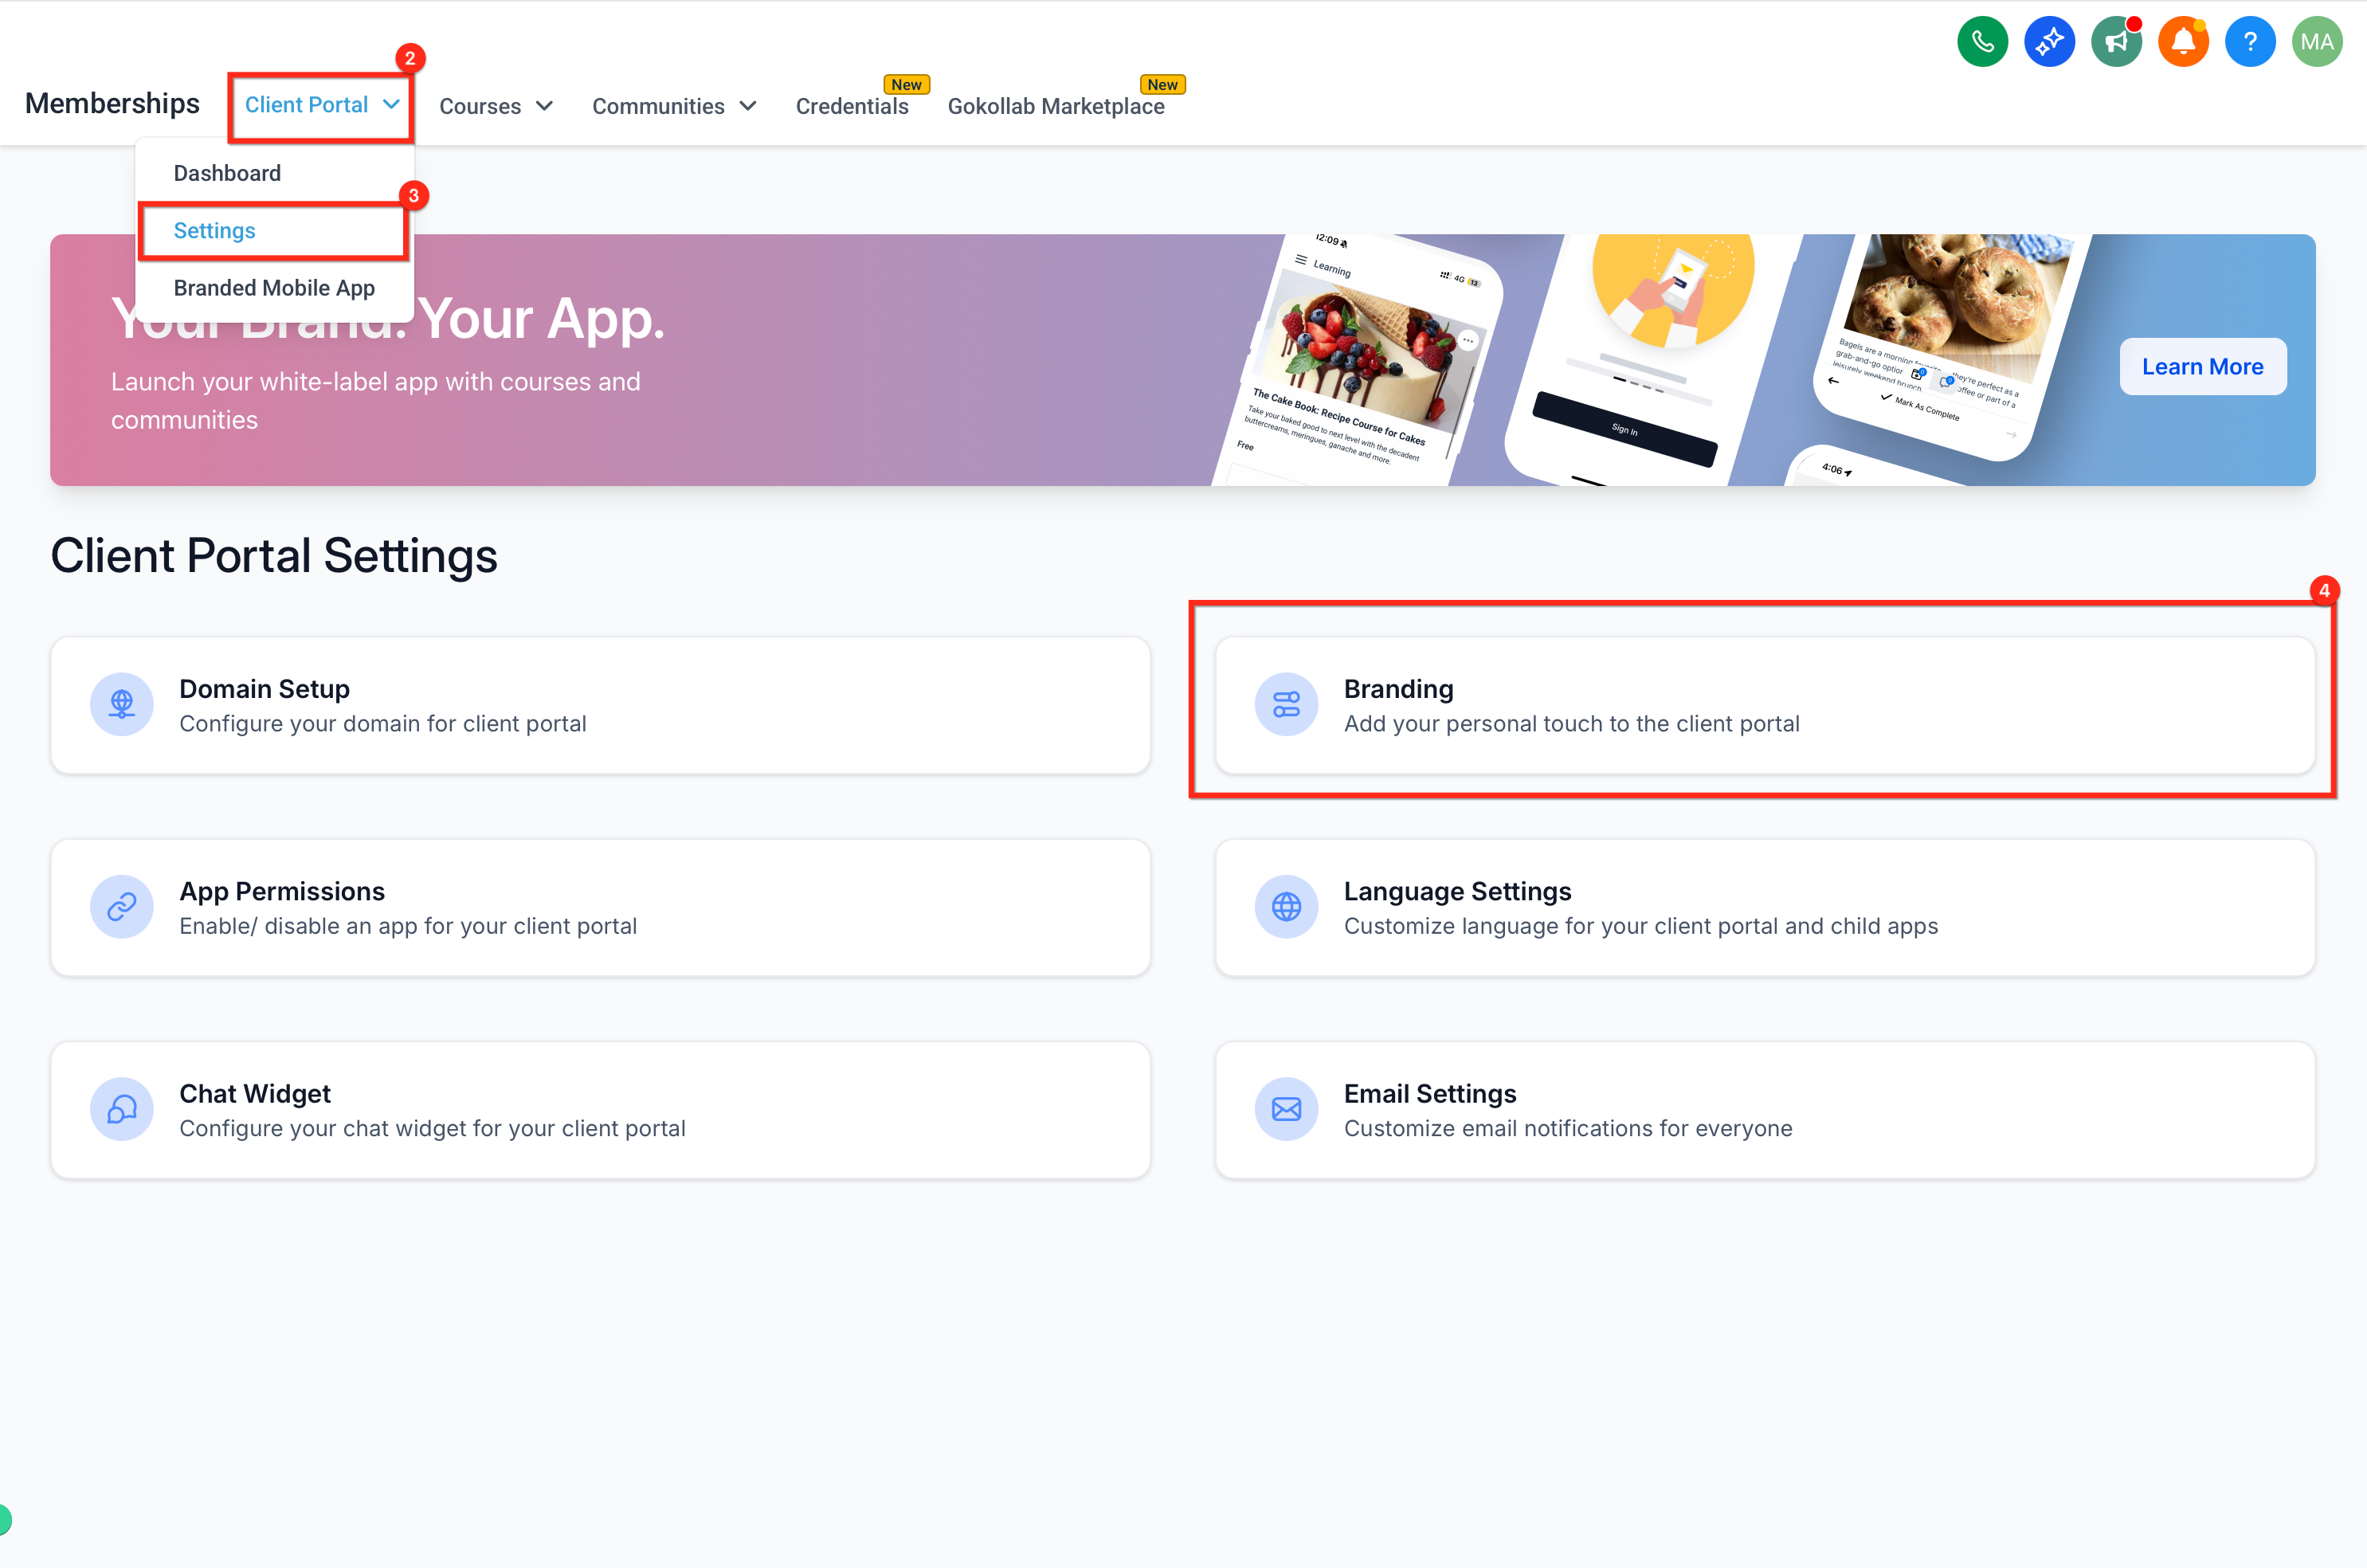
Customize the portal's appearance. In the Branding section, you can fully control the look and feel of your portal.
Setting | Description |
|---|---|
Portal Name | Enter a name for your portal. This is displayed prominently on your portal. |
Portal Description | Add a short description of your portal or its services. This is visible to your patients. |
Brand Color One | Choose the primary color to represent your brand. Often used for buttons, headings, or highlights. |
Brand Color Two | Choose a secondary color to complement your primary color and add variety to the color scheme. |
Favicon | Upload a favicon, the small icon shown in the browser tab. Use a 1:1 aspect ratio in SVG, PNG, or JPG format, with maximum dimensions of 16x16 pixels. |
Portal Image | Upload your practice's square (1:1) image in SVG, PNG, or JPG format, not exceeding 720x720 pixels. This serves as the main branding image in your portal. |
Logo | Upload your logo to display on the portal. Use a 1:1 aspect ratio in SVG, PNG, or JPG format, with maximum dimensions of 200x200 pixels. |
Support Email | Specify an email address patients can contact for support or questions related to the portal. |
Copyright | Enter copyright information, typically something like "© Your Practice Name." |
Save Settings | Click Save Settings to apply your changes. To discard changes, click Cancel before saving. |
If you serve patients in multiple regions, you can set a default language for your Client Portal.
Go to Memberships → Client Portal → Settings → Language Settings.
Select a language and click Save.
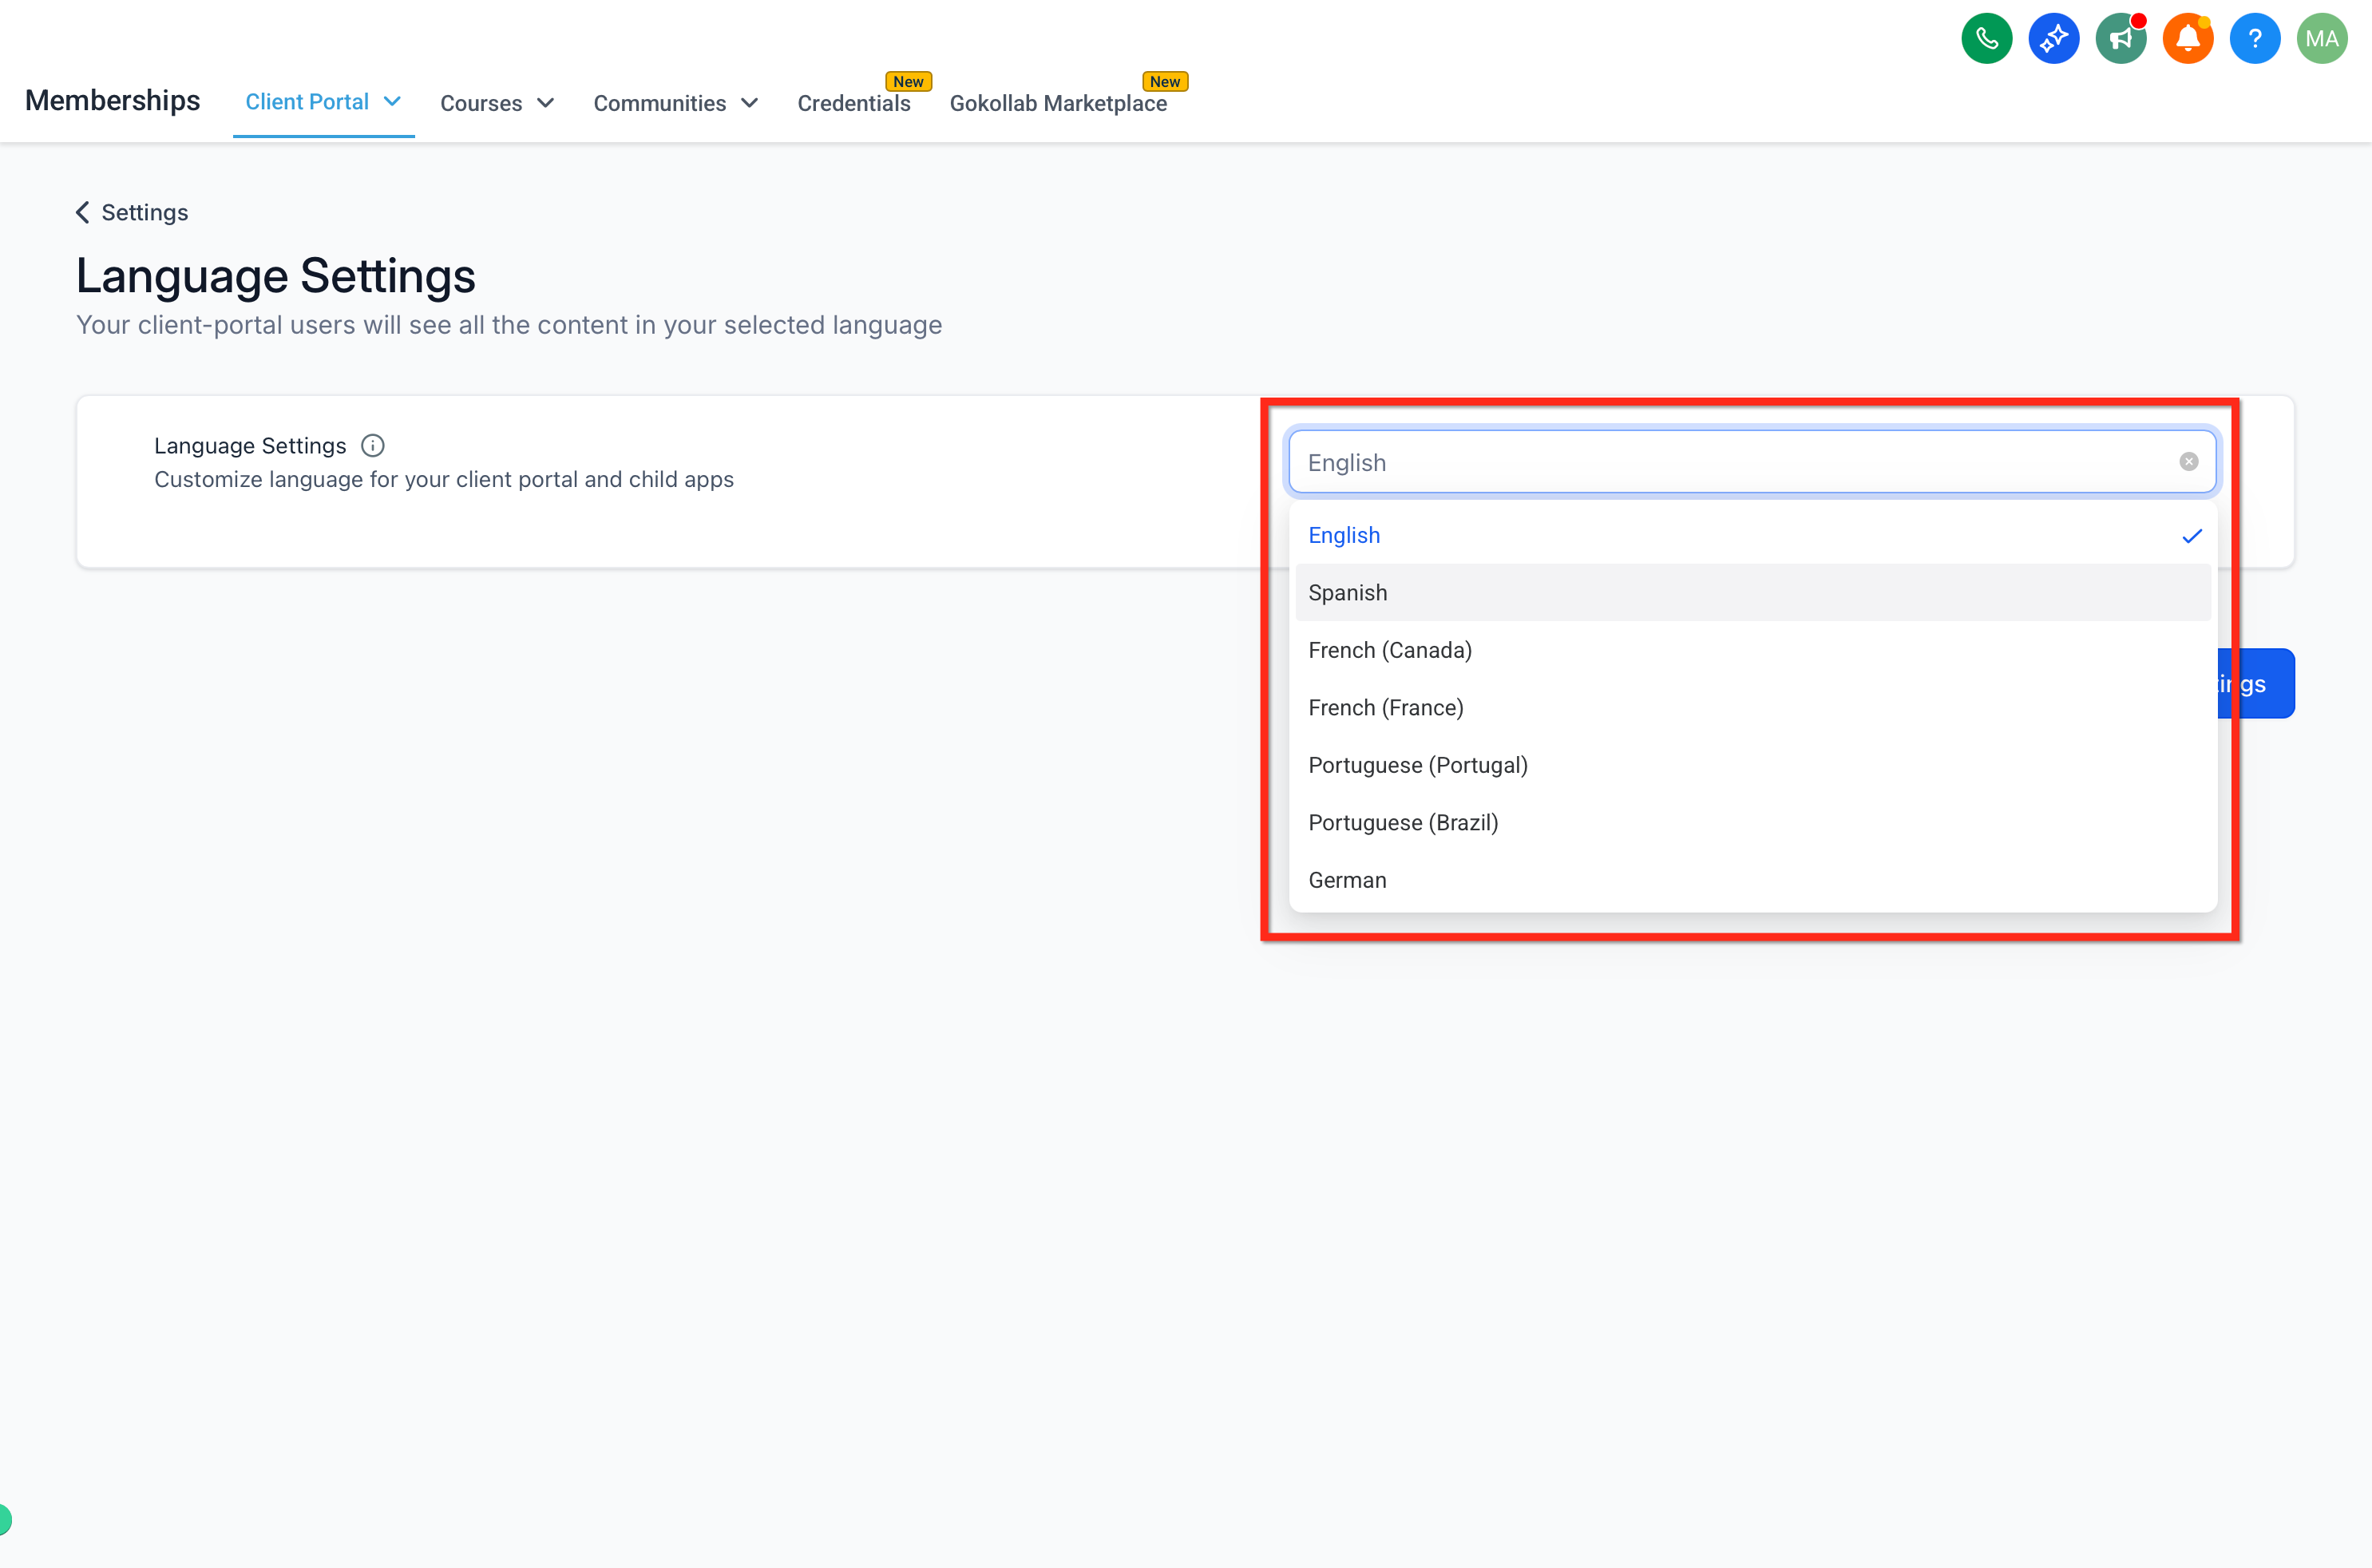
Patients can still change their own language within the Client Portal from Manage Your Account → Language Settings.
Inviting patients to your portal gives them a central place to access important information, updates, and resources related to the services they receive from your practice. There are two primary ways to invite patients.
Your portal includes child apps such as membership courses and the affiliate program. You can invite patients directly from these apps.
Membership courses: Existing membership users have dual access; they can reach their courses through their usual method as well as through the Client Portal after logging in. Their current username and password work in both places. For accounts with no existing courses, patients set up access directly in the Client Portal.
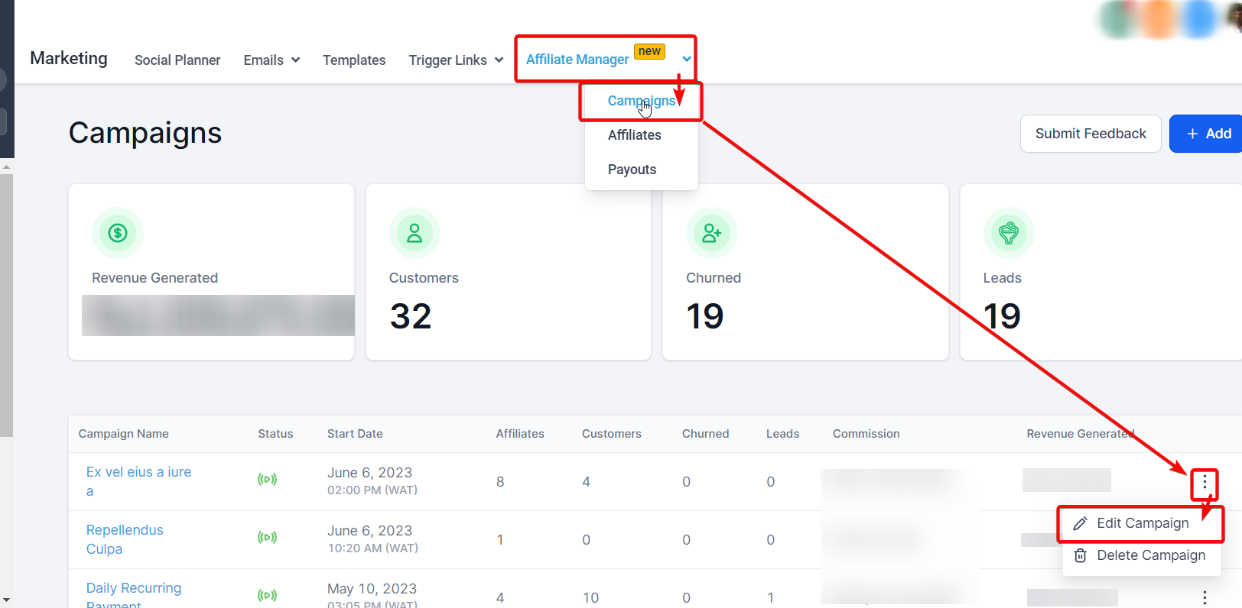
Affiliate program: You can invite affiliates from the affiliate management system. Go to Marketing → Affiliate Manager → Campaigns → Edit Campaign.
Copy the signup link to share with the people you want to invite:
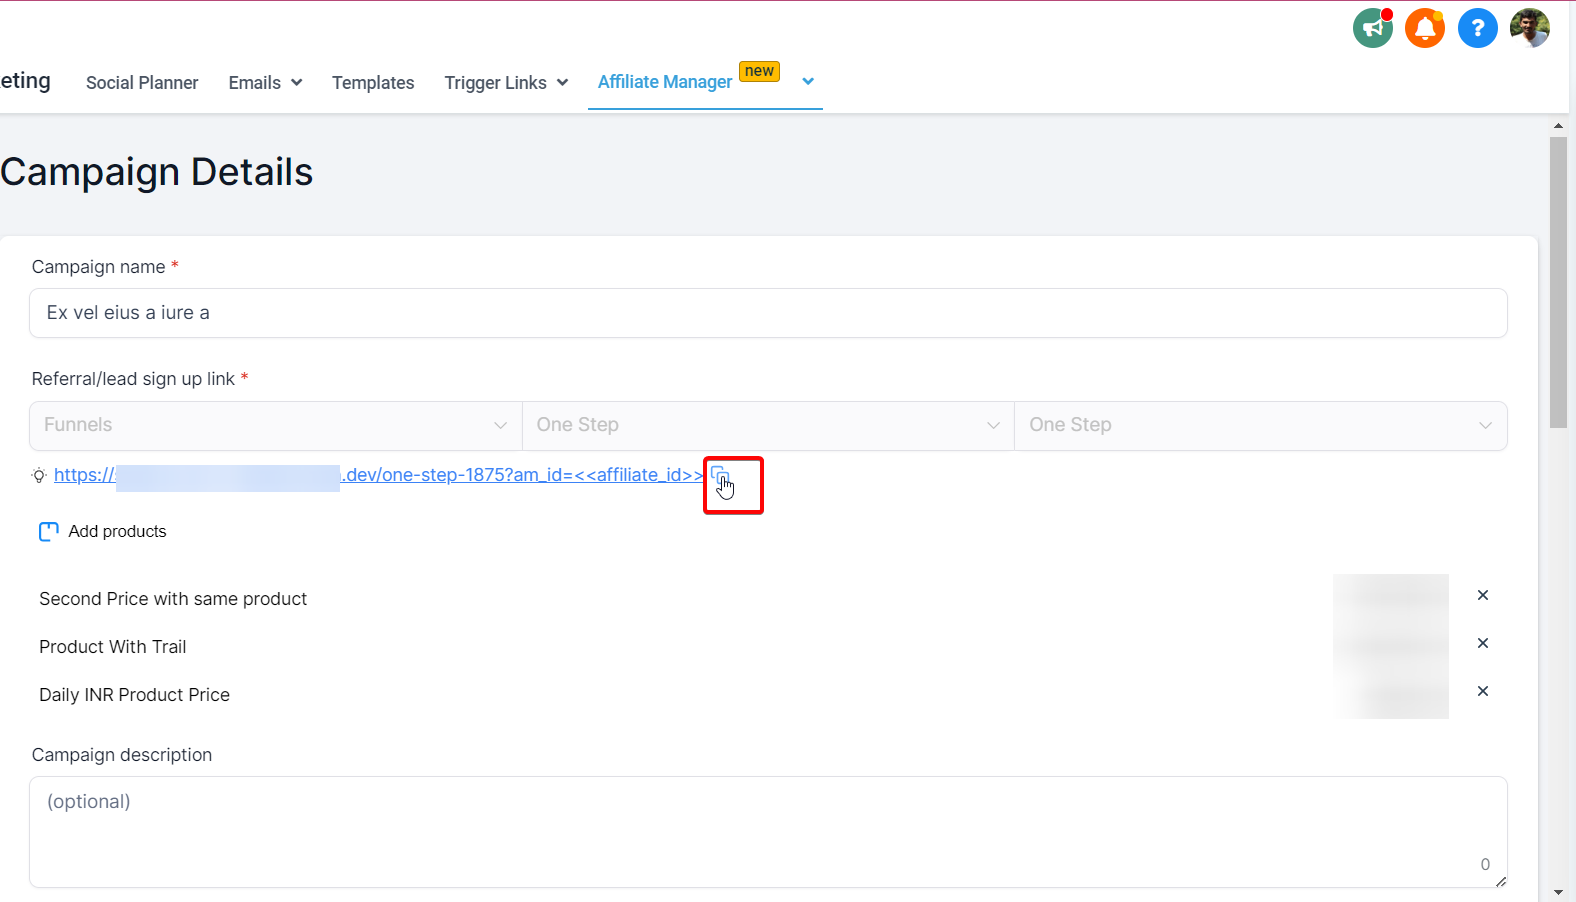
This lets them sign up as an affiliate and access all their affiliate information through the Client Portal, including their referral links, commission rates, and earnings.
For a more direct approach, or to invite many patients at once, share your portal URL. You can copy this URL from the Domain Setup section of your Client Portal settings.
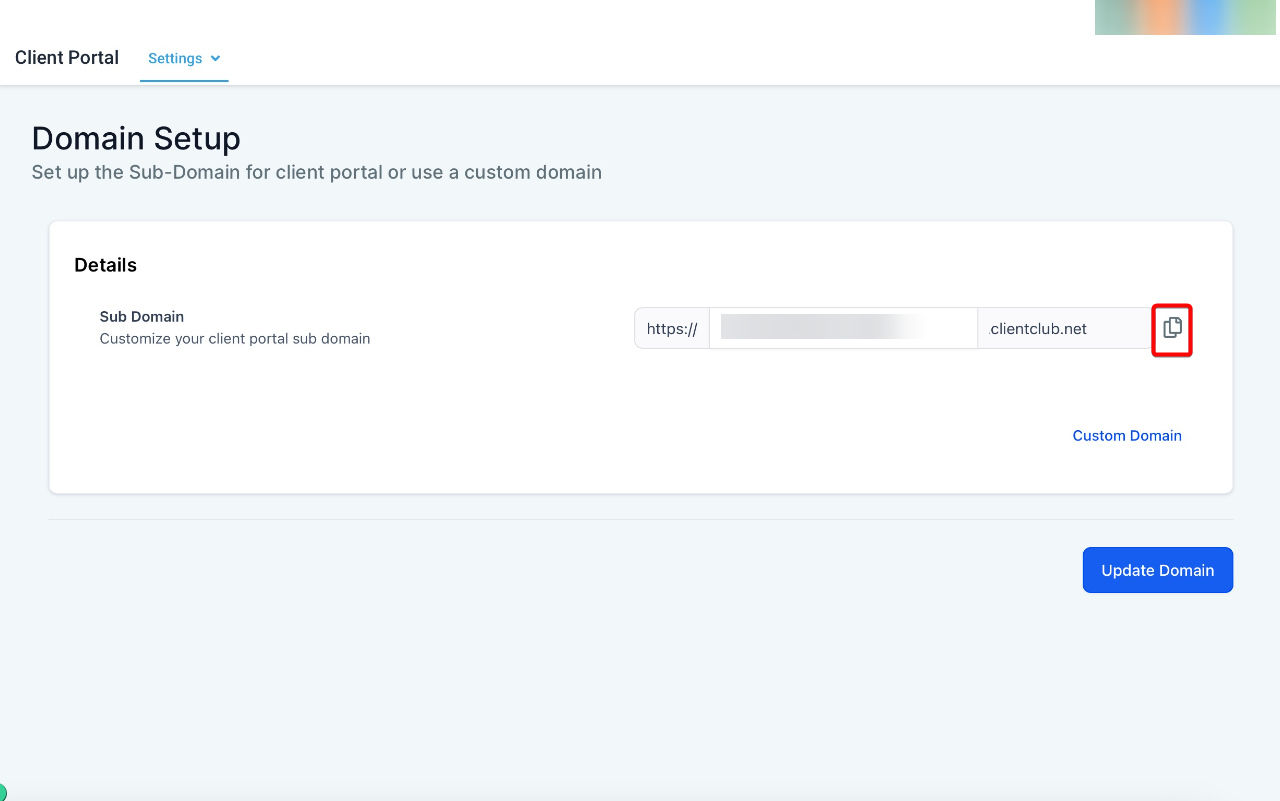
Once copied, you can share this URL by email, text message, or any other channel you use to reach patients. Consider adding it to a welcome email or newsletter for new patients, or posting it on your website or social media.
Your Client Portal is a hub for all your services, so when sharing the URL, highlight the benefits patients gain by logging in, such as exclusive content, direct support, and access to their courses and memberships.
Who needs to sign up? Patients only need to sign up for the Client Portal if they cannot already access a child app (such as membership courses or the affiliate manager). If they have already been granted access to a child app, they can log in to the Client Portal directly using the same credentials, skipping a redundant sign-up.
Account creation and duplicate contacts. Patients can sign up more than once with the same email address only if your business profile settings permit duplicate contacts; each registration creates a distinct account. If duplicate contacts are not allowed, a patient cannot sign up more than once with the same email, which preserves data integrity and avoids confusion.
Note: Review your duplicate-contact settings so you understand how they affect account creation for the Client Portal.
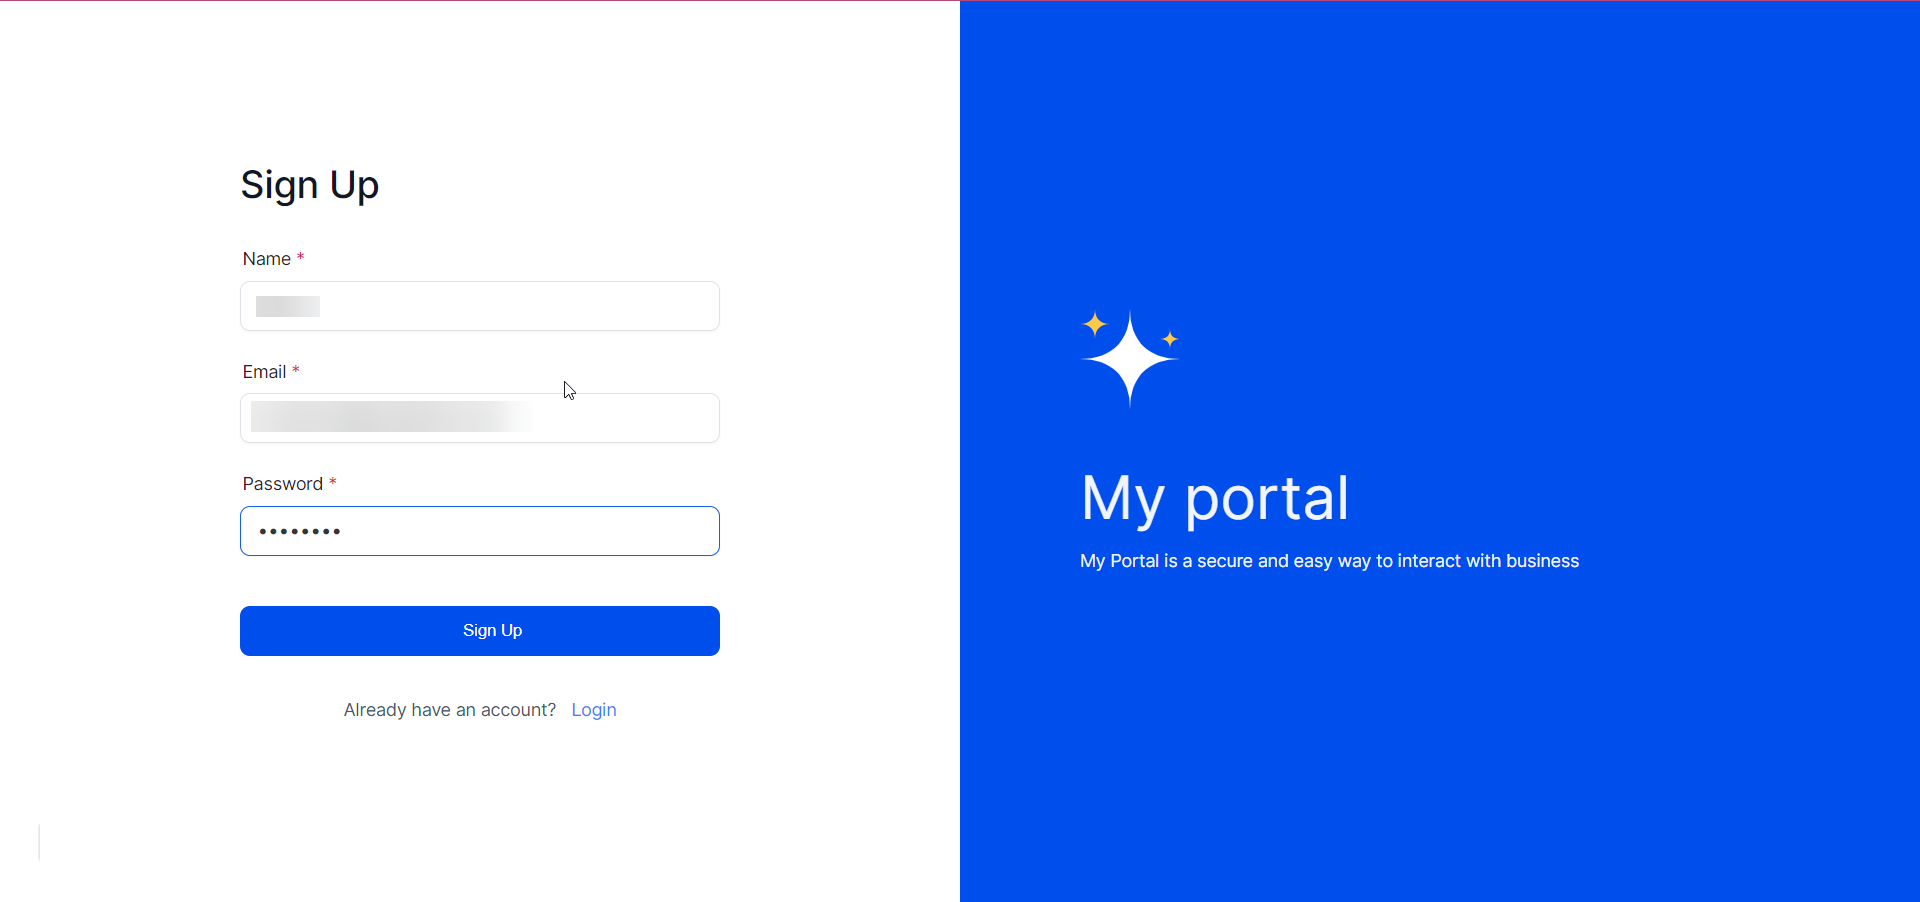
Registration. To register, patients provide their full name and email address and choose a password. After they submit these details, the system emails a verification code to the address they provided.
Note: Remind patients to check their email, including spam and junk folders, for the verification code. Verification codes expire after 15 minutes.
Verification. Patients enter the verification code sent to their email to authenticate their account. After successful verification, they can log in with the password they chose during registration.
Note: The verification step is critical for keeping patient accounts secure and authentic. Advise patients to keep their login details private and never share them.
Patients can log in using either of two methods:
Password login: Patients who already have a password can log in directly.
Email verification: Alternatively, patients can verify their identity with a secure, time-limited code sent to their registered email. They enter this code on the login page to gain access. This is also how a patient logs in if they forget their password.
When multiple accounts are tied to the same email address, the system prompts the patient to select the correct account from a list, helping ensure they access the right information.
Note: If multiple accounts are tied to one email, always double-check which account you select so you reach the correct information.
The Client Portal is a comprehensive hub where patients interact with your practice through various child apps, including membership courses and (soon) community groups.
To fully use these services, patients should complete their profile details, such as name, email address, contact details, and preferences. This information customizes their experience and ensures everything works smoothly across all child apps.
Once their profile is complete and they have access to the child apps, patients can move between apps using the app switcher in the top-right corner of the top bar. Clicking it opens a dropdown listing every accessible app, so patients can jump to the one they want with a single click.
Note: Completing profile details gives patients the best experience and smooth operation across all apps. Encourage patients to keep their profile accurate and up to date, and to use the app switcher for quick navigation.
My branding changes aren't showing up. What could be wrong?
This is usually a caching issue. Ask the patient to clear their browser cache or view the portal in an incognito window. If the issue persists, contact support.
I've set up my DNS records correctly, but the portal isn't accessible. Why?
DNS changes can take up to 48 hours to propagate across the internet, so recent changes may not appear immediately. If it takes longer than 48 hours, contact your domain registrar for support.
My favicon won't upload. What's the ideal format and size?
Use a 1:1 aspect ratio in SVG, PNG, or JPG format, not exceeding 16x16 pixels. If your favicon meets these specifications and still won't upload, contact support.
Affiliates are having trouble accessing their stats. What should I do?
Make sure affiliates have the correct login details and that you've granted them the right permissions to view their stats. If the problem continues, contact support.
Can a patient with multiple accounts switch between them in the Client Portal?
Yes. If a patient has multiple accounts tied to the same email, they are prompted to choose which account to log into and can switch between accounts as needed.
Is it necessary for patients to complete their profile details?
Yes. Profile details are used across all child apps, so completing them provides a seamless, personalized experience.
What if a patient forgets their password?
Patients can still log in using a secure code sent to their email, so they can access their account without remembering their password.
