Smart Lists in Aesthetix CRM are dynamic contact lists that update automatically based on the filters and conditions you set. Unlike static lists that stay fixed until you change them by hand, a Smart List continuously adds or removes contacts as their data changes, so groups like leads, patients, or consults stay current in real time. You can segment contacts on almost any criteria, choose which columns to display, save your views, share them with your team, and run bulk actions such as mass email or SMS campaigns against them.
Save time – Automate segmentation instead of manually rebuilding lists.
Sharper targeting – Group contacts by behavior, lead status, treatment interest, or engagement.
Better organization – Keep your contact database structured and searchable.
Power automation – Use Smart Lists as the starting point for bulk messaging and campaigns.
Real-time updates – Contacts are added or removed automatically based on filters like tags, custom fields, engagement activity, or opportunity stages.
Automated segmentation – Maintain lists of leads, active patients, or prospects without manual upkeep.
Advanced filtering – Apply multiple filters at once (for example, "Opened an email in the last 30 days" plus "Has an open invoice").
Bulk actions – Send mass email or SMS to everyone in a list in a single step.
A contact cannot be added to a Smart List by hand. Membership is always driven by the list's filters: when a contact starts matching the conditions (for example, you add a matching tag), they appear automatically; when they no longer match, they drop off.
Smart Lists live in the Contacts area of Aesthetix CRM.
Navigate to Contacts. From the left-hand navigation menu, click Contacts. This opens your All Contacts list.
View your Smart Lists. At the top of the Contacts page you'll see Smart List tabs. New accounts come pre-configured with lists such as Leads, Patients, Mass SMS, and Mass Email. These update automatically as contact data changes.
To open a saved Smart List, click its name from the tabs at the top of the Contacts page.
The fastest way to build a segment is to apply filters to your contacts and then save the result as a Smart List. For example, to create a list of leads interested in a specific treatment:
Open the filters. From the All Contacts view, click Contacts, open the Smart Lists section, then click More Filters at the top right of the screen. This opens the available filter options.
Choose a filter field. A variety of filters appears. Select the field you want to filter on, for example Type of Contact and choose is Lead.
Add the details. Locate the next field you need, such as Treatment of Interest, and select the value (for example, a specific service the lead is interested in). You can highlight a field like First Name and type a specific search value.
Apply the filter. Click Apply to filter your list down to the matching contacts.
Save it as a Smart List. Click Save as Smart List, give the list a unique Name, then click Save.
Run bulk actions. With the Smart List saved, you can perform bulk actions such as sending a text blast or email campaign to everyone on the list.
Advanced Filters let you narrow Smart List results with precise rules tied to contact fields and related data. They make it easy to build targeted lists based on contact details, engagement, communication settings, opportunity data, and more.
Each filter is built from three parts: a field, an operator, and a value. The operators available depend on the field you pick. A date field offers date-based operators, a number field offers comparison operators, and so on.
Precise segmentation – Narrow lists using specific field values, operators, and conditions.
Better list accuracy – Match contacts reliably by choosing operators that fit the field type.
Faster list building – Use the searchable filter list to find fields quickly.
Flexible filtering – Work with date, string, number, status, opportunity, and DND data.
Cleaner contact management – Surface missing values, invalid statuses, and records that need review.
Safer outreach – Use DND and status filters to build more compliant communication lists.
Choosing the right field, operator, and value is the key to reliable results.
Go to Contacts, then click + Add Smart List or open an existing Smart List.
Click Advanced Filters.
Search for and select the field you want to use.
Choose the operator that matches the segmentation you want.
Enter or select the value.
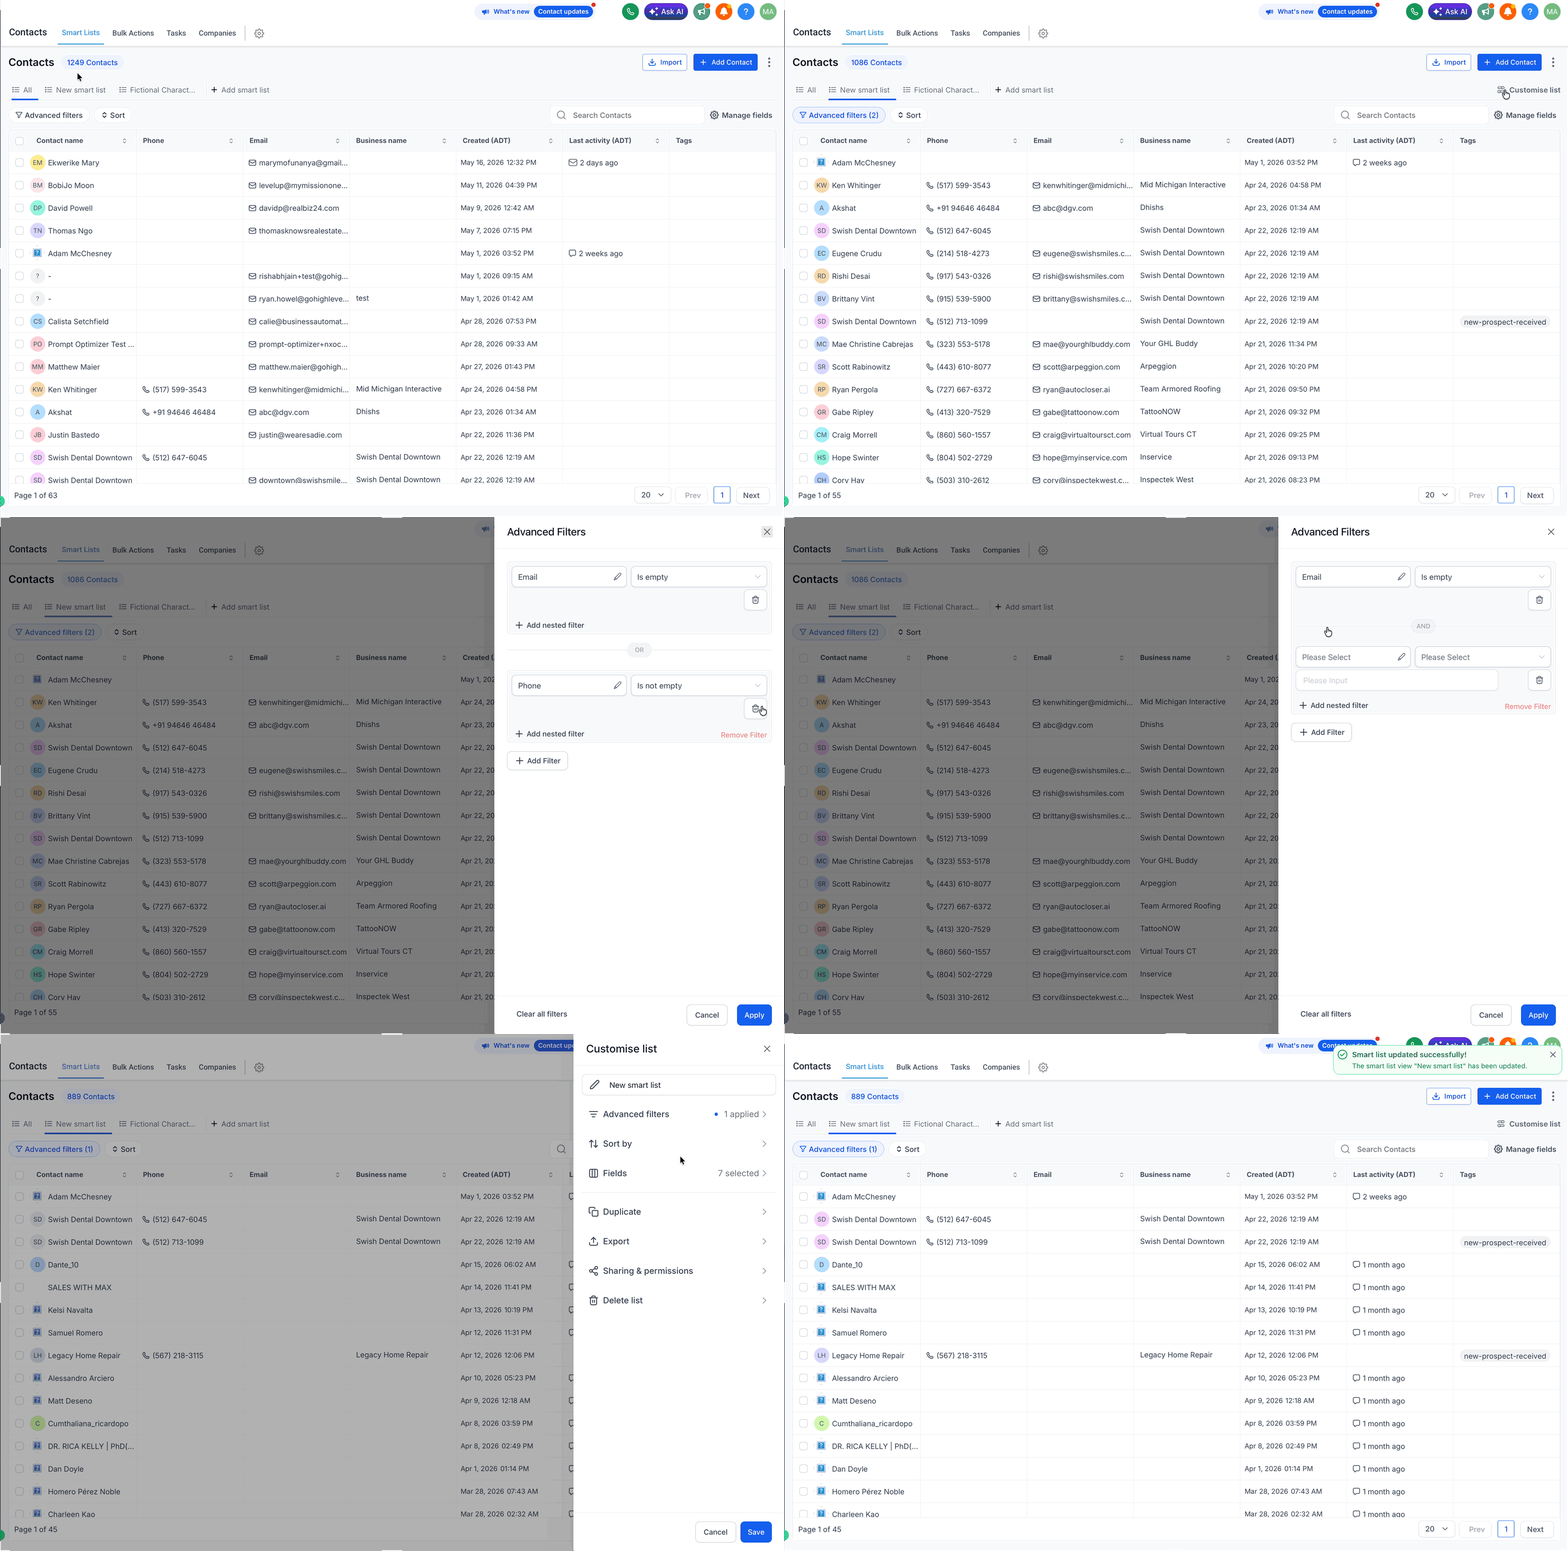
Click + Add Nested Filter to add another condition that must also be true for a contact to stay in the list. Use this for AND logic.
Click + Add Filter to add another possible condition a contact can match to be included. Use this for OR logic.
Click Apply.
AND (Add Nested Filter) narrows your list: a contact must satisfy every nested condition to be included.
OR (Add Filter) widens your list: a contact is included if it matches any one of the separate filters.
Date filters segment contacts using exact dates, relative timeframes, and rolling date conditions. They're useful for finding recent activity, upcoming events, and recurring date-based milestones, and they apply to any field that stores a date or date-and-time value.
Date fields you may be able to filter by include:
Last Visit Date and Next Visit Date (custom fields)
Date of Birth
Created On
Last Activity On
Last Updated On
Last Email Clicked Date
Last Email Opened Date
For appointment-based segmenting, use the Last Visit Date and Next Visit Date custom fields. In Aesthetix CRM, your appointment data lives in these two custom fields, which are kept up to date by your EMR integration. Because your practice and integrations work through the EMR rather than the built-in calendar, the native calendar/appointment date fields will usually be empty, so filter on Last Visit Date (for example, to reach patients who have not visited in a while) and Next Visit Date (for example, to remind patients with an upcoming visit) instead.
The operators are grouped below by the kind of date logic they apply.
Relative Date Filters show contacts based on action timing relative to today.
Filter Setting | Meaning | Example Input | Contacts That Will Match |
|---|---|---|---|
Is → Today | Last appointment occurred today | Today = 11 Mar 2026 | Appointment on 11 Mar 2026 |
Is → Tomorrow | Appointment scheduled tomorrow | Today = 11 Mar 2026 | Appointment on 12 Mar 2026 |
Is → Yesterday | Appointment occurred yesterday | Today = 11 Mar 2026 | Appointment on 10 Mar 2026 |
Is → This Week | Appointments in the current calendar week | Week: 9–15 Mar 2026 | Appointment between 9 Mar – 15 Mar 2026 |
Is → This Month | Appointments in the current month | Month: March 2026 | Appointment between 1 Mar – 31 Mar 2026 |
Is → This Quarter | Appointments within the current quarter | Q1 = Jan–Mar 2026 | Appointment between 1 Jan – 31 Mar 2026 |
Is → This Year | Appointments within the current year | Year = 2026 | Appointment between 1 Jan – 31 Dec 2026 |
Exact Date Filters pinpoint a specific date or date range.
Filter Setting | Meaning | Example Input | Contacts That Will Match |
|---|---|---|---|
Is → On | Matches appointments on a specific date | 5 Mar 2026 | Appointment exactly on 5 Mar 2026 |
Is → Between | Matches appointments within a date range | 1 Mar – 7 Mar 2026 | Appointment between 1 Mar & 7 Mar 2026 |
Time Difference Filters (Relative Duration) filter by elapsed or upcoming time from today.
Filter Setting | Meaning | Example Input | Contacts That Will Match |
|---|---|---|---|
Is → More Than | Appointment happened longer than the specified time ago | More than 7 days ago | Appointment before 4 Mar |
Is → Less Than | Appointment happened within the specified time ago | Less than 7 days ago | Appointment between 4 Mar – 11 Mar 2026 |
Is → In the Next | Appointment scheduled within the upcoming range | Next 3 days | Appointment between 11 Mar – 14 Mar 2026 |
Is → In the Last | Appointment happened within the past range | Last 3 days | Appointment between 8 Mar – 11 Mar 2026 |
Date Comparison Filters compare action dates against a fixed reference date.
Filter Setting | Meaning | Example Input | Contacts That Will Match |
|---|---|---|---|
Is → After Date | Appointment occurs after the selected date | After 5 Mar 2026 | Appointment 6 Mar 2026 onward |
Is → Before Date | Appointment occurs before the selected date | Before 5 Mar 2026 | Appointment 4 Mar 2026 or earlier |
Negative Filters (Is Not) exclude contacts based on date conditions; they are the inverse of each positive filter.
Filter Setting | Meaning | Example Input | Contacts That Will Match |
|---|---|---|---|
Is Not → Today | Excludes appointments happening today | Today = 11 Mar 2026 | Any appointment except 11 Mar 2026 |
Is Not → Yesterday | Excludes appointments from yesterday | Yesterday = 10 Mar 2026 | Any appointment except 10 Mar 2026 |
Is Not → This Week | Excludes appointments in the current week | Week: 9–15 Mar 2026 | Any appointment outside this range |
Is Not → On | Excludes a specific date | Not on 5 Mar 2026 | All dates except 5 Mar 2026 |
Is Not → Between | Excludes a date range | Not between 1–7 Mar 2026 | Dates before 1 Mar or after 7 Mar 2026 |
Is Not → Tomorrow | Any date except tomorrow | Mar 12, 2026 | Contacts whose last appointment is not scheduled for tomorrow |
Is Not → This Month | Any month other than March 2026 | Before Mar 1 or after Mar 31 | Contacts whose last appointment was in any other month |
Is Not → This Quarter | Outside the current quarter (Q1 2026) | Before Jan 1 or after Mar 31 | Contacts whose last appointment falls outside Q1 2026 |
Is Not → This Year | Not in 2026 | Before Jan 1 or after Dec 31 | Contacts whose last appointment was not in 2026 |
Is Not → More Than ... Ago | Appointment NOT more than 30 days ago | On or after Feb 9, 2026 | Appointment was within the last 30 days |
Is Not → After Date | On or before the selected date | On or before Mar 1, 2026 | Inverse of "After Date" |
Is Not → Less Than ... Ago | NOT within the last 7 days | On or before Mar 4, 2026 | Last appointment was 7+ days ago |
Is Not → Before Date | On or after the selected date | On or after Jan 1, 2026 | Inverse of "Before Date" |
Is Not → In the Next ... | Not within the next 7 days | Not within Mar 11–18, 2026 | Past appointments and future ones beyond the 7-day window |
Is Not → In the Last ... | NOT within the last 14 days | Before Feb 25 or after Mar 11, 2026 | Contacts who haven't had a recent appointment |
Empty / Not Empty Filters identify contacts with or without any appointment record.
Filter Setting | Meaning | Example Input | Contacts That Will Match |
|---|---|---|---|
Is Empty | Contact has never had an appointment recorded | - | Contacts with no appointment history |
Is Not Empty | Contact has at least one appointment | - | Contacts with any appointment on record |
Best practices for date filters:
Use In the Last to identify recent engagement.
Use More Than to identify inactive contacts.
Use Between for historical reports.
Use Is Empty to find leads without appointments.
DND (Do Not Disturb) filters tell you whether communication restrictions are enabled for a contact. They're especially useful for building compliant outreach lists and excluding contacts who shouldn't receive messages on a given channel. DND filters apply to fields that store yes-or-no values tied to communication preferences.
DND and boolean fields you may be able to filter by include:
DND all
SMS DND
Email DND
Calls & Voicemails DND
WhatsApp DND
Inbound DND
FB Messenger DND
GMB Messenger DND
Filter Setting | Meaning | Example Input | Contacts That Will Match |
|---|---|---|---|
Enabled | Contact has DND enabled | - | Contacts who opted out of the selected channel |
Disabled | Contact does not have DND enabled | - | Contacts who have not opted out of the selected channel |
String filters match contacts on text-based information such as names, labels, IDs, attribution values, and communication details. Use them to find exact values, partial matches, selected dropdown values, comma-separated lists, or blank fields.
String fields differ in how the value is entered. Some use a free-text input where you type the value; others use a dropdown or selected-value field where you choose from available options. Some fields accept comma-separated values, while others support only a single selected value. If an operator isn't shown for the selected field, it isn't available for that field.
String fields you may be able to filter by include:
First name
Last name
Address
Timezone
Last Updated By
Opportunity Pipeline
Email Status
Tags
Note on custom fields: Any new custom field created as:
Single line or Multi line text follows contact score parameters.
Text Box list follows Time Zone parameters.
Drop Down Single, Drop Down Multiple, Radio Button, or Checkbox follows Tags parameters.
Filter Setting | Meaning | Example Input | Contacts That Will Match |
|---|---|---|---|
Is | Matches one selected value | Chicago | Contacts located in Chicago |
Is Not | Excludes one selected value | Chicago | Contacts not located in Chicago |
Contains | Matches text appearing anywhere in the field value | New York | Contacts whose city includes "New York" (e.g., New York City) |
Does Not Contain | Excludes text appearing anywhere in the field value | New York | Contacts whose city doesn't include "New York" |
Is any of (comma separated) | Matches one or more listed values | Chicago, London, New York City | Contacts located in Chicago, London, or NYC |
Is None of (comma separated) | Excludes any value from a comma-separated list | Chicago, London, New York City | Contacts not located in Chicago, London, or NYC |
Is Empty | Field has no stored value | - | Contacts with no city listed |
Is Not Empty | Field contains a value | - | Contacts with any city listed |
Numeric filters segment contacts on measurable values such as scores and counts. Use them to compare values, ranges, and thresholds, or to check whether a numeric field is filled in. They apply to fields that store measurable numeric values.
Numeric fields you may be able to filter by include:
Engagement Score
Score from a Quiz (Custom Field)
Note on custom fields: Any new custom field created as:
Number follows engagement score parameters.
Phone follows Phone Number parameters.
Monetary follows engagement score parameters.
Filter Setting | Meaning | Example Input | Contacts That Will Match |
|---|---|---|---|
Equal To | Matches one selected number | 100 | Contacts who scored a 100 |
Does Not Equal | Excludes one selected number | 100 | Contacts who did not score 100 |
Between | Matches a numeric range | 90 - 100 | Contacts who scored between 90 and 100 |
Greater Than | Matches values above a threshold | 90 | Contacts who scored over 90 |
Greater Than or Equal To | Matches values at or above a threshold | 90 | Contacts who scored 90 or above |
Less Than | Matches values below a threshold | 90 | Contacts who scored under 90 |
Less Than or Equal To | Matches values at or below a threshold | 90 | Contacts who scored 90 or below |
Is Empty | Field does not contain a value | - | Contacts who did not complete the quiz |
Is Not Empty | Field contains a value | - | Contacts who completed the quiz |
Add columns to a Smart List to see more contact data at a glance without opening each record.
From the Contacts page, click Contacts.
Click Columns.
From the drop-down menu, tick the box for each field you want to display. You can select more than one additional column.
Your selected columns appear in the Smart List dashboard.
Smart Lists support drag-and-drop column management, so you can keep the most important fields front and center.
Open the Smart List you want to edit from Contacts.
In the list view, open the column/field management option near the top of the table.
Drag and drop the columns into your preferred order.
Close the column manager to return to your list; the new order is reflected immediately.
Note: Your Smart List remembers the most recently saved column order and visibility. If you reorder columns or show/hide fields later, save the Smart List again to keep those changes. Otherwise it keeps using the last saved layout.
You can adjust an existing Smart List's filters at any time.
Go to Contacts and click a Smart List name at the top to open it.
Open the Customize List panel on the right-hand side.
Click Advanced Filters to make changes. Click the pencil icon to edit a filter, or use the dropdown arrow to remove one. Click the Save icon to store your changes.
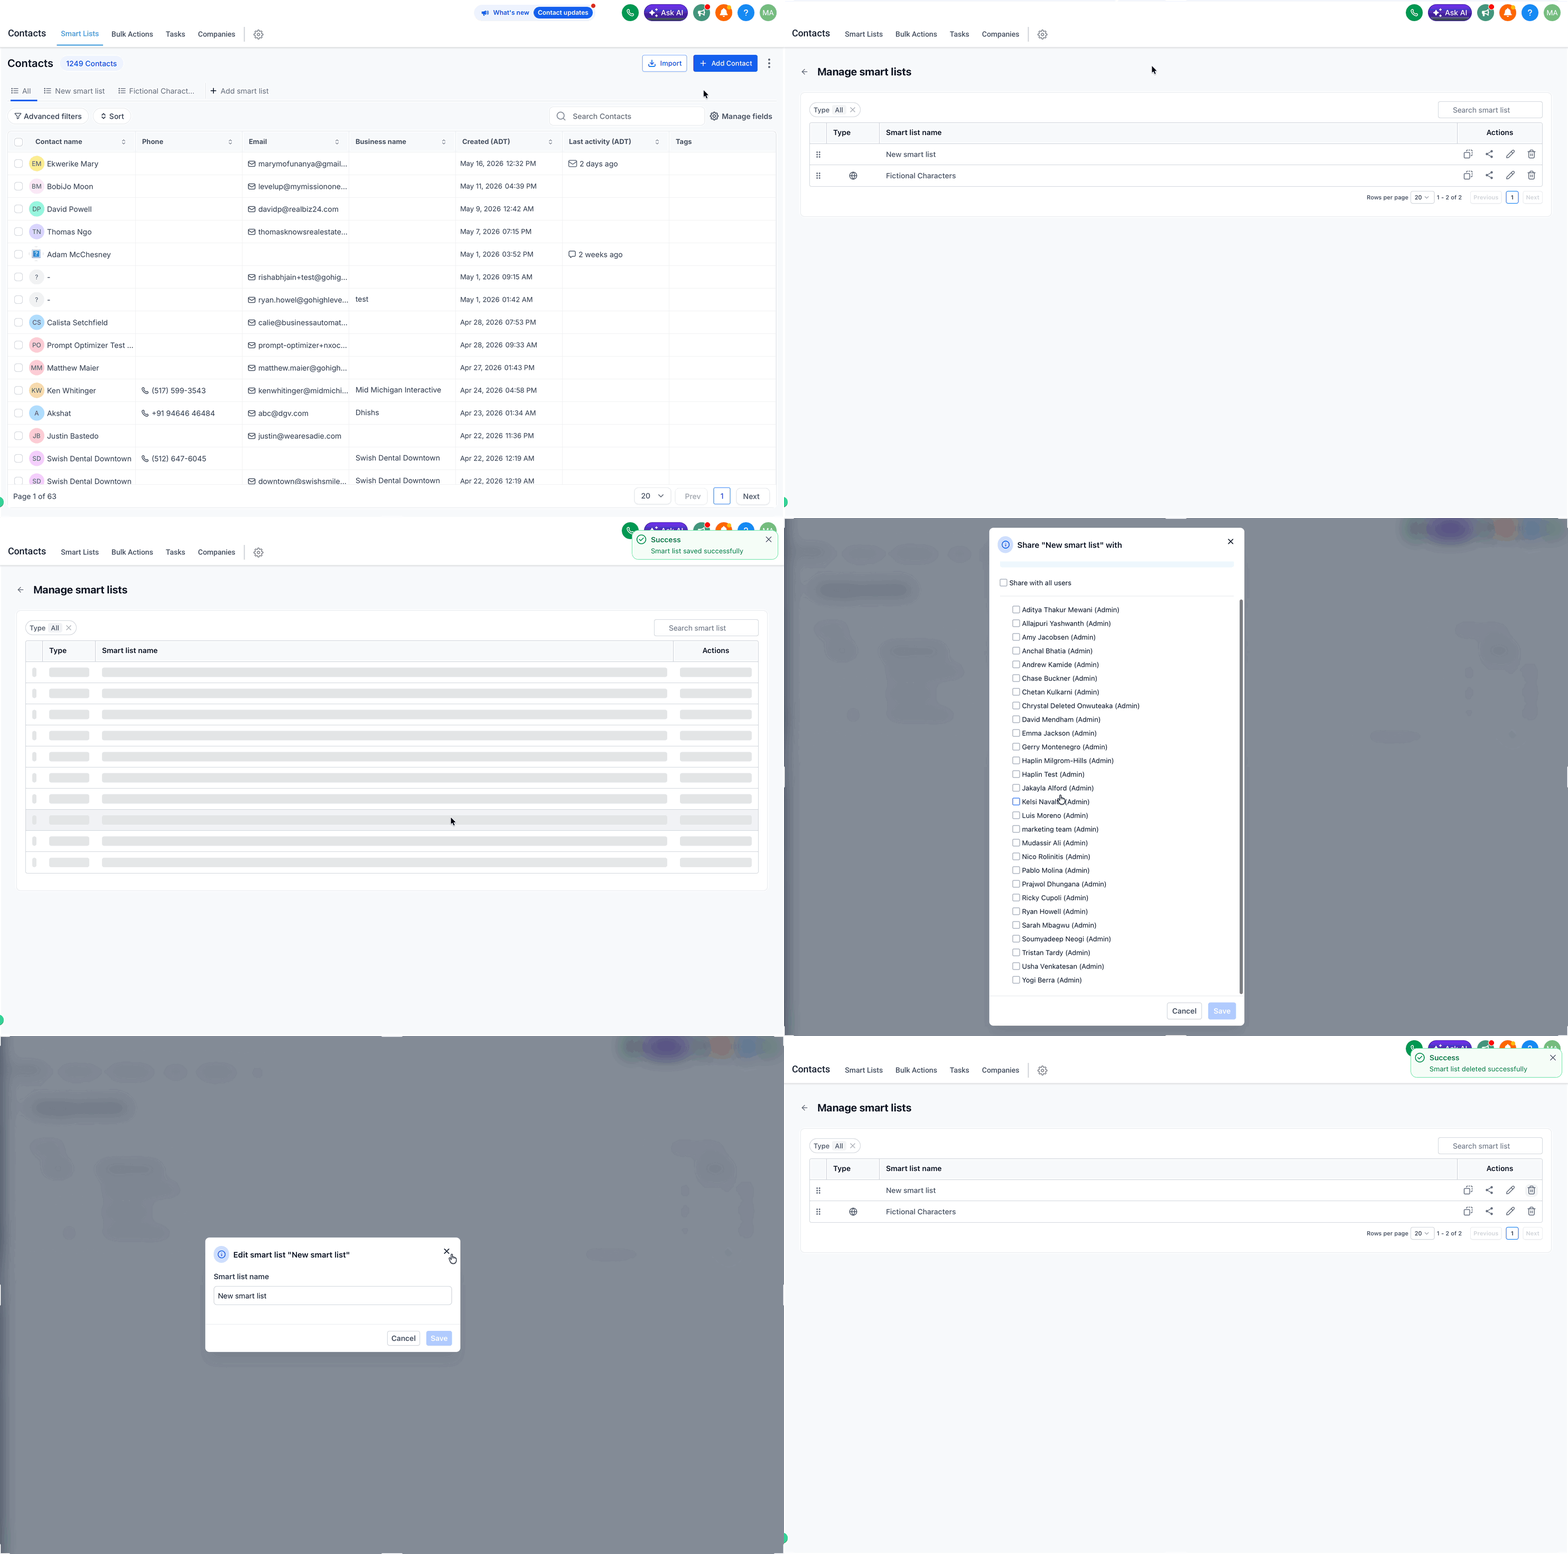
Use Manage Smart Lists to organize all of your saved lists from one place.
Go to Contacts → Smart Lists, then click the three-dot (⋮) menu next to Add Contact.
Select Manage Smart Lists.
In the Actions column, use the icons next to a list to manage it.
Copying a list lets you reuse a working configuration and adapt it for another segment.
Click Contacts.
Select Manage Smart Lists.
Click the copy icon (Copy Smart List) for the list you want to duplicate.
Edit the name of the copied list if desired.
Click Save.
Remove lists you no longer need to keep your workspace tidy.
Click Contacts.
Select Manage Smart Lists.
Click the trash icon (Delete this Smart List) for the list you want to remove.
Click OK to confirm.
Open Manage Smart Lists.
Click the pencil icon next to the list.
Edit the name, then save.
Sharing lets your whole team work from the same refined segments.
Navigate to Contacts in your dashboard.
Open Manage Smart Lists.
Select the Smart List you want to share (or use the share icon next to it).
Choose Share with all users (Global list) to make it accessible account-wide, or select specific users below.
Click Save to confirm.
When finished managing your lists, click × to close the Manage Smart Lists panel.
All of the controls above are available together from the Manage Smart Lists view, where each saved list has an Actions column with the following icons:
Copy icon – Create a copy of the list.
Share icon – Share the list with your team (globally or with specific users).
Pencil icon – Rename the list.
Trash icon – Delete the list.
Click × to close the panel when you're done.
Q: Can I manually add an existing contact to a Smart List? No. Contacts are added automatically based on the list's filters and conditions. If you add a tag (or other data) to a contact that matches a Smart List's filter, they join that list automatically.
Q: Can all users see Smart Lists, or only the person who created them? Smart Lists are created at the user level. With global versus local lists, you can push a Smart List to the full account so it's visible to all users.
Q: Is there a way to see who created or shared a Smart List? No. Aesthetix CRM does not log who created or shared a Smart List.
Q: Can Smart Lists be transferred between accounts? No. There is currently no feature to move a Smart List from one account to another.
Q: If I schedule an email campaign to a Smart List, will the list update before sending? Yes. Smart Lists are dynamic, so the recipient list is generated at the time of sending, not when the campaign is scheduled. New contacts that meet the filters before the send are included, and contacts that no longer match are excluded.
Q: Do all fields support the same filter operators? No. The operators available depend on the field you select.
Q: Can I use more than one filter at a time? Yes. Apply multiple filters with AND/OR logic to narrow your results further.
Q: Can I filter contacts by opportunity information? Yes. Opportunity-related filters let you segment by pipeline, stage, and status.
Q: How do I show 100 contacts per page instead of 20? Use the contacts-per-page selector at the bottom right and choose 100. Available options are 20, 50, and 100.
