Once your Conversational AI agents are live, Aesthetix CRM gives you fine-grained control over how and when they respond. You can pause or resume an agent for a single patient, designate which agent handles general inbound messages, hand a conversation off from one agent to another, reuse a proven agent setup across accounts, and automatically capture summaries and transcripts of every conversation. This guide covers each of these management tasks.
Your Conversational AI agents live under AI Agents, and conversations happen in the Inbox. For current pricing, see the pricing page.
Note on PHI: Don't enter protected health information (PHI) into Conversational AI. AI features aren't approved for processing PHI — use them for productivity, communication, scheduling, and engagement, not to store or process medical records. See the HIPAA Compliance guide for details.
Bot status for individual contacts gives your team more control over when Conversational AI should respond, pause, or stay inactive for a specific patient. Instead of turning Conversational AI on or off for every contact, you can update the status for one conversation while every other contact keeps its current AI behavior. This contact-level control lives in the message composer in the Inbox, and status changes apply only to the selected conversation.
This feature is available only in Suggestive or Auto-Pilot mode. If the bot status icon is not visible in the message composer, confirm that Conversational AI is enabled for your account and that the agent is using one of these supported modes.
Contact-level control: Update the Conversational AI status for one patient without changing agent behavior for everyone else.
Temporary pausing: Snooze Conversational AI for a set amount of time so it can automatically reactivate later.
Permanent inactive option: Keep Conversational AI inactive for a contact until someone manually turns it back on.
Improved accuracy: Prevent the agent from responding in conversations that need manual review, opt-out handling, or special attention.
Flexible management: Use Conversational AI differently across contacts based on each conversation's context.
Each status determines how Conversational AI behaves for the selected contact. Understanding these options helps you choose whether the agent should keep responding, pause temporarily, or stop engaging.
Active: The agent responds to all incoming messages.
Inactive: The agent stays off until it is manually reactivated.
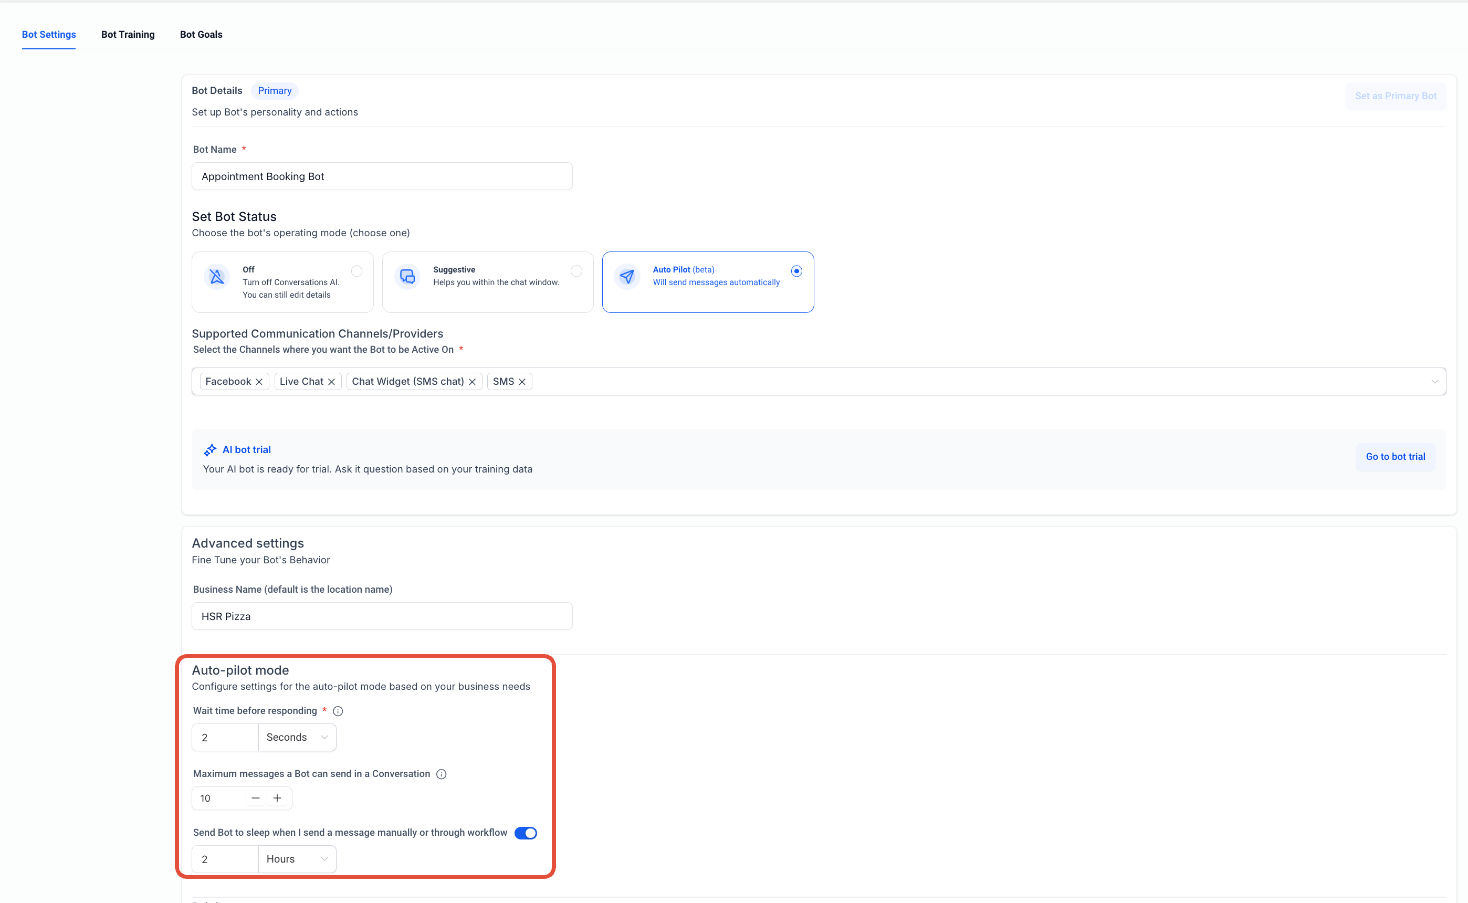
Sleep/Snooze: The agent is temporarily paused, either manually or due to certain actions (for example, when a manual or workflow message is sent, or message limits are reached). You can set a specific time for the agent to automatically wake up and start responding again.
Conversational AI status can change automatically depending on contact behavior, agent settings, and account configuration. The agent may become inactive for a contact when:
A contact replies with an opt-out keyword such as "STOP."
The agent reaches the maximum configured AI message limit.
A user sends a manual message and sleep settings are configured to pause AI after manual replies.
A workflow sends a message or updates the Conversational AI status.
Advanced Conversational AI settings are configured to send the agent to sleep during human handoff scenarios.
Go to the Inbox and open the conversation for the contact you want to update.
Locate the Conversational AI status icon in the message composer area. The icon shows whether Conversational AI is currently active, inactive, or sleeping.
Click the Conversational AI status icon and choose the desired status:
Active to allow Conversational AI to respond or suggest replies based on the configured mode.
Inactive to turn Conversational AI off for the contact. (Select Inactive if you want to use Sleep/Snooze to temporarily pause Conversational AI for the contact.)
If setting the status to Sleep/Snooze, select Inactive, then choose when Conversational AI should reactivate by checking Reactivate bot after and selecting a duration in minutes, hours, or days. Leave automatic reactivation unchecked if the agent should remain inactive until manually reactivated.
Apply the change by clicking out of the module. Confirm that the status icon updates in the message composer for that contact. A different indicator confirms that the agent is no longer active for that contact.
Does contact-level Inactive override global Conversational AI settings?
Yes. When set to Inactive, Conversational AI will not reply for that contact until you change the status back to Active.
What happens to incoming messages while the agent is sleeping?
Messages are received as normal. Conversational AI remains paused until the wake time, after which it resumes based on your configuration.
Does sending a manual message pause the agent automatically?
Depending on your global settings, manual messages can trigger auto-sleep or delay AI replies to prevent overlap.
Can I bulk-update bot status for many contacts at once?
Contact-level status is designed for one-to-one control. Use workflows for conditional or larger-scale changes.
What if the status control isn't visible?
Verify that Conversational AI is enabled, an agent is assigned to the channel, and your response mode supports AI replies.
Conversational AI agents can be used in different ways depending on whether an agent is set as the primary agent or added to workflows as a non-primary agent. Primary agents manage general inbound conversations and serve as the main agent for your communication strategy. Non-primary agents support workflows by responding to specific tasks based on their assigned channels when they are added to a workflow. Assigning the correct communication channels to both types is essential for seamless operation and consistent conversations.
Primary agents handle conversations from assigned communication channels — such as SMS, Facebook, or live chat — as long as those conversations are not already being handled by a Conversational AI agent inside a workflow. They act as the default responder for your communication channels.
Please note: You can change the primary agent at any time. Changing which agent is primary will not affect that agent's configuration, but you should make sure any missing communication channels are assigned to the new primary agent if needed.
General conversations: Primary agents automatically respond to messages received outside of workflow automation.
Channel dependence: A primary agent's ability to respond is determined by the communication channels assigned to it.
Go to AI Agents > Conversational AI > Agent List.
Create a new agent or select an existing agent you want to set as primary.
Click Set as Primary.
Click Save to save your changes.
Assigning channels ensures that agents can communicate through specific conversation channels. Supported channels are WhatsApp, Instagram, Facebook, SMS, Chat Widget (SMS chat), Live Chat, and Email. The primary agent handles general inbound messages from assigned channels, as long as the conversation was not initiated in a workflow being handled by another Conversational AI agent.
Go to AI Agents > Conversational AI > Agent List.
Create a new agent or select an existing agent you want to add channels to.
Go to Bot Settings > Supported Communication Channels/Providers.
Select the channels where you want the agent to be active.
Click Save to save your changes.
Non-primary agents are not involved in general inbound communication. Instead, they work exclusively within the workflows they are assigned to.
Workflow triggered: Non-primary agents respond only when a workflow step activates them. You can transfer the conversation to different agents at different steps of the workflow, but only one agent can be present in a conversation at any given time.
Channel-dependent: A non-primary agent's ability to respond depends on the channels configured in its settings and whether they match the communication channels in the workflow that triggers it.
Specialization: Non-primary agents are ideal for tasks such as appointment booking, follow-ups, or specific support for conversations managed within workflows.

Assigning channels ensures that non-primary agents can communicate through the specific channels required for their use within workflows.
For example, if you are setting up a non-primary agent trained to respond to leads from Facebook and Instagram, the following must be true:
The non-primary agent has Facebook and Instagram assigned as communication channels.
A lead nurture workflow is created that triggers from Facebook and Instagram messages.
The non-primary agent is added to that same lead nurture workflow as an action.
Important: Ensure that the channels used in a workflow match the channels assigned to the agent. If a workflow includes Facebook and SMS steps, ensure the assigned agent can handle both platforms, or designate separate agents for each channel.
What's the difference between a primary agent and non-primary agents?
The primary agent handles all general inbound messages unless they are assigned to a different agent in a workflow. Non-primary agents are used exclusively within workflows to handle specific tasks.
What happens if I don't assign all necessary channels to my primary agent?
If channels are missing from the primary agent's configuration, it will not be able to respond to messages on those platforms. Make sure all relevant communication channels are assigned to the primary agent to avoid interruptions.
Can I have more than one primary agent?
No. Only one agent can be the primary agent at a time. If you need to switch, you can do so, but make sure all required channels are reassigned to the new primary agent.
Can non-primary agents respond to general inbound messages?
No. Non-primary agents respond only within workflows. General inbound messages are managed by the primary agent.
How do I ensure a non-primary agent responds to a specific workflow step?
Assign the non-primary agent to the appropriate step in the workflow and verify that the workflow uses channels that match the agent's assigned channels. For example, an SMS agent will not respond to Facebook messages within the same workflow.
Can I assign multiple non-primary agents to a single workflow?
Yes. You can assign multiple non-primary agents to a workflow, each configured for different tasks or channels. For example, you could use one agent for appointment booking and another for patient support within the same workflow.
What happens if a workflow includes a channel not assigned to the non-primary agent?
The agent will not respond on channels it is not configured for. To avoid this, make sure the channels in the workflow match the channels assigned to the agent.
Can I switch a non-primary agent's channel assignments after it has been added to a workflow?
Yes. You can modify a non-primary agent's channel assignments at any time. However, you will need to review the workflows using that agent to make sure its new channel configuration aligns with the workflow steps.
The Transfer Bot Action lets one Conversational AI agent seamlessly hand a conversation to another agent when a specific intent, phrase, or condition is detected. Instead of building one large agent to handle every possible scenario, you can create specialized agents for different services, departments, or languages, and route each conversation to the right one without losing conversation flow.
For example, if a conversation starts with a general agent but the contact mentions "I'd like to book a facial," it can automatically transfer to an agent configured to handle facial bookings.
Improves the experience: Routes each conversation to the most relevant agent based on what's needed.
Reduces complex workflows: Allows agent-to-agent handoffs without building unnecessary workflow branches.
Supports modular setups: Lets you create separate agents for different services, teams, departments, or languages.
Improves accuracy: Keeps each agent focused on a specific topic or use case.
Preserves conversation flow: Helps the destination agent continue the conversation naturally after the transfer.
Simplifies maintenance: Makes it easier to update individual agents instead of managing one large agent.
From your account, navigate to AI Agents.
Select Conversational AI from the top navigation.
Open the Agent List tab.
Click the three-dot menu next to the agent you want to edit.
Select Edit.
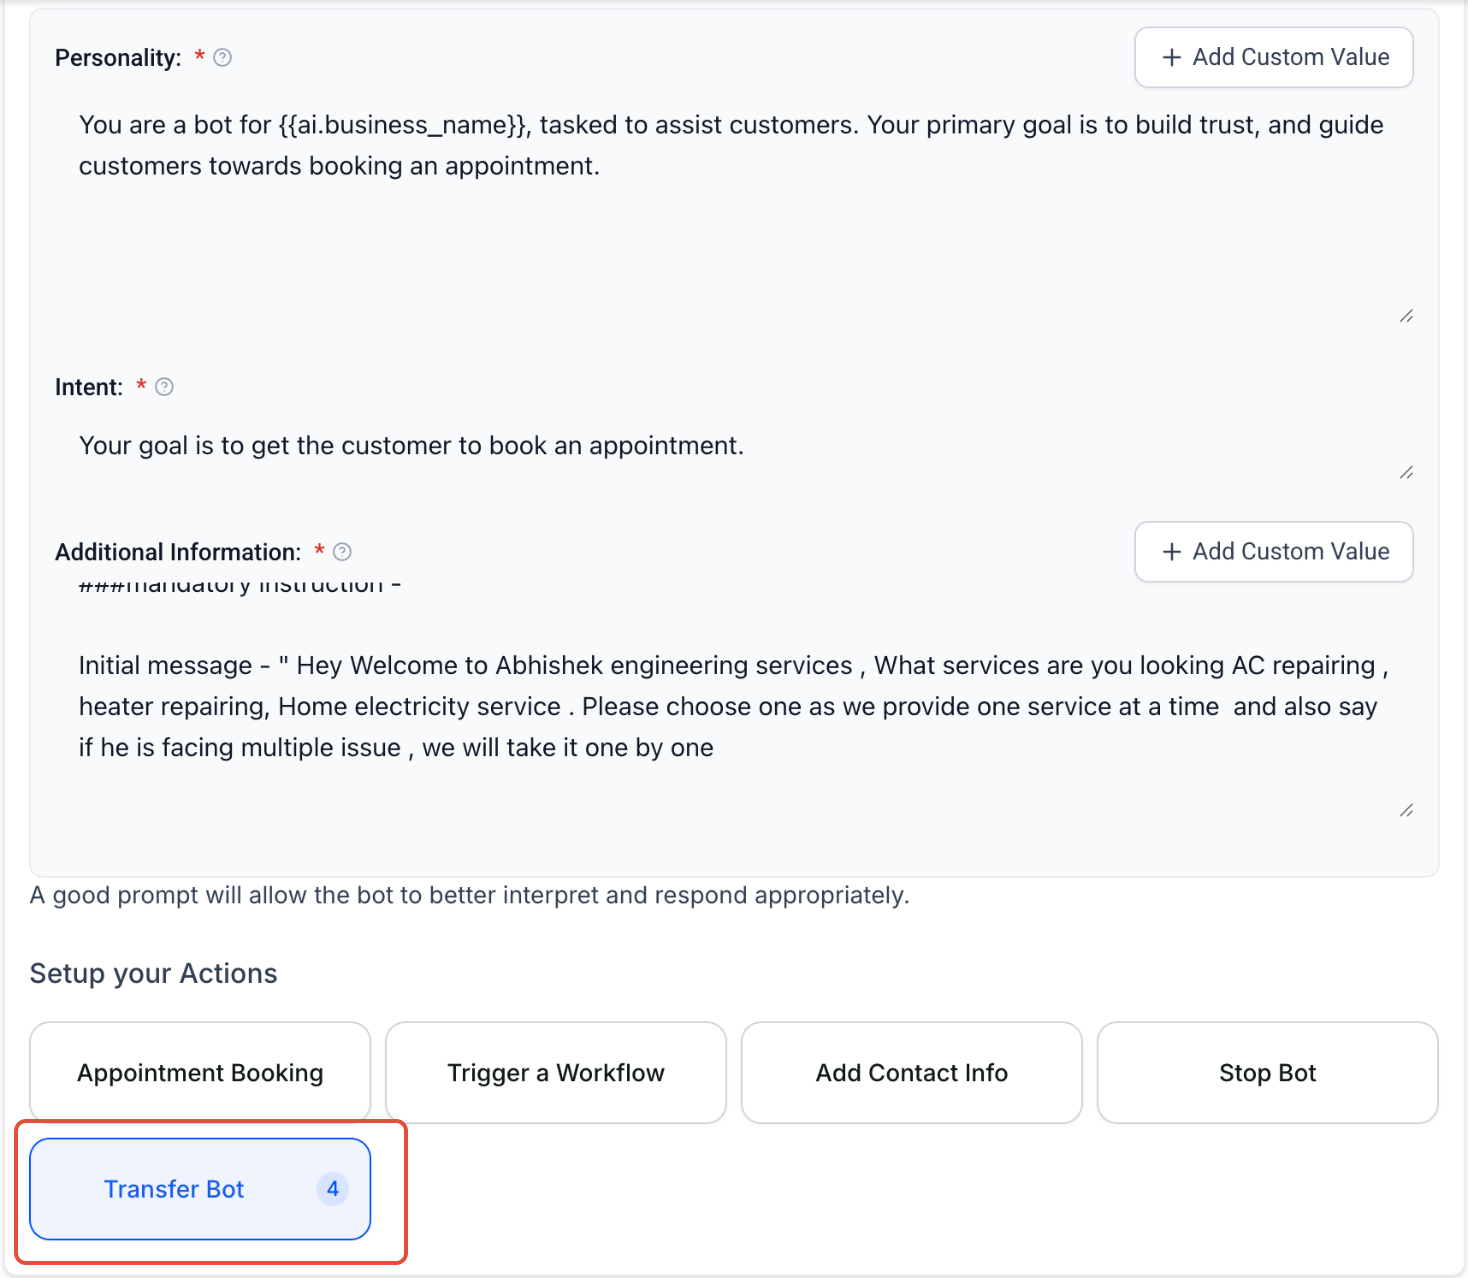
Open the Bot Goals tab.
Under Setup your Actions, click Transfer Bot.
In the Bot Transfer window, enter an Action name. Use a clear name that explains where the conversation will be transferred, such as "Transfer to Facial Booking Agent."
Select the destination agent from the Select Bot to Transfer to dropdown.
Confirm that the current agent and selected agent are compatible. Both should be active on the same channel and both should be in Auto-Pilot mode.
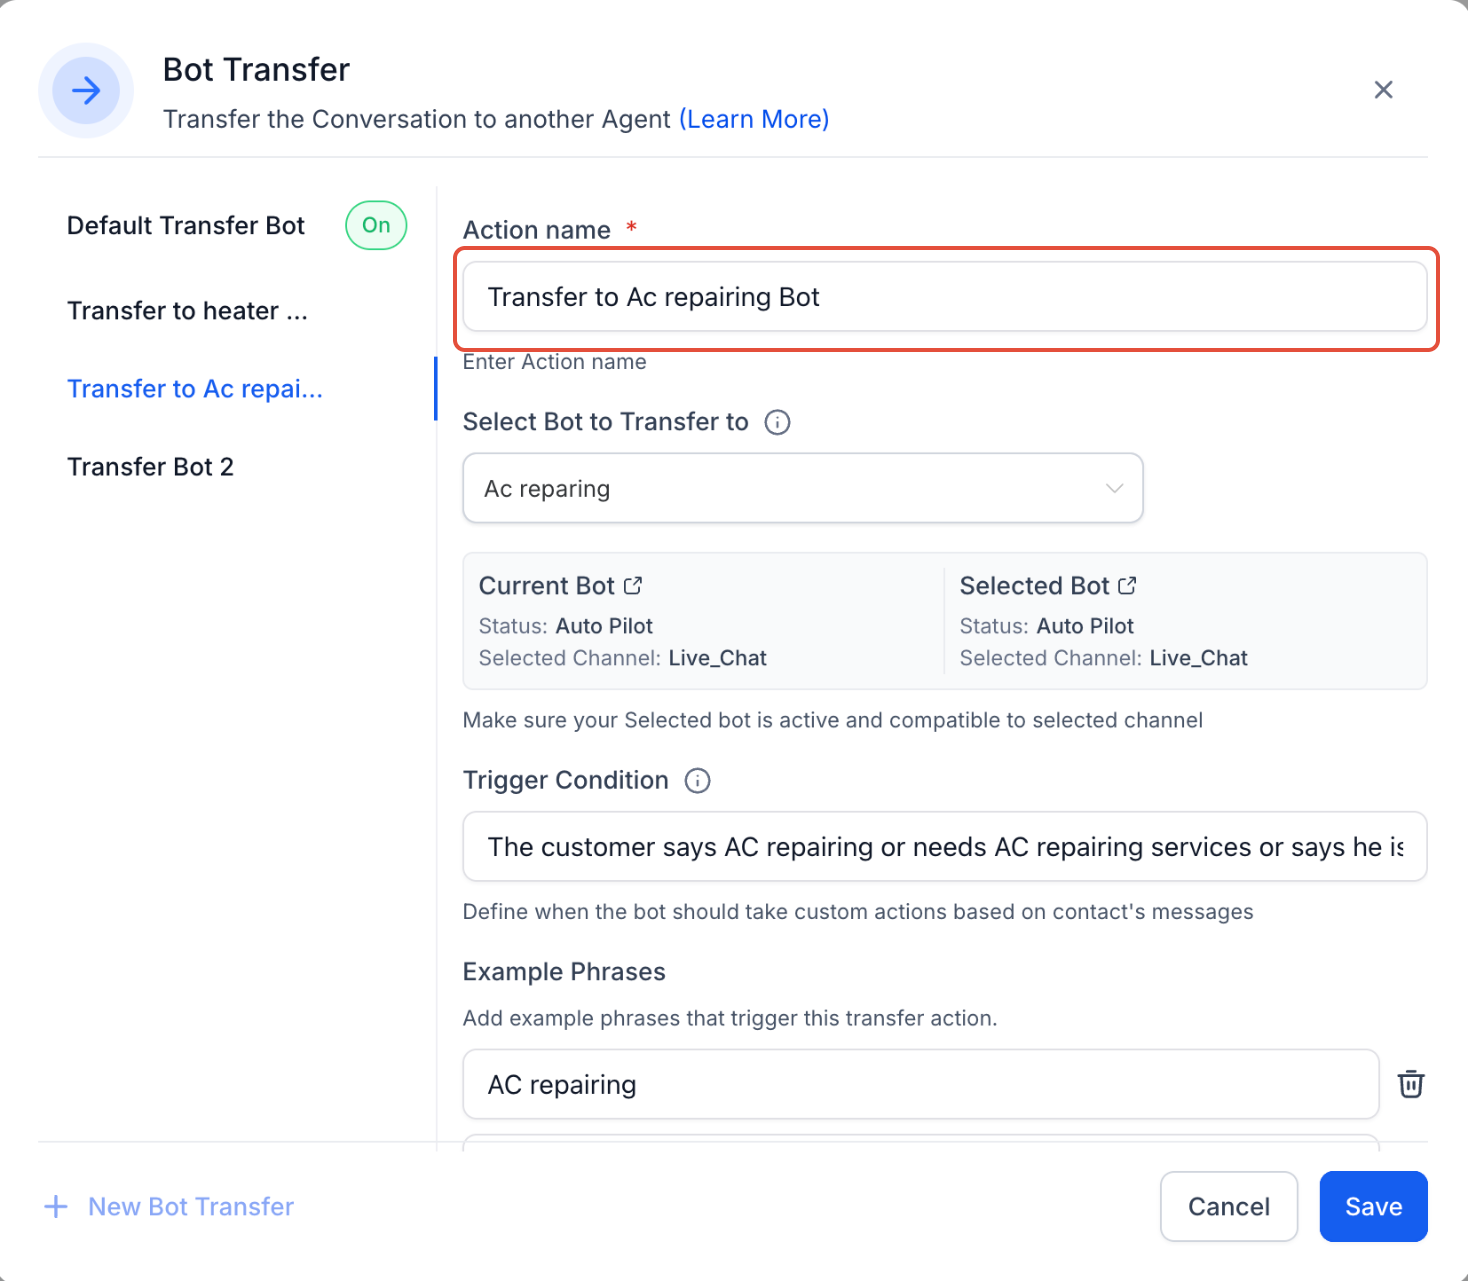
Add a Trigger Condition to define when the transfer should happen. For example: "The patient wants to book a facial or asks about facial services."
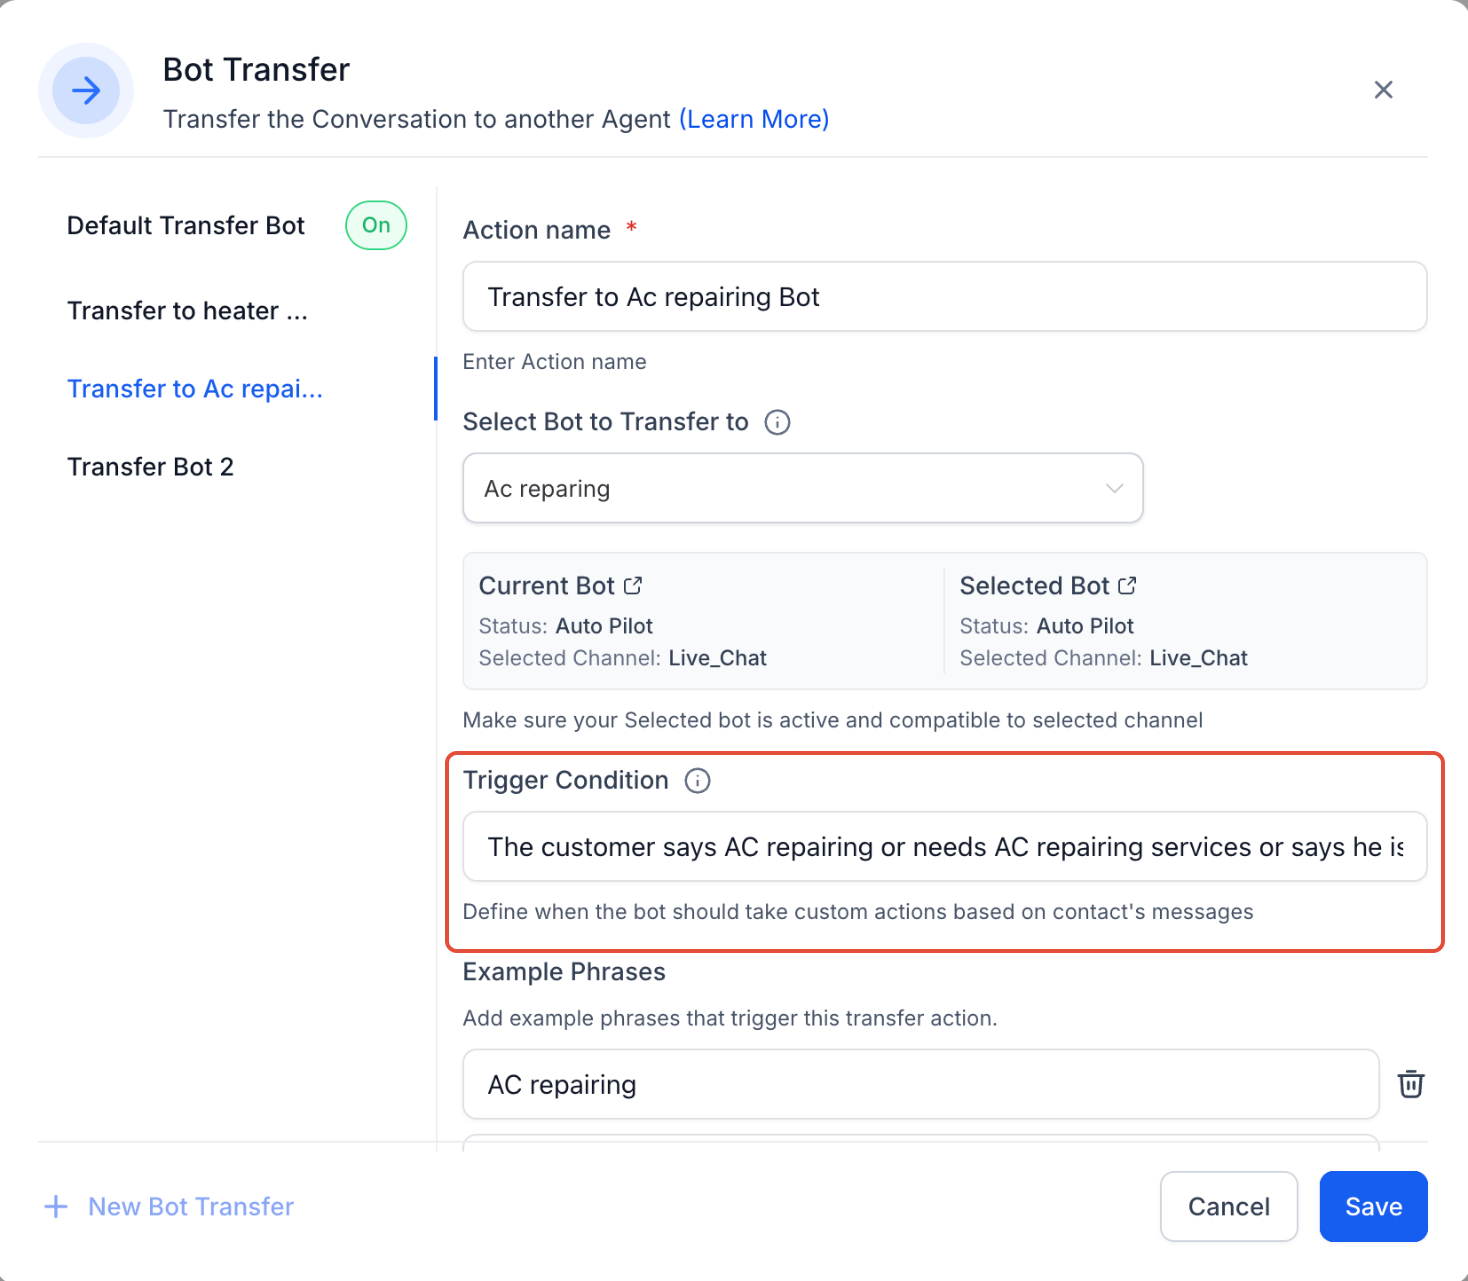
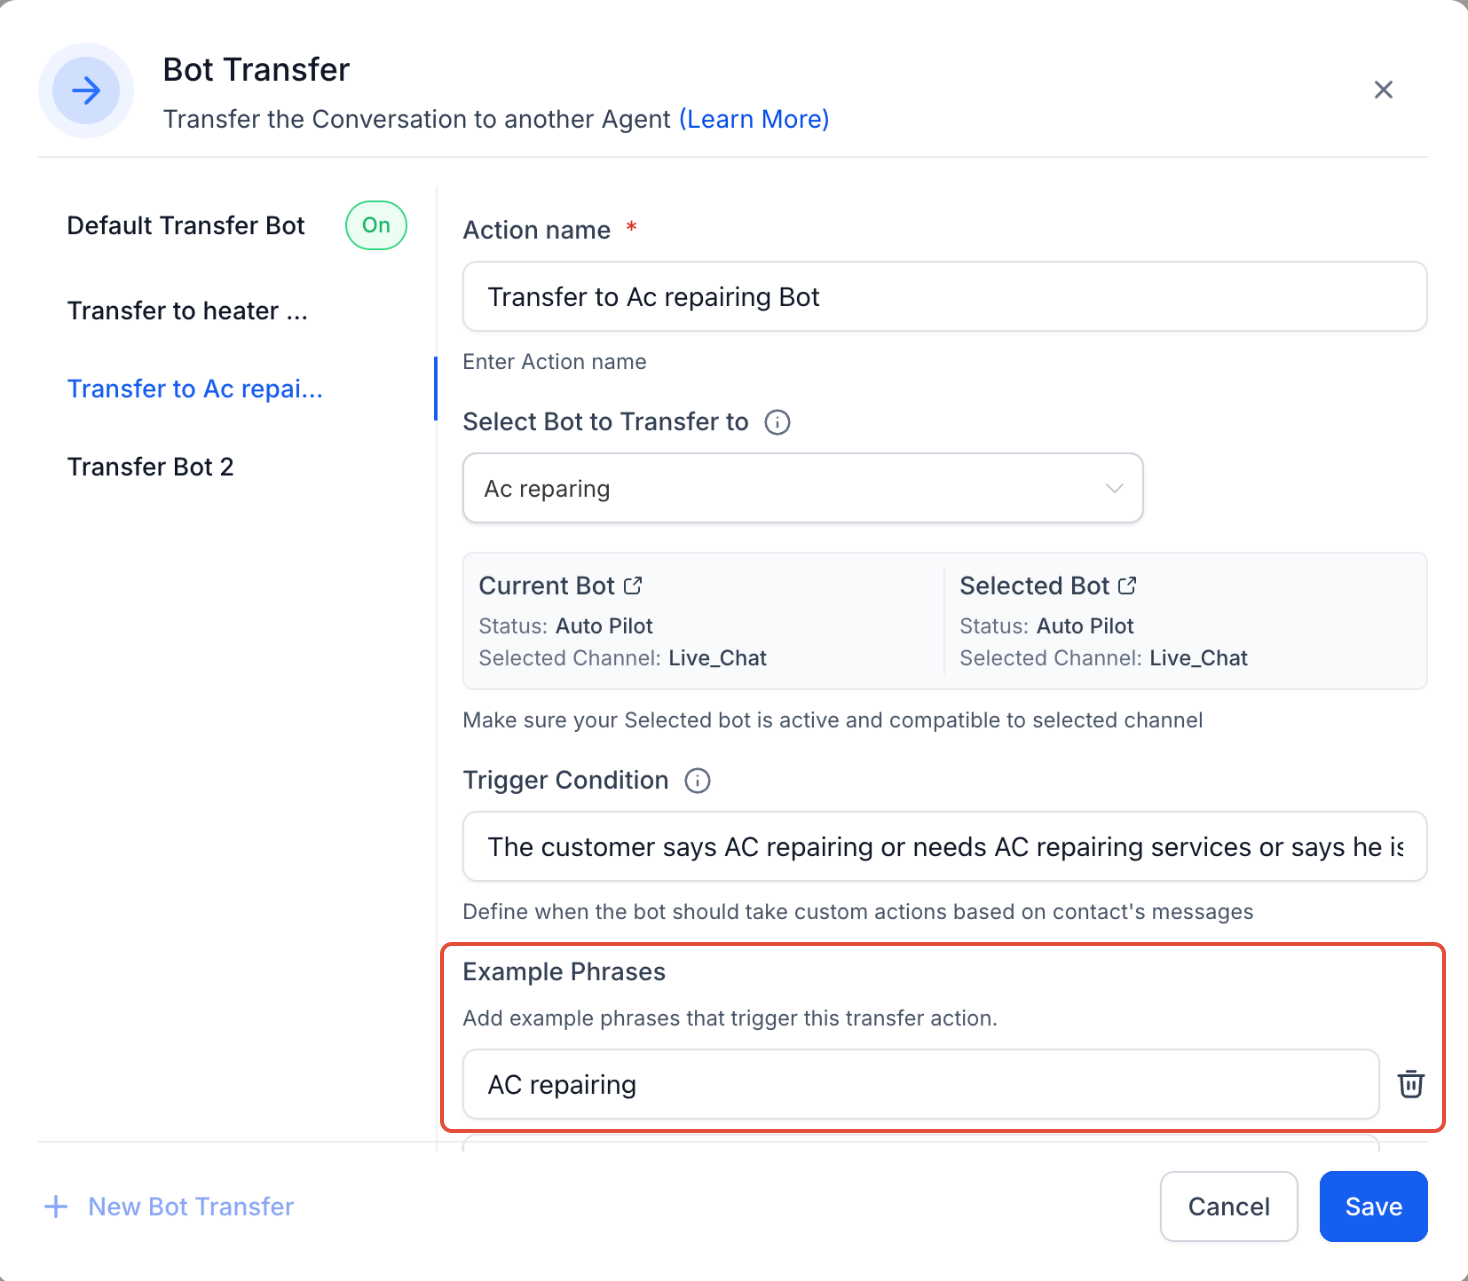
Add Example Phrases that patients may use to trigger the transfer. For example: "book a facial," "I'd like a facial," or "do you offer facials?"
Click Save to apply your changes.
Transfer Bot Action depends on compatibility between the source agent and destination agent. If these requirements are not met, the transfer may not work as expected.
The source agent and destination agent must be active on the same channel. For example, if the source agent is active on Live Chat, the destination agent must also be active on Live Chat.
Both agents must be in Auto-Pilot mode.
The destination agent should be published and tested before using it in a live transfer.
Trigger conditions and example phrases should be specific enough to avoid accidental transfers.
Transferring to another agent is useful when your med spa has multiple services, departments, or conversation paths better handled by separate agents. This lets each agent stay focused while still creating a connected experience. Common examples include:
A general intake agent transferring to a sales/consultation agent.
A support agent transferring to a billing agent.
A general services agent transferring to a treatment-specific agent (injectables, laser, skincare).
A multilingual agent transferring to a language-specific agent.
A general appointment agent transferring to a service-specific booking agent.
Example phrases help the agent understand the types of messages that should match a transfer scenario. Use clear, realistic phrases that contacts are likely to send, such as:
"I'd like to book a facial."
"I need help with billing."
"Can I schedule a Botox consultation?"
"I want to ask about laser treatments."
"Do you offer chemical peels?"
Avoid vague trigger conditions that could match too many conversations. Specific examples improve transfer accuracy. Also avoid overlapping trigger conditions across multiple transfer scenarios.
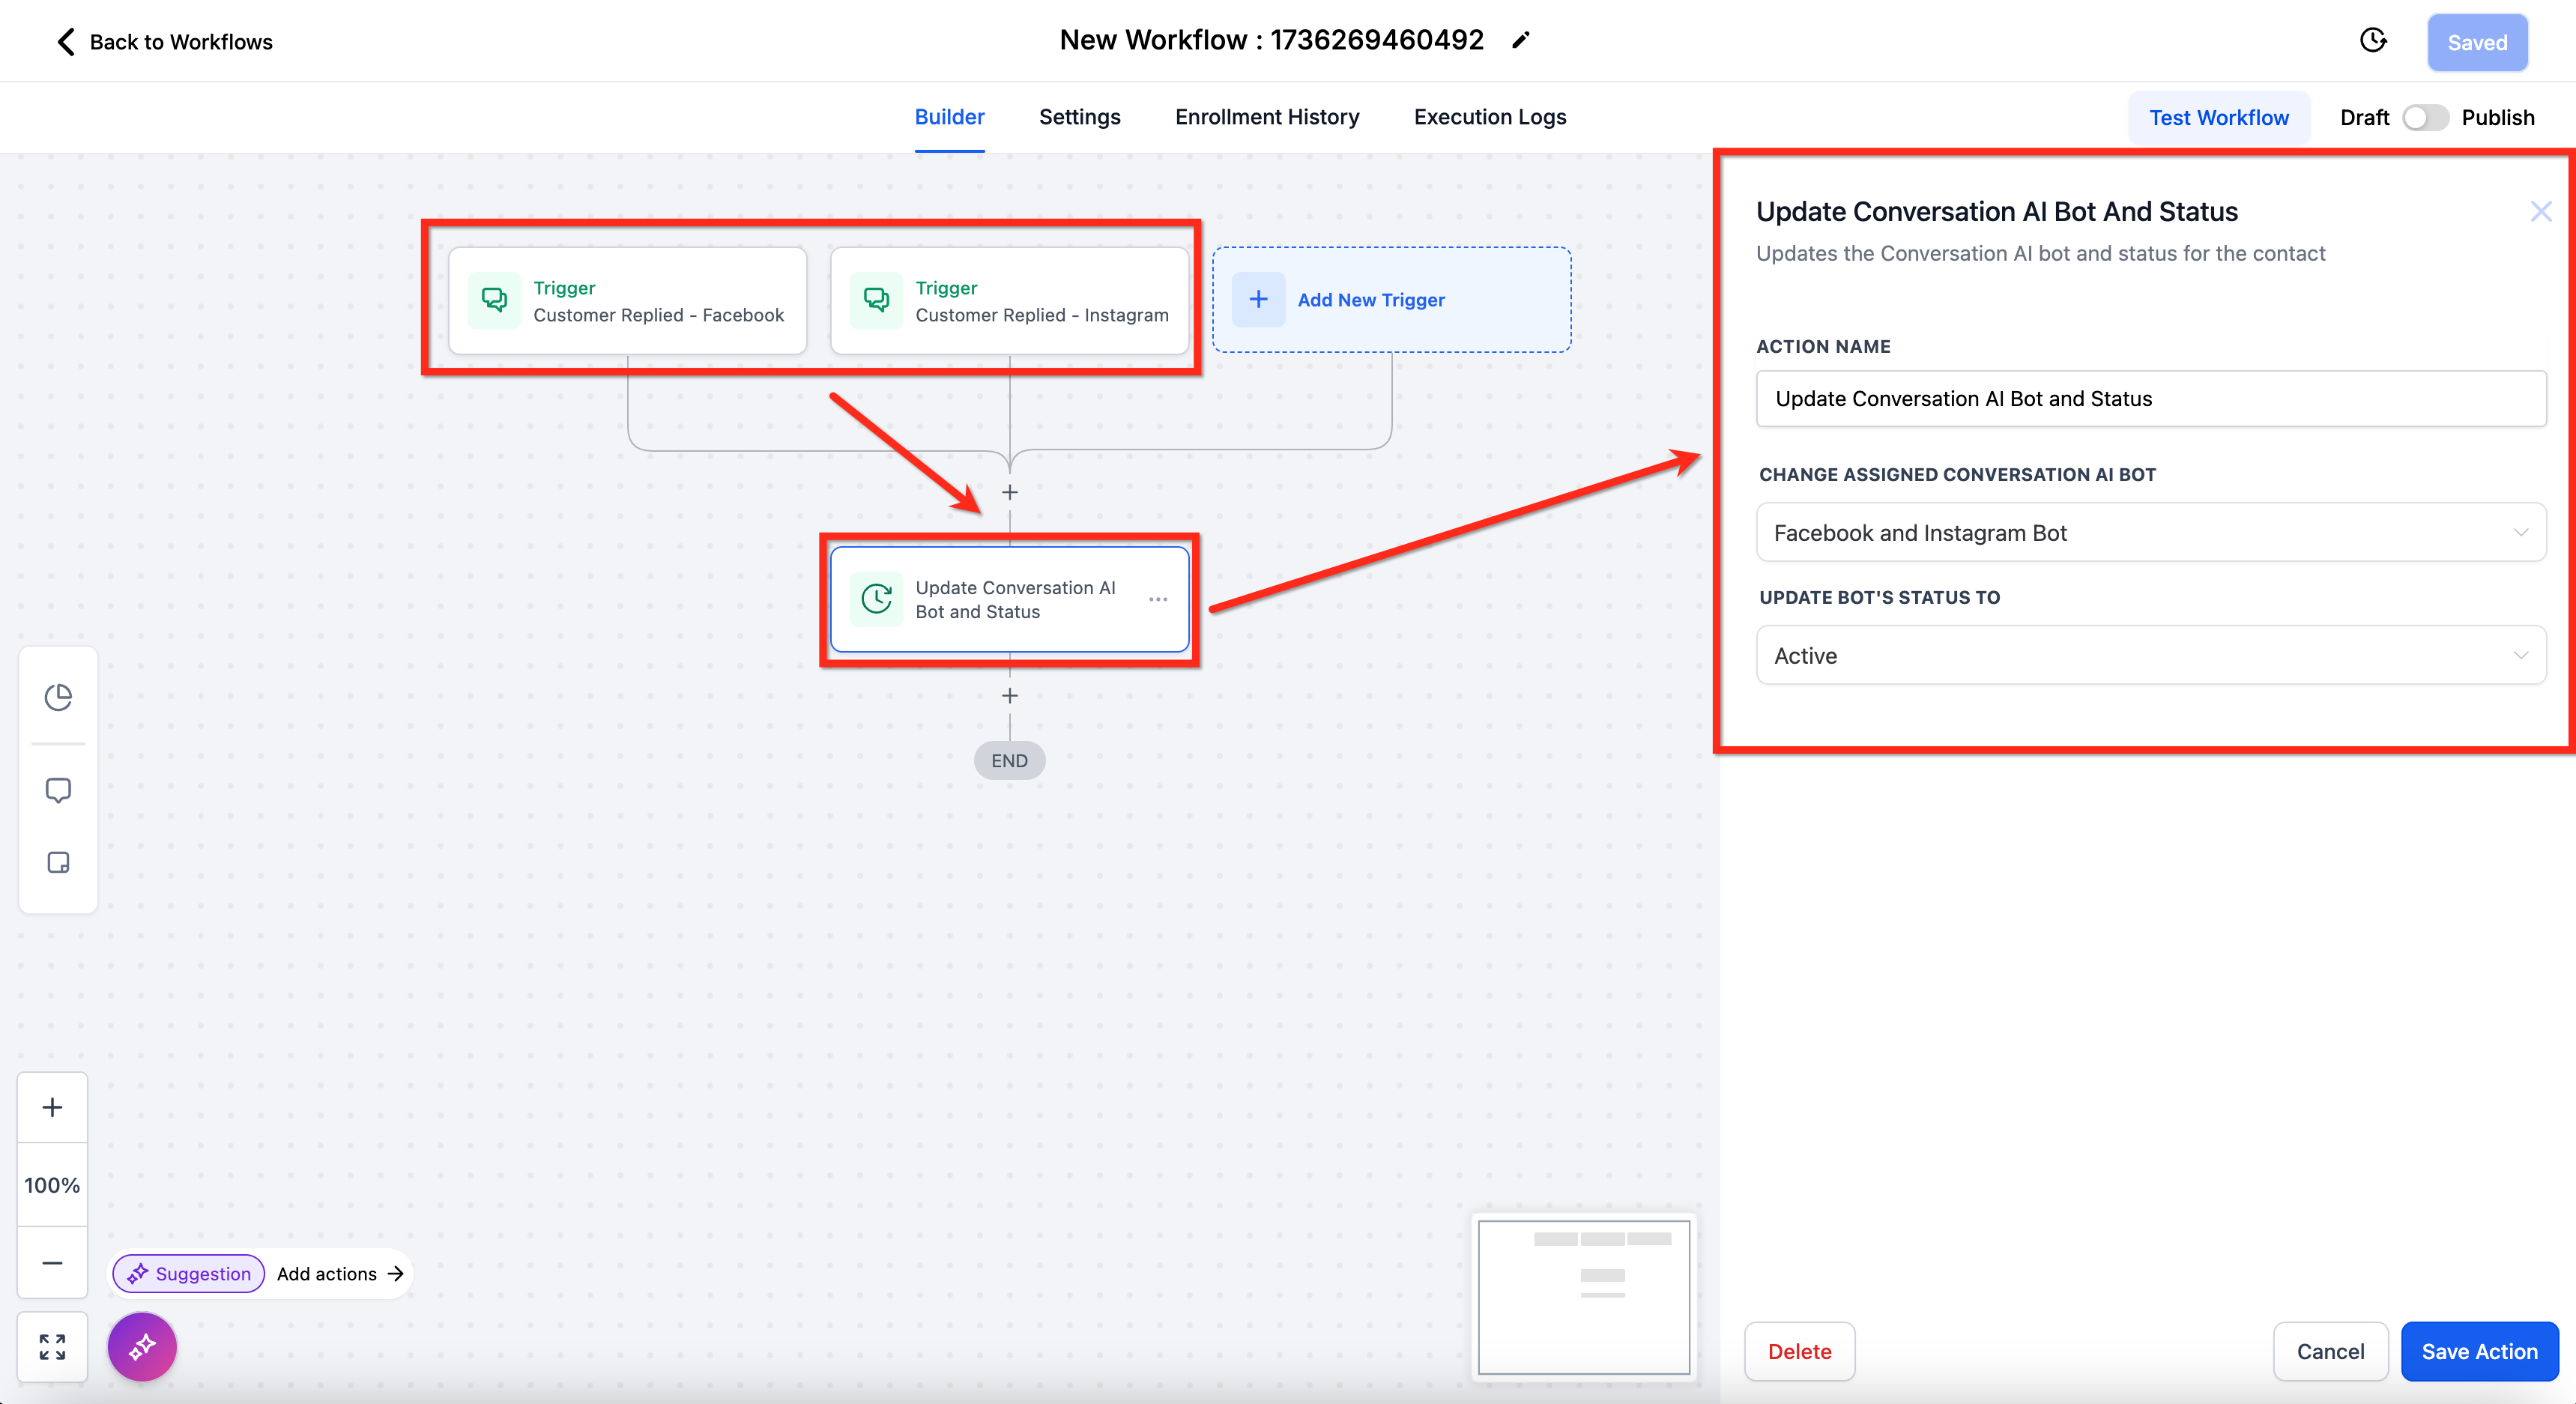
If you are using the Update Conversation AI Bot and Status workflow action, add a Wait step before or after the update action as needed. Without a Wait step, the original agent may continue reassigning the conversation, which can break the transfer logic.

Use clear action names that describe the destination agent.
Keep each agent focused on a specific topic, service, department, or language.
Make sure all destination agents are published before selecting them.
Confirm that both agents are active on the same communication channel.
Keep both agents in Auto-Pilot mode.
Test each transfer scenario before using it in live conversations.
Add enough example phrases to help Conversational AI understand patient intent.
What does the Transfer Bot Action do?
It transfers a conversation from one Conversational AI agent to another based on patient intent, trigger conditions, or example phrases.
Can I transfer a conversation to any agent?
You can transfer to a compatible destination agent. The source and destination agents must be active on the same channel, and both must be in Auto-Pilot mode.
Will the conversation history be preserved after transfer?
Yes. The conversation context is preserved so the destination agent can continue the conversation more naturally.
Why is my transfer not working?
The most common causes are a channel mismatch, one of the agents not being in Auto-Pilot mode, the destination agent not being published, or trigger conditions that are too vague.
Can I use Transfer Bot Action instead of building complex workflows?
Yes. It can reduce the need for complex workflow routing by allowing one agent to hand off the conversation directly to another.
What happens if I use the Update Conversation AI Bot and Status workflow action?
Add a Wait step when using this workflow action. Without it, the original agent may keep reassigning the conversation and break the transfer logic.
Can I use Transfer Bot Action for different departments or services?
Yes. You can create separate agents for sales, support, billing, treatment booking, or other departments and transfer conversations based on their needs.
Should the destination agent be tested before using it?
Yes. Always publish and test the destination agent before enabling it in a live transfer scenario.
Bot snapshots let you save a fully configured Conversational AI agent — including prompts, actions, settings, and training data — into an account snapshot so it can be reused in other accounts. This is useful when you have a tested agent setup you want to deploy repeatedly without rebuilding it from scratch, and it helps keep configurations consistent across locations.
A snapshot can clone entire agents, including prompts, actions, configurations, Bot Training Web Crawler URLs, and Custom Bot Responses, so each imported agent starts with the same structure, logic, and training setup as the original.
Full configuration capture: Includes agent settings, prompts, actions, and related configuration details.
Faster account setup: Reduces the need to manually rebuild the same agent in each account.
Consistent experience: Helps maintain the same tone, instructions, and logic across accounts.
Training data included: Captures Bot Training Web Crawler URLs and Custom Bot Responses.
Primary agent support: Automatically sets the imported agent as primary when the destination account does not already have one.
Flexible import handling: Lets you decide whether to overwrite or skip agents when a naming conflict exists.
Before creating the snapshot, make sure the source account contains the agent configuration, prompts, actions, and training data you want to reuse.
Navigate to Account Snapshots from the left-hand navigation menu.
Click Create new snapshot.
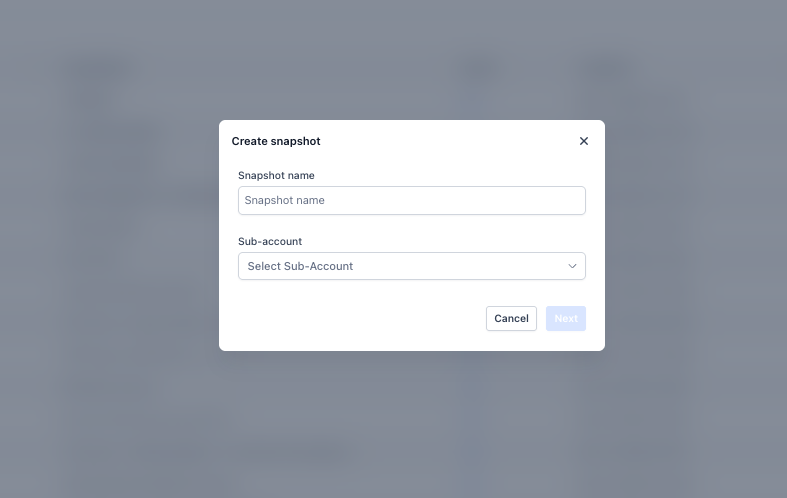
Enter a descriptive Snapshot name.
Click the account dropdown and select the source account that contains the Conversational AI agent you want to include.
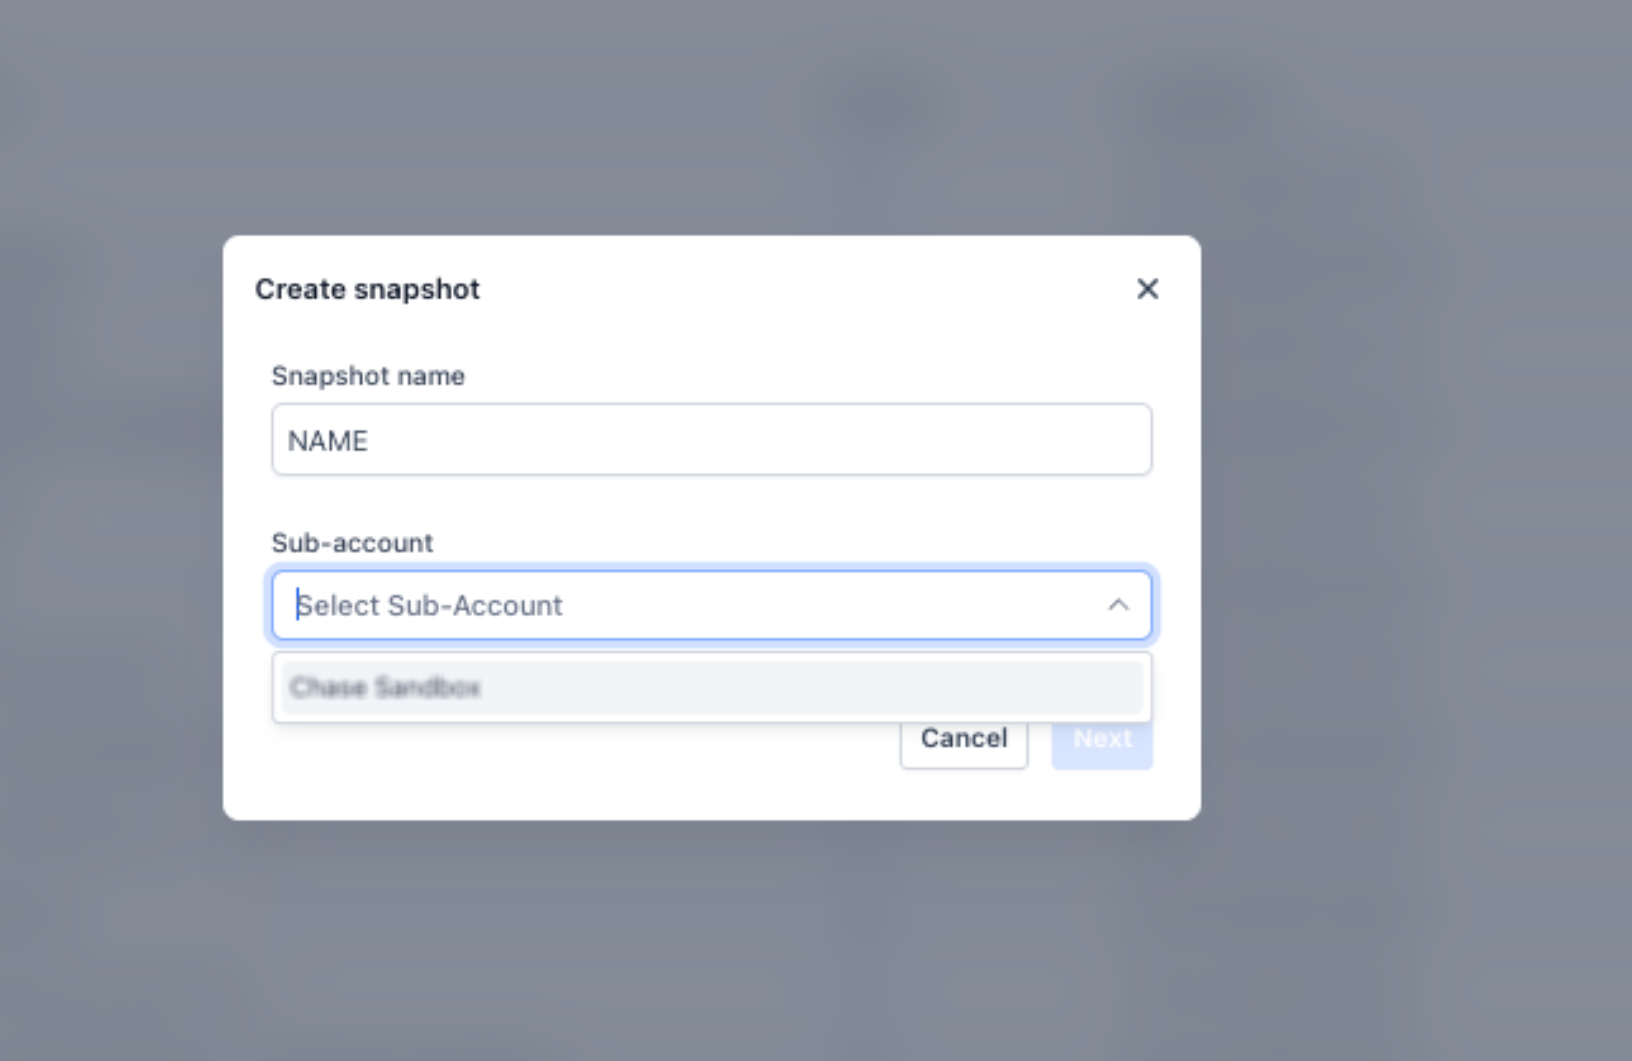
Click Next.
Continue through the snapshot creation flow and review the selected assets.
Locate the Conversational AI section.
Review the agents and related data included in the snapshot. This may include:
Agent names
Agent settings and configurations
Agent actions
Agent prompts
Bot Training Web Crawler URLs
Custom Bot Responses/FAQs
Click Create Snapshot to finish.
Understanding how agent data is copied helps prevent confusion when importing snapshots into other accounts.
Primary agent auto-assignment: If the destination account does not already have a primary Conversational AI agent, the imported agent is automatically set as primary. If a primary agent already exists, you can manually review and update the primary setting after import.
Conflict handling: If an agent with the same name already exists in the destination, you can decide how to handle the conflict during import:
Overwrite: Replaces the existing agent with the one from the snapshot.
Skip: Keeps the existing agent and does not import the matching agent from the snapshot.
What's included: Snapshots are designed to preserve the core setup needed to recreate the agent in another account, including:
Complete agent structure
Agent actions
Prompt and response mappings
Agent settings and configurations
Bot Training Web Crawler URLs
Custom Bot Responses/FAQs created in Bot Training
What happens if an agent with the same name already exists in the destination account?
During import, you can choose to overwrite the existing agent or skip the one from the snapshot.
Will my prompts and action logic be preserved?
Yes. The snapshot preserves the agent's configured prompts, actions, settings, and related logic.
Does the snapshot include training data like FAQs and Web Crawler URLs?
Yes. Bot Training data, including Web Crawler URLs and Custom Bot Responses/FAQs, is included.
Will the imported agent automatically become the primary agent?
If the destination account does not already have a primary agent, the imported agent will automatically be set as primary.
Can I change the primary agent after importing a snapshot?
Yes. You can manually update the primary agent from the Conversational AI settings after import.
Can I edit an existing snapshot after it has been created?
No. Snapshots cannot be edited after creation. If you update the original agent, create a new snapshot to capture the latest configuration.
Should I test the agent after importing a snapshot?
Yes. Always test the imported agent in the destination account to confirm prompts, actions, training data, and primary settings are working as expected.
Conversation summaries and transcripts help you quickly understand interactions without reading full message threads. When enabled, Aesthetix CRM can automatically generate summaries, store them on the contact record, and trigger follow-up actions — improving efficiency, visibility, and follow-up.
Quick insights: Instantly understand conversation outcomes.
Automation-ready: Trigger workflows based on summaries.
Improved tracking: Monitor interactions across sessions.
Better follow-ups: Take action based on conversation results.
Centralized data: Store summaries directly with contact records.
Turning on this feature generates summaries automatically based on inactivity or defined conditions.

Locate the Conversation Summary section.
Toggle Enable Conversation Summary ON.
Set inactivity time (for example, 15 minutes).
Set minimum message count (for example, 3 messages).
Enable options like saving to a contact field or triggering workflows.
Click Save to apply changes.
You can automate actions when a summary or transcript is created.
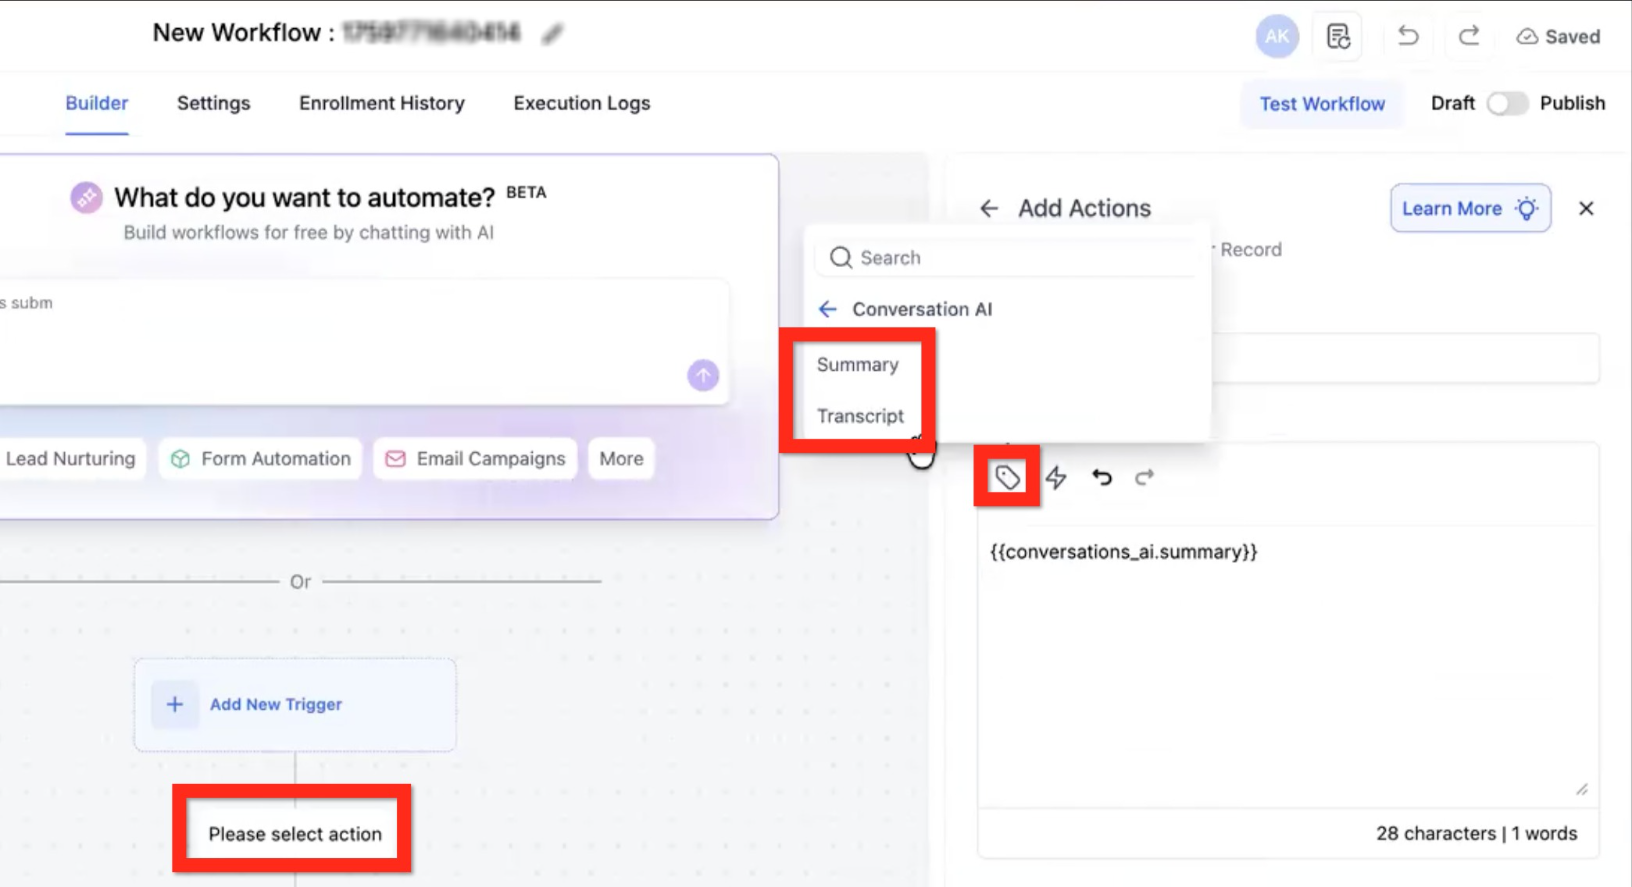
Open your workflow builder.
Click Please select action.
Search for and select Summary or Transcript.
Insert the variable into your workflow.
Save and publish the workflow.
Inactivity time: Defines how long the system waits before generating a summary after no activity. Example: if set to 15 minutes, the summary is created after 15 minutes of no messages.
Minimum messages requirement: Ensures summaries are only created for meaningful conversations. If the conversation has fewer messages than this number, no summary is generated.
Instant summary on sleep: A summary is generated immediately when the conversation ends due to message limits being reached, manual or automated intervention, stop conditions, or handover/inactivity.
Enable the option to save to a contact field.
Select the field where the summary should be stored.
Each new summary replaces the previous one.
Enable the workflow trigger option.
Select an existing workflow.
Use summaries to create tasks, update records, or send notifications.
You can use summary and transcript data in automation for advanced actions.
Use variables such as Conversation Summary and Conversation Transcript.
Apply that data to update contact details, generate insights, or trigger automation.
Enable email notifications.
Select recipients such as admin users, assigned users, or specific recipients.
Save settings.
Summaries are generated per session.
Each new summary replaces the previous one.
Only messages sent after enabling the feature are included.
Messages during disabled periods are ignored.
Both inbound and outbound messages are included.
Each new summary includes only messages since the last summary.
When is a conversation summary created?
A summary is generated after inactivity, or instantly when certain conditions end the conversation.
Does it include all past messages?
No. It only includes messages sent after the feature is enabled or after the last summary.
Can summaries trigger automation?
Yes. Workflows can be triggered automatically when summaries are generated.
Can I store summaries for later use?
Yes. Summaries can be saved to a selected contact field.
What happens if there are not enough messages?
No summary is generated if the minimum message requirement is not met.
No summary showing? Turn ON the summary toggle and ensure inactivity and minimum-message conditions are met.
Missing messages? Only messages sent after enabling the feature are included.
Workflow not triggering? Select a published workflow.
Not saving to contact? Enable "Save to custom field" and pick a field.
No email alerts? Select at least one recipient.
If it still doesn't work, test with a new conversation.
