Bot Goals and behavior settings define how your Conversational AI agent communicates, what it should accomplish, which actions it can take, and how it responds during real conversations. Together they let you shape the conversation experience: set the agent's personality and goal, capture leads, collect the right contact details, book appointments, trigger follow-up automations, fine-tune response timing, and test everything before going live.
This guide covers the Bot Goals tab (prompt, actions, and testing), the Advanced Settings that control timing and sleep behavior, the Add Contact Info action, how the agent understands new questions during a conversation, and the conditions that put a bot to sleep.
Conversational AI lives under AI Agents in Aesthetix CRM. It has two builders: a Prompt-based builder and a Flow-based builder. The settings described here apply to your Conversational AI agents regardless of which builder you used.
Note on PHI: Don't enter protected health information (PHI) into Conversational AI. AI features aren't approved for processing PHI — use them for productivity, communication, scheduling, and engagement, not to store or process medical records. See the HIPAA Compliance guide for details.
Bot Goals define what your Conversational AI agent should accomplish during a conversation. Instead of only answering questions, the agent can collect important contact information, help patients book appointments, trigger follow-up workflows, and notify your team when it needs help.
Bot Goals are configured inside each Conversational AI agent. The Bot Goals tab brings together the agent's prompt, available actions, and a real-time test panel so you can refine the patient experience in one place. The prompt controls how the agent communicates, while actions control what the agent can do during or after a conversation.
Other settings — such as Bot Training, Brand Voice, and Advanced Settings — also affect how the agent responds, but this guide focuses on the behavior and goals you configure for the agent.
Clearer response behavior: Define the agent's personality, goal, and supporting instructions so it responds with purpose.
Goal-focused conversations: Guide contacts toward outcomes such as sharing their details, capturing a lead, or booking appointments.
Action-based automation: Allow the agent to book appointments, trigger workflows, or collect contact information.
Cleaner patient experience: Avoid repeated questions by skipping fields that already contain information.
Team visibility: Notify your team or summarize conversations when human review is needed.
Real-time testing: Test responses while configuring the agent so you can refine behavior before launch.
Bot Goals are configured per agent, so each agent can have its own prompt, actions, and testing behavior. Make sure you select the correct agent before making changes.
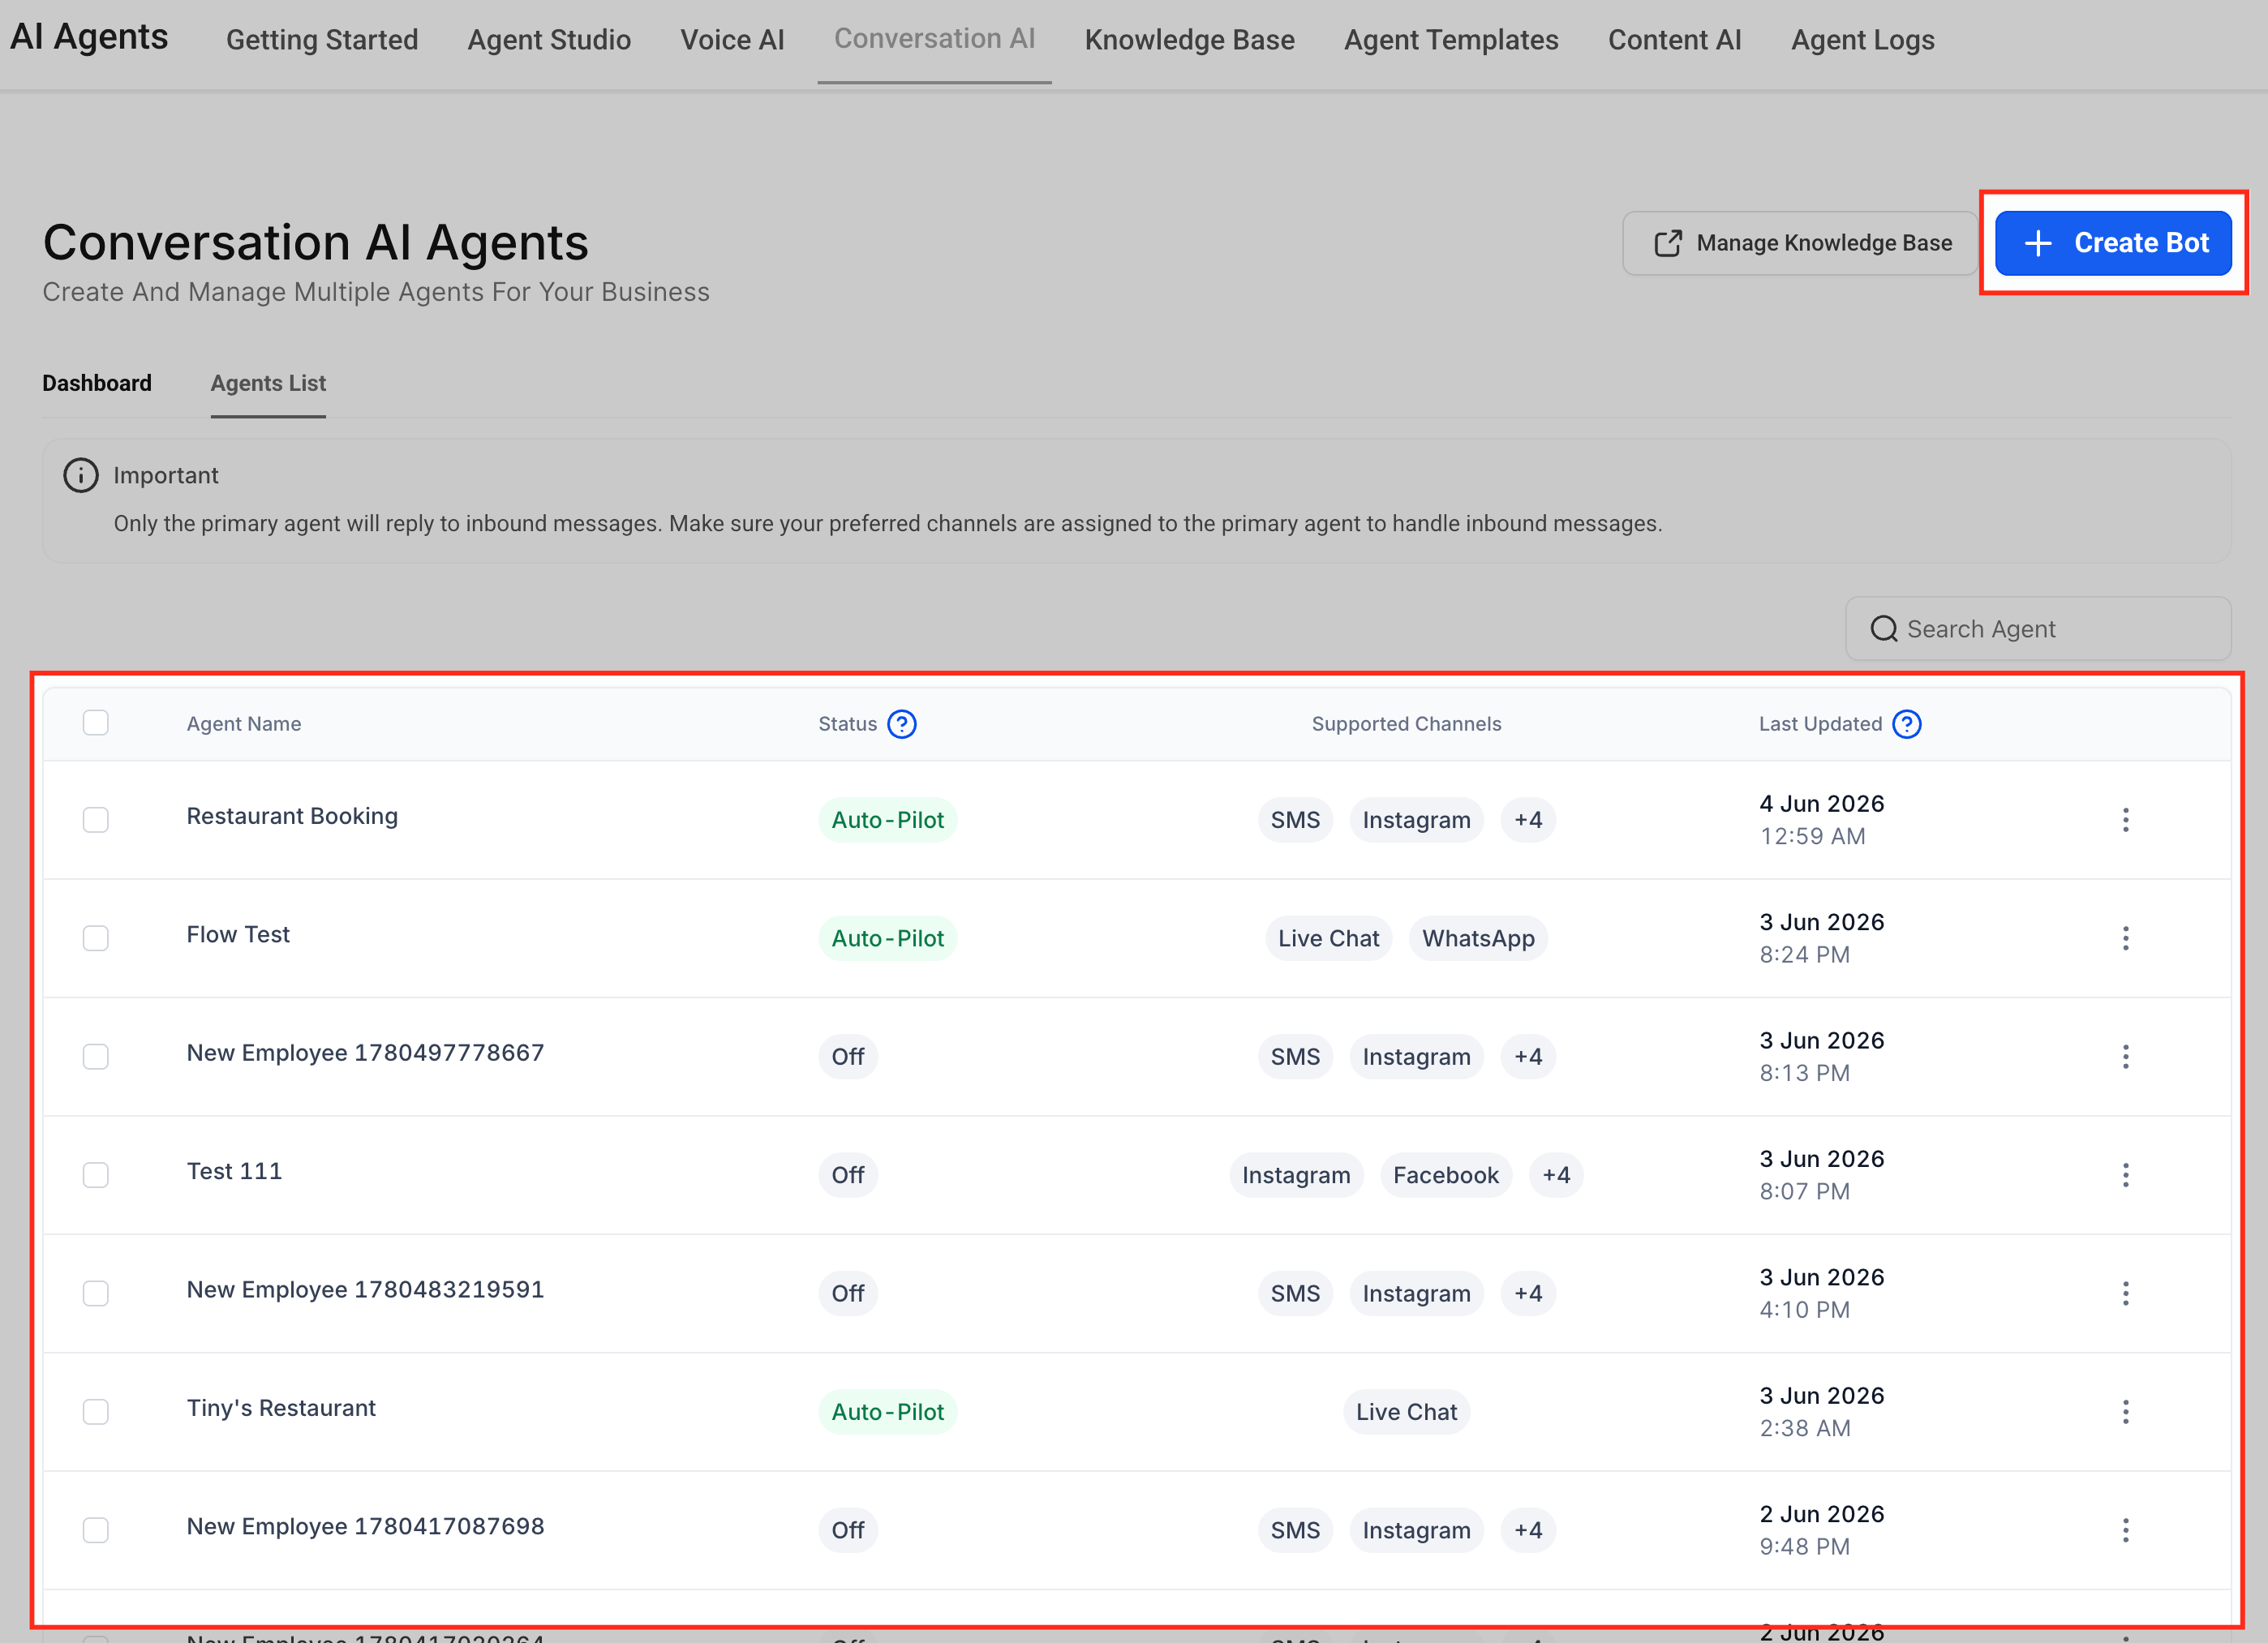
Go to AI Agents.
Select Conversational AI.
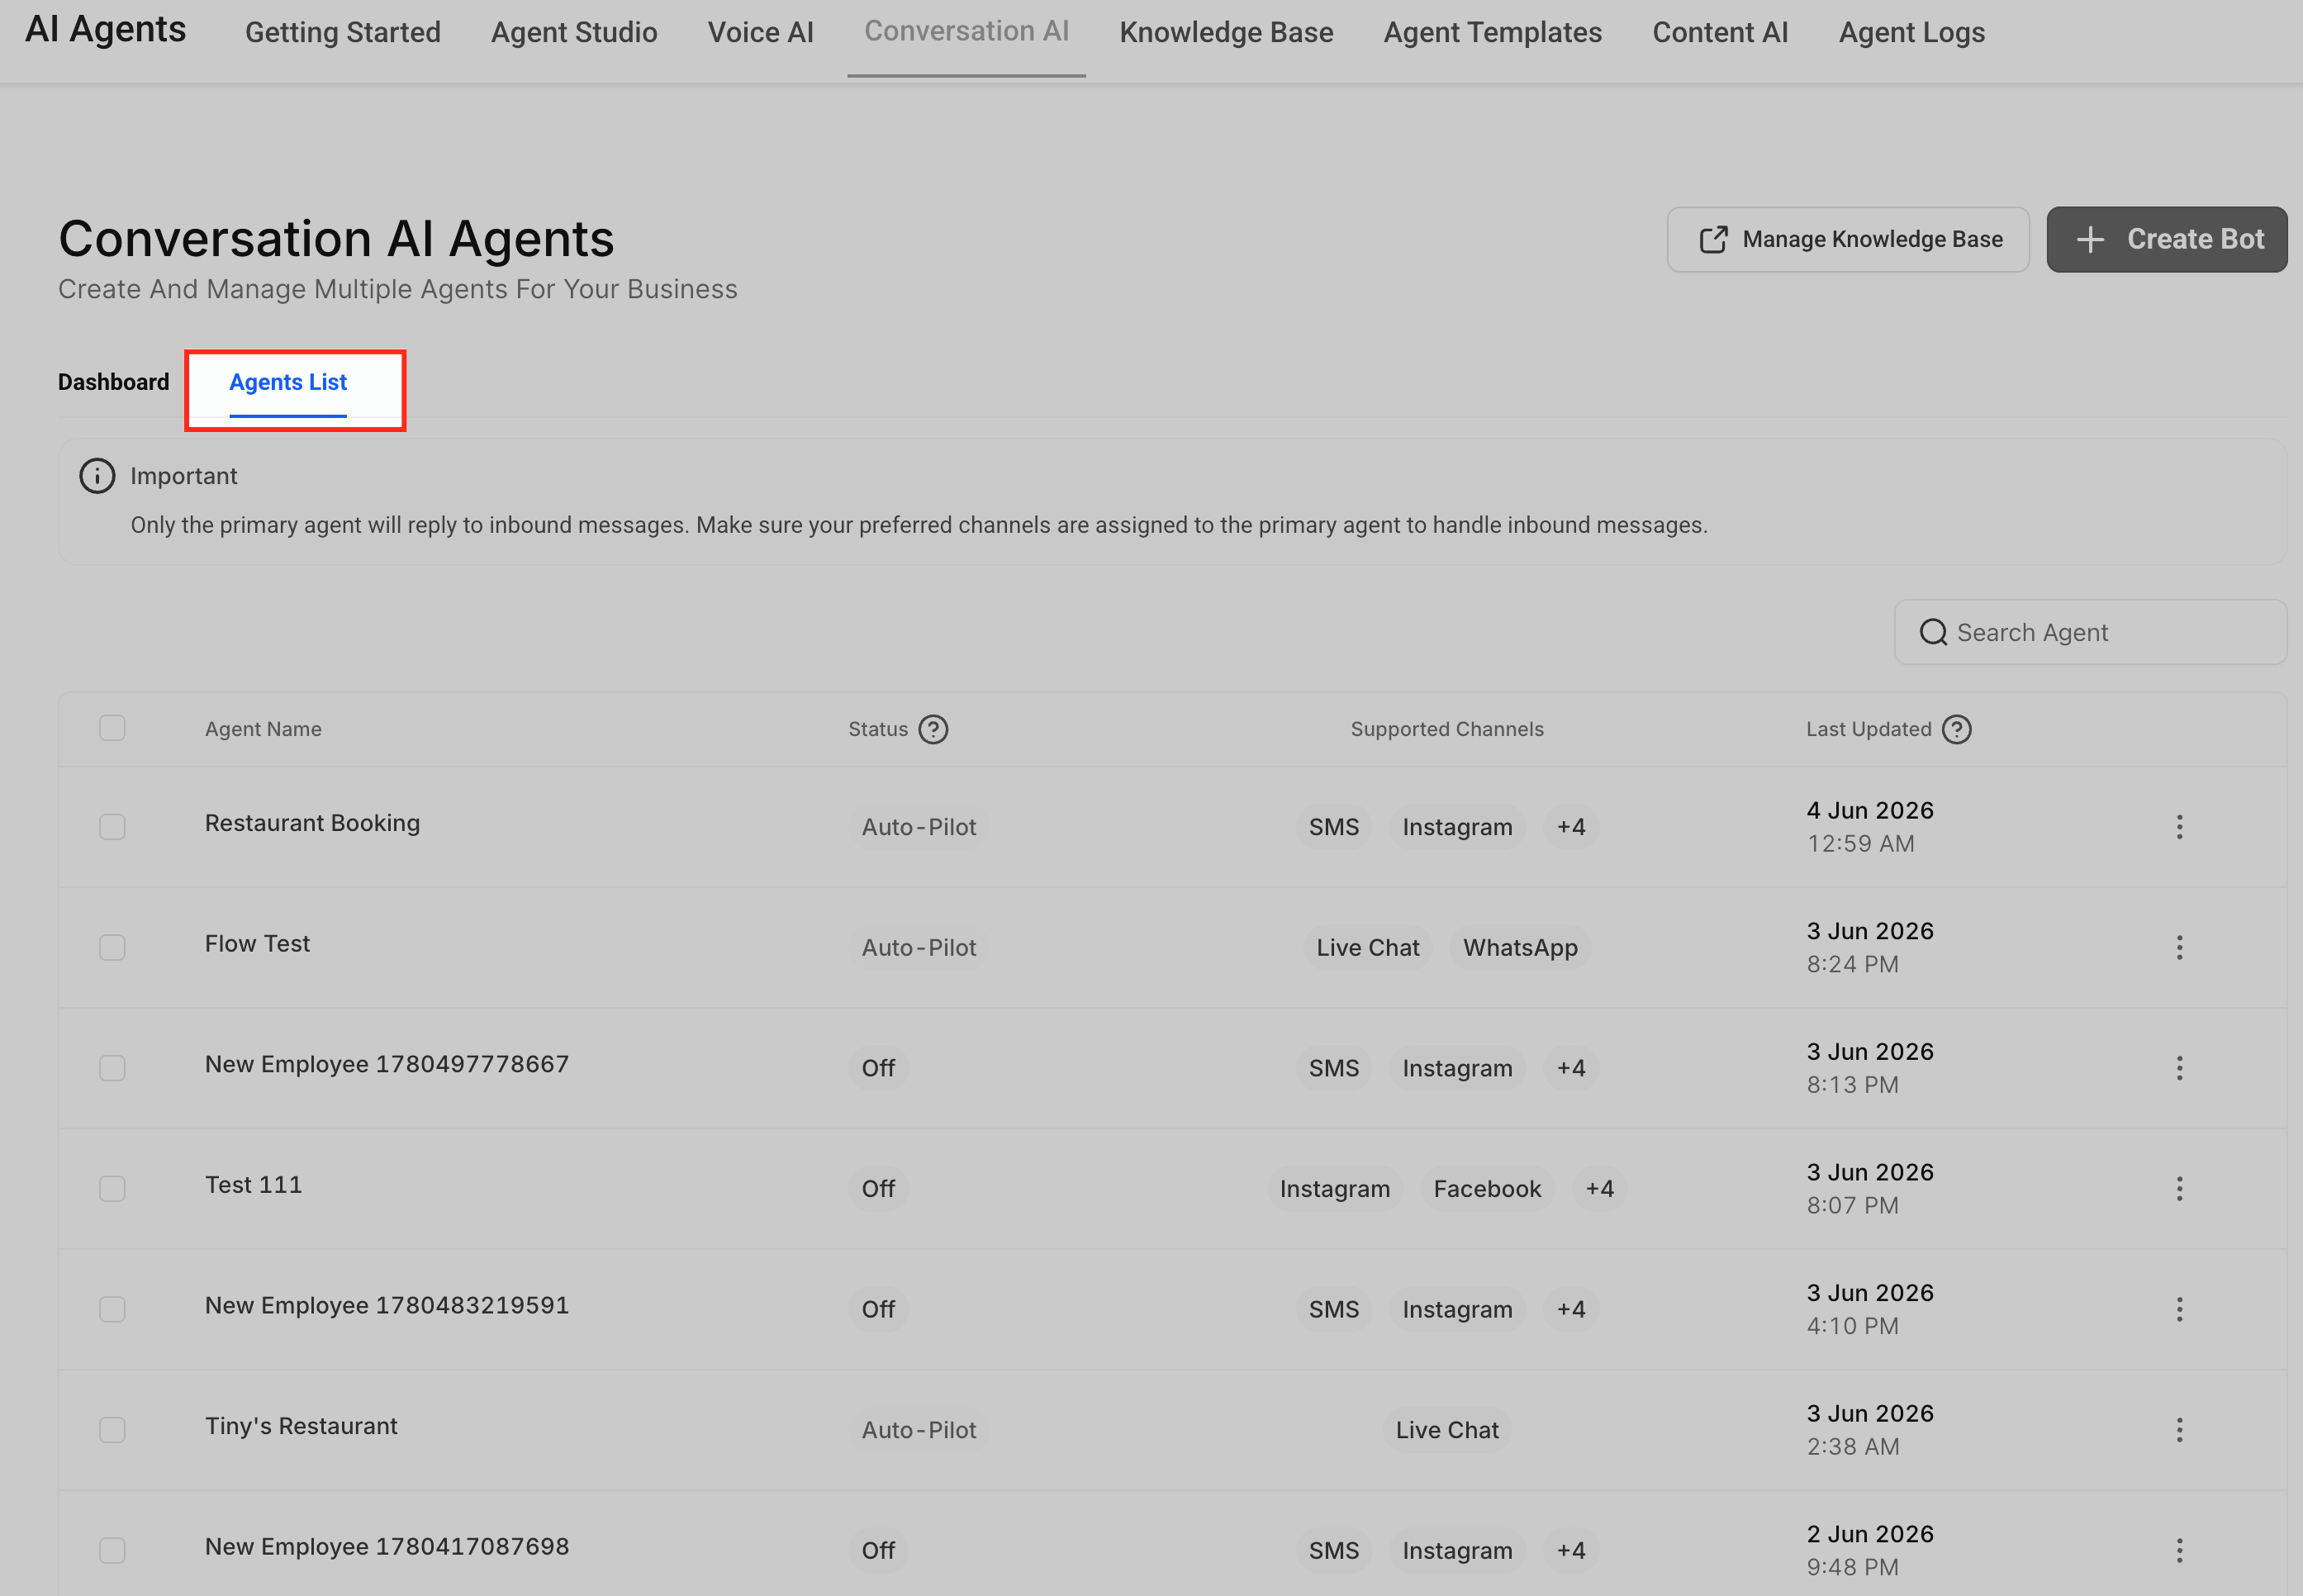
Click Agents List to view your existing agents.
Open or select the agent you want to configure. If you do not have an agent yet, click Create Bot to create one first.
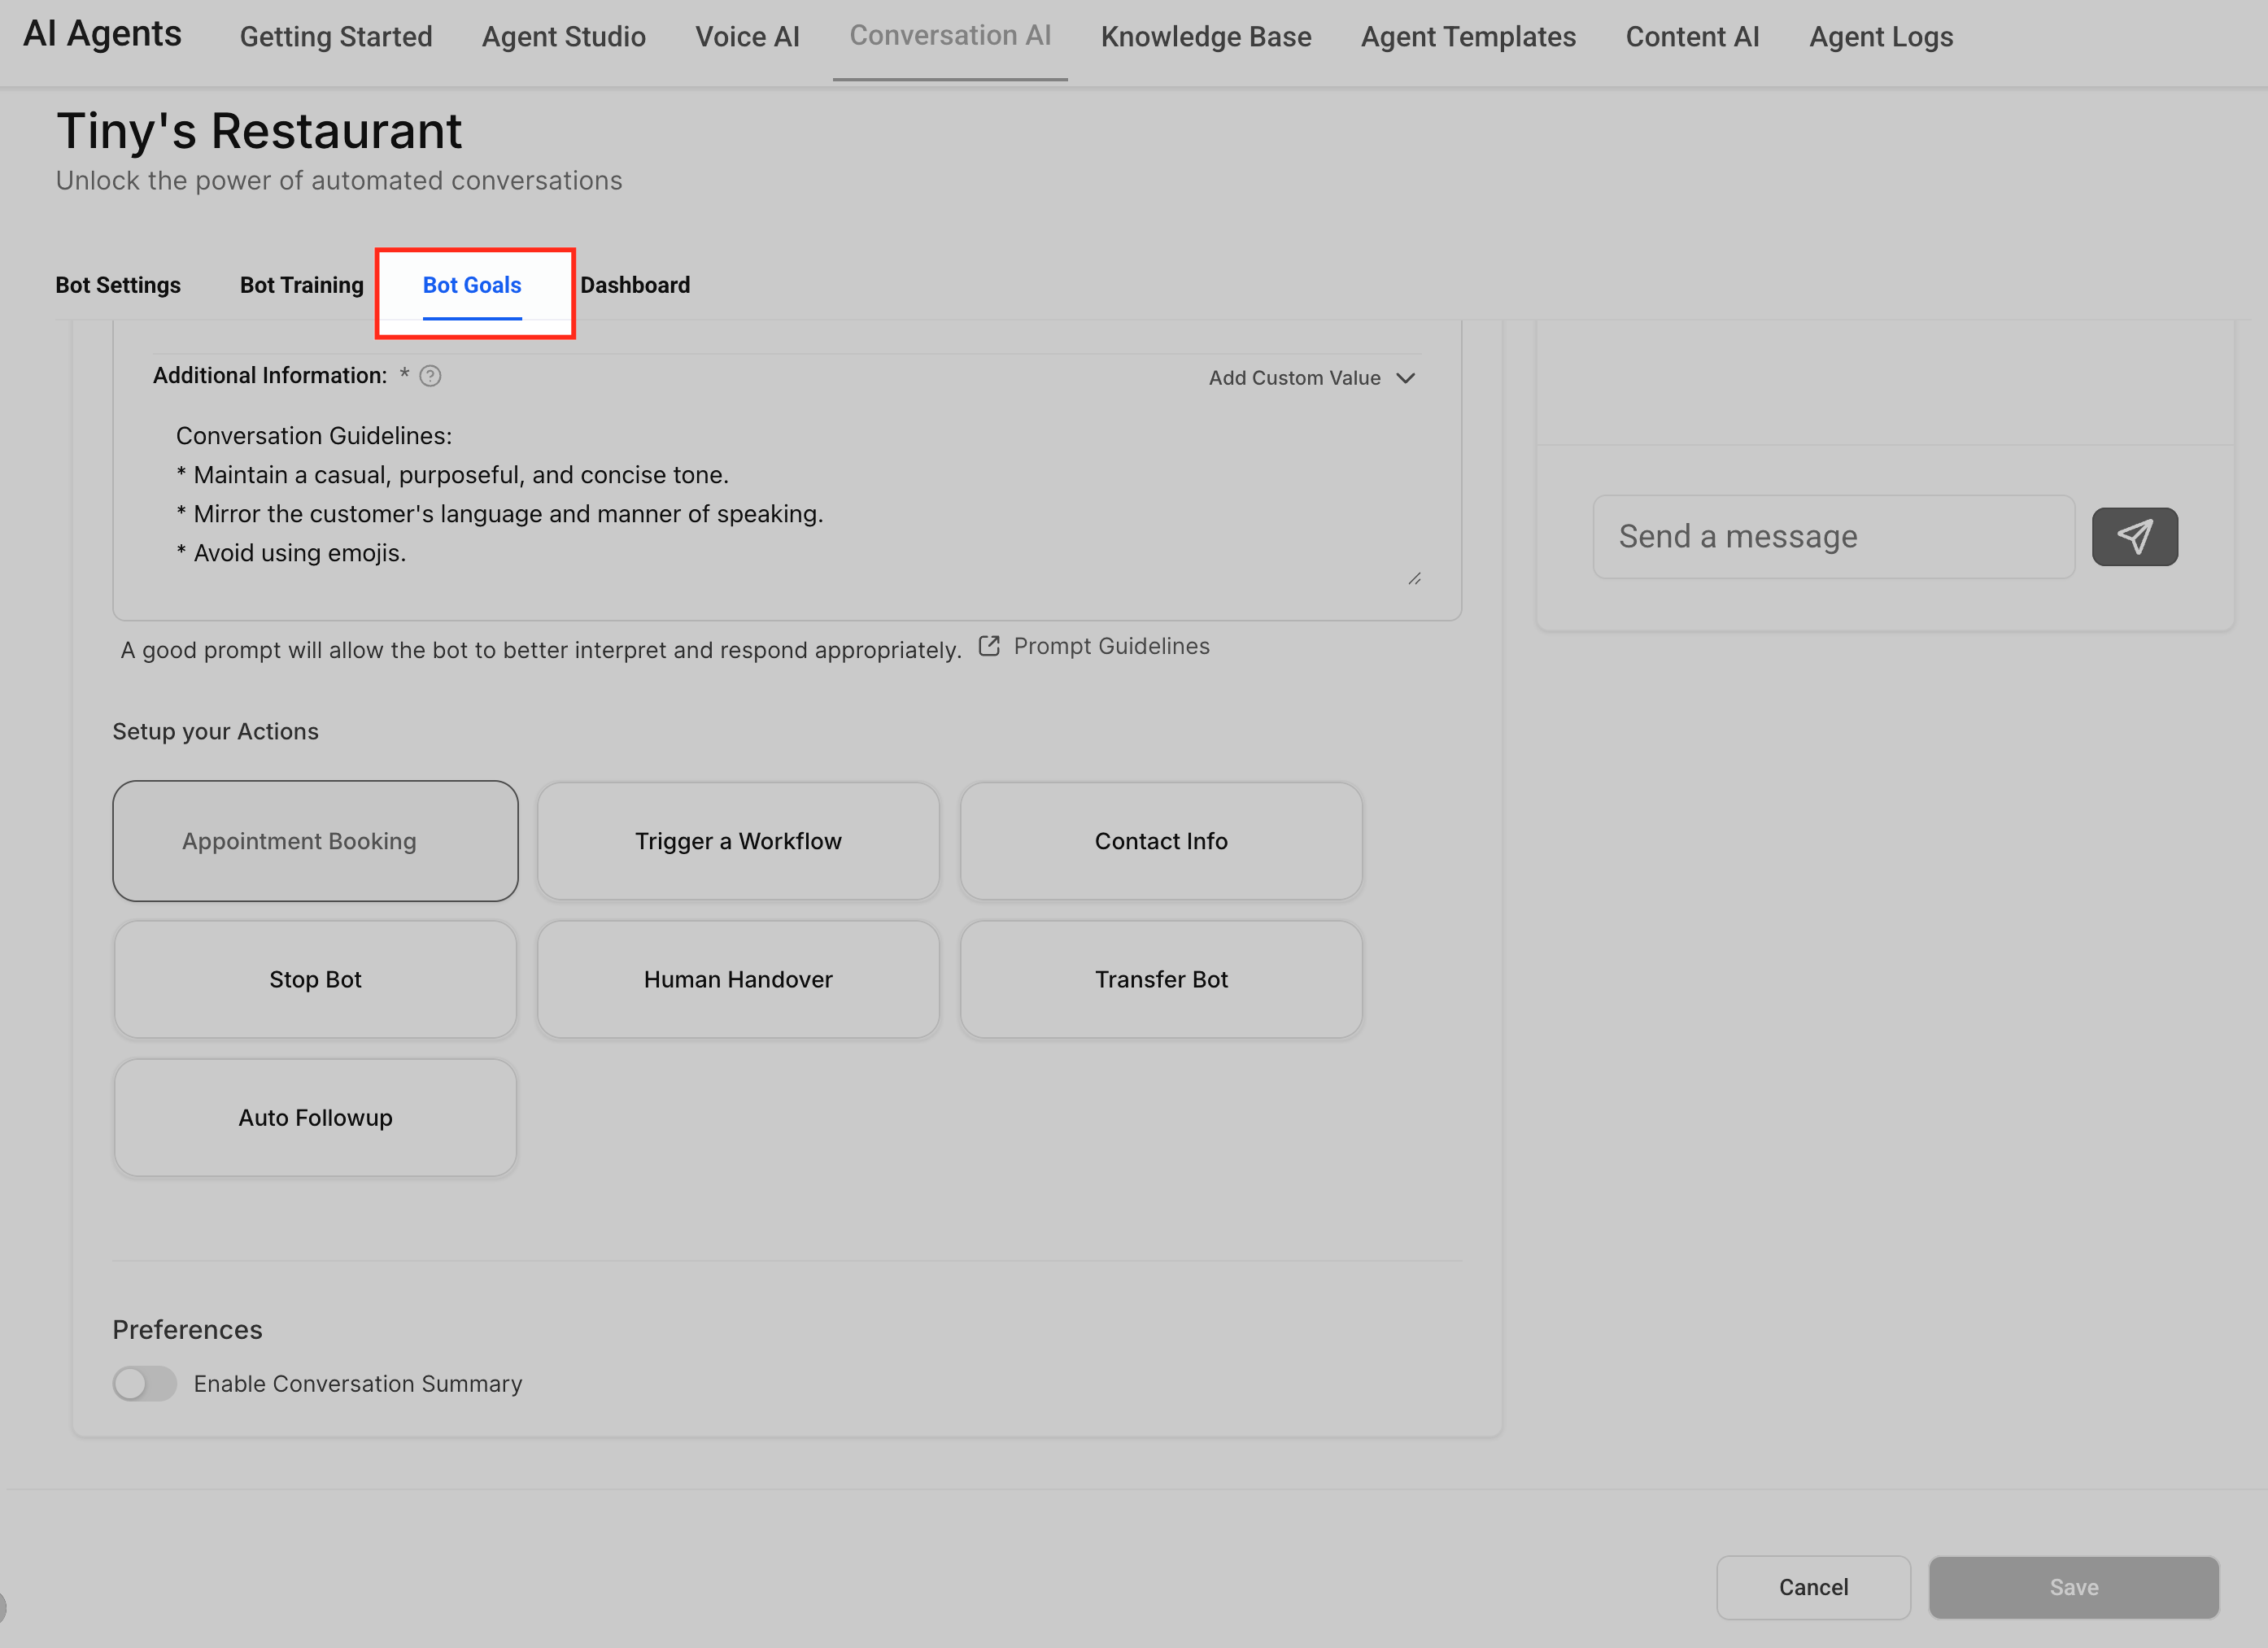
Click the Bot Goals tab.
Selecting the correct agent is important when you have different bots for different locations, channels, services, or use cases.
The Prompt area defines the core behavior of the agent. It combines the agent's personality, goal or intent, and additional information so the agent responds in a way that matches your business and communication style.
The Prompt area may include:
Model selector
Word count or available word limit
Personality
Goal or Intent
Additional Information
Add Custom Value
Prompt Guidelines
Depending on your account or interface version, the primary objective field may appear as Goal or Intent. Both refer to the main outcome the agent should work toward during the conversation.
Personality determines who the agent is and how it should sound during conversations. This helps the agent match your brand's communication style and create a consistent experience for patients.
Use Personality to define tone and role, such as:
Friendly and approachable
Professional and concise
Formal and structured
Enthusiastic and energetic
Warm and knowledgeable
Example:
You are a friendly med-spa booking assistant. Keep responses warm, helpful, and concise.
Goal or Intent defines the agent's primary objective — what it should focus on accomplishing during the conversation.
Use Goal or Intent for outcomes such as:
Capturing and qualifying leads
Booking appointments
Collecting required contact information
Answering general business and service questions
Sharing a resource after qualification
Guiding contacts to the right next step
Example:
Your goal is to guide patients toward booking a consultation at the med spa.
Additional Information gives the agent supporting rules, context, boundaries, and conversation guidelines. This field is useful for explaining how the agent should handle specific situations while working toward its goal.
Use Additional Information for instructions such as:
Ask one question at a time.
Maintain a casual, purposeful, and concise tone.
Mirror the patient's language and manner of speaking.
Avoid using emojis.
Do not guess when the answer is unavailable.
Let the patient know a team member can help when human review is needed.
Example:
Ask one question at a time. If the answer is not available in training content, do not guess. Let the patient know a team member can help.
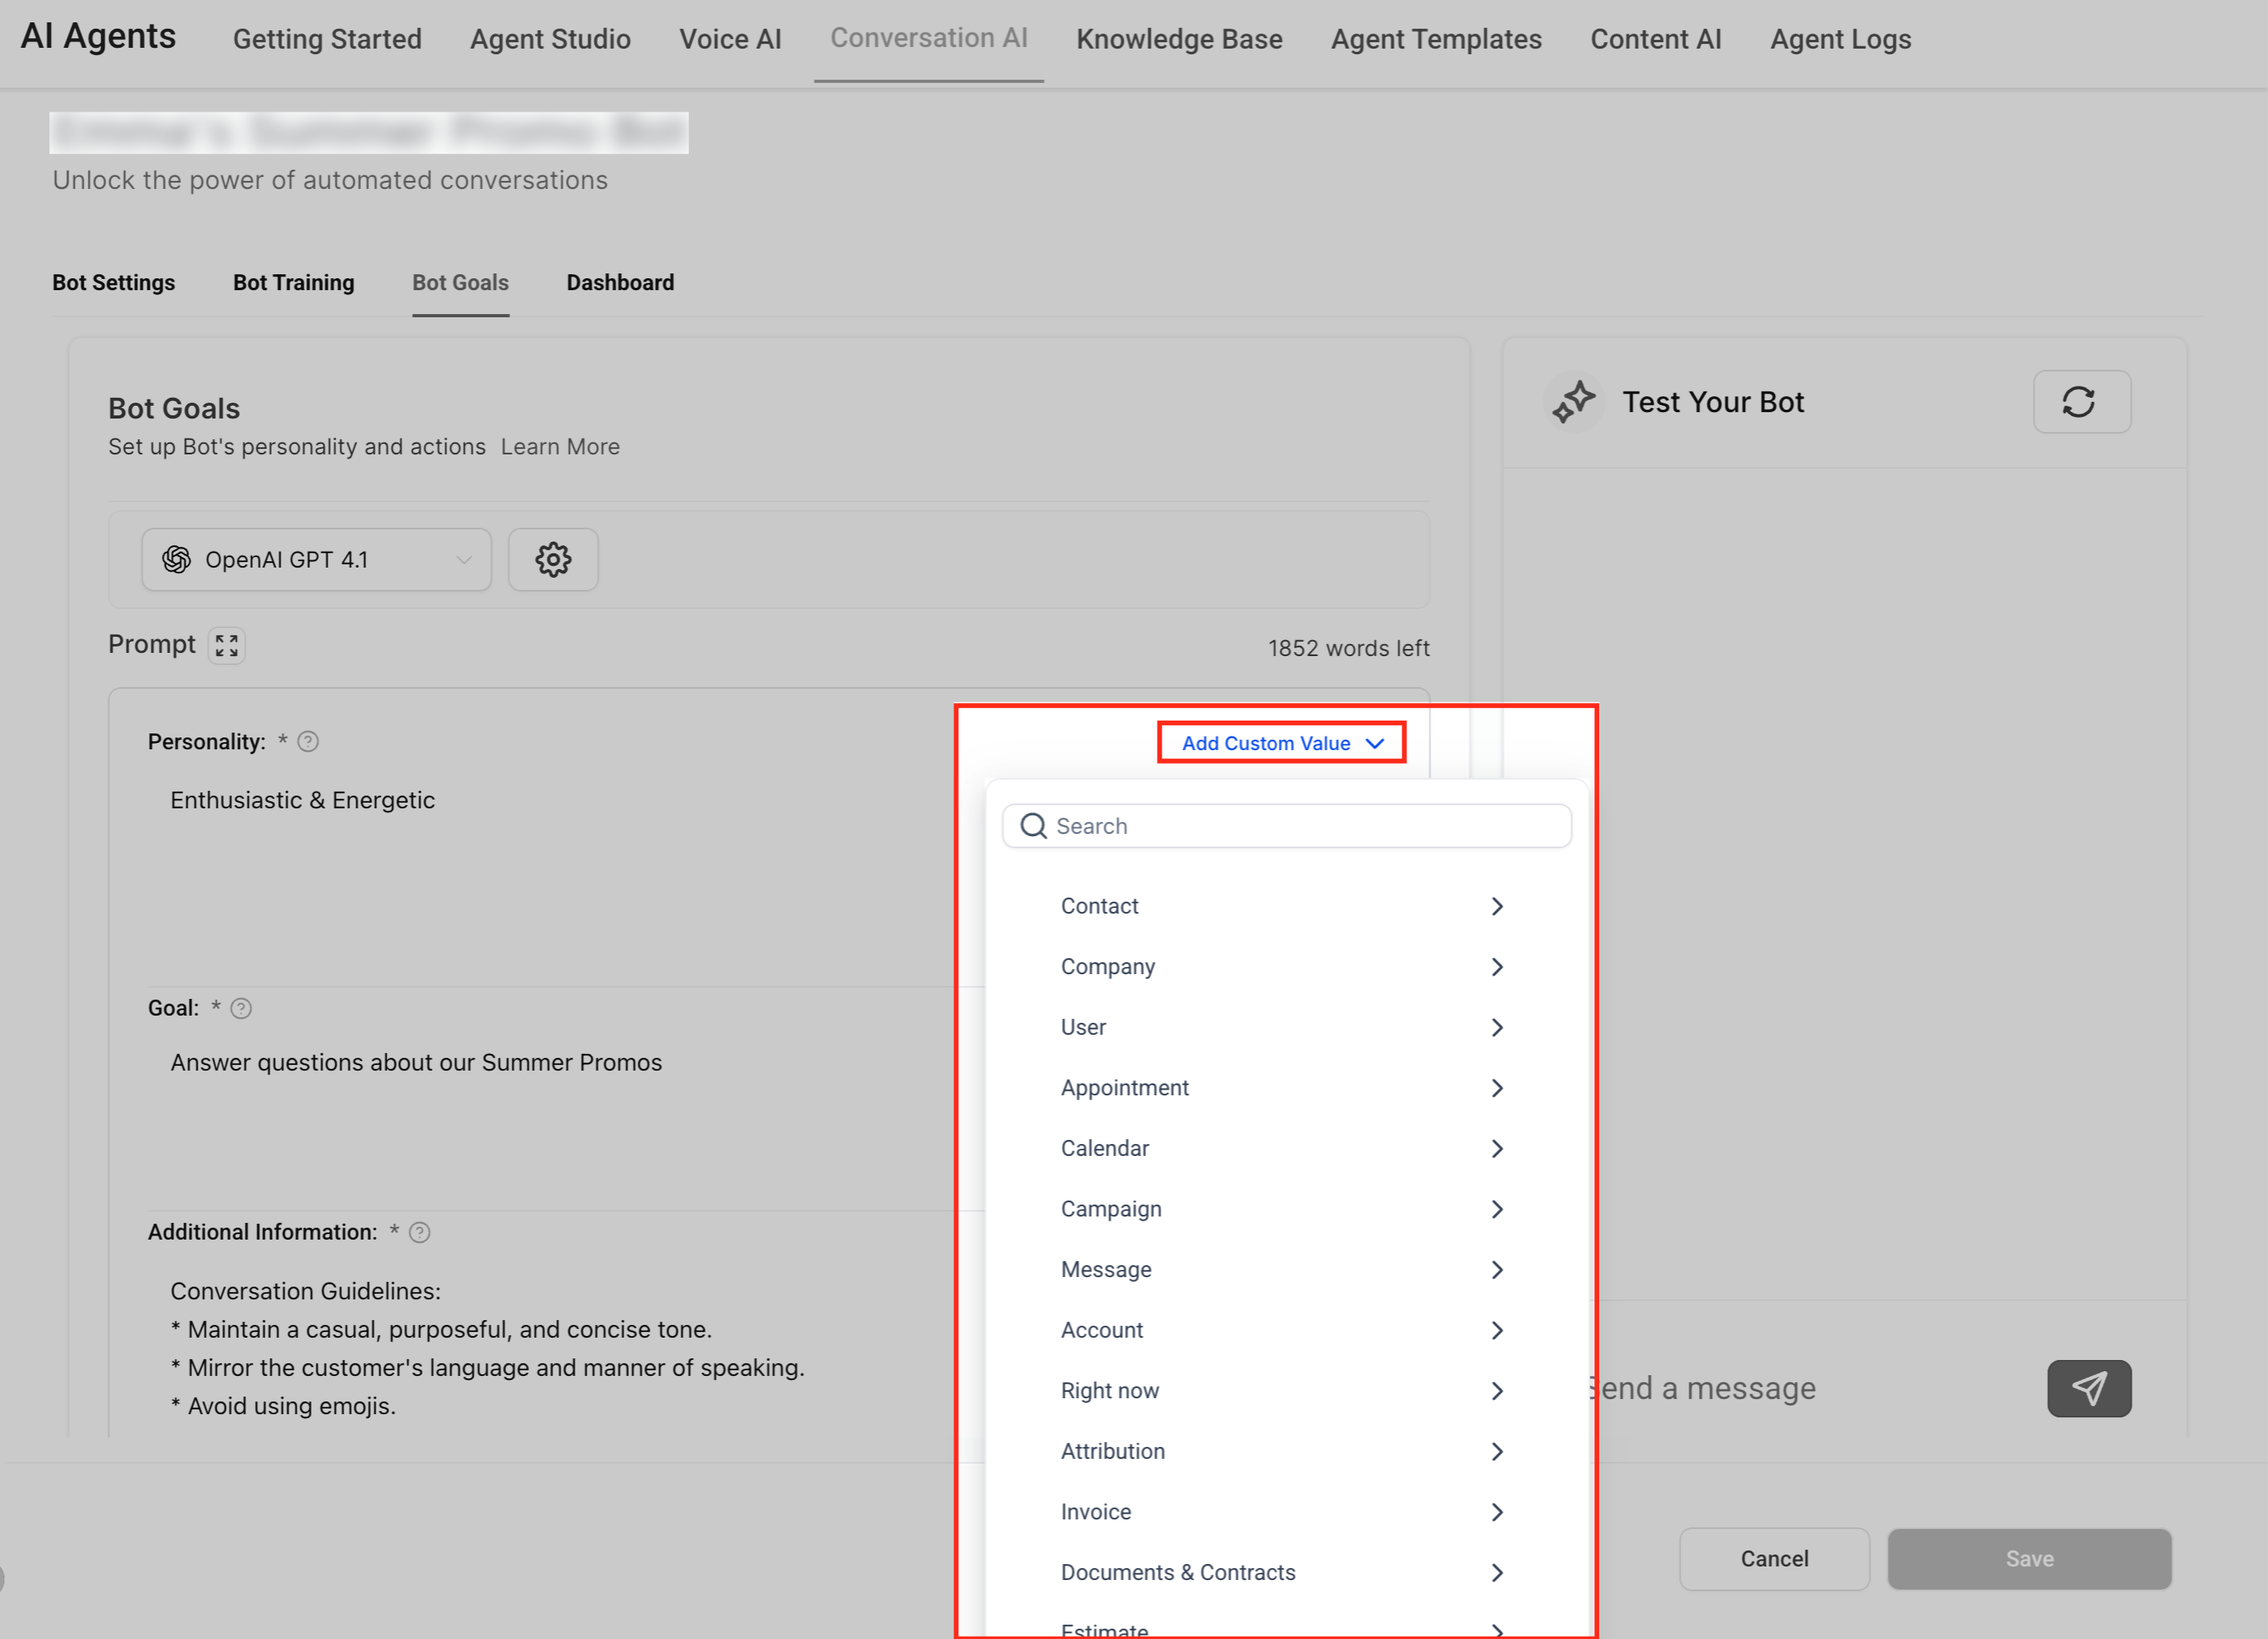
Add Custom Value lets you insert dynamic account, contact, or business information into the prompt. This personalizes the agent's instructions without manually typing the same information each time.
Custom values are useful when you want the prompt to reference available information such as the business name, contact details, assigned user, or other supported values in the account.
Example:
You are a bot for {{ai.business_name}}, tasked to assist patients.
Pro Tip: Avoid including detailed calendar slot information directly in the prompt. Calendar availability should come from the booking configuration, not static prompt text. Adding specific slot details to prompts can cause inaccurate responses if availability changes.
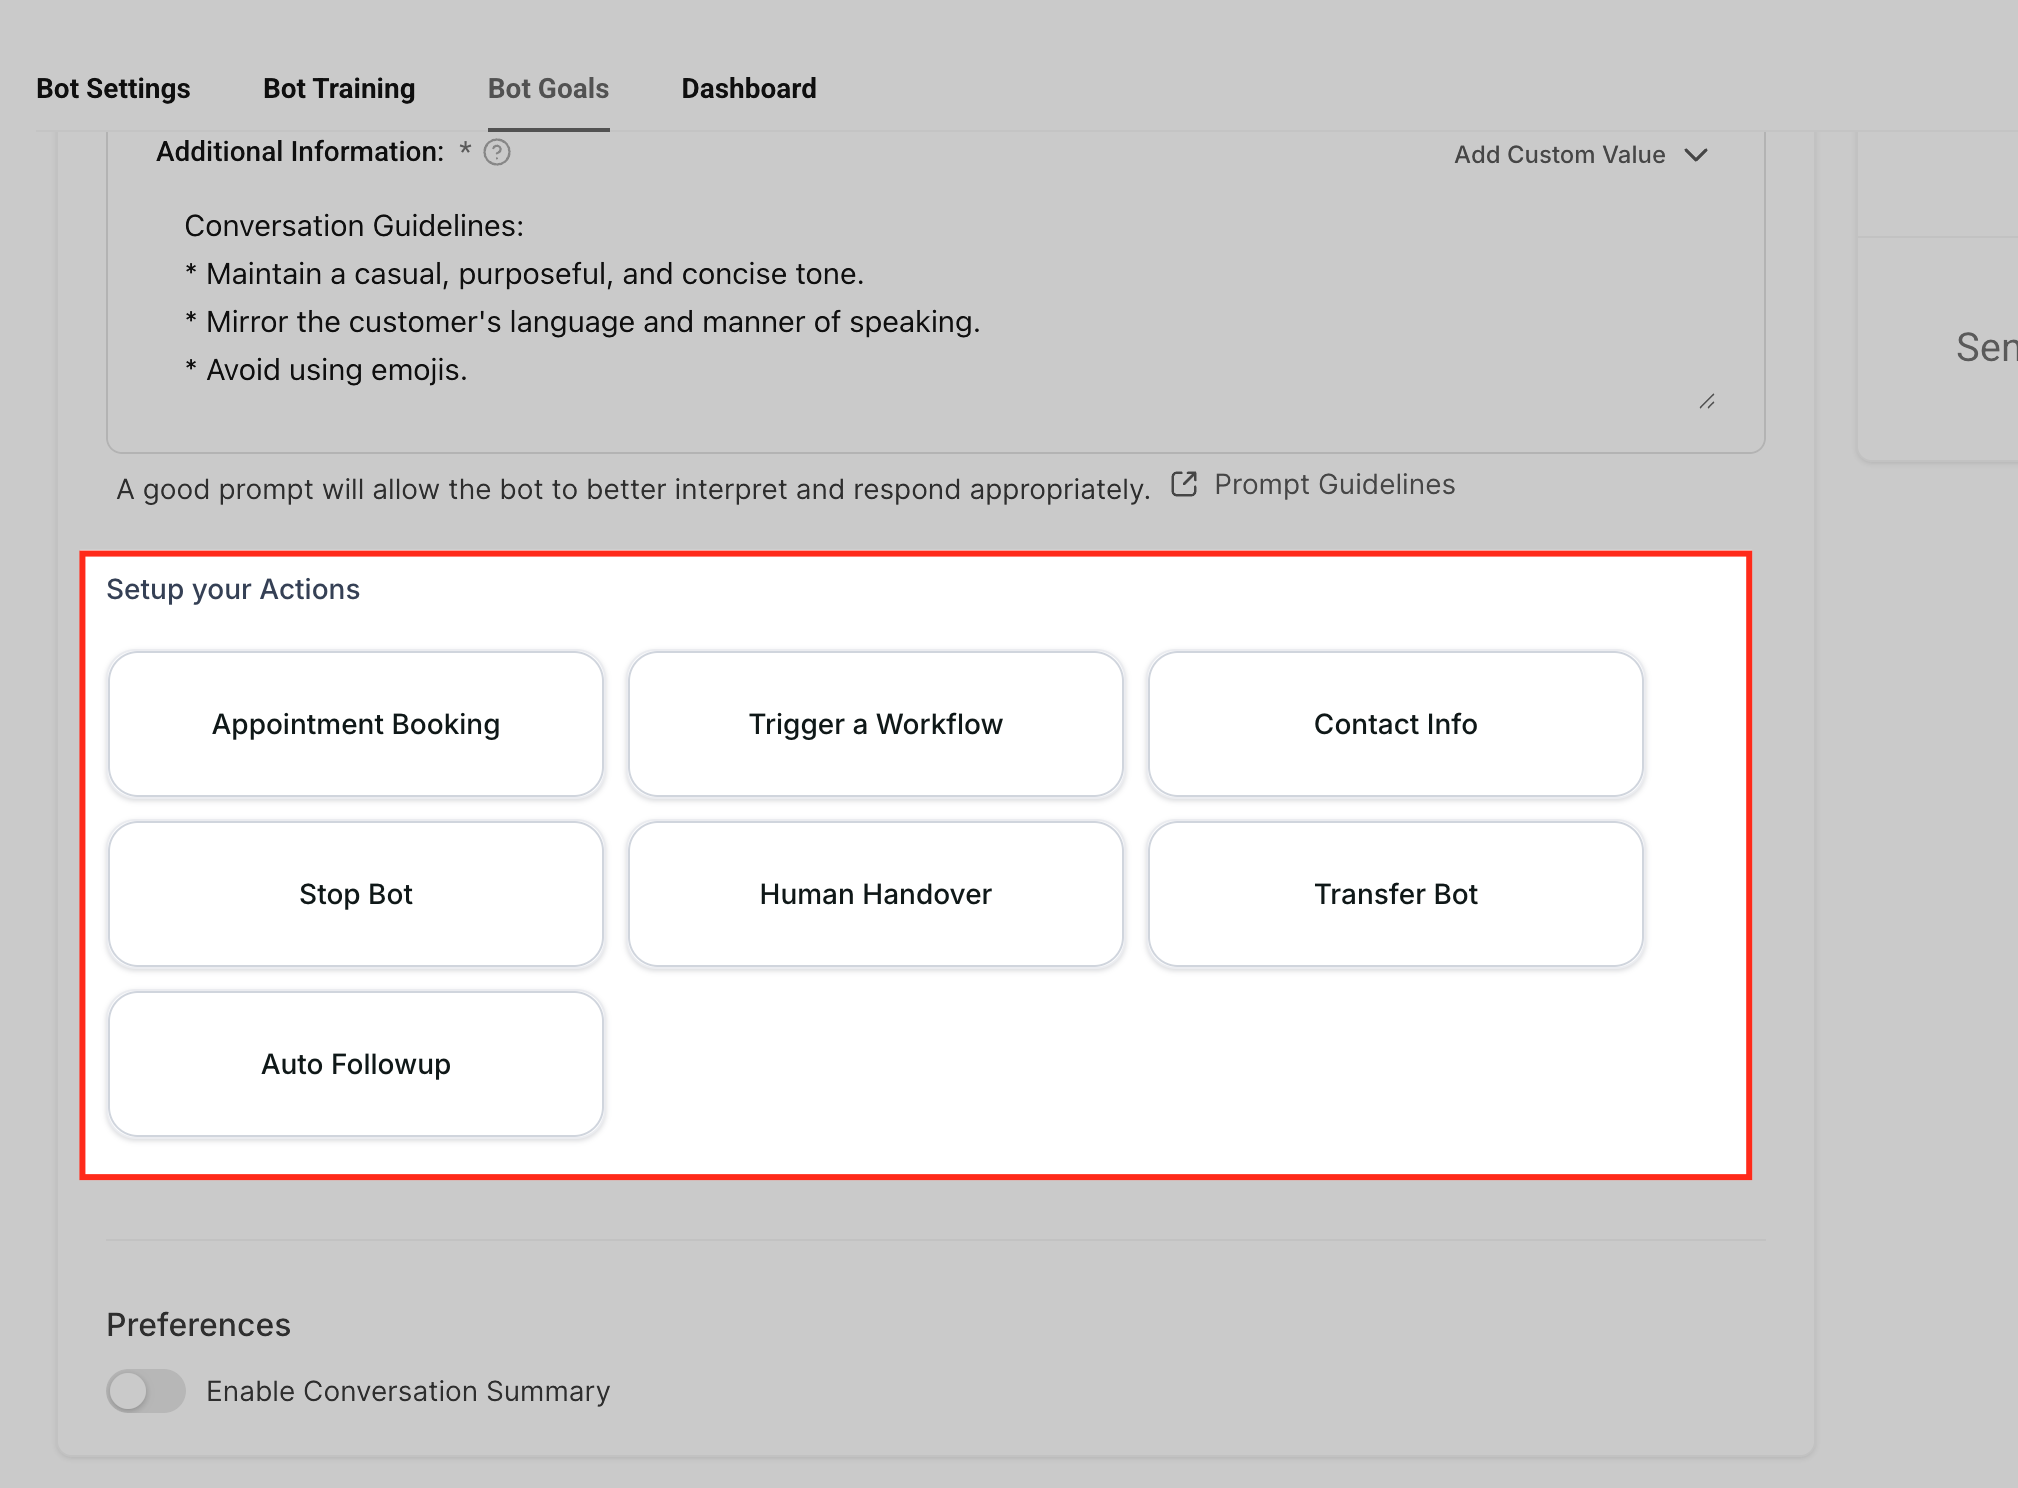
The Setup your Actions area contains the actions the agent can perform during or after a conversation. These actions move the conversation from response handling into practical next steps, such as booking, automation, contact updates, or handoff.
Available actions may vary by account, configuration, or release status. Common actions include:
Appointment Booking
Trigger a Workflow
Contact Info
Human Handover
Stop Bot
Auto Followup
Transfer Bot
Appointment Booking helps the agent move patients from conversation to scheduling. This is useful when the goal is to book a consultation, treatment, follow-up visit, or other calendar-based appointment.
Before enabling this setting, make sure the calendar you want to use is already configured. Booking behavior may depend on calendar availability, routing, and appointment settings.
Use Appointment Booking when the agent should:
Identify that the patient wants to schedule.
Collect required booking details.
Guide the patient toward available appointment options.
Help convert the conversation into a booked appointment.
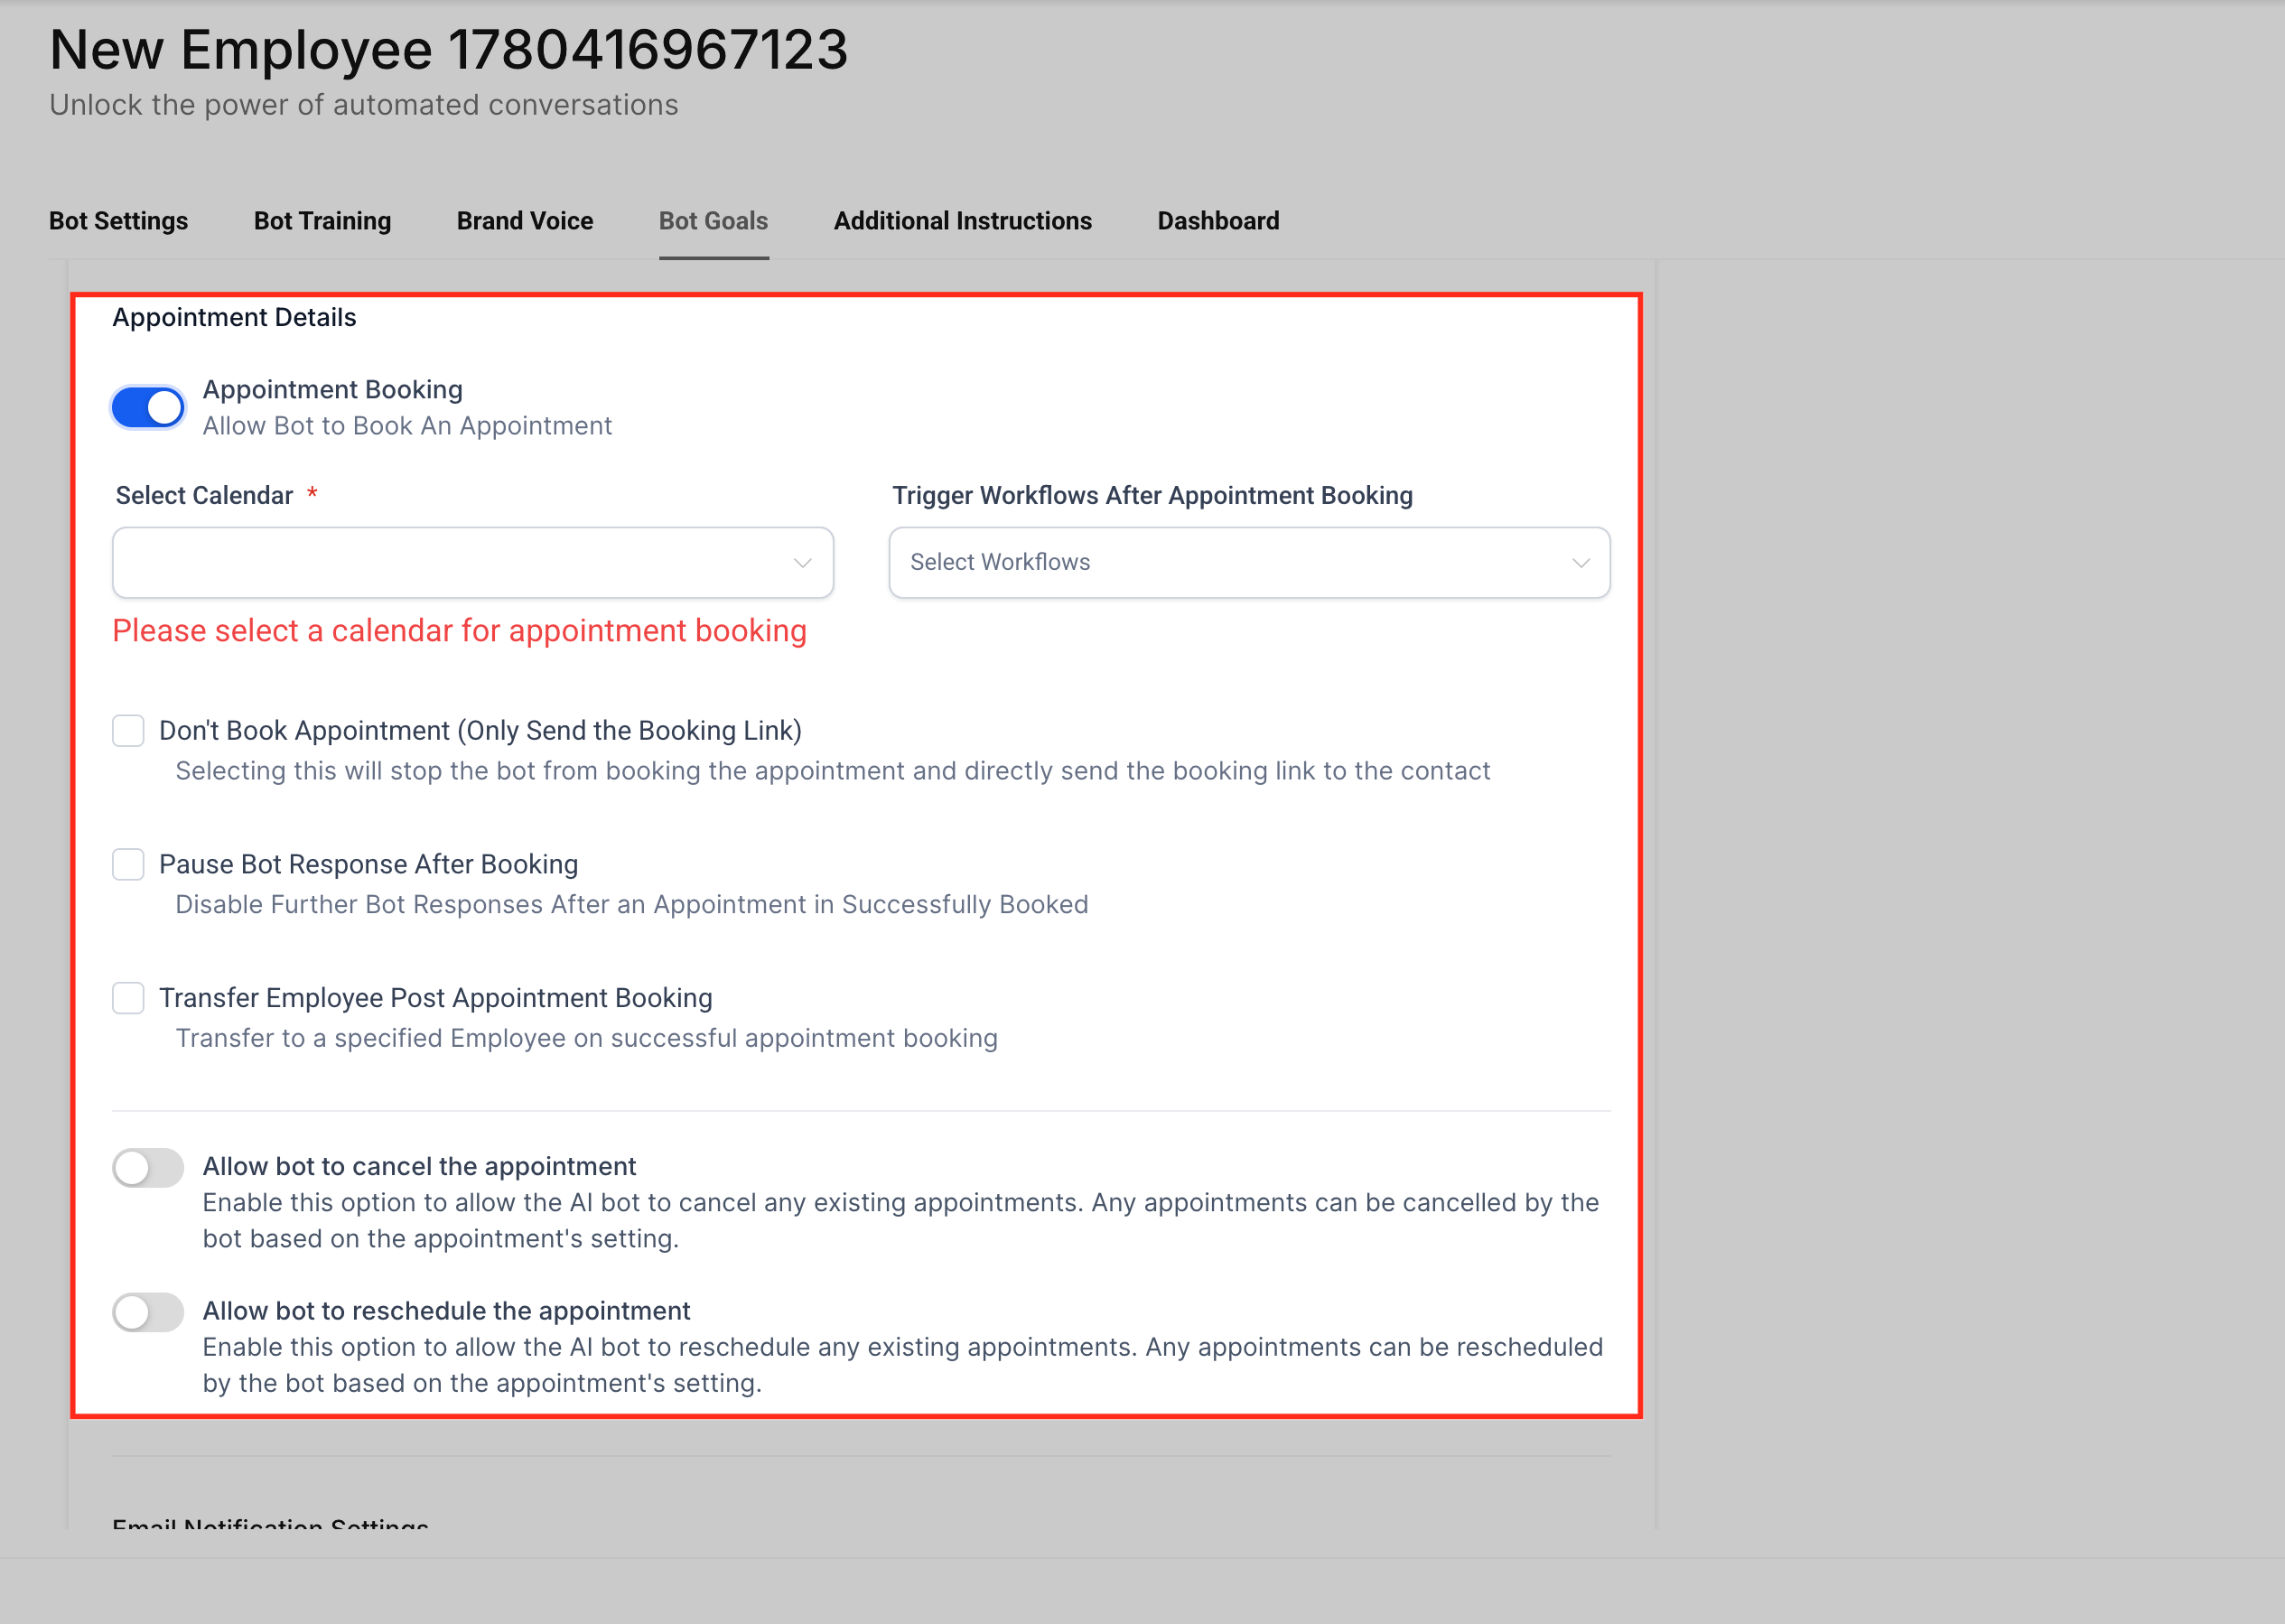
Appointment Booking may include options such as:
Pick a calendar: Select the calendar the agent should reference for available slots and booking.
Send booking link only: Send the calendar booking link instead of booking directly in the conversation.
Pause bot responses after booking: Stop further bot responses once an appointment is successfully booked.
Trigger workflow after booking: Start a selected workflow after a successful booking.
Transfer employee or bot after booking: Transfer the conversation after the appointment is booked, depending on available configuration options.
Trigger Workflow allows the agent to start a workflow when the conversation meets a defined condition. This connects AI conversations to follow-up automation, internal notifications, lead routing, tagging, pipeline updates, or other workflow actions.
Before connecting a workflow to the agent, create and configure the workflow you want the bot to trigger. The agent can only trigger workflows that are available and properly set up in the account.
Common use cases include:
Trigger a sales follow-up workflow when a patient asks for pricing.
Trigger a support workflow when a patient asks for help.
Send an internal notification when the agent identifies an urgent or high-value request.
Start a lead qualification workflow after required information is collected.
Add a tag or update a contact after a specific conversation outcome.
Move a contact into a pipeline stage after the agent identifies interest.
Contact Info allows the agent to collect missing contact details and save them to selected contact fields. This is useful when the agent needs to gather information such as a business name, date of birth, service preference, or other custom details.
Contact Info is best used when the selected contact field is empty. It is not intended to overwrite existing contact field values. See the Add Contact Info Action section below for full setup steps.
Some accounts include additional actions that control how the agent hands off, pauses, continues, or transfers a conversation. These help manage the conversation after the agent identifies that another process or responder should take over.
Human Handover: Route or hand off the conversation when human review is needed.
Stop Bot: Stop the bot from continuing the conversation in specific scenarios.
Auto Followup: Continue follow-up based on configured behavior.
Transfer Bot: Move the conversation to another bot or specialized agent.
Use these actions when the conversation should no longer be handled in the same way by the current agent. Availability and behavior may vary based on account configuration.
Information Collection controls which details the agent should ask for during the conversation. These details help qualify patients, complete missing contact records, and give your team better context before follow-up.
Common standard fields include:
Name
Phone
Street Address
City
You can also add custom questions or objectives when the agent needs to collect information specific to your process, for example:
Ask what service the patient is interested in.
Ask for the preferred appointment day.
Ask whether the patient is a new or returning patient.
Ask for the reason for the visit before scheduling a consultation.
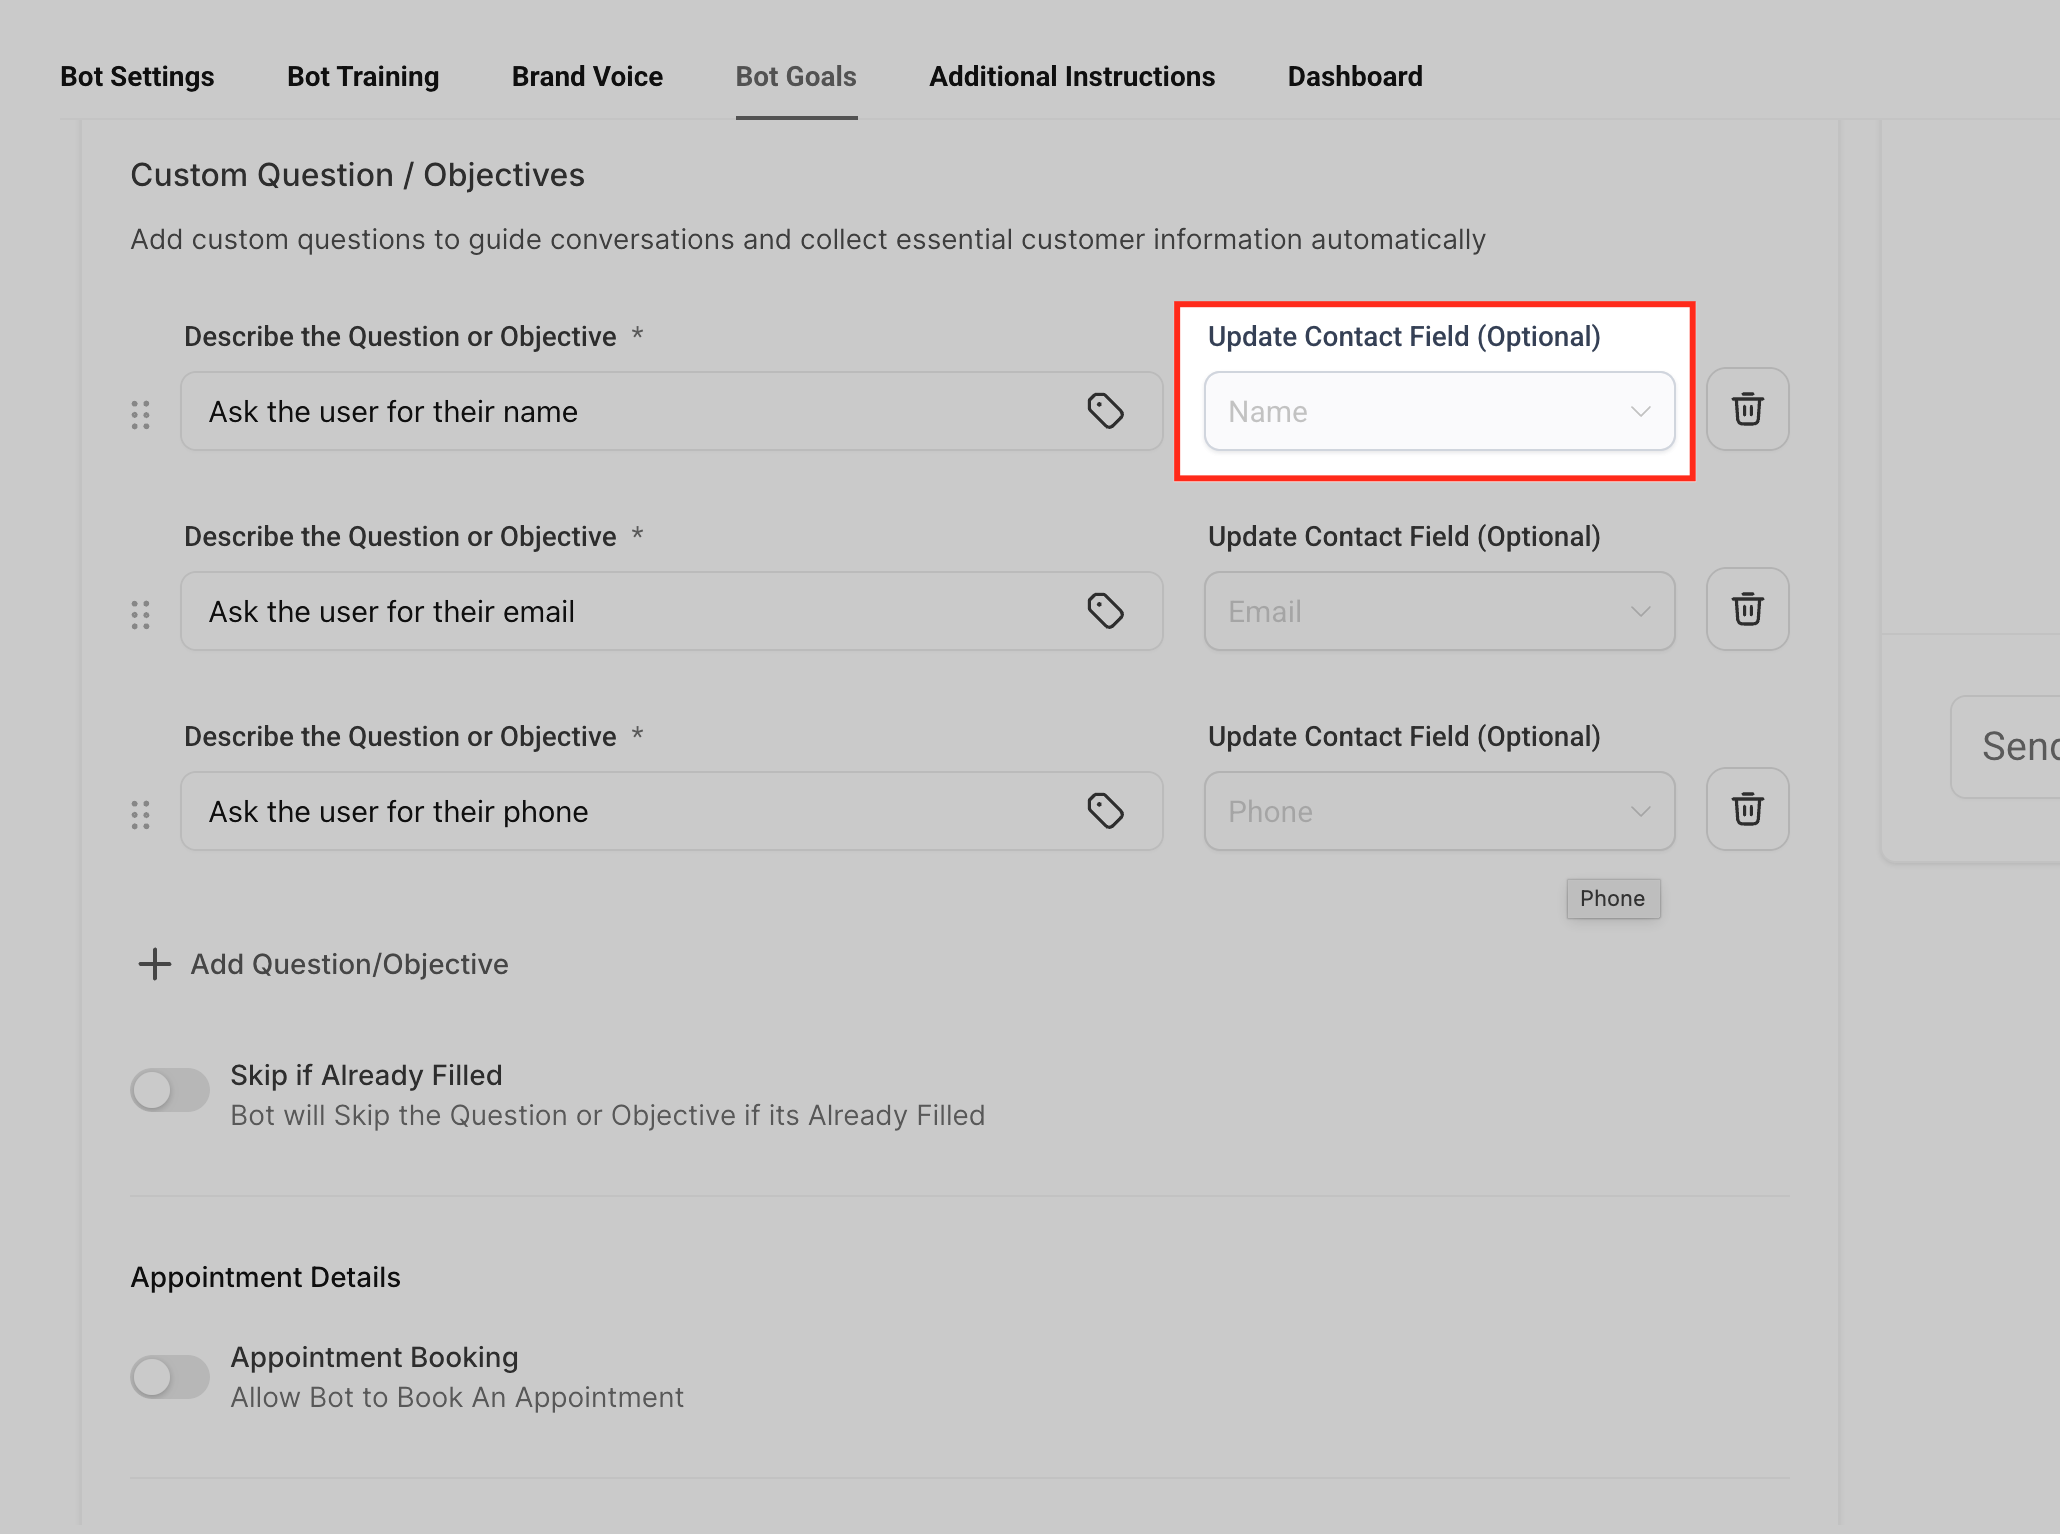
Update Contact Field mapping controls where each collected answer is saved on the contact record. Mapping each question to the correct field keeps contact records accurate and makes the information available for follow-up, workflows, and reporting.
Add or select the question/objective.
Open Update Contact Field.
Choose the field where the answer should be saved.
Confirm the selected field matches the type of information being collected.
Test the bot to confirm the answer updates the correct contact field.
Example: If the agent asks, "What city are you located in?", map the answer to the City contact field.
Important: If a question is not mapped to a contact field, the agent may still ask the question, but the answer may not automatically update the intended contact record field.
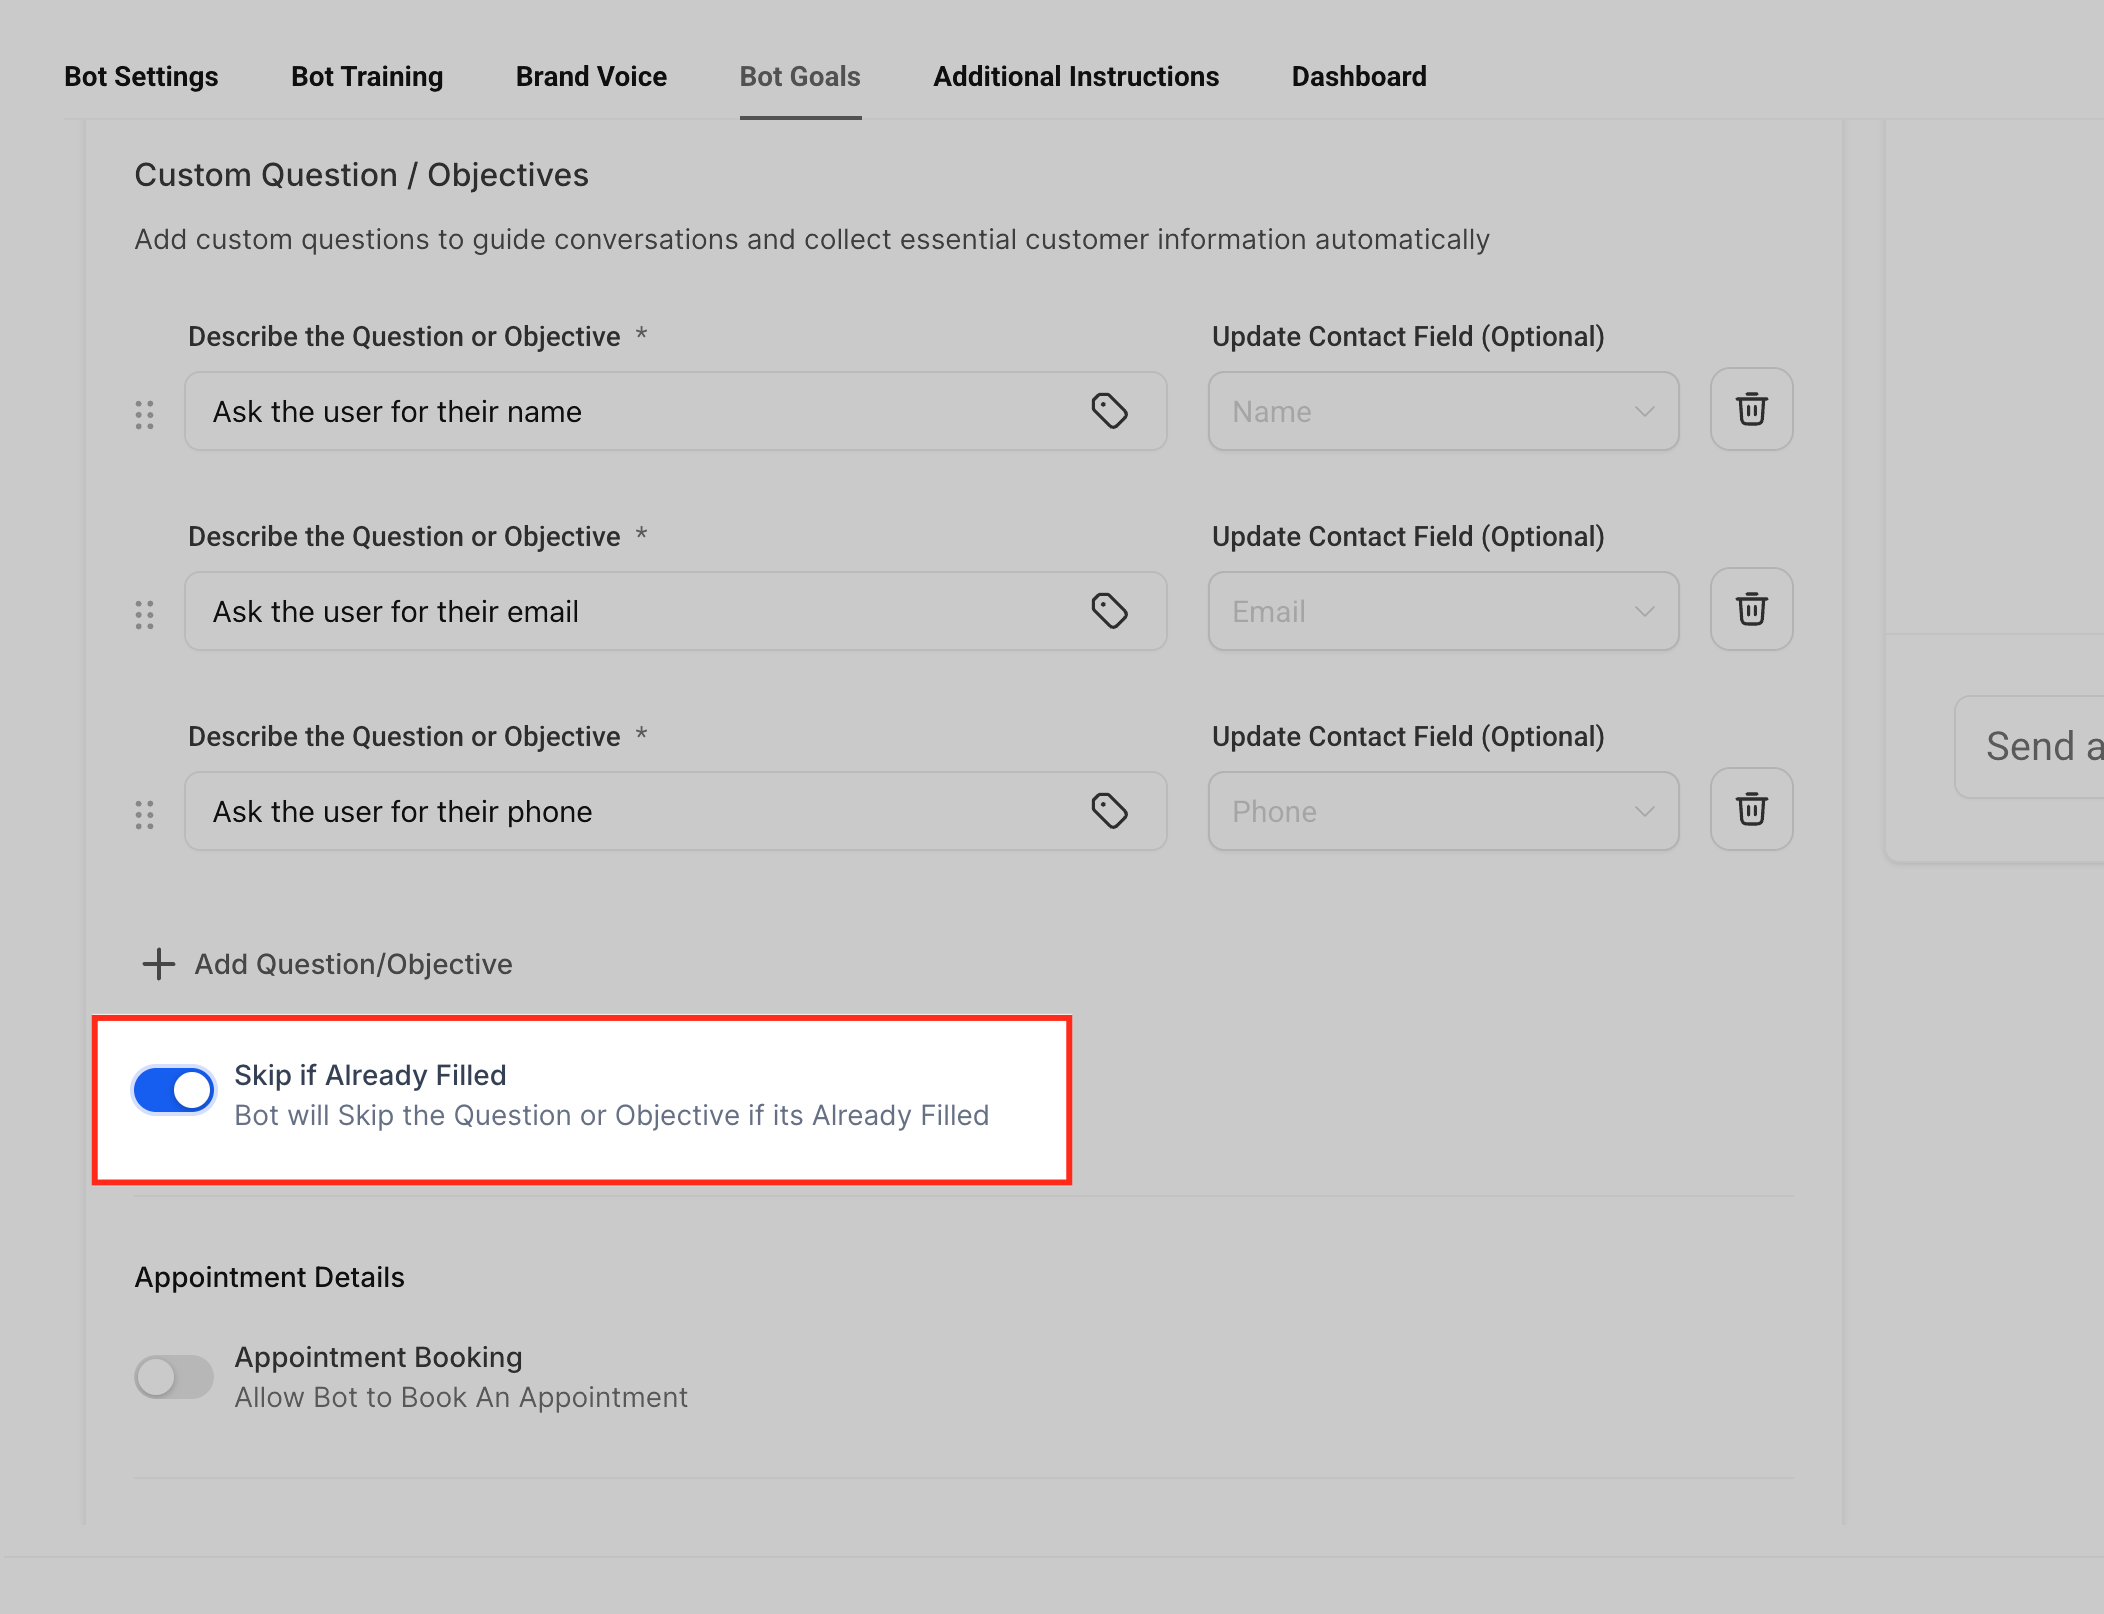
Skip if Already Filled prevents the agent from asking for information that already exists on the contact record. This keeps conversations smoother and avoids asking patients to repeat details they have already provided.
Use this setting for fields such as name, email, phone number, address, or any other mapped field that may already be saved.
Example: If a patient already has an email address saved, the agent can skip the email question and continue to the next missing detail or objective.
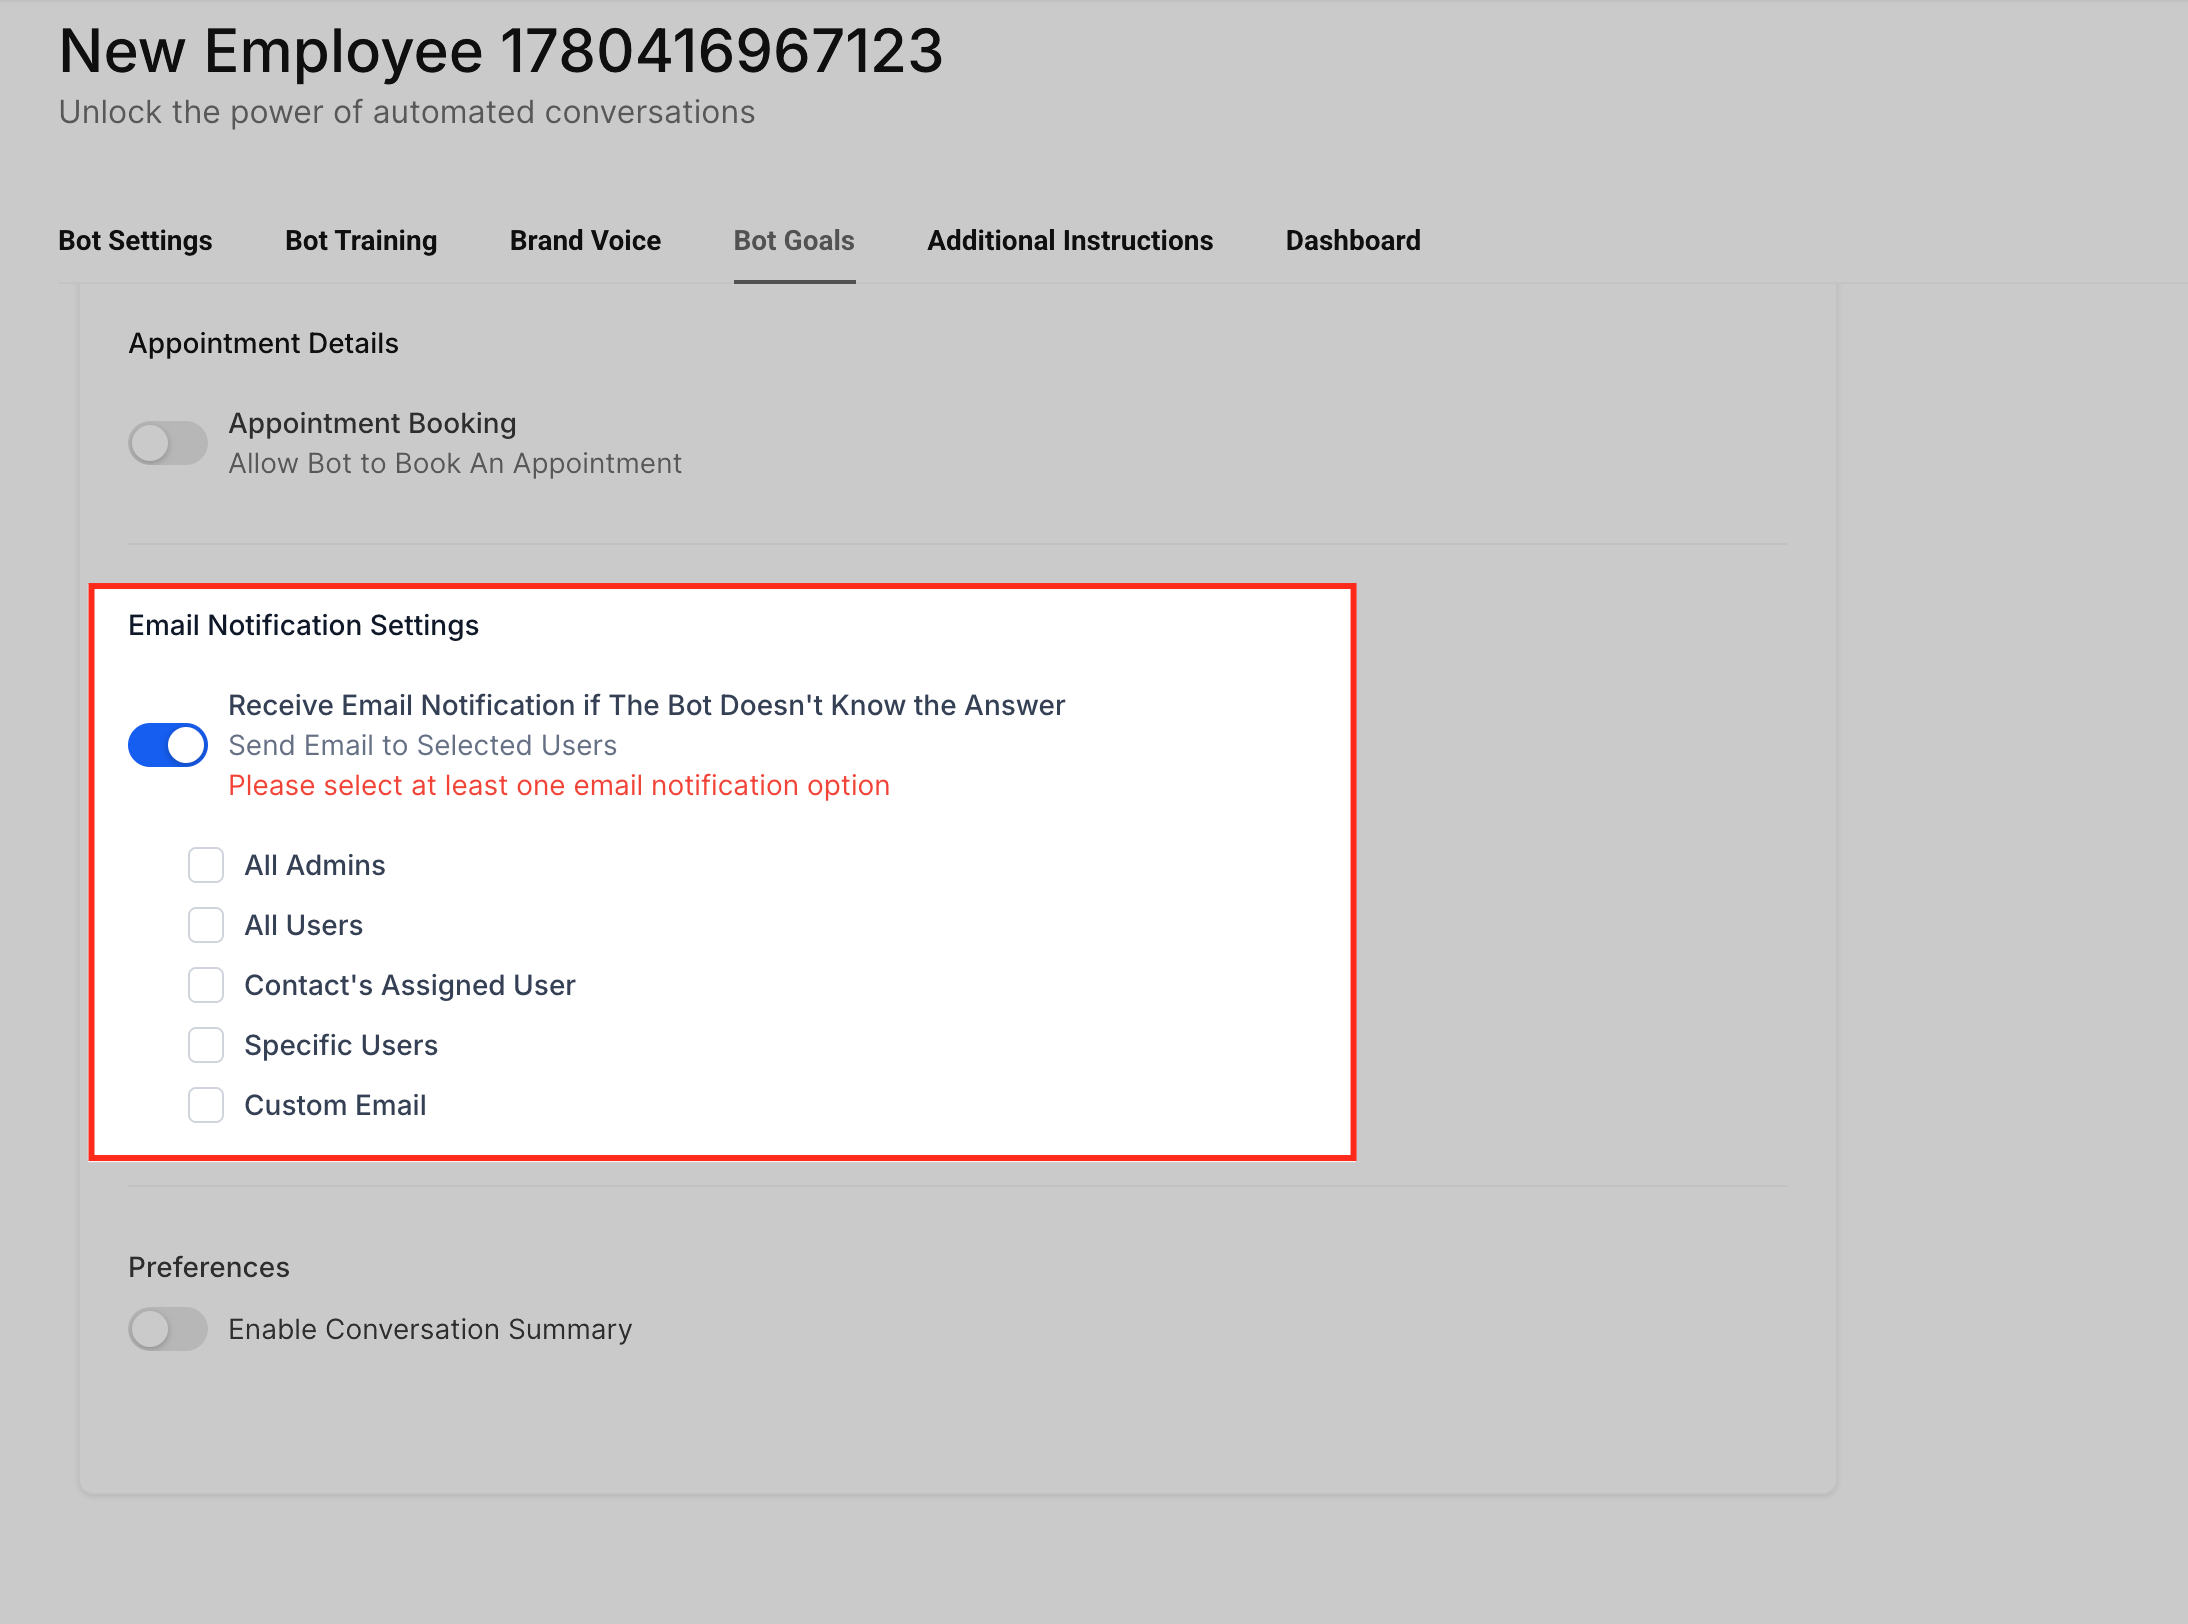
Email Notification Settings alert your team when the agent cannot answer a question or when a conversation may need human review. These notifications help prevent missed questions and identify gaps in bot training.
Examples:
Notify a support inbox when the agent does not know the answer.
Alert a team member when a sensitive or high-value question is asked.
Review unanswered questions and add better training content later.
Conversation summaries help your team quickly understand what happened during a bot-handled conversation — the patient's request, collected details, and next steps — without reading the full thread.
Enable Conversation Summary when your team needs fast context for follow-up, handoff, review, or performance monitoring. This is especially helpful when a team member takes over after the bot conversation.
These settings guide the agent to ask the right questions, save important answers to the correct contact fields, and take follow-up actions such as booking an appointment, triggering a workflow, or notifying your team. Review each setting carefully before saving so the agent's behavior matches the outcome you want.
1. Go to Conversational AI
Navigate to AI Agents > Conversational AI. This is where Conversational AI agents are created and managed. Each agent can have its own goals, training, channels, and behavior settings.
2. Open the Agents List
Click Agents List to view your existing agents. Since Bot Goals are configured per agent, changes made here only apply to the selected agent.
3. Select an agent
Click the agent you want to configure. If you do not have an agent yet, click Create Bot to create one first. Selecting the correct agent is important when you have different bots for different locations, channels, services, or use cases.
4. Open the Bot Goals tab
Inside the agent editor, click Bot Goals. This is where you define what information the agent should collect and which actions it should take after identifying the patient's intent or needs.
5. Configure Information Collection
In the Information Collection area, choose the standard fields the agent should collect, such as name, email, phone, street address, or city. These fields are commonly used for lead qualification, appointment booking, follow-up, and support handoff.
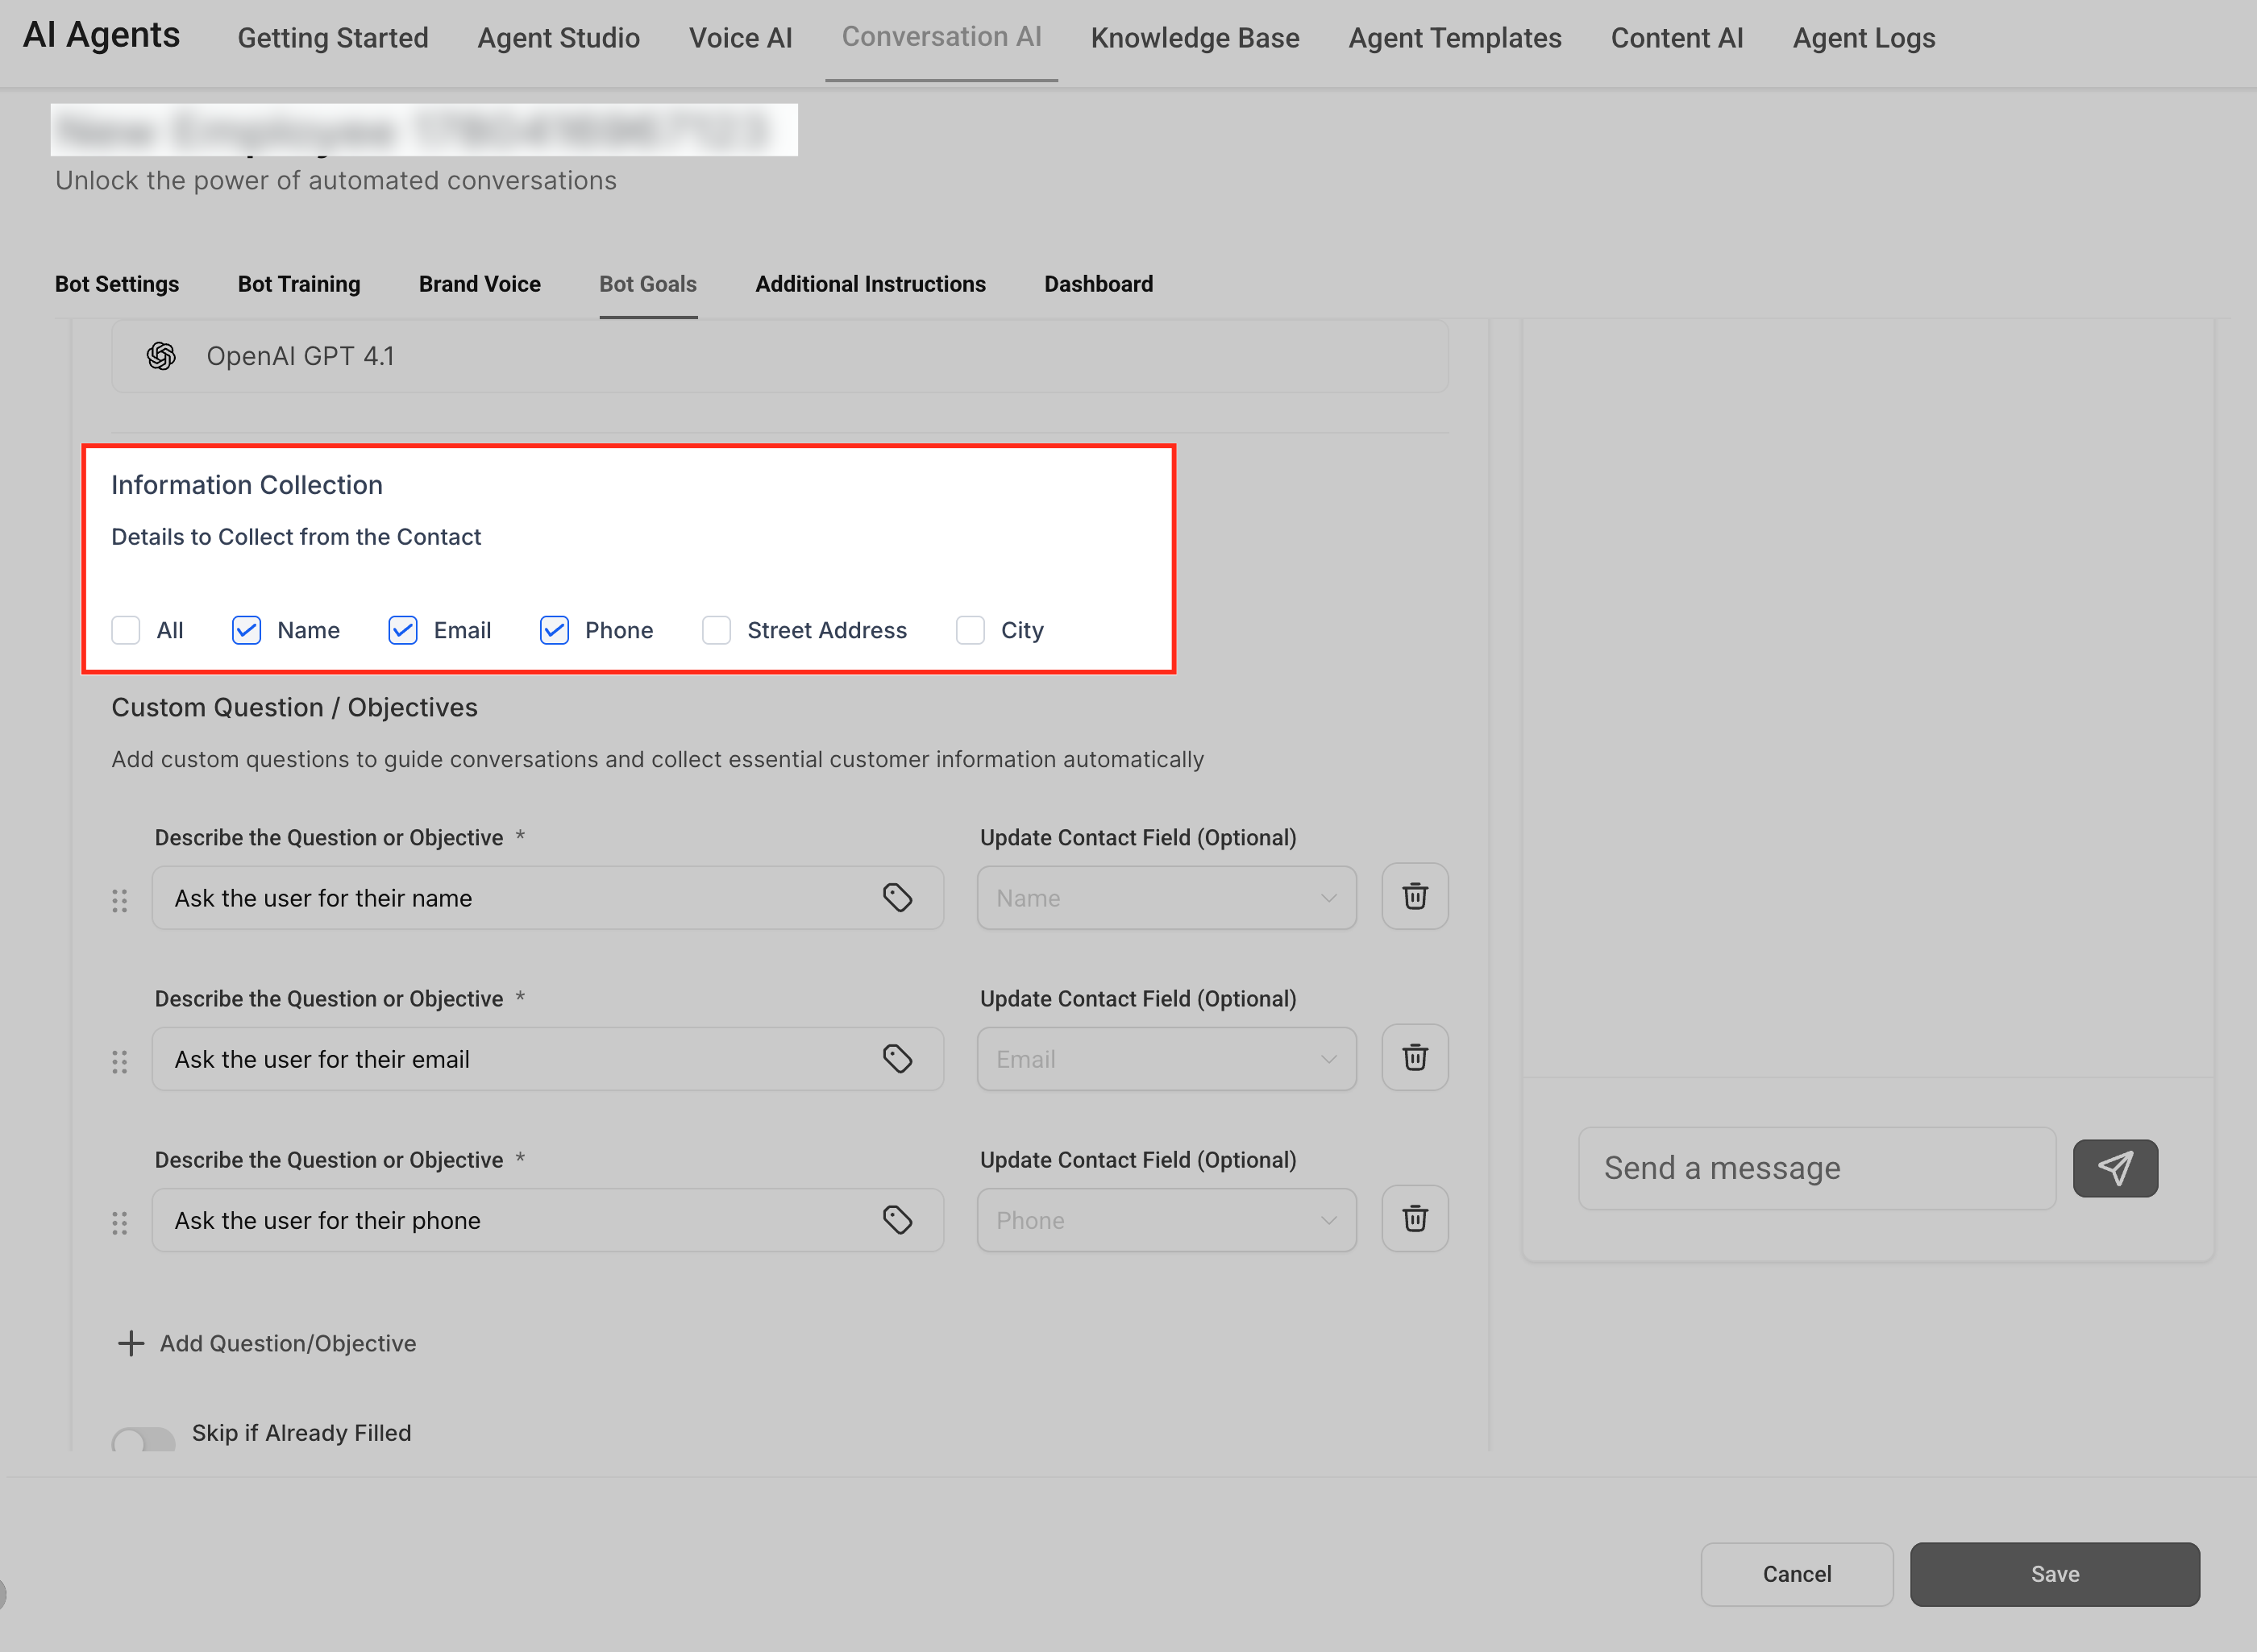
6. Add custom questions or objectives
Add any custom questions or objectives the agent should ask during the conversation. These are useful when standard contact fields are not enough to qualify the patient or prepare your team for the next step.
Examples:
Ask what service the patient is interested in.
Ask for the preferred appointment day.
Ask whether the patient is a new or returning patient.
Ask for the reason for contacting the business.
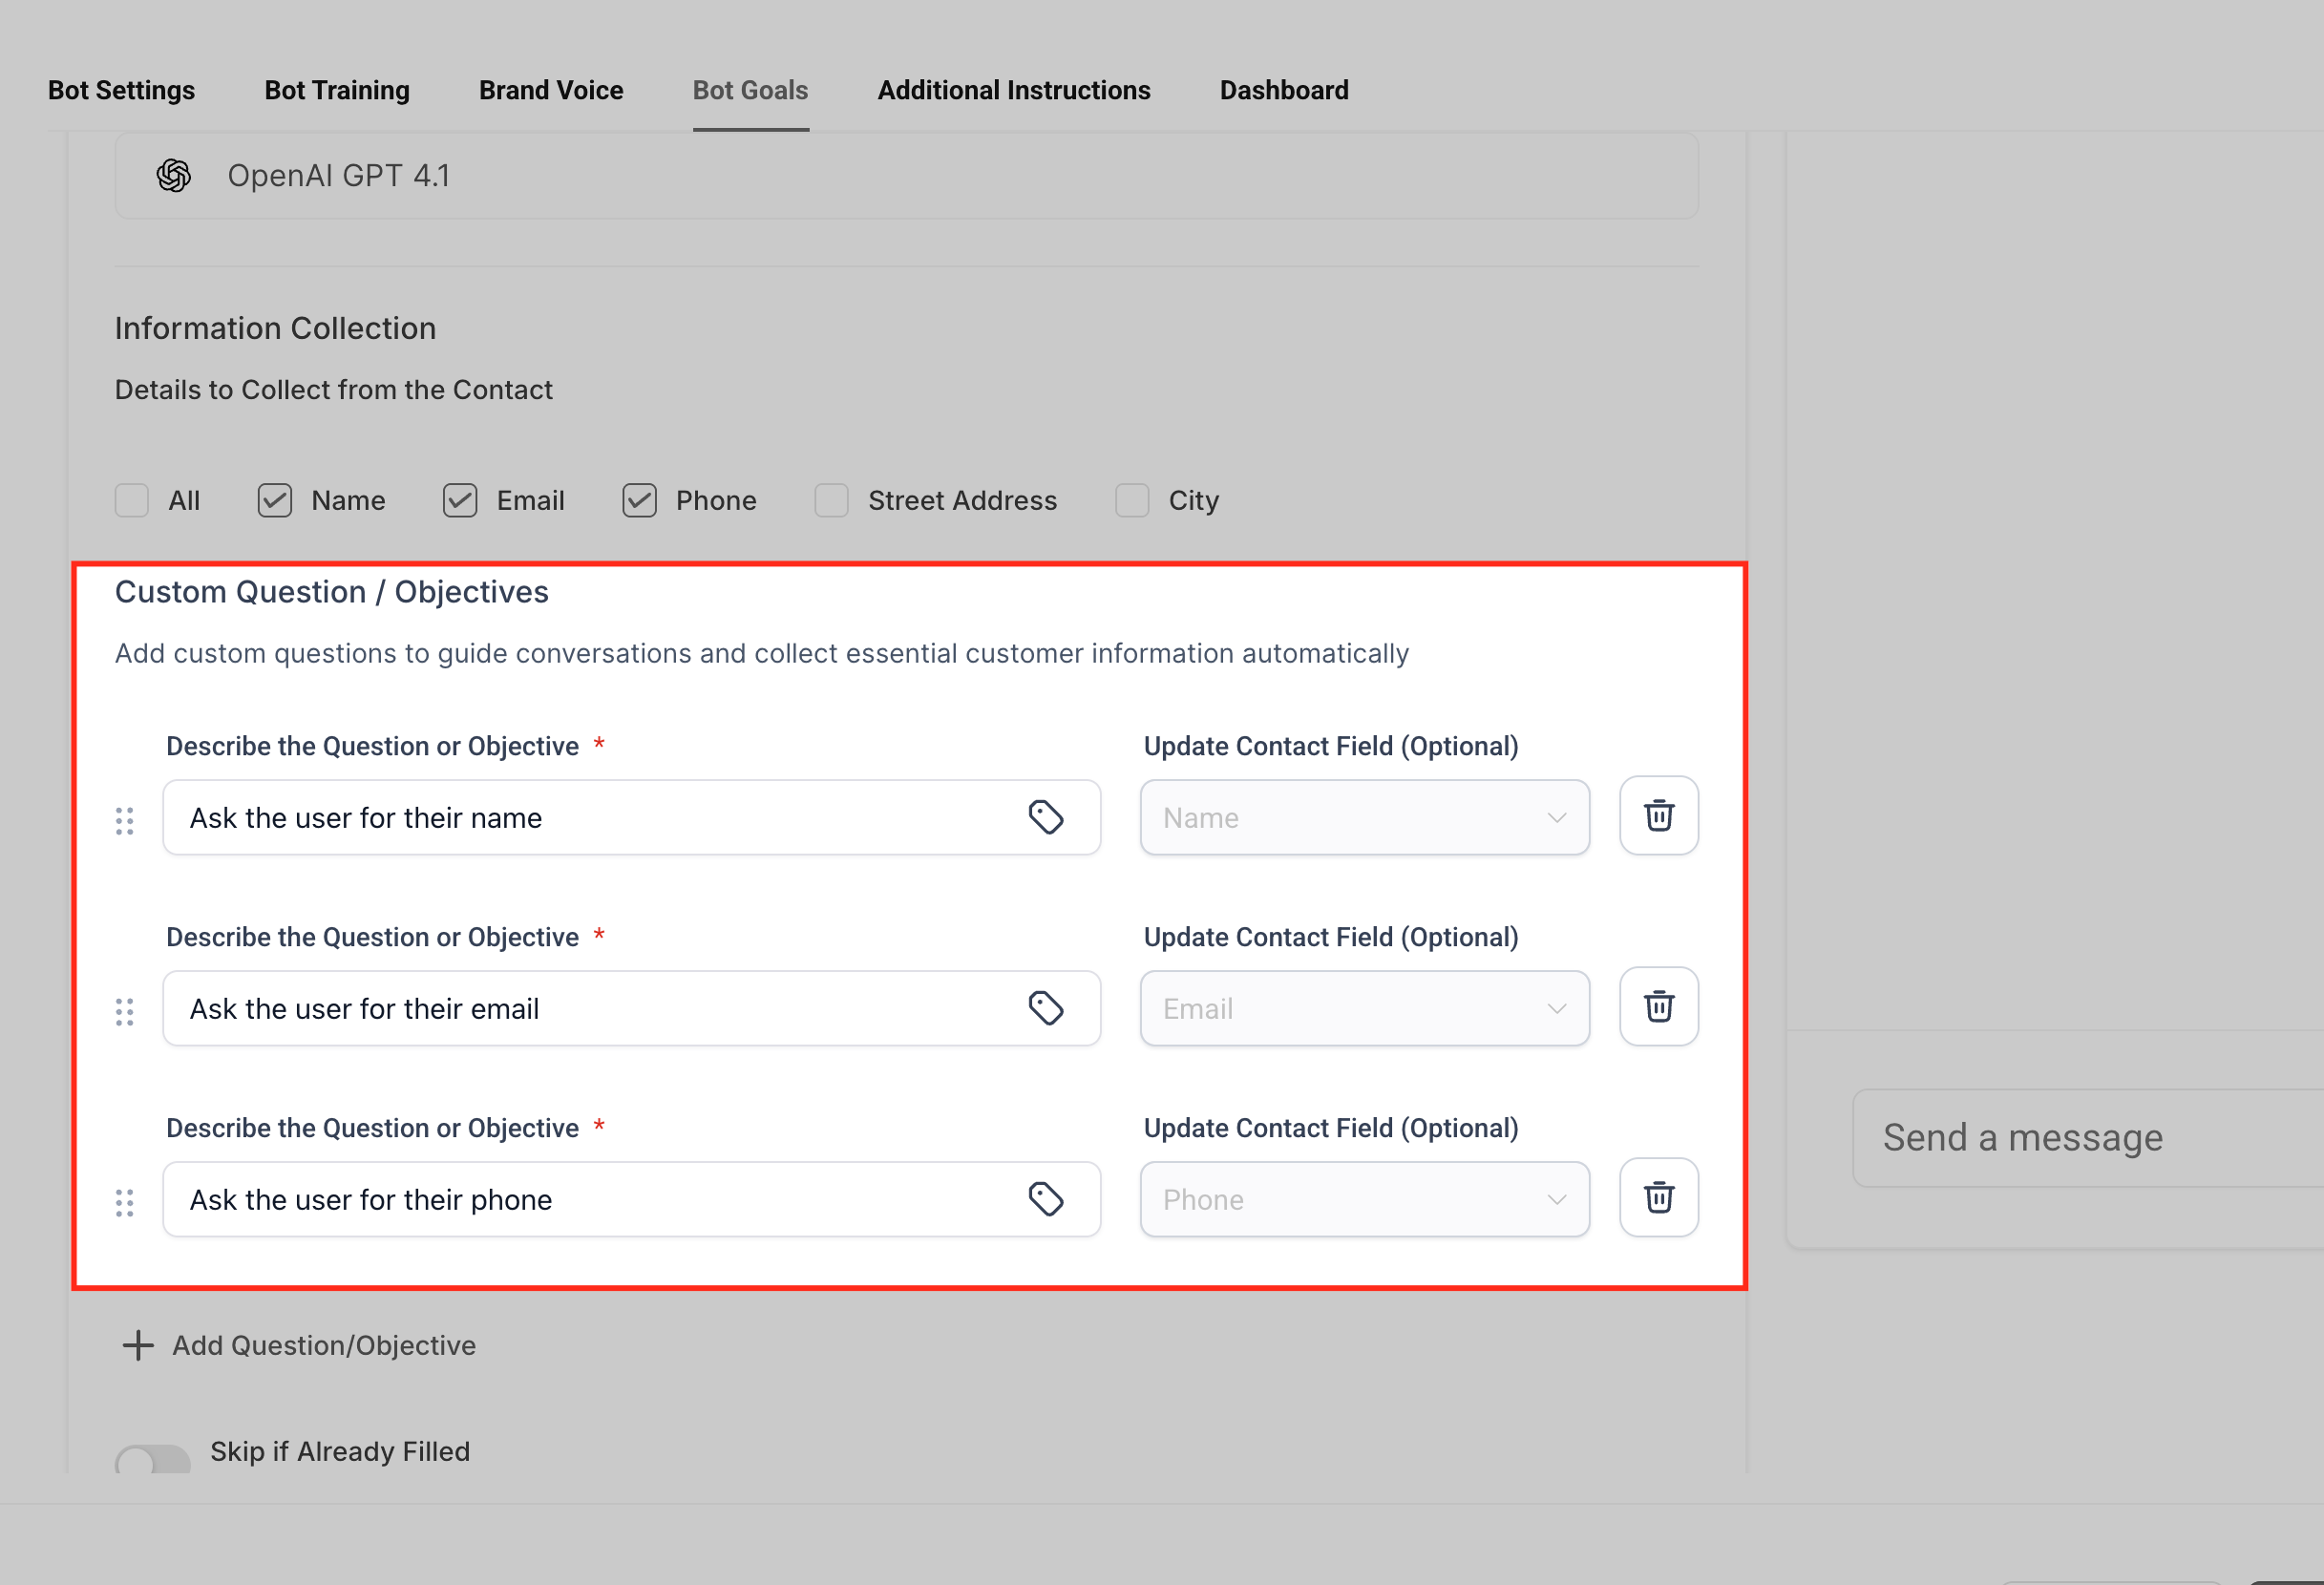
7. Map answers to contact fields
Use Update Contact Field to choose where each collected answer should be saved on the contact record. Field mapping connects the answer from the conversation to the correct place in the CRM, which matters because workflows, segmentation, reporting, and team follow-up often depend on accurate contact fields.
Example: If the agent asks, "What city are you located in?", map the response to the City field.
8. Enable Skip if Already Filled
Turn on Skip if Already Filled when the agent should avoid asking for information that already exists on the contact record. For example, if the patient's email is already saved, the agent can move on to the next missing detail instead of asking again. Use it for fields such as name, email, phone, city, or address.
9. Enable Appointment Booking, if needed
Turn on Appointment Booking if the agent should help patients schedule appointments. Before enabling this setting, confirm that the correct calendar is configured and available for the agent to use.
10. Configure Trigger Workflow, if needed
Select or configure Trigger Workflow if the agent should start an automation based on the conversation — such as notifying your team, tagging a contact, updating a pipeline, sending a follow-up message, or starting a lead qualification process. Before using this setting, make sure the workflow is already created and ready to use.
11. Configure Email Notification Settings
Set up Email Notification Settings if your team should be notified when the agent does not know an answer or when a conversation may need review. These notifications help prevent unanswered questions from being missed and let your team add better training content later.
12. Enable Conversation Summary, if needed
Turn on Conversation Summary if your team needs a summarized version of bot-handled conversations for faster review or follow-up. This is especially helpful when a team member takes over after the bot conversation.

13. Save your changes
Review the configured goals, then click Save. Any unsaved changes may be lost if you leave the page or switch to another area before saving.
14. Test the Bot Goals setup
Use the test panel to send sample patient messages and confirm the agent asks the right questions, updates the correct fields, and triggers the expected actions. Try different scenarios, such as a new lead with no contact information, an existing contact with some fields already filled, a patient asking to book an appointment, and a patient asking something the bot may not know.
The Add Contact Info action helps you collect important details during a Conversational AI chat and automatically save them to the contact record. By capturing information like business details, addresses, and dates directly from the patient's responses, you reduce manual data entry and keep contact records up to date.
Important: This action only updates empty fields on a contact. A contact's email and phone are updated automatically, so this action is not required for adding or updating email or phone.
Tip: After enabling this action, explicitly ask the patient for their contact details in the bot's prompt. If this instruction isn't included in the prompt, the bot will not ask for the information, and the contact field won't be updated.
Faster data capture: Collect details like address, business info, or date of birth as part of a natural conversation.
Cleaner CRM records: Save information directly to the contact profile so your team doesn't need to re-type it.
Better personalization: Use captured details to tailor responses, follow-ups, and appointment flows.
Flexible fields: Update both standard fields and supported custom field types for your specific use case.
Step 1: Open the Agent
Navigate to AI Agents > Conversational AI > Agents List. Open the agent you would like to edit.
Step 2: Open Bot Goals
Once the agent is open, select the Bot Goals tab.
Step 3: Select Contact Info
Scroll down to the Setup your Actions section. Choose Contact Info.
Step 4: Configure the Action
Follow these steps to configure the update contact details action:
Action Name: Assign an action name of your choice to help you recognize it later, for example "Update Contact's Date of Birth".
Which contact field to be updated: Choose the field you want to update from the dropdown menu (e.g., name, phone, email, business name).
What to update in the field: Write a short description of what you're updating. This helps the AI generate more accurate, personalized responses. For example, for Date of Birth you could write "This is the birth date of the contact"; for Business Name, "This is the business name of the contact."
Output Example (custom fields only): If applicable, provide at least 2 examples of the updated information. For example, if you're updating "What is your favorite food?", you could enter "Tacos" and "Hamburgers".
When you're done, click Save to finalize the new contact information settings.
Step 5: Update Prompt
Update your bot's Additional Information prompt to explicitly ask the patient for the contact detail(s) you want to update. If this instruction isn't included in the prompt, the bot will not ask for the information, and the contact field won't be updated.
Example: To collect name, email, phone, business name, and date of birth before booking an appointment, add this in the Additional Information section so the bot asks these questions:
### mandatory instruction: before booking an appointment, always start the conversation by asking these questions one after another
1. Ask the customer their name
2. Ask the customer their email
3. Ask the customer their phone
4. Ask the customer their date of birth
5. Ask the customer their business name
You can add more than one field in the same action using Add new field. The Add Contact Info action maps a limited number of fields at one time; if you need to capture more, trigger a workflow from Conversational AI and use Update Contact Field actions inside the workflow to populate as many fields as needed.
Advanced Settings help you fine-tune how your Conversational AI bot behaves during patient interactions — response timing, conversation limits, sleep and reactivation behavior, and response style.
With Advanced Settings, you can:
Control how long the bot waits before responding.
Limit the number of messages the bot can send in a conversation.
Enable the bot to respond to images and voice notes in Autopilot Mode.
Automatically pause bot responses when manual or workflow messages are sent.
Configure when the bot should reactivate after being put to sleep.
Adjust the level of detail used in bot responses.
Advanced Settings can be configured when creating a new bot or when editing an existing one.
While creating a new bot:
Navigate to AI Agents > Conversational AI.
Click + Create Bot.
Select your preferred builder (Prompt-based or Flow-based) and complete the initial bot configuration.
Scroll to Bot Settings and locate Advanced Settings.
While editing an existing bot:
Navigate to AI Agents > Conversational AI.
Locate the bot in the Agents List.
Click the three-dot menu and select Edit, or click directly on the bot name.
Scroll to Bot Settings and locate Advanced Settings.
Autopilot Mode Settings determine how your bot automatically interacts with patients, balancing responsiveness, conversation quality, and operational efficiency.
1. Wait Time Before Responding
The Wait Time Before Responding setting determines how long the bot waits before sending a reply. This delay lets the bot collect multiple incoming messages and respond more naturally with a single, contextual answer. You can configure the delay using minutes and seconds.
Example: If a patient sends three messages within a few seconds, the bot can wait, process all of them together, and provide one complete response instead of several replies.
2. Maximum Messages a Bot Can Send in a Conversation
This setting limits the total number of automated messages the bot can send within a conversation before it automatically goes to sleep for that contact.
Minimum: 1 message
Maximum: 100 messages
When the limit is reached, the bot stops responding to that contact and the conversation must be reactivated before automated responses resume. To reactivate the bot, mark the conversation as Read, or use another configured reactivation method.
3. Allow the Bot to Respond to Images and Voice Notes
This setting enables the bot to process and respond to image and voice note inputs from patients.
Supported input types:
Images
Voice Notes
Important: This feature is only supported when the bot is operating in Autopilot Mode. If the bot is in Suggestive Mode, enabling this setting will not activate image or voice note processing. Response times for image and voice note analysis may be slightly longer than for standard text responses.
4. Bot Sleep and Reactivation Settings
These settings help manage transitions between AI-driven and human-driven conversations, which is especially useful when team members need to take over.
Send Bot to Sleep When I Send a Manual Message or Workflow Message — This pauses bot responses whenever selected outbound message types are sent. Available options are Manual Messages and Workflow Messages. When enabled, the bot stops responding after the selected message type is sent, so team members can continue the conversation without interference from the bot. Common use cases include staff taking over conversations, escalated support, and personalized outreach.
Reactivate Bot After — This determines when the bot should automatically resume responding after being put to sleep. You can configure hours, minutes, and seconds. When enabled, the bot becomes active again after the selected duration. When disabled, the bot remains inactive indefinitely until a user manually reactivates it.
Response Settings control how detailed the bot's replies are, so you can tailor conversations to patient expectations and communication preferences. Available styles:
Concise
Balanced
Detailed
Balanced is generally recommended because it provides a good mix of detail and efficiency.
Several events can put the bot in a conversation to sleep. Understanding these helps you predict when the bot will pause and when it will resume.
Bot Settings
Max Messages — When the total messages in the conversation reach the configured limit.
Bot Goals
Stop Bot — When the condition in this goal is reached.
Appointment Booking (Post Appointment Booked) — After an appointment is successfully booked.
Human Handover — When the goal is reached and the conversation calls in a human.
Transfer Bot — When the condition is triggered to switch to a different bot.
Conversation
Manual Input — When a team member sends a message in the conversation.
Manual Switch to Inactive — When you manually switch the Conversational AI from Active to Inactive in the Inbox.
Workflow
Action — When a workflow action sets the conversation to inactive/sleep.
Message Sent — When a workflow sends a message in the conversation.
During an active conversation, Conversational AI reviews recent conversation context to understand what a patient is really asking. Instead of treating every message as a standalone request, it identifies whether the patient is asking a new question, continuing a previous topic, requesting support, or asking about your services, pricing, or business information.
This works automatically using your bot training, Knowledge Sources, conversation history, and configured instructions. It does not require enabling a new setting or rebuilding your existing setup.
Reviews recent conversation context — The agent evaluates the latest message alongside prior messages.
Identifies the patient's intent — It determines whether the patient is asking a new question, following up on an earlier topic, asking for support, or requesting business information.
Matches the request to available information — It uses relevant training data, Knowledge Sources, bot instructions, and conversation history to prepare the most appropriate response.
Generates a context-aware response — The final reply is based on the detected intent and the most relevant available information.
Examples:
Follow-up question: A patient asks "What packages do you offer?" then "Does the second one include support?" The agent treats the second message as a follow-up to the package discussion, not an unrelated question.
Topic change: A patient asks about appointment availability, then "What is your cancellation policy?" The agent detects the shift and responds with the relevant policy information.
New inquiry after an earlier conversation: A patient previously discussed pricing, then returns later and asks about a different service. The agent treats this as a new question while still considering useful conversation history.
Accurate intent detection helps the agent understand the question, but response quality also depends on the information available to the bot. Clean, updated, well-structured training data gives the agent better material to reference. Review these areas regularly:
Bot training content
Custom Bot Responses or FAQs
Knowledge Sources (tables, rich text, file uploads, FAQs, web crawler sources, and web search sources)
Website crawler sources
Bot goals, personality, and additional instructions
Duplicate, outdated, or conflicting information
To get the best results, periodically open your Conversational AI settings, confirm your bot instructions are clear, review your training data and Knowledge Sources, test common patient questions (including follow-ups, topic changes, and new inquiries), and review AI response details when a reply seems inaccurate.
The Test Your Bot panel lets you test the agent while configuring Bot Goals, confirming that the prompt, actions, and response behavior work as expected before the agent is used in live conversations. Testing is especially useful after changing Personality, Goal/Intent, Additional Information, or action settings. Use realistic patient messages to confirm the agent responds naturally and follows the intended rules.
Use the test panel to:
Chat with the bot: Send sample messages to see how the agent responds.
Give feedback on answers: Use positive or negative feedback to improve response behavior and identify missing training content.
Edit prompt behavior: Update Personality, Goal/Intent, or Additional Information when responses don't match expectations.
Reset the conversation: Clear the test conversation after making changes so you can test again from a fresh start.
Repeat testing after any major prompt or action change.
Area | Use It For | Example |
|---|---|---|
Prompt | Define response behavior, personality, goal, and instructions | Tell the agent to sound professional and ask one question at a time. |
Appointment Booking | Help patients schedule appointments | Book a consultation or send a booking link. |
Trigger Workflow | Start automation after a conversation outcome | Notify your team after a qualified lead responds. |
Contact Info | Collect and save missing contact details | Ask for a business name or preferred service. |
Human Handover / Stop Bot / Transfer Bot | Control handoff, stopping, or routing | Hand off billing questions to a human. |
Test Your Bot | Validate behavior before launch | Test whether the agent follows the prompt and actions. |
Issue | What to Check |
|---|---|
Bot Goals tab is missing | Confirm your user role has permission to manage Conversational AI agents and goals. |
Agent is not asking the expected questions | Review the selected fields, custom questions/objectives, and saved Bot Goals settings. |
Contact fields are not updating | Confirm each question is mapped to the correct field under Update Contact Field. |
Agent asks for information already saved | Confirm Skip if Already Filled is enabled and the contact data exists in the mapped field. |
Appointment Booking does not start | Confirm Appointment Booking is enabled and the calendar is configured correctly. |
Workflow does not trigger | Confirm the workflow is ready and the trigger condition is clear. |
Email notification is not received | Confirm the notification settings and recipient email address are correct. |
Conversation summary is missing | Confirm Conversation Summary is enabled and the conversation meets the summary requirements. |
Add Contact Info field did not update | The field may already contain a value, the wrong field may be selected, or the bot may not have captured the answer clearly. Confirm the field is empty and mapped correctly. |
For current pricing, see the pricing page.
Q: What do Bot Goals control?
Bot Goals control the agent's prompt, personality, goal or intent, supporting instructions, available actions, and testing experience — including collecting information, booking appointments, triggering workflows, sending notifications, and creating summaries.
Q: What is the difference between the Prompt and Setup your Actions?
The Prompt controls how the agent communicates and what it should focus on. Setup your Actions controls what the agent can do, such as booking appointments, triggering workflows, or collecting contact information.
Q: Are Bot Goals the same as Bot Training?
No. Bot Goals define what the agent should accomplish. Bot Training helps the agent answer questions accurately using knowledge sources, FAQs, and business information.
Q: Why do I see Goal in one account and Intent in another?
Depending on your account or interface version, the primary objective field may appear as Goal or Intent. Both define the main outcome the agent should work toward.
Q: Should I add calendar availability to the prompt?
No. Calendar availability should come from appointment booking settings. Adding specific slots to the prompt may cause inaccurate responses if availability changes.
Q: Can Bot Goals update contact fields?
Yes, when the Contact Info action is configured. Use Update Contact Field to map collected answers to the correct fields. This is typically used to collect and save missing contact information.
Q: Can Add Contact Info overwrite an existing contact field value?
No. Add Contact Info only updates empty fields. If the selected contact field already has a value, the bot will not replace it.
Q: Can I use Add Contact Info for Name, Email, or Phone?
No. For Name, Email, and Phone, skip this action and instruct the bot to collect those details through the prompt or information collection flow instead.
Q: Can Add Contact Info update custom fields?
Yes. You can select available contact fields, including supported custom fields, as long as the field is appropriate for the type of information the bot should collect.
Q: Can I collect more than one field in the same action?
Yes. Use Add new field to configure additional fields inside the Add Contact Info action. To capture more fields than the action allows, trigger a workflow and use Update Contact Field actions inside it.
Q: Can Bot Goals trigger workflows?
Yes. Use Trigger Workflow when the conversation should start an automation after a specific outcome or condition.
Q: What happens when the maximum message limit is reached?
The bot automatically goes to sleep for that contact and stops sending responses until it is reactivated, such as by marking the conversation as Read.
Q: How can I reactivate the bot once it goes to sleep?
Mark the conversation as Read, or use another configured reactivation method. If you've set a Reactivate Bot After duration, the bot resumes automatically after that period.
Q: Can the bot respond to images and voice notes in Suggestive Mode?
No. Image and voice note processing is currently supported only in Autopilot Mode.
Q: Can I disable automatic bot reactivation?
Yes. If automatic reactivation is disabled, the bot remains inactive until manually reactivated.
Q: What is the best response style for most businesses?
Balanced is generally recommended because it provides a good mix of detail and efficiency.
Q: Why would I increase the wait time before responding?
Longer wait times let the bot collect multiple messages and provide a more contextual, single response.
Q: Will workflow messages always put the bot to sleep?
Only if the workflow message option is enabled within the Bot Sleep Settings.
Q: Can I update Advanced Settings after the bot is live?
Yes. Advanced Settings can be modified at any time by editing the bot configuration.
Q: Do I need to enable the new query detection behavior?
No. It works automatically and does not require a new setting. It also does not replace your existing bot configuration, training data, goals, instructions, or workflows.
Q: Do I need to retrain my bot for it to work?
No retraining is required. However, reviewing and updating your training data can improve the quality of responses.
Q: What should I do if the agent gives an inaccurate response?
Review the bot's training data, Knowledge Sources, FAQs, and instructions. If available, review the AI response information in the conversation to understand which content influenced the reply, then update the source content as needed.
Q: Why is the bot not following my prompt?
The prompt may be vague, conflicting, or missing important context. Make the instruction more specific, remove conflicts, and test again.
Q: Should I test the bot after changing Bot Goals?
Yes. Always test after changing prompts or actions to confirm the agent responds correctly and follows the intended behavior.
Q: Can the bot work across SMS, Facebook, and Instagram?
Yes. The bot can be configured to respond on SMS, Facebook, and Instagram through the Bot Settings tab.
