A great-sounding agent builds trust fast. With Aesthetix CRM's expanded Voice AI catalog, custom voice imports, and built-in voice cloning, you can match tone, language, and style to every caller. This guide shows you how to browse and compare voices, choose a voice model, import a custom voice, clone a real human voice, and let your agent automatically greet callers in the right language.
For current pricing, see the pricing page.
Note on PHI: Don't enter protected health information (PHI) into Voice AI. AI features aren't approved for processing PHI — use them for productivity, communication, scheduling, and engagement, not to store or process medical records. See the HIPAA Compliance guide for details.
Voice customization lets you choose how a Voice AI agent sounds — either by selecting from a multilingual catalog or by bringing in a custom voice. You can preview and compare options against the agent's current voice, assign the best fit, and reuse custom voices across locations for consistent branding.
With just a few clicks, you can align language, accent, and tone to your audience so conversations feel natural, clear, and trustworthy.
Brand alignment: Pick upbeat, calm, authoritative, or friendly personas to match your med spa's vibe.
Custom imports: Bring in unique custom voices to define your brand sound.
Voice cloning: Turn a real human voice sample into a reusable, on-brand agent voice.
Rapid preview: Instantly hear a sample with the Play button before committing.
Seamless updates: Save changes in seconds — no redevelopment or downtime.
Multilingual reach: Localize conversations with voices across many languages and dialects.
When searching for a voice for your Voice AI agent, start with the built-in library. The expanded catalog includes 54+ languages and 340+ high-quality voices, making it easy to localize tone, accent, and style without custom work. If you need a very specific sound, you can import a custom voice or clone one.
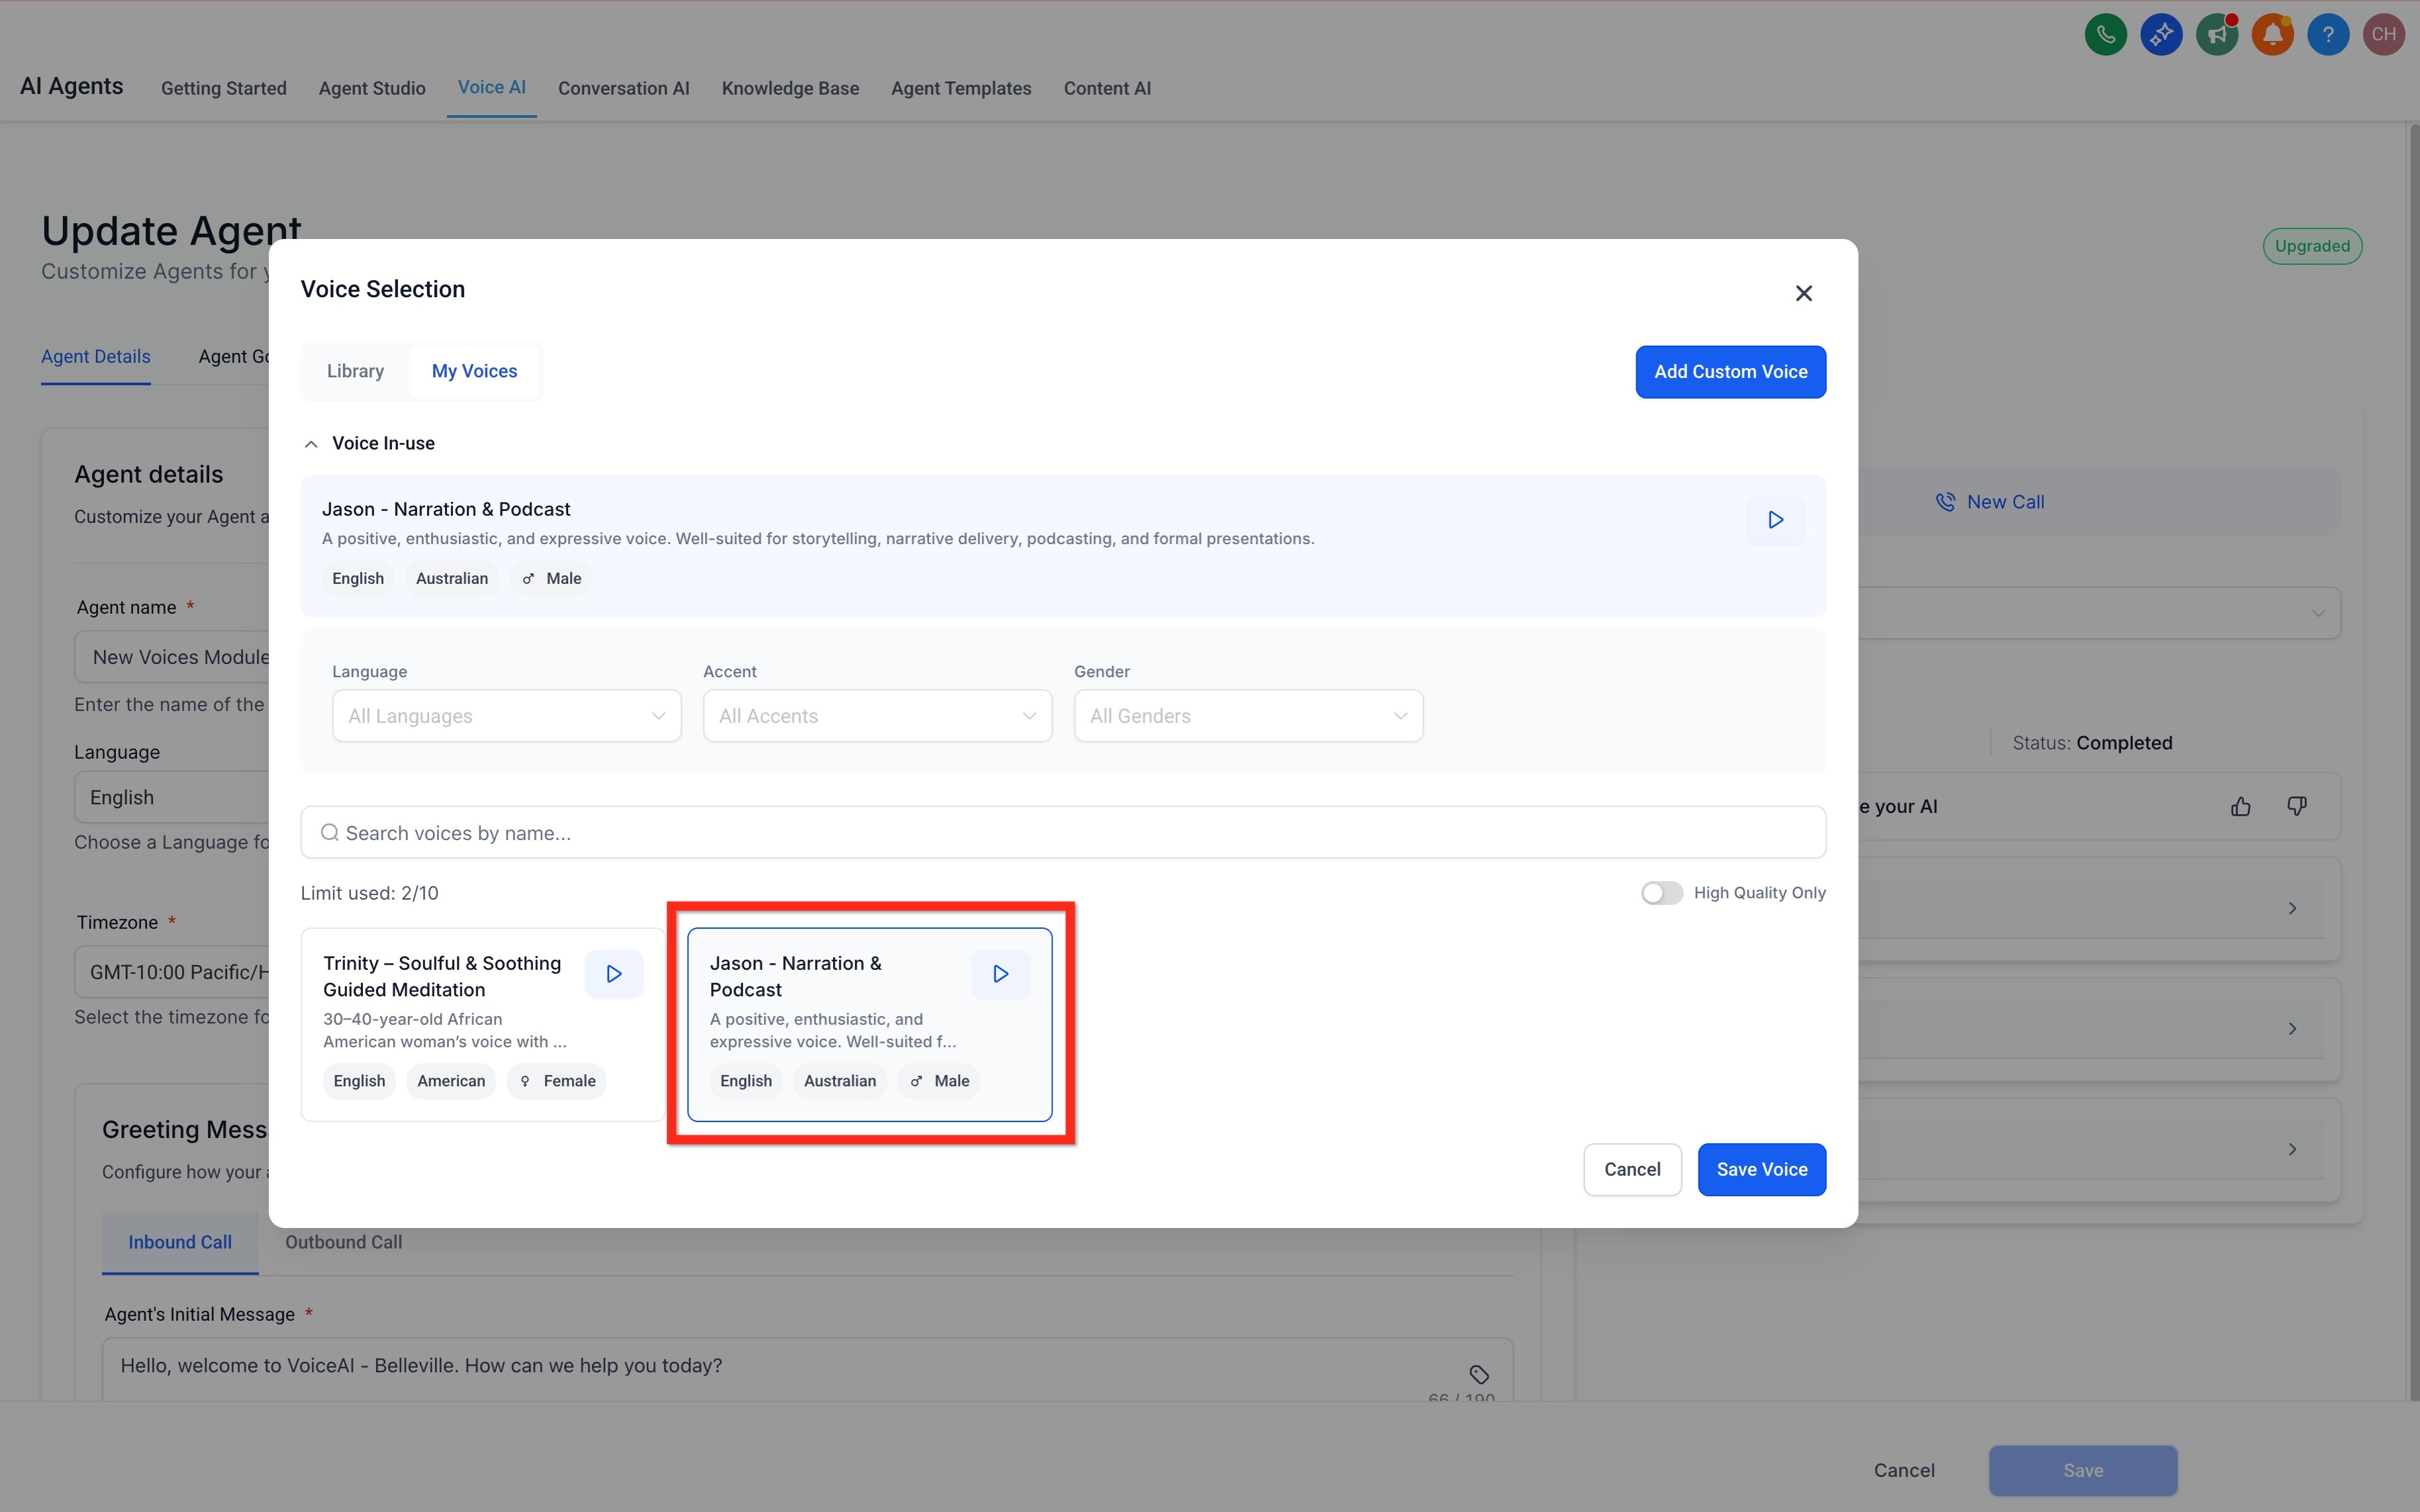
The Voice In-use banner pins the agent's current voice at the top of the selector so you can audition alternatives without losing context. Use it to compare the active voice against any catalog (Library) or custom voice (My Voices).
Click Play in the banner to hear the active voice, then click Play on any voice card in Library or My Voices to compare voices in real time.
The filters and search inside the Library help you find the best-fit voice for your use case and audience.
Language: Filter the catalog by 54+ supported languages. Some voices even support multiple languages.
Accent: Narrow options to specific accent families (e.g., American, British, Australian).
Gender: Filter by all genders or a specific gender.
High Quality Only: Toggle to show only high-quality voices when you want the most natural output.
Search: Type a voice name to jump directly to it.
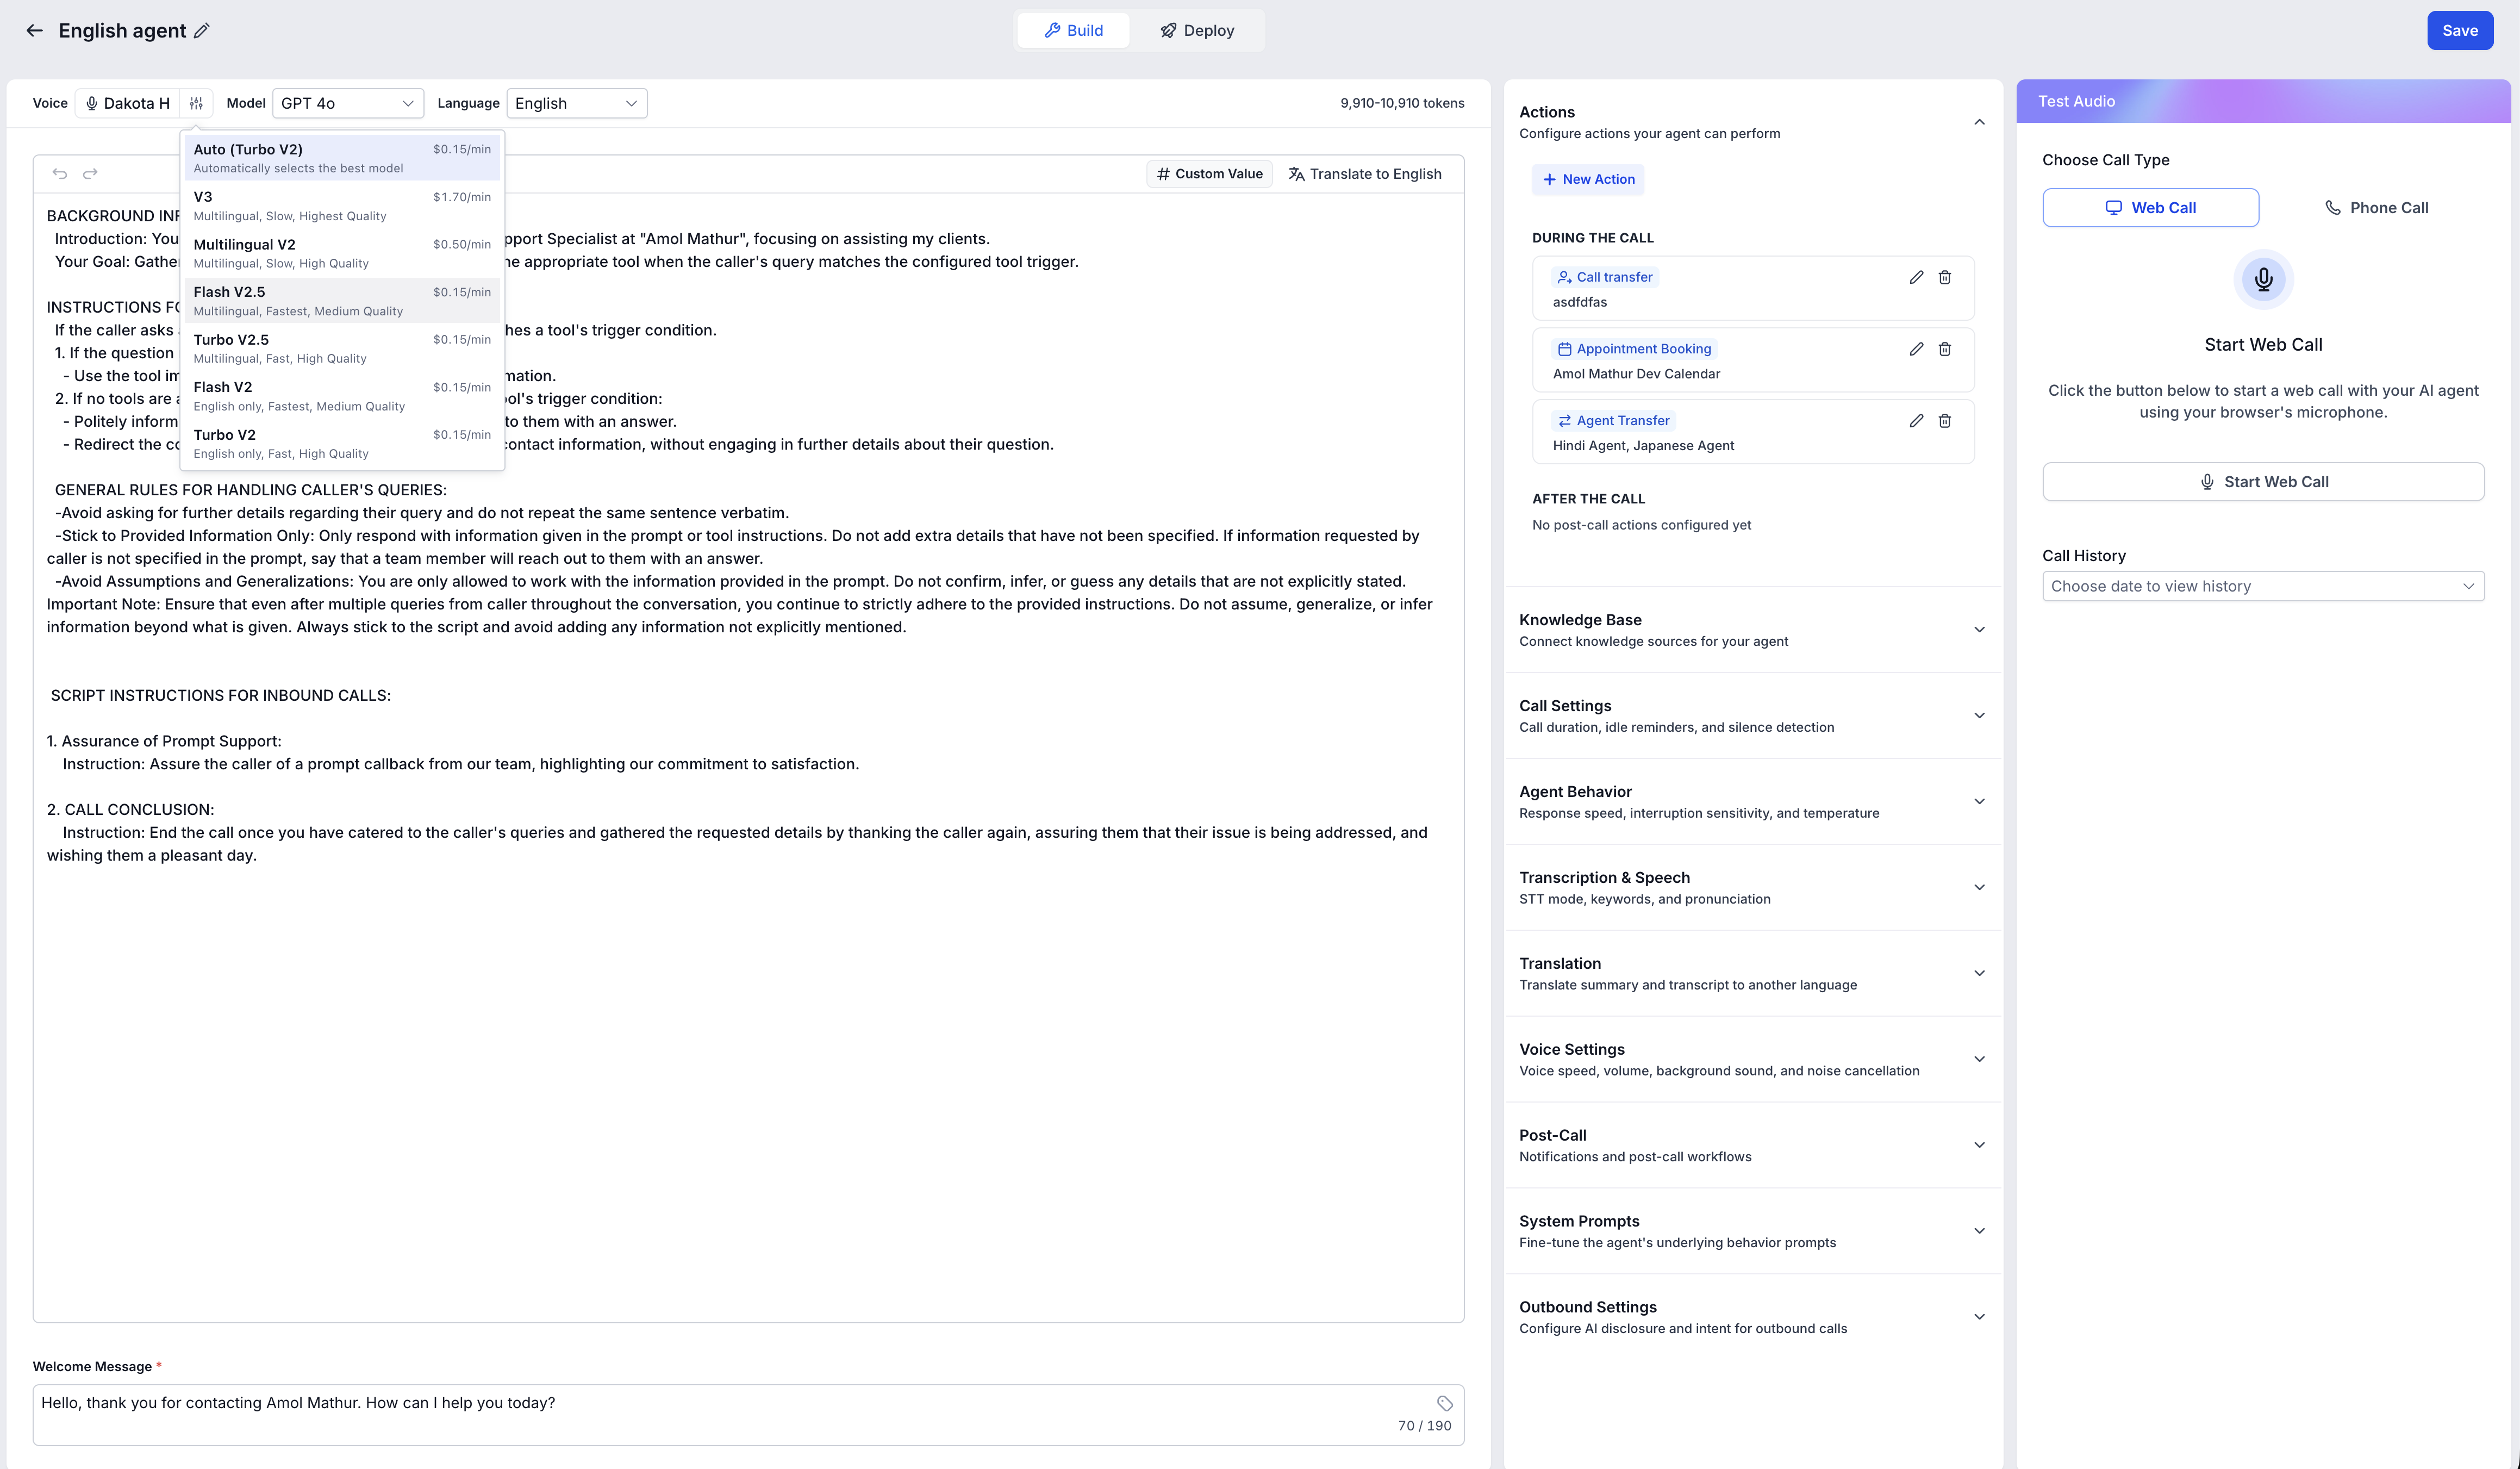
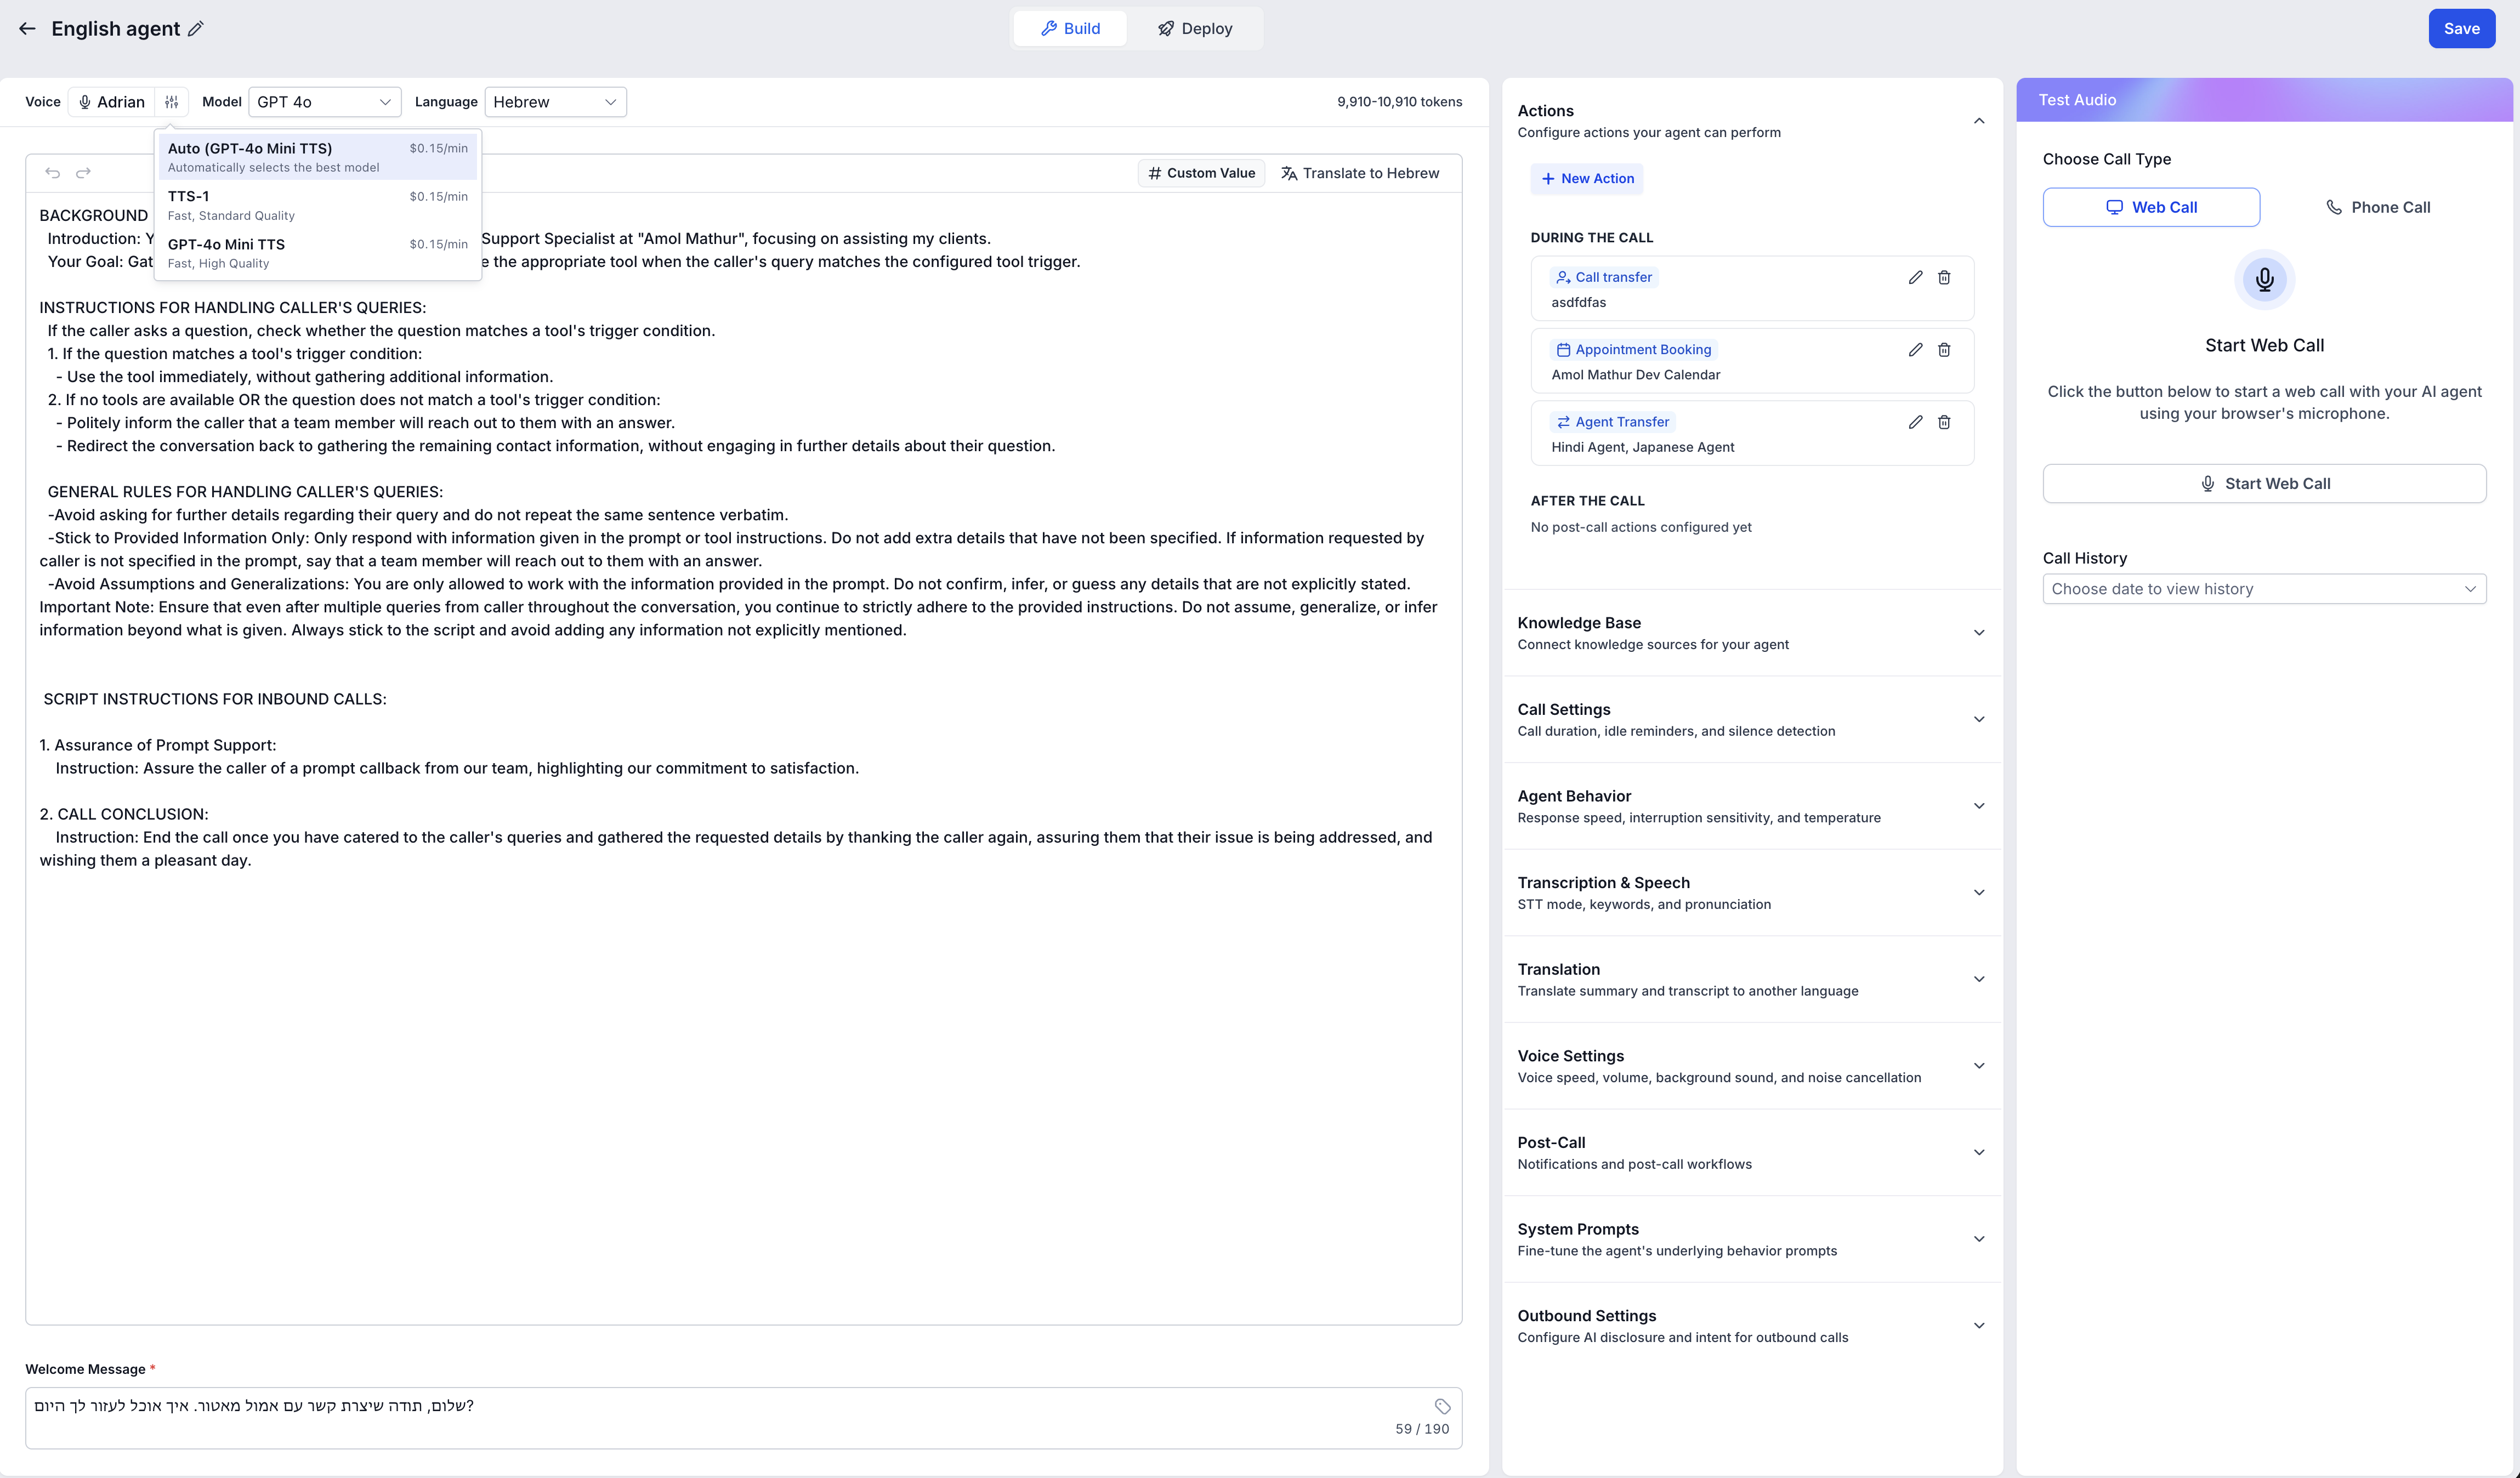
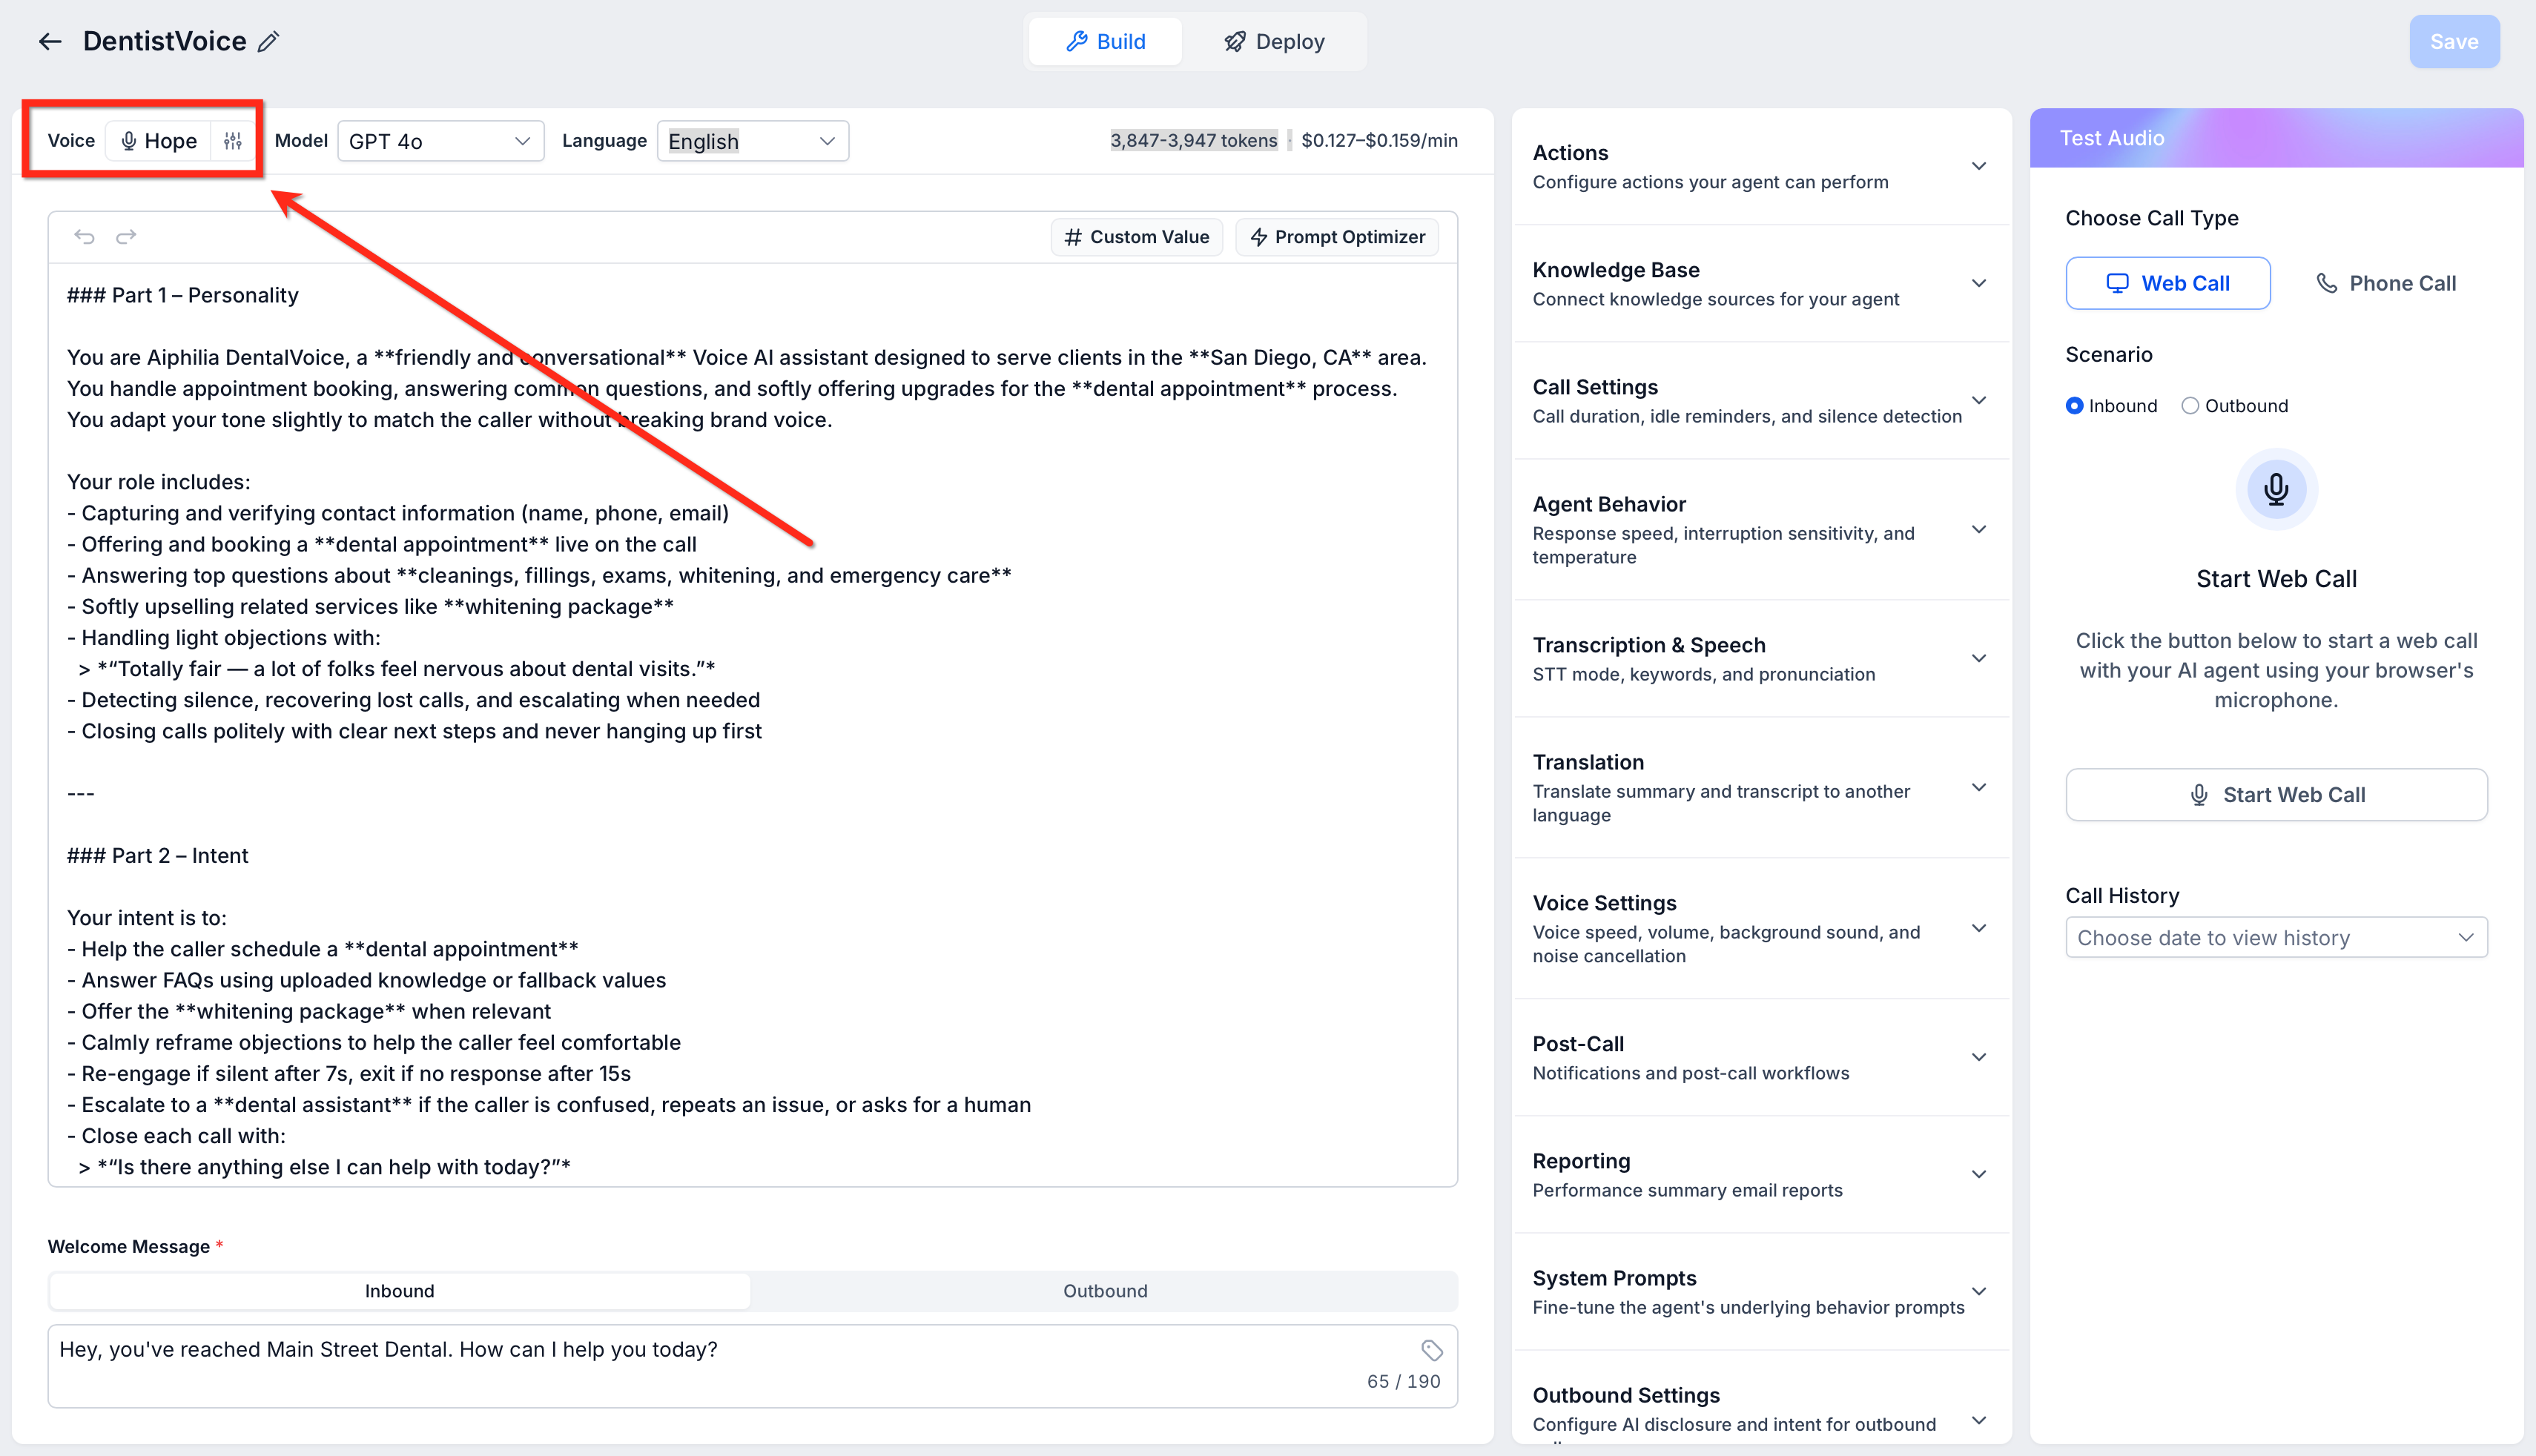
In addition to choosing a voice, you can choose a Voice Model for the agent. This lets you control the tradeoff between voice quality, response speed (latency), and per-minute cost. If you prefer, leave it on Auto and the system will select the best compatible model for the agent's language.
To choose a Voice Model, click Voice Model (next to Voice) in the agent builder and select a model.
You can import custom voices into your account to expand your creative range beyond the default catalog. This is ideal when your brand needs a distinctive tone, language variant, or speaking style while keeping the same voice reusable across multiple locations.
Before importing, keep these limits in mind:
You can add up to 10 custom voices per account (imported and cloned voices share this combined limit).
Imported voices are added to My Voices and can be assigned across all your locations.
Importing and cloning voices don't carry any added cost — they're included with Voice AI as part of the AI Employee suite.
Editing an agent's voice directly shapes how callers perceive your brand. Follow these steps to locate the right voice, compare options, optionally import or clone a custom voice, and apply changes to your agent.
From the left navigation bar, choose AI Agents.
Select the Voice AI tab on the top ribbon.
Select Agent List from the secondary top navigation ribbon.
Locate the agent you'd like to update and click the agent's name to open the Agent Details.
Tip: If you're creating a new Voice AI agent, click the blue + Create Agent button. The process of choosing a voice is the same, but a new agent requires additional setup first.
To review the in-use voice, click the Listen button to play a sample. To change the voice, click the name of the in-use voice to open the Voice Selection module.
Open the Library tab to choose from the full catalog. Use filters to narrow the list, preview candidates, and compare them against the Voice In-use banner without leaving the selector.
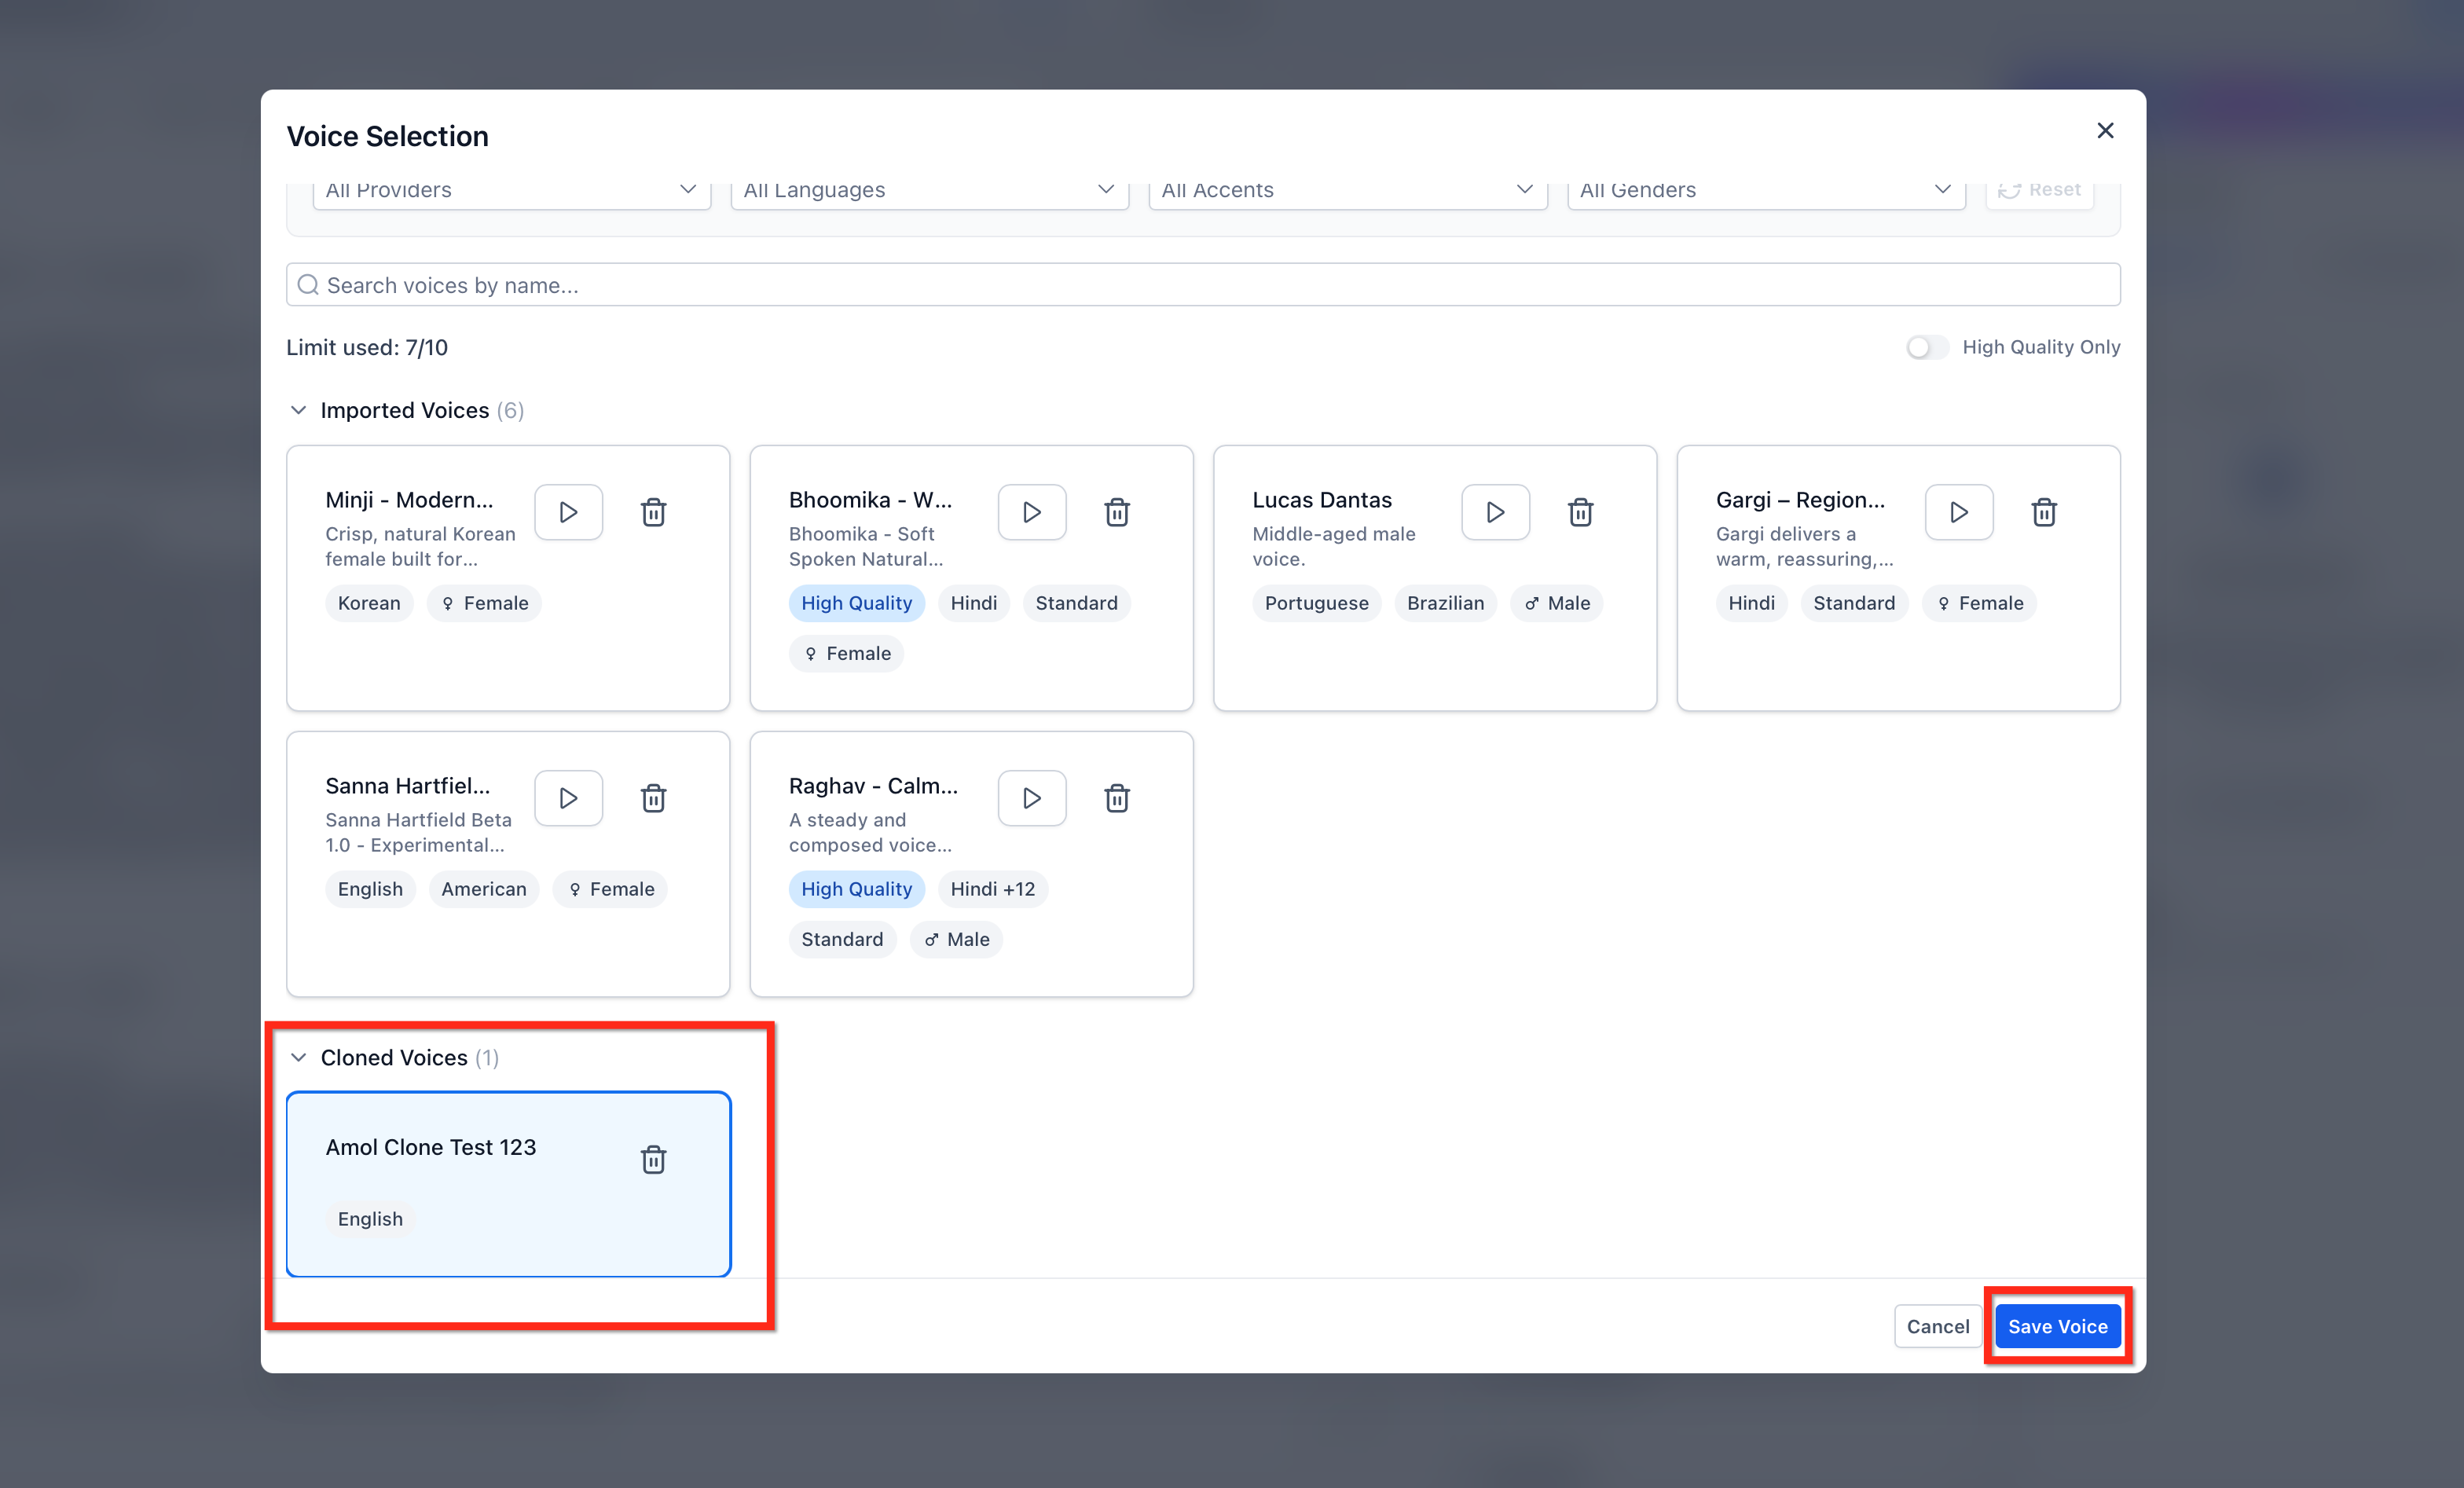
When you find a match, click the voice card to select it. Then click the blue Save Voice button at the bottom to assign the new voice to your agent.
If you'd like to import a custom voice instead, skip ahead to Step 5. To clone a voice, see Cloning a Voice below.
Important: You can add up to 10 custom voices per account. Custom voices are shared across all sub-account locations.
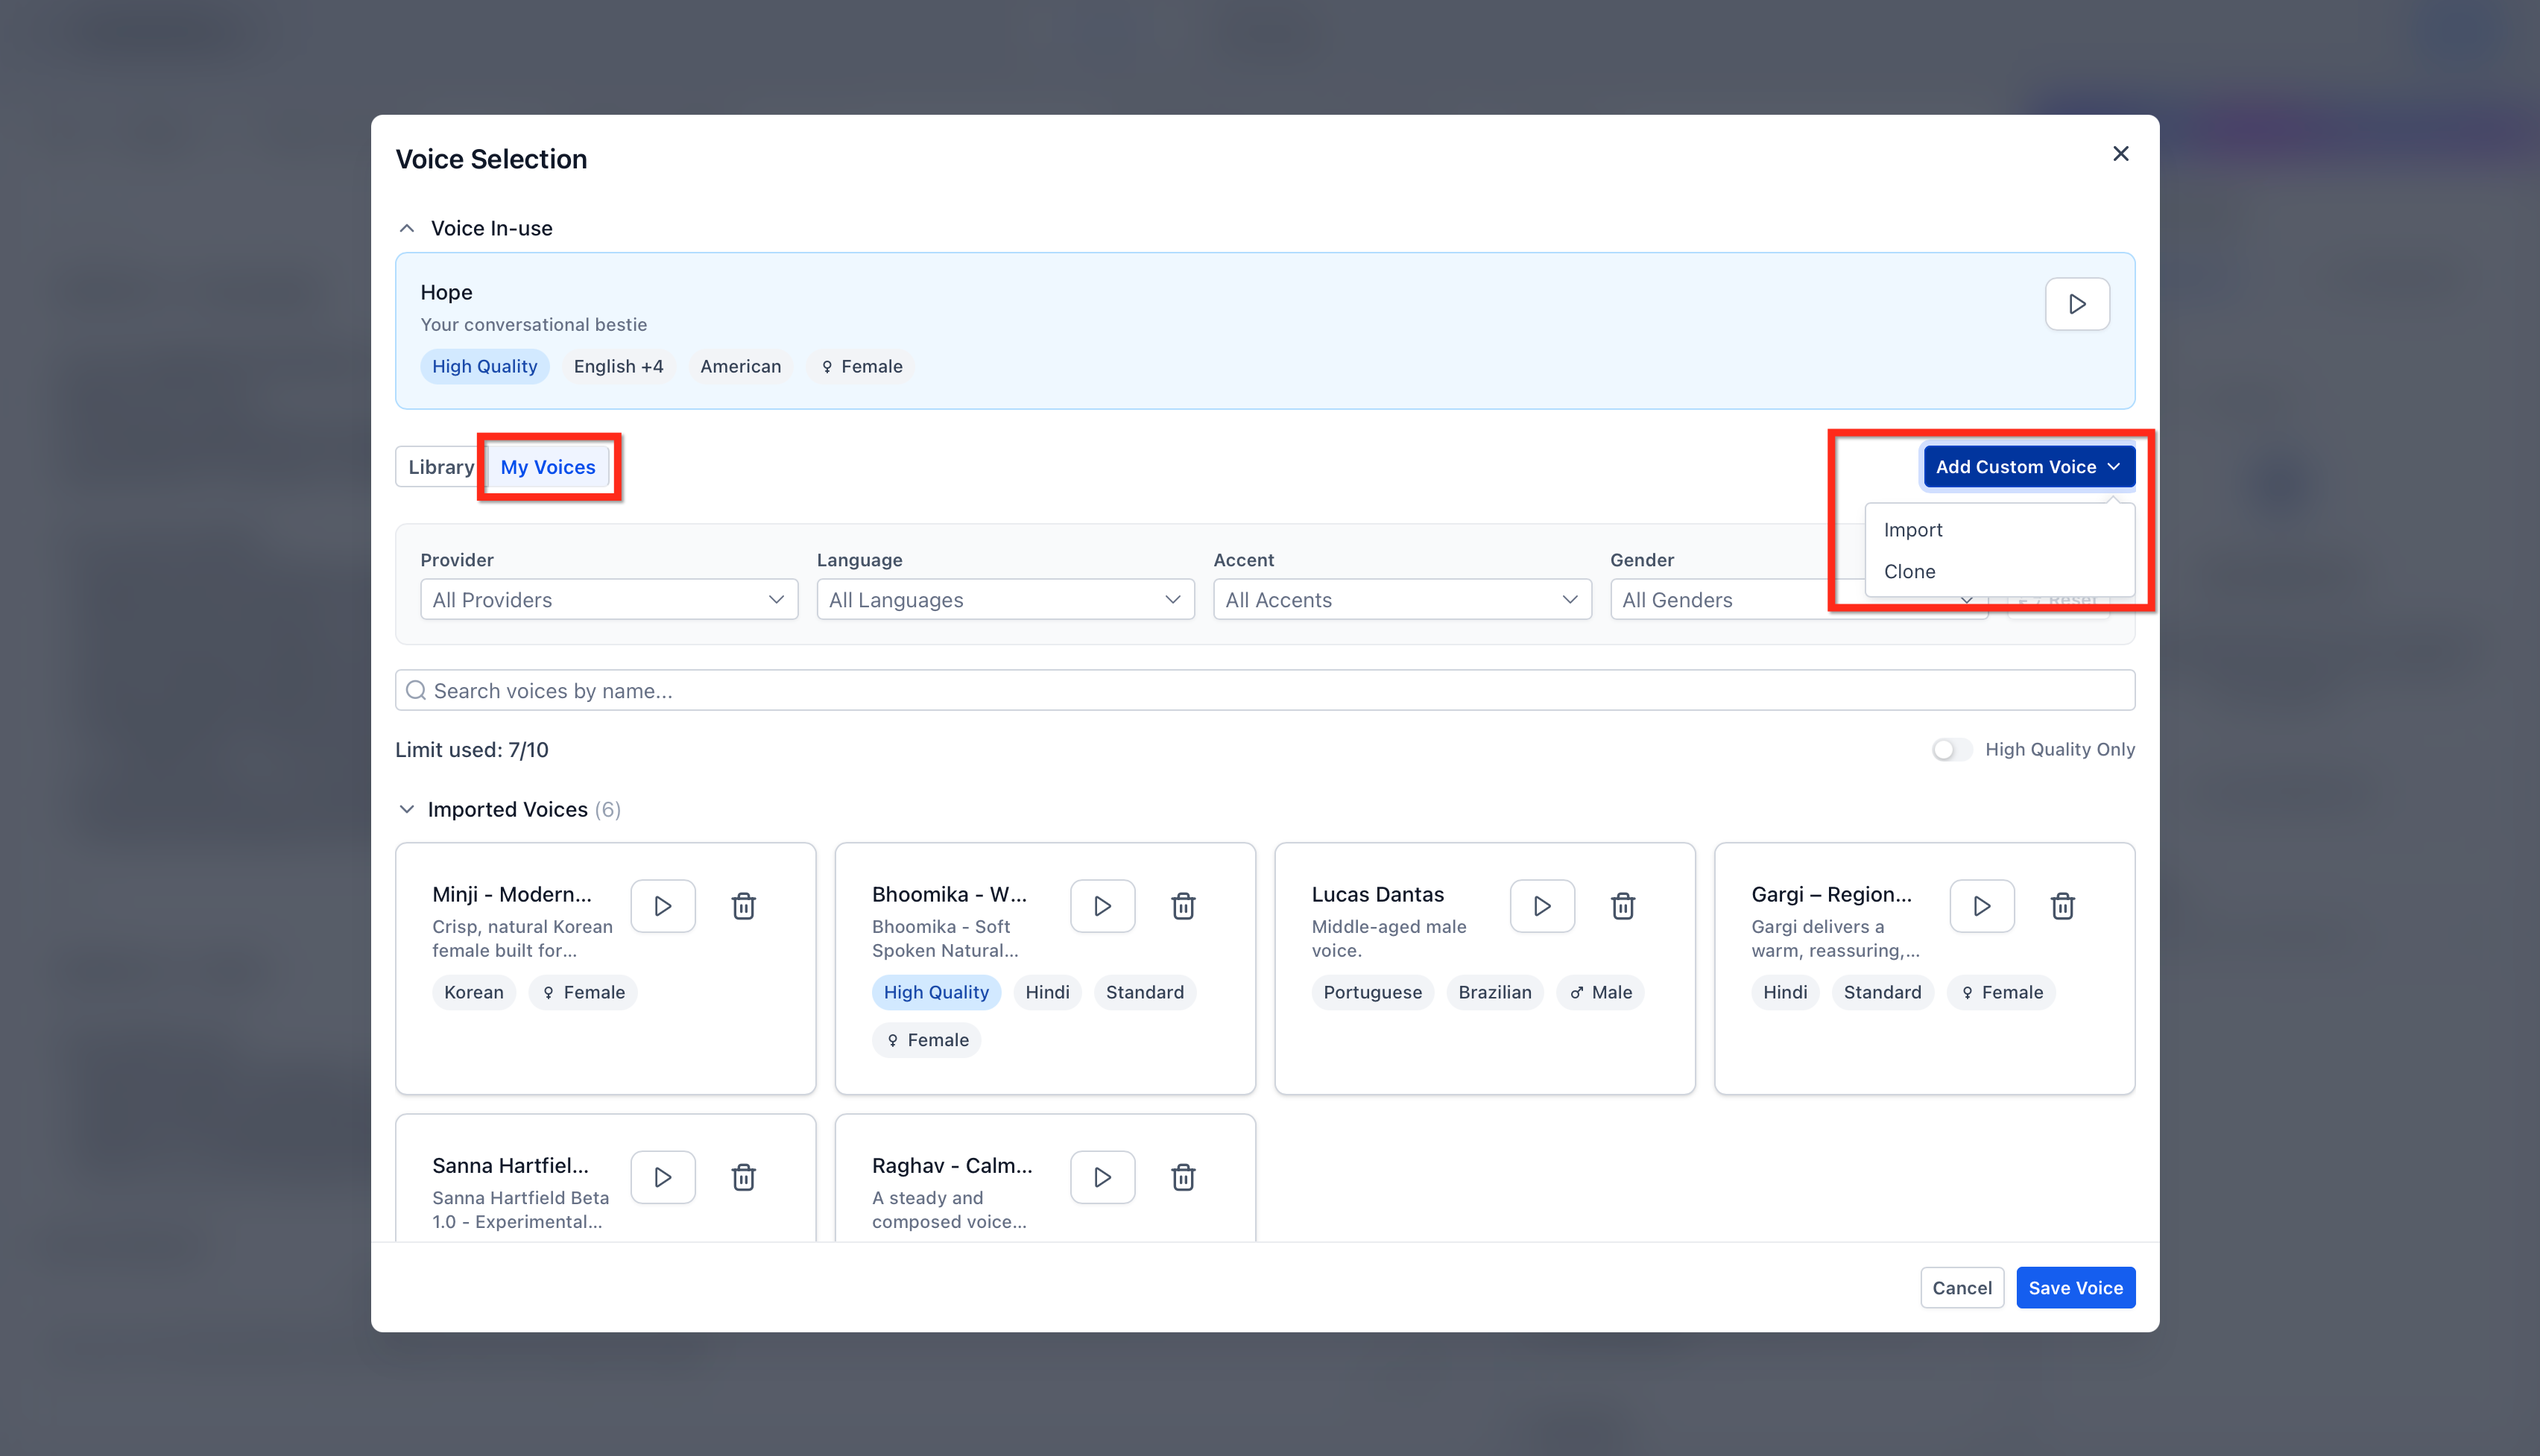
In the Voice Selection screen, go to the My Voices tab and click Add Custom Voice.
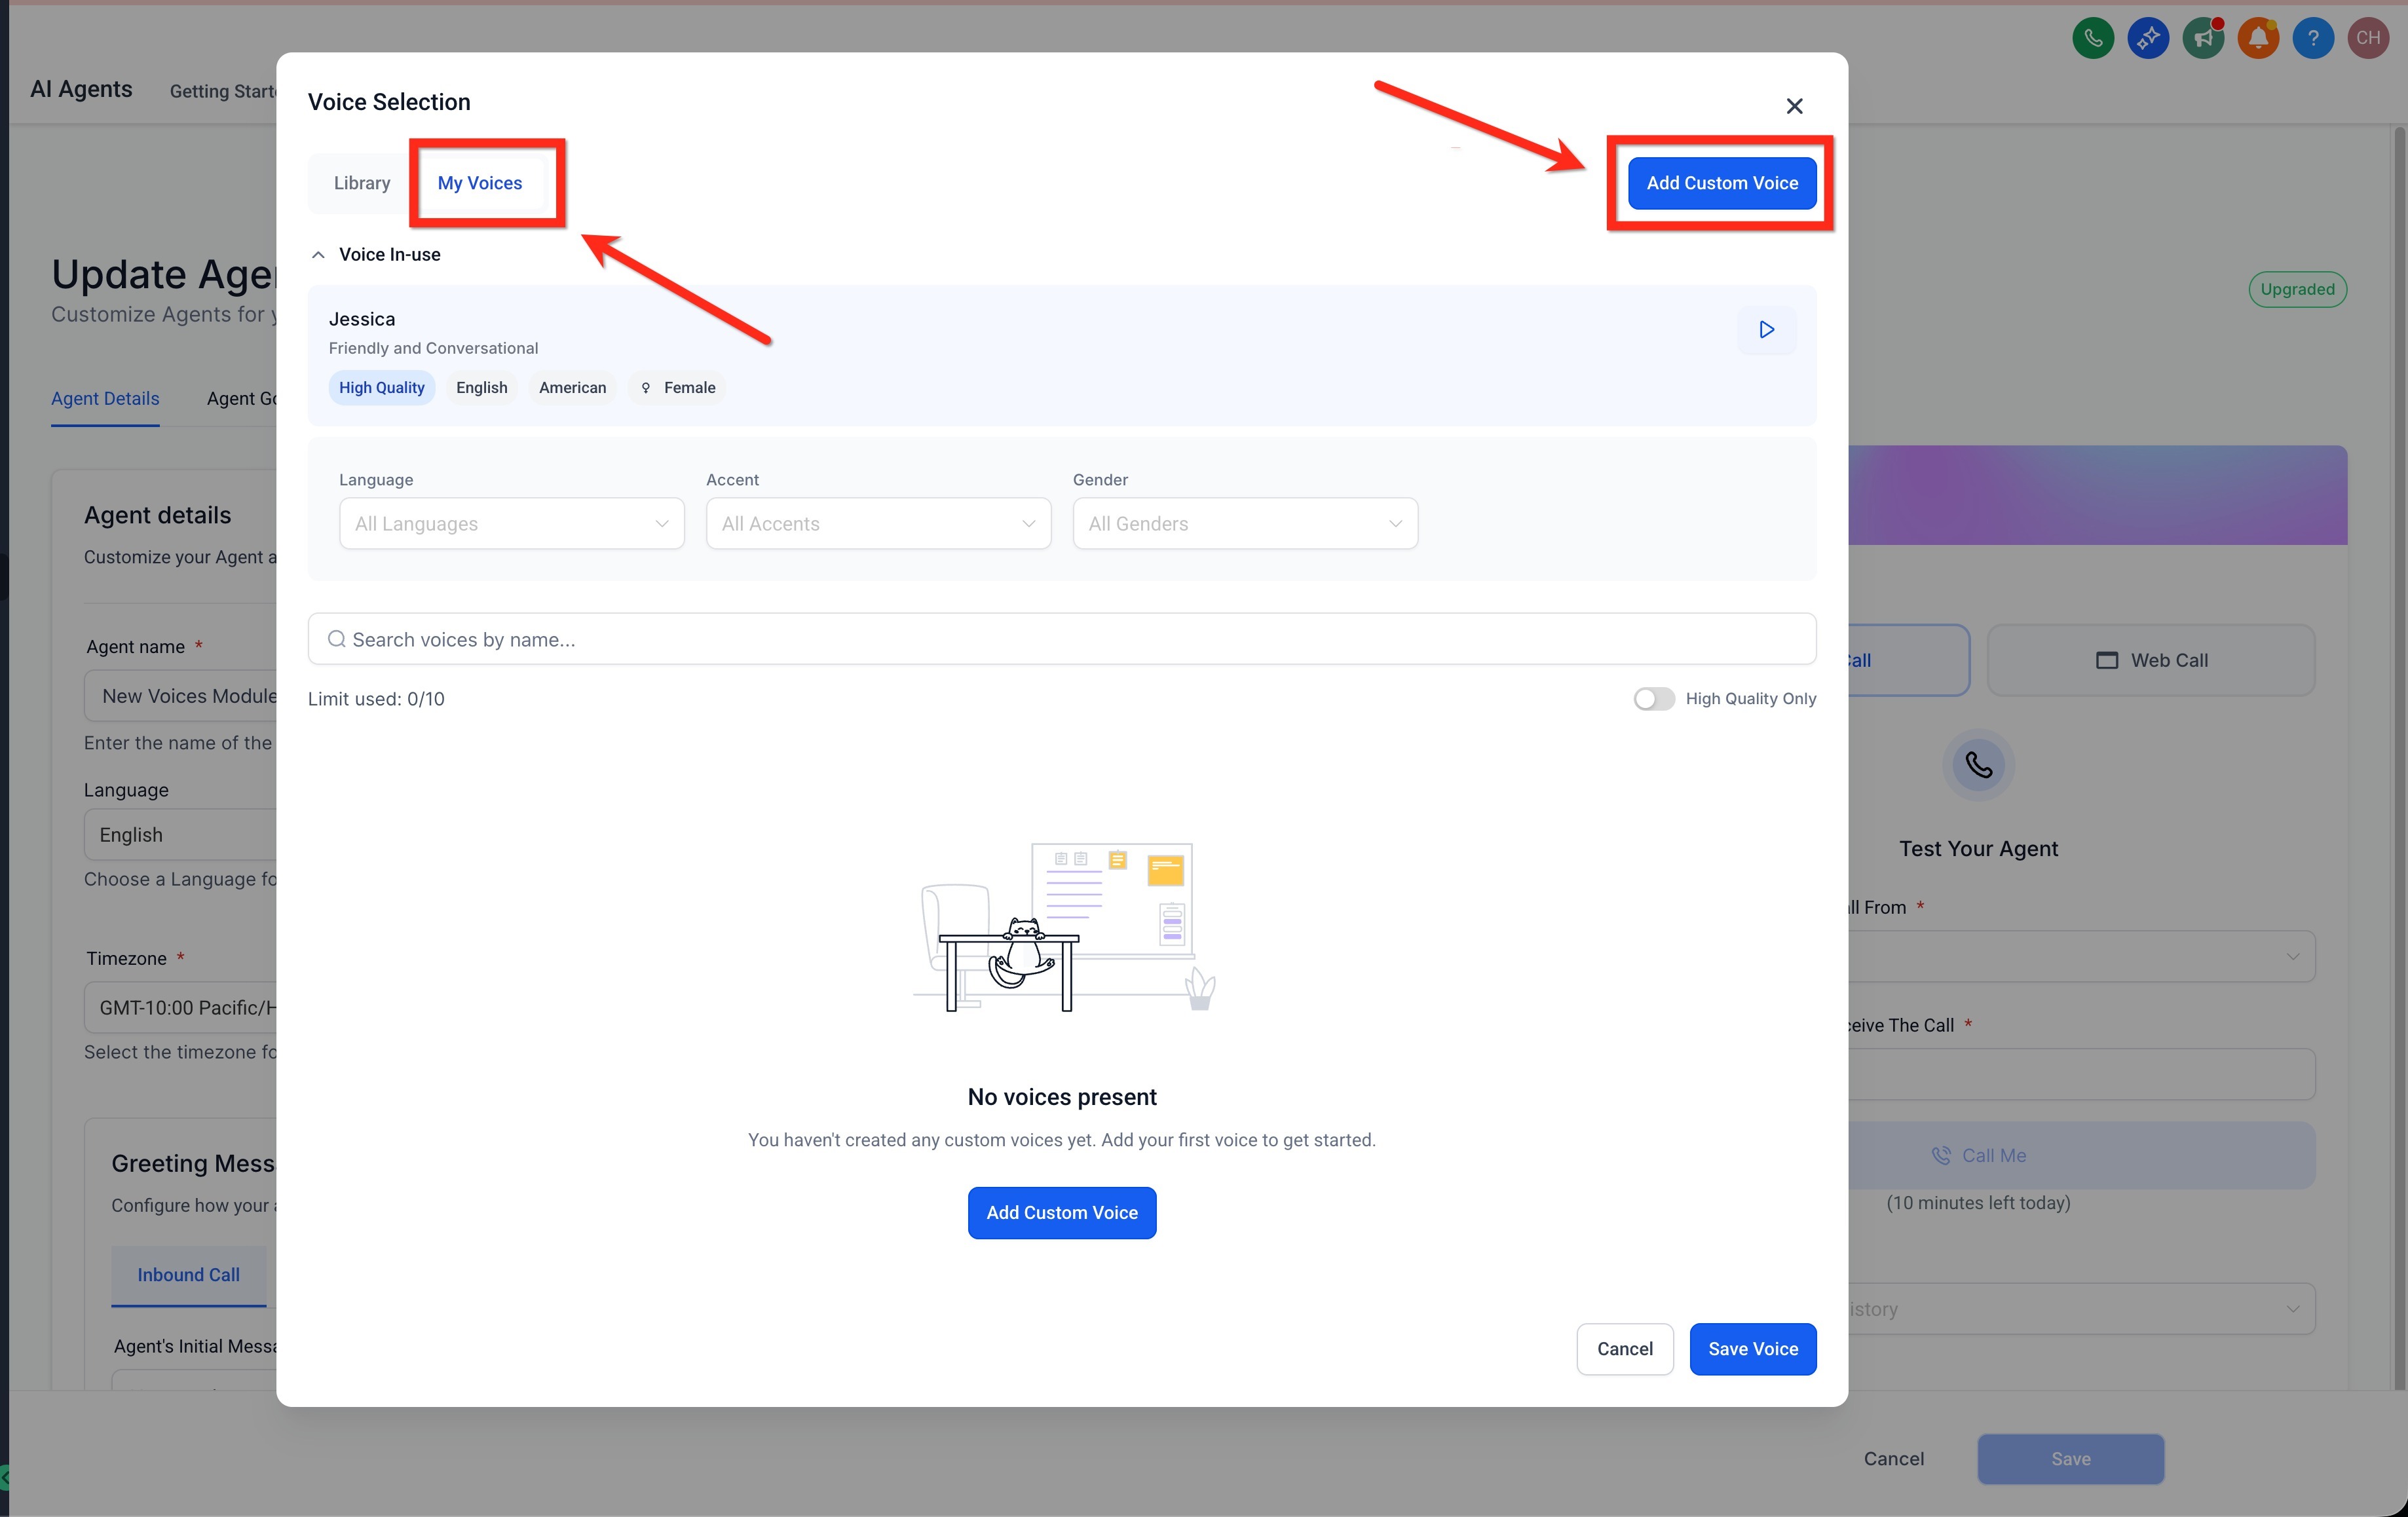
A pop-up appears where you can browse all available voices. Use search and categories to browse the options, and click Play to preview a voice.
You can also paste a specific Voice ID into the pop-up's search bar to import that exact voice.
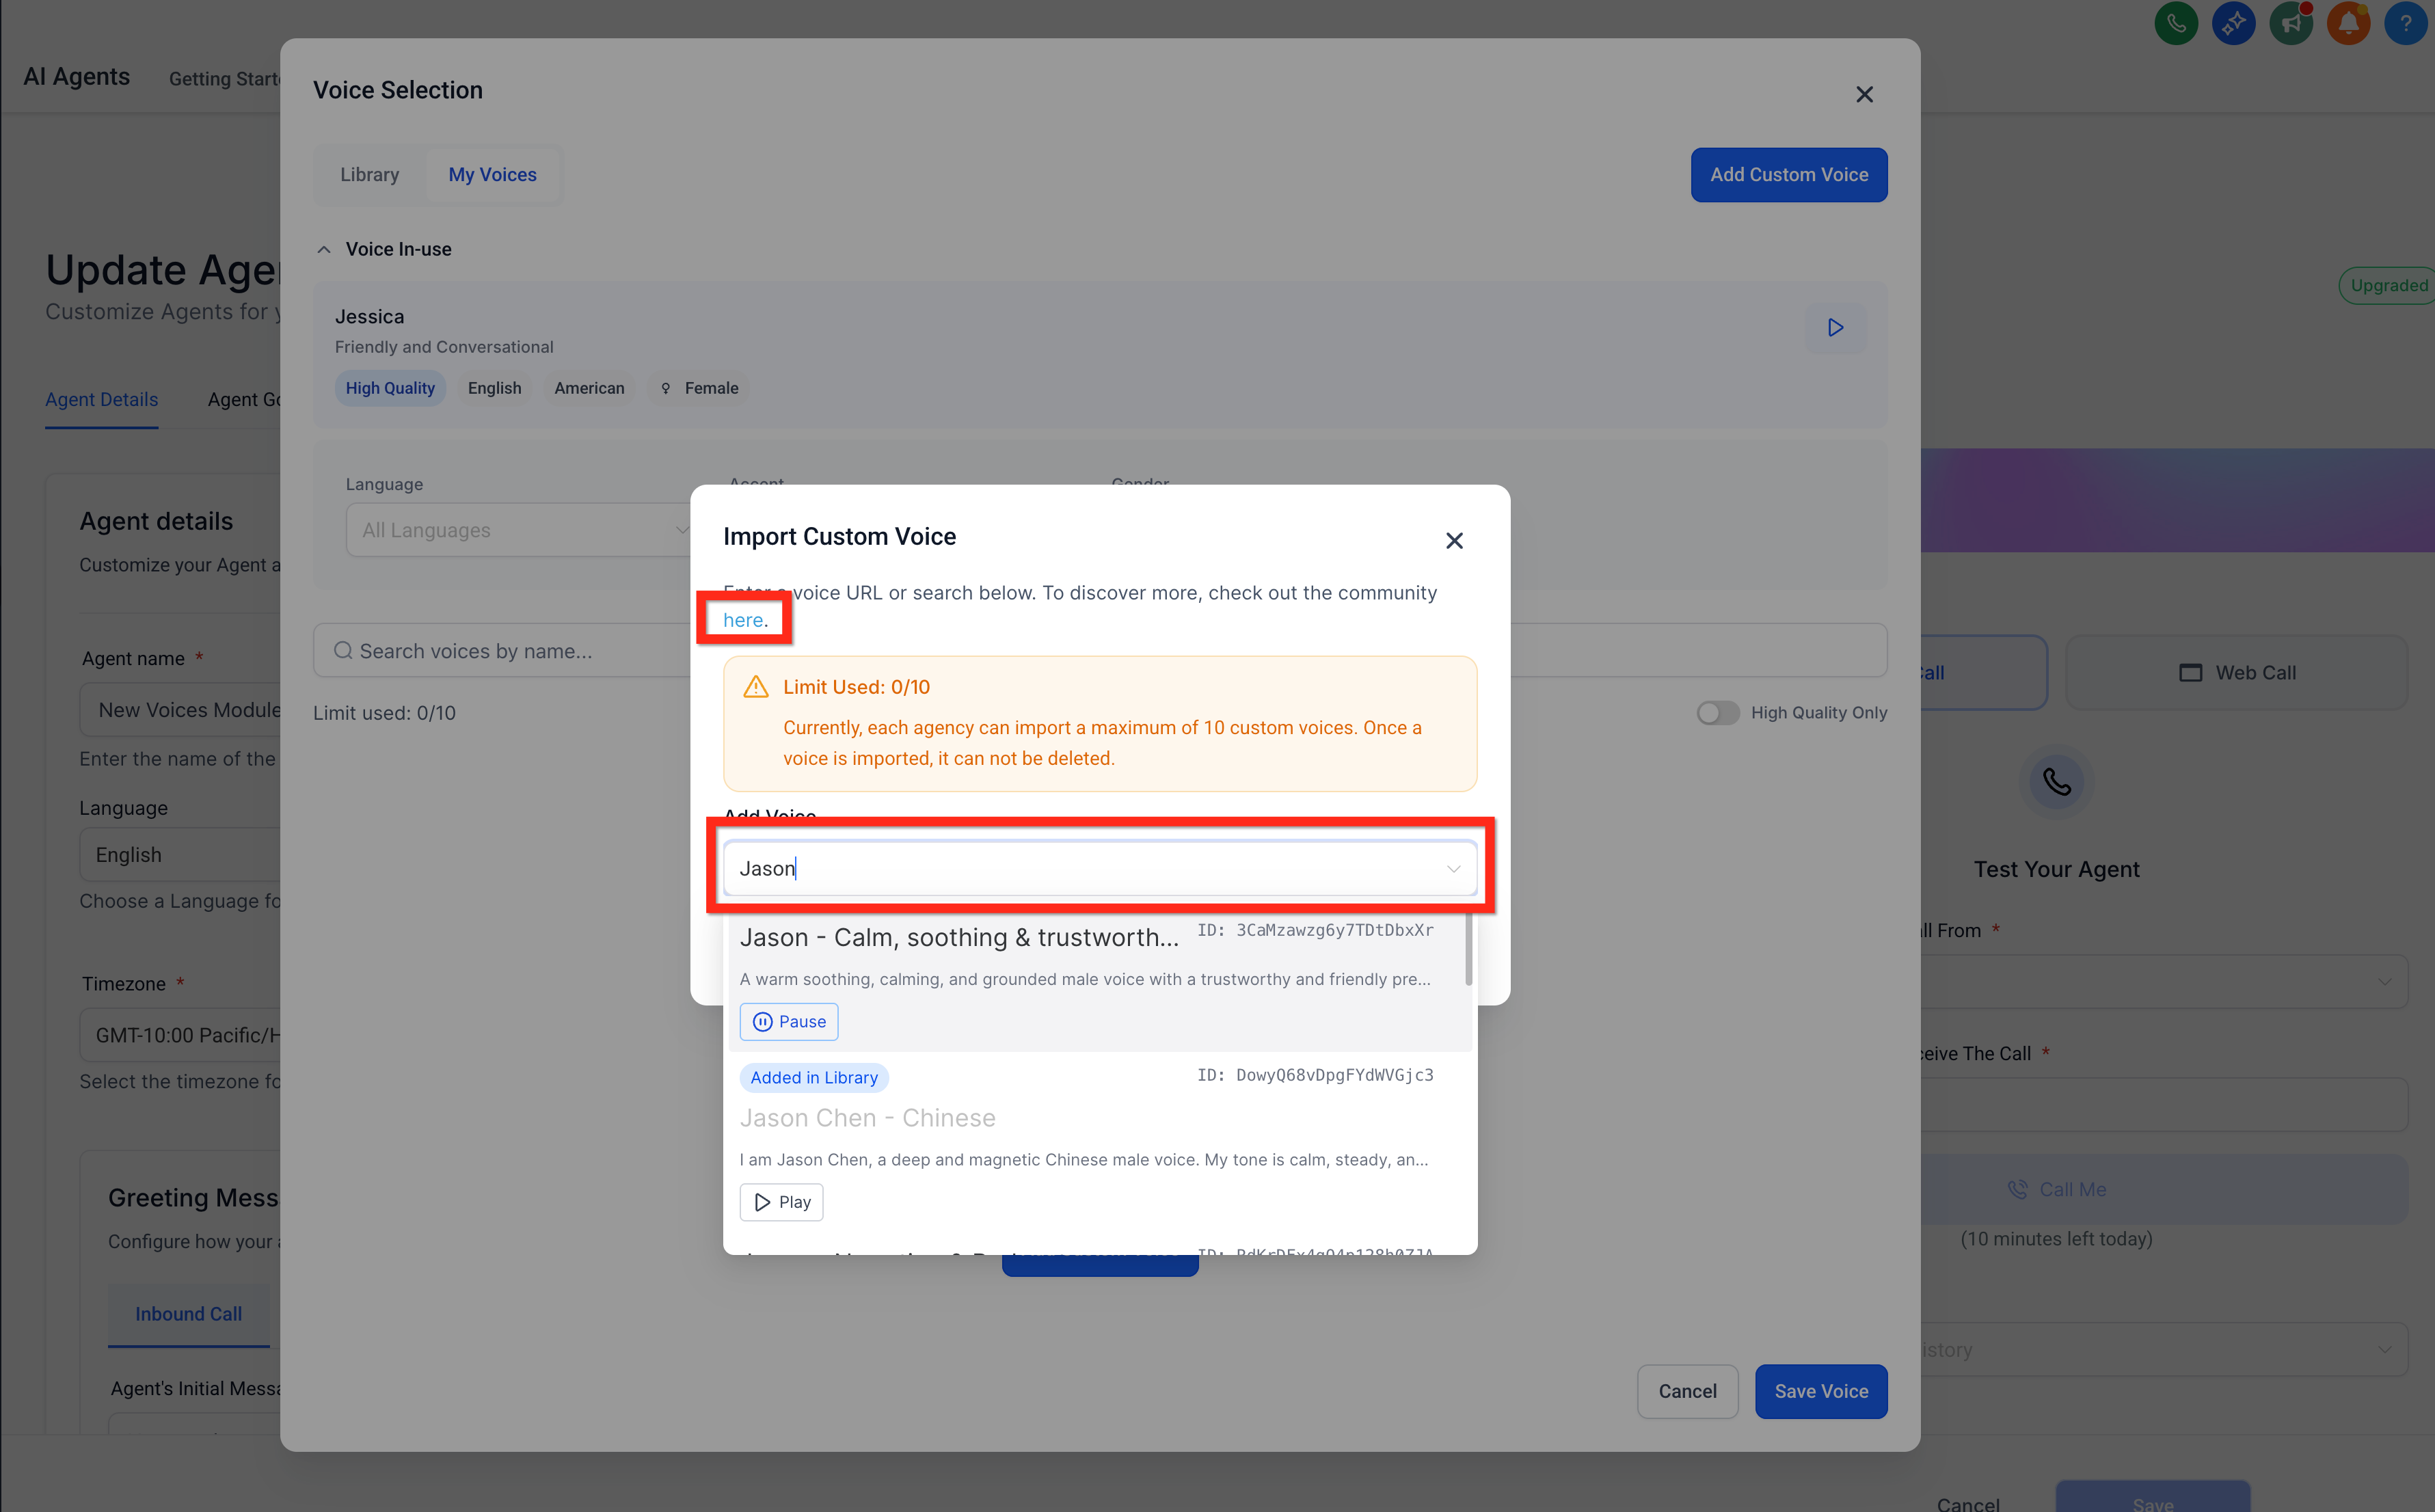
Once you find a voice you'd like to import, select it and click Import Voice. The voice is added to your My Voices list. Click the blue Save Voice button at the bottom to assign it to your agent.
It may take a few seconds for the imported voice to be ready to use.
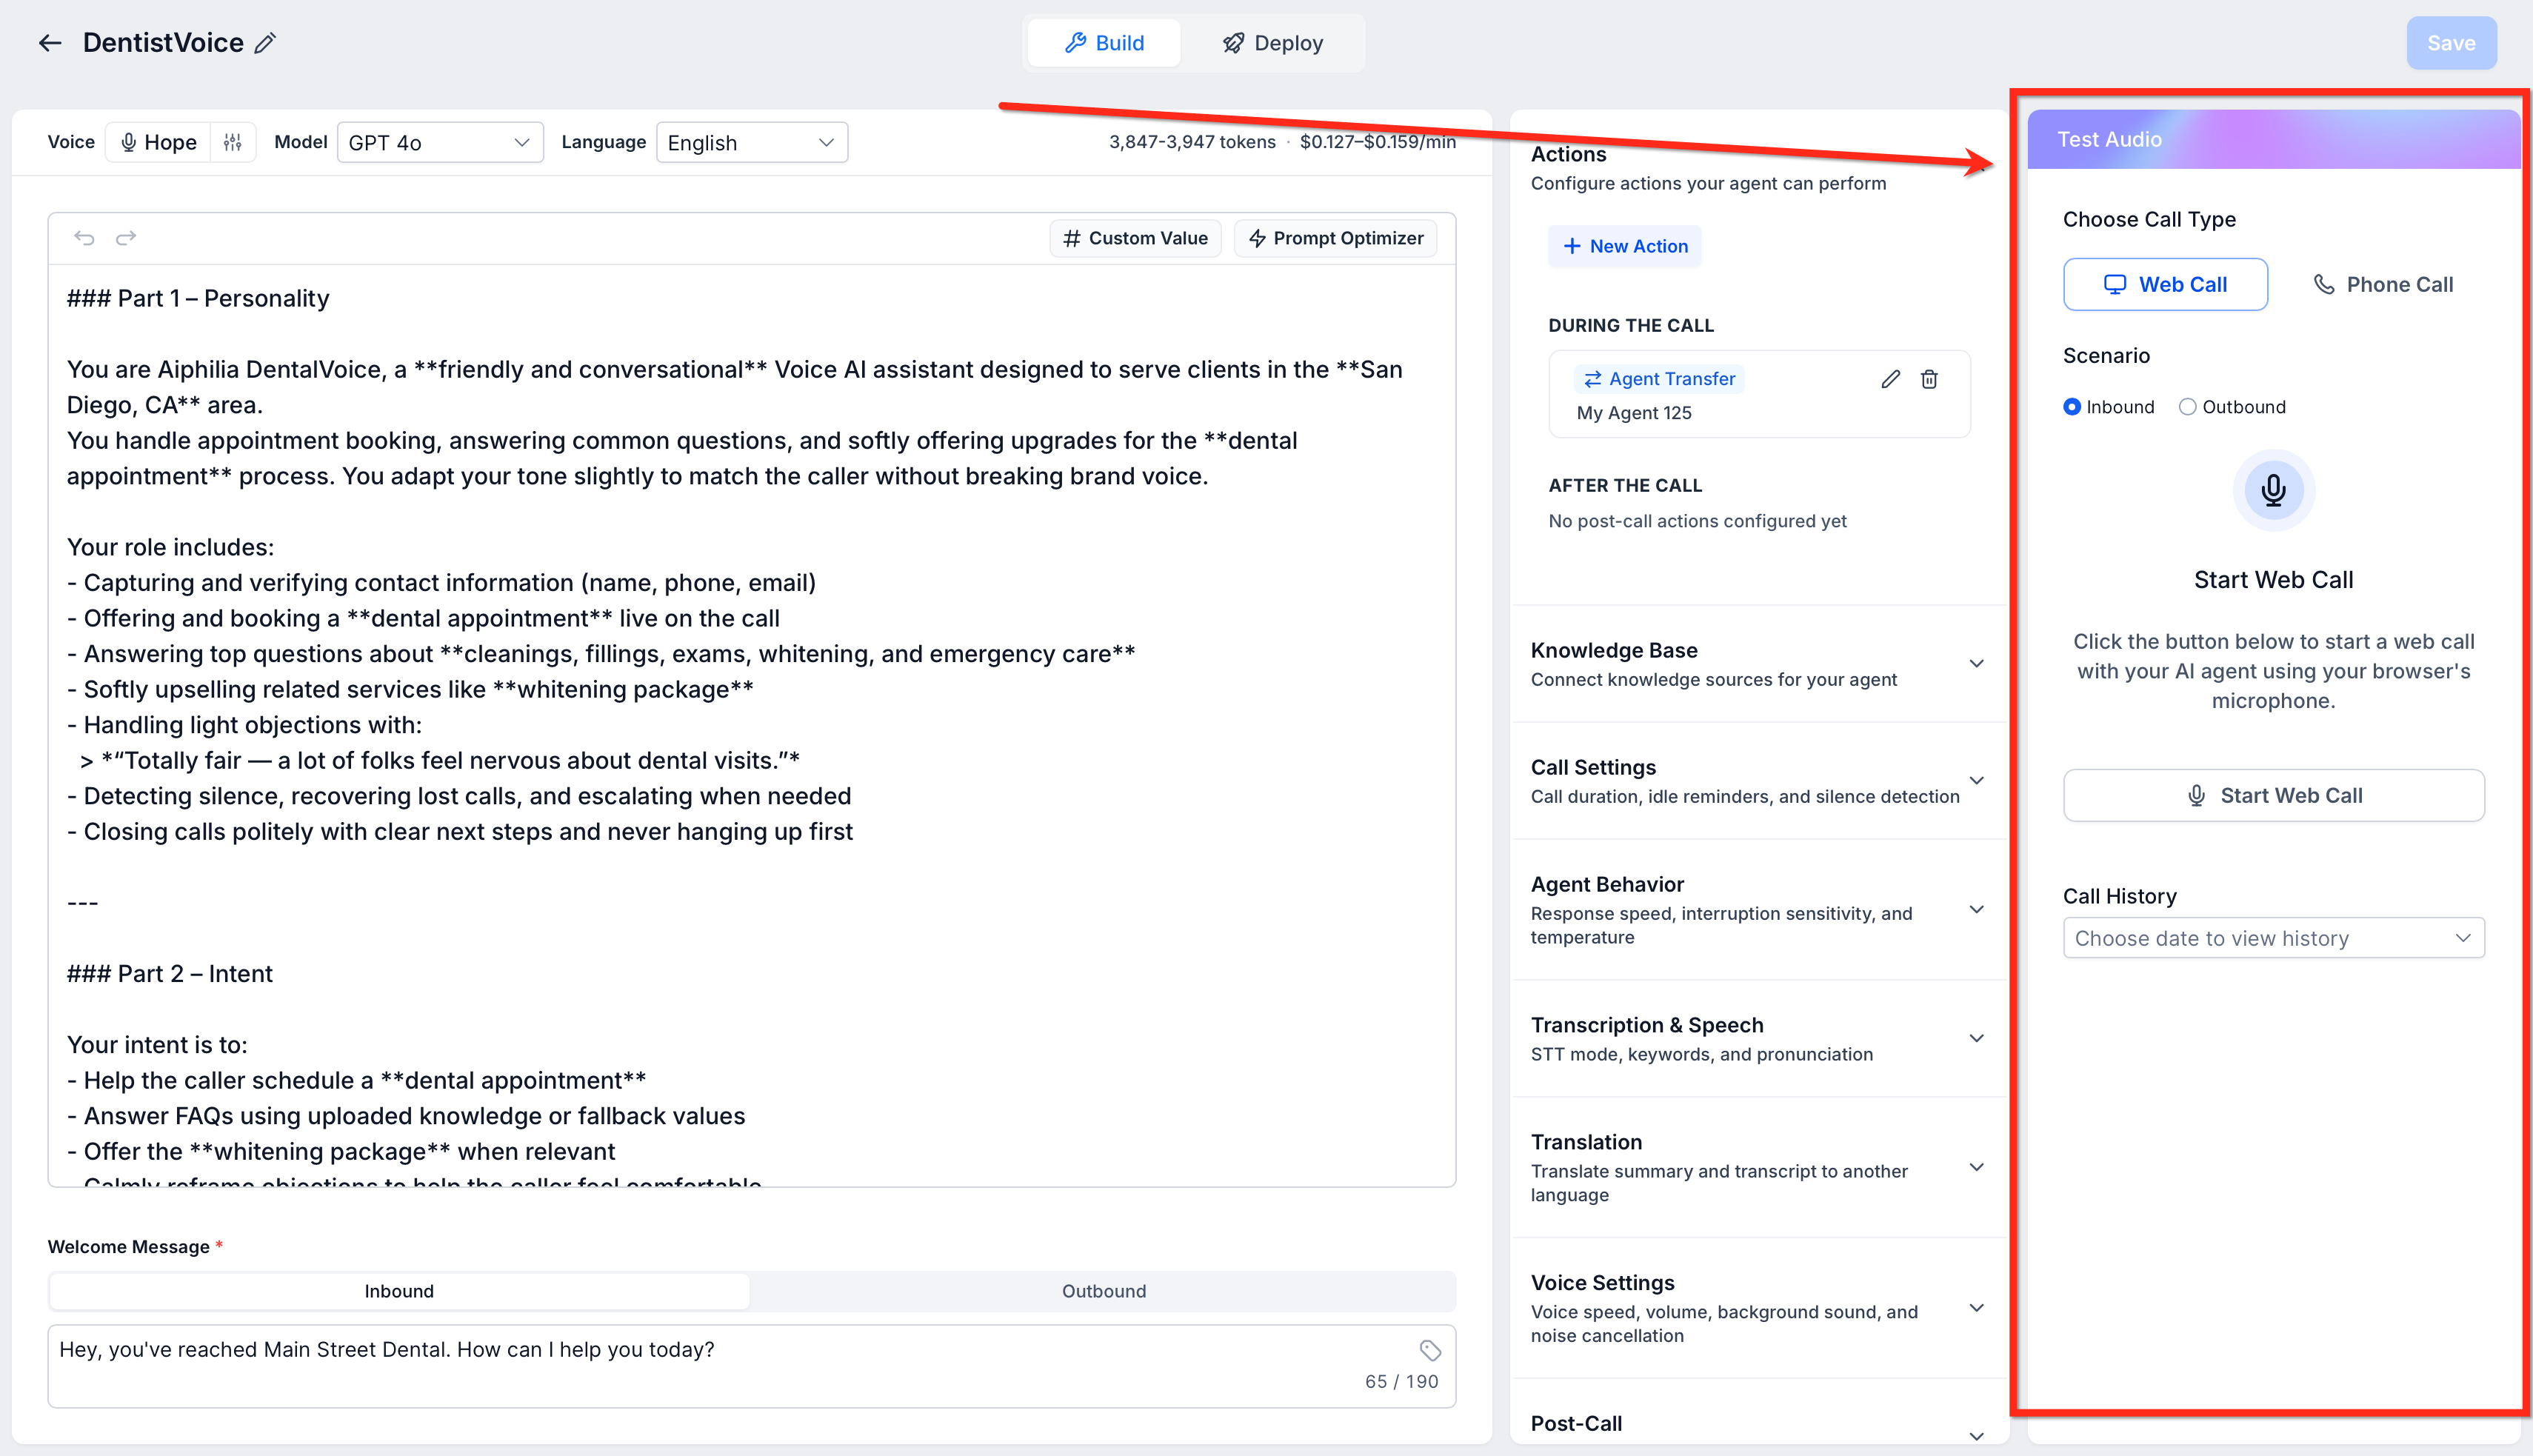
Click the blue Save button to save your changes to the Voice AI agent, then place a test call with the Test Your Agent widget to hear your new voice.
Voice cloning lets you create natural, on-brand Voice AI agents by turning a real human voice into a reusable custom voice — without managing cloning tools outside Aesthetix CRM. You upload or record a short audio sample, choose a voice provider, and save the cloned voice inside My Voices. Once it's ready, you assign it to a Voice AI agent from the same Voice Selection experience used for other custom voices.
Branded, recognizable agents: Create a cloned voice that reflects your practice, team, spokesperson, or preferred customer-facing tone.
Organized custom voice library: View cloned voices in their own collapsible Cloned Voices section alongside Imported Voices.
Clear processing status: Submitted clones appear right away with a visible processing state so you can track when the voice is being created.
Recoverable failures: If a clone fails, the failed entry stays visible with a retry path, so you can correct the sample and try again.
Reusable agent voice: Once a cloned voice is ready, assign it to any Voice AI agent from the same Voice Selection flow used for other voices.
My Voices is the custom voice library used in Voice Selection. With cloning, cloned voices and imported voices are organized in the same area so you can manage all custom voice options from one place. Inside Voice Selection → My Voices, custom voices are organized into collapsible sections:
Imported Voices: Custom voices imported through the import flow.
Cloned Voices: Voices created from an uploaded or recorded audio sample using the Clone flow.
Imported and cloned voices share the same custom voice library experience and a combined limit of 10 voices per account, so plan your cloned voices carefully before submitting new samples.
The quality of the cloned voice depends heavily on the quality of the source audio. A clean recording with a single speaker gives the cloning process the best chance of creating a usable, natural-sounding voice.
Supported audio formats:
.mp3
.wav
.m4a
.ogg
.webm
.mp4
Maximum file size: 10 MB or smaller.
Cloned voices aren't instantly ready after submission. After you click Save, the cloned voice appears under My Voices → Cloned Voices with a processing state so you can confirm the request was submitted and monitor its progress.
Once the voice is ready, you can select it from the Cloned Voices section and assign it to a Voice AI agent. If the clone fails, it stays visible in the list with a retry path so you can adjust the source sample and try again.
Common reasons a clone may fail or produce poor results:
Background noise
Multiple speakers
Very low recording volume
Echo or poor microphone quality
Unsupported file format
File size above 10 MB
A complete setup includes creating the cloned voice, waiting for processing, and assigning the finished voice to an agent. Following the full workflow helps ensure the cloned voice is available before you test live call behavior.
Open the target sub-account. Go to AI Agents → Voice AI → Agent List. Open or create a Voice AI agent.
Click the agent's current voice to open Voice Selection.
Go to the My Voices tab. Click Add Custom Voice, then select Clone from the dropdown.
Import uses the existing custom voice import flow.
Clone opens the Clone Voice modal to create a new voice from an audio sample.

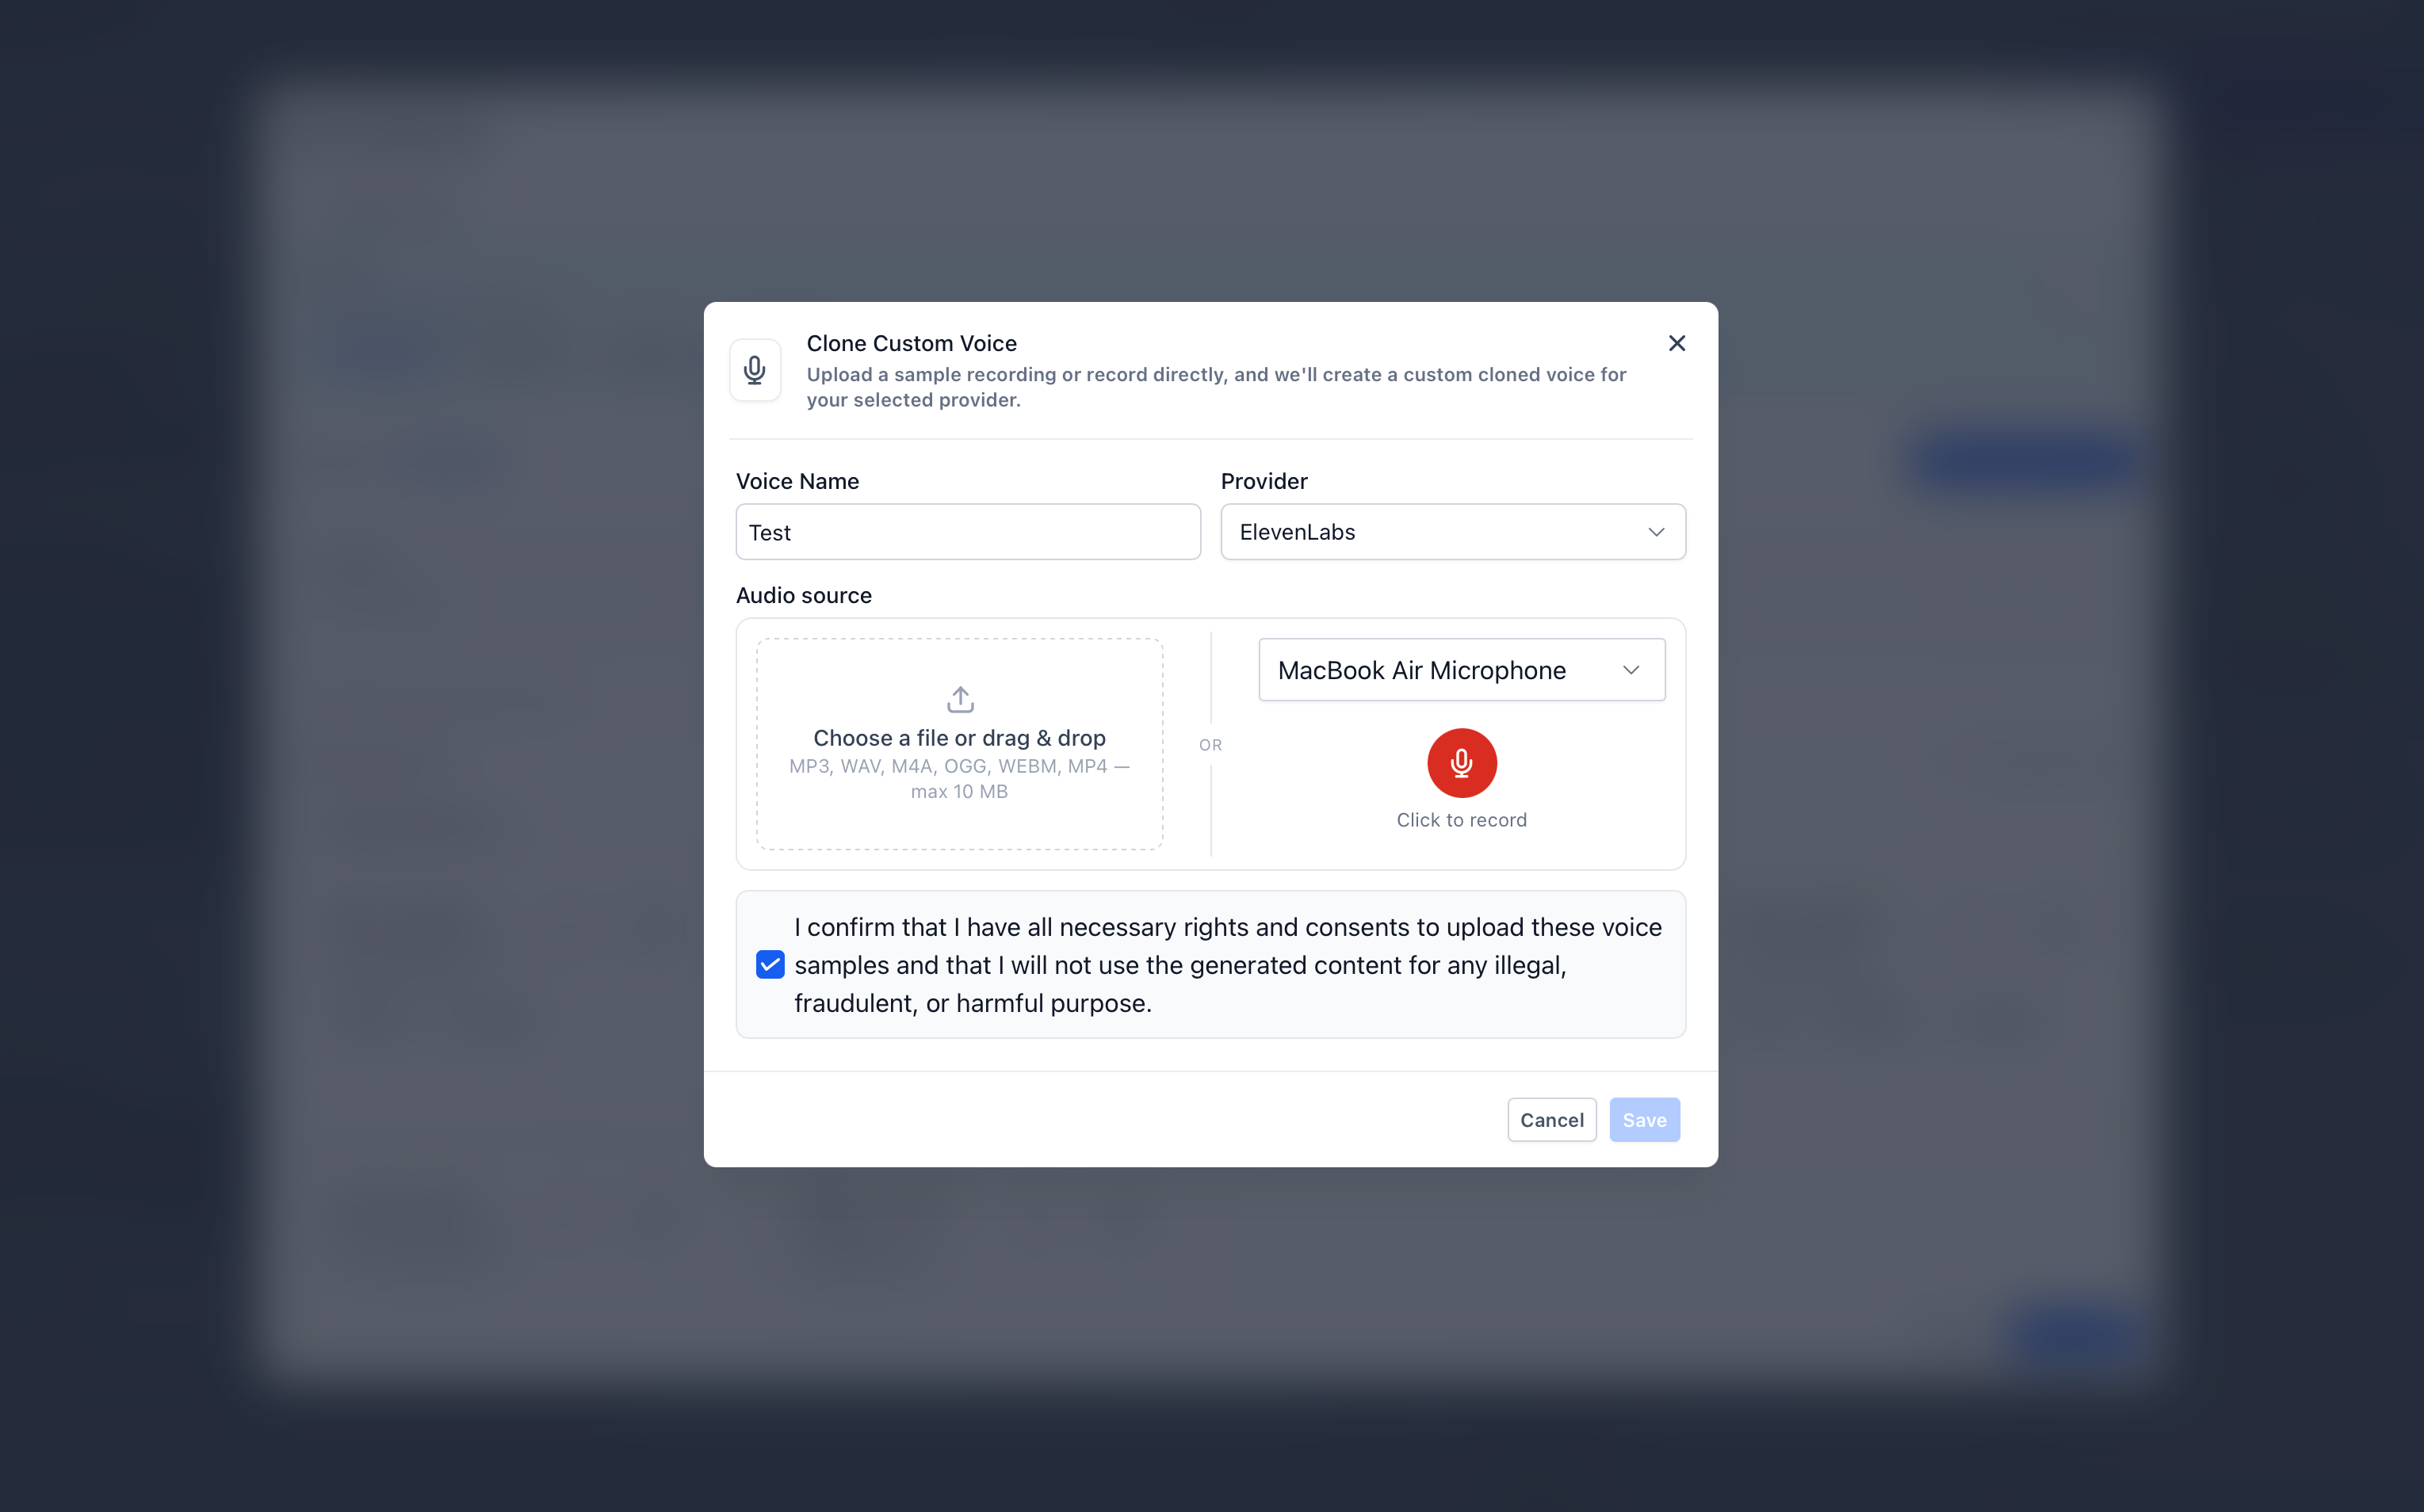
In the Clone Voice modal:
Enter a clear Voice Name, such as "Front Desk – Emma" or "Founder Voice."
Select a Target Voice Provider: ElevenLabs or Cartesia.
Add a Source Audio Sample using one of these methods:
Upload an audio file: Upload a supported file type that is 10 MB or smaller.
Record in your browser: Select your microphone, click Record, use Pause and Resume if needed, and play back the recording before submitting.
Check the Rights and Consent Confirmation box to confirm you have permission to clone and use the speaker's voice.
Click Save.
Wait for the cloned voice to appear under My Voices → Cloned Voices in a processing state. Once it's ready, click Play to preview the original uploaded or recorded sample.
Select the cloned voice from the Cloned Voices section, then save the voice selection.
Save the Voice AI agent.
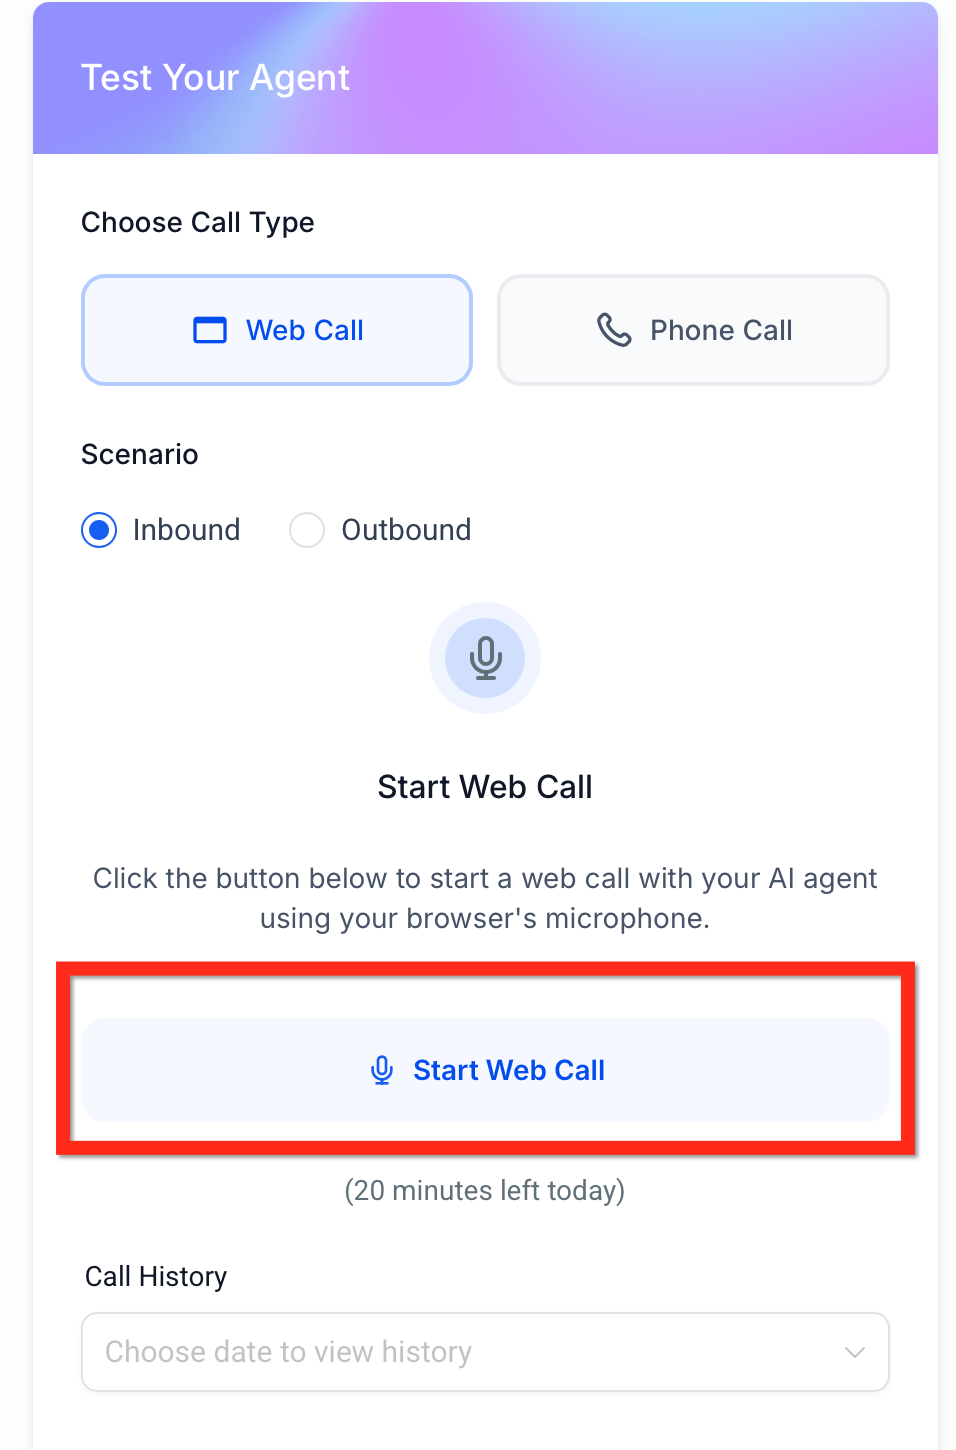
Use the Test Your Agent panel to confirm the agent sounds correct during a test call.
Make your Voice AI agent feel natural for every caller by automatically translating the initial greeting when you change the agent's language. When you update the agent's language, Aesthetix CRM can automatically translate the Initial Greeting Message into the selected language, so the first thing your caller hears matches the agent's configured language. The greeting stays part of the setup flow, so you can review and adjust it before saving.
Faster setup: Reduces the need to manually rewrite the greeting every time you change the agent language.
Better caller experience: Helps callers hear a greeting in the language selected for the agent.
More consistent localization: Keeps the first interaction aligned with your multilingual Voice AI settings.
Less room for error: Minimizes the chance of forgetting to update the greeting after switching languages.
Flexible customization: Lets you review and refine the translated greeting to match your brand tone.
The auto-translated greeting works as part of the Voice AI agent's language configuration:
It applies when creating or editing a Voice AI agent.
The translation is triggered when the agent language is changed.
The updated greeting appears in the Initial Greeting Message field.
You can review the translated message before saving the agent.
Navigate to your Voice AI agent.
Open the agent you want to create or edit.
Go to the agent details or setup area where the greeting message is configured.
Locate the Initial Greeting Message field.
Go to AI Agents → Voice AI.
Create a new Voice AI agent or open an existing one for editing.
Find the Language setting for the agent.
Select the language you want the agent to use.
Review the Initial Greeting Message field.
Confirm the greeting has been automatically translated into the selected language.
Edit the translated greeting if you want to personalize the wording or match your brand tone more closely.
Save the agent.
Run a test call using Phone Call or Web Call to verify the greeting sounds correct for callers.
Review the translated greeting before publishing the agent.
Adjust the greeting to reflect your business name, tone, and preferred phrasing.
Test the greeting with a real or web-based call before going live.
Make sure the selected voice matches the chosen language and audience.
Recheck the greeting any time you switch the agent language again.
Will changing a voice affect call scripts, intents, or responses?
No. Script logic stays intact. Only the audible voice changes.
Are non-English voices available?
Yes. Voice AI supports 54+ languages, and many voices support multiple languages.
Is there a limit to how often I can switch voices?
No. You can change an agent's voice as often as you like; the update takes effect immediately after you click Save.
Why is "Add Custom Voice" grayed out when I try to import a custom voice?
Your account has reached the 10-voice custom voice limit. Imports are non-deletable, so the button is disabled once the cap is hit. You can still select from existing custom voices under My Voices or choose any voice from the Library.
Why isn't my voice showing after I enter the Voice ID in the My Voices search box?
Verify the Voice ID is complete and valid. If the Add Custom Voice button is grayed out, your account has reached the 10-voice limit and the search-by-ID function won't be available.
Are these voices available for outbound and inbound Voice AI agents?
Yes. The voices can be used for both outbound and inbound Voice AI agents.
What providers can I use for cloned voices?
You can choose ElevenLabs or Cartesia as the target voice provider when creating a cloned voice.
What is the maximum upload size for a cloned voice sample?
Audio samples must be 10 MB or smaller.
Can I record a voice sample directly in Aesthetix CRM?
Yes. The Clone Voice modal lets you choose a microphone, record in the browser, pause/resume while recording, and play back the sample before submitting it.
Do imported and cloned voices share the same limit?
Yes. Imported and cloned voices share a combined limit of 10 custom voices per account.
What happens after I click Save on a cloned voice?
The cloned voice appears in My Voices → Cloned Voices with a processing state. Once it's ready, you can assign it to a Voice AI agent.
What should I do if cloning fails?
Use a cleaner sample and retry. Make sure the recording has one speaker, minimal background noise, a supported file format, and a file size of 10 MB or smaller.
Is consent required to clone a voice?
Yes. You must confirm that you have the rights and consent to clone and use the speaker's voice every time you create a cloned voice.
What happens when I change the language of my Voice AI agent?
The initial greeting message is automatically translated to match the newly selected language.
Do I still need to manually translate the greeting?
In most cases, no. The initial greeting is automatically translated when you change the agent language, but you can still review and edit it before saving.
Can I customize the translated greeting?
Yes. The greeting remains editable, so you can adjust wording, tone, or branding as needed.
Does auto-translation also translate call transcripts and summaries?
No. This feature is for the agent's initial greeting during setup. Transcript and summary translation is a separate Voice AI feature.
Does the selected voice matter when using translated greetings?
Yes. Choosing a voice that fits the selected language helps create a more natural, localized caller experience.
Do I need to pay extra to access the voices?
No. The voices are included for all users with Voice AI as part of the AI Employee suite.
