Ticketing brings patient and client support requests into your Aesthetix CRM account so your team can track each issue from the first message to resolution. You will find it as Tickets in the left sidebar, below Opportunities, and its configuration lives under Tickets > Settings.
A ticket is a record of one specific request, such as a billing question, a product order problem, a membership question, or a post-treatment question that needs the right staff member. Every ticket is linked to a contact and has its own ticket ID, name, status, priority, category, assignee, and other details. Each ticket keeps the request, customer messages, internal notes, ownership, and progress together.
One patient can have several tickets at once. For example, a billing ticket and a membership ticket each have their own owner, status, and history, while both stay connected to the same contact.
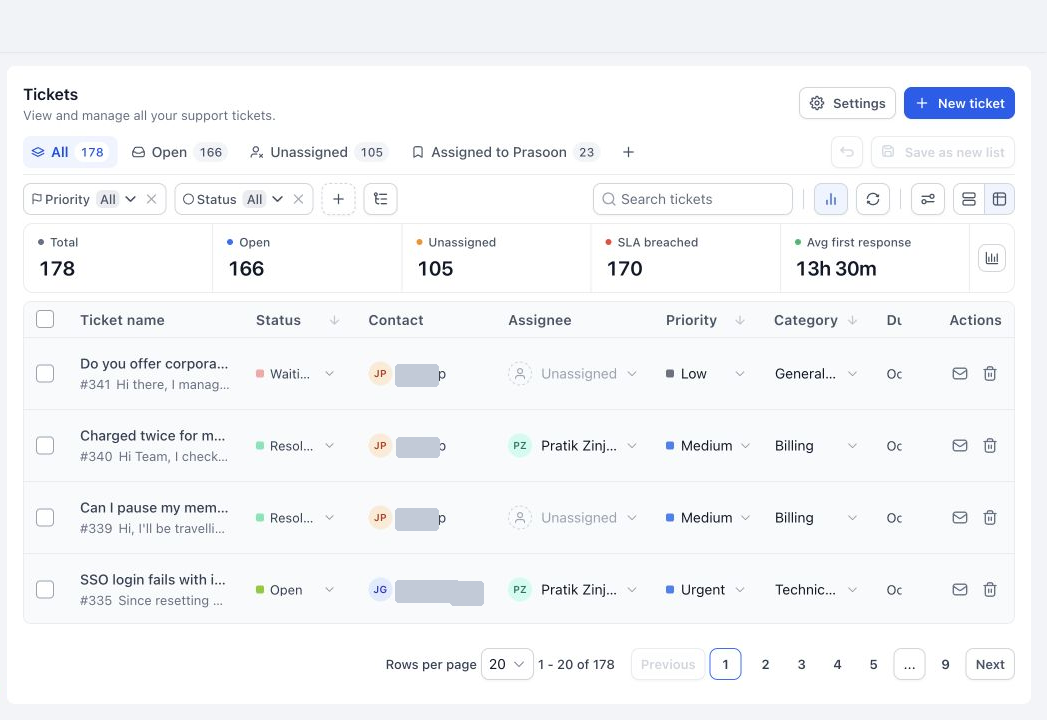
Select Tickets in the left sidebar. When tickets already exist, this opens the ticket list, where you can search, filter, create a ticket with New ticket, or open Settings. If you do not see Tickets, ask an administrator to confirm that Ticketing is enabled for your account and that your user has access (see User permissions below).
Request type | How a ticket helps |
|---|---|
Billing questions | Route to front desk or billing, track until answered, keep a record of the reply. |
Product order issues | Capture the order reference in a custom field and assign to the person who handles orders. |
Membership questions | Categorize as Membership so the right team member picks it up. |
Post-treatment questions | Route quickly to a nurse or provider, with a due date and an SLA target. |
Onboarding and general service requests | Assign an owner and keep the conversation in one place. |
A typical process is receive, assign, respond, resolve. Your statuses can also mark tickets that are waiting on the patient or blocked by another dependency.
Open Tickets > Settings and review your statuses, priorities, categories, ticket form, and Fast Replies.
Connect a support email integration, or use New ticket to create your first request manually. See Create Tickets and Connect Email Integrations in Ticketing.
Configure SLA policies and business hours if your team works to response targets. See Configure Ticketing SLAs and Business Hours.
Assign and respond to tickets, then save useful views as Smart Lists. See Work Tickets from the Ticketing List and Ticket Details Page.
Add workflows and connect knowledge bases as your process develops. See Automate Ticketing with Workflows and Use AI in Ticketing for Summaries and Suggested Replies.
Tickets can contain patient health details, in the message text, in attachments, and in the emails that create or answer them. Keep clinical details (diagnoses, treatment notes, photos, medications) in your EMR, not in tickets. Use Ticketing for the administrative side of a request and point to the EMR record by reference. Limit ticket access by role, and avoid sending protected health information (PHI) over unsecured email. Ticket replies go out by regular email.
Open Tickets > Settings with an administrator account. Decide which stages your requests move through, how you define urgency, and what information staff need to collect. A small, clearly named set of values is easier for a team to use consistently.
The Settings menu includes these sections: Status, Priority, Category, Ticket configuration, Fast replies, SLA, Business hours, Integrations, Automation, and Knowledge base. This guide covers the first five. The others have their own guides.
Statuses describe progress through your process. Starter statuses include New, Open, Waiting on Customer, Resolved, and Blocked. Your account may already have customized values.
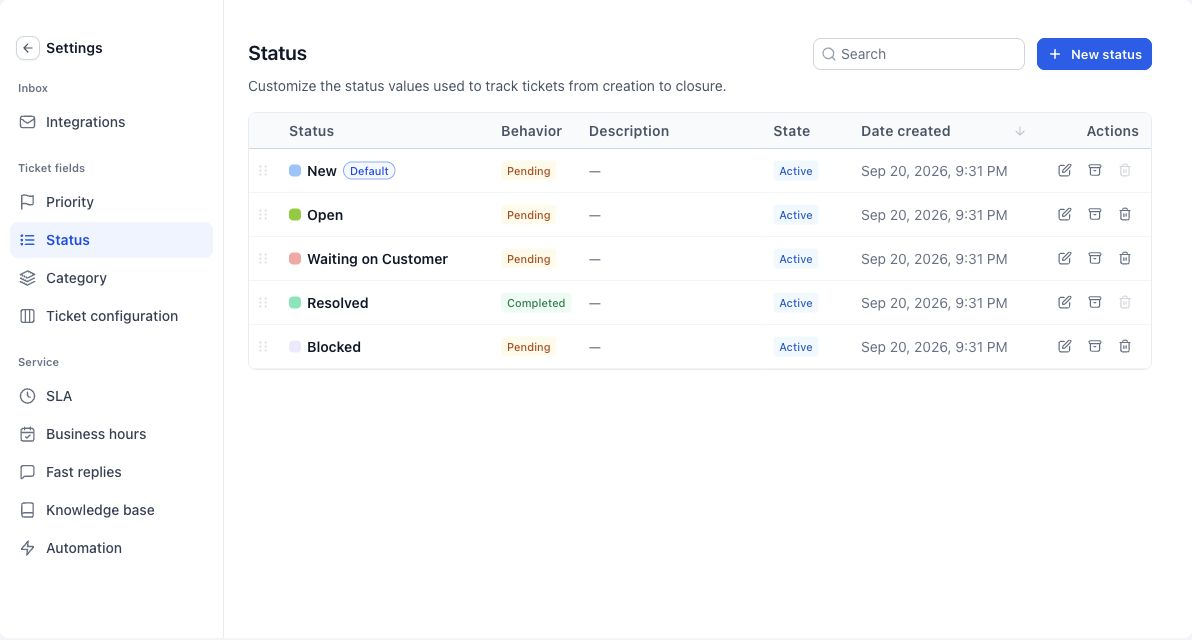
Open Settings > Status.
Select New status, or select an existing status to edit it.
Enter a Name, add a description that explains when to use it, and choose a color.
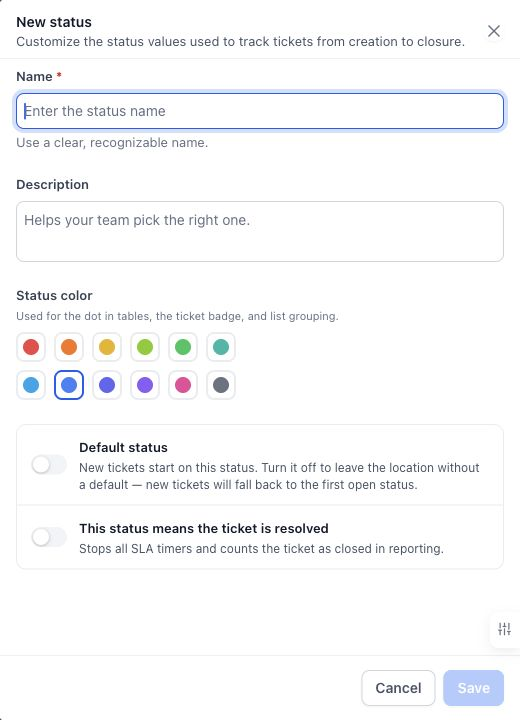
Turn on Default status if new tickets should start here.
Turn on This status means the ticket is resolved only for a status that represents completed work.
Select Save.
Key behavior:
The resolved-status setting stops SLA timers and counts the ticket as closed in reporting. The name alone does not do this, so a status named "Resolved" is not treated as completed unless this setting is on.
A waiting status does not pause SLA clocks automatically. Pause statuses are chosen inside the SLA policy.
Drag the handle beside a status to arrange the order. The Default badge marks the starting value. If you remove the default, new tickets fall back to the first open status.
Priorities communicate urgency. The starter set is Low, Medium, High, and Urgent, with Medium as the initial default.
Open Settings > Priority and select New priority, or open an existing value.
Enter the name and a description that helps staff choose consistently, for example what separates an urgent post-treatment concern from a routine question.
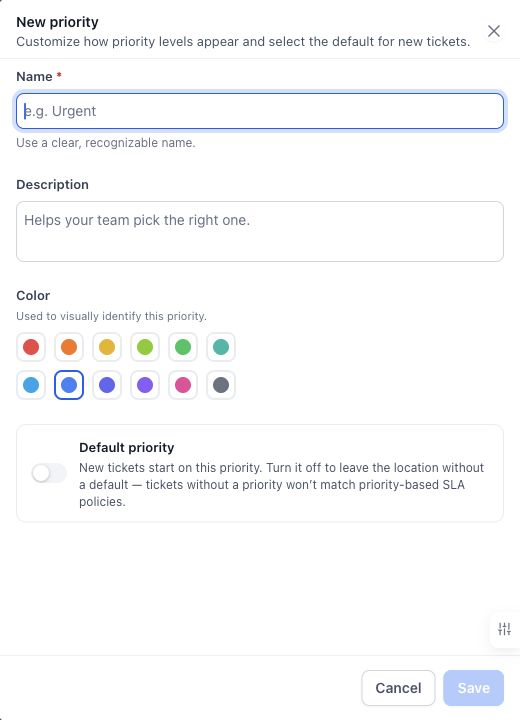
Choose a color.
Turn on Default priority if this should be preselected on new tickets.
Select Save, then arrange the values with their drag handles.
Only one priority can be the default at a time. A ticket with no priority will not match an SLA policy that requires a specific priority, so review your SLA conditions when you change defaults.
Categories group requests by type. For example, Billing names the area, and Refund request can name a specific issue inside it.
Open Settings > Category and select New category.
Enter a name and an optional description.
Turn on Default category if it should be preselected on new tickets.
To add a second classification level, turn on Enable sub-categories.
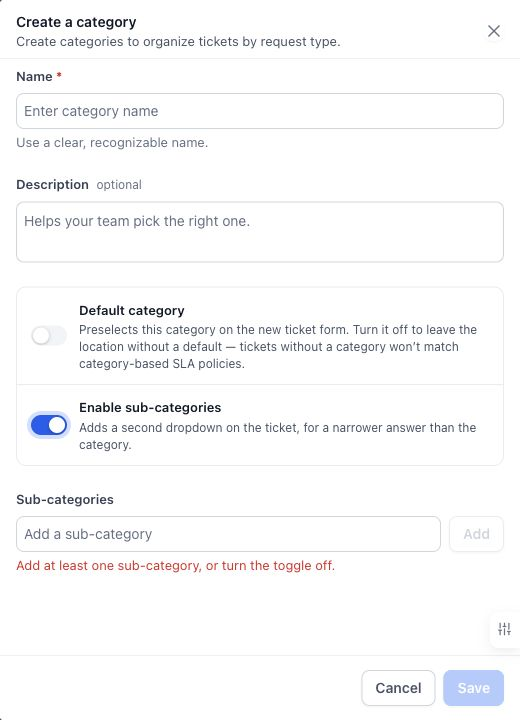
Enter each subcategory and select Add. Add at least one value when subcategories are enabled.
Select Save.
A category with subcategories adds a second dropdown to the ticket. If you choose no default category, staff pick one when creating or reviewing a ticket. Tickets with no category do not match SLA conditions that require a category.
Example categories for a practice: Billing, Product Orders, Memberships, Post-Treatment Questions, Scheduling Help, General.
The Status, Priority, and Category pages each provide search and row actions.
Action | What it does |
|---|---|
Edit | Update the value's name, description, color, or settings. |
Archive | Retire the value from active selection. Tickets that already use it keep it. |
Delete | Remove the value, when the action is available. |
Delete may be unavailable because the value is protected, is a default, is in use, or is required by the configuration. Read the explanation on the disabled control. For a value with history, archiving is usually the right way to stop using it on new work.
The ticket form controls what staff see when they create a request. Use it to collect what is needed to investigate, such as an order reference or affected product.
Open Settings > Ticket configuration.
Expand Standard fields or Custom fields in the left panel, or search for a field.
Add the fields you need to the form preview, and drag them into order.
Mark supported fields as Required when staff must complete them at creation.
Remove optional fields you do not need. Protected fields have no removal control.
Review the preview and select Save. Select Discard to abandon unsaved layout changes.
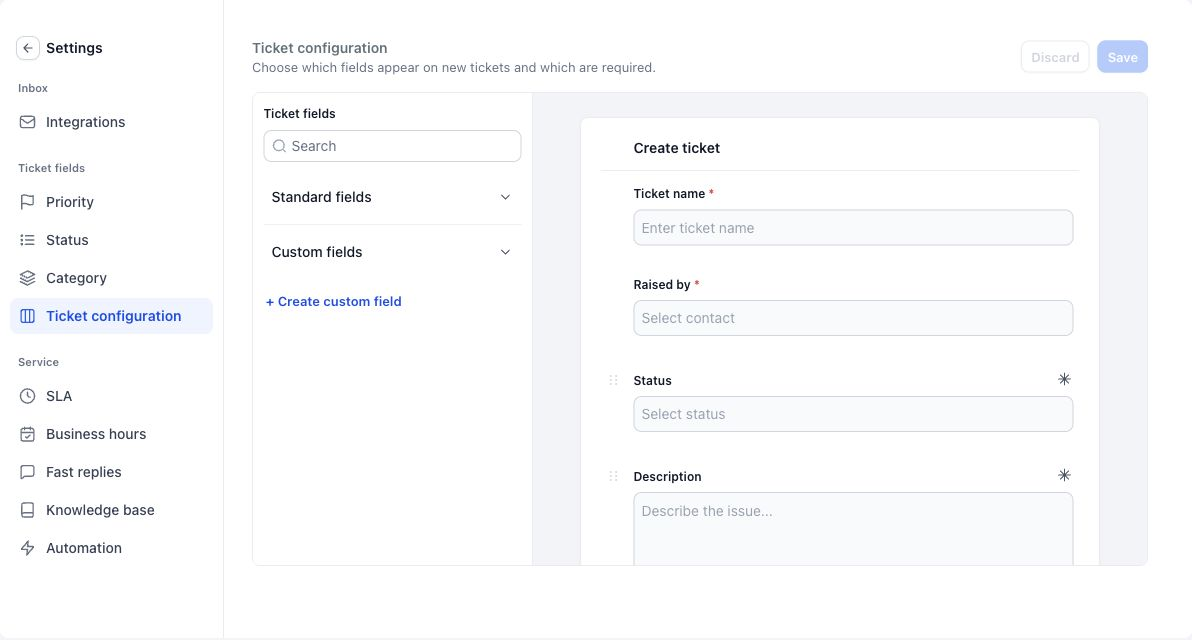
Ticket name and Raised by (the contact) are always required. Other required indicators depend on your configuration. Requiring a field on the creation form does not make it required to resolve a ticket.
To create a field, select + Create custom field, choose a type, enter its name and options, and save it, then add it to the layout. A dropdown works well for consistent reporting, and a text field suits a reference that varies, such as an order number. Avoid fields that invite clinical details.
Fast Replies are reusable messages staff can insert into a ticket and edit before sending. Use them for greetings, requests for missing information, instructions, and closing messages.
Open Settings > Fast replies.
Select Create a fast reply.
Enter a recognizable Name (the title agents search for) and the Message.
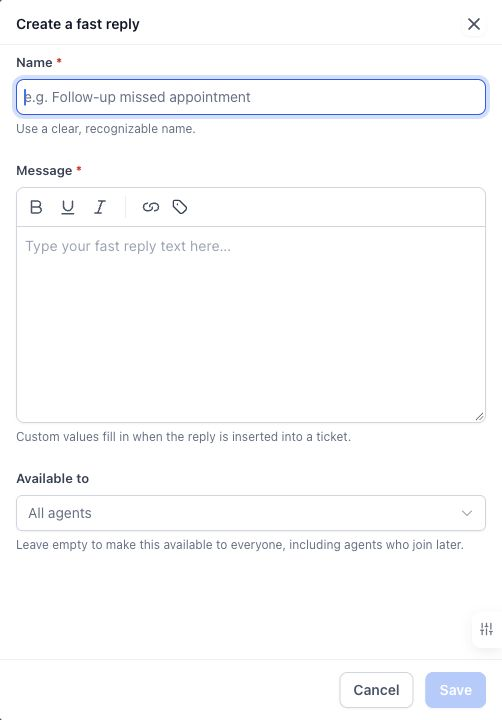
Use formatting and Insert a custom value as needed. Custom values fill in when the reply is inserted into a ticket.
Under Available to, select specific agents, or leave it empty for all agents, including those who join later.
Select Save.
In a ticket's editor, open Fast replies or type / and keep typing the title to find a reply. Insert it, check the filled-in custom values, and adapt it before sending. Row actions let you edit, duplicate, archive, or delete a Fast Reply. Duplicating gives you a starting point for a similar message, and archiving retires a reply from normal use.
Keep Fast Replies free of clinical specifics. For example, "Thanks for reaching out. We are reviewing your question and will reply within one business day" is safe, while a reply that quotes treatment details is not.
Control who can see and work tickets in your staff settings. Open a user under My Staff, then review Roles & Responsibilities > Ticketing. The permission model separates viewing tickets from viewing and managing them. Assigned-data restrictions limit which records a user can access.
For a practice, a common setup is front desk and billing staff who can view and manage tickets, while other roles only view. Check administrator access if a user can see tickets but cannot open Ticketing Settings, since settings are intended for administrators.
Do changes to a default update every existing ticket?
No. Defaults set the starting values for new tickets only. Use ticket editing or bulk actions to change existing tickets.
Does a status named Resolved automatically count as completed?
No. Turn on This status means the ticket is resolved for that status. The setting, not the name, controls SLA timers and closed-ticket reporting.
Can different staff members use different Fast Replies?
Yes. Select the users under Available to, or leave it empty so all agents can use the reply.
Can customers see internal notes?
No. Internal notes are team-only. Only a public reply is emailed to the patient.
Do I need an email integration to create tickets?
No. You can create tickets manually with New ticket. An email integration lets incoming emails create tickets automatically.
Why can I not see Tickets or its settings?
Ask an administrator to confirm Ticketing is enabled for your account and that your staff role grants Ticketing access. Settings are intended for administrators.
Does switching views or applying a filter change the tickets?
No. Views and filters only change what you see. Editing a ticket field is a separate action.
Should I put patient health information in a ticket?
Keep clinical details in your EMR and limit what you write in tickets, replies, and attachments. Ticket emails go out as regular email, so avoid including PHI.
