The WordPress File Manager lives in the WordPress Management section of Aesthetix CRM and gives you direct access to your practice website's filesystem. You can browse folders, upload and download files, edit file contents, create and delete items, compress and extract archives, and manage file permissions, all from one interface, without an external FTP client or cPanel login.
The WordPress File Manager is a built-in tool that connects directly to your WordPress site's filesystem from inside Aesthetix CRM. It removes the need for a separate FTP client or hosting control panel by giving you a full interface for managing files and folders in one place.
With the File Manager you can browse your site's directory structure, upload and download files, edit file contents, create and delete folders, manage archives, and update file permissions. This keeps routine WordPress maintenance in the same place you already manage your practice's website.
The File Manager supports common workflows like theme customization, plugin troubleshooting, and content edits, making it a practical tool for anyone who maintains your practice's WordPress site.
Unified file access. Manage your entire WordPress filesystem from a single interface without switching between an FTP client, a hosting control panel, or an SSH terminal.
Faster workflow. Upload, edit, and organize files instantly with search, filtering, sorting, and pagination to navigate large directory structures efficiently.
Safe editing. Preview file contents before making changes, and rely on conflict-safe protection that helps prevent accidentally overwriting a newer version of a file.
Complete file operations. Create, delete, compress, extract, and manage permissions for files and folders without leaving the interface.
Streamlined maintenance. Troubleshoot issues, customize themes, and modify plugins directly through the File Manager instead of switching between platforms.
Explore your WordPress directory structure with built-in navigation tools. Use search to locate specific files, apply filters to narrow results, sort files by name or date, and page through large directories. This makes it easy to find and open any file on your site.
Upload files in supported formats directly to any folder on your WordPress site. Download files for backup, offline editing, or sharing with a collaborator. This removes the need for a separate FTP client when moving files to or from your site.
Preview file contents before making changes so you know you are editing the right file. Edit and save files directly in the File Manager, with conflict-safe protection that flags a file if it was changed by another user or process since you opened it, reducing the risk of accidentally overwriting newer work.
Perform common file operations directly in the toolbar and context menus:
Create: add new files and folders to organize your site structure
Delete: remove files and folders you no longer need
Compress: package files and folders into an archive (for example, a .zip) for backup or distribution
Extract: unpack an archive to restore a backup or install a plugin or theme
Where your hosting environment supports it, update chmod values to control read, write, and execute permissions for WordPress core files, themes, plugins, and uploads.
The WordPress File Manager brings FTP-level control into your existing workflow, so you can maintain your site without opening a separate tool.
Step 1: Access the File Manager
Go to your WordPress Management section in Aesthetix CRM, then click File Manager to open the file browser.
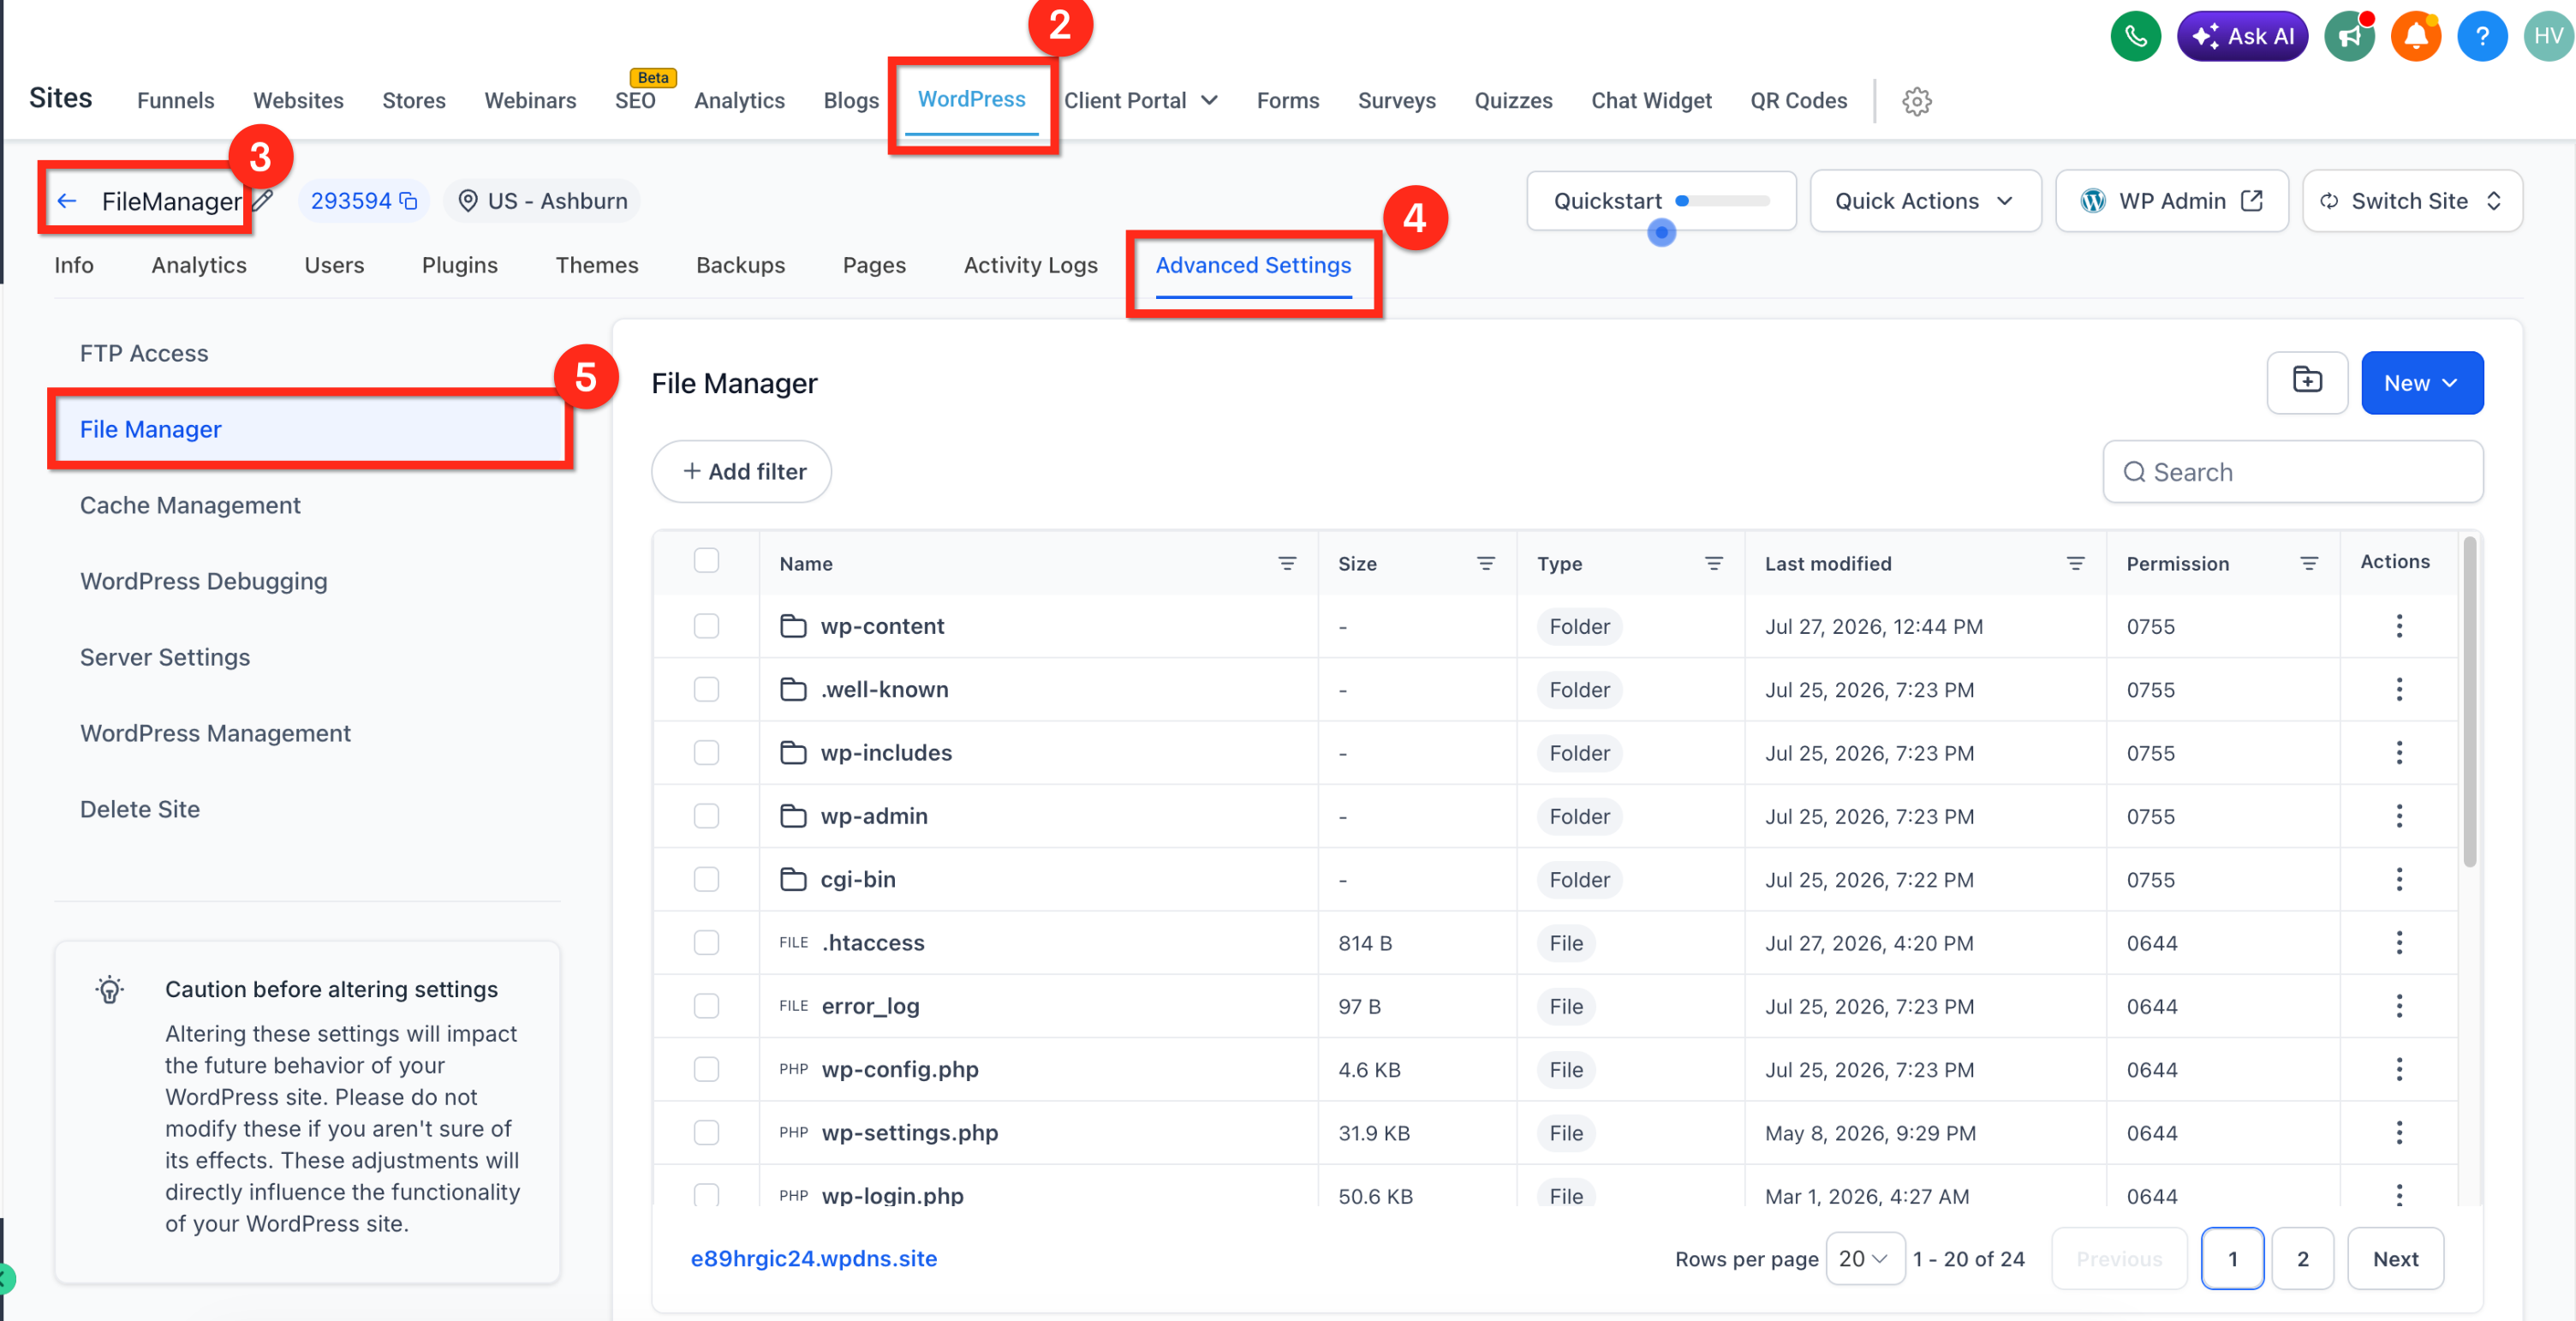
Step 2: Browse and search your files
Navigate your site's directory structure by clicking into folders. Use the search bar to find specific files, apply filters to narrow results, or sort by name or modification date. Pagination controls help you move through large directories.
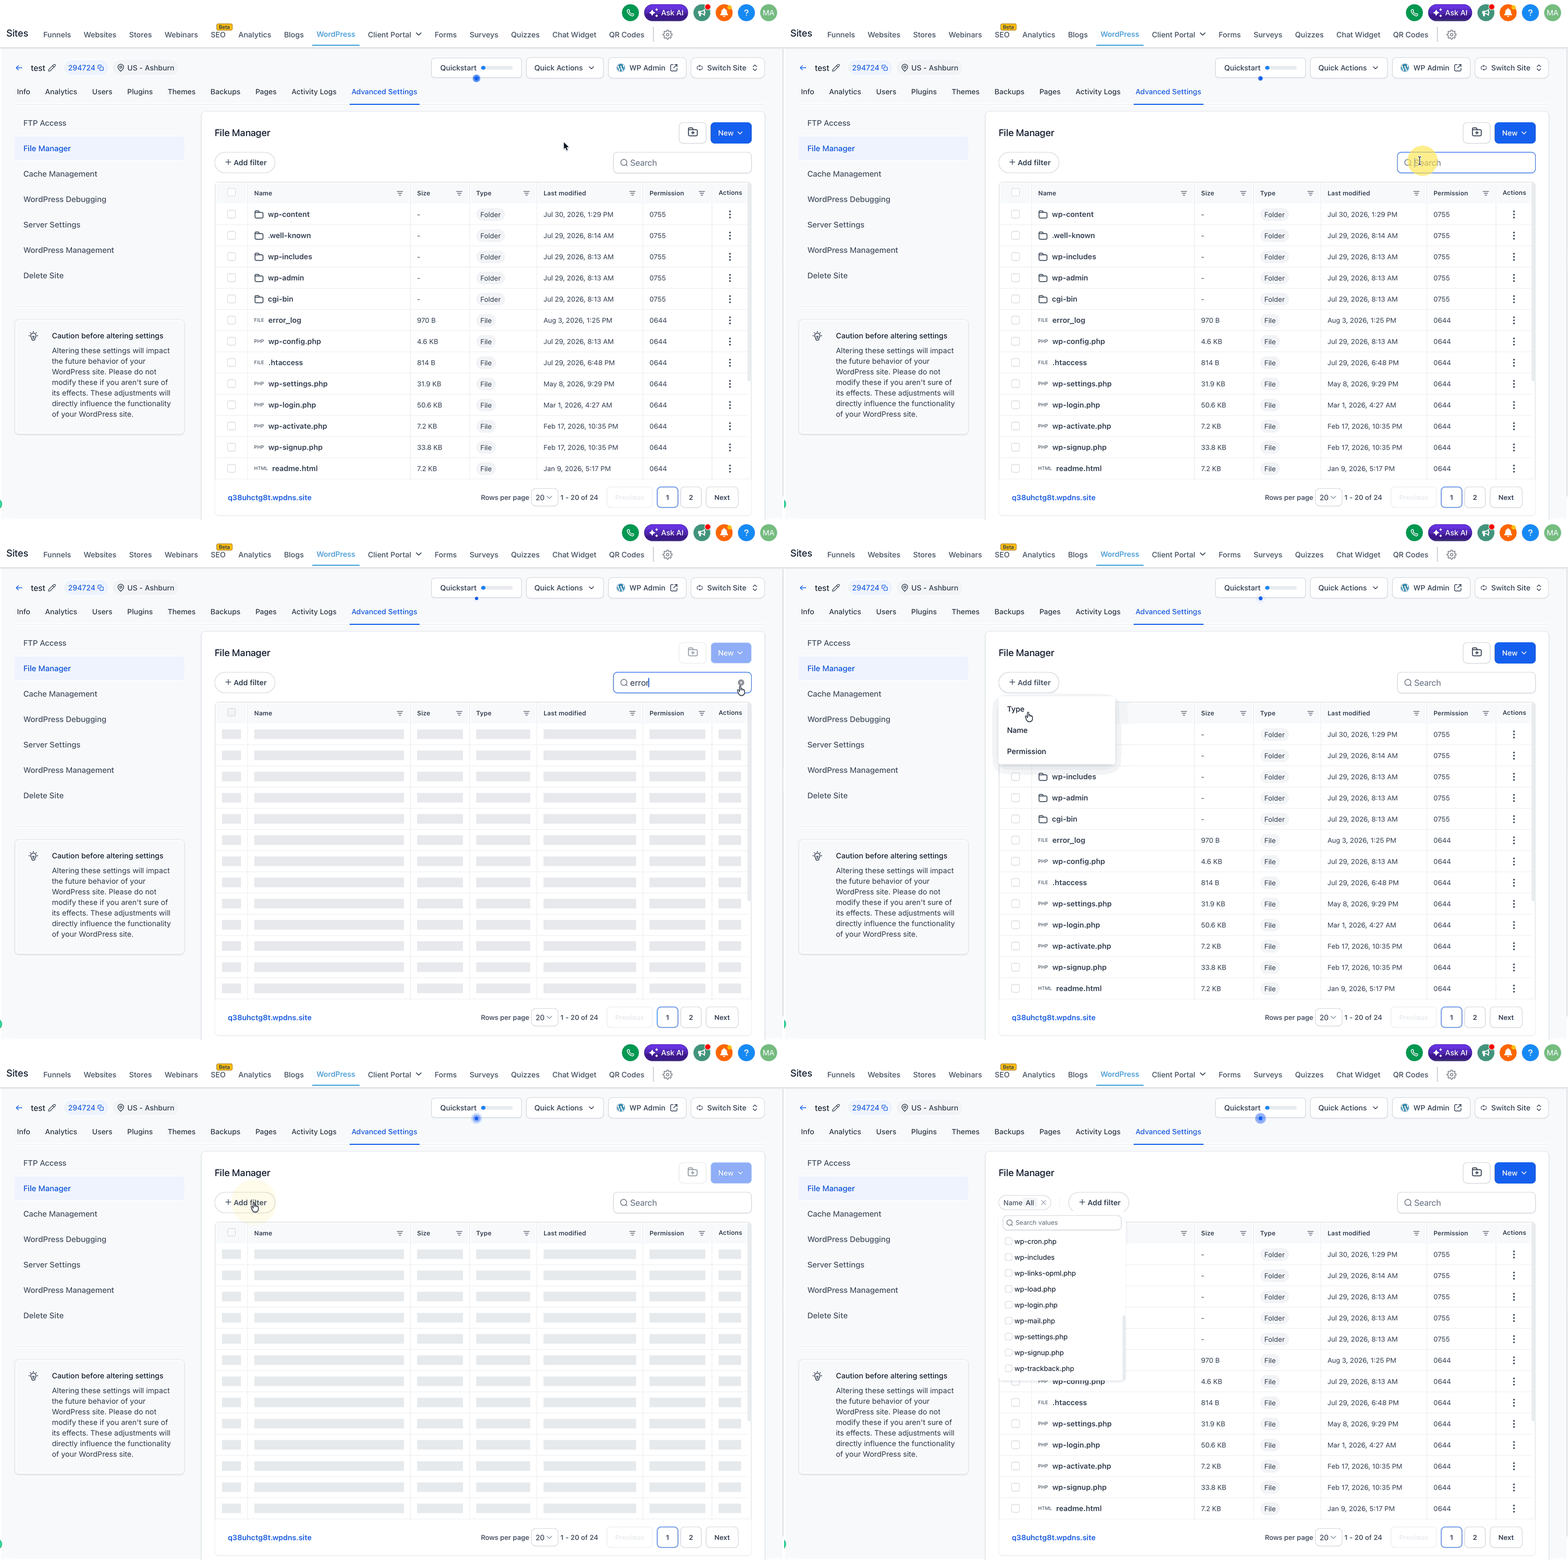
Step 3: Upload or download files
To upload files:
Navigate to the target folder
Click the Upload button
Select files from your computer in a supported format
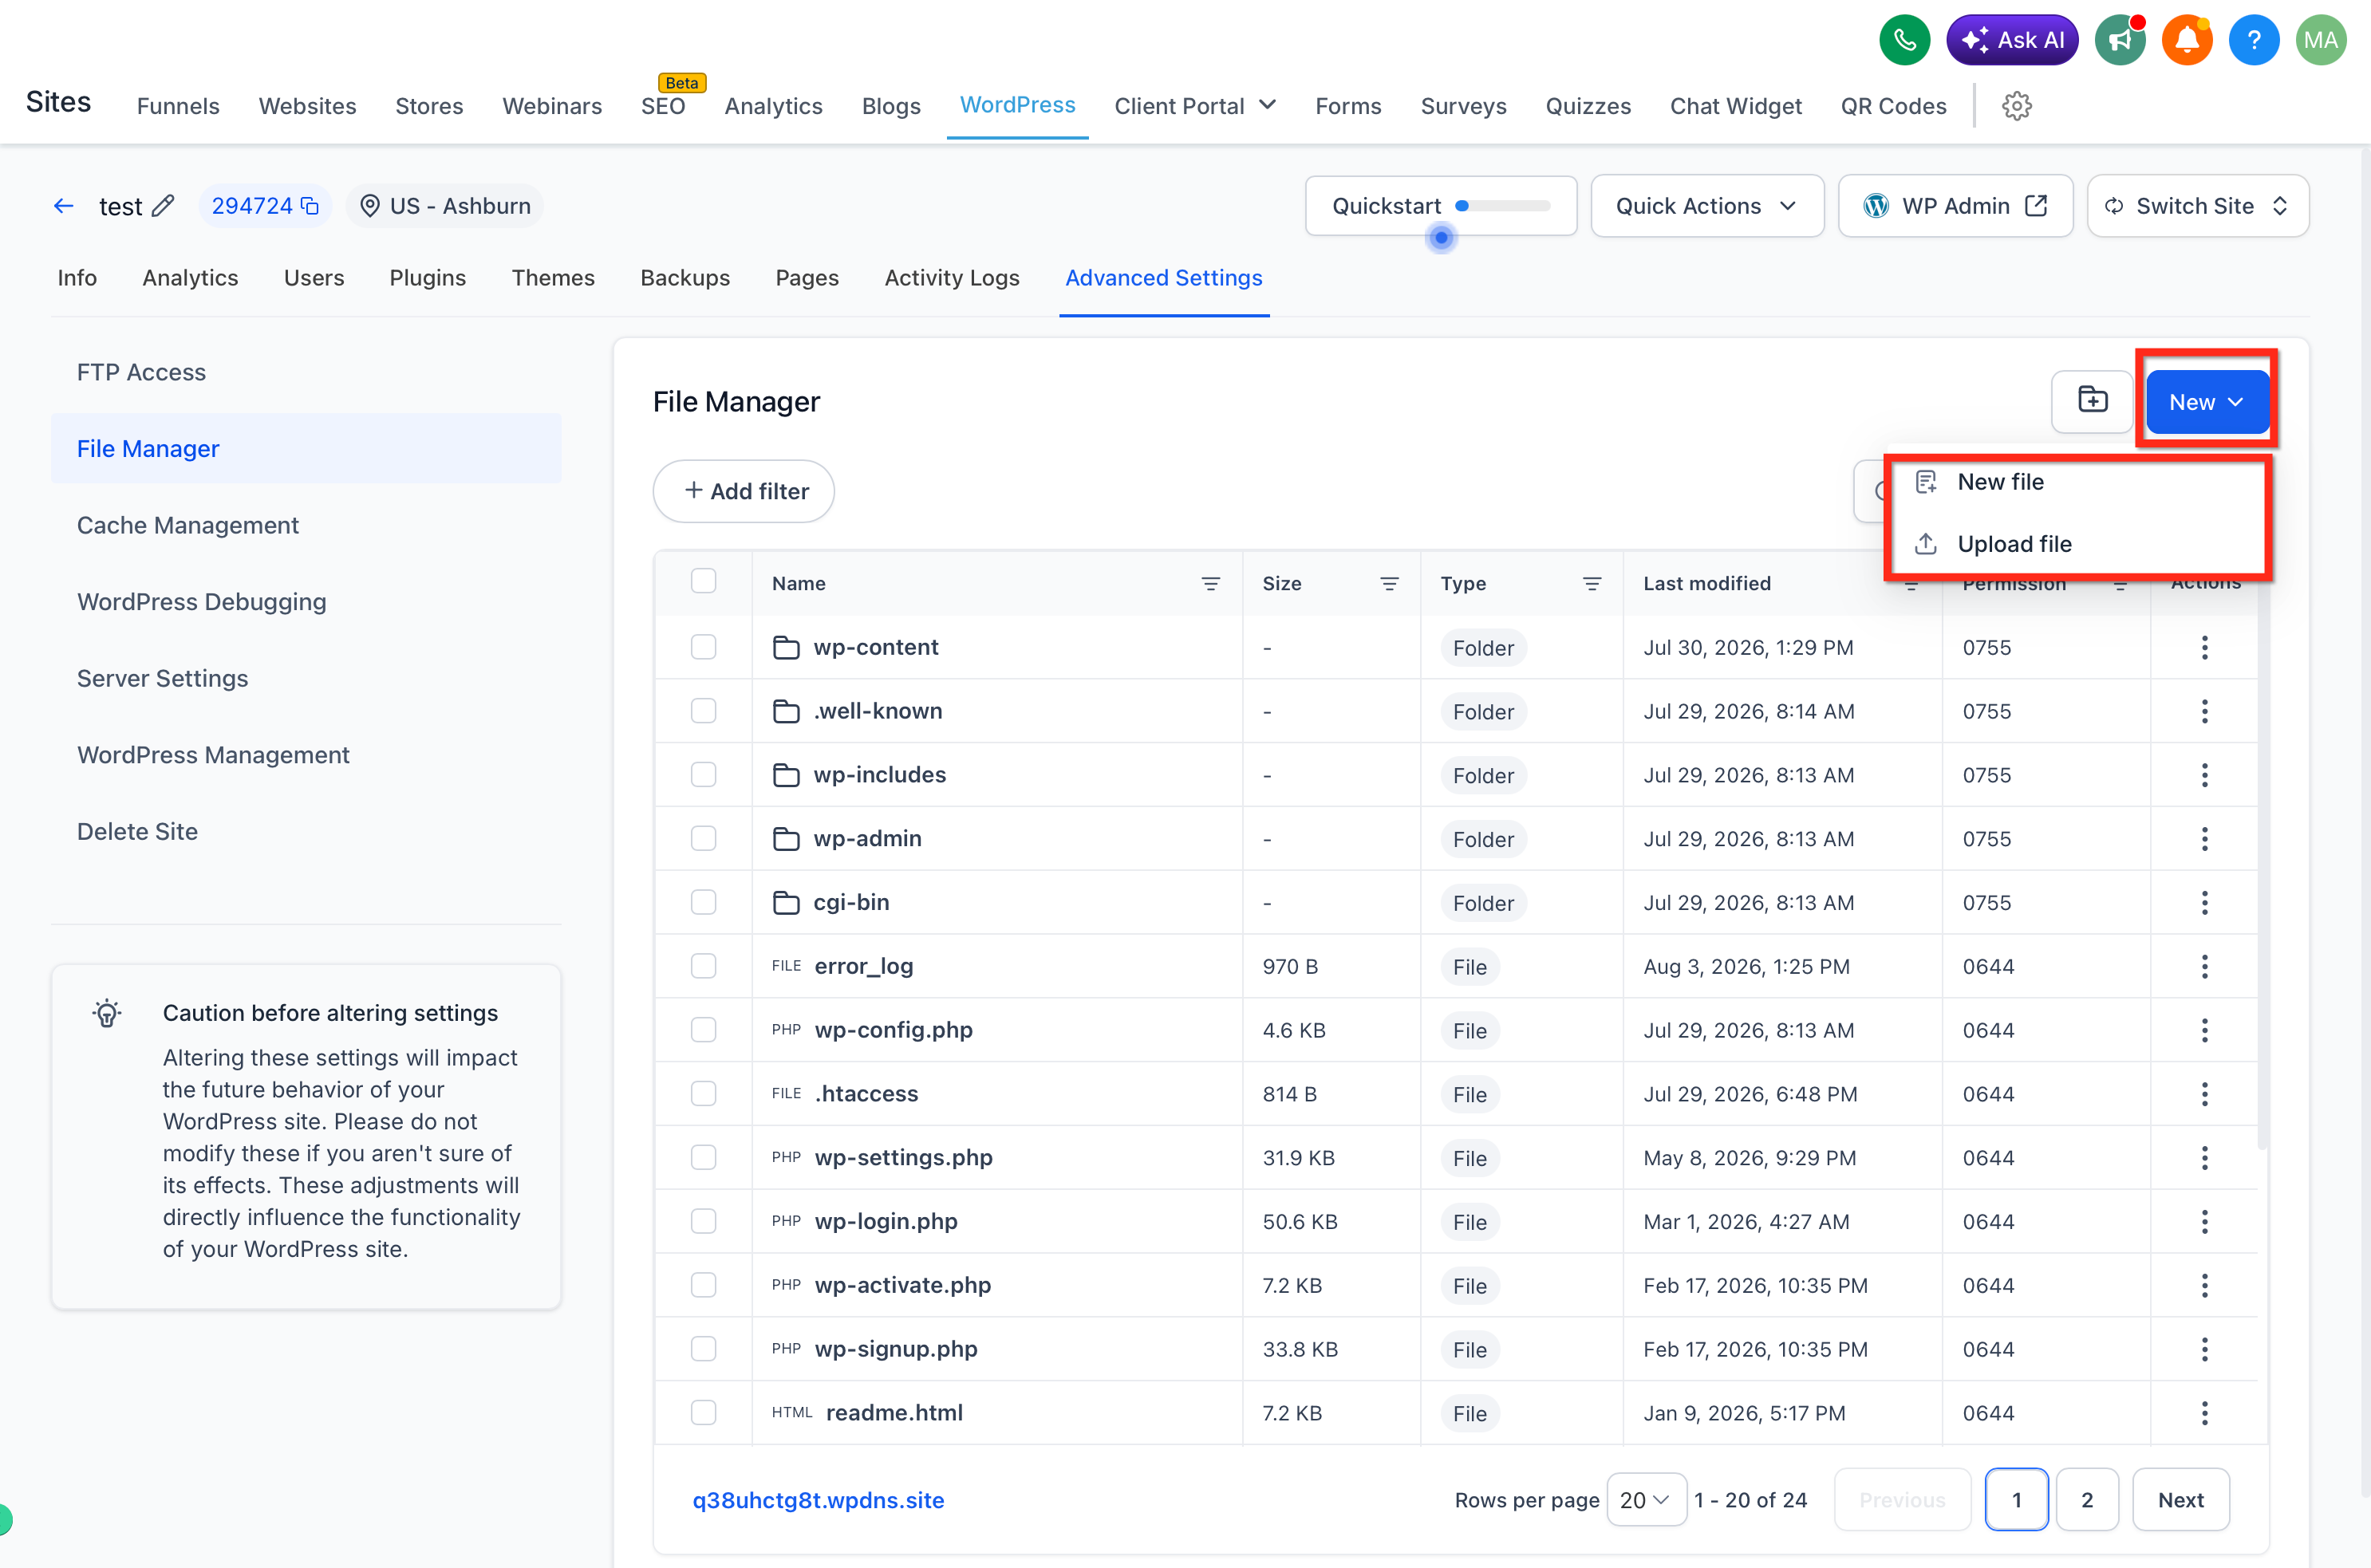
To download files:
Select the file or folder you want to download
Click the Download button
The file saves to your local device
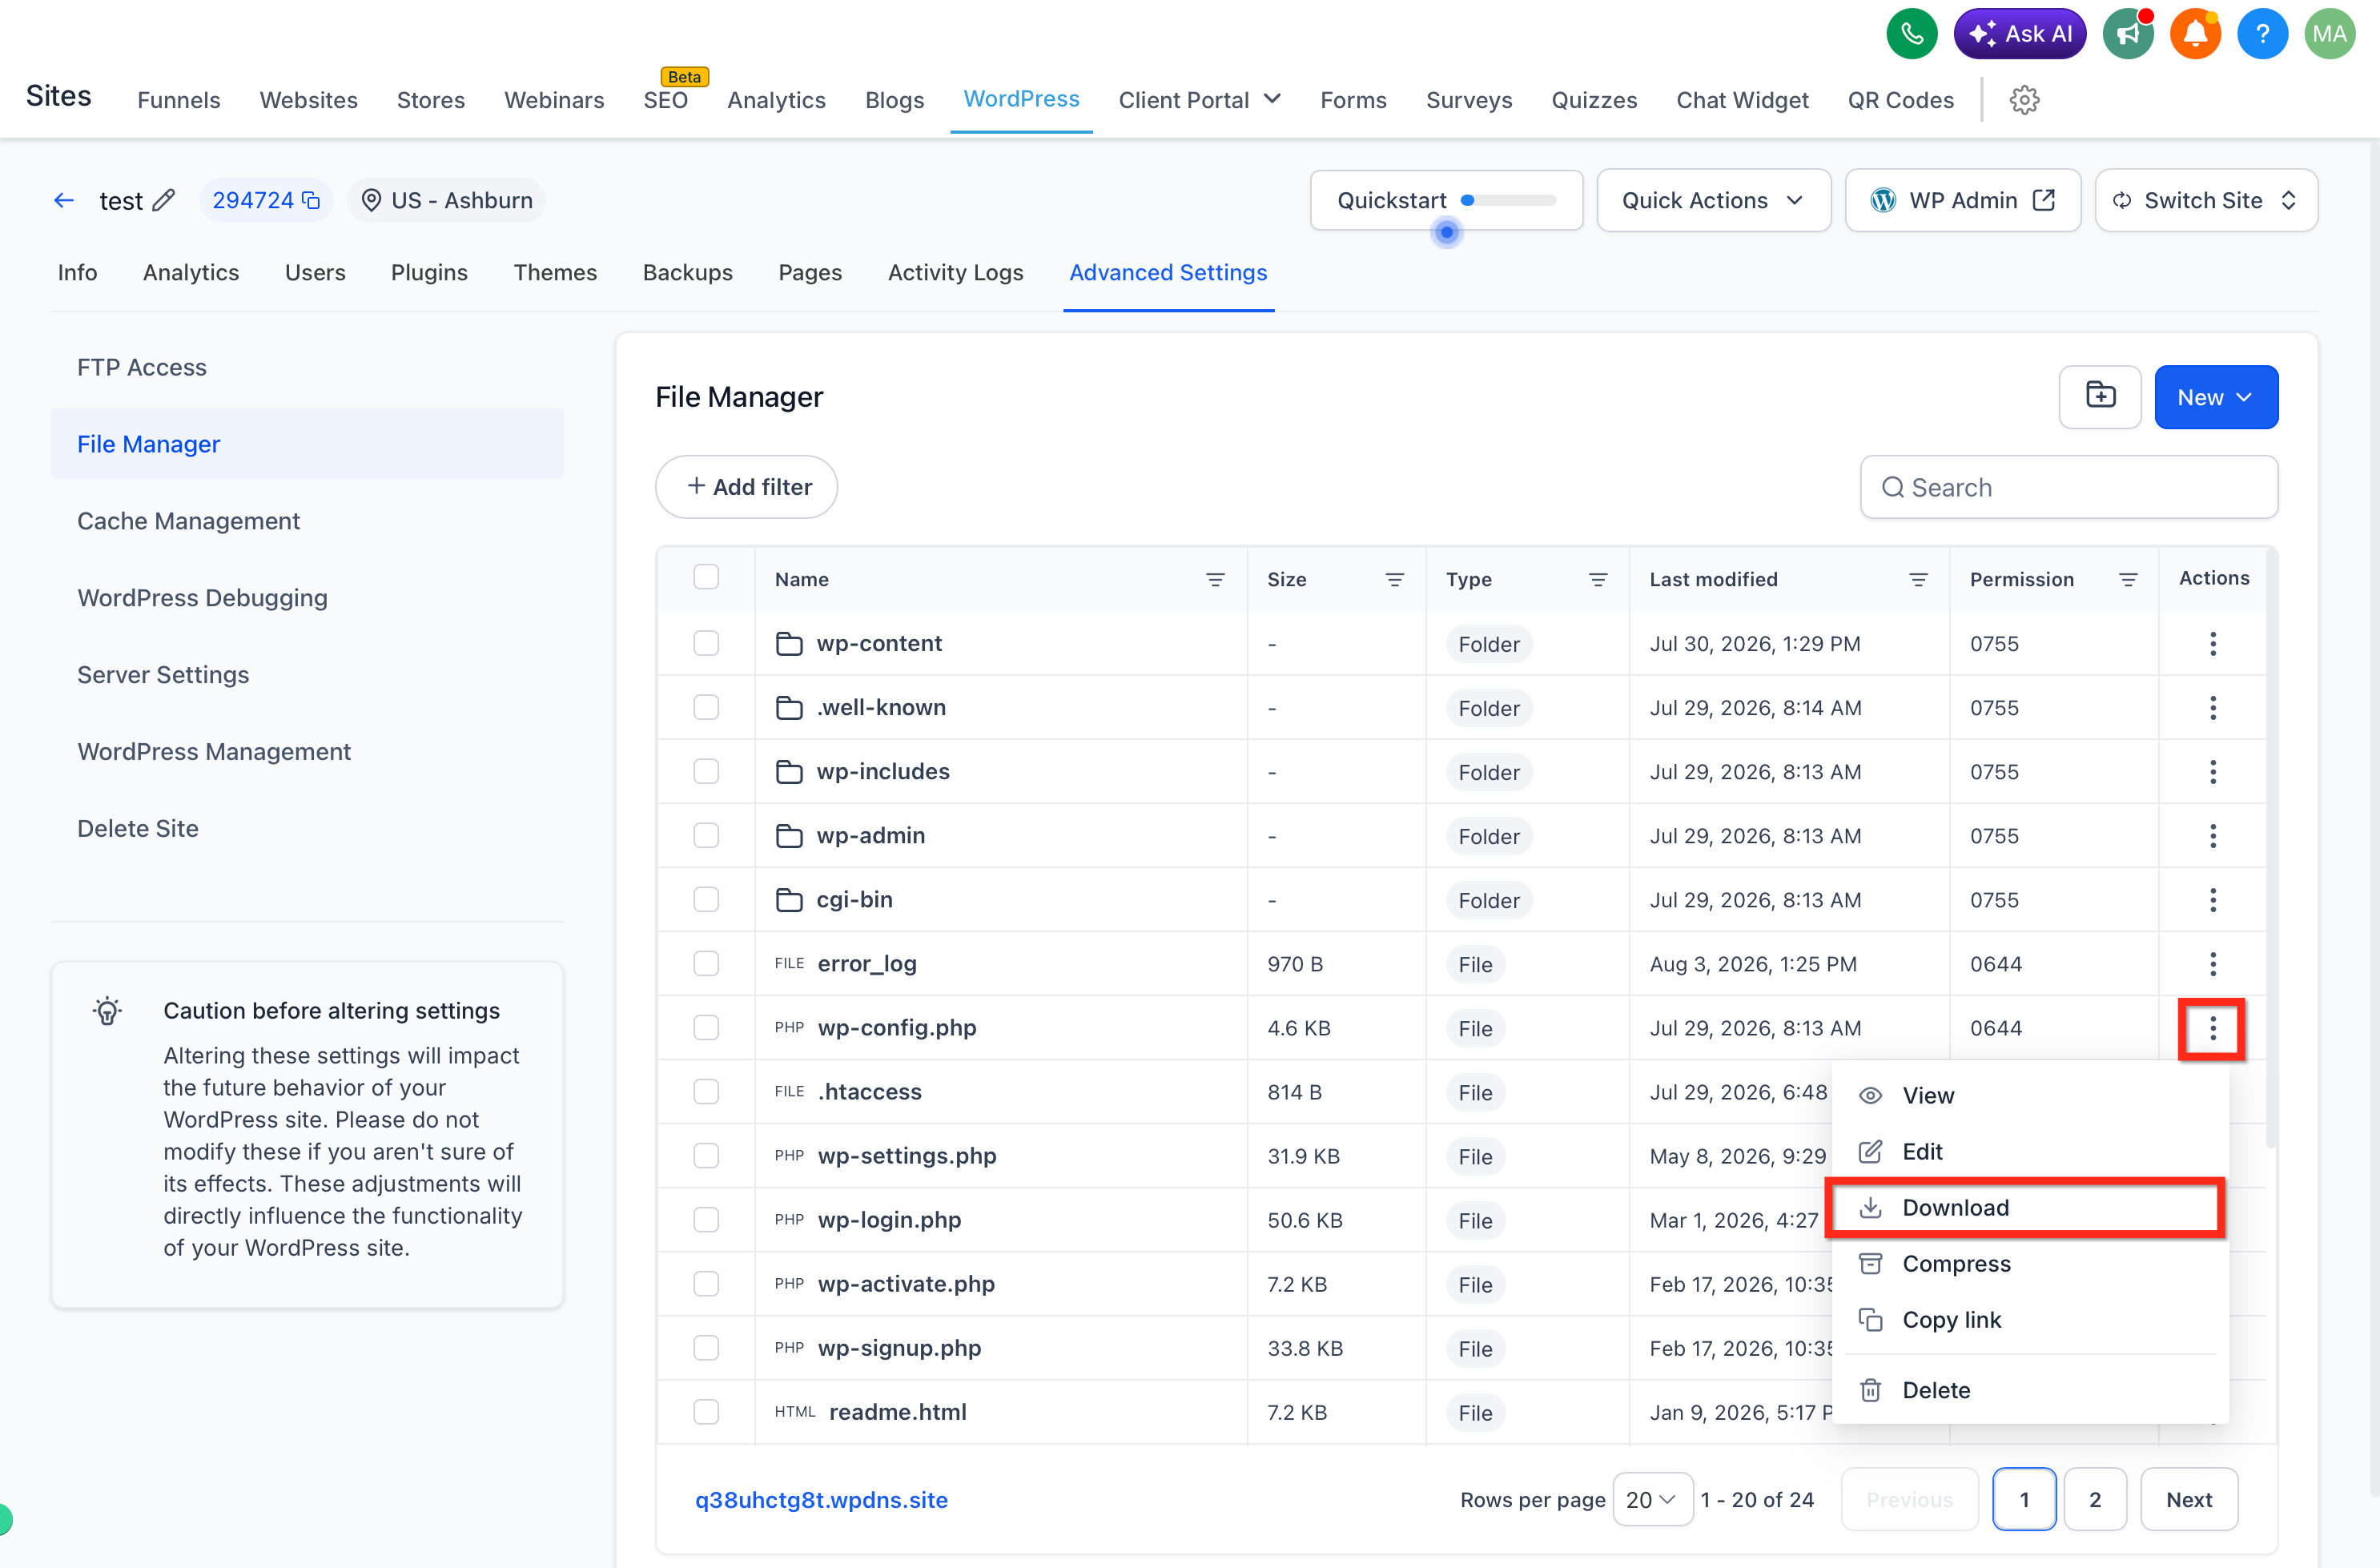
Step 4: Edit files safely
To edit a file:
Select the file you want to edit
Click Edit to view its contents
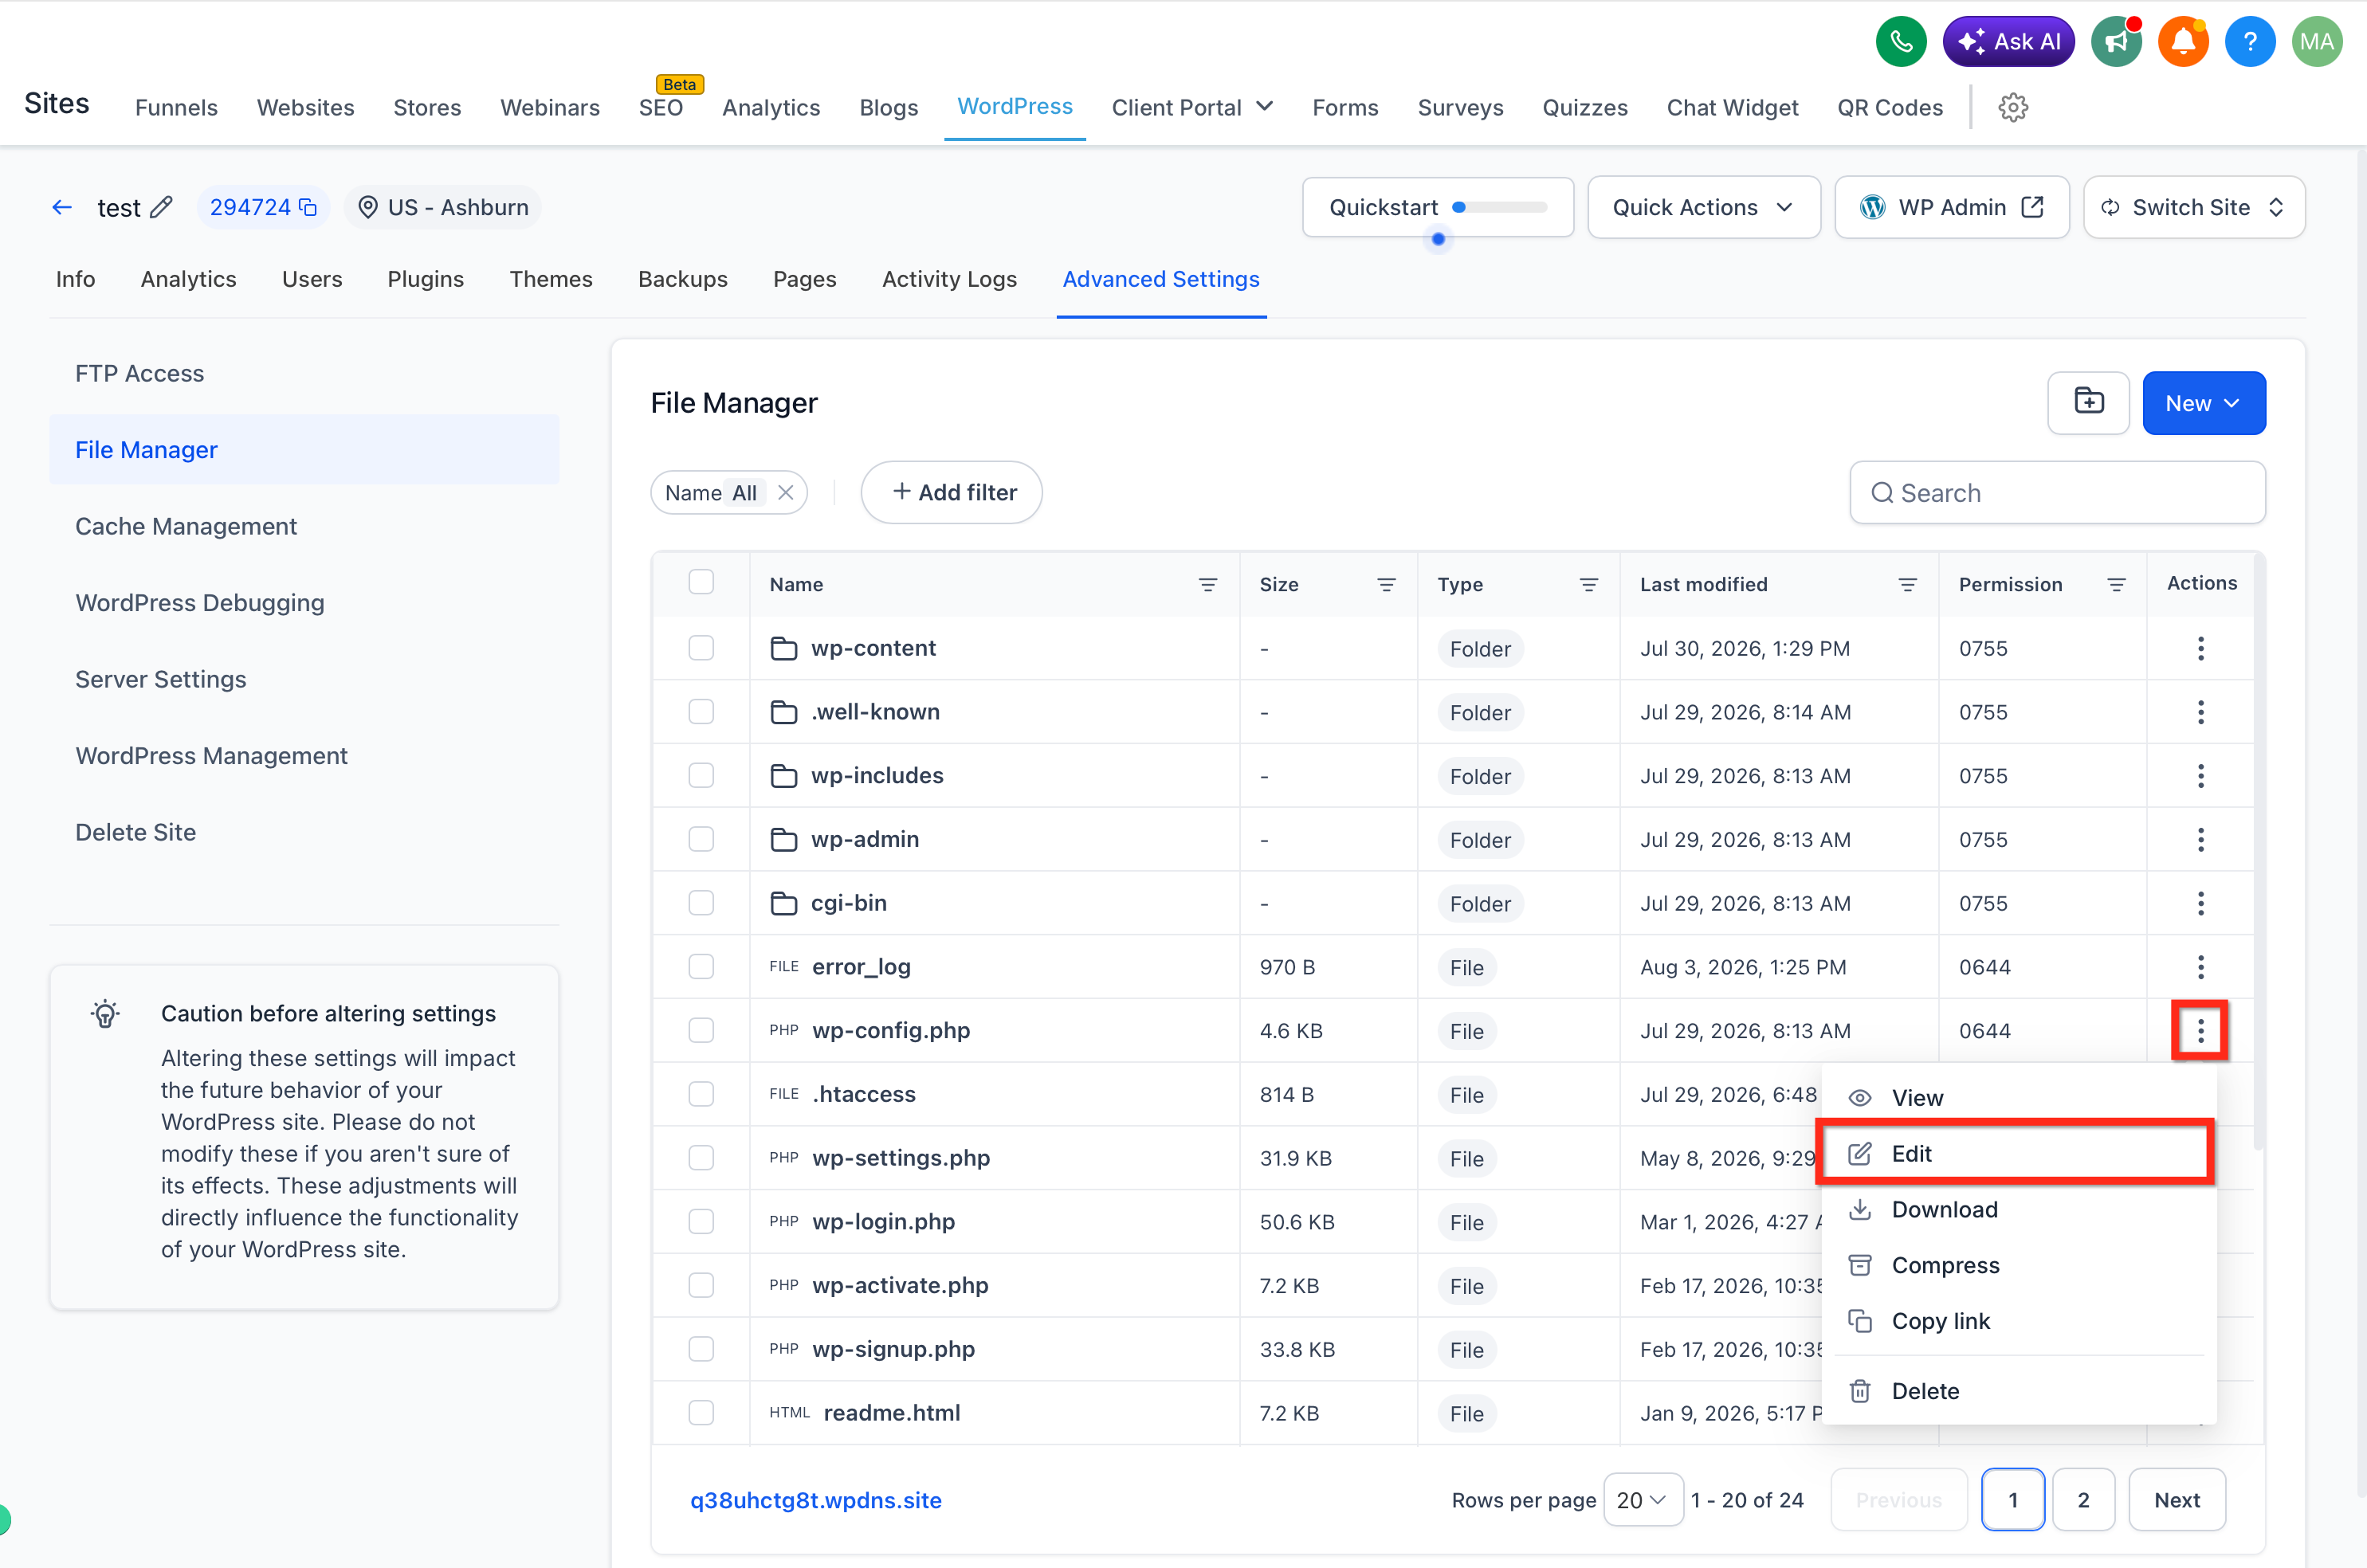
Make your changes in the editor
Click Save to apply them
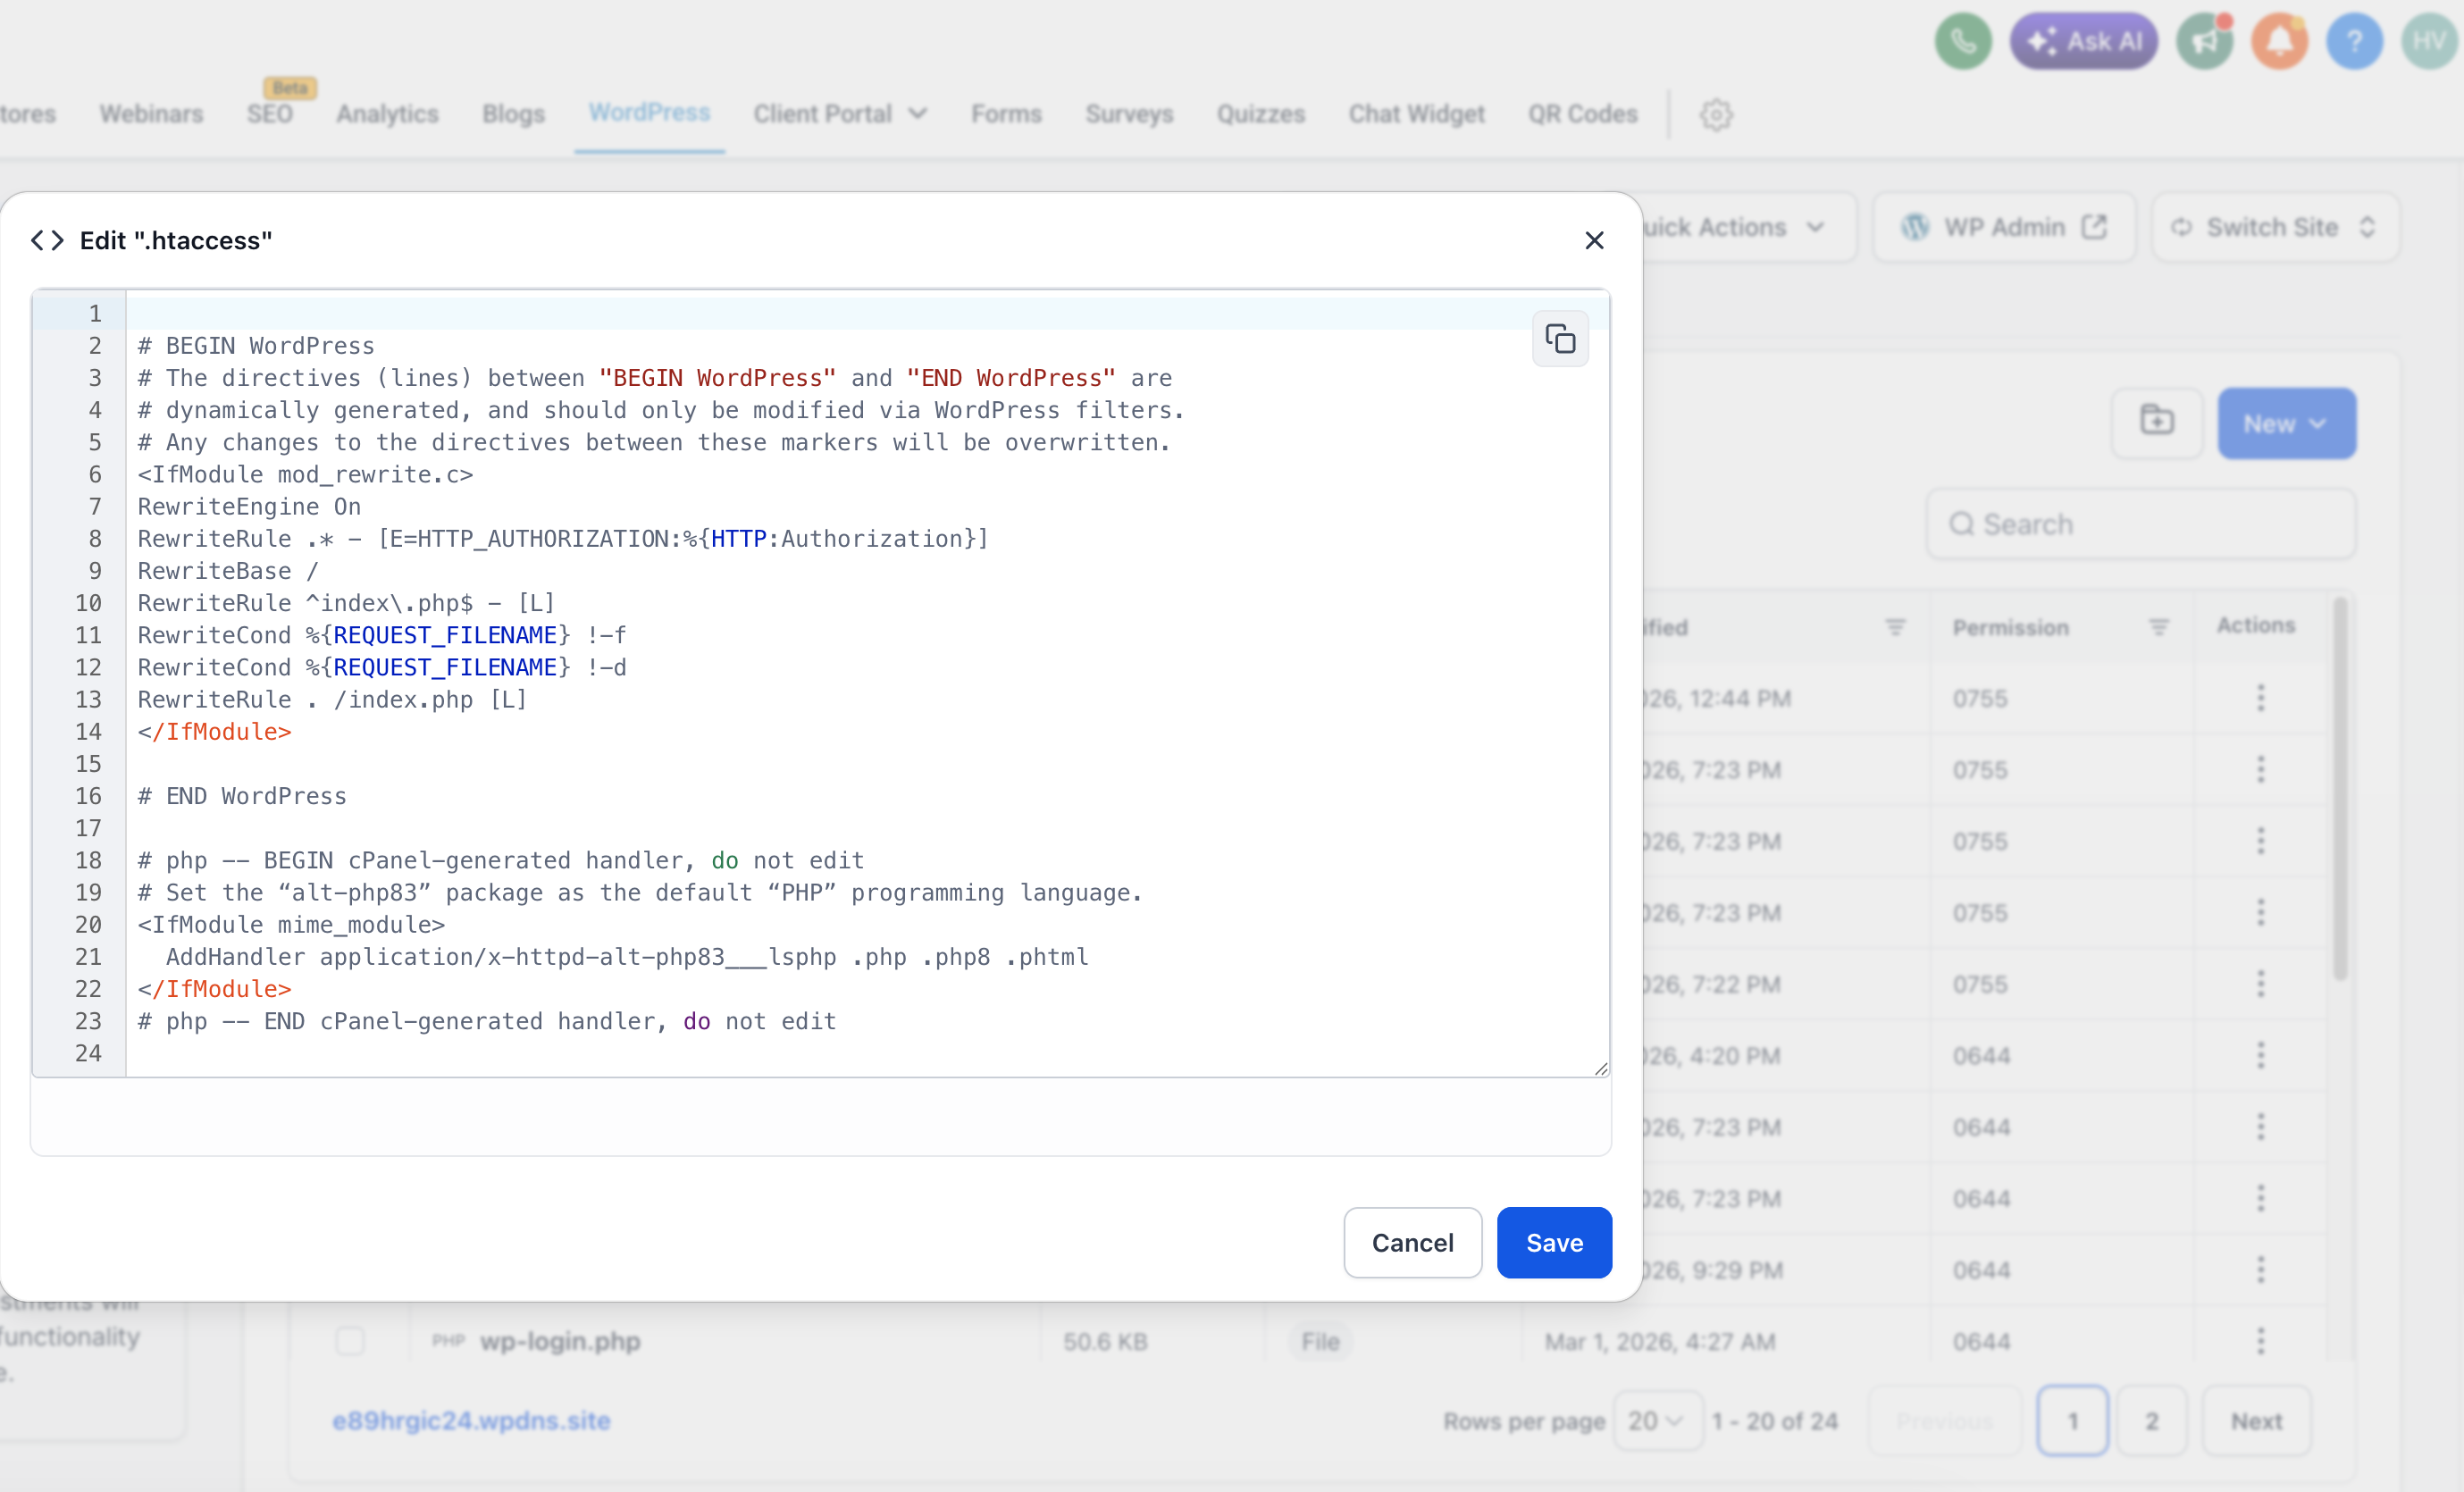
The File Manager includes conflict-safe protection that alerts you if the file has been changed by another user or process since you opened it, helping prevent an accidental overwrite.
Preview a file's contents before editing anything critical, such as wp-config.php or .htaccess, so you know exactly what you are changing.
Step 5: Manage files and folders
Use the toolbar and context menus to run common operations:
Create: click New File or New Folder to add an item to the current directory
Delete: select files or folders and click Delete to remove them from your site
Compress: select files or folders and click Compress to create an archive
Extract: select an archive and click Extract to unpack its contents
Step 6: Update file permissions (chmod)
To change file or folder permissions:
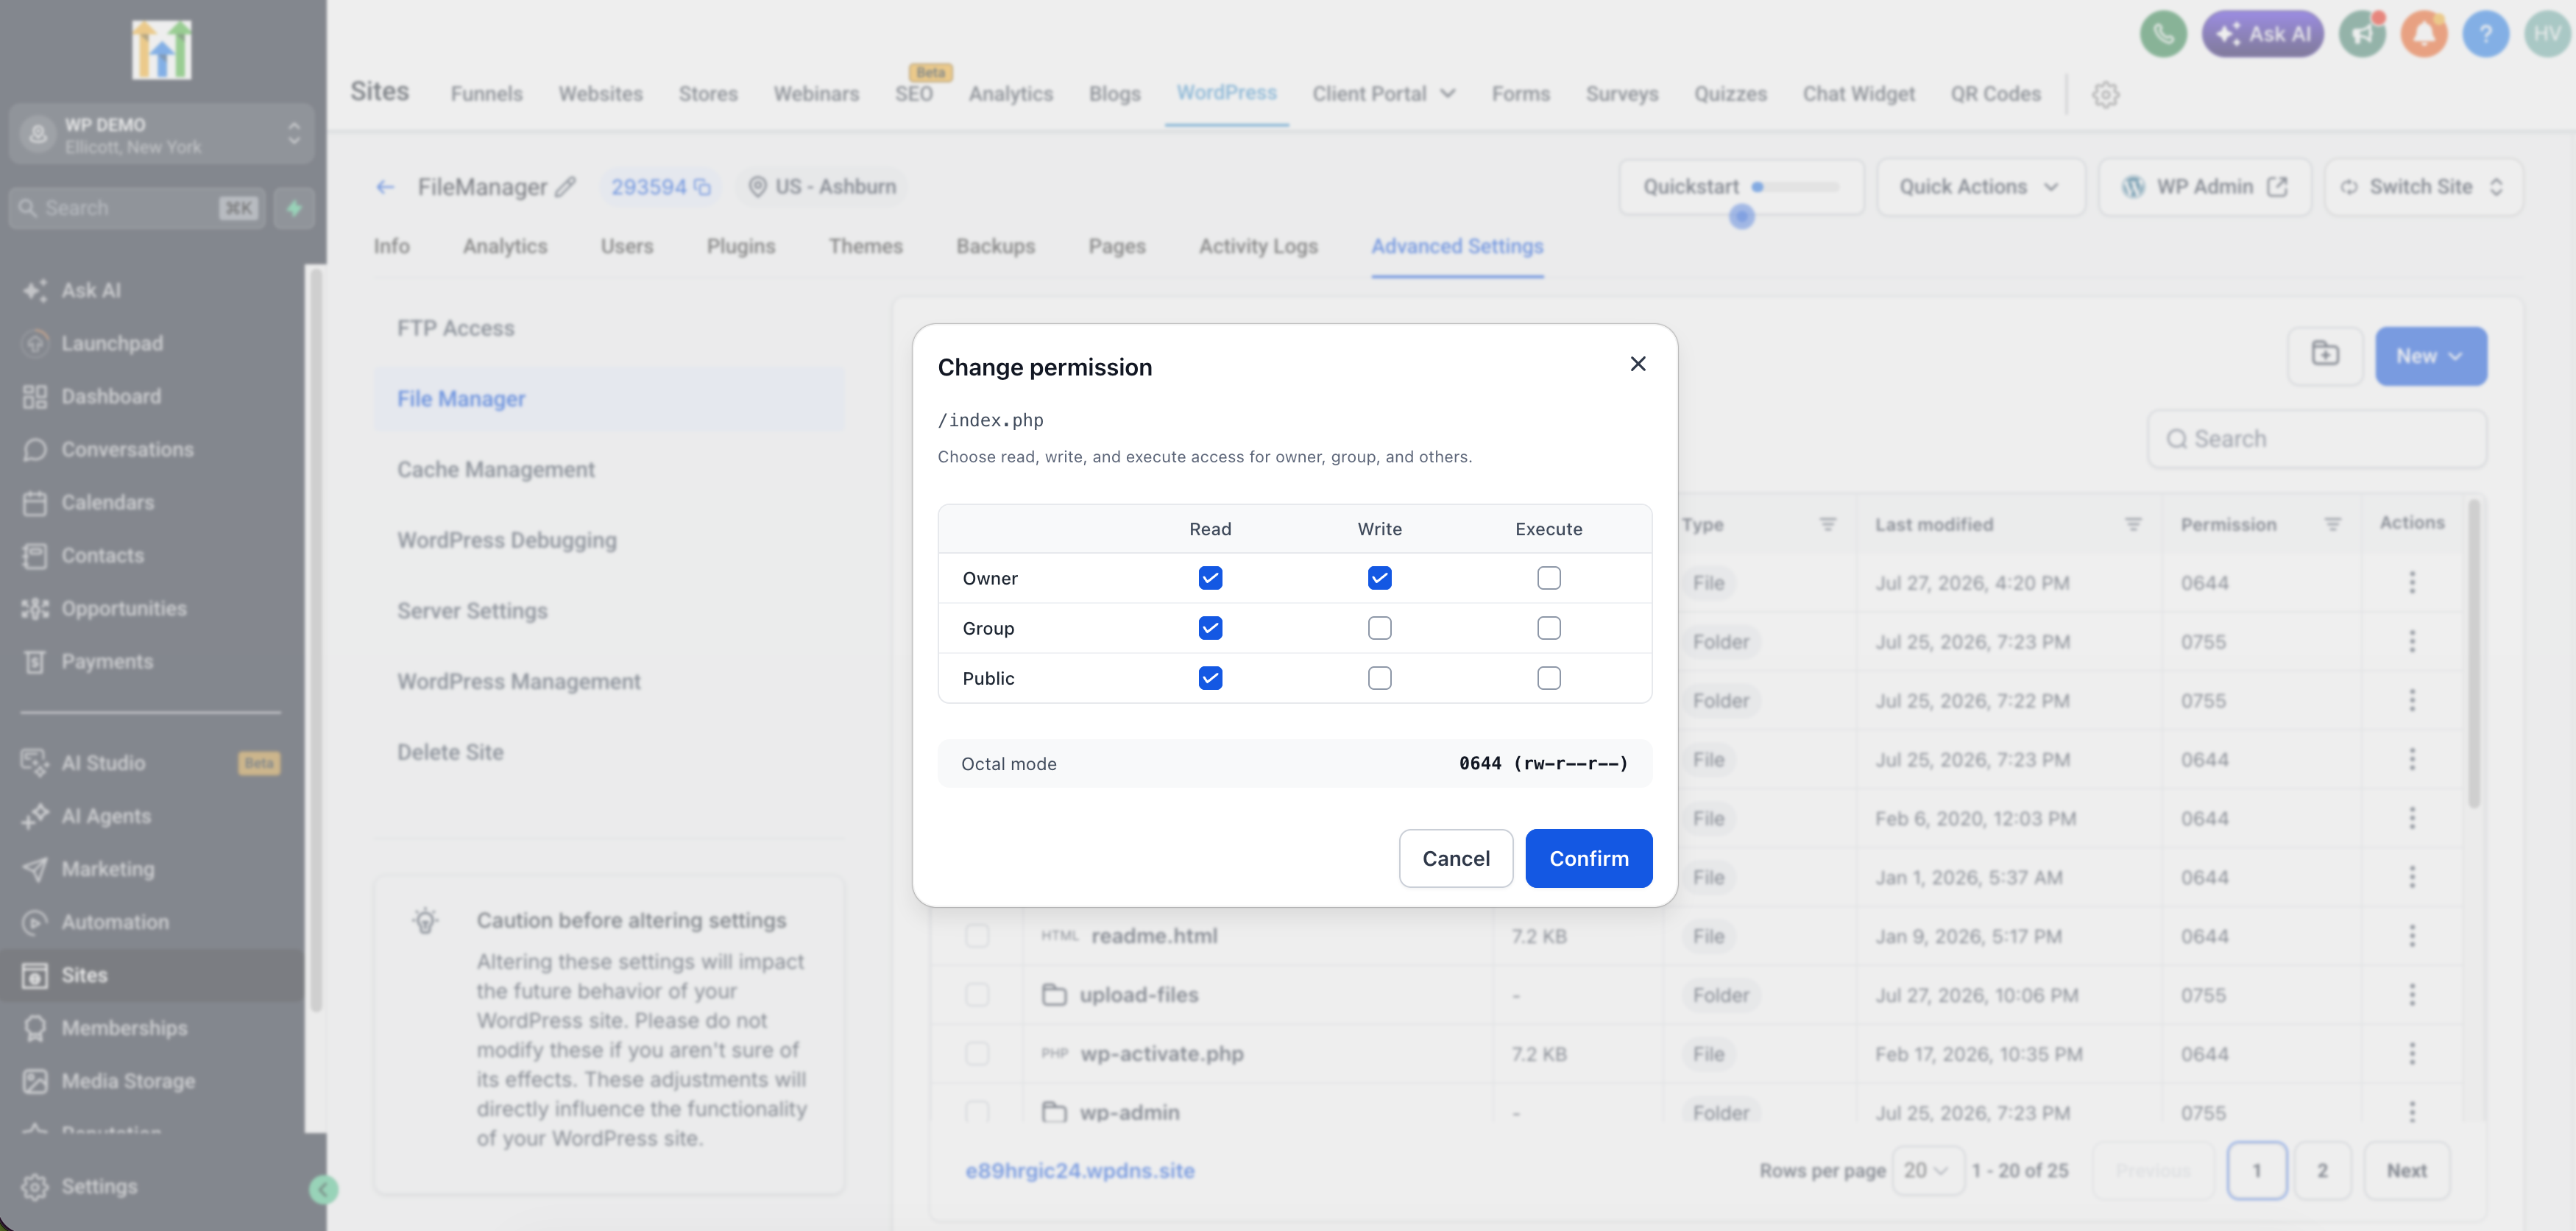
Select the file or folder
Click Permissions (or Properties)
Adjust read, write, and execute settings for owner, group, and others
Click Save to apply the new permissions
Permission management depends on whether your hosting environment supports chmod. If the option is unavailable, check with your hosting provider.
Incorrect file permissions can compromise site security or break site functionality. Confirm the recommended permission settings for WordPress core files, themes, and plugins before you change anything.
The AI-Powered WordPress Page Builder lives alongside the File Manager in your WordPress Management section and helps you create a WordPress landing page in minutes using AI, instead of building one from a blank canvas. You describe the page you want, review and customize the result, and continue refining it in your page builder plugin, such as Elementor, if you want full manual control.
New AI-generated pages are created in Draft mode by default, so you can review, customize, and preview a page before it goes live. When a page is ready, you can publish it, and unpublish it later if you need to take it offline.
Faster page creation. Generate a complete landing page structure in minutes instead of building one from scratch.
Guided setup. Business niche, business goal, and content-feel selections help direct the AI toward the right layout and tone.
Prompt assistance. Use the prompt-improvement option if you want help describing the page you have in mind.
Built-in customization. Refine content, adjust tone, and switch color palettes directly in the page editor.
Page builder compatibility. Continue editing the generated page in a plugin such as Elementor, using the workflow you already know.
Live style previews. Preview color palette changes in real time before applying them to the page.
Targeted image regeneration. Regenerate a single AI-generated image without rebuilding the whole page.
Section variety. Choose from a range of layout and content variants for sections like testimonials, services, FAQs, and hero banners.
Draft-first workflow. Review and customize a generated page before it goes live, preview how it will look on your site, then publish or unpublish it as needed.
Step 1: Open AI Generated Pages. Go to your WordPress Management section in Aesthetix CRM, open the site you want to edit, and go to its Pages area. Select AI Generated Pages, then click Generate New AI Page.
Step 2: Enter your page details. Add a Page Name, a Custom Site Slug, and the Name of Business, then continue.
Step 3: Choose your design preferences. Select your business niche, your business goal, and how you want the content to feel, then continue.
Step 4: Describe the page you want. Enter a plain-language prompt describing the type of page you want the AI to create. Include important details such as offers, sections, services, brand style, or calls to action. Use the prompt-improvement option if you want help strengthening your description, then generate the page.
Step 5: Review and customize the generated page. New pages are created in Draft mode so you can review them before anything goes live. In the Customizations panel you can edit the generated text directly, use Refine to improve selected copy, use rewrite options such as Shorten or Elaborate, and change the tone of the content. Available tones typically include Professional, Friendly, Compelling, and Confident.
Step 6: Adjust images and styling, then save. Hover over any AI-generated image and use the regenerate option to describe and insert a replacement without rebuilding the rest of the page. In the Styles tab, choose from available color palettes and preview the changes live before applying them. When you are ready, save your changes, then continue editing in a page builder plugin such as Elementor if you want additional control.
AI-generated pages stay in Draft mode by default, which gives you control over when they become visible on your website.
Review and customize the generated page while it is in Draft mode.
Use Preview to see how the page will look before it goes live.
When the page is ready, use Publish to make it live.
Use Unpublish at any time to take a published AI page offline.
Each site includes 12 AI page generation credits per month, and your remaining balance is shown in the AI Generated Pages area.
Do I need FTP credentials to use the WordPress File Manager? No. The File Manager connects directly to your WordPress site's filesystem from inside Aesthetix CRM, so you don't need FTP credentials or a hosting control panel login.
What file formats can I upload through the File Manager? It supports the standard file formats used on a WordPress site, including images, documents, scripts, stylesheets, and archive files. If a format isn't supported, the File Manager notifies you during the upload.
What happens if I try to save a file that someone else already changed? Conflict-safe protection detects that the file was modified since you opened it and notifies you before you save, so you can review the changes, merge your edits, or cancel to avoid overwriting someone else's work.
Can I compress and extract files in the File Manager? Yes. You can select files or folders and compress them into an archive such as a .zip, or select an existing archive and extract it to restore a backup or install a plugin or theme.
How do I update file permissions if the option isn't available? Permission management (chmod) depends on your hosting environment. If the option isn't available in the File Manager, use your hosting provider's control panel or contact their support team.
Can I edit theme or plugin files with the File Manager? Yes. You can browse, preview, and edit theme and plugin files directly. Back up anything you plan to change, and test edits on a staging site when you can, so you don't disrupt your live site.
Is there a file size limit for uploads? Upload size limits come from your hosting environment's PHP settings, not the File Manager itself. If you hit a size restriction, contact your hosting provider about raising the limit.
Can I delete multiple files or folders at once? Yes. Select multiple items using the checkboxes in the File Manager, then click Delete to remove them all at once. Double-check your selection before deleting, since the action removes every selected item.
Can I generate a WordPress page with AI? Yes. The AI-Powered WordPress Page Builder generates a landing page from a plain-language description, which you can then review, customize, and publish from your WordPress Management section.
Can I change the tone of an AI-generated page's content? Yes. In the Customizations panel you can switch between tone options such as Professional, Friendly, Compelling, and Confident.
Are AI-generated pages published automatically? No. New AI-generated pages are created in Draft mode by default so you can review, customize, and preview them before publishing.
Can I keep editing an AI-generated page in a page builder plugin? Yes. Once a page is generated you can continue refining it in a page builder plugin such as Elementor.
How many AI page generations do I get? Each site includes 12 AI page generation credits per month. Your remaining balance is shown in the AI Generated Pages area.
