Communities in Aesthetix CRM let you build private, invite-only spaces around your practice and charge patients or staff for access to a group or a course. You manage all of this from Marketing > Memberships > Communities, inside the Group area's Settings. This guide covers making a group private, setting up paid groups, selling paid courses inside a community, and granting or revoking access to individual courses for specific members.
Private groups restrict a community's posts and discussions to members who have requested access and been approved. They're useful when you want a confidential space, such as a VIP patient group, a staff-only training group, or a provider peer-support group, where content shouldn't be visible to the general public.
Role | Access level and responsibilities |
|---|---|
Owner | The creator of the group. Can assign members as admin or contributor, convert the group between public and private, and review and accept membership requests. The Owner role cannot be reassigned. |
Admin | Can assign members as admin or contributor, convert the group between public and private, review and accept membership requests, and change the roles of contributors and other admins. |
Contributor | Participates in the group and contributes to discussions, but has no authority over group settings or membership. |
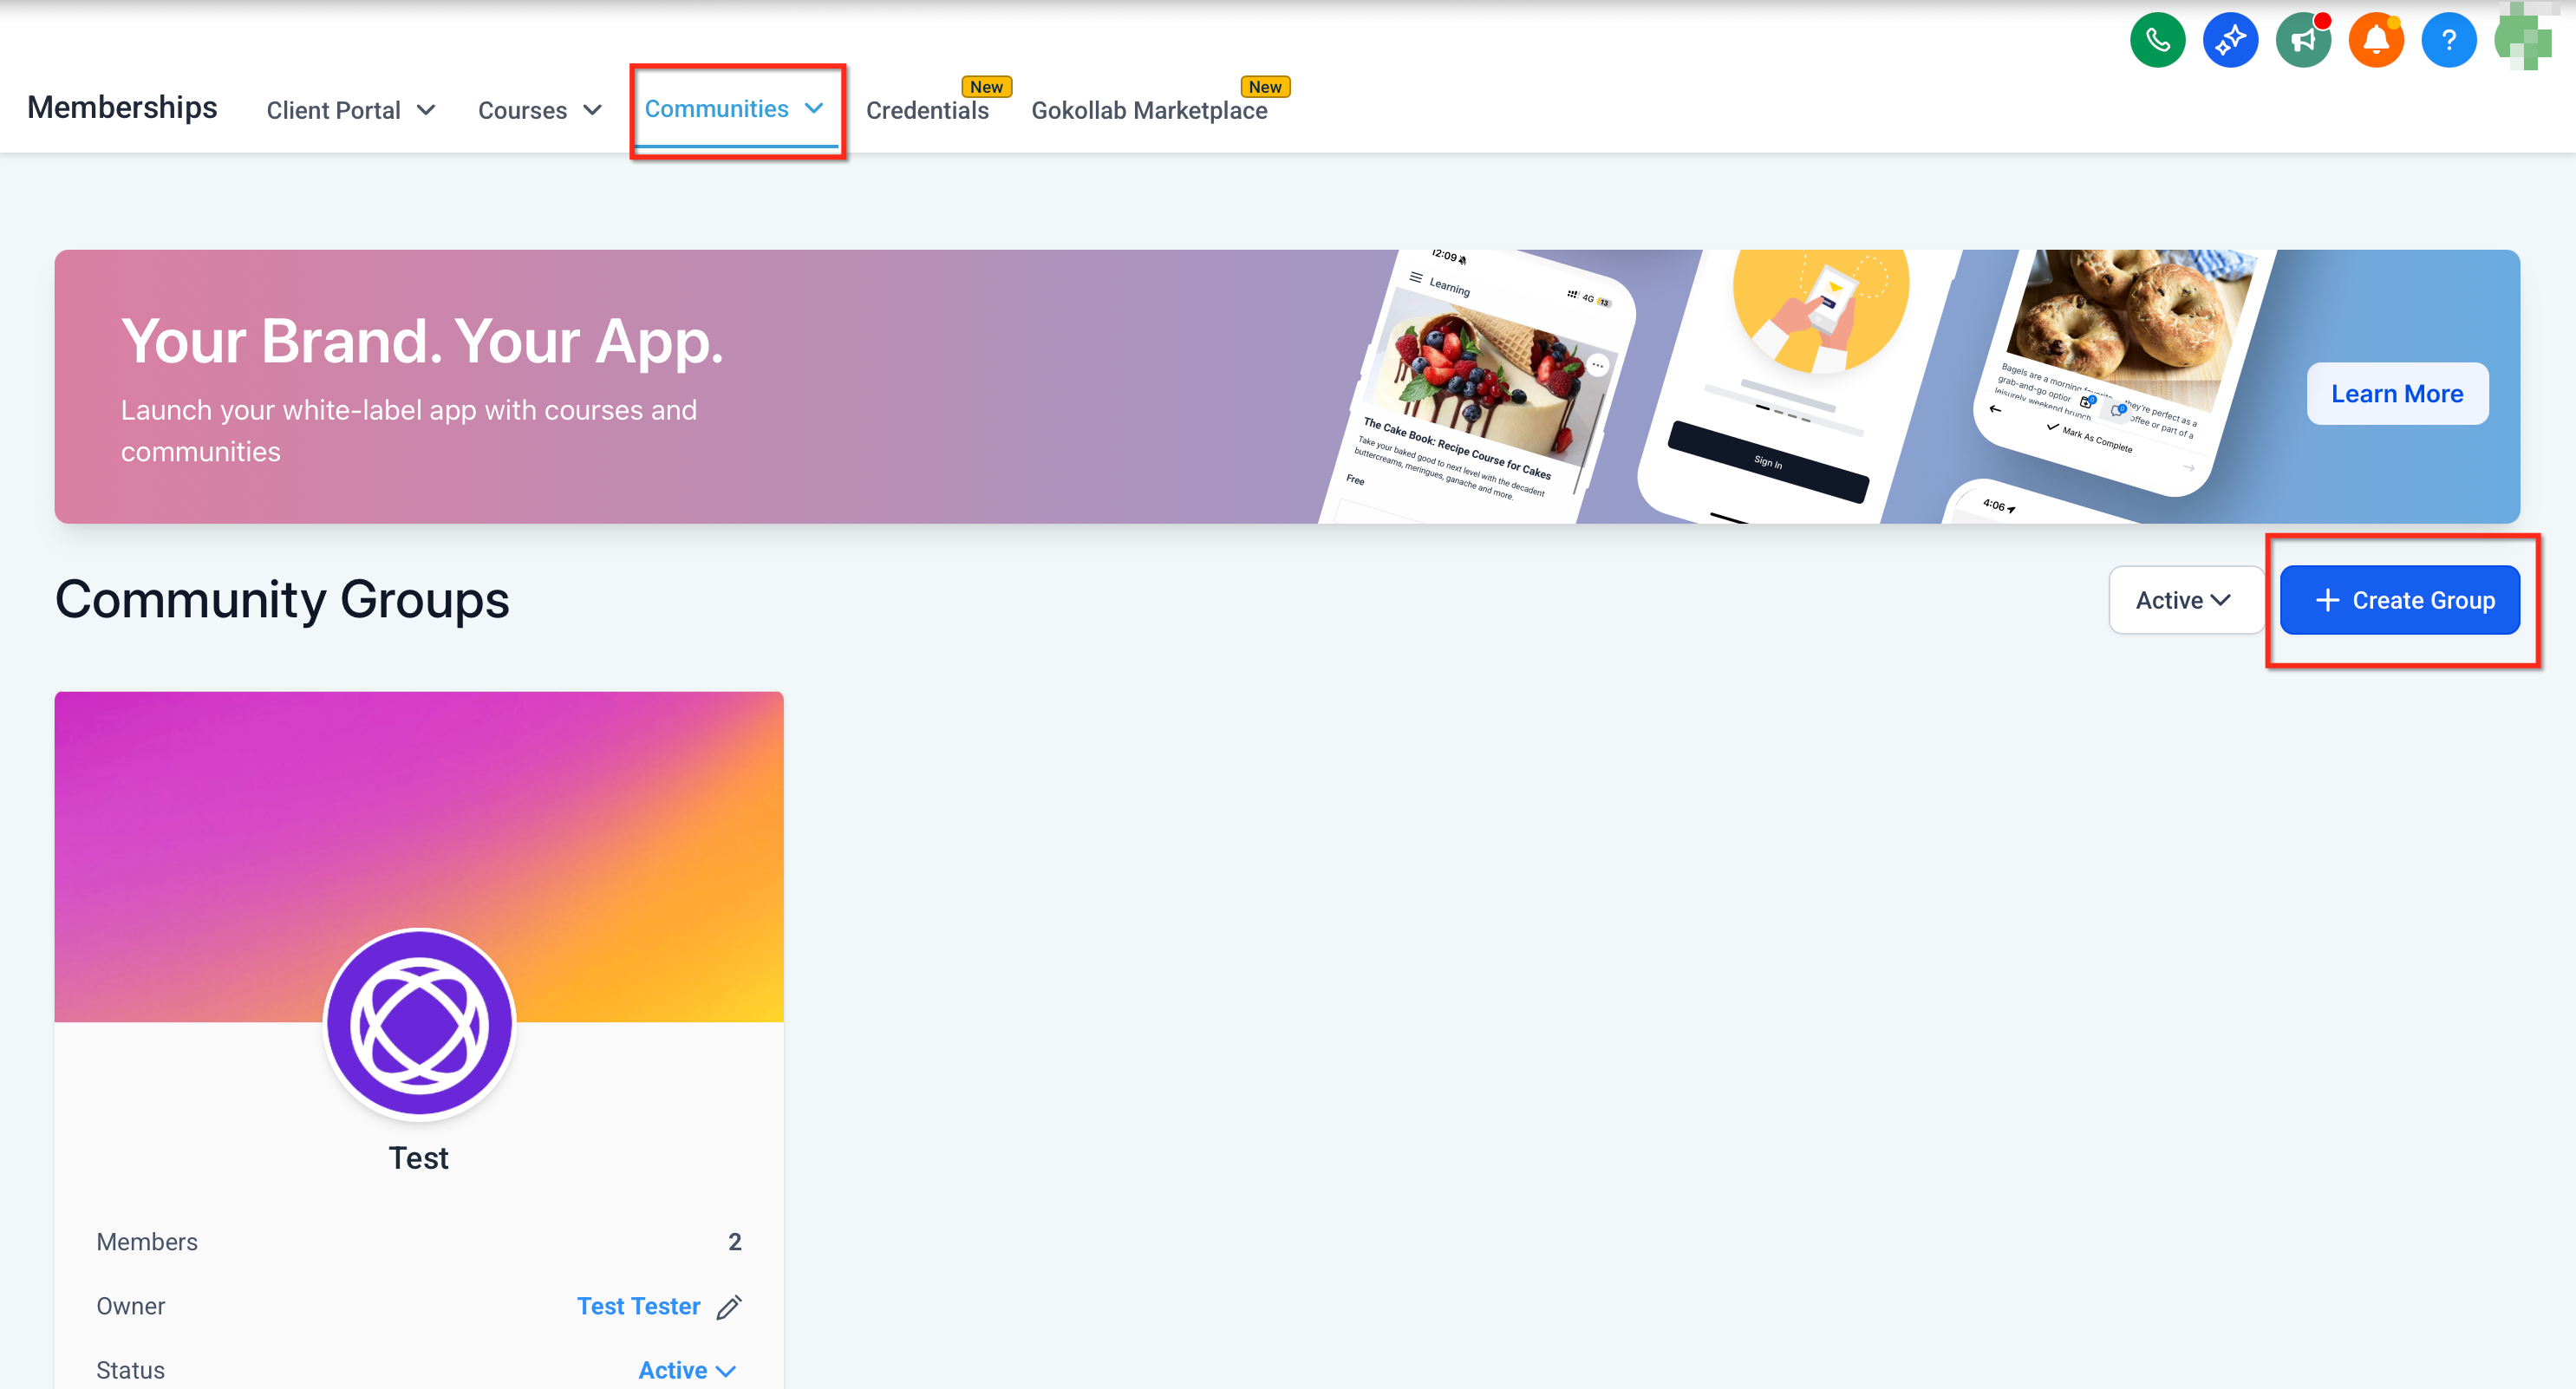
Go to Marketing > Memberships > Communities, then click + Create Group.
Name the group, customize its appearance, and click Create Group.
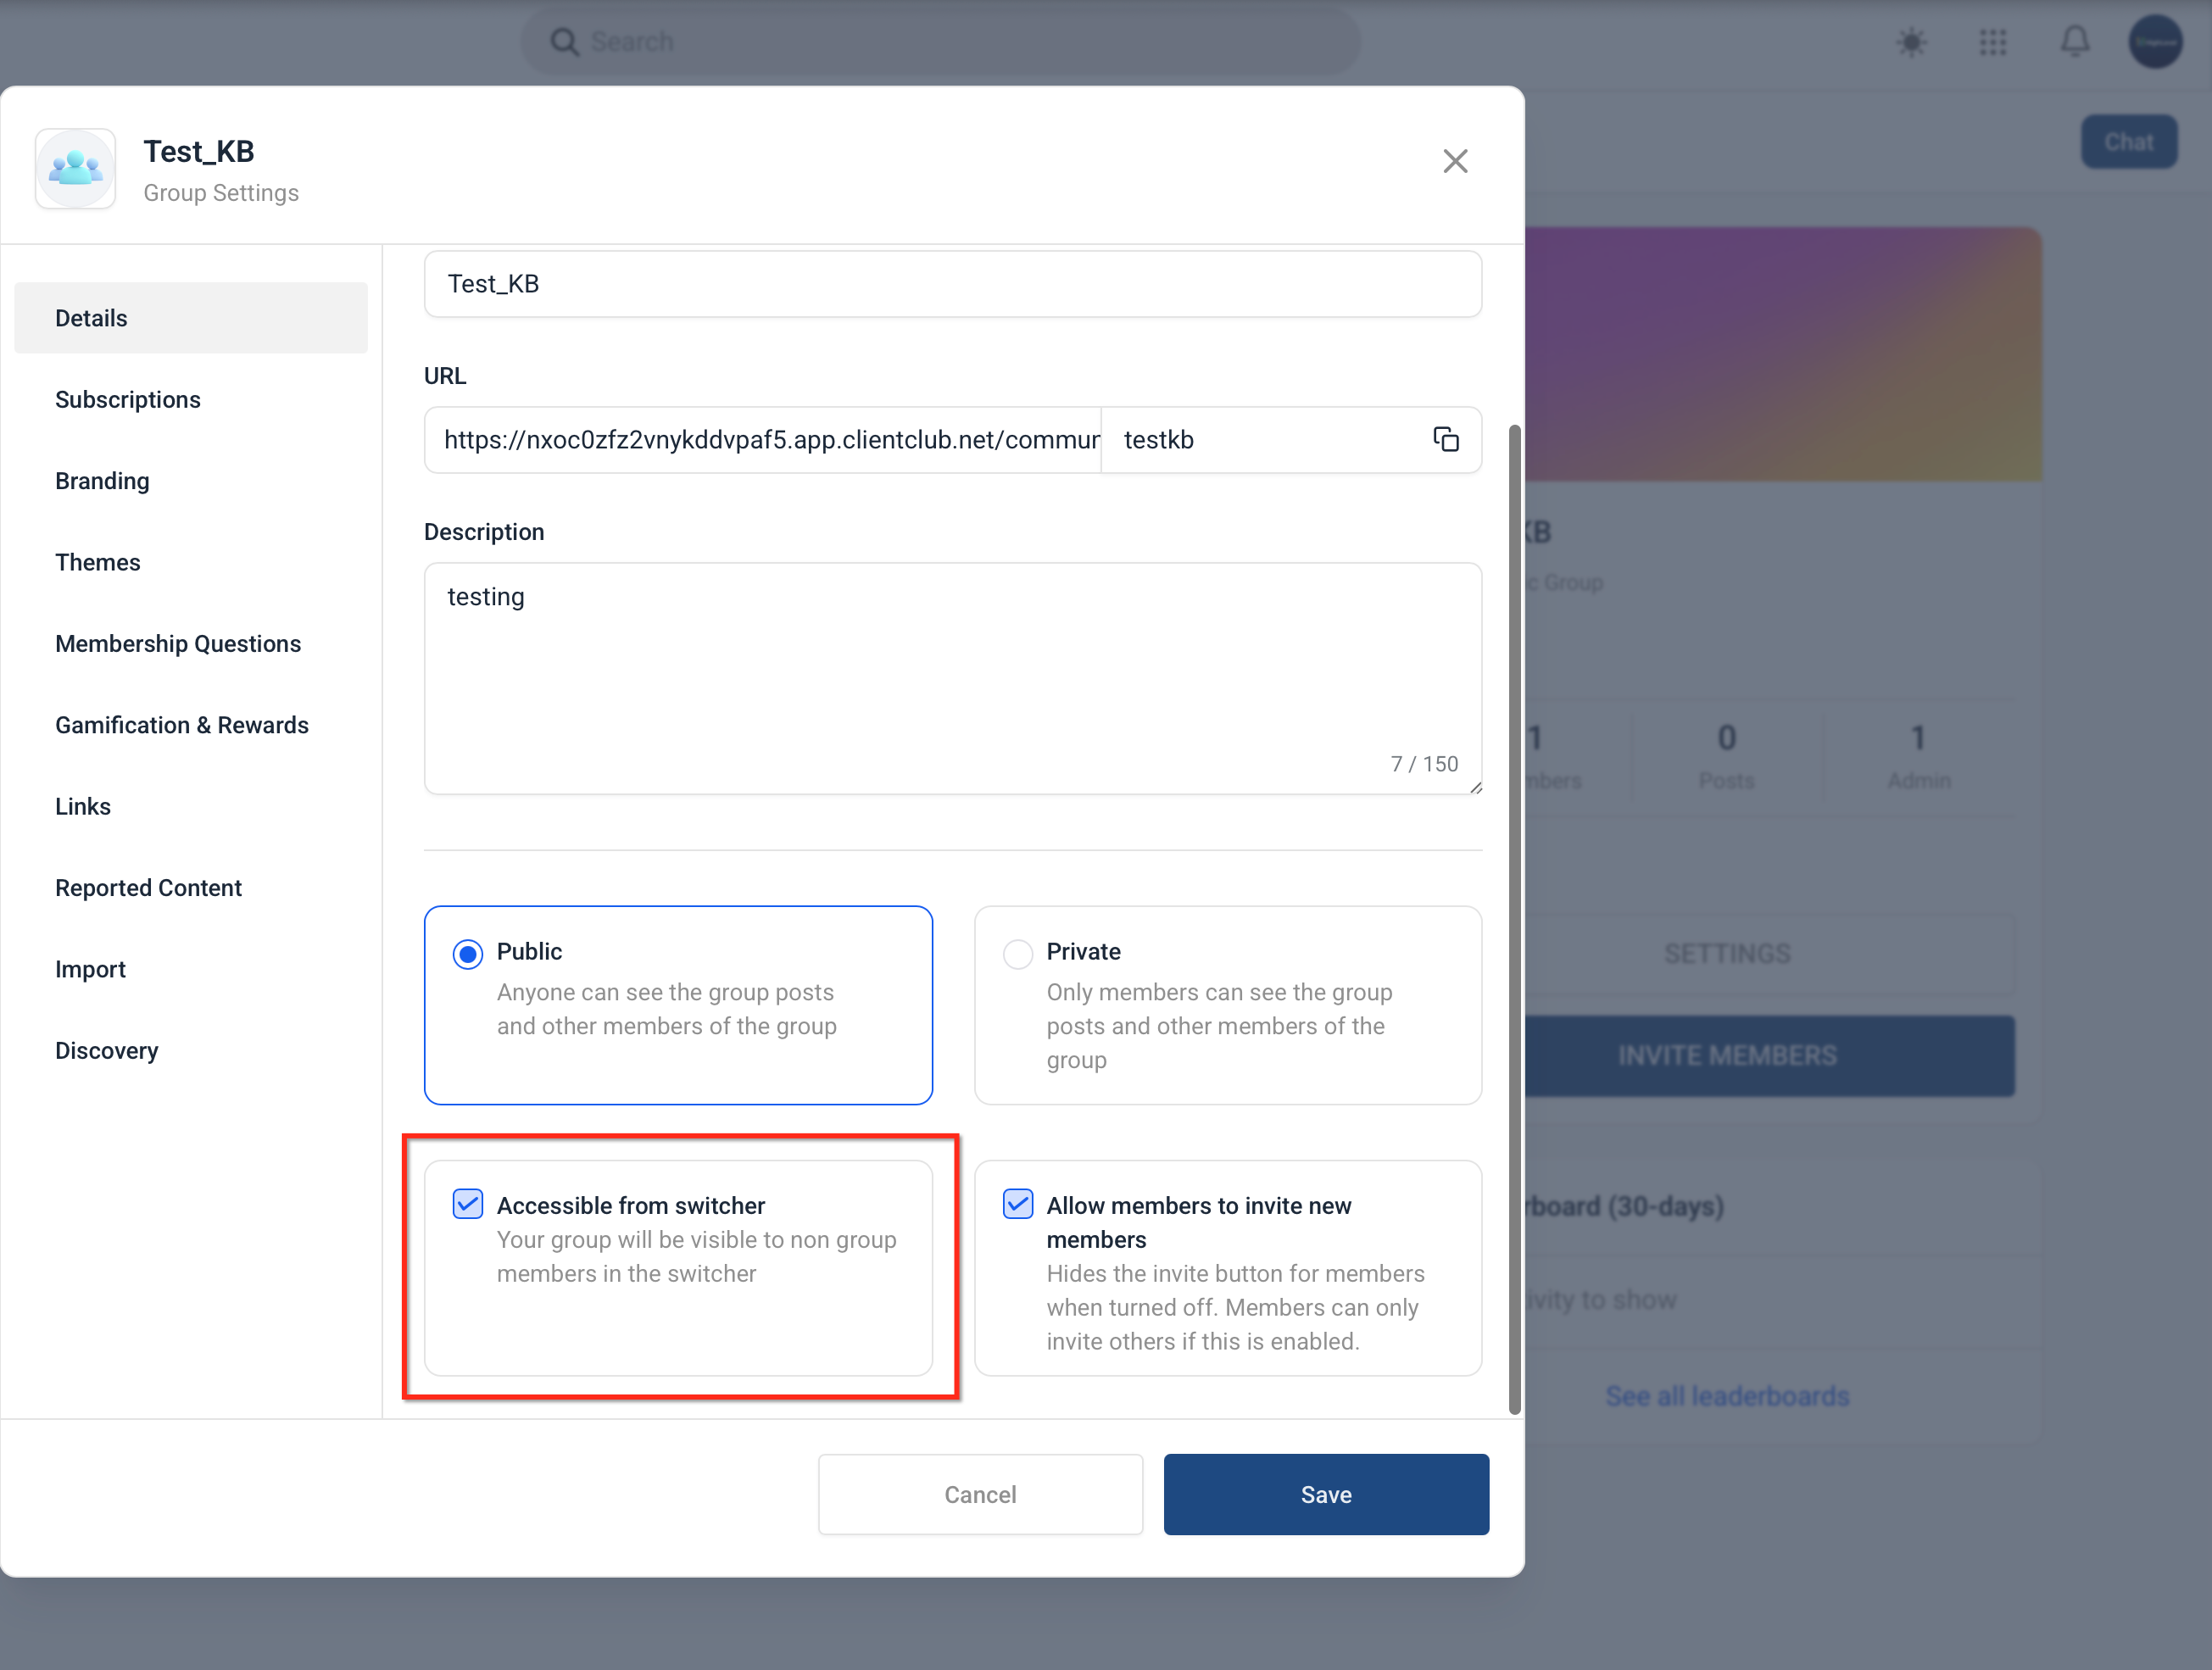
Open the group and click Settings.
Go to Details, switch the group to Private, and click Save.
Switching a group from Private to Public automatically approves all pending membership requests. Switching from Public to Private restricts previously posted content to current members only, so plan the timing of any conversion carefully.
Requesting to join: Interested members click the group's URL and select Request to join. The button changes to Membership Pending while the request is reviewed.
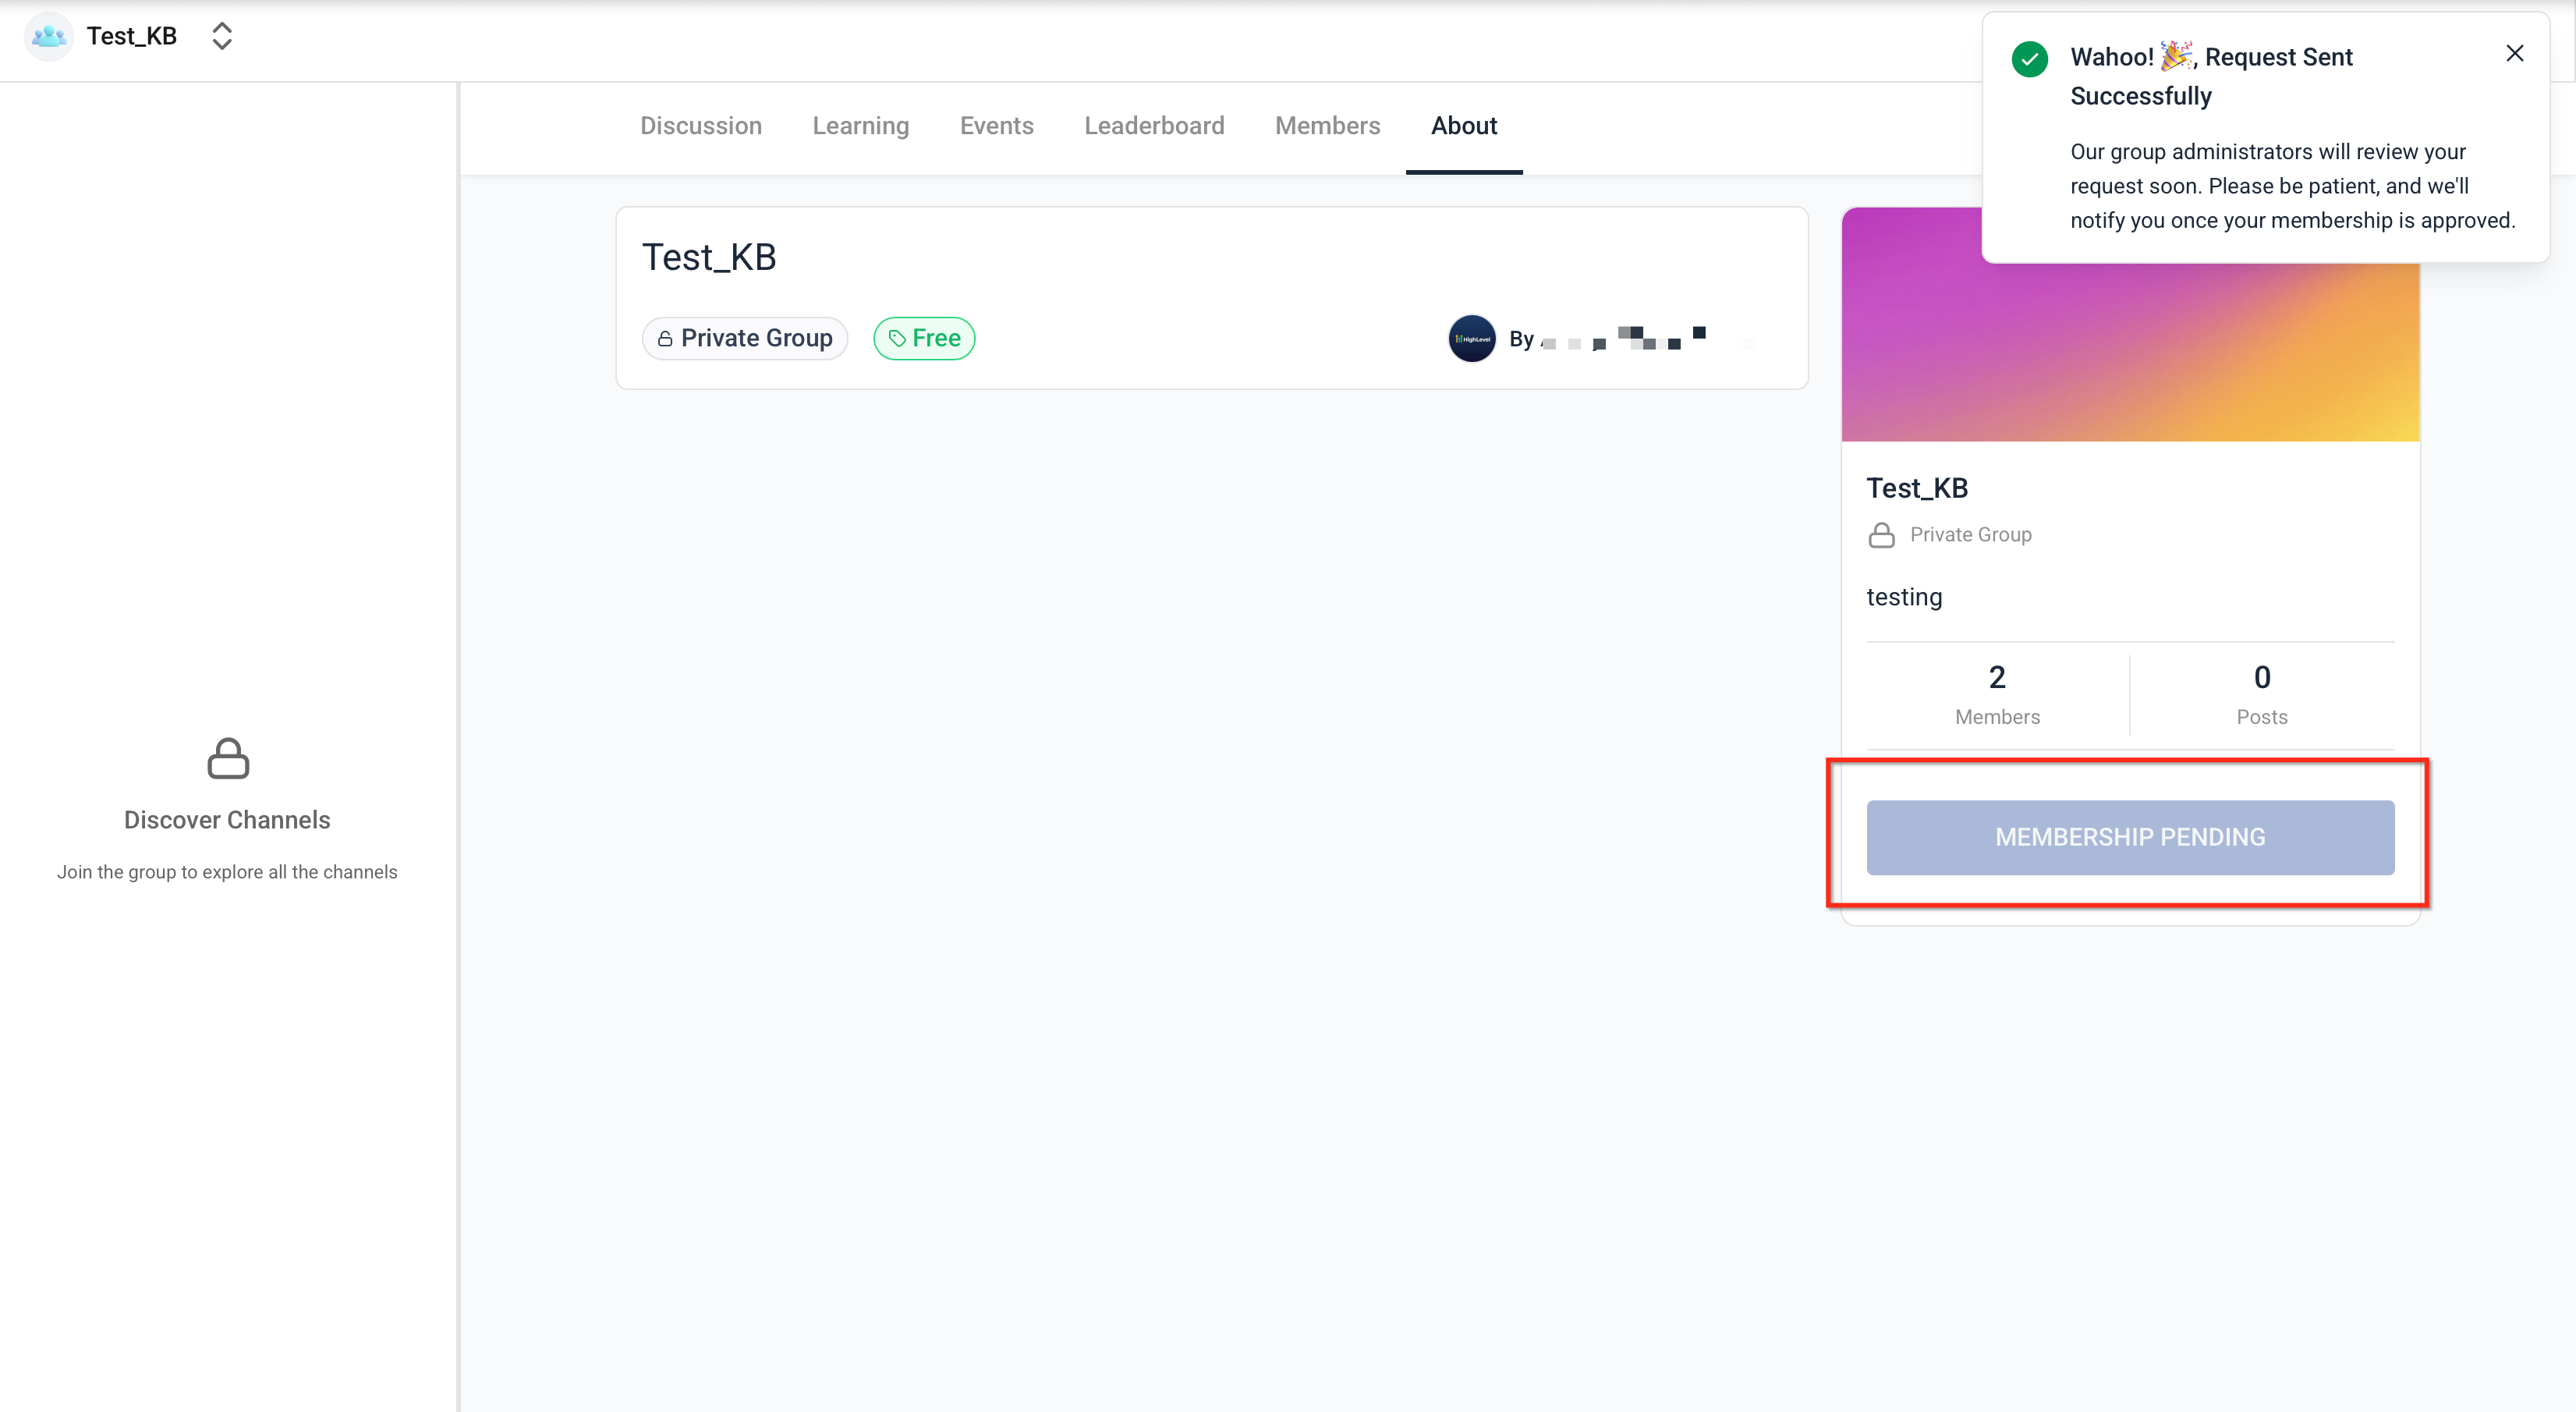
Reviewing requests: Admins and owners approve or reject requests from the Members section, under the Requested tab.
Adjusting roles: Owners and admins can promote or change a member's role between admin and contributor at any time. The Owner role can't be reassigned to another member.
Beyond who can join, you control who can even see that the group exists. Turning on Accessible from switcher makes your group visible in the group switcher (top left) to people who already have access to other groups in your account, even if they aren't members of this specific group yet. Leave it off to keep the group's existence hidden from non-members.
Paid Groups let you charge patients or staff to access a Public or Private community. This is a good fit for a subscription-based patient education community, a paid alumni group for a treatment program, or an exclusive membership perk.
Taking payments for a paid group? AX Pay, Aesthetix CRM's built-in payment provider, offers better processing rates than Stripe and connects to the same Payments settings used for group checkout. See the AX Pay help article for setup details.
From the group's Settings, choose whether the paid group will be Public or Private. This works the same way as the visibility settings described above; a paid group can still require approval if you also set it to Private.
A one-time payment gives a member unlimited access to the group after they pay and are granted access.
Open the community and go to Settings > Subscriptions.
Click Add new price. Set the Amount and choose One-time as the Type.
Click Add, then Save to finish creating the paid group.
To test the checkout flow before going live, turn on Test Mode.
Once saved, the group's description automatically shows the pricing to prospective members.
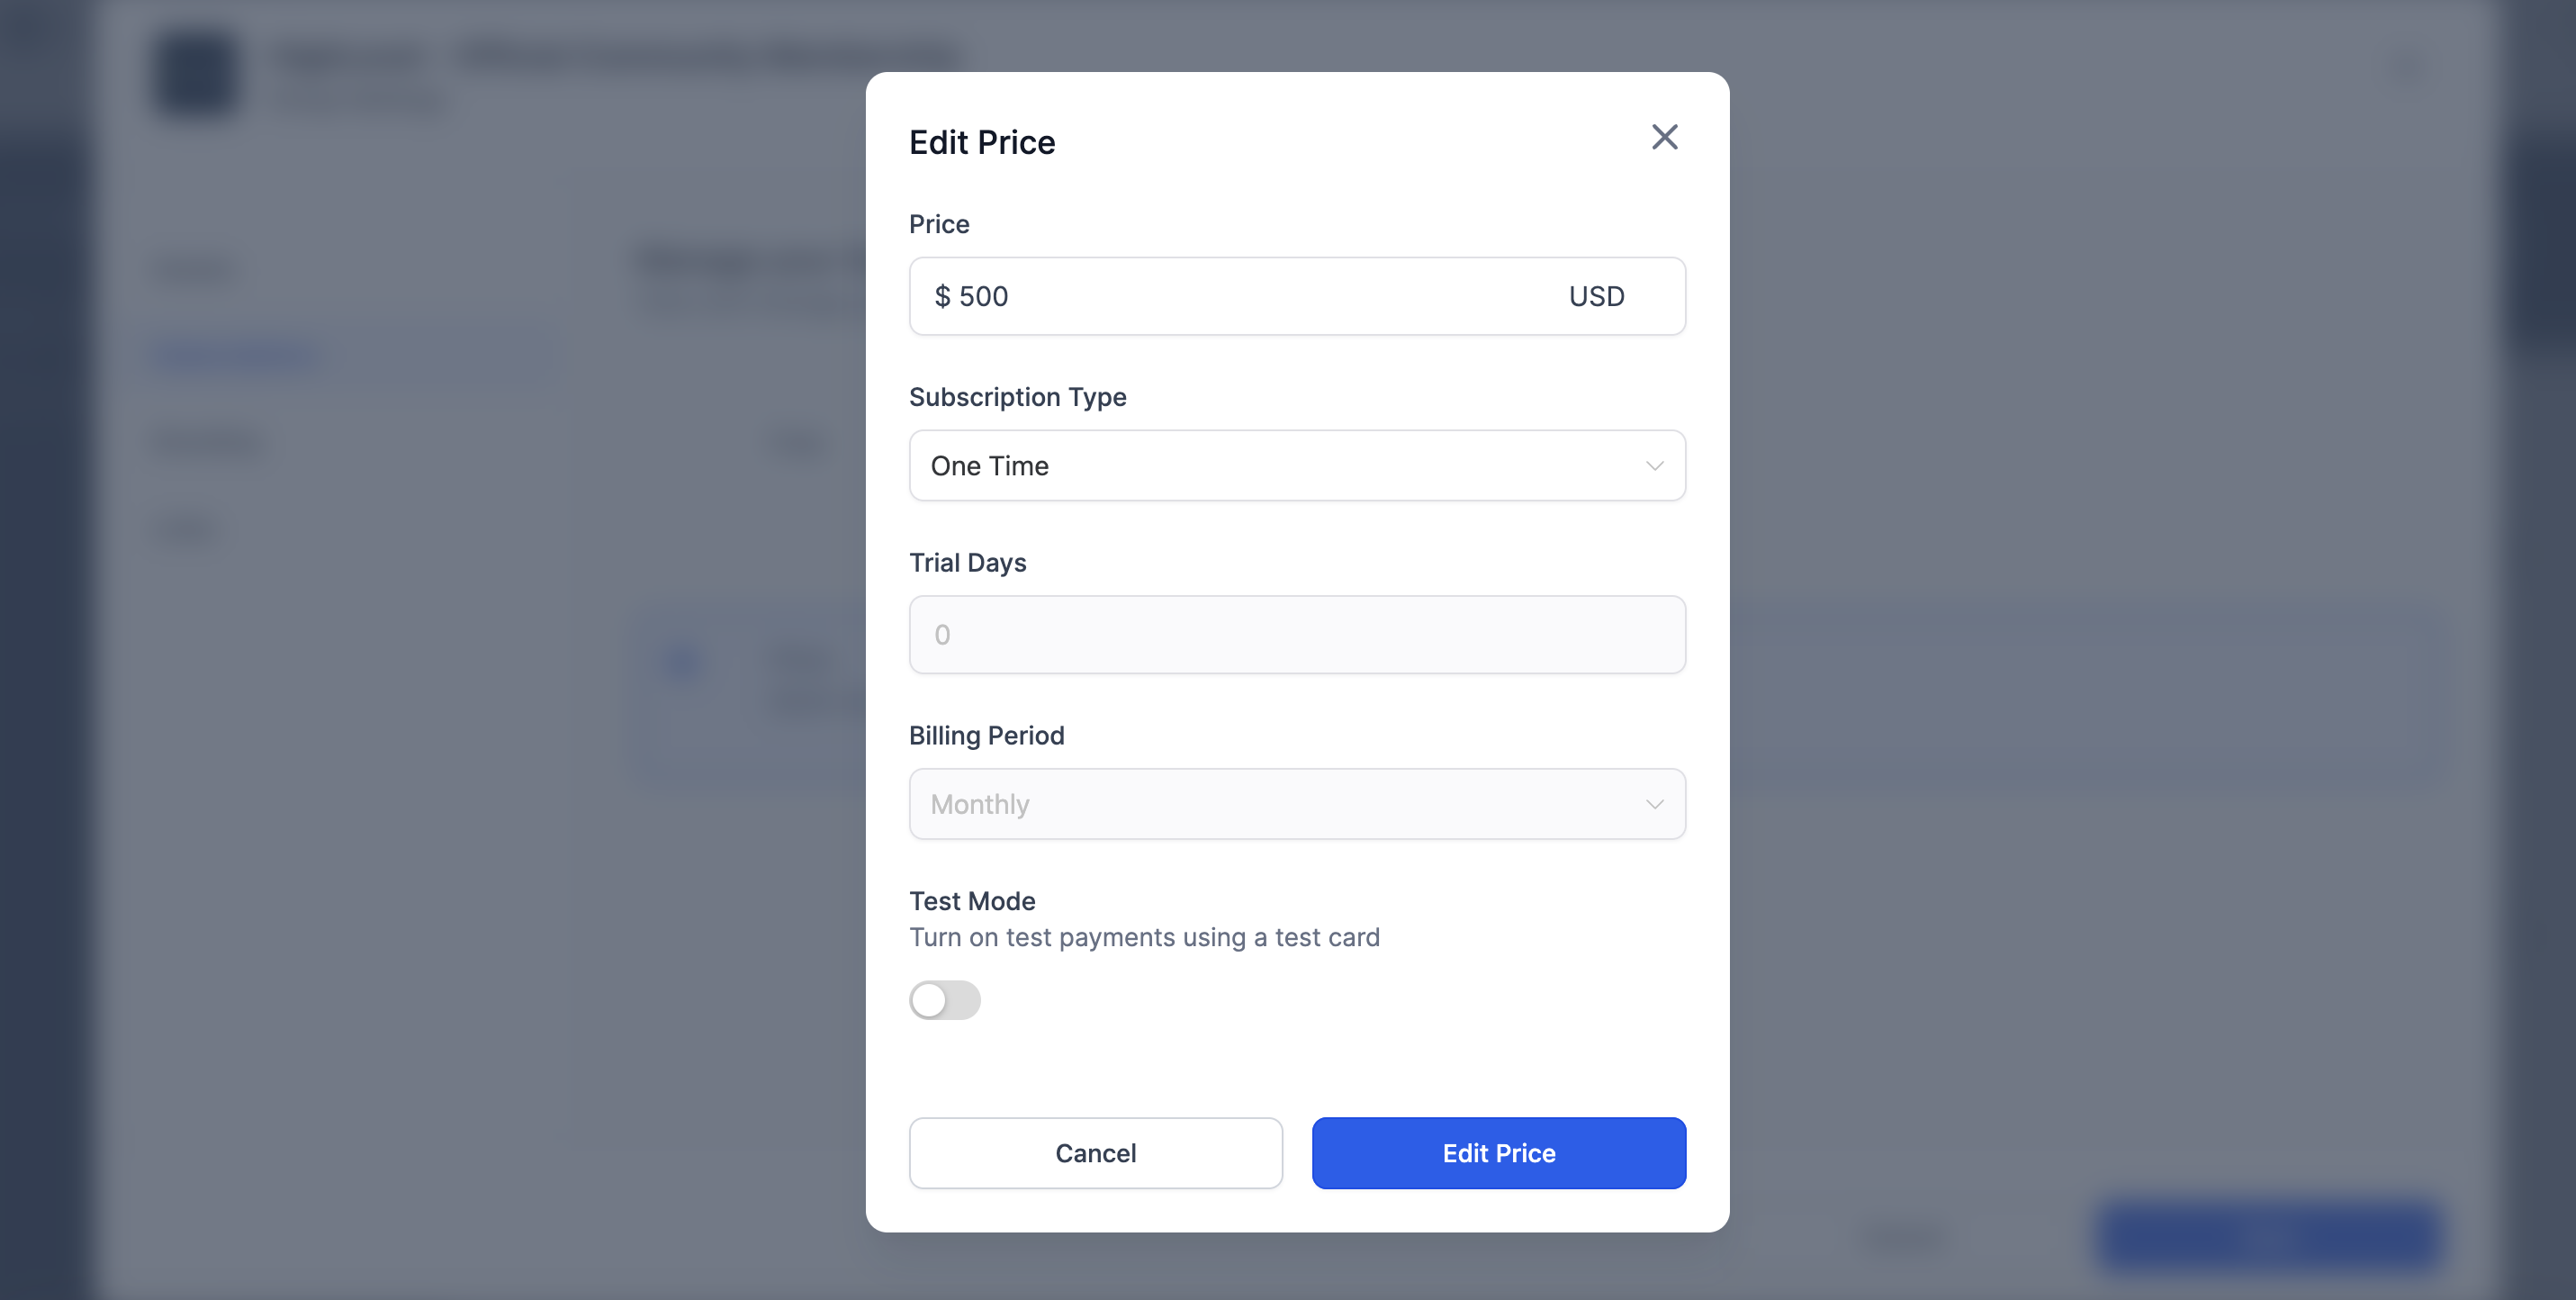
A recurring subscription gives a member access for as long as their subscription stays active.
Open the community and go to Settings > Subscriptions.
Click Add new price. Set the Amount, choose Recurring as the Type, and set any Trial Days and the Billing Period (monthly or annually).
Click Add, then Save to finish creating the paid group.
Turn on Test Mode to run a test payment before launch.
The group description reflects this pricing and billing cadence to members who want to join.
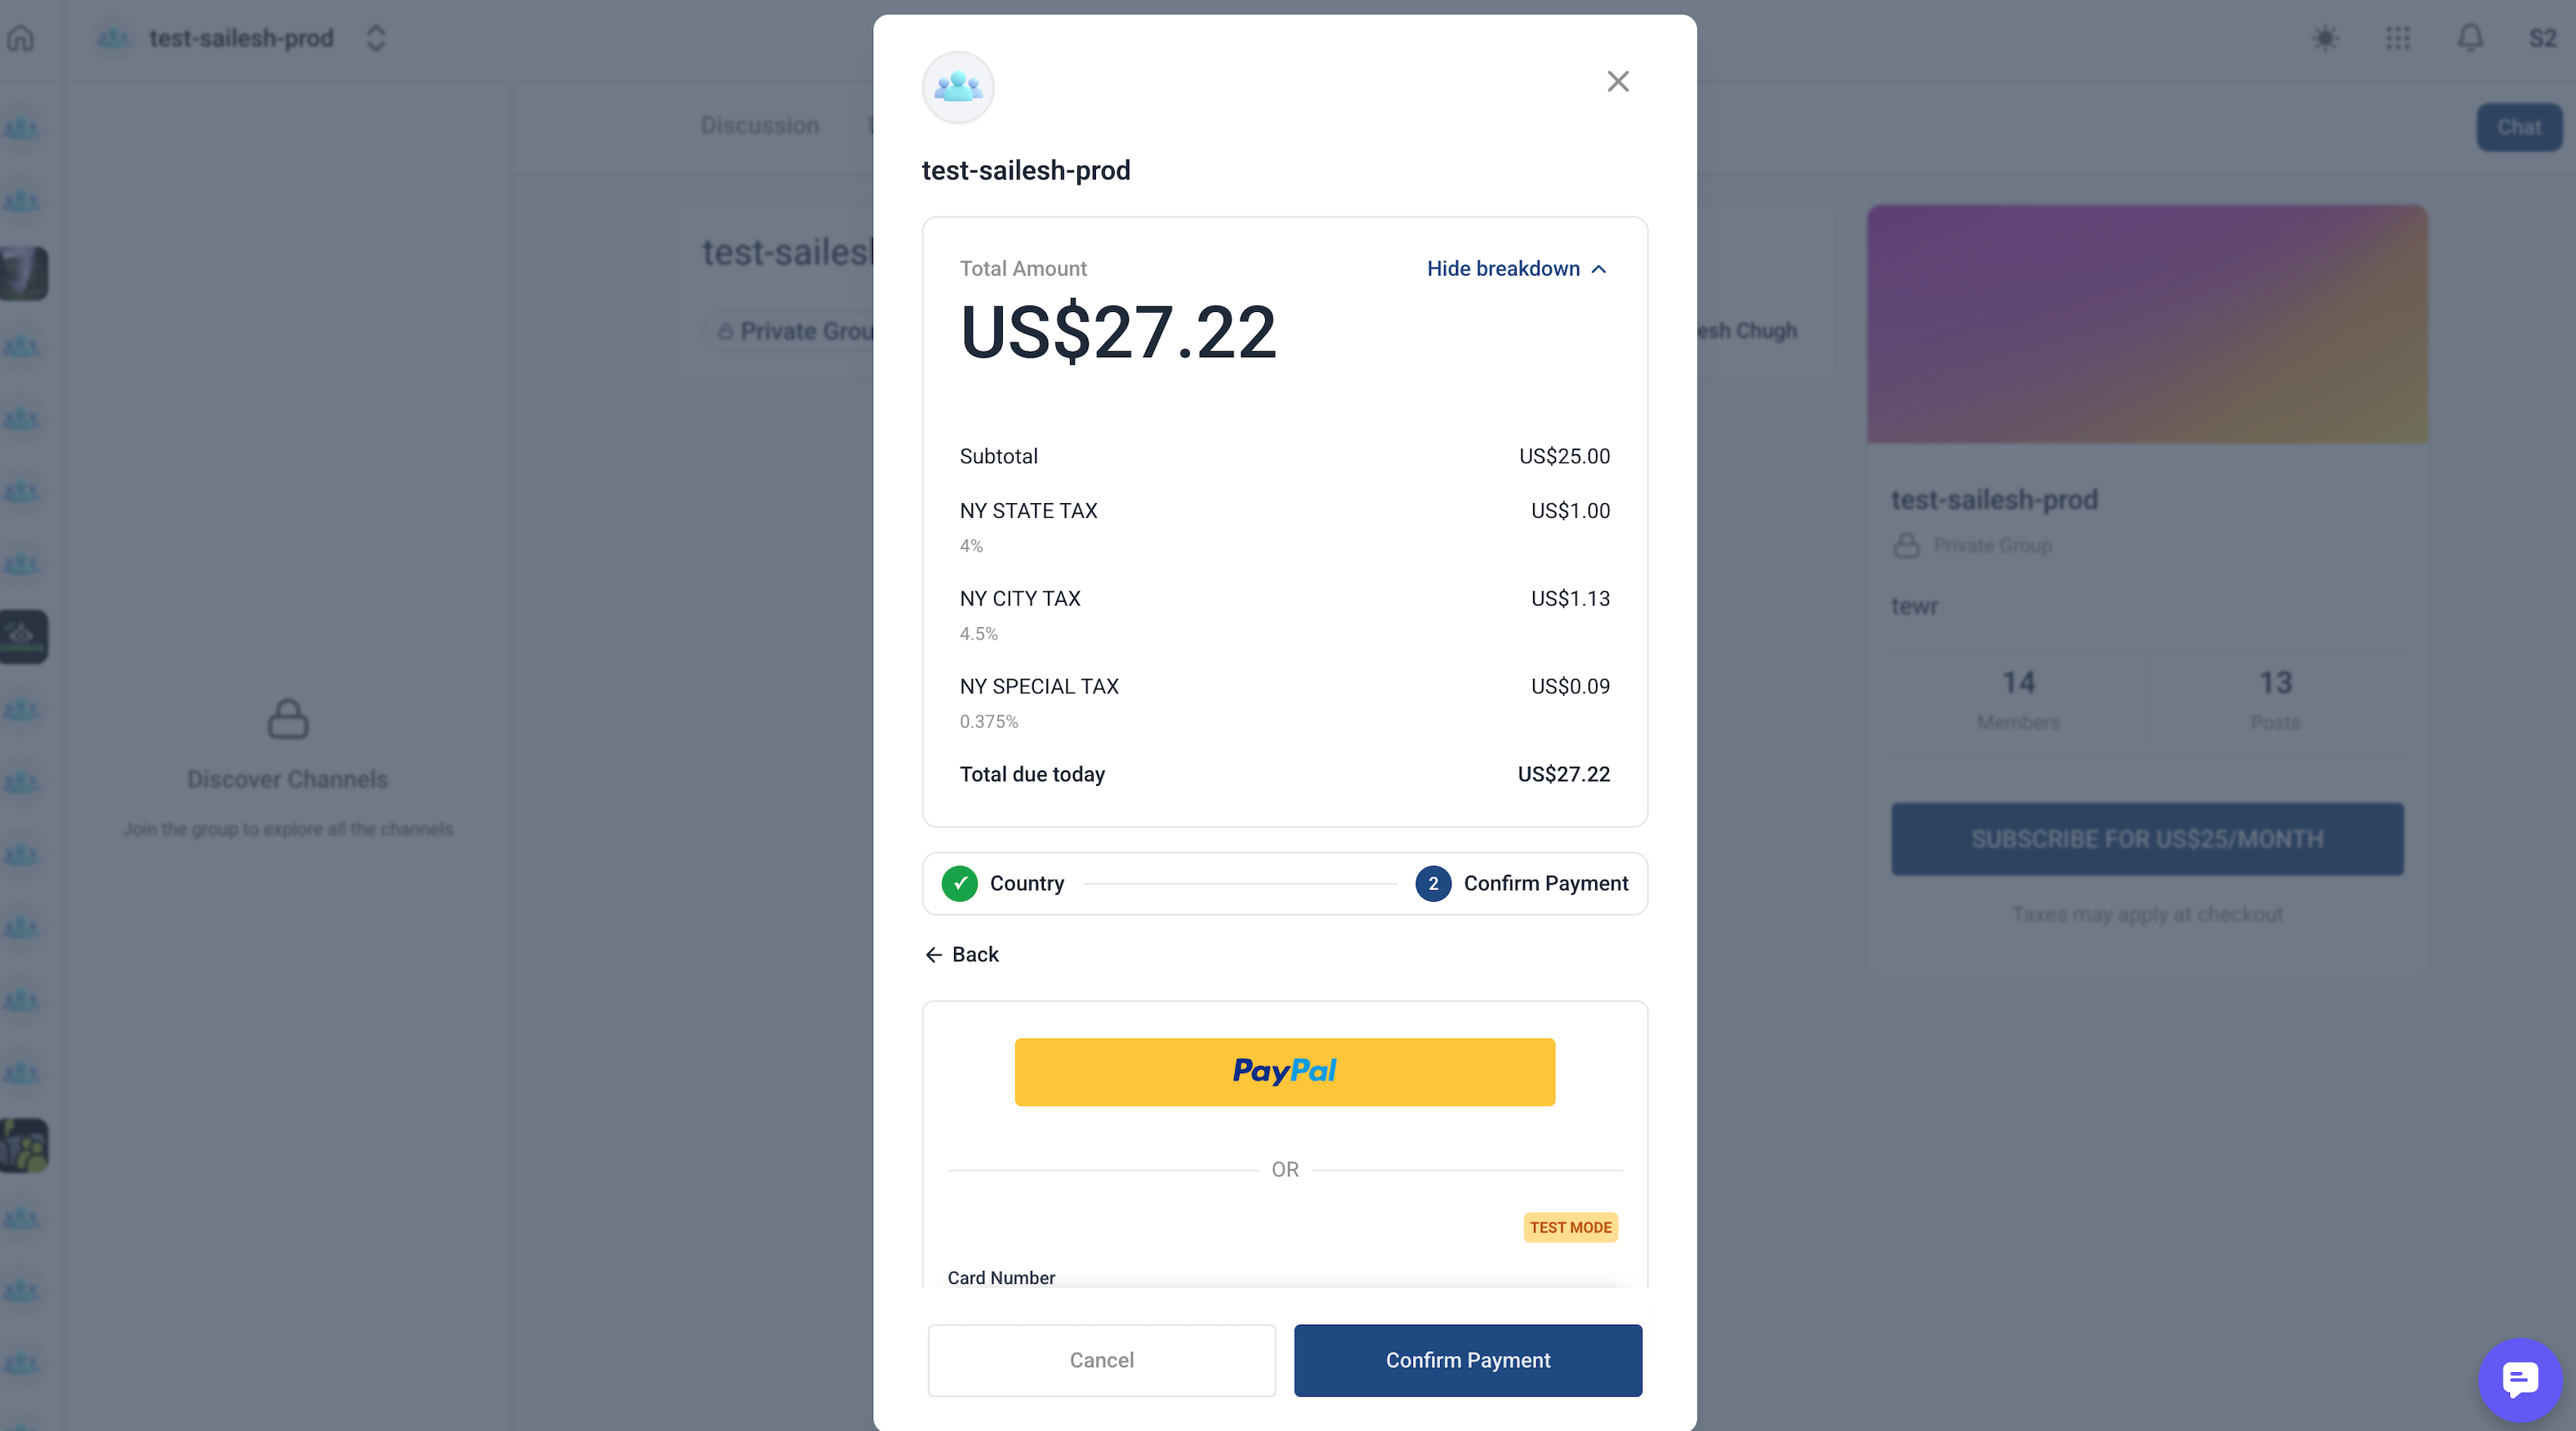
Paid group checkouts can apply taxes using your existing Payments settings. If you have Automatic Taxes or Manual Tax Rates configured under Payments > Settings > Taxes, eligible paid group purchases show tax at checkout automatically.
Private groups: After a member pays, follow the same approval process used for any private group: go to the Members tab, click the filter, select Requested, and accept or deny the membership.
Public groups: Once payment is made, the member signs up and becomes a member immediately, no separate approval step required.
Admins and owners receive an email with payment details whenever a member pays to join or request membership.
Members receive a payment confirmation email with their payment details.
Once an admin approves a paid member's request, that member is notified their membership and access are active.
When a member cancels through the Aesthetix CRM Payments screen: the member receives a cancellation confirmation email, the group's admins and owners receive a cancellation notice, and the member is automatically removed from the group.
When a member cancels through the Stripe screen: the same three things happen: the member gets a cancellation confirmation, admins and owners are notified, and the member is automatically removed from the group.
Issuing a refund:
From Aesthetix CRM: go to Payments > Transactions, click the three-dot icon on the transaction line item, and select Refund.
From Stripe: refunds can also be issued from the contact details screen inside Stripe.
If a member's contact record is deleted and later restored, they're reinstated in the group without needing to pay again, as long as the restore happens through normal contact recovery.
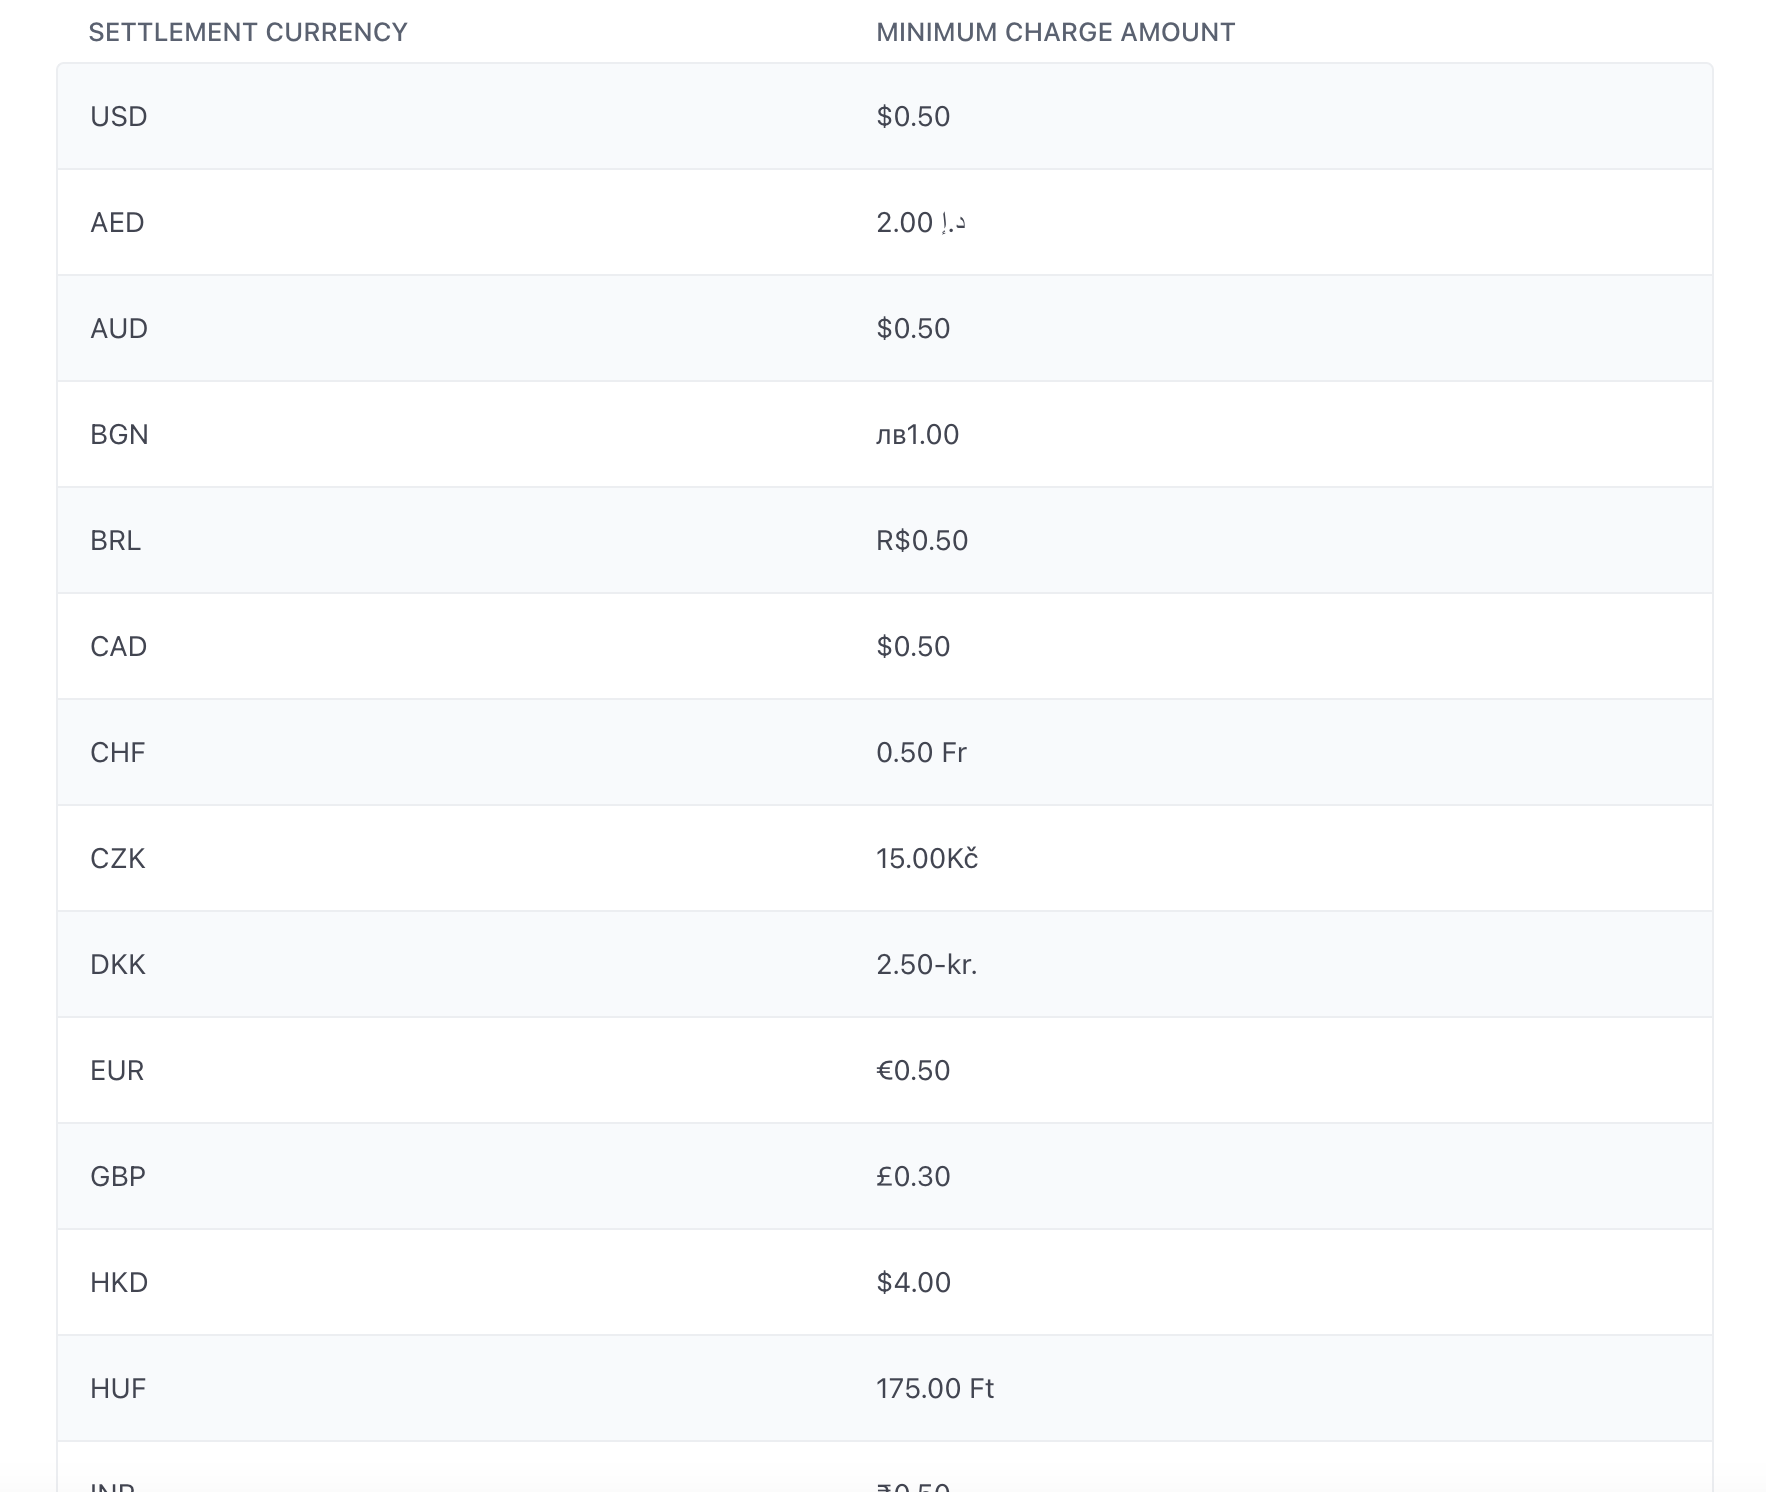
Minimum and maximum charge amounts vary by currency and follow Stripe's published currency limits.
Paid Courses let you sell individual courses inside a community, separately from (or in addition to) a paid group subscription. This is useful when a community is free to join but a specific course inside it, such as an advanced skincare protocol or a certification track for staff, carries its own price.
Selling a course on its own? The same AX Pay recommendation applies here: connect AX Pay under Payments for lower processing rates than Stripe on course checkouts.
As a community owner or admin, open the group's Learning tab.
Click to add a new course and enter its title, description, and content.
Under pricing, choose a one-time fee or a recurring subscription, then enter the price and select a currency.
Taxes: course checkouts can apply taxes the same way group checkouts do, using your Automatic Tax or Manual Tax Rate configuration under Payments settings.
Turn on Test Mode to run a test payment with test card details before publishing.
Reorder courses: use Move Courses on the Learning Page to arrange courses in the order that makes the most sense for learners.
Email notifications: both course creators and learners are notified automatically on successful payments and on subscription cancellations.
Adjust pricing anytime: you can change the course fee, switch between one-time and recurring, adjust the trial period, or change currency after a course is live.
Share a course link: open the course's three-dot menu and select Copy Link to get a shareable URL for social posts, email newsletters, or other marketing.
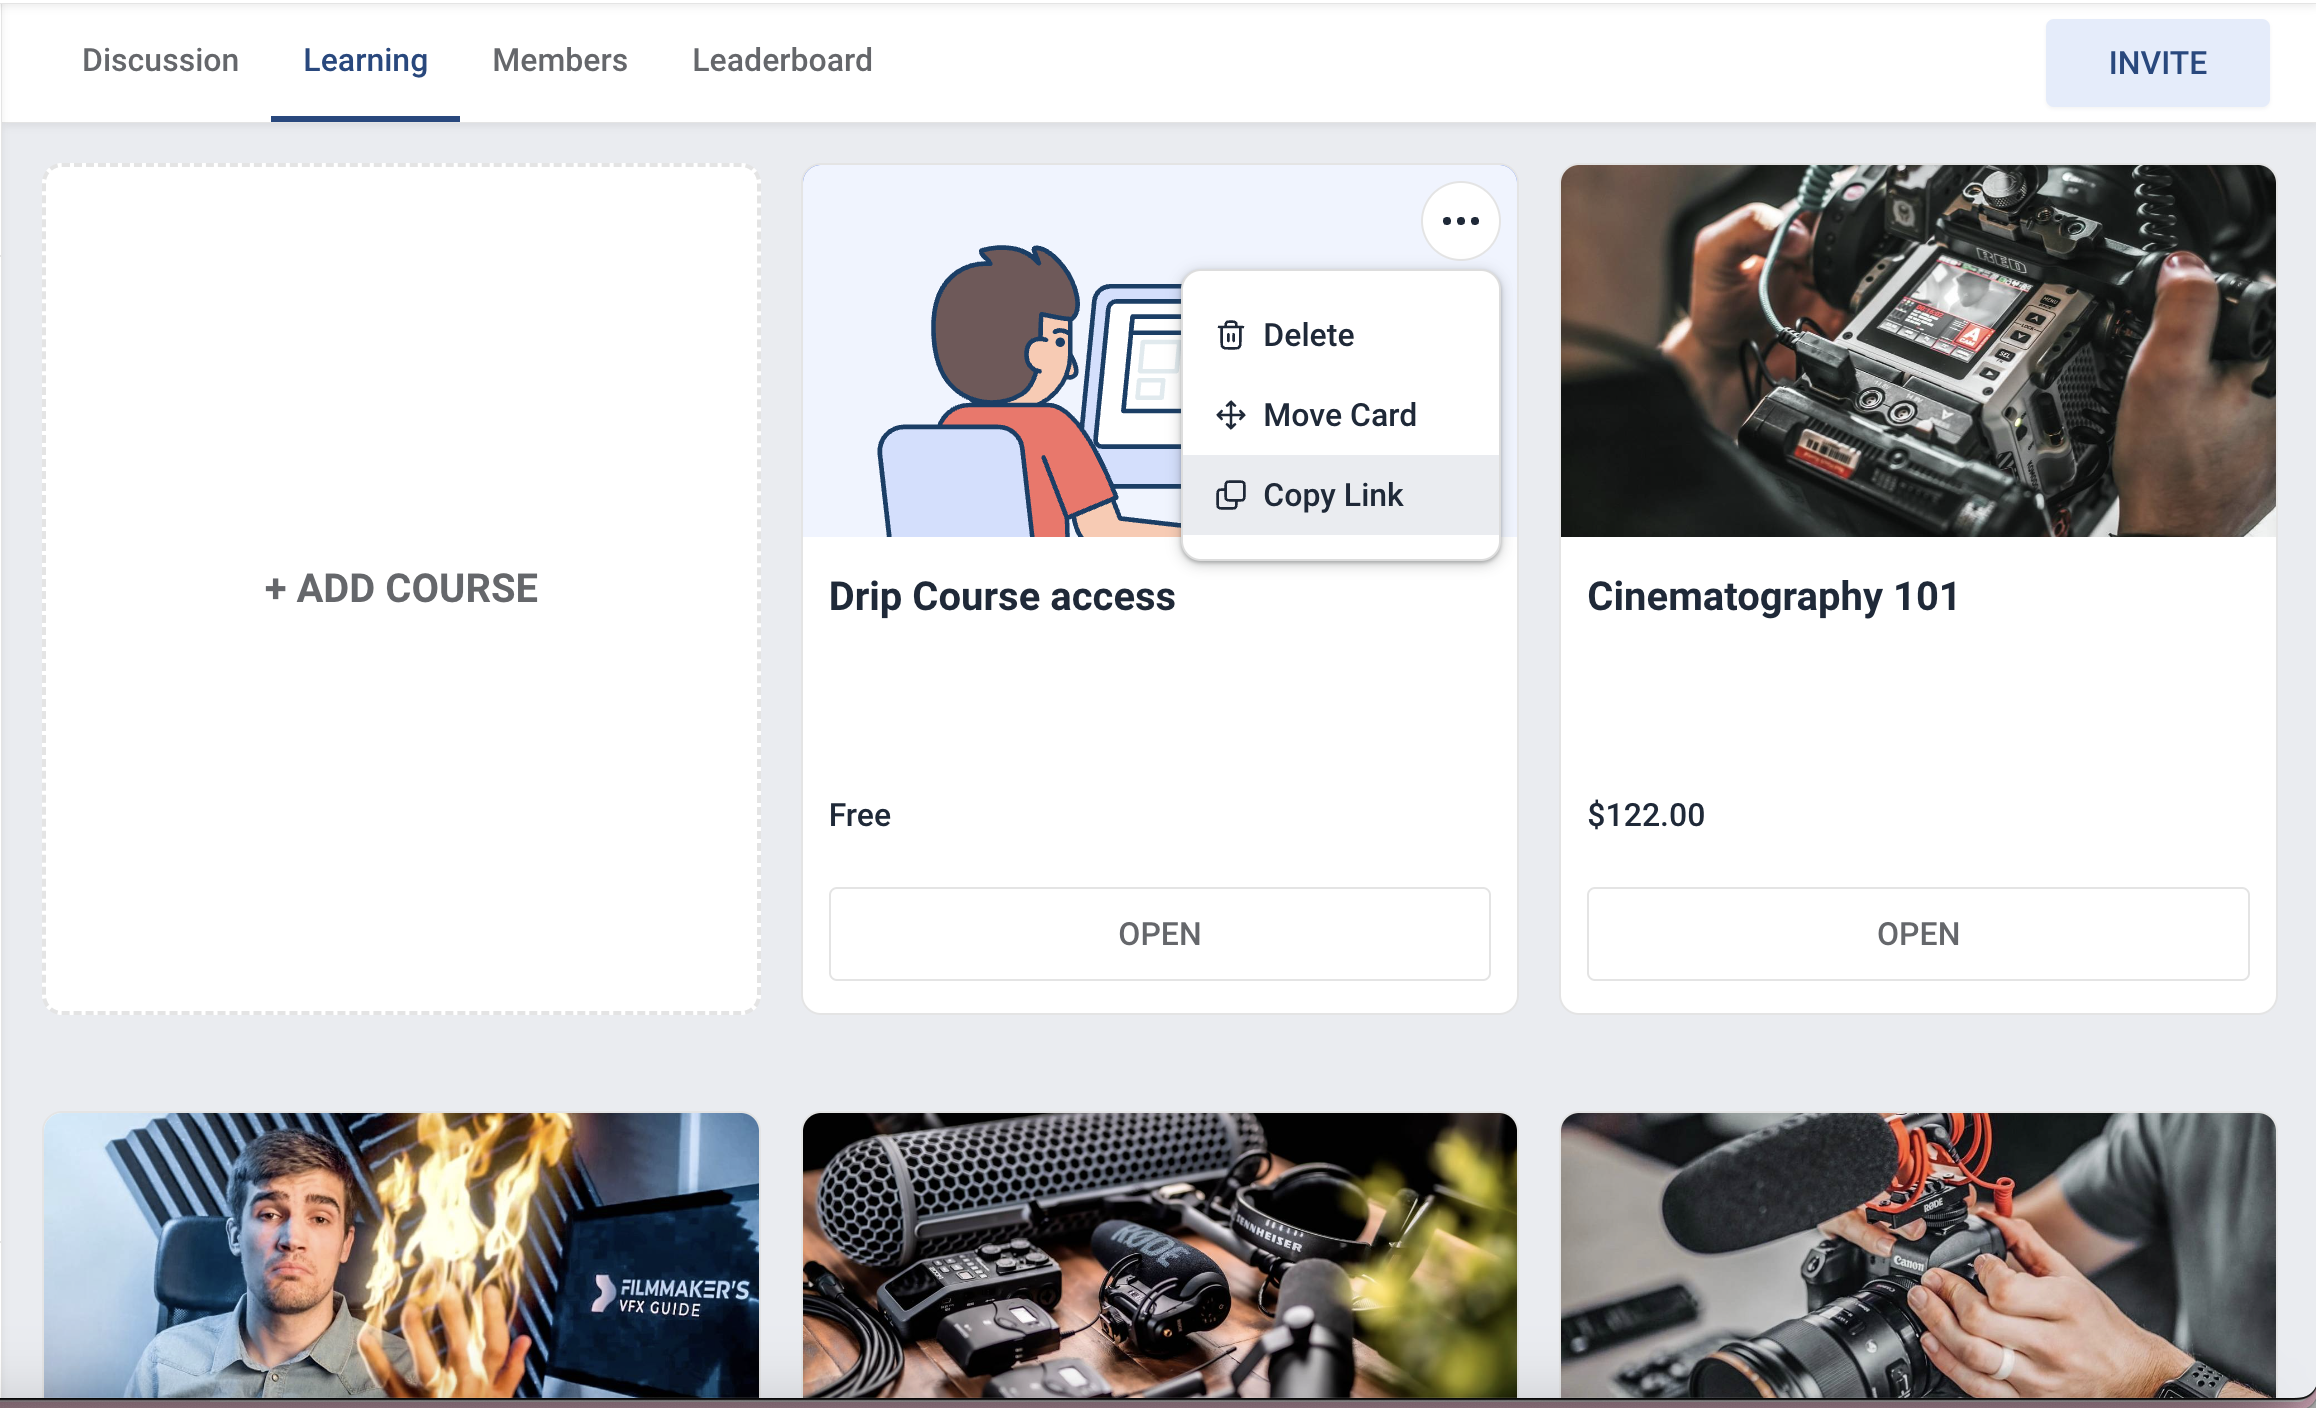
A patient or member browses the Learning tab in the community, selects a course, reviews the price and details, and completes checkout. They receive a payment confirmation and course access details by email.
Courses can still be offered for free. Paid Courses is an additional option, not a requirement, so a community can mix free and paid courses on the same Learning tab.
Beyond price-gated access, admins can manually grant or revoke access to any individual course for any individual member, and can mark a course as fully Private so it can only ever be unlocked by an admin, never automatically.
Go to Marketing > Memberships, then Communities.
Click Groups from the dropdown and open your group.
Click the Learning tab.
Click Add Course and select an existing course.
Under Course Visibility, choose Private, access granted by admin only.
Click Add Course to save it.
A course marked Private appears locked to every member until an admin grants access individually; it cannot be unlocked through level progression, purchase, or a time delay.
Private courses work well for VIP or premium patient content, internal staff training, or invite-only programs.
Instead of making a course fully Private, you can limit it to the members of one specific private channel in the group. Everyone in that channel gets the course automatically, without an admin having to grant access one member at a time, while everyone else never sees the course at all. This is a good fit for a paid or invite-only cohort that already has its own private channel, such as a certification track, a VIP program, or a staff training group. See the "Manage posts, content & channels" guide for setting up private channels themselves.
Open your group's Learning tab.
Click the three-dot menu on the course card and select Edit.
Open the Visibility dropdown and choose Private Channel, listed as "Members of a private channel."
Select the private channel whose members should have access to the course.
Click Update Course to save.
Only group admins and owners can change a course's visibility settings. Once saved, the course shows a "Private-channel based access" tag next to its name on the Learning tab, and only members of the selected channel see it in their course list.
Go to the Members tab in your group.
Click the three-dot menu next to the member.
Select Manage Courses.
Click Grant Courses.
Select one or more courses and click Grant.
The member receives an email notification as soon as a course is unlocked for them.
Go to the Members tab in your group.
Click the three-dot menu next to the member.
Select Manage Courses.
Click the red X icon next to the course.
Click Confirm.
Access can't be revoked if the member already qualifies for the course through its normal unlock criteria (All Members, Level Unlock, Paid, or Time Unlock). Manual revocation only applies to access that was manually granted or to Private courses.
Automation around course completions and access changes, including sending a workflow when a member is granted or removed from a course, is handled in Workflows, not inside the community settings themselves.
Who can create and manage private groups? Owners and admins. They can create, manage, and convert groups between public and private.
How does a patient or staff member join a private group? They visit the group's URL and click Request to join. The button changes to Membership Pending until an admin or owner approves the request from Members > Requested.
What's the difference between a paid group and a paid course? A paid group charges for access to the entire community, its posts and discussions. A paid course charges for one specific course inside a community, which can be free to join otherwise.
Can I offer both free and paid courses in the same community? Yes. Paid Courses is an additional option; you can keep offering free courses alongside paid ones on the same Learning tab.
What happens to a member if they cancel a paid group subscription? They receive a cancellation confirmation email, the group's admins and owners are notified, and the member is automatically removed from the group, whether they cancel from Aesthetix CRM Payments or from Stripe.
Can I brand a private or paid group? Yes. Group settings include options to customize colors, images, and other branding to match your practice.
If a patient's contact record is deleted and restored, do they have to pay again for group or course access? No. As long as the record is restored through normal contact recovery, the patient is reinstated without being charged again.
Why can't I revoke a member's course access? If the member already meets the course's unlock criteria (for example, they're covered under All Members, a Level Unlock, a Time Unlock, or they paid for it directly), that access can't be manually revoked. Manual revocation applies to access that was manually granted or to Private courses.
Do private courses ever unlock automatically? No. A course marked Private requires an admin to manually grant access every time; it never unlocks through level, time, or payment rules.
What's the difference between a Private course and a course restricted to a private channel? A Private course must be granted individually by an admin, member by member. A course restricted to a private channel is granted automatically to everyone who belongs to that channel, with no separate per-member step needed.
How do members know a course has restricted visibility? Courses set to Private Channel visibility show a "Private-channel based access" tag next to the course name on the Learning tab.
Where do taxes on group or course payments come from? From your existing Payments settings. If you have Automatic Taxes or Manual Tax Rates configured under Payments > Settings > Taxes, eligible paid group and paid course purchases display tax at checkout automatically.
