Community groups are the hub of your practice's online community: a space for patients and prospects to ask questions, share results, and stay engaged between visits. You manage groups from Marketing > Memberships > Communities > Groups in Aesthetix CRM. This guide covers member roles, invitations, approvals, and how to remove or manage members inside a group.
Click Marketing in the left navigation.
Click Memberships.
Click Communities.
Select the group you want to manage.
Click the People tab to see everyone currently in the group.
Every group has a hierarchy of roles, each with different responsibilities and capabilities. Picking the right role for each member protects the group and saves you from having to undo mistakes later.
Role | Create Posts | Moderate Posts | Manage Members | Delete/Deactivate Group |
|---|---|---|---|---|
Owner | Yes | Yes | Yes | Yes |
Admin | Yes | Yes | Yes | No |
Channel Manager | Yes | Yes | Yes | No |
Contributor | Yes | No | No | No |
Owner: Has full administrative control over the group, including the authority to deactivate it. A group can only be deactivated, not permanently deleted, so this is a safeguard against accidental data loss rather than a true "delete."
Admin: Manages group members day to day. Admins can invite or remove members and grant administrative privileges to others, which lets them share the workload of running the group.
Channel Manager: Moderates a specific channel within the group, including its members and content. Useful if you split a large community into topic-based channels (for example, "Skincare Tips" versus "Treatment Q&A") and want different people responsible for each.
Contributor: The typical patient or prospect member. Contributors can start discussions, comment, and like posts, but they cannot moderate content or manage other members.
What each permission means:
Create Posts is the ability to publish new posts in the group. Whether Contributors have this ability depends on the settings the Owner has configured.
Moderate Posts is the ability to edit or remove posts made by other members. This is typically reserved for Owners, Admins, and Channel Managers.
Manage Members covers adding new members, changing roles, and removing members from the group. This is typically reserved for Owners and Admins.
Delete/Deactivate Group is the ability to pause the entire group. This is reserved for the Owner only, to prevent an accidental or unauthorized shutdown.
Choose whichever invite method fits how you're promoting the group.
From the group, copy its unique Group URL.
Use this link in your email campaigns, text campaigns, and automations to invite patients to join.
Because the URL is reused everywhere, consider storing it as a custom value. If you ever need to change the group's URL, you only have to update the custom value once and it updates everywhere it's referenced, including messages you've already sent that link back to the value.
Go to Memberships > Communities > Groups.
Log in to your group.
Click Invite Members.
Copy the invite link and send it by email, text, WhatsApp, or any other channel.
Go to Memberships > Communities > Groups.
Log in to your group.
Click Invite Members.
Under Email Invite, enter the recipient's name and email address.
Turn Administrative Privileges on or off depending on whether this person should manage the group.
Click Send Invite. The recipient gets an email with a join action.
By default, members can share the group URL to invite others themselves. To control this, go to the group's Settings and turn Allow members to invite new members on or off. Turning it off hides the invite button for regular members, so only Admins and Owners can bring new people in.
Privacy settings determine who can find and join your group, and whether you need to manually approve each request.
Public groups: Anyone can see the group's posts and its member list, and anyone can join immediately with no approval needed.
Private groups: Only members can see posts and the member list. Every join request needs to be approved before that person gets in, even when someone uses a direct invite link, either by reviewing it yourself or by setting up a workflow to handle it automatically (see Automating join request review with workflows below).
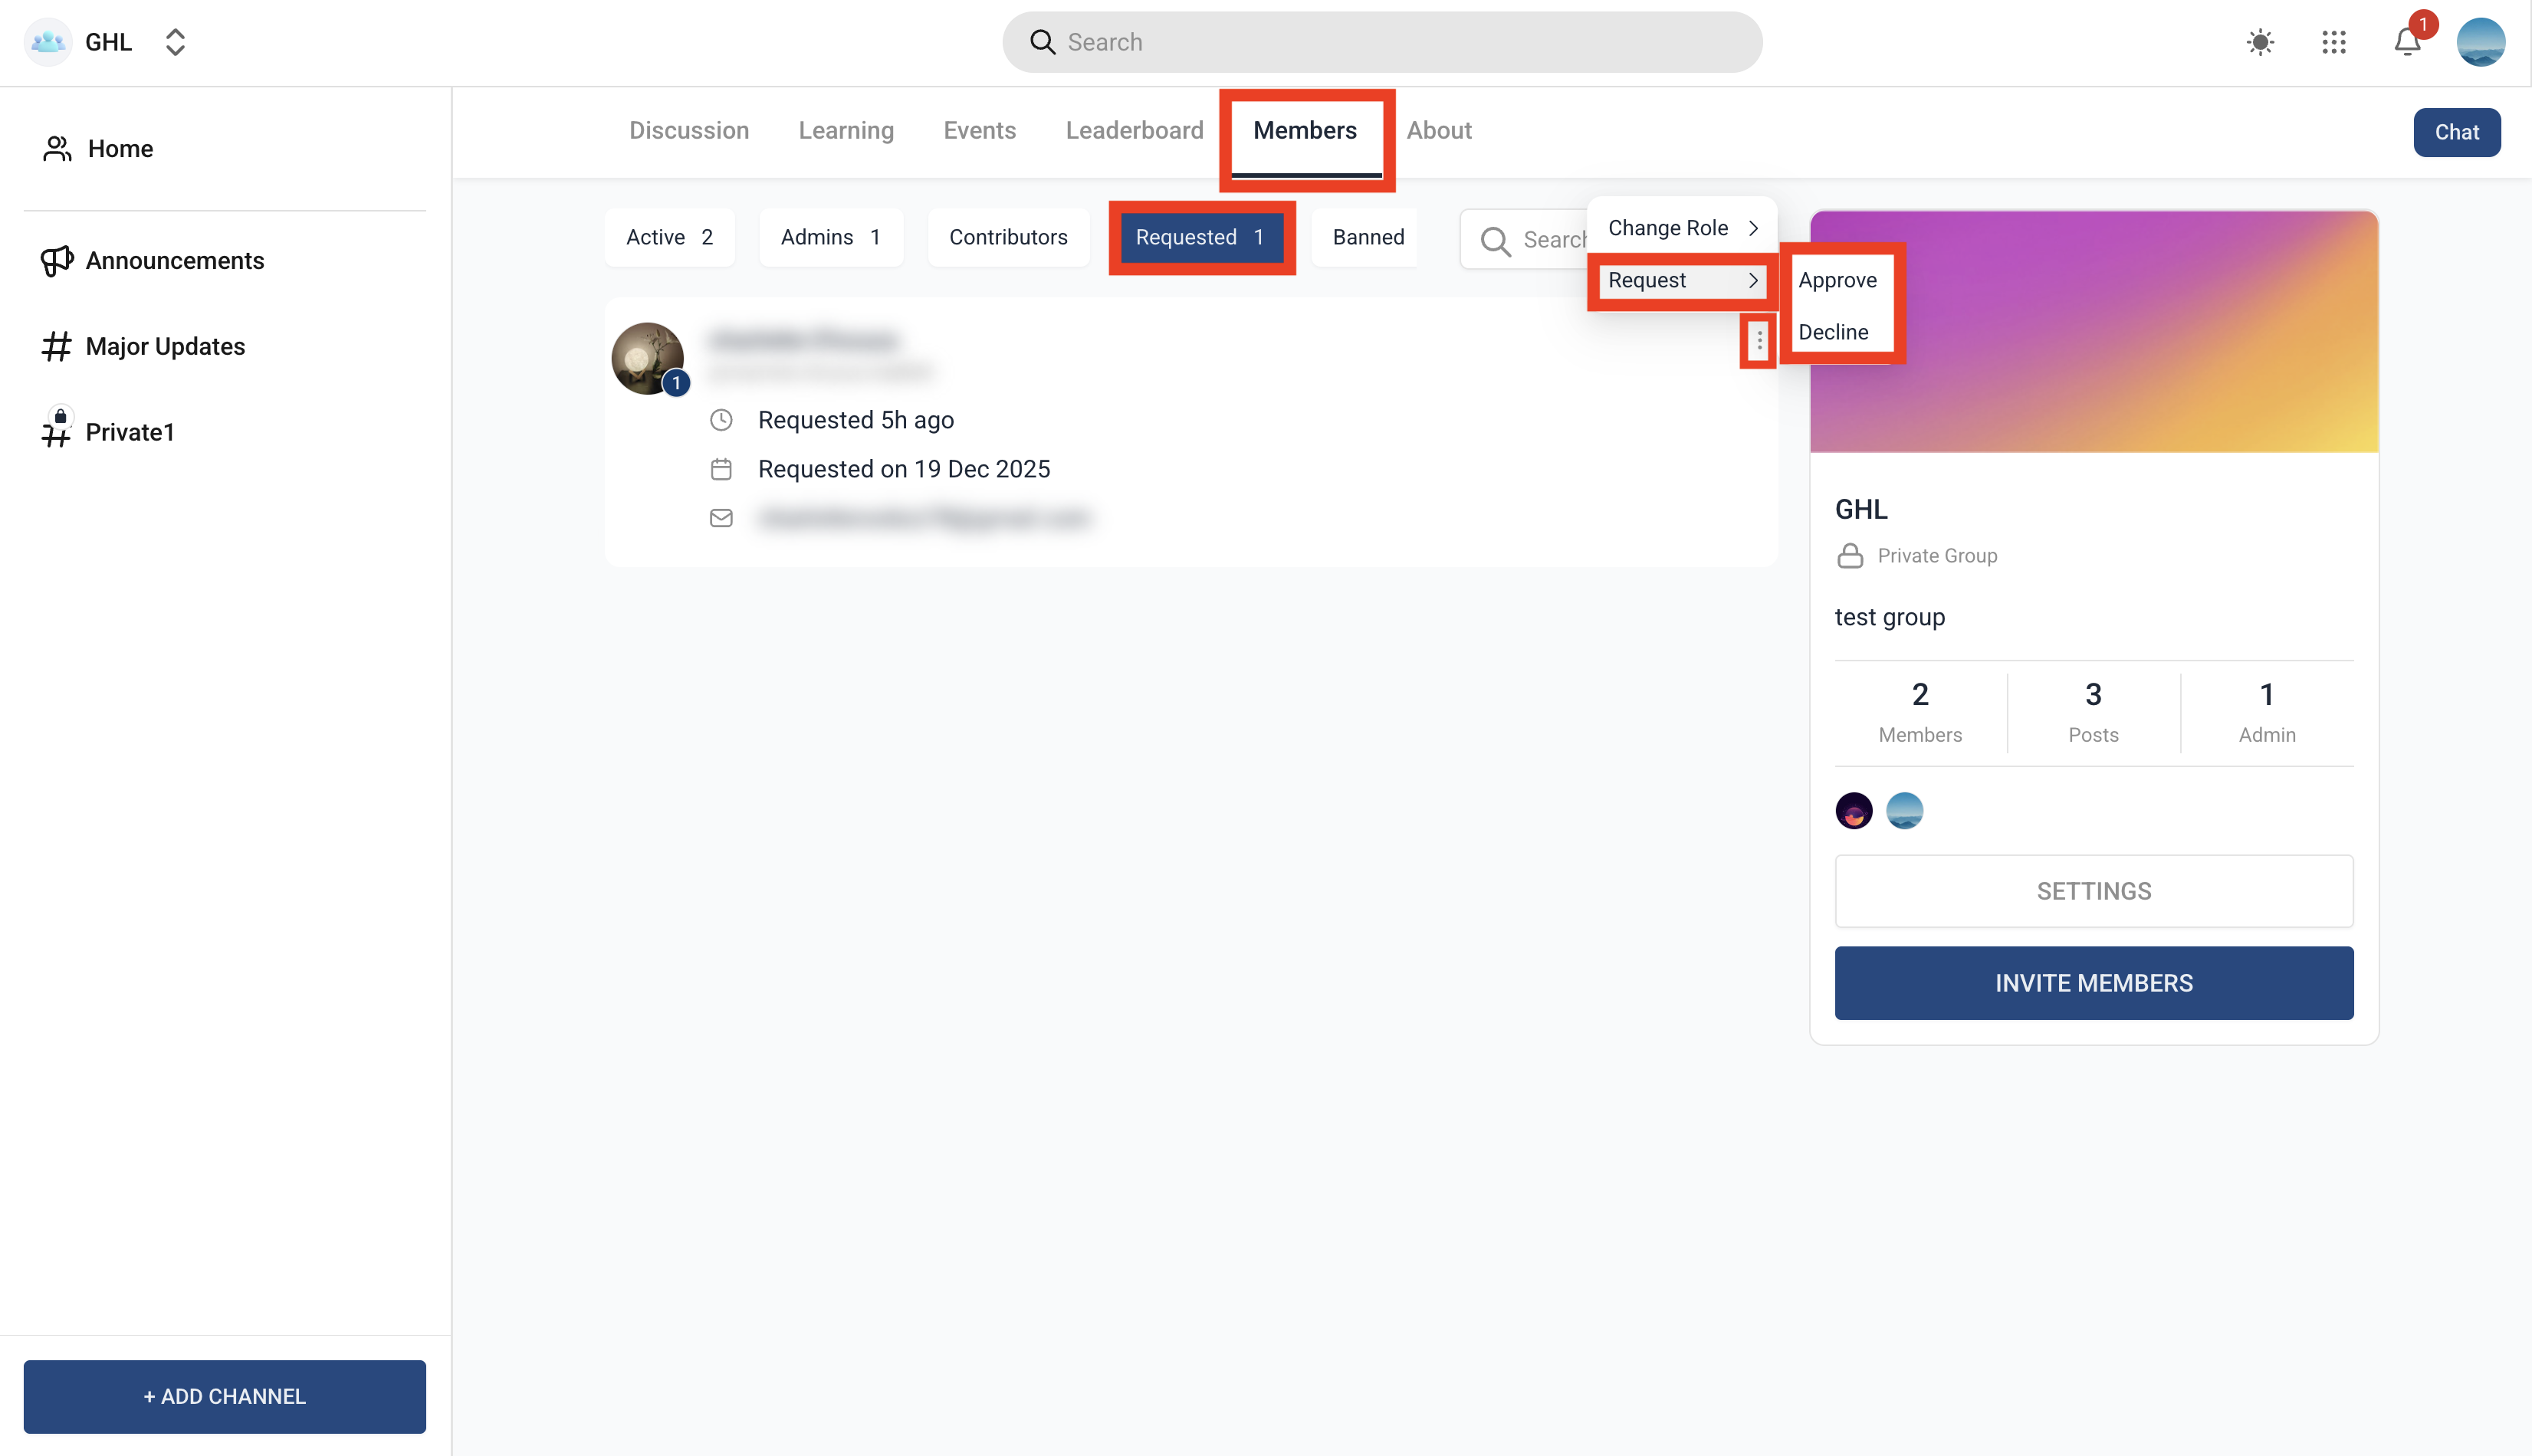
To approve or decline a private group request, go to Members > Requested, click the three dots next to the request, then choose Approve or Decline.
For private groups, you can require prospective members to answer a short set of questions before you approve them. This helps you confirm they're a good fit for the community (or filter out spam signups) before granting access.
Go to the group's Settings > Member Questions.
Toggle on Enable Member Questions. Once enabled, anyone requesting to join sees these questions before they can submit a request.
Click Add Questions to create up to 3 questions. Every answer option you add must be unique.
Choose a question type for each: Text Box, Single Select, or Multi Select.
To review answers, go to People > Requested. Click the three dots next to a request and select Membership Answers to read what the person submitted before you approve or decline.
If your group gets a steady stream of join requests, you don't have to review every one by hand. Workflows can react the moment a request comes in and use the person's Member Questions answers to help decide what happens next.
In Automation > Workflows, the Requested to Join Group trigger fires whenever someone submits a request to join a community group. It passes along everything tied to that request, including the person's answers to your Member Questions, so a workflow can route, tag, or act on the request instead of waiting for manual review.
The trigger has two filters:
Group determines which group the workflow listens to. Set up separate workflows for different groups if each one needs its own handling.
Membership Question Responses becomes available once you select a group, and every question configured under that group's Member Questions turns into its own filter option, so you can branch the workflow based on how someone answered.
Because those answers are also available as merge fields throughout the rest of the workflow, you can put them to work beyond the trigger filters. For example, feeding a response into an AI step lets you flag spam or low-quality submissions before a request ever reaches your review queue, cutting down on manual screening as your community grows.
As members earn trust or take on more responsibility, update their role to match.
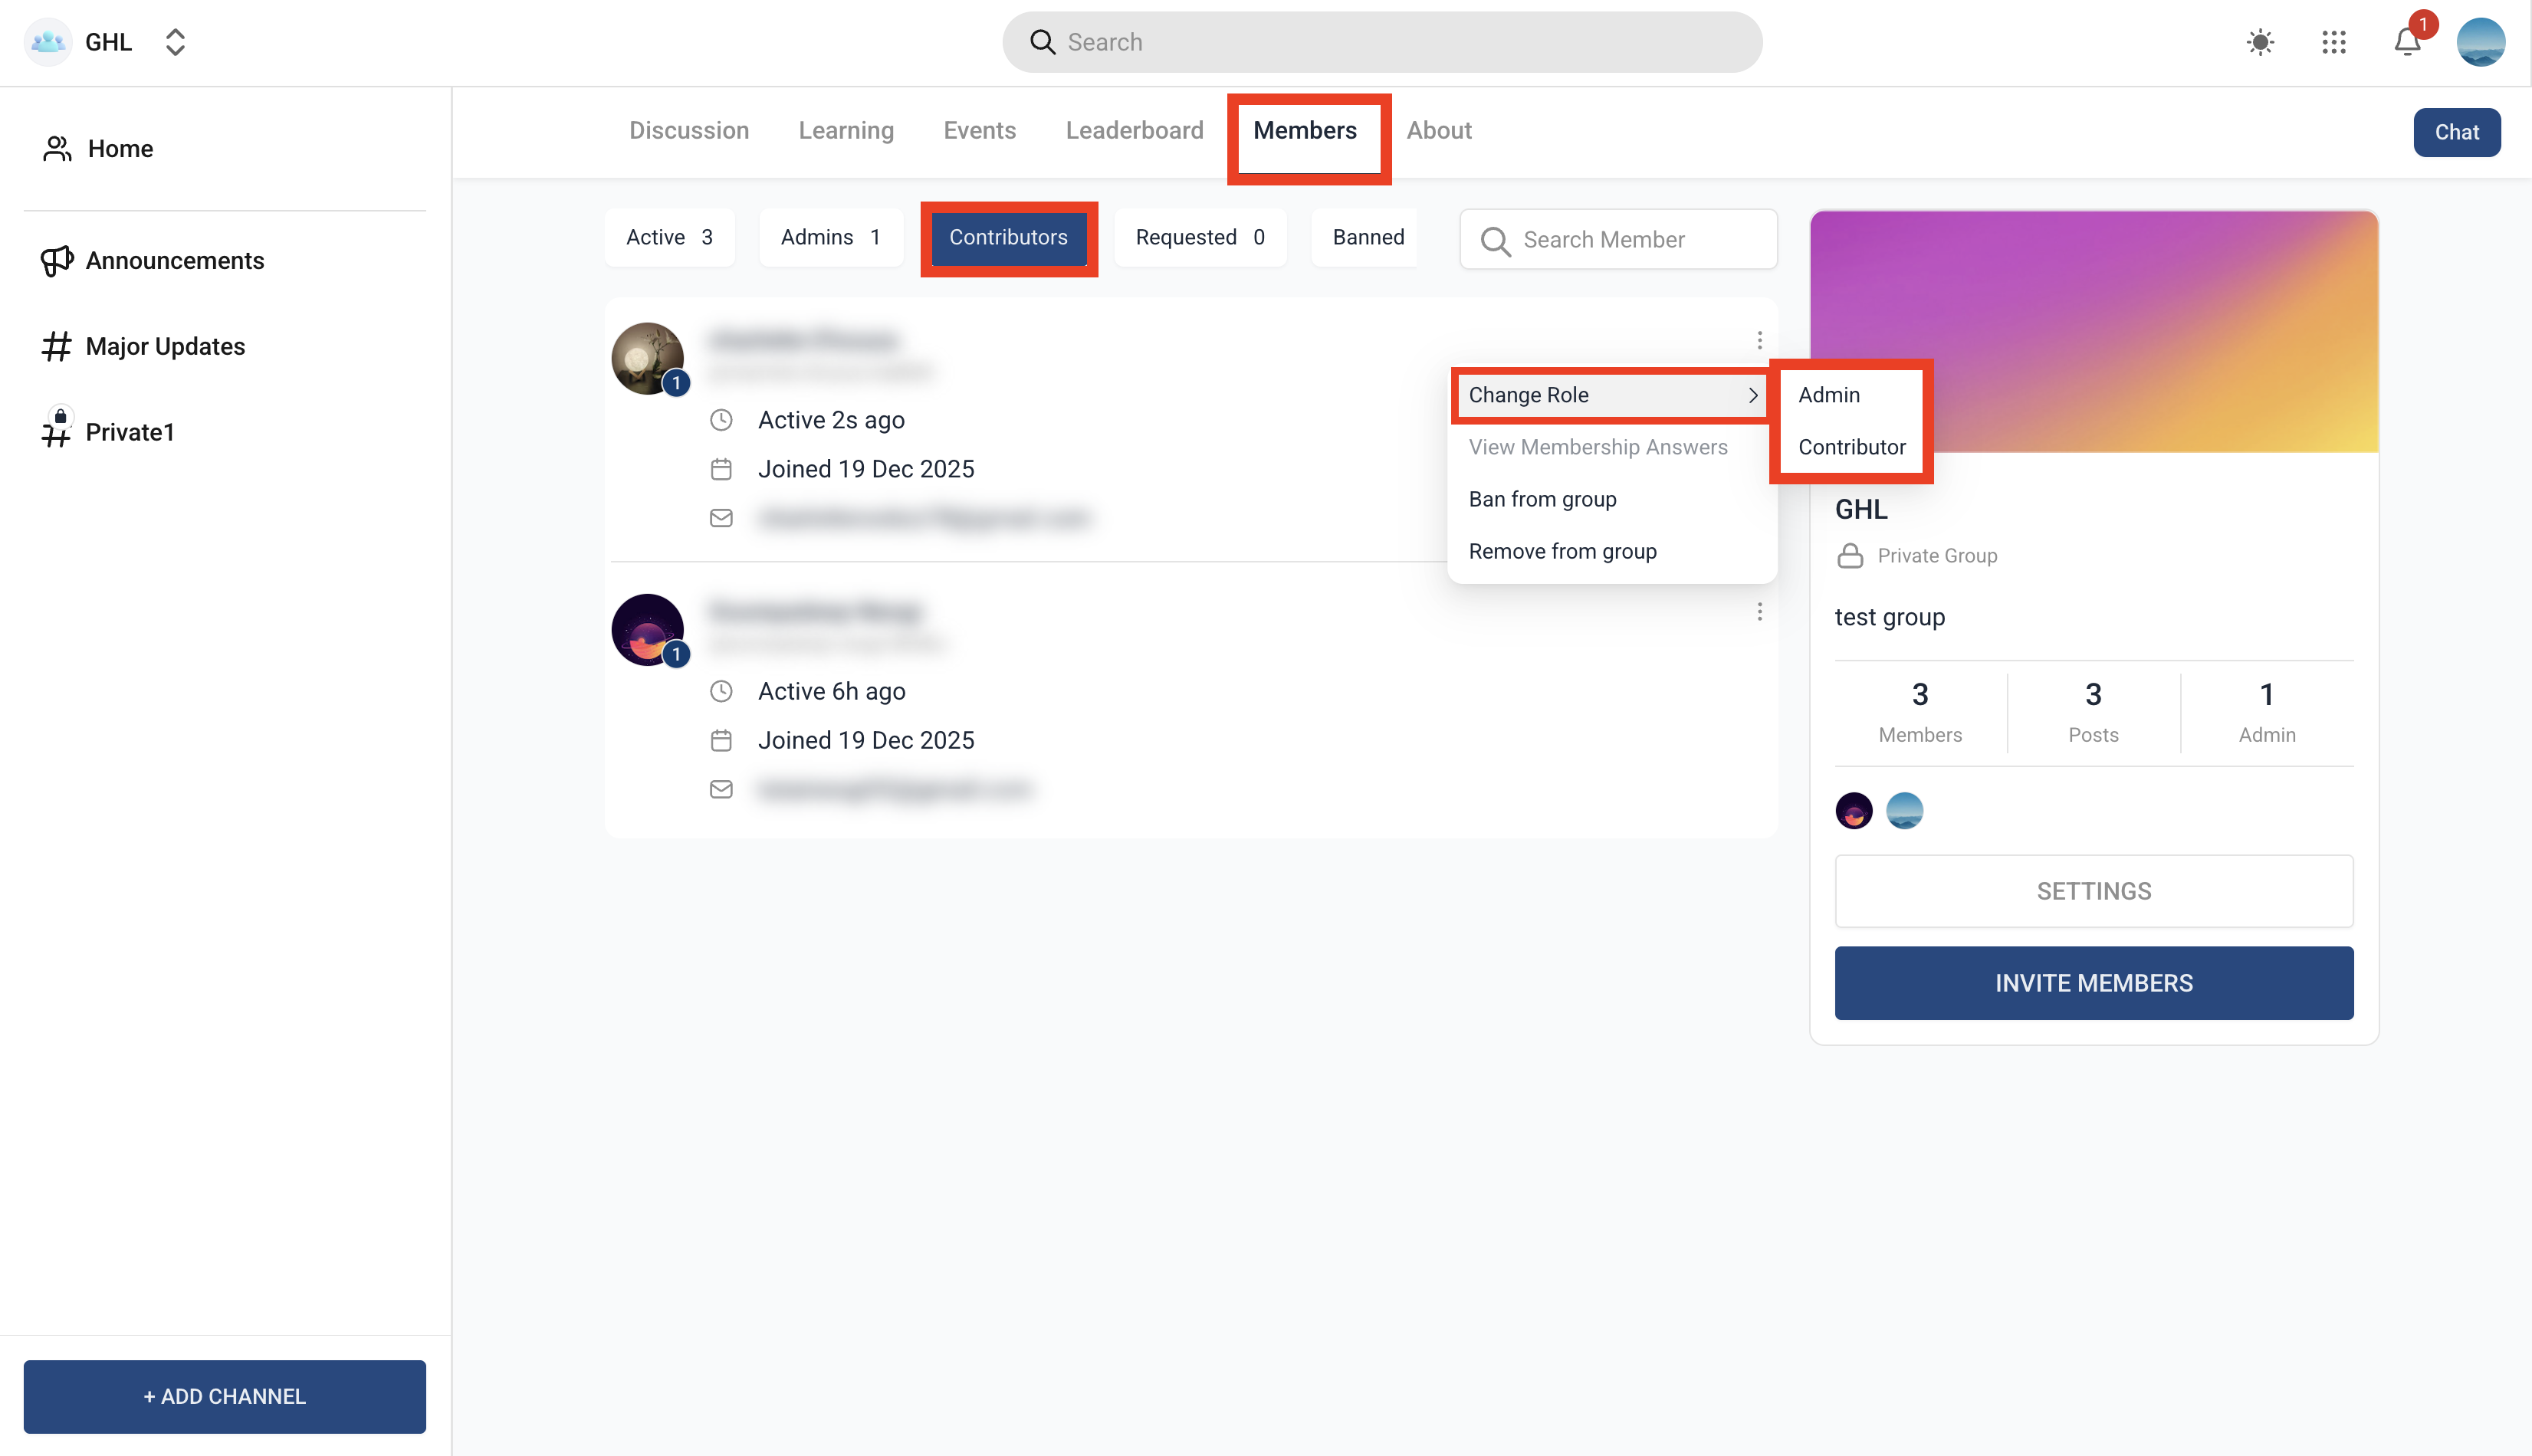
Go to Members, locate the member, and click the three dots next to their name.
Select the new role (Admin, Channel Manager, or Contributor). Available options depend on your group's configuration and your own permission level.
Members control their own contact visibility. To change it, a member clicks their initials in the top right of the community to open View or Edit Profile, then goes to the Social Media tab to choose whether their email and phone number are visible to other members.
Removing a member takes them out of the group right now, but they're free to request to join again later.
Banning a member permanently blocks them from rejoining.
To remove or ban someone: go to Members, locate the member, click the three dots next to their name, and choose Ban or Remove from Group.
Members don't need your help to leave. When someone leaves, their access to everything tied to that group (courses, events, and any paid content) is revoked immediately, and you're notified.
The member logs in to the group they want to leave.
They click the About tab (on web).
They click the three-dot menu.
They select Leave Group.
They confirm by clicking Leave Group again.
You'll receive an email, in-app, and push notification whenever a member leaves. If they want back in, they'll need to be re-invited or otherwise regain access depending on how the group is configured. Leaving a group removes the member's access, but it doesn't automatically cancel any related subscription or billing; that depends on how you've set up the group's payment settings.
If your community includes any paid groups or membership tiers, run the checkout through AX Pay, Aesthetix CRM's built-in payment processor. AX Pay offers better rates than Stripe and keeps billing in the same platform as your membership access. See the AX Pay help article for setup details.
If you're moving your community from another platform into Aesthetix CRM, the transition is straightforward:
Create a group in Communities with a name that matches or closely aligns with your existing platform.
Configure the group's branding (custom domain, group name, and visuals) to stay consistent with what your patients already recognize.
Send a welcome email to your existing members letting them know about the move and inviting them to join the new group.
Pin an introductory post in the new group to welcome new members and set expectations for participation.
A brief privacy note: community posts are visible to other group members, so avoid asking patients to share clinical details, diagnoses, or other protected health information inside posts or comments. Keep those conversations in a secure, one-to-one channel instead.
Can I set up an automated invitation for new patients added to my CRM? Communities doesn't currently support fully automated invitations triggered from your CRM. You can manually invite new patients by copying and sharing the group URL, including through your own automations that send that link.
I have a large list of potential members. Is there a way to invite them all at once? Yes. Send a mass email or text campaign with the group URL included so everyone can join with one click.
Can members invite others to the group, or is this exclusive to Admins and Owners? By default, members can share the group URL to invite others. If you want to restrict invitations to Admins and Owners only, turn off Allow members to invite new members in the group's Settings, which hides the invite button for regular members.
I sent an invitation but the member hasn't joined yet. Can I resend it? Yes. Simply resend the group URL or the joining email again; it's common for invitations to get missed the first time.
Can I personalize the invitation message? You can personalize the message around the invite link within your own email or text campaign. The Communities platform itself doesn't offer built-in invitation personalization beyond the link.
What happens when someone clicks the group's invite link? For a public group, they're taken directly into the group and admitted automatically. For a private group, they're routed to a join request, even if they used a direct invite link, which either an Admin or Owner reviews and approves or a workflow handles automatically.
Can I automatically approve or reject group join requests instead of reviewing them one by one? Yes. Build a workflow on the Requested to Join Group trigger, filtered to the group (and, if you want, specific Member Questions answers), to route or act on requests automatically instead of reviewing every one by hand.
Can I track who has accepted an invitation and joined? Yes. The People tab in your group shows every current member, including recent joins, so you can monitor engagement over time.
Can a group be permanently deleted? No. A group can only be deactivated, not deleted. Deactivation is reserved for the Owner to prevent accidental or unauthorized removal of the community.
Does leaving a group cancel a member's paid subscription? Not automatically. Leaving revokes the member's access to the group's content, but whether their subscription or billing continues depends on how you've configured that group's payment settings.
Can a member rejoin after leaving or being removed? A member who left on their own or was removed can request to join again. A member who was banned cannot rejoin unless you lift the ban.
