Communities gives your practice a private, branded space where patients or staff can gather, share, and learn together. You might run a patient community for a treatment program (post-op support, membership cohorts, or a loyalty group) or a provider peer group for internal training and team updates. Communities lives under Marketing > Memberships > Communities once it's turned on, and it shares its login and domain with your Client Portal, so members only need one set of credentials for everything you share with them.
Communities is an add-on feature you enable once per account.
Go to Settings.
Select Labs.
Find Communities in the list and switch the toggle on.
Communities is a unified space that brings together discussions, courses, events, and member profiles, so your patients or team can connect, learn, and participate in groups built around a shared interest, program, or role.
Once Communities is enabled, you'll build your first community and its first group.
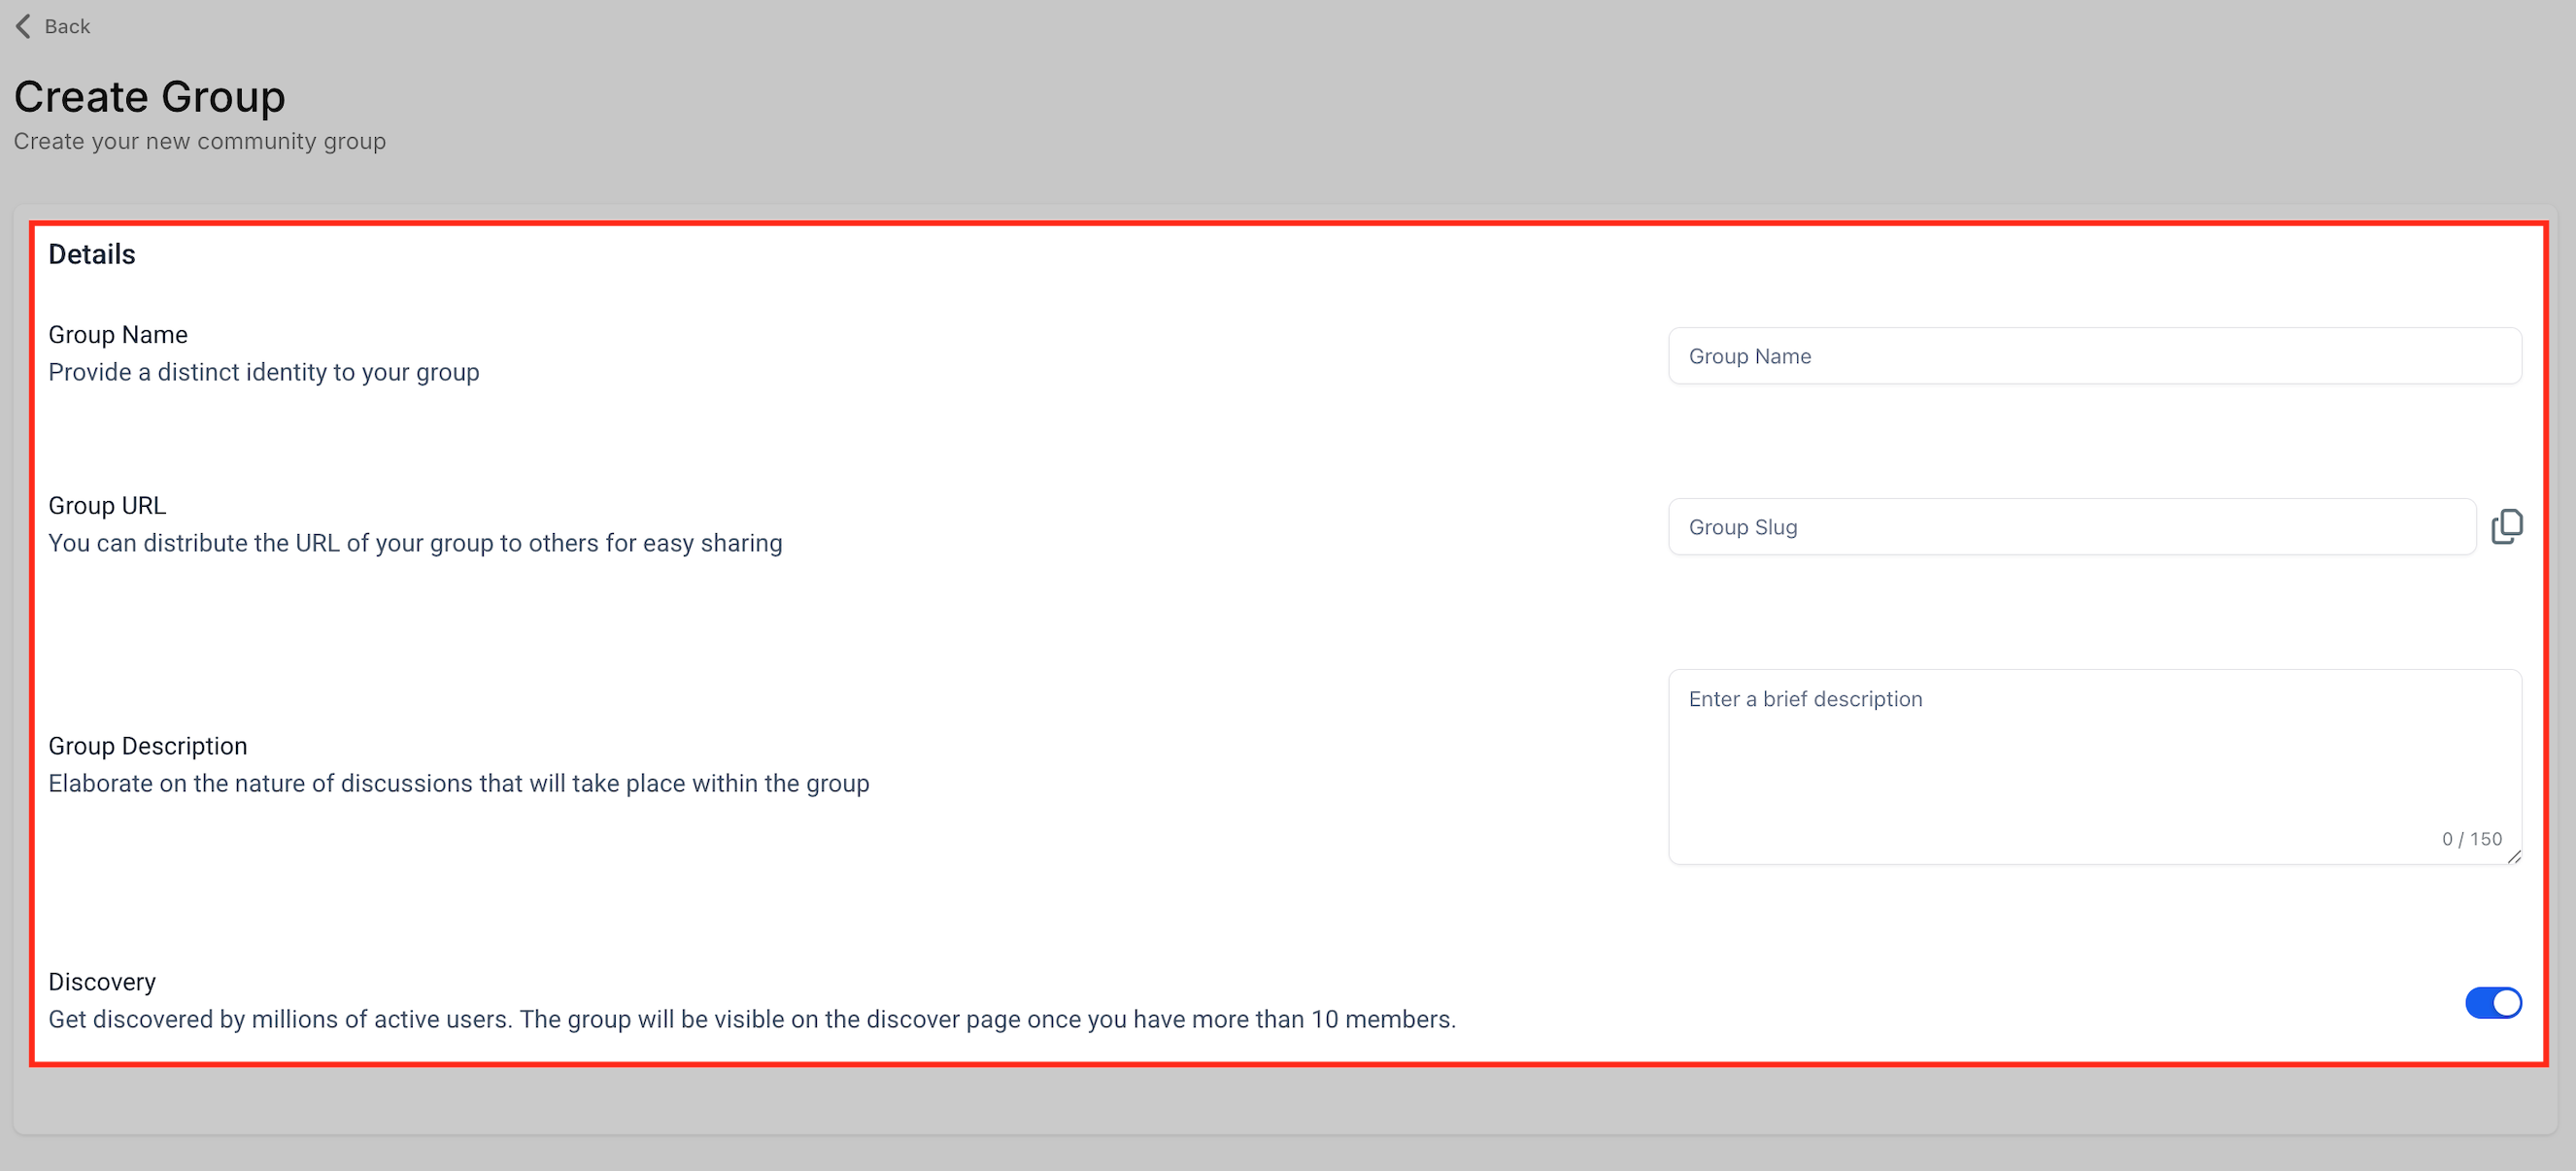
Open the Communities section and click Create New Community to start your branded space. From here you can shape your community's branding, structure, and membership settings.
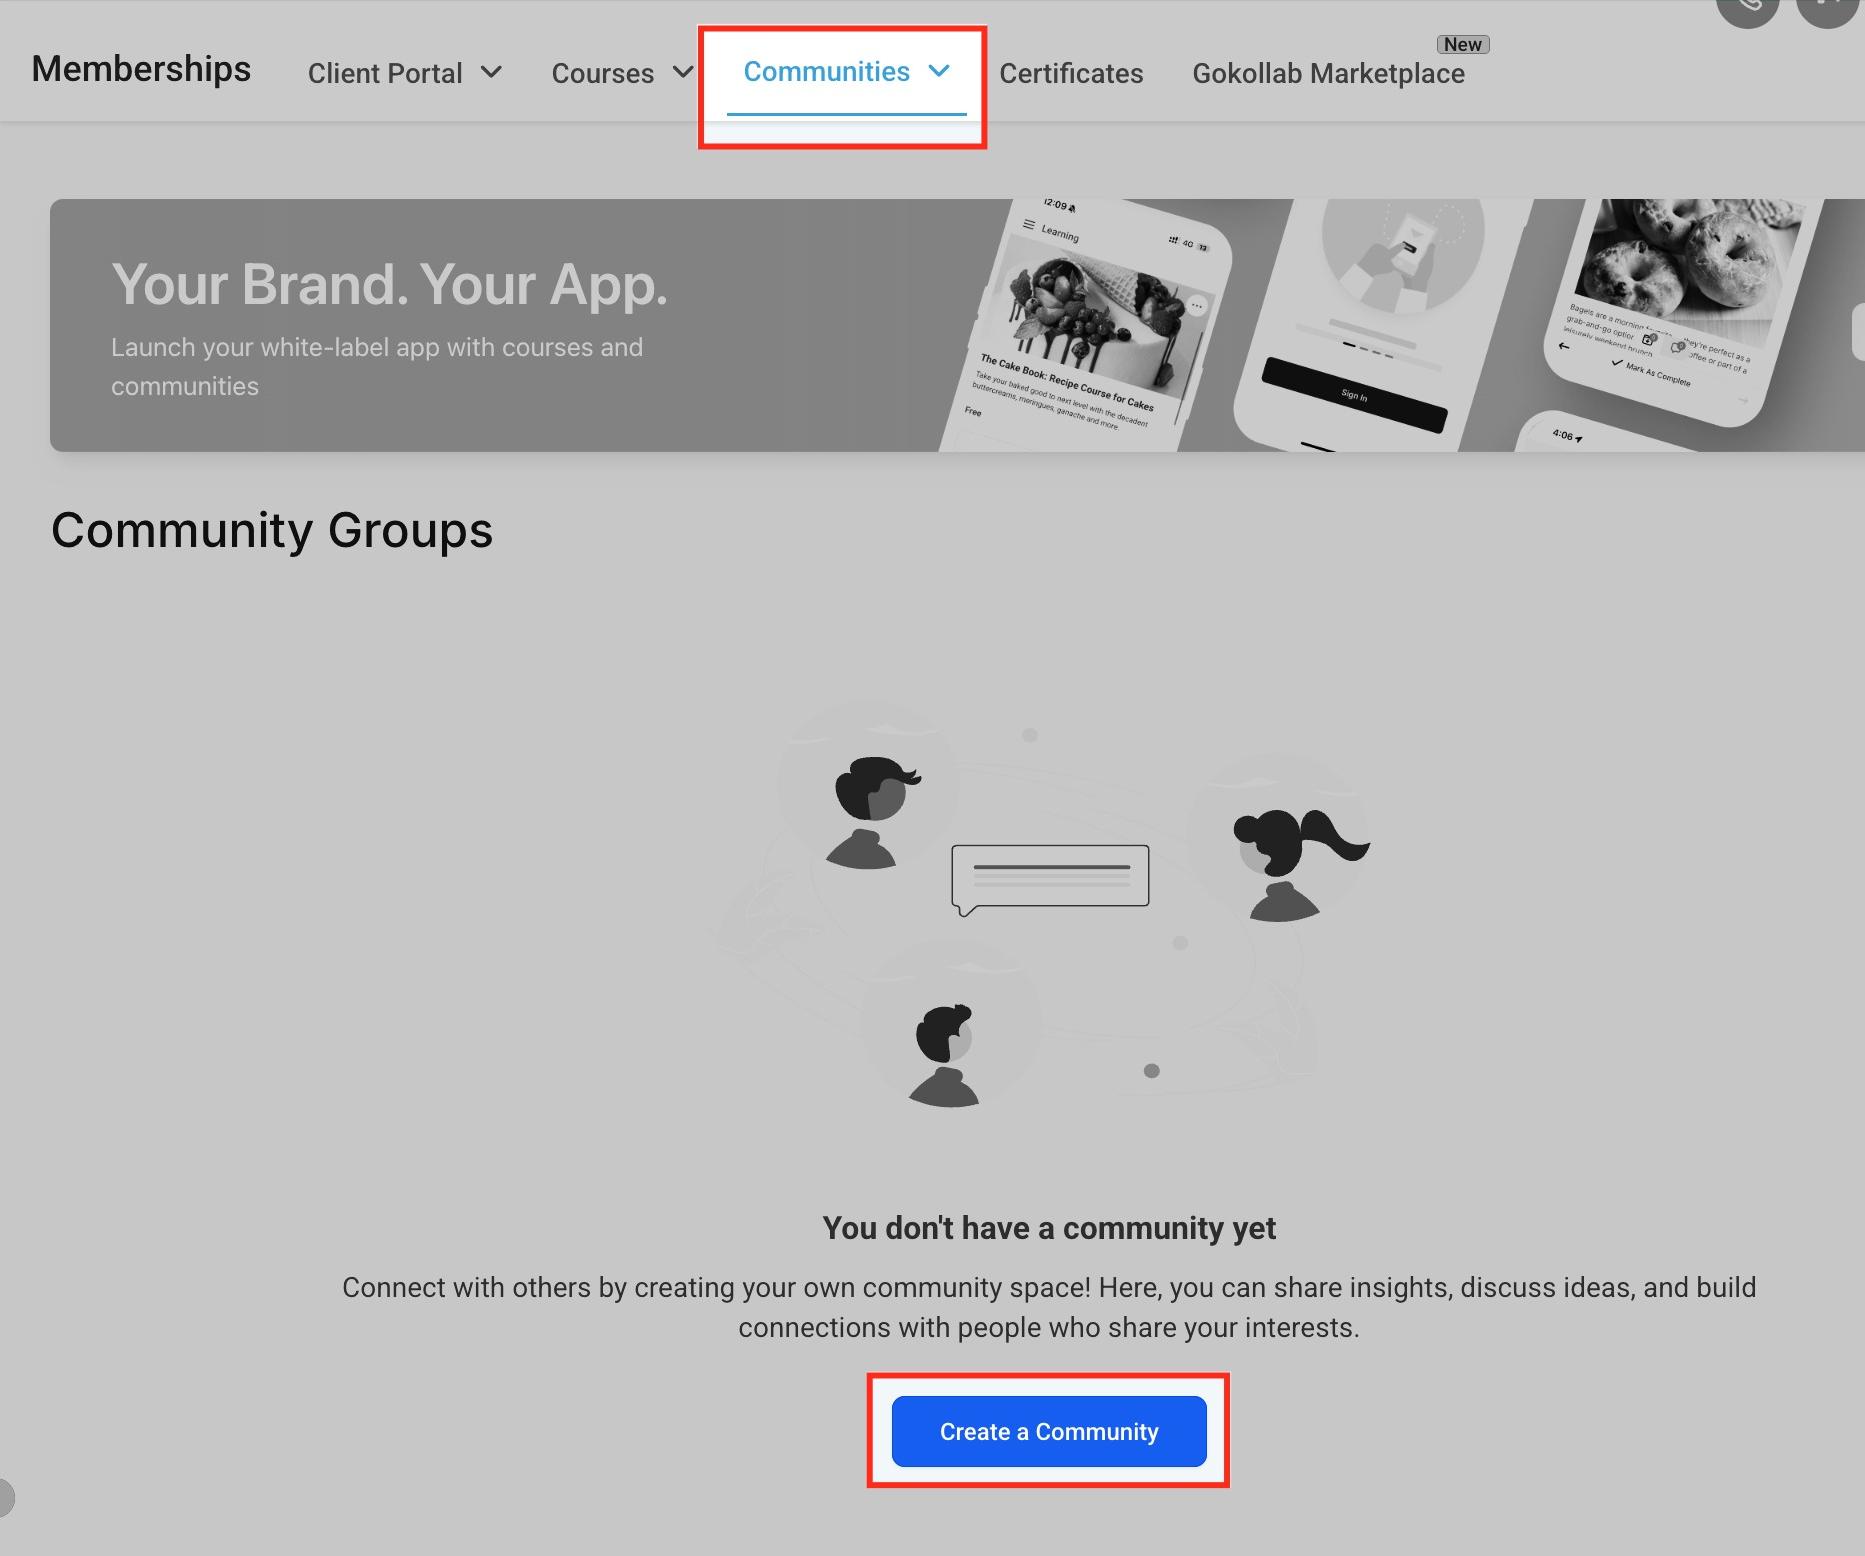
Define your first group's identity: name, URL, and a short description. This is what members see first when they join, so keep it clear and aligned with why the group exists (for example, a post-treatment support group or a staff education hub).
Communities uses the same domain as your Client Portal. If you've already configured a custom domain for your Client Portal, you don't need to set one up again for Communities; it's shared automatically. If you haven't, you have two options:
Use the pre-configured subdomain. A ready-to-use subdomain is available instantly; just select it and click Update Domain to activate it.
Connect a custom domain you own. This gives your community a fully branded web address.
To reach the domain menu from inside Communities:
Go to Marketing > Memberships > Communities > Settings.
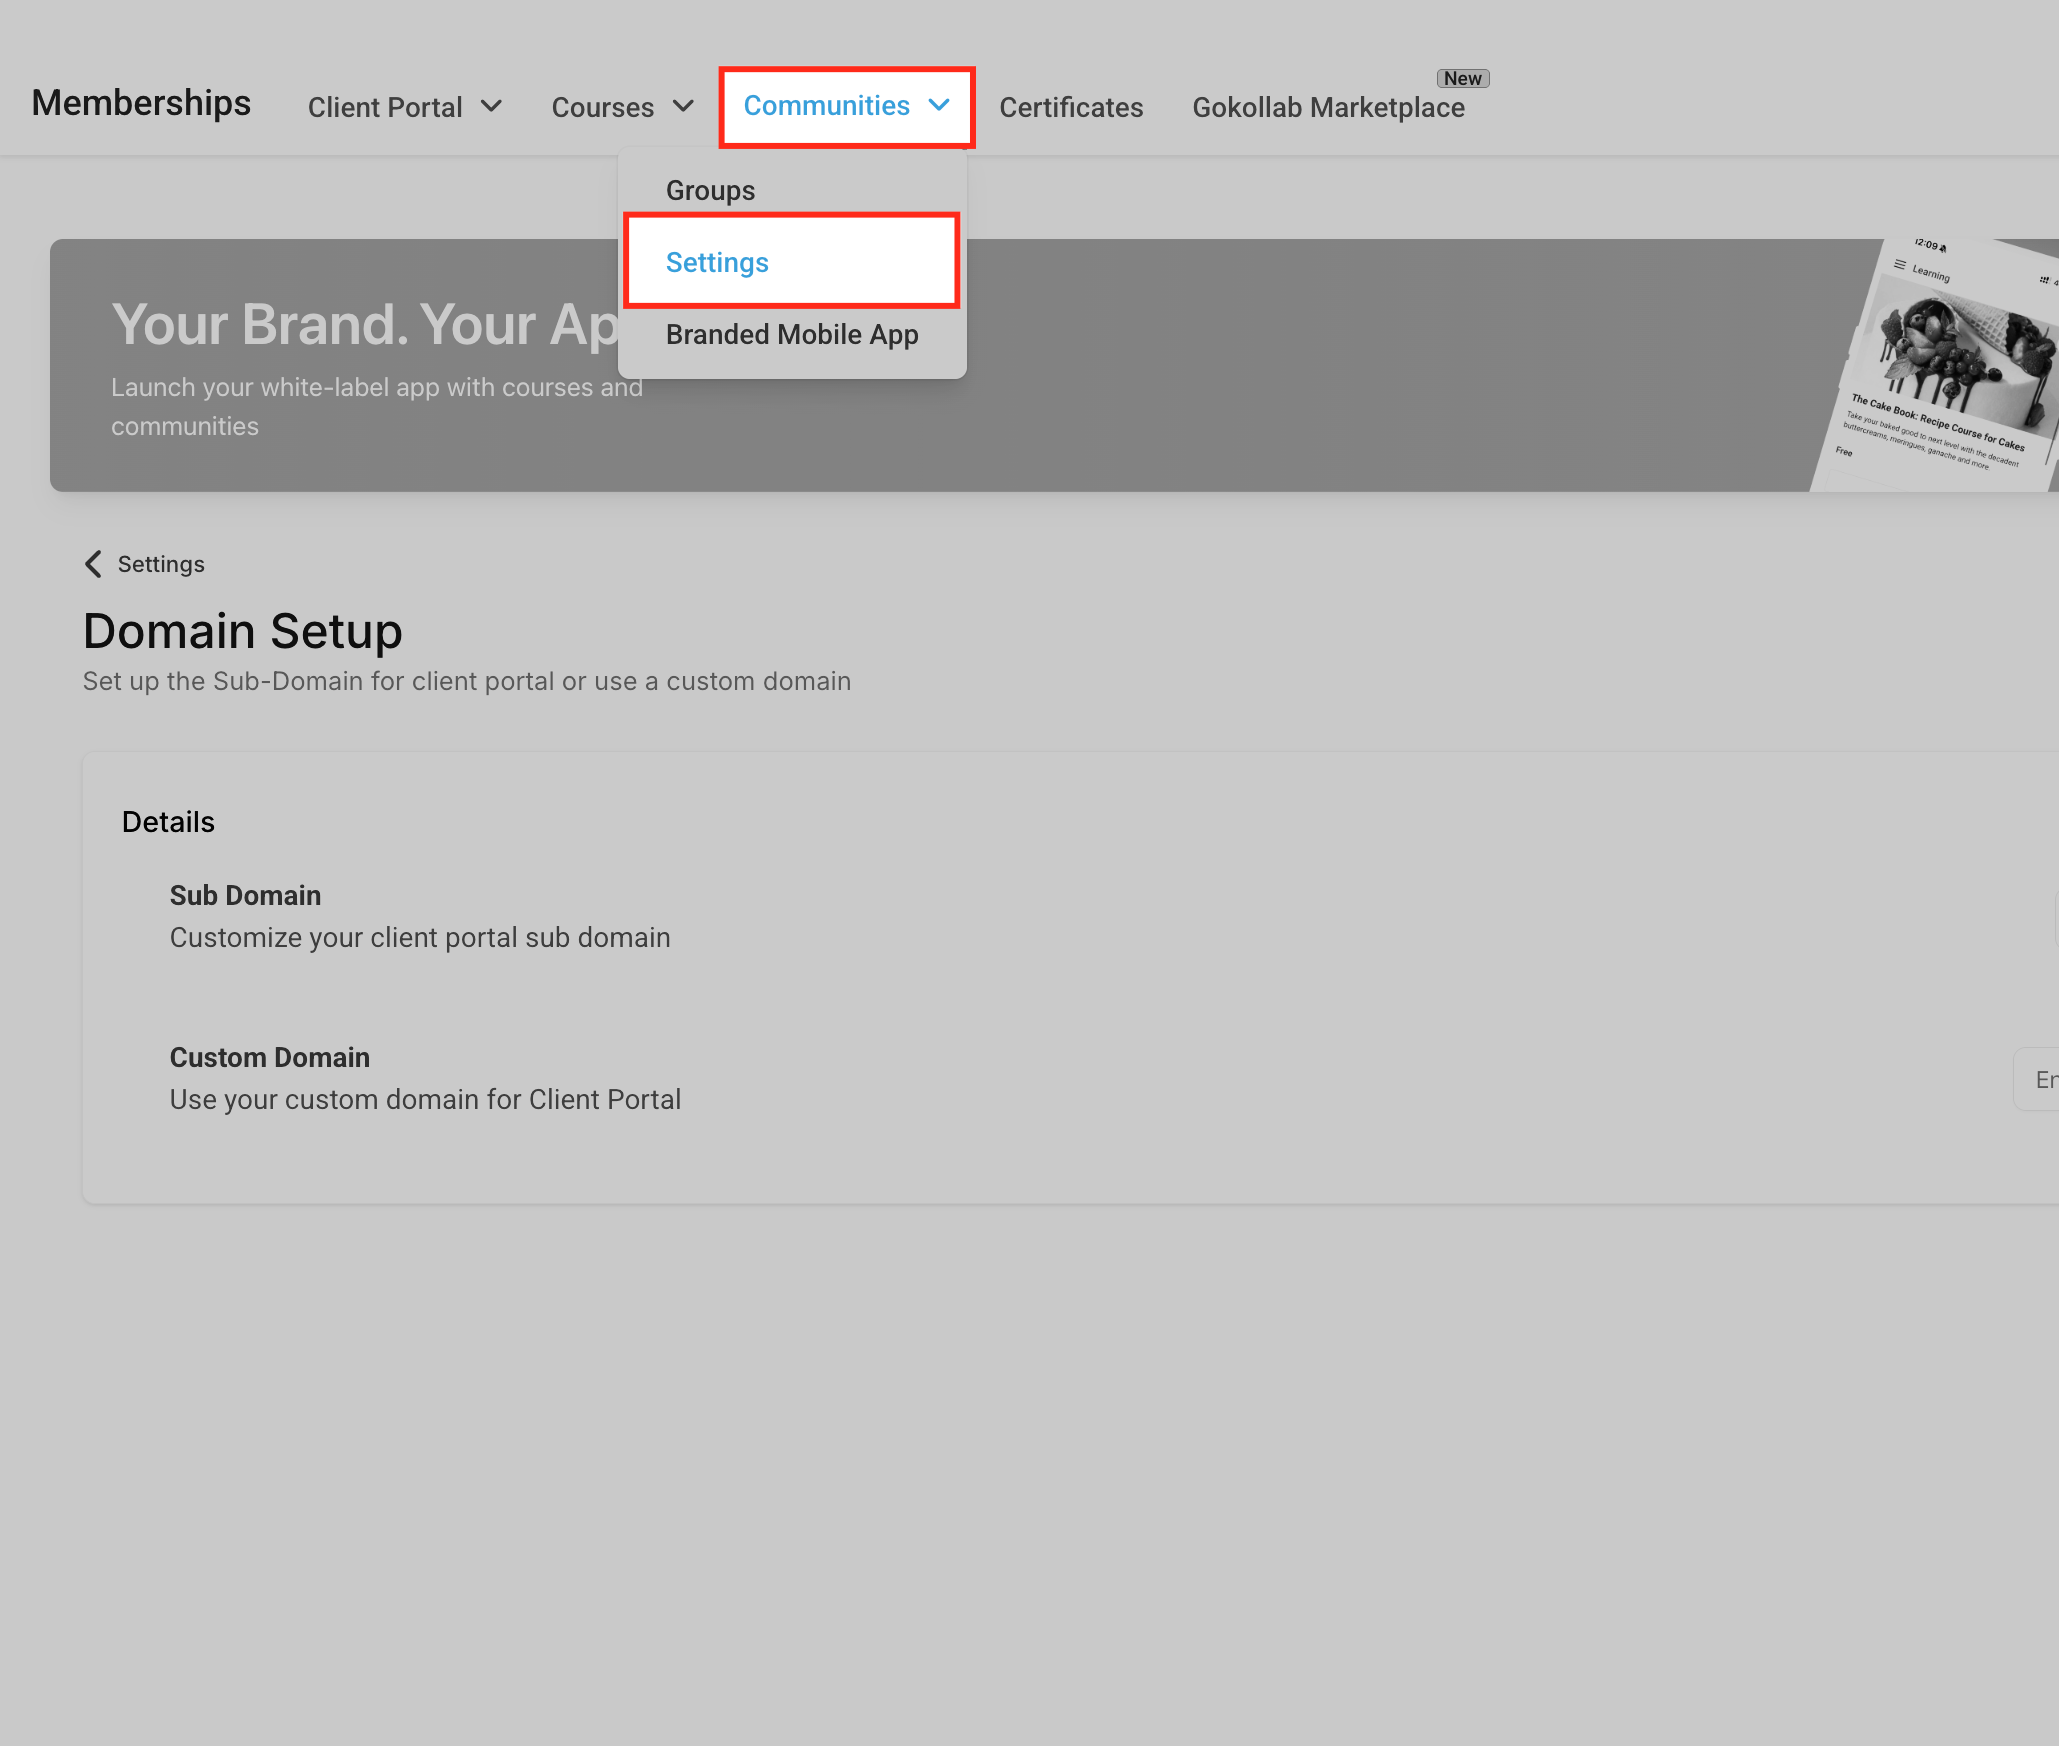
You'll be redirected to your Client Portal's Domain Settings, since both features share the same domain.
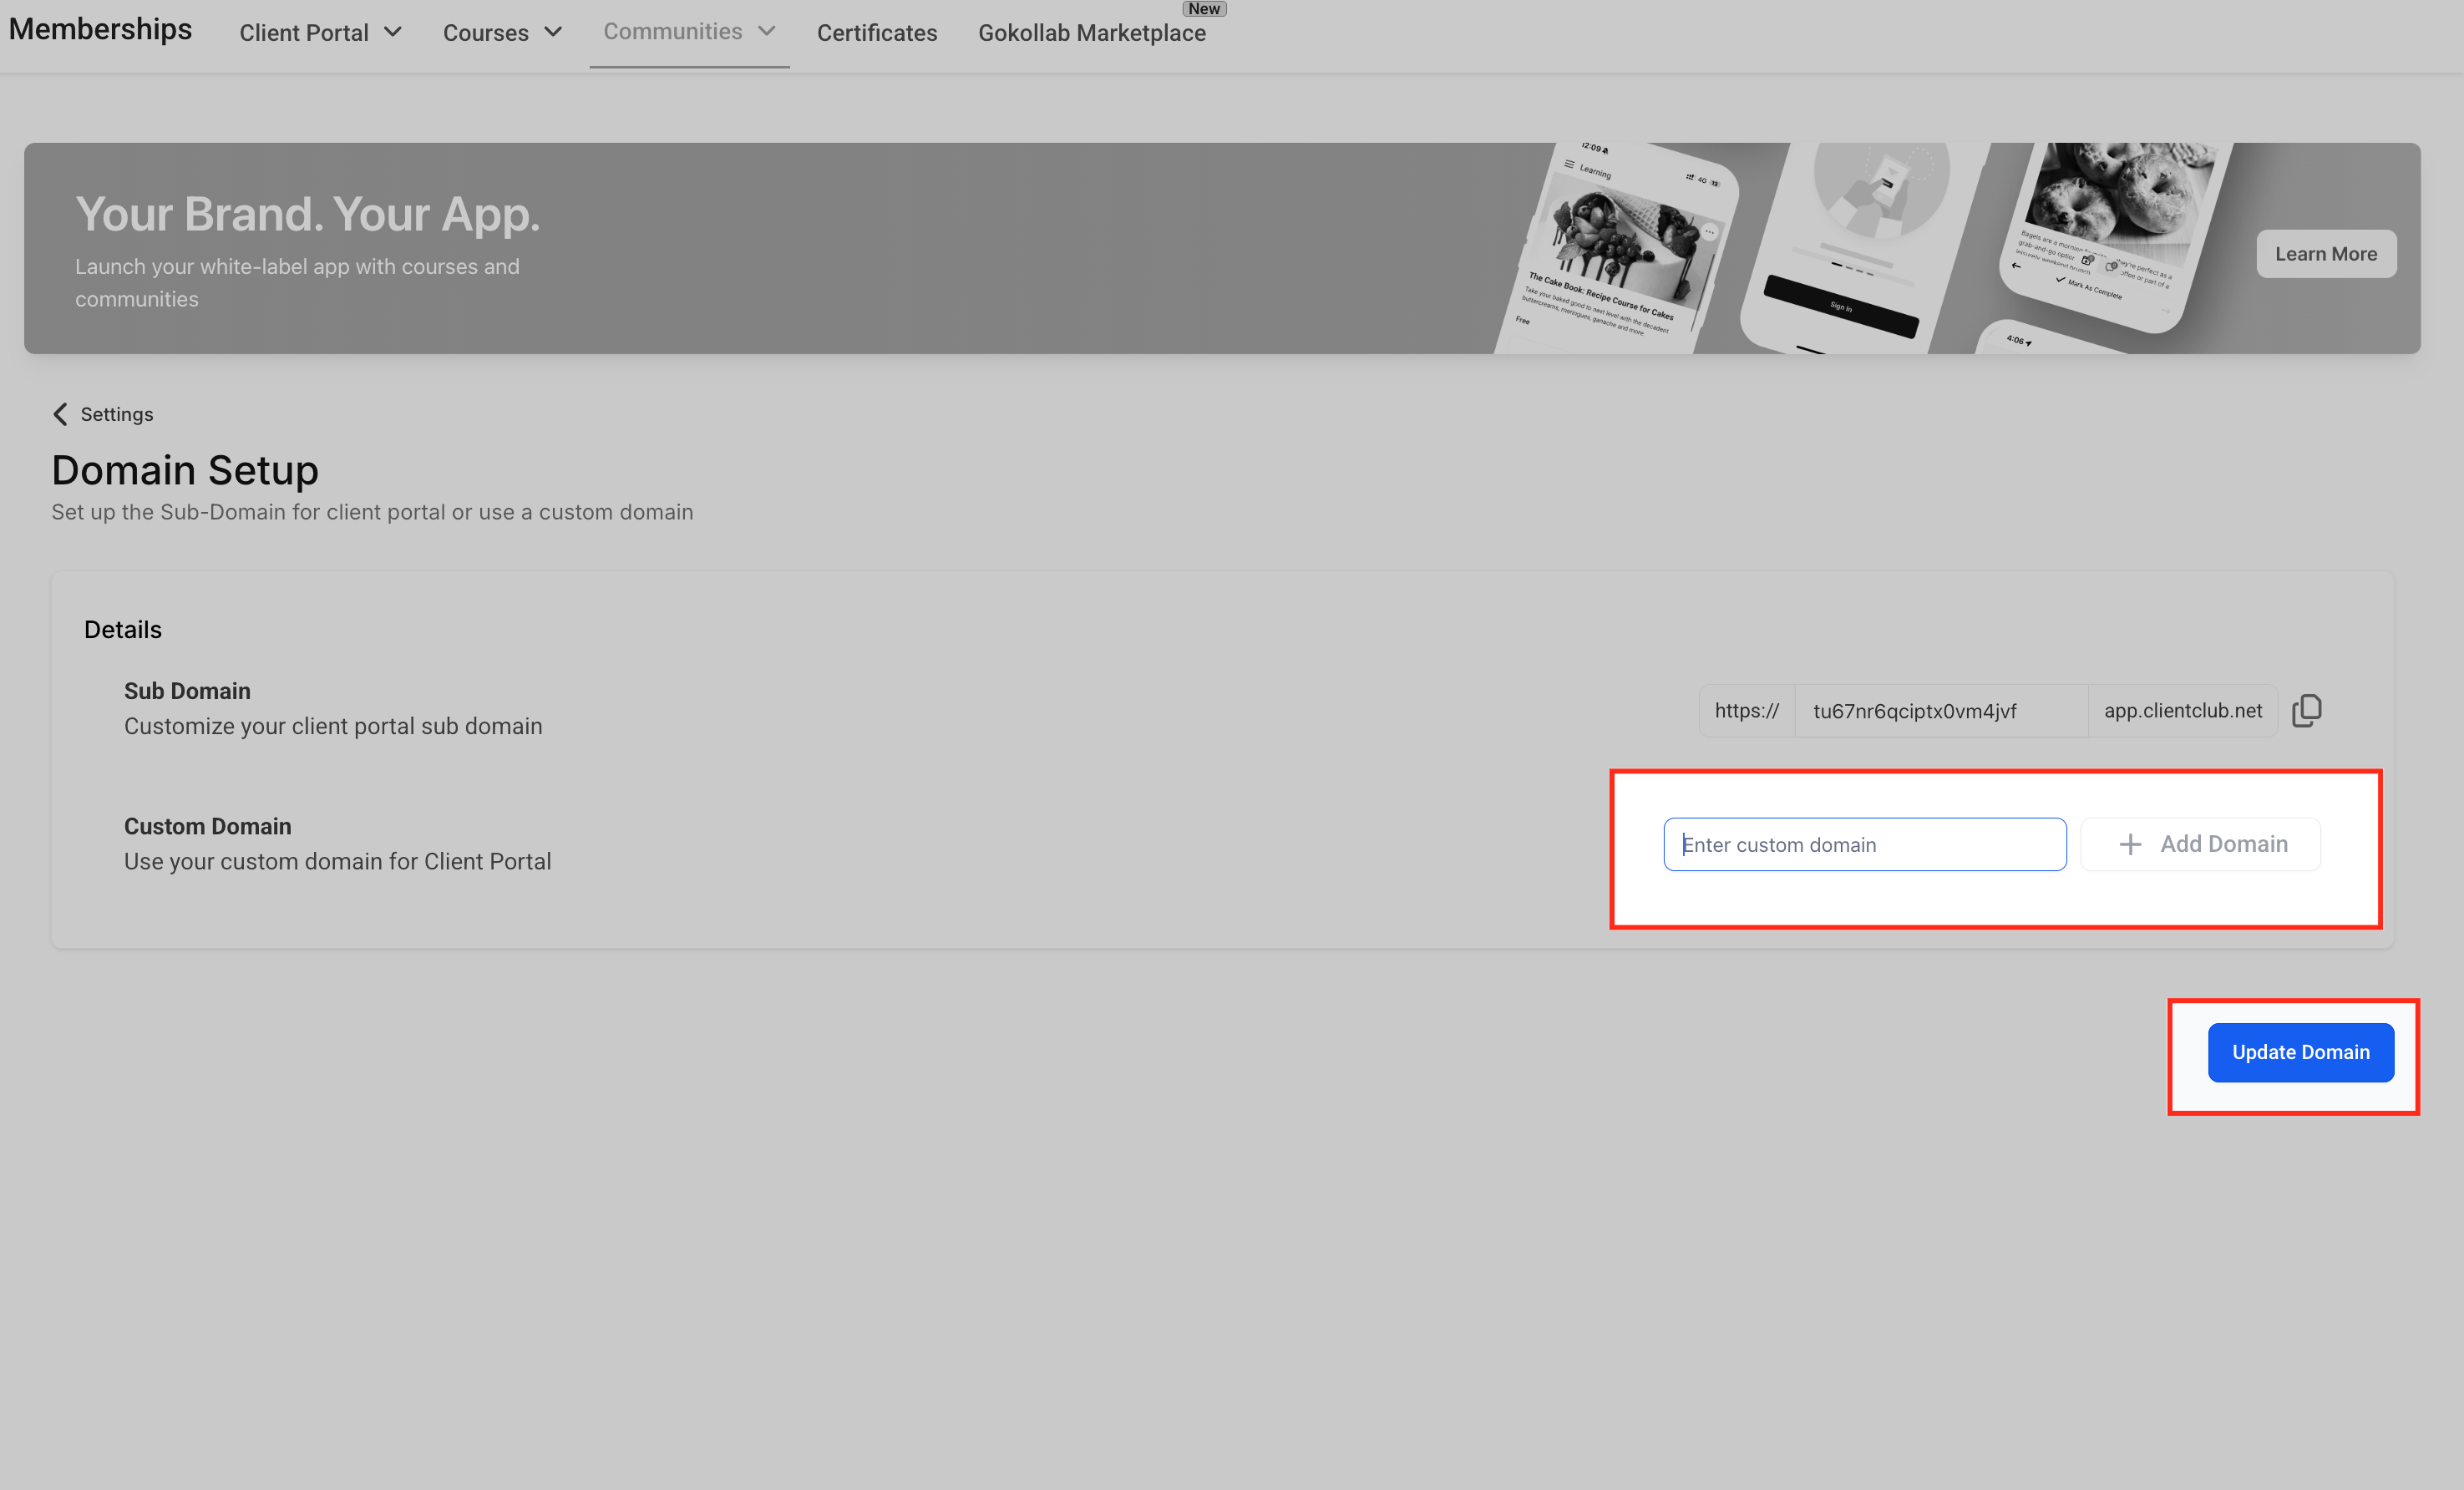
Setting up the A or CNAME record and DNS propagation follows the same process as your Client Portal's custom domain. For the full walkthrough, including the DNS record details and how to add them at your registrar, see the Client Portal setup guide in the Client Portal collection rather than repeating those steps here. Plan for up to 24 to 48 hours for DNS changes to propagate before the domain goes live.
Community Settings is where you shape the overall look of your community before you start creating groups.
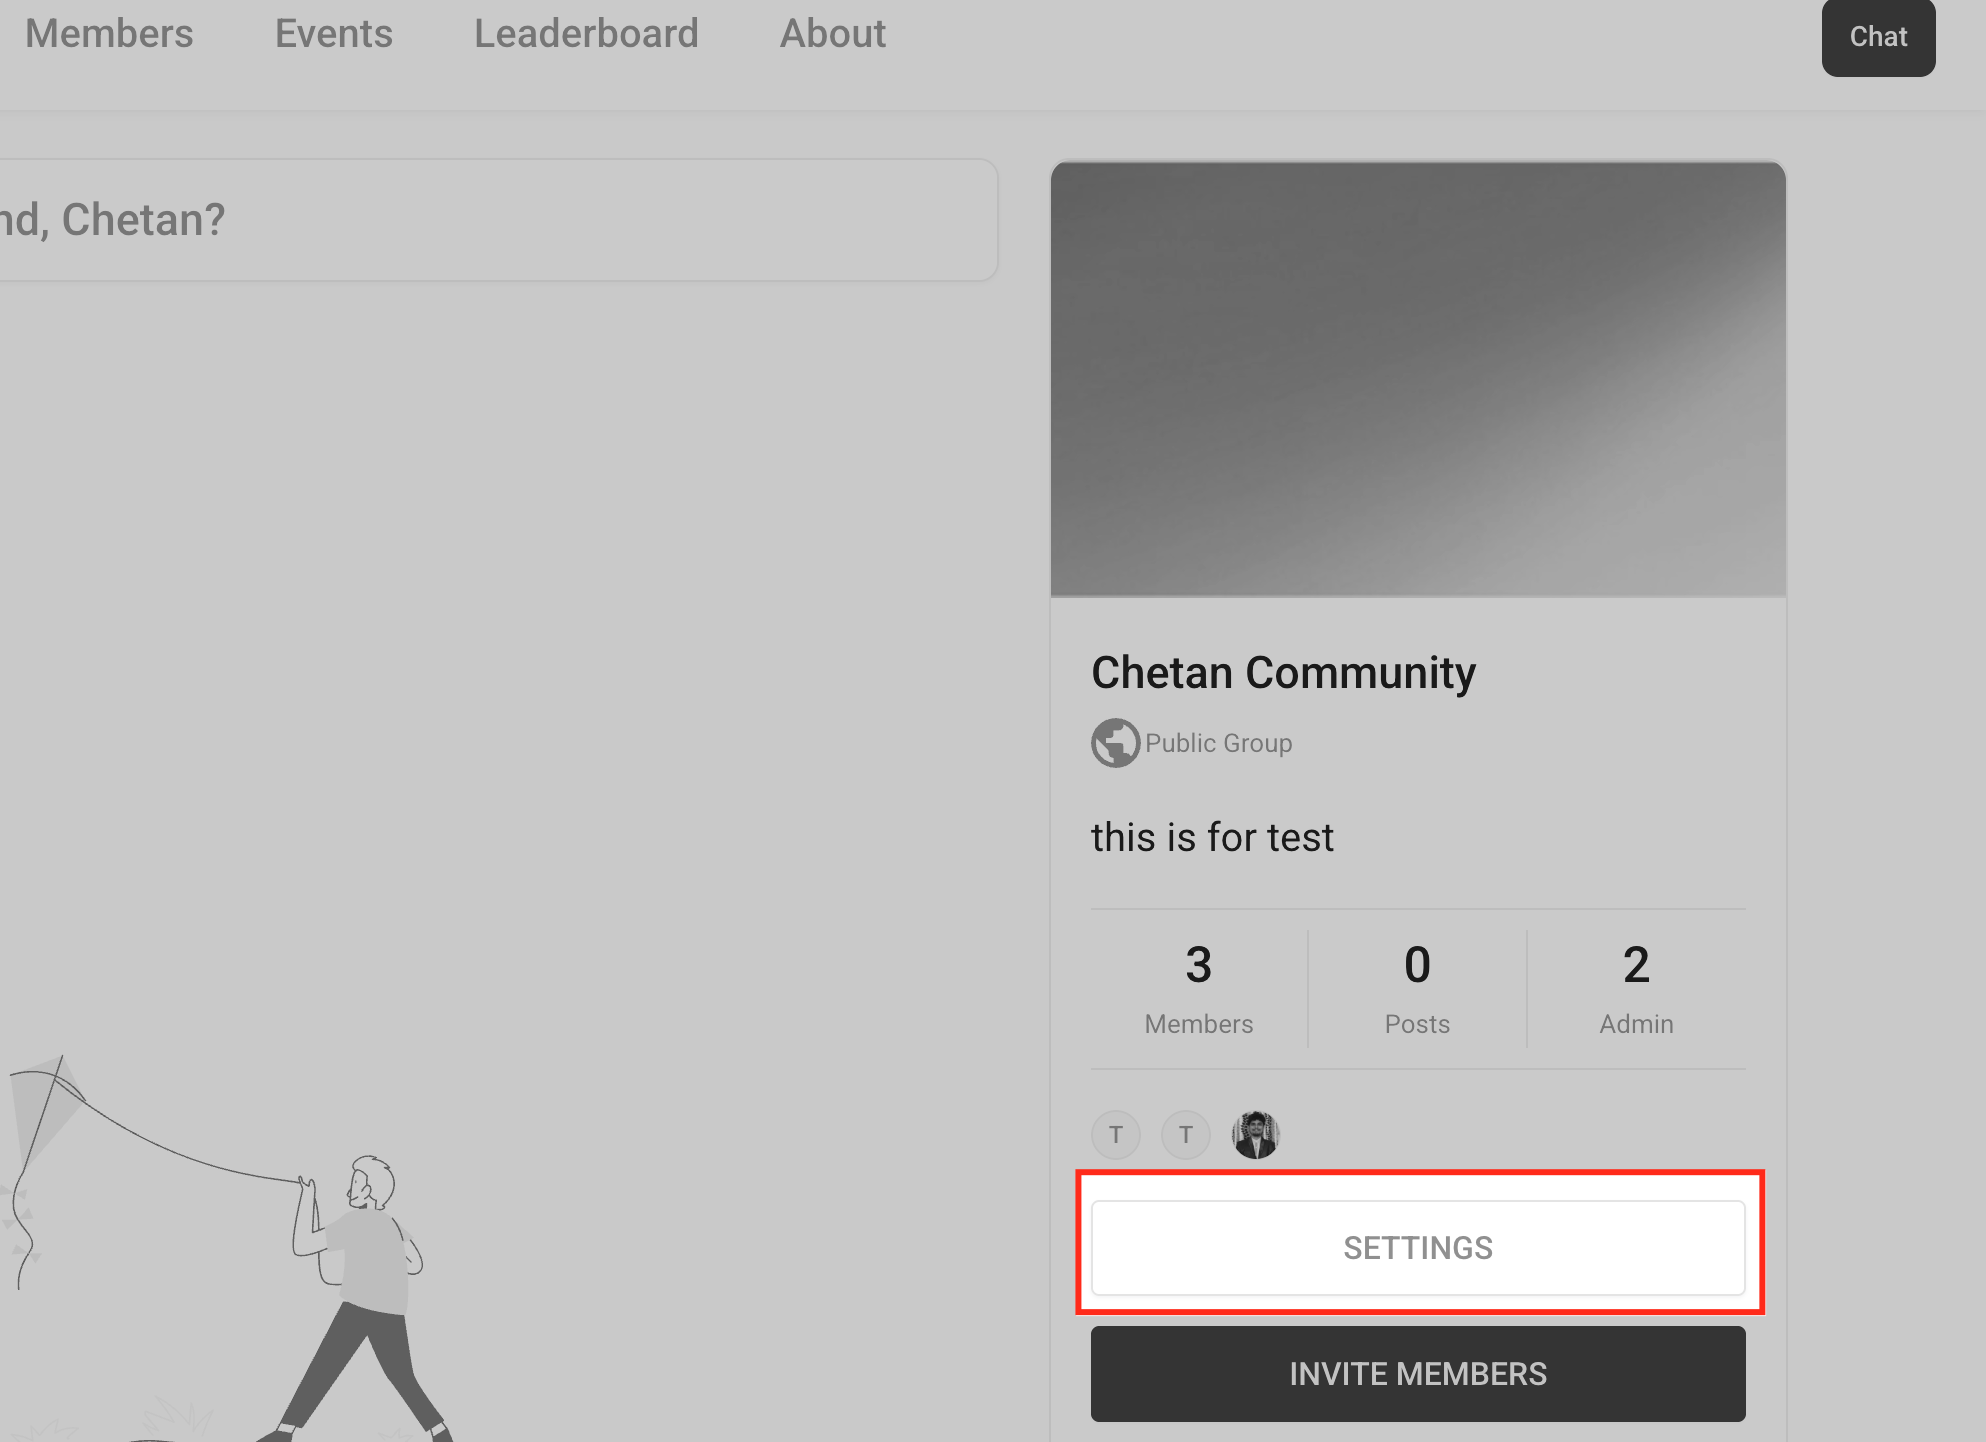
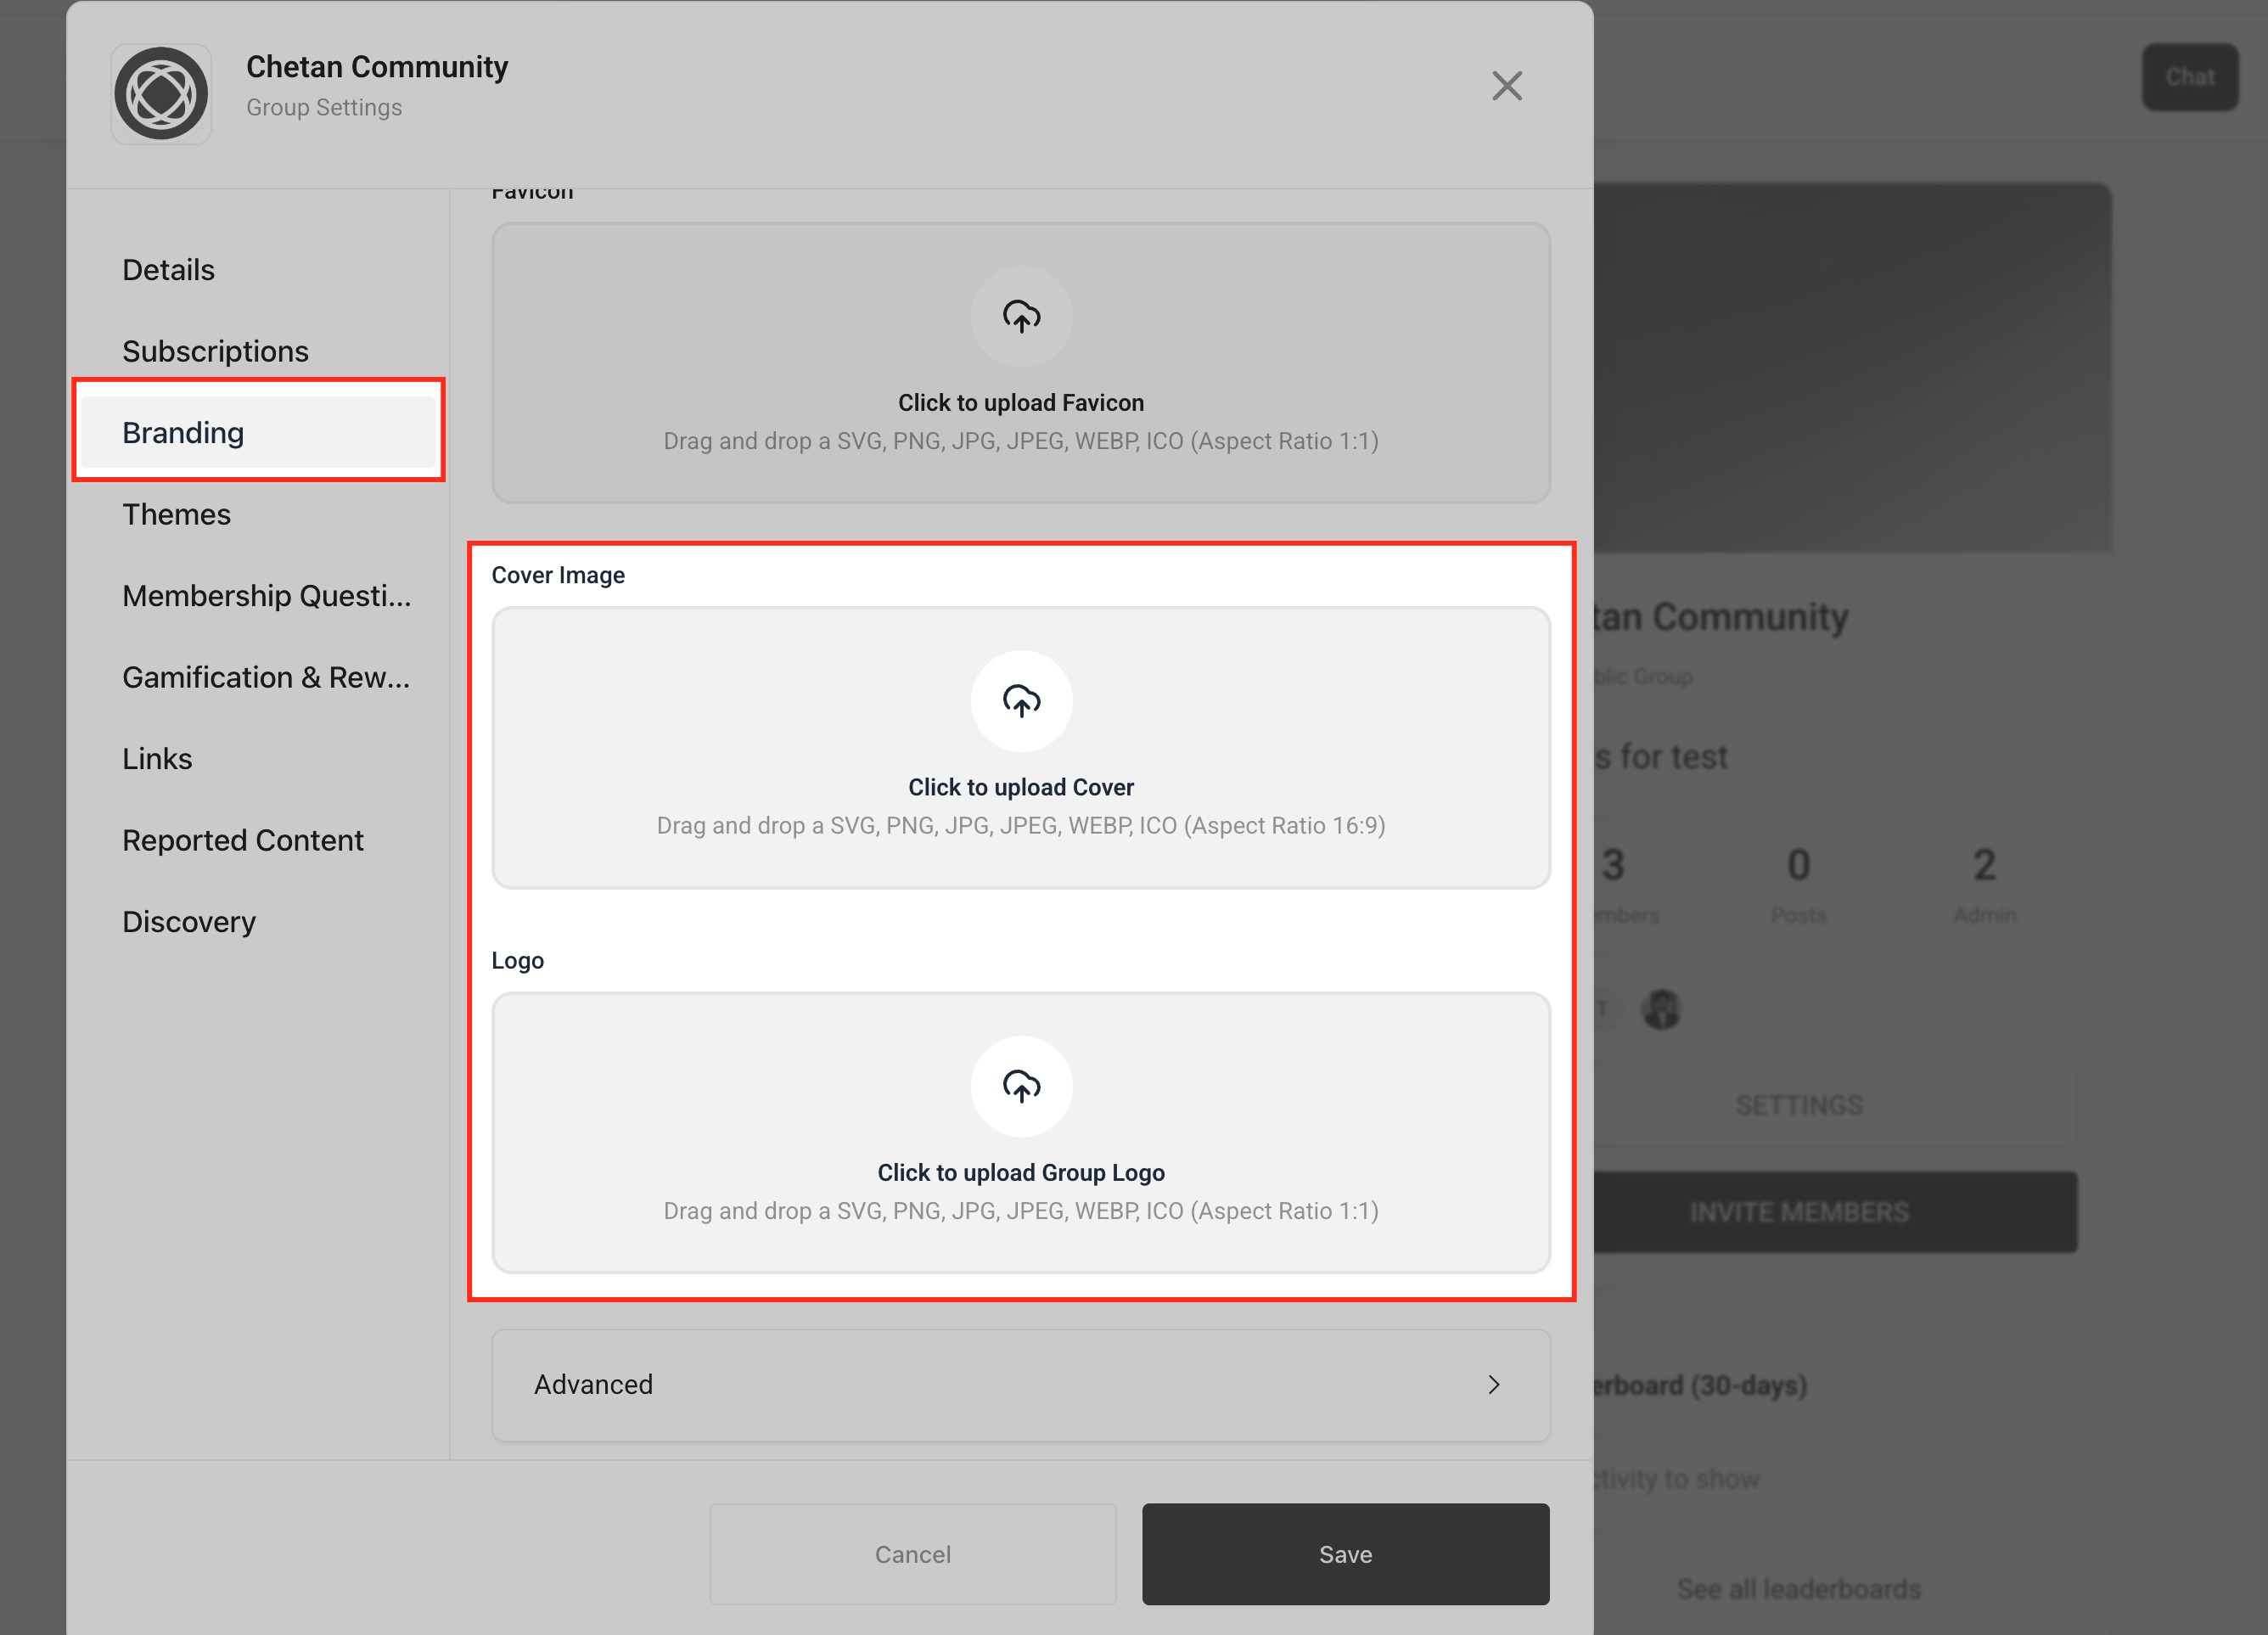
In the Branding tab, upload your logo, cover image, and favicon. The favicon appears in browser tabs, the cover image sets the visual tone of your community, and the logo reinforces your practice's identity throughout the portal. You can update any of these later.
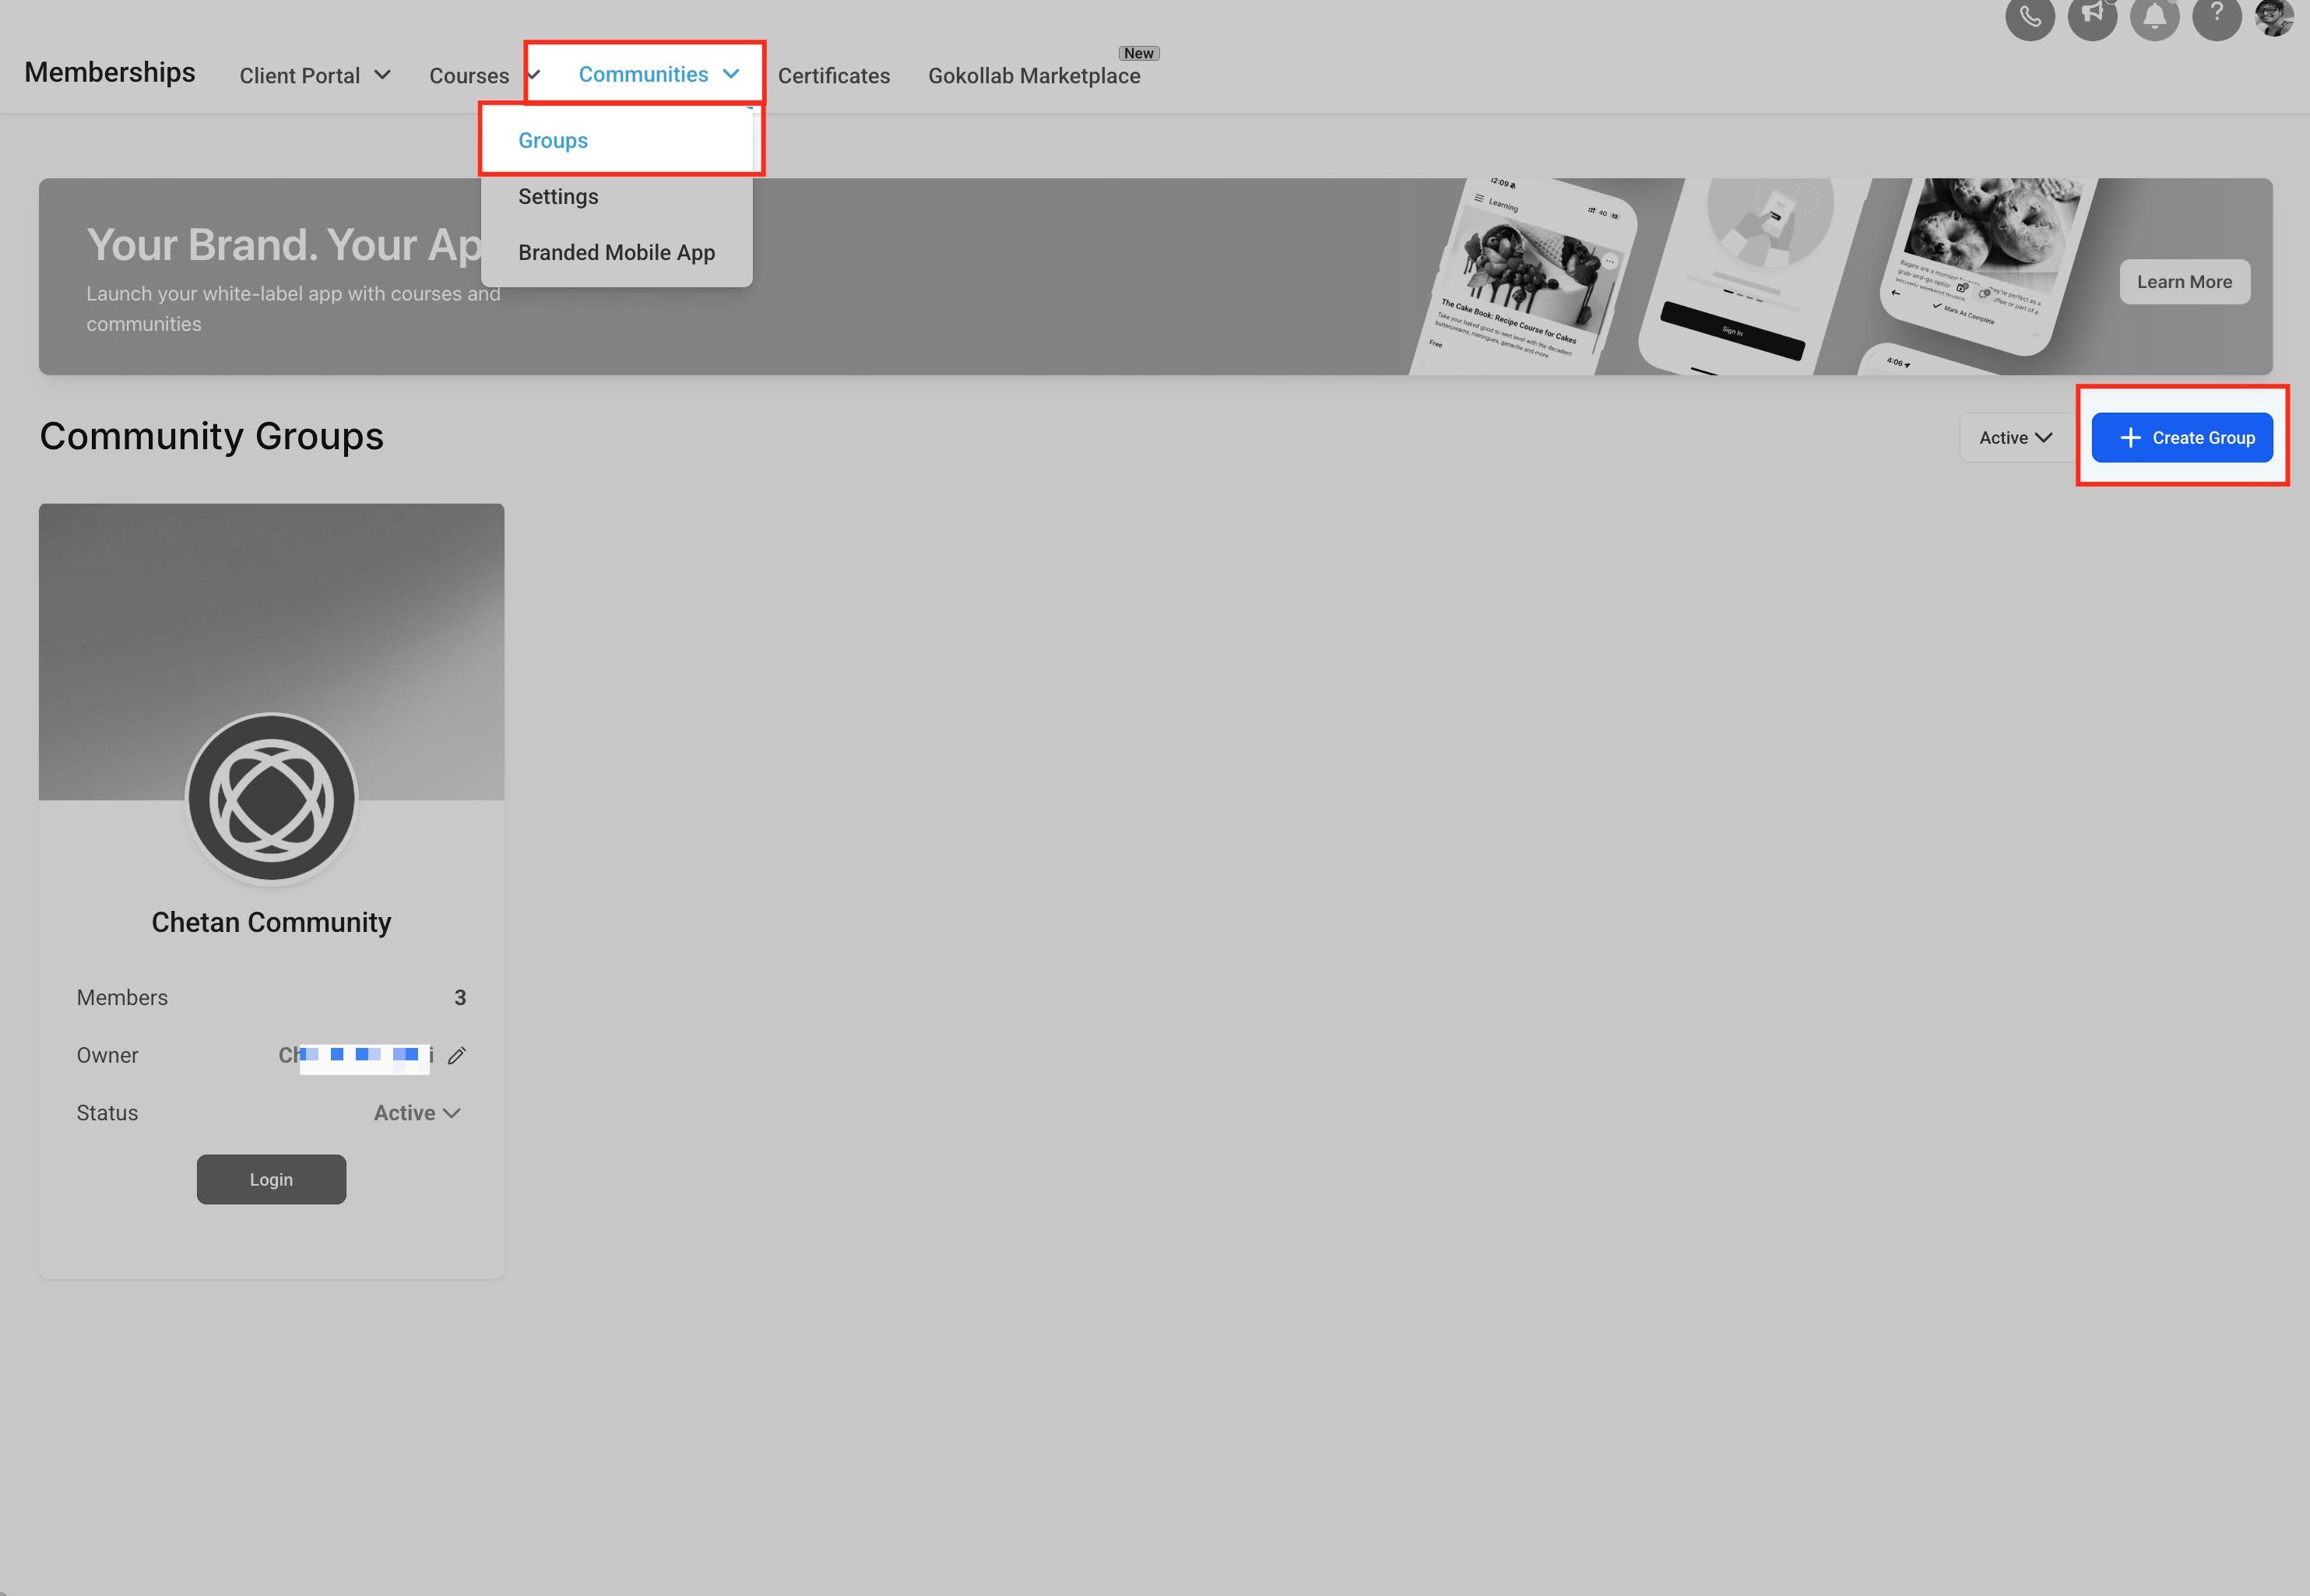
Groups are the smaller spaces inside your community where members actually gather, sorted by topic, program, or purpose. Each account can create multiple groups, so you might run separate groups for a weight-loss program, a skincare membership, and an internal staff group, all inside one community.
To create a group, go to Marketing > Memberships > Communities > Groups and click Create Group.
Fill in the following details:
Field | What it does |
|---|---|
Group Name | The main identifier for your group. Make it relevant to its purpose, for example "Post-Op Support Circle." |
Group URL (Slug) | The web address members use to find and join the group. Keep it short and easy to share, for example "post-op-support." You can only change the slug once after the group is created, so double-check it before saving. |
Group Description | A short summary of what the group is about and what members can expect. |
Brand Color | A color that represents your practice or the group's theme, applied across the group's design. |
Favicon | A small icon shown in the browser tab, ideally a simplified version of your logo. |
Cover Image | The banner image at the top of the group page. Recommended aspect ratio is 16:9. |
Logo | The group's square logo, shown in the group switcher and other UI. Recommended size is 200x200 pixels. |
Whoever creates a group automatically becomes its owner and takes on administrative responsibility for it. Group ownership can't be transferred to another person later, so choose who creates each group carefully.
By default, a new group inherits the branding you set at the community level, but you can override the name, description, slug, brand color, favicon, cover image, and logo for each individual group at any time from its settings.
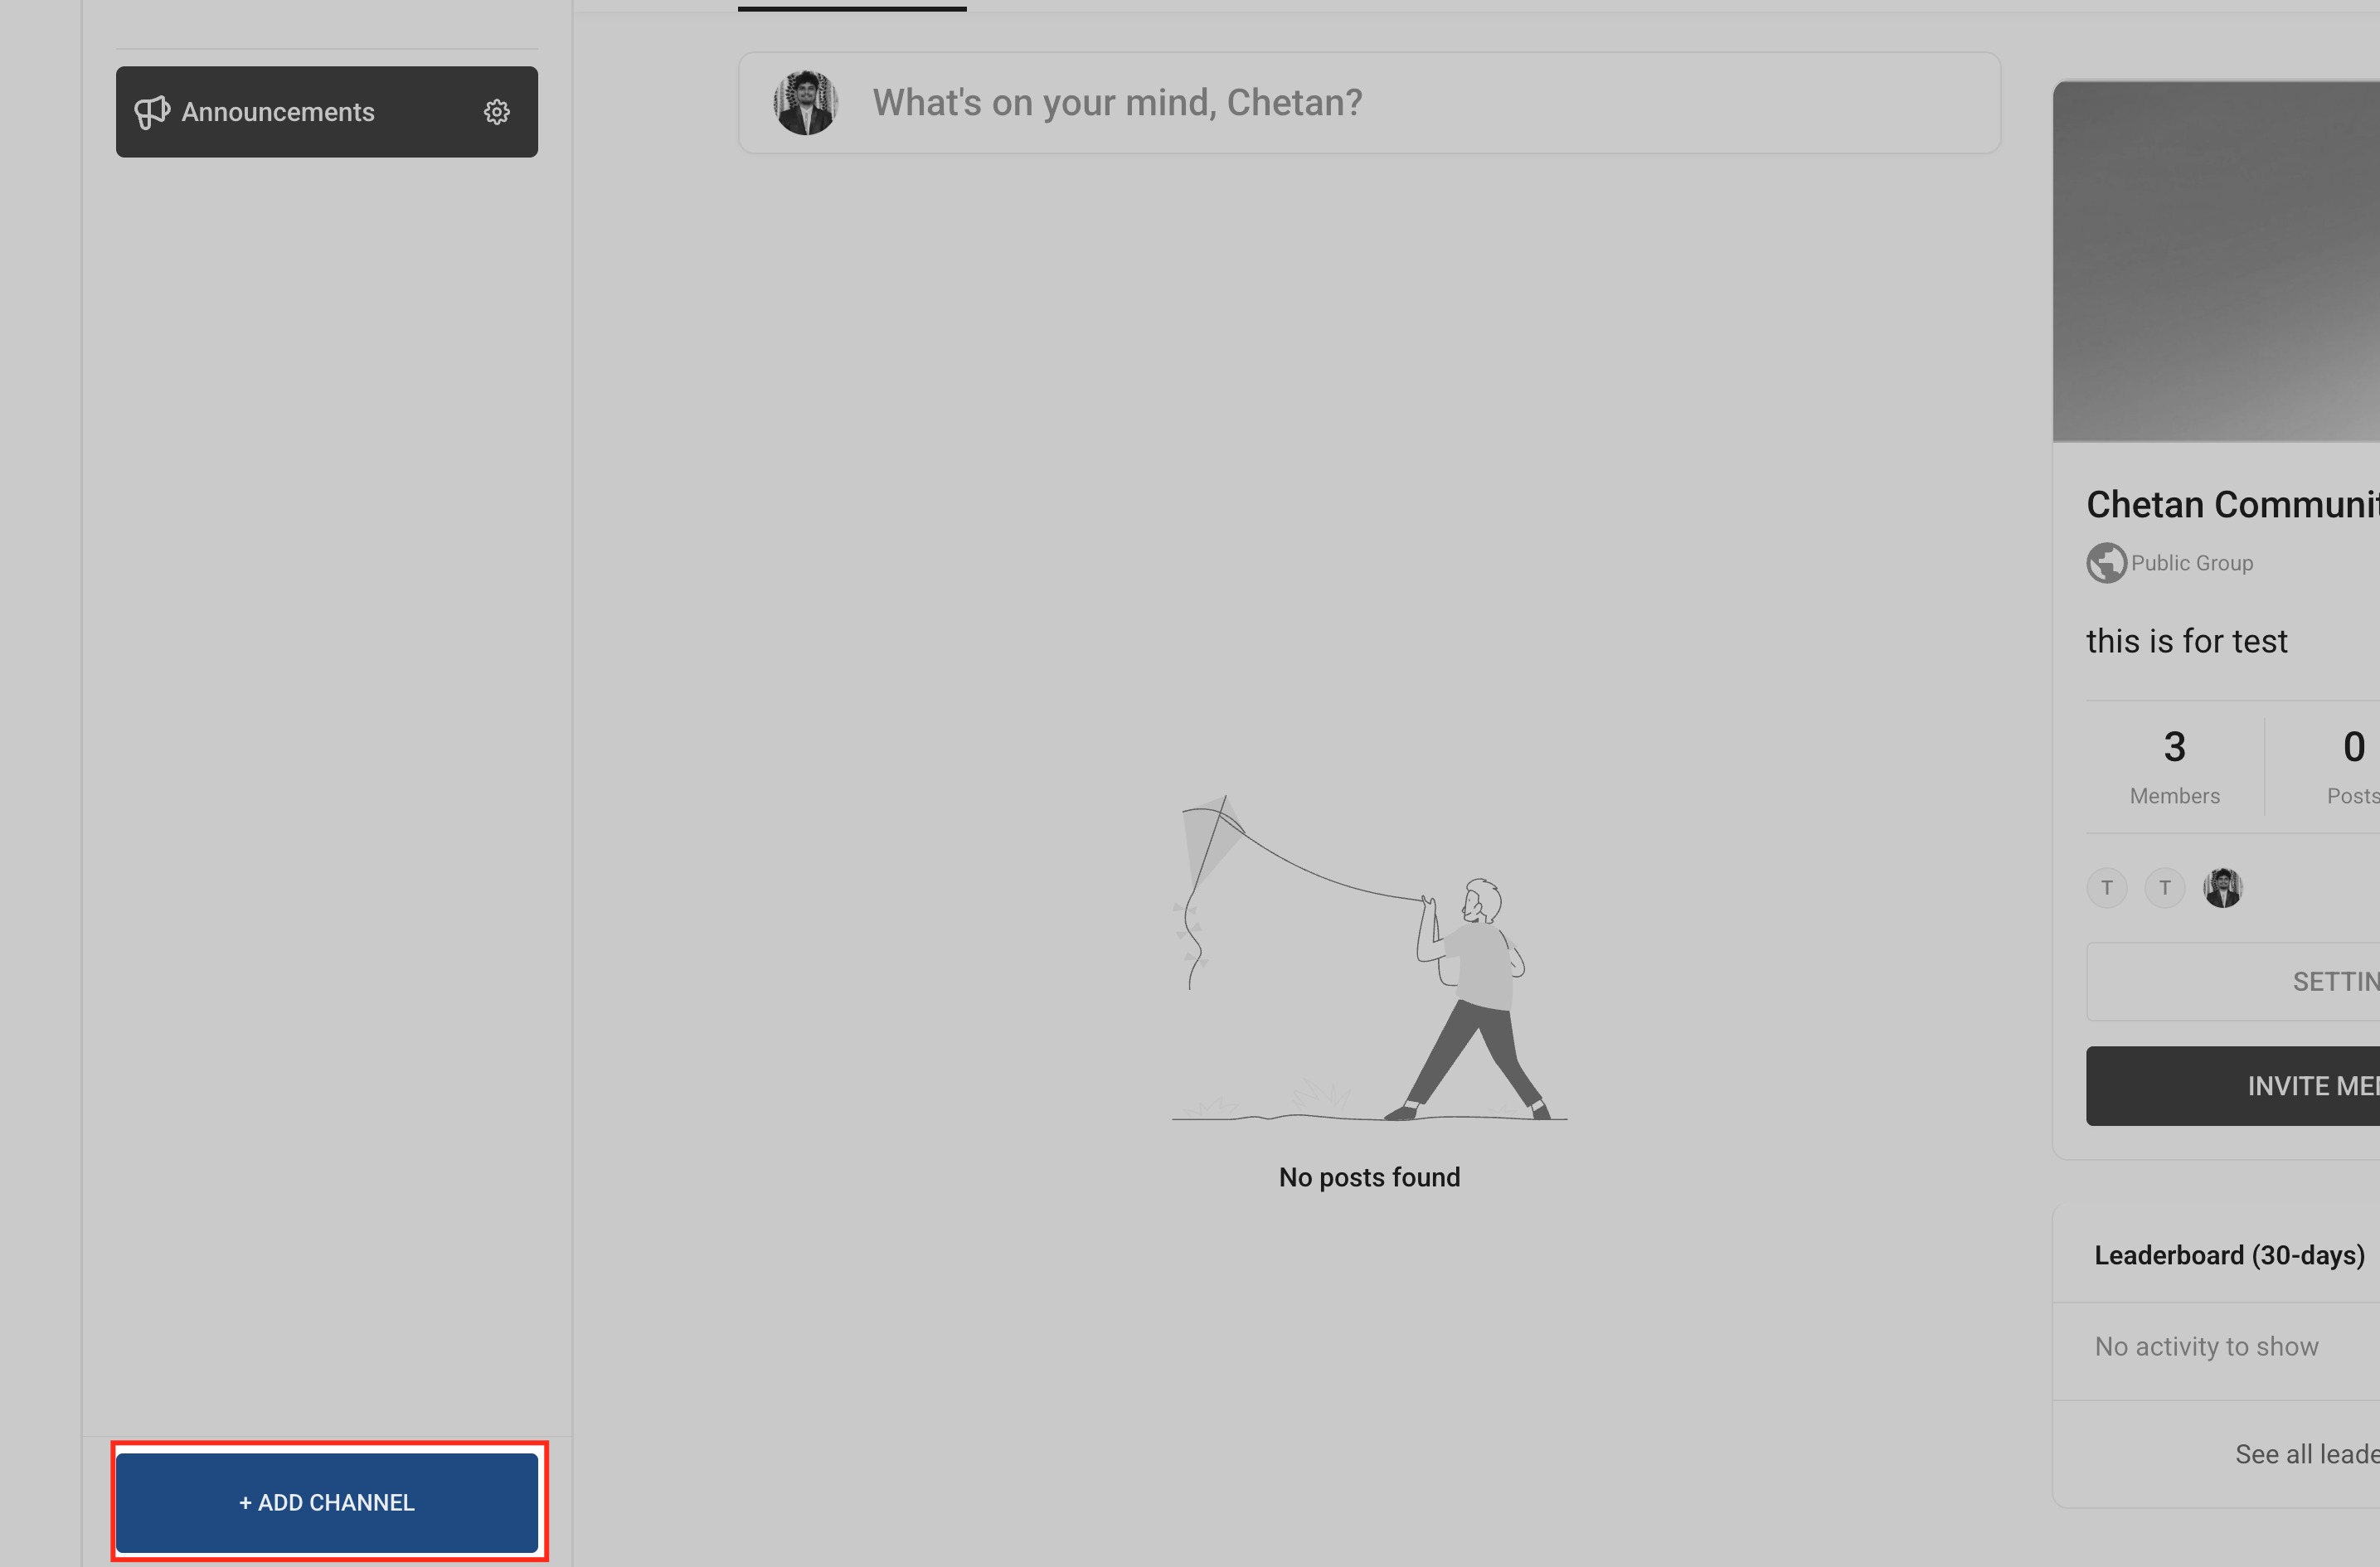
Channels organize the conversations inside a group so members can find what they're looking for. Add a channel from the left-hand panel inside the group, for example "Announcements" for practice updates, "Aftercare Tips" for treatment guidance, or a "VIP" channel for members in a premium program. Each channel can get its own icon and privacy setting.
You control which tabs appear in a group's navigation, and you can reorder them, rename their labels, and hide the ones you don't need, so a discussion-only support group and a full learning hub can each show only what's relevant.
Discussion: Where members post and reply. Always on, cannot be disabled or removed.
About: Introduces the group's purpose. Always on, cannot be disabled or removed.
Learning: Shows any courses attached to the group. Can be shown or hidden per group.
Events: Shows upcoming live sessions or workshops. Can be shown or hidden per group.
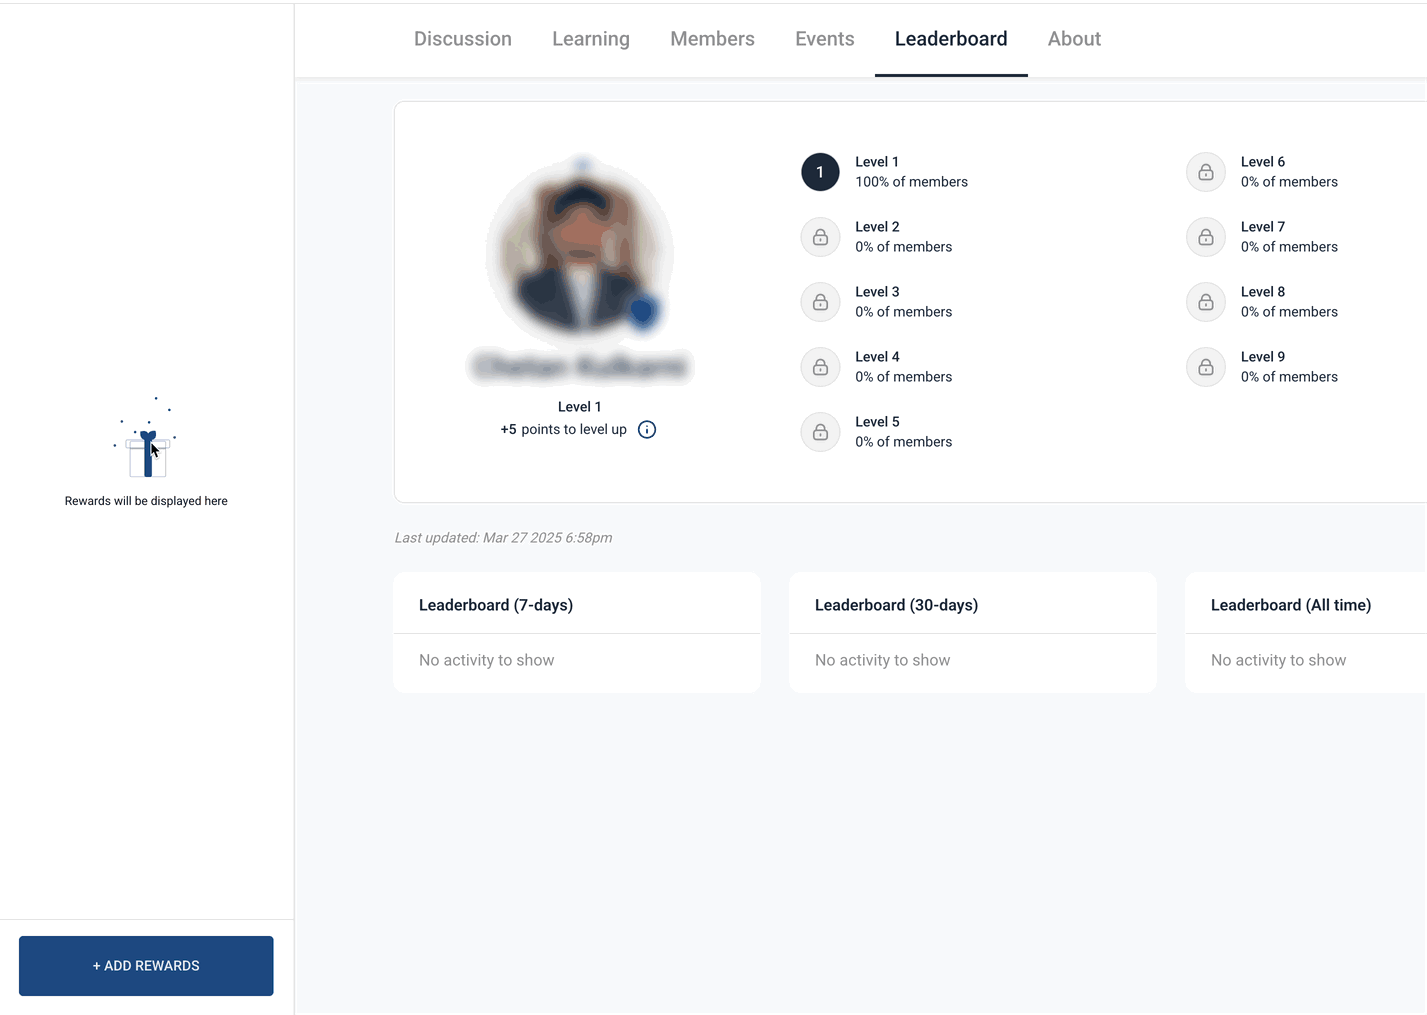
Leaderboard: Shows member rankings and rewards. Can be shown or hidden per group.
Members: Lists group members and roles. Admins can always see this tab even when it's hidden from regular members.
Tab settings apply per group, not globally, so you can build a quiet discussion-only support group alongside a full learning-and-events hub without one affecting the other. To adjust them, open the group and go to Settings > Navigation Tabs, where you can:
Reorder tabs. Drag any tab into the order you want using its drag handle, so the features members use most sit first.
Rename tab labels. Give a tab custom text that fits your practice's language, for example renaming "Learning" to "Courses" or "Events" to "Meetups."
Show or hide tabs. Toggle Learning, Events, Leaderboard, and Members on or off.
Discussion and About are core to how a community functions and stays discoverable, so they always stay on and can't be disabled or removed, though you can still rename them. Click Save when you're done. Changes apply immediately for every member of that group and persist across sessions.
Members join a group using its unique URL. Clicking the link takes them to a page where they sign up (or log in) with a shared community profile that works across every group in the community, then they can choose to join any group that interests them. A member can belong to multiple groups at once, for example a patient in both a treatment program group and a general practice community.
You can also invite members directly from inside the group:
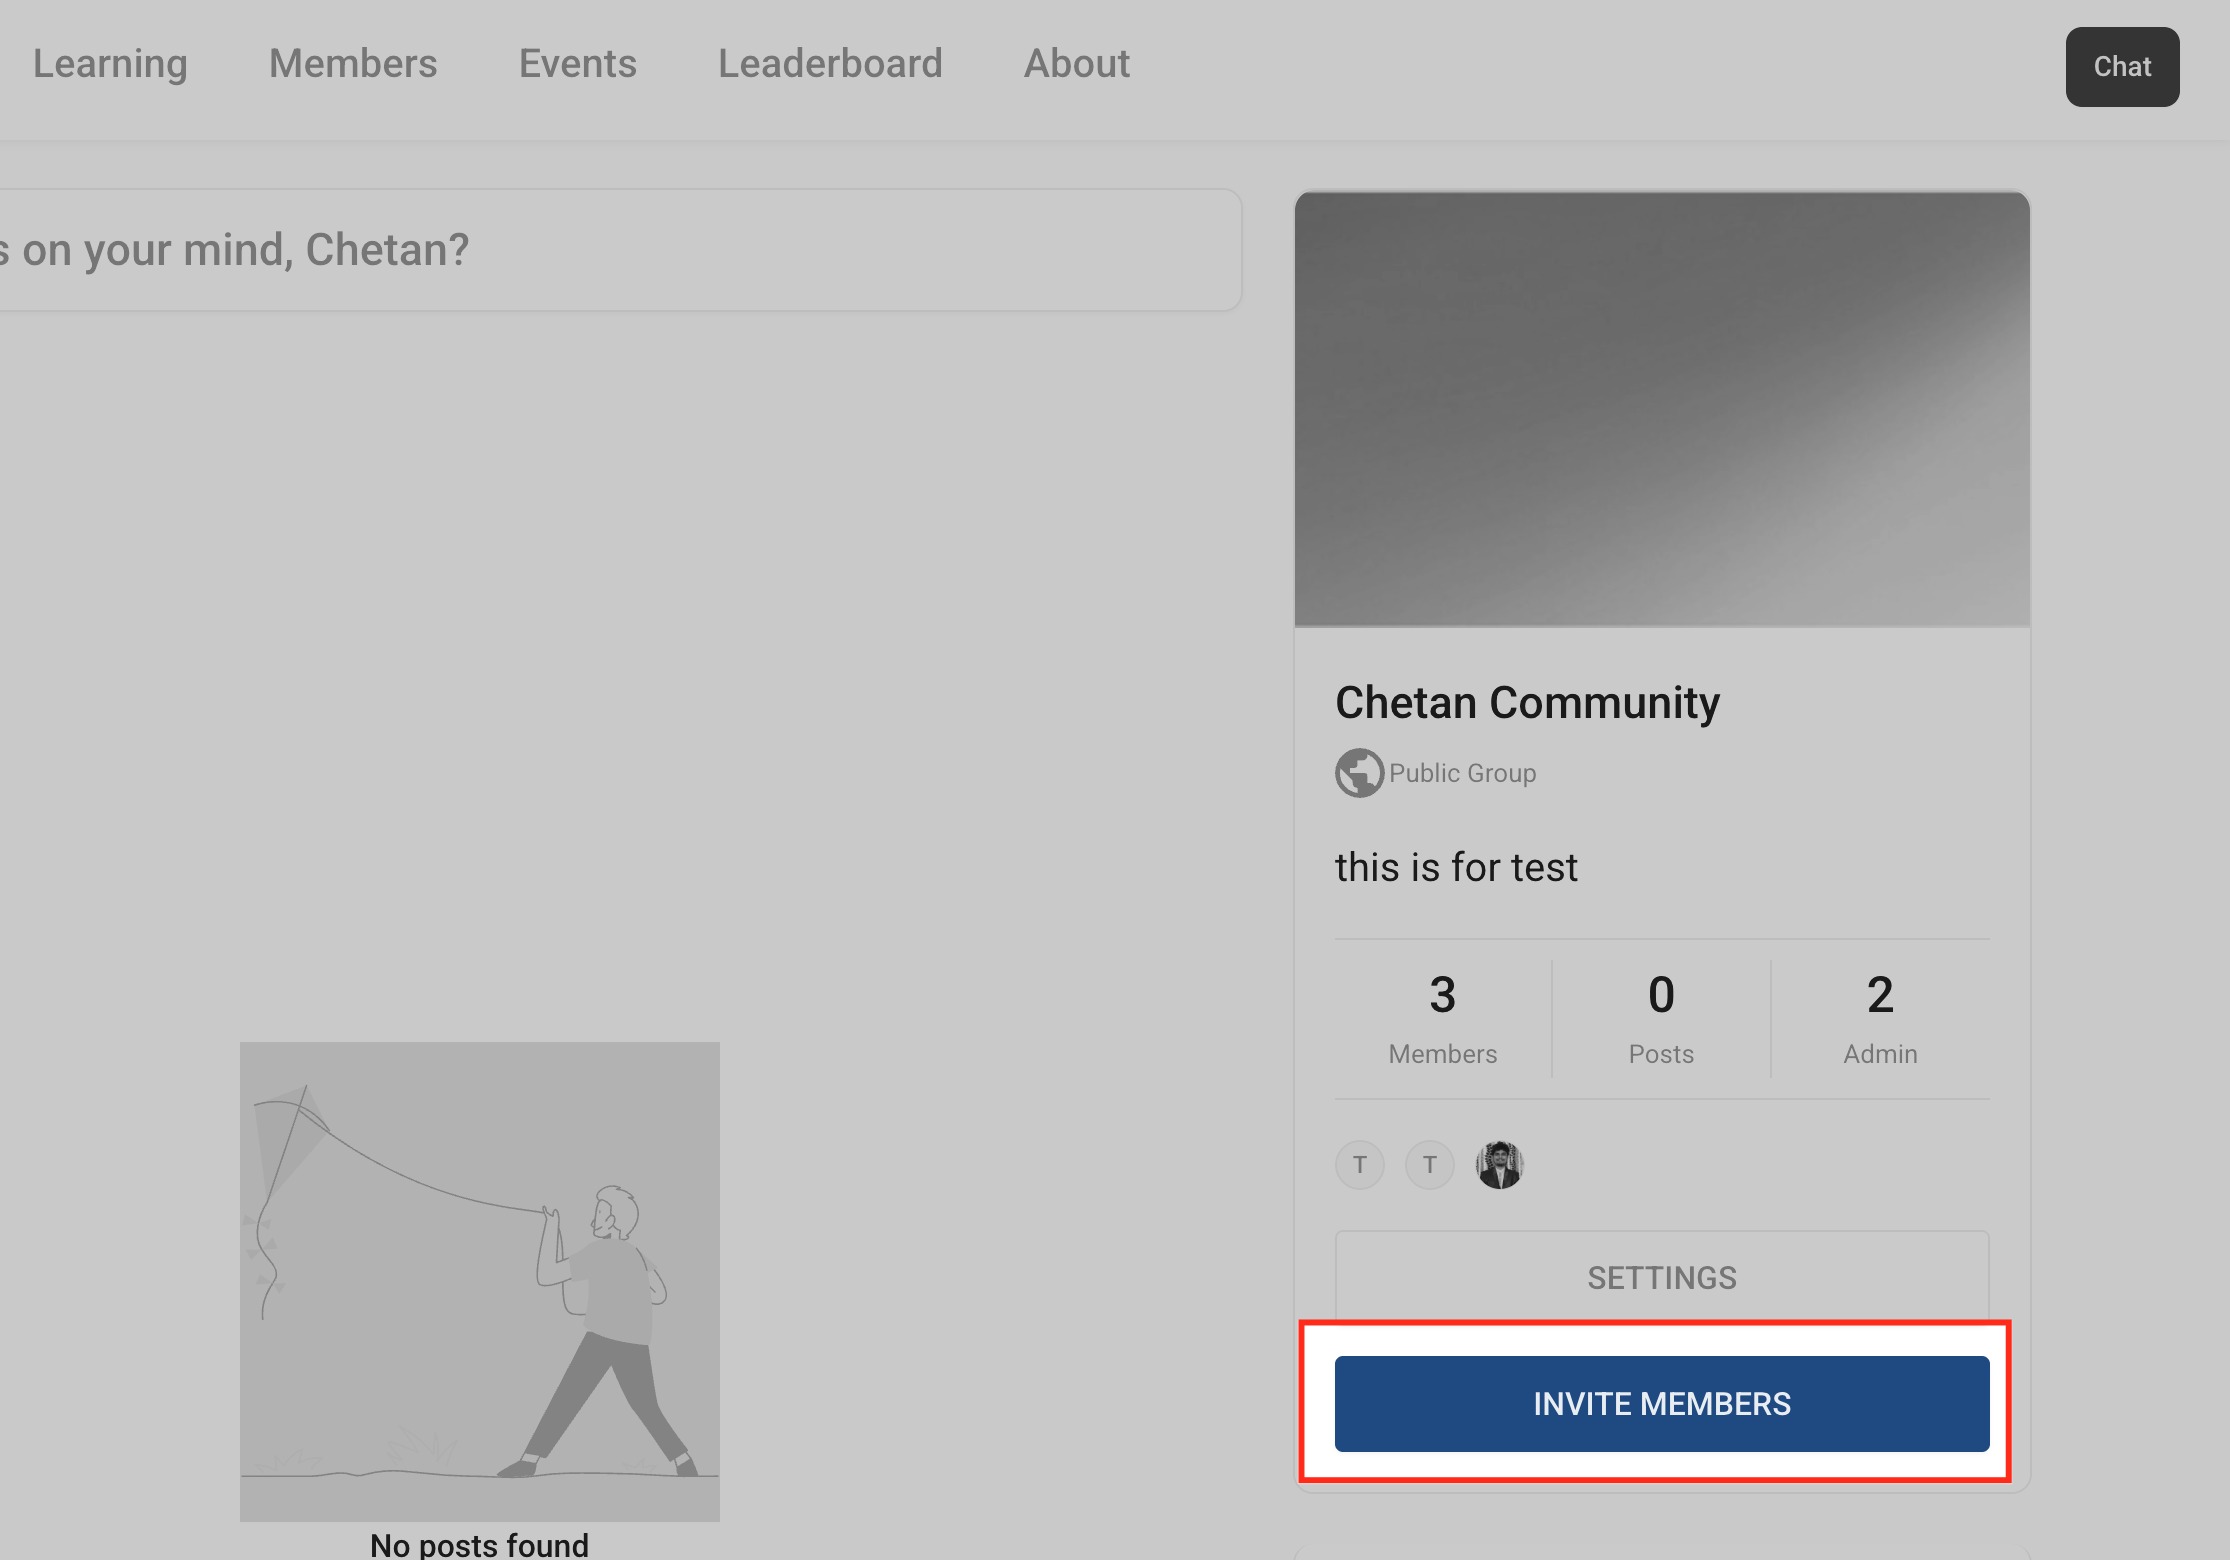
Open the Members tab and click Invite Members.
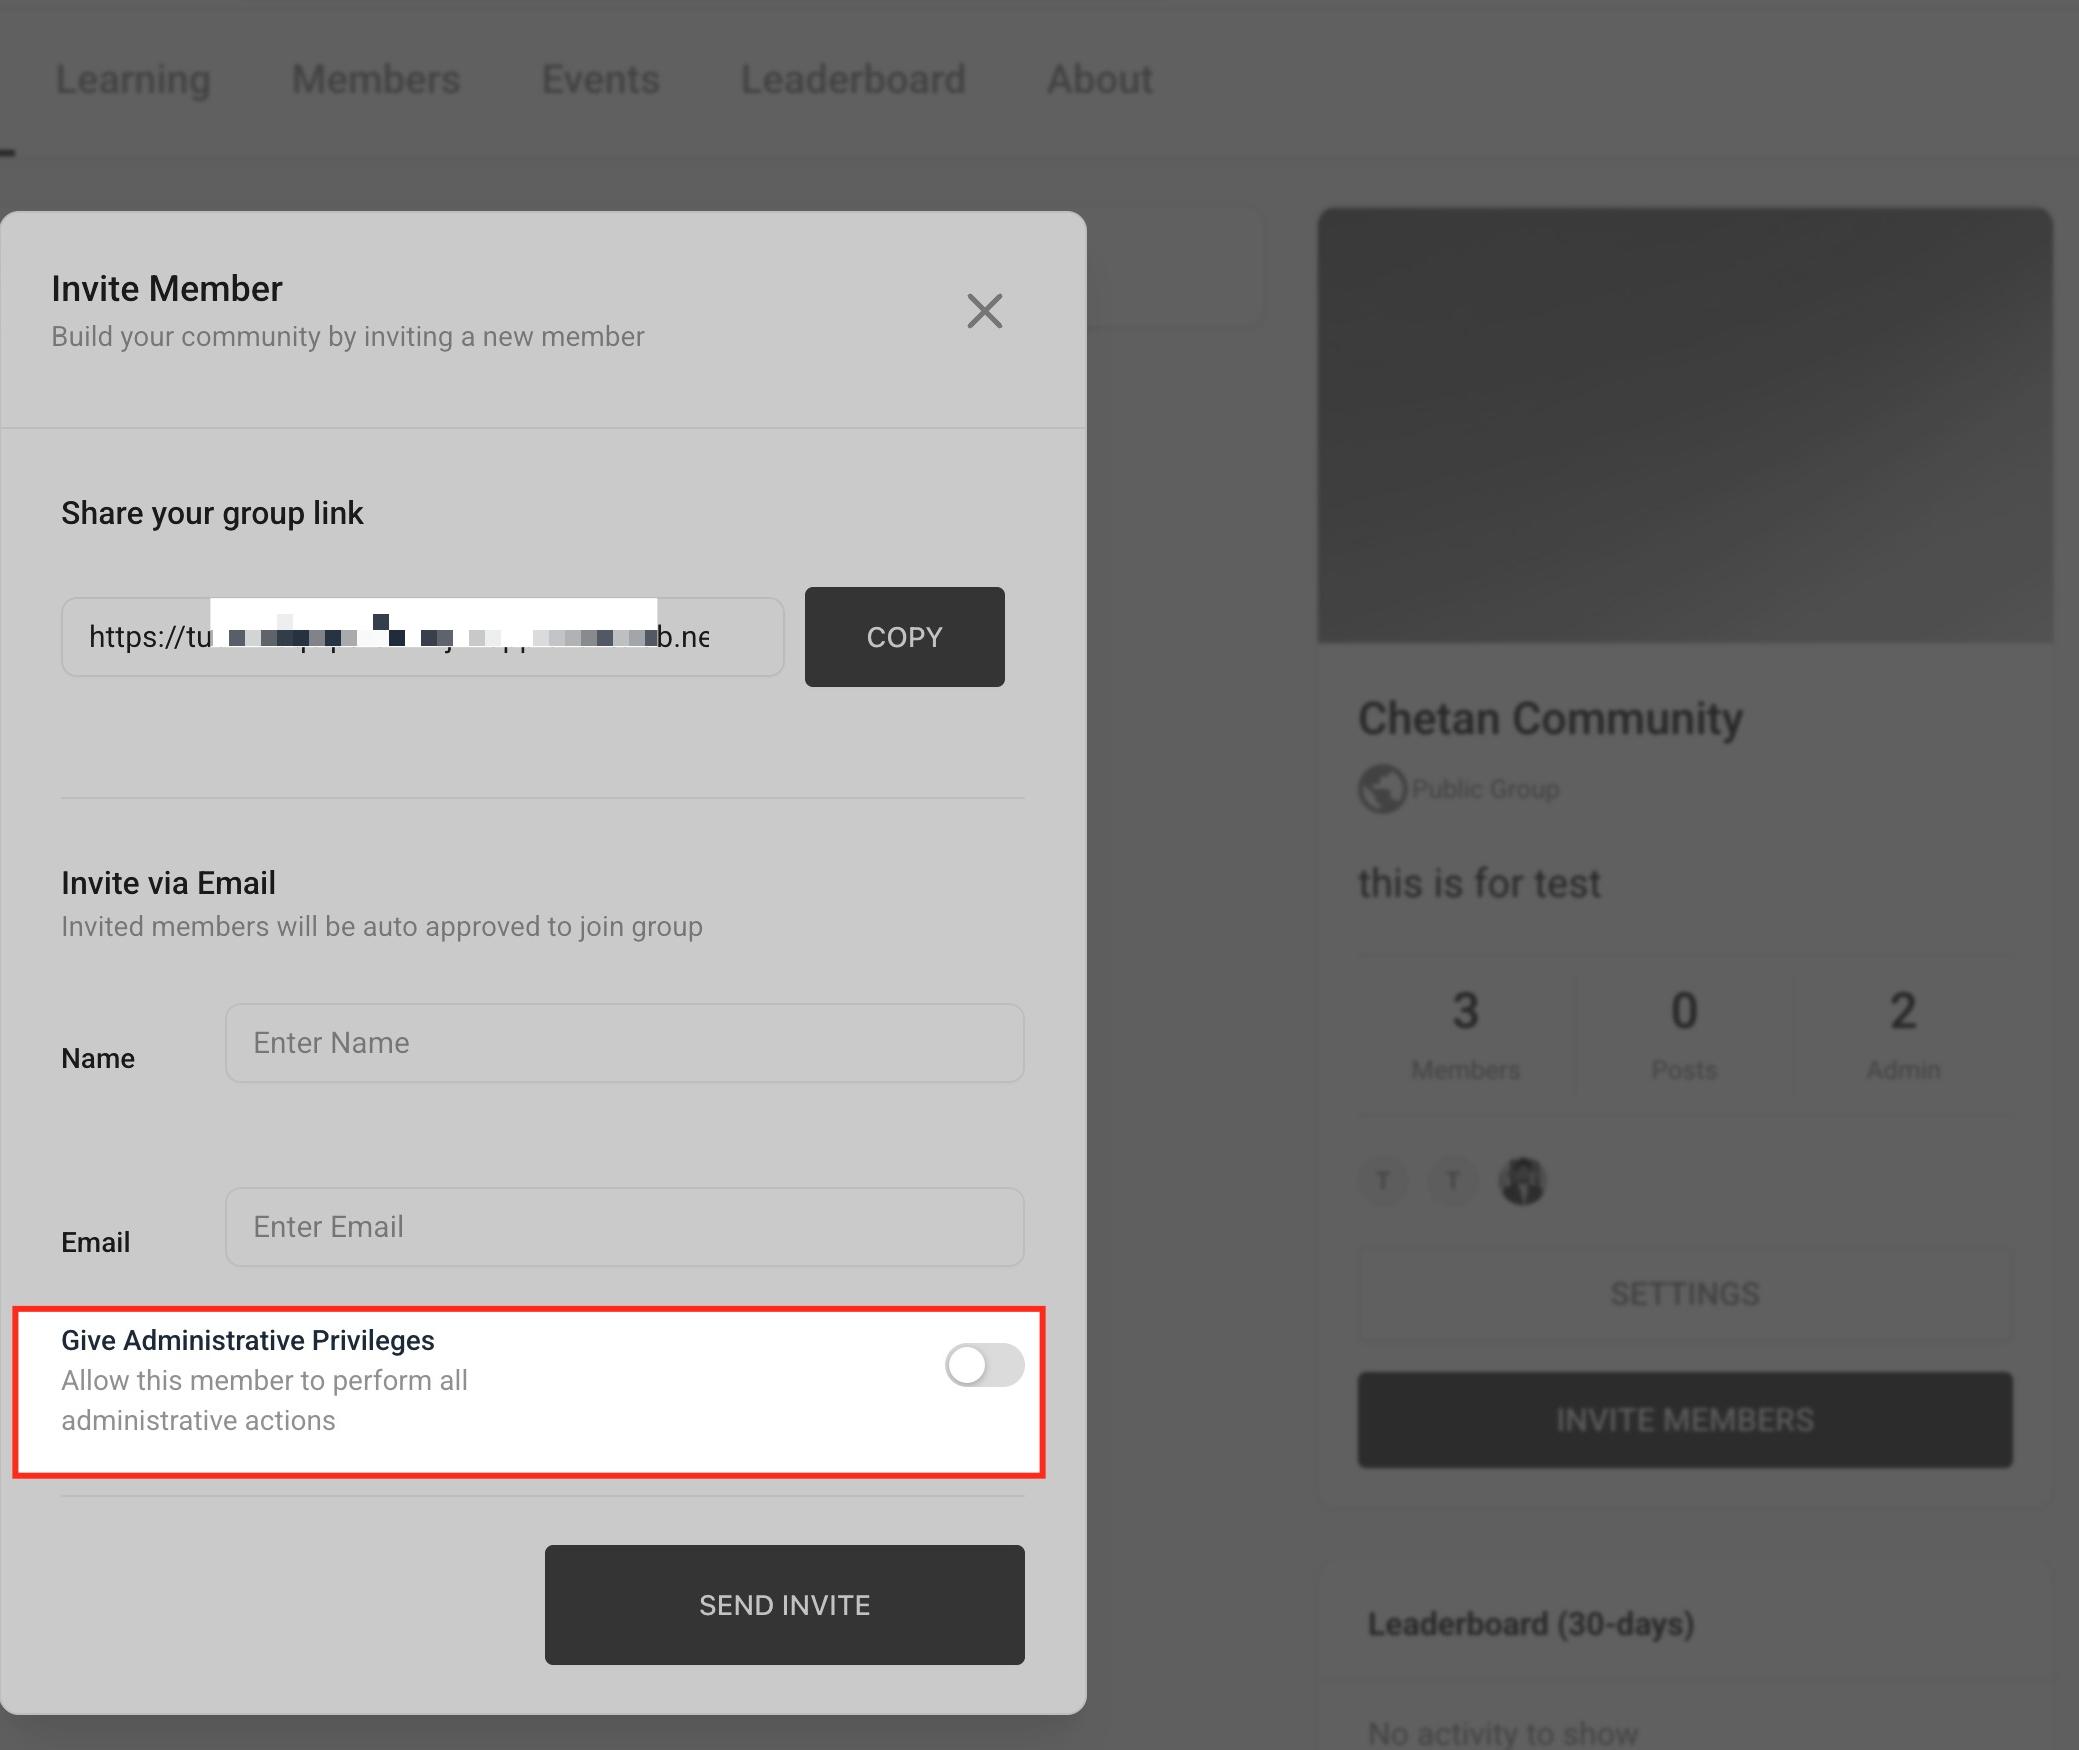
If the invitee needs full administrative access, toggle Give Administrative Privileges before sending the invite. You can change anyone's role later from the Members tab using the three-dot menu next to their name.
Roles work as follows:
Admin: Full control over the group, including settings, channels, and member management. Account admins get admin access automatically when they log into a group.
Moderator: Day-to-day moderation permissions without full settings access. Staff who aren't account admins take on this role when they access a group.
Member: Basic access to participate in discussions, courses, and events.
If your community carries patient information, such as posts referencing a treatment, appointment details, or before-and-after progress shared by a member, treat it as PHI. Limit admin access to staff who need it, keep sensitive conversations in private channels or groups, and avoid asking members to post identifying medical details in public discussion threads.
You can pause a group without deleting it. Go to Marketing > Memberships > Communities, find the group's Status tab, and switch it to Active or Inactive. Use the status filter to view only active or only inactive groups when you're managing several at once.
Attach existing courses to a group so members can access structured content without leaving the community. Build the courses themselves in your Courses area; cross-link to that collection rather than recreating course content inside a group.
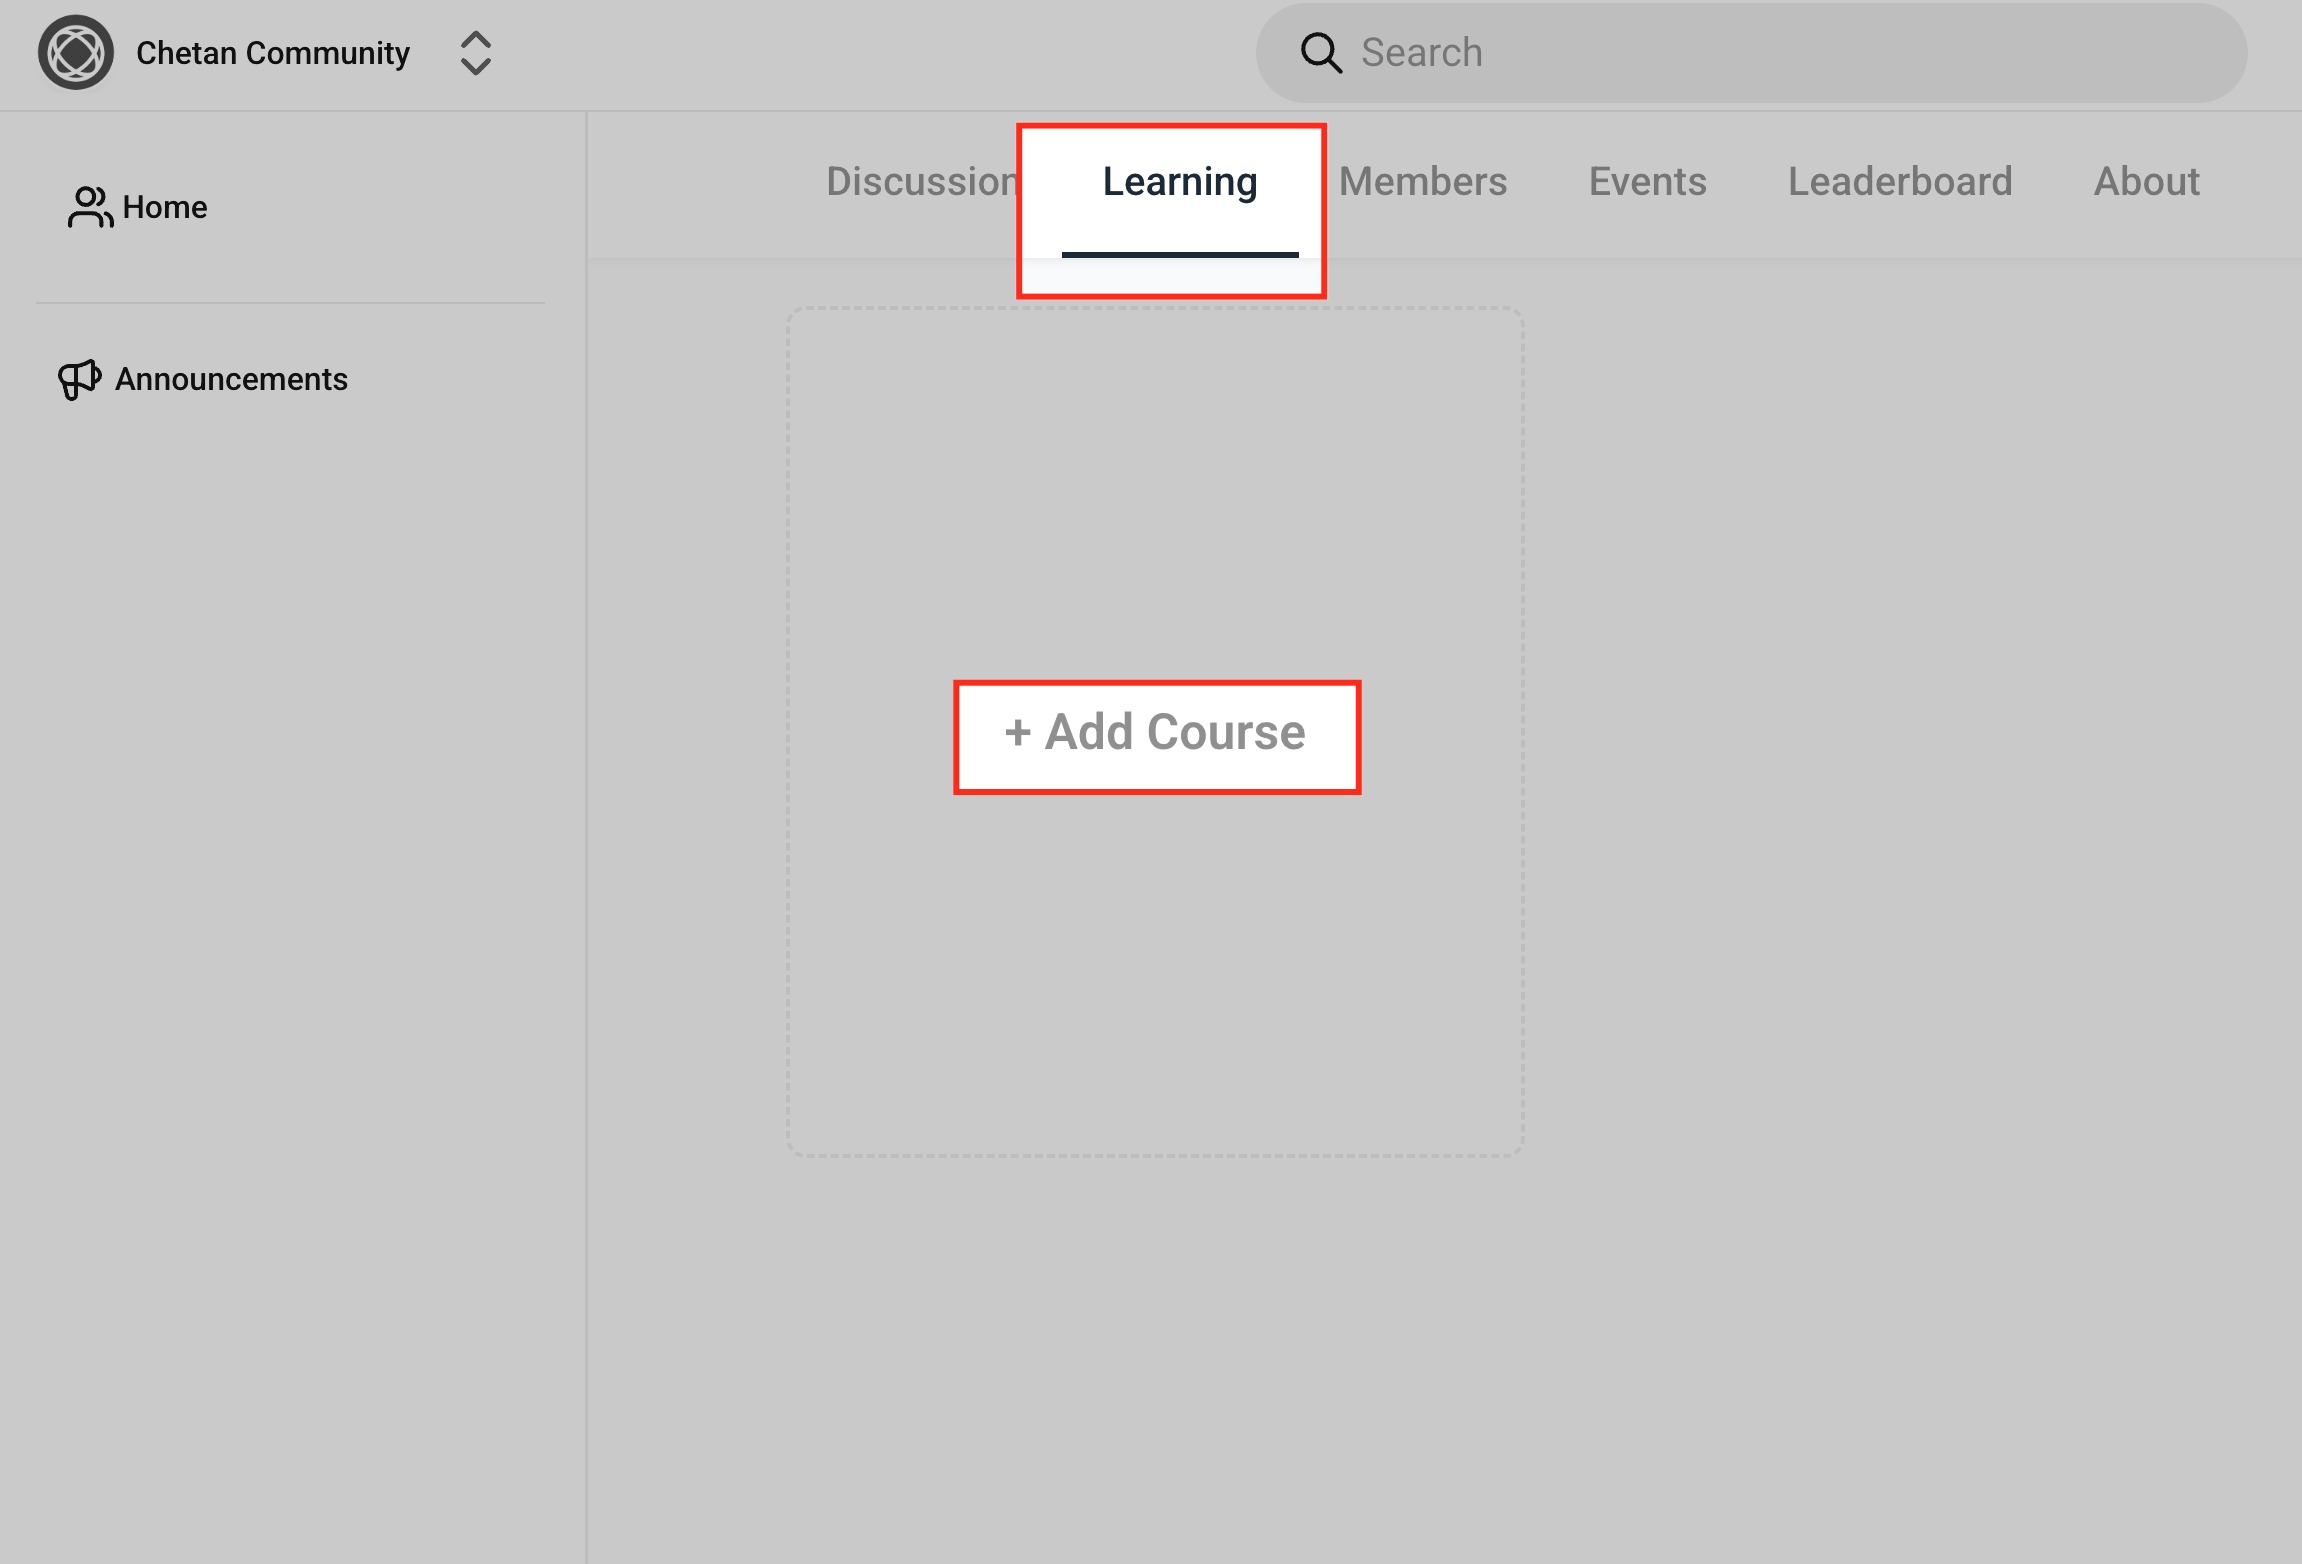
Open the Learning tab inside your community and click Add Course.
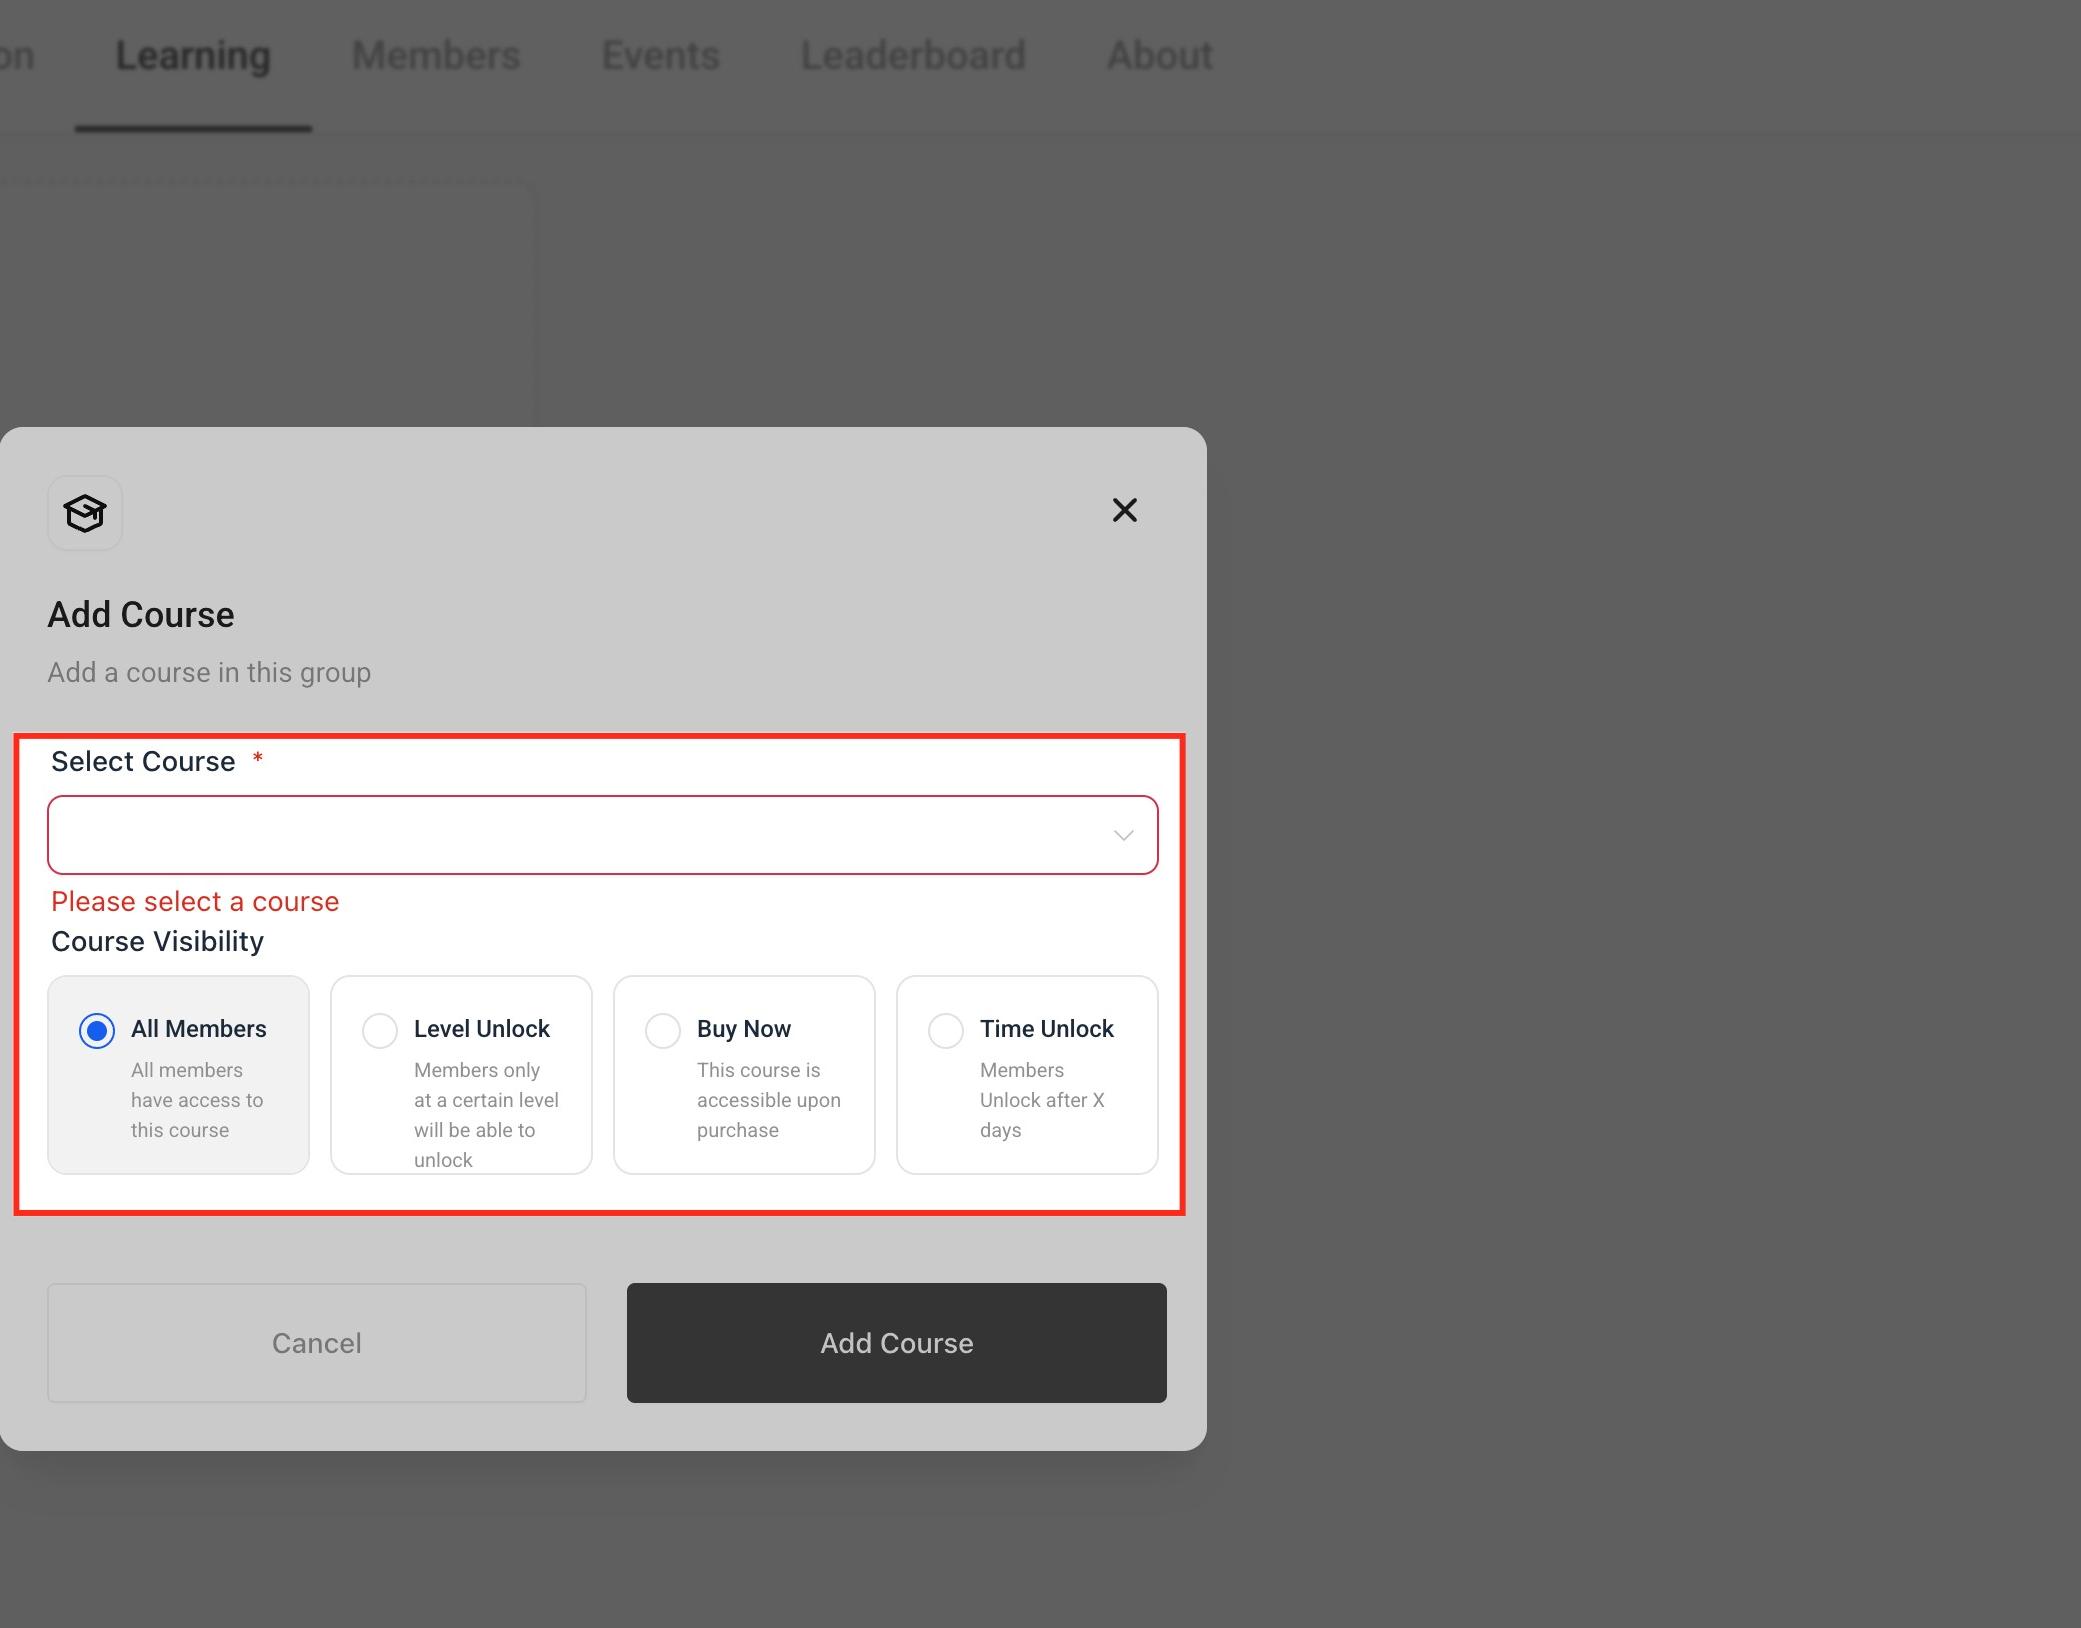
Choose an existing course from your library, then set its visibility: available to all members, restricted to certain member levels, sold via a one-time purchase, or unlocked after a set time or milestone.
Courses linked inside a community group only appear there; they don't affect how the same course shows up in your main course catalog.
If you sell course access through a group, route the checkout through AX Pay, Aesthetix CRM's own payment processor, which offers better rates than Stripe. See the AX Pay help article to get it connected before you turn on paid course access.
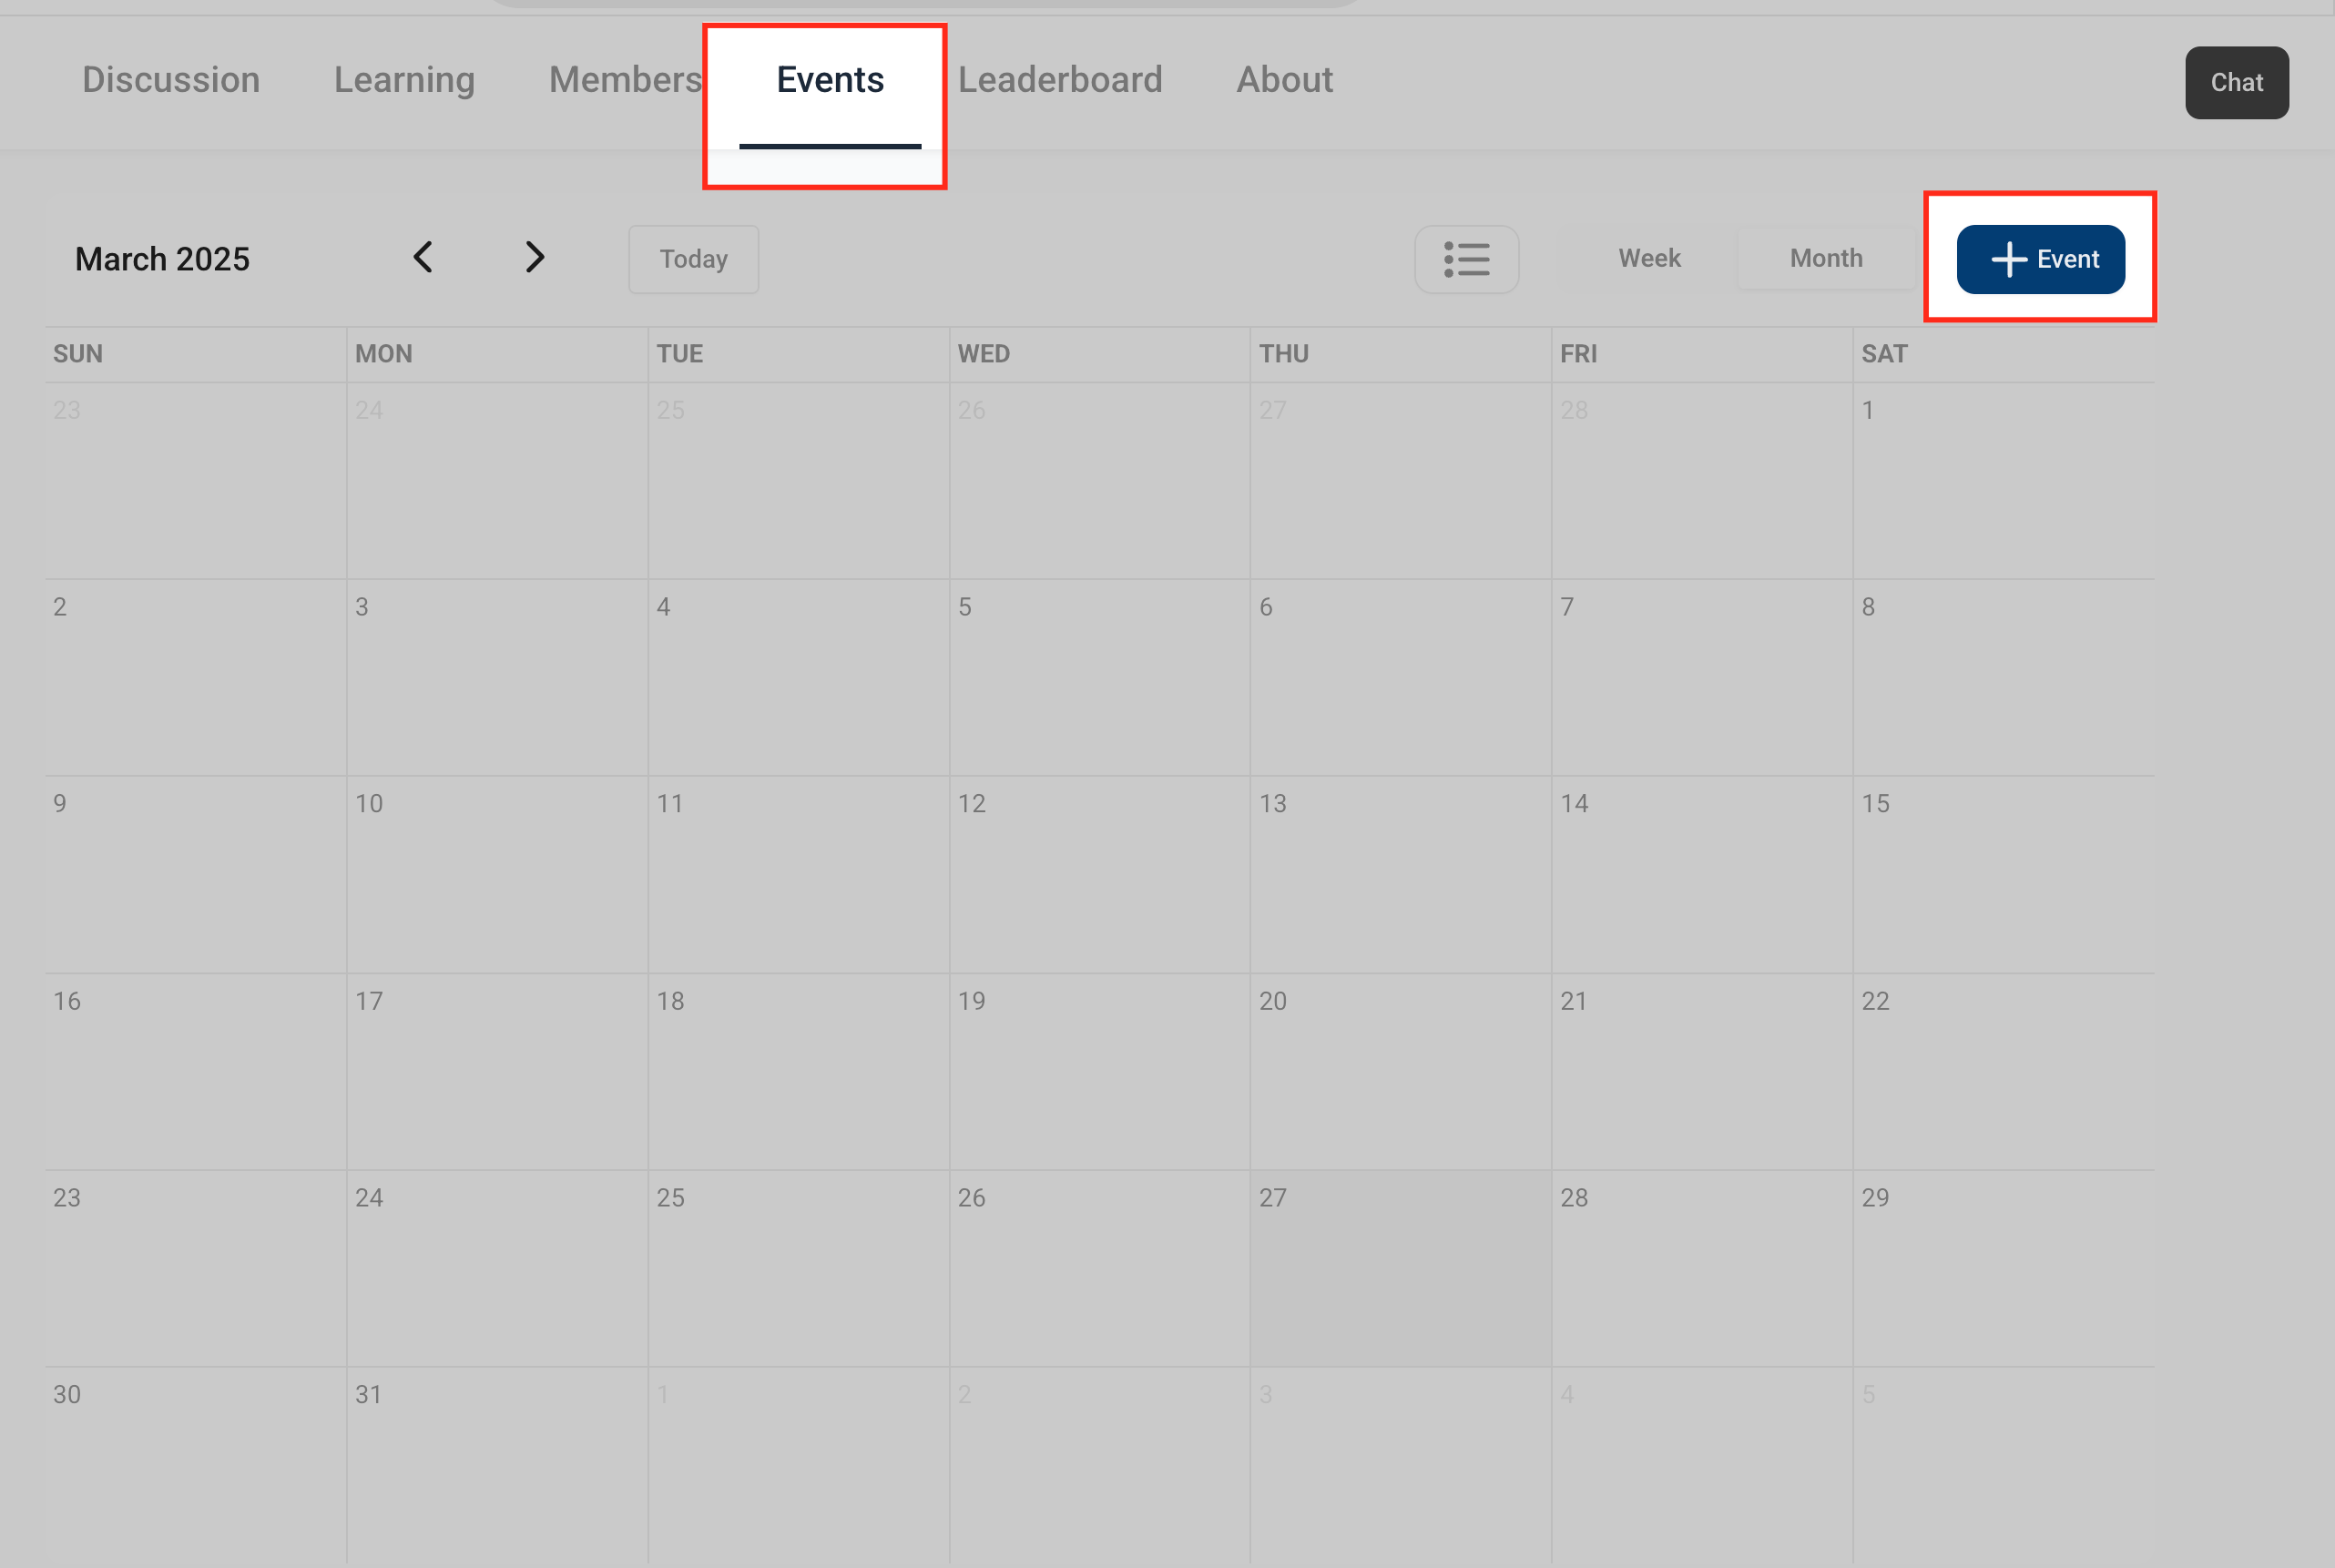
Events let you host live sessions such as office hours, Q&As, or workshops directly inside a group. Go to the Events tab and click Create Event, then fill in the title, description, a banner image, and a meeting link (a Zoom link, for example). You can run a one-time event or repeat it weekly or monthly, and reminders can be enabled so members get notified before it starts.
Post creation nudges keep a group active by prompting people to share important updates the moment they happen, instead of relying on anyone to remember to post manually. Right after a key action, the community surfaces a Share as Post prompt with a pre-filled message and automatic mentions, so the update can go out in a single click.
Nudges appear after these actions:
A new course is created, so members can discover it without hunting through the Learning tab.
A new event is created, giving the session instant visibility in the feed.
A member completes a course, celebrating the milestone and encouraging others to enroll.
Each nudge opens the standard community post composer, the same one members already use to write posts and pick a channel, so nothing new has to be learned. The course or event mention is inserted automatically, giving readers a clear, clickable path straight to the resource. Because the prompt shows up right when the person is most engaged, it meaningfully increases how often these updates actually get shared.
Use the Leaderboard to recognize active members and encourage participation. Open the Leaderboard section to view or set member levels (for example Bronze, Silver, Gold), then go to Gamification & Rewards to assign what each level unlocks, such as course access, discounts, or an exclusive role. For a hands-off setup, use a workflow to award rewards automatically when a member completes an action, like submitting a form or finishing a course; build that automation in Workflows rather than inside Communities.
Each group's interface can be restyled to match your practice's brand, with separate settings for light mode and dark mode. Turn Communities on under Labs first if you haven't already, then open your group, click the settings icon, and select Themes.
Choose between two approaches:
Predefined theme: Browse the available themes and click one to preview it. Selecting a theme applies it immediately. If you run several groups, giving each one a different predefined theme helps members tell them apart at a glance.
Custom theme: Build your own by adjusting individual style elements. Light mode and dark mode are customized and saved separately.
Option | What it changes |
|---|---|
Sidebar Background | Background color of the sidebar and top bar |
Primary | Button colors |
Background | Surface elements and modals |
Tertiary | Links and selection elements (radio buttons, checkboxes) |
Surface | Base layer of the interface |
Primary Font | Main text |
Secondary Font | Selected/secondary text |
Fill Colour | Hover color |
Borders | All border colors |
Error | Error state color |
Click any color swatch to open the picker, or enter a hex code directly, then click Save to apply your changes.
Custom themes are reflected on web only, not in the mobile app.
Here's how a customized group looks once your theme is applied:
Members see whichever theme the admin has set, and they can switch between light and dark mode themselves from their own Settings.
Control which emails your community sends and customize their content from Marketing > Memberships > Communities > Settings > Email Settings.
Notification categories include:
Category | What it covers |
|---|---|
Group Invitation | Sent when a member is added to a group |
Membership Status | Approval, decline, new join requests (to admins), and private channel additions |
General Group Activity | New comments, replies, likes, tags, and reported content |
Calendar Events | Sent when a new event is scheduled in the group |
Learning (Courses) | New course added, join-group learning alerts, time-based course unlocks, subscription cancellations, and payment confirmations |
Role Changes | Member promotions and group ownership transfers |
Each email type has a default template you can preview and customize to match your practice's tone and branding. To edit the event reminder email, for example:
Select Group Event Reminder Email.
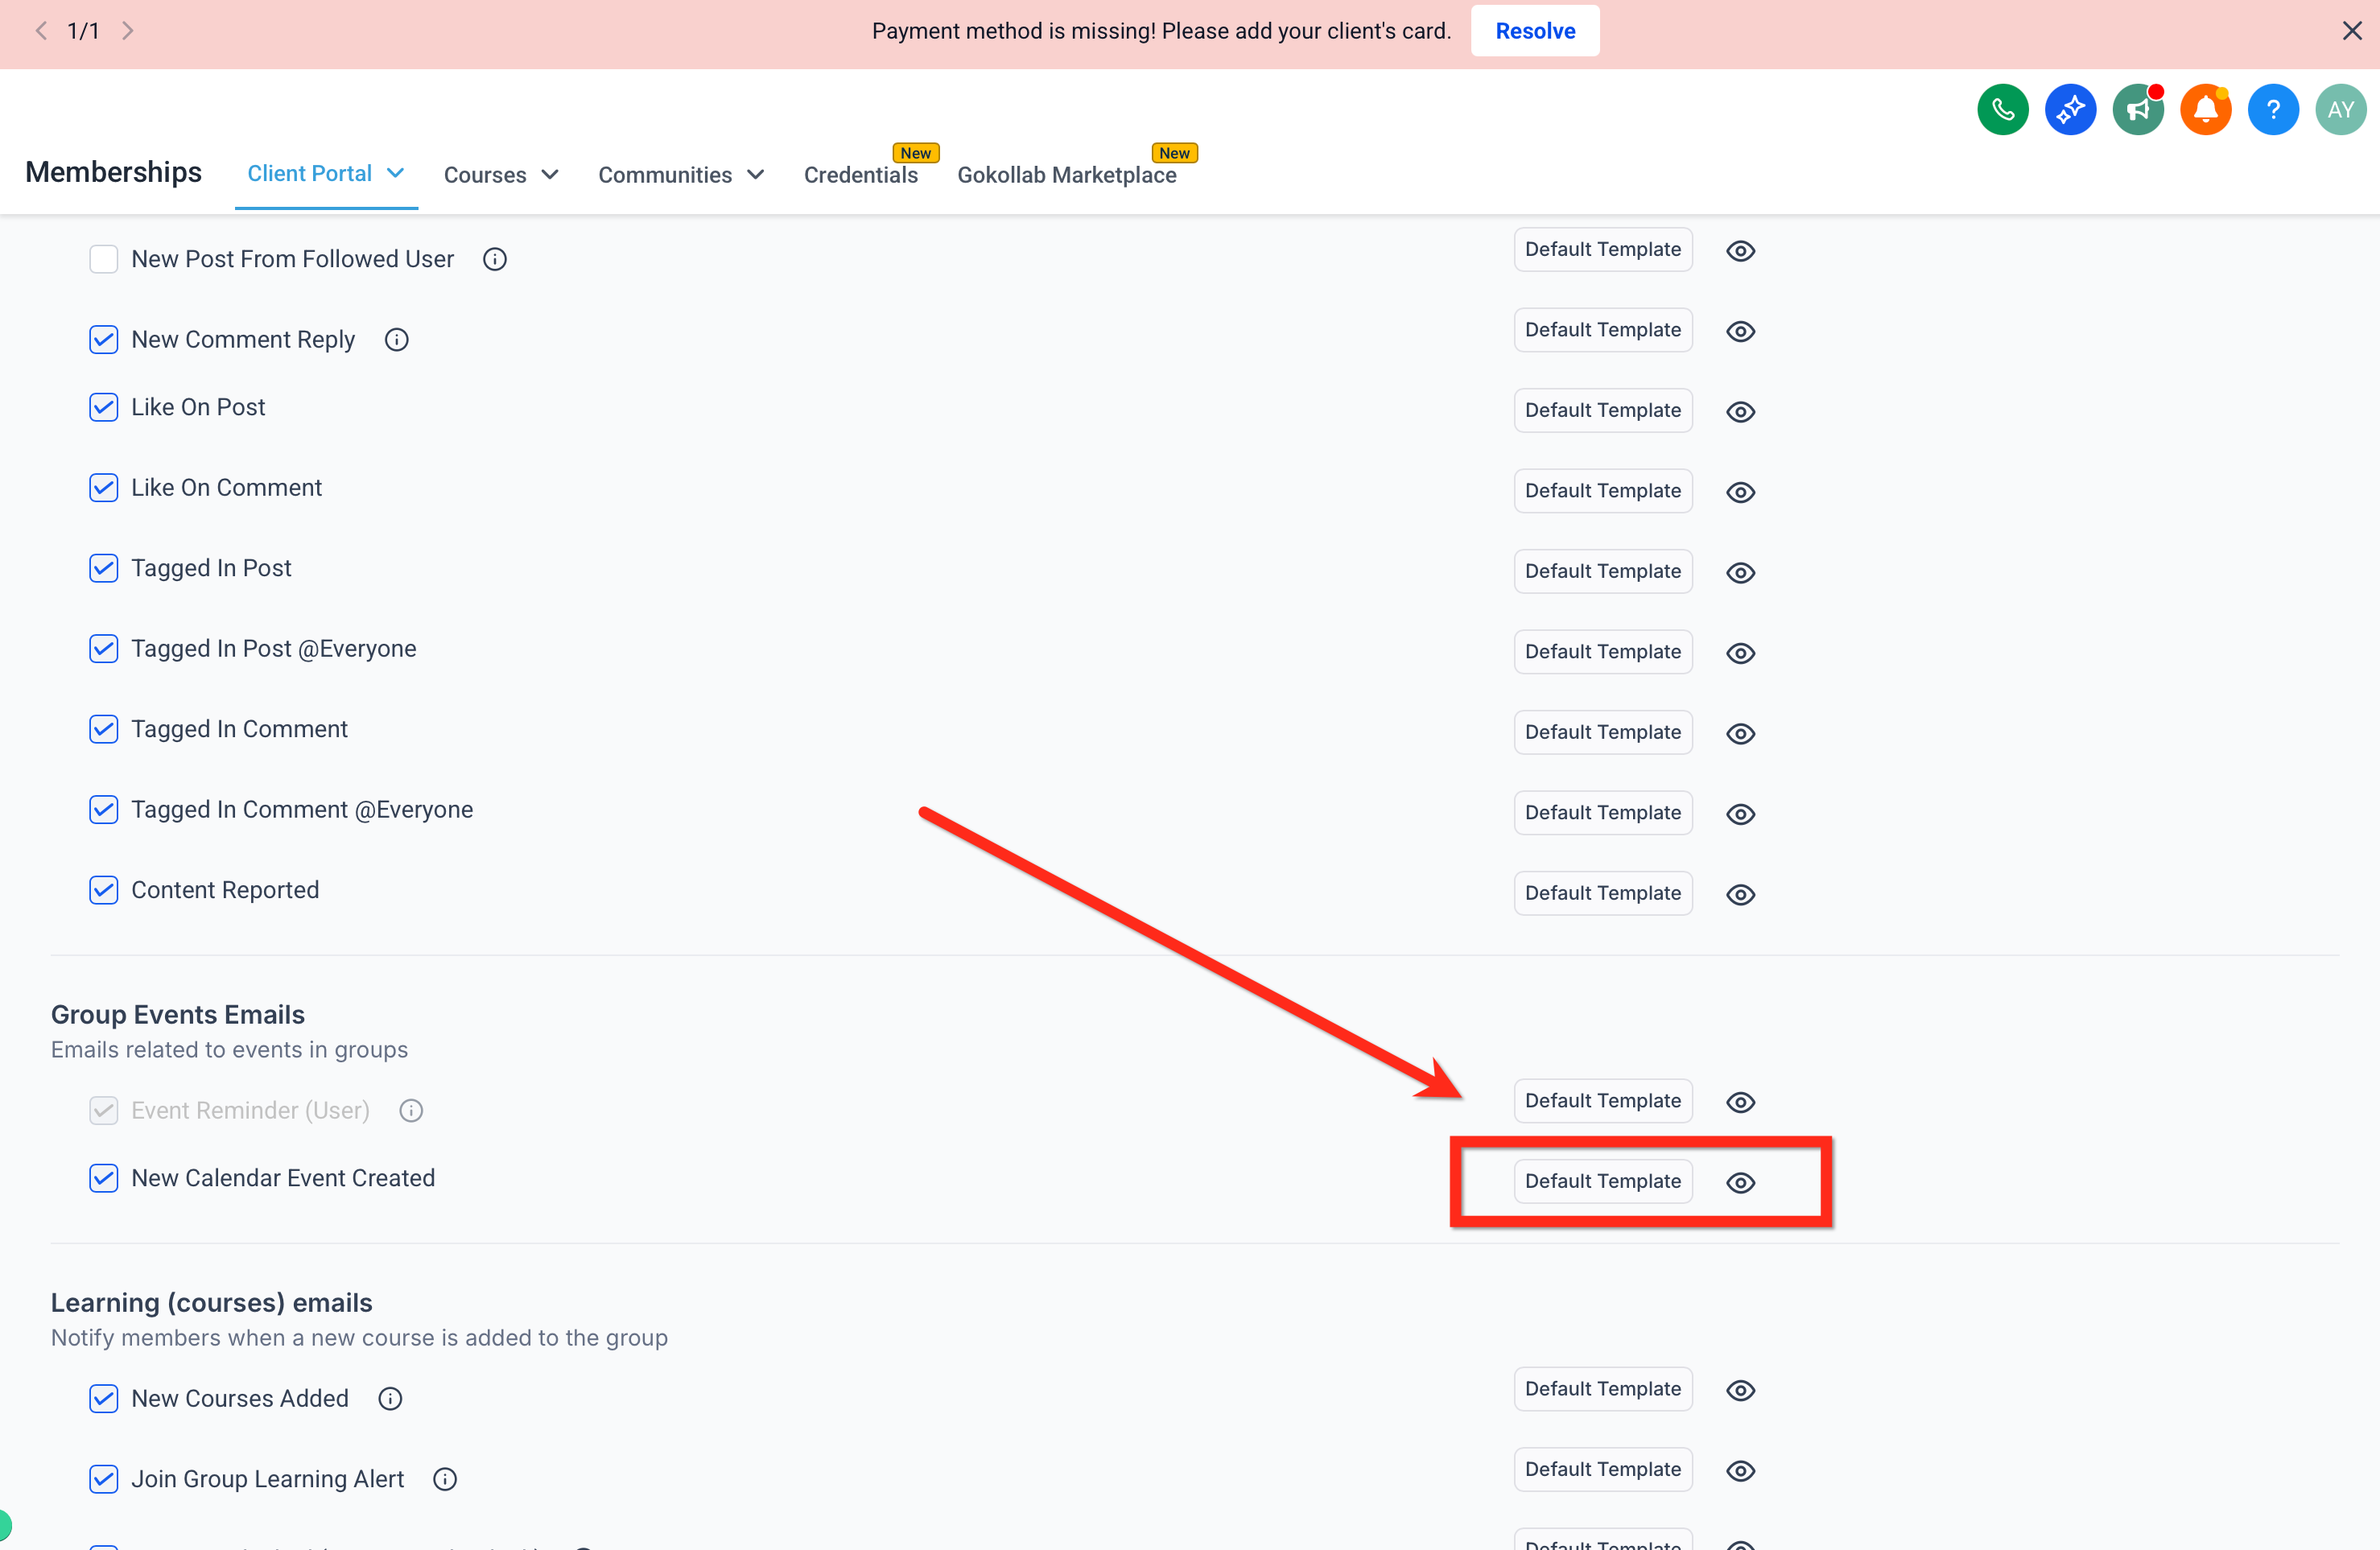
Click Default Template, then Edit.
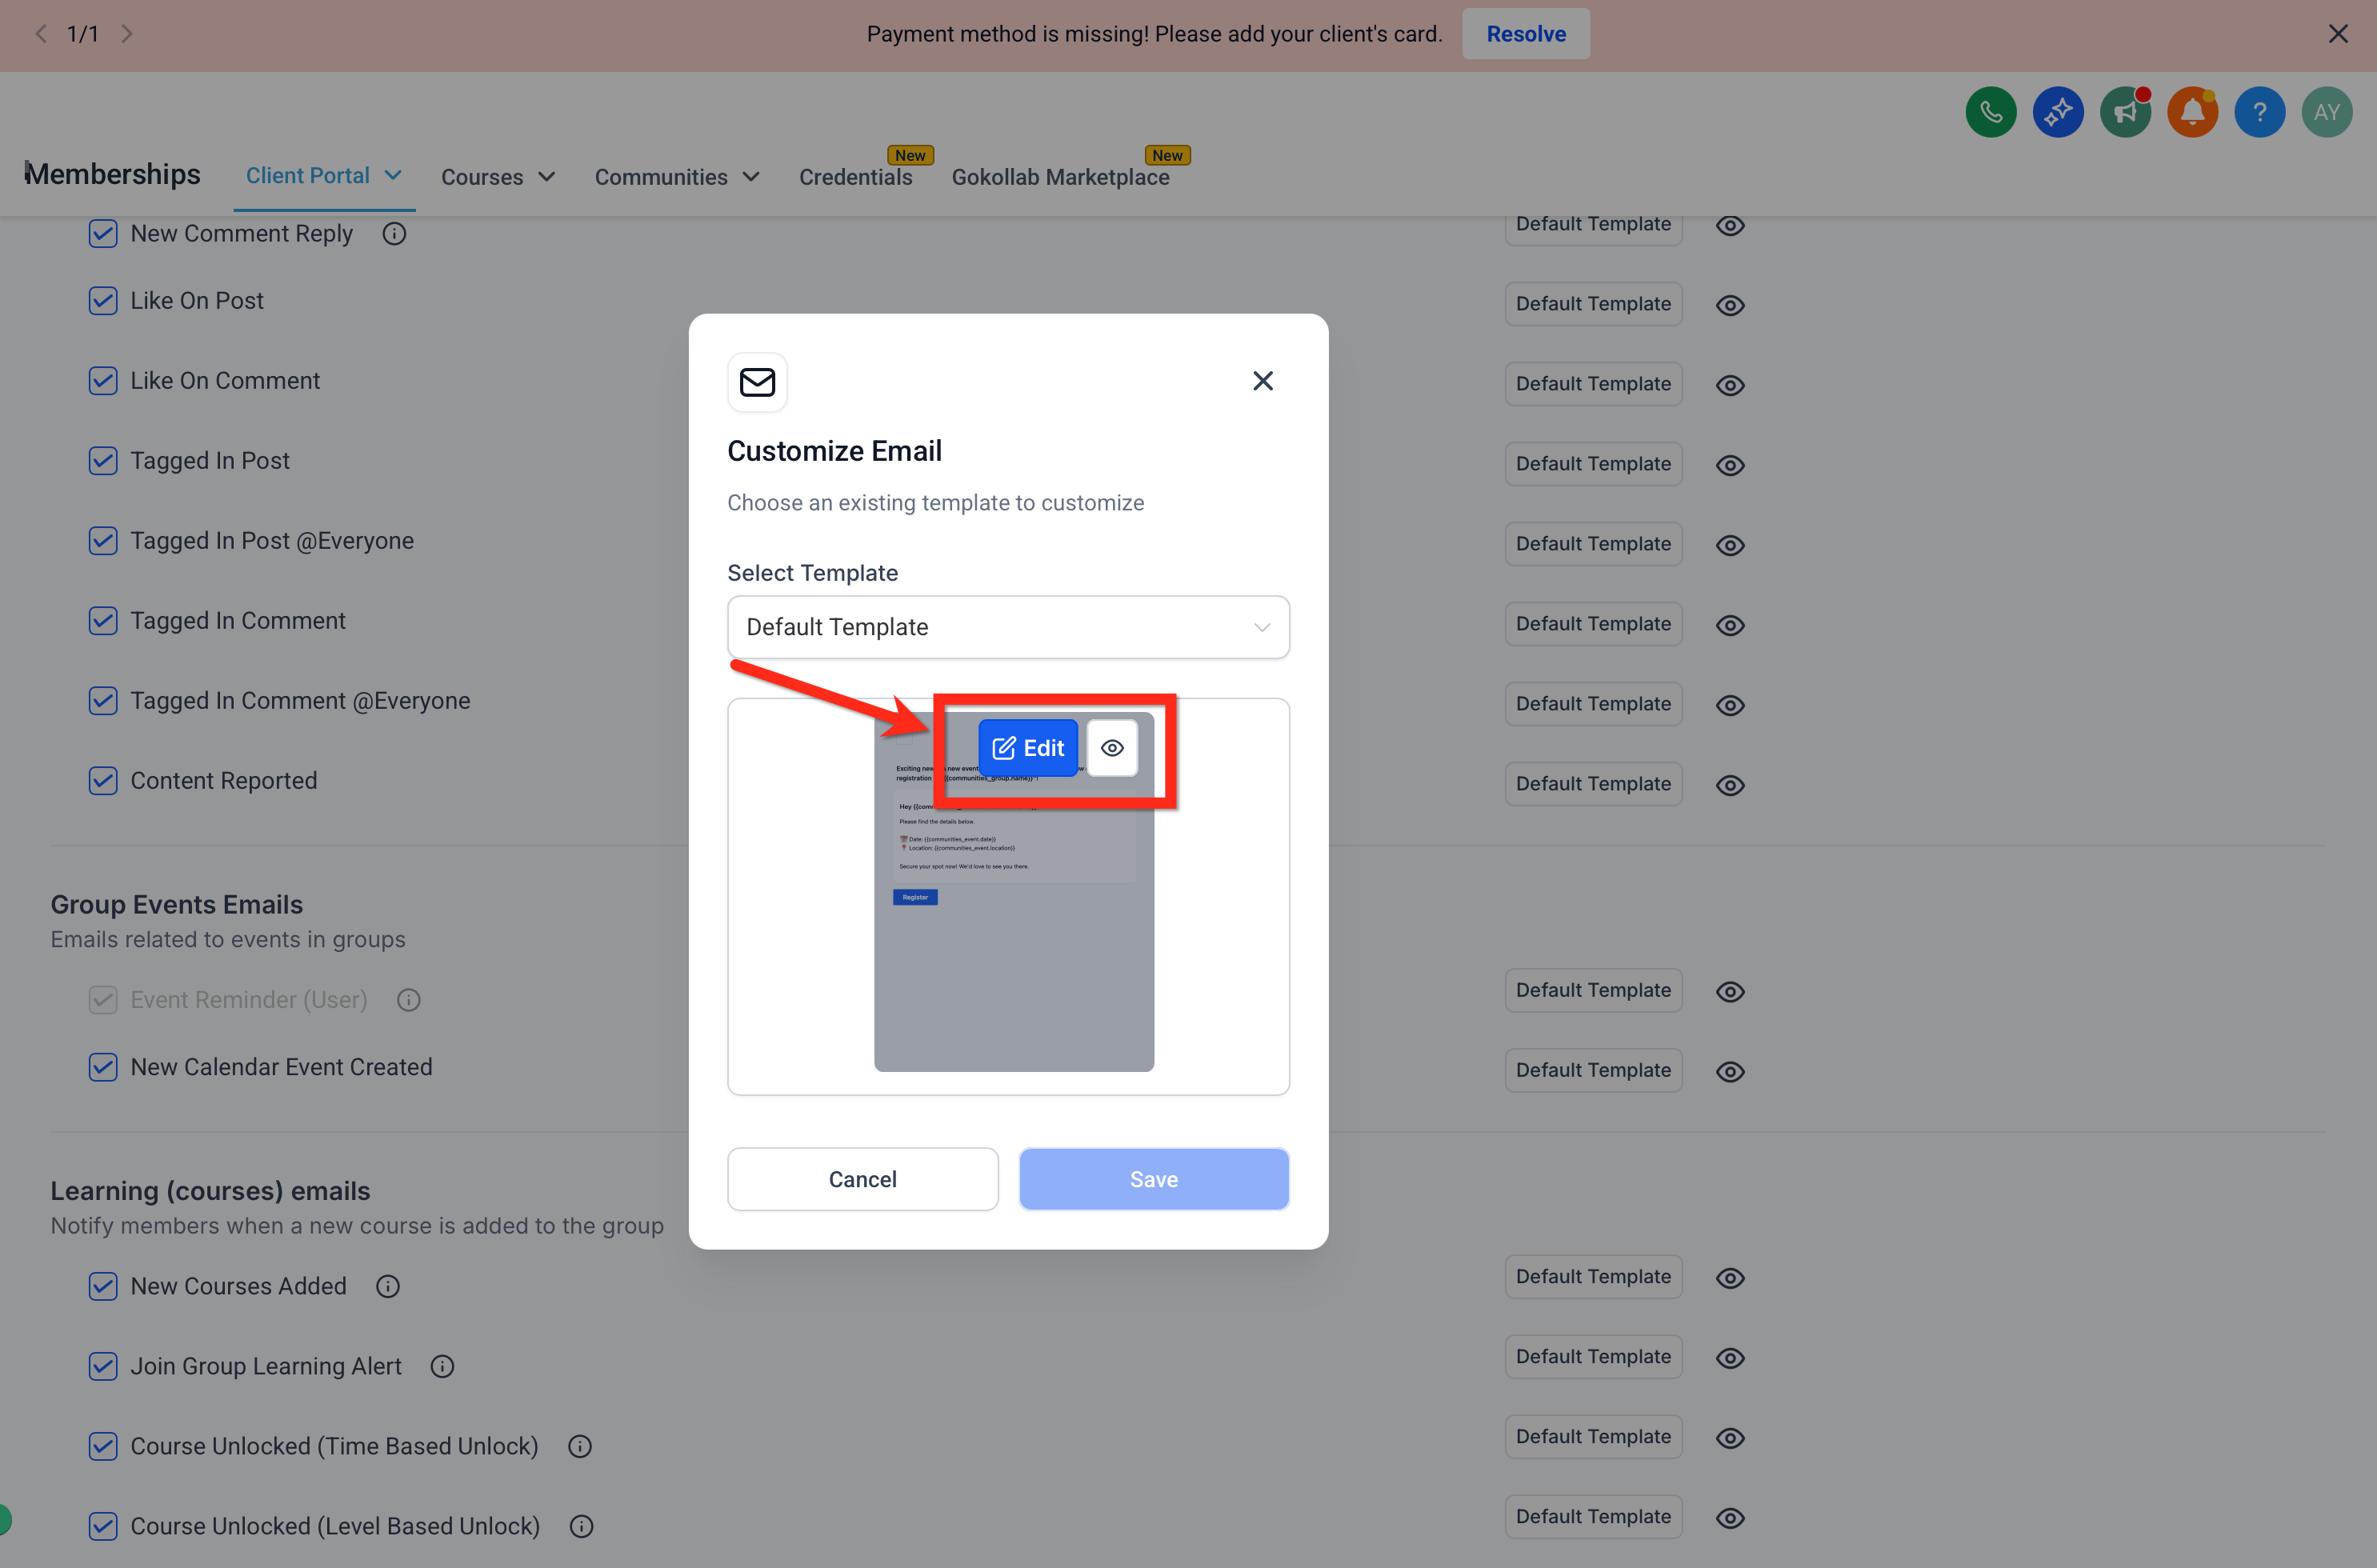
Update the subject and body, inserting merge fields as needed.
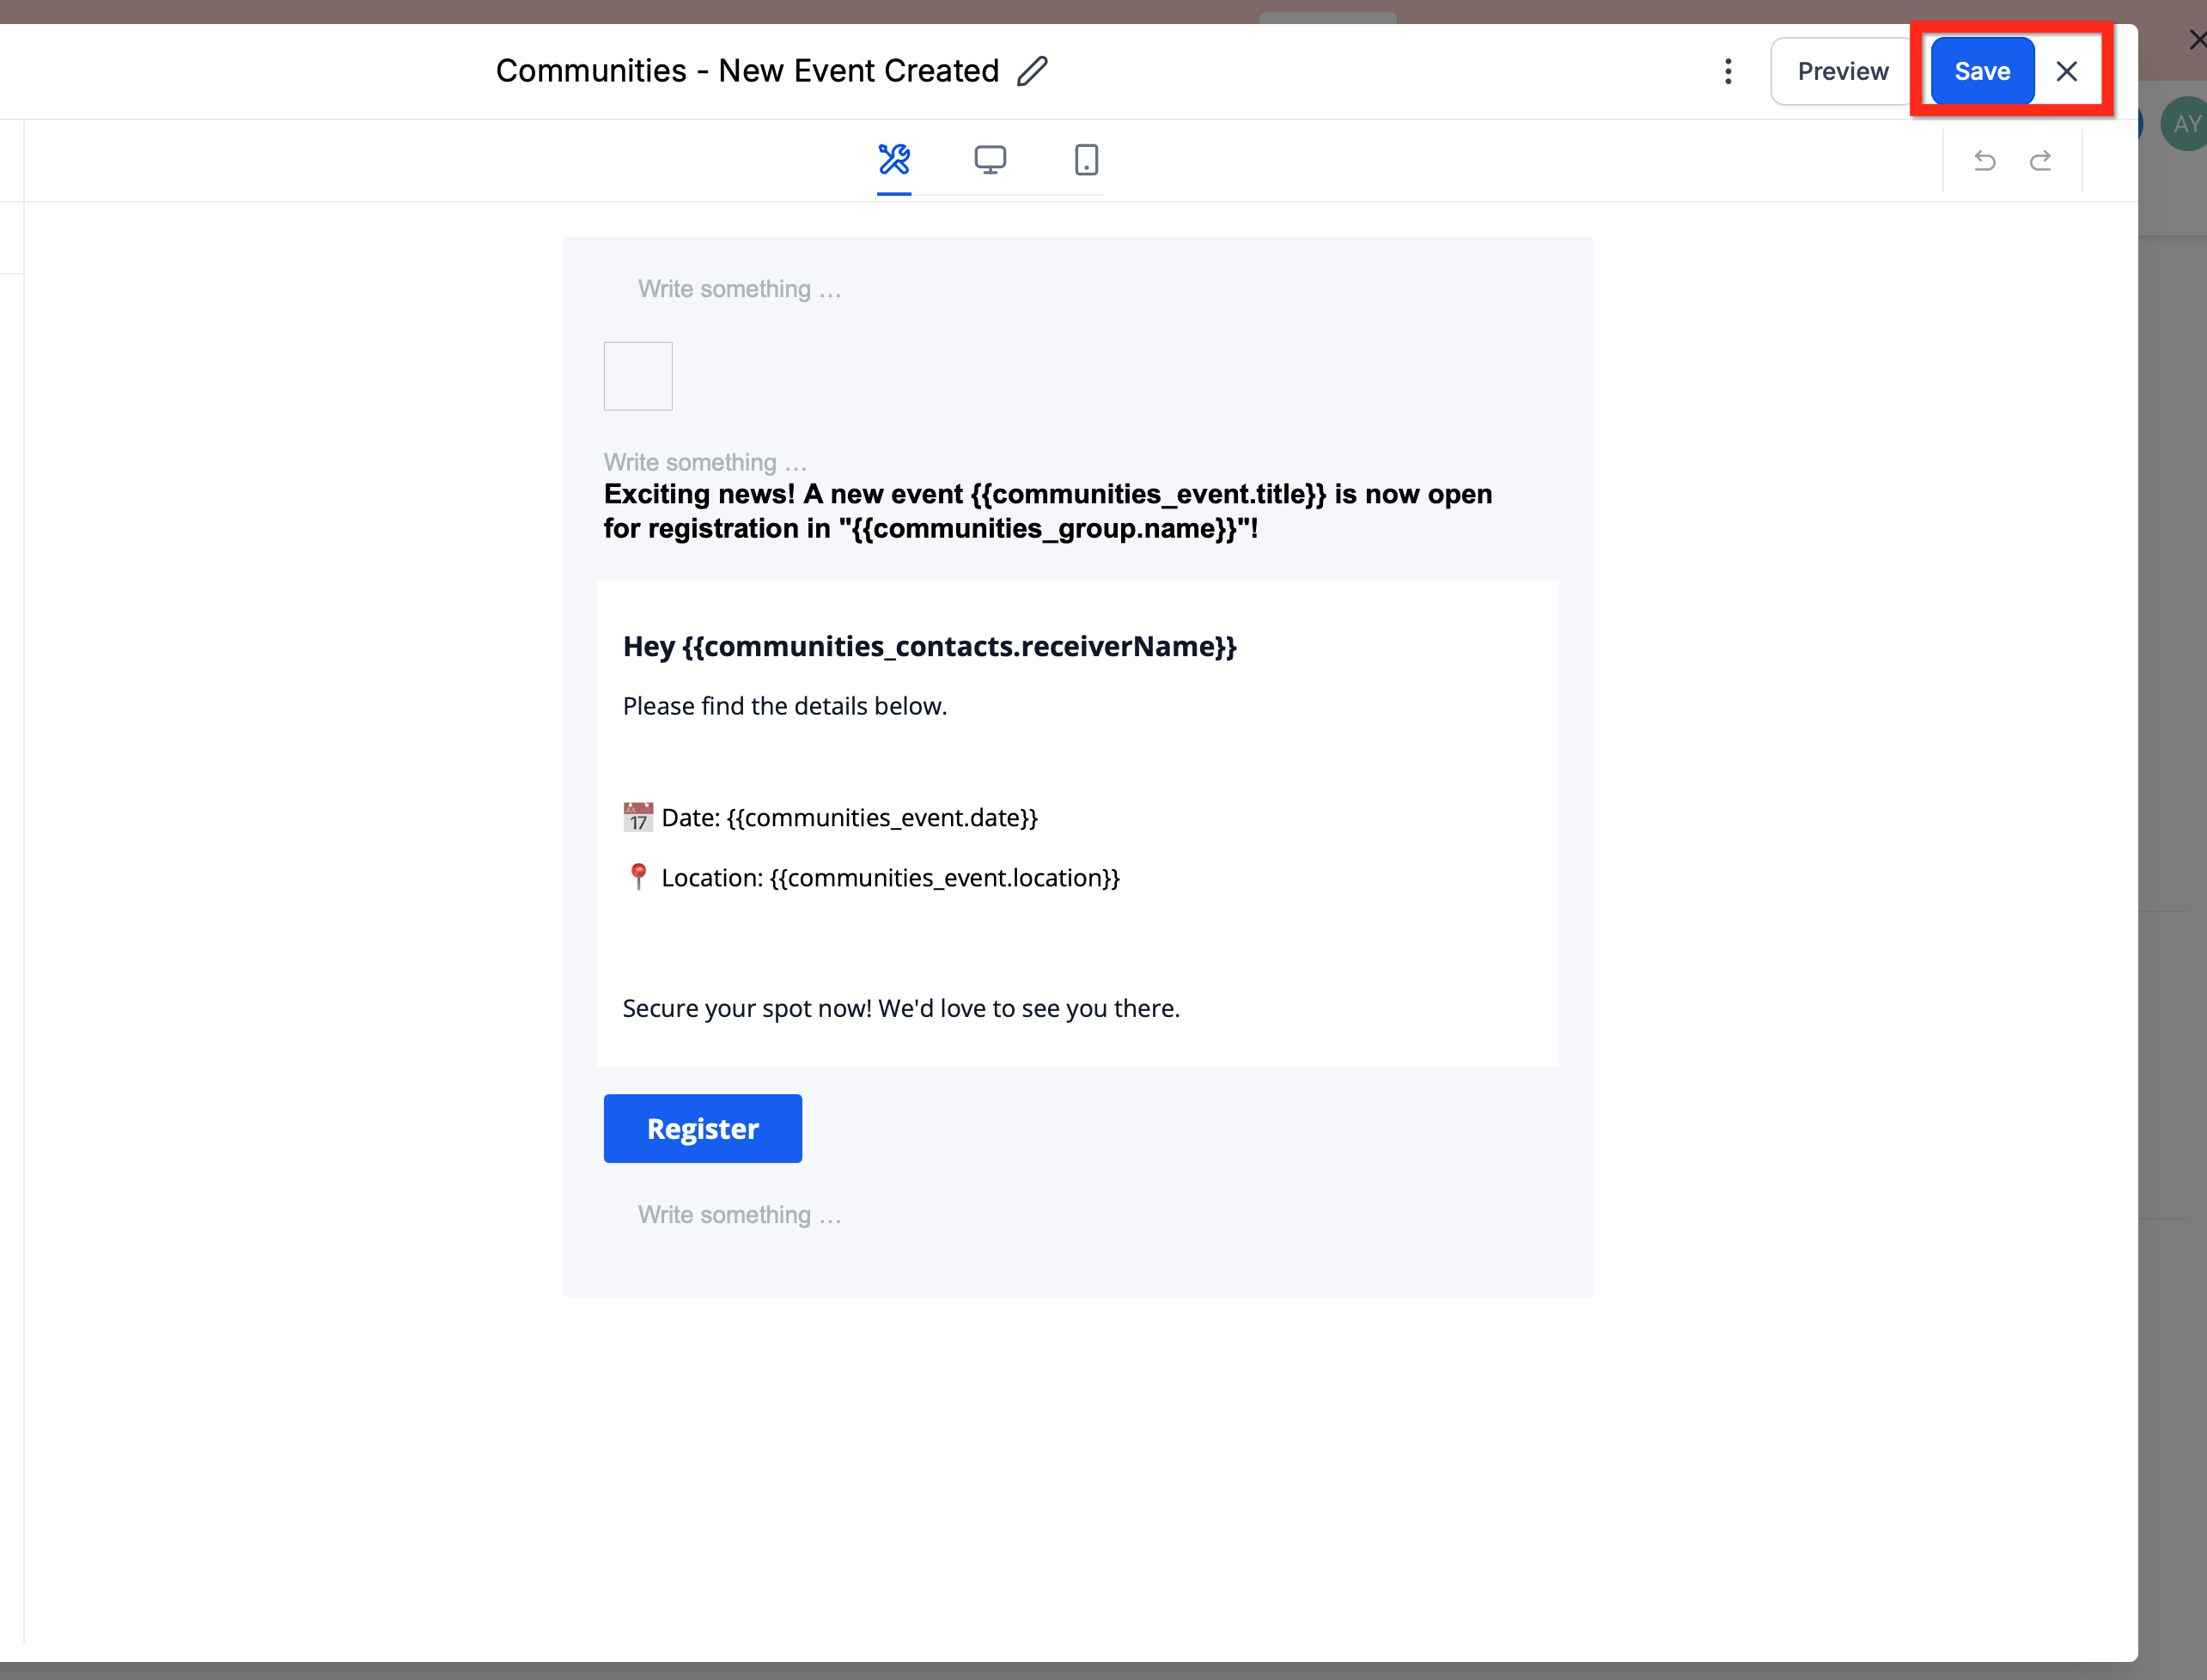
Preview your changes, then Save.
Community notifications send from the default email address selected under your account's Email Services settings.
Can I run a community for patients and a separate one for staff? Yes. Create separate groups for each audience, or separate communities entirely if you want fully distinct branding and domains. Group membership and visibility settings keep the two audiences apart.
Can I monetize course access inside a community? Yes, you can sell course access through a group using the "Buy Now" visibility option. Connect AX Pay first so payments route through Aesthetix CRM's own processor.
What happens if I delete a community? Deleting a community is permanent. All groups, content, and member discussions inside it are removed and can't be recovered.
How do I troubleshoot a custom domain that won't verify? Confirm your DNS records match what was provided during setup and allow up to 48 hours for propagation. If it still isn't resolving after that, check the DNS record values against your domain registrar's dashboard.
Can I change a group from public to private after it's created? Yes. Open the group, go to Settings > Details, choose Public or Private, and save your changes.
Can I change a group's URL slug after creating it? Yes, but only once. Go to Settings > Details, edit the slug, and save. Double-check it before saving since you won't be able to change it again.
Can I reorder or rename the tabs in a group? Yes. Open the group and go to Settings > Navigation Tabs, where you can drag tabs into a new order and give them custom labels, for example renaming "Learning" to "Courses." Discussion and About stay required and can't be removed or disabled, but they can be renamed. Changes save immediately and carry across sessions.
What are post creation nudges? They're automatic Share as Post prompts that appear right after someone creates a course, creates an event, or completes a course. Each prompt opens the normal post composer with a pre-filled message and an automatic mention of the course or event, so the update can be shared in one click.
Are there limits on how many groups or members I can have? There's currently no set limit on the number of groups or members within a community.
Why can't I disable the Discussion or About tabs? Those two tabs are core to how a community functions and stays discoverable, so they're always on. Learning, Events, Leaderboard, and Members can each be shown or hidden per group.
Do members see the same navigation on mobile as on desktop? Yes, the visible tabs mirror your settings across both desktop and mobile.
How are reward levels calculated? Levels are based on points earned through participation, like posts, comments, and likes. You can also assign points manually or through an automated workflow.
