A course offer is how you package one or more of your courses (skincare education, post-procedure care, practitioner training, or any other content you've built) into something patients or team members can purchase. Once someone buys a product tied to an offer, they're automatically granted access to every course included in that offer. No manual enrollment needed.
Offers live under Marketing > Memberships > Offers in Aesthetix CRM.
Go to Marketing.
Click Memberships.
Click Offers.
Click Create Offer.
Give the offer a title.
Choose the course (or courses) this offer should unlock.
Add a price, or leave it blank to publish the offer as free.
Click Create, then Publish when you're ready for patients to buy it.
If you haven't connected a payment processor yet, you can still create the offer, but you won't be able to attach a price to it until a processor is linked. Unpriced offers are automatically treated as Free offers.
AX Pay callout: Before you connect Stripe or another processor to your course offers, take a look at AX Pay, Aesthetix CRM's own built-in payment provider. AX Pay offers better rates than Stripe and keeps your course sales, refunds, and payouts inside the same account you already use for everything else. See the AX Pay help article for setup details.
Once you have offers set up, the Offers page gives you a running dashboard of how each one is performing. Use the Published / Draft filter at the top to switch between live offers and ones you're still building.
Column | What it shows |
|---|---|
Units Sold | Total units sold across the last 30 days |
Revenue This Month | Total earnings for the current 30-day period |
All Time Revenue | Lifetime earnings across every offer, old and new |
Title | The name of the offer |
Products | Number of course products included in the offer |
Price | The offer's current price |
Net Revenue | Net revenue generated by that specific offer |
Actions | Preview, edit, change checkout settings, or delete the offer |
From the Actions menu (or the icons next to each row) you can:
Click the eye icon to preview the offer exactly as a patient would see it.
Click the edit icon to open the offer and change its details.
Choose Checkout from the "more actions" dropdown to jump straight to the offer's checkout page settings.
Choose Delete from the "more actions" dropdown to remove the offer entirely.
After you create an offer (or open an existing one to edit it), you'll land on its details page. Here's what each field controls:
Title. Names the offer. You can rename it any time.
Nickname. An internal-only label. Patients never see this; it's just there to help you tell offers apart at a glance.
Description. A short summary of what's included, shown to patients so they know what they're buying before checkout.
Advanced. Opens additional configuration settings for the offer.
Included Products. Click + Add Product to bundle additional course products into this same offer. This is how you build multi-course packages (for example, a full injectables certification track made up of several individual course modules).
Publish / Draft Mode. Toggle whether the offer is live for purchase or still hidden while you're setting it up.
Edit Price. Choose a Free plan, a one-time payment, or a recurring subscription. Recurring and paid one-time options both require a connected payment processor.
Add Image. Upload an offer image (1280x720 recommended). Click remove if you need to swap it out later.
Edit Checkout. Customize the offer's checkout page, including offer details shown at checkout, any additional contact information you want to collect, and whether to require a signed Service Agreement before purchase.
Add an Upsell. Set up a one-click upsell that appears immediately after a patient completes their initial purchase, letting them add an optional related product or service to their order without re-entering payment details.
Get Link. Click the link icon, then Copy, to grab a shareable checkout URL for the offer.
Preview. Opens the offer's public checkout/landing page exactly as patients will see it.
Delete. Removes the offer permanently from the "more actions" menu.
If any patient forms or agreements are attached at checkout (like a signed Service Agreement), keep in mind that data may include patient health information depending on what you ask for. Treat those submissions the same as any other PHI-bearing intake and restrict access accordingly.
Offers control which courses get bundled together and at what price. Separately, Aesthetix CRM's Payments area lets you create a sellable product and link it to a published offer, which is what actually puts that offer in front of buyers through your store or a direct checkout link. This is also how you'd sell a course alongside physical or other digital products.
Before you start, make sure your membership offer already exists and is published. Only published offers appear in the product setup dropdown; if an offer is still in Draft, it won't be selectable.
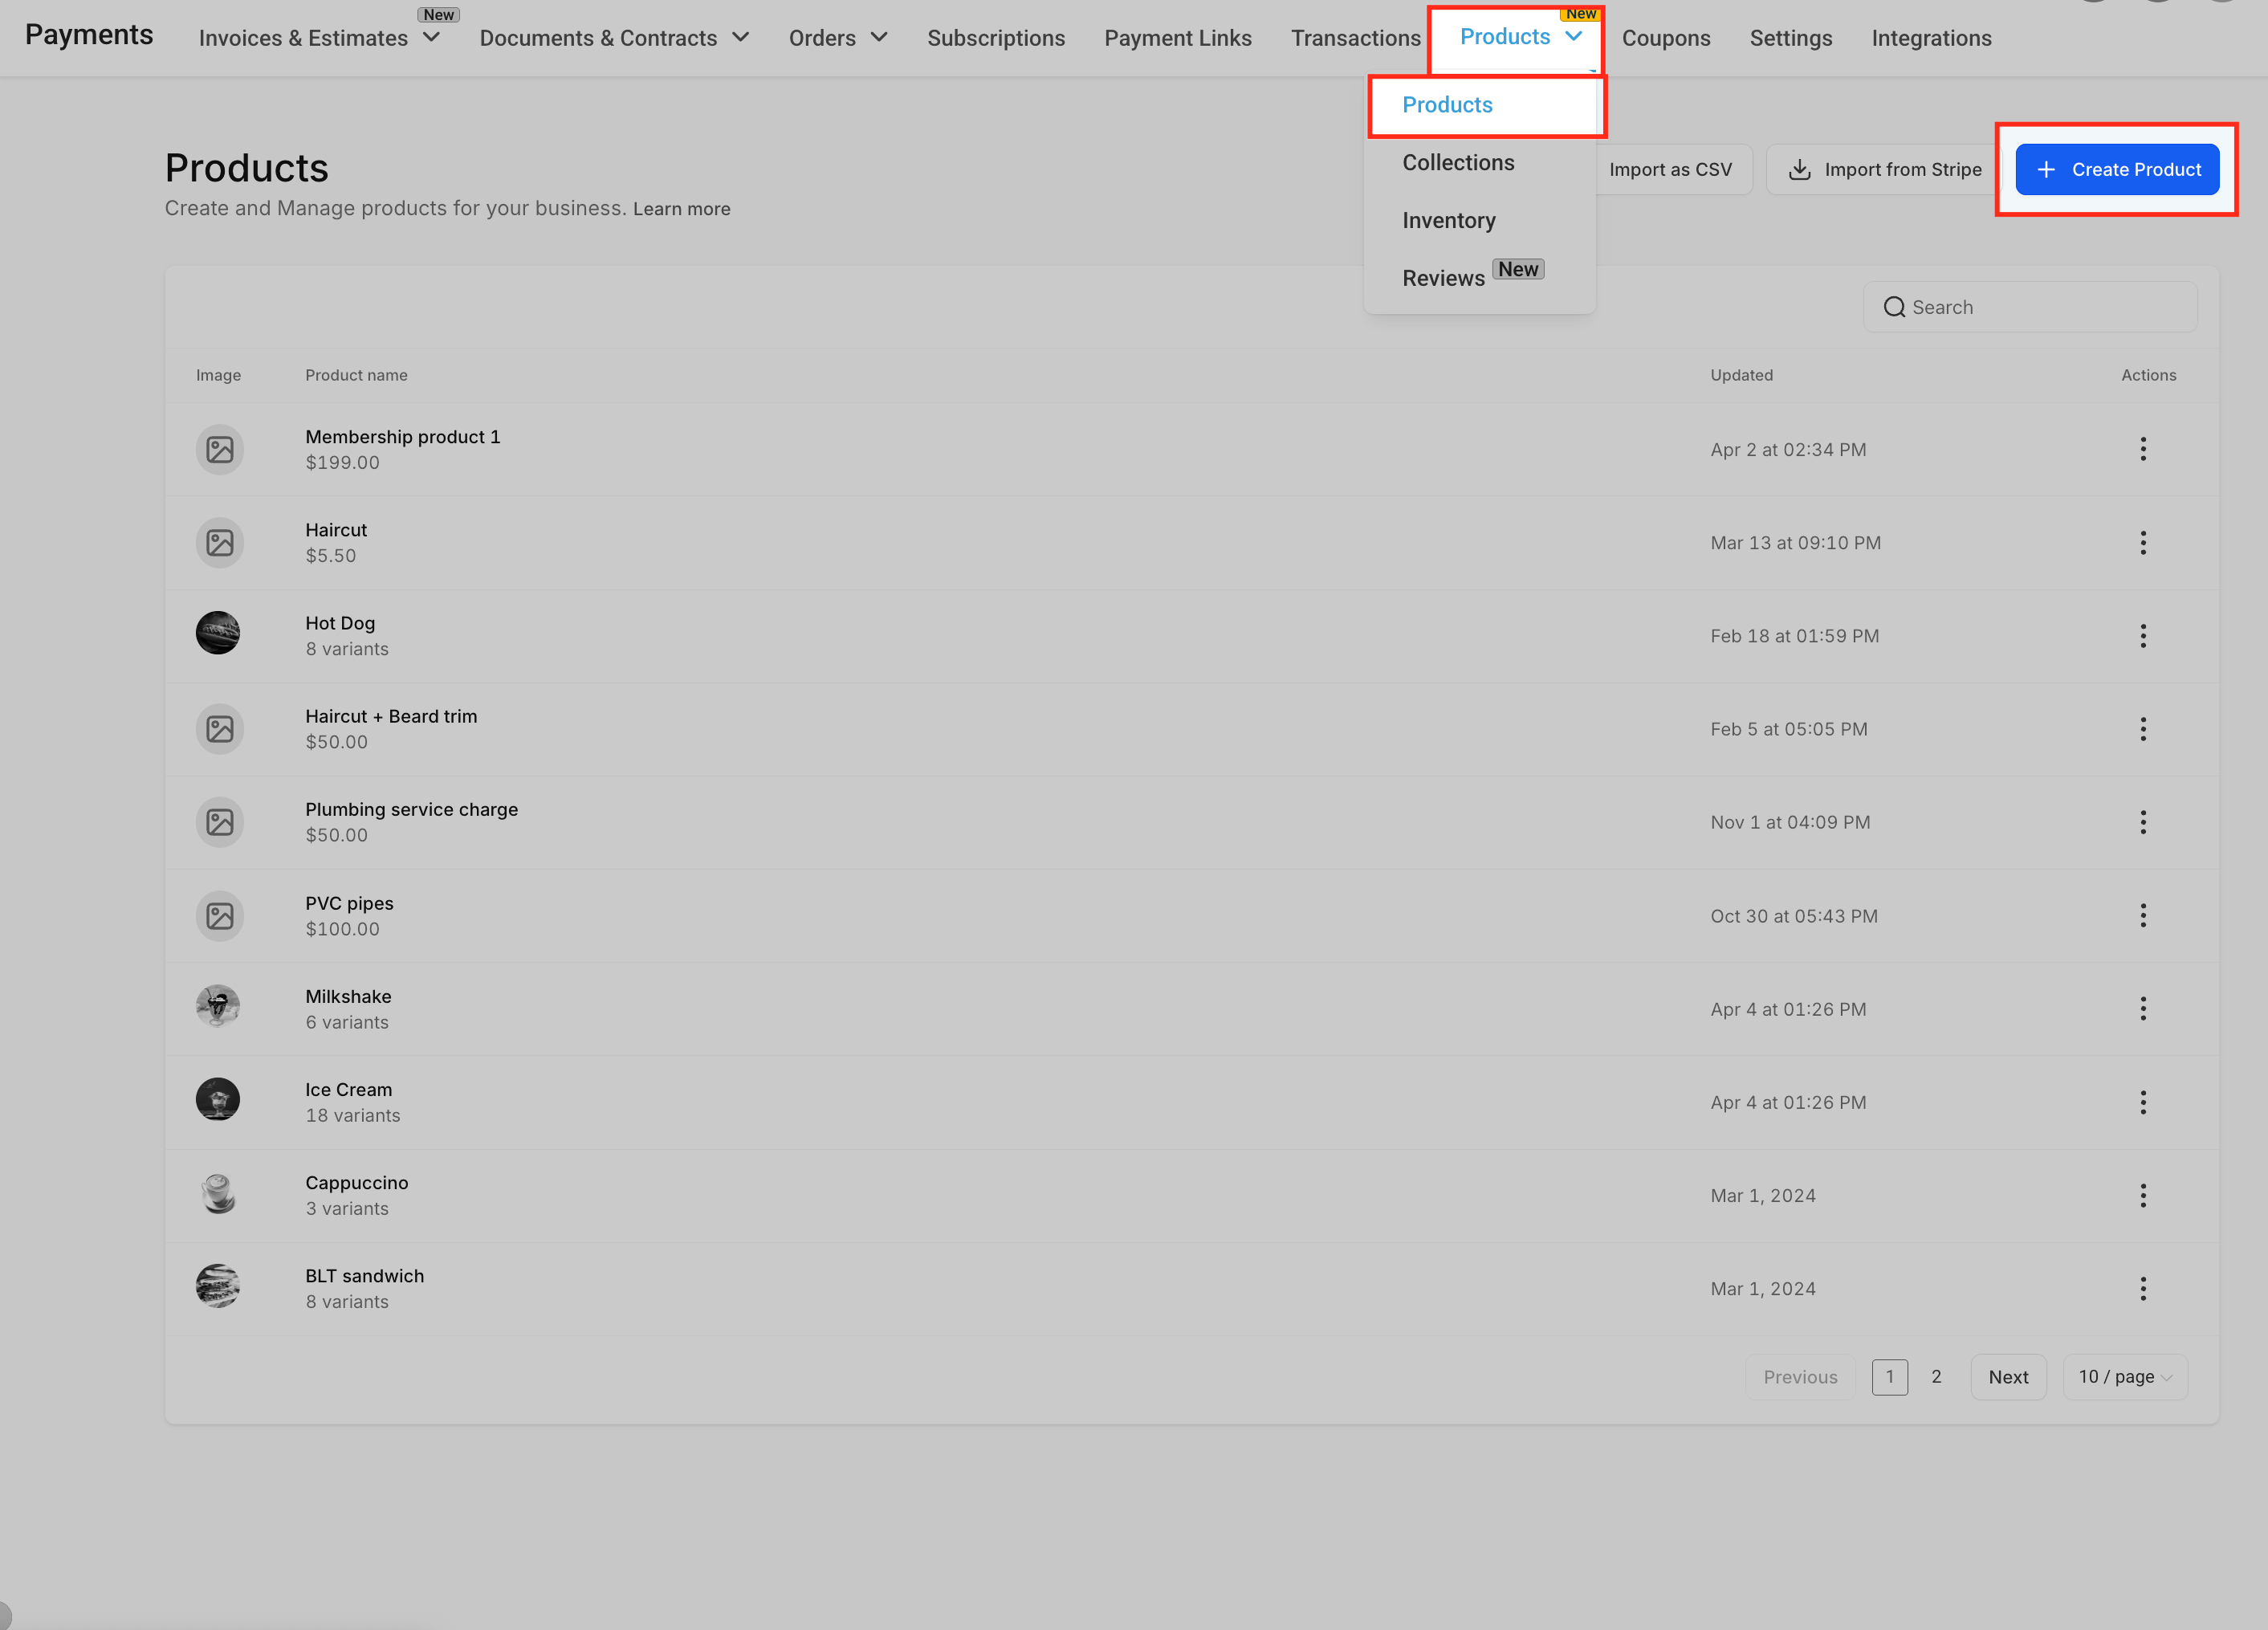
Go to Payments in the left-hand menu, hover over the Products dropdown in the top menu, and click Products. This opens the product management page listing everything you've created so far. Click the blue + Create Product button in the top right to start a new one.
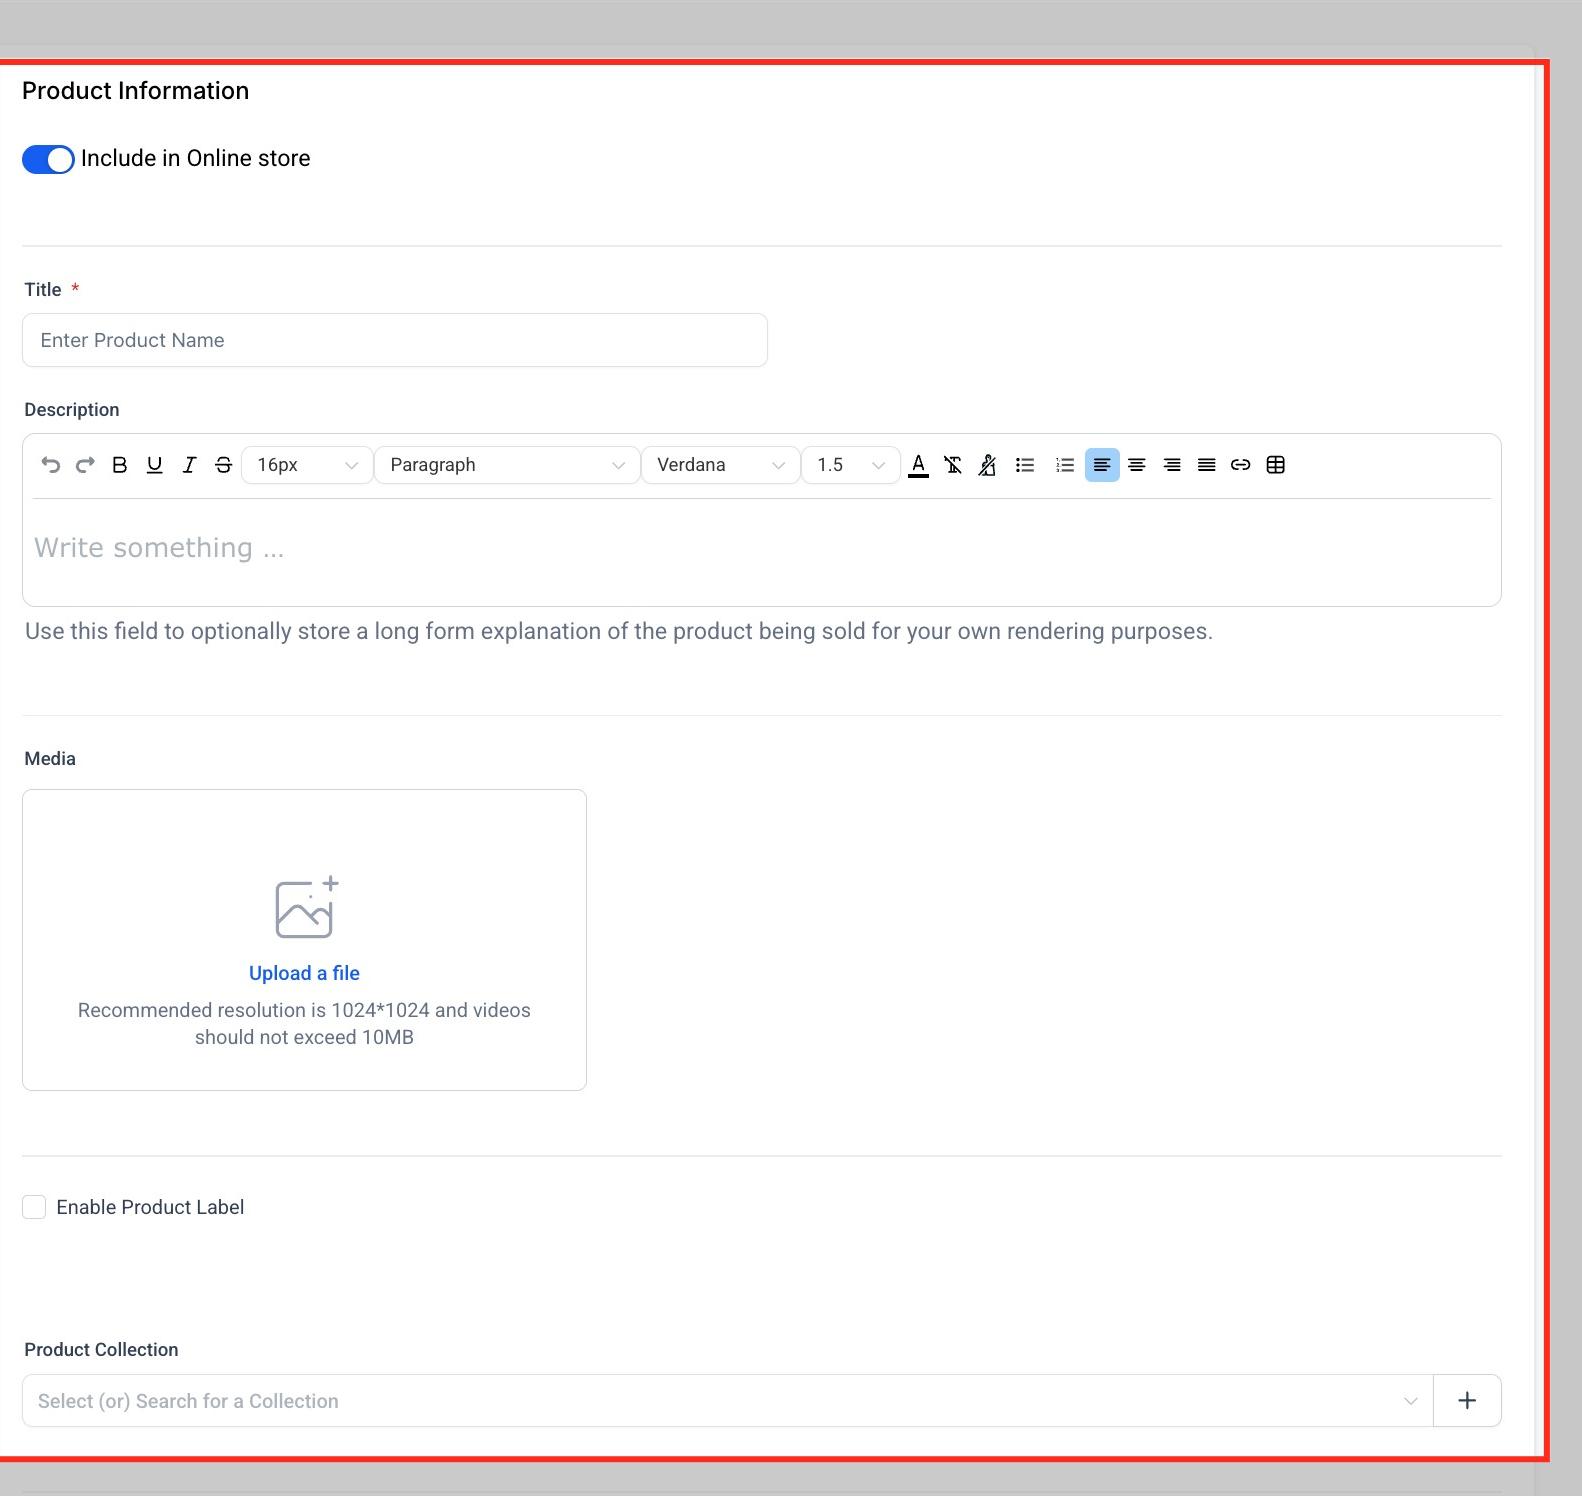
In the Product Information section, the Include in Online Store toggle controls whether this product is visible and purchasable through your storefront; leave it enabled if you want it publicly available. The Title field names the product and appears at checkout, in internal views, and in public listings. The Description field lets you write a fuller overview using rich text formatting (bold, italics, links, bullet points, fonts).
The Media section is where you upload an image or video representing the product; a resolution of 1024x1024 and a file size under 10MB is recommended. The Enable Product Label checkbox lets you assign a custom badge label (like "New" or "Top Pick") for visual organization. The Product Collection dropdown assigns the product to an existing collection, which helps keep a larger catalog organized.
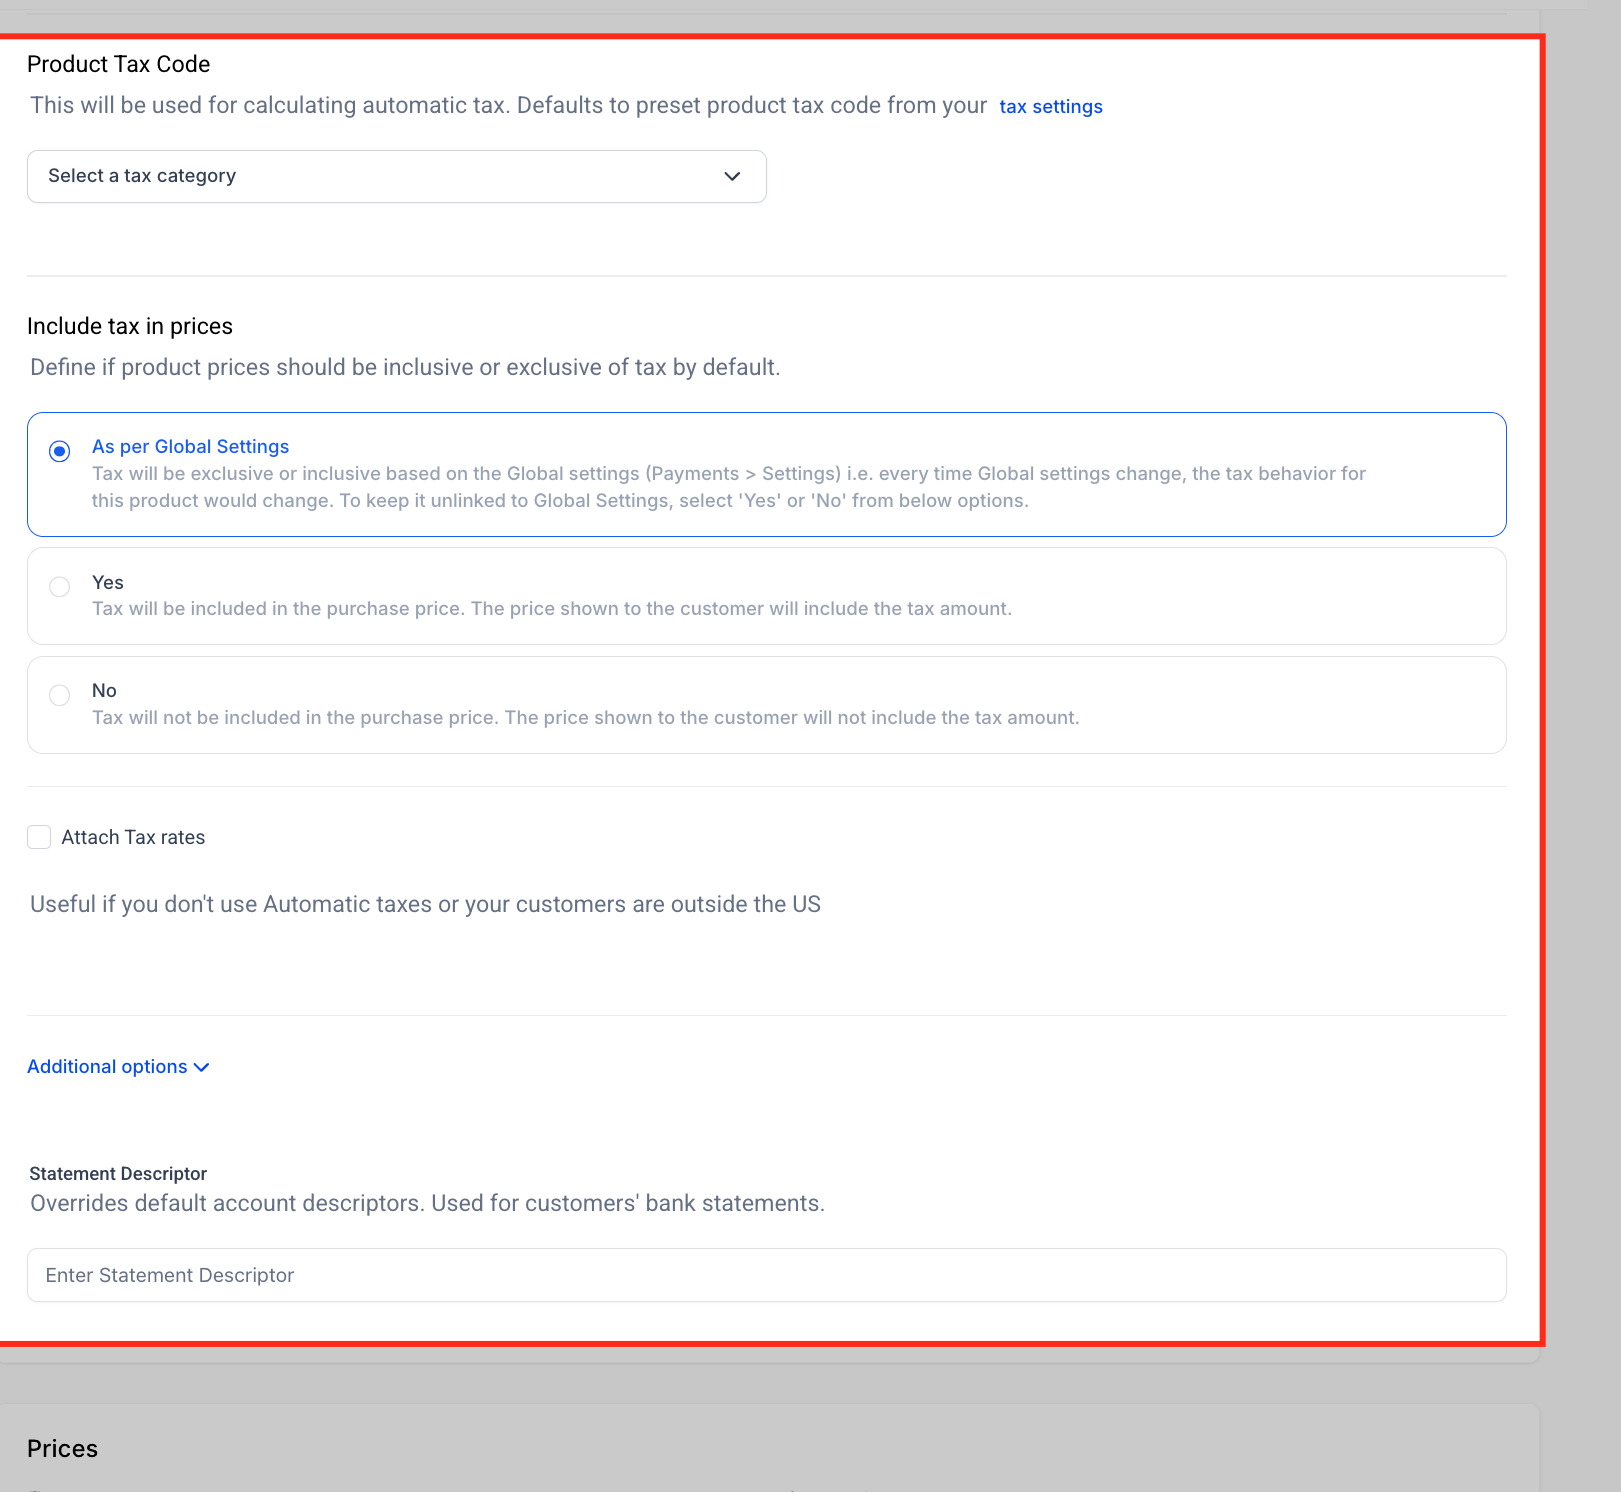
The Product Tax Code lets you select a tax category so the system can calculate tax automatically at checkout; leaving it blank applies your default global tax settings. Include tax in prices controls whether pricing is shown tax-inclusive or tax-exclusive, or you can follow your global default. Attach Tax Rates is useful if you're handling taxes manually or selling to buyers outside the U.S. The Statement Descriptor field overrides what appears on a patient's bank or card statement for this purchase, which can help cut down on payment disputes.
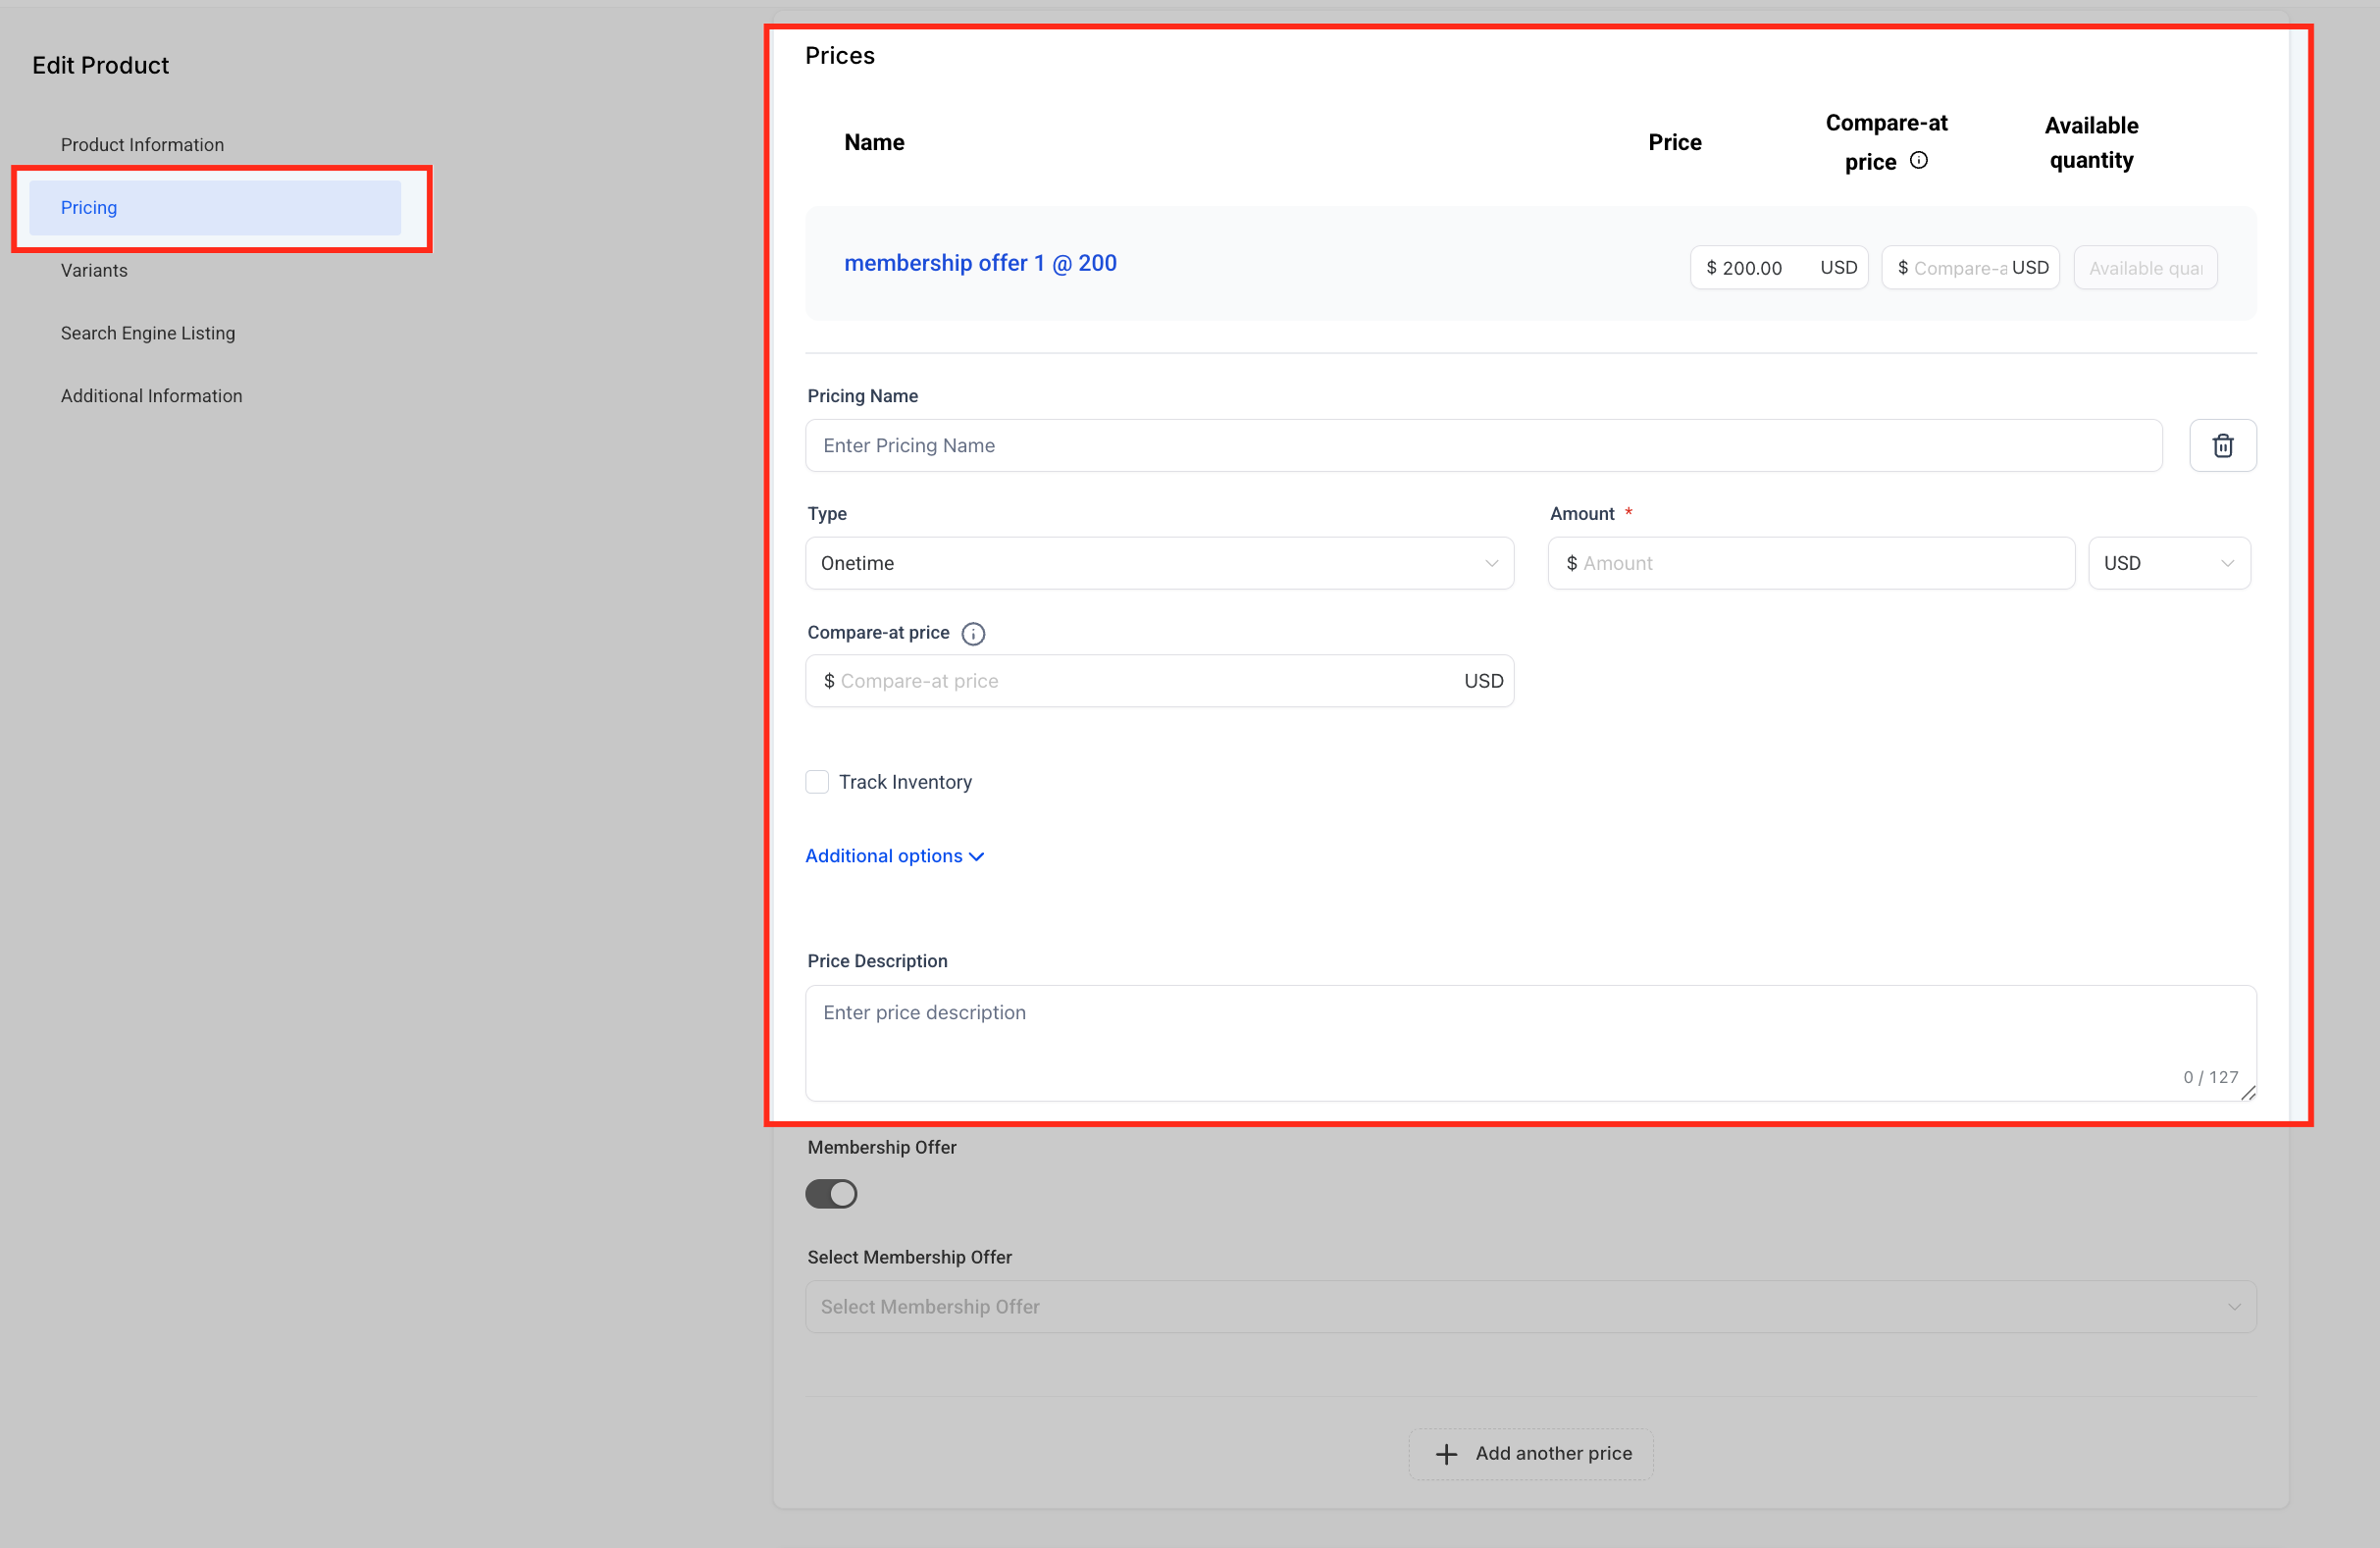
Enter a Pricing Name as an internal label, useful if you're offering multiple tiers. Choose the Type: Onetime for a single charge, or Recurring for billing cycles, trial periods, and setup fees. Enter the exact charge in Amount, and optionally set a Compare-at Price to display a "was" price alongside the actual price. Use the Currency selector to set the payment currency. Check Track Inventory if you need to manage stock levels and quantities. Additional Options reveals advanced settings like purchase limits, and Price Description lets you add an internal note about this pricing entry.
Important: If you set up a recurring payment with a fixed number of payments, the subscription will automatically end and cancel once that number is reached. Leave this field blank if you want the subscription to run indefinitely until manually cancelled.
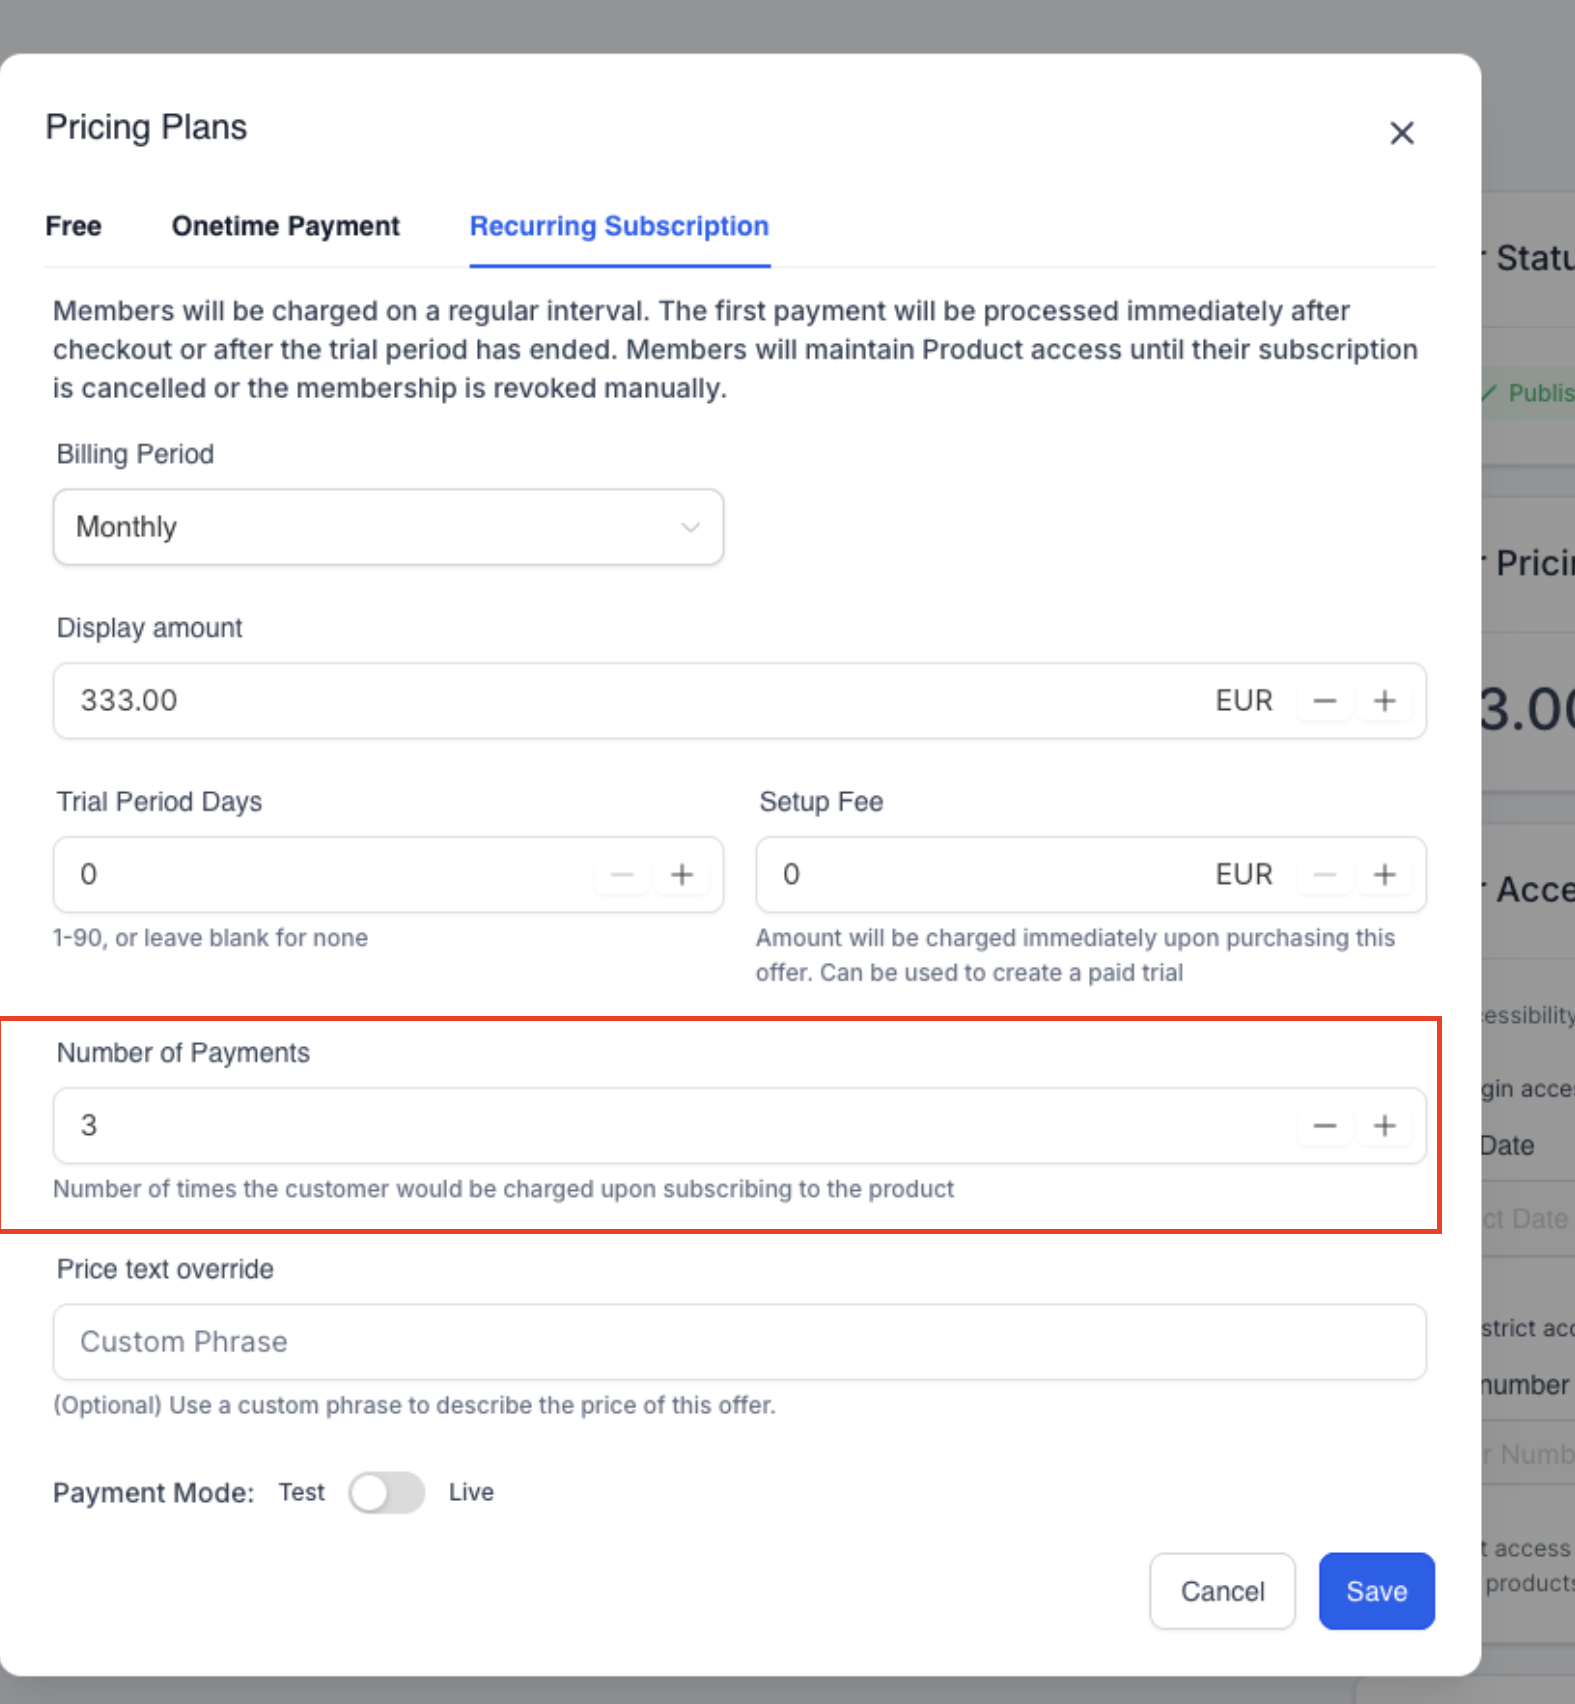
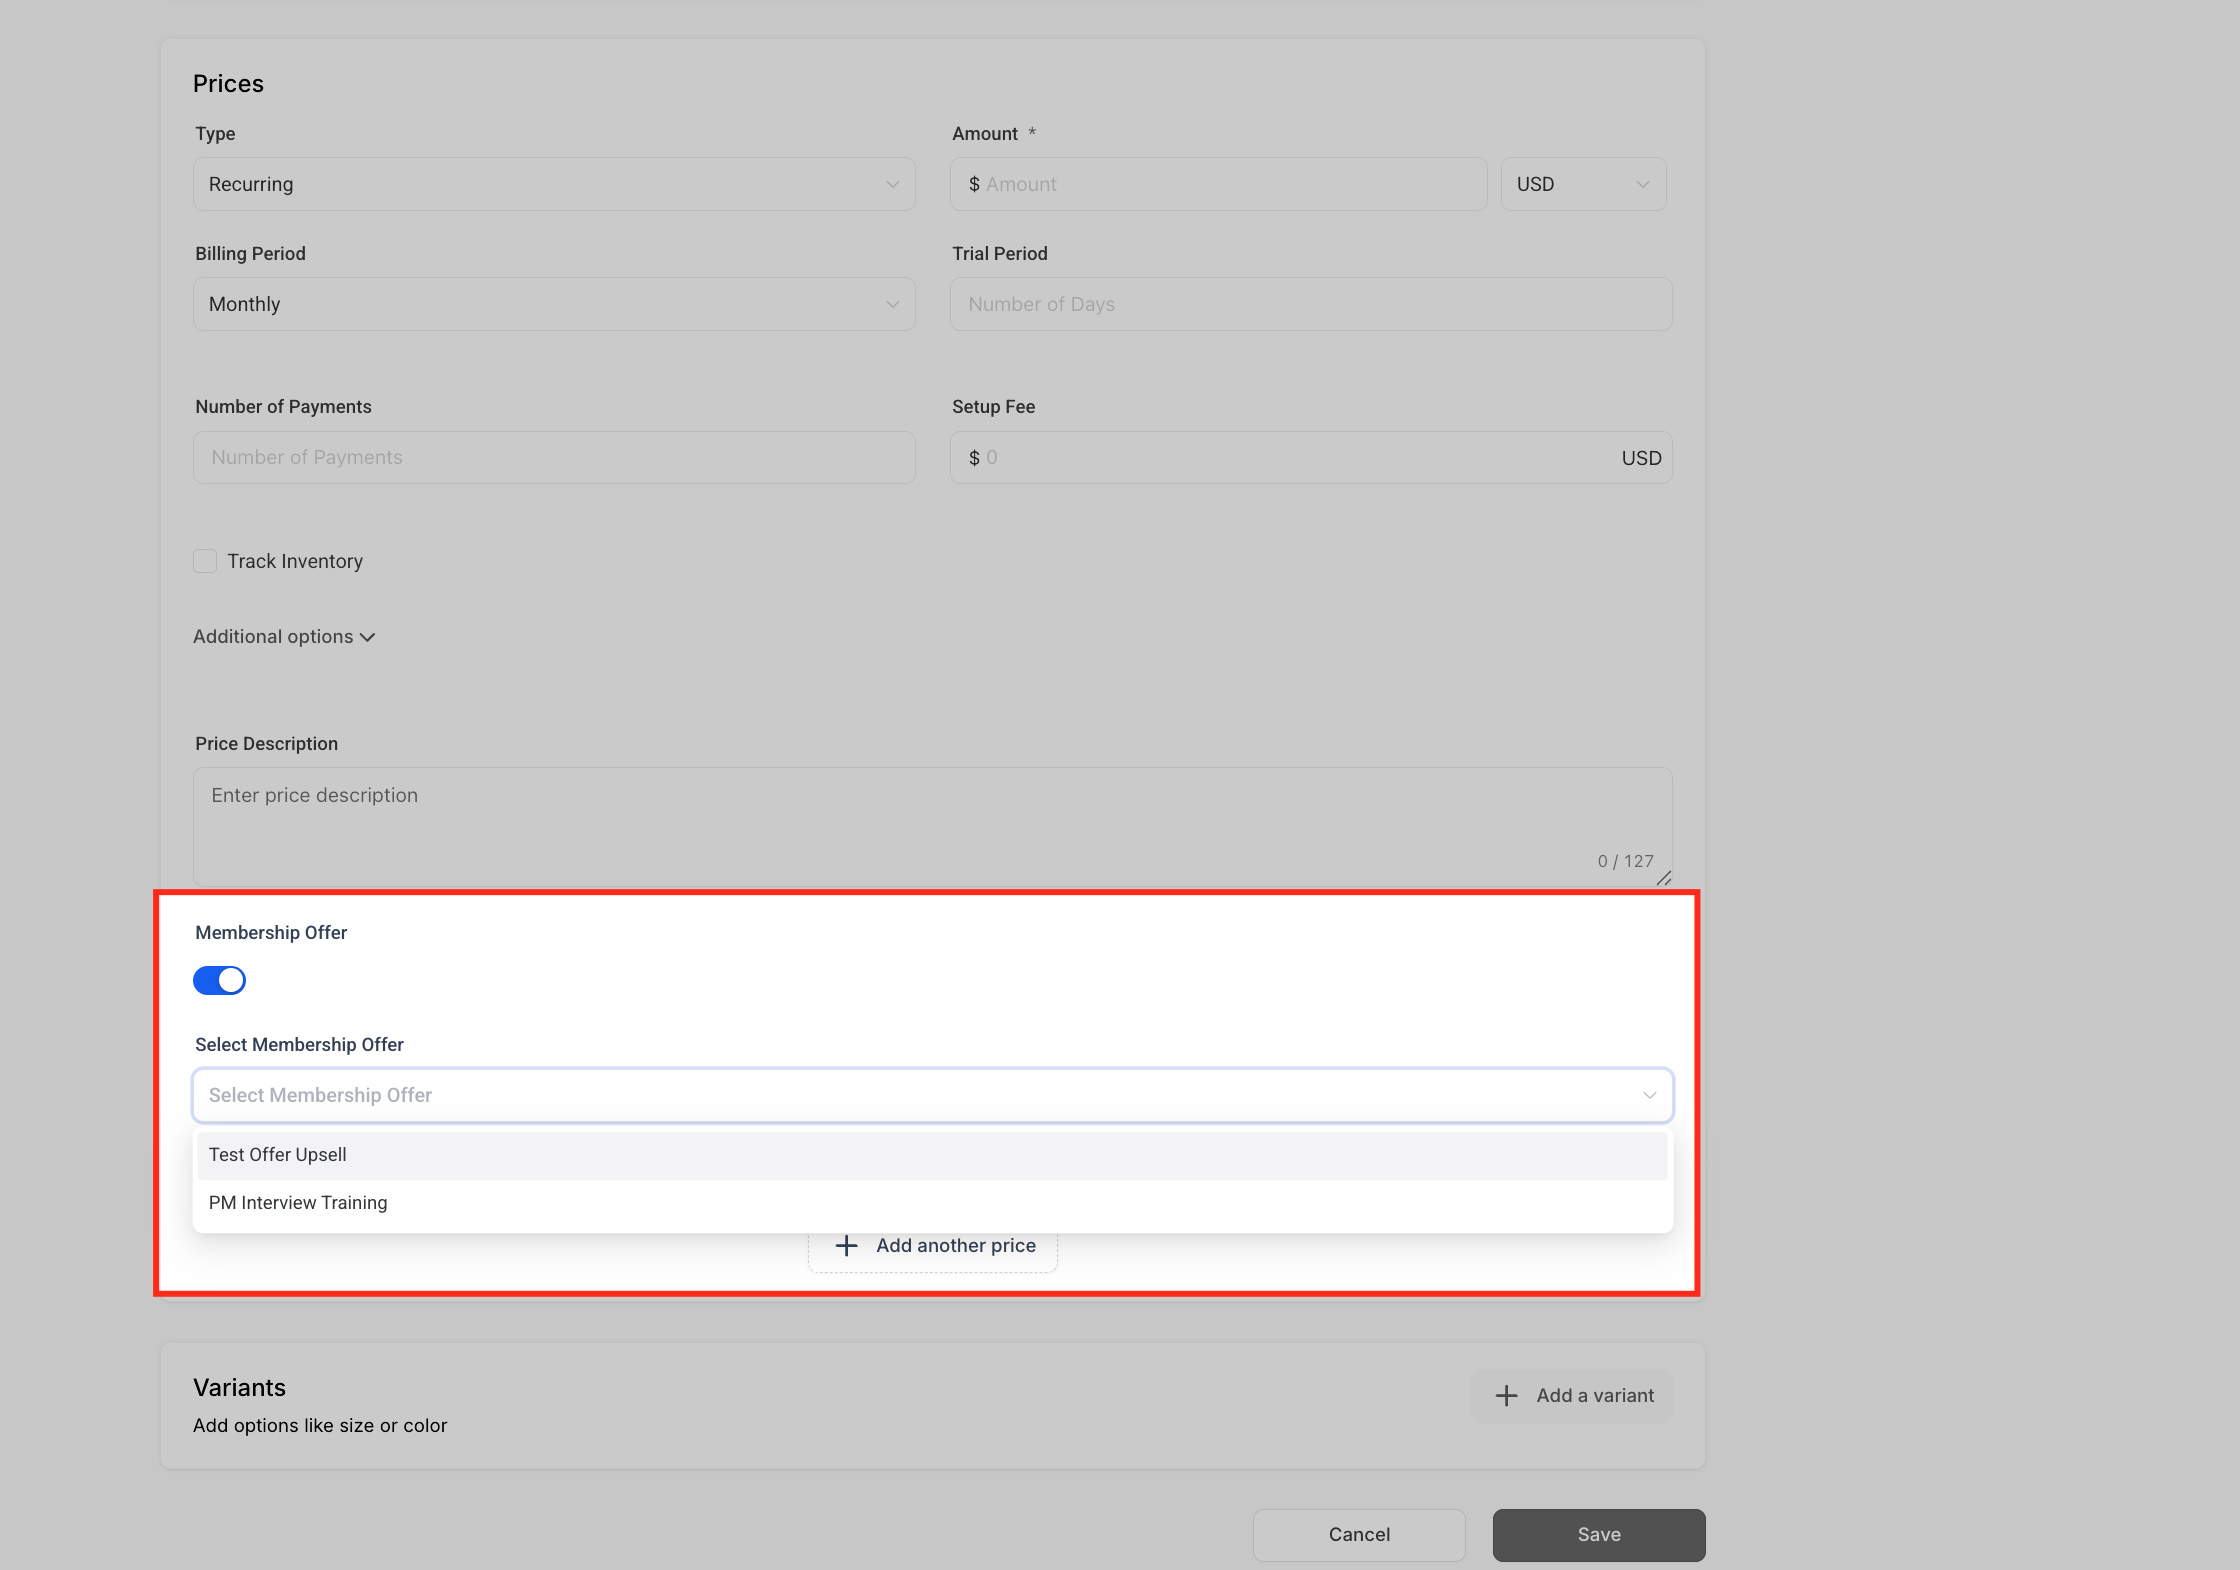
Toggle on Membership Offer to activate access linking. Once enabled, a Select Membership Offer dropdown appears. Choose the published offer that should be granted when a patient buys this product. This step is what actually connects payment to course access: without enabling this toggle and selecting an offer, buyers won't be granted access to the membership content even after completing payment.
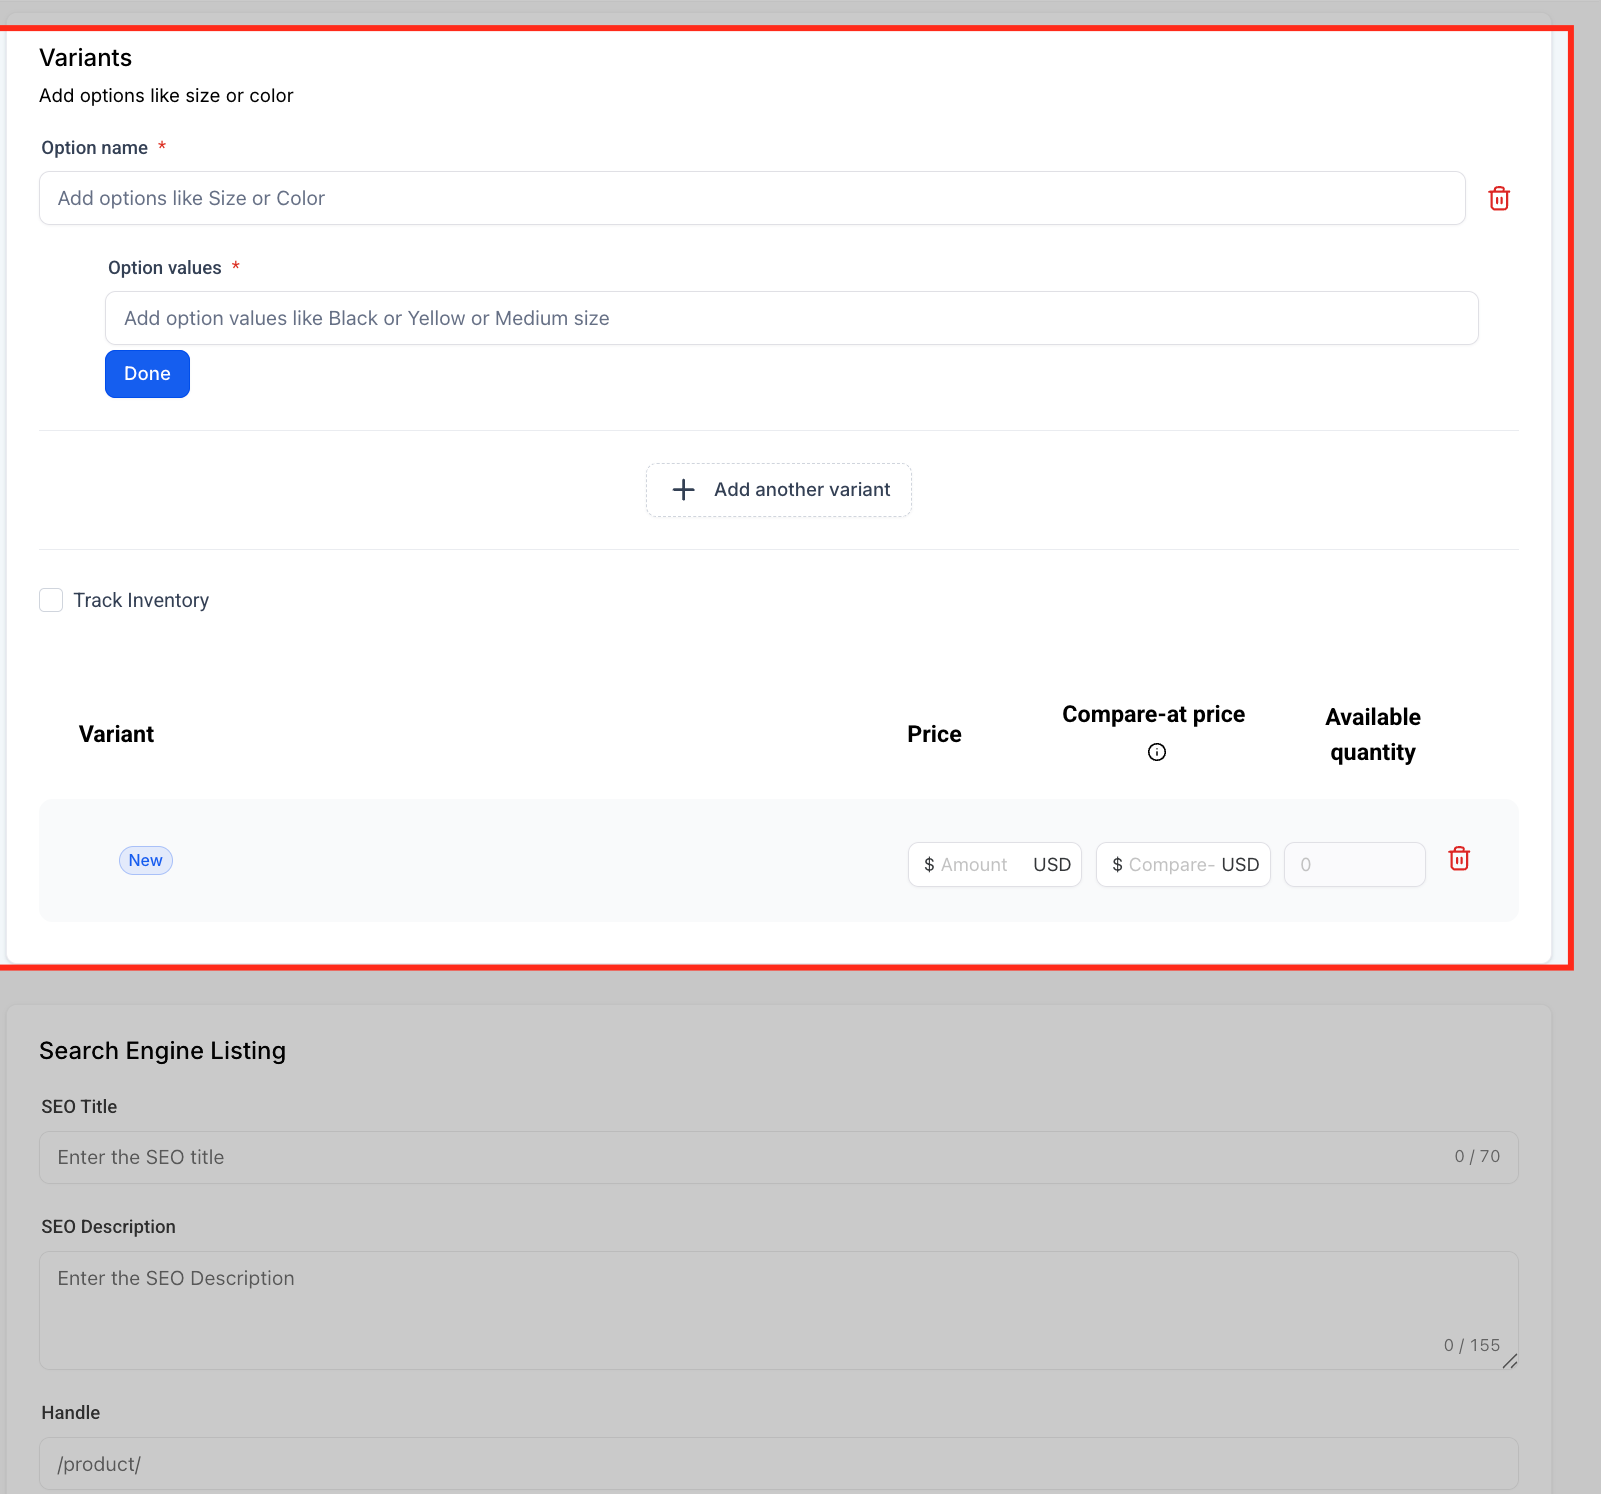
Use Variants to create different versions of the same product, such as multiple access levels or content tiers. Add an Option name (for example, "Access Plan"), then list your Option values (like "Basic," "Premium," "Pro") and click Done. Each variant can have its own price, compare-at price, and available quantity, which is useful for bundles or limited-enrollment cohorts. Enable Track Inventory if you want to cap how many of a given variant can be sold.
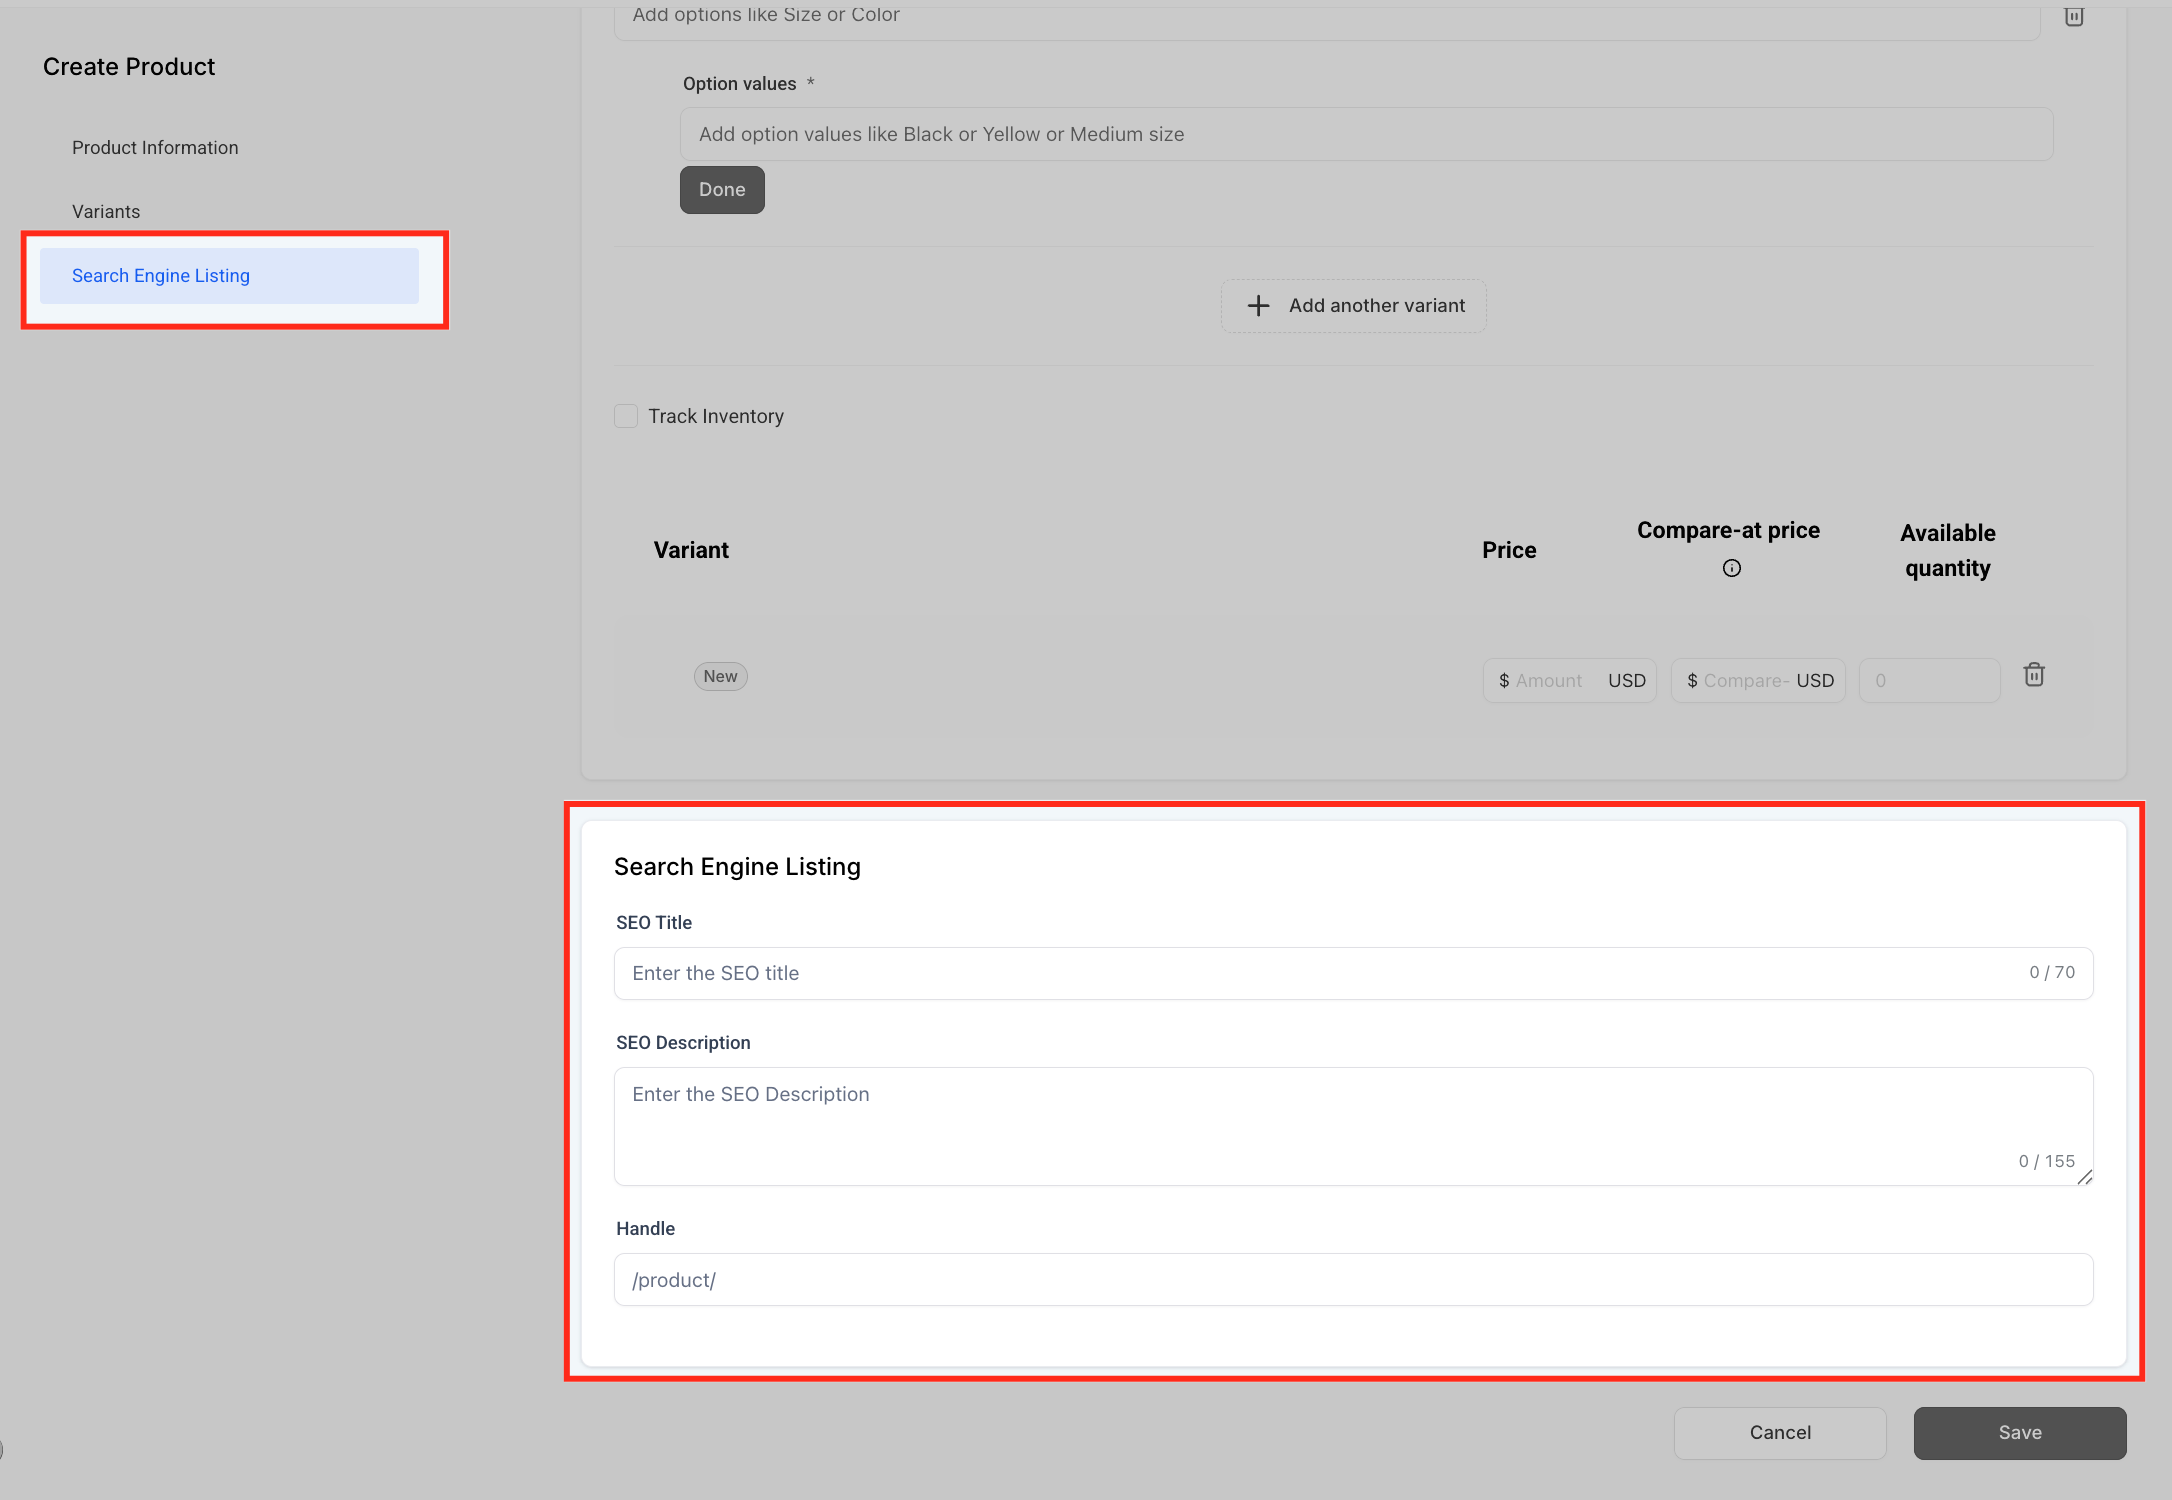
The Search Engine Listing section is optional but improves discoverability. Set an SEO Title with keywords patients might search for, an SEO Description summarizing the product, and a Handle to define the product's URL slug (for example, /product/skincare-masterclass).
Click Save in the bottom-right corner. From that point on, anyone who purchases this product automatically gets access to the course offer it's linked to.
What happens once a patient buys is controlled by your membership settings and workflow automation, not by the offer itself. Automations that run on a course purchase (welcome emails, tagging, follow-up sequences) are built in Workflows, so check there if you want to customize what happens after checkout beyond basic access.
Why doesn't my offer show up in the product dropdown when I'm creating a payment product? Make sure the offer is published. Draft offers never appear in the Membership Offer dropdown during product setup.
Can a single offer include more than one course? Yes. Use Included Products on the offer's details page to bundle multiple course products into one offer, so a single purchase unlocks everything included.
Do I need a payment processor to create a course offer? No, you can create and publish a free offer without one. To charge for an offer, you need a connected payment processor, which is why we recommend setting up AX Pay first.
Can I offer both one-time and recurring pricing for the same product? Yes. You can configure multiple pricing options on the same product, one-time and recurring, so patients can choose how they'd like to pay.
What happens automatically after someone buys a course product? They're granted access to the course(s) tied to the linked membership offer immediately. No manual enrollment step is required on your end.
How do buyers get their login credentials? Enable the welcome email option in your membership settings to automatically send login credentials after purchase.
How do I delete a course offer? Open the offer from the Offers list and choose Delete from the "more actions" menu. If you instead want to remove a linked payment product, delete the associated offer and the product is removed along with it.
Can I add an upsell to a course offer's checkout? Yes. Use Add an Upsell on the offer's details page to offer a related product immediately after the initial purchase, without requiring the patient to re-enter payment information.
Where do I get a shareable link for an offer? Click the Get Link icon on the offer, then Copy, to grab a direct checkout URL you can share or embed anywhere.
Can I require patients to sign an agreement before purchasing a course? Yes. Use Edit Checkout on the offer's details page to require a Service Agreement and collect any additional contact information you need before checkout completes.
