Comments and engagement tools help you build an active learning community around the courses you sell to patients and staff in Aesthetix CRM. From the Courses area you can control who can comment on a lesson, keep learners and instructors notified when something happens in a course, and automatically recognize new enrollees with a Welcome Badge. This article covers all three: comment moderation, in-app notifications, and Welcome Badges.
Comments let students leave feedback and ask questions directly on a lesson, and let course creators respond. Timely, visible feedback helps students stay engaged and improves how well a course teaches. You control comment visibility at the category level or the individual lesson level from the Products tab.
Each lesson or category can be set to one of three comment states:
State | What it does |
|---|---|
Enabled | The comment box is visible on the page, shows the existing comment thread, and lets students add new comments. |
Hidden | The comment box is not visible on the page and existing comments are not shown. |
Locked | Students can no longer add new comments, but any existing comments remain visible. |
Open the Products tab and select an existing course, or create a new one.
Click into the Comments section of the product.
Select the category you want to configure, then choose Enabled, Hidden, or Locked for every lesson in that category at once.
Open the Products tab and select an existing course, or create a new one.
Click into the Comments section.
Instead of applying a setting to the whole category, select the specific lessons within that category and set each one to Enabled, Hidden, or Locked.
Use category-level changes when you want a consistent policy across an entire module, and lesson-level changes when only a specific lesson needs a different setting (for example, locking comments on an older lesson while keeping newer lessons open for discussion).
Rather than opening each product individually, you can review and moderate comments from a single screen:
Go to the Products tab.
Click Manage Comments.
From here you can see every comment left across your course catalog in one place.
Individual comments can be switched between two visibility levels from the comments manager:
User Only: the comment is visible only to the course creator and the student who posted it.
Public: the comment is visible to all students enrolled in the course, plus the course creator.
To change it, open Manage Comments, find the comment, and select User Only or Public from its visibility dropdown.
To delete a comment:
Click Products > Manage Comments.
Find and select the comment you want to remove.
Click Delete.
To restore a deleted comment:
Click Products > Manage Comments.
Click the Deleted tab.
Find and select the comment you want to bring back.
Click Restore.
Deleted comments are not permanently erased right away, they move to the Deleted tab where you can review and restore them if needed.
HIPAA note: comments are visible to other enrolled students (or publicly, if set to Public). Remind staff and patients not to include protected health information such as diagnoses, treatment details, or photos in course comments. Keep any patient-specific discussion in a private channel instead.
Course notifications keep learners and instructors connected to what's happening inside a course without needing to check back manually. Notifications appear as in-app alerts in the Client Portal bell icon, with an accompanying email, and as push notifications for mobile app users who have them enabled.
When someone replies to a comment a learner posted in a course they're enrolled in, that learner gets an instant notification. This keeps discussions active and makes it easy for students to jump back into a thread as soon as someone responds.
Instructors also receive notifications when learners comment, so they can respond and keep the conversation moving. Instructors see these alerts in the Client Portal Notifications tab (bell icon).
When a previously locked lesson or category becomes accessible, for example because a prerequisite was completed, learners are notified right away. This keeps them aware of new content as soon as it's available instead of relying on them to check back on their own.
If you release course content on a drip schedule, learners are notified the moment new drip content unlocks. This removes the guesswork of when the next lesson will be available and gets students back into the course sooner.
Push notifications are optional and are configured per learner inside the Client Portal:
Open the Client Portal.
Click the profile icon in the top right and select Manage Your Account.
Select Notifications.
Turn on Push for the notification types you want, and turn on Email as well if desired.
While the notifications above fire automatically based on activity in a course, Course Announcements let you post an update yourself, on your own schedule, with room for real content instead of a one-line alert. Each announcement supports formatted text, images, and links, and you choose whether it goes to learners in one specific course or across every course you offer. Announcements always appear in-app; email delivery is optional and controlled per announcement.
Go to the Products tab and click Announcements in the top right.
Click + New announcement and enter a Title.
Use the rich text editor to add formatted text, images, and links to the announcement body, then choose whether to target learners of a specific course or all courses.
Turn on email notifications if you also want course members to receive the announcement by email.
Click Publish to send it.
From the Announcements list you can view, edit, clone, and delete any announcement, and use the Sent to and Date range filters or the search box to find a specific one later.
Once you publish an announcement, learners see an unread indicator and announcement icon in the Client Portal top bar, along with a banner. They can open the announcements list to see every update posted for their courses, then open any entry to read the full announcement without leaving their course experience.
A Welcome Badge is a credential that's automatically issued to a learner the moment they enroll in a course for the first time. It gives every new enrollee immediate recognition without any manual setup, and it's the earliest form of recognition in the learner journey, arriving before any completion certificate or workflow-triggered badge.
Instant recognition: learners receive a badge as soon as they enroll, reinforcing engagement from day one.
On by default: every newly created course includes a Welcome Badge automatically, so credential adoption stays consistent across your catalog.
No setup required: no workflows or manual configuration are needed to issue the badge.
Curated templates: a focused set of Welcome Badge designs makes it quick to pick a professional-looking badge.
Richer learner profiles: automatically issued badges add to a learner's credential history inside the Client Portal.
Credential type | When it's issued | How it's triggered | Purpose |
|---|---|---|---|
Welcome Badge | At first enrollment | Automatic (default on new courses) | Recognize and engage learners immediately |
Completion Certificate | After course completion | Course completion settings | Validate that a course was finished |
Workflow-issued Badge/Certificate | Based on custom actions | Workflow automation | Reward milestones, quizzes, or other custom achievements |
Welcome Badges are only attached automatically to newly created courses. They are not applied retroactively to courses that already existed before this feature.
Navigate to Courses > Products and create a new course. A Welcome Badge is added to it automatically.
Open the course settings and locate the Welcome Badge section.
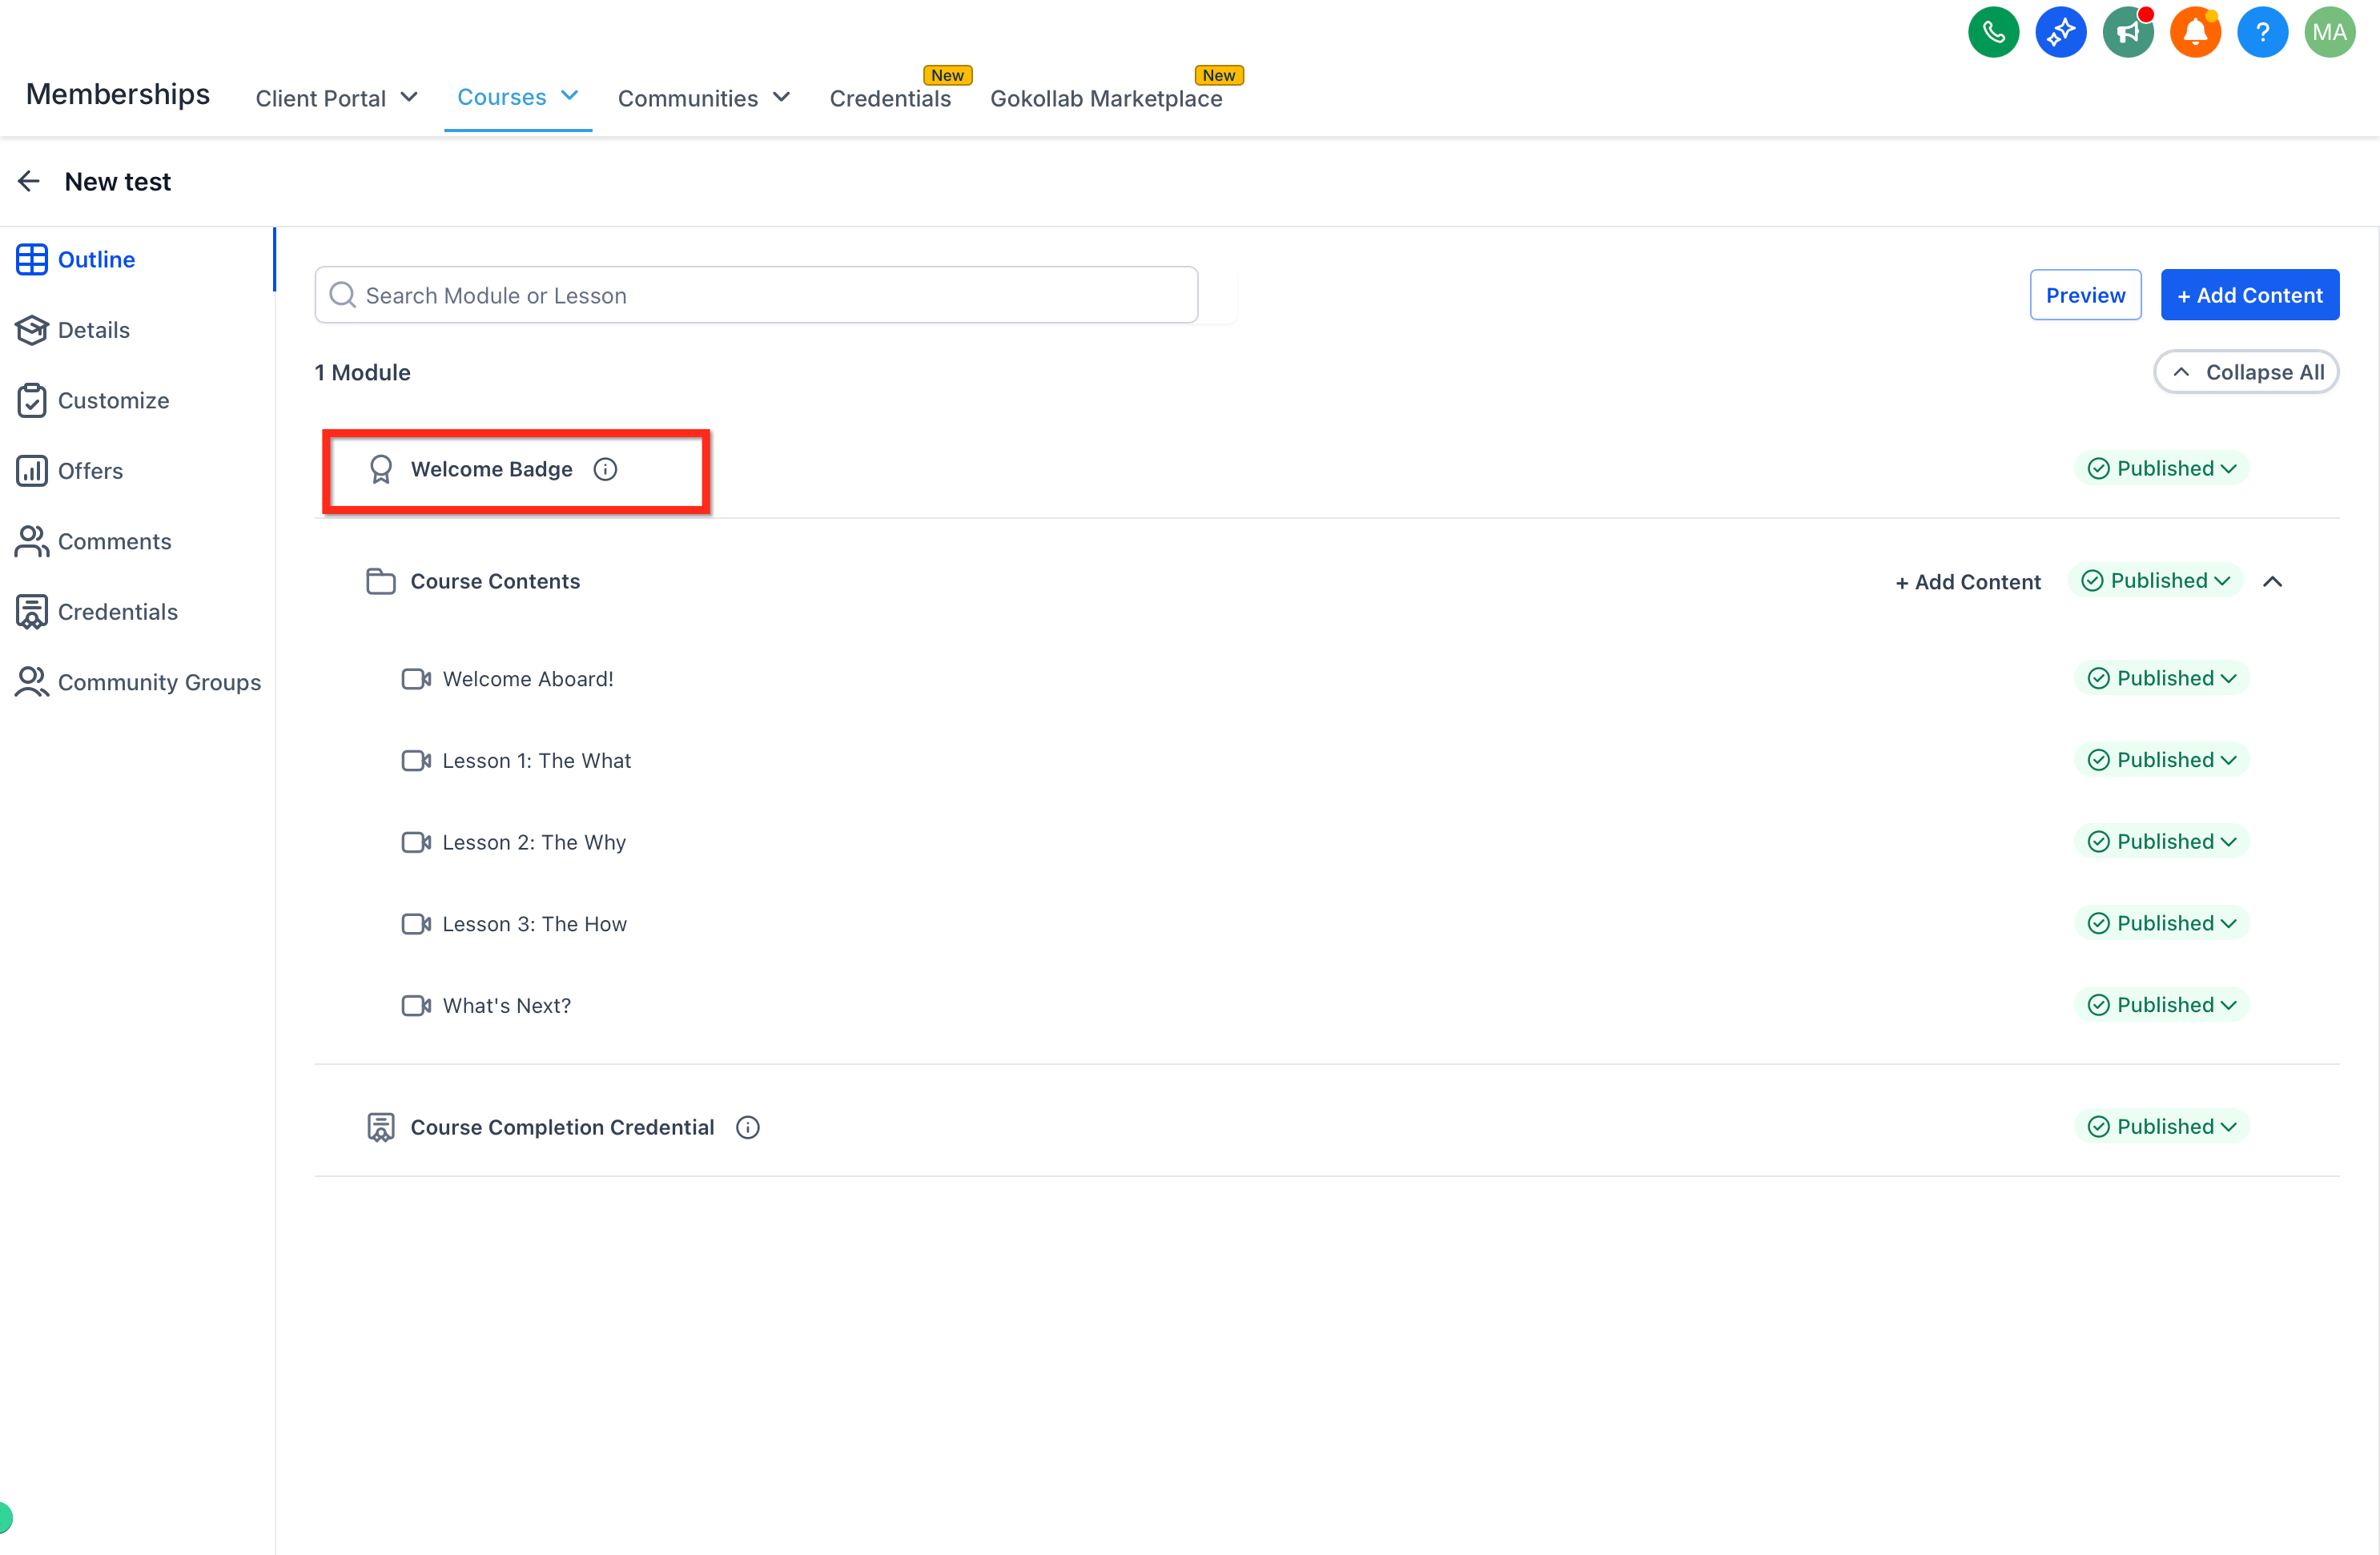
Select a template from the curated Welcome Badge options and save your selection.
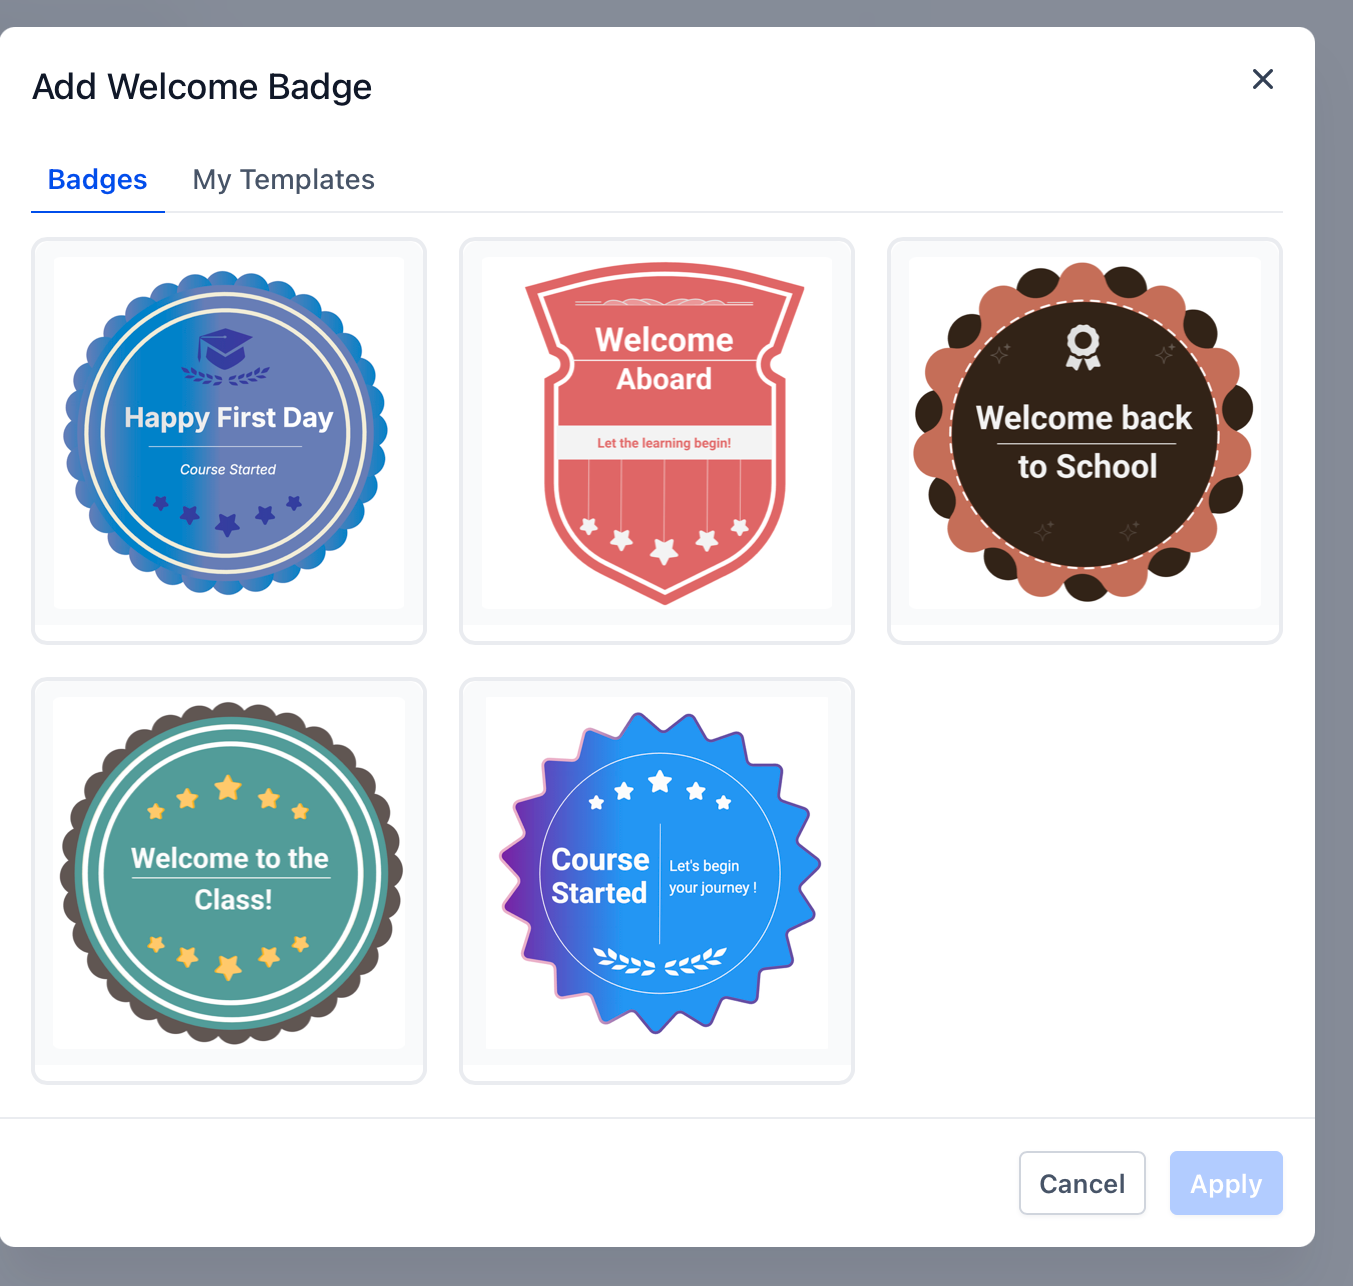
To customize the design, go to Courses > Credentials and edit the badge in the Certificate Builder.
To disable automatic issuance, set the badge's status to Draft in Credentials. Set it back to Published whenever you want to turn it on again.
If you'd rather use a different design as your Welcome Badge, you can select any badge from My Templates instead of the curated set. Workflow-based badge issuance also remains available if you want to reward learners for milestones, quiz results, or other custom achievements alongside the automatic Welcome Badge. For details on setting those up, see the guides for Workflows.
Can I set different comment permissions for different lessons in the same course? Yes. You can apply a comment setting to an entire category at once, or drill into individual lessons within that category and set each one separately.
What's the difference between Hidden and Locked comments? Hidden removes the comment box entirely, so existing comments aren't shown. Locked keeps existing comments visible but stops students from posting new ones.
Who can see a comment set to User Only? Only the course creator and the specific student who posted it. Switch it to Public to make it visible to all enrolled students.
If I delete a comment by mistake, can I get it back? Yes. Deleted comments move to the Deleted tab in Manage Comments, where you can find them and click Restore.
Do learners get notified about every new comment in a course? No. Comment notifications are triggered specifically when someone replies to a comment that learner posted, not for every new comment in the course.
Will I be notified if content I couldn't access before becomes available? Yes. Learners get an in-app notification (plus email, and push if enabled) as soon as a previously locked lesson or category unlocks, and again when new drip content is released.
Where do I create a course announcement, and can I send it to more than one course? From the Products tab, click Announcements, then + New announcement. You can target learners of a single course or send the same announcement to every course you offer.
Do learners get an email for every announcement? Only if you turn on email notifications for that specific announcement. Announcements always appear in-app regardless; email delivery is optional and set per announcement.
Can I edit or reuse an announcement after it's published? Yes. Open the Announcements list and you can view, edit, clone, or delete any announcement you've sent.
Does the Welcome Badge apply to courses I created before this feature existed? No. It's only added automatically to newly created courses.
Will a learner receive the Welcome Badge again if they re-enroll? No. It's issued only on a learner's first enrollment in a course.
Can I still issue badges through workflows if I use Welcome Badges? Yes. Workflow-based badge and certificate issuance works independently and can be used alongside the automatic Welcome Badge for other milestones.
Where do I go to redesign a Welcome Badge? All design customization happens in Credentials, using the Certificate Builder.
