Aesthetix CRM lets you collect payment right when a patient books an appointment, whether that is the full service cost, a deposit to hold the slot, or a balance you collect later at checkout. Everything lives under Payments in the left menu (to connect a provider) and inside each calendar's settings (to turn payments on for that calendar). Once payments are enabled, every booking gets its own Payments tab where your front desk can see what is owed and collect it.
Use AX Pay for calendar payments. AX Pay is Aesthetix CRM's built-in payment processor and carries better rates than Stripe, with no separate account to manage. If you still want to run a card through Stripe, NMI, Authorize.net, Square, or PayPal, those are supported too. See the AX Pay guide in the Payments collection to get set up.
Calendar payments are supported through several gateways: AX Pay, Stripe, NMI, Authorize.net, Razorpay, Square, and PayPal. You only need to connect a provider once, then any calendar can use it.
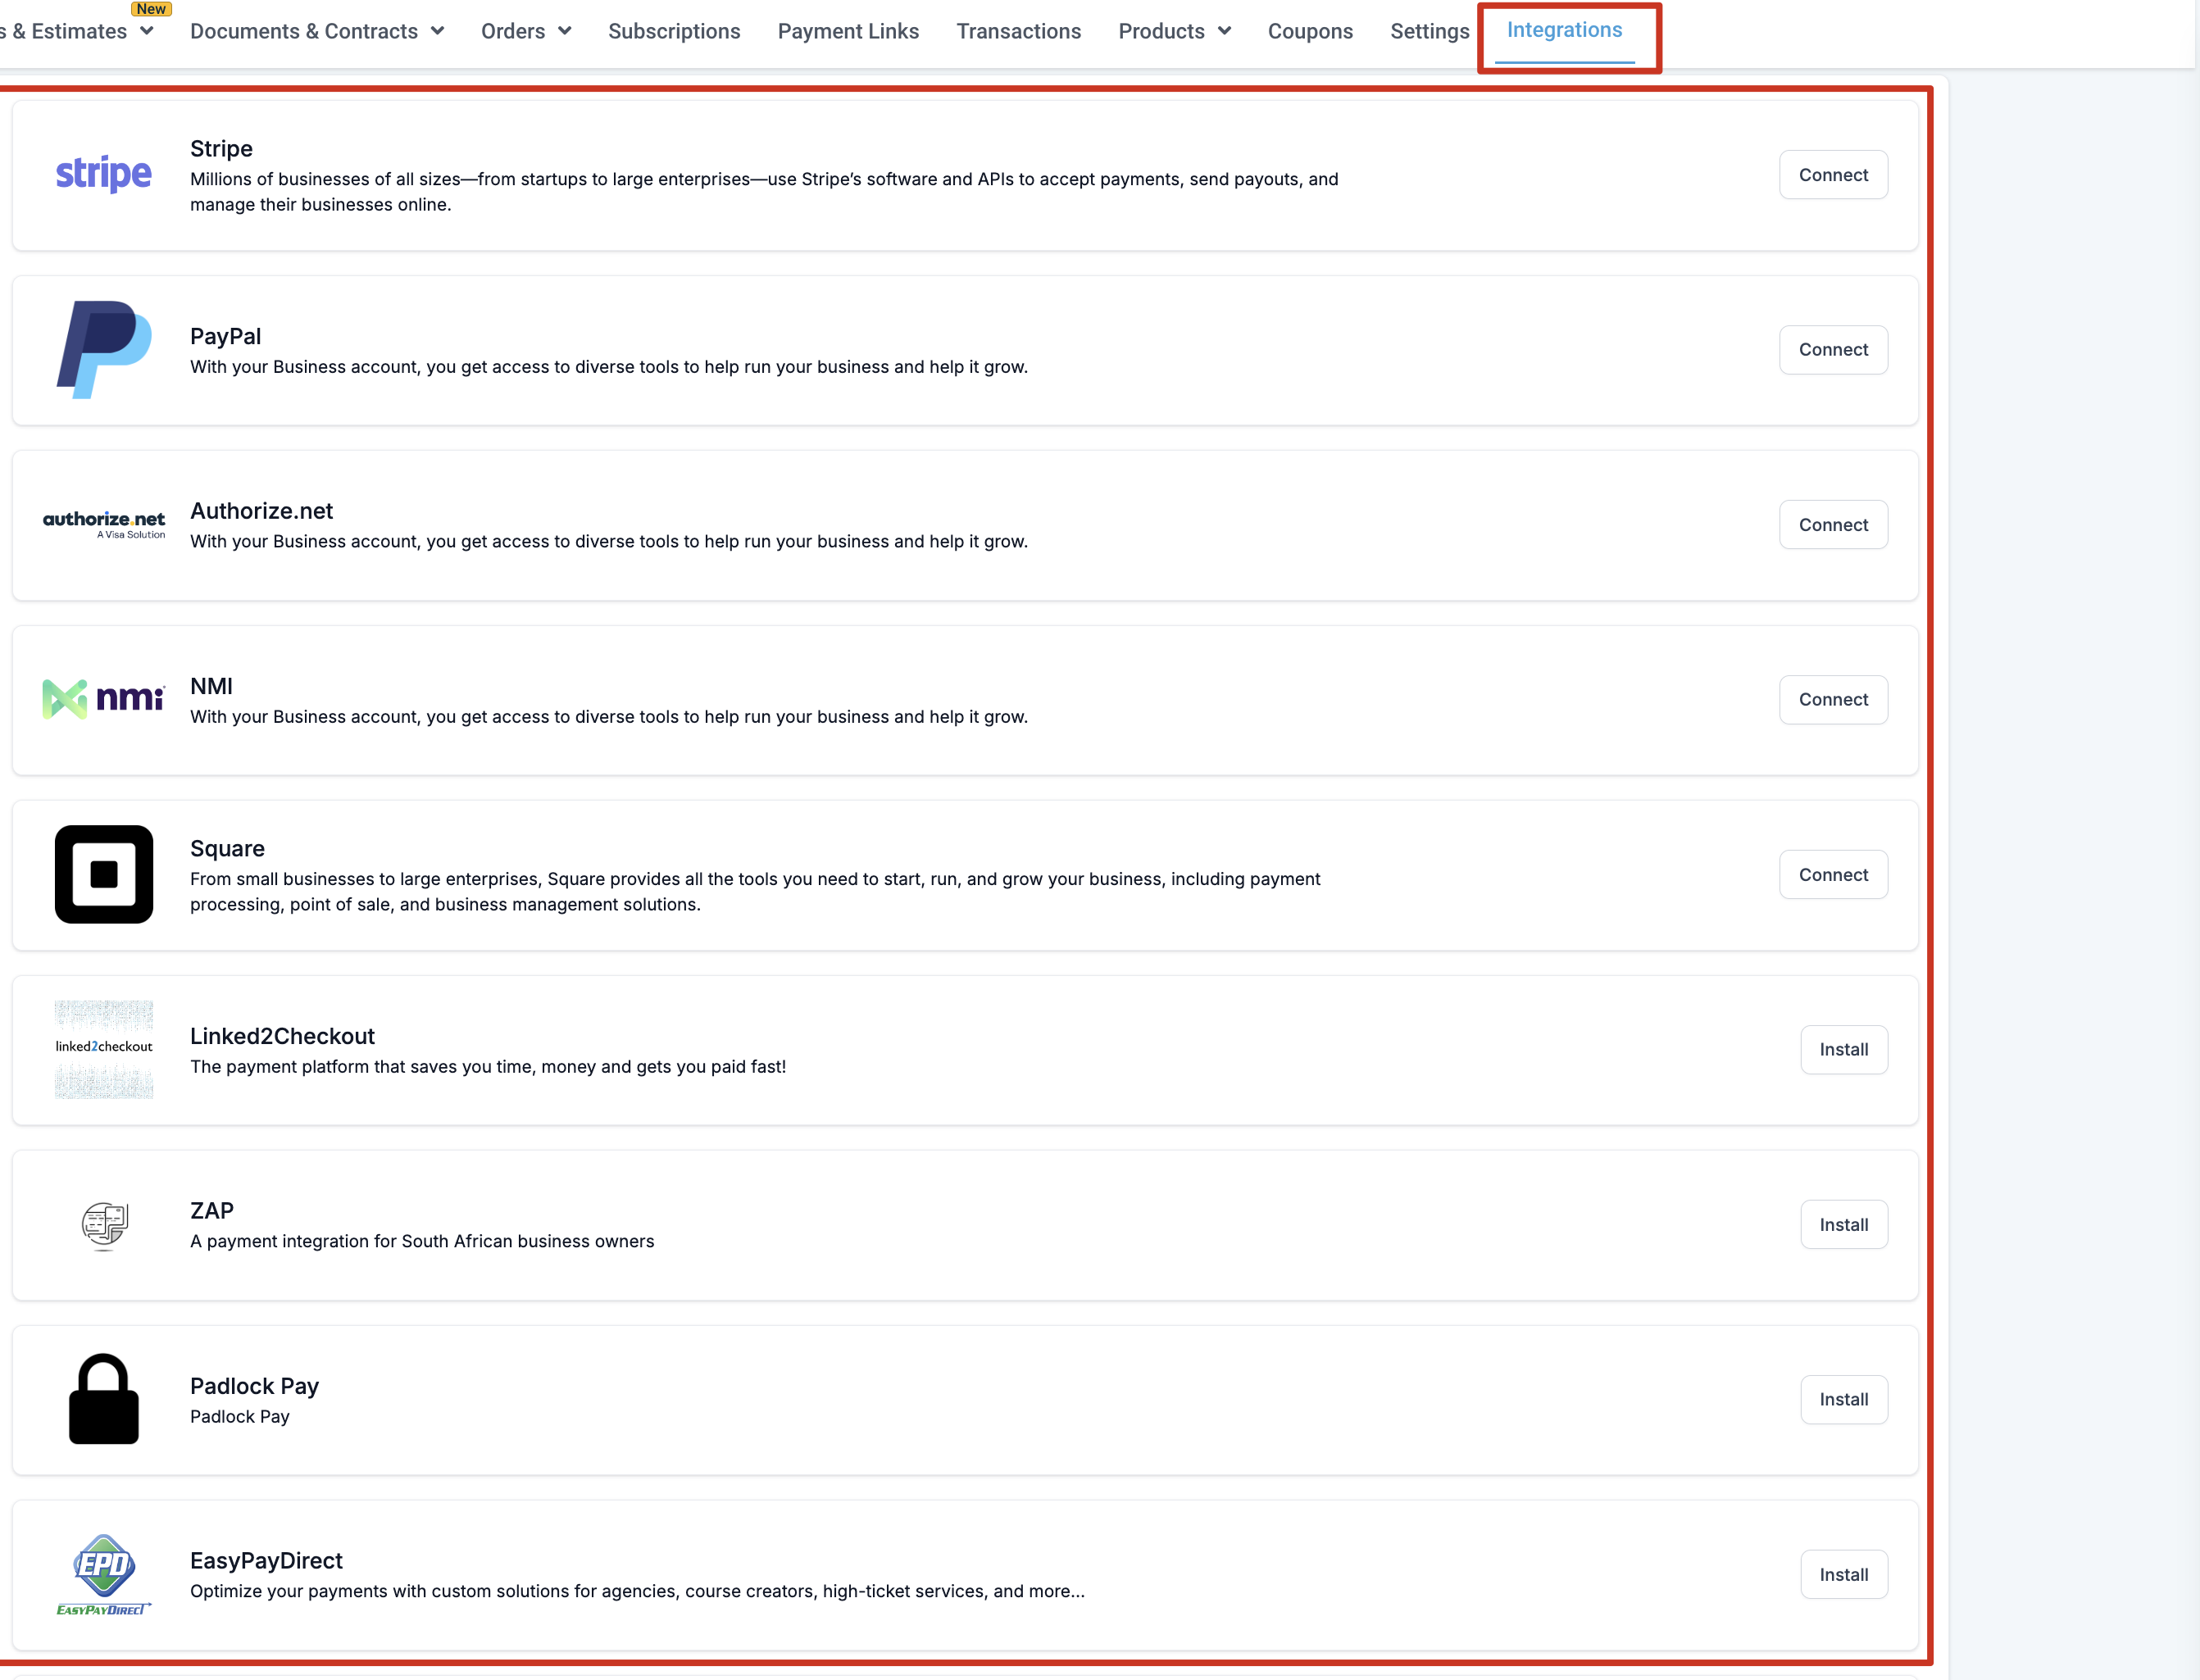
Add a gateway from Payments > Integrations. If you connect more than one provider, you will see a dropdown to choose your default payment gateway. Only the default gateway collects payments, so if AX Pay is your default, all calendar bookings run through AX Pay even if Stripe is also connected.
Please note: Razorpay, NMI, and Square are not currently supported on the older Classic booking widget or on Service Menu (v1) calendars. Use a Service Calendar for the widest payment support.
If you choose Stripe as a provider, connect it from the Payments tab:
Click on Payments.

Click on Integrations.

Click Connect with Stripe.

Log in to your Stripe account.

Click Connect.

Log in to your Square account at app.squareup.com and stay signed in. Then, from Payments > Integrations, click Connect next to Square Live Mode. Aesthetix CRM automatically picks up the signed-in Square account and links it.
Once a provider is connected, turn payments on for the specific calendar that needs them.
Go to Calendars.

Open Calendar Settings.
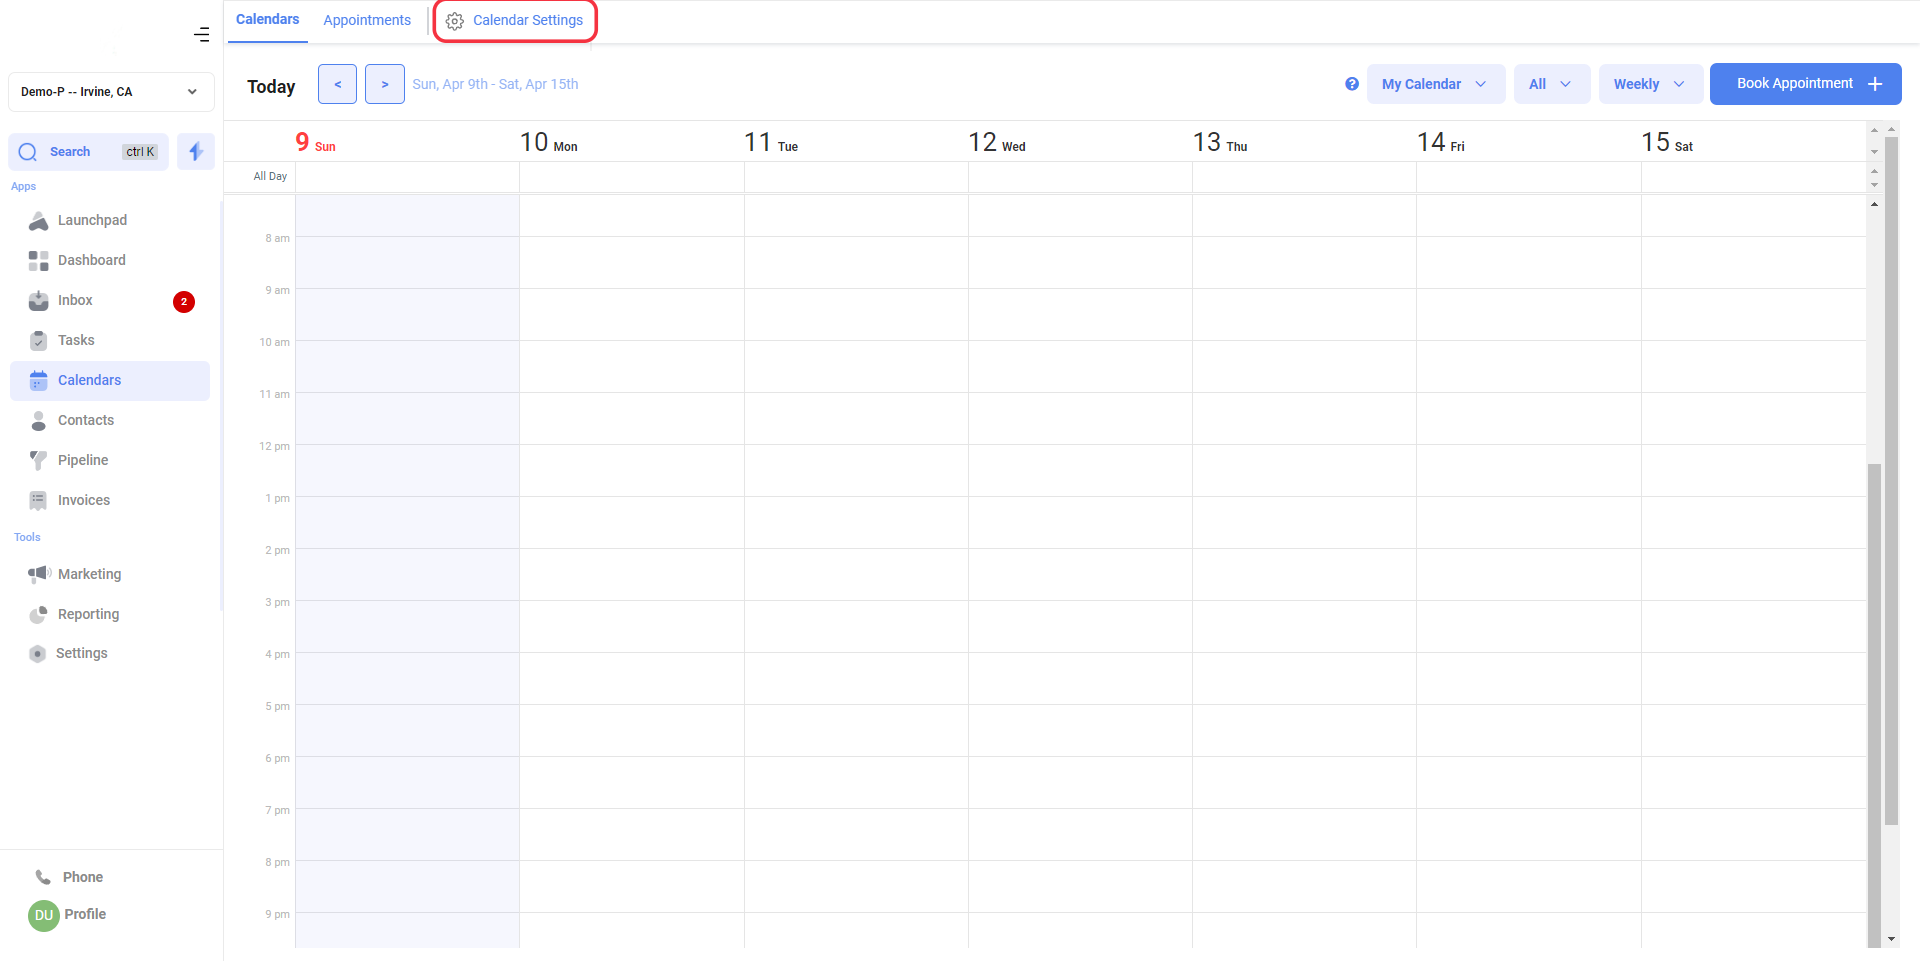
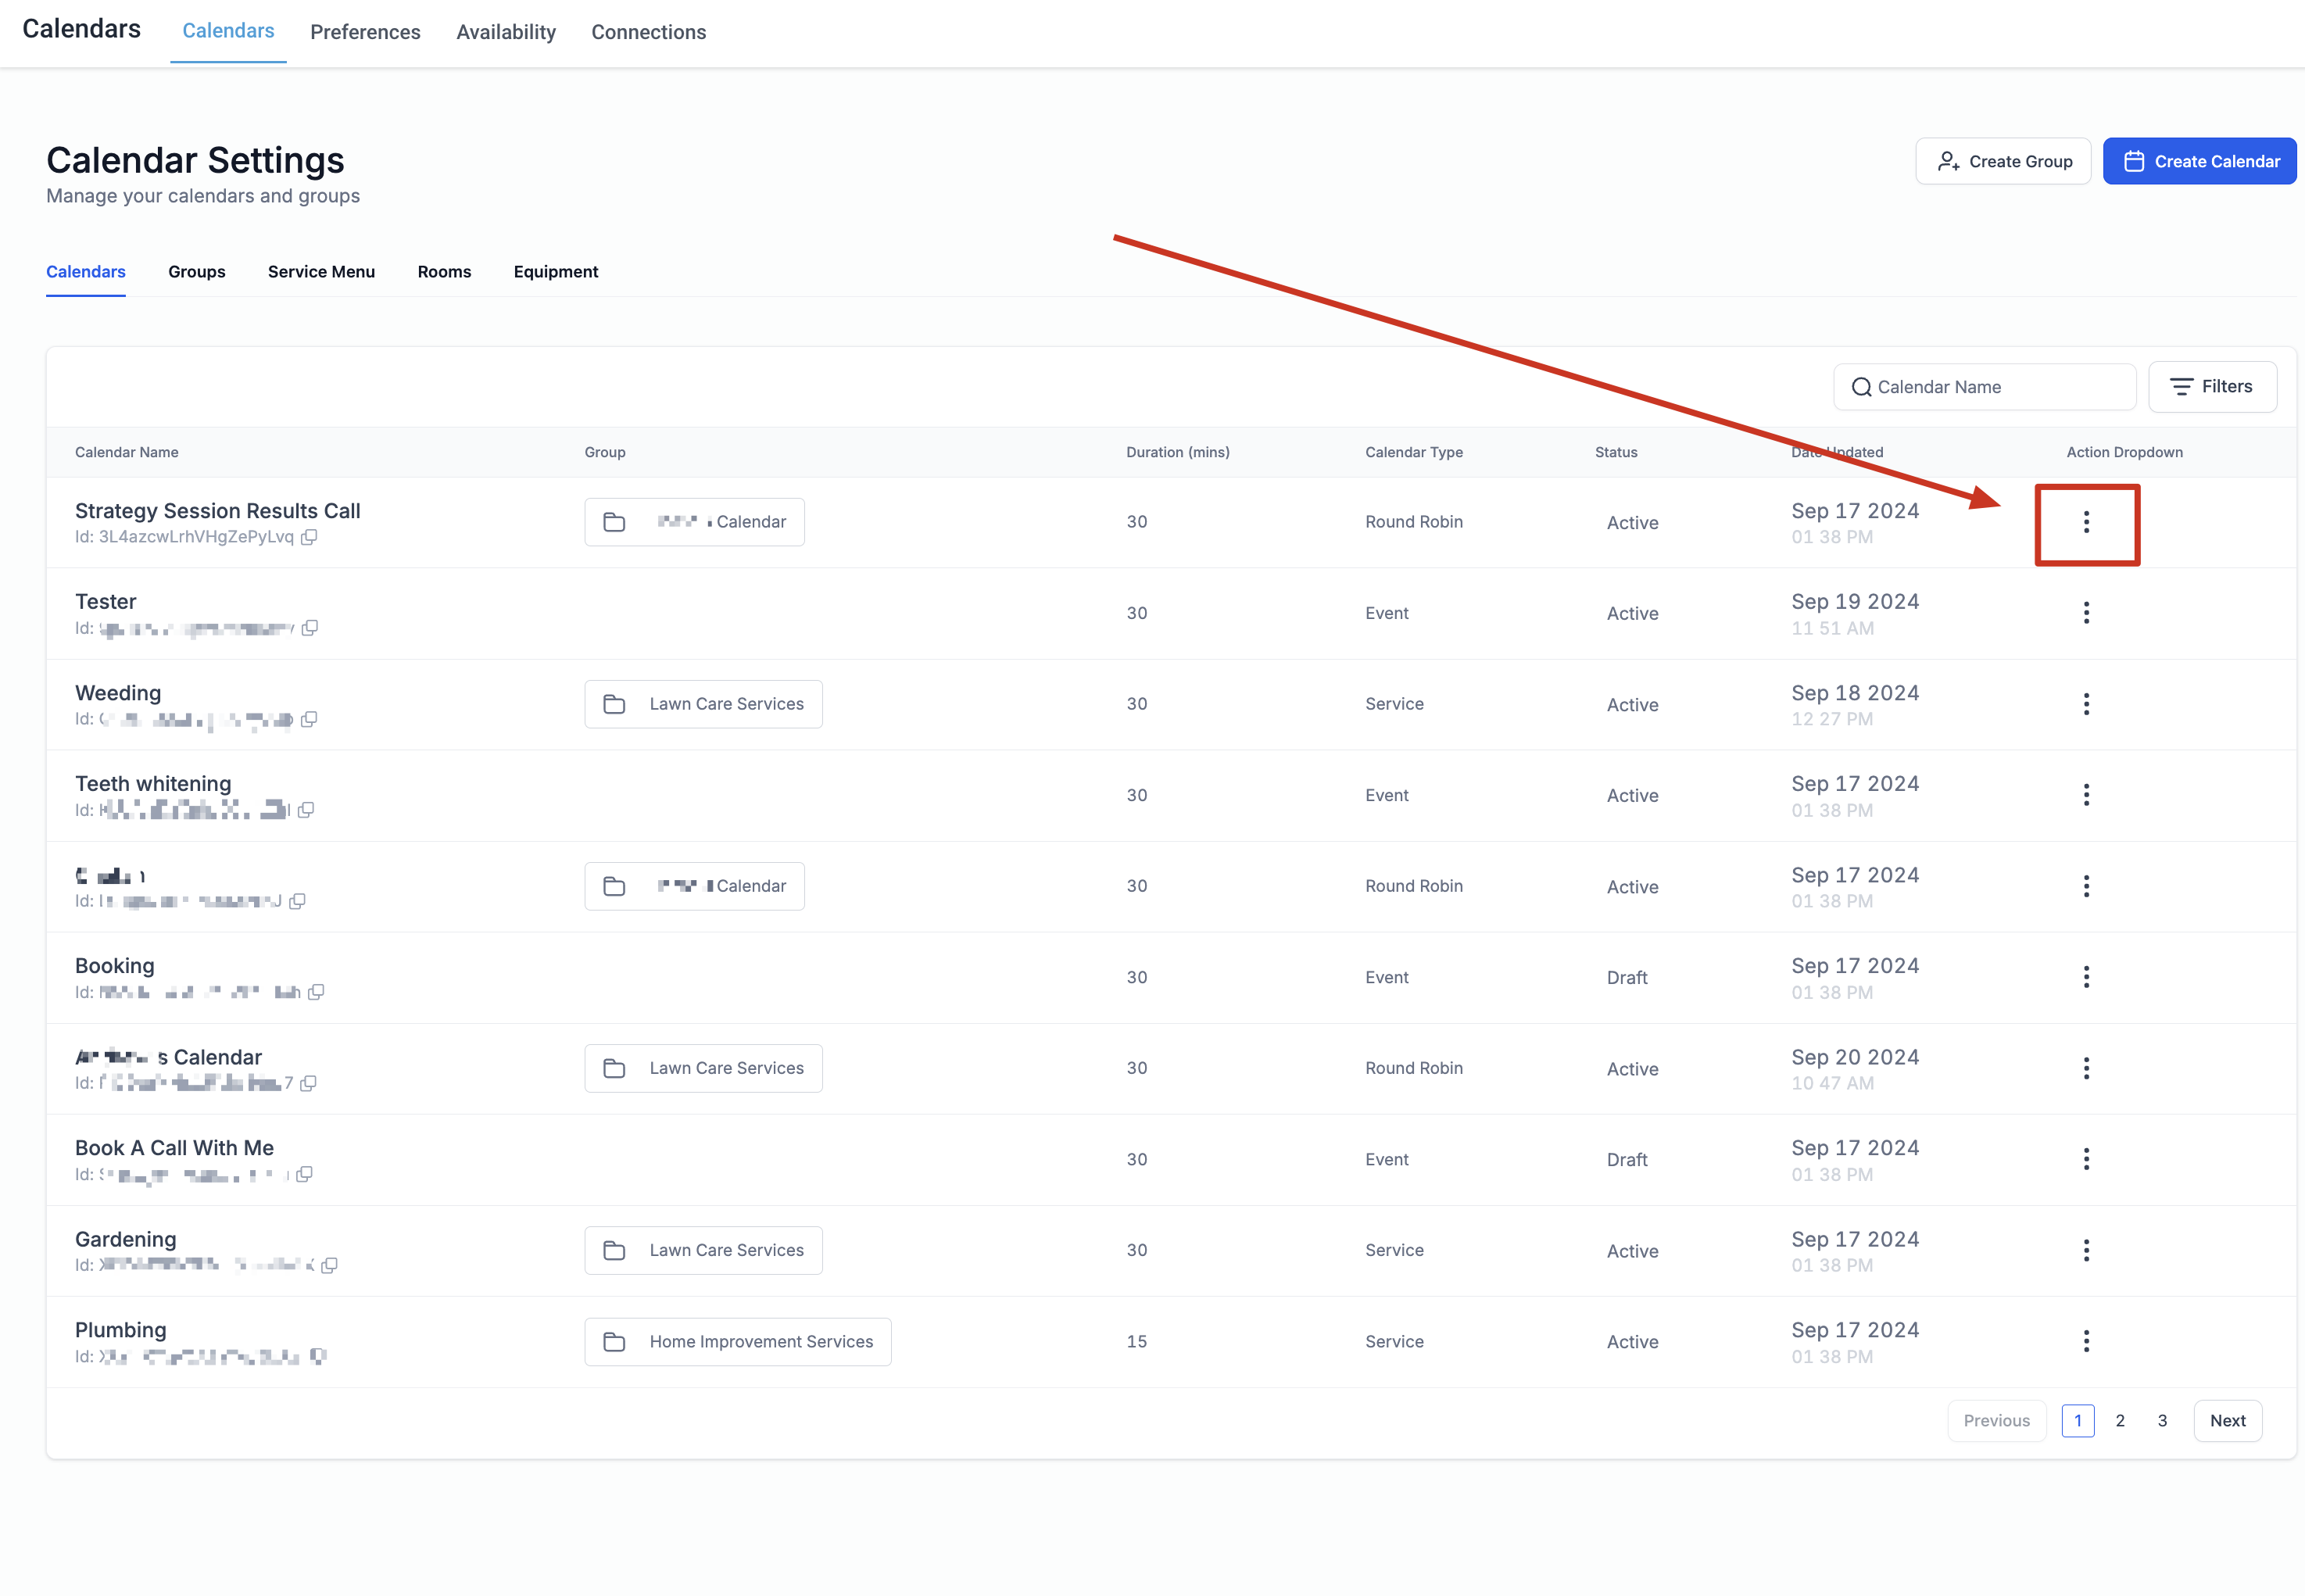
Click the three dots next to the calendar you want to update, then click Edit.


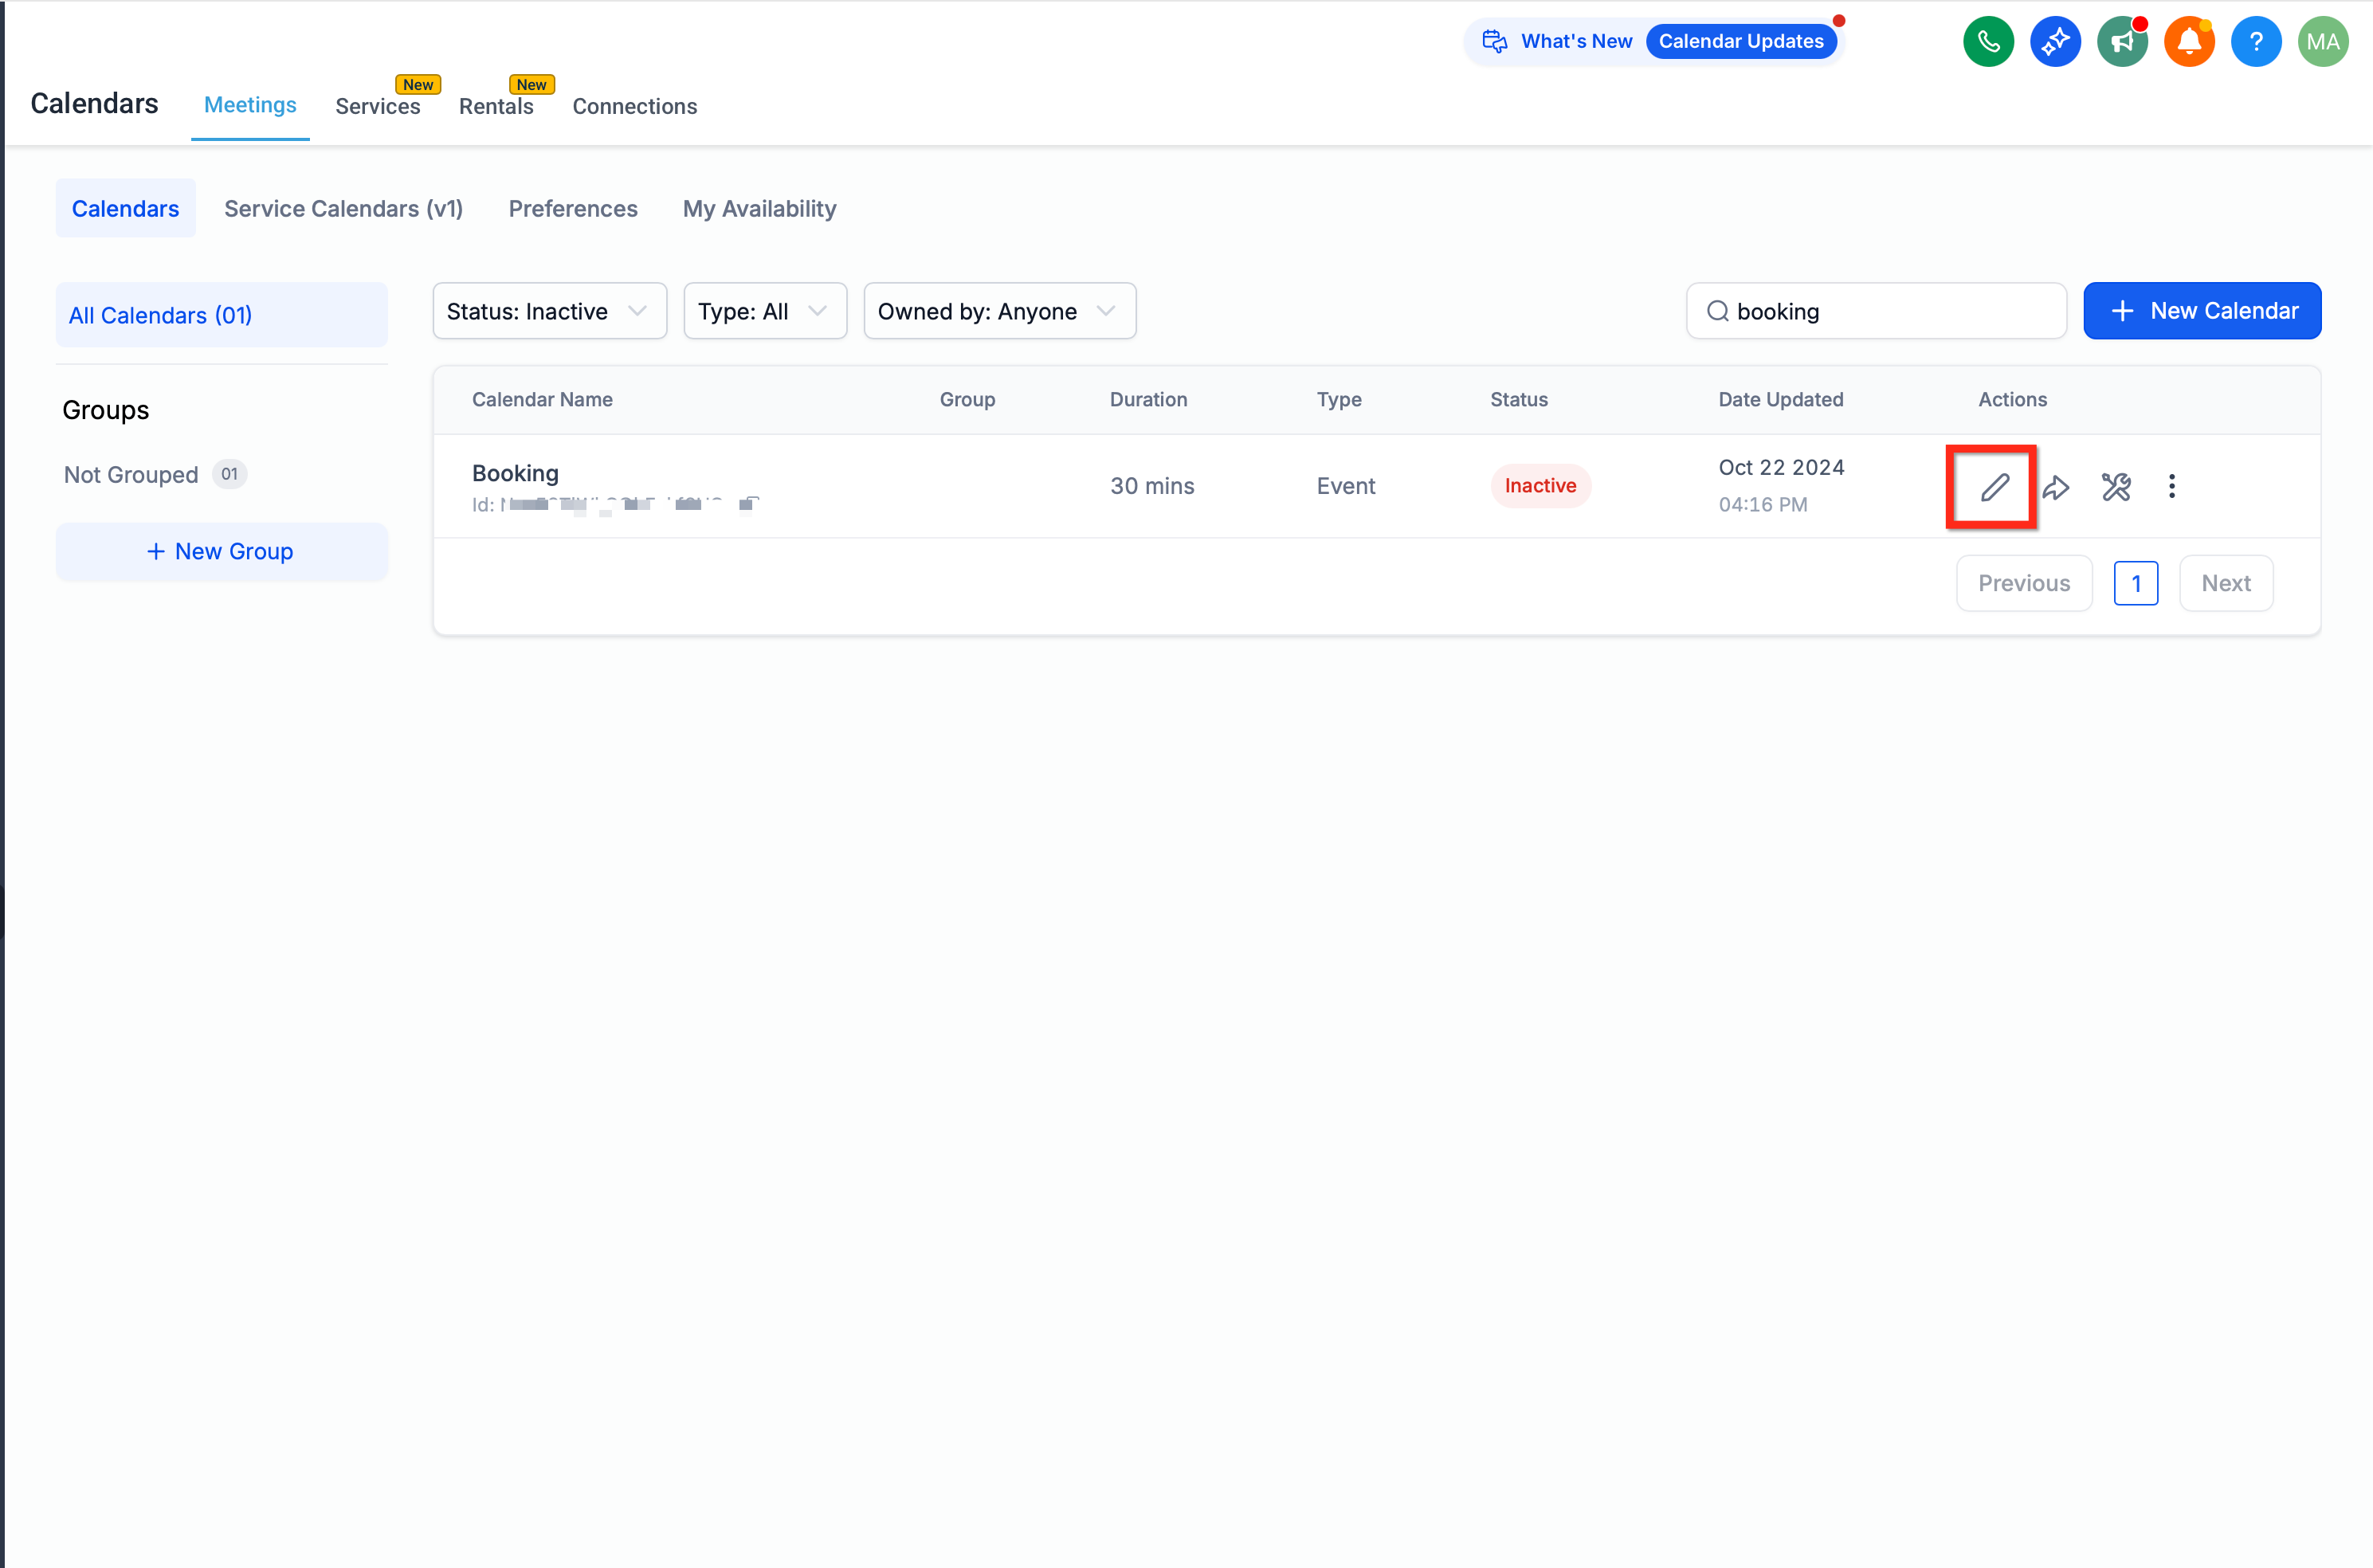
Move through the calendar's setup steps until you reach the payment configuration step.

Toggle on Accept Payments (also labeled Use Payment in the older calendar builder). Aesthetix CRM automatically creates a linked Product tagged Calendar the first time you enable this.

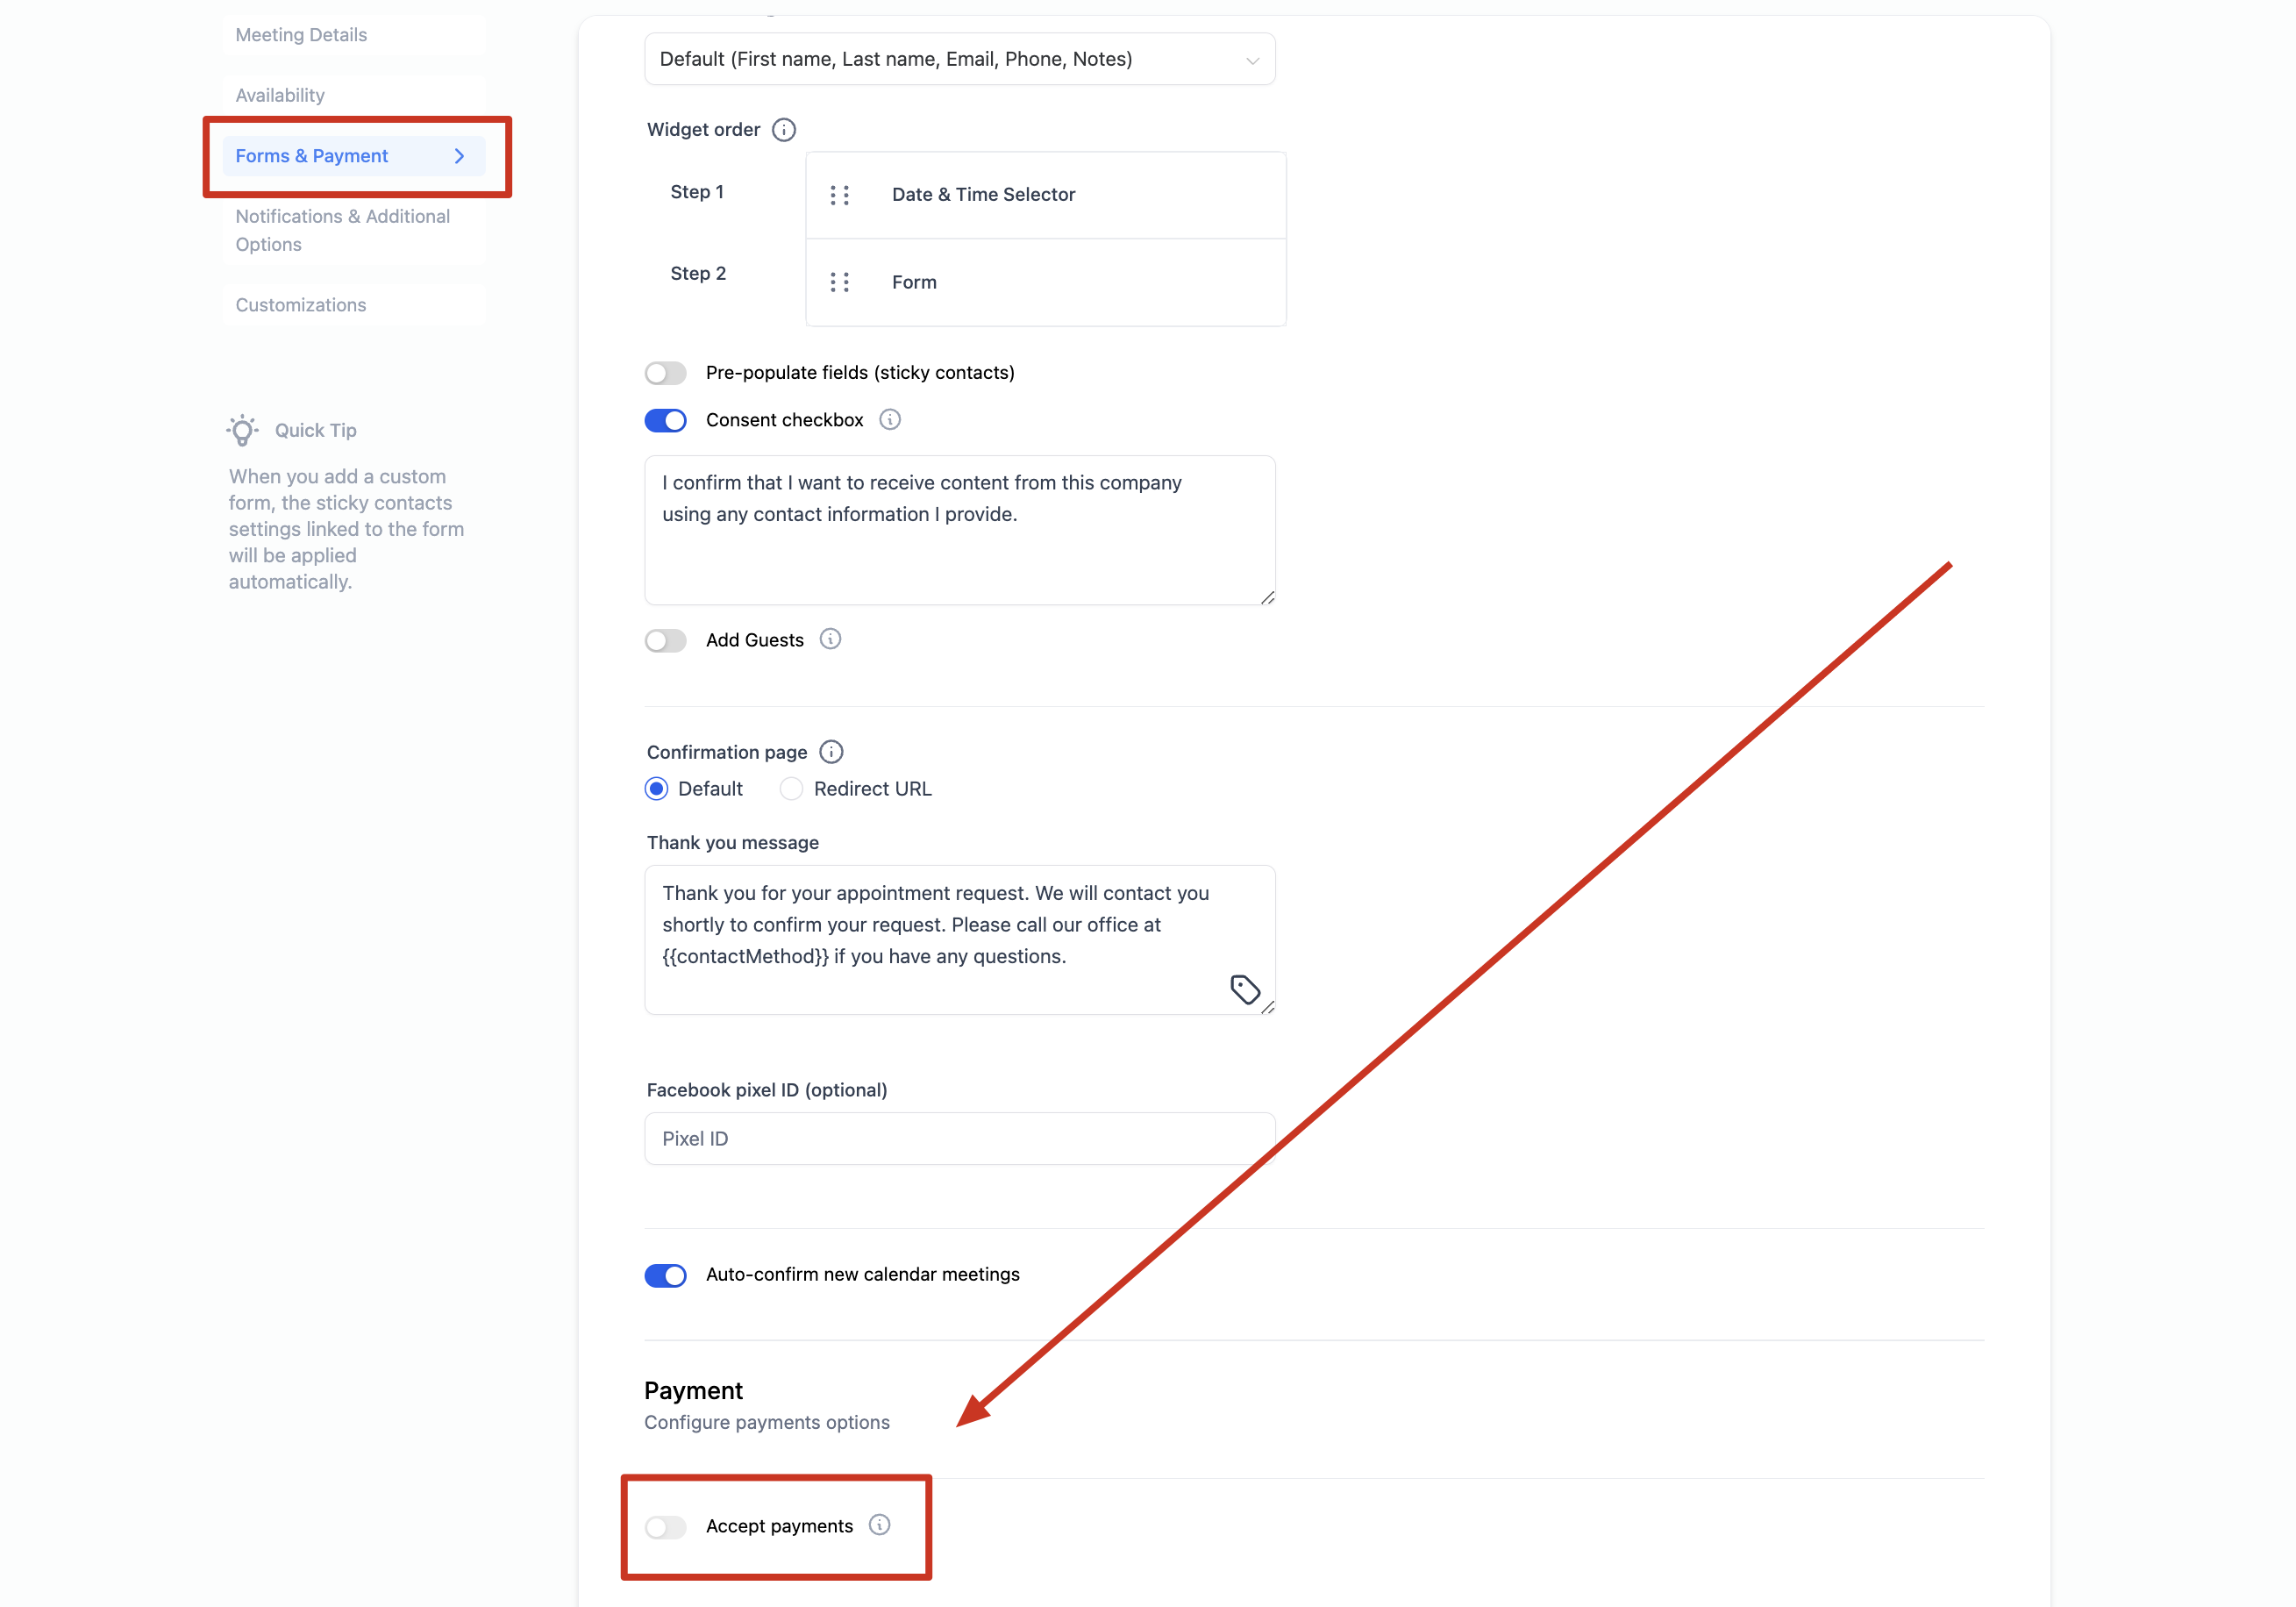
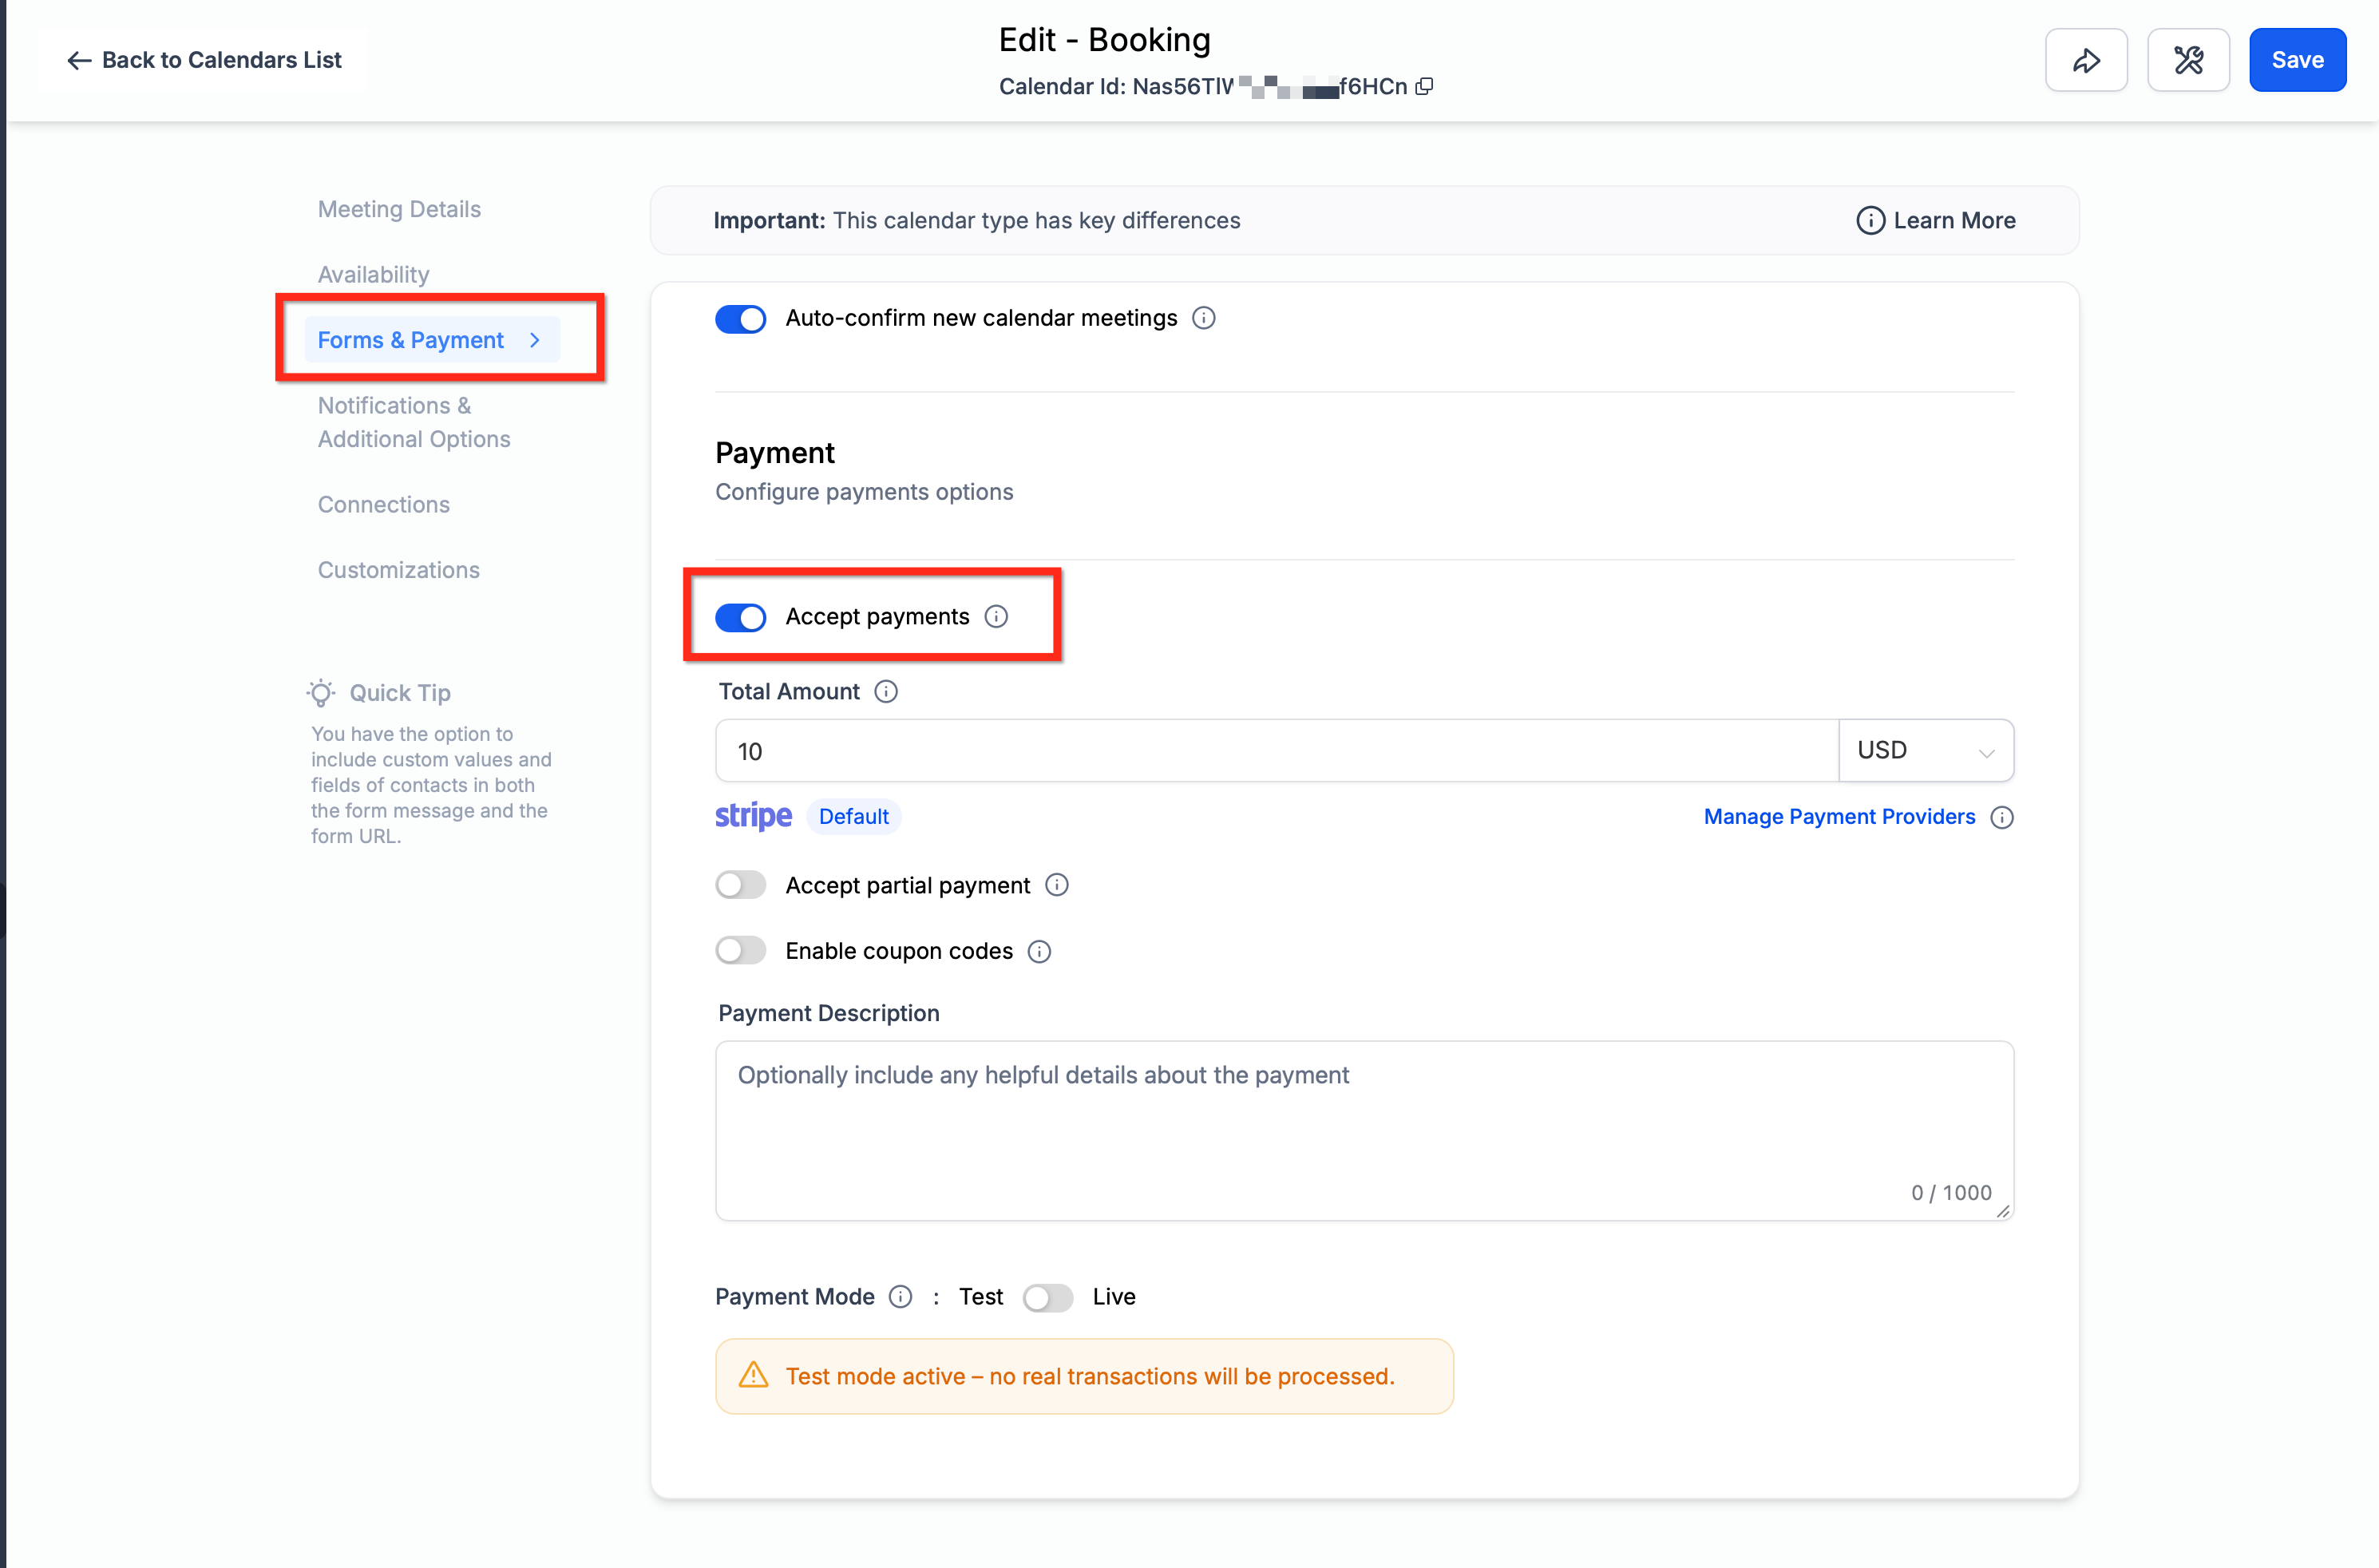
Once enabled, three new fields appear on the calendar:
Amount (with currency)
Description (the charge description patients see)
Payment mode: Test or Live. Leave the calendar in Test mode while you confirm everything works, then switch it to Live before sharing the booking link with patients.
Enter the amount, currency, and description for the appointment.

Confirm the calendar is in Test mode, walk through a test booking, then switch the toggle to Live mode when you are ready to accept real payments.

Click Complete to save your changes.

When you turn on Accept Payments, choose how the calendar should handle the patient's card:
Charge upfront: Collect payment during the booking itself. If the amount due is greater than $0, the patient enters card details and pays that amount right away. If the amount is configured as $0, or a coupon brings the total down to $0, no card is collected and no payment is processed. If a coupon leaves a balance above $0, the patient pays the discounted amount.
Collect Card on File: Securely save the patient's card without charging them at booking. The patient still enters card details, and the card is saved for later use, but no charge or transaction is created during booking. This is different from a $0 booking: with Charge upfront and a $0 total, no card is collected at all, while Collect Card on File always saves a card even though it never charges it during booking.
Setup | Final Amount | Card Collected? | Payment Processed? |
|---|---|---|---|
Collect Card on File | No upfront charge | Yes | No |
Charge upfront | Greater than $0 | Yes | Yes |
Charge upfront | Configured as $0 | No | No |
Charge upfront + coupon | Reduced to $0 | No | No |
Charge upfront + coupon | Greater than $0 | Yes | Yes, final discounted amount |
If you don't see payment fields on the calendar, it means no payment gateway has been connected yet. Go back to Connecting a Payment Provider above and add one first.
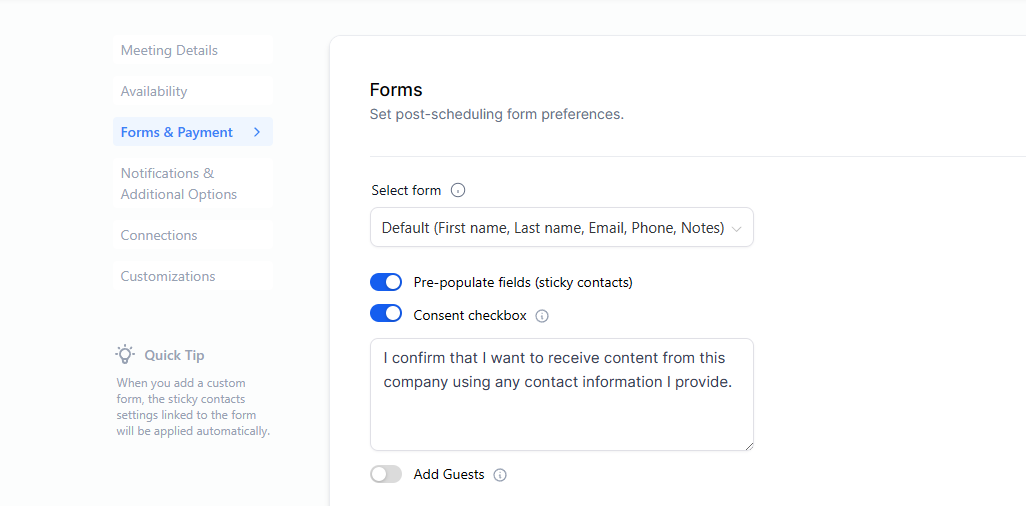
A few optional settings to configure at the same time:
Enable Coupon Code adds a coupon field to the booking widget so patients can apply a discount at checkout.
Partial Payment / Deposit lets you collect a deposit at booking instead of the full amount. Partial payments are not available on recurring calendars.
For recurring appointments, choose whether the widget charges for the First Appointment Only or for All Appointments in the series up front.
Every booked appointment gets its own Payments tab inside the appointment modal. This is where your front desk checks what a patient owes and collects it, without leaving the appointment record.
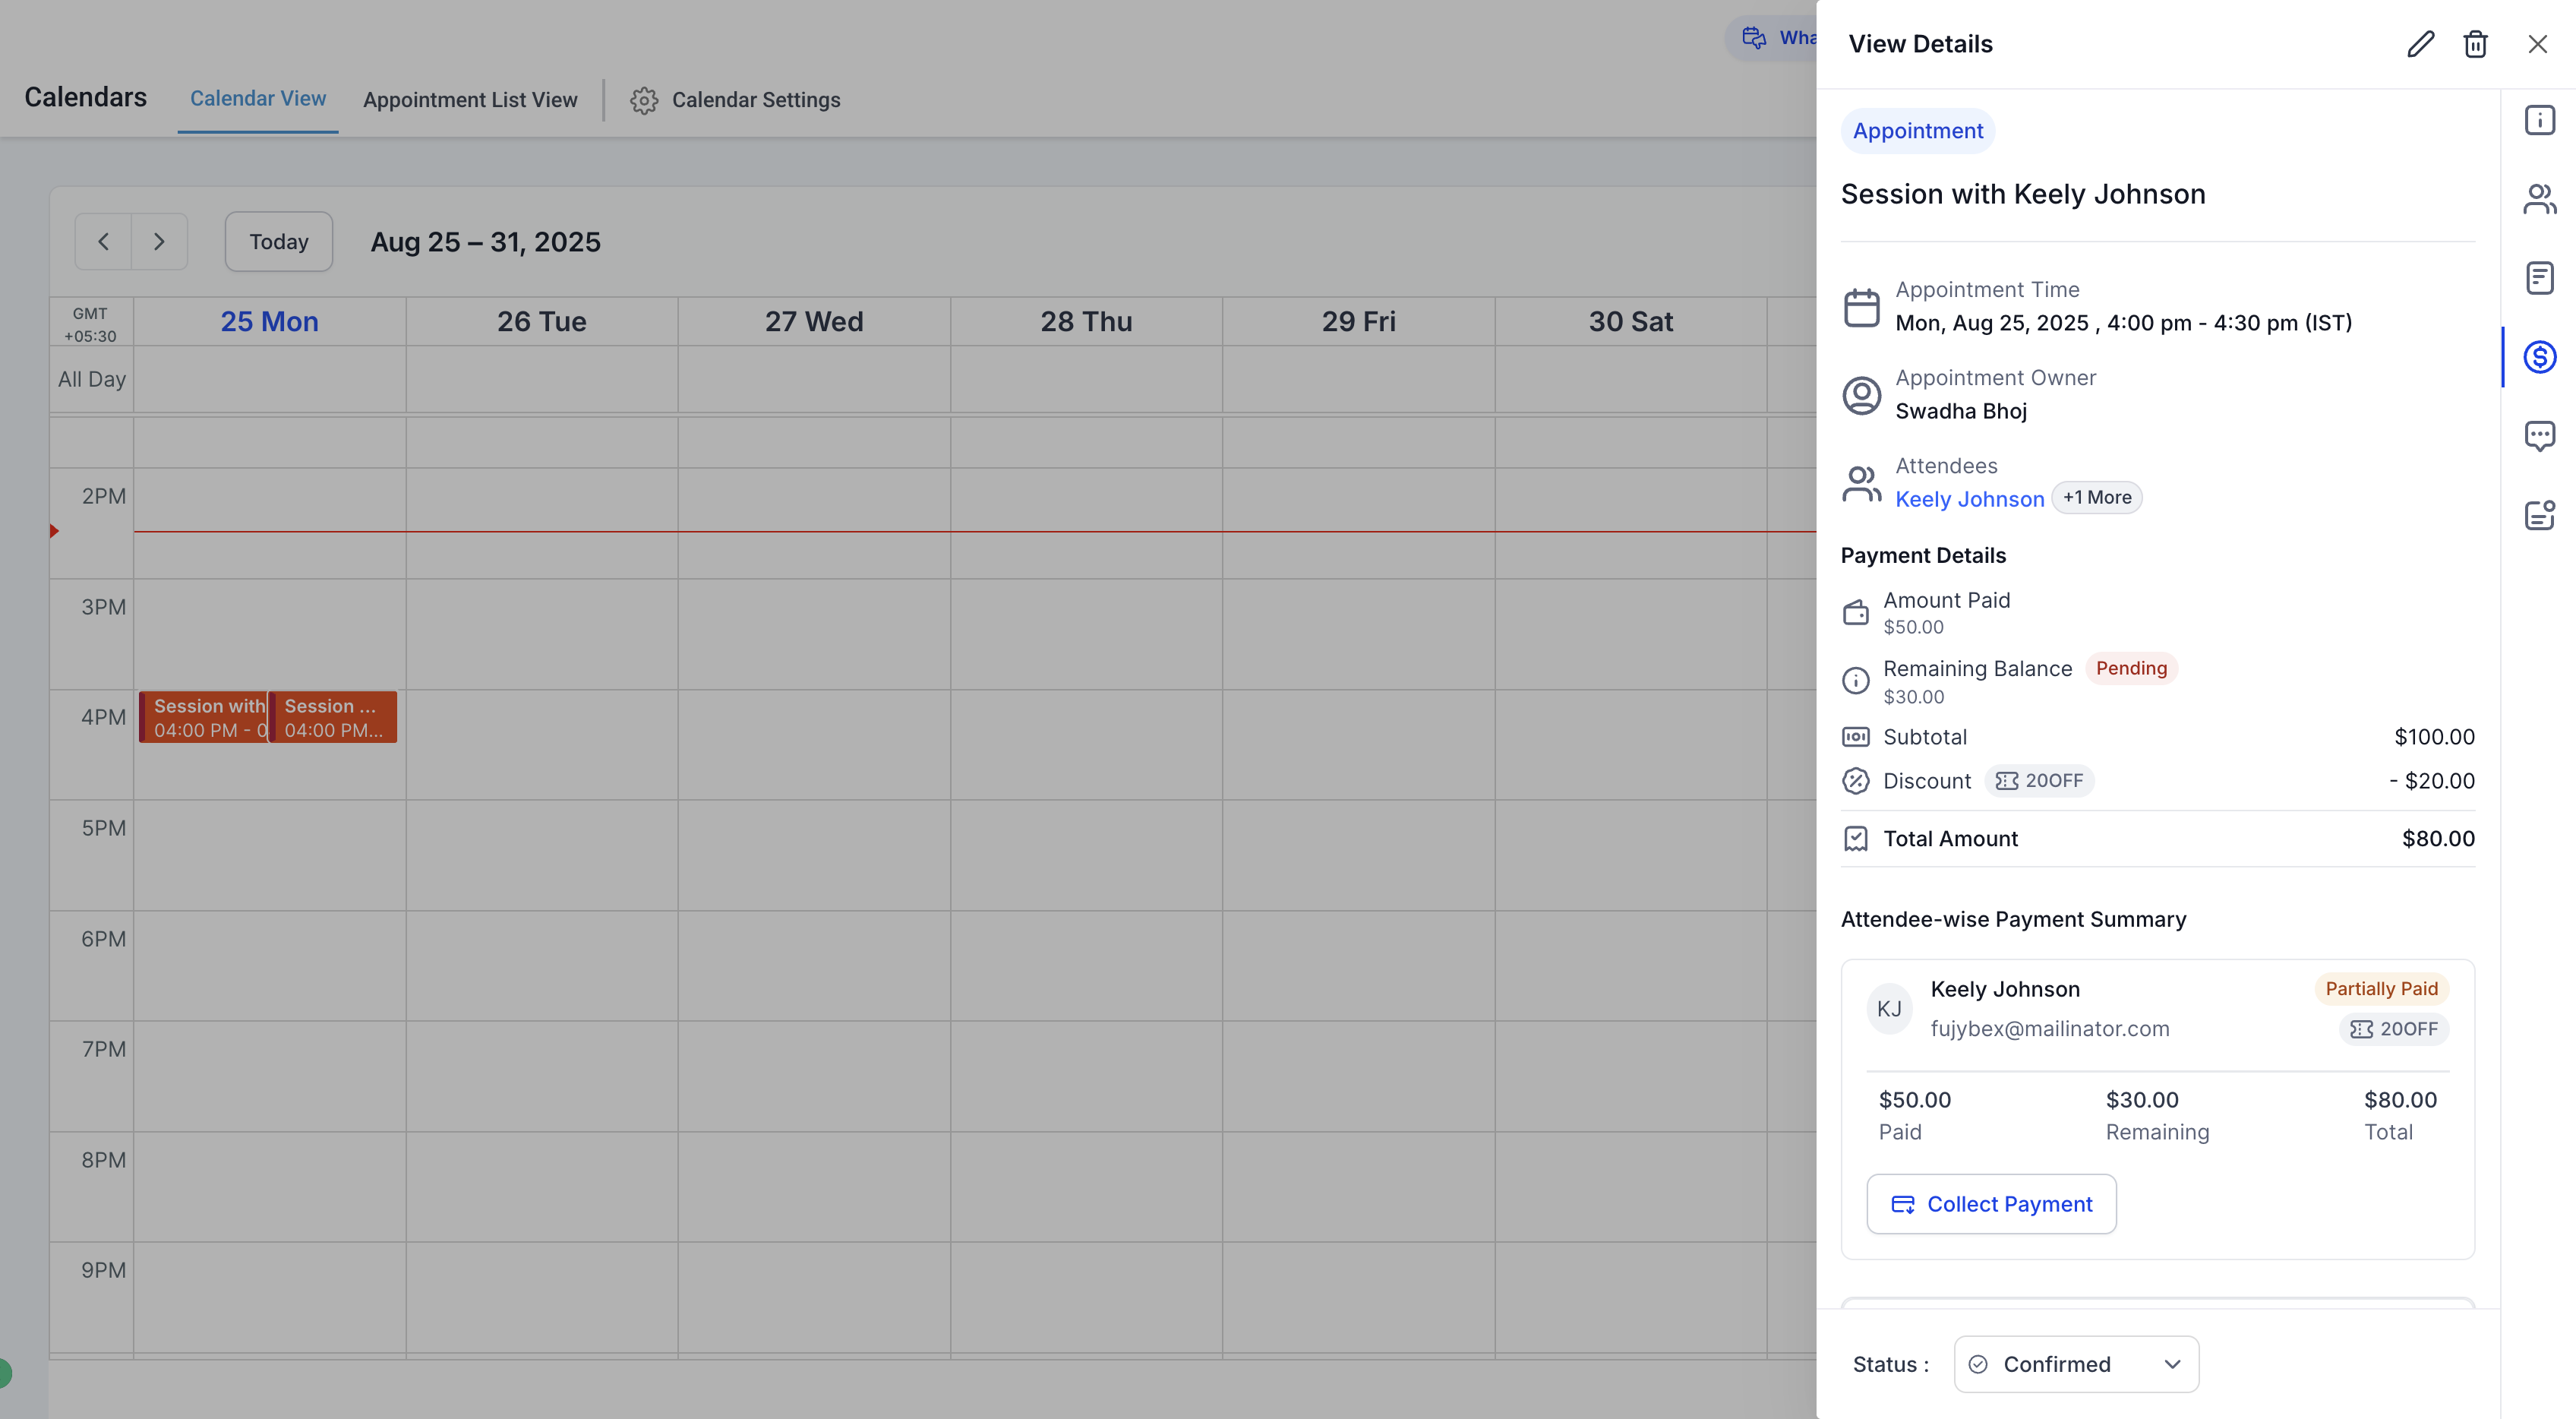
Payment Summary shows three numbers at a glance:
Amount Paid: total already collected for the appointment.
Remaining Balance: what is still owed.
Total Amount: the full cost after any coupon or discount.
Attendee-wise payment details break the totals down by person for bookings with guests. Each attendee shows as Paid, Partially Paid, or Remaining.
Transaction History lists every charge tied to the appointment, including PayPal transactions collected through the booking widget.
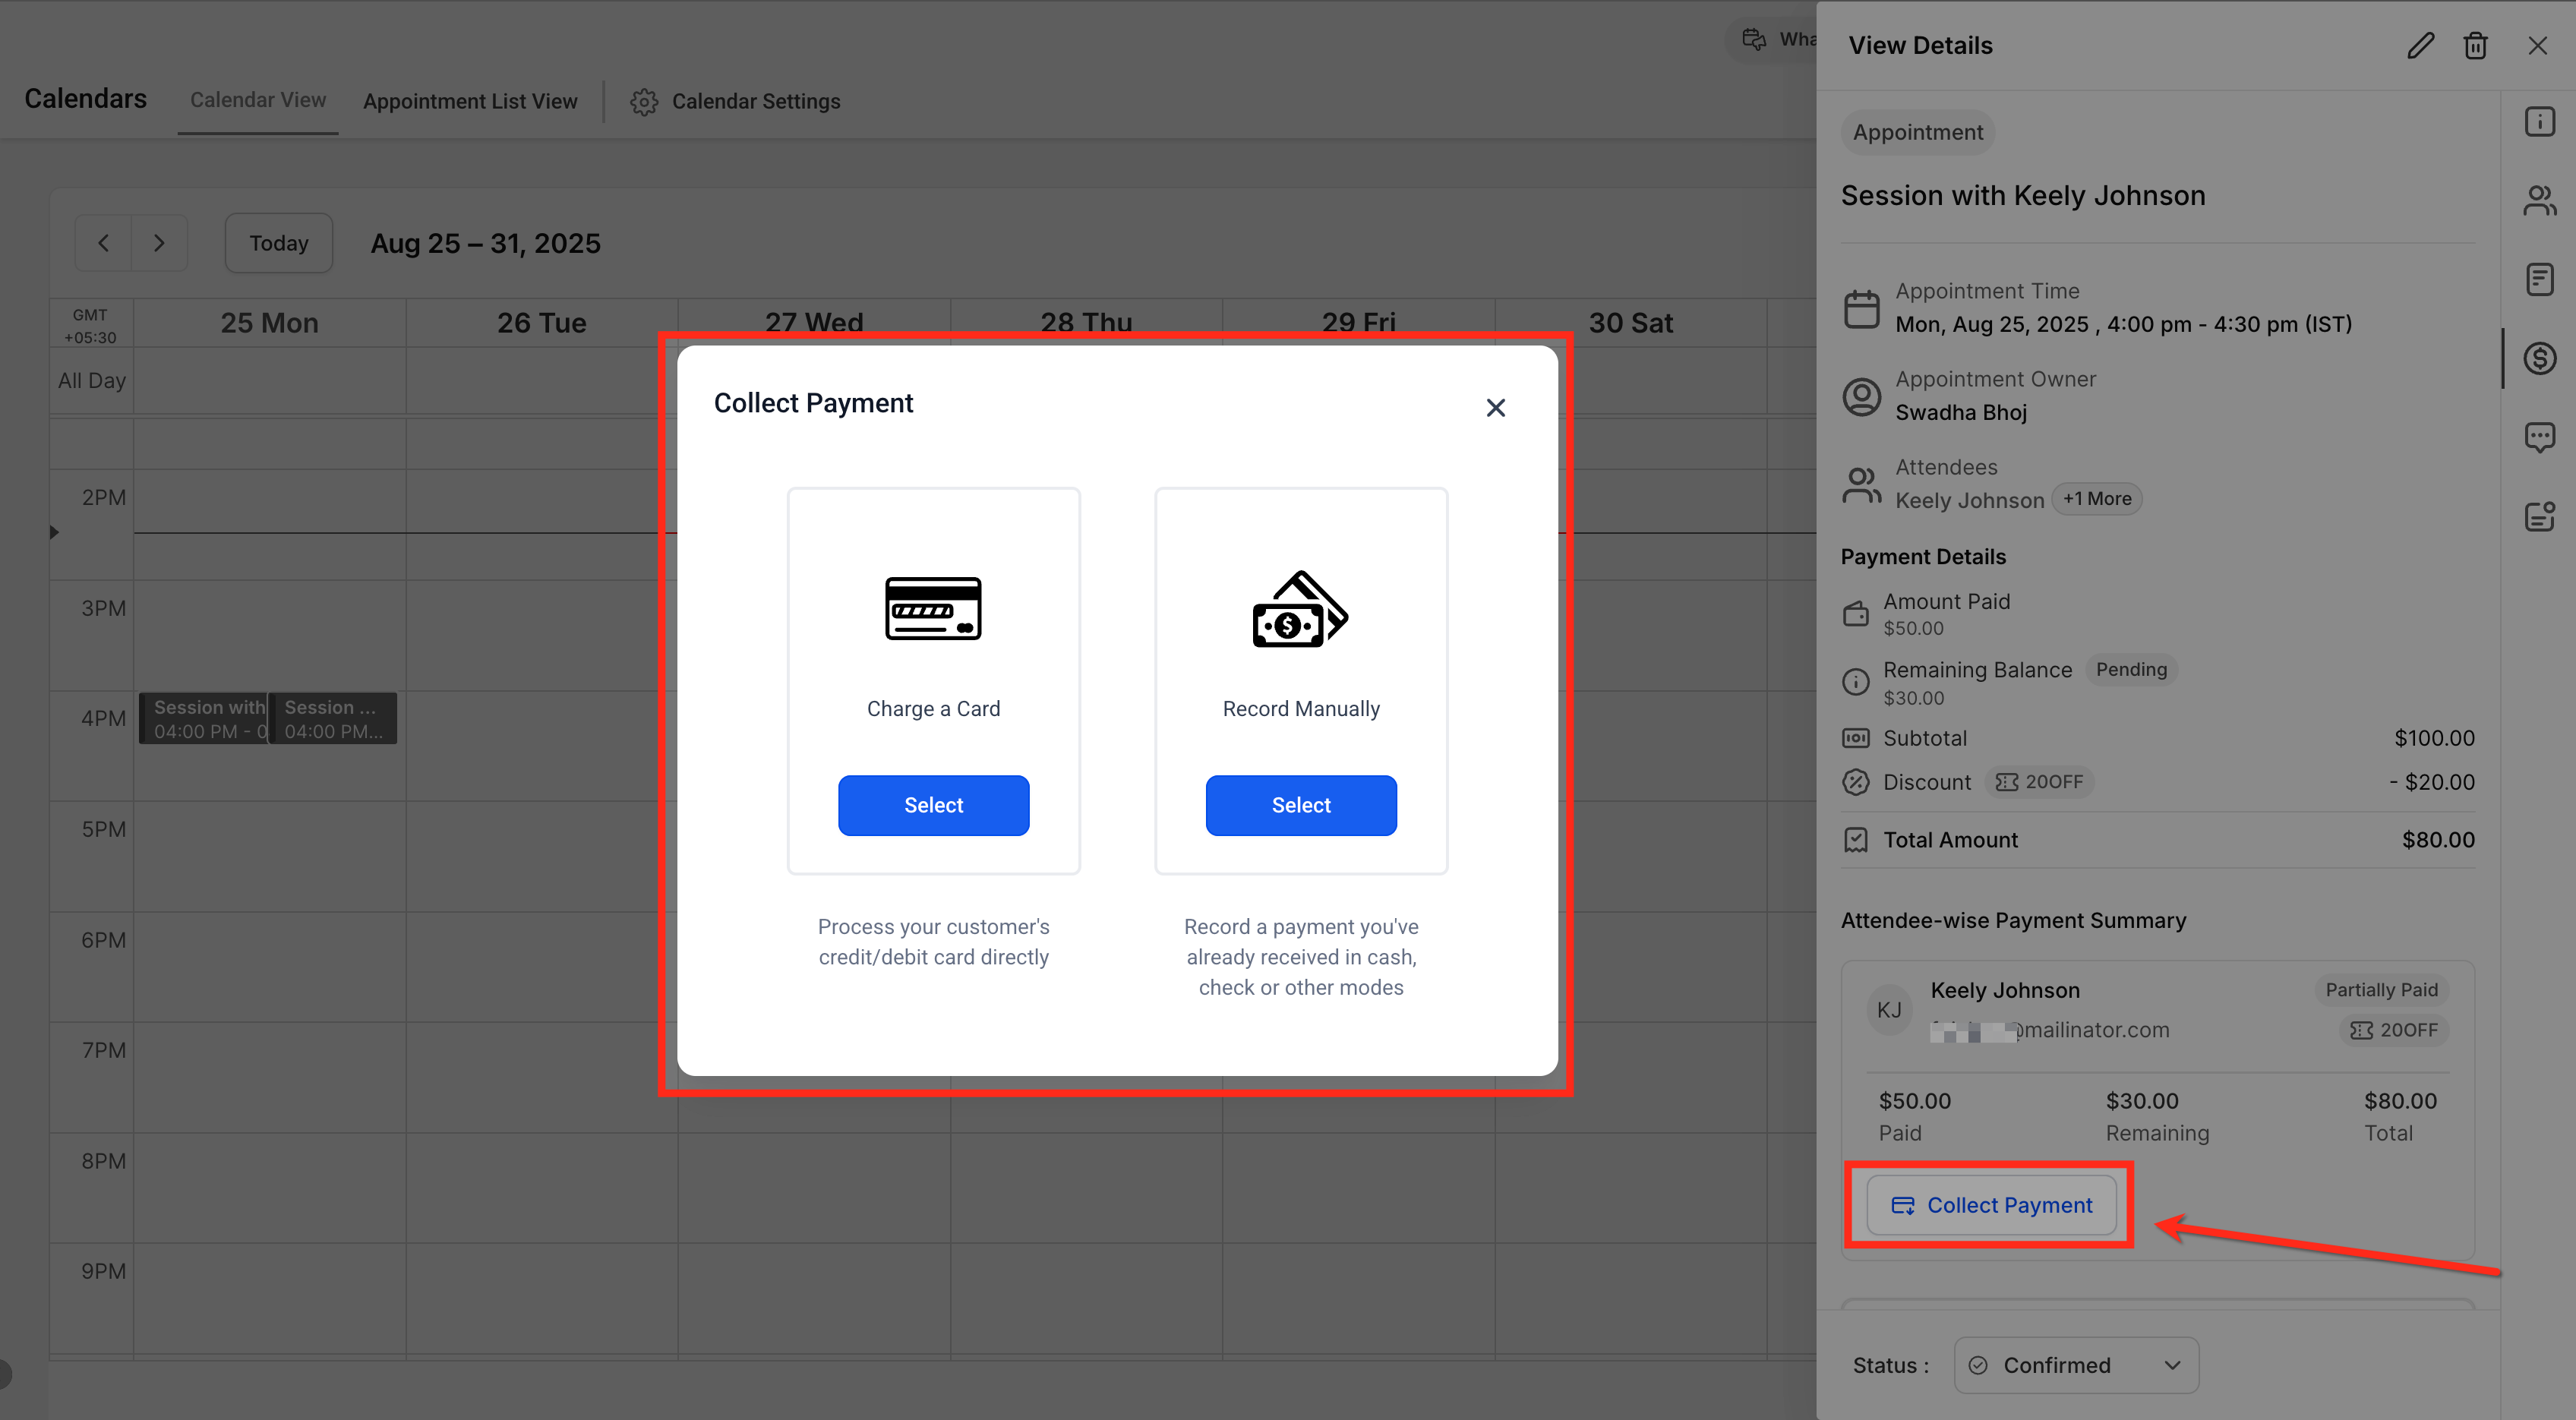
If a balance is due, a Collect Payment button appears with two options: Charge a Card to run a card on file, or Record Manually to log a payment taken outside the system, such as cash or check.
To find and use the tab:
Go to Calendars > Appointments and open the appointment.
Click the Payments tab.
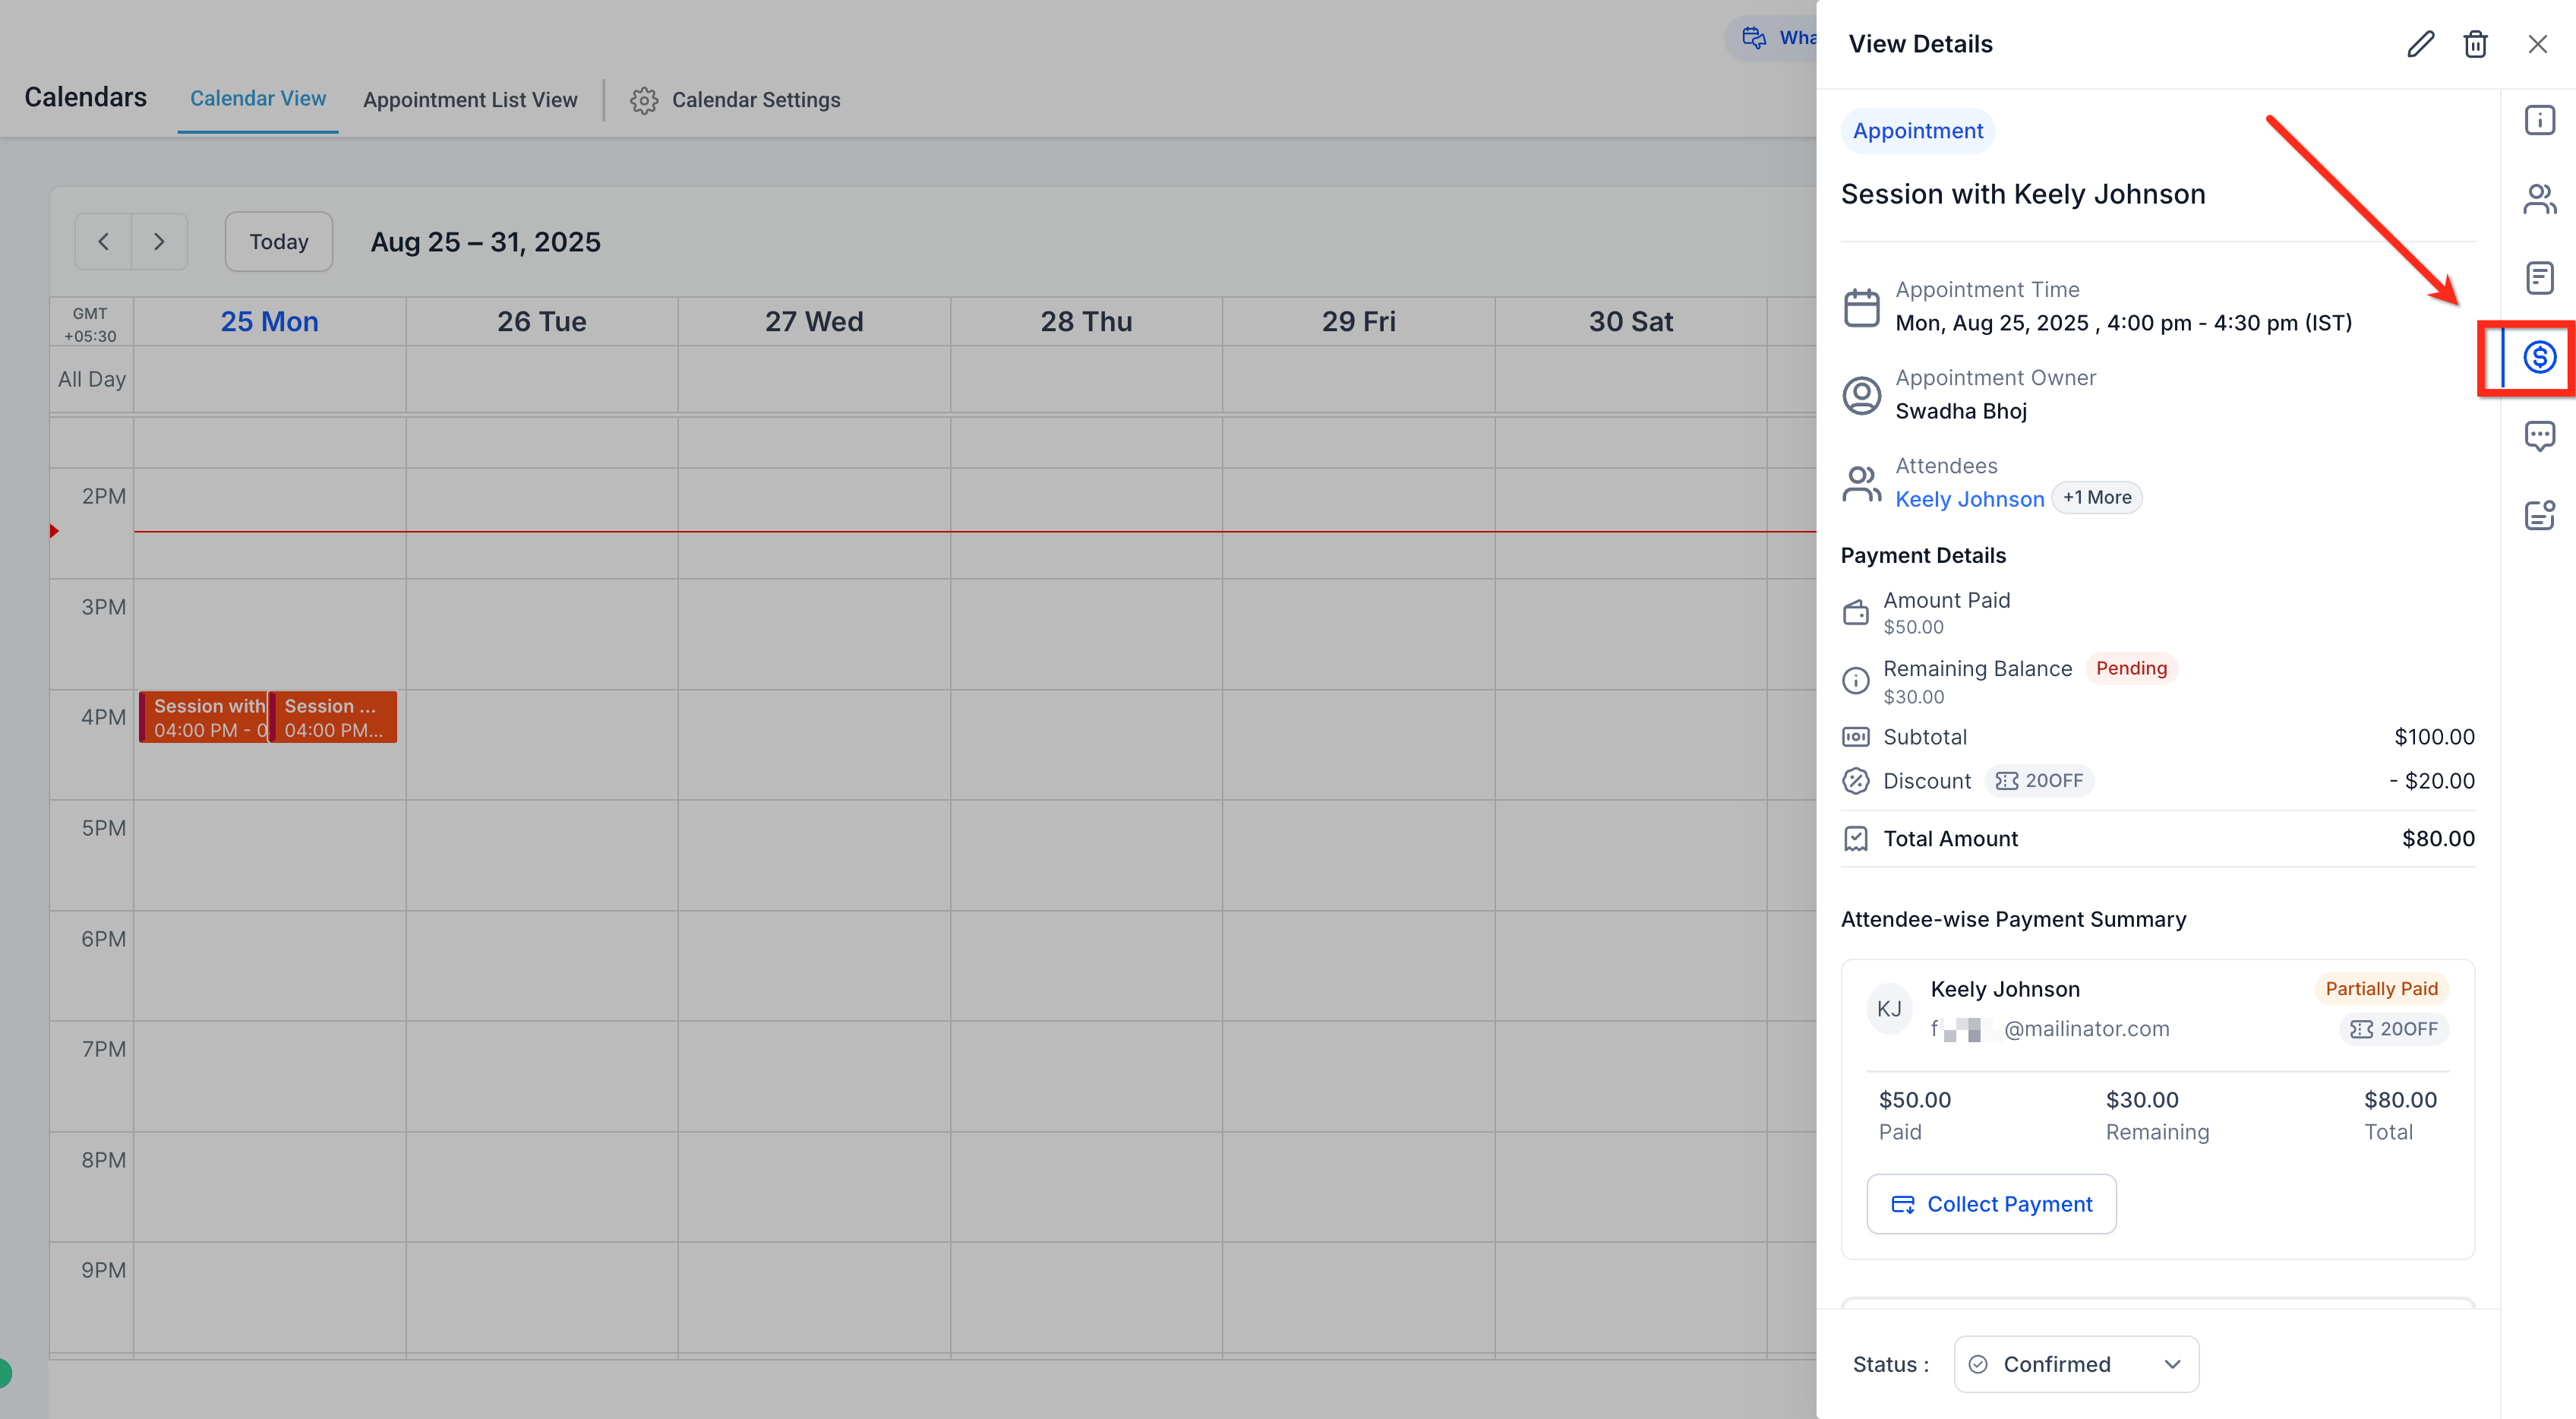
Click Collect Payment, choose Charge a Card or Record Manually, fill in the required fields, and save.
Confirm that Amount Paid, Remaining Balance, and each attendee's status updated correctly.
Refunds are handled from Payments > Transactions, or directly through your gateway (for example, from your PayPal dashboard). Once a refund goes through, it shows up in the appointment's Transaction History.
Enabling Accept Payments on a calendar automatically creates a matching Product tagged Calendar, visible under the Products tab. These calendar-linked products cannot be deleted directly from Products; remove the payment setup on the calendar instead.
Booking the appointment automatically creates an Order, visible under the Orders tab. You do not need to manage that order separately; everything can be done from the appointment's Payments tab.
Scenario | Setup / Action | What You'll See |
|---|---|---|
Pay in full at booking | Enable Accept Payments; book normally | Amount Paid equals Total Amount; attendee status = Paid |
Deposit (partial payment) | Enable Partial Payment/Deposit; collect deposit at booking | Remaining Balance shows what's due; status moves from Partially Paid to Paid once collected |
Coupon applied | Enable Coupon Codes; patient enters code on the widget | Summary shows a Discount (Coupon) line; Total Amount reflects the discount |
Guests added after booking | Edit appointment, add guests, collect per attendee | One order exists from the original booking; additional orders can be created on later saves if Collect Payment for Guest is on |
Recurring, first occurrence only | Collect for the first appointment only on the widget | First appointment shows paid; later occurrences show a balance due until collected manually |
Recurring, all occurrences | Collect for all appointments on the widget | Full series total is collected upfront and shown as paid on the initial booking |
Payments are not supported on bookings made through the older Service Menu (v1).
Payments are not supported on custom recurring appointments created directly in the appointment modal (as opposed to through the booking widget).
Partial payments do not work on recurring calendars.
Group bookings create one order for the full group at initial booking.
Editing an appointment to add guests with Collect Payment for Guest turned on can create a new order every time you save. Plan those edits carefully to avoid unintended duplicate orders.
Keep charge descriptions general (for example, "Appointment Deposit" rather than naming a specific treatment) so receipts and transaction records don't expose more patient health information than necessary.
Do I have to use Stripe for calendar payments? No. AX Pay is built into Aesthetix CRM, offers better rates than Stripe, and needs no separate account setup. Stripe, NMI, Authorize.net, Razorpay, Square, and PayPal are also supported if you prefer one of them.
Can I connect more than one payment provider? Yes. You can connect multiple gateways, but only your default gateway actually collects payments. Set the default under Payments > Integrations.
Which calendar types support payments? Service Calendars support payments across all listed providers. Razorpay, NMI, and Square are not currently available on the Classic booking widget or on Service Menu (v1) calendars.
What's the difference between Test and Live mode? Test mode lets you walk through a booking and confirm your setup without charging a real card. Switch the calendar to Live mode once you've verified everything, so patients are actually charged.
Can I collect a deposit instead of the full amount? Yes, turn on Partial Payment/Deposit in the calendar's payment settings. This is not available on recurring calendars.
Can I save a patient's card without charging them at booking? Yes, turn on Collect Card on File in the calendar's payment settings. The patient's card is saved for future use, but nothing is charged and no transaction is created until your front desk collects payment later from the Payments tab.
Where do coupon discounts show up after a patient books? The appointment's Payments tab shows a Discount (Coupon) line in the Payment Summary, and the Total Amount reflects the discounted price. Transaction History shows the charge against the discounted total.
How do I refund a patient? Go to Payments > Transactions to issue a refund, or process it directly through your gateway's dashboard. The refund then appears in the appointment's Transaction History.
What happens if I add guests to an appointment after it's booked? You can collect payment per guest from the Payments tab. Just be aware that saving edits with Collect Payment for Guest enabled can generate a new order each time, so review your setup before making repeated edits.
Why don't I see payment fields when editing a calendar? You haven't connected a payment gateway yet. Add one under Payments > Integrations first, then the Amount, Description, and Payment mode fields will appear on the calendar.
