Personalized emails feel more relevant to your patients, and relevance drives opens, clicks, and bookings. Aesthetix CRM gives you several ways to tailor a single email to each recipient without building separate campaigns: custom values (merge fields) with fallback defaults, conditional elements that show or hide content based on contact data, and a contact preview so you can confirm exactly how the email will look before you send.
This article covers all of them. For segmenting your audience, see the Contacts area. To automate multi-step follow-up, see Email Sequences.
Custom values, also called merge fields, pull contact data such as first name or appointment details into an email so each recipient sees their own information. The challenge is missing data: when a contact field is empty, an email can display "Hi ," instead of "Hi Sarah,". Fallback default values solve this.
When the related contact field is empty, the email displays the default value you configured for that specific custom value instead of leaving the space blank. You can add defaults to custom values in subject lines, preview text, and email body content across campaign emails, workflow emails, bulk emails, and email templates.
Cleaner personalization: Prevents blank spaces when fields such as first name, practice name, or appointment details are missing.
More professional emails: Keeps subject lines, preview text, and body content polished before they reach the recipient.
Flexible messaging: Allows different defaults for the same custom value in different email contexts.
Works with incomplete data: Lets you personalize even when some contact records are incomplete.
Better readability: Keeps messages natural and complete, so recipients never see awkward gaps or broken sentences.
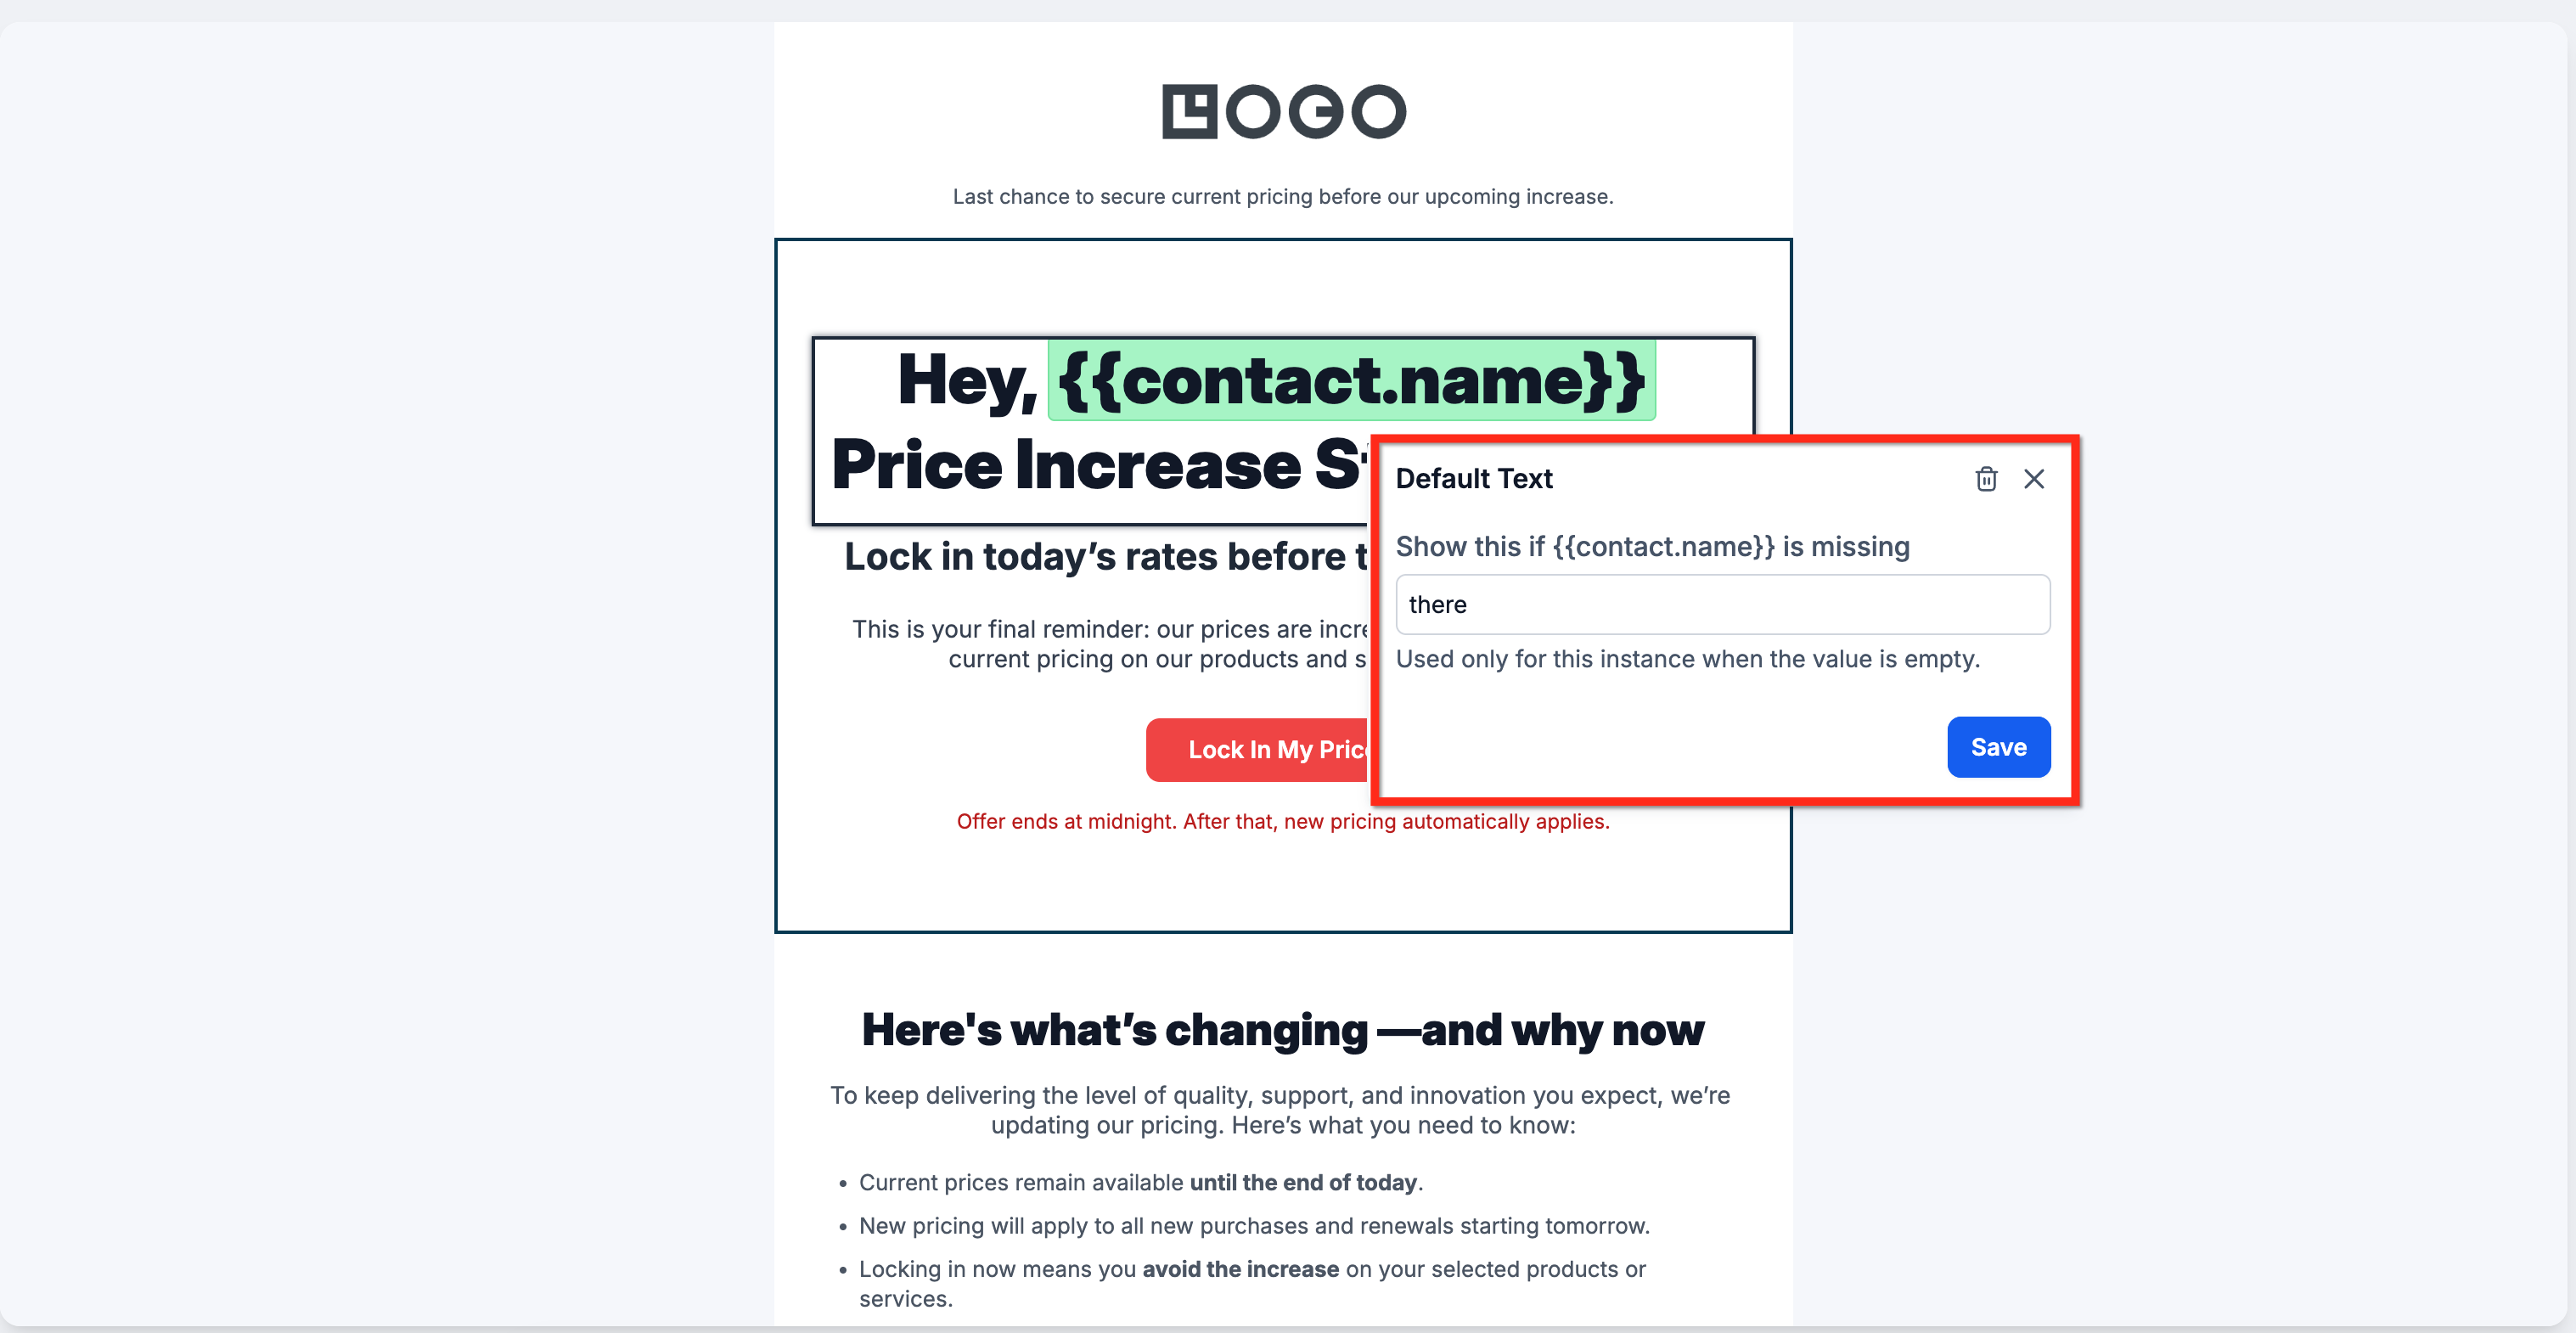
Defaults only display when the contact field is missing or empty. They never update, replace, or overwrite the contact's saved data. You can even use a different default each time the same custom value appears, even within the same email. For example, if {{contact.first_name}} appears twice in one email, one instance can fall back to "there" while another falls back to "friend".
Example 1: Missing first name
Body text: Hey {{contact.first_name}}, we are so glad you booked with us!
Default value: "there"
If first name exists: Hey Sarah, we are so glad you booked with us!
If first name is missing: Hey there, we are so glad you booked with us!
Example 2: Subject line personalization
Subject: Hi {{contact.first_name}}, your appointment is confirmed
Default value: "friend"
If first name exists: Hi John, your appointment is confirmed
If first name is missing: Hi friend, your appointment is confirmed
Custom value tags use visual indicators so you can tell at a glance whether a default has been set. Hovering over a configured custom value shows the default value in a tooltip.
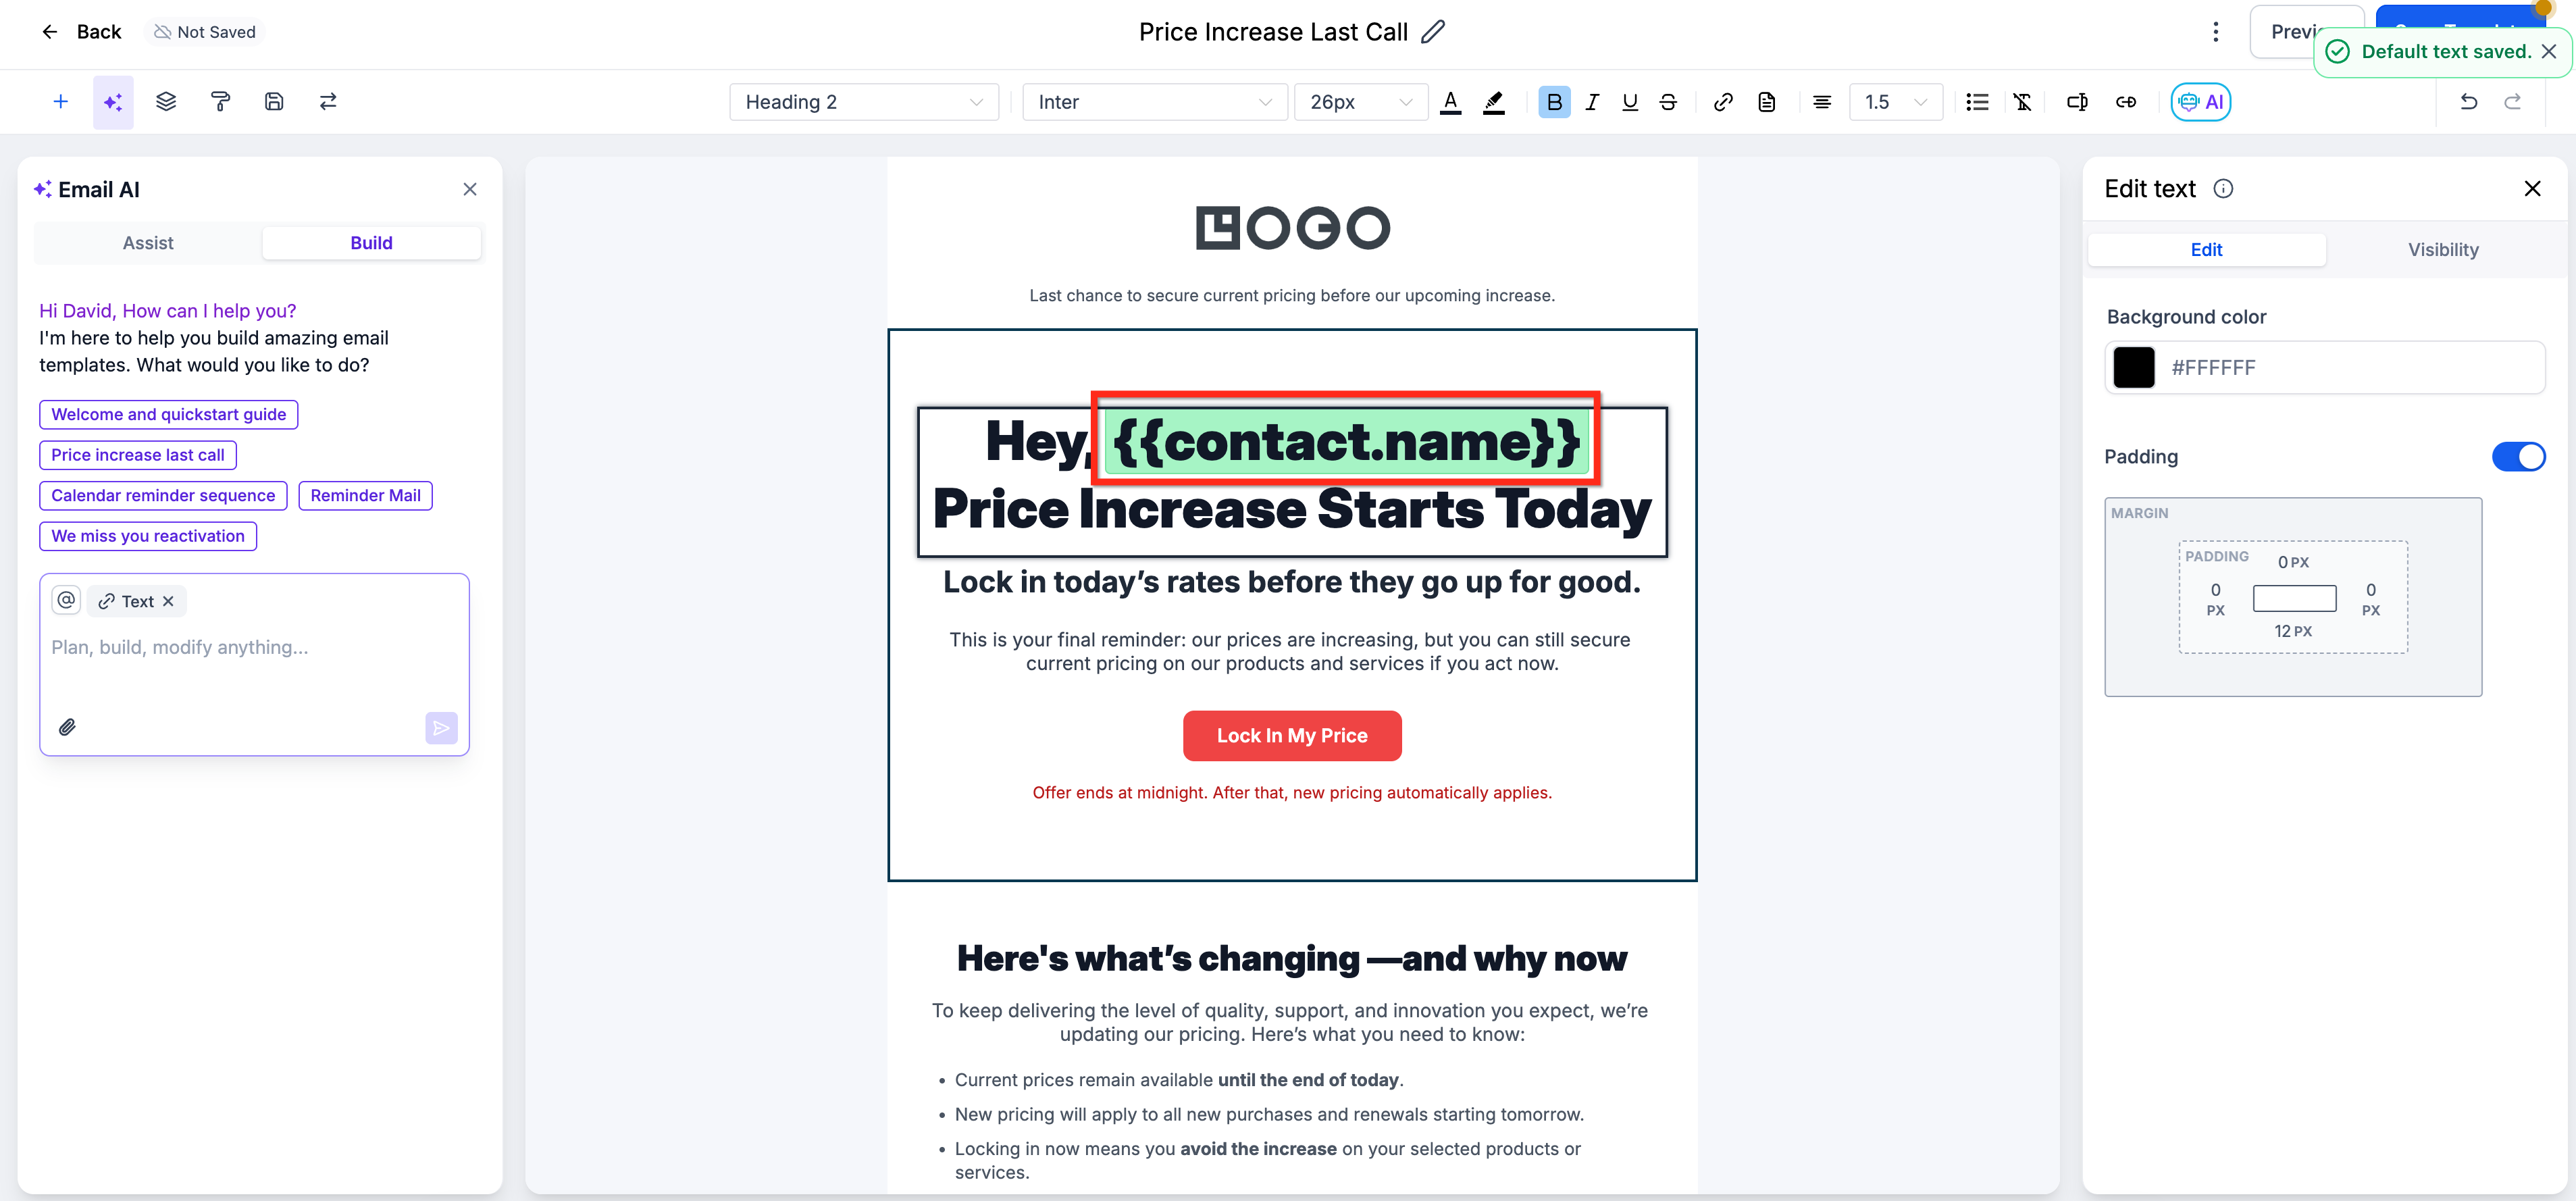
Green highlighted custom value: A default value has been set.
Standard or grey custom value: No default value has been set.
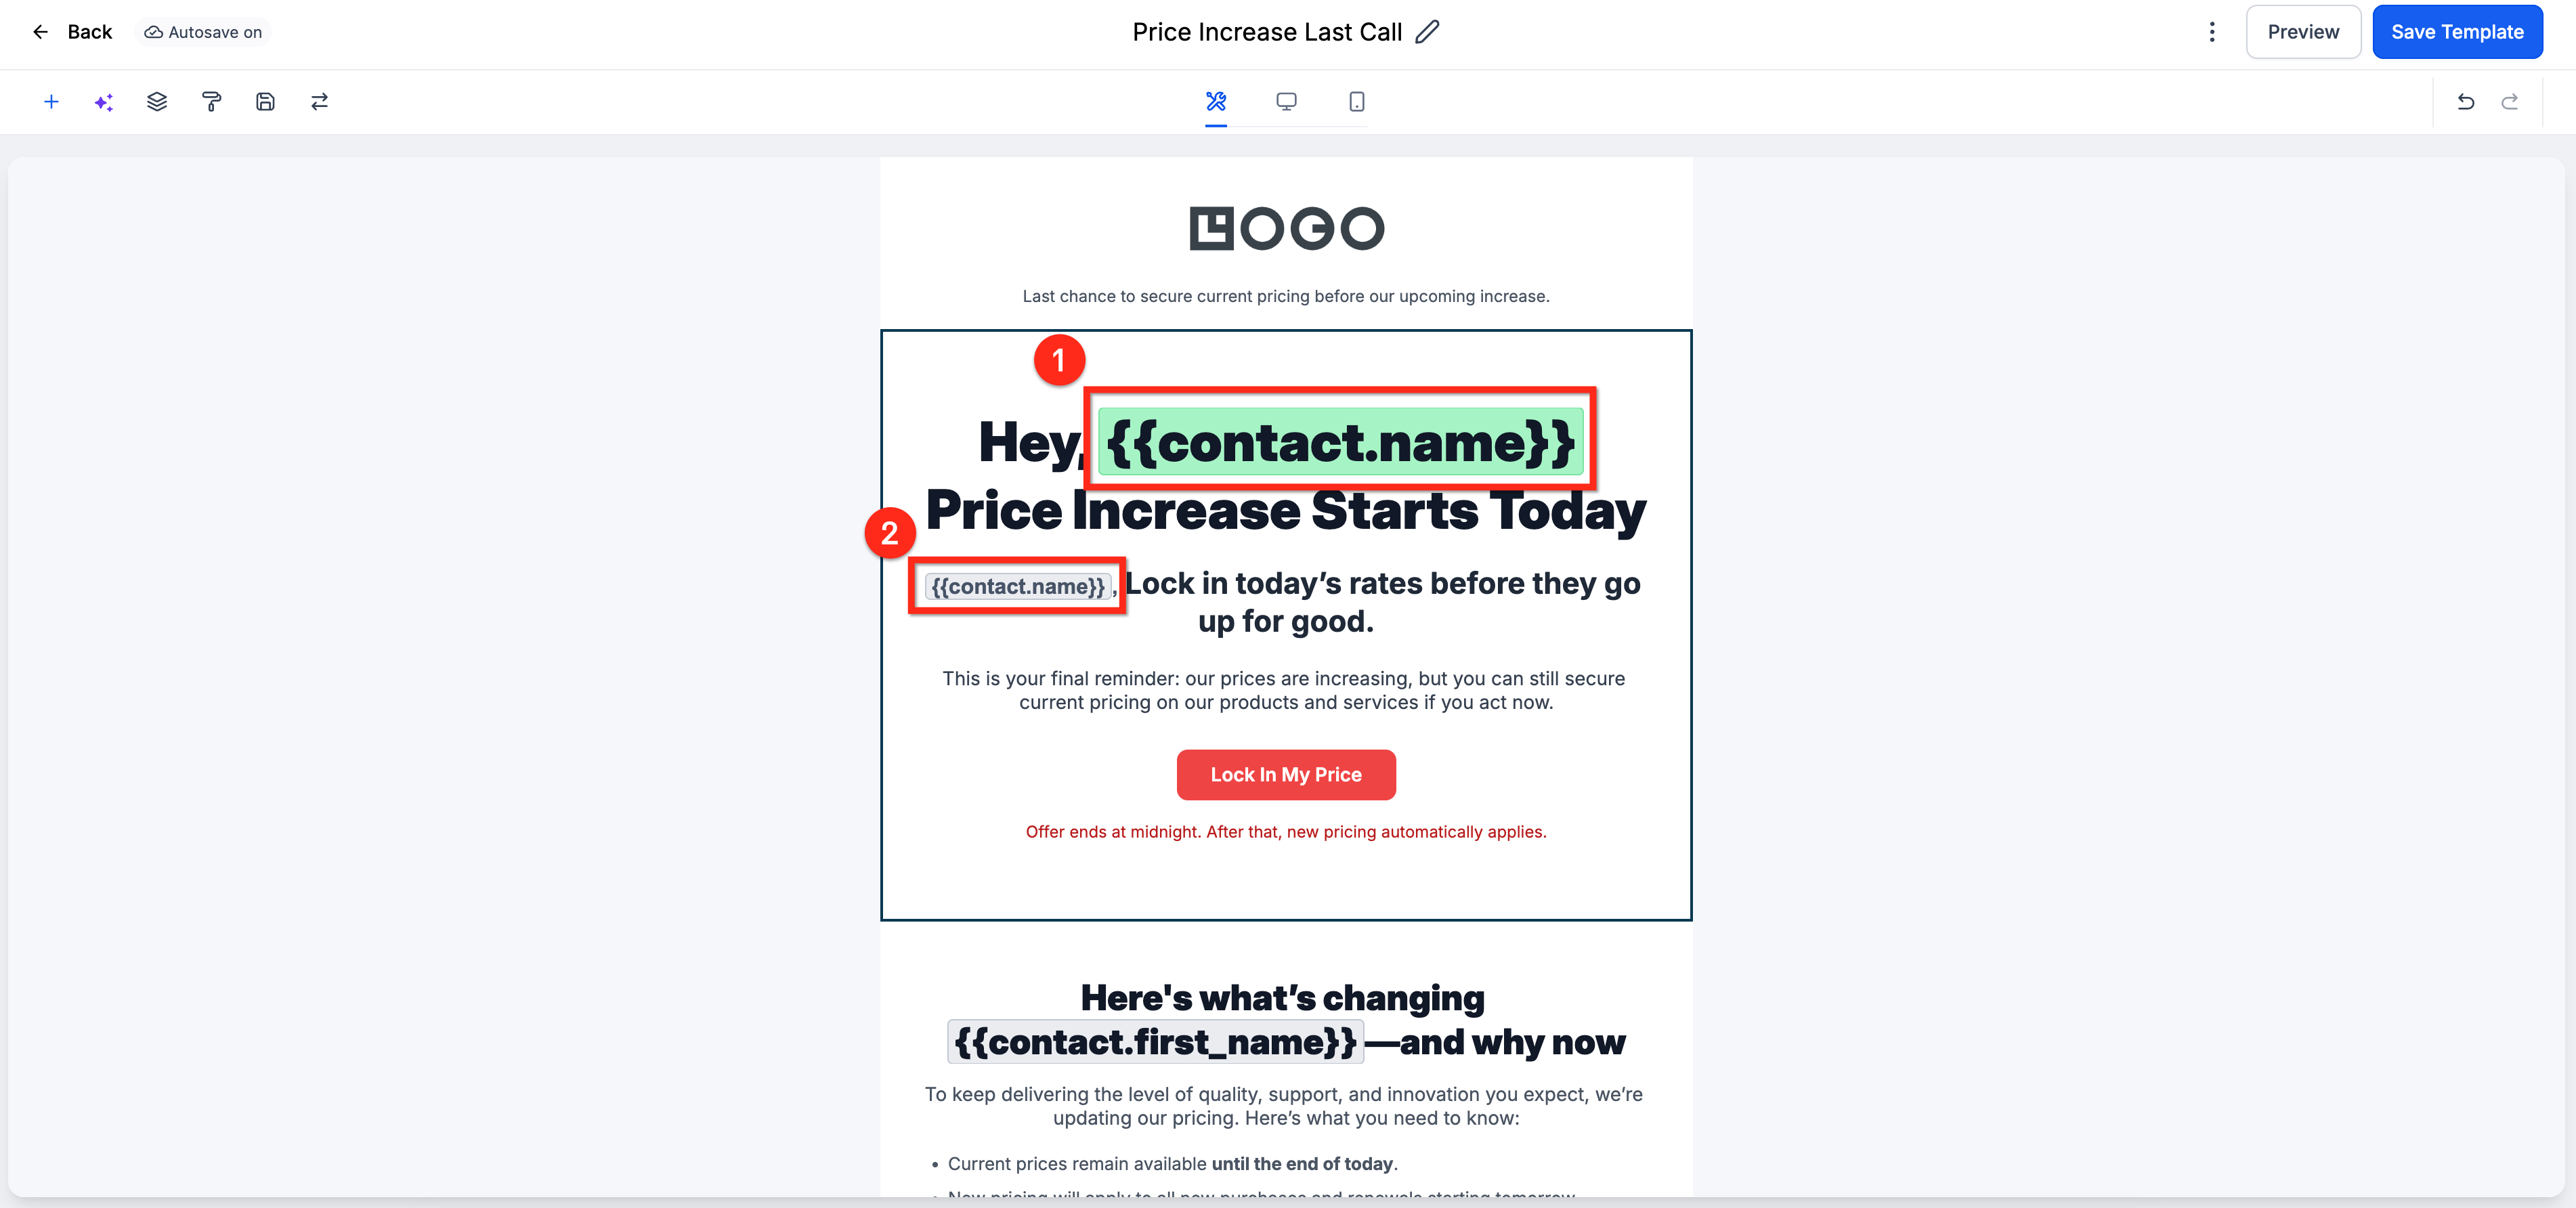
Create or edit a campaign email, template, workflow email, or bulk email action. Add or locate the custom value you want to personalize, such as {{contact.first_name}}.
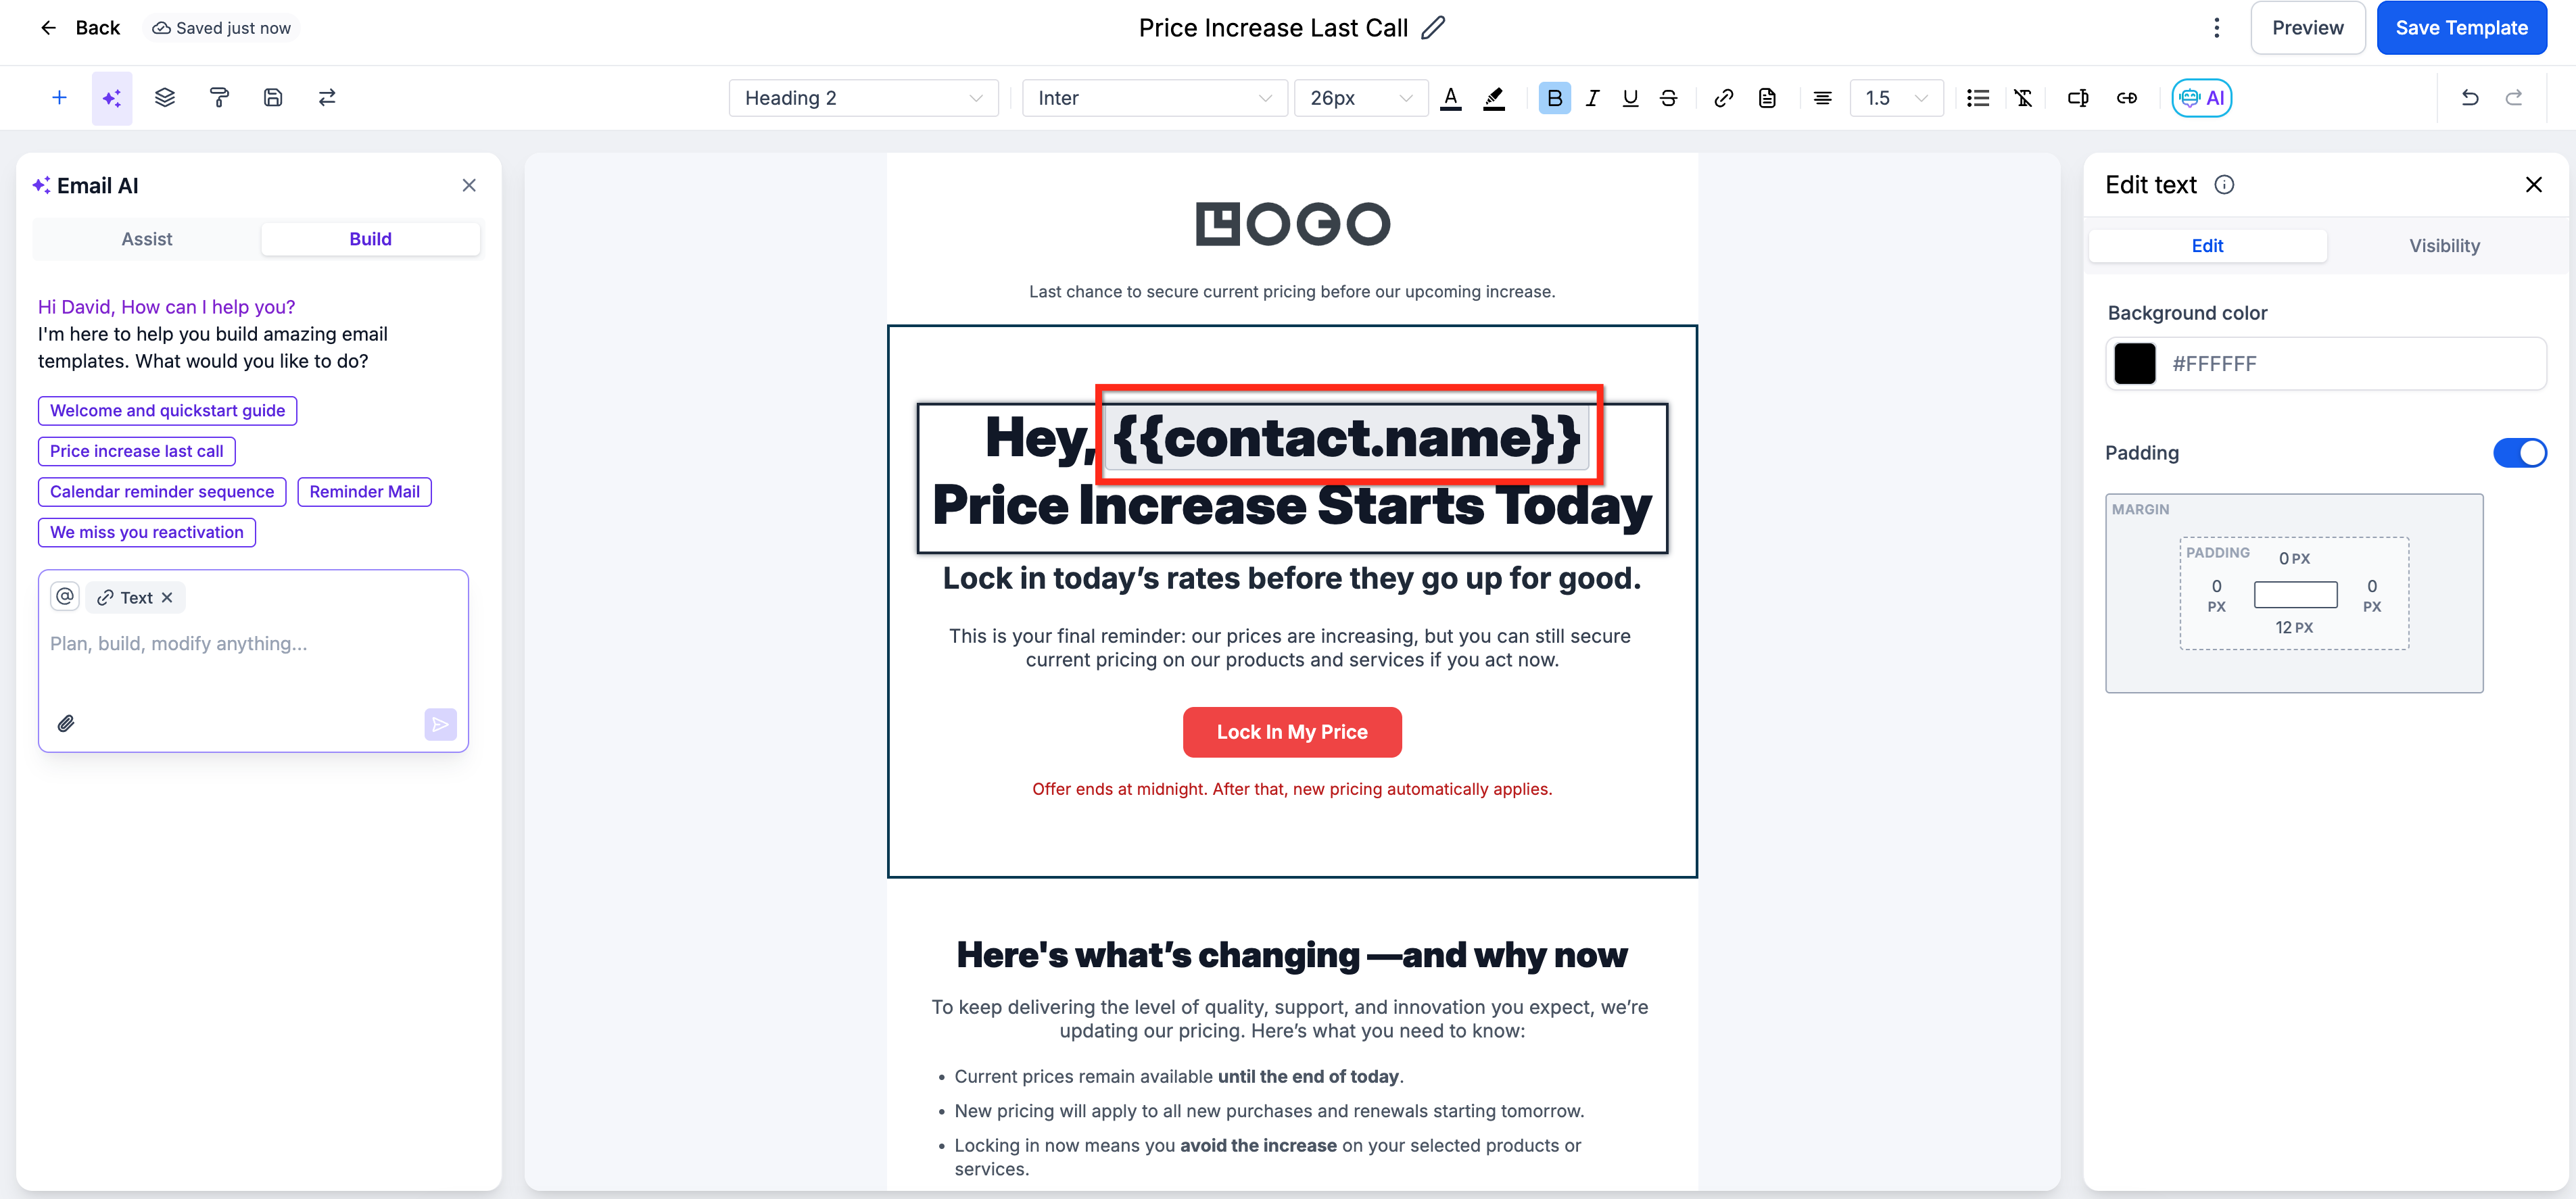
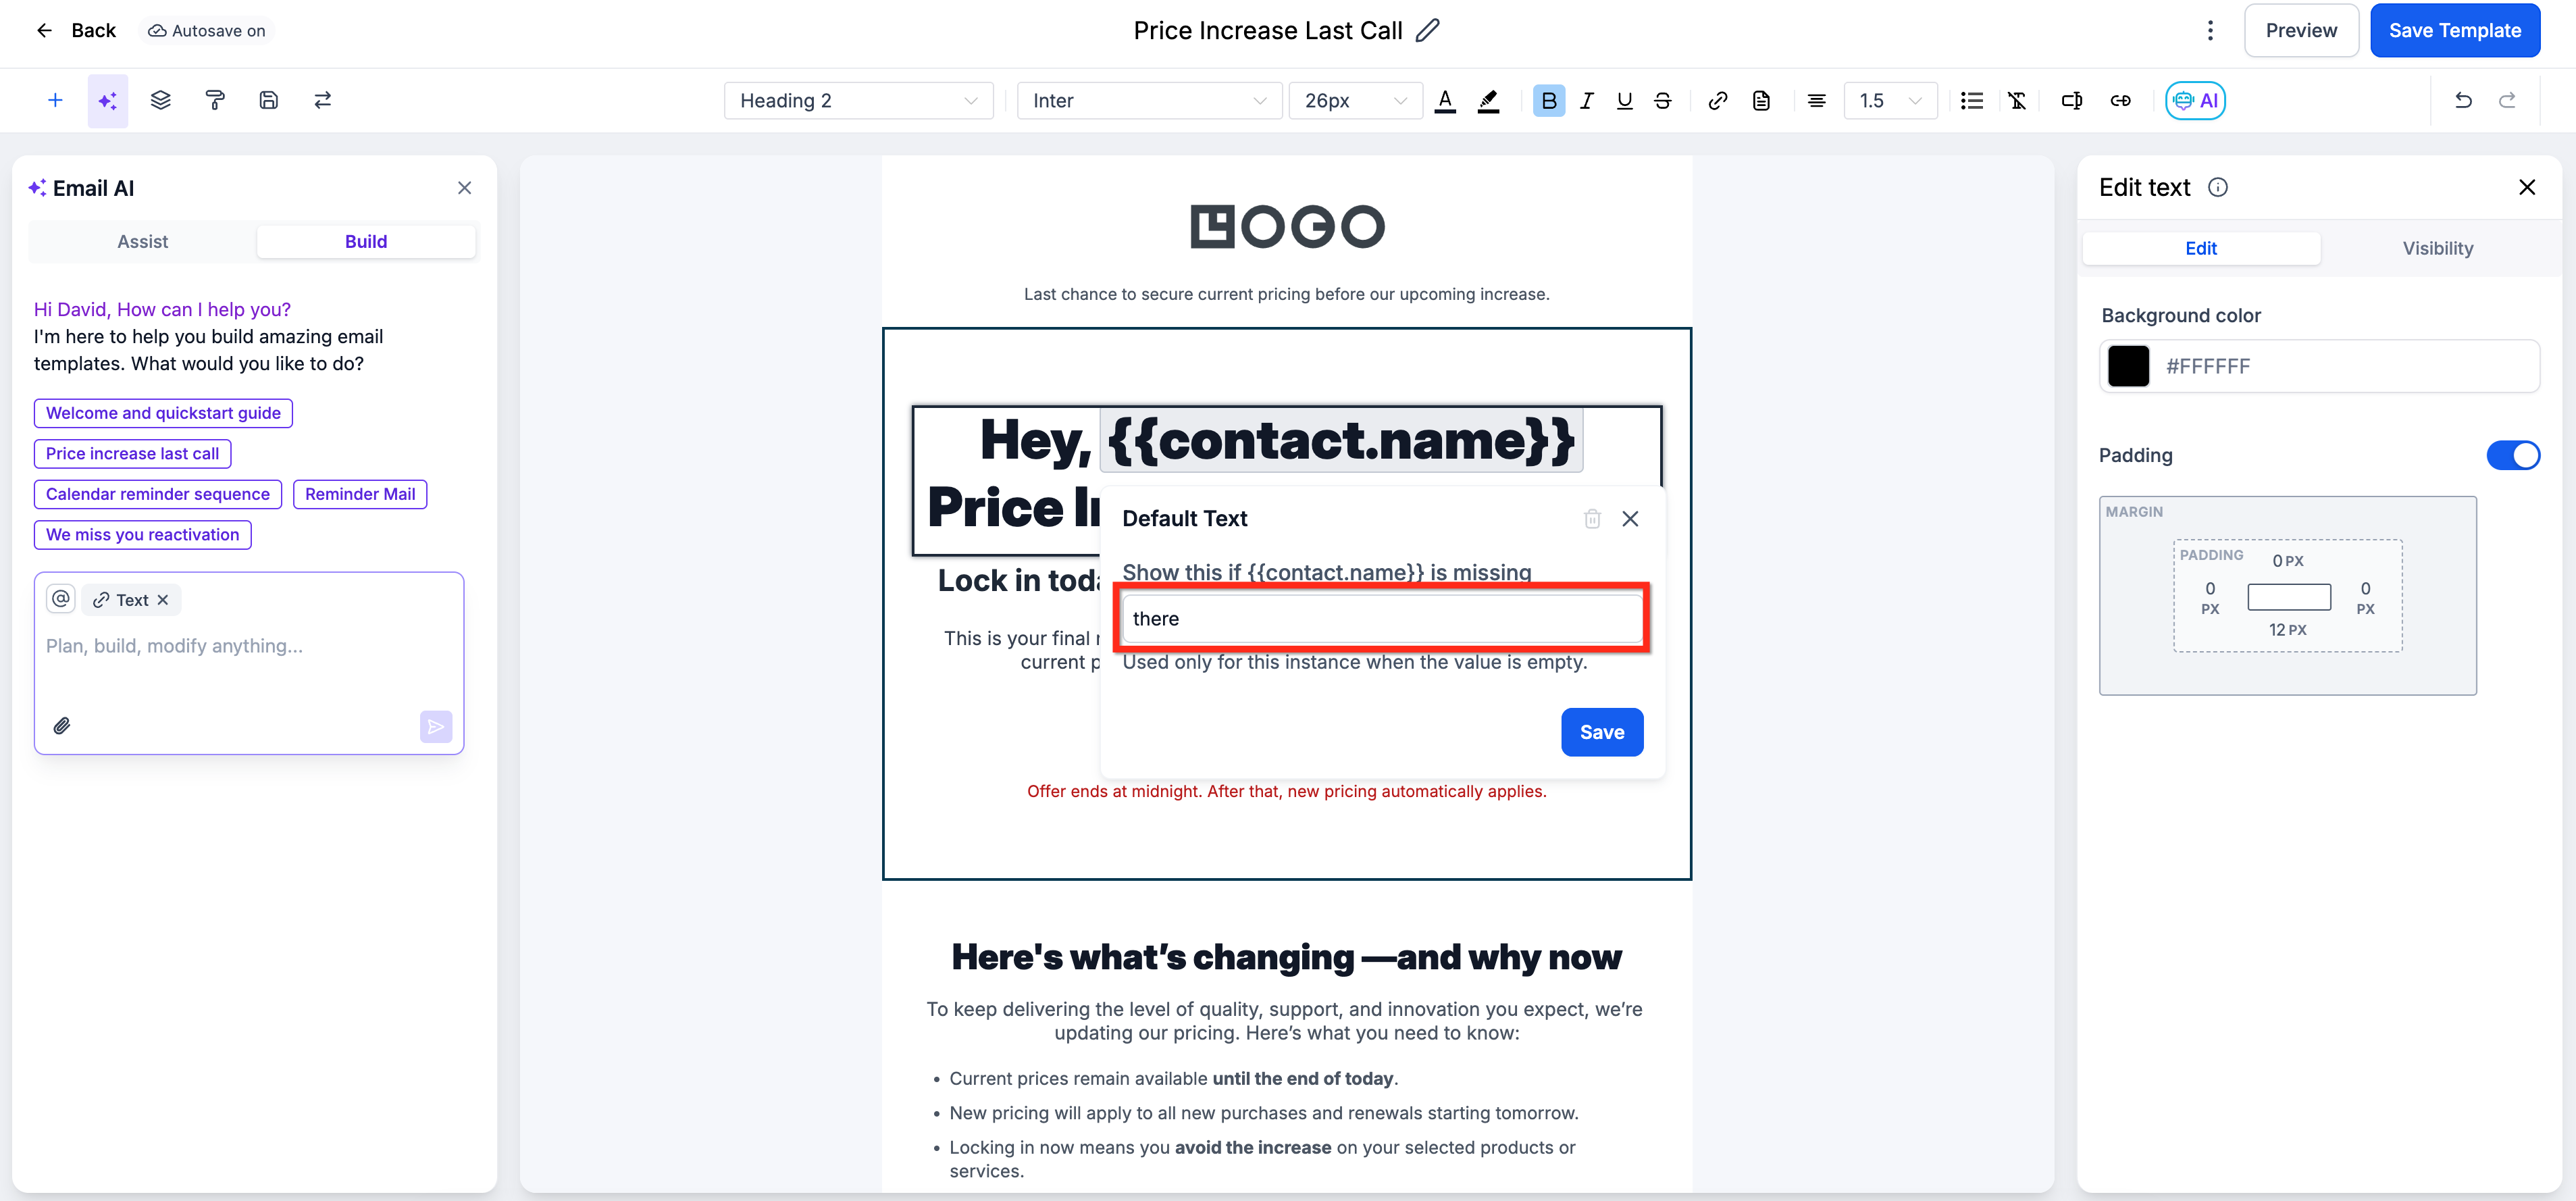
Click the custom value to open the Default Text Editor.
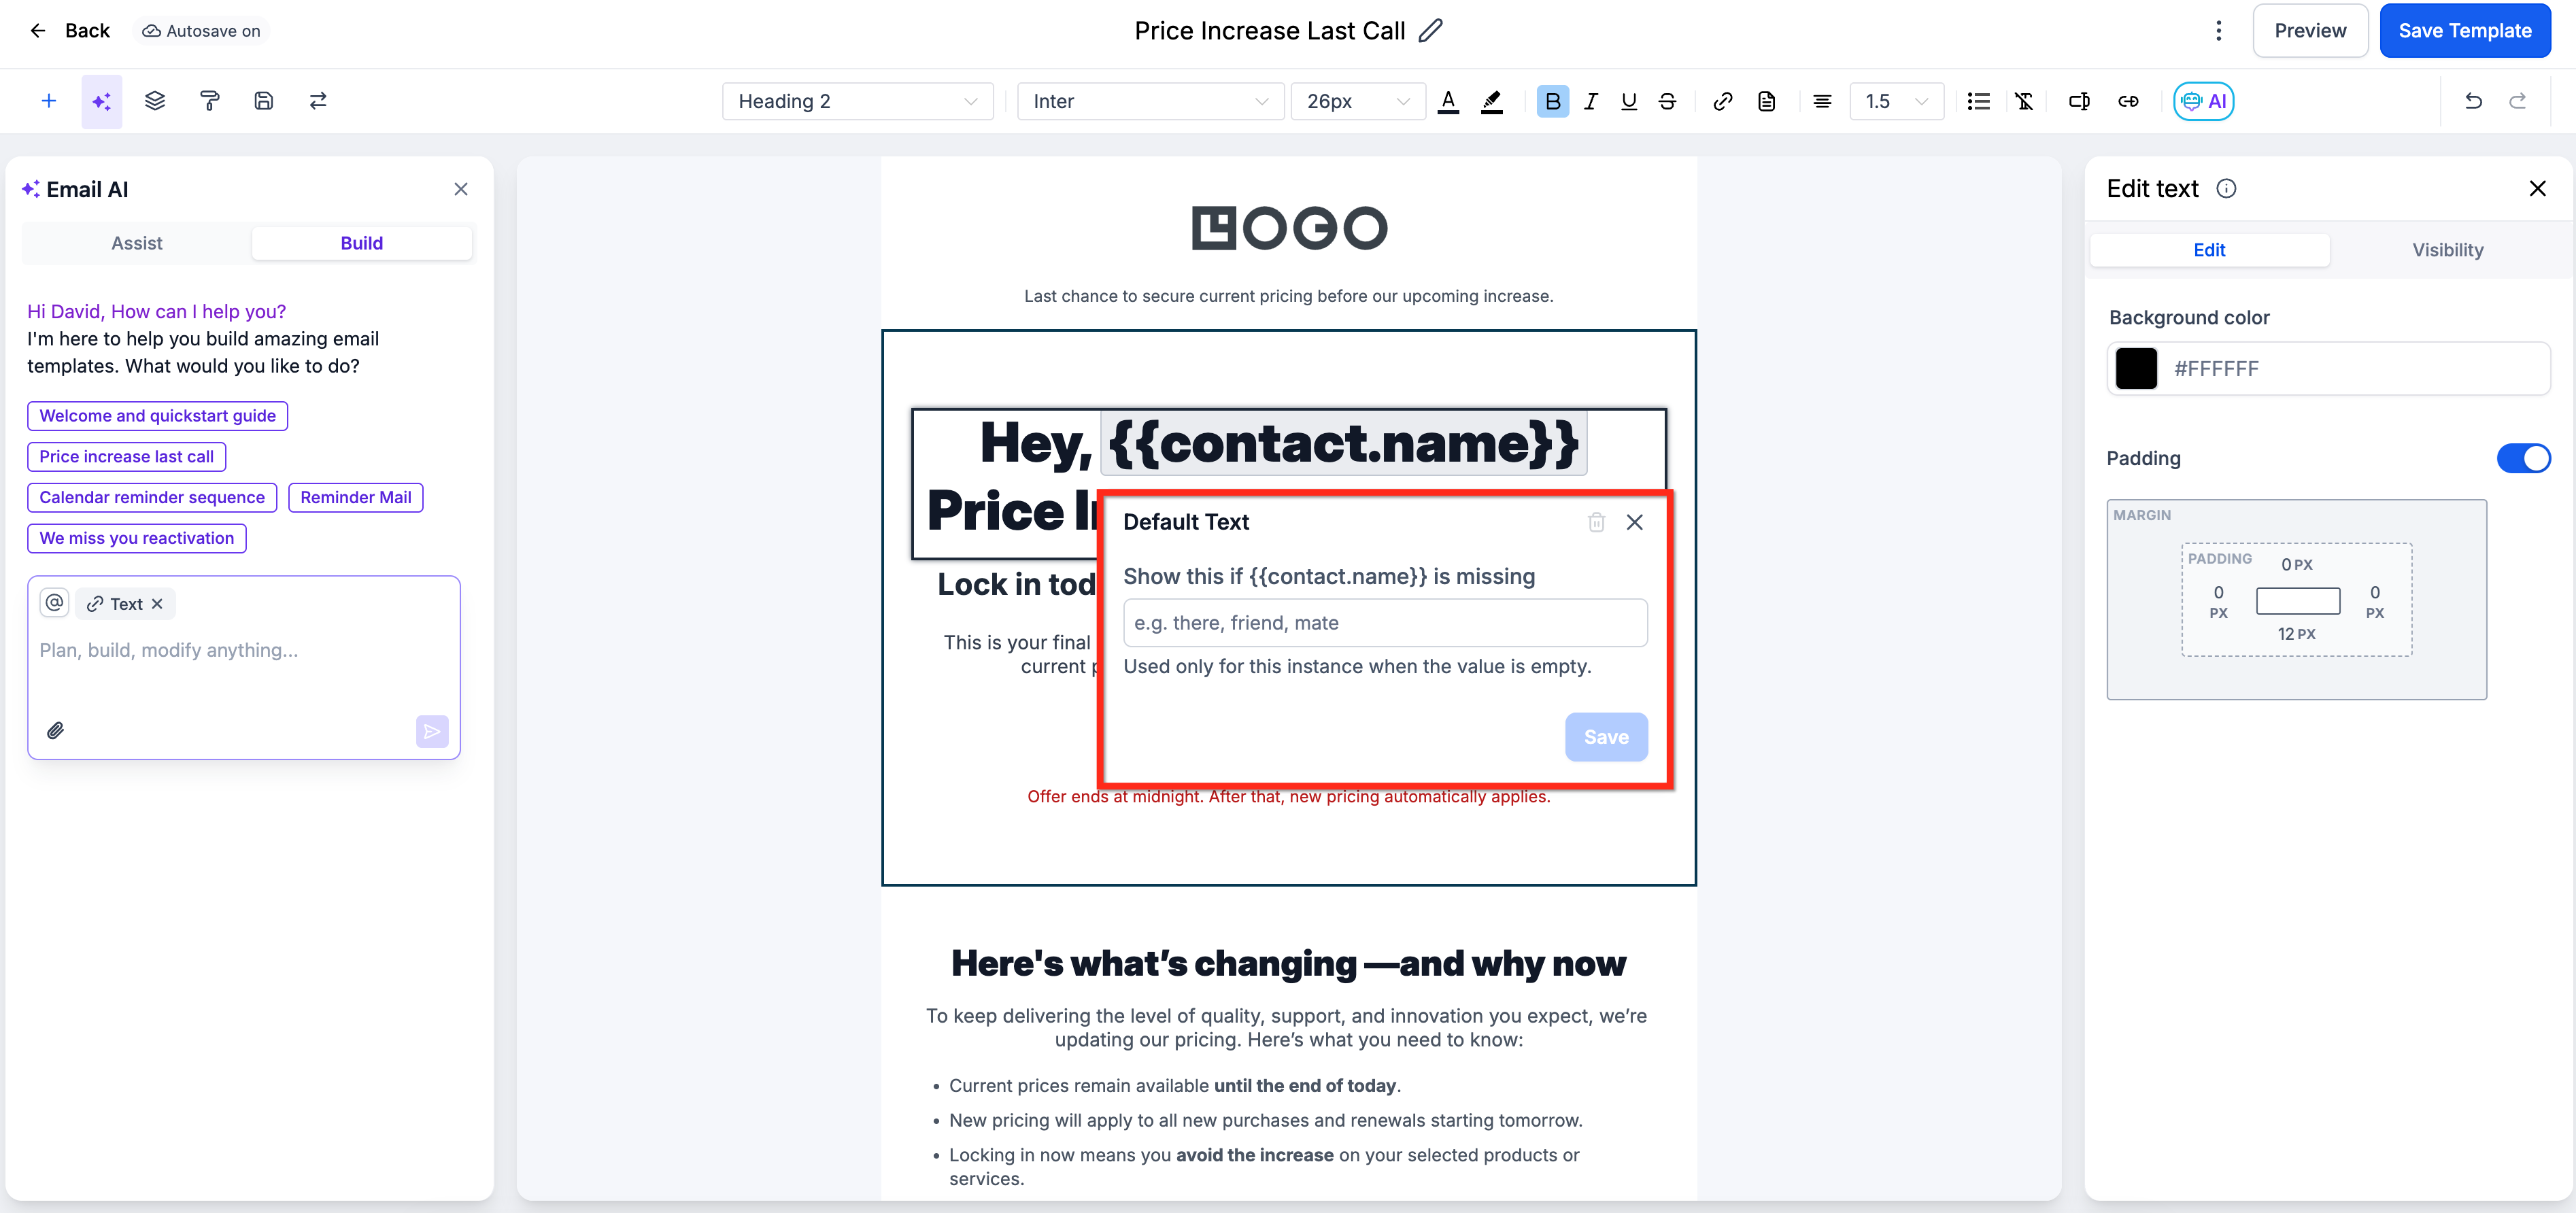
Enter the fallback text you want to display when the value is missing, then click Save.
Confirm the custom value is highlighted in green, indicating a default has been set.
You can also type the fallback directly in the email builder using this syntax:
{{default contact.firstname "there"}}
This uses the contact's first name when available and falls back to "there" when {{contact.firstname}} is blank.
A conditional element shows content, such as an image or a block of text, only when a contact meets criteria you set. This lets you tailor messaging to individual contacts automatically inside one email instead of building separate campaigns.
Common uses for a med spa:
Location-based content: Show a different image or offer depending on which location a patient belongs to.
Field-based text: Change a text element based on a contact field, such as patient type or treatment interest.
Personalization: Show customized content to each contact so your emails feel more relevant.
Time savings: Avoid creating multiple smart lists and separate campaigns. Use one campaign with conditional elements instead.
Increased engagement: Content tailored to the recipient increases the likelihood of higher click-throughs, replies, and bookings.
Simplified management: Manage all content variations in one place, reducing complexity and the chance for error.
Go to Marketing → Email Marketing.
Create an email campaign or template.
Select any element and open the Visibility tab.
Enable the Conditional Element toggle.
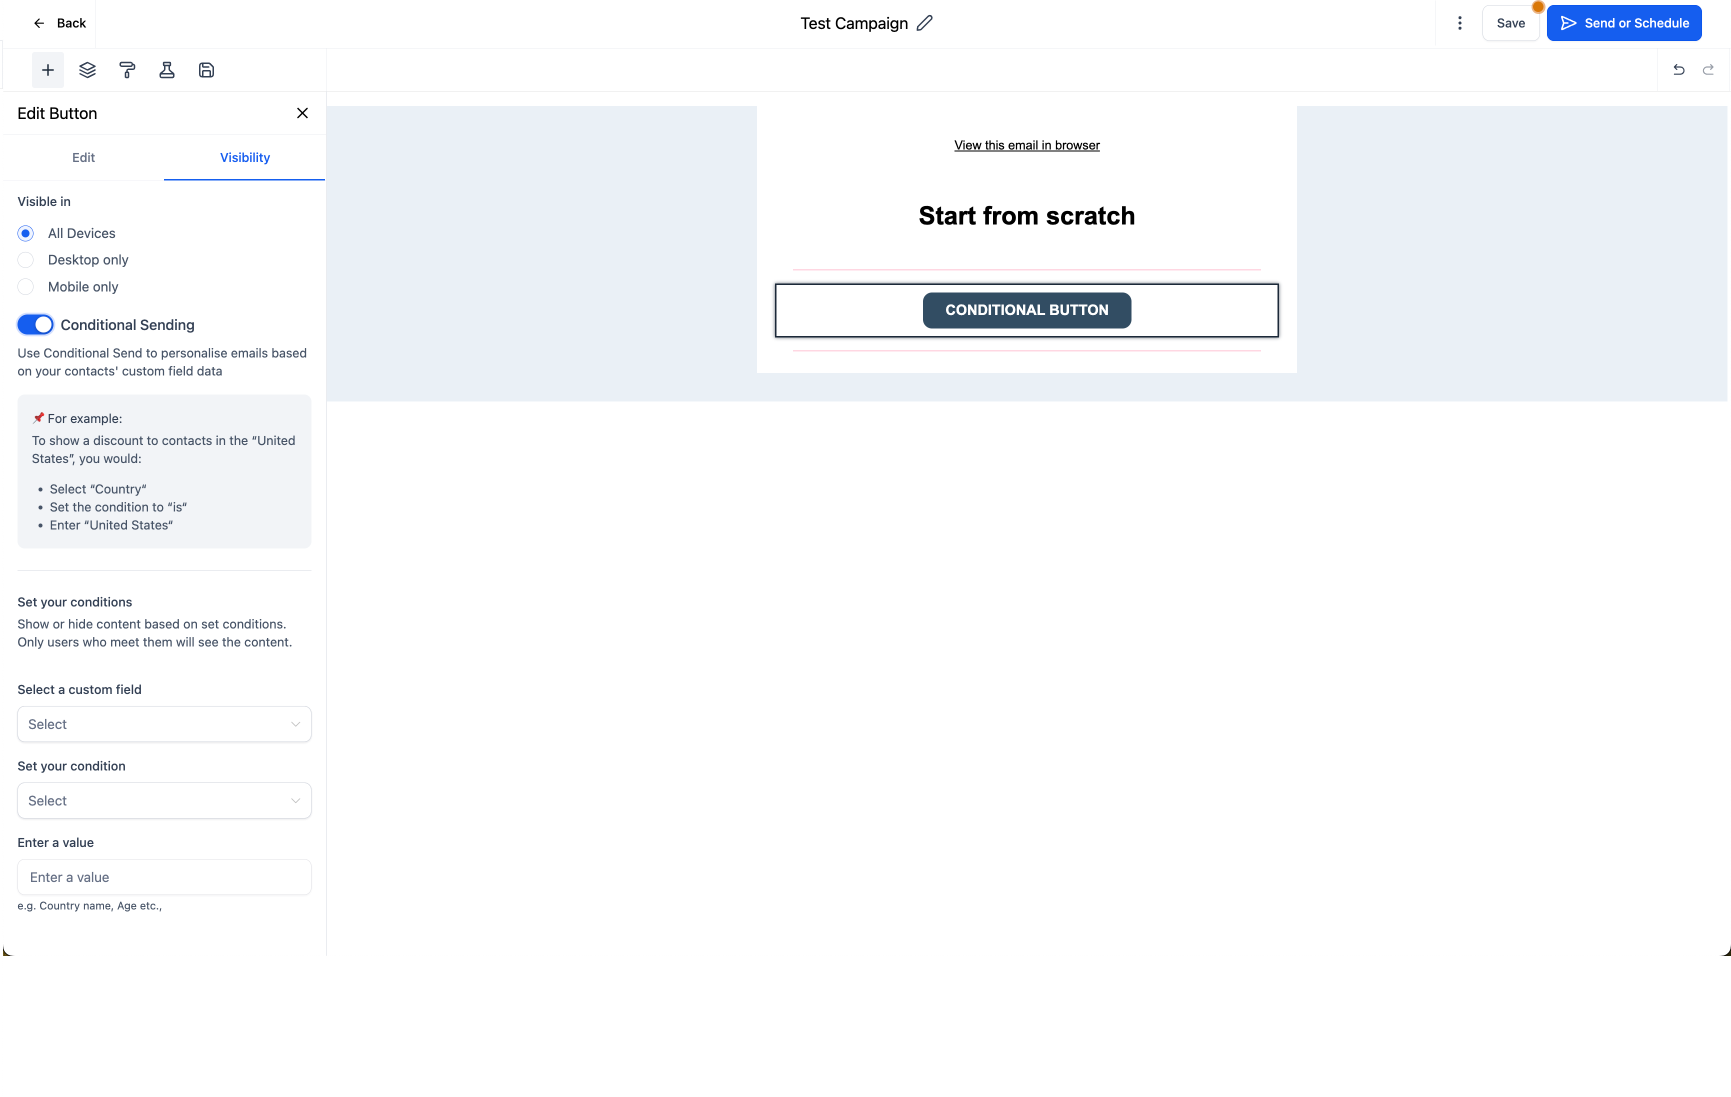
Set the conditions based on contact fields. Alternatively, click the Conditional Element icon in the element's overlay actions to add conditions quickly.

Conditional Sending shows or hides whole content blocks based on a contact's field data. A common use is a personalized greeting that gracefully falls back when a field like First Name is empty.
Goal: Show "Dear {{contact.first_name}}," when First Name is available, or "Dear Patient," when it is not.
Enable Conditional Sending. Toggle it on in the content block's sidebar.
Set up the personalized greeting. Add a text block reading Dear {{contact.first_name}},. Under Set your conditions, select the custom field First Name, set the condition to Is Not, and leave the value blank. This block displays only when First Name is not empty.
Set up the default greeting. Add another text block reading Dear Patient,. Under Set your conditions, select First Name, set the condition to Is, and leave the value blank. This block displays only when First Name is empty.
Preview and test. Use the preview feature to see how the email appears for contacts with and without a First Name.
Limitations: Only one custom value can be used under Conditional Sending per content block, and you cannot apply multiple conditional settings for the same field within a single block.
Tips: Always preview with test contacts to confirm your conditions work, and use clear, friendly defaults to keep a professional tone.
You can preview exactly how custom fields will appear for a specific contact before sending, which removes the need to create fake test records.
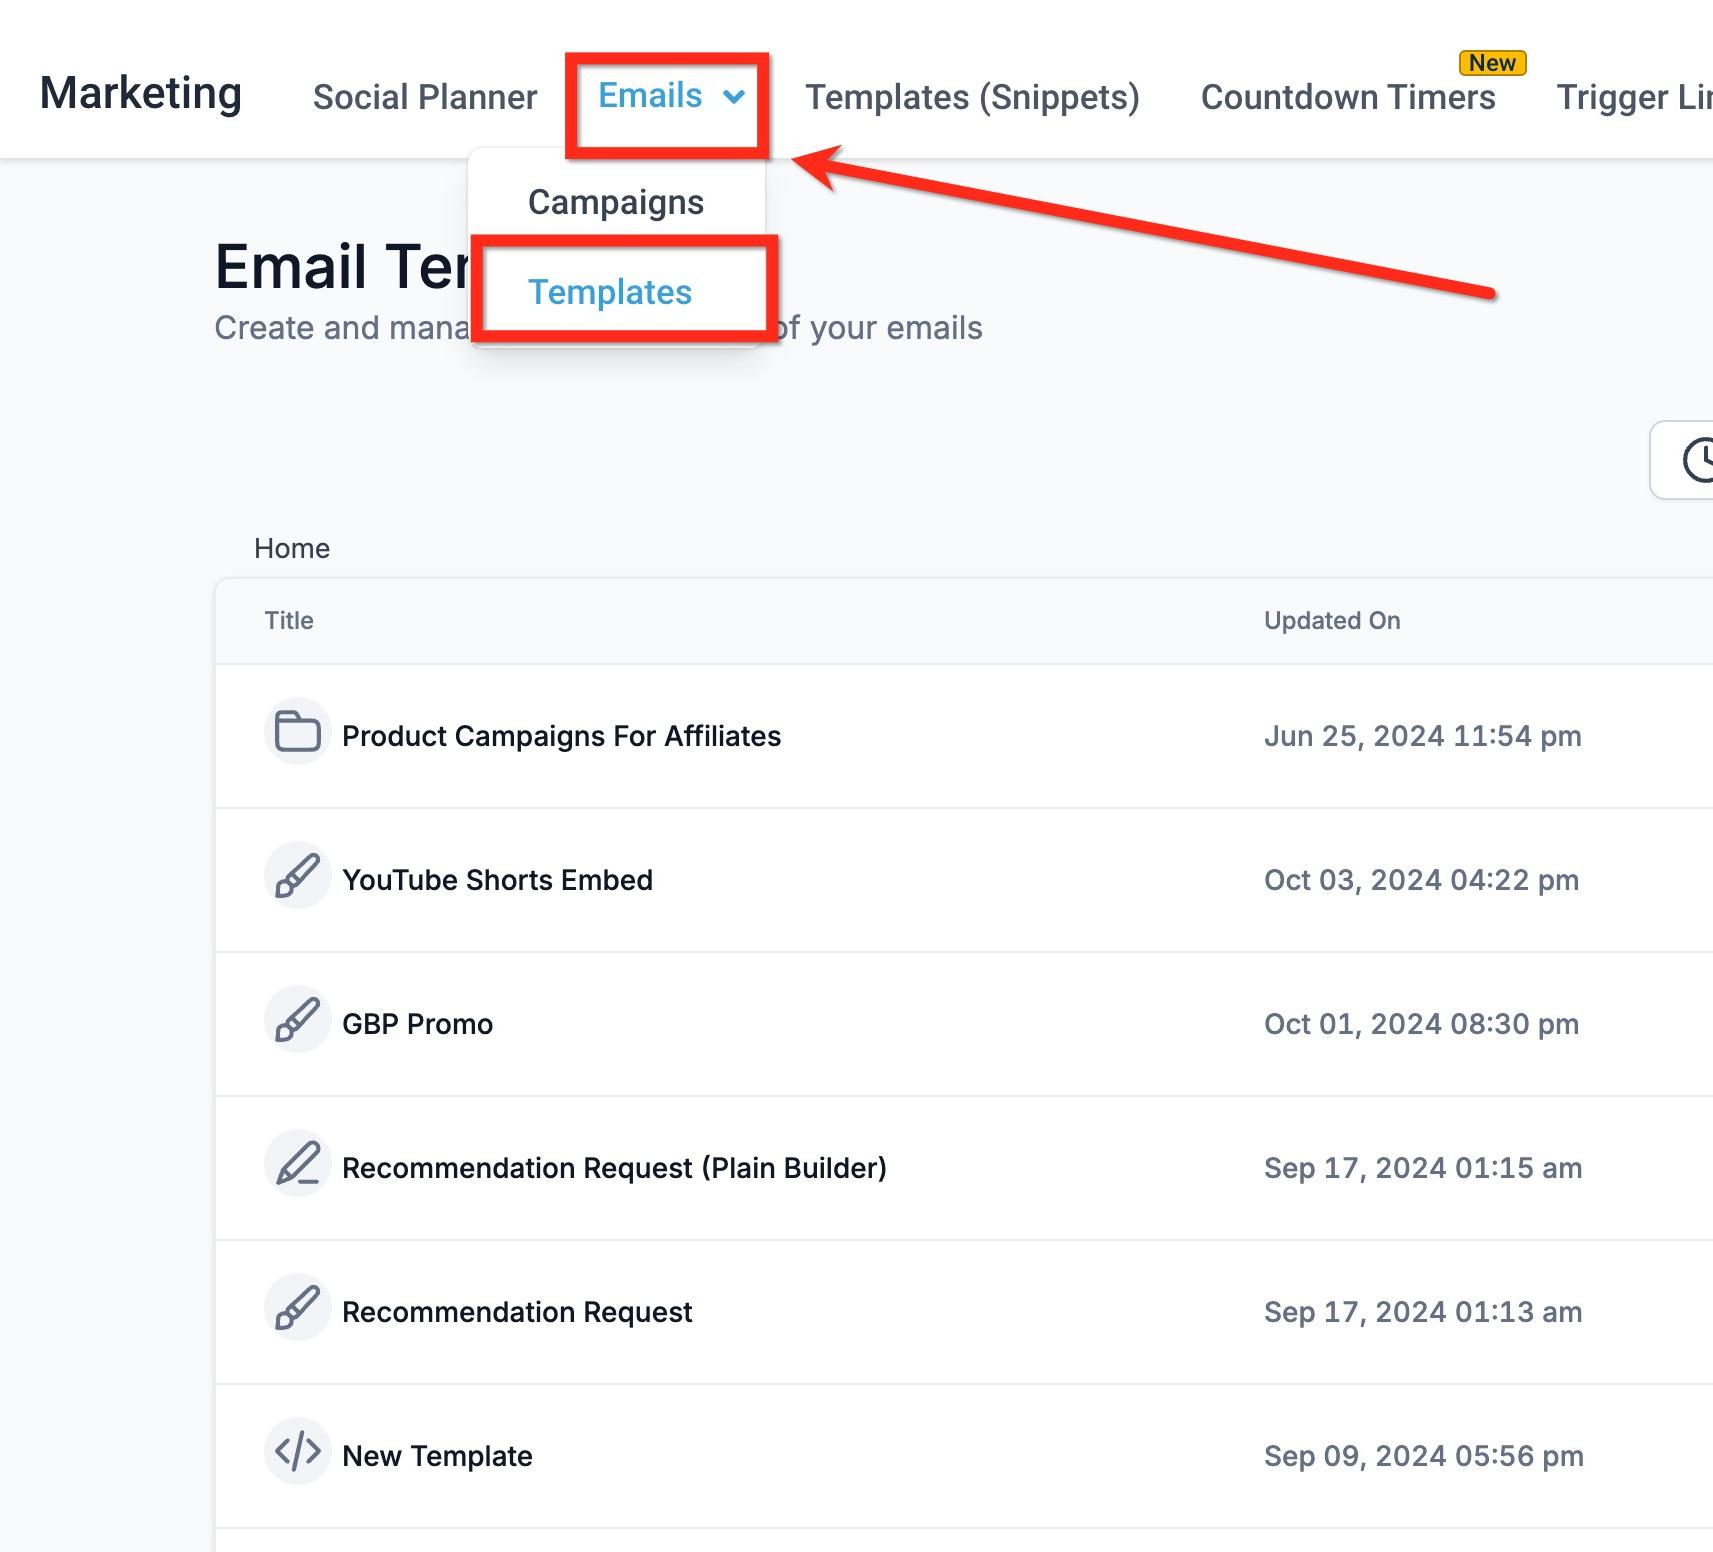
Navigate to Marketing → Email Templates and open the personalized email you want to check.
Inside the Email Builder, add the contact custom fields you want to use.
Click the three dots in the top-right corner and select Preview Template.
On the Preview screen, select Preview Contact Info in the upper-right corner.
By default a contact's information is shown. To preview as a specific patient, search for that contact in the search bar.
The contact's information and custom field data appear on the right panel alongside the email preview on the left, giving you a real view of how that patient will see the email. Search again to preview a different contact.
Can I set one global default for all custom values? Not currently. Defaults are configured individually for each custom value usage, which gives you more flexibility based on the context of the email.
Will a default value replace existing contact information? No. If the contact field contains data, the actual value is always used. The default only appears when the field is empty.
Can I use defaults in subject lines and preview text? Yes. Defaults can be used in subject lines, preview text, and email body content.
Where can I use fallback defaults? You can use them in workflow emails, campaign emails, bulk actions, and email templates.
How do I know if a custom value already has a default? Custom values without a default appear as grey tags. Once a default is added, the tag turns green.
Can the same custom value have different defaults if it appears more than once? Yes. Each usage can have its own unique default depending on the message and context.
Can I use conditional elements for fields other than First Name? Yes. Conditional elements and Conditional Sending work for any custom field on the contact.
Can I use multiple custom fields in one conditional block? No. Conditional Sending allows only one custom value per content block.
Why should I preview as a specific contact before sending? Previewing as a real contact confirms that your custom fields, defaults, and conditional content resolve correctly, so no patient receives a blank or broken message.
