Offline conversions are actions that happen outside your website or app, such as a qualified lead, a booked consultation, or a closed treatment package. Ad Manager lets you create, manage, and edit Google Ads offline conversion actions directly in Aesthetix CRM, so your Google reporting stays aligned with your practice's processes and workflows without switching to the Google Ads interface.
Note: Before setting up conversion actions in Ad Manager, your Google account must be connected to Aesthetix CRM. See the Connect Google with Ad Manager guide.
This flow is for offline conversion actions, tracking events like leads, sales, and calls that occur outside your website or app. Every conversion you create here is automatically available in your connected Google Ads account and can be used in campaign reporting. Existing Google Ads conversions are automatically imported into this view, so you manage both new and existing actions in one place. Conversions created in Aesthetix CRM are created in Google Ads via API, so no manual setup is needed in the Google Ads UI.
Key benefits:
Seamless setup: Manage everything inside Aesthetix CRM instead of the Google Ads interface.
Consistent tracking: Keep your Google conversions aligned with your CRM workflow events.
Time-saving: Create and manage conversions in a few clicks.
Advanced reporting: Better optimization and attribution for offline conversions.
Centralized management: View and edit all conversion actions, existing and new, in one list.
Automatic sync: Conversions created here are instantly available in your connected Google Ads account.
Navigate to Marketing in the left menu, then click Ad Manager in the top navigation. This opens the campaign dashboard.
In the Ad Manager dashboard, click the gear icon next to the Create Campaign button. This opens the settings, where you configure conversion tracking and platform preferences.
Click Google Ads under Platform Settings, then switch to the Conversions tab. This view lists all your past synced and newly created Google Ads conversion actions. You can search by name and filter by date range.
Click + Create a new conversion in the top-right corner of the Conversions screen.
Give your conversion a clear, descriptive name so you can identify it later in reports and workflows. Example: "Qualified Lead - Consultation Booking."
Select a relevant Conversion Source from the dropdown. Options include Converted Lead, Qualified Lead, Purchase, Signup, Add to Cart, and more. Choose the one that best matches the action you are tracking.
Choose how conversions are counted per ad click. Use Many per click for purchases or repeatable actions, or One per click for leads or one-time form submissions to prevent duplicates. For most lead-gen goals like consultation requests, One per click is the right choice.
Use the same value for each conversion. Applies a fixed monetary value to every conversion. Enter a Value (for example, 50) and a Currency Code (for example, USD). Best when all conversions are worth roughly the same, such as each new consultation lead.
Use a different value for each conversion. Best when conversions vary in value, such as treatment packages of different amounts. Enter a default Value and Currency Code, used when no custom value is provided. To fully use this option, send custom values during upload through Workflows or other integrations.
Do not use a value for this conversion action. Tracks conversions purely by count, without a monetary value. This disables the value and currency fields. Use it when your goal is to measure actions like signups rather than calculate revenue or ROAS.
Conversions can happen some time after an ad click. Choose how long to track conversions after someone clicks your ad. Select a timeframe from the dropdown, such as 30, 60, or 90 days, or set a custom duration.
Once all fields are filled out, click Create. The action is instantly synced with your connected Google Ads account and available for tracking and reporting. Aesthetix CRM creates the conversion action in Google Ads via API, with no manual setup needed in the Google Ads UI.
You can edit or delete any conversion action created here:
Click the 3-dot menu next to the conversion.
Choose Edit or Delete.
In the edit modal you can update the count settings, value and currency, click-through window, and conversion source.
Note: The attribution model is fixed to Data-driven for offline conversions, per Google Ads guidelines.
You can also create a conversion action directly in the Google Ads interface, then send data to it from Aesthetix CRM. This is a standalone Google-side setup and does not include Aesthetix CRM steps. Use it if you prefer to define the action in Google Ads first.
A conversion action is a rule in Google Ads that records when a desired action occurs. For offline conversions, such as a deal marked won in your CRM, Google matches identifiers like GCLID, GBRAID, or WBRAID to attribute results back to ads and keywords.
Note: Aesthetix CRM supports offline conversions only. Website, app, phone call, and other conversion sources are not supported. To send form submissions, number pool calls, chat widget replies, and similar events directly, use the Add to Google Ads workflow action in Workflows.
Prerequisites on the Google side:
Admin or standard access to the correct Google Ads account.
Agreement on your goal taxonomy (for example, Lead vs Submit lead form vs Qualified lead).
A decision on whether the action should be a Primary action used for bidding.
Clarity on which identifier (GCLID, GBRAID, or WBRAID) you will send when posting offline conversions.
Follow these steps in Google Ads:
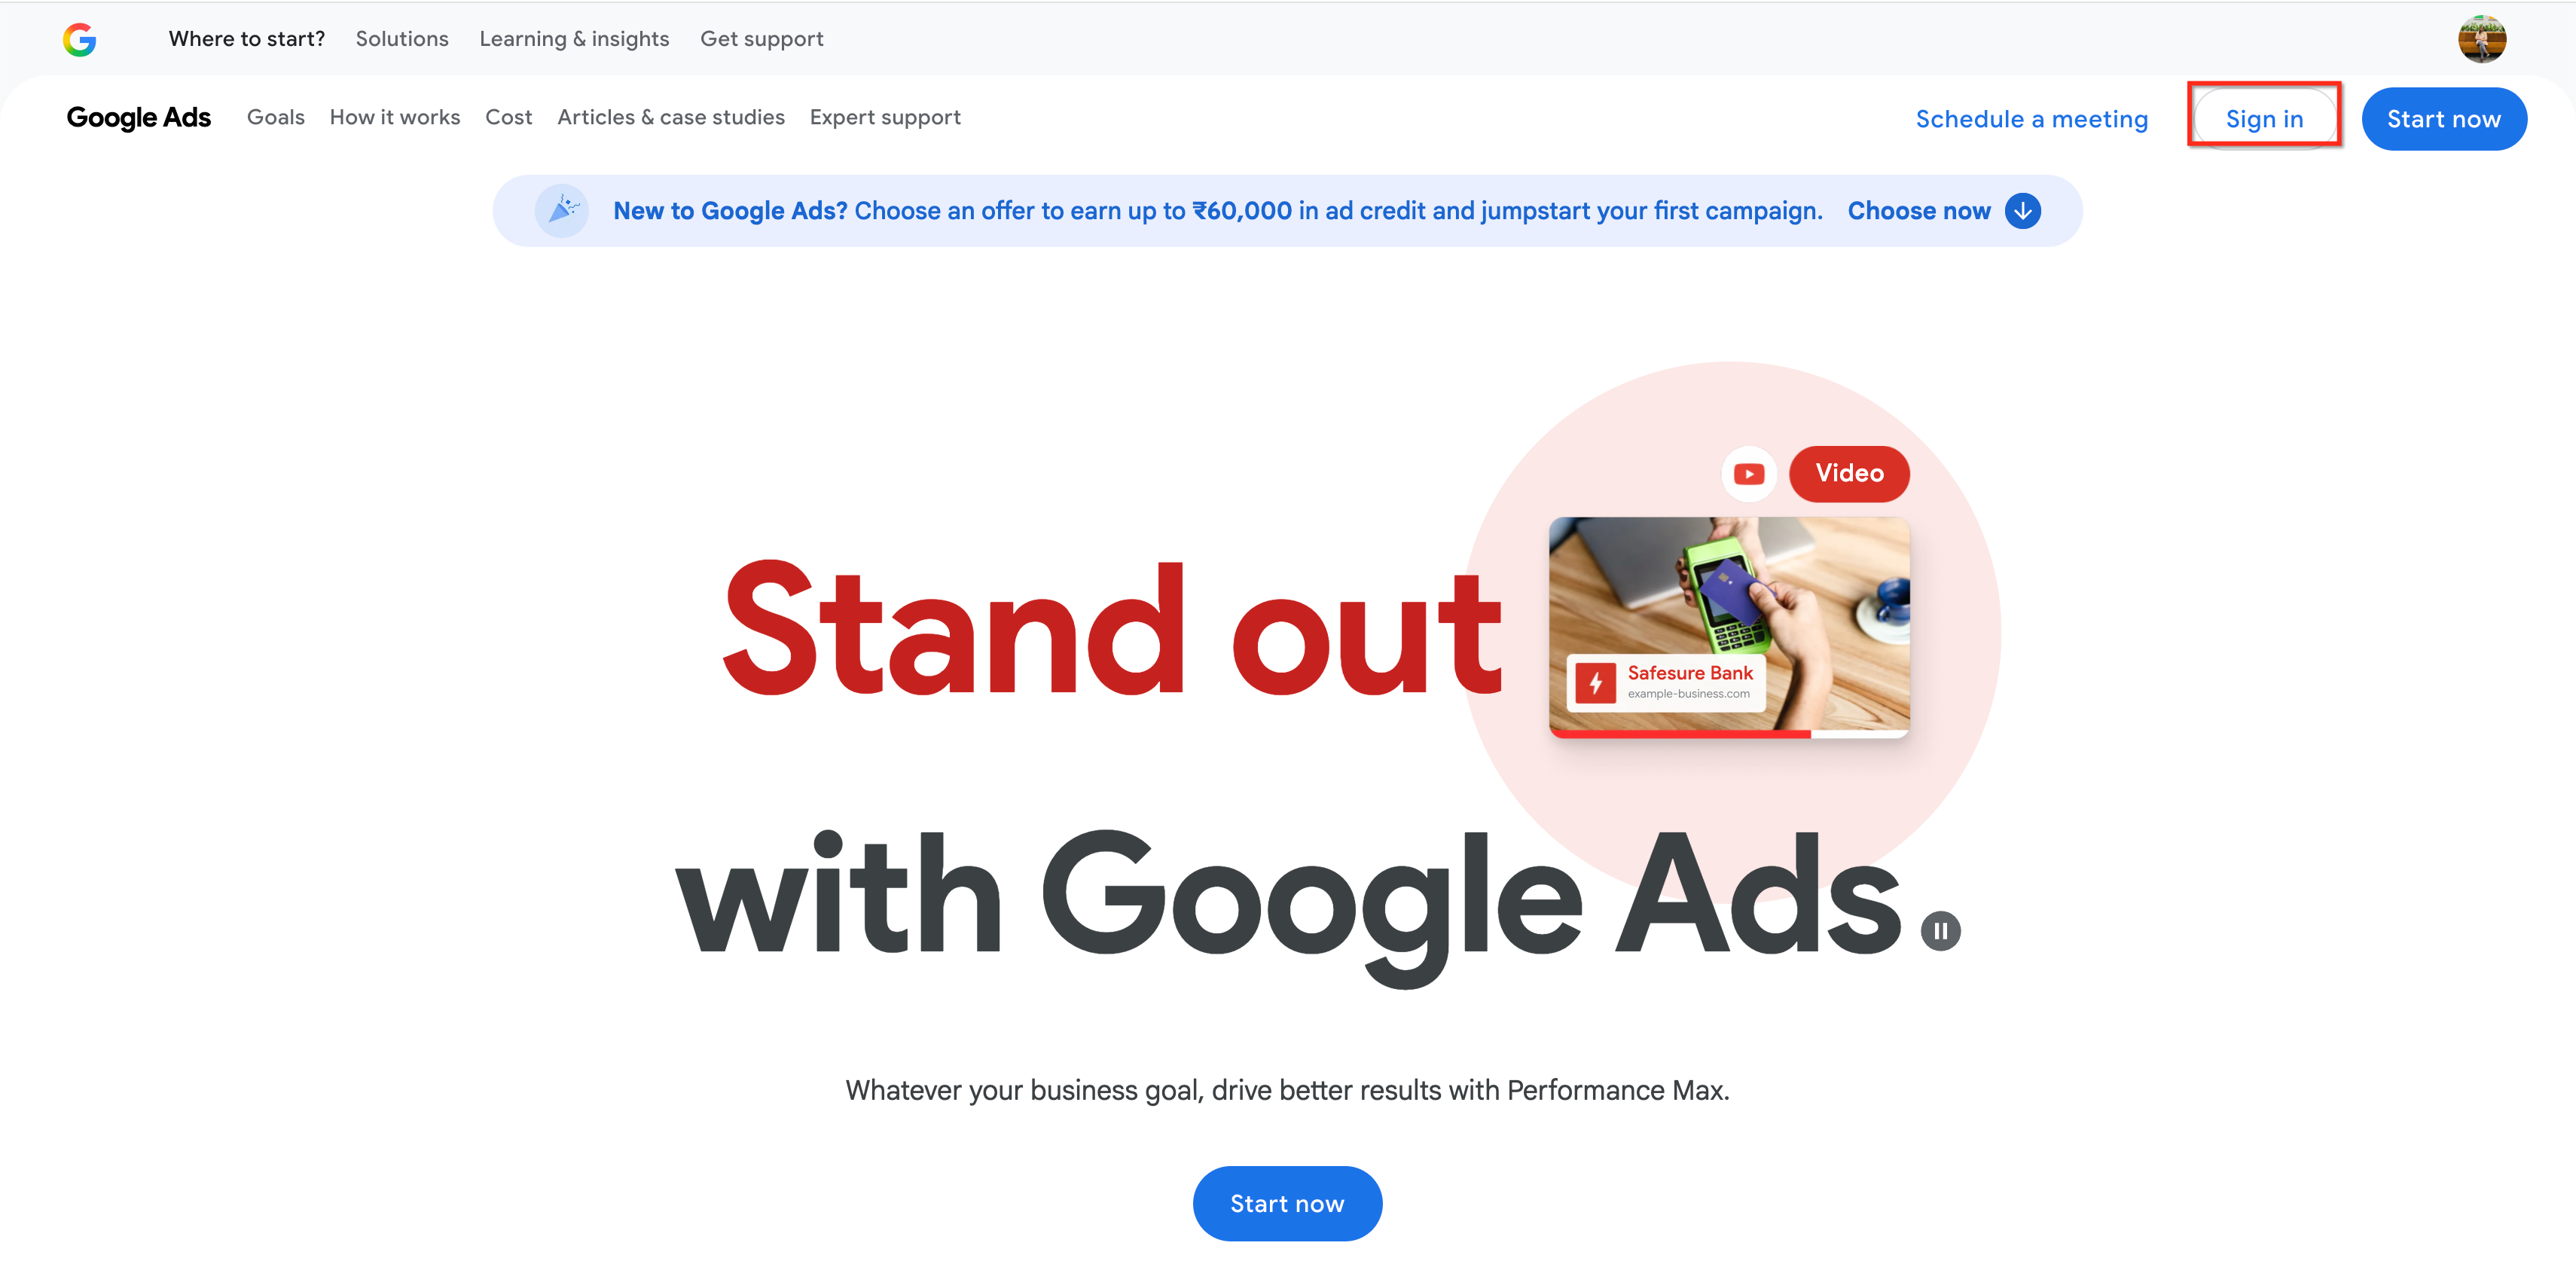
Open your Google Ads account at ads.google.com.
Click Sign In to sign in, or Start Now to create a new Google Ads account.
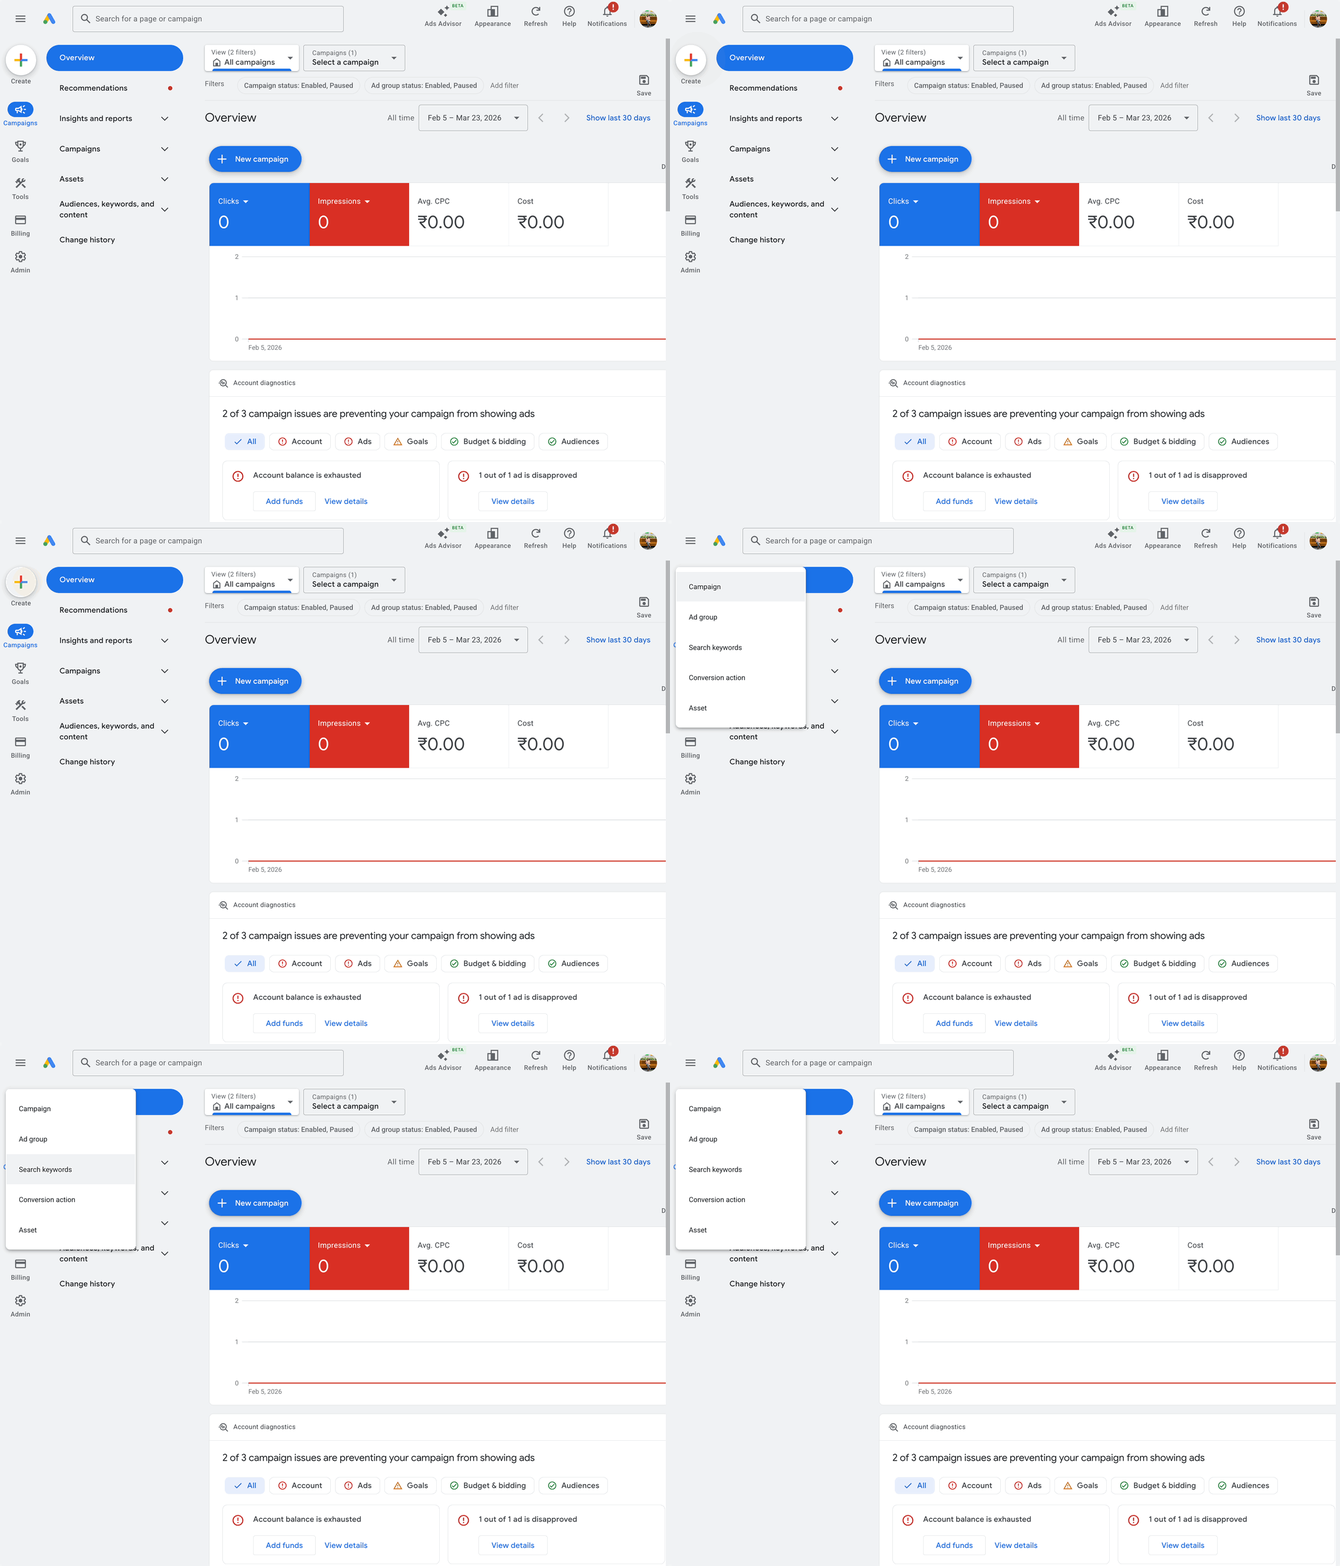
Click the + button and select Conversion Action from the dropdown.
Choose the data source to measure conversions, depending on your current Google Ads UI prompt.
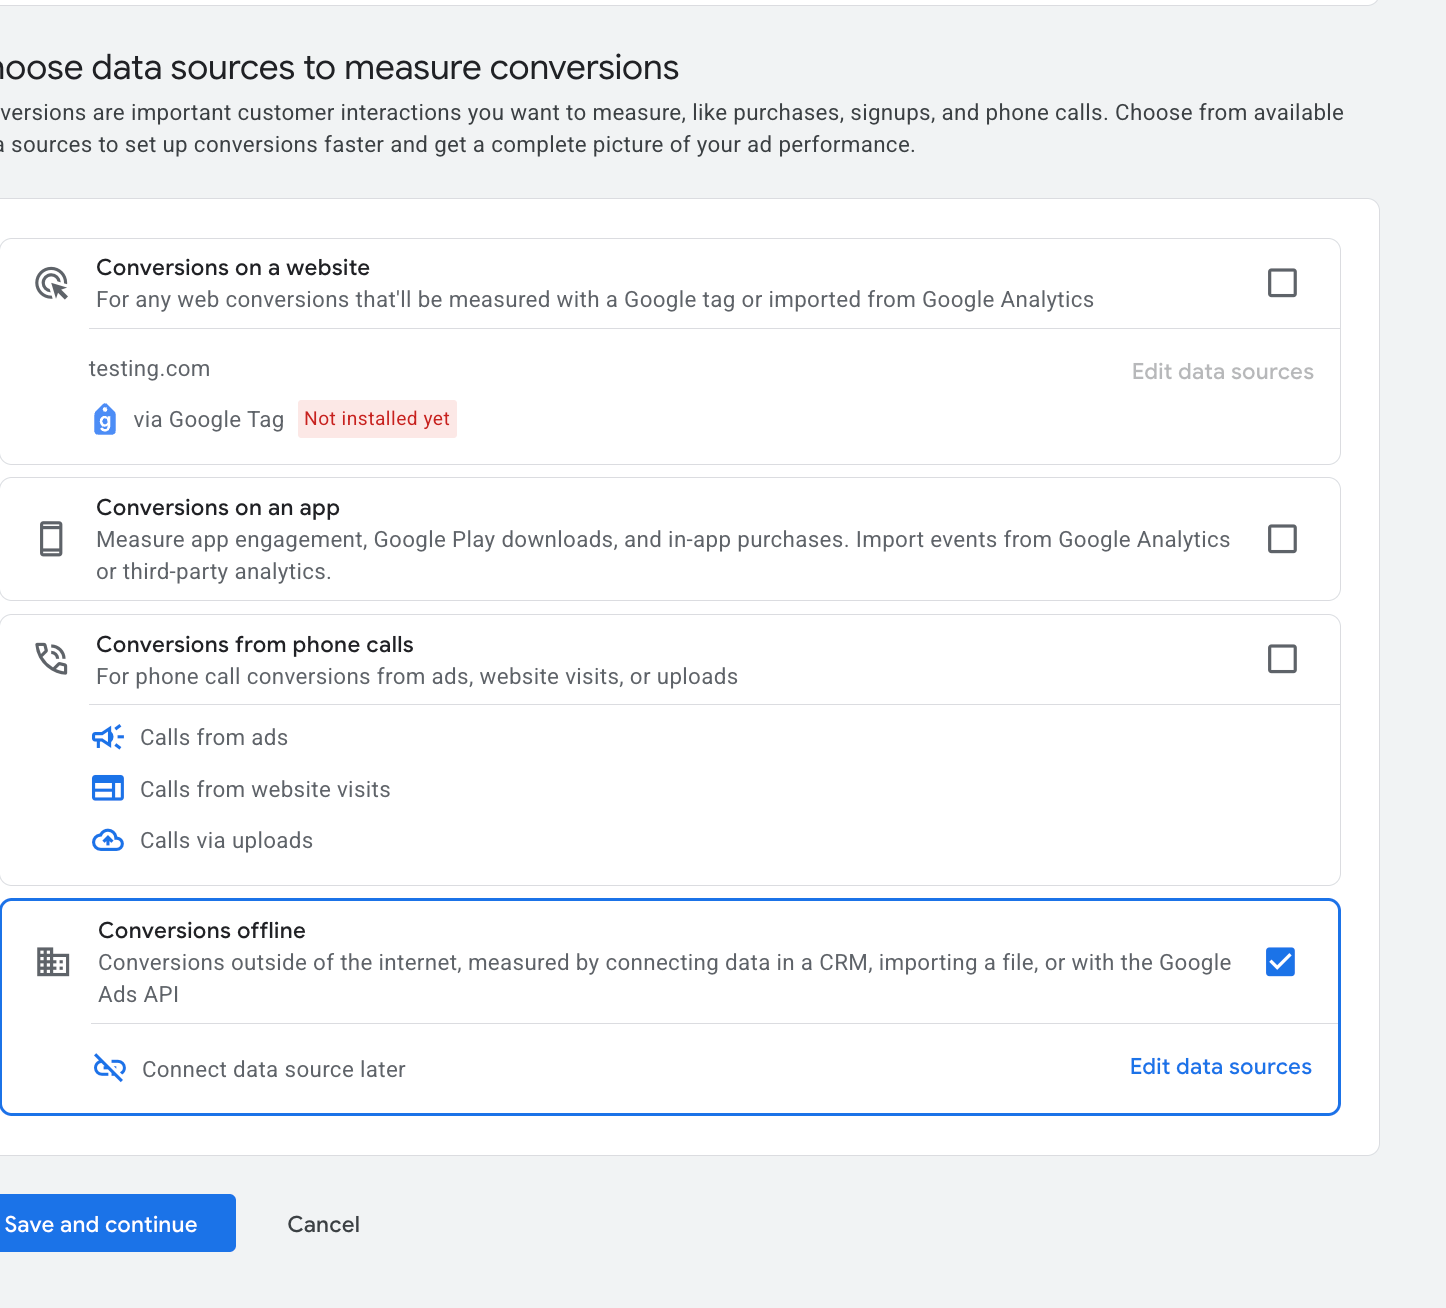
Choose the Conversions offline option. Aesthetix CRM supports offline conversions only.
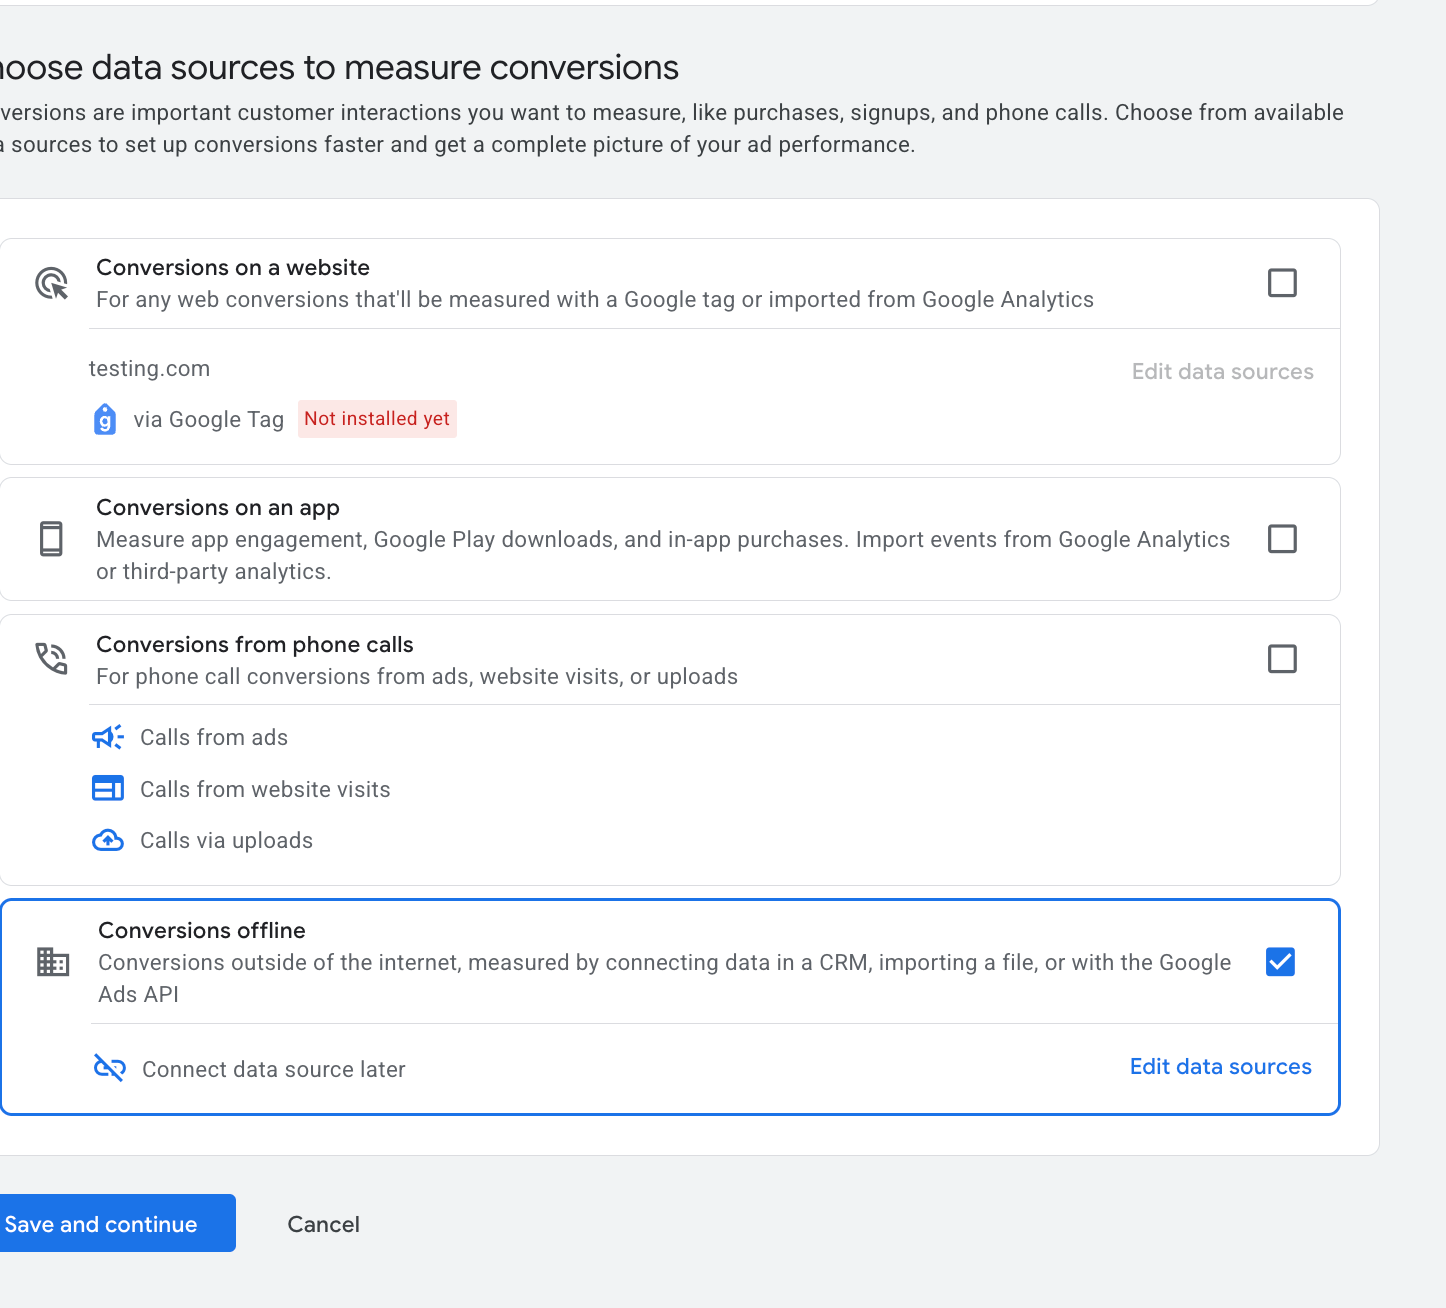
Click Edit Data Sources to add an offline data source, and select "Skip this step and set up a data source later."
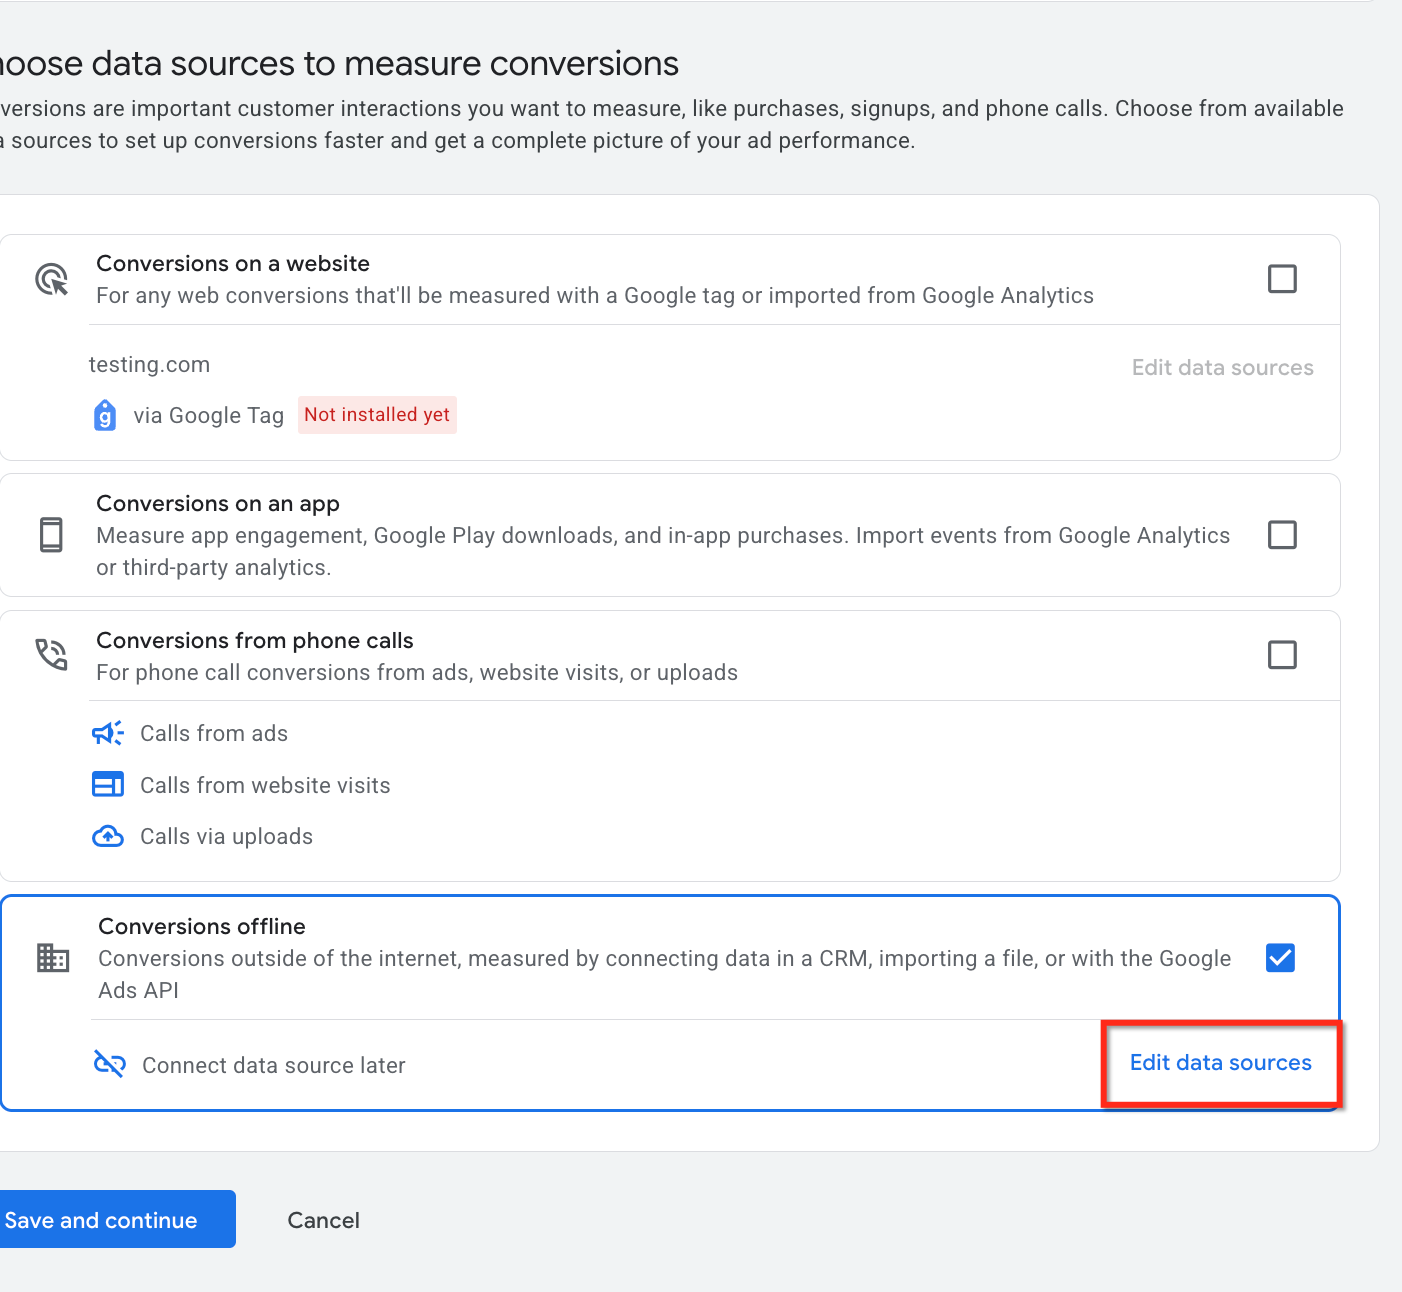
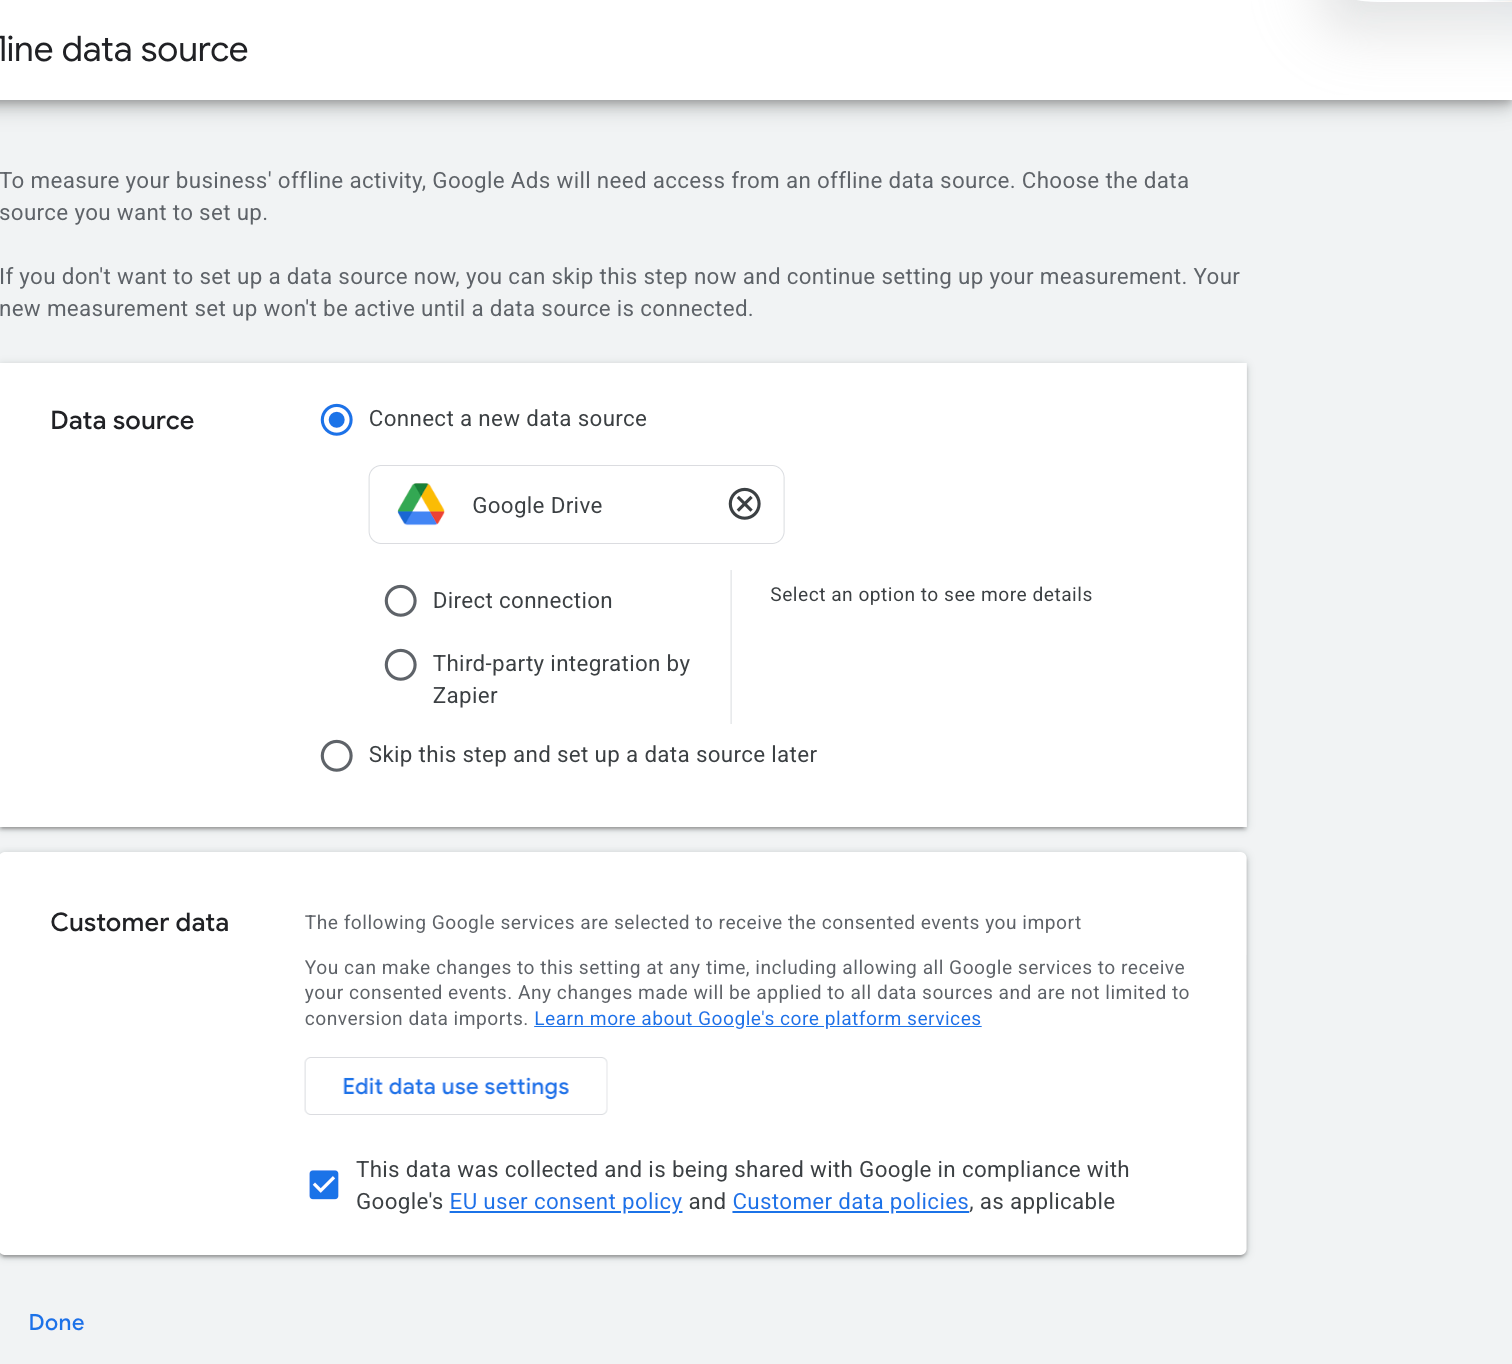
Click Save and Continue. Then select the Conversion Category to define what you want to measure. Click See all to view the full list of categories.
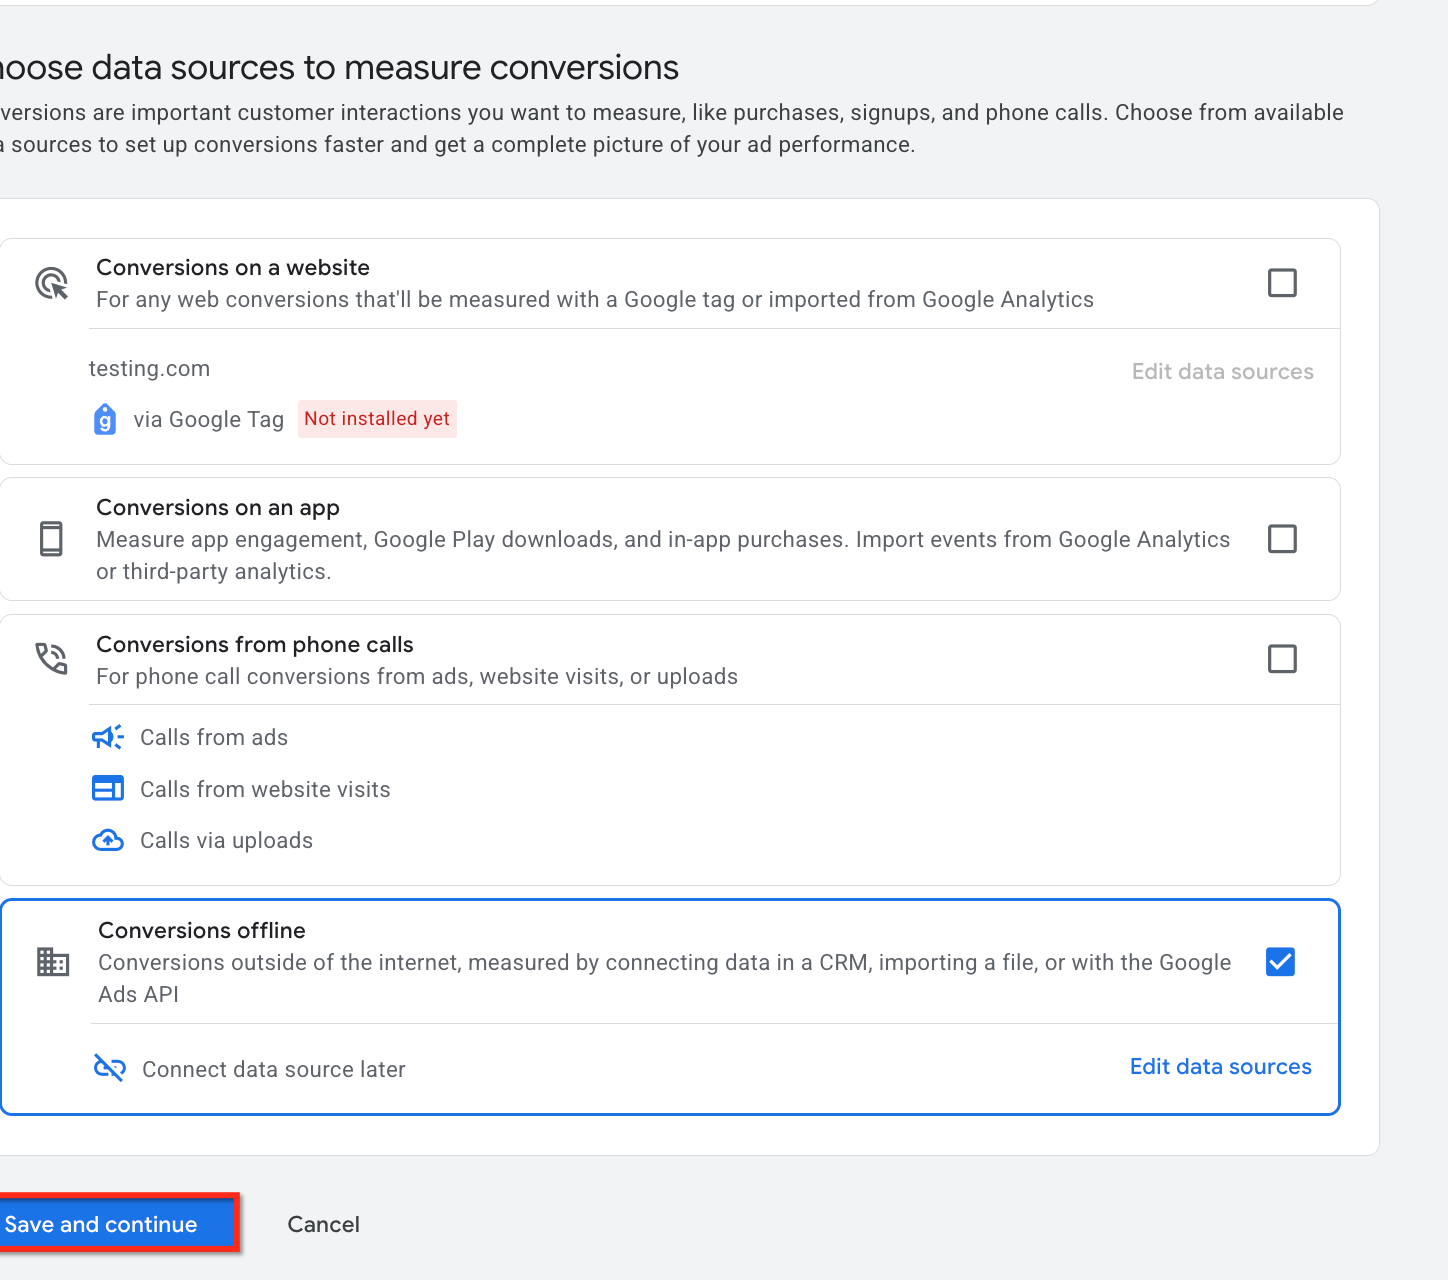
After selecting the category, add a data source to it.
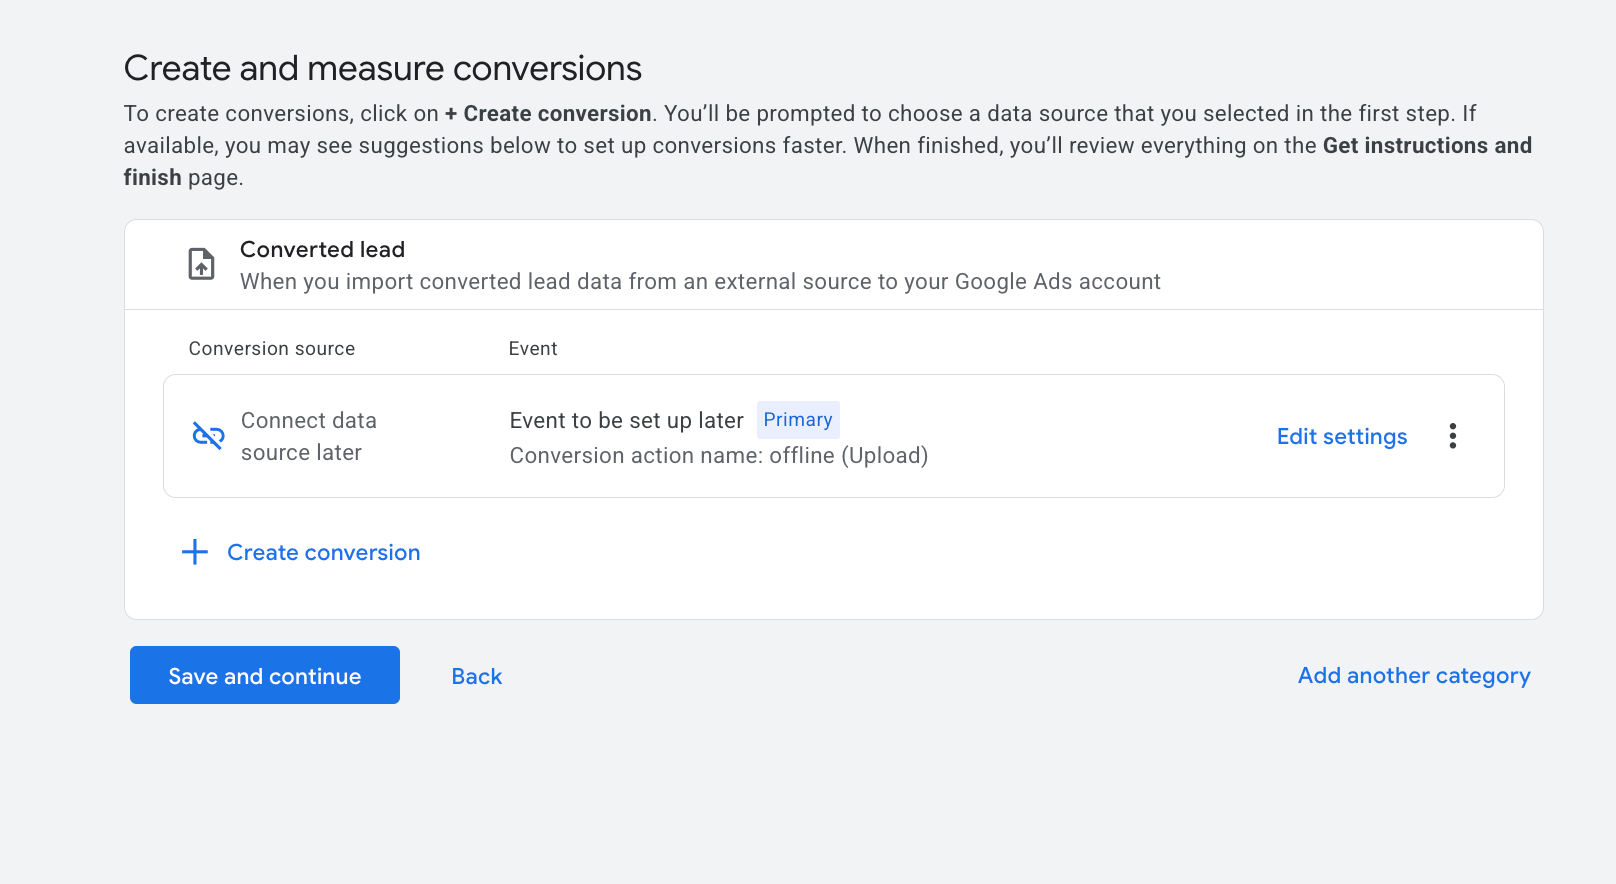
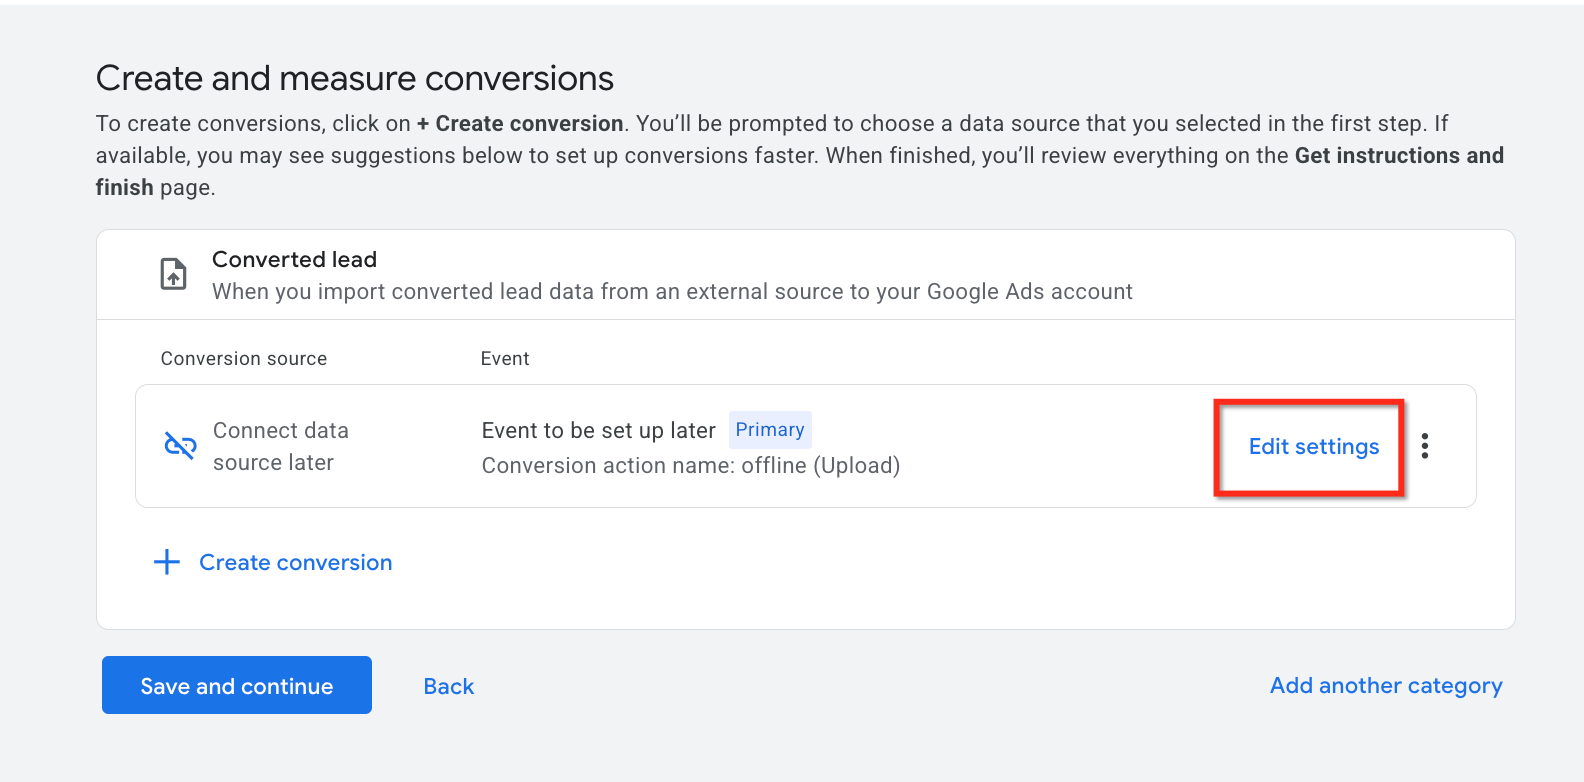
Click Edit settings to define the details.
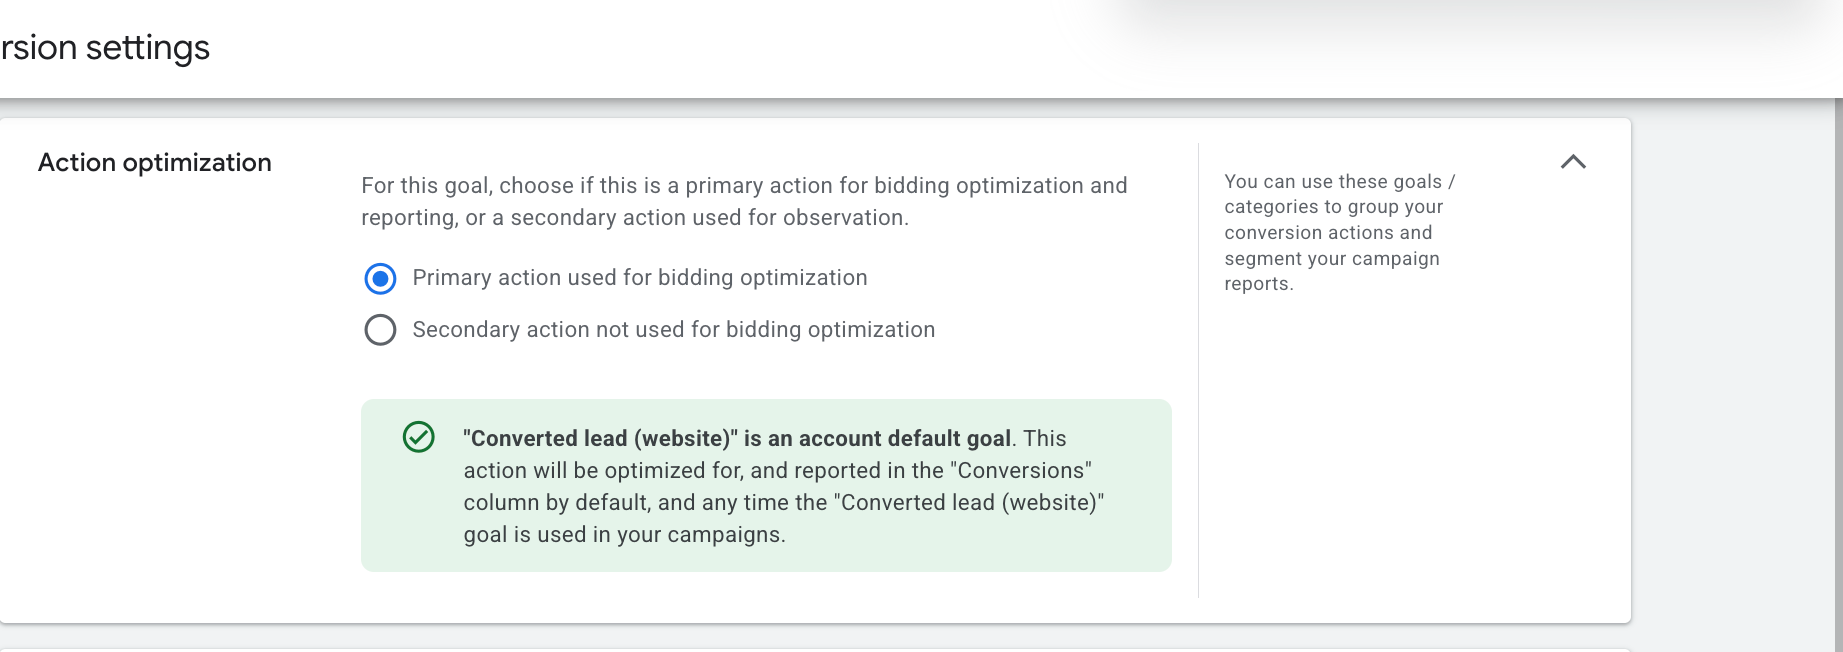
In the action optimization section, keep Primary action used for bidding optimisation selected as the choice.
Give the conversion a name. In this example it is "Conversion Test." Copy and paste the conversion name somewhere handy for later.

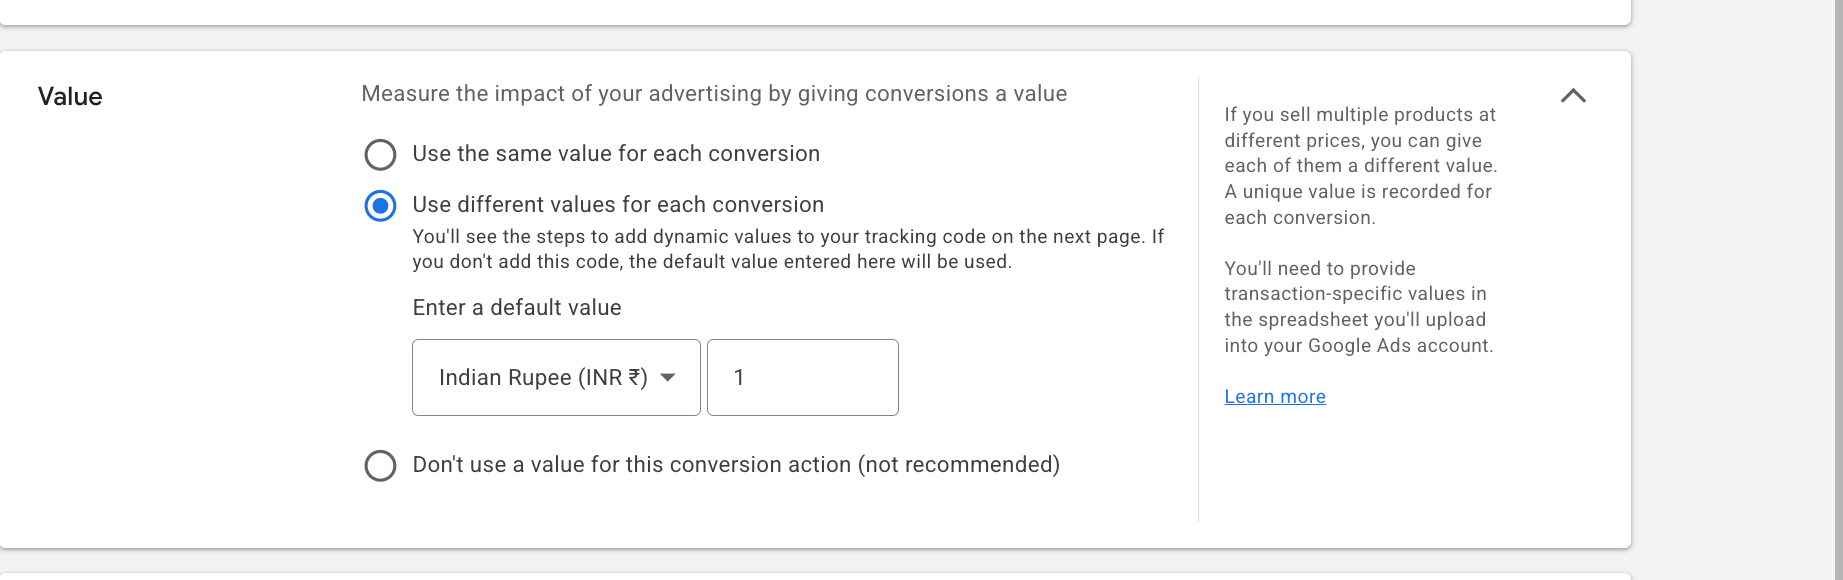
Select the value for your conversion: same value, different value, or don't use a value.
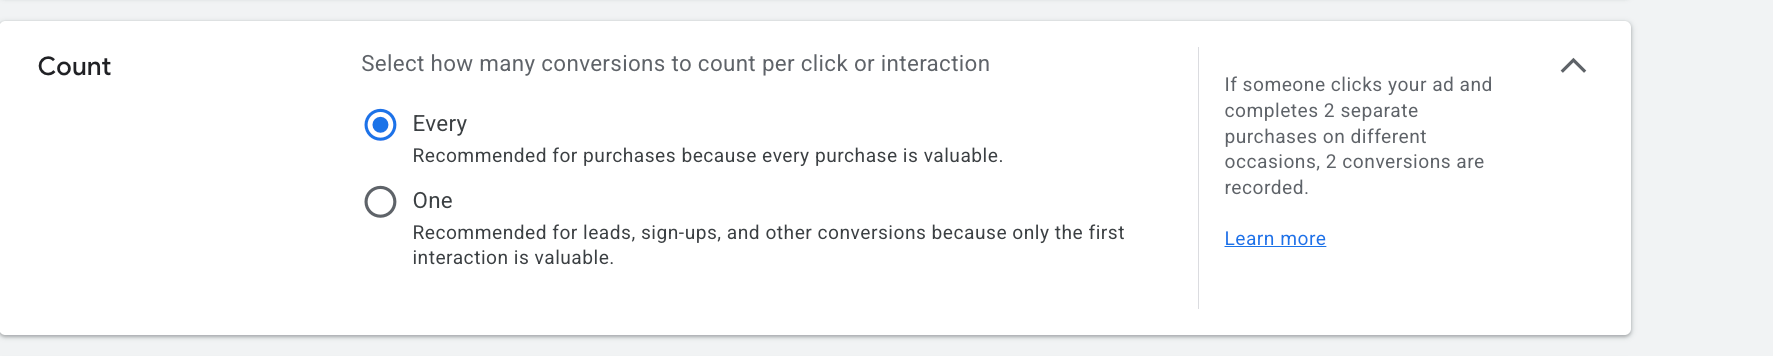
Select the count. We recommend choosing Every.
Set up the conversion window and attribution model. Set the click-through conversion window to 90 days, select an engaged-view conversion window from the dropdown, then set the attribution model to Last Click or Data Driven (recommended).
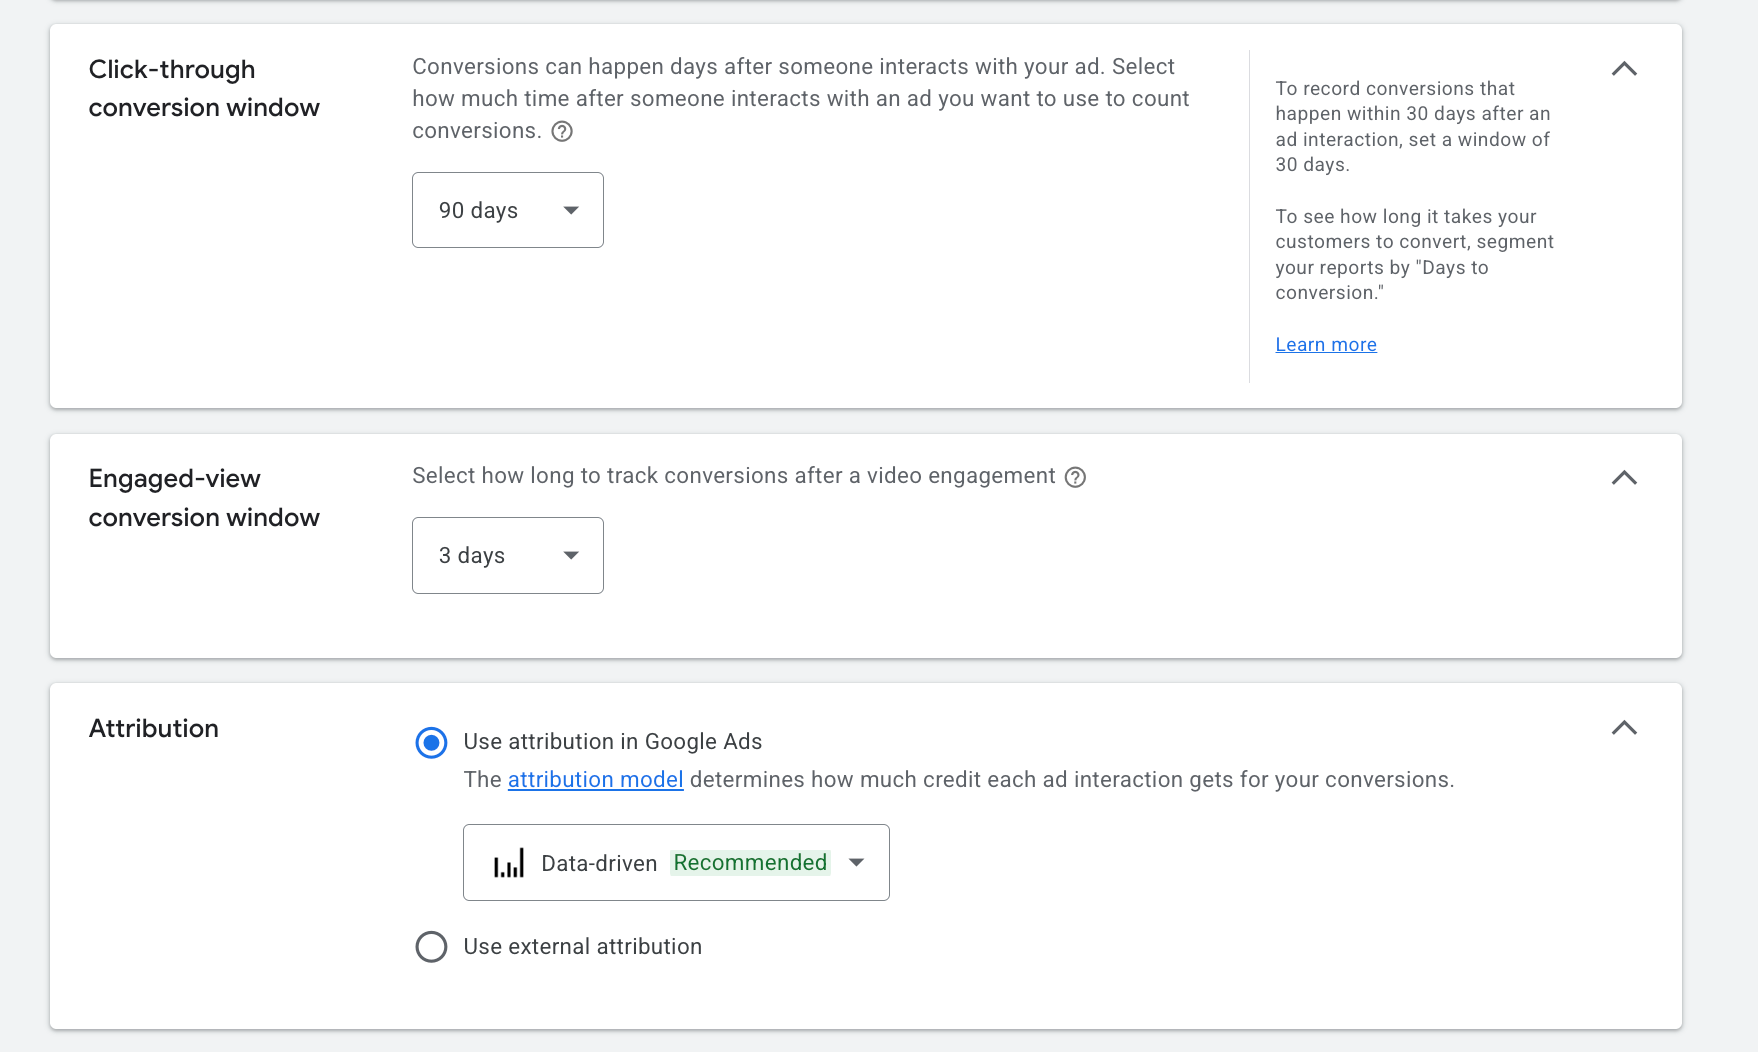
Click Done to save the conversion settings.

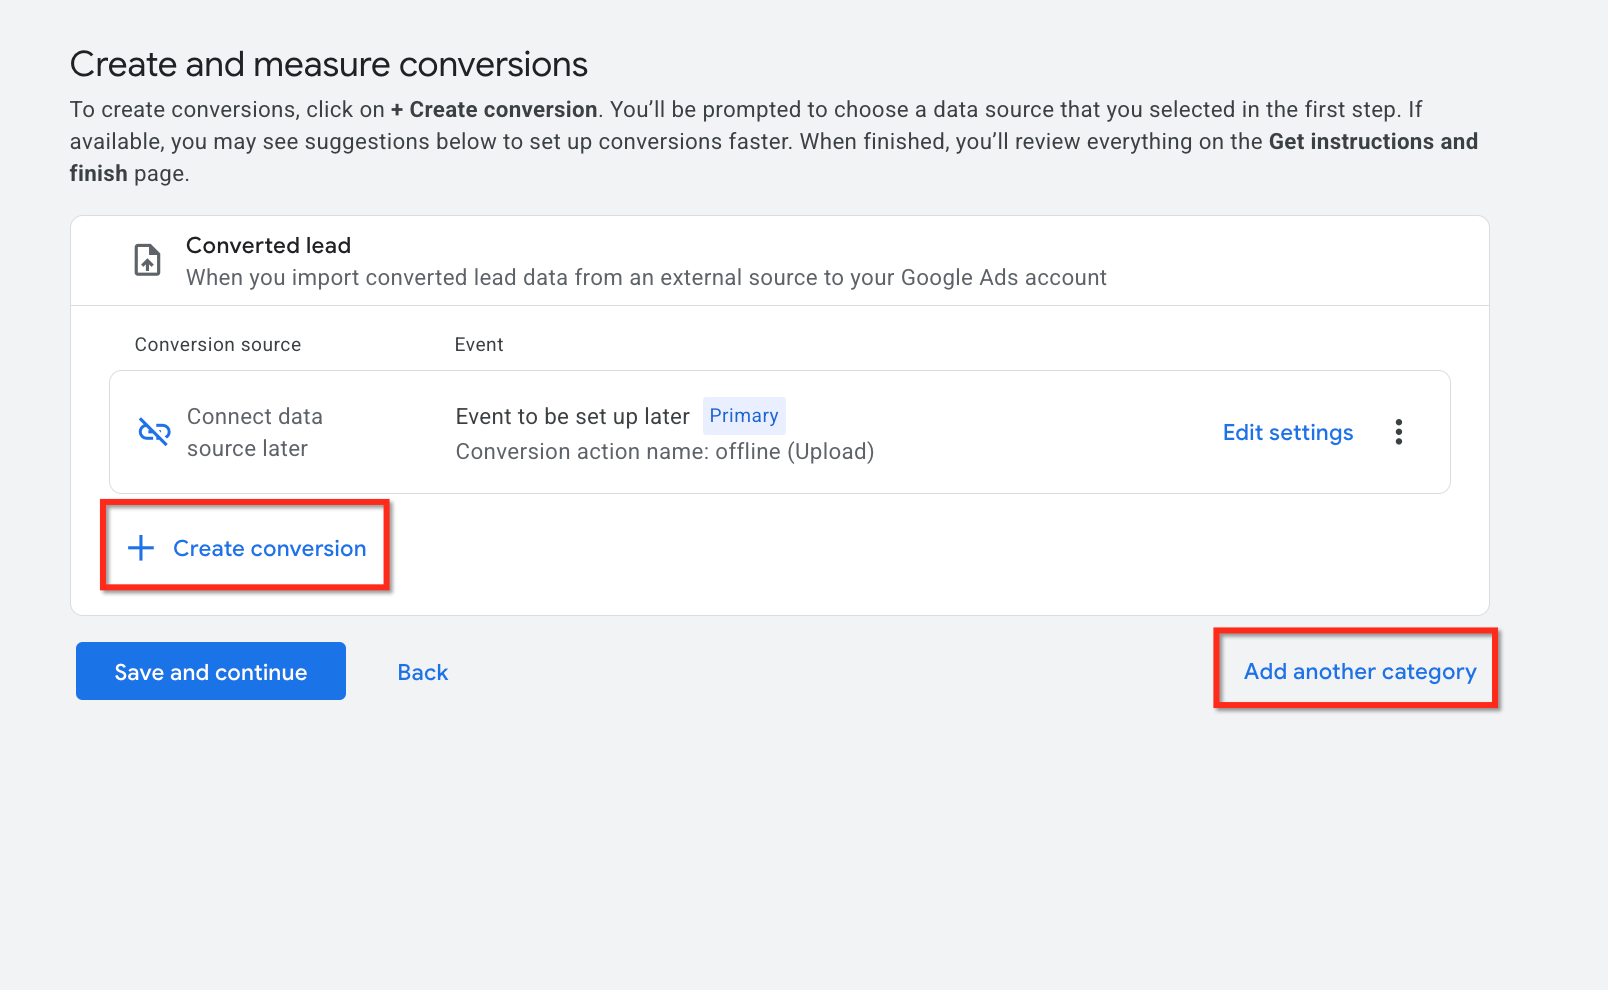
Click Save and continue. Choose Create Conversion to create the conversion, or Add Another Category to add more categories.
Click Finish to complete the conversion creation process.
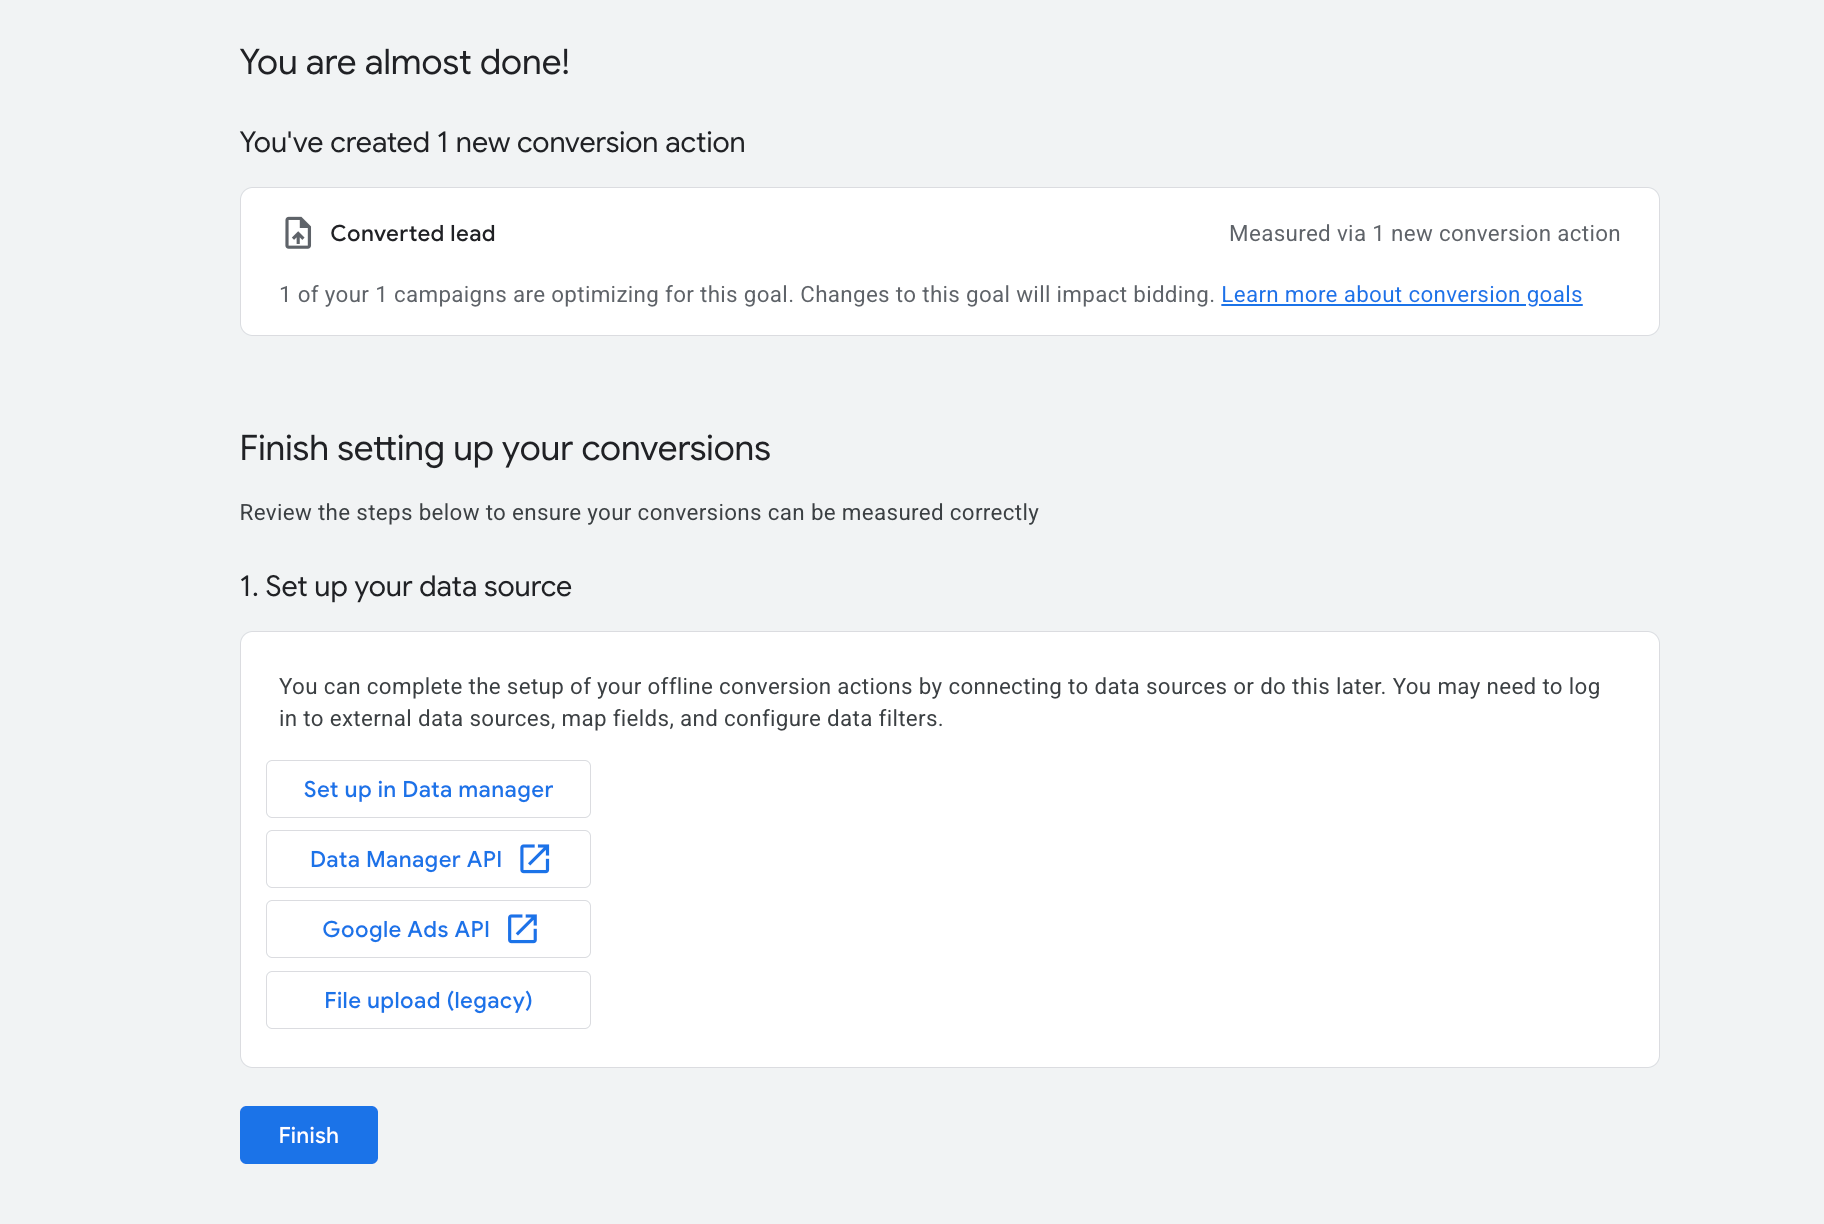
After the Google-side action exists, send conversions to it from Aesthetix CRM using the offline conversions flow above, or the Add to Google Ads action in Workflows.
Can I set up website conversion actions with this feature? No. This feature supports offline conversion actions only. Website conversion tracking through Google Tag Manager is planned for a future update.
Will conversions I create in Aesthetix CRM appear in Google Ads? Yes. Any conversion action you create here is automatically synced to your connected Google Ads account via API, and existing Google Ads conversions are imported and kept in sync.
What types of offline conversions can I track? Leads, purchases, form submissions, phone calls, CRM-updated statuses, and other actions that happen outside your website or app, such as a booked consultation or a closed treatment package.
Should I count Every or One per click? Use One per click for lead generation to avoid inflating conversions when the same contact repeats an event. Use Every (Many per click) for revenue events like purchases.
Do I need GCLID, GBRAID, or WBRAID to upload offline conversions? Yes. At least one identifier is needed for reliable matching. Capture and store whichever is available on first touch, then include it when sending the conversion.
Why is the attribution model locked to Data-driven? Google Ads guidelines fix the attribution model to Data-driven for offline conversions, so it cannot be changed in Ad Manager.
Should I use Ad Manager or Workflows to send conversions? Use Ad Manager for a centralized ads workspace with built-in mapping. Use the Add to Google Ads action in Workflows when you need granular automation or custom logic. Both can send to the same Google conversion action.
How long until conversions appear in Google Ads? Processing can take from a few hours up to 24 to 48 hours depending on volume and method. Reporting latency is normal, so use absolute date ranges when checking reports.
Why don't my uploads match or show results? Common causes include missing identifiers, incorrect timezones, currency or value mismatches, or sending to the wrong conversion action. Confirm the conversion name, identifier presence, and event timestamps.
