Products are the treatments, packages, memberships, and retail items you sell through Aesthetix CRM. They power your payment links, invoices, order forms, calendars, and online store. In the Products section, under the Payments tab, you can create products, set one-time or recurring pricing, organize them into collections, and manage your full catalog in one place.
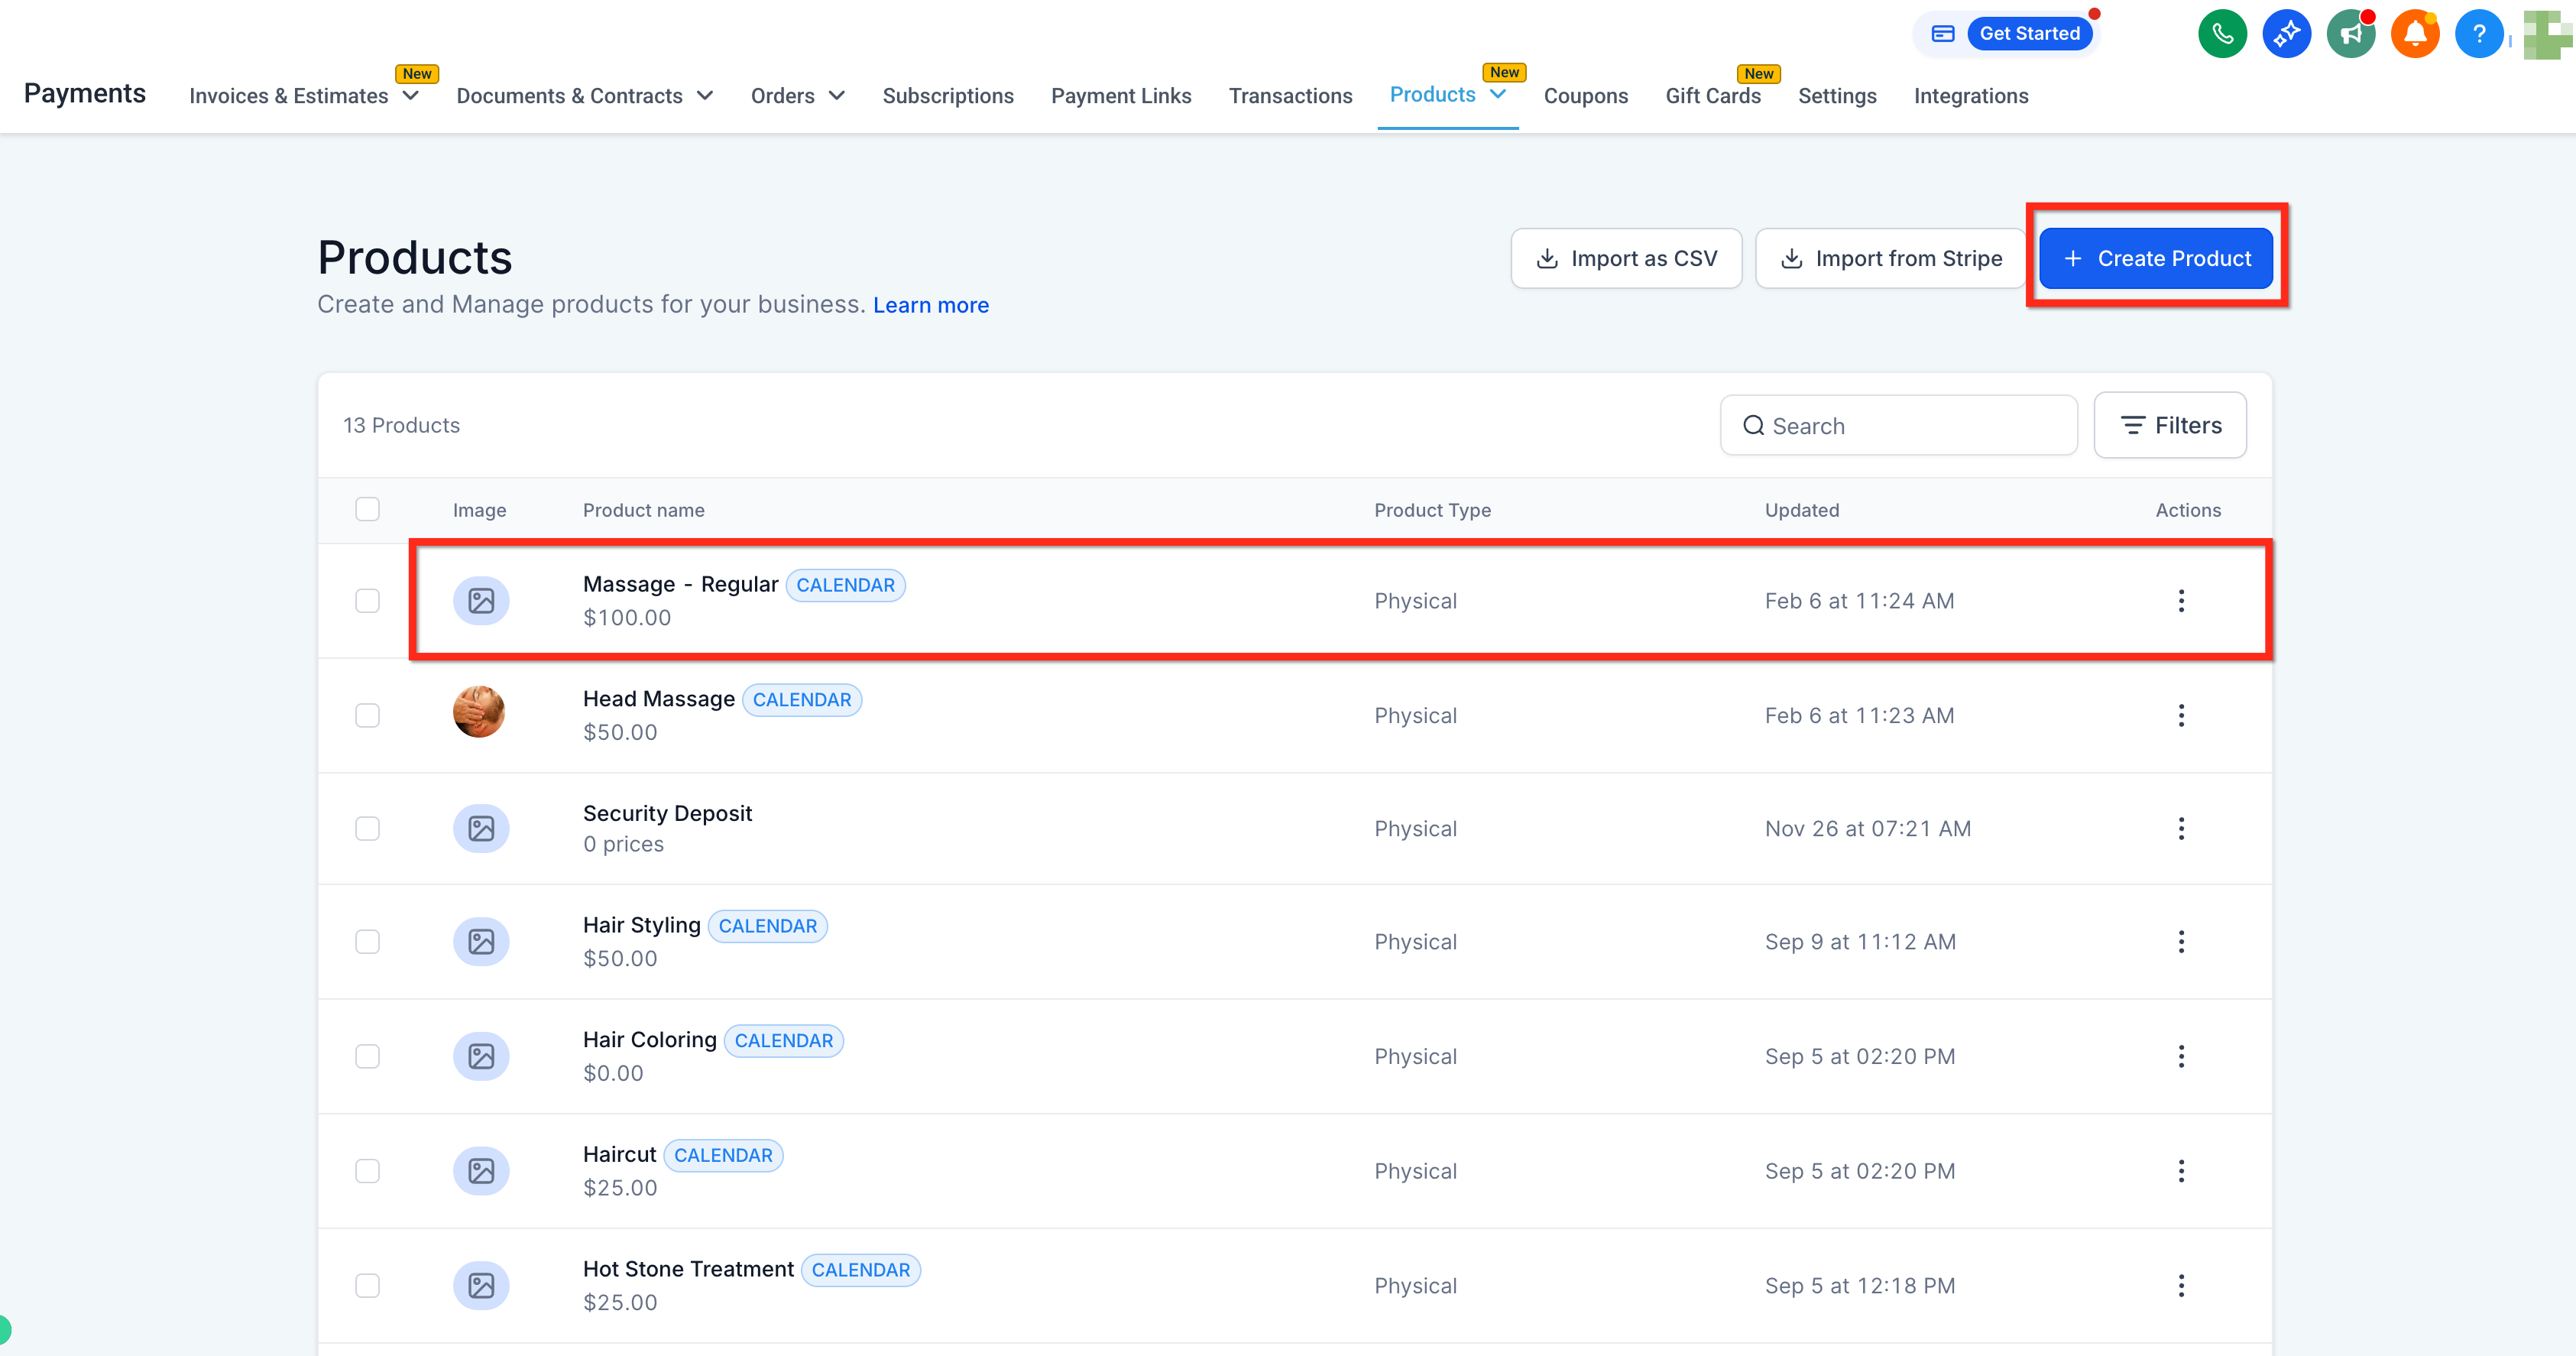
In the Payments section, open Products. This page lists your existing products and is where you create new ones, import in bulk, and manage your catalog.
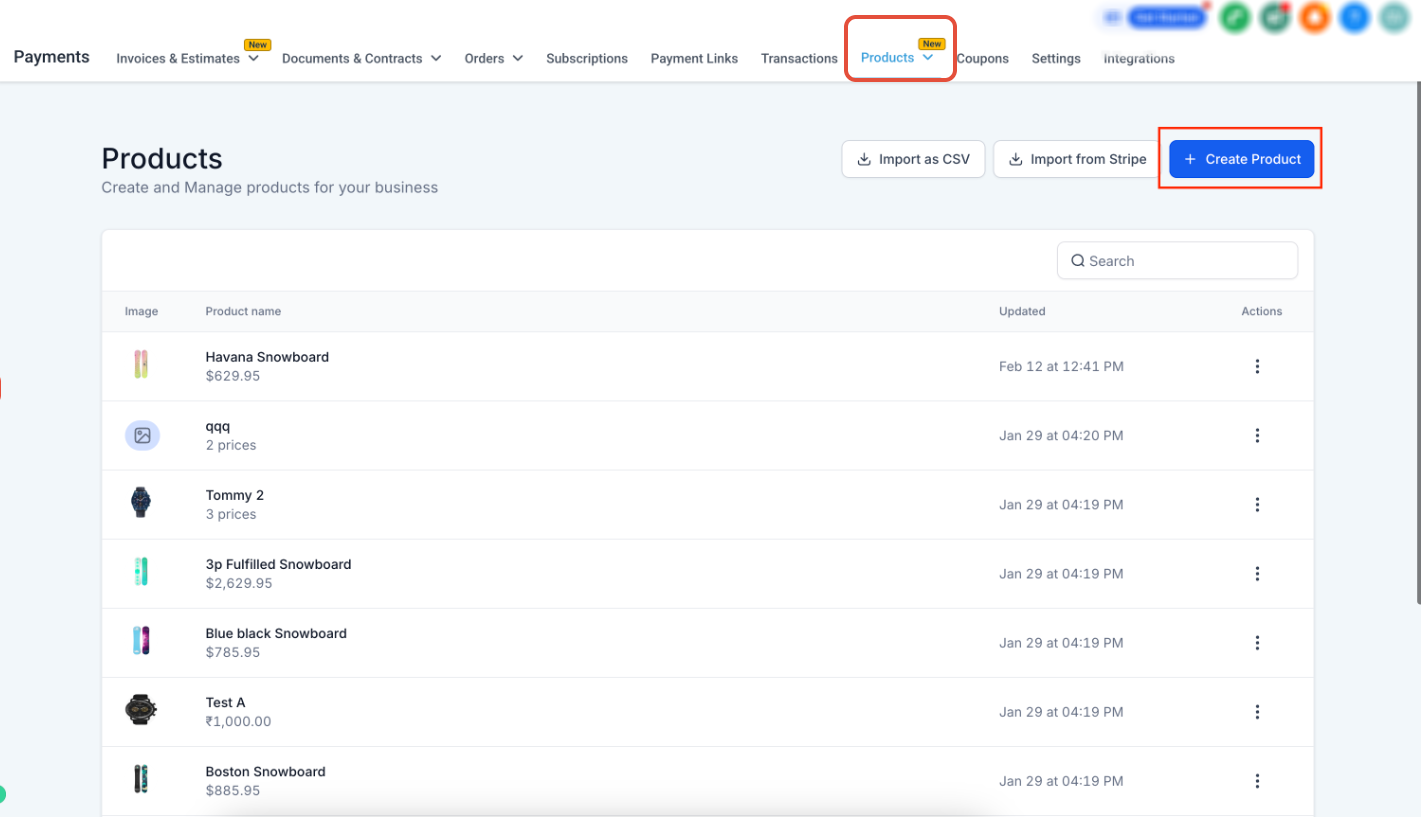
Each product row shows key details at a glance:
Name: The product name.
Type: The product type (physical goods, digital goods, or a service).
Updated: The date and time the product was last changed.
Use the search bar to quickly find a product by name. Click the More Actions menu on any row to View, Edit, or Delete that product.
To start a new product, click Create Product in the upper-right corner. This opens the product configuration page.
Include in Online Store: Enable this toggle if you want the product to appear in your storefront.
Product Name / Title: Enter a clear, descriptive name. This is the first step to selling the product and is what patients see.
Description: Use the description editor to give a full explanation of the product or treatment.
Product Type: Choose the category that fits what you are selling: Physical Goods, Digital Goods, or A Service.
Media / Product Image: Upload one or more images in the order you want them shown. Aesthetix CRM accepts PNG and JPG files up to 2MB each. High-quality images build patient trust and improve conversions.
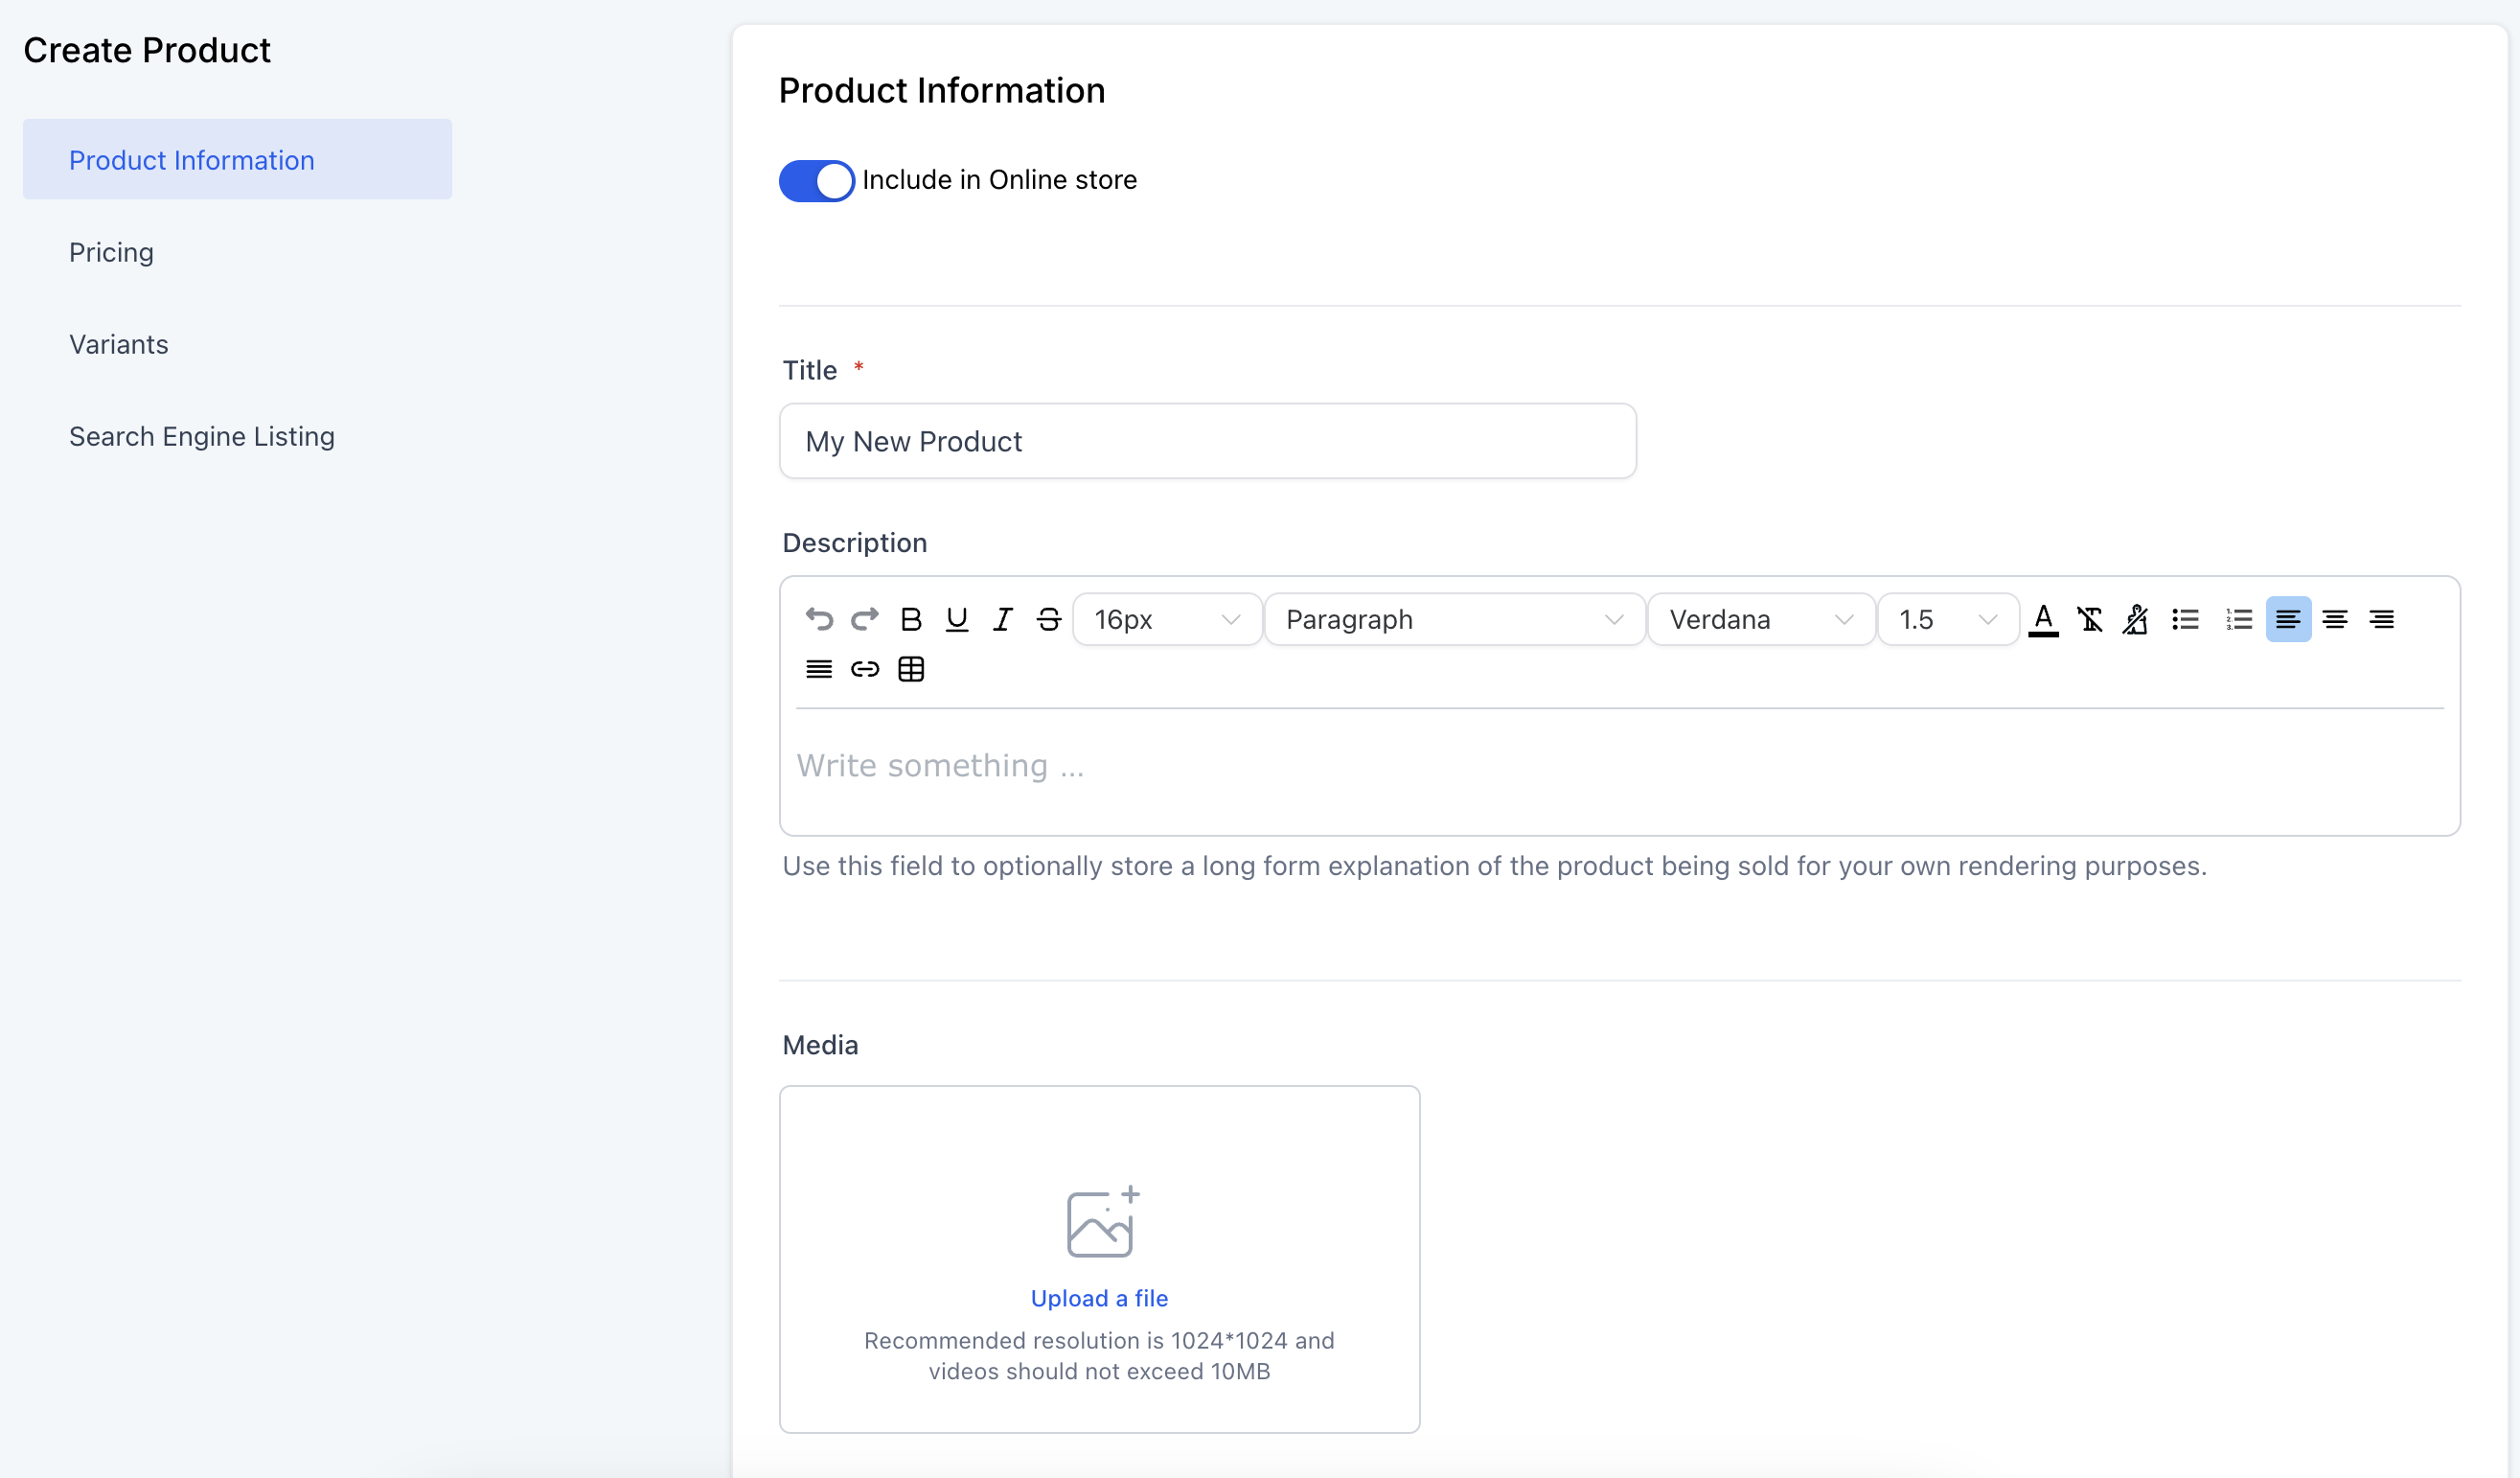
Under Additional Options, you can enter a Statement Descriptor. This short text appears on your patient's credit card statement alongside the company name set in your payment gateway settings, so patients recognize the charge.
Collections group related products so patients can browse categories such as skincare, injectables, memberships, or seasonal offers.
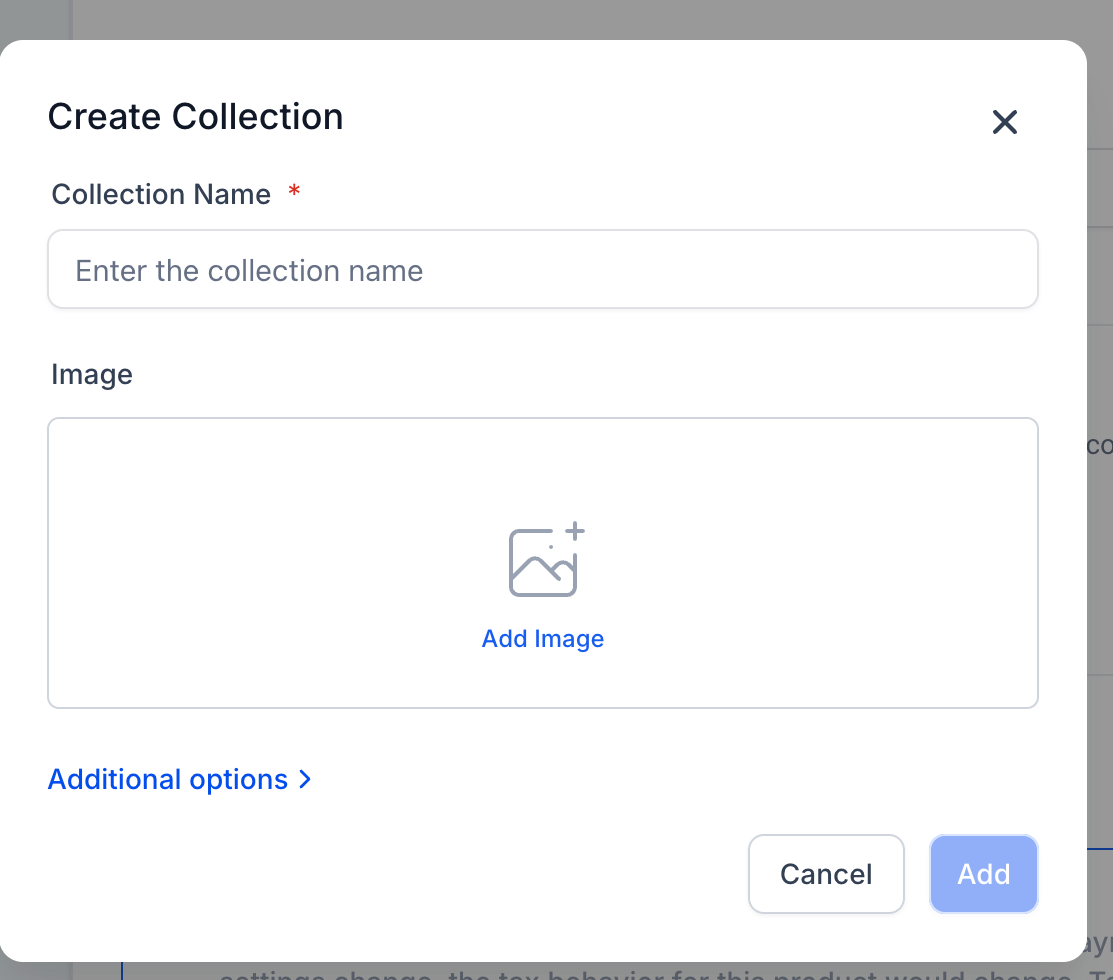
To add a product to a collection:
Select the Collections field.
Search for an existing collection.
Assign the product to one or more collections.
If no collection exists yet, click the + icon to create a new one and add the product to it immediately.
Product taxes control how tax is calculated for the item.
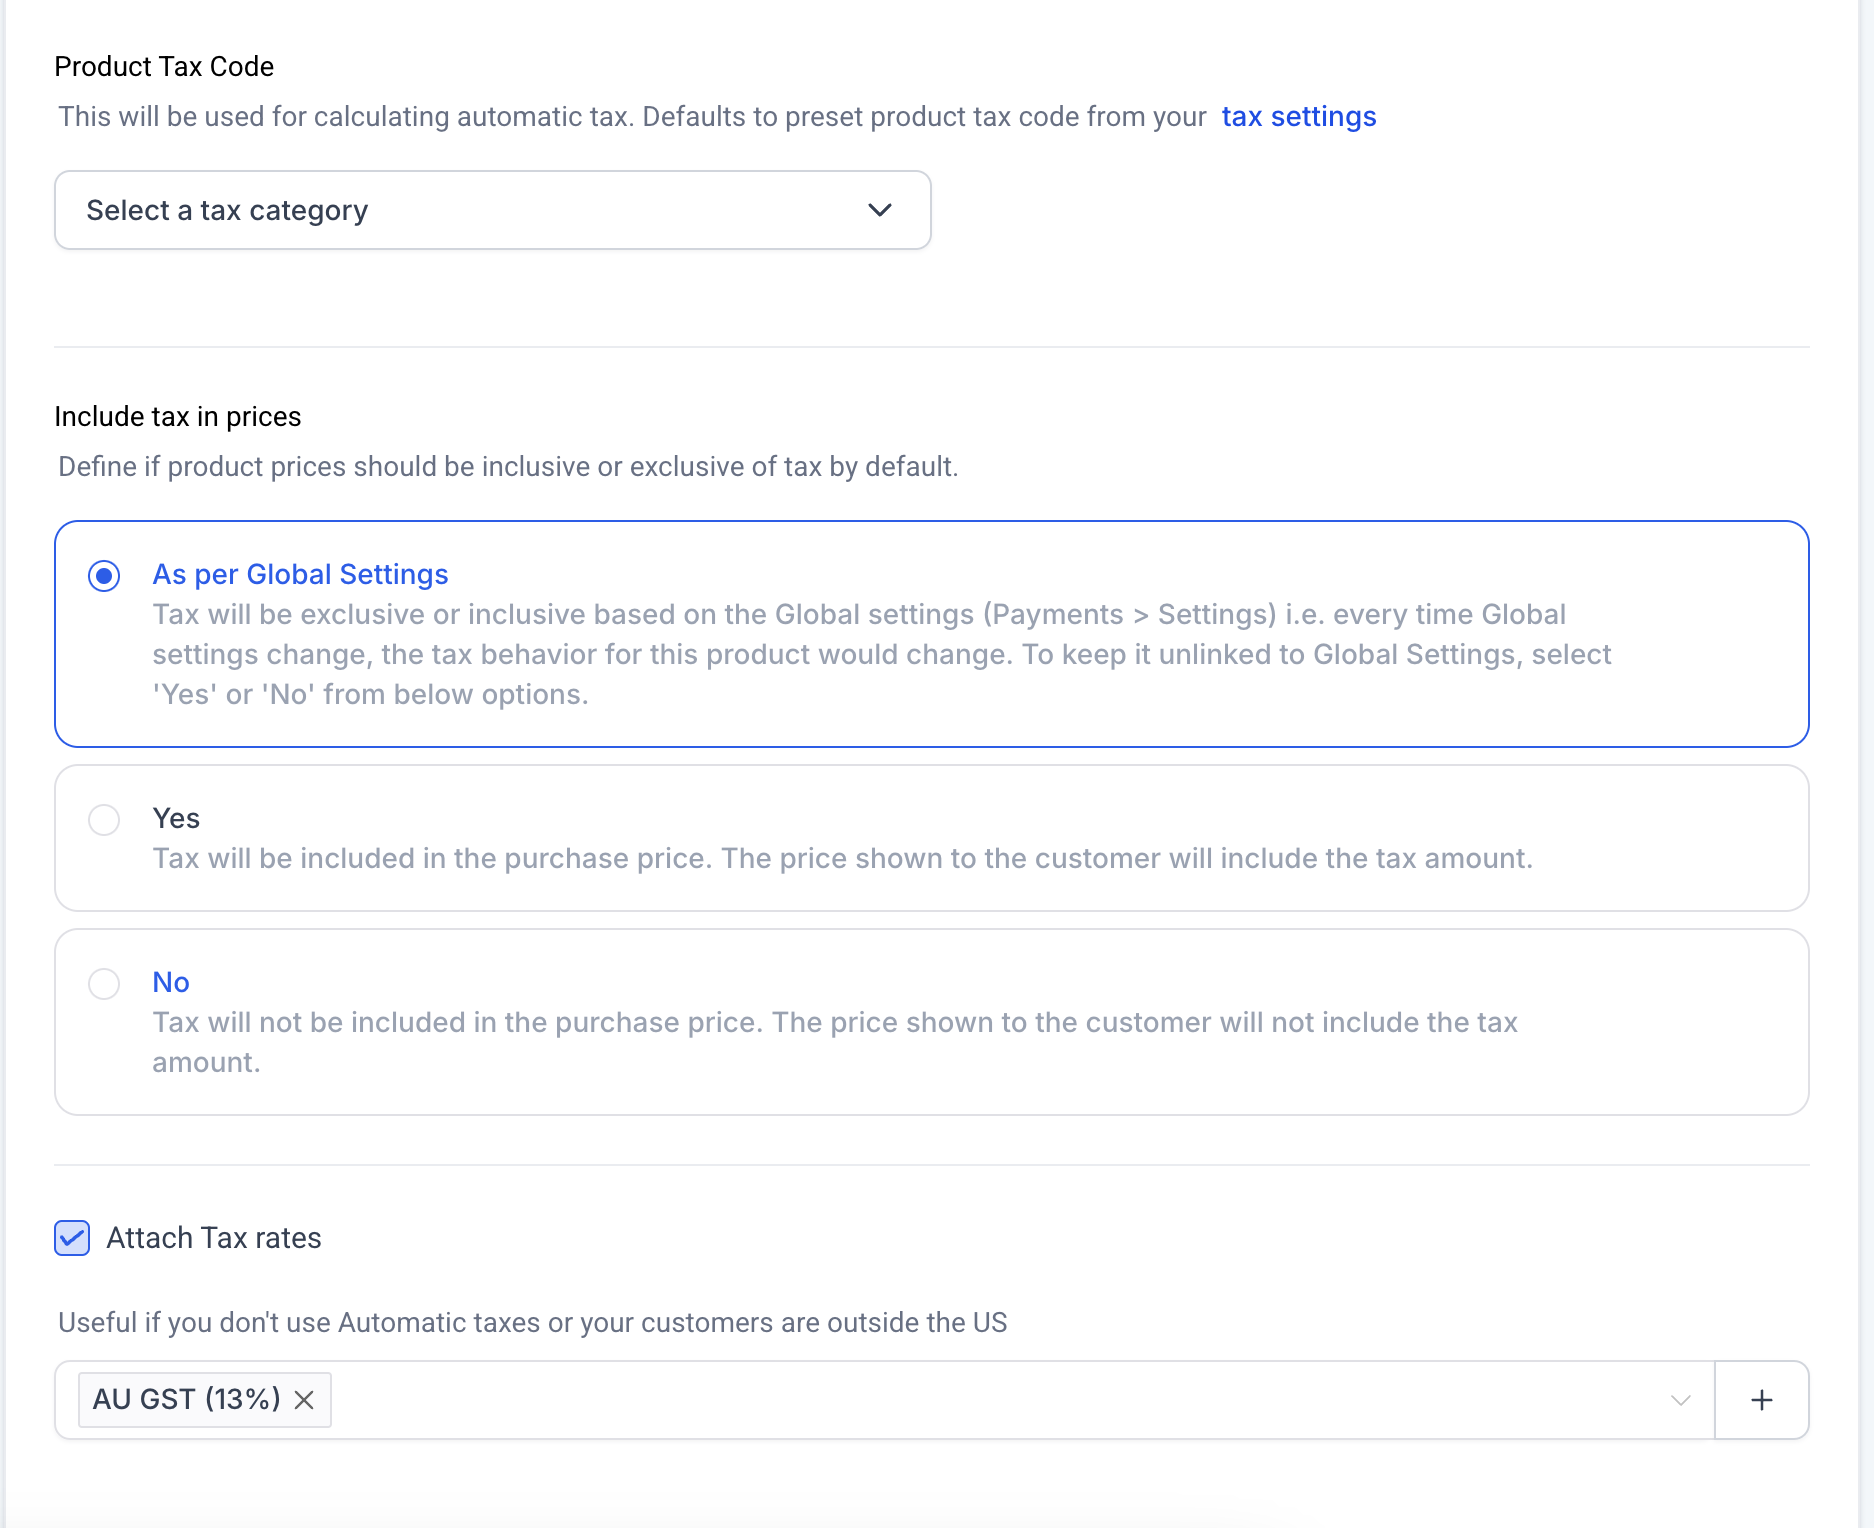
Product Tax Code: Select the appropriate tax category for automatic tax calculations.
Include Tax in Prices: Choose As per global settings (follow your default tax configuration), Yes (tax is included in the displayed price), or No (tax is added separately at checkout).
Attach Tax Rates: Manually attach tax rates to the product if needed. This is useful in regions where automatic tax calculation is unavailable.
For full details on tax setup, see the guide on configuring taxes and tax settings.
Pricing defines how patients are charged. For a one-time purchase, configure:
Pricing Name: A label for this pricing structure.
Pricing Type: Select One-time for a single payment.
Amount: The purchase price.
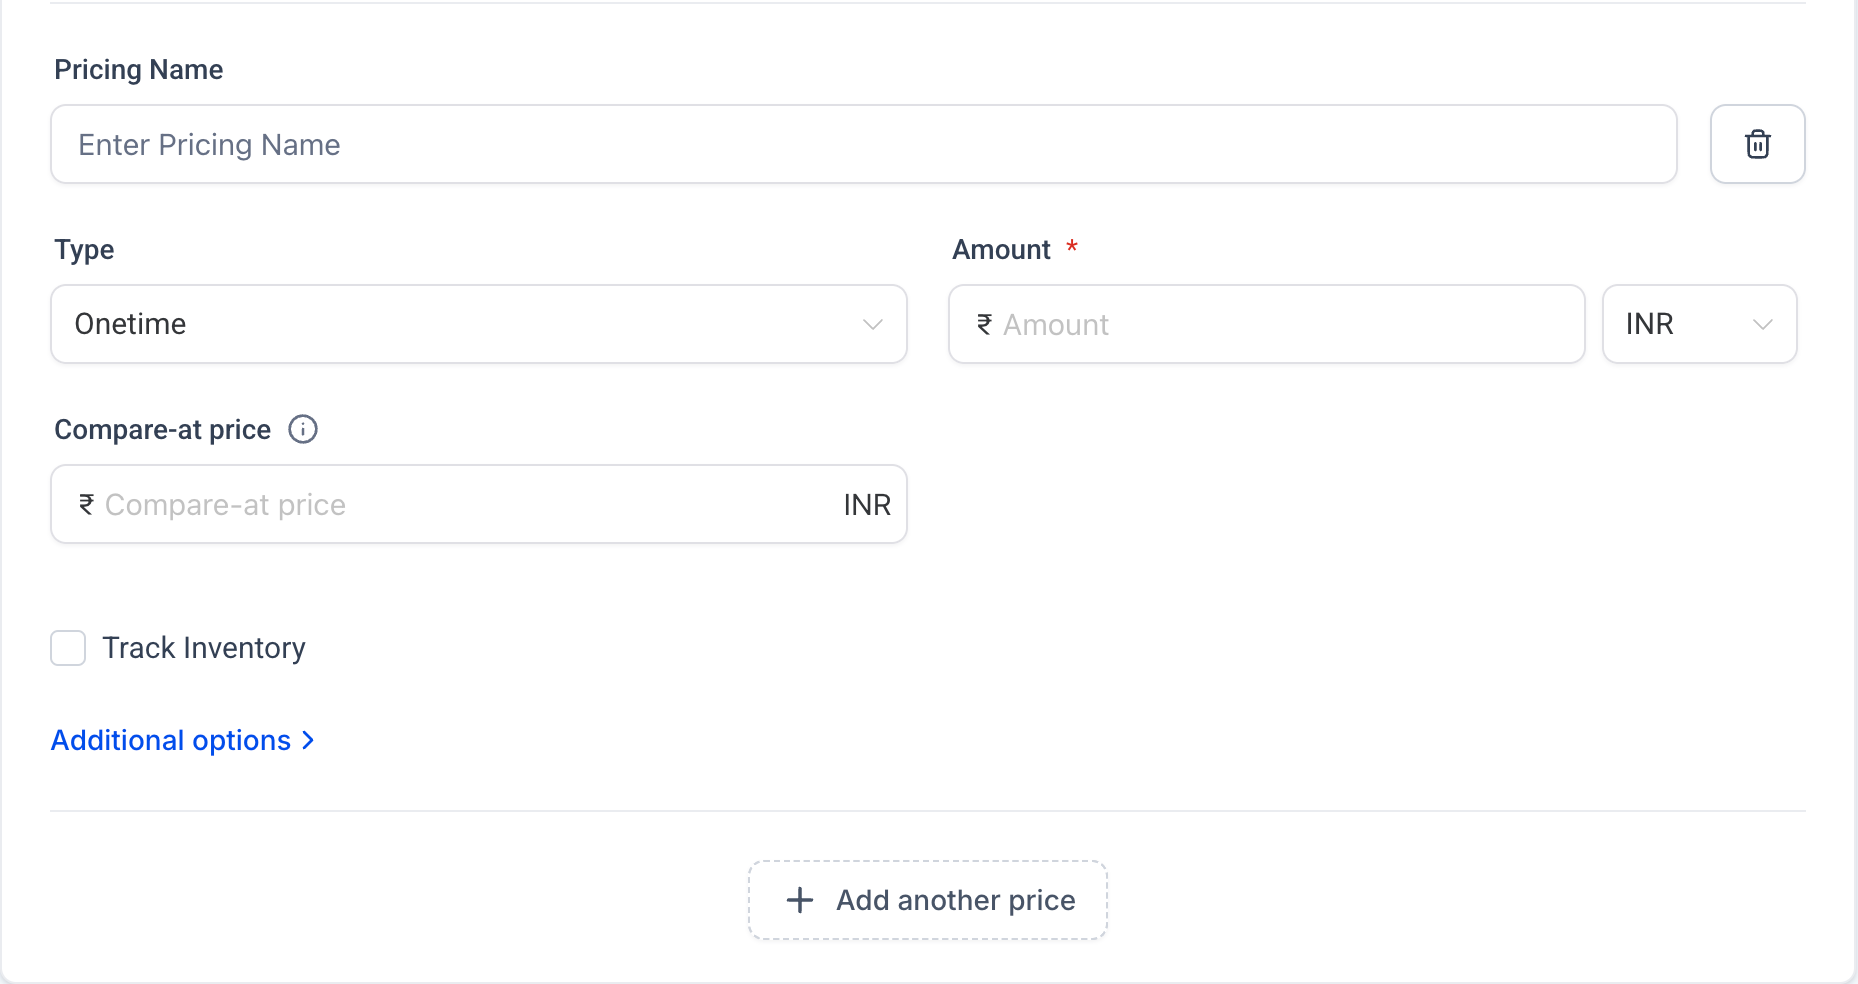
Optional pricing options include:
Compare-at Price: Show a higher original price to highlight a discount.
Track Inventory: Turn on inventory tracking for the product.
Available Quantity: Set how many units are available.
Continue Selling When Out of Stock: Allow purchases even when inventory reaches zero.
Price Description: A brief description shown with the price.
For memberships, subscriptions, or payment plans, select Recurring and set the billing details.
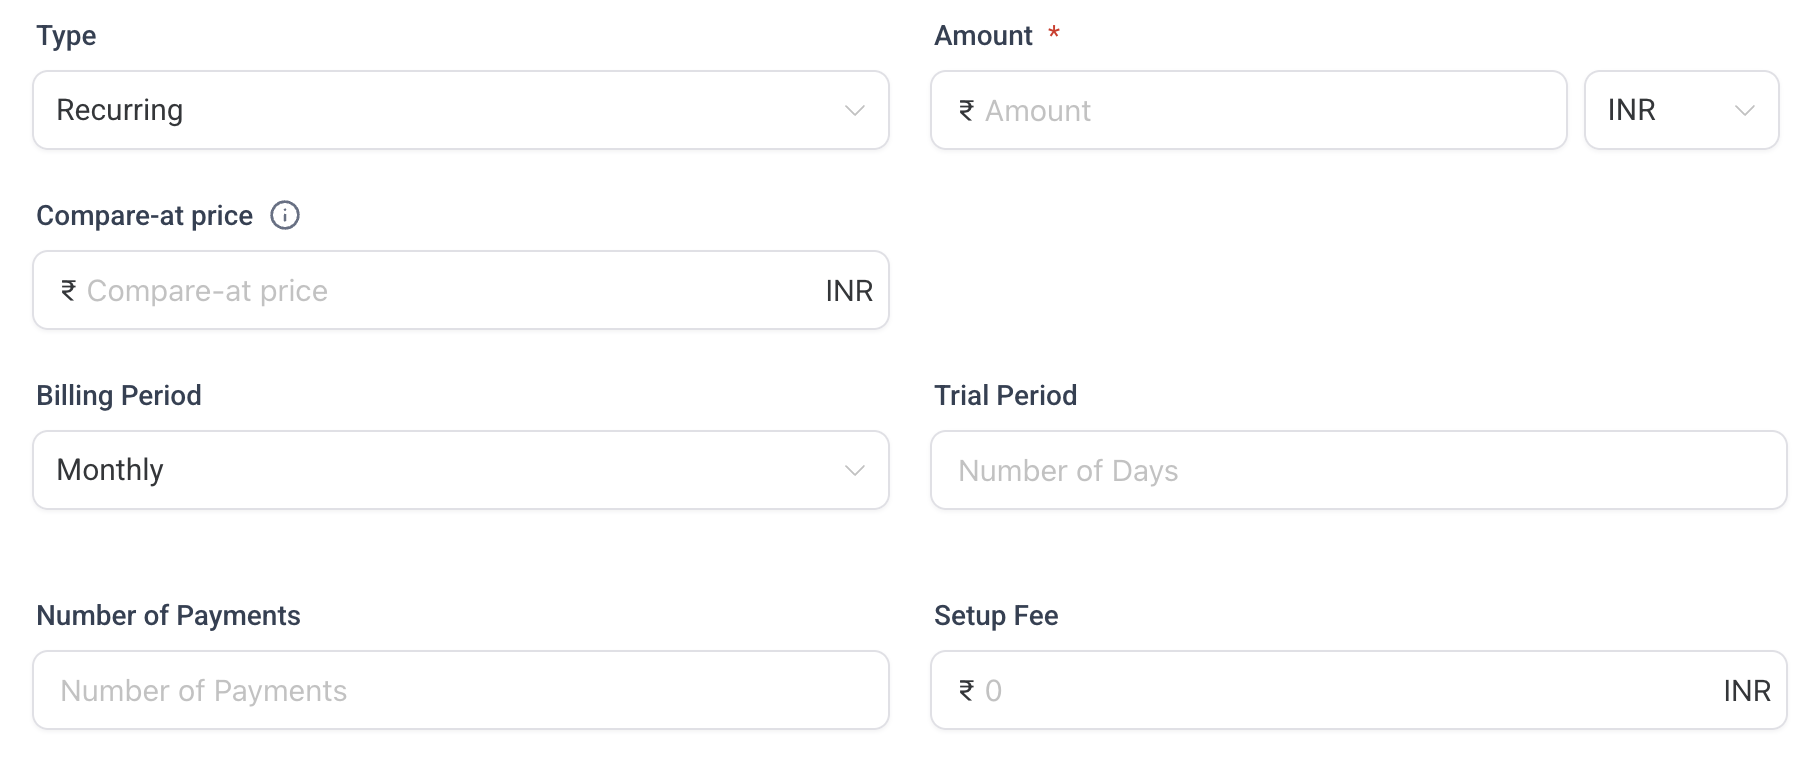
Billing Period: How often the patient is billed (daily, weekly, monthly, yearly, or a custom interval).
Trial Period: An optional number of days before billing begins.
Number of Payments: Limit the total number of billing cycles.
Setup Fee: An optional one-time charge added to the first payment.
Recurring pricing is commonly used for monthly memberships, treatment subscriptions, and installment payment plans.
Turn on the Membership Offer toggle to connect the product to a membership offer in your membership portal, then select the offer from the dropdown.
Variants let a single product carry multiple options, such as different sizes, volumes, or session counts, without creating separate listings.
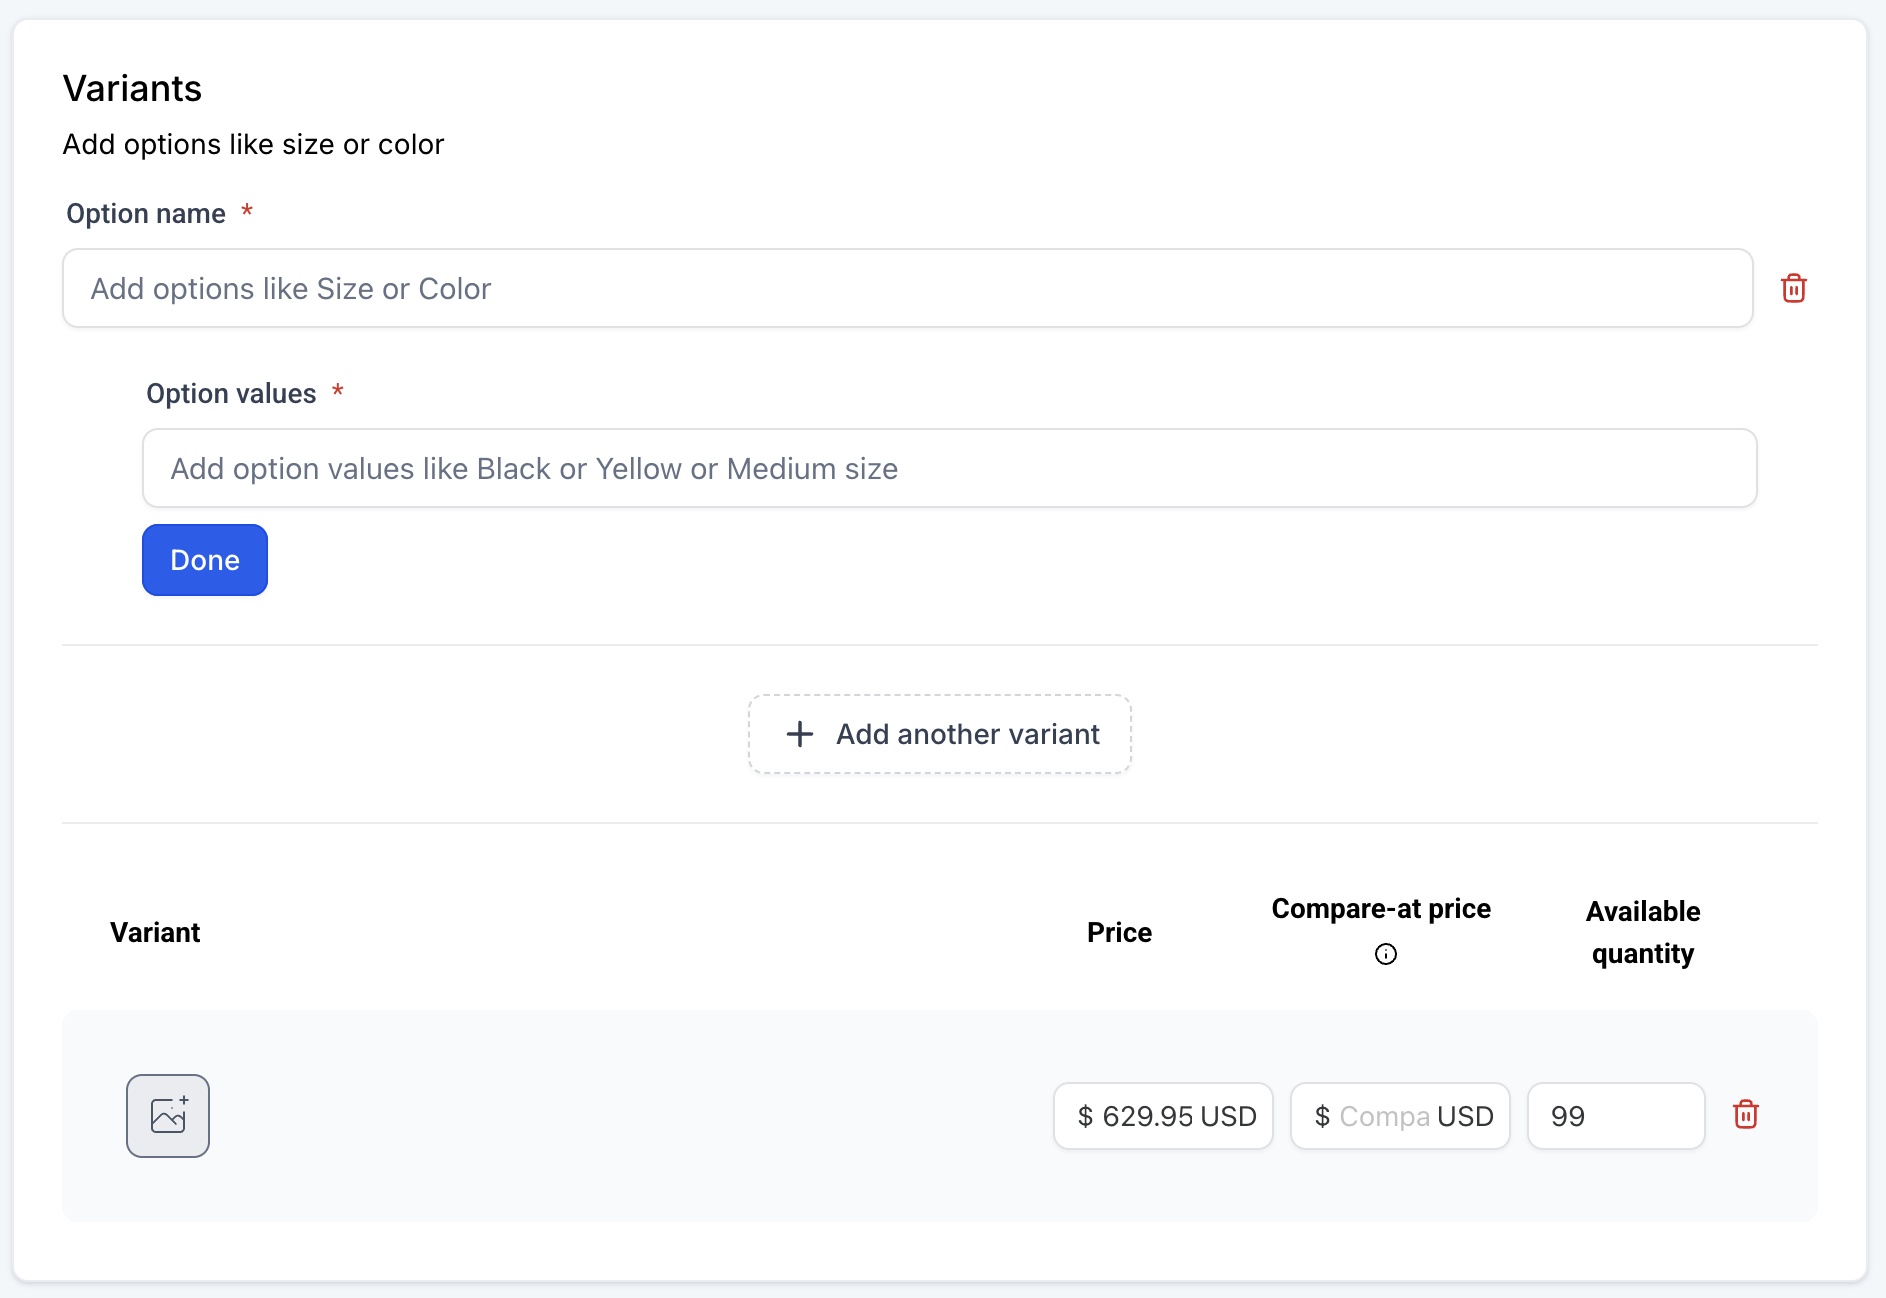
Enter an Option Name such as Size or Volume.
Add Option Values such as Small, Medium, Large.
Click Done to generate the variants.
Each variant can have its own price, compare-at price, inventory quantity, and image.
Once everything is configured, review your details and click Save. Then set the product status:
Draft: The product stays hidden from patients.
Active: The product becomes visible in your store and available to purchase.
To update a product, open the Products page, click the More Actions menu, and choose Edit. You can change the name, description, type, image, statement descriptor, pricing, and other settings at any time. Products can be edited even after they are published.
Cost price and margin are optional fields you can enable on any product price or variant to see your profitability directly inside the Products module, without external spreadsheets.
Cost Price: What the product costs your practice to deliver or acquire (always zero or greater).
Margin (Amount): Selling price minus cost price. Can be positive or negative.
Margin (Percentage): That difference as a percentage of cost price. If cost price is zero, margin percentage is treated as 100%.
In the Payments section, open Products.
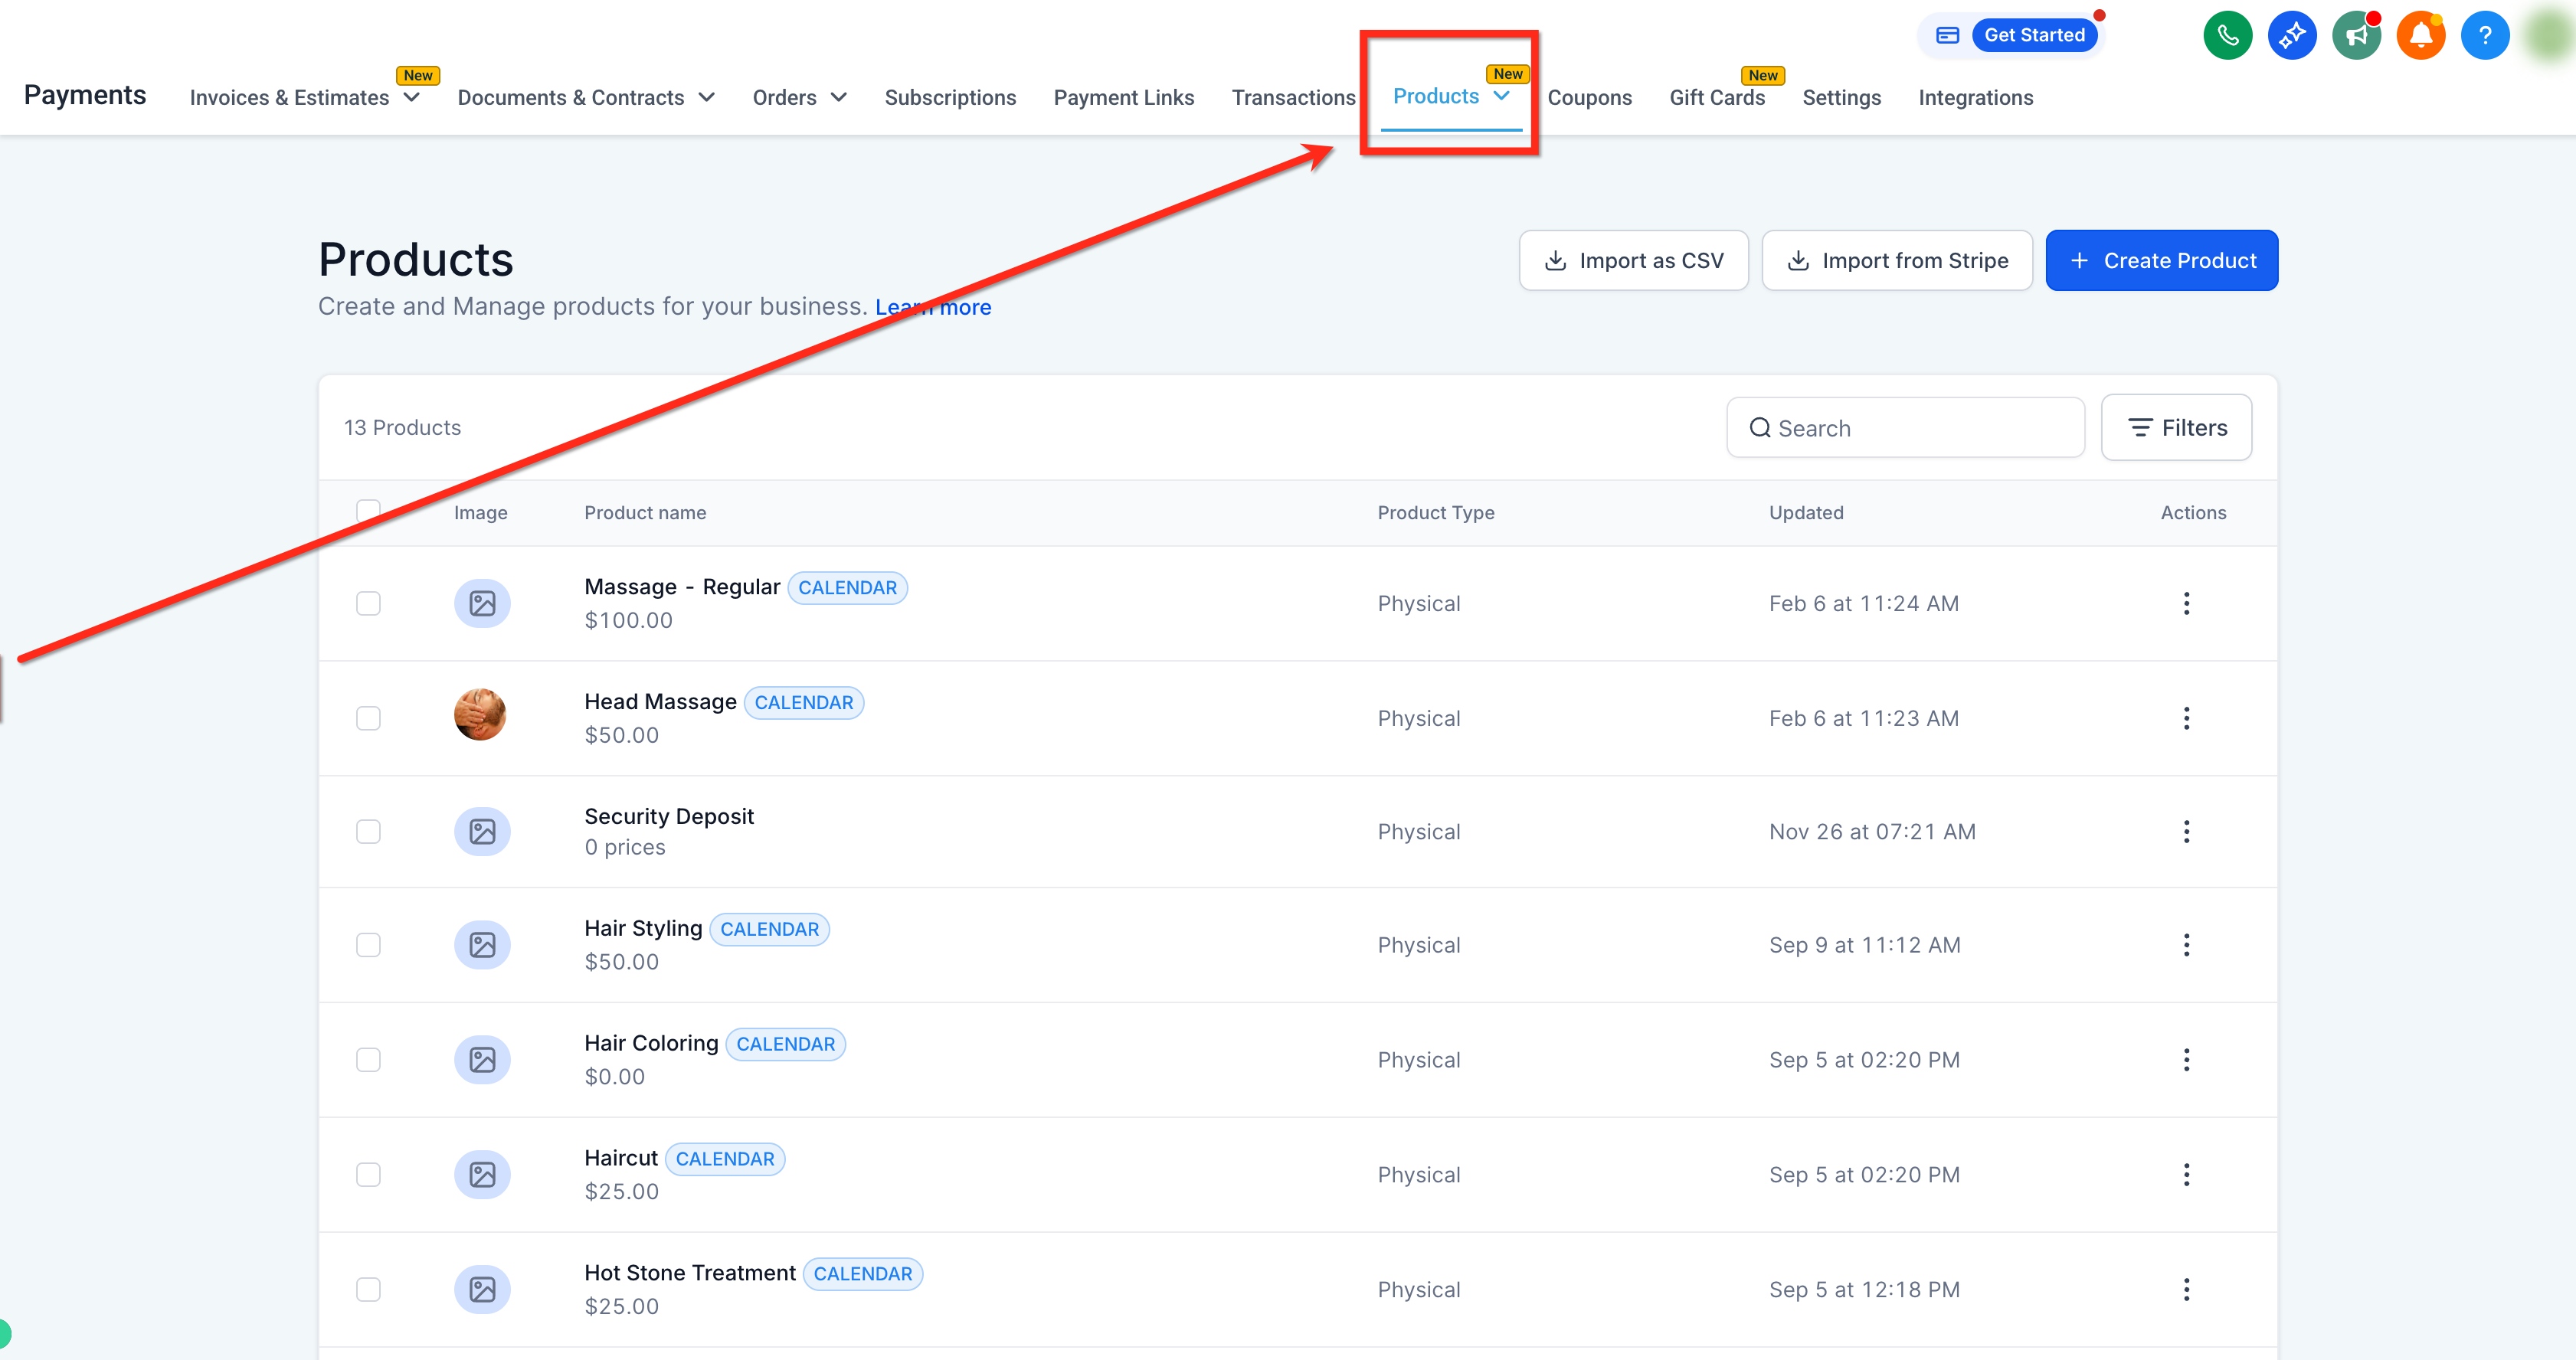
Click Create Product, or open an existing product to edit it.
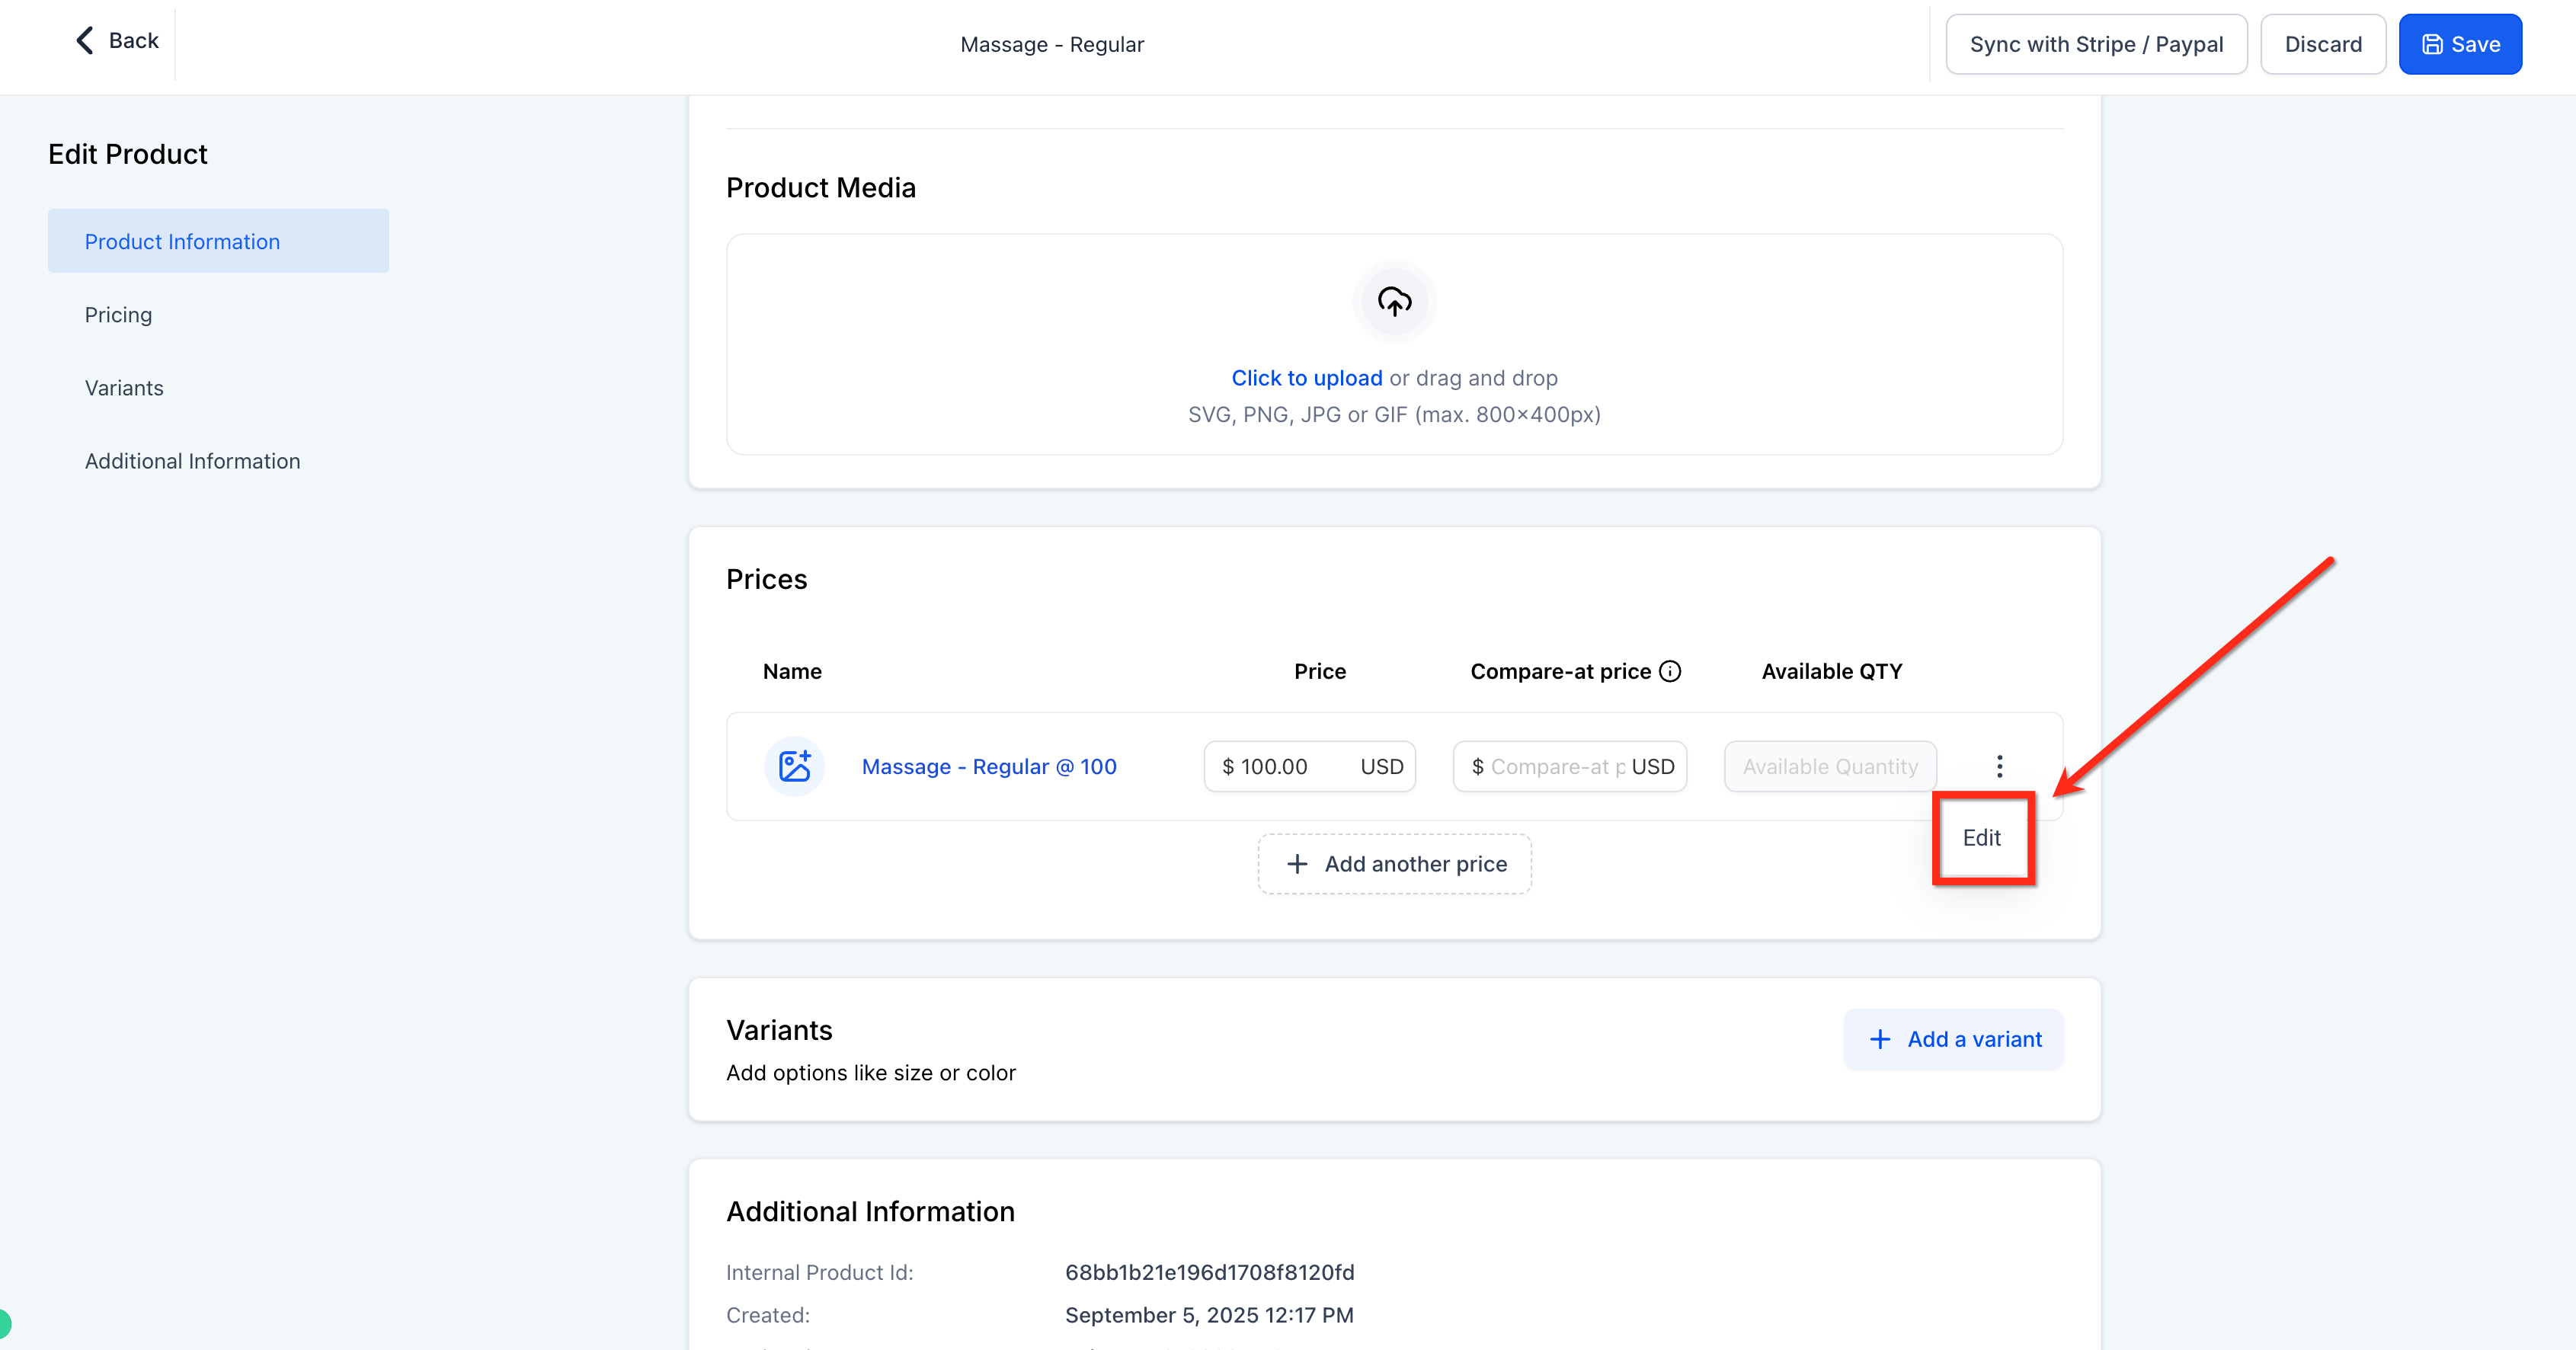
Scroll to the Pricing section. For existing products, click Edit next to the price you want to configure.
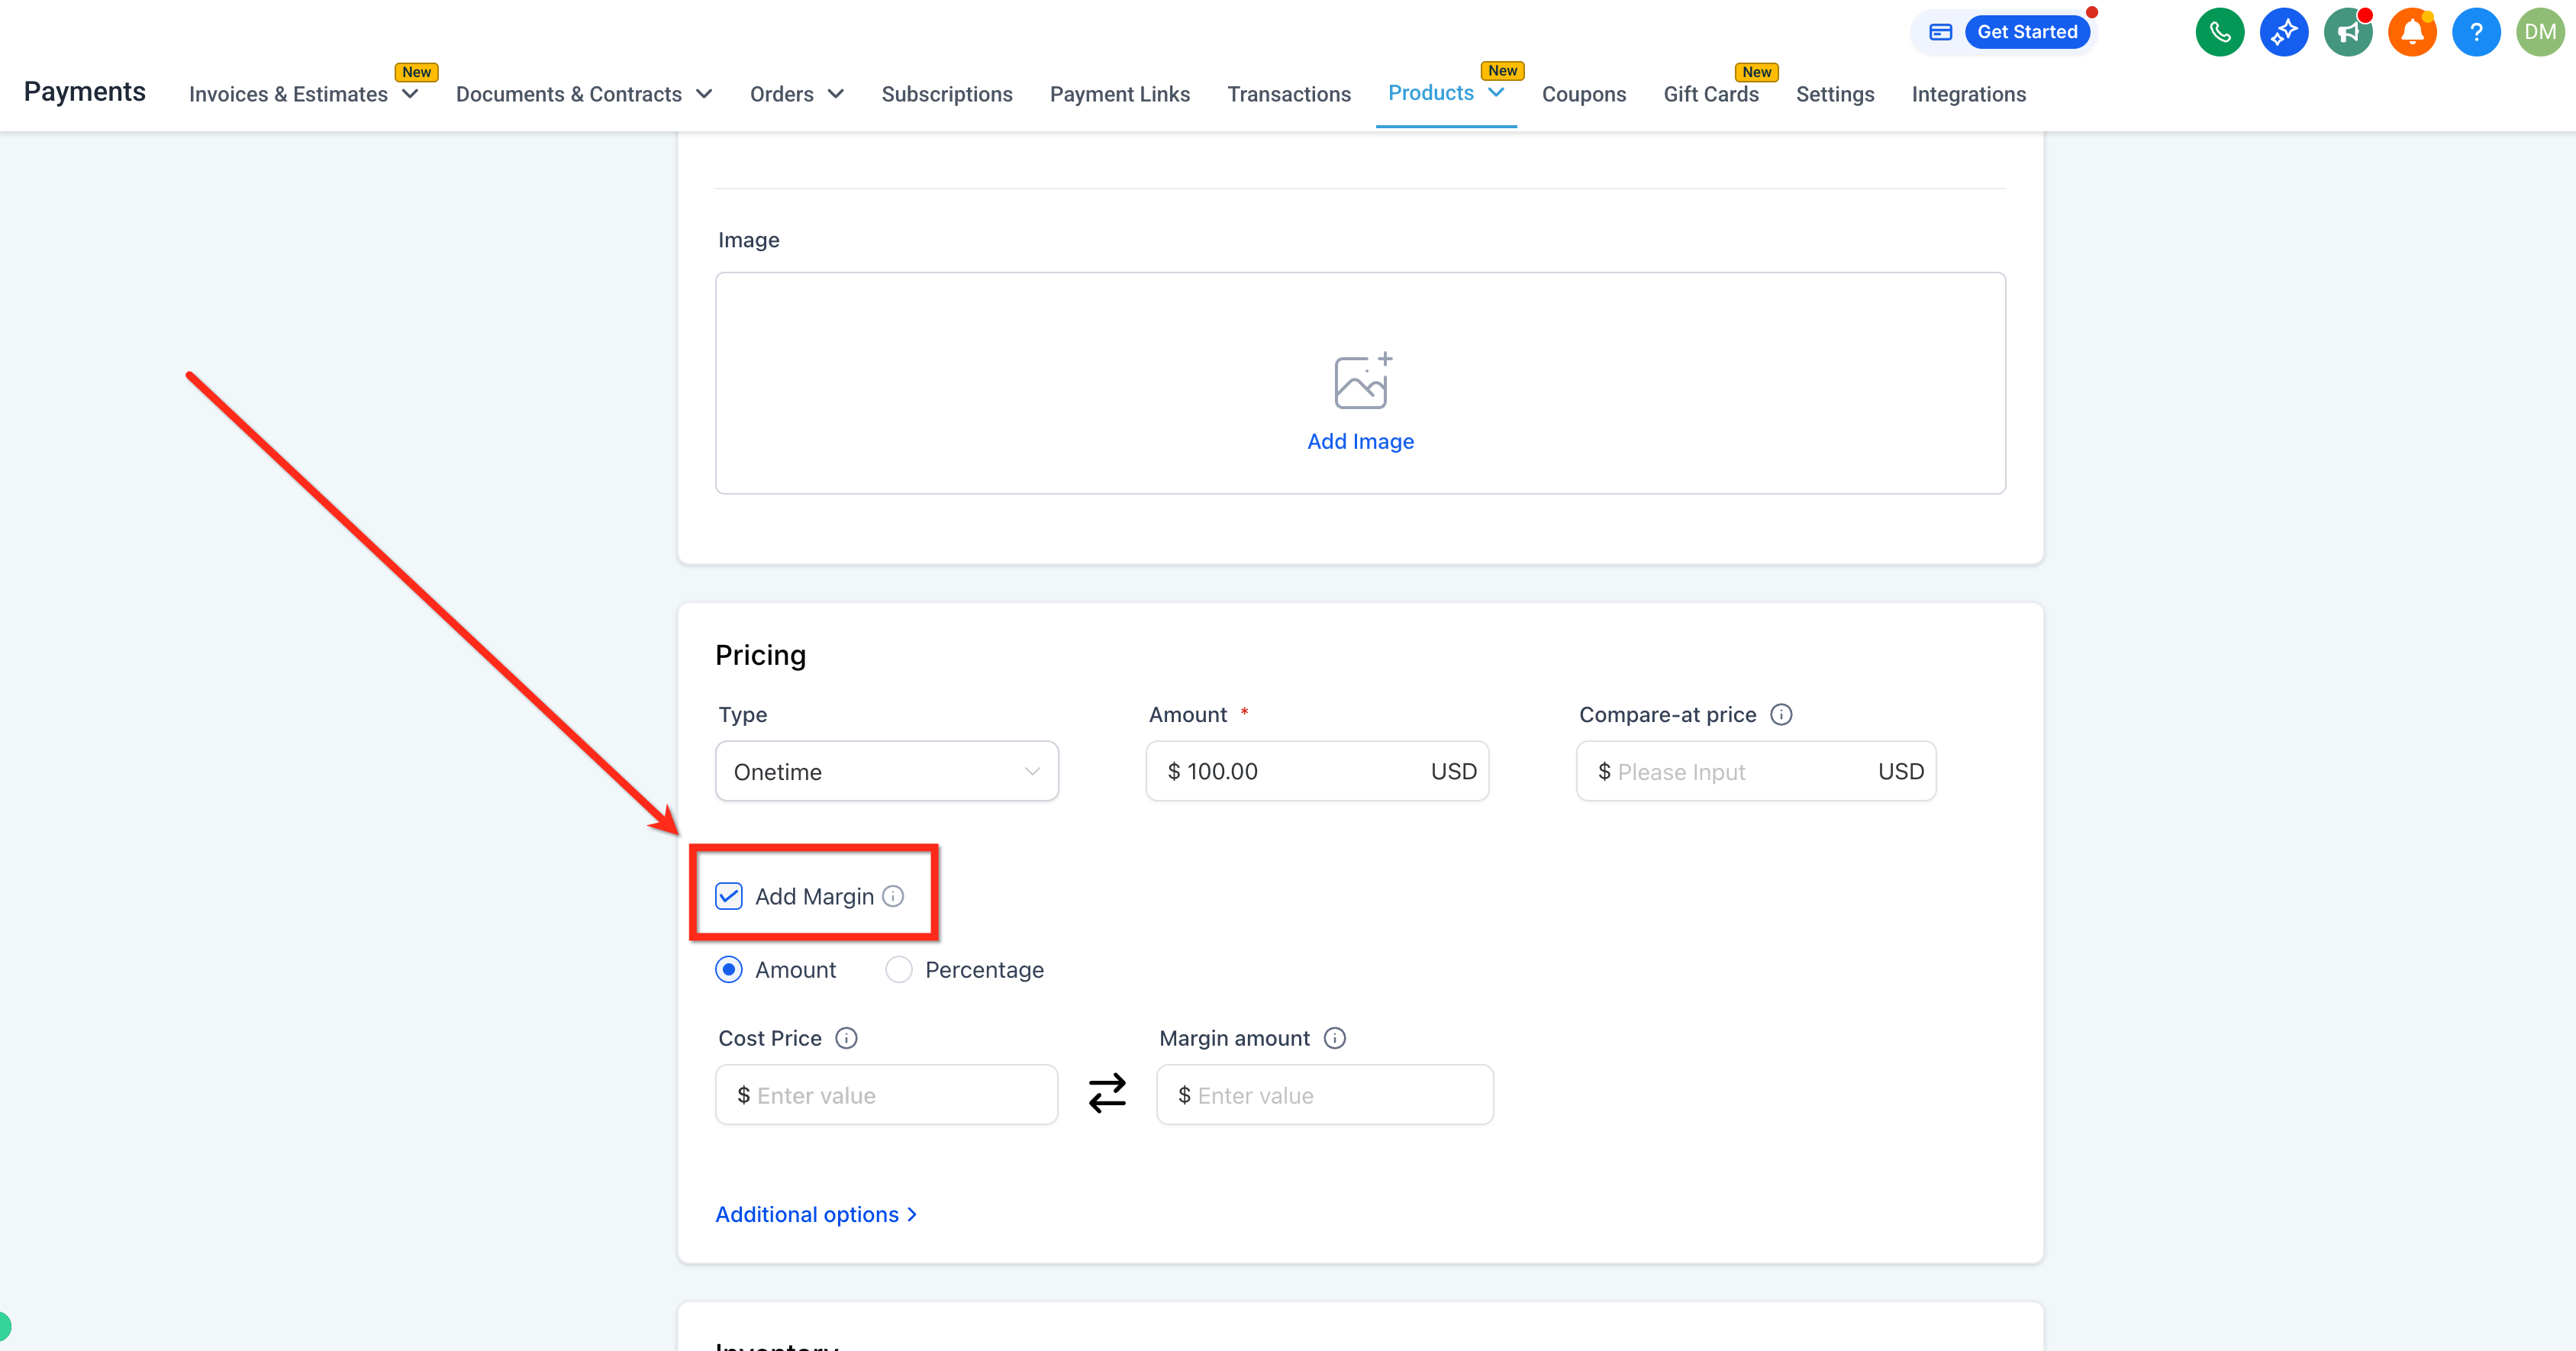
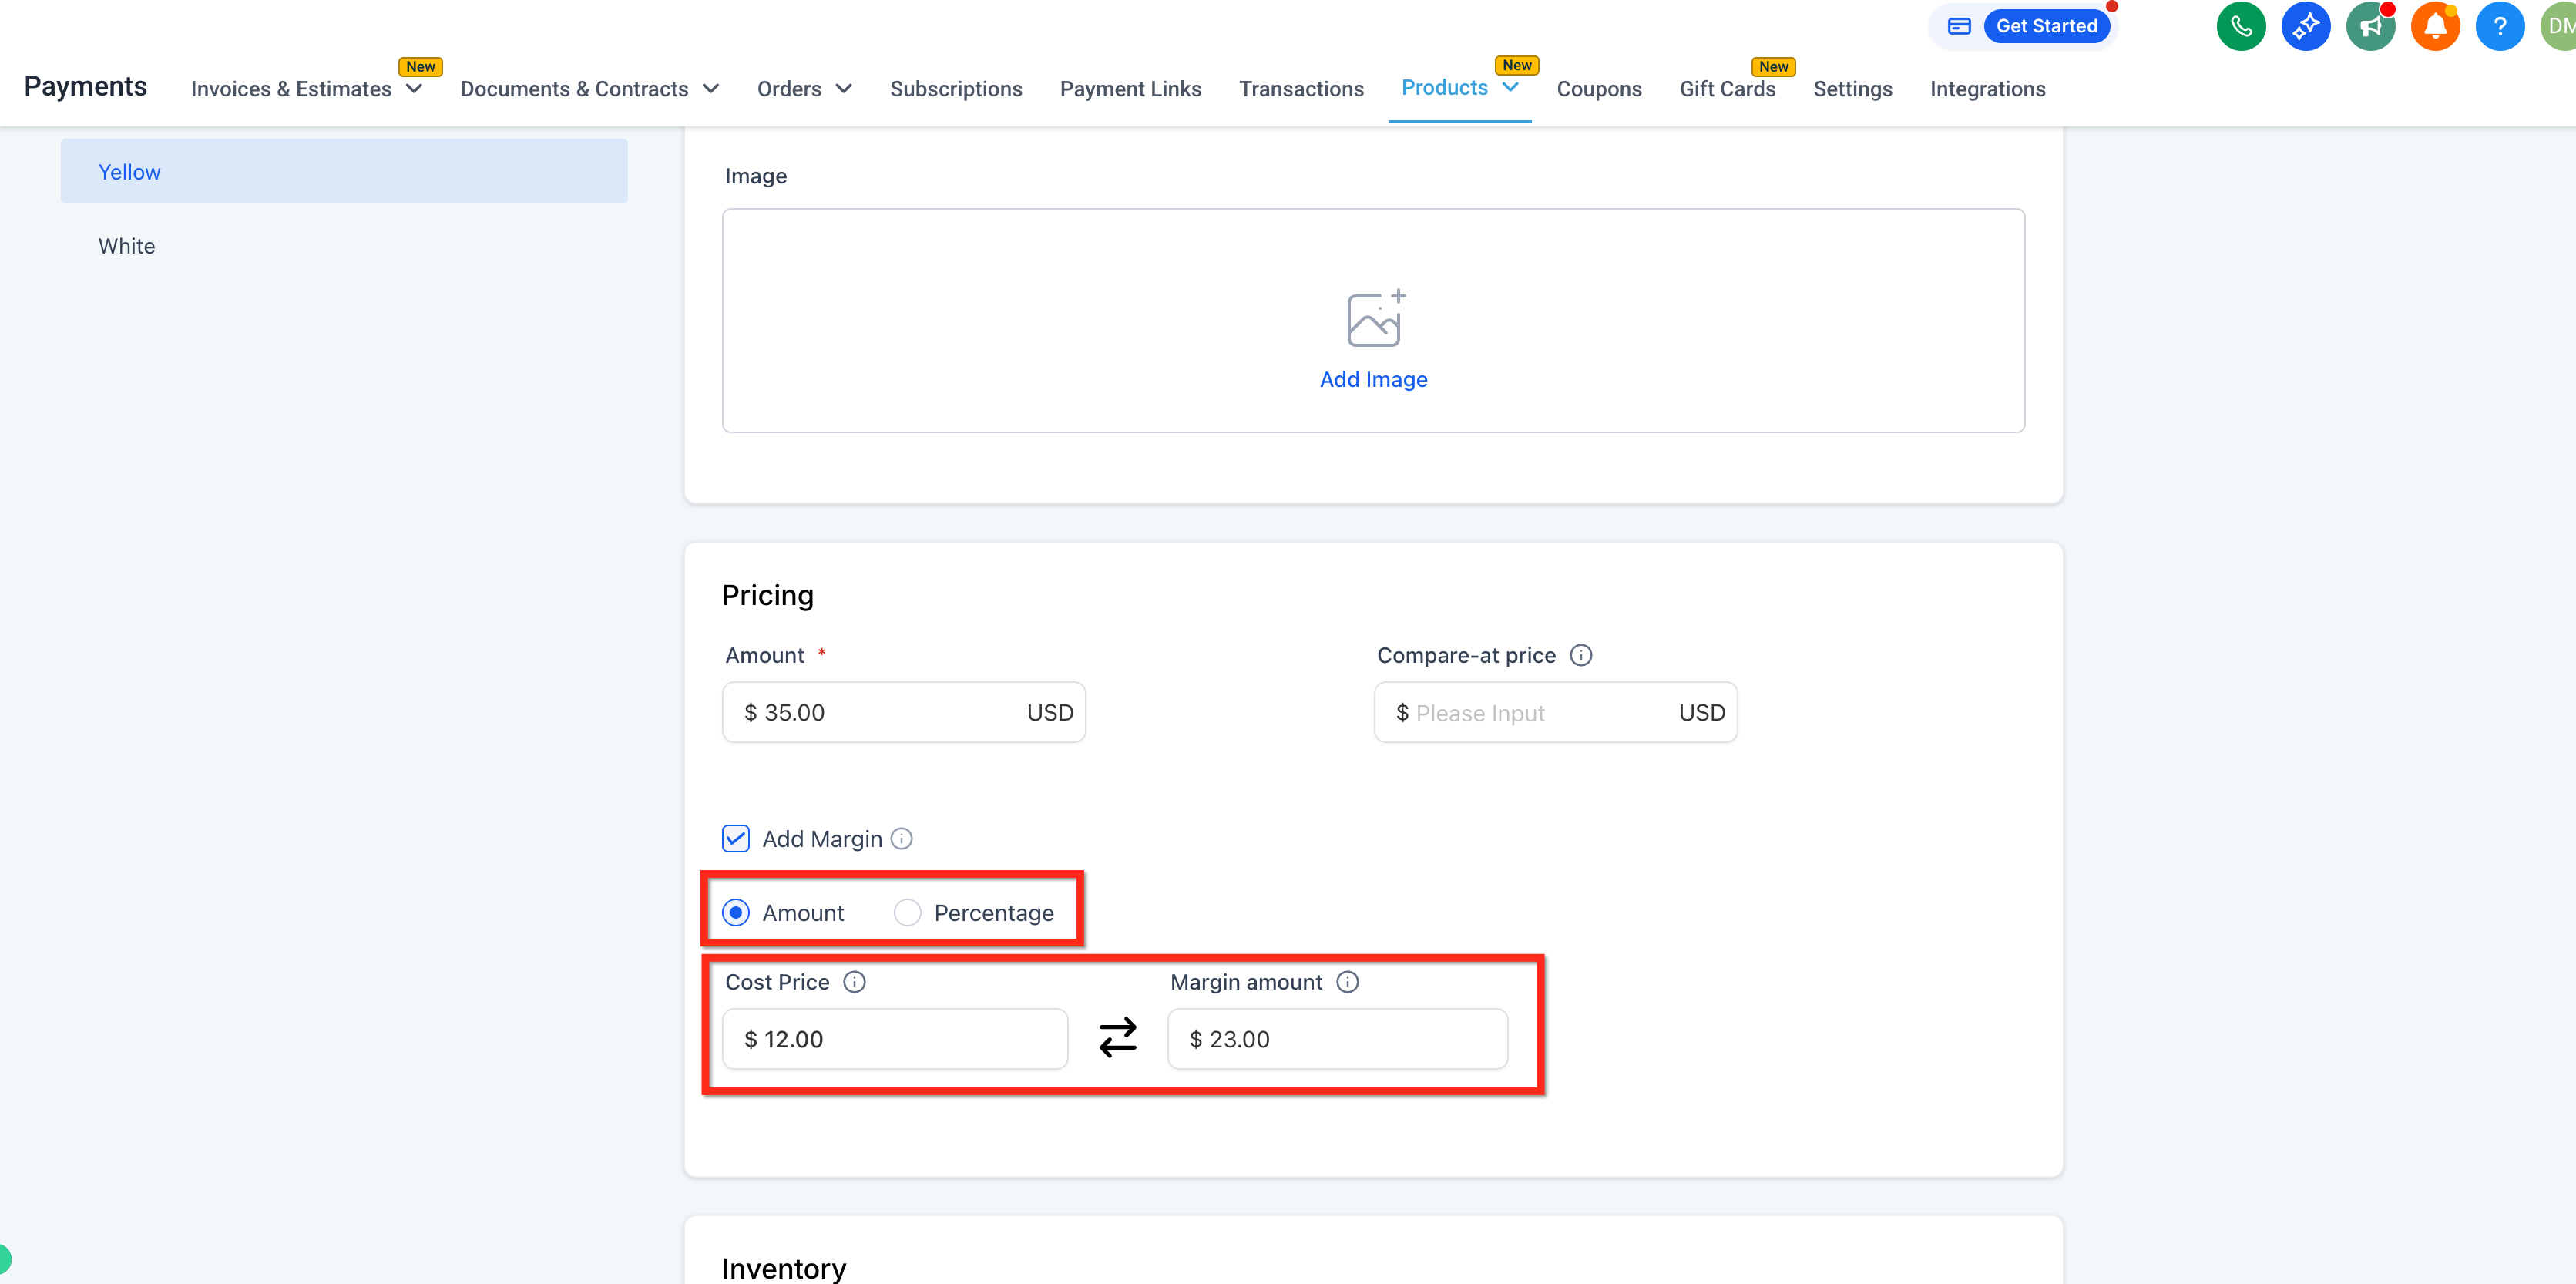
Check the Add Margin checkbox to reveal the Cost Price and Margin fields. The checkbox is off by default, and enabling it does not affect existing transactions.
Choose Amount or Percentage, then enter either the cost price or the margin. The other value calculates automatically based on your selling price. Cost price cannot be negative.
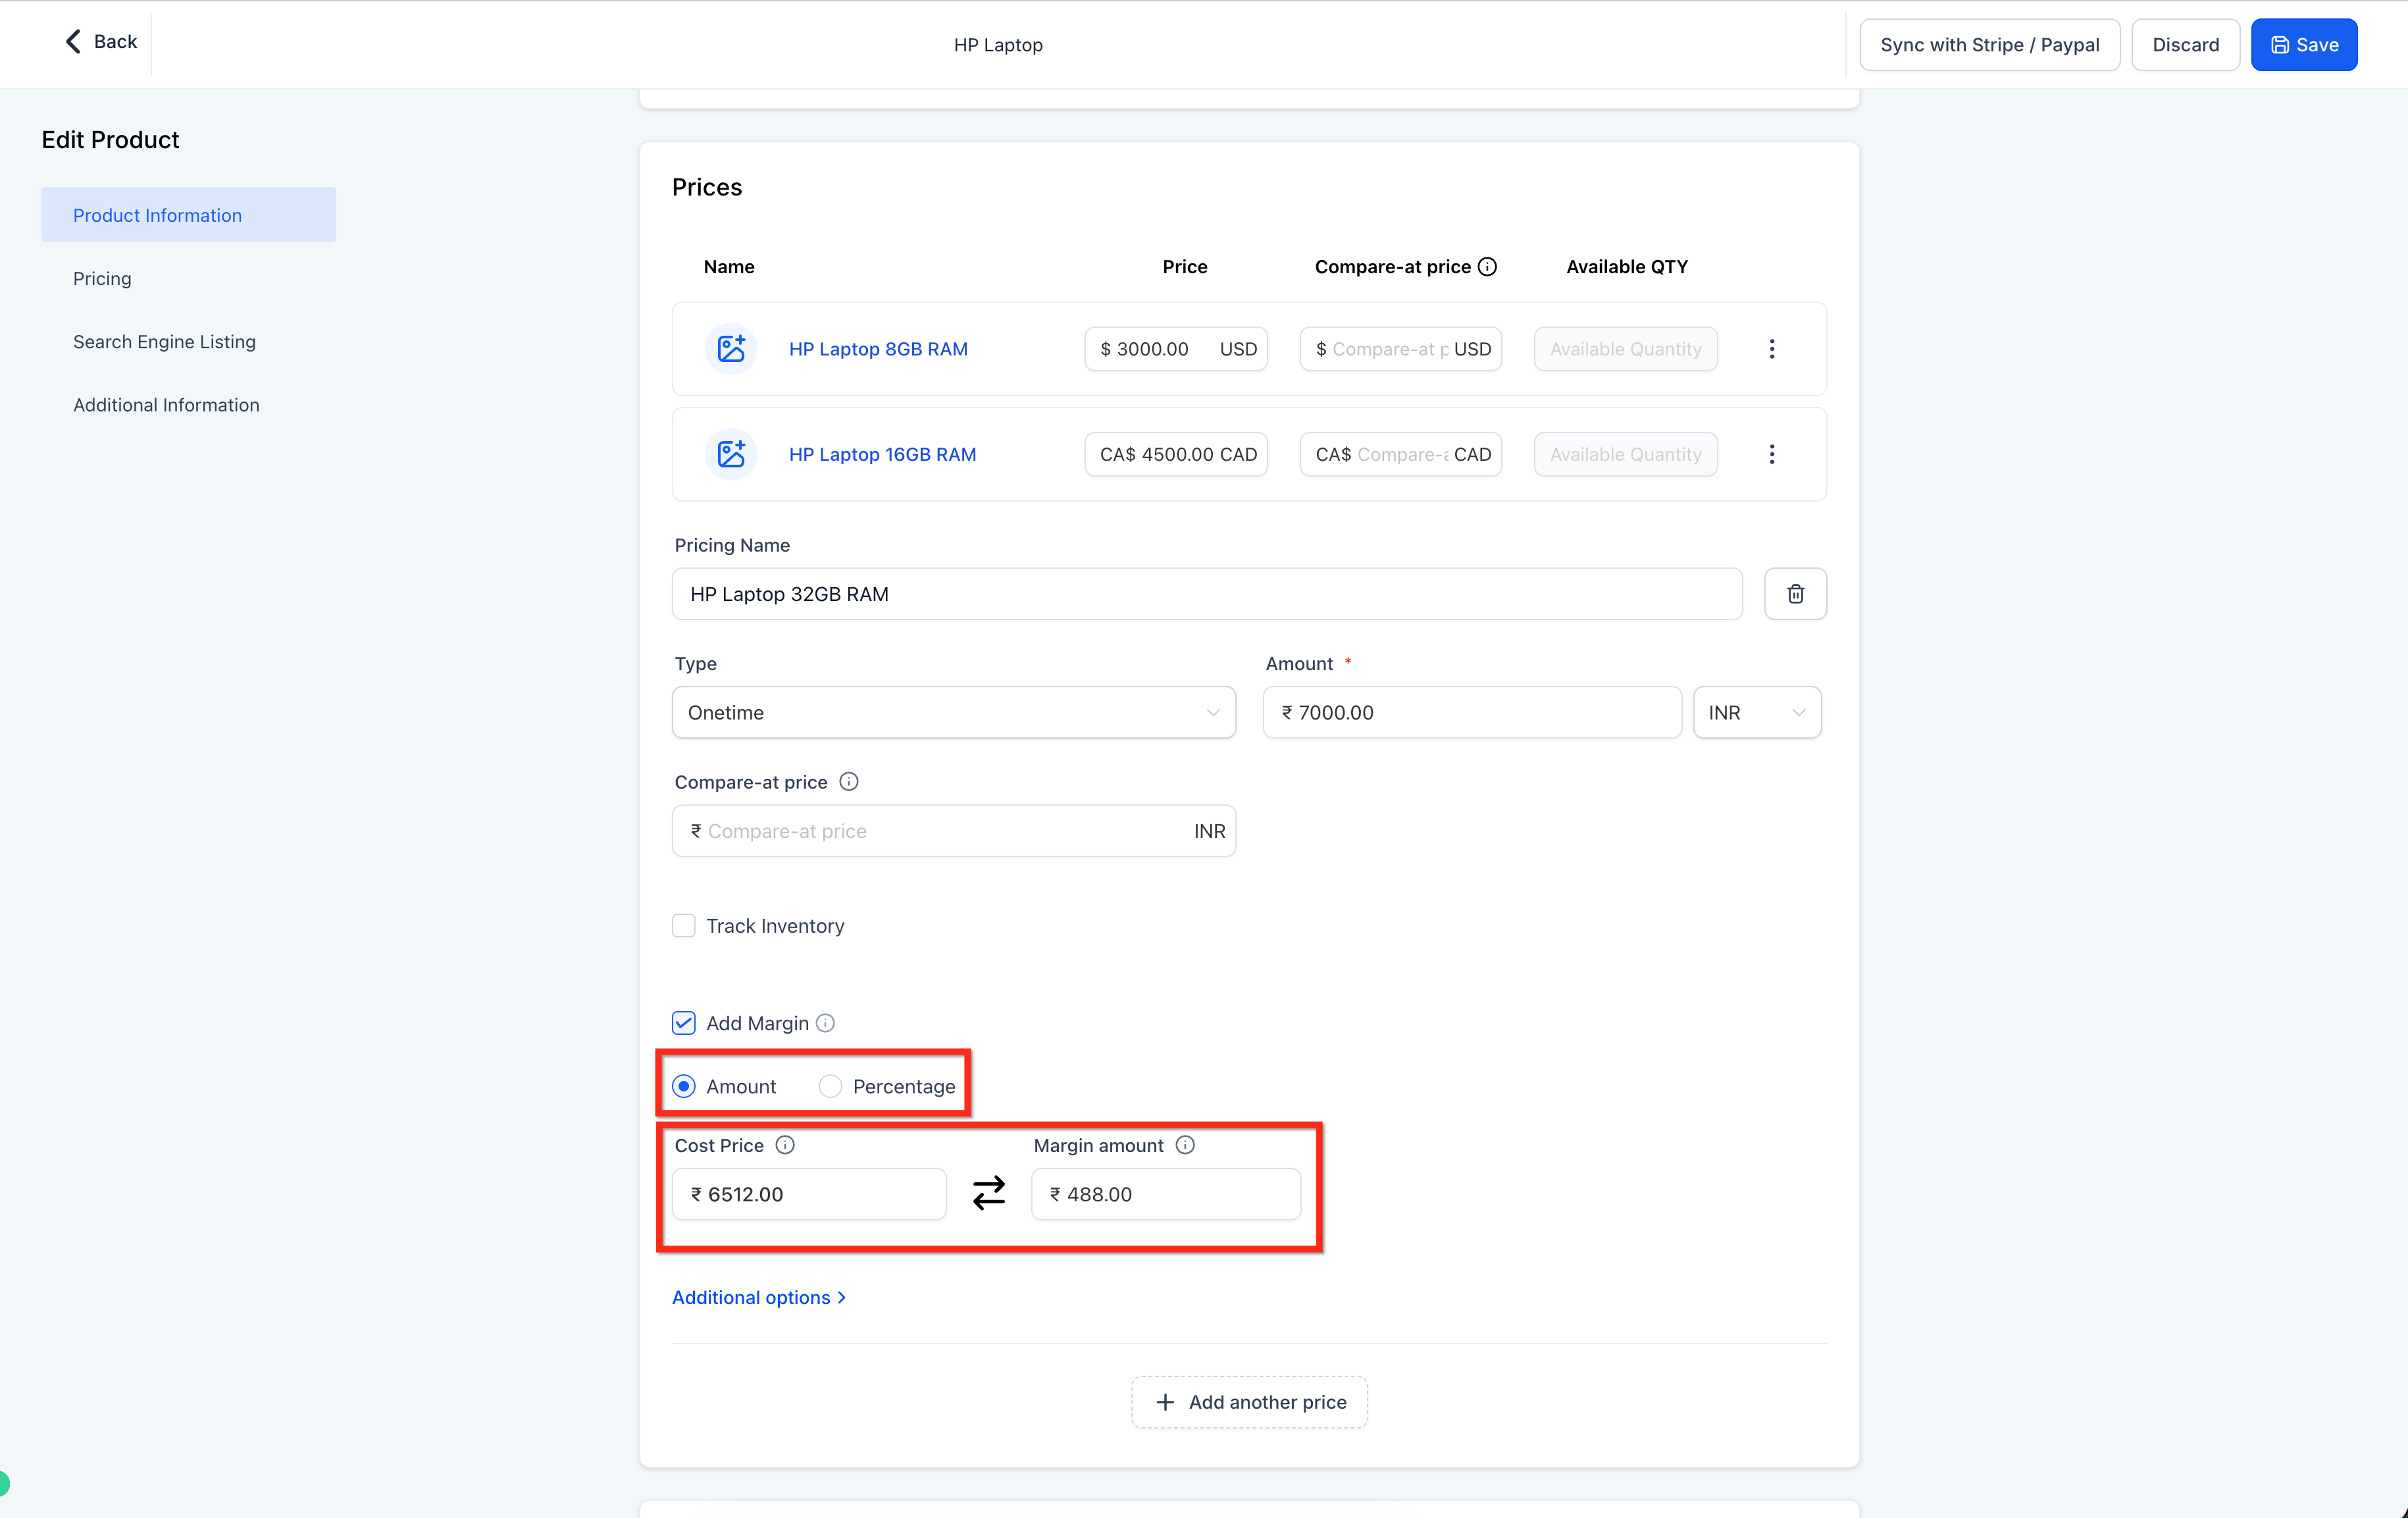
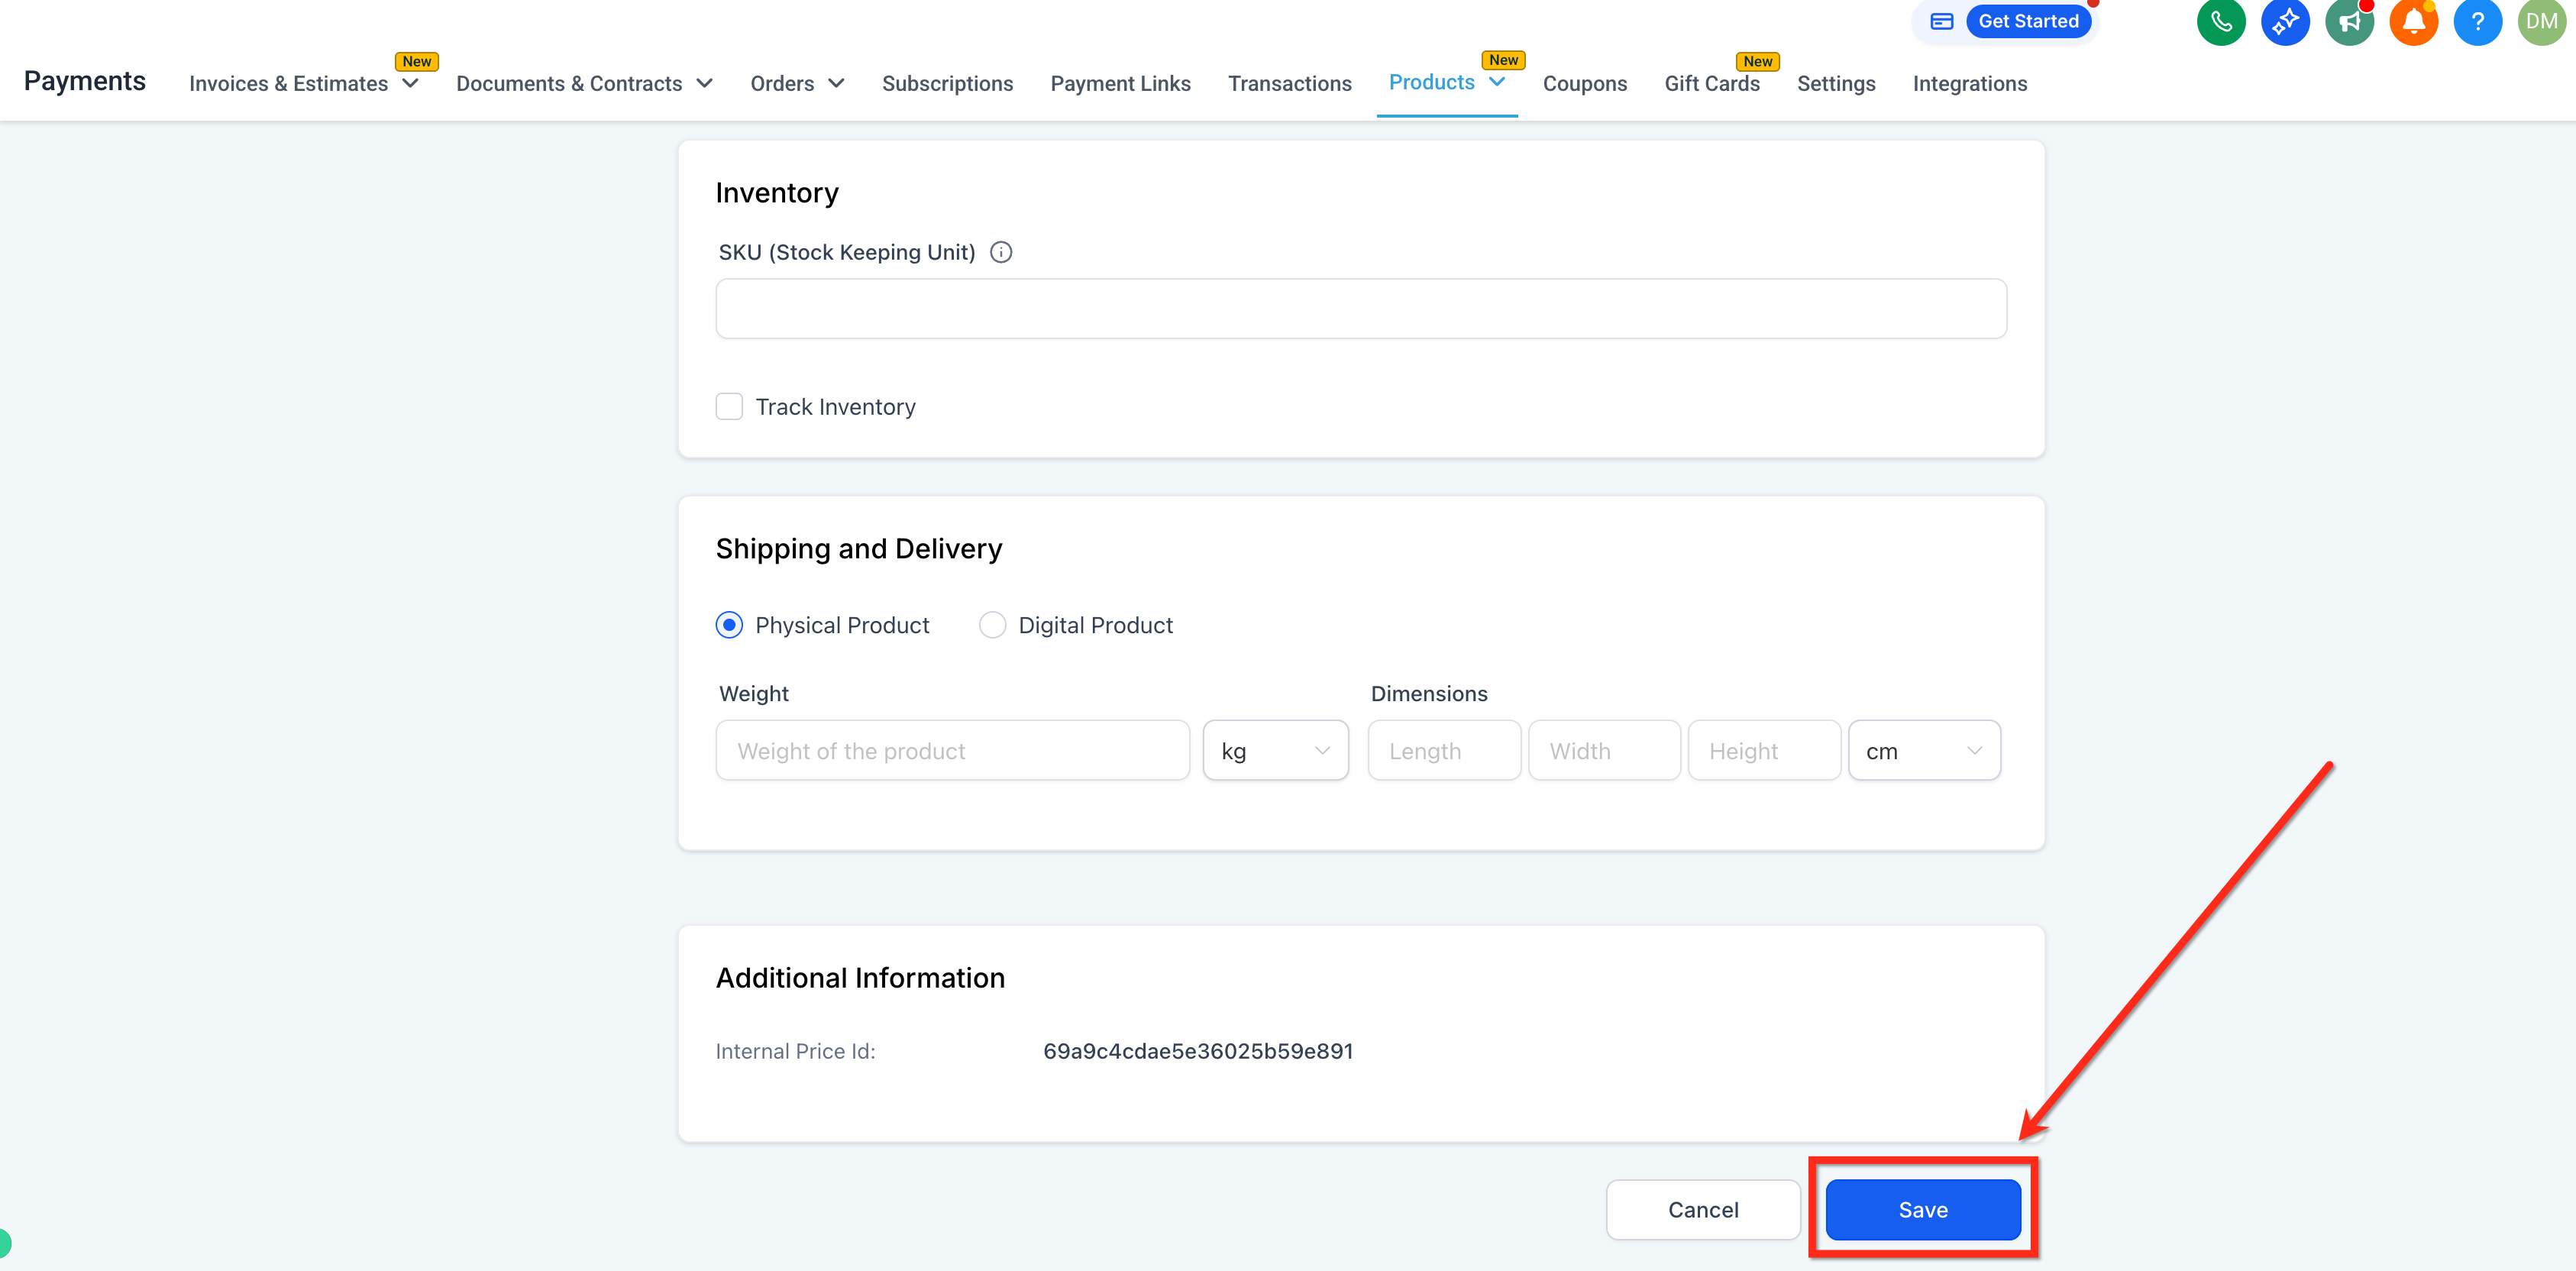
Click Save. Cost price and margin are stored at the price level and reflected in exports going forward.
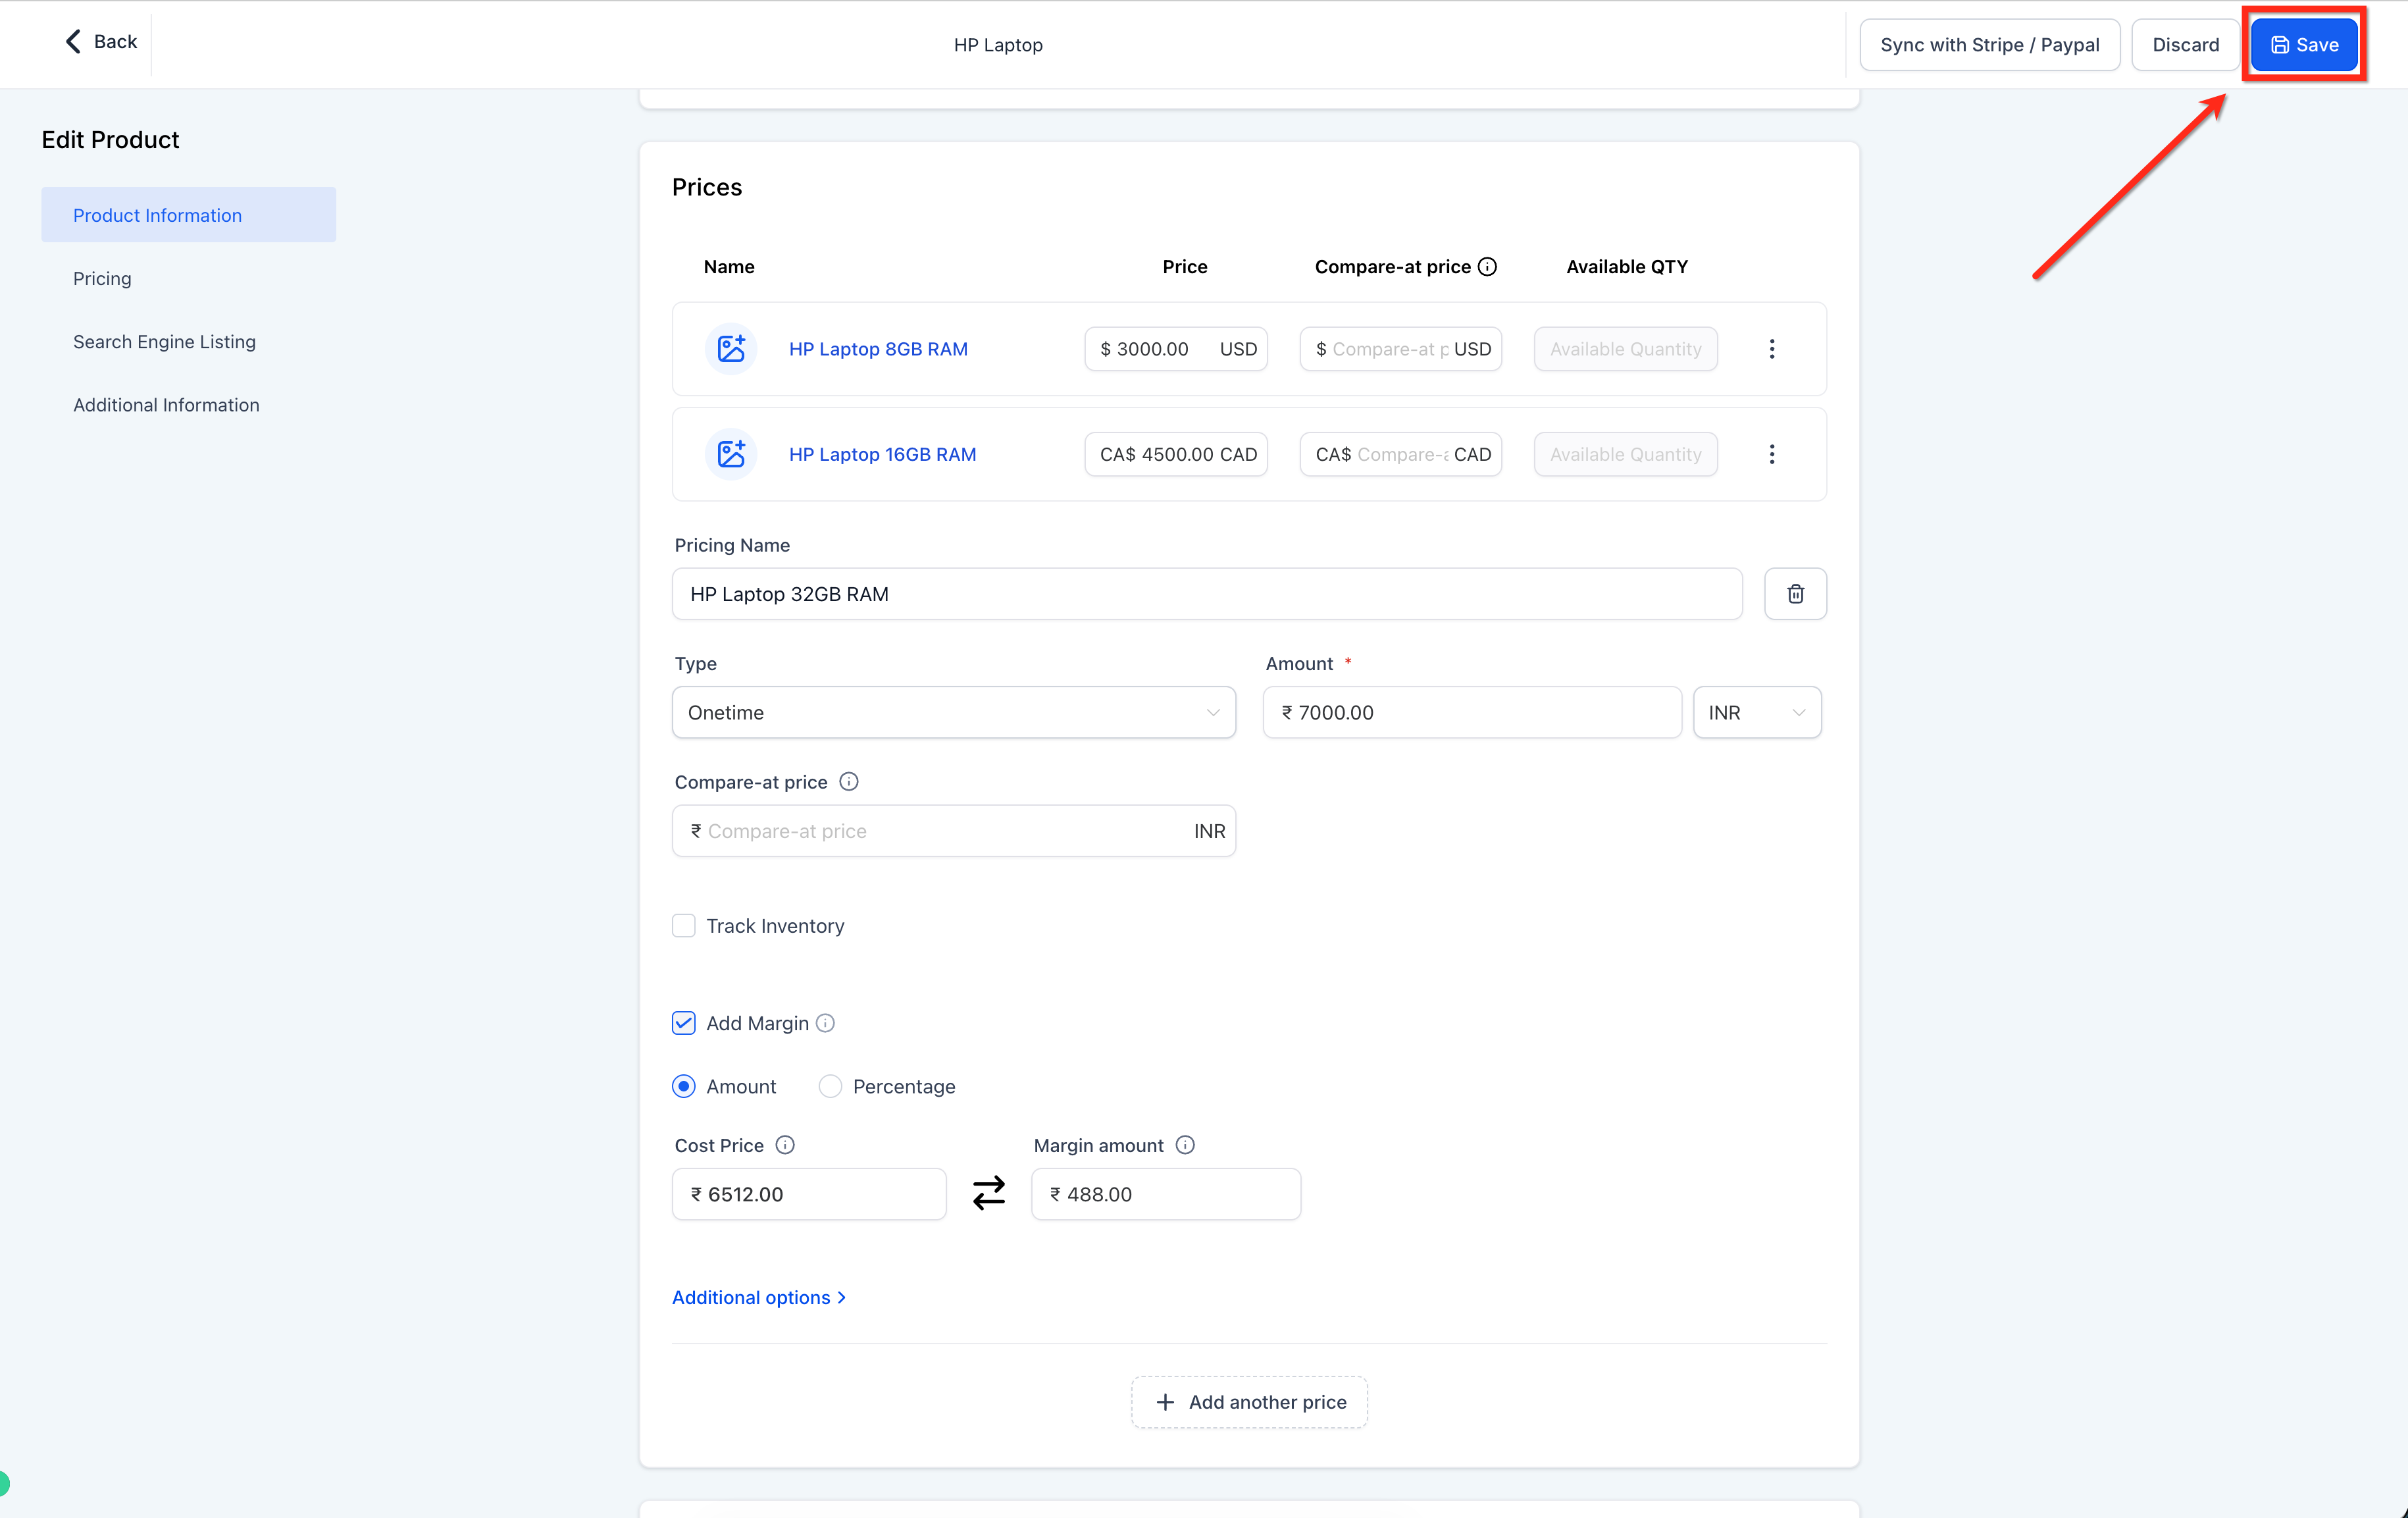
Note: If you check Add Margin but leave both fields empty, the system treats cost price as equal to selling price and keeps the margin at zero.
Create your variants first, then track cost and margin per variant.
In the product edit flow, go to the Variants section.
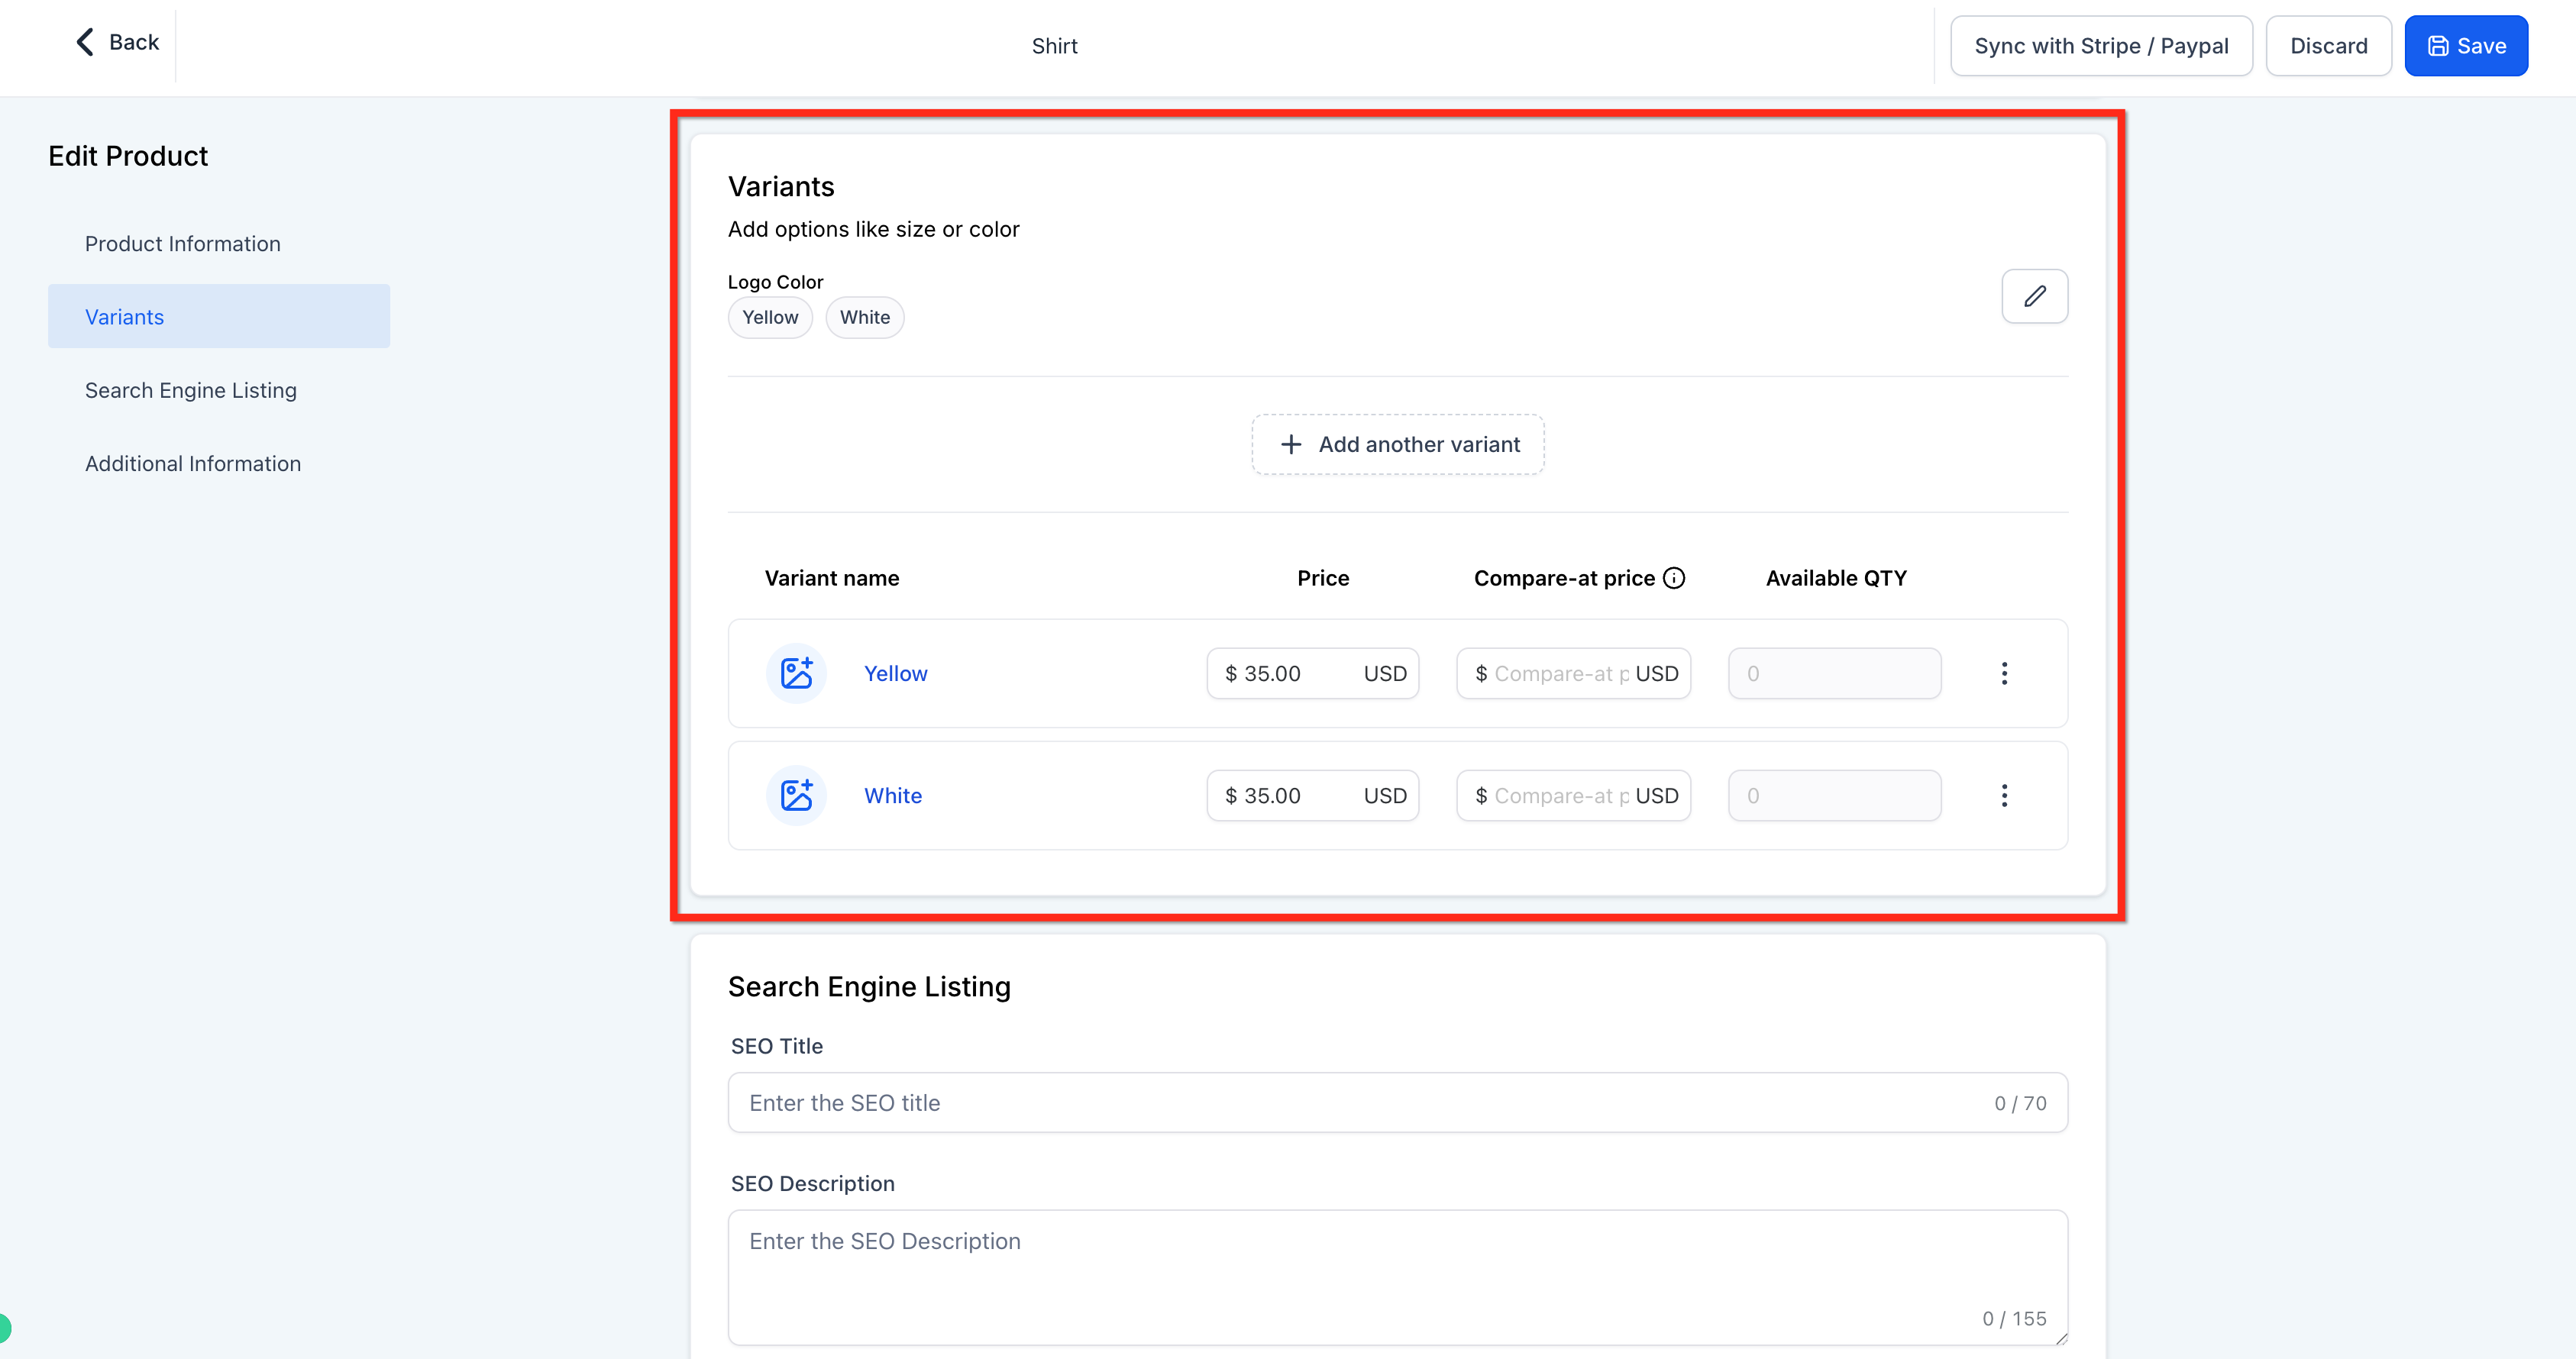
Click Edit on the variant you want to configure.
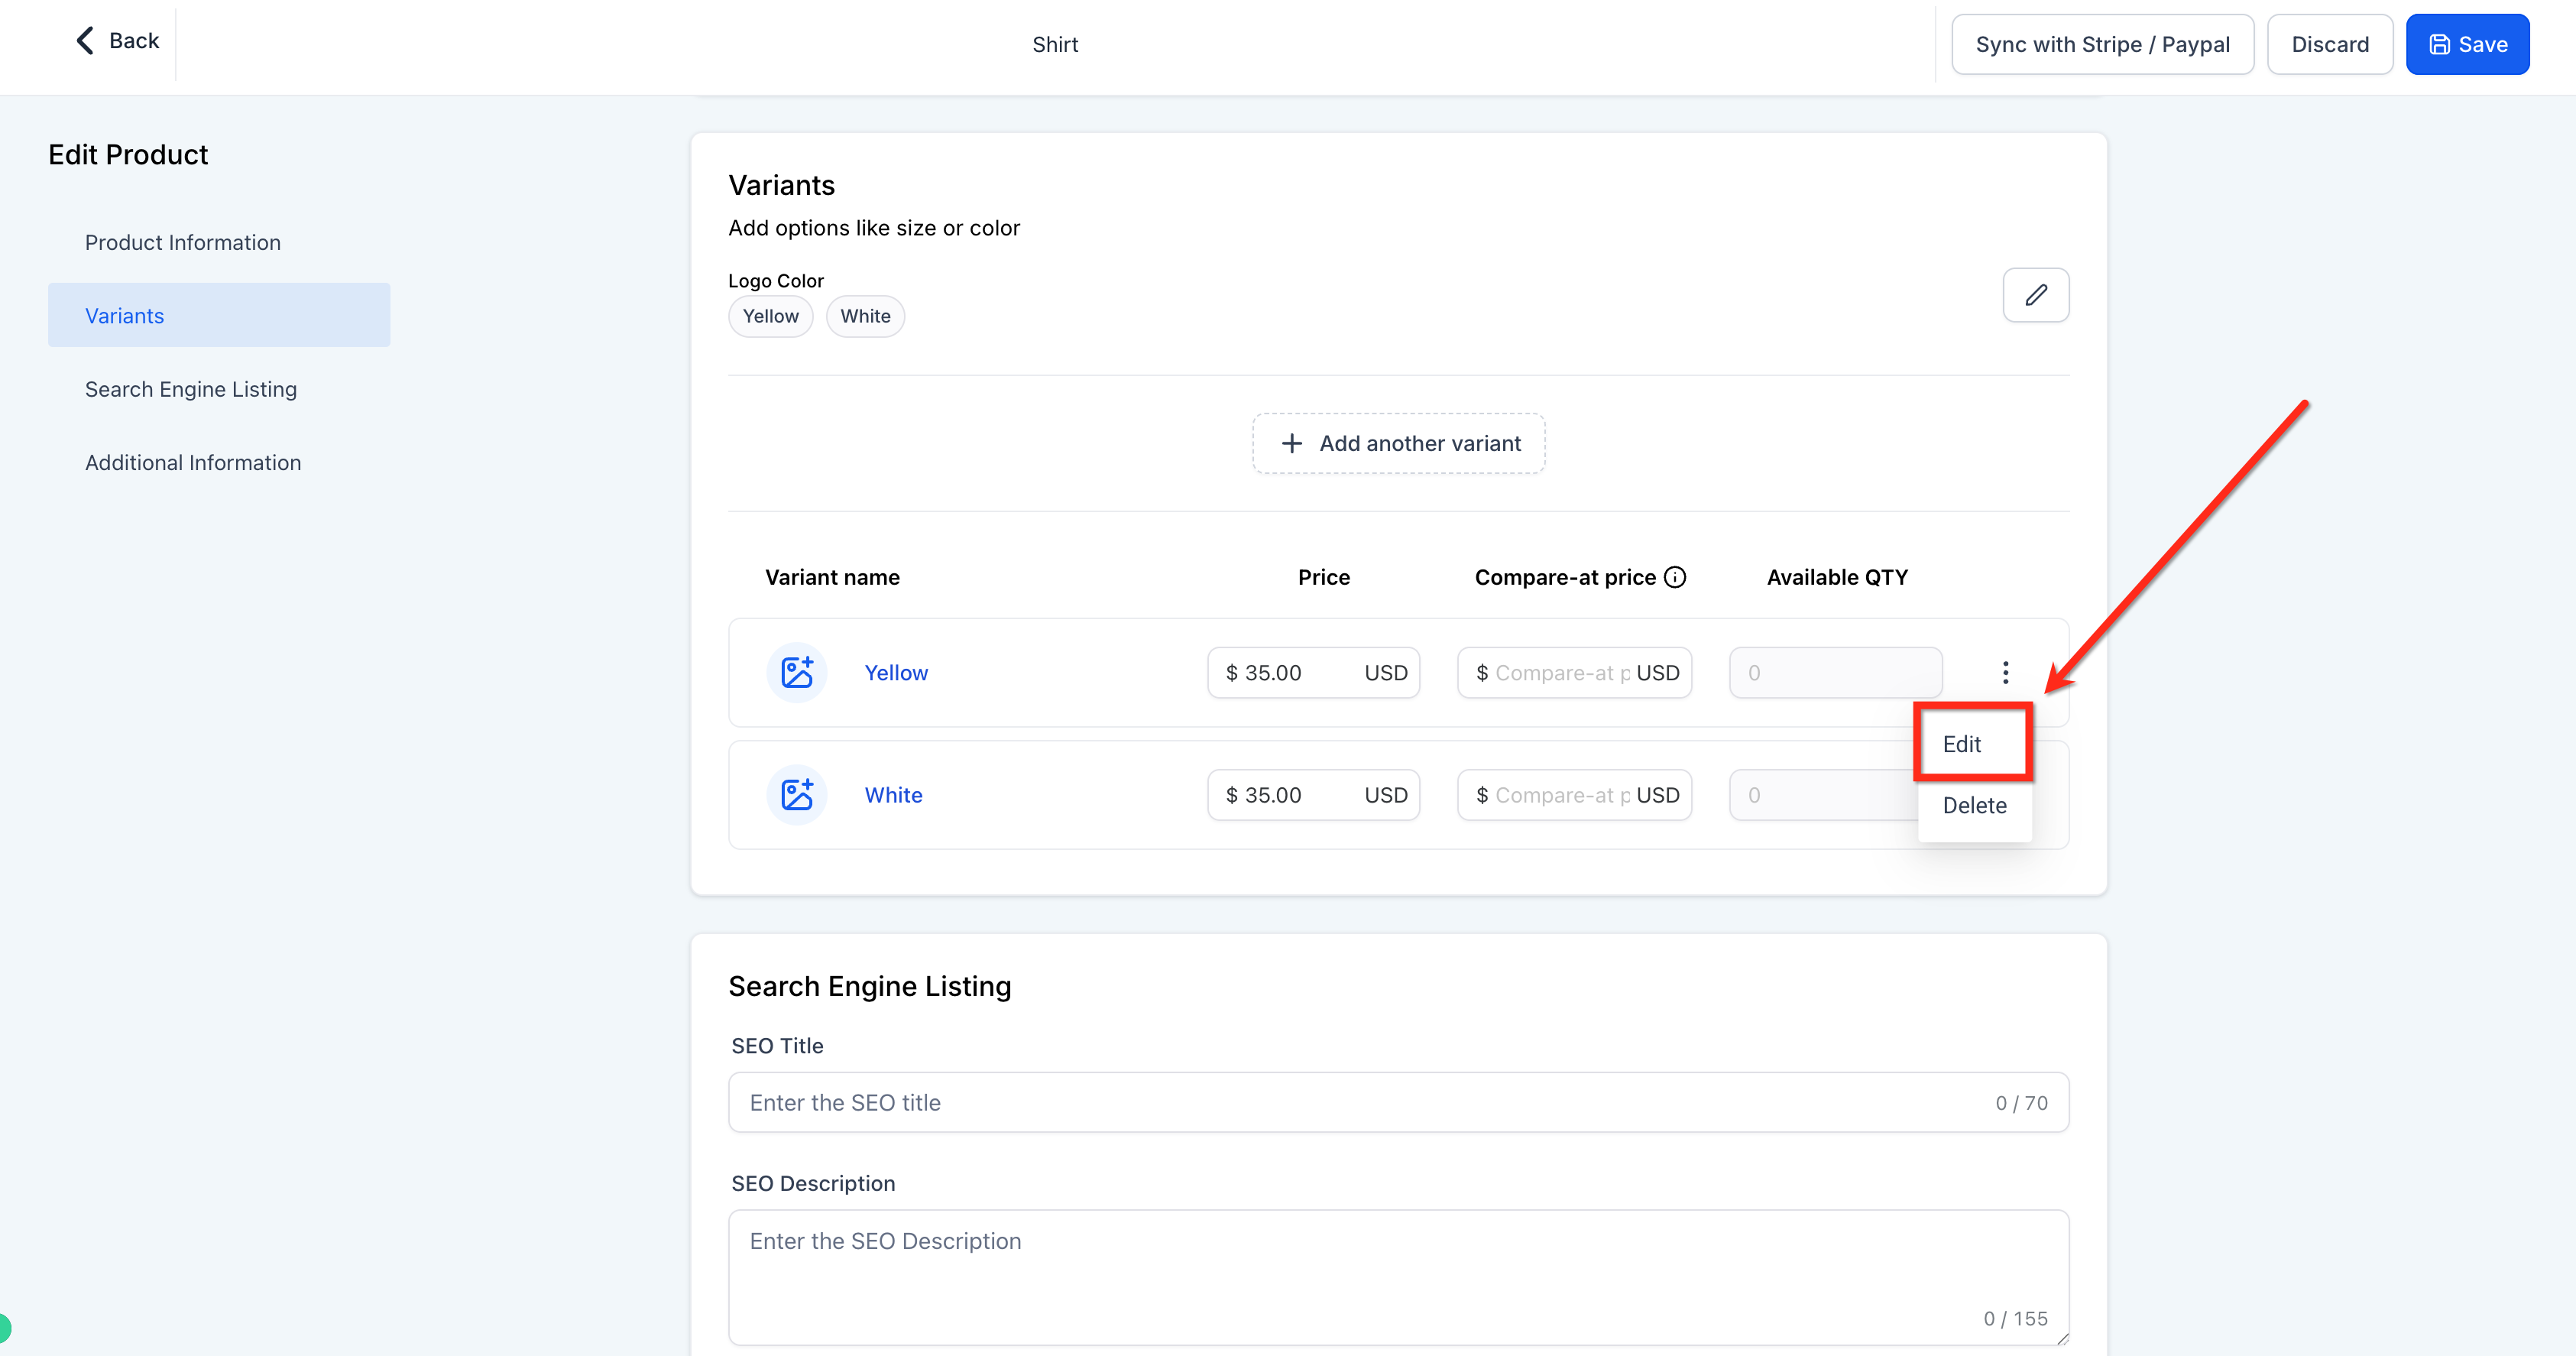
Check the Add Margin checkbox in the variant's Pricing section.
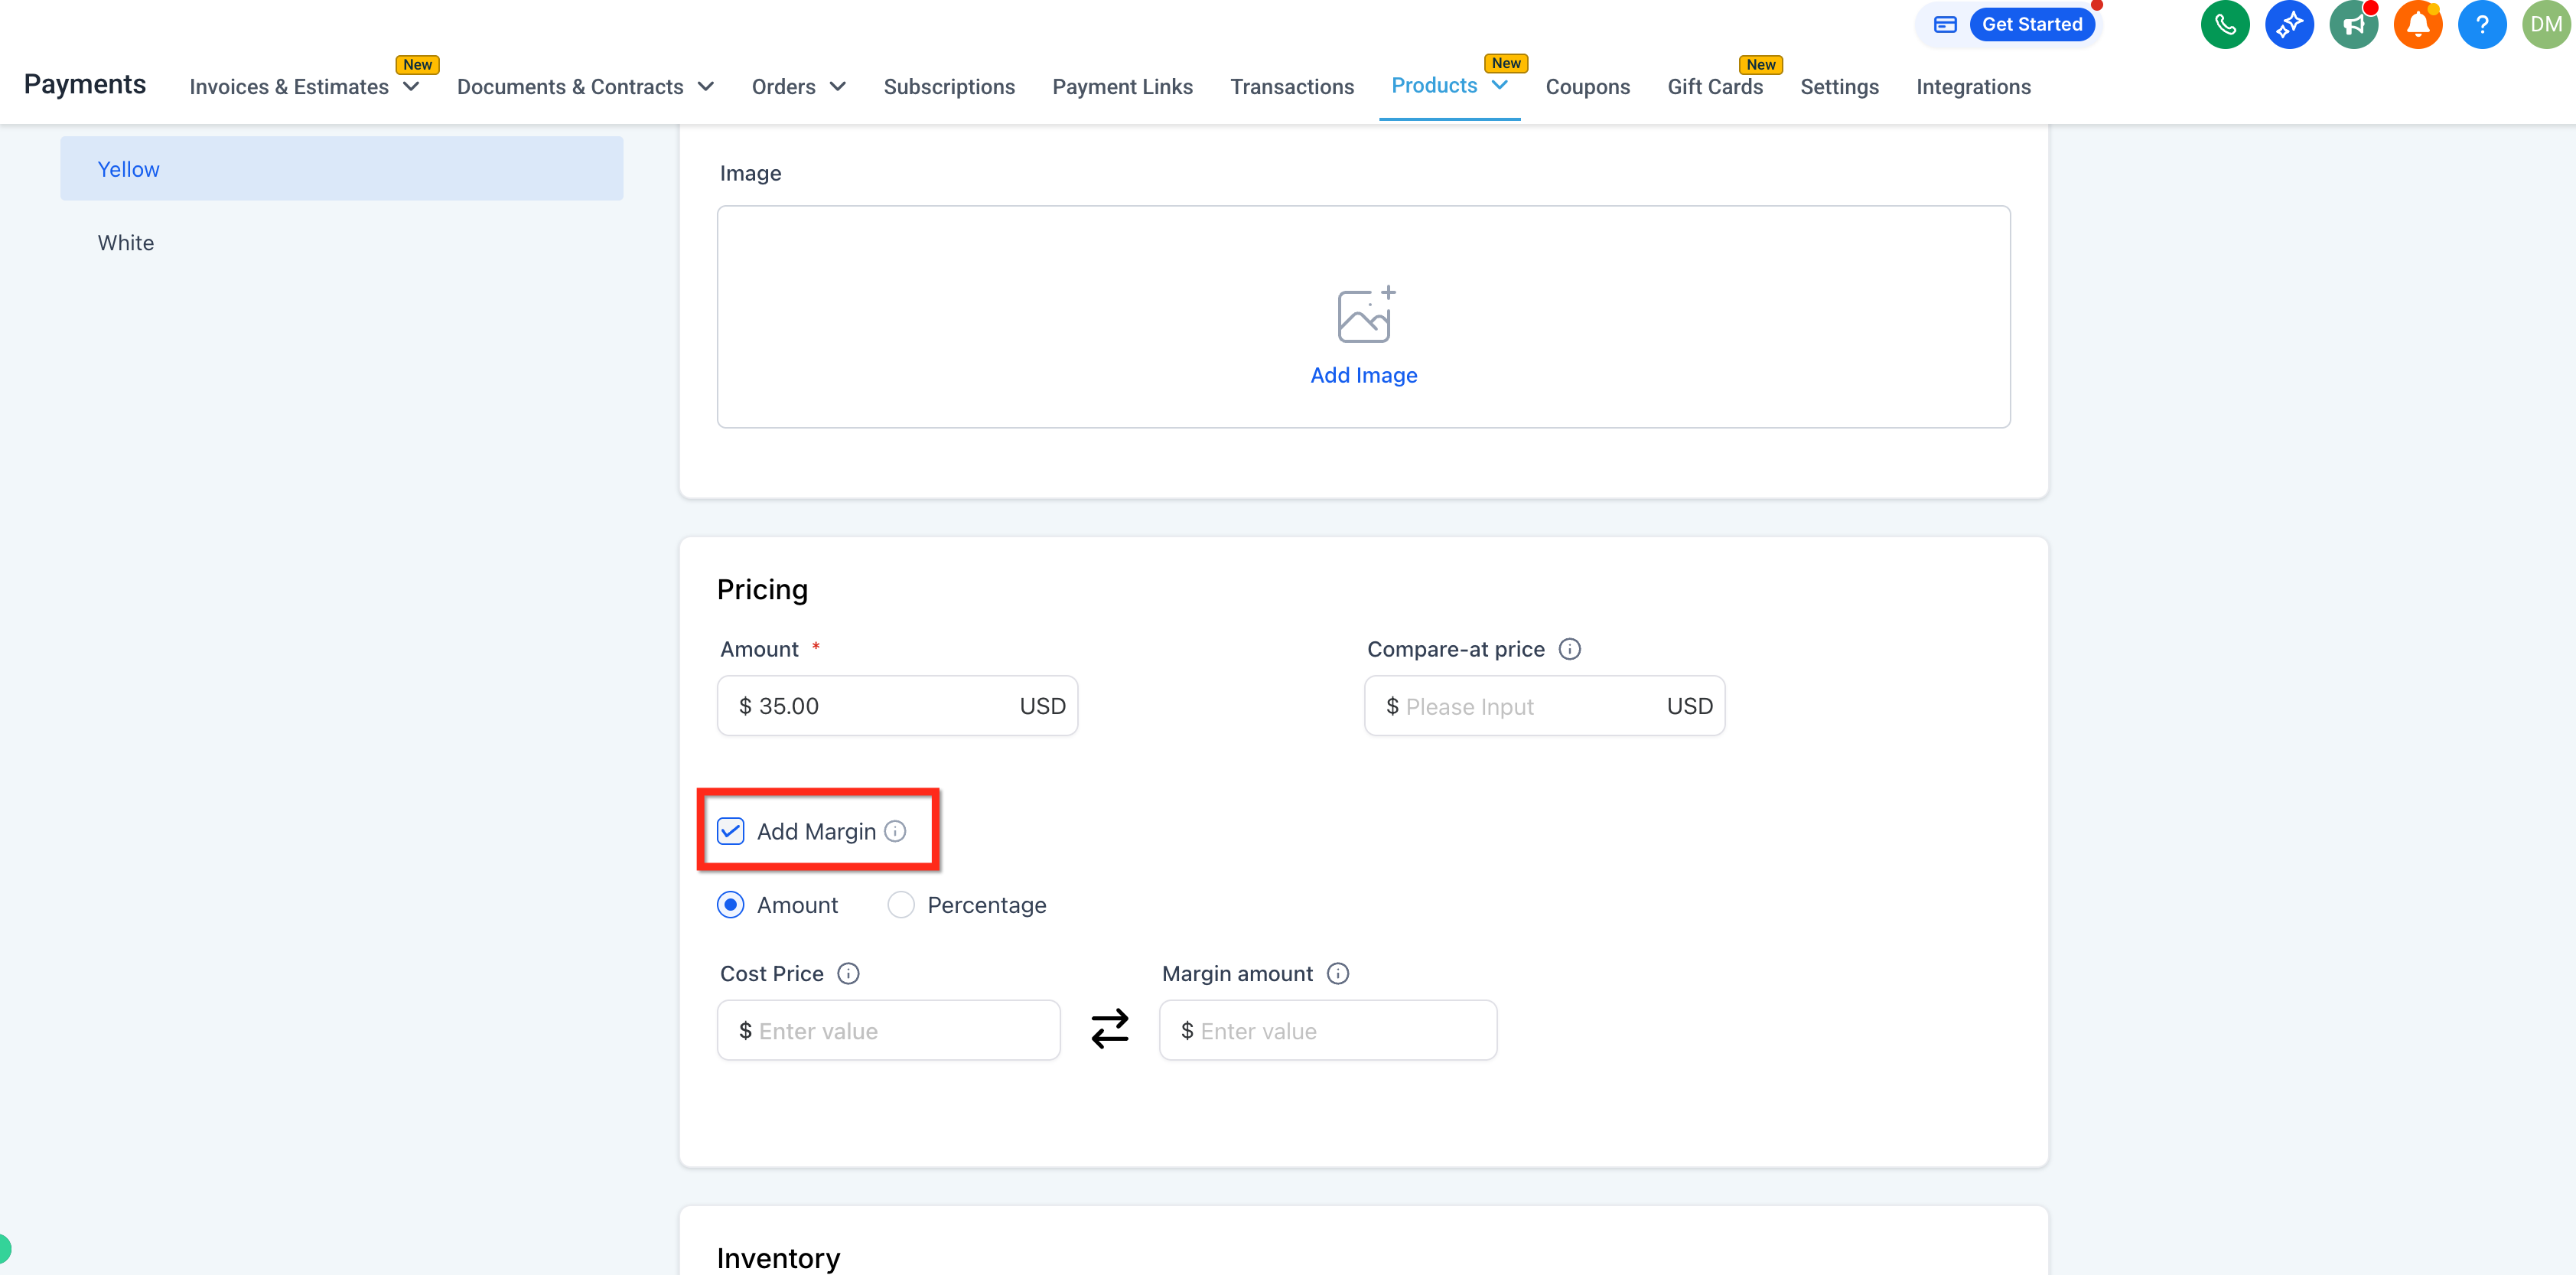
Choose Amount or Percentage and enter either the cost price or margin.
Save, then repeat for each variant. Each price denomination and each variant combination has its own independent cost price and margin.
The two fields stay in sync automatically. Changing the selling price or switching modes recalculates the dependent field without data loss.
Margin percentage is capped between -100% and 100%.
In invoices and calendars, selling prices can be overridden at the line-item level, but cost price is always sourced from the original product price and is not recalculated.
For recurring products, only the recurring amount is used for margin. Setup fees are excluded.
Cost price is an internal field. It is never shown to patients on checkout, receipts, or invoices.
A Line Item Cost Price column is available in the Transactions CSV export, so you can analyze profitability at the transaction level.
In the Payments section, open Transactions.
Click Export CSV.
The Line Item Cost Price column appears automatically for products that have a cost price defined.
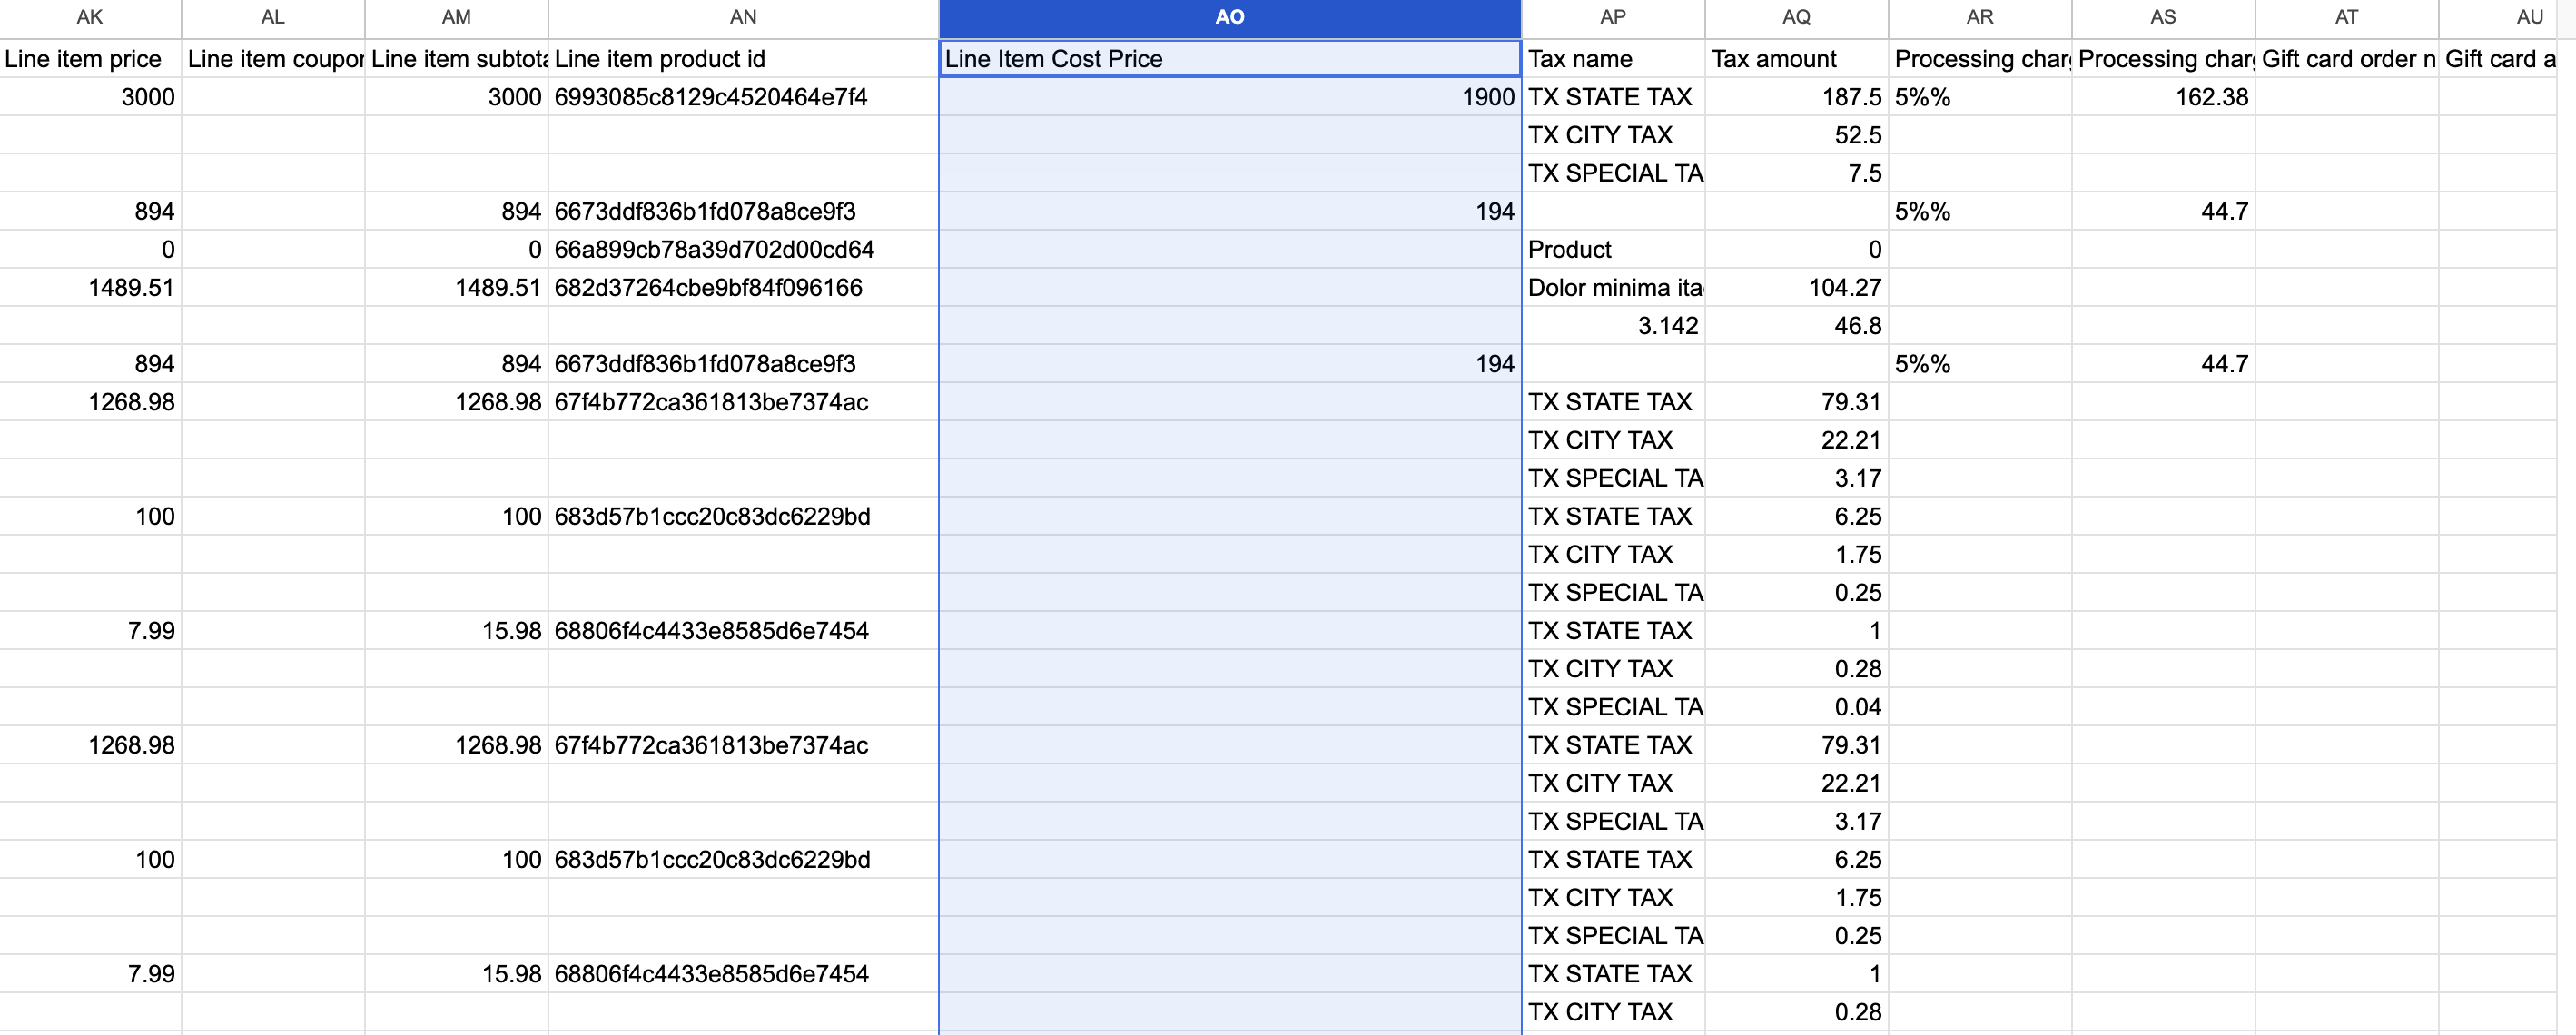
Cost price data is not applied retroactively. Only transactions created after cost price is configured will populate this column.
Collections group products for easier browsing and merchandising. There are two types.
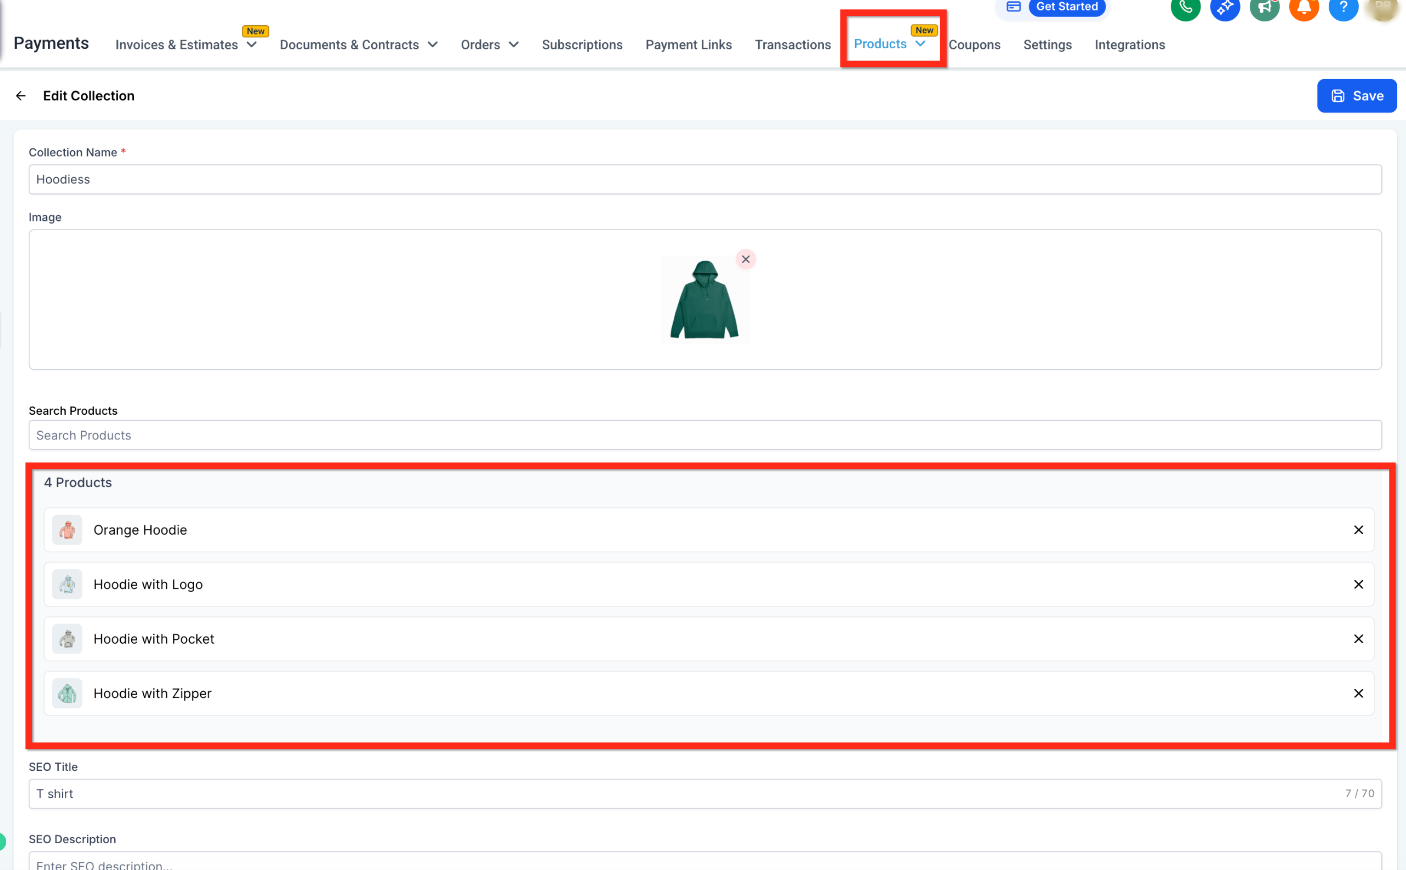
Manual Collections are curated lists you hand-pick. You can add or remove products at any time and reorder them by drag-and-drop. They are best for seasonal promotions, featured products, or fixed campaigns.
Smart Collections automatically include products that match saved rules, such as products under a certain price or items in stock. Conditions can be based on Title, Variant Title, Price, or Inventory. A product qualifies if any variant or price row matches. Smart Collections update automatically within a few minutes, and manual additions or removals are disabled to keep them accurate.
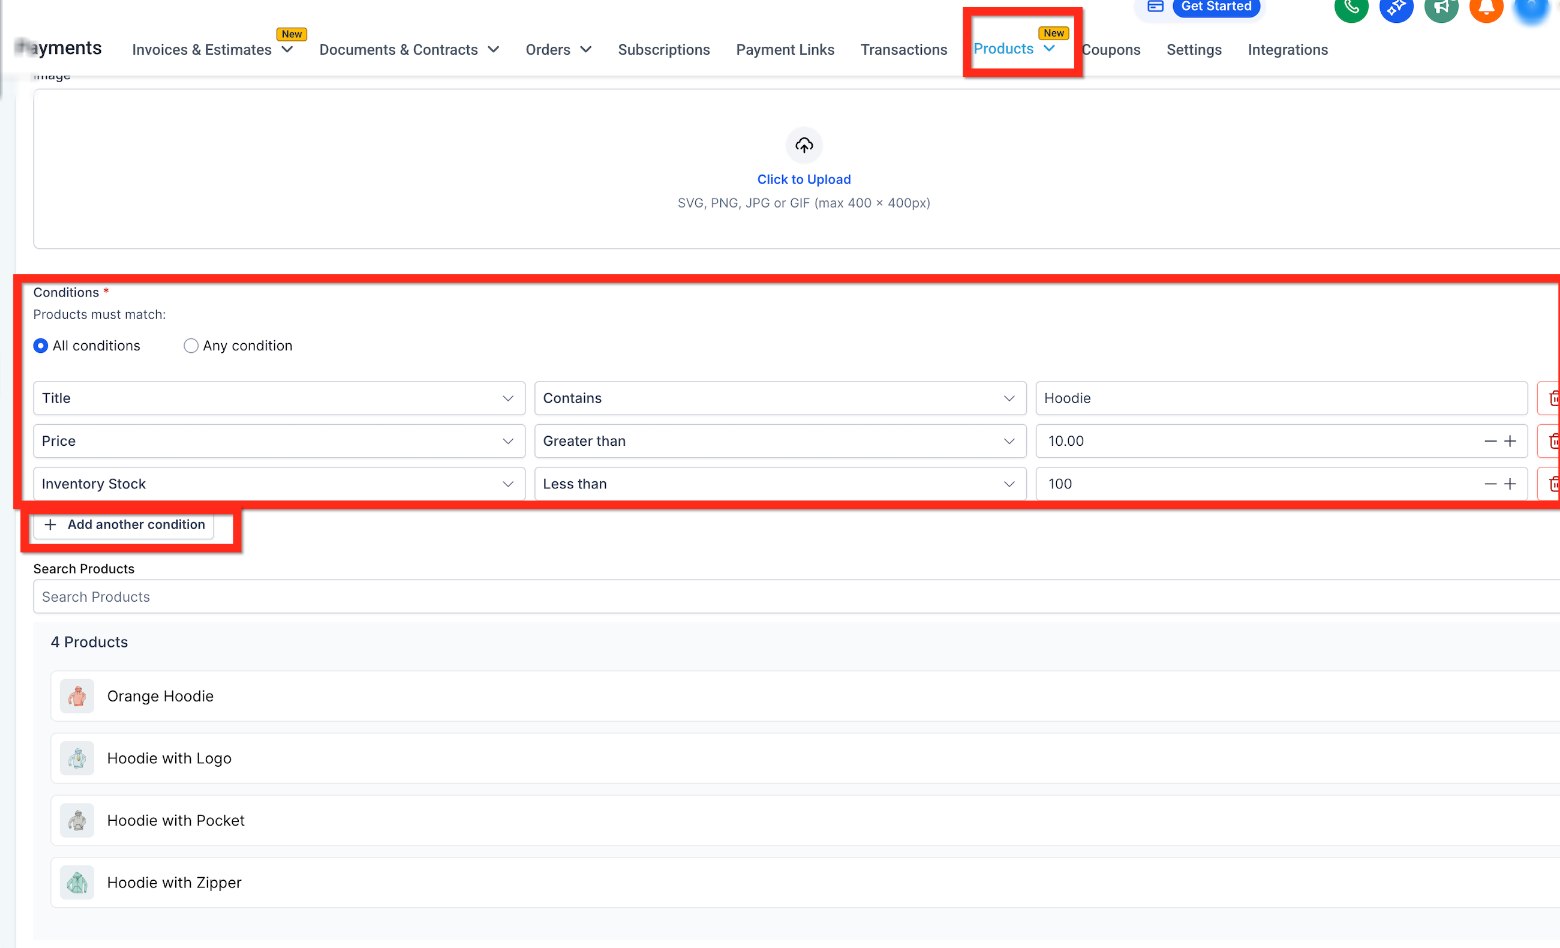
Smart Collection rules support the operators Equals, Not Equals, Greater Than, Less Than, Contains, and Does Not Contain. Multiple conditions can be combined with AND or OR logic. Invalid or conflicting conditions (such as Price greater than 100 AND Price less than 50) are blocked when you save.
In the Payments section, open Products, then Collections.
Click Create Collection.
Enter a Name, an optional Image, and SEO details.
Select a Collection Type: Manual (search and select products) or Smart (define one or more rules).
For Smart Collections, choose whether to apply All or Any conditions.
Click Save. Smart Collections process and update automatically in the background.
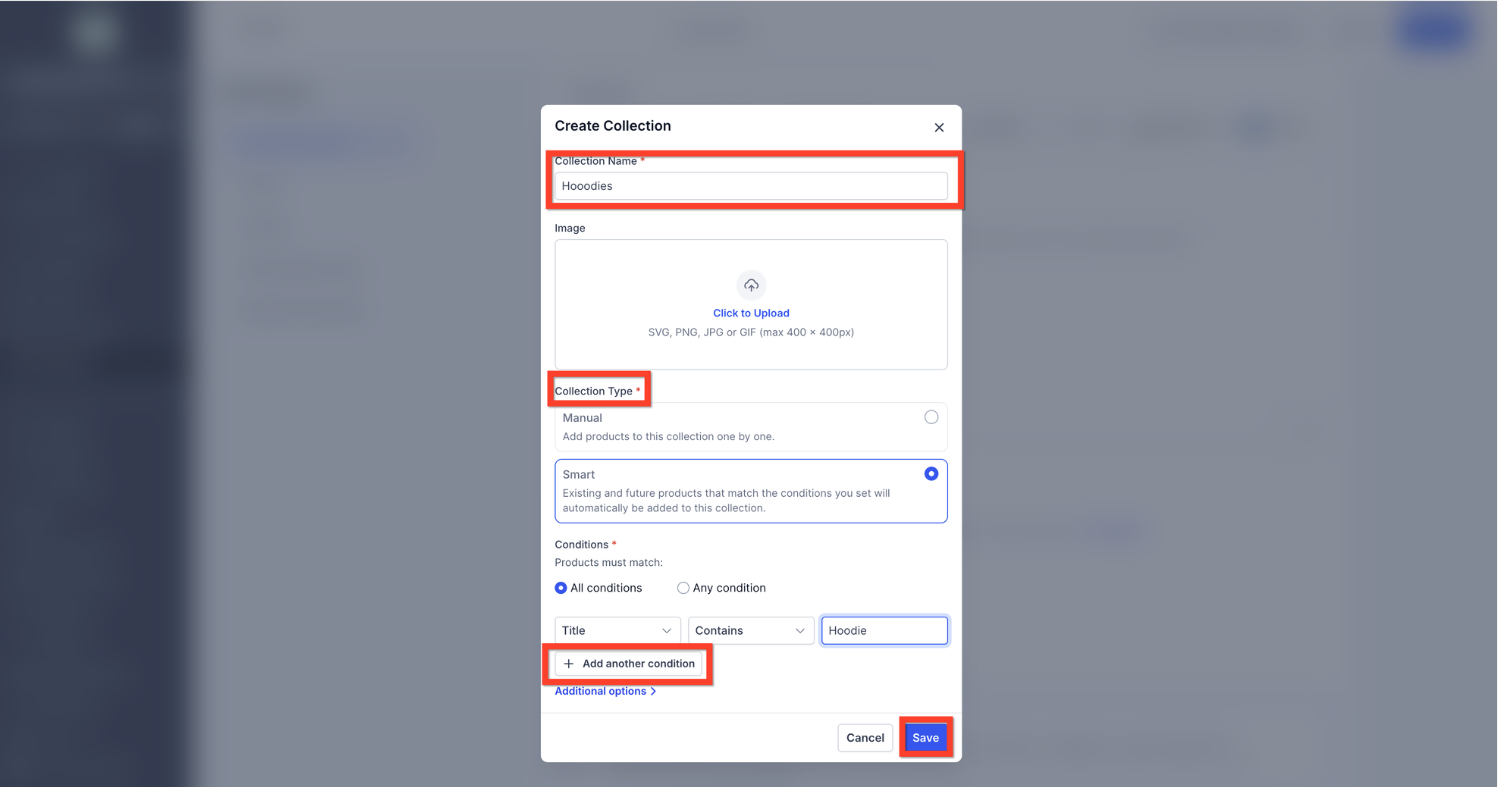
Note: Once created, a collection type (Manual or Smart) cannot be changed. To switch, create a new collection and replace the old one.
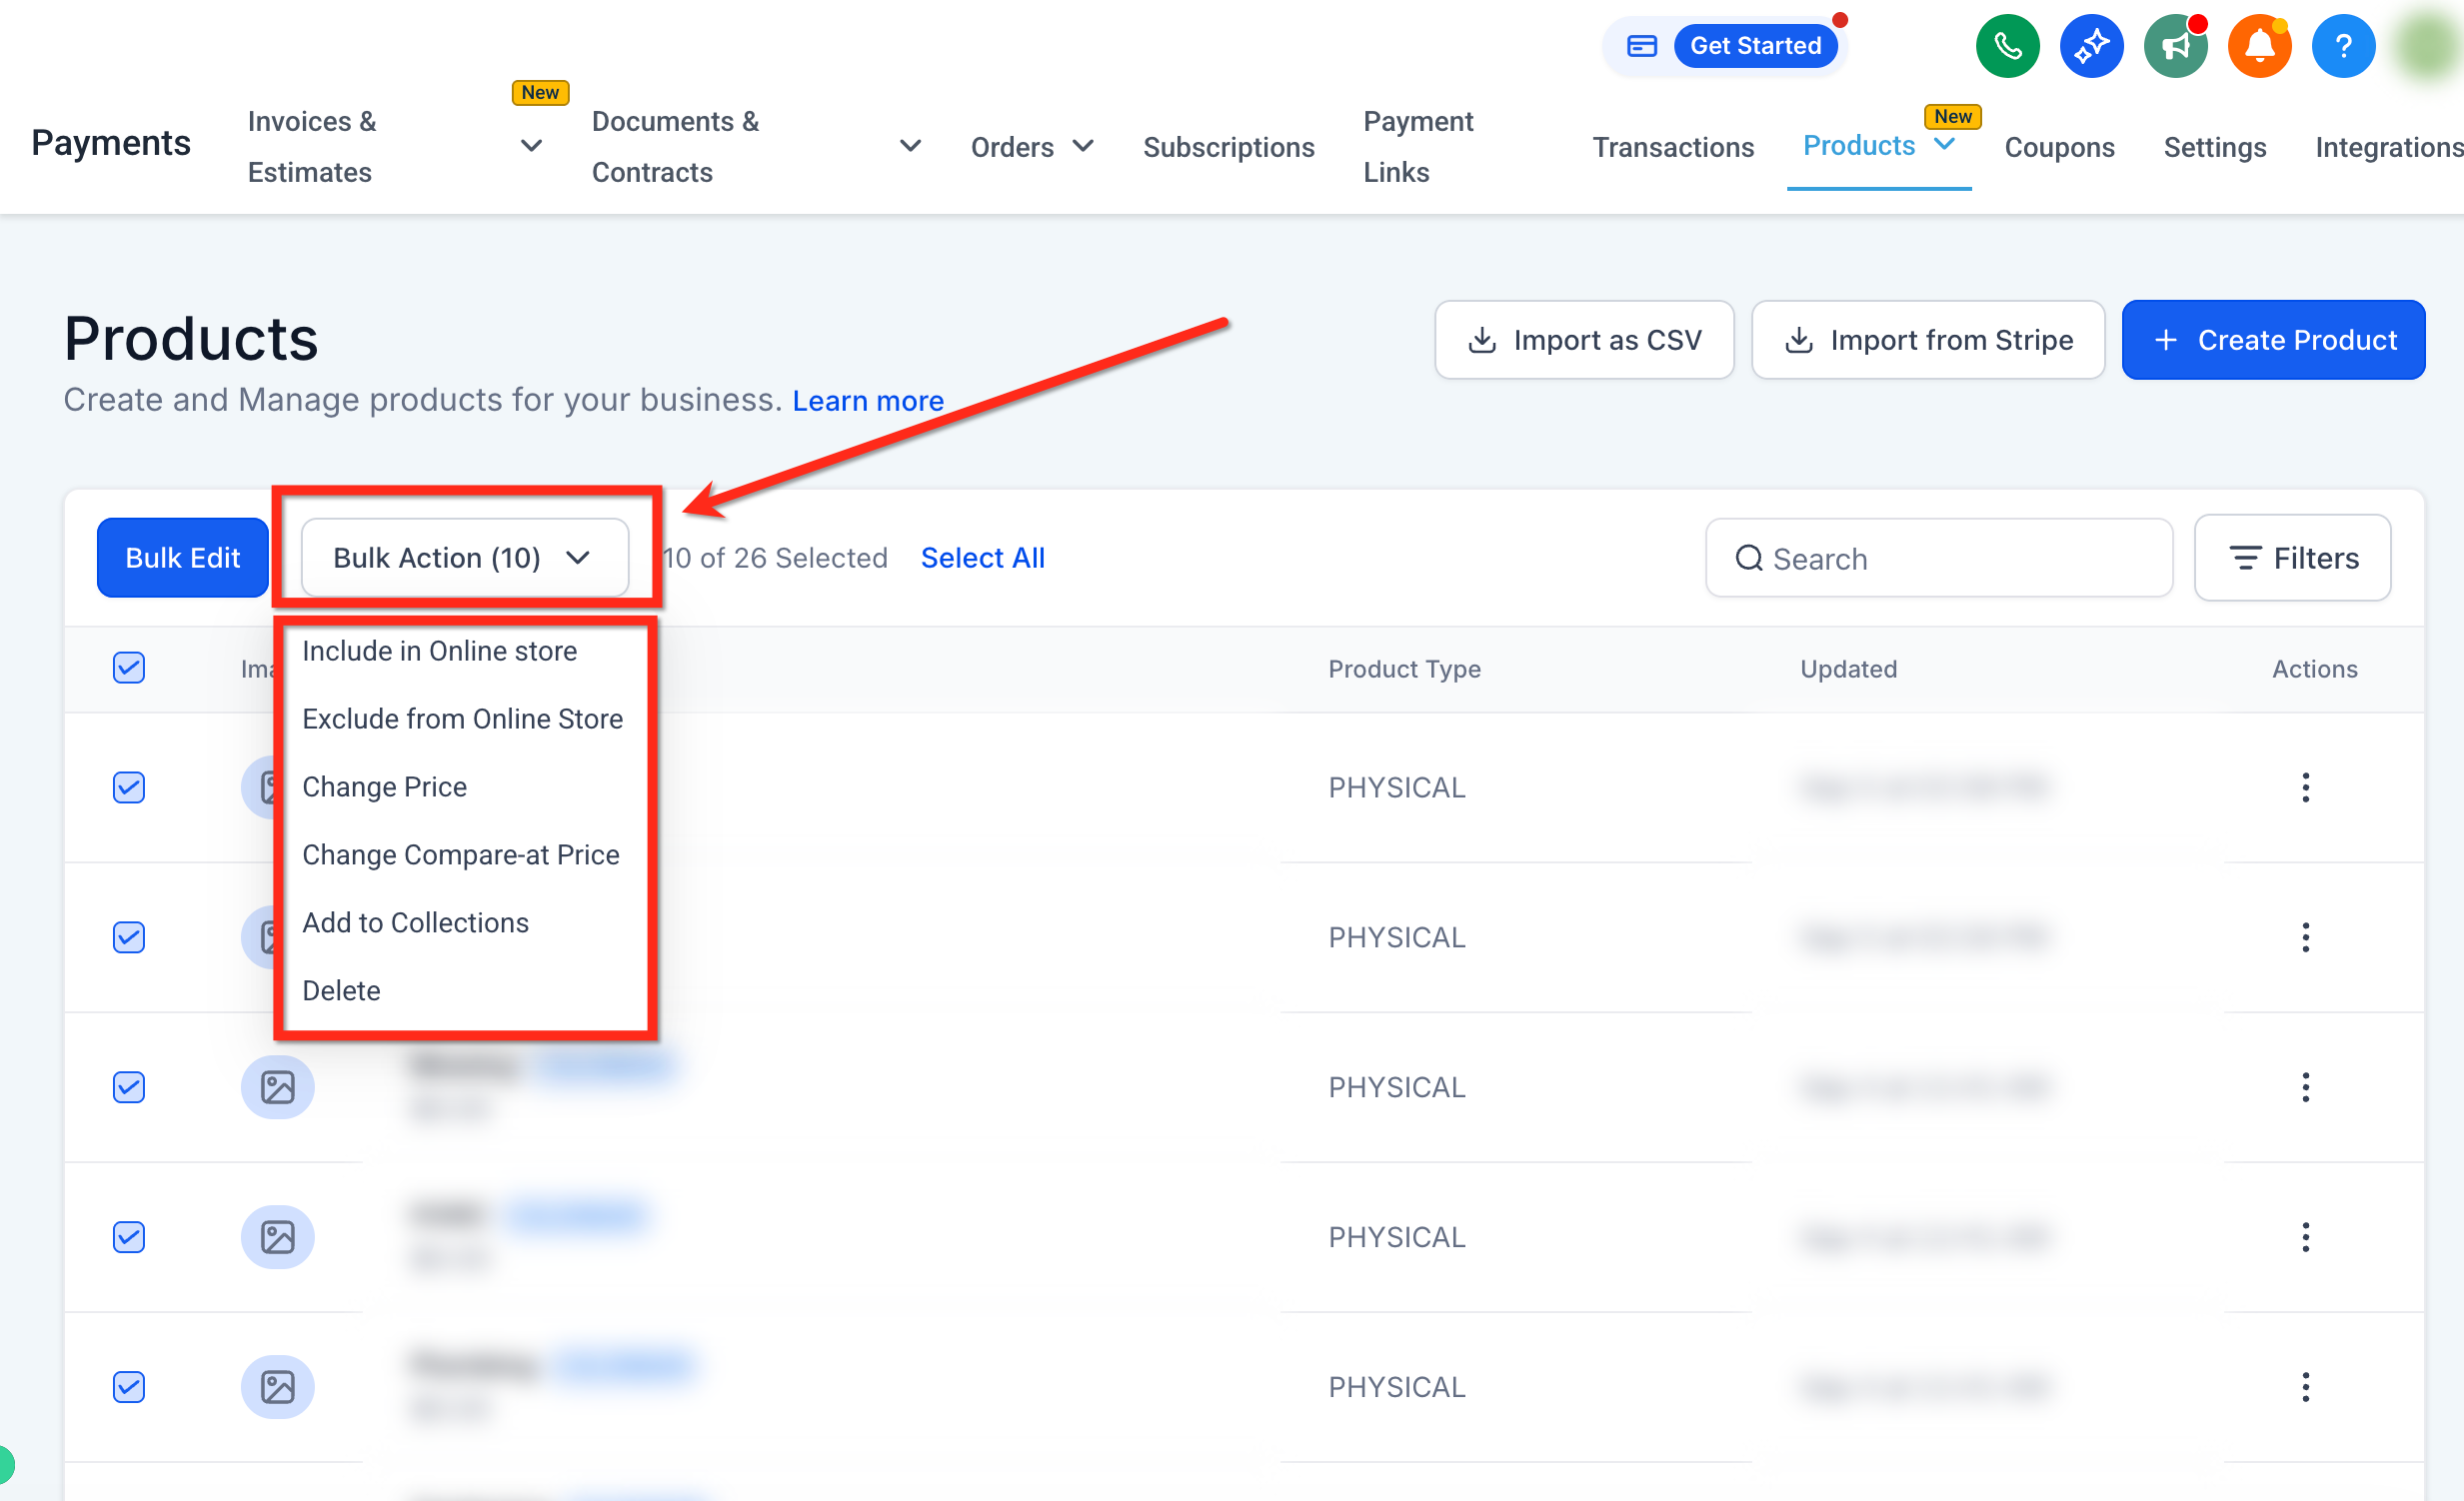
Bulk actions let you update many products or variants at once, which saves time on large catalogs and frequent price or stock updates.
Available bulk actions include:
Include in / Exclude from Online Store: Control store visibility for selected products.
Change Price and Change Compare-at Price: Increase, decrease, or set new values using a fixed amount or percentage.
Add to Collections: Add products to existing collections or create new ones on the fly.
Delete: Remove selected products in bulk with a confirmation prompt.
To use bulk actions:
In the Payments section, open Products.
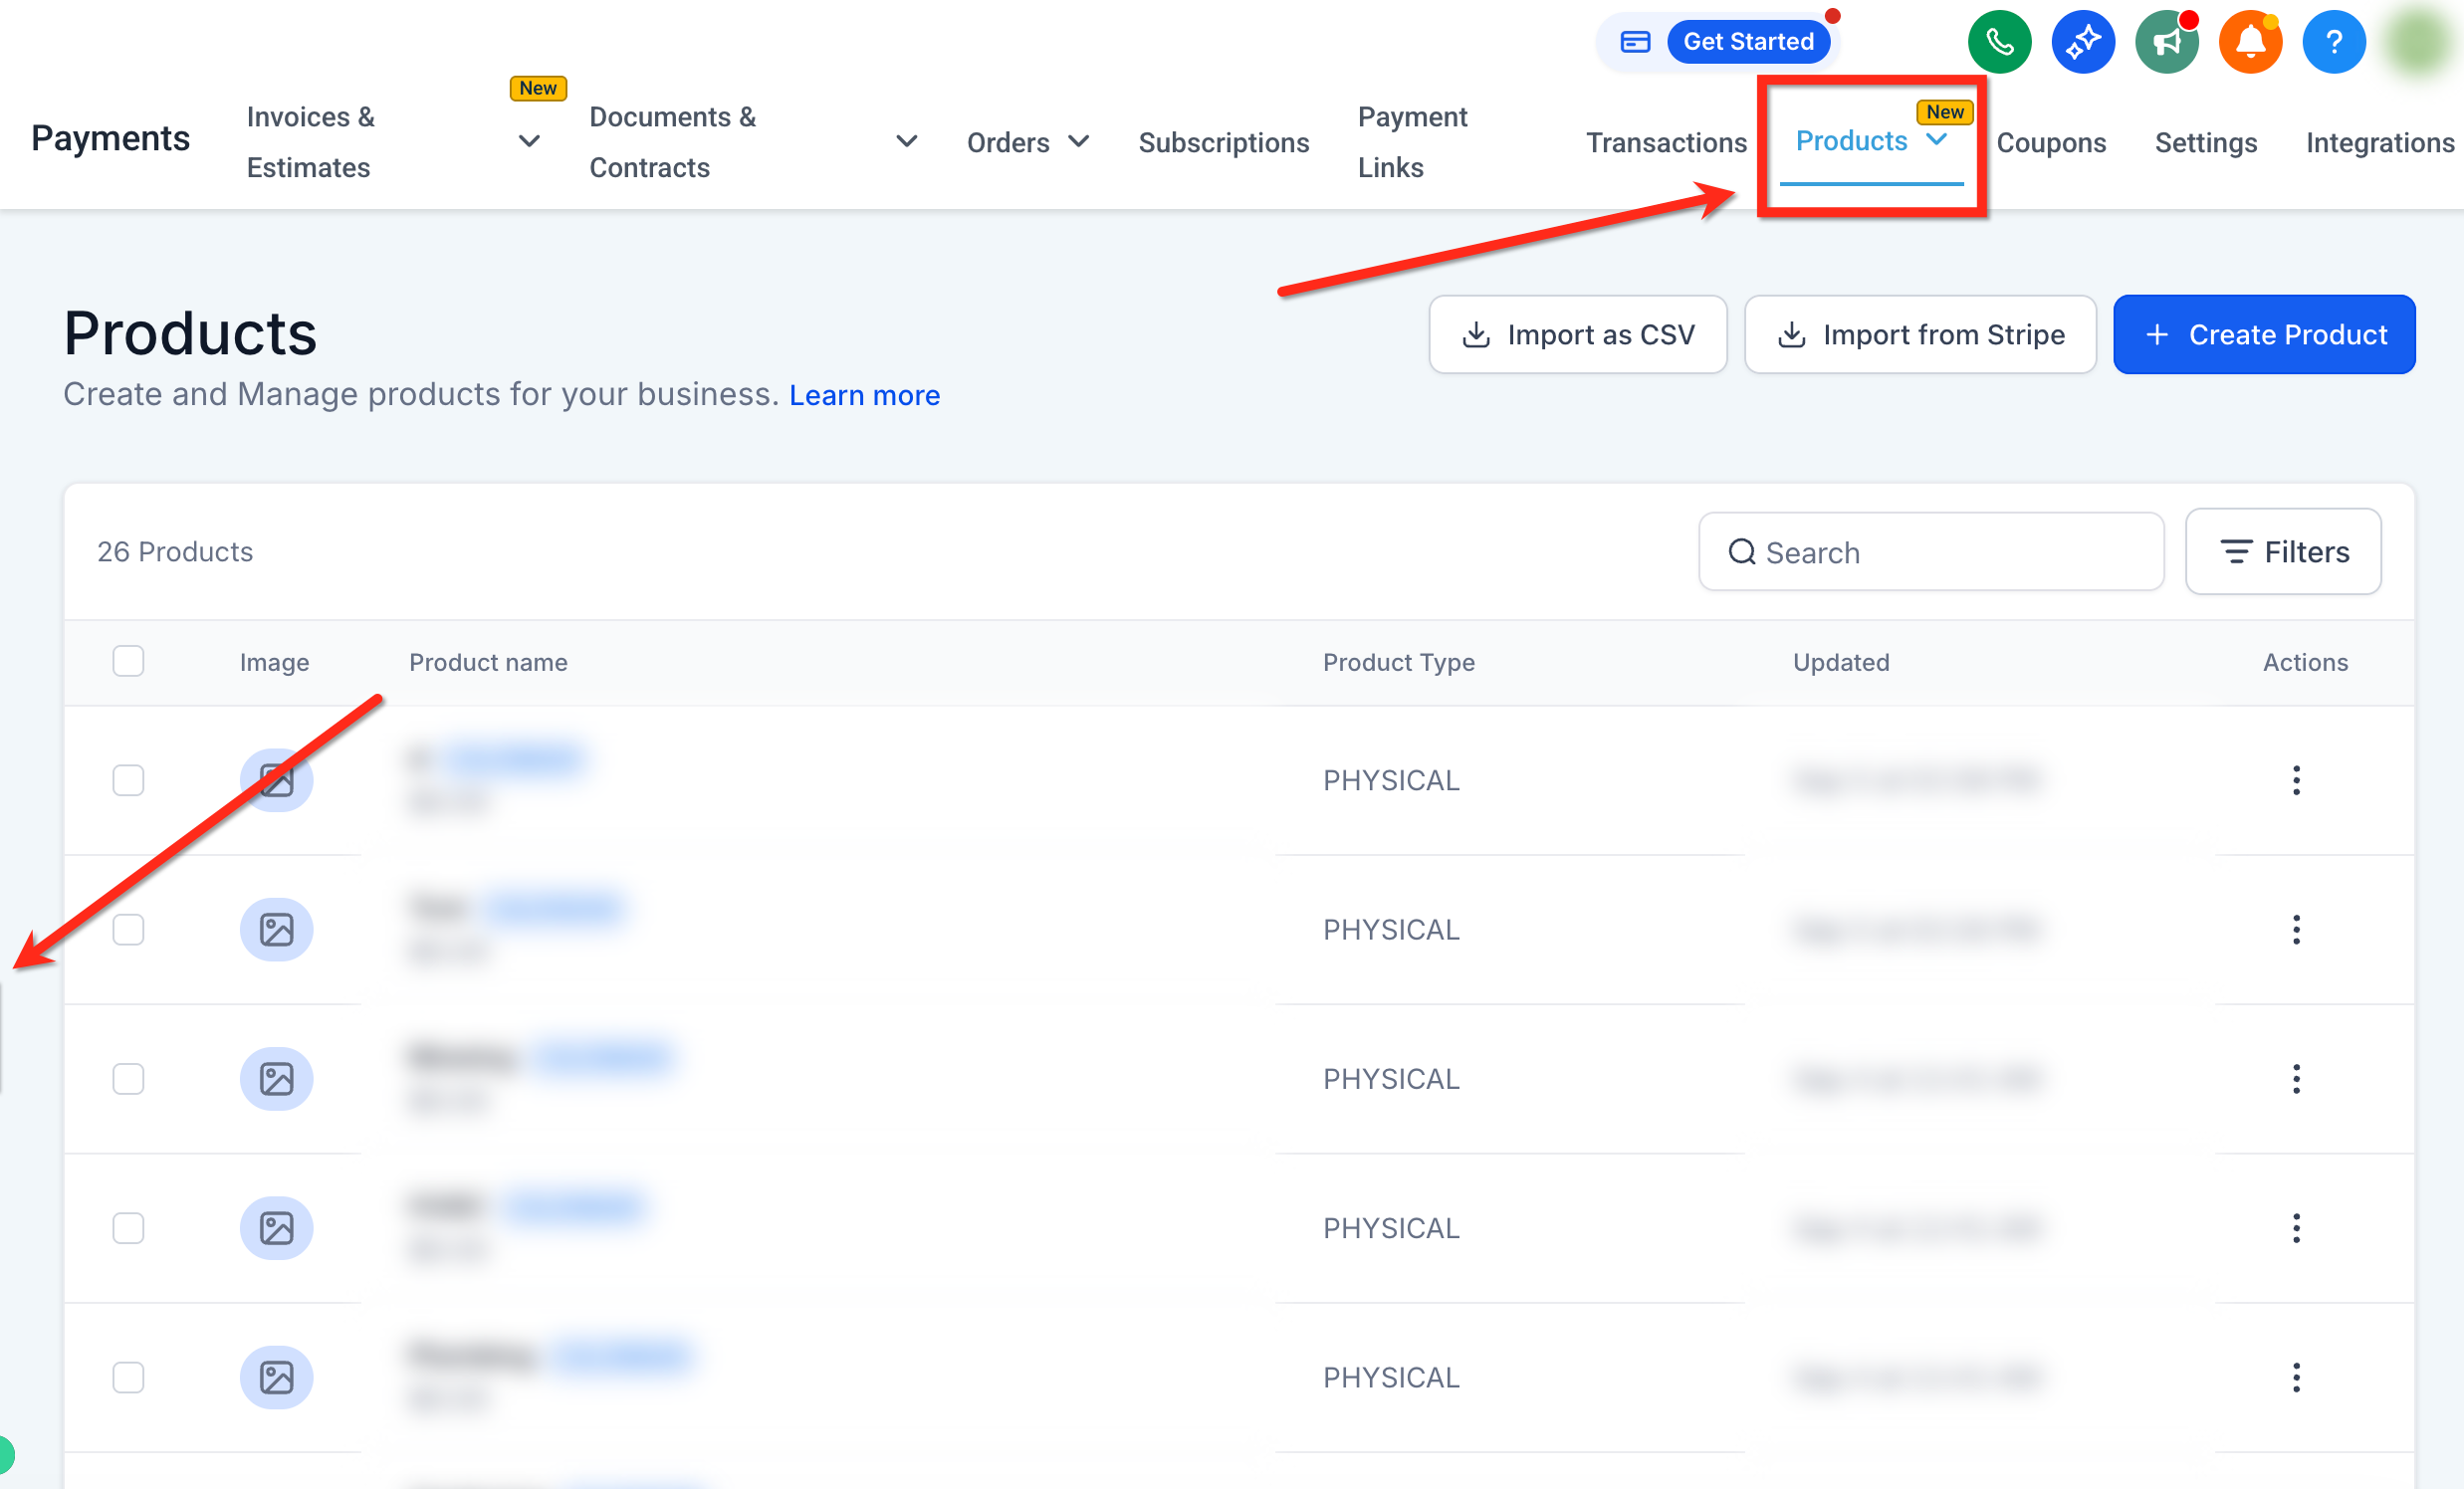
Use the checkbox on each row to select products, or the top checkbox to select all on the current page. To select every product, use the Select All prompt that appears.
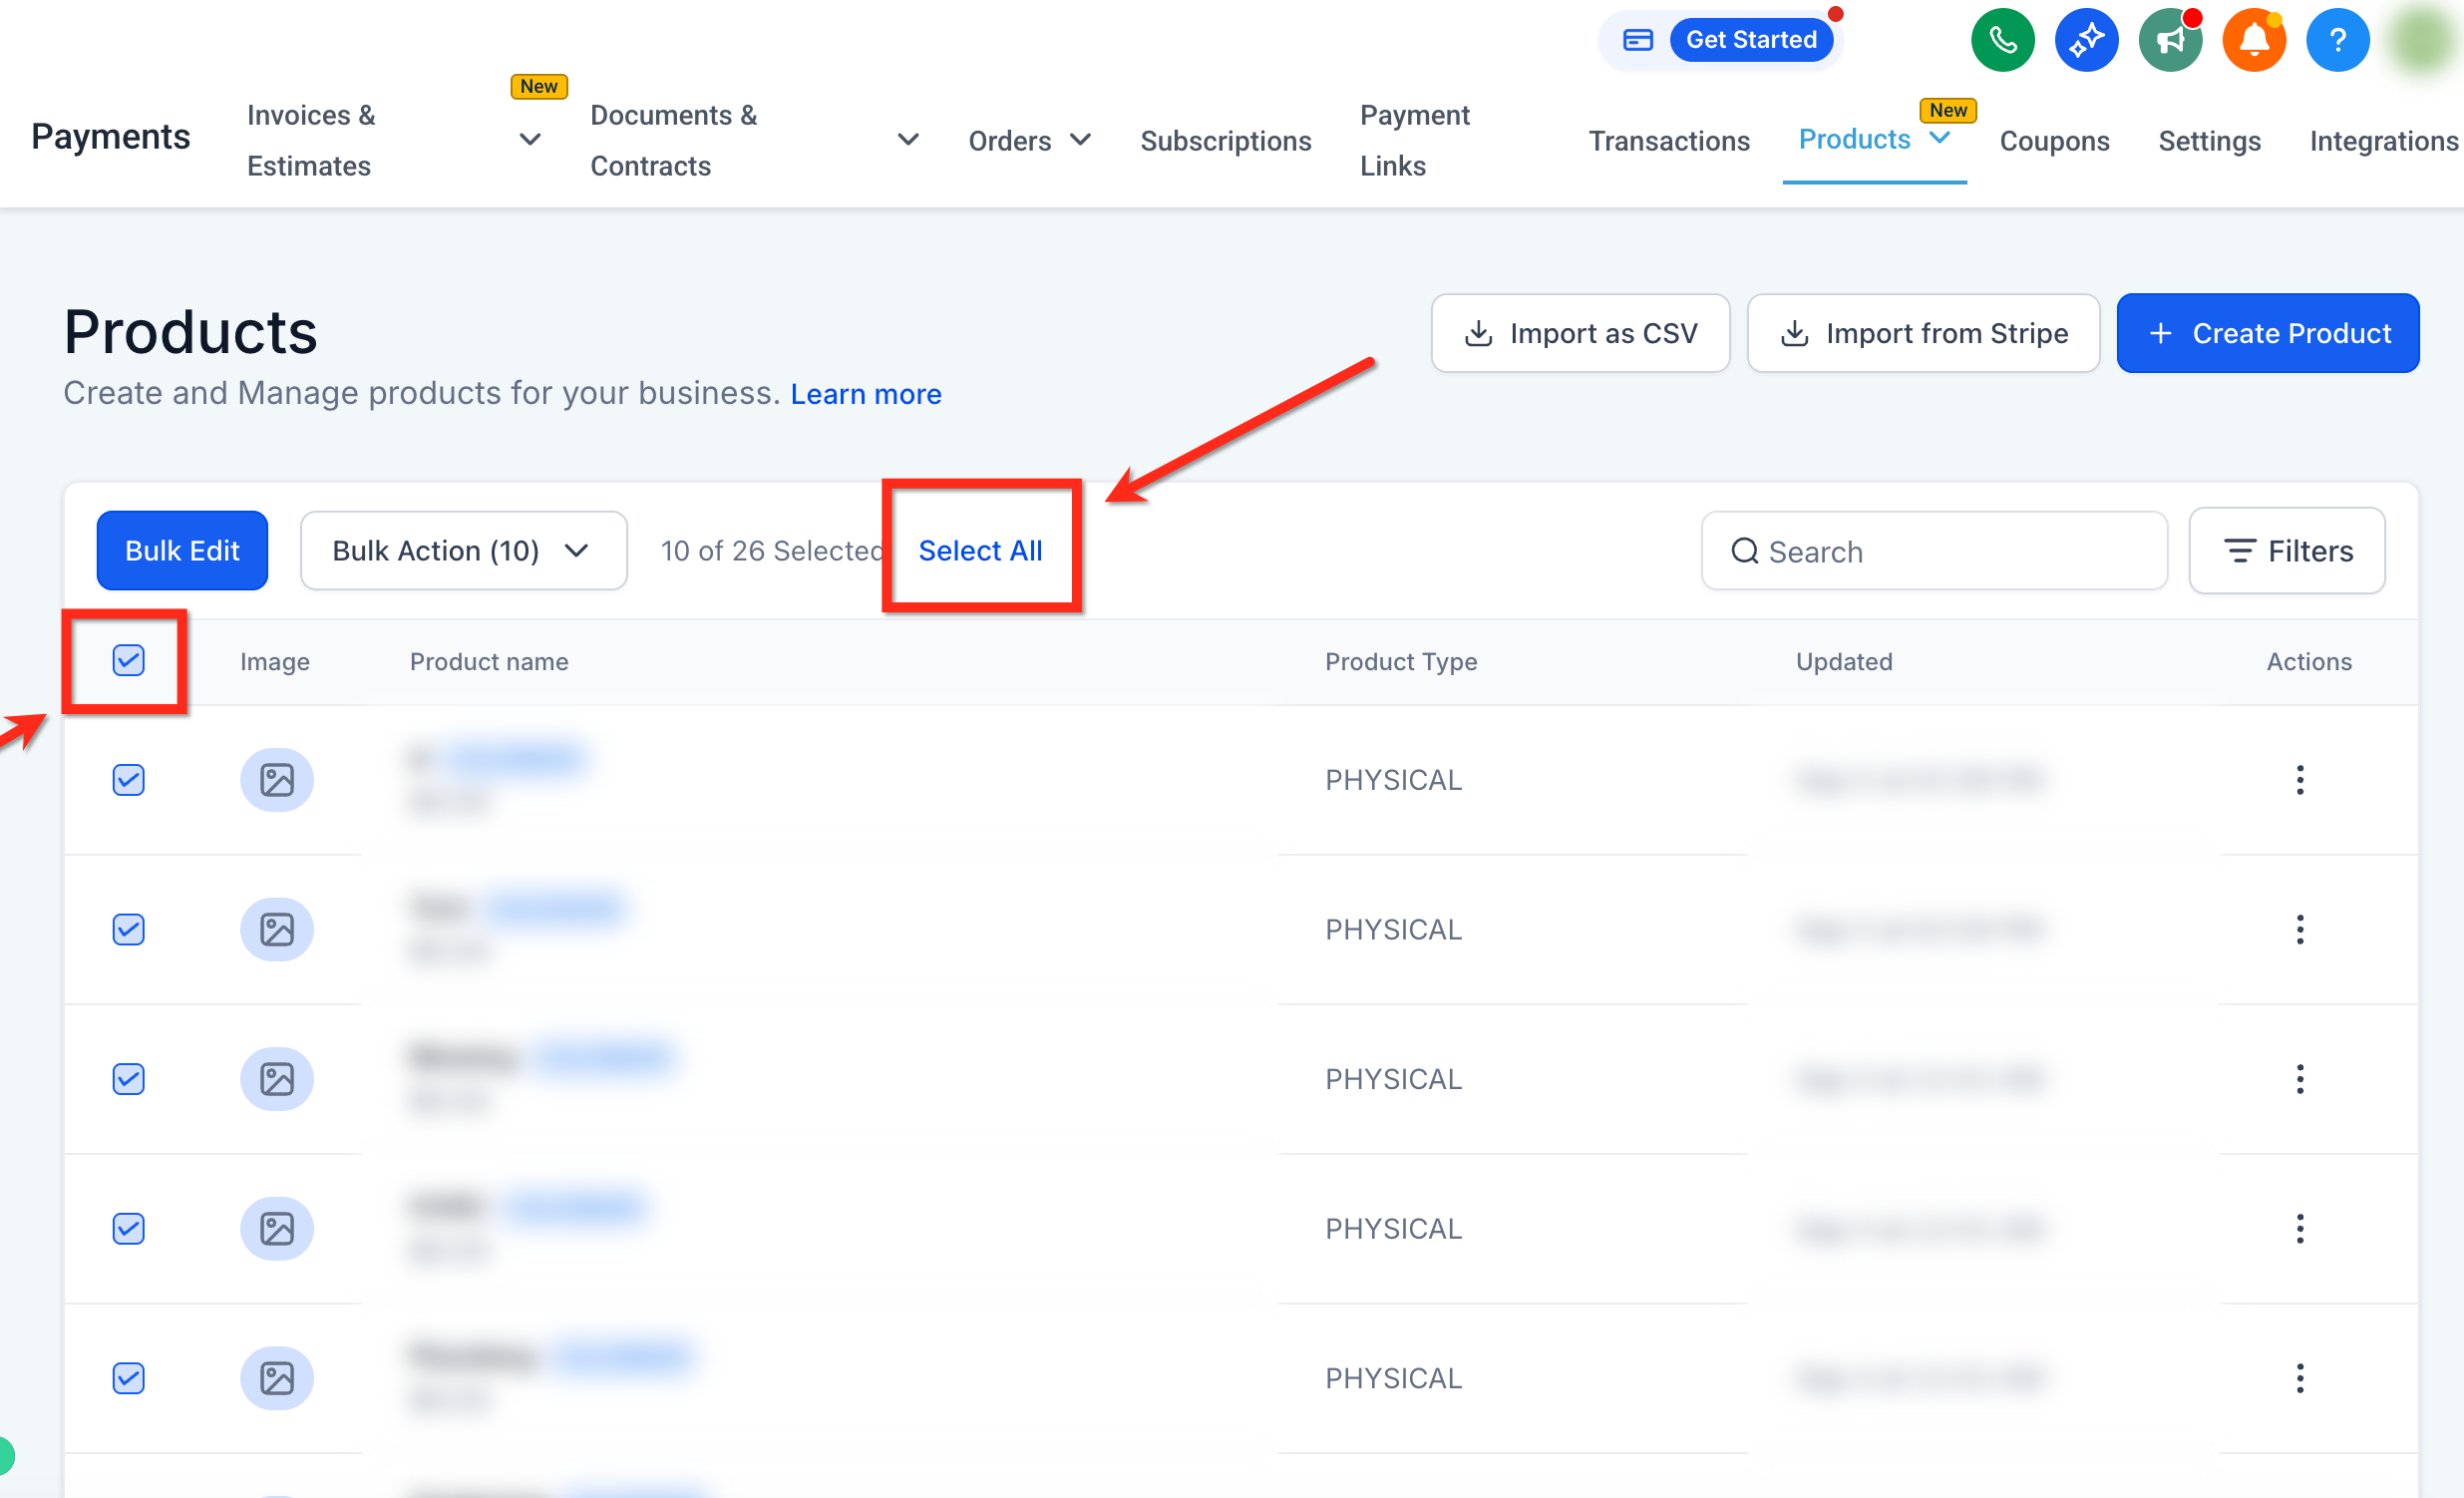
Open the Bulk Actions dropdown and apply your change.
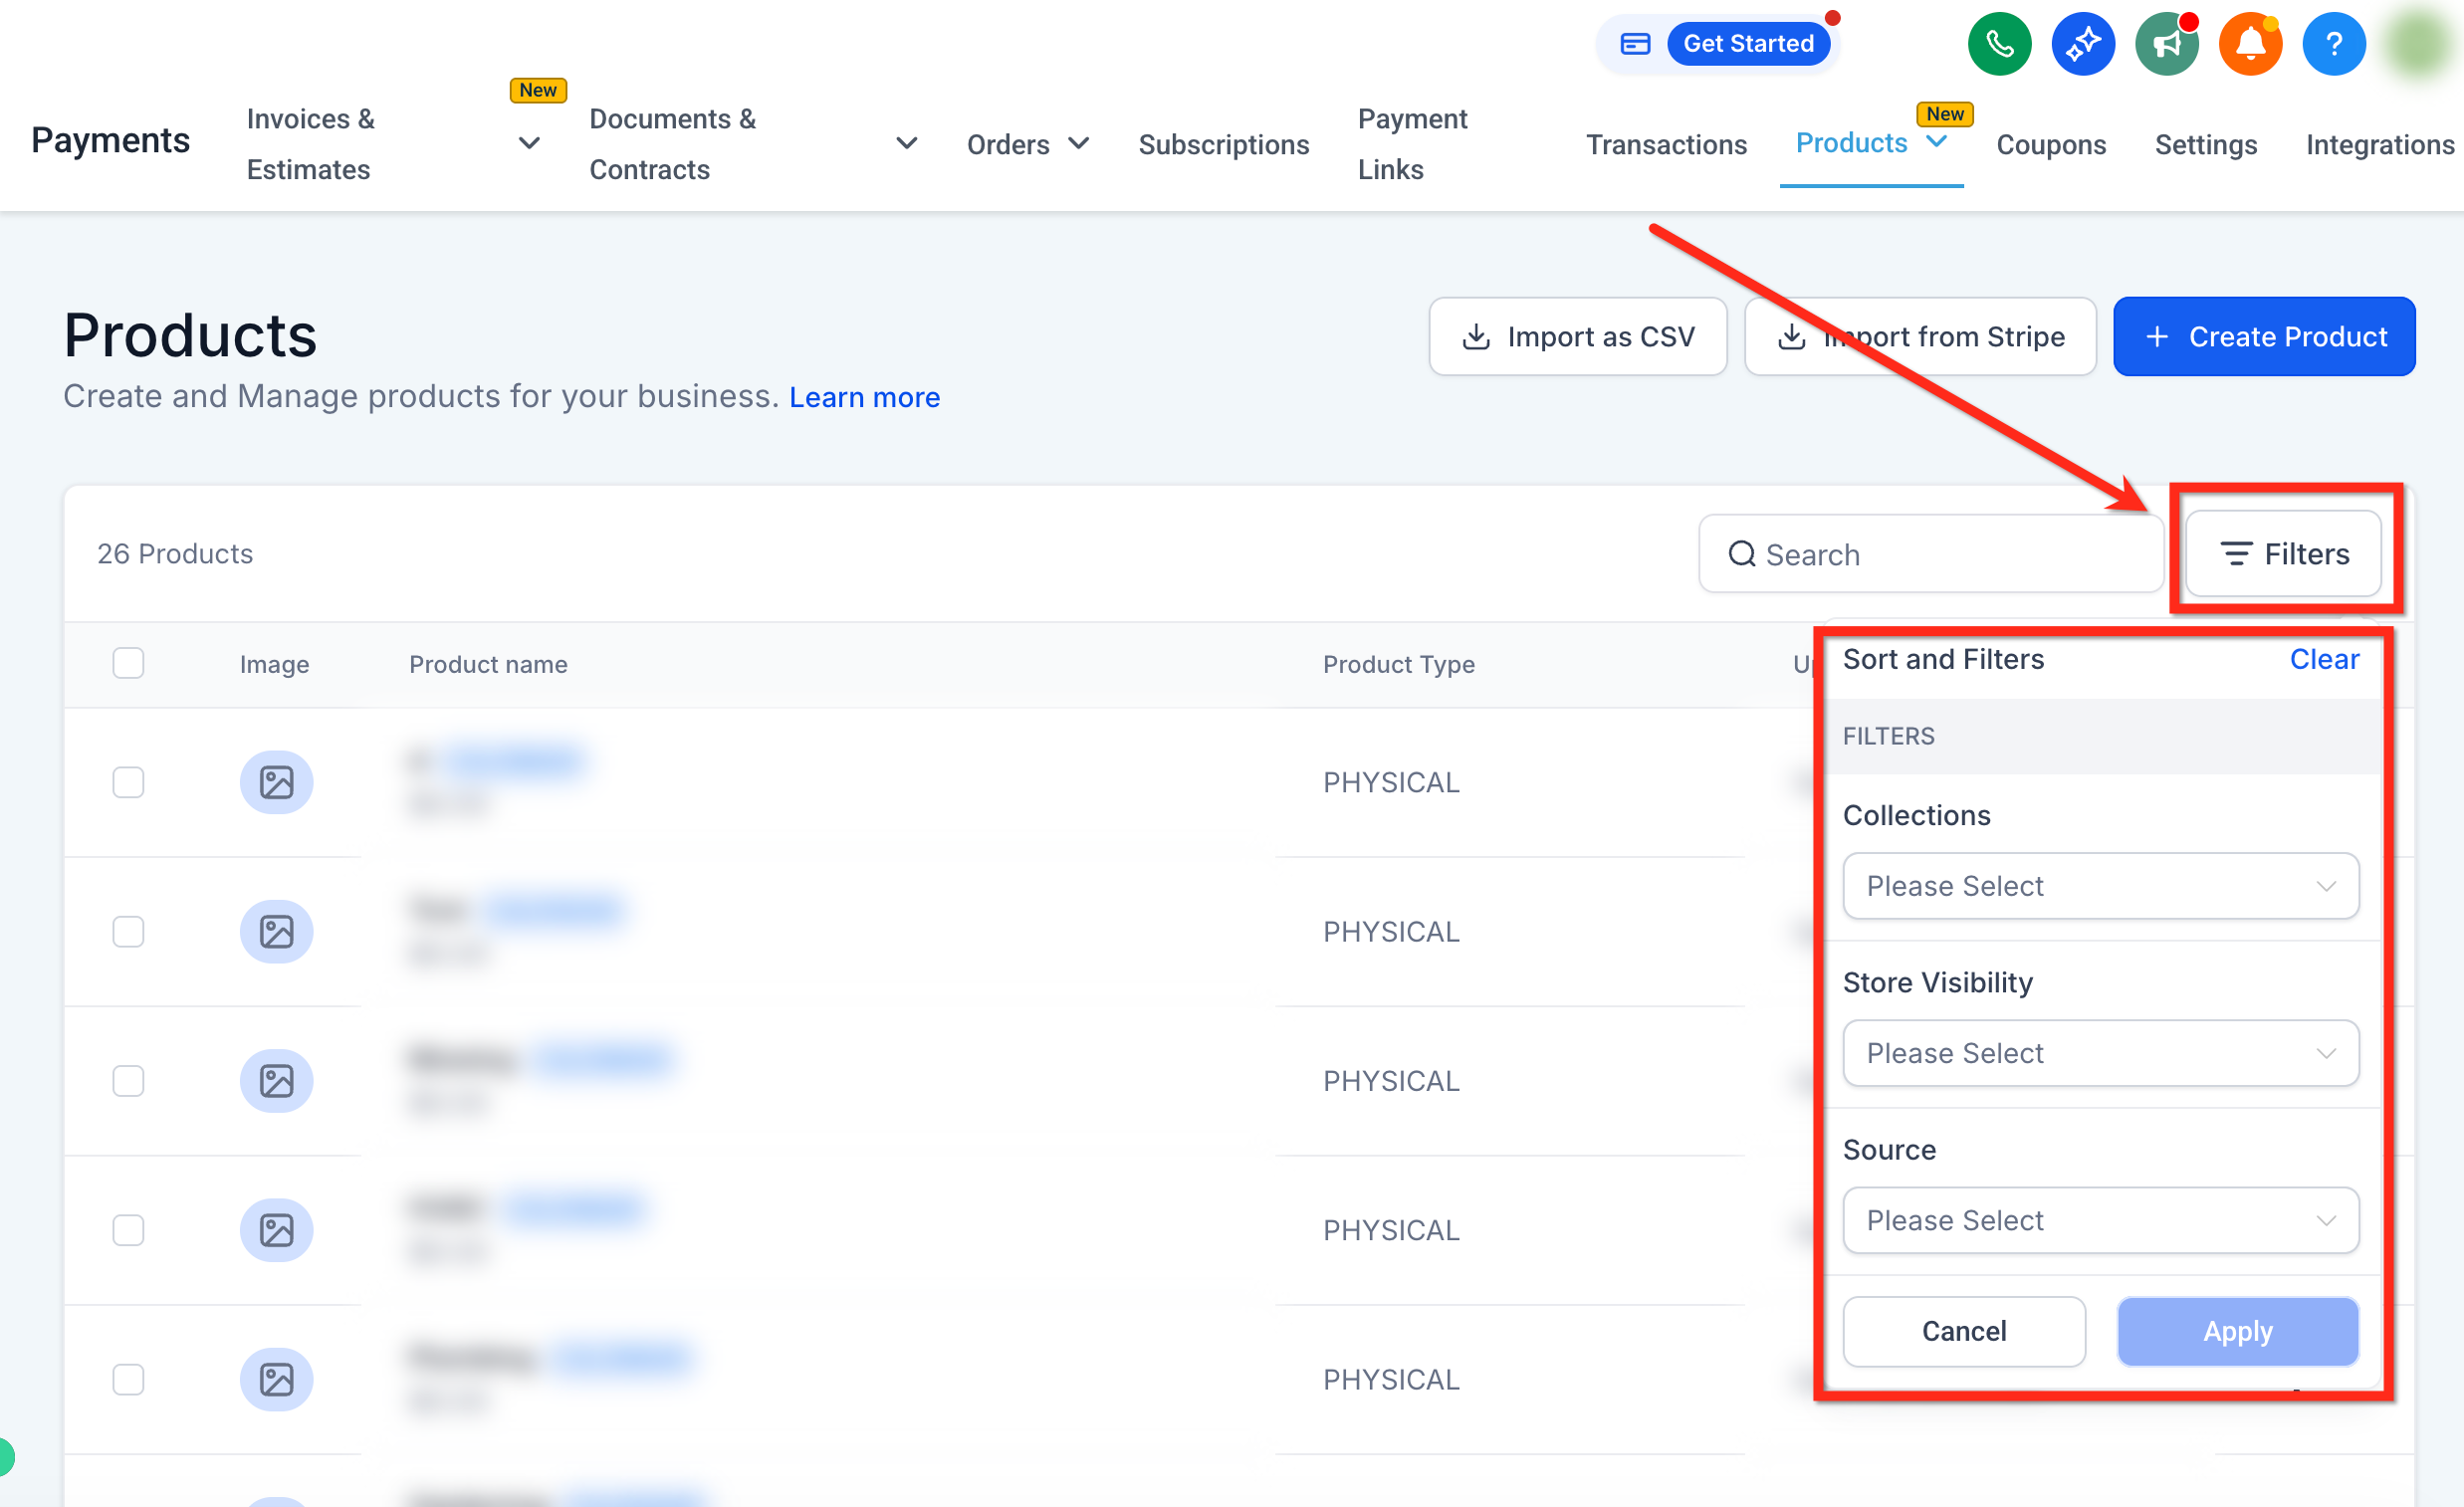
You can narrow your selection first with the Filters button. Filters include Store Visibility (Included or Hidden), Collections by name, and Source (all products or WooCommerce).
Important behaviors to know:
Price changes apply to all variants of a selected product, and changes that would produce a negative value are skipped for those products.
Increase and Decrease actions require an existing base value. Products without one are unaffected.
Only one bulk operation can run at a time.
Store visibility changes apply across all connected stores. To exclude a single store, use the Sites section instead.
Deleting more than 50 products requires typing "Delete" to confirm.
Changes across more than 300 products may take a few moments to reflect.
Product deletion permanently removes products you no longer need. To protect billing and patient access, some product types cannot be deleted, and deletion is blocked while active subscriptions exist.
Important: Deleting a product does not remove historical records such as transactions, orders, invoices, or subscriptions that already used it. It only prevents future purchases or actions on that product.
Permissions: Your role needs Products → Delete and Products → View.
Navigation: Products are managed under Payments → Products.
Awareness: Deletion is permanent and cannot be undone.
Before deleting, confirm the product is not used in active checkouts, calendars or memberships, or active subscriptions.
Go to Payments → Products.
Locate the product.
Click the Delete (trash) icon.
Confirm in the dialog.
Go to Payments → Products.
Click Edit on the product.
Click Delete Price.
This only works if the product has more than one price or variant. The last remaining price cannot be deleted, and saved prices or variants cannot be removed (only unsaved ones can).
Go to Payments → Products.
Select products with the checkboxes, or use Select All.
Click Delete under Bulk Actions.
Review the confirmation message and confirm.
You will see a message such as: "Are you sure you want to delete these products? This action cannot be undone. Only products eligible for deletion will be deleted." Only eligible products are removed. Protected products are skipped automatically.
Subscription plan products: Deletion is blocked while active or past-due subscriptions exist. Resolve or cancel those subscriptions first, then delete. When blocked, the delete option is disabled.
Calendar products: Products created by Calendars cannot be deleted, and the delete option is hidden.
Membership or Community products: These cannot be deleted, and the delete option is hidden.
Saved prices and variants: These cannot be deleted. Only unsaved prices or variants can be removed.
Where do products live in Aesthetix CRM? In the Payments section, under Products. From there they power your payment links, invoices, order forms, calendars, and online store.
Can I create multiple pricing options for one product? Yes. You can add multiple pricing options, including a mix of one-time and recurring structures, on the same product.
Can I edit a product after publishing it? Yes. Products can be edited at any time from the Products page, including name, description, image, and pricing.
What image formats and sizes are supported? Product images accept PNG and JPG files up to 2MB each. Upload them in the order you want them shown in your storefront.
Can products belong to multiple collections? Yes. A product can appear in multiple collections, whether manual or rule-based.
Can I set different cost prices per variant? Yes. Each variant combination has its own independent cost price and margin fields, so you can track profitability per option.
Is cost price visible to patients? No. Cost price is an internal field and is never shown at checkout, on receipts, or on invoices.
Why is the delete button missing on my product? The product is likely a Calendar product, a Membership or Community product, or a subscription plan with active or past-due subscriptions. Those cannot be deleted, or deletion is temporarily blocked.
Can deleted products be restored? No. Product deletion is permanent. Confirm dependencies before proceeding.
Why does a deleted product still appear in my payment gateway? Products linked to an external gateway require dual deletion. Delete the product under Payments → Products, then log in to your gateway dashboard (such as Stripe or PayPal) and delete or archive the corresponding product or plan there as well.
