Build a simple contact form for your practice website to capture new patient inquiries and connect every submission straight to your contacts.
A contact form is one of the easiest ways to turn website visitors into new patients. In Aesthetix CRM you can create, customize, and embed a form that collects a prospective patient's name, email, phone, and message, then routes each submission directly into your contacts.
Log in to your Aesthetix CRM account.
In the left-hand menu, click Web Tools, then Forms.
Click the + Create New Form button to start a new form.
You can start from one of the existing Contact Form templates or build a new form from scratch to suit your practice.
You can also build a new form, or reuse an existing one, directly inside the Landing Page Builder or Websites builder while you are editing a page. However you create it, the form still appears in this centralized Forms list so your whole team can find and manage it in one place.
Drag and drop the fields you need from the Form Elements panel into your form. For a basic practice contact form, add Full Name, Email, Phone Number, and a Message or custom text area so patients can tell you what they are interested in.
If you need to gather more detail, you can also add:
Custom Fields to capture information unique to your practice.
Dropdowns, checkboxes, or radio buttons for specific options, such as the treatment a patient is asking about.
New field types built on the spot: Create and edit several custom field types directly inside the Form Builder, so you do not have to leave the form to set one up.
A range of field types: Beyond dropdowns, checkboxes, and radio buttons, custom fields can also be date pickers, number or monetary fields, and file uploads, so you can capture almost any kind of patient information.
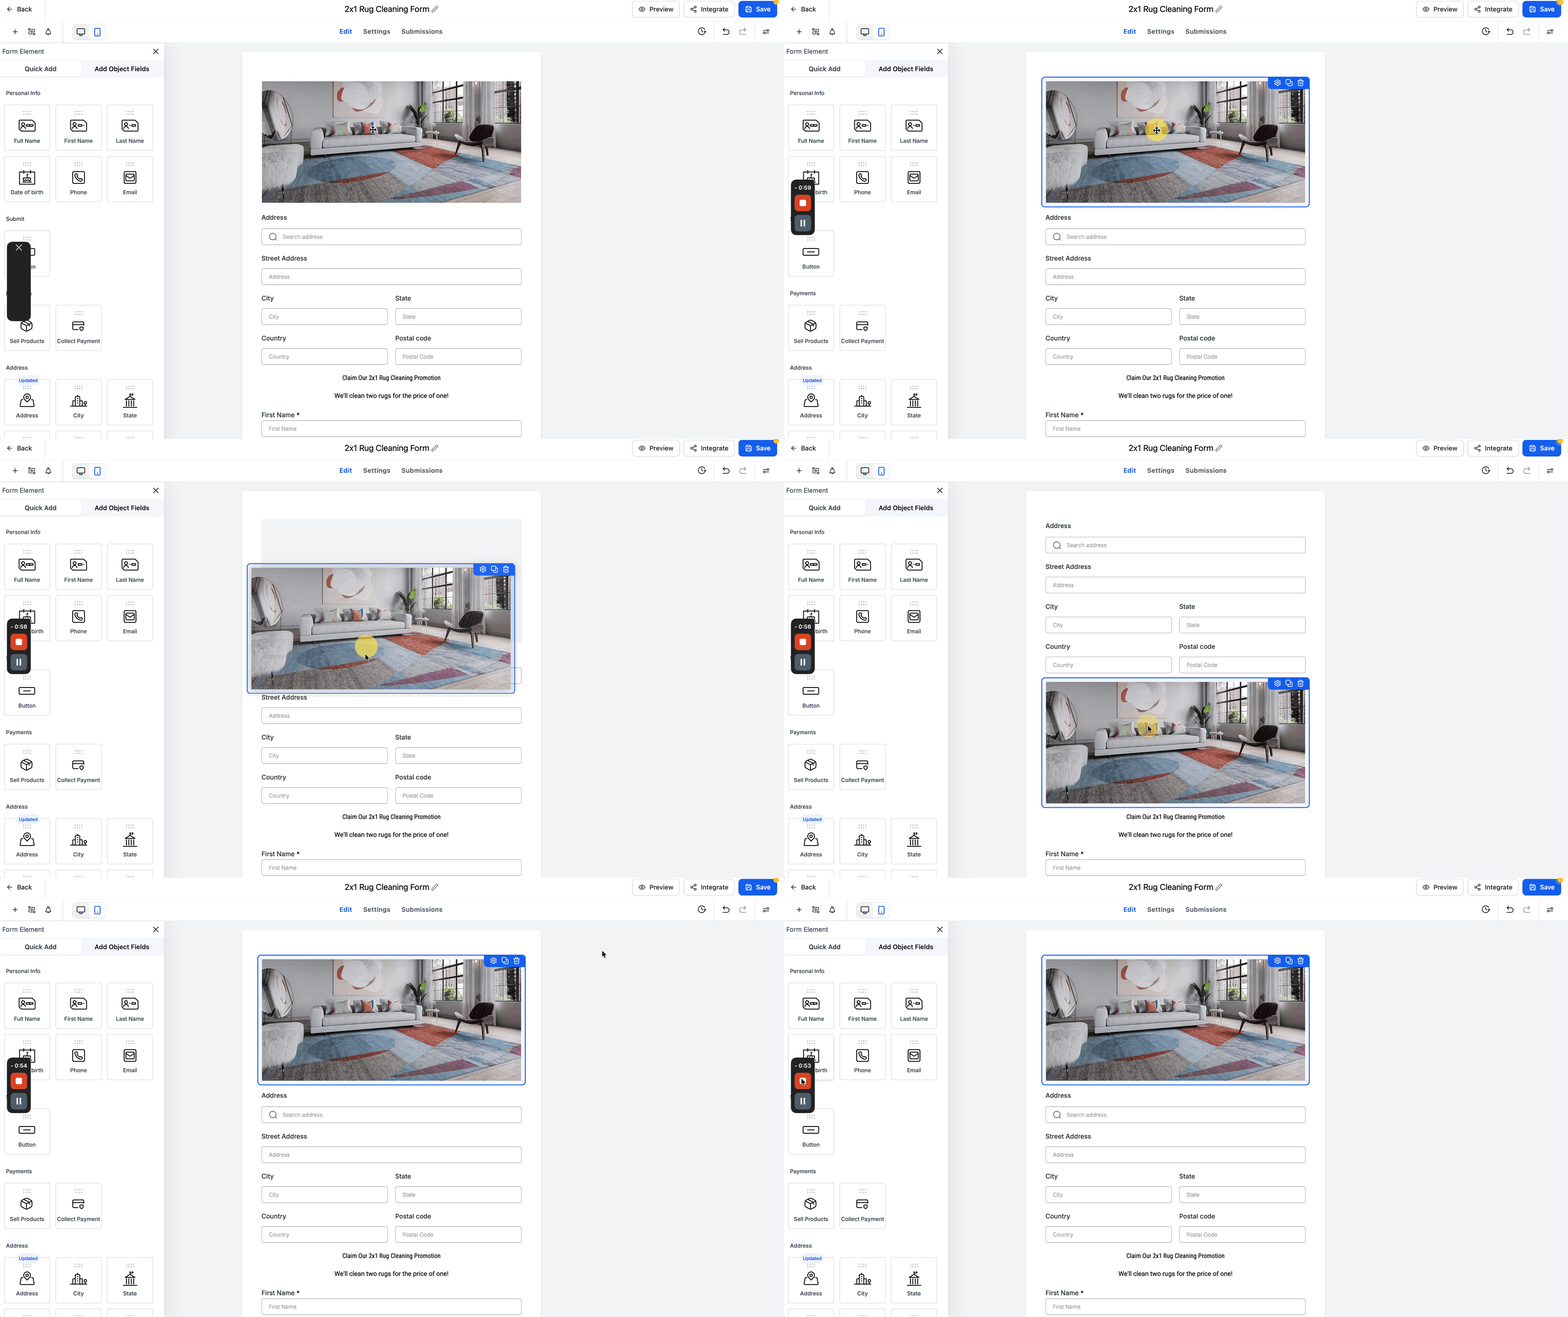
You can rearrange fields at any time by dragging them into the order you prefer. As you drag a field, the builder gives you smoother movement, a subtle shadow for clearer visual feedback, and automatic scrolling in longer forms so you can move fields higher or lower without scrolling manually.
For this example, we will add a "query" field so patients can describe the treatment they are interested in.
You can set up email notifications for yourself so your team is alerted whenever a patient submits the form, and you can also send a confirmation email to the patient who filled it out.
Notifications break down into two types: an Email Notification that alerts your team, and an Auto Responder that goes to the patient automatically. For each Email Notification you can set a custom subject line, recipient address, reply-to address, and sender name so replies land with the right person on your team.
Click the Styles tab to adjust the form's background, text color, and spacing so it matches your practice branding. Toggle Full Width for a responsive design that looks clean on any device.
Beyond Styles, open Themes to start from a ready-made visual preset and refine it further, or use Advanced for additional configuration options.
Under Settings, choose what happens after a patient submits the form:
Show a Thank You Message and enter a custom message.
Redirect to Another Page and enter a URL.
Trigger a Workflow or Automation, for example an automatic follow-up email to a new patient inquiry.
Powered by the Form Submitted trigger: Any workflow you attach fires from the Form Submitted trigger, which starts the automation the moment a patient completes and submits the form.
Apply Conditional Logic: Show or hide specific fields, display a custom message, redirect the visitor, or filter out unqualified leads based on how a patient answers earlier questions.
Click Save Form once you are satisfied with your form.
Click the Integrate Form button to get your embedding options.
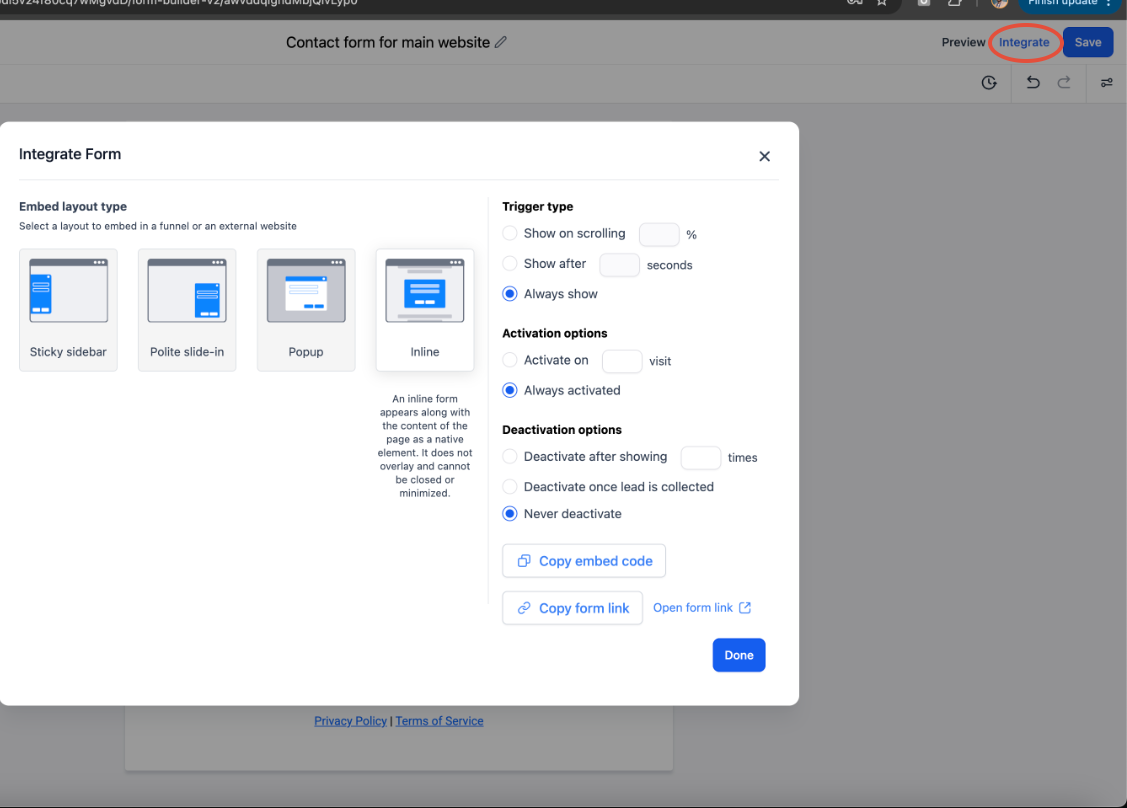
Alongside the embed code, you can also copy a direct link to the form itself. Share that link by text, email, or social post whenever you want a patient to fill out the form without needing a page to host it.
Once your form starts receiving responses, you can review them without leaving the Form Builder.
Open the form you want to review.
Click the Submissions tab at the top of the Form Builder.
Use the date filters or search field to find a specific response.
Adjust the visible columns if you want to see additional captured fields.
This is especially useful when you are testing a new form: submit a test entry, then check the Submissions tab to confirm the data came through correctly.
Once the form is live, click the Analytics tab to track views, responses, average completion time, and completion rate.
With these steps complete, you will have a fully functional contact form ready to capture new patient inquiries and add every submission to your contacts.
Note: Because your contact form is connected to your contacts, each submission automatically creates or updates a contact record, so no lead ever falls through the cracks.
Where do I find the Form Builder? In the left-hand menu, click Web Tools, then Forms. From there you can create a new form or edit an existing one.
What fields should a basic patient contact form include? At a minimum, include Full Name, Email, Phone Number, and a Message field. These give your team everything needed to follow up with a prospective patient.
Do I have to build a form from scratch? No. You can start from one of the existing Contact Form templates and customize it, or build a new form from scratch if you prefer.
Can I get notified when a patient submits the form? Yes. In the form's notification settings you can send an email alert to yourself or your team each time the form is submitted, and you can also send a confirmation email to the patient.
What can happen after a patient submits the form? You can show a custom thank you message, redirect the patient to another page, or trigger a workflow or automation such as an automatic follow-up email.
How do submissions connect to my contacts? Every form submission is added directly to your contacts, creating or updating a contact record automatically so you can follow up right away.
Can I style the form to match my practice branding? Yes. Use the Styles tab to adjust background, text color, and spacing, and toggle Full Width so the form looks polished on any device.
How do I add the form to my website? After saving, click the Integrate Form button to get the embedding options you can place on your website or landing pages.
Can I share the form without embedding it on a page? Yes. Alongside the embed code, the Integrate Form options include a direct link you can send by text, email, or social media.
Which workflow trigger starts an automation from a form submission? The Form Submitted trigger. It fires as soon as a patient completes and submits the form, so any workflow you attach starts right away.
Can I create a new custom field without leaving the Form Builder? Yes. Several custom field types can be created and edited directly inside the Form Builder, so you do not need to set them up elsewhere first.
Can I build a form without leaving the Landing Page Builder or Websites builder? Yes. You can create or reuse a form directly inside either builder while editing a page, and it will still show up in this centralized Forms list.
Can I use the same form in more than one place? Yes. Save it once and add it to as many pages, funnels, or links as you need. Give reusable forms a clear, consistent name so your team can find the right one quickly.
Can the form show or hide fields based on how a patient answers? Yes. Conditional Logic lets you show or hide fields, display a custom message, redirect the visitor, or filter out unqualified leads based on their responses.
How can I cut down on spam or invalid submissions? Turn on CAPTCHA and email or phone validation in the form's settings. This matters most when a submission automatically triggers a follow-up email or text.
Could repeated submissions create duplicate contact records? It depends on your account's contact deduplication settings. If avoiding duplicates matters to your practice, check those settings so matching submissions are handled the way you want.
