Aesthetix CRM lets you sell your treatments, packages, and products directly on order forms, then collect payment through the providers your practice already uses. This guide walks through the payment providers you can connect, how products behave at checkout, how to turn on automatic sales receipts, and the options available for a smooth buying experience.
For everything related to managing transactions, subscriptions, and refunds, see Payments.
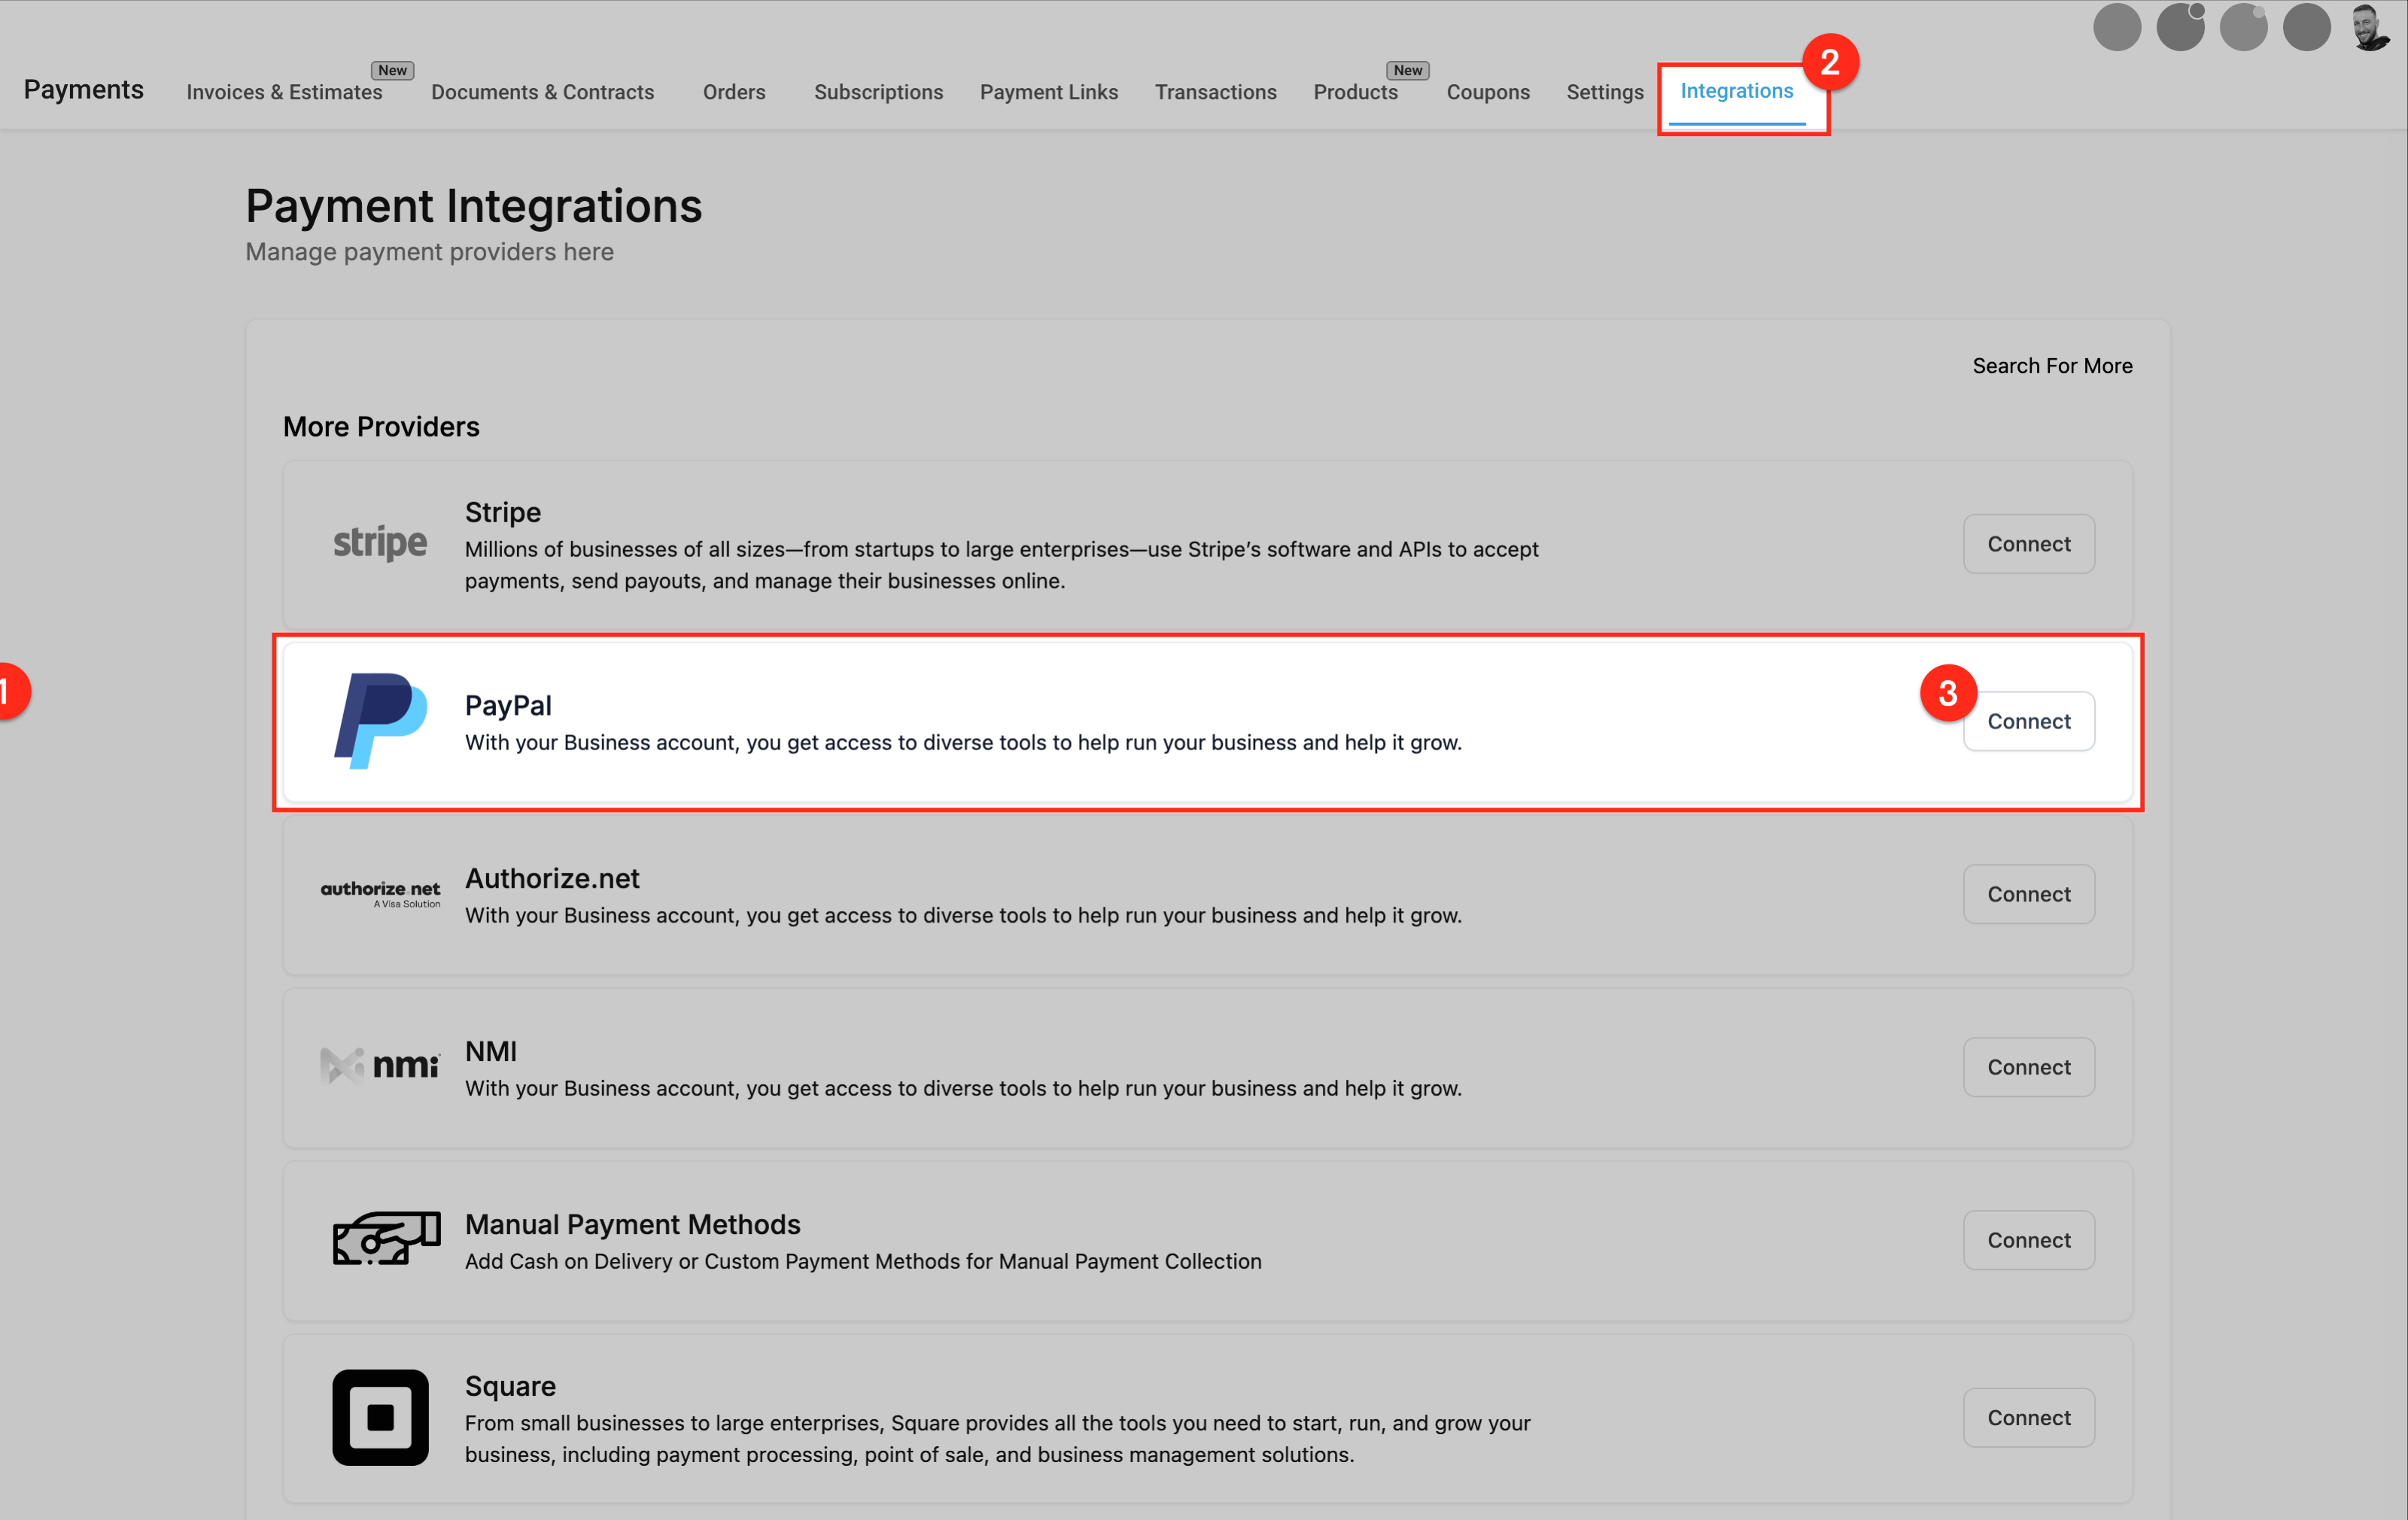
You can connect multiple payment providers to sell products on your order forms:
Stripe
Authorize.net
NMI
PayPal
Square
Custom payment providers (installed from the Marketplace)
Connect and manage these providers under Payments > Integrations.
Both one-time and recurring products can be sold on 1-step and 2-step order forms. There are three ways to offer products during checkout:
Main/primary products: the main product or service you're selling on the order form.
Bump products: optional add-ons a client can check to include while purchasing a primary product.
Upsells: offered immediately after checkout, letting a client add a service or product with a single click once they've purchased the primary product.
Apple Pay and Google Pay are only supported by Stripe. To display Apple Pay as a payment method, turn on the toggle on the Stripe connection card under Payments > Integrations.
Google Pay displays by default (where applicable in the buyer's country) when your practice is connected to Stripe.
Different recurring products cannot be sold together in a single checkout with any payment provider. To sell two different recurring products within one flow, use upsell purchases.
PayPal does not support purchasing bump products while a client purchases a recurring product.
You can configure setup fees, trial periods, and the number of payments when creating a recurring product under Payments > Products. Those settings are applied automatically when a client purchases that product.
Track all orders under Payments > Orders, subscriptions under Payments > Subscriptions, and manage refunds from the Transactions table.
Note: If a product has a trial period and no setup fee is explicitly charged before the trial begins, no charge is applied at the time the order is completed, and the amount shows as "0." Charges are applied when the trial ends.
The payment element supports PayPal and PayLater, giving your clients a widely recognized, trusted way to pay across forms, invoices, payment links, and order forms. Offering PayPal can help increase conversion and customer satisfaction.

Websites & funnels: Use the 1-step and 2-step order form page elements to collect payments with PayPal buttons.
Forms & surveys: Collect payment with PayPal buttons using the "Collect Payment" element.
Invoices: Collect invoice payments from clients using PayPal buttons.
Payment links: Add PayPal buttons directly to your one-time payment links.
E-commerce stores: Give shoppers more ways to pay by adding PayPal buttons to your store.
Step 1: Connect your PayPal account
Navigate to Payments > Integrations.
Click PayPal and enter your Client ID and Secret Key from your PayPal developer account.
Save the integration settings.
Step 2: Add or update the payment element
If you're collecting payments in forms, surveys, websites, or funnels, add the payment element to enable PayPal buttons during checkout.
If you already have a payment element and are now adding PayPal, make sure it's updated to the latest version that supports PayPal.
Note: In forms or surveys, add the "Collect Payment" element to enable PayPal buttons. In funnels or websites, use the 1-step or 2-step order form elements instead, these support PayPal automatically, with no additional payment element needed. If you added the order form before November 1, 2024, delete it and re-add it to ensure PayPal compatibility.
Step 3: Preview the payment element
To see the PayPal buttons in your payment element, preview your form, survey, website, or funnel.
Note: You will not see the PayPal buttons while adding the payment element in the builder, only in the preview or live version.
Receipts give your clients documented confirmation of their purchases and help your practice keep accurate records. With automatic receipts, Aesthetix CRM can send receipts to clients effortlessly.
Automatic receipts cover primary, bump, and upsell purchases on 1-step and 2-step order forms, along with subscriptions, calendar appointment booking payments, and invoice payments. Automating receipts simplifies your workflow and improves the overall client experience.
You have full control over your receipts, with several options to personalize them:
Custom title: Customize your receipt's title to give it a personal touch that aligns with your brand.
Receipt numbers: Assign a prefix and initial number to your receipts to make tracking and managing transactions easier.
Email template: Customize the email template used when sending client receipts to reflect your practice's identity, adjusting the content to create a professional, consistent experience.
Receipts are sent as downloadable PDF files attached to an email, delivered directly to the client's email address. This makes it easy for clients to access and save their receipts.
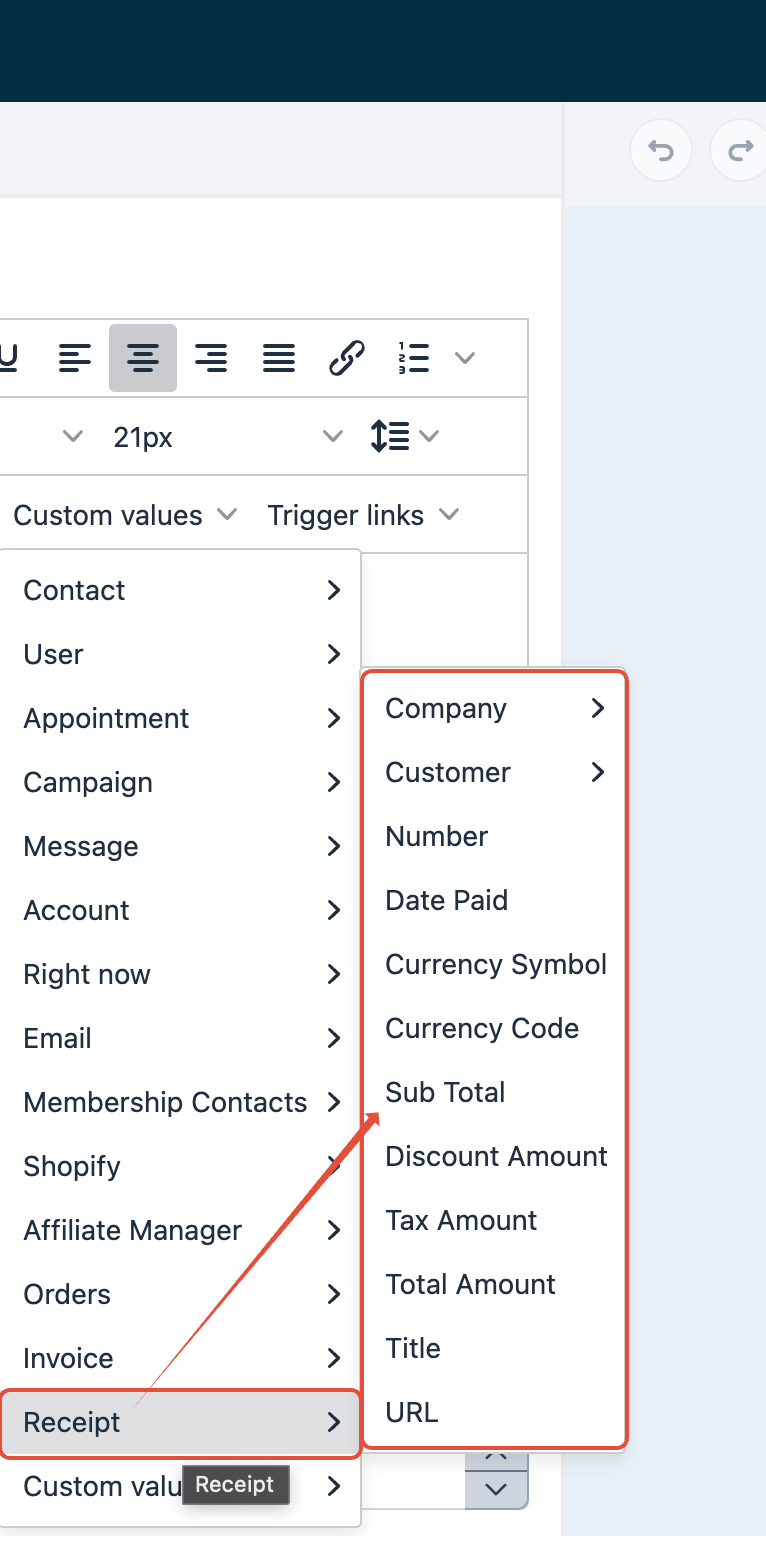
You can use custom templates for sending receipts. Create personalized, branded templates using custom values available within the email builder, so your receipts match your practice's unique style.
Can I send sales receipts automatically for only certain types of payments?
No. Enabling sales receipts applies globally to all payments made through order forms, calendar bookings, and invoices. For selective receipt handling, disable automatic receipts and send them manually for specific payments.
Can sales receipts include custom fields or personalized messages?
Currently, sales receipts don't support adding custom fields or personalized messages beyond standard transaction details. However, you can customize the email template associated with the receipt to include a general message or branding elements.
Are sales receipts sent immediately after a payment is processed?
Yes. Sales receipts are sent automatically as soon as the payment is successfully processed. Delays may occur depending on email delivery factors outside our control, such as the recipient's email server.
How can I verify if a sales receipt was successfully delivered to a client?
Check the Email Reporting section within your account by navigating to Marketing > Emails > Email Reporting. Filter by the recipient's email address or the subject line of the receipt email. The reporting dashboard shows the delivery status, delivered, opened, or bounced, helping you confirm the client received the receipt.
How can I stop the system from automatically emailing receipts to my clients?
If you prefer to send receipts manually or through a third-party platform (like Stripe), disable native automatic receipts:
Navigate to Payments in the left-hand sidebar.
Click Settings at the top of the page.
Select the Receipts tab.
Locate the toggle labeled "Enable automatic sales receipts for payments."
Switch the toggle to OFF and click Save.
Can I change a receipt number to a shorter or lower number?
No. Receipt numbers are automatically generated and must always be higher than the last one used. You can't edit, reset, or overwrite them.
If I turn off automatic receipts, will I still have a record of the payment?
Yes. Disabling the outbound email does not affect your internal bookkeeping. The system still records every successful payment under the Transactions tab.
Does this setting apply to both one-time and recurring payments?
Yes. Once the toggle is turned off, the system stops sending automated receipt emails for all transaction types captured through your connected payment providers.
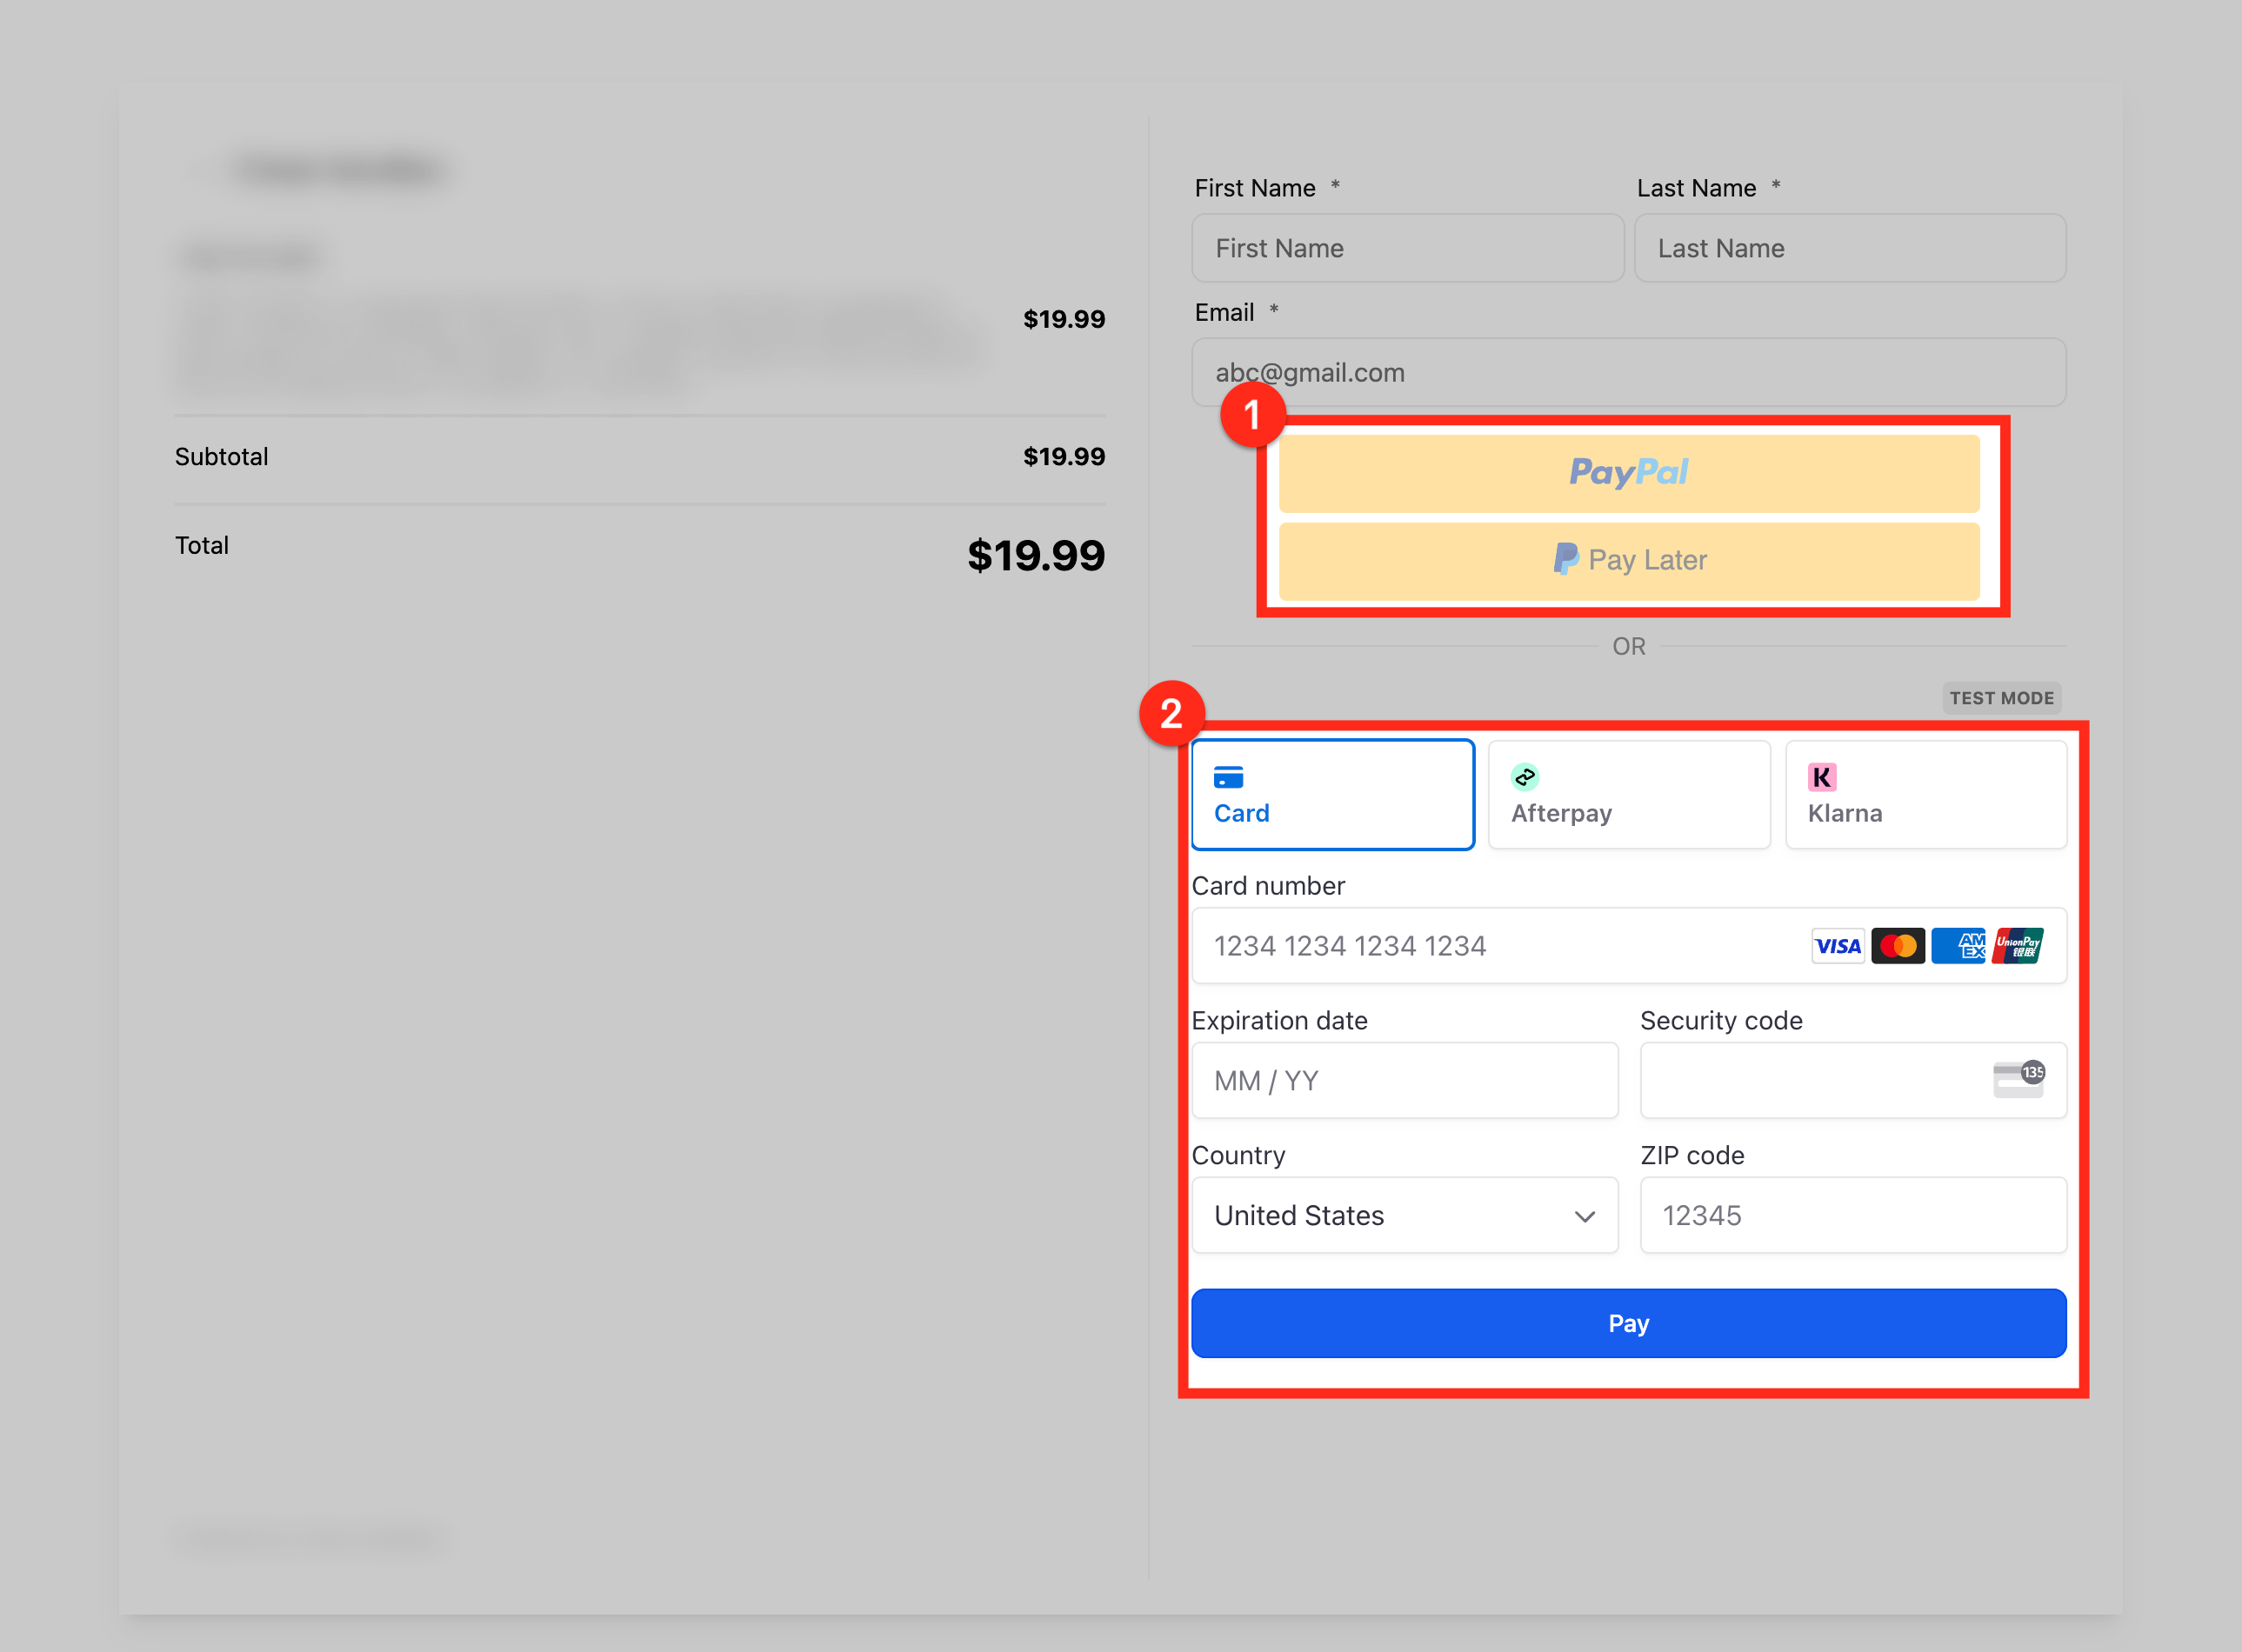
If you have multiple payment providers connected, clients can choose their preferred payment method during checkout. For example, if both PayPal and Stripe are connected to your account, a client opening a payment link from your practice would see both options.
How do I obtain my PayPal Client ID and Secret Key?
Log in to your PayPal developer account, navigate to My Apps & Credentials, and create a new app to receive your Client ID and Secret Key.
Can I use PayPal alongside other payment providers?
Yes. If you have multiple payment providers connected, clients can choose their preferred payment method during checkout.
Is PayLater available for all transactions?
PayLater availability depends on PayPal's terms and the customer's eligibility. This is not configured within Aesthetix CRM.
Do I need to update my existing payment elements to support PayPal?
Yes. Upgrade your payment element to the latest version, which includes PayPal support.
