Email marketing is one of the most effective ways to stay in touch with your patients and prospective patients. A regular email campaign is a one-time broadcast you design and send to a selected audience from the Email Marketing area, with no automation required. It is ideal for time-bound announcements, promotions, seasonal offers, and newsletters.
This guide walks through the full flow: creating a new campaign, choosing recipients, designing the email, setting your sender preferences, reviewing the campaign summary, and choosing whether to send now or schedule for later.
For more advanced delivery timing (Batch, RSS, and Smart Send/AI Schedule), see the Email Scheduling Options guide. To build and save reusable audiences, see the Recipient Segments guide. To compare two versions of a campaign, see the A/B Testing guide.
Note: To send an email, make sure you have a verified sending domain connected to your account.
Go to Marketing > Email > Campaigns.
Click New to start a fresh campaign, or open an existing draft to continue editing it.
If you start from the Template Library, choose a template and click Continue. You can preview any template before selecting it.
This opens the campaign in the email builder, where you will design your content before sending.
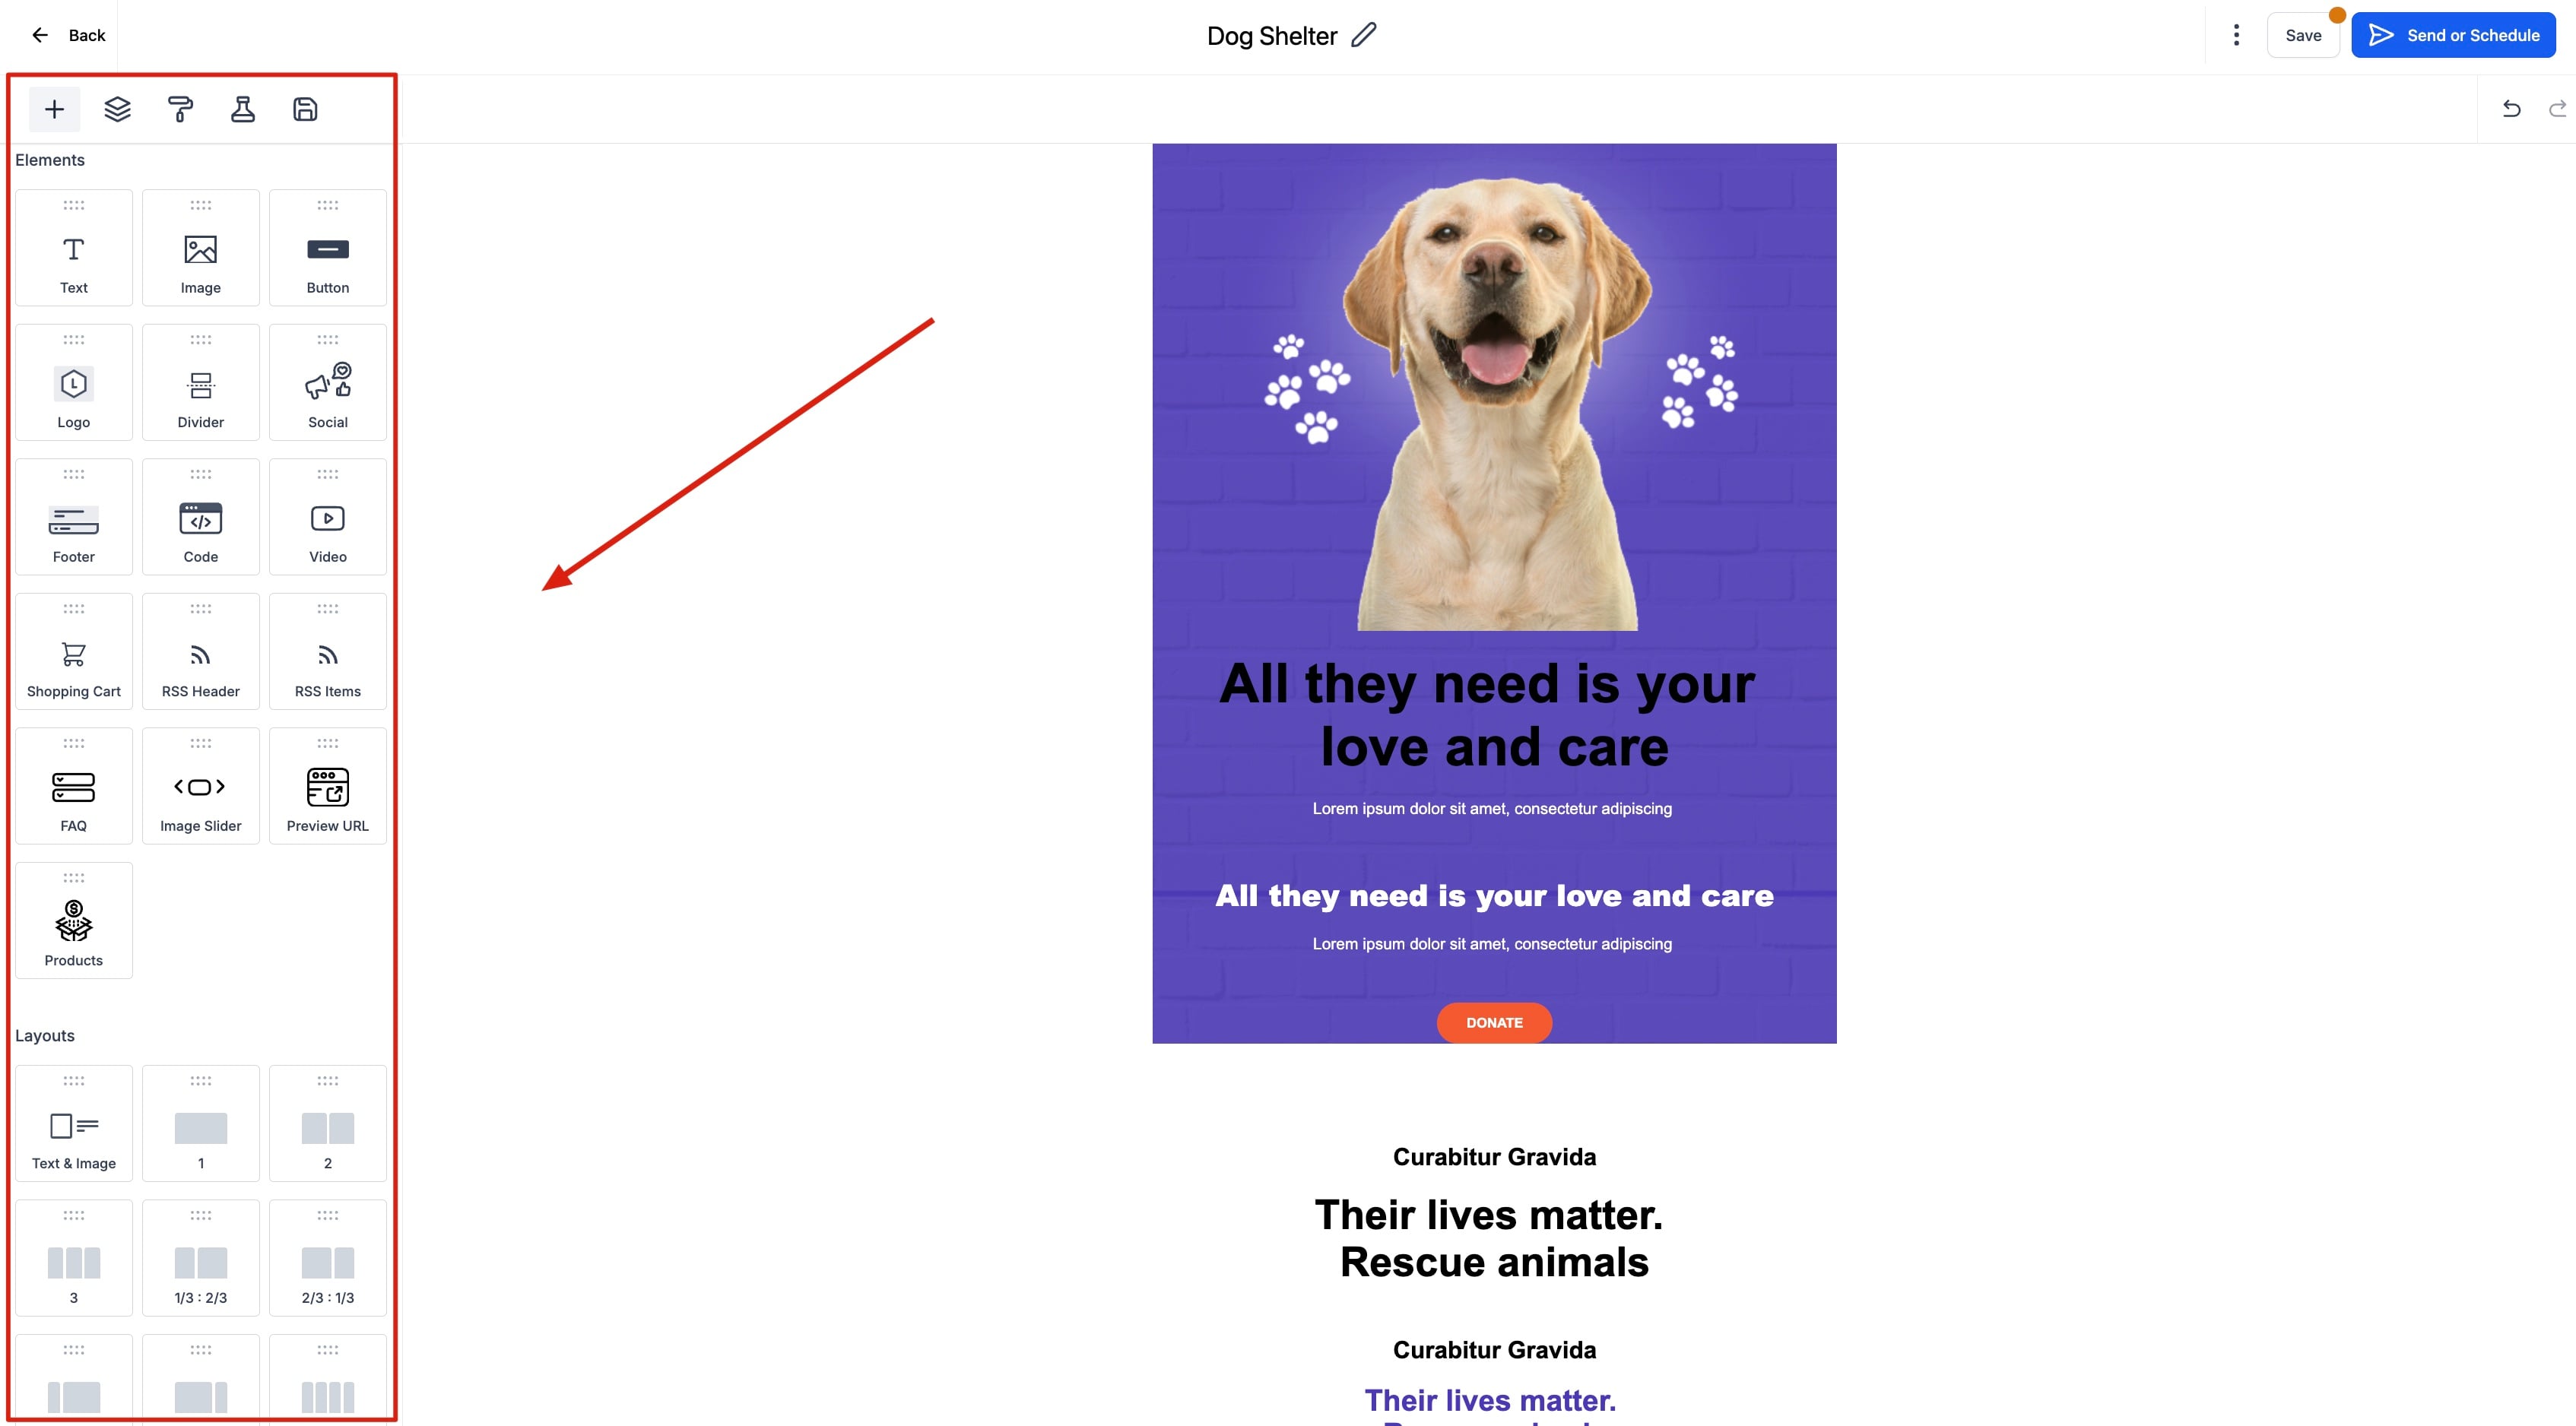
The email builder lets you work on each part of your email in any order and review everything at once before you send. Whether you are new to email marketing or an expert, the builder gives you the tools to design polished campaigns.
Build your layout or start from a selected template.
Add your content, images, and links.
Use Preview (next to Save on the top menu bar) at any time while editing to review your email in one click. This helps you catch formatting and personalization issues early.
Use Test Email to send yourself a proof and verify the layout on desktop and mobile before committing to a send.
For a deeper walkthrough of the builder and its inline editor, see the Email Builder guide.
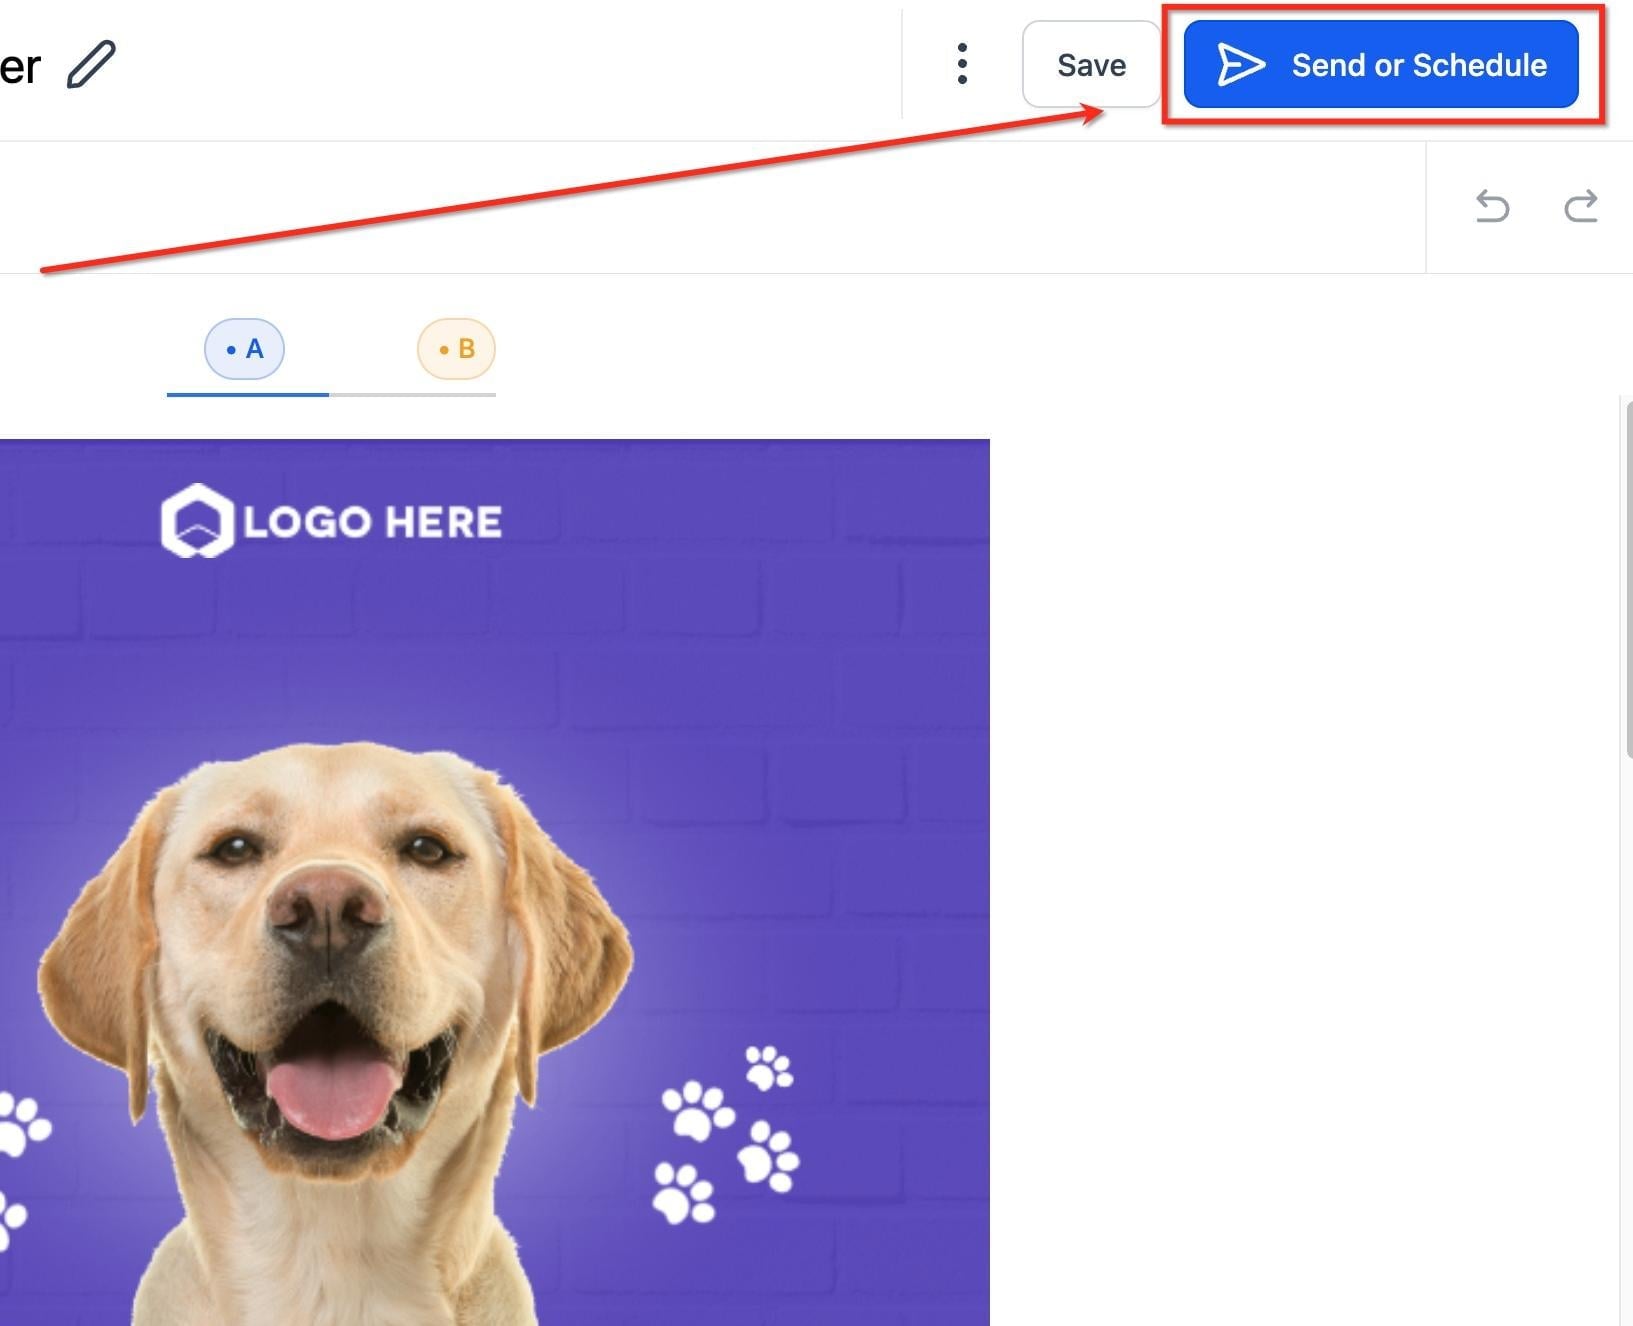
When your design is ready, click Send or Schedule to move to the delivery screen.
Sender Preferences let you set default details like From Name, From Email, Reply-To, and Test Recipient(s) so they auto-fill every time you create a new campaign or test send. Setting them once saves time, reduces typos, and keeps your sender identity consistent across every email.
These defaults are a starting point. They auto-fill new campaigns and tests, but you can still override them for an individual send when a specific campaign needs different sender details.
To configure your defaults:
Go to Marketing > Email, then open the Campaigns tab.
Click the gear (Settings) icon in the top-right corner.
Select Sender Preferences from the left sidebar.
Sender Name: Enter the name recipients will see in their inbox, such as your practice name or a team member's name. Use the tag icon on the right to insert a dynamic value (like a custom field) instead of a fixed name.
Sender Email: Enter the address that appears in the From line. Use one that matches your verified sending domain so it looks professional and authenticates correctly. A verification status (for example, "Email verified") appears just below the field to confirm the address is safe to use.
Test Recipient(s): Add up to 5 email addresses, separated by commas, where test emails will be sent before a campaign goes live. Use this for proofreading and checking formatting across inboxes.
Custom Reply-To: Optionally enter a different address where replies should go. For example, send newsletters from [email protected] but route replies to a shared inbox your team monitors. If left blank, replies default to the Sender Email.
Click Save to store these as your defaults.
Important: Updating Sender Preferences only applies to new campaigns and test emails. Existing drafts and scheduled emails keep their current settings unless you update them manually. Cloned campaigns inherit the original campaign's stored sender values, not your new defaults, so always review the From Name, From Email, and Reply-To after cloning.
Tip for deliverability: Mismatched Sender Email and Reply-To values can be flagged as suspicious by some email providers. For best inboxing, keep your Sender Email domain authenticated and your Reply-To on the same monitored domain.
On the Send or Schedule screen, add the people who should receive the campaign:
To: Add your recipients by choosing individual contacts, smart lists, tags, or saved segments.
From: Confirm the sending email address (pre-filled from your Sender Preferences).
Name: Confirm the sender name (optional, pre-filled from your Sender Preferences).
Subject: Add your subject line.
Preview: Add preview text that appears after the subject line in the inbox (optional).
To build and reuse targeted audiences (for example, patients who booked a specific treatment), see the Recipient Segments guide.
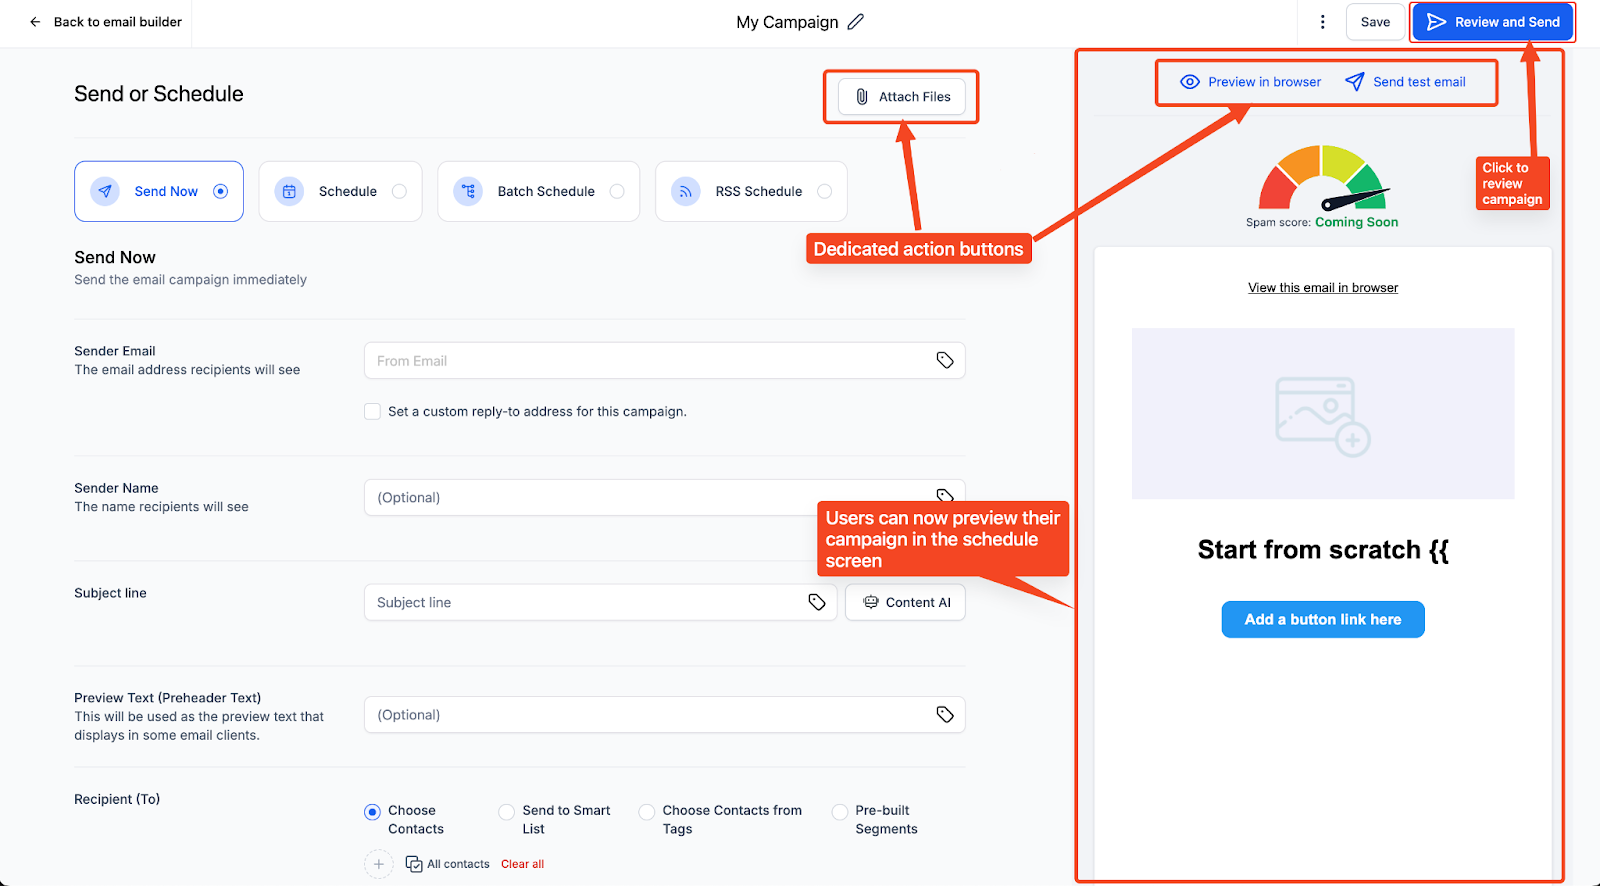
The improved send or schedule screen shows your email design alongside the fields you are filling in, so you can compose the subject line and preview text while seeing the final layout. Hover over the preview to make quick edits without leaving the screen.
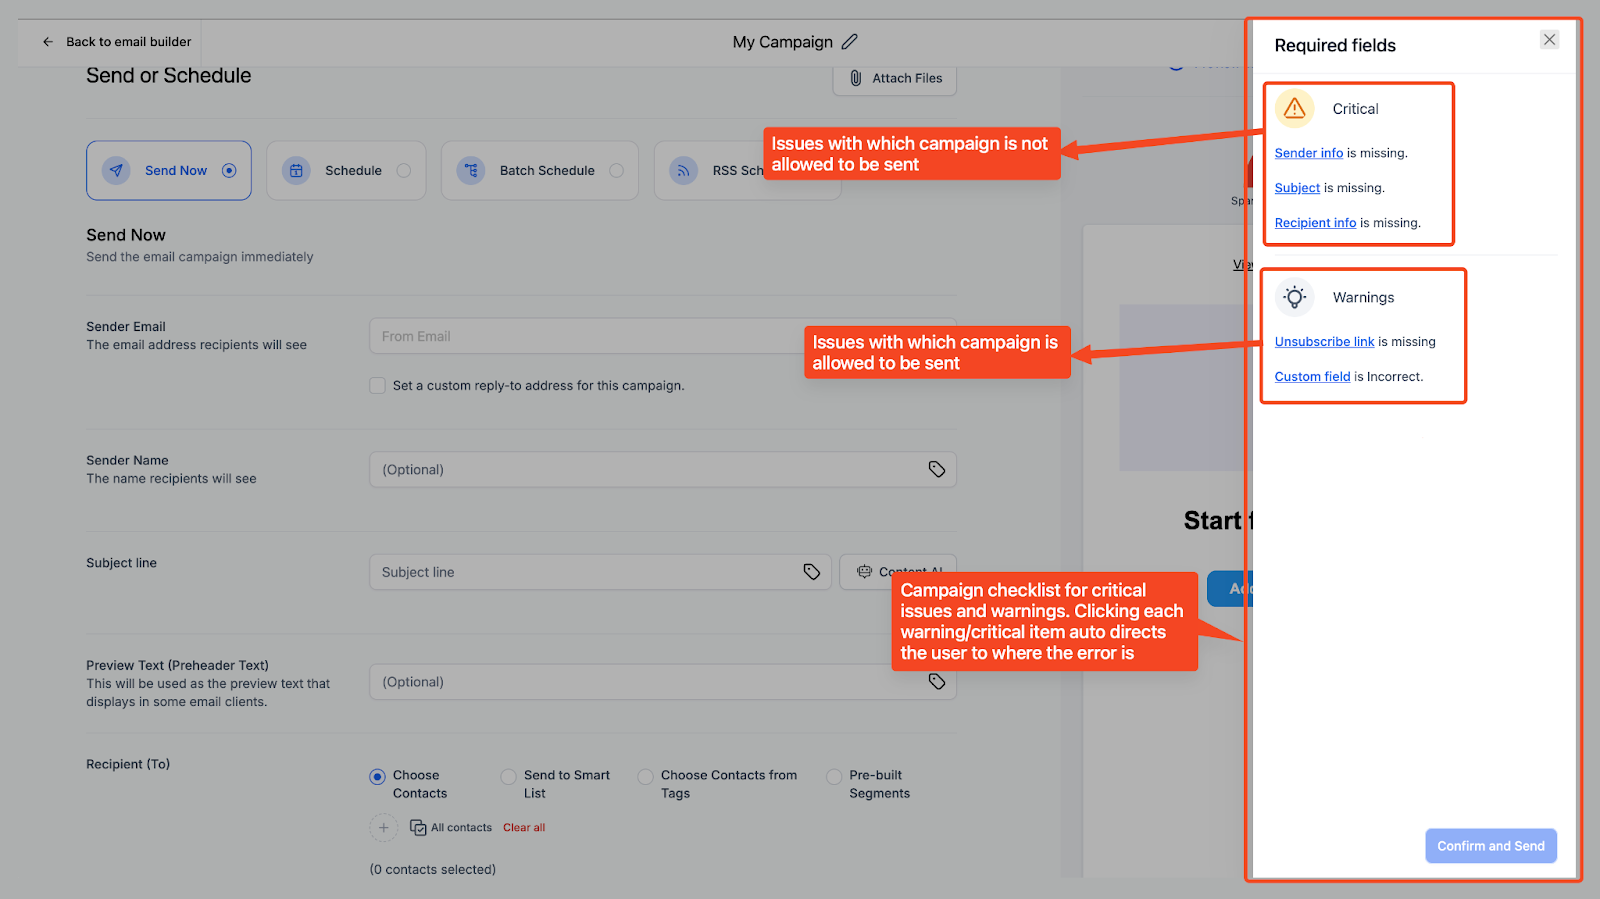
Before sending, the screen runs a checklist for required fields:
A Required Fields checklist flags any missing or incorrect mandatory fields and custom-field errors so you can resolve them before sending.
If you added attachments, the Attach Files button shows a number badge with the attachment count for an at-a-glance confirmation.
To attach files:
On the Send or Schedule screen, click Attach Files.
Select the file(s) you want to include (maximum total attachment size is 10MB).
Confirm the attachments are listed before you send or schedule.
You can also configure Additional Settings like Link Tracking, UTM Tracking, and Tags as needed.
When the checklist is clear, click Confirm & Send (or proceed to schedule).
On the delivery screen, choose how your campaign goes out:
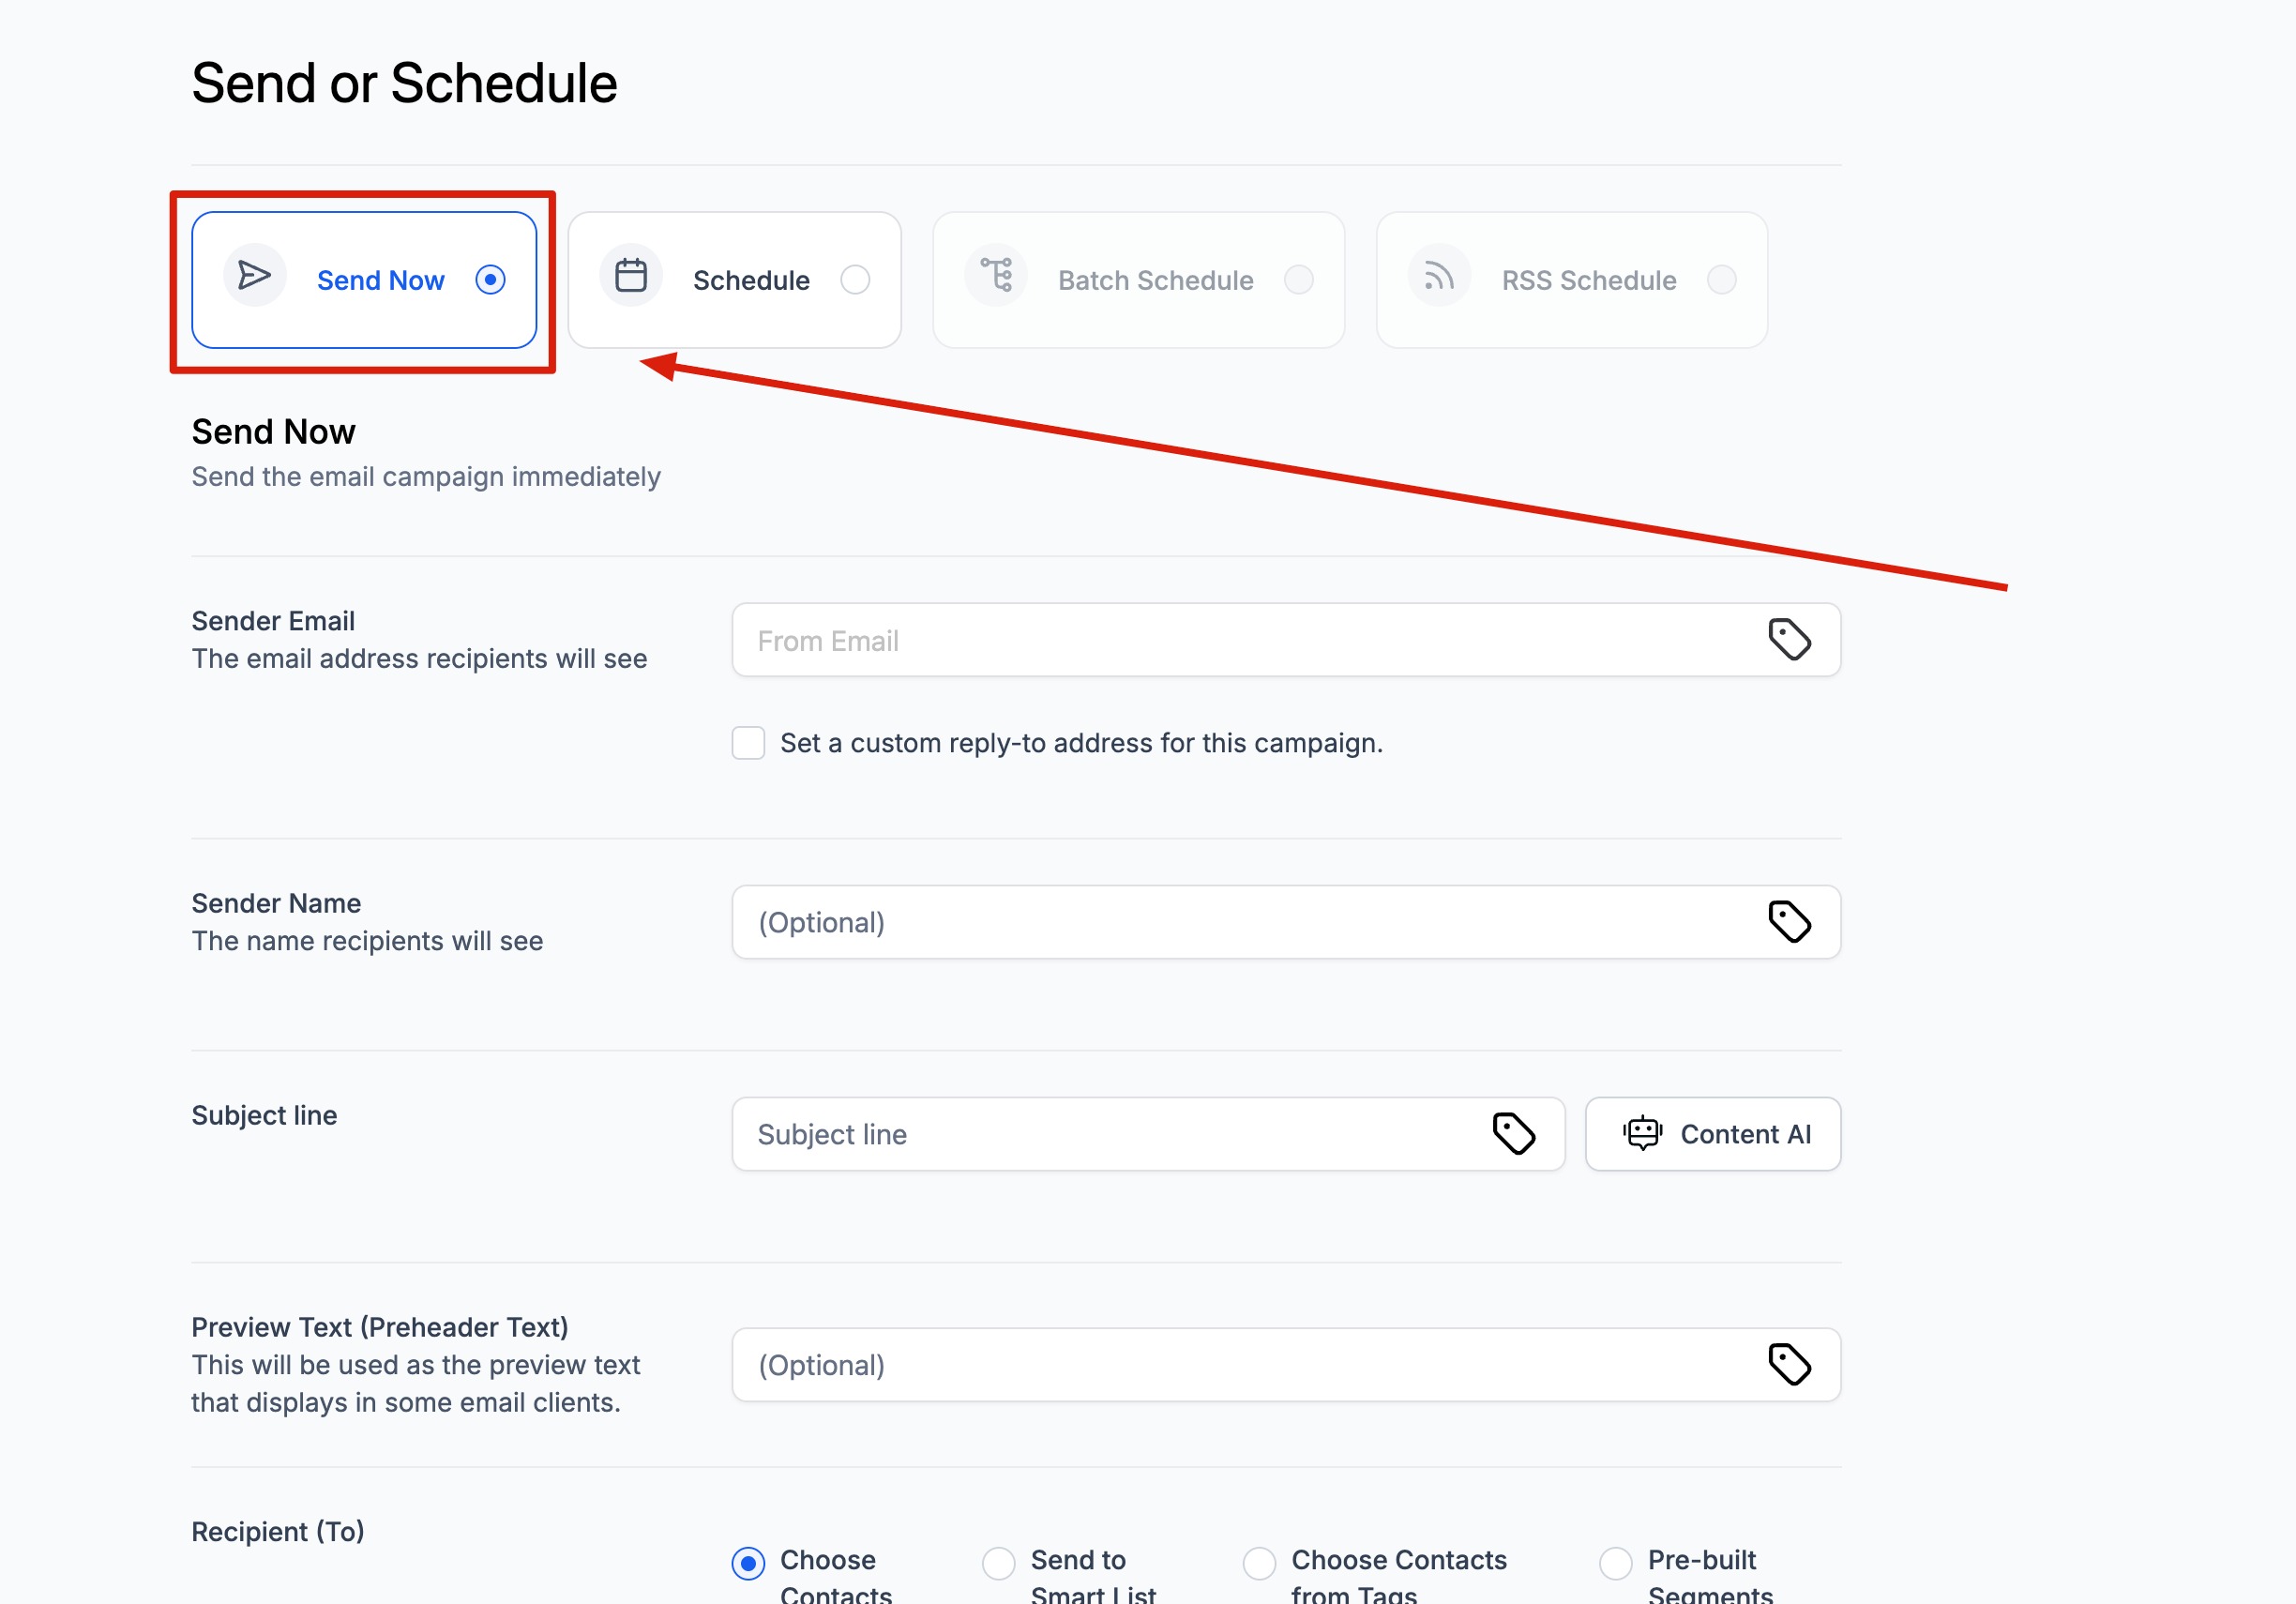
Send Now delivers your campaign to the selected recipients immediately. This is best for urgent communications such as a flash sale, a last-minute opening, or an important announcement.
Choose Send Now.
Confirm your sender name, sender domain, and sender email.
Confirm your subject line, recipients, and any additional settings.
Click Send to deliver instantly.
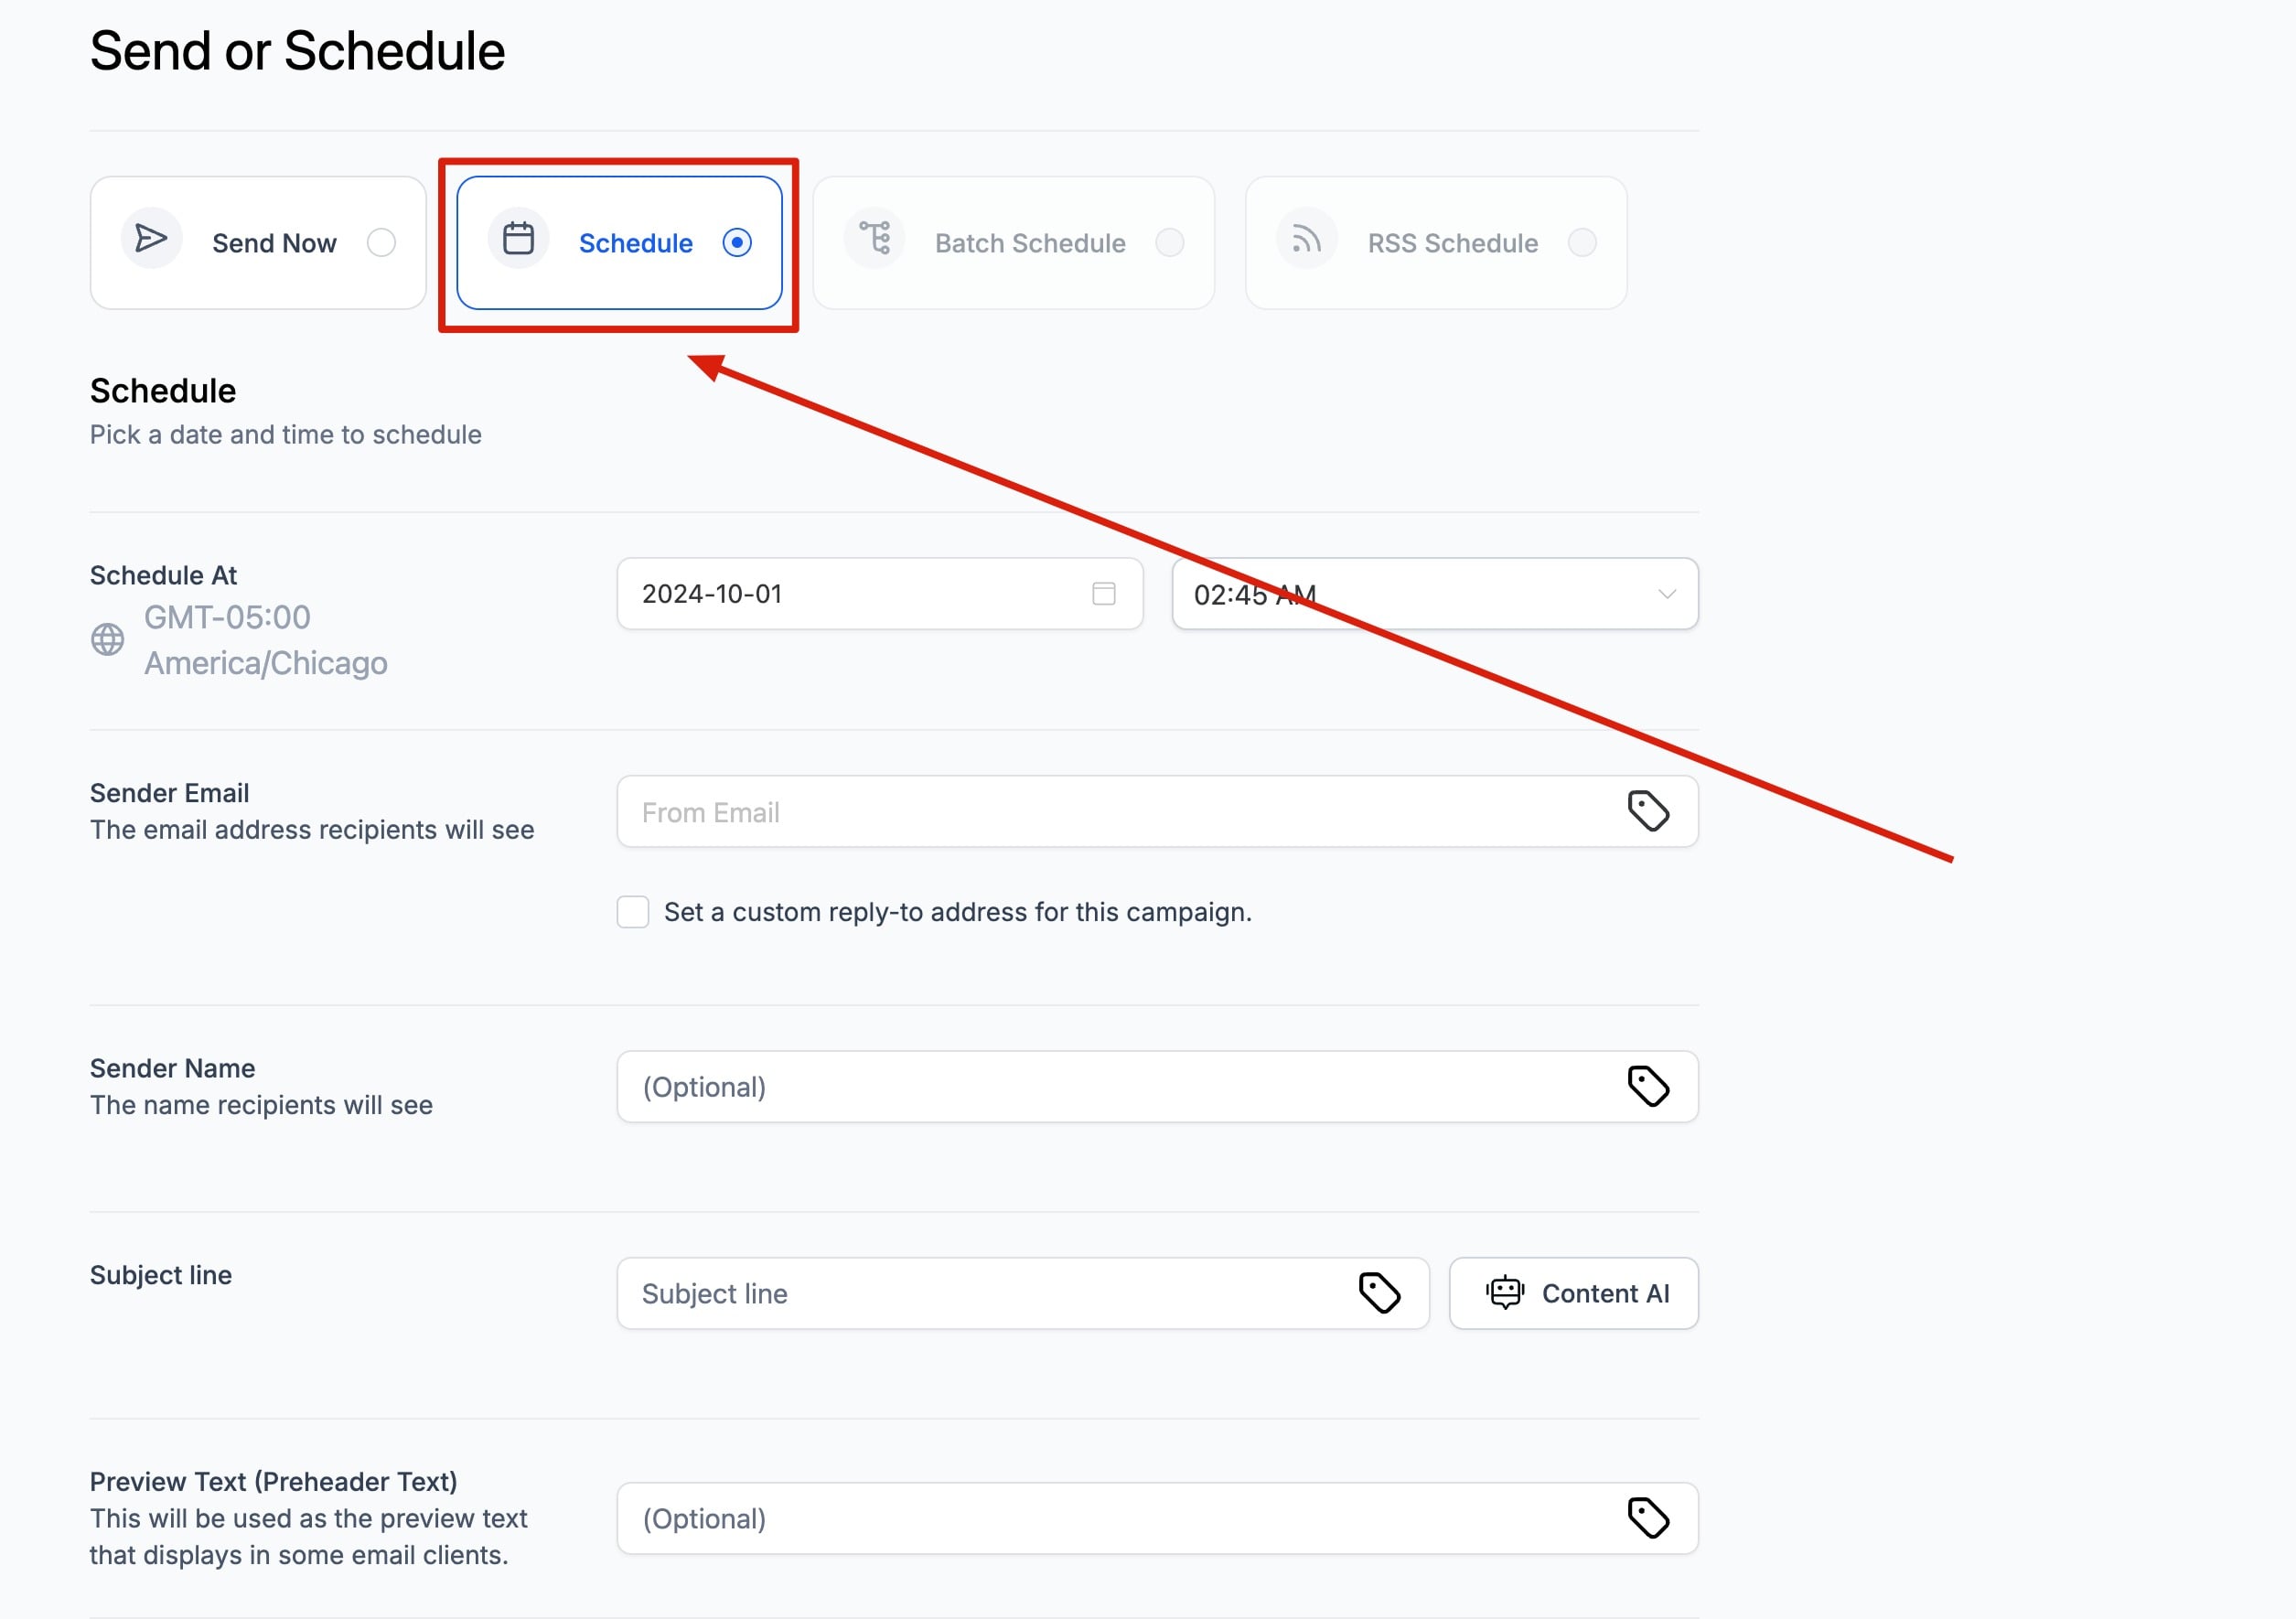
Schedule lets you pick a specific date and time so your campaign lands when your audience is most likely to engage. This is ideal for event reminders, seasonal promotions, and planned marketing.
Choose Schedule.
Set the Date and Time. The email is sent according to your account's location time zone, and the chosen time is shown under the schedule option.
Confirm your sender details, subject line, and recipients.
Click Schedule to confirm.
You can reschedule a scheduled campaign up to one hour before its send time. For example, if a campaign is scheduled for 11:00 AM, you can reschedule it until 10:00 AM. You can also pause or cancel a scheduled campaign before it sends.
For Batch delivery (sending large lists in smaller groups), RSS-driven sends, and Smart Send/AI Schedule timing, see the Email Scheduling Options guide.
Can I reschedule a campaign after scheduling it? Yes. You can change the date and time up to one hour before the scheduled send time.
Can I cancel a scheduled campaign? Yes. You can pause or cancel a scheduled campaign any time before it sends.
Which time zone is used for delivery? The system uses the location time zone set in your account.
Can I test the email before sending? Yes. Use Preview and Test Email in the builder, then confirm the details on the review screen. (Note: recipients of a test or preview email cannot unsubscribe from it.)
Can I attach files to an email campaign? Yes. On the Send or Schedule screen, click Attach Files to upload attachments. The total attachment size must be within 10MB.
If I update my Sender Preferences, will existing scheduled campaigns use the new defaults? No. Sender Preferences apply only to new campaigns and test emails. Existing drafts and scheduled campaigns keep their original sender details unless you update them manually.
What happens to sender details when I clone a campaign? Clones inherit the original campaign's stored sender values, not your current defaults. Always review the From Name, From Email, and Reply-To after cloning.
Can I restore an earlier version of a campaign? Yes. In the campaign editor, click the three dots and choose See Version History to restore a previous version.
What is the difference between a campaign and a workflow for sending emails? A campaign is a one-time broadcast. A workflow automates multi-step journeys and can send emails based on triggers and conditions.
