Bulk Actions let you act on many contacts at once instead of editing records one at a time. You can add or remove tags, delete contacts, send emails, send review requests, and add opportunities to a pipeline across an entire selection in a single operation.
To use any bulk action in Aesthetix CRM, start from your contact list:
Click Contacts in the left navigation.
Open Smart Lists.
Use the checkboxes on the left of each row to select the records you want to act on. You can select individual contacts, select an entire page, or apply filters first to narrow the list before selecting.
With contacts selected, the bulk action toolbar appears at the top of the list. Each icon in that toolbar opens one of the actions described below. Most actions ask for an Action Name (or action description) so you can identify the operation later in the Bulk Actions dashboard, and several support scheduling and throttling so you control when and how fast the work runs.
Adding tags in bulk lets you organize and categorize many contacts at once, so you can filter, search, and segment them more easily afterward.
Click Contacts, then open Smart Lists.
Select the records you want to tag.
In the bulk action toolbar, click the Add Tags icon.
Click into the tags field and choose one or more tags to apply to the selected records.
Enter an action description so you can identify this operation later.
Click Add to apply the tags.
Removing tags in bulk clears outdated, incorrect, or overlapping tags from many contacts at once. This keeps segmentation accurate, prevents stale tags from triggering automations, and supports clean reporting. Removing a tag only changes how a contact is grouped or segmented; it never deletes any contact information.
Click Contacts, then open Smart Lists.
Use the checkboxes on the left to select the contacts you want to remove tags from. You can select individual records or filter first to narrow a group.
In the bulk action toolbar, click the Remove Tags icon. This opens the bulk action panel for tag removal.
Enter an Action Name for this operation so you can identify it later in the Bulk Actions dashboard.
Choose what to remove:
To remove only specific tags, open the Tags dropdown and select one or more tags. The list shows all existing tags, and you can scroll or search to find the right ones. Leave the Remove all tags box unchecked.
To clear every tag from the selected contacts, check the Remove all tags box. This removes all tags at once without your having to specify which ones, which is ideal for cleanup or starting fresh with a new tagging structure. Be sure you want this before enabling it, since it clears everything in one go.
Click the Remove Tags button to begin. A pop-up confirms that the operation has started.
Click Check Progress to track the real-time status of the bulk action.
Review results in the Bulk Actions dashboard, which logs each tag-removal task with its operation name, start time, completion time, and a Show Stats link for contact-level success details.
Bulk delete removes multiple contacts at once so you can clear out outdated or unnecessary records and keep your database clean. Deletion is permanent, so review your selection carefully before confirming.
Click Contacts, then open Smart Lists.
Select the records you want to remove.
In the bulk action toolbar, click Delete.
Click Confirm to finalize the deletion.
The bulk email builder is a unified interface for creating and sending email to a selected group of contacts. It brings the three email creation modes (Quick Compose, Smart Builder, and template selection) into one flow, filters out invalid and unsubscribed recipients before sending for better deliverability, and offers built-in tracking. It uses the same composer as Campaigns and Workflows, so the experience is consistent across the platform.
Dynamic object labels: The builder reflects the object label configured for your account. If you have renamed or replaced the default Contact object (for example, to Leads or Clients), the modal header and helper text update automatically. This affects displayed labels only; recipient selection, filtering, and delivery behavior are unchanged.
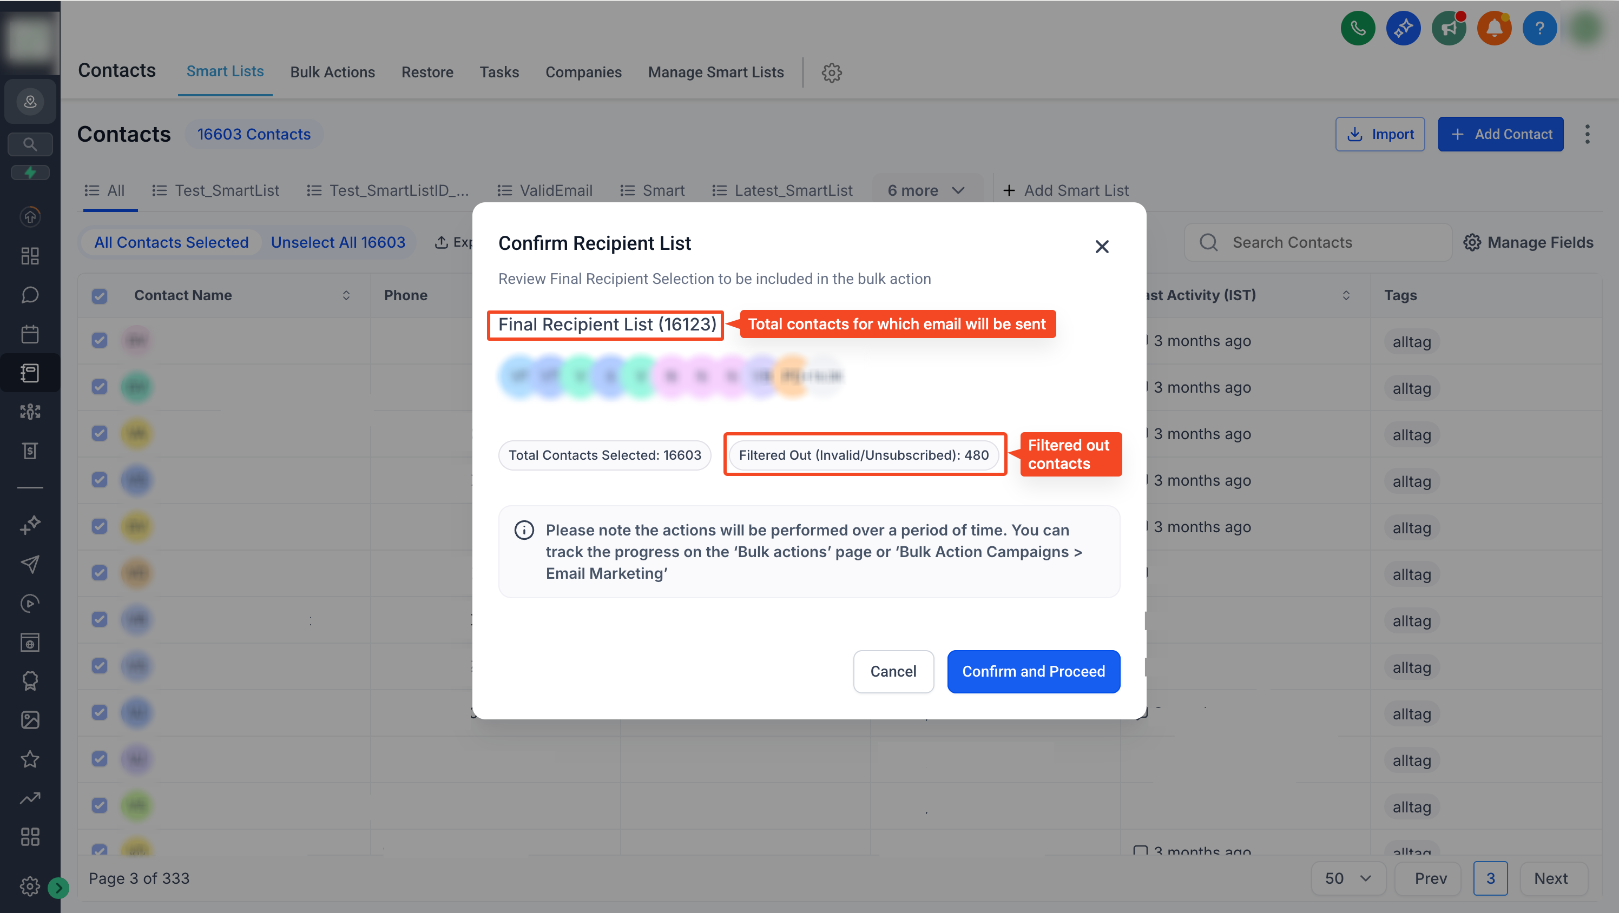
Pre-send contact filtering: Before sending, a confirmation modal automatically reviews your selected contacts and excludes invalid email addresses and unsubscribed, bounced, or DND-marked contacts. It shows a summary of total contacts selected, filtered contacts, and the final recipient list, which protects your sender reputation and improves deliverability.

Email creation modes: The builder offers three ways to create your email:
Quick Compose: A simple, text-focused editor that is ideal for fast announcements or transactional updates.
Smart Builder: A fuller builder where you choose your editing experience: the Design Editor (visual, drag-and-drop), the Code Editor, or the Plain Text Editor.
Select Existing Template: Choose from your saved templates (My Templates) or browse the Template Library for pre-designed layouts.

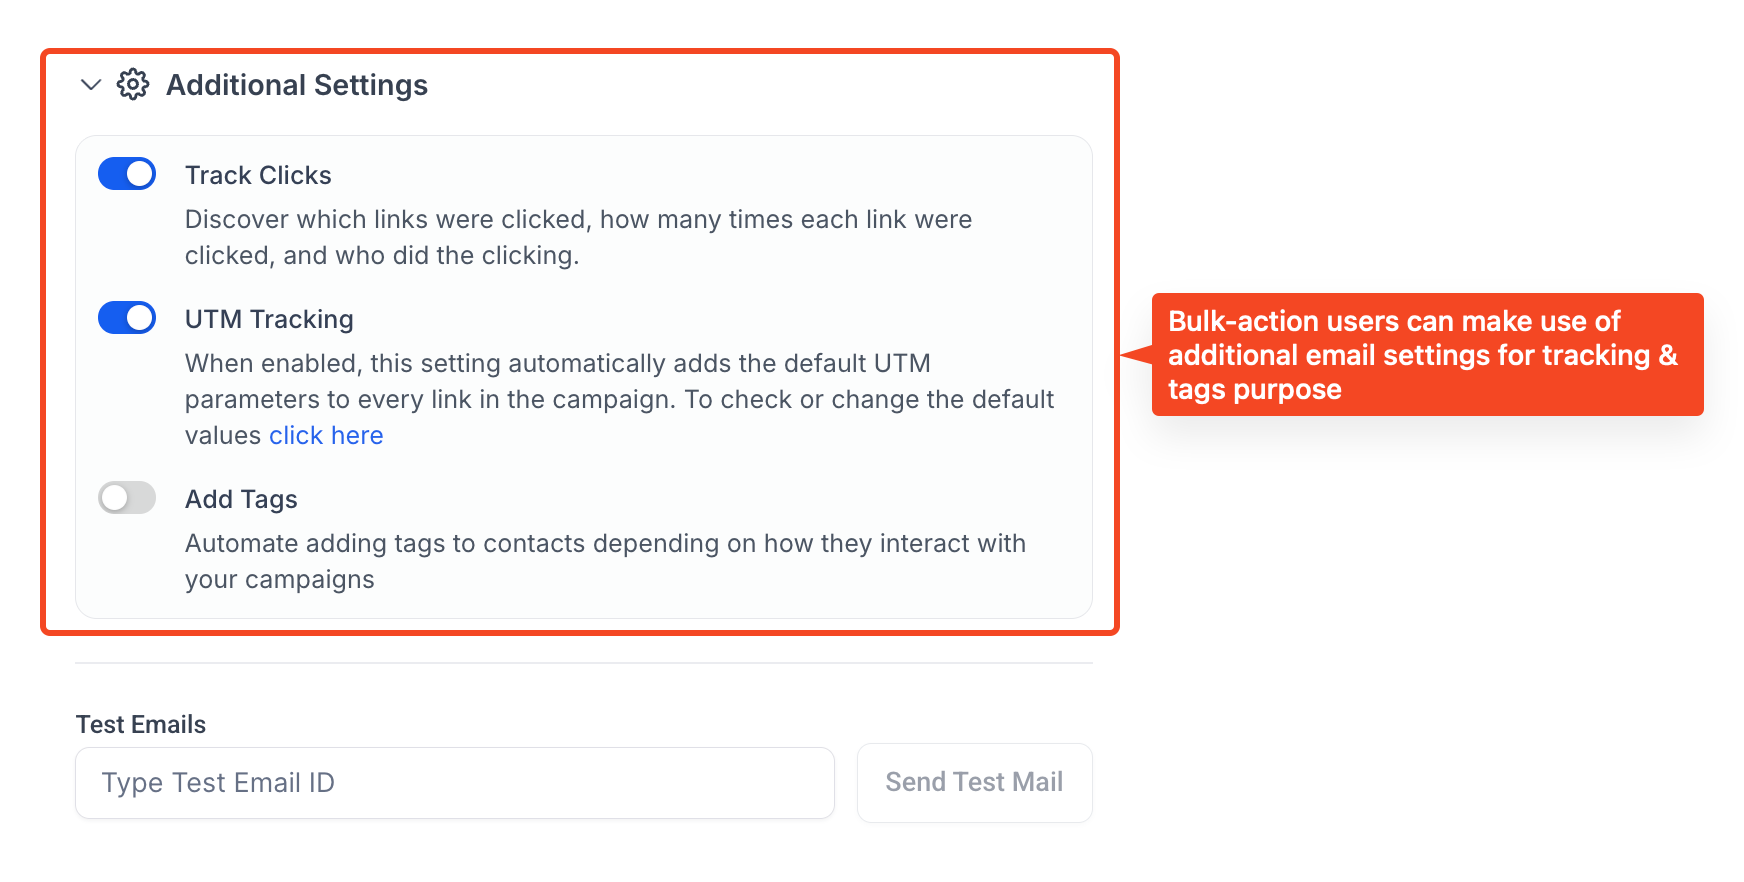
Additional email settings: Expand the Additional Settings drawer to access advanced options:
Track Clicks (Link Tracking): Monitor which links were clicked and who clicked them.
UTM Tracking: Automatically append campaign parameters to your URLs for analytics.
Add Tags: Automatically apply tags to contacts based on engagement, such as opens or clicks.
Send a test and review: Before sending to your list, verify the layout and content:
Enter a Test Email ID.
Click Send Test Mail.
Click Review Campaign to preview and confirm details before sending.
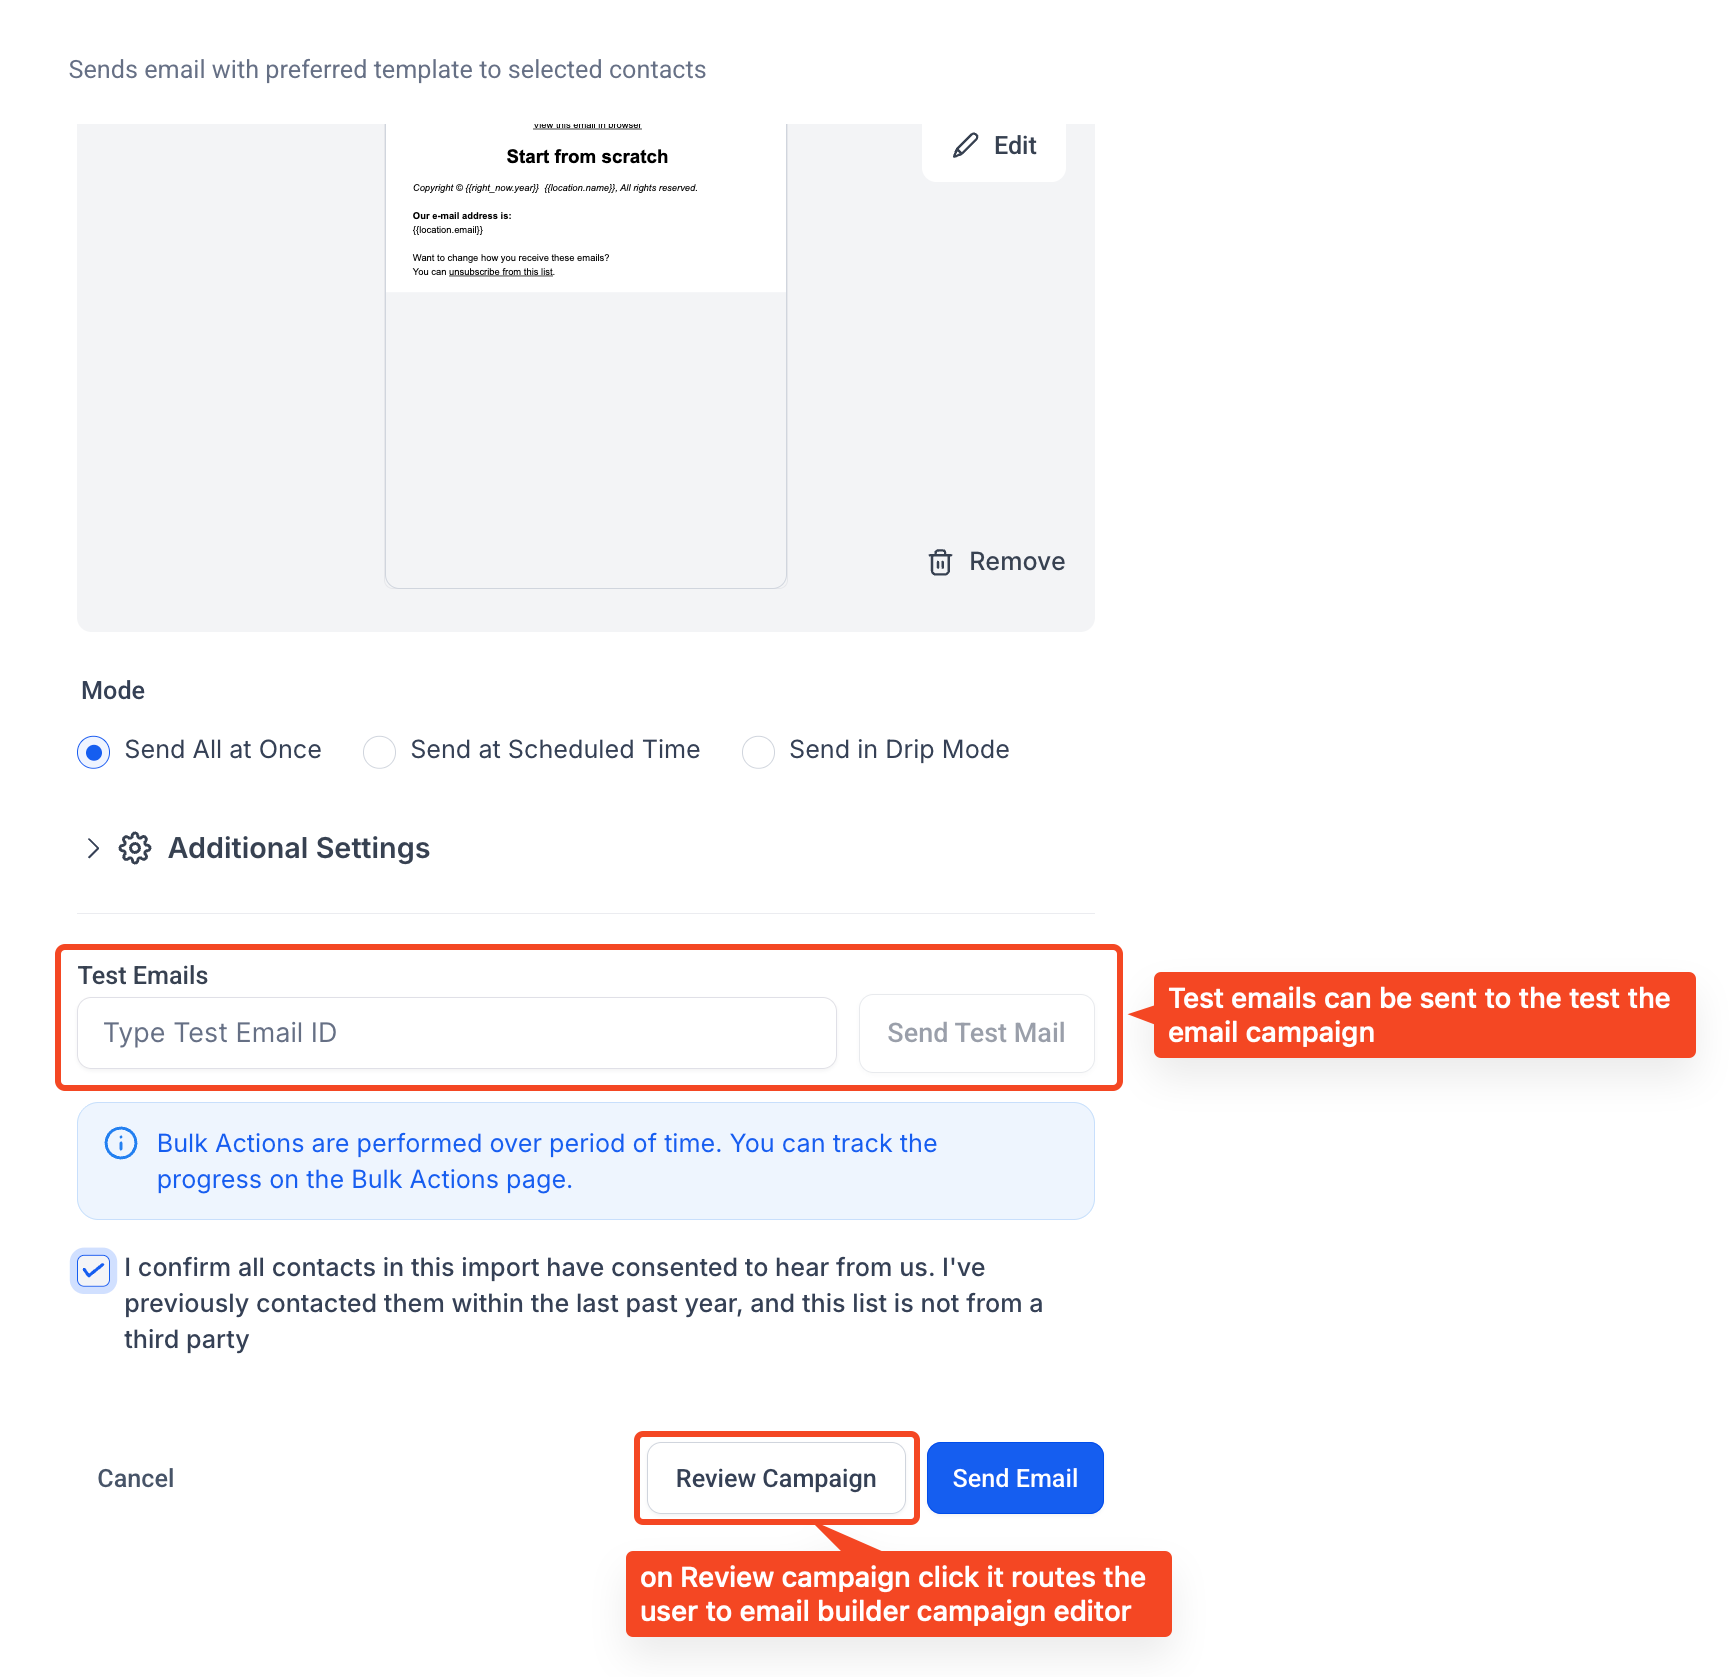
Sending options: Choose how the email goes out:
Send All at Once: Immediately sends to all recipients.
Send at Scheduled Time: Schedule a specific send date and time. Note that recipients are captured at scheduling time, so the list does not update dynamically afterward.
Send in Drip Mode: Gradually sends in batches to optimize inbox placement. You set the batch quantity, the repetition interval, the days the send should run on, and the hours during which sending is allowed.
Go to Contacts → Smart Lists.
Select the contacts or Smart List you want to email.
Click Send Email from the bulk action toolbar.
If prompted, select Ok, proceed to confirm.
Choose your creation mode: Quick Compose, Smart Builder, or Select Existing Template.
Compose your email content.
Expand Additional Settings to add link tracking, UTM tags, or engagement tags if desired.
Review the recipients in the confirmation modal; the filtered list shows only valid contacts.
Send a test email if needed, then click Review Campaign.
Add an action description for this send.
Choose a sending option (Send All at Once, Send at Scheduled Time, or Send in Drip Mode), set any schedule or drip settings, and click Send Email.
Viewing performance: Use Load More Stats on a bulk email action for deeper reporting, including opens, clicks, bounces, and comparisons across send sources. This opens the full Email Statistics dashboard.
For an all-in-one view, go to Marketing → Emails → Statistics, which aggregates results across Campaigns, Workflows, and Bulk Actions.
Sending review requests in bulk lets you ask many customers for feedback at once, helping you build your online reputation efficiently.
Click Contacts, then open Smart Lists.
Select the records you want to request reviews from.
In the bulk action toolbar, click the star icon to request reviews.
Click Ok, proceed to confirm.
Choose the type of review request you want to send.
Choose how the requests go out:
Add all at once: Sends to all selected records together.
Add all at scheduled time: Pick a date and time for the requests to send.
Add in drip mode: Sends in batches. Enter the batch number, set the interval, select the days the action should repeat on, and set the time of day for activity.
Enter a brief action description.
Do a final review to make sure everything looks correct.
Click Send Review Requests to send.
This action creates an opportunity in a sales pipeline for each selected contact at once, so you can track potential deals without adding them one by one.
Click Contacts, then open Smart Lists.
Select the contacts you want to add to a pipeline.
In the bulk action toolbar, click Add to Pipeline.
Select the desired pipeline from the list.
Choose the appropriate stage of that pipeline.
Enter the Opportunity Name.
Specify the Opportunity Source.
Set the Lead Value.
Choose the Opportunity Status.
Provide a description for the action.
Click Add/Update Opportunity to save.
This action enrolls all of the selected contacts into a workflow at once, so you can start an automation for an entire segment without adding contacts one by one.
Click Contacts, then open Smart Lists.
Select the contacts you want to enroll.
In the bulk action toolbar, click the Add to Workflow (trigger automation) icon.
Choose the workflow you want to enroll the selected contacts into.
Confirm whether contacts that have run through this workflow before should be allowed to re-enter, if that option is offered.
Enter an action description so you can identify this operation later.
Confirm to begin enrolling the selected contacts.
Use bulk enrollment carefully. Many workflows are started by tags, so bulk-enrolling contacts (or bulk-adding a tag) can unintentionally trigger other tag-based automations at the same time. Before you run this on a large group, review which workflows the relevant tags trigger and confirm the contacts you selected should actually enter those automations. Starting the wrong workflow for hundreds of contacts is difficult to walk back.
This action sends a single SMS to every selected contact at once, which is useful for quick announcements, reminders, or follow-ups to a segment.
Click Contacts, then open Smart Lists.
Select the contacts you want to text.
In the bulk action toolbar, click the Send SMS icon.
Compose your message. You can insert merge fields (custom values) so each contact receives personalized details such as their first name.
Enter an action description for this send.
Choose how the messages go out: send all at once, schedule for a later date and time, or send in drip mode (in batches, with the interval, days, and hours you set) to control pacing.
Confirm to send.
Opt-outs and DND are respected. Contacts who have opted out of text messaging or are marked DND for SMS are excluded automatically, so you stay compliant. Make sure your sending number is properly configured before sending to a large list.
This action sends a WhatsApp message to the selected contacts at once. WhatsApp must be connected for your account before this option is available.
Click Contacts, then open Smart Lists.
Select the contacts you want to message.
In the bulk action toolbar, click the Send WhatsApp icon.
Choose the WhatsApp template or compose the message you want to send. Merge fields can personalize the content per contact.
Enter an action description for this send.
Choose how the messages go out: all at once, scheduled, or in drip mode for pacing.
Confirm to send.
Respect the messaging window. WhatsApp limits free-form messaging to contacts who have messaged you recently; outside that window you generally need an approved template. Contacts who have opted out are excluded. For connecting WhatsApp and setting up templates, see the WhatsApp collection.
This action associates the selected contacts with a company at once, so you can keep records grouped under the right business without editing each contact individually.
Click Contacts, then open Smart Lists.
Select the contacts you want to associate.
In the bulk action toolbar, click the Manage Companies icon.
Choose the company to associate the selected contacts with, or update their existing company association.
Enter an action description for this operation.
Confirm to apply the change.
For more on companies and how they relate to contacts, see the Custom Objects and Companies guide.
This action creates or updates opportunities for the selected contacts at once. It is broader than adding contacts to a pipeline: you can use it to update the pipeline, stage, status, value, or other opportunity details across a selection.
Click Contacts, then open Smart Lists.
Select the contacts whose opportunities you want to manage.
In the bulk action toolbar, click the Manage Opportunities icon.
Choose whether to create new opportunities or update existing ones for the selected contacts.
Set the pipeline, stage, status, value, and any other details that should apply.
Enter an action description for this operation.
Confirm to apply the changes.
This action merges selected duplicate contacts into a single record, so you can clean up duplicates without merging each pair by hand.
Click Contacts, then open Smart Lists.
Select the duplicate contacts you want to merge.
In the bulk action toolbar, click the Merge Contacts icon.
Review the records and confirm which information should be kept on the master record.
Confirm to complete the merge.
Merging is permanent and follows specific rules about which record becomes the master, how fields are combined, and how many contacts can be merged at once (up to 10). Review those rules before you run this on a selection. For full details, see the Merging, Duplicates, and Restoring Contacts guide.
This action runs email verification on the selected contacts at once, checking whether their email addresses are valid and deliverable so you can improve deliverability and segment on email validity.
Click Contacts, then open Smart Lists.
Select the contacts whose email addresses you want to verify.
In the bulk action toolbar, click the Verify Email icon.
Enter an action description for this operation.
Confirm to start verification.
Email verification has a cost. Each verification consumes credits, so avoid running it on contacts that are already verified or re-running it unnecessarily. Also note that importing or updating a contact clears its existing verification status. This means a Smart List filter such as "Valid Email" will not include those contacts until they are verified again, and re-verifying them consumes credits a second time. Plan verification around imports rather than verifying the same contacts repeatedly.
Can I remove multiple tags from contacts at once? Yes. Select as many tags as you like from the Tags dropdown in a single Remove Tags action.
Can I remove all tags from selected contacts in one action? Yes. Check the Remove all tags box in the action window to clear every tag from the selected records.
Will removing tags delete any contact data? No. Removing tags only changes how contacts are grouped or segmented. It does not delete any contact information.
Can I undo a bulk tag removal? Tag removals cannot be undone directly, but you can reapply tags using the Add Tags bulk action if needed.
Where can I see which contacts were affected by a bulk action? Open the Bulk Actions dashboard and click Show Stats next to the relevant action to view the detailed list of contacts and their success status.
Will unsubscribed or invalid contacts receive my bulk email? No. The system automatically excludes unsubscribed, invalid, bounced, and DND-marked contacts before sending.
Can I use my existing email templates for a bulk email? Yes. Templates from My Templates or the Template Library are available in the bulk email builder.
Can I track performance for bulk emails? Yes. Opens, clicks, and bounces are tracked under Bulk Actions → Show Stats, and aggregated in the Email Statistics dashboard.
Can I automate tagging based on email engagement? Yes. Use the Add Tags option under Additional Settings to tag contacts automatically based on opens or clicks.
Are Smart Lists dynamically updated for scheduled sends? No. Recipients are captured at the time you schedule the send, not at the time it goes out.
Can bulk-enrolling contacts in a workflow trigger other automations? Yes. Because many workflows are started by tags, bulk-enrolling contacts or bulk-adding a tag can unintentionally start tag-triggered workflows. Review which workflows a tag triggers before running it on a large group.
Does verifying email addresses in bulk cost anything? Yes. Each email verification consumes credits, so avoid re-running it on already-verified contacts. Keep in mind that importing or updating a contact clears its verification status, so it would need to be verified again, which consumes credits a second time.
