Aesthetix CRM lets you move patient and prospect data in and out of the platform using CSV files. This reference covers everything from formatting your spreadsheet, running a bulk import, adding tags, importing opportunities alongside contacts, and importing Companies and Custom Objects, through troubleshooting failed imports, exporting your contacts, and migrating from another platform (including the onboarding contact migration, Vagaro, and Nextech). Only Admin users can import and export.
Interactive walkthrough
Follow these steps to bulk import a list of contacts from a CSV file.
Click Contacts in the left-hand menu.
Click Actions (or the Import Contacts button on the Smart Lists tab).
Click Import.
Choose Upload a file or drag and drop, then select your CSV file. Make sure the file is a supported size (under 30 MB).
Map your columns. Align each column from your imported file with the matching contact field in Aesthetix CRM. Use the preview column to confirm the mapped data looks correct.
If any columns do not match a field, check Don't import data in unmatched columns. You cannot proceed to the next step until unmatched columns are either mapped or this option is selected.
On the Details step (the final step), confirm your import settings.
Enter an Import Name. You can keep the default name or customize it.
Optionally check Create a list of contacts from the import to generate a fresh Smart List from this import.
Click Advanced to control how existing contacts are handled. You have two choices:
Add New and Update Existing Contact Records: creates a list for new contacts and simultaneously refreshes your existing contacts by incorporating the imported data.
Add New Contact Records: creates a new list and adds only the contacts, without updating existing records.
If updating, set Find Existing Contact Records rules. Merging is restricted to existing contacts only.
Set Find Existing Contacts Based on (Primary). When merging or updating, you can choose to skip existing contacts that share the same primary phone number, or include them. You may also check the box to exclude updating blank values for pre-existing records (so empty cells in your file do not overwrite data already on the record).
Under Add Tags, search for existing tags or create new ones to attach to the imported contacts.
Under Add to workflow, optionally enroll the imported contacts in a workflow.
Click Submit.
You can watch the progress and results of any import on the Bulk Actions page (covered in the troubleshooting section below).
Updating existing contacts clears their email verification status. When you import a file that updates contacts already in your account (the "Add New and Update Existing Contact Records" option), the email verification status on those updated records is reset. This matters if you rely on a Valid Email filter in a Smart List, because those updated contacts will no longer be marked valid until you re-verify them. Re-verifying consumes email-verification credits and has a cost, so plan imports carefully and avoid re-verifying the same contacts repeatedly. Only re-verify when you genuinely need a clean Valid Email segment (for example, before a large email send).
A clean, correctly formatted CSV is the single best way to avoid import errors. CSV stands for Comma-Separated Values: each line is one record, and fields are separated by commas. You can create or edit a CSV in Excel, Google Sheets, or Notepad.
Requirement | Detail |
|---|---|
File format |
|
Sheets allowed | One sheet/tab per file |
Max file size | 30 MB (split larger files into smaller files) |
Header row | Required, and the first row must not be blank; at least one column header must match a field in the system |
At least one of the following is required to create or update a contact:
First Name
Email Address
Phone Number
For updating existing contacts, include a unique identifier (Contact ID, Email, or Phone) consistent with your duplicate-detection settings. Common optional fields include Company, Tags, Status (Subscribed/Unsubscribed), Created Date, additional emails, and additional phone numbers.
A simple example:
First Name | Last Name | Phone | Company | Tags | Status | Created Date | |
|---|---|---|---|---|---|---|---|
Jane | Doe | +11234567890 | Glow Med Spa | VIP, Lead | New | 01/01/2024 | |
John | Smith | +15556667777 | Glow Med Spa | Patient | Active | 02/02/2024 |
Follow these formatting rules so each column maps cleanly:
Field type | Accepted formats / notes |
|---|---|
Date Picker (date fields) |
|
Multi-Select / Checkbox / Textbox List | Separate values with commas, semicolons, or periods: |
Single Option / Radio | One value only, e.g. |
Contact Owner |
|
Tags | Separate with commas, semicolons, or periods: |
Do Not Disturb (DND) |
|
Phone Number | E.164 recommended: |
Numerical |
|
Monetary |
|
Additional Emails | Comma-separated in their own column: |
Additional Phone Numbers | Comma-separated in their own column: |
File Upload / Signature | Not supported in imports |
For international phone numbers, you can verify formatting at libphonenumber.appspot.com before uploading.
If your CSV includes a Country field, the value must match an accepted country name or short code exactly (for example, United States, not USA or U.S.). Aesthetix CRM supports the full standard list of countries and global timezones during import; timezone values are also case-sensitive and must match exactly (for example, America/New_York).
Before importing, make sure any custom fields you want to populate already exist in your account using the same labels and data types, and remove blank rows and columns to avoid unexpected behavior.
Tags help you organize and segment imported contacts. There are two ways to apply them.
Be careful adding tags during an import. Many workflows are triggered when a tag is added to a contact. If you add a Tags column or apply a tag to the whole list during import, you can unintentionally enroll every imported contact into those tag-triggered workflows, which may send a flood of emails or texts. Before importing with tags, check whether any active workflow is triggered by the tags you plan to use, and pause those workflows or remove the tags from your file if needed.
Use this when you want different tags on different contacts in the same list.
Open the .csv file containing your contact list.
Create a column titled Tags and enter as many tags as you want per row, separating each tag with a comma. These tags are created (if new) and applied to the matching contact records during import.
For example, if your file has four contacts and you want the tag Test1 on all four but TestTag on only two, put Test1, TestTag in the Tags cell for those two rows and just Test1 in the other two.
Use this when you want the same tag (or tags) applied to every contact in the import.
Click Contacts.
Start the Import process.
Proceed to Step 3: Details.
Click Advanced.
In the tags field, enter the desired tags separated by commas. These tags are added to all contacts in the list.
For example, to add the tag test to every contact, simply enter test. You can add one or multiple tags, and you can use existing tags or create new ones during import.
Aesthetix CRM can import contacts and opportunities at the same time from a single CSV, which is useful when you want patient records and their pipeline opportunities created in one pass.
Admin access is required.
The file must be CSV (.csv), under 30 MB, and contain only one sheet.
The first row must be a header row, with at least one header matching a system field.
Mismatched headers: ensure CSV headers match system fields.
Blank required fields: every row needs at least one of Name, Email, or Phone.
Special characters in phone numbers: remove spaces, dashes, or letters where they cause issues.
Duplicate records within the CSV: clean the list before importing.
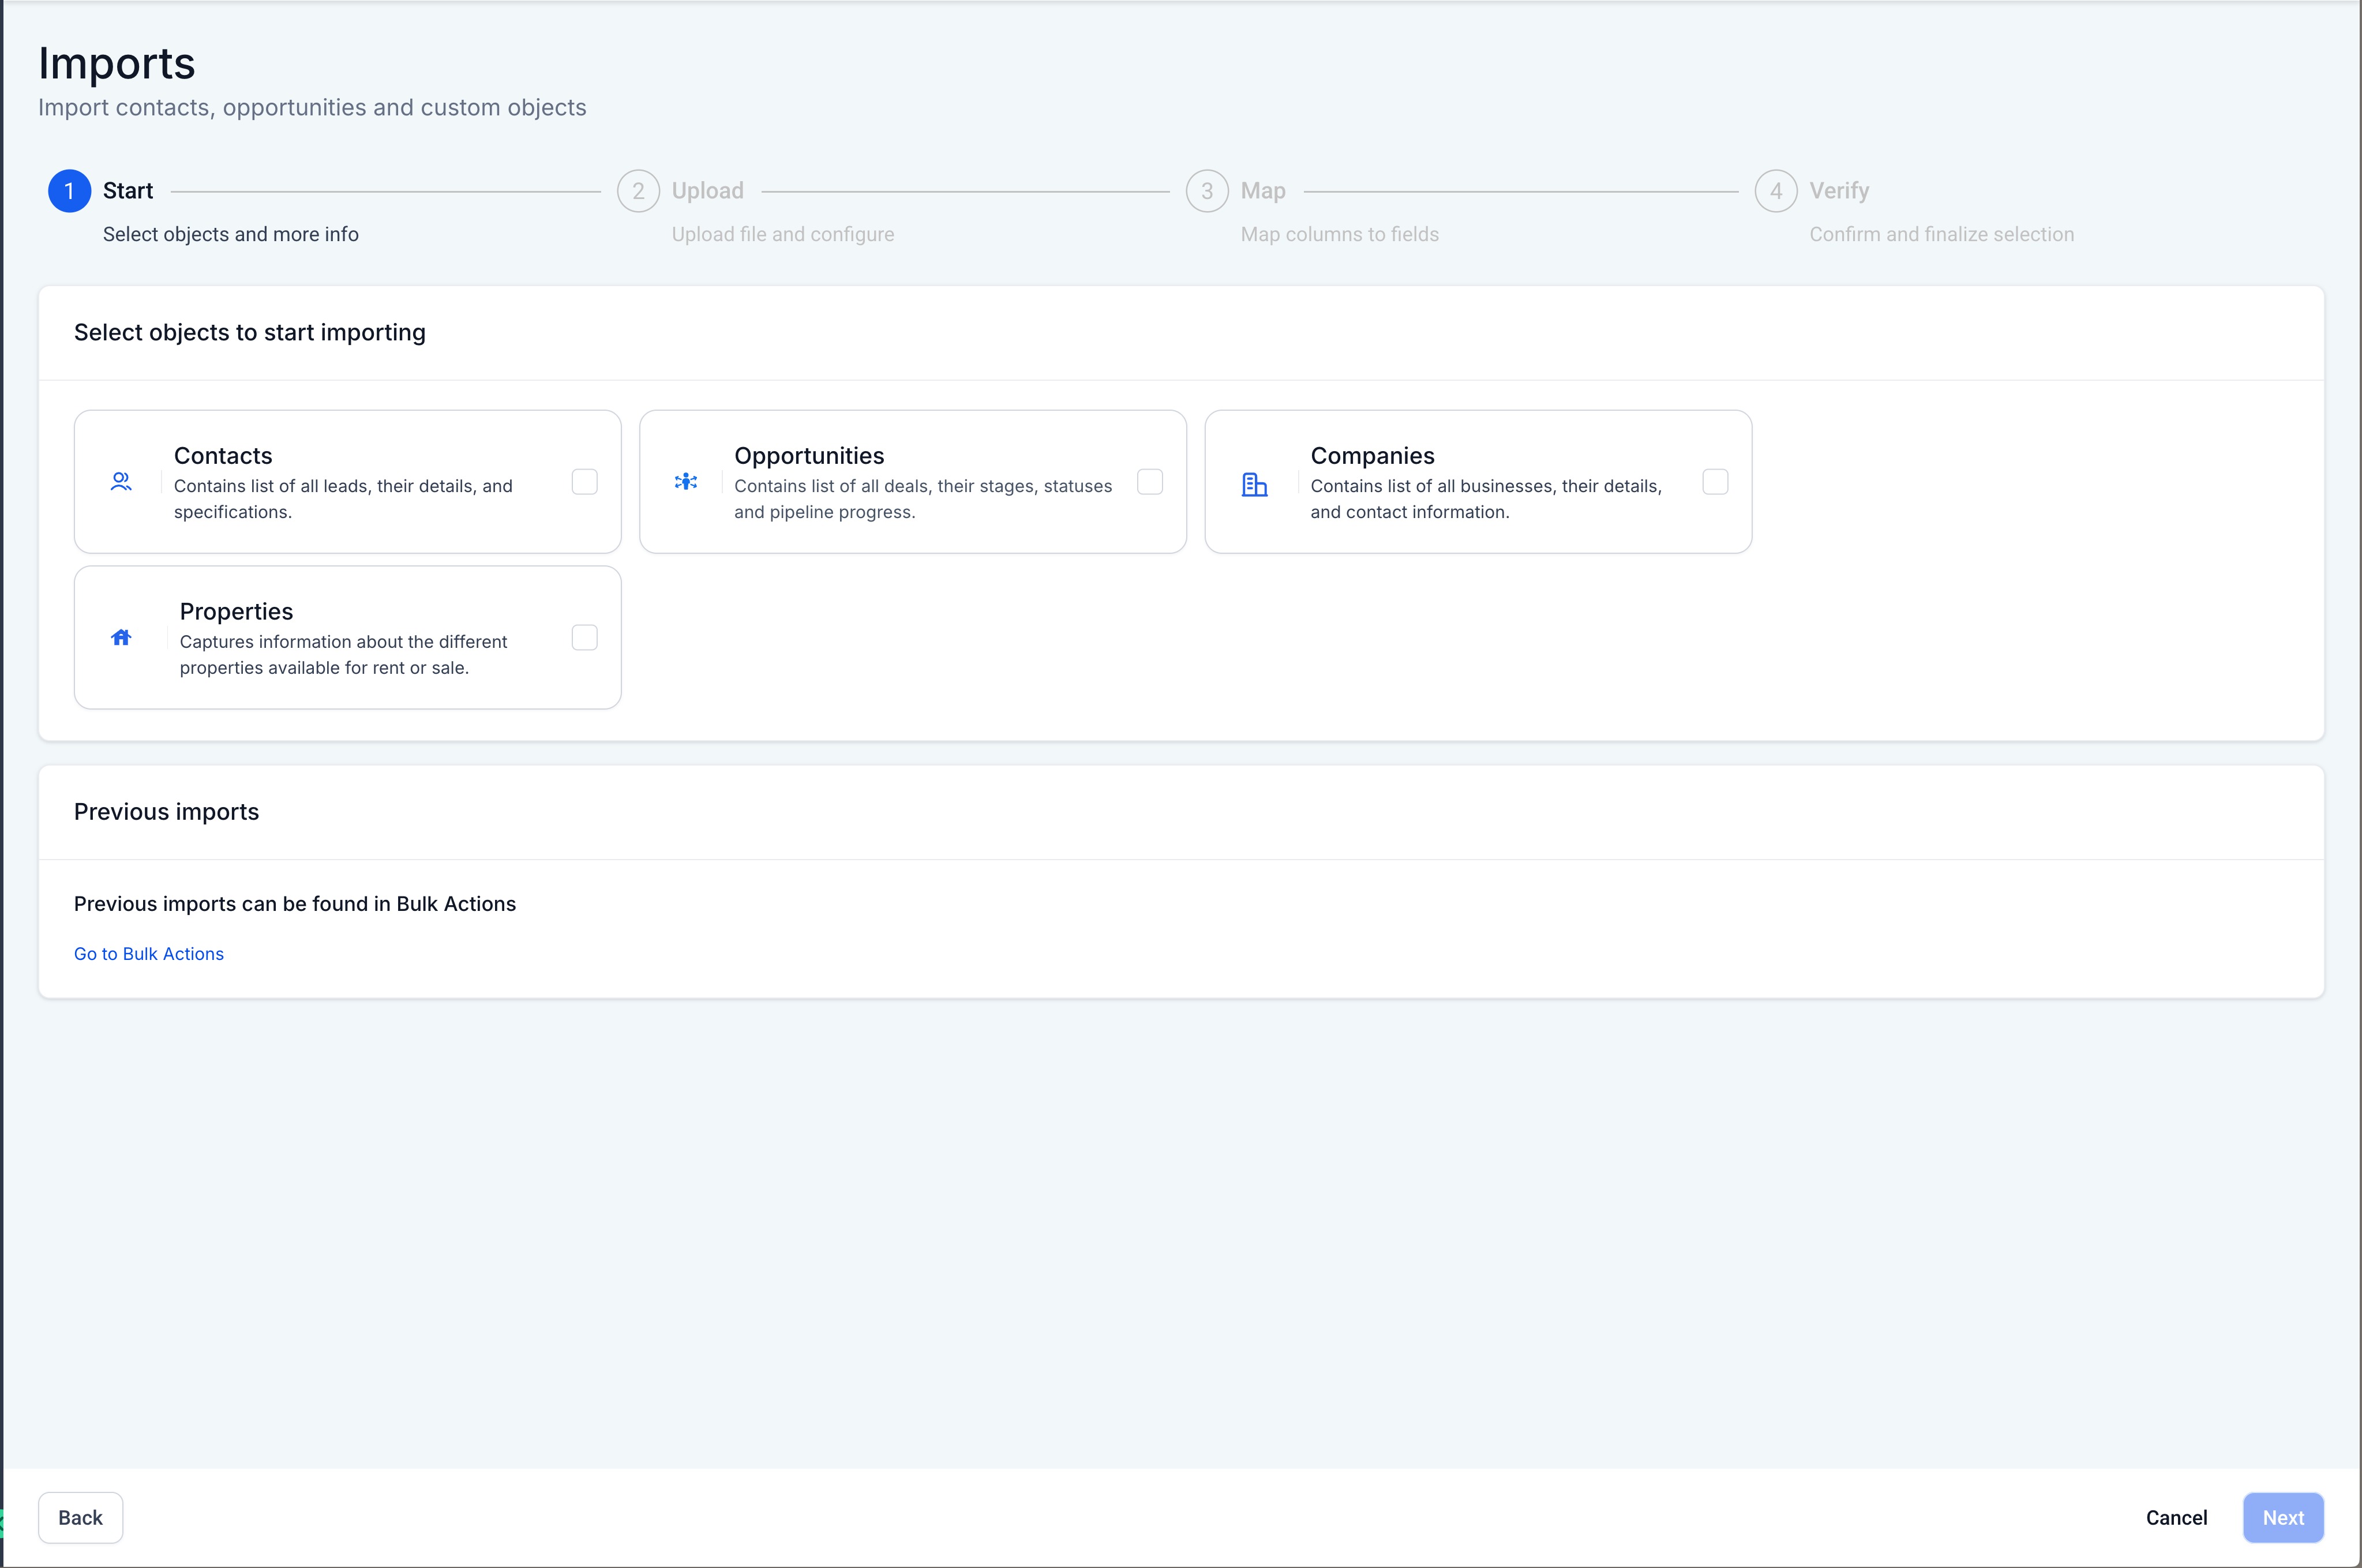
Open the import flow from either the Contacts tab (Smart Lists, then Import Contacts) or the Opportunities tab (Import button, or the three-dot options menu). Both routes lead to the same process.
Choose what to import: Contacts, Opportunities, or both Contacts and Opportunities at the same time. Click Next.
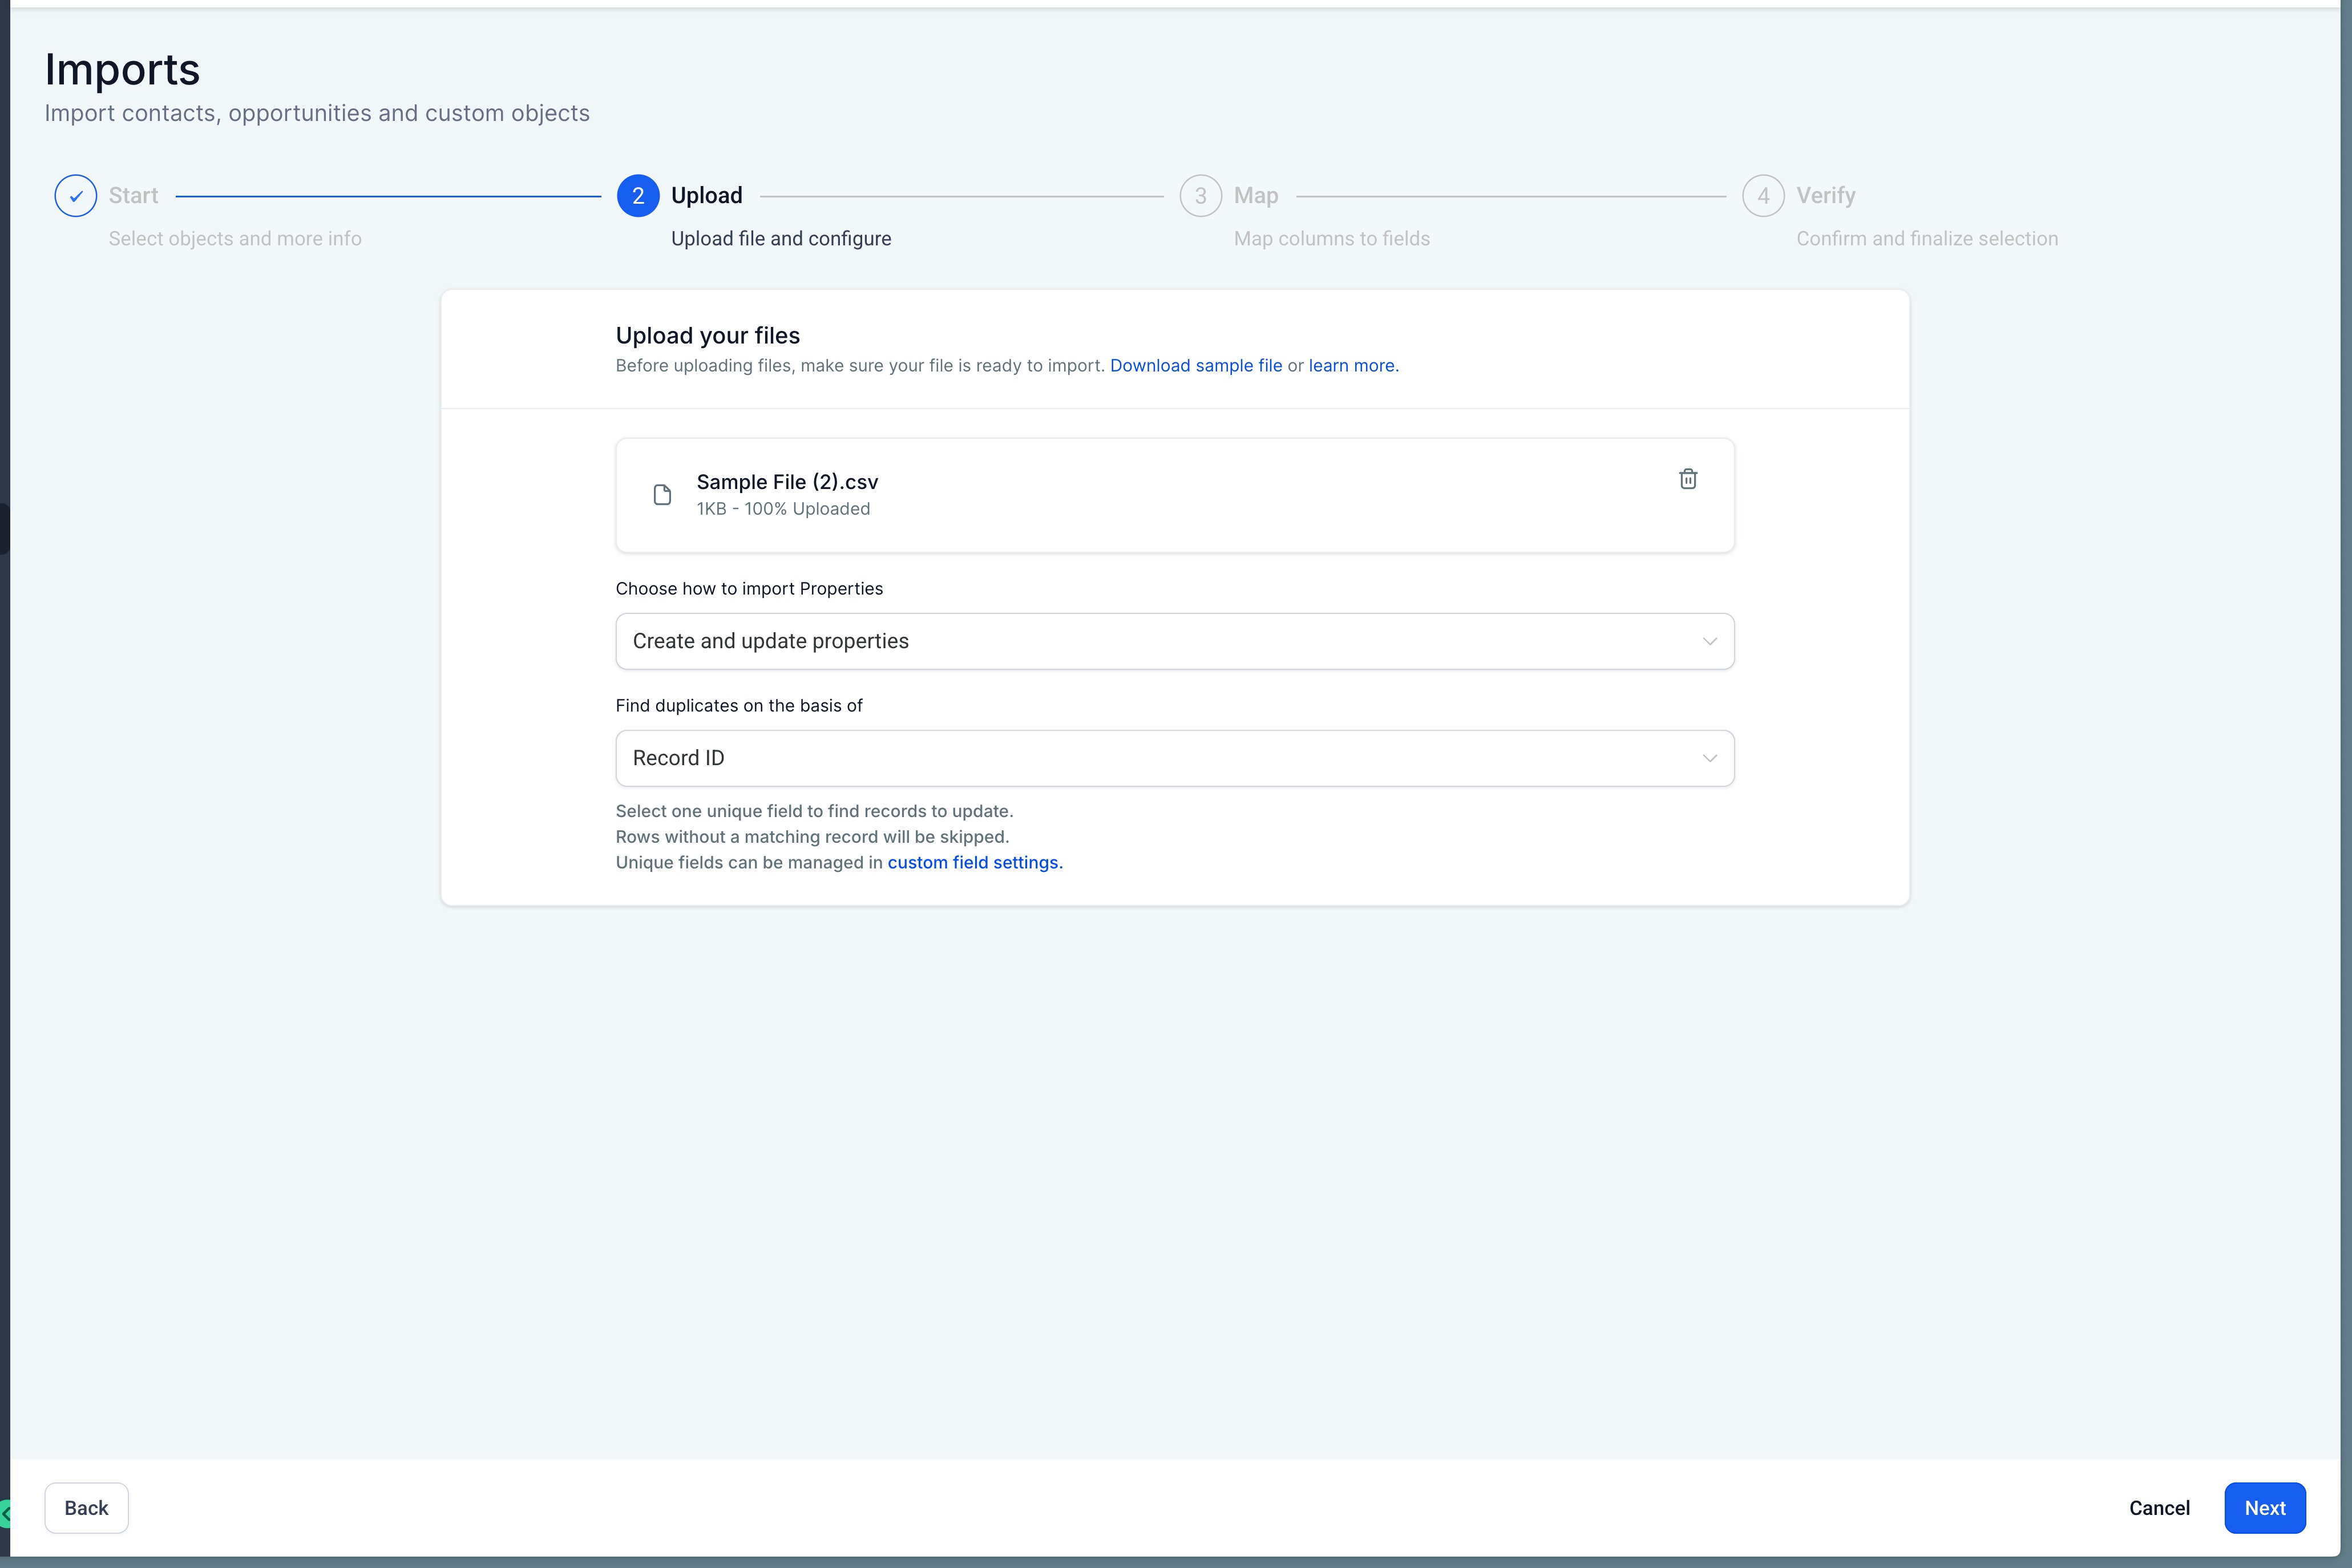
Upload your CSV file, then click Choose how to import to decide whether to Create, Update, or Create & Update records. If an Opportunity ID is provided in the CSV, that opportunity is updated; if not, a new one is created.
Map columns to fields. When importing both objects, make sure you select the correct object (Contacts or Opportunities) for each field you map. If contacts and opportunities are on the same line in the CSV, they are automatically linked to each other. This step also supports contacts with multiple email addresses and phone numbers, which are added automatically.
Review and complete. Confirm your mappings. You can also choose to create a Smart List, add the contacts to a workflow, or add a new tag to the imported contacts. You must check the box confirming all the contacts/opportunities for import.
A few behavior notes:
Checking Don't update empty values prevents blank cells in your file from clearing fields that already have a value.
If you choose not to import a field, leave it unmapped and check the option to not import data for unmapped columns to proceed.
Contact de-duplication is set by default to match on email first, then phone. These settings are pulled from your global settings and cannot be changed during the import itself.
You can bulk import Companies and Custom Object records using a CSV file, creating new records, updating existing ones, or both in a single import. This is useful when migrating data from another CRM, onboarding, or maintaining structured records at scale. Import supports only CSV (.csv) files; Excel (.xlsx) and Google Sheets links are not supported.
User permissions: Admin access is required.
File requirements: .csv format, maximum 30 MB, only one sheet/tab, a header row in the first row, and headers that match existing standard or custom fields.
Field preparation: required fields must contain valid values, custom fields must already exist in your account, and if updating records you must include the correct identifier (for example, Record ID).
Missing required fields
Blank primary field values
Incorrect Record IDs when using Update mode
Unique field conflicts
CSV headers that don't match field names
Always test with a small file first.
When uploading your CSV you choose one of three modes:
Create: creates new records only. Requires the Primary field. Existing records are not updated, and duplicate handling follows unique field rules if applicable.
Update: updates existing records only. Requires a Record ID or unique field (for custom objects). Rows without a matching Record ID or unique field are skipped.
Create & Update: creates new records and updates existing ones. If a Record ID or unique field matches, the record updates; if not, a new record is created. Unique field rules apply if configured.
Navigate to Import. For Companies, go to Companies and click Import in the top right. For Custom Objects, go to Custom Object and click Import in the top right.
Select the object. Choose the Company or Custom Object you want to import. Only one Custom Object can be imported at a time.
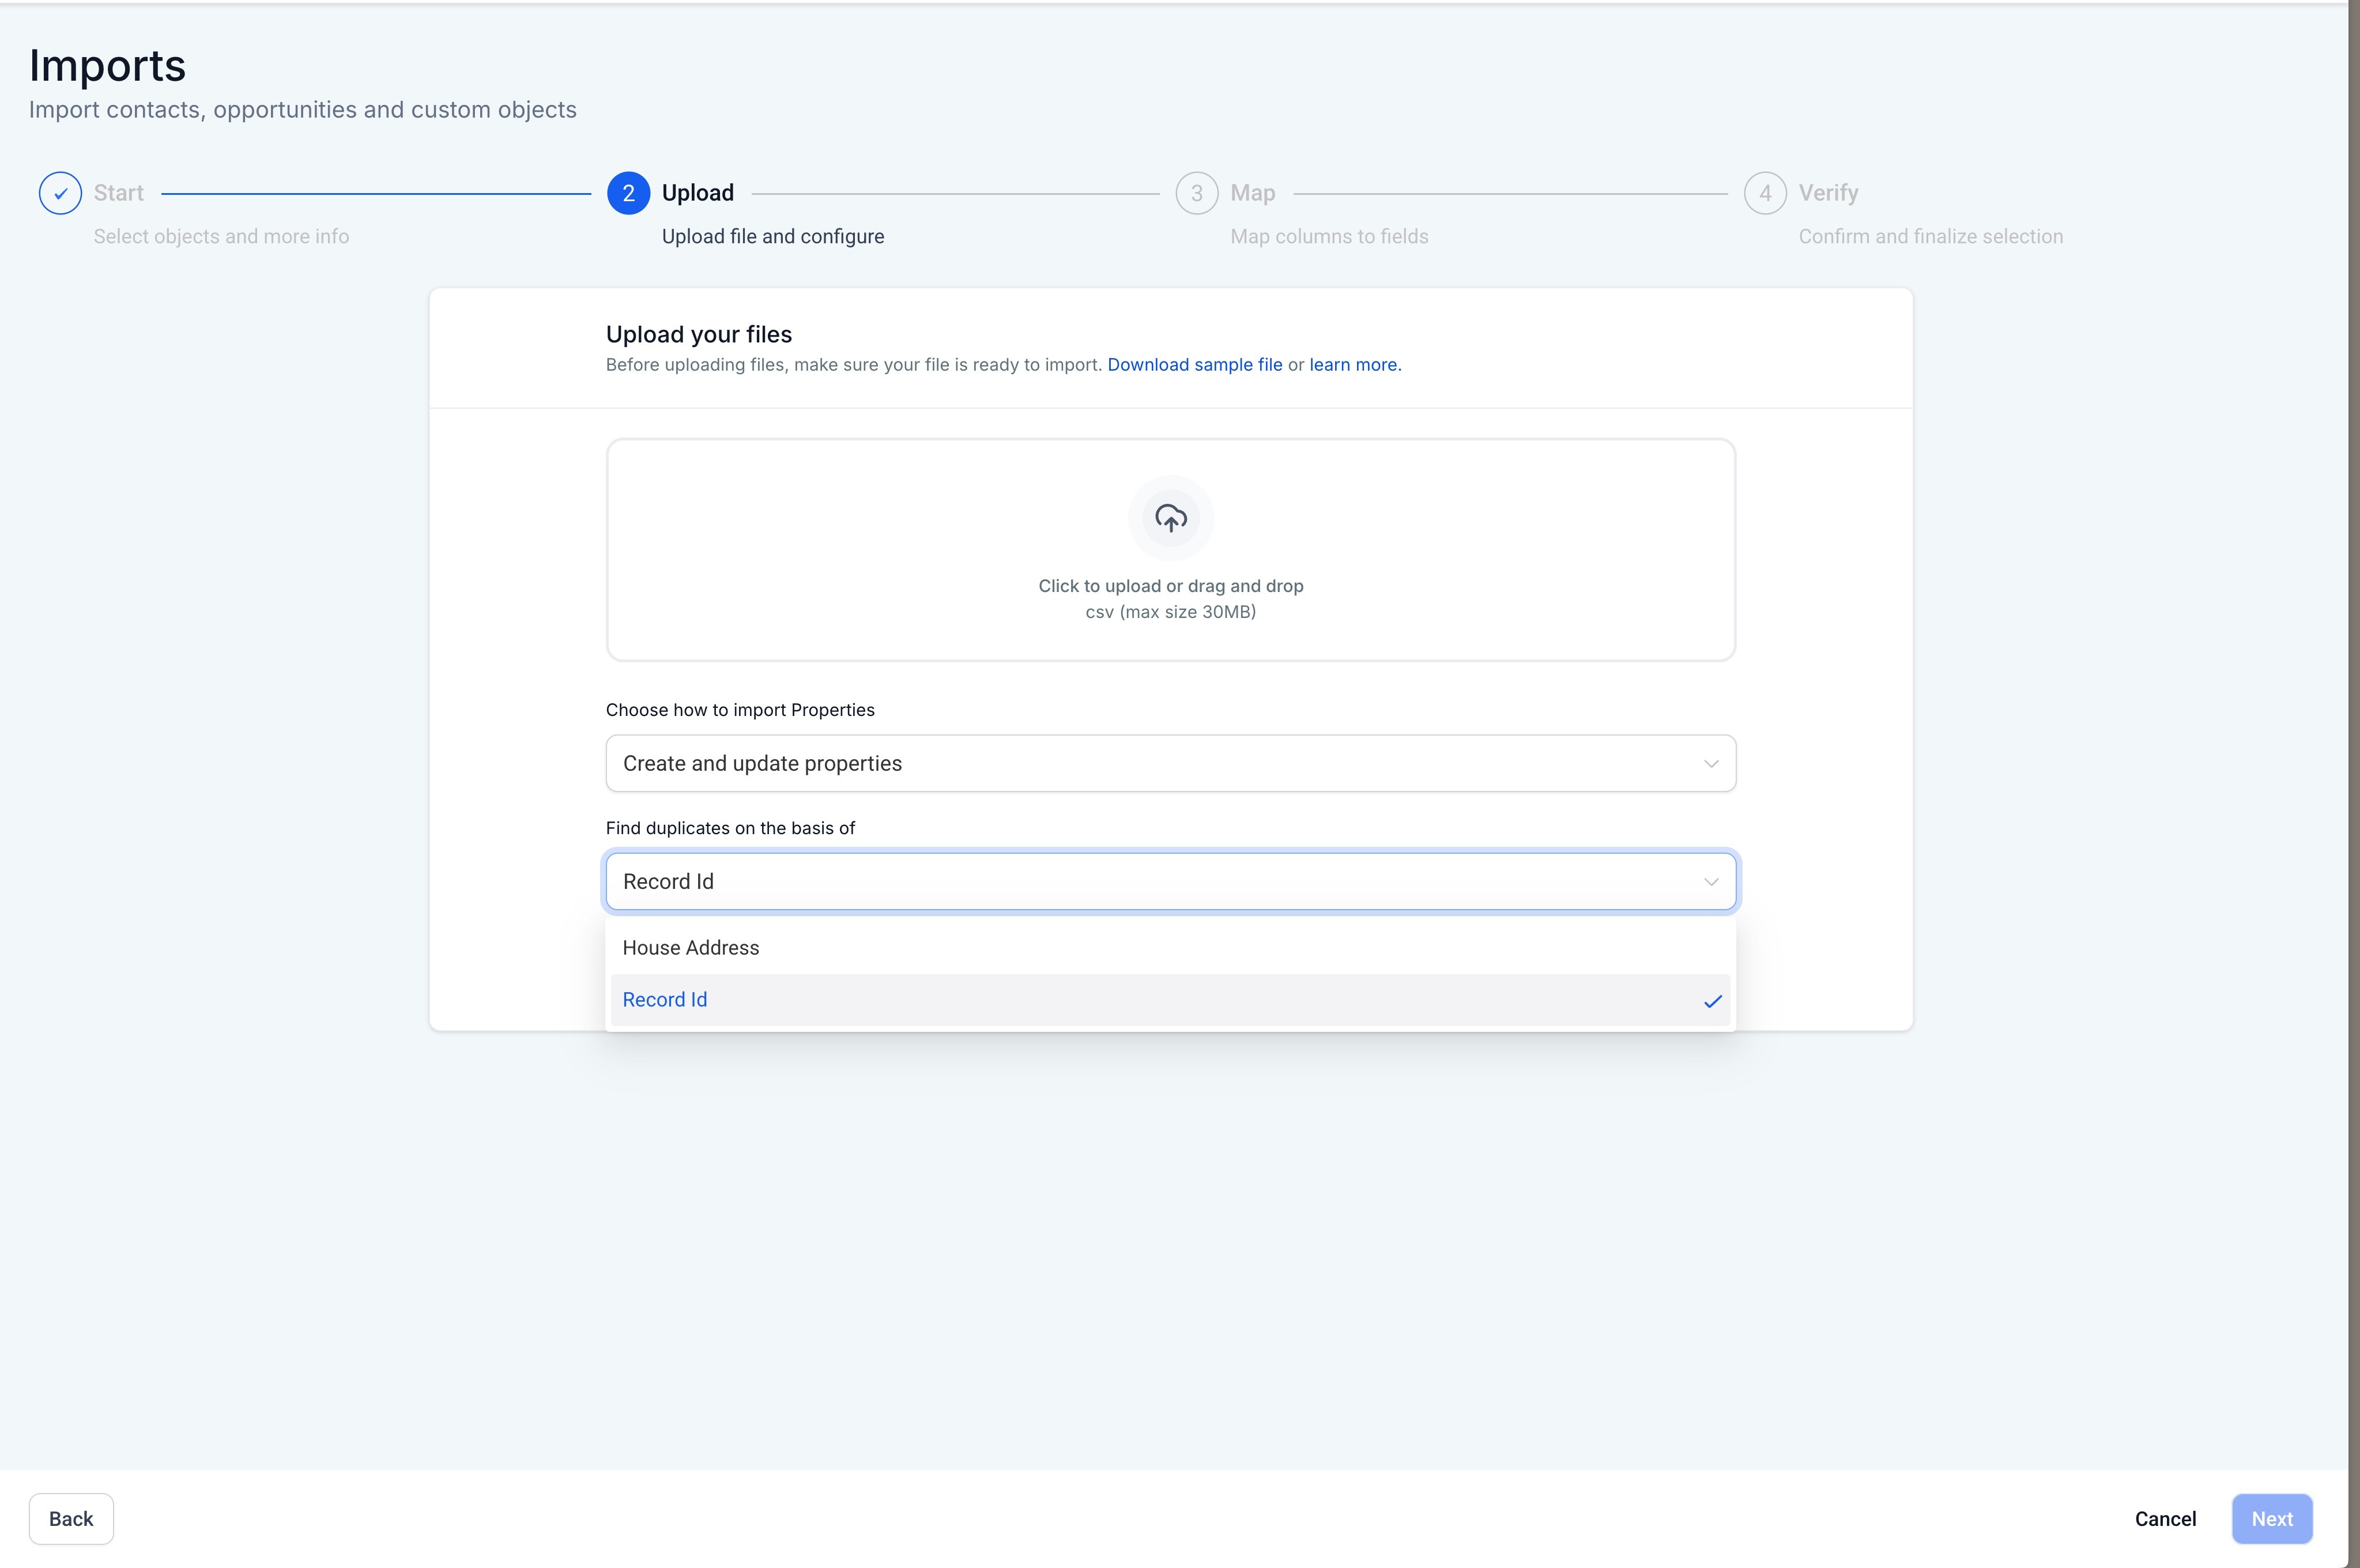
Upload your CSV file. Upload your CSV and choose your import mode.
If applicable, select the unique field to deduplicate on.
Map columns to fields. Match each CSV column to the correct field. Required fields must be mapped, unmapped columns can be ignored, successfully mapped fields show a green indicator, and errors or warnings are highlighted.
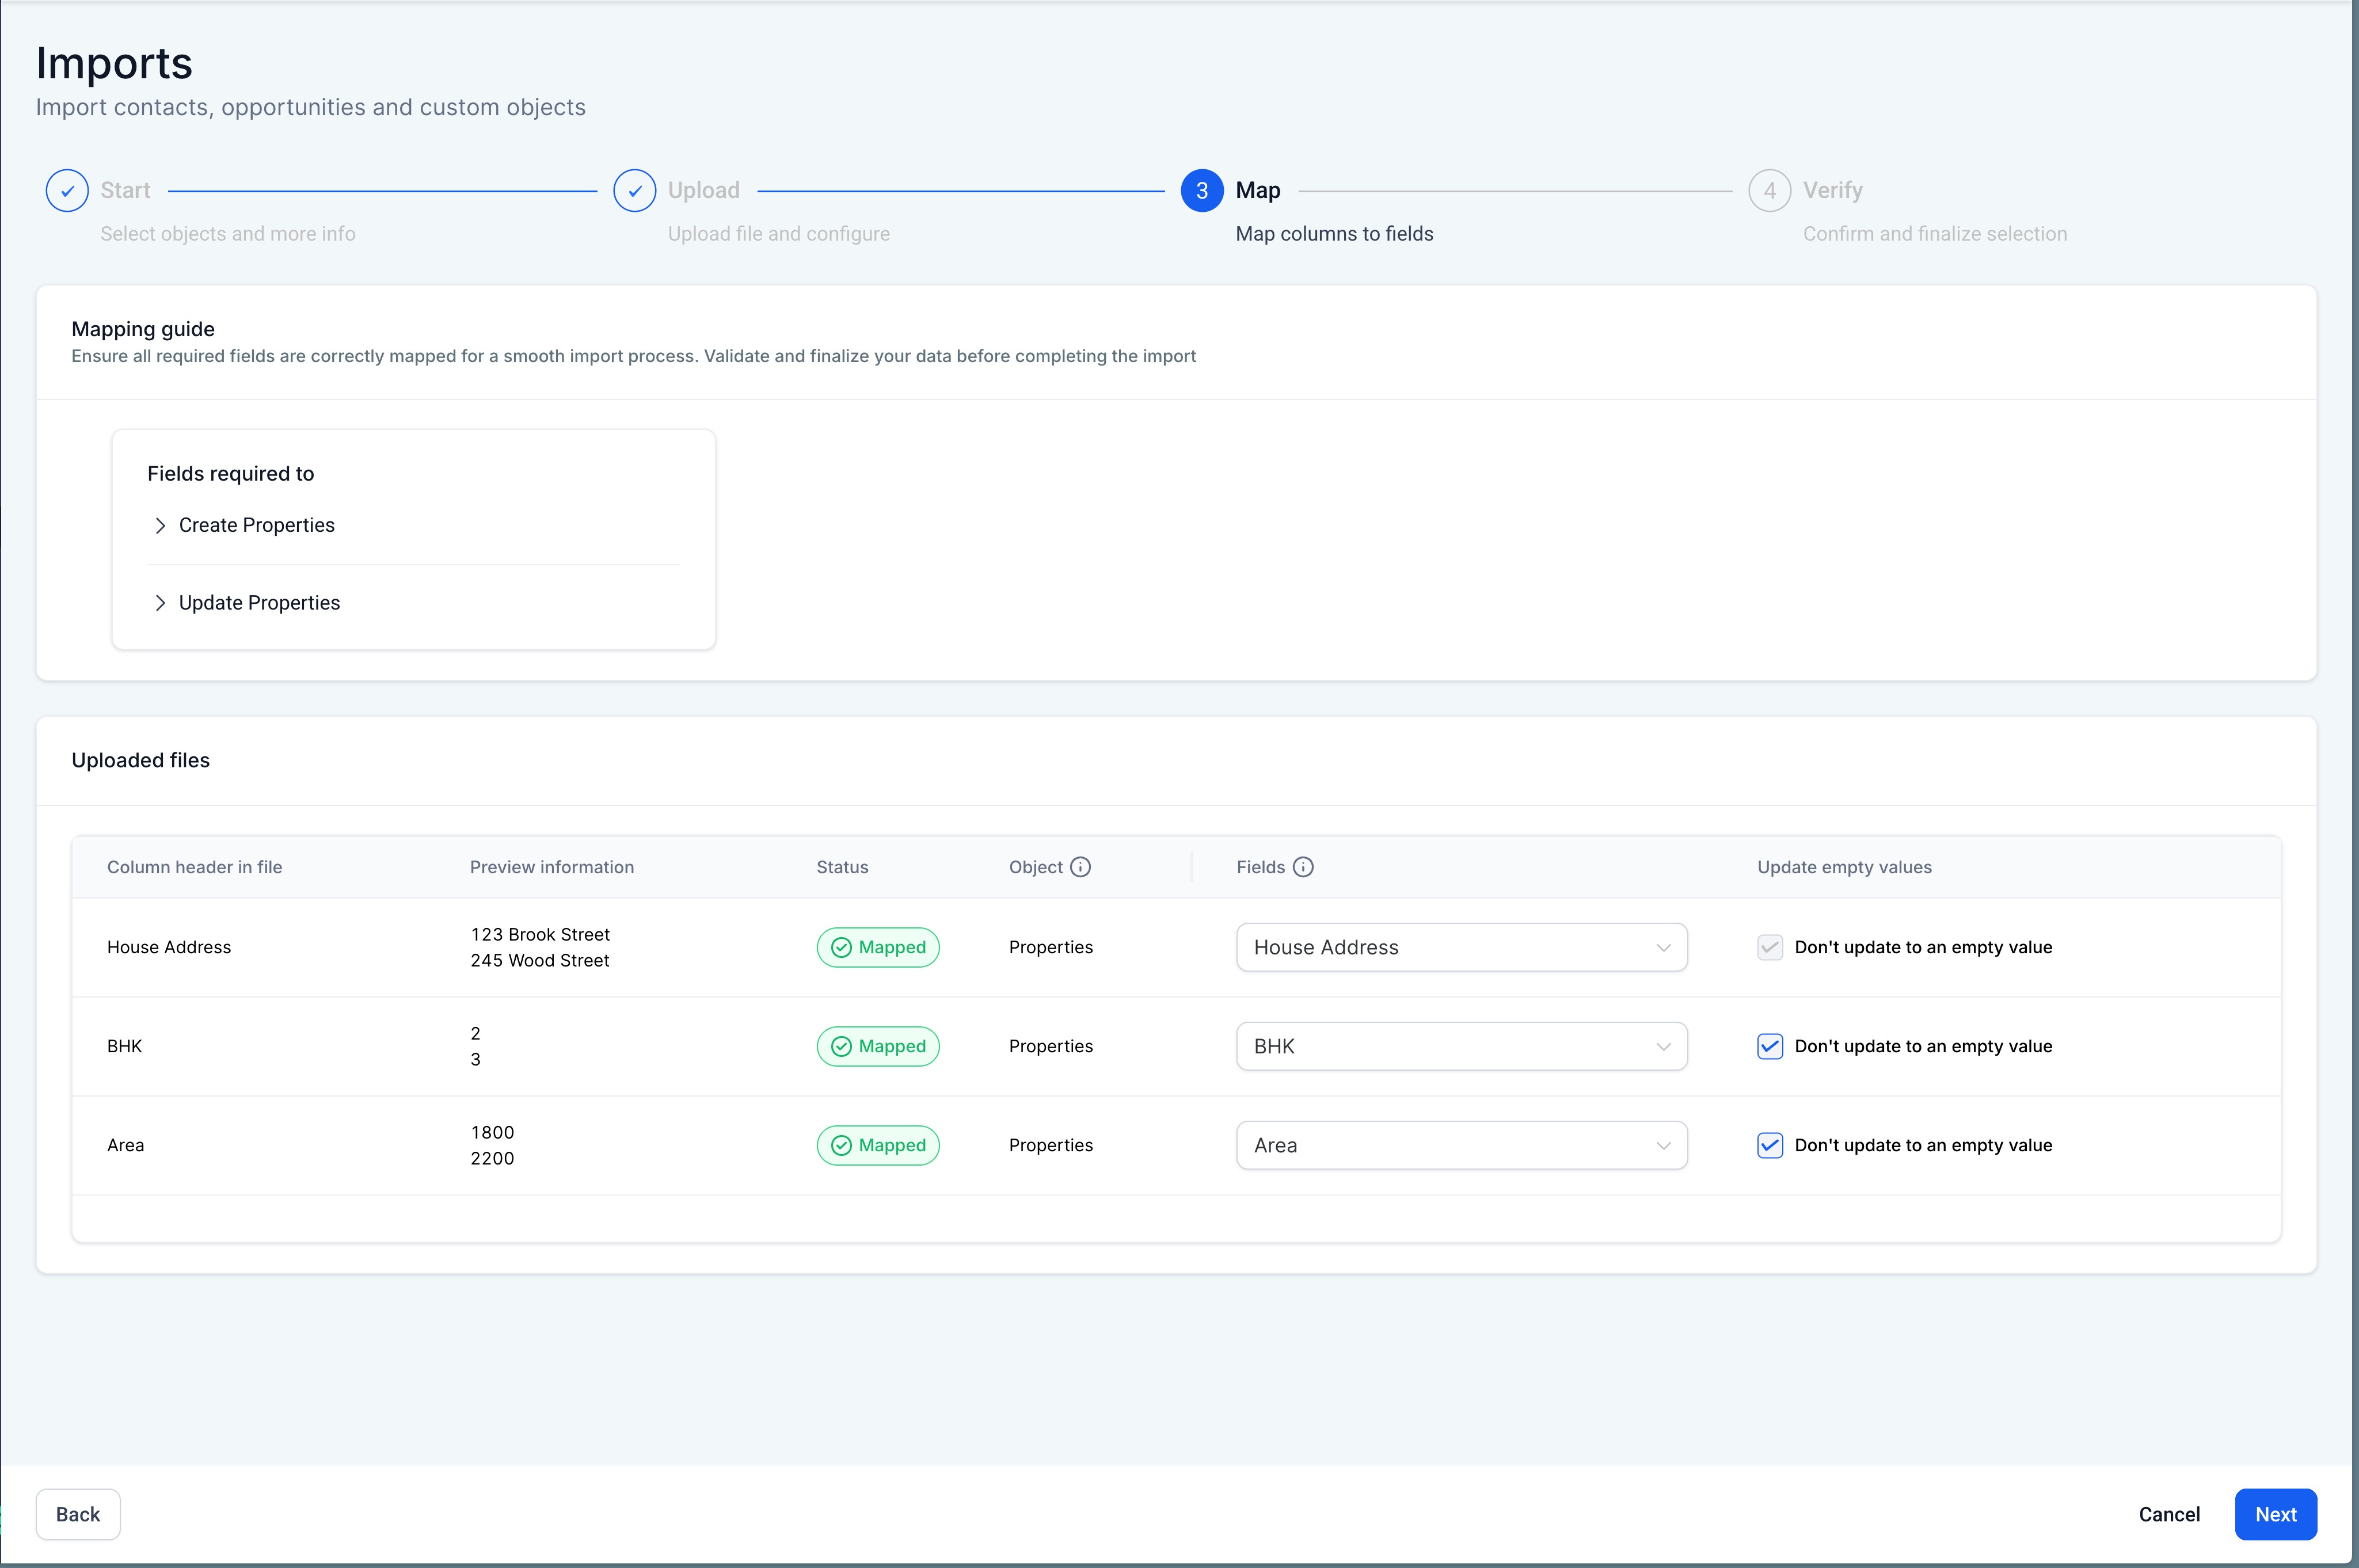
The Don't Update Empty Values option controls blanks: when enabled, blank cells in your CSV will not overwrite existing values; when disabled, blank cells will clear existing values (except for restricted fields).
If your Company or Custom Object contains unique fields, you must select a Record ID or one unique field as the deduplication field when multiple are mapped. The system then checks other unique fields for conflicts, and if a non-selected unique field conflicts, that row fails. This keeps your data clean and conflict-free.
The Primary field and any required fields cannot be updated to empty. These protections prevent accidental data loss.
Every import (contacts, opportunities, Companies, and Custom Objects) is tracked on the Bulk Actions page, where you can review results and resolve errors.
Click Contacts.
Click Bulk Actions. Your import appears in the list here.
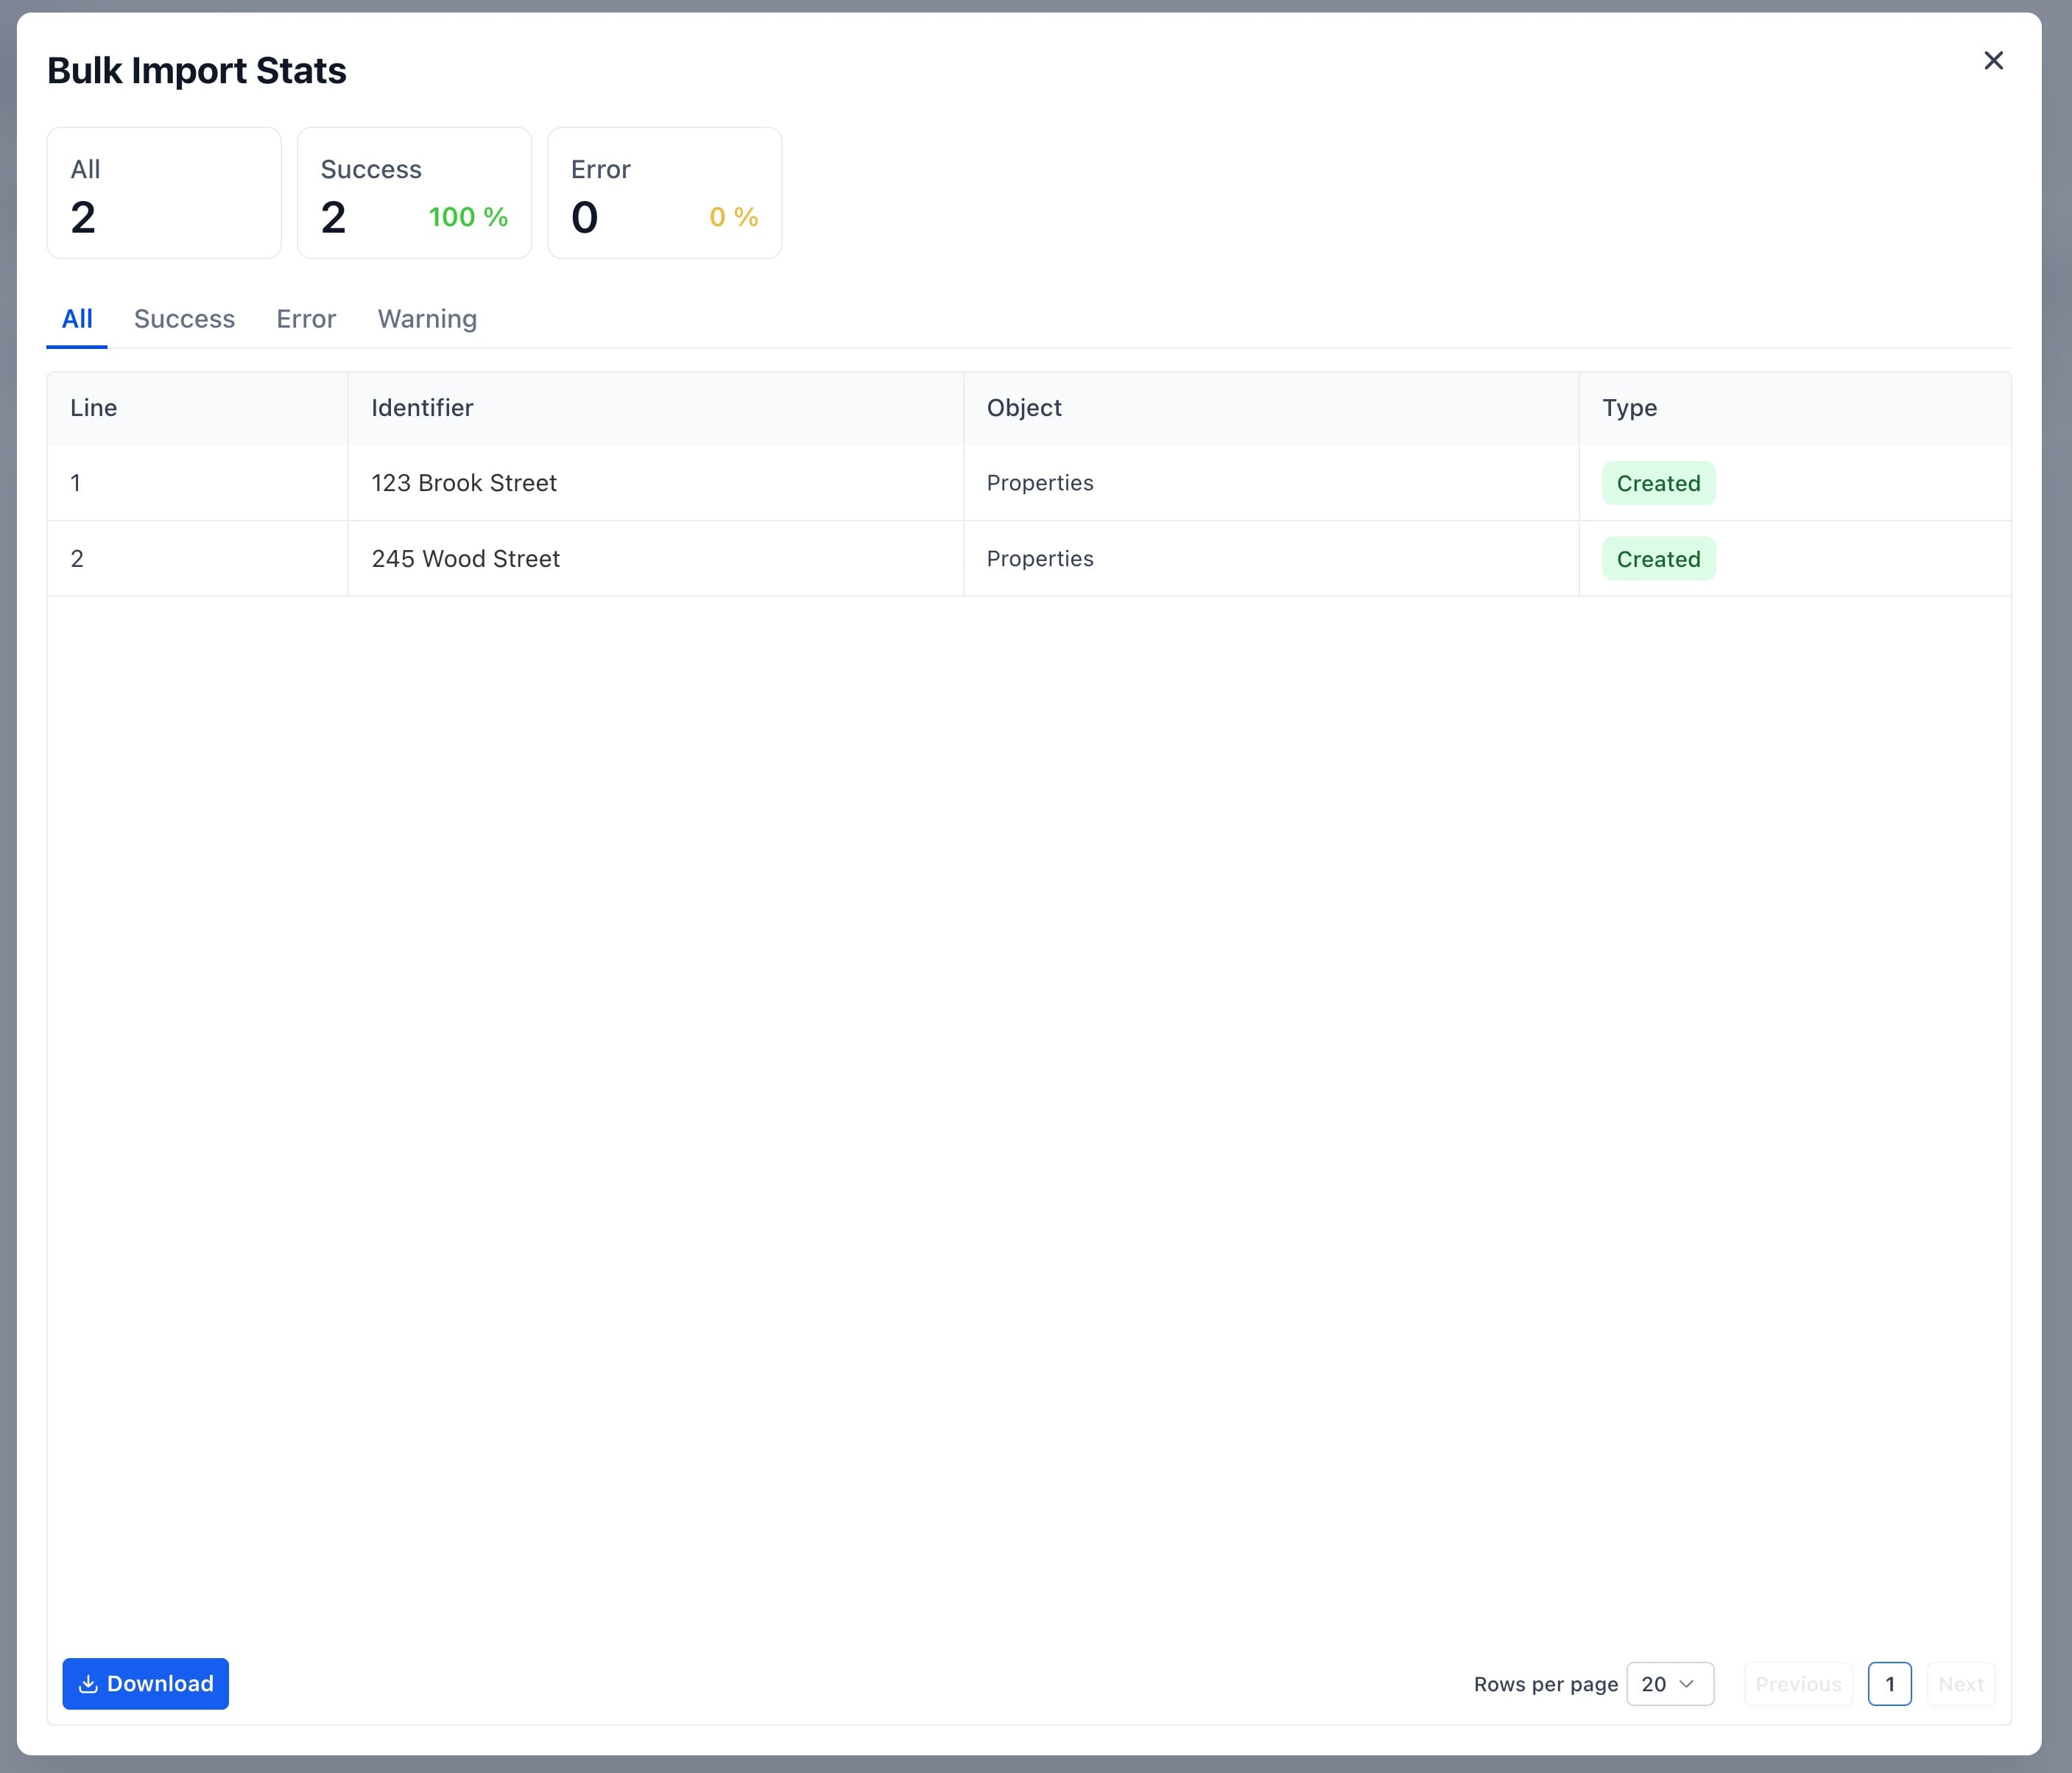
Click Show Status (or Show Stats) on your import row.
Any errors from the import are displayed here.
Click the three dots on the row to access the logs.
Select Show Error Log.
Review the detailed error log, which includes the line number, Record ID, the primary field, the status, the error or warning message, and resolution guidance.
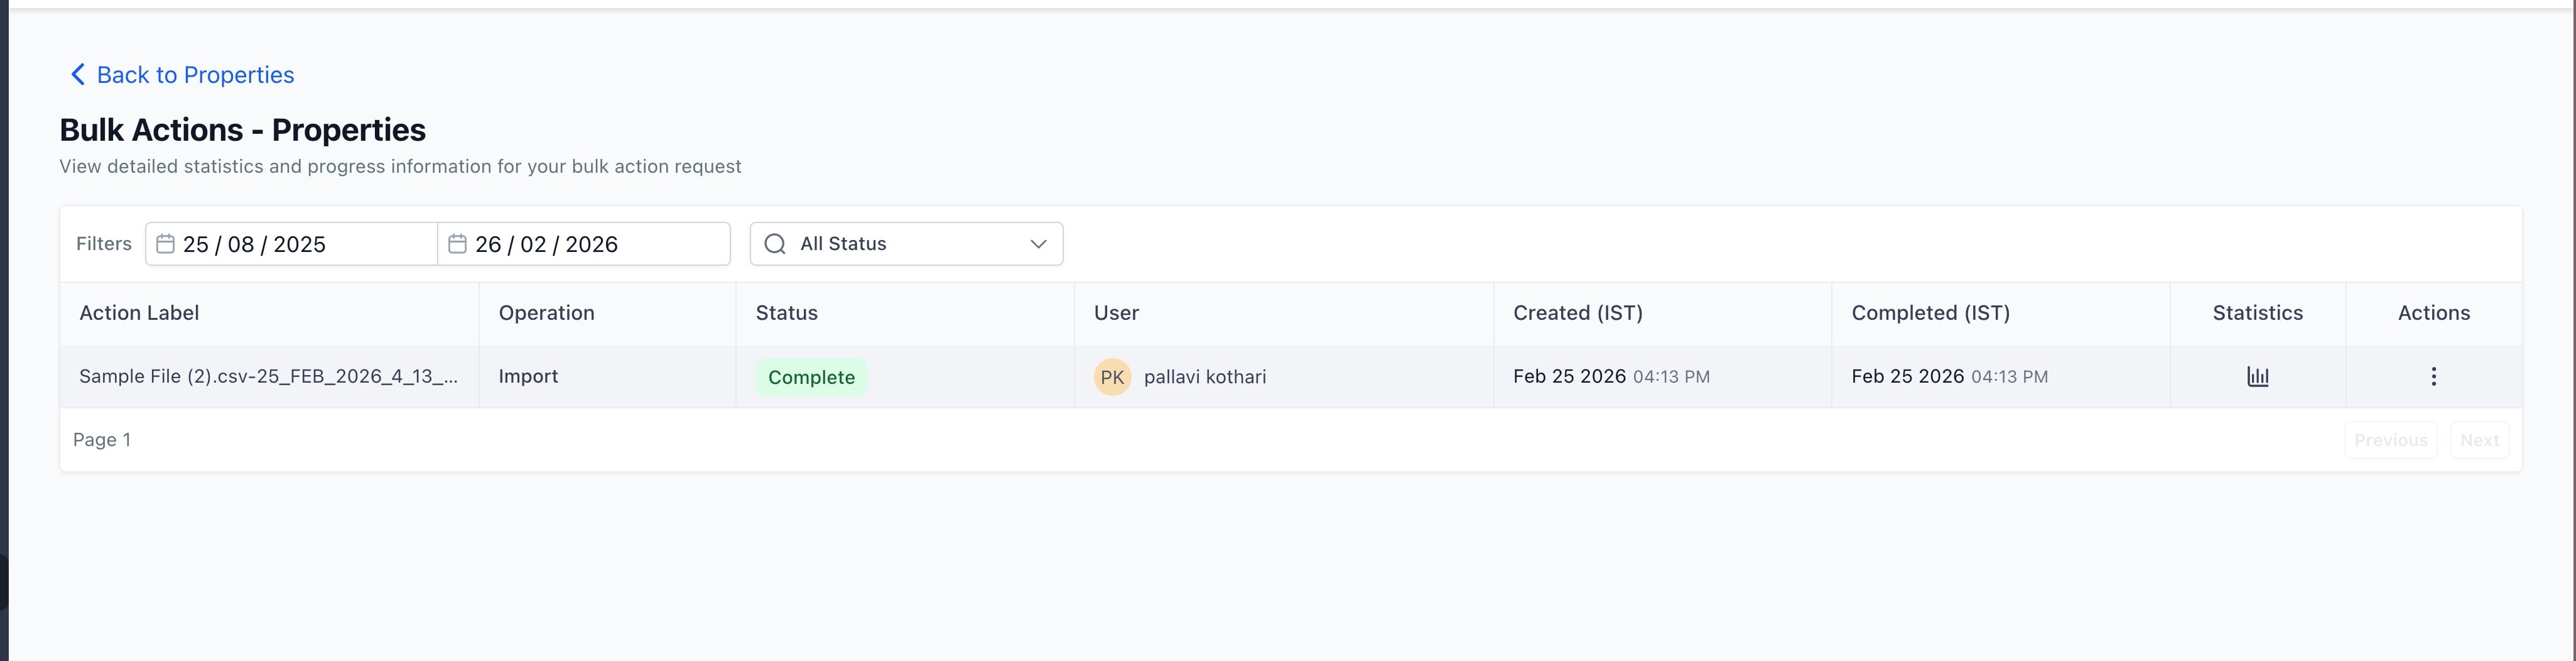
Import statistics are organized into tabs: All, Success, Error, and Warning. While an import is running you can also pause, resume, or cancel it from Bulk Actions.
Import failed entirely: check the error messages on the import status page, download the error log, fix the flagged rows, and re-import the corrected CSV.
Mismatched or unrecognized fields: a column that does not match a system field is ignored unless you map it to an existing standard or custom field during import.
Phone numbers rejected: remove parentheses, dashes, and spaces, or reformat to E.164 (+11234567890). Some exported files (for example, from legacy systems) store phone numbers with () and - that must be cleaned by highlighting the entire phone column and removing those characters before importing, so the data is not corrupted.
Contacts all set to Do Not Disturb: if your CSV includes a DND column, DND is automatically applied to all channels (SMS, Email, Calls, Voicemail). To apply DND to specific channels only, leave the DND column out and use a workflow with tags instead.
Notes not importing fully: you can import only one note per contact, with a limit of 5,000 characters.
Unique field conflict (Companies/Custom Objects): only that row fails; the rest of the import continues.
File too large: split files over 30 MB into smaller files and import them separately.
Imports cannot be undone, so always validate your CSV before starting.
Exporting downloads your contacts to a CSV file you can back up, analyze, or migrate. The exported file includes details such as names, emails, phone numbers, tags, and selected custom fields. Only Admin users can export contacts.
Click Contacts, then open Smart Lists.
Refine your selection with Advanced Filters if needed, then check the boxes next to the contacts you want to export. To export everything, click the checkbox beside the filter fields and choose Select All Contacts.
(Optional) Click Manage Fields to check or uncheck which columns to include. The exported CSV contains only the columns currently visible in the Contacts table, so confirm your column settings before exporting.
Click More, then Export (or click the three dots beside the + Add Contact button and choose Export).
Confirm your selection in the export modal and click Export. You will see a message that the export has started.
The export runs in the background, so you can keep working. Click Check Progress to watch it in Bulk Actions, or dismiss the message. You will get a notification when the file is ready.
Go to Contacts, then Bulk Actions, and find your export row (Operation: Export, Status: Complete, with a file name). Click the Download (down arrow) icon to save the file to your device.
Exports run asynchronously on the server, so large datasets process without freezing your screen.
Completed export files remain available for 30 days, after which the download link is disabled.
Only Admin users can download completed exports.
A contact's latest note is truncated to 255 characters in the export, and exports do not include automation history (past emails, SMS logs).
Export contacts separately for each account or location; you can combine the resulting CSV files in a spreadsheet afterward.
Scheduled automatic exports are not available at this time.
If your scheduling, POS, EMR, or marketing system is not directly integrated with Aesthetix CRM, the recommended approach is a regular export from that system and an import into Aesthetix CRM. Syncing your client data this way lets you update contact type from Lead to Patient, update Patient Lifetime Value, improve lead-source reporting, enable marketing automation and personalization, and run bulk actions such as review requests.
During onboarding, Aesthetix CRM performs a historical contact import so your database transfers accurately and efficiently.
Timing: Your contact export must be completed as part of the Go-Live Prep Checklist so your data is ready before your official Go-Live date.
Where to submit: Your onboarding manager provides an encrypted, secure cloud hosting link. Drag and drop your file(s) into the secure folder and the team handles the rest.
What to provide: A historical contacts spreadsheet in .csv or .xlsx format, exported from your current CRM, EMR/EHR, email marketing platform, SMS marketing system, or any other contact storage tool. You may provide up to two separate spreadsheets: one for leads and one for patients. Multi-location practices may provide one patient list and one lead list per location. Additional files can be self-imported or imported for an added fee.
Matching and duplicate prevention: Aesthetix CRM uses a strict protocol to prevent duplicates. Contacts are created or updated based on Email Address and Phone Number, and a unique identifier (email or phone) is required to create a new record. Duplicate contacts are not allowed. When multiple lists are provided, marketing-system contacts are imported first as Leads and your EMR list is imported second as Patients, which produces the most accurate contact classification.
Fields to include:
Required: Email Address or Phone Number (unique identifier), and Subscribed/Unsubscribed status. First Name, Last Name, Email Address, Phone Number, and Type of Contact (Lead or Patient) are also requested.
Optional: Lead Source, Location, Treatment of Interest, Patient Lifetime Value, User Assignment, New Lead Date, Patient Since.
Custom fields: Aesthetix CRM will configure up to three new custom fields complimentary for your initial import. For additional custom fields, contact your Onboarding Manager or email [email protected] to coordinate a quote.
Contact types: A Lead is someone who has never visited your practice. A Patient is a contact who has completed an appointment.
Smart Lists: During onboarding, Aesthetix CRM automatically builds Smart Lists for Leads, Patients, Mass SMS, and Mass Email. Smart Lists let you filter and segment contacts by custom fields, tags, activity, lead status, and more.
If you use Vagaro for scheduling and POS, export regularly and import into Aesthetix CRM:
Export a Vagaro report (.csv) for the time period since your last import.
Add a column titled Type of Contact and enter Patient for all records.
Import the .csv into Contacts.
Map the data fields.
Choose your import settings: uncheck Don't update empty values for existing records, and add tags such as patient and send review.
Submit and review the list from Bulk Actions.
If you use Nextech EMR, run a regular data reconciliation by exporting from Nextech and importing into Aesthetix CRM:
Export the report from Nextech.
Format the file: align it to your import template, format the date columns, confirm email addresses, and save as .csv.
Import into Aesthetix CRM: map the fields, and under Advanced uncheck Don't update empty values for existing records.
Enroll the import in a workflow that uses the Next Appointment and Procedure Date so it updates opportunities for Consult Booked and/or Surgery Scheduled.
Who can import and export contacts? Only Admin users can import or export contacts.
What file format and size are supported?
CSV (.csv) only, one sheet per file, with a header row, and under 30 MB. Split larger files into smaller ones.
Can I import contacts with more than one phone number or email? Yes. Put additional values in separate columns (for example, Additional Phone Numbers and Additional Emails) and separate entries with commas. They are stored as secondary fields rather than replacing the primary value.
How does Aesthetix CRM handle duplicates? Based on your duplicate-detection settings, it matches by Contact ID, email, or phone (email first, then phone by default) and either updates the existing record or skips it instead of creating a duplicate.
Can I update existing contacts with a CSV import? Yes. Choose Update or Create & Update during import, and include a field used for matching (Contact ID, email, or phone).
What happens if I include a column that doesn't exist as a field? It is ignored unless you map it to an existing standard or custom field during import.
Why are all my imported contacts set to Do Not Disturb? A DND column applies DND to all channels automatically. To set DND for specific channels only, omit the DND column and use a workflow with tags.
Can I undo an import? No. Imports cannot be reversed, so always validate your CSV before starting.
My import failed. What should I do? Open Bulk Actions, read the error messages, download the error log, fix the flagged rows, and re-import the corrected CSV.
How long are exported files available? Export files are available for 30 days, after which the download link is disabled.
How are new contacts added after onboarding? Once your historical import is complete, new contacts can come in through many channels: manual entry, website forms, EMR integrations, Meta Instant Forms, Facebook Messenger and Instagram DMs (via Aesthetix CRM integrations), phone calls to your Aesthetix CRM number, text messages to your Aesthetix CRM number, the chat widget on your website, third-party automation tools (such as Zapier, Keragon, or Integrately), and inbound webhooks.
How will my contact source(s) be displayed? Aesthetix CRM supports a comprehensive list of contact sources. If you provide source data in your import file, it is displayed on the contact record. Moving forward, contact sources are assigned automatically by the channel each contact comes in through (see Contact Source Reporting and Campaign Tracking for details). UTM parameters are supported, workflow actions can assign or update the Contact Source automatically based on system triggers, and the Contact Source can also be updated manually by users.
If you need help preparing your contact spreadsheets, configuring custom fields, or planning a migration, email [email protected]. During onboarding, your Onboarding and Customer Success teams can guide you through the historical contact import end to end.
