Once your automations are built and live, the real work becomes keeping them organized, enrolling the right contacts, pausing what needs to pause, and reading the data to confirm everything is firing correctly. This reference covers the day-to-day management tools in Aesthetix CRM Workflows: how to organize, enroll, unenroll, edit, pause, and monitor your workflows, with exact steps, settings, and gotchas for each.
Most management tasks start from Automations > Workflows, which is your workflow list page. Editing inside a workflow happens in either the Standard Builder (list-style) or the Advanced Builder (drag-and-drop canvas); a few newer tools are Advanced Builder only, and those are noted where relevant.
Folders let you group related workflows so your list stays manageable as it grows. You can create folders, move workflows in and out of them, nest folders inside other folders, and restrict who can access a folder.
Create a folder
Go to Marketing > Workflows (or Automations > Workflows).
Click Create Folder.
Enter a Folder Name.
Click Create. The folder is saved and added to your All Workflows list.
Move a workflow into a folder
Hover over the workflow you want to move to reveal its actions, then click the three-dot menu next to it.
Select Move to Folder.
In the popup, choose the destination folder.
Click Move Here (also shown as Move) to save.
You can move a workflow out of a folder back onto the general page, or into a different folder, using the same process. If you want to create a workflow directly inside a specific folder, open that folder first, then create the workflow; it will automatically save inside that folder.
You can place folders inside other folders to build a hierarchy ("nesting"). This tree structure scales far better than a single flat list, and a maximum depth of 2 to 3 levels is recommended so workflows stay easy to find.
Navigate to Workflows.
Create a folder: click Create Folder, type the name, and click save.
Create a nested folder: open an existing folder, then click Create Folder again and follow the same steps. The new folder is nested inside the one you opened.
Move a workflow or folder: click the three-dot menu on the right of the item, choose Move To Folder, navigate to the target folder in the modal, select it, and click Move Here. You can also use the New Folder button in the modal to create the destination on the fly.
Rename a folder: open the folder, click the three-dot menu, choose Rename Folder, type the new name, and click save.
Delete a folder: click the three-dot menu next to the folder, choose Delete Folder, then confirm with Delete.
Deleting a folder does not delete the folders and workflows inside it. Everything inside is moved up one level.
Best practices for nested folders
Group by purpose: use top-level folders for broad categories (for example New Patient Nurture, Reactivation, Internal Processes), then nest by campaign or phase.
Limit depth to 2 to 3 levels so workflows stay quick to locate.
Set permissions strategically on sensitive folders.
Audit your structure periodically and archive or delete unused folders.
Use search and filters when the structure gets large.
Folder permissions restrict who can see, create, and edit workflows inside a folder, protecting your battle-tested automations from unauthorized changes. If a folder's permission is set to a given role, only users at that role or above can see, create, and edit the workflows inside it.
Add folder permissions
Hover over (or create) a workflow folder.
Click the Actions drop-down (three-dot menu).
Choose Manage Permissions.
Select the User Type and Role that should have access to this folder and its workflows.
Access granted by setting
Folder permission set to | Access granted for |
|---|---|
Admin only | Only top-level Admins |
Standard user | Admins and Standard users |
Account Admin | Admins, Standard users, and Account Admins |
All | All users |
Regardless of folder permissions, all users can still view the list of workflows a contact belongs to from the Contact Details page, and can add or remove contacts to and from any workflow there.
Nested folders typically inherit permissions from their parent folder, and you can customize permissions at an individual folder level when needed. When a folder is moved, its permissions may be retained or adjusted based on the new location.
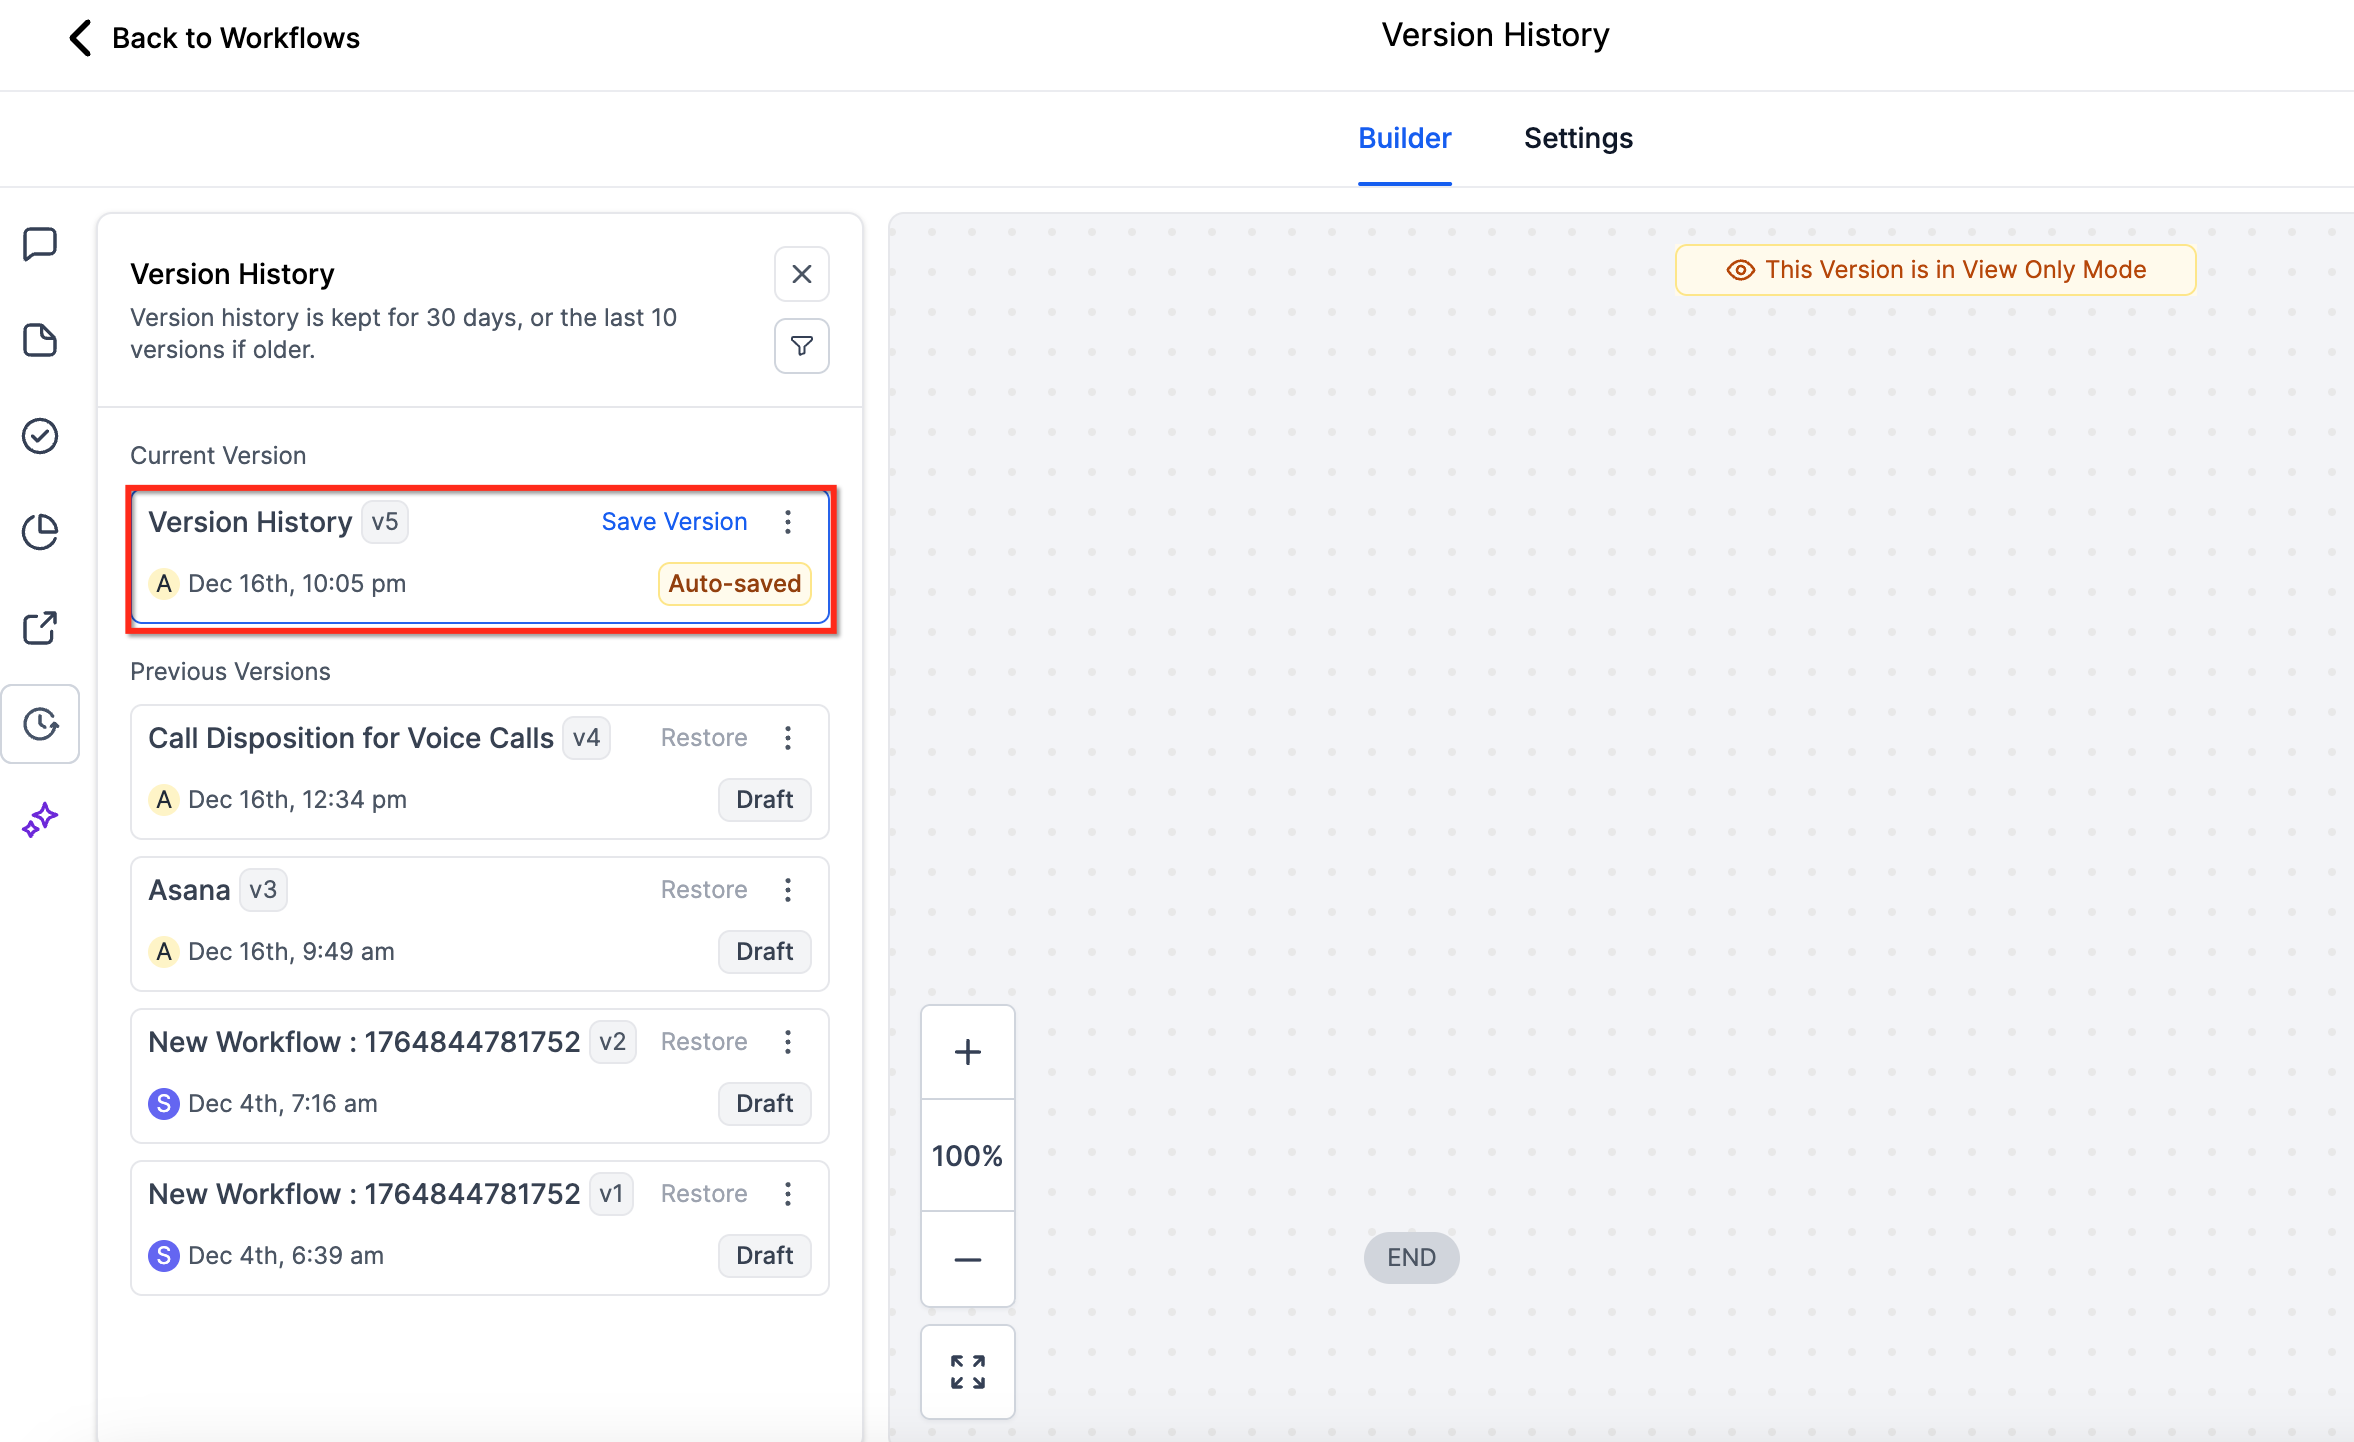
Version History is your built-in timeline of every saved state of a workflow, so you can review past edits and roll back with confidence. The "Deleted" tab is a separate safety net for workflows you removed entirely.
Each version records who edited it, the exact timestamp, and whether it was a Draft or Published build. You can browse, filter, and restore past versions, and restoring always creates a new draft, so your live workflow does not change until you publish.
What is captured
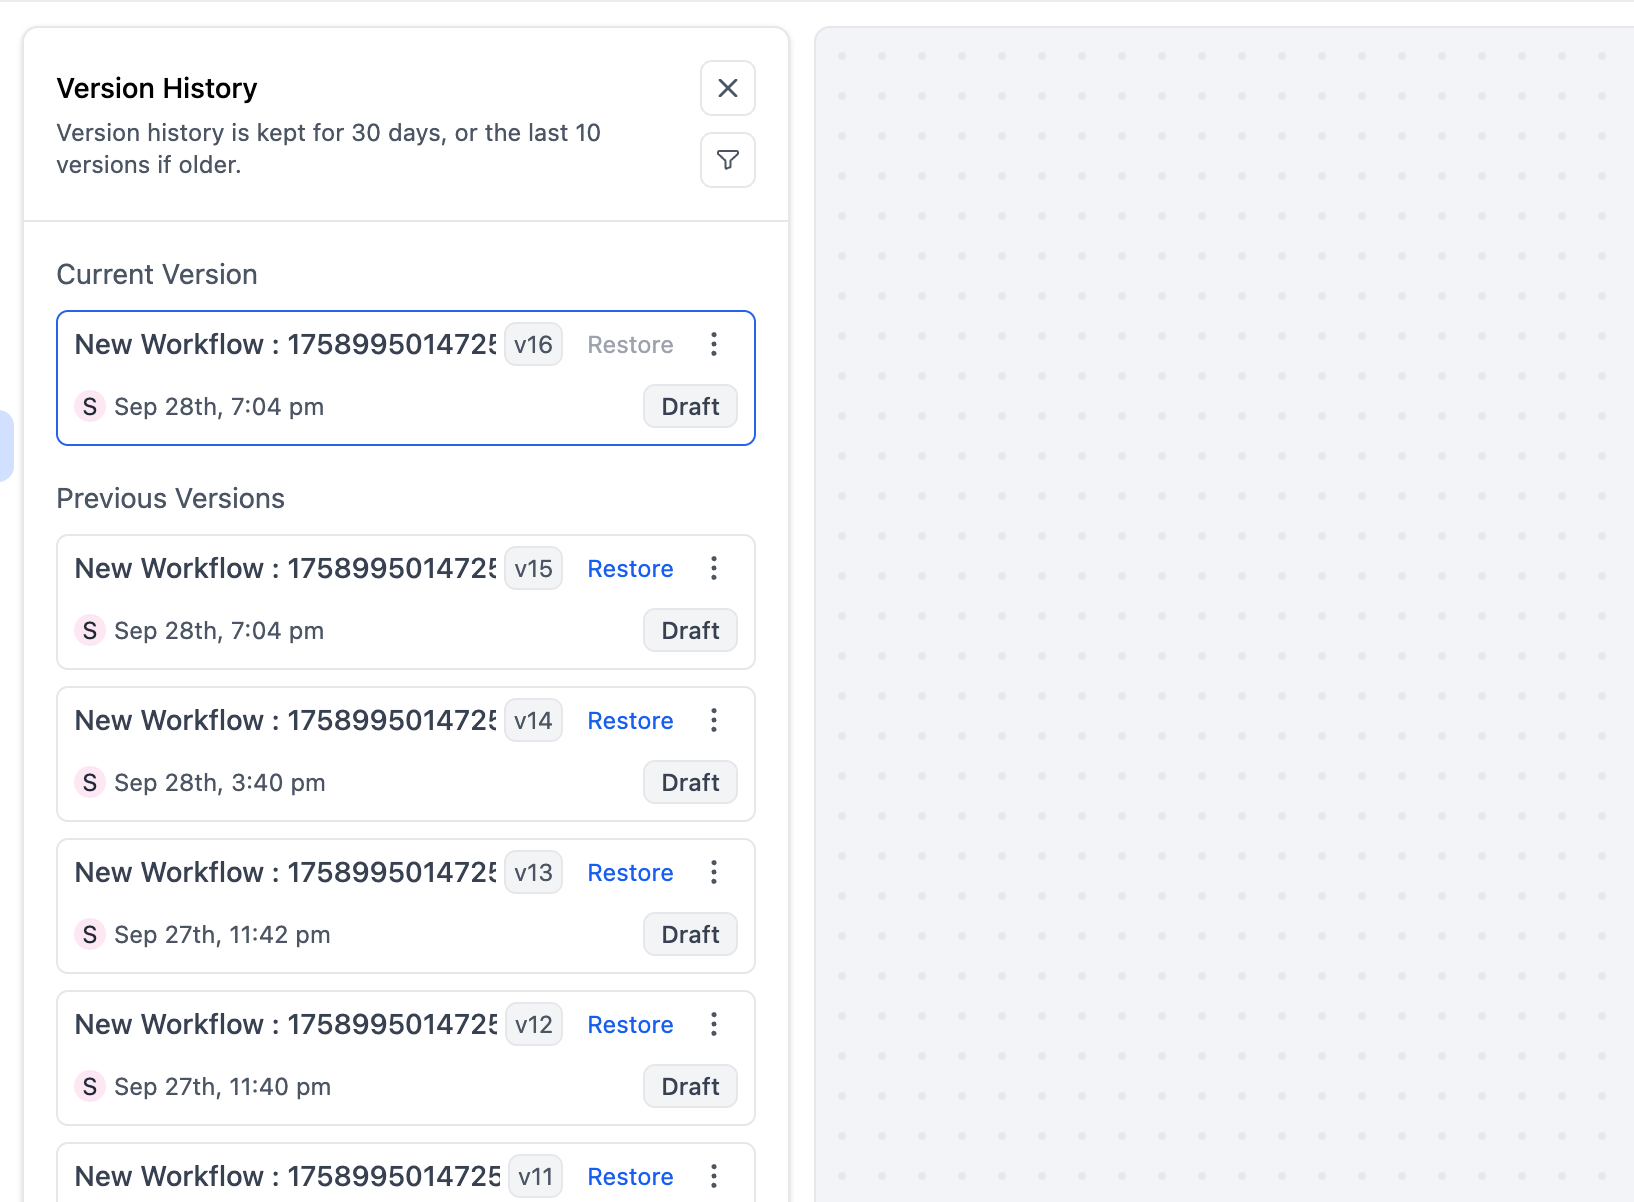
Up to 10 versions or 30 days of history (whichever comes first).
Version label (v12, v13, v14...), workflow name, timestamp, editor, and status.
How versions are created
Versions are recorded automatically when you:
Click Save manually.
Confirm changes in the Unsaved Changes pop-up.
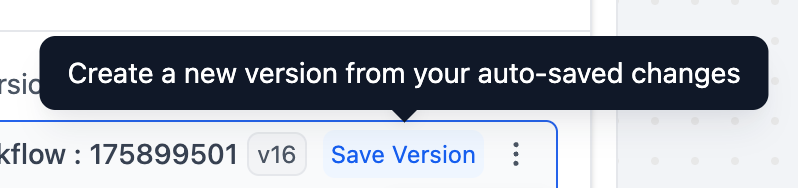
Use Save Version in the workflow.
Change the workflow status (Draft to Publish, or Publish to Draft).
Routine auto-saves do not create new versions on their own. To capture your current state as a version, click Save Version, which snapshots your latest auto-saved changes into Version History.

Browse and restore
Open a workflow and click the Version History icon in the sidebar.
Browse saved versions by timestamp and editor; filter by editor if needed.
Select a version to Preview (and Compare, where supported).
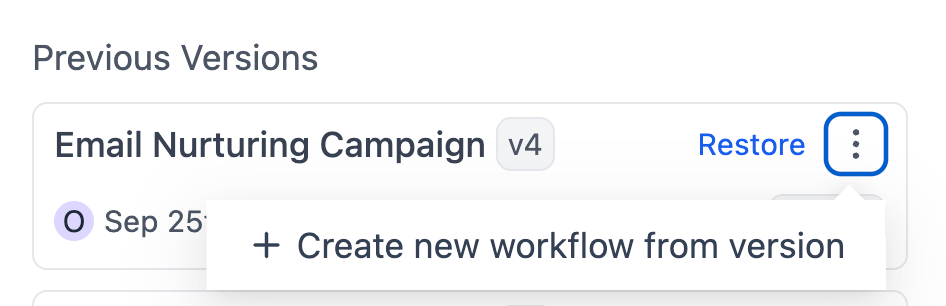
Click Restore next to a version to reopen it as a new draft, or choose Create new workflow from version to branch into a separate workflow without touching the original.
Test the draft, then Publish when ready.
Requirements to restore
The workflow must be in Draft.
There must be no enrolled contacts currently in the workflow.
The restored state becomes a new version; all prior versions remain available.
Notes and limitations
Restoring creates a new draft; you must Publish to push it live.
Undo/Redo resets after a restore: your session history starts fresh from that draft.
Auto Save covers canvas edits; some configuration-panel edits may still need their own save/apply.
Best practice: name versions at milestones (for example "Added enterprise branch") and use Save Version before large changes.
If you deleted a workflow entirely, you can recover it within 30 days.
Click Marketing.
Click Workflows.
Click the Deleted tab to see removed workflows.
Review the list of workflows deleted in the past 30 days.
Click Restore next to the workflow you want to recover.
Once restored, the workflow is set to Draft.
Beyond trigger-based entry, you can push contacts into a published workflow yourself: one at a time from the contact record, or in bulk from a filtered contact list. Only published workflows are available for manual enrollment.
Click Contacts.
Select the contact person you want to enroll.
Click the Contacts tab on the contact record.
Click Campaigns/Workflows.
Click the option to add a workflow manually.
Select the Campaign/Workflow you want to enroll the contact in.
Select the Event Start Date.
Click Add.
The Add to Automation feature lets you select many contacts from a filtered list and enroll them into a published workflow all at once, at a scheduled time, or in a drip pattern. The most common use is filtering by a tag, then enrolling the matching contacts for outreach, re-engagement, or batch processing.
Step 1: Filter your contacts
Navigate to Contacts > Smart Lists.
Click Advanced Filters to open the filter panel.
To filter by tag, search for "Tag" in the filter search bar, then select it.
Set the operator (for example "Is") and choose the tag value (for example "follow-up"). Click Apply. The list now shows only contacts that match.
You can filter by any contact field (email, city, contact source, opportunity stage, and so on) or add multiple filters and nested filters to target exactly the contacts you want.
Step 2: Add to Automation
Select the contacts: use the checkboxes for individual contacts, or click Select all to select every contact in the filtered list. The bulk action toolbar appears once at least one contact is selected.
From the bulk action toolbar, click Trigger automation to open the Add to Automation dialog. It shows your selected contacts at the top with configuration fields below.
Step 3: Configure the automation
Fill in the fields:
Action Name: a name for this bulk action, shown in the tracking report on the Bulk Actions page (for example "Workflow automation bulk import").
Automation Type: select Workflow.
Workflow: choose the workflow to add contacts to. The dropdown lists all published workflows.
Mode: choose when and how contacts are enrolled (see Scheduling Modes below).
Click Add to Automation. A confirmation shows the number of contacts being processed (for example "Add to Automation 10 Contacts is in progress / is scheduled").
Click Check Progress to open the Bulk Actions page, or Dismiss to return to the contact list.
Scheduling Modes
The Mode setting controls when selected contacts are enrolled:
Send All at Once: all selected contacts are added immediately. This is the default; no extra fields.
Send at Scheduled Time: all contacts are added at a date and time you choose (displayed in your account's timezone). Extra field: Pick a Start Date and Time.
Send in Drip Mode: contacts are enrolled in batches over time, ideal for large lists you want to stagger. Extra fields:
Field | Description |
|---|---|
Pick a Start Date and Time | When the first batch is enrolled. |
Number of Messages per Batch | How many contacts to enroll in each batch. |
Repeat after | The interval between batches (number and unit: Days, Hours, or Minutes). |
Separate from enrolling contacts, you can also bulk-manage the workflows themselves from the list page, applying the same command to many workflows or folders at once.
Go to Automations > Workflows.
Optionally apply filters or open a smart list to narrow results.
Use item checkboxes to select either folders or workflows (you cannot mix the two in one selection).
Use Select All to choose all visible folders or workflows on the page.
Open the Select All dropdown to switch between All Workflows, All Folders, Published Workflows, and Draft Workflows.
From the bulk toolbar, choose an action:
Publish/Draft (workflows only)
Move (workflows or folders)
Delete (workflows or folders)
Manage Permissions (folders only)
Review the confirmation dialog, which shows how many items will be affected and any warnings, before applying.
Bulk actions respect user roles and folder permissions: options may be hidden or disabled if you lack permission. Select All targets only the visible items on the current page (or the filtered/smart-list results you can see). After moving items, workflows follow the structure and visibility of the destination folder, and you must have access to a destination folder to move items into it.
Advanced Filters and Smart Lists help you find and organize workflows on the list page. Advanced Filters are for one-time, on-the-fly narrowing; Smart Lists save a filtered view for repeated use.
Use Advanced Filters
Open Automations > Workflows.
Click Advanced Filters in the top-right to open the side panel.
Set filters by:
Triggers (for example "Form Submitted", "Appointment Booked")
Actions (for example "Send SMS", "Add Tag")
Tags assigned to the workflow
Other attributes (status Published/Draft, last updated date, last modified by)
For each filter, select a filter type, choose an operator (equals, contains, does not contain), then enter or select a value.
Add multiple filters to refine:
+ And Condition: all selected filters must match (for example Published AND Form Submission trigger).
Or Condition: matches at least one filter (for example Published OR a specific tag).
+ Add Filter Condition: match across different attributes for more flexibility.
Use the trash bin icon to delete a filter.
Click Apply to display matching workflows.
Use Smart Lists
After applying filters, click Save, then choose Save as New Smart List (or Discard Changes to reset).
The Smart List appears at the top of the Workflows page; clicking it instantly re-applies its filters.
To create one from scratch: click + Smart List, set filters, and Save.
To edit or delete: open the Smart List, click Customize List in the top-right, modify the filters or delete the list, and save any changes.
Smart List visibility follows roles: a Smart List a user creates is visible only to that user and admins; one an admin creates is visible to all admins but not regular users.
When you want to stop automated messages (such as texts or emails) from reaching a contact, unenroll them from the active workflow.
Open the contact in the Inbox and look at the contact card on the right-hand side.
Scroll down to Active Campaigns/Workflows, which lists every automation the contact is currently enrolled in.
Find the workflow you want to stop (for example a lead nurture workflow) and click the X button next to it.
Confirm with OK.
This unenrolls the contact and immediately stops any pending automated actions in that workflow.
The Allow Re-entry setting controls whether a contact can enter the same workflow more than once. Turn it off to ensure a contact only ever goes through a workflow a single time; turn it on to let them re-enter (for example a recurring promotion).
Click Marketing.
Click Workflows.
Navigate to the workflow you want to edit.
Click Edit Workflow.
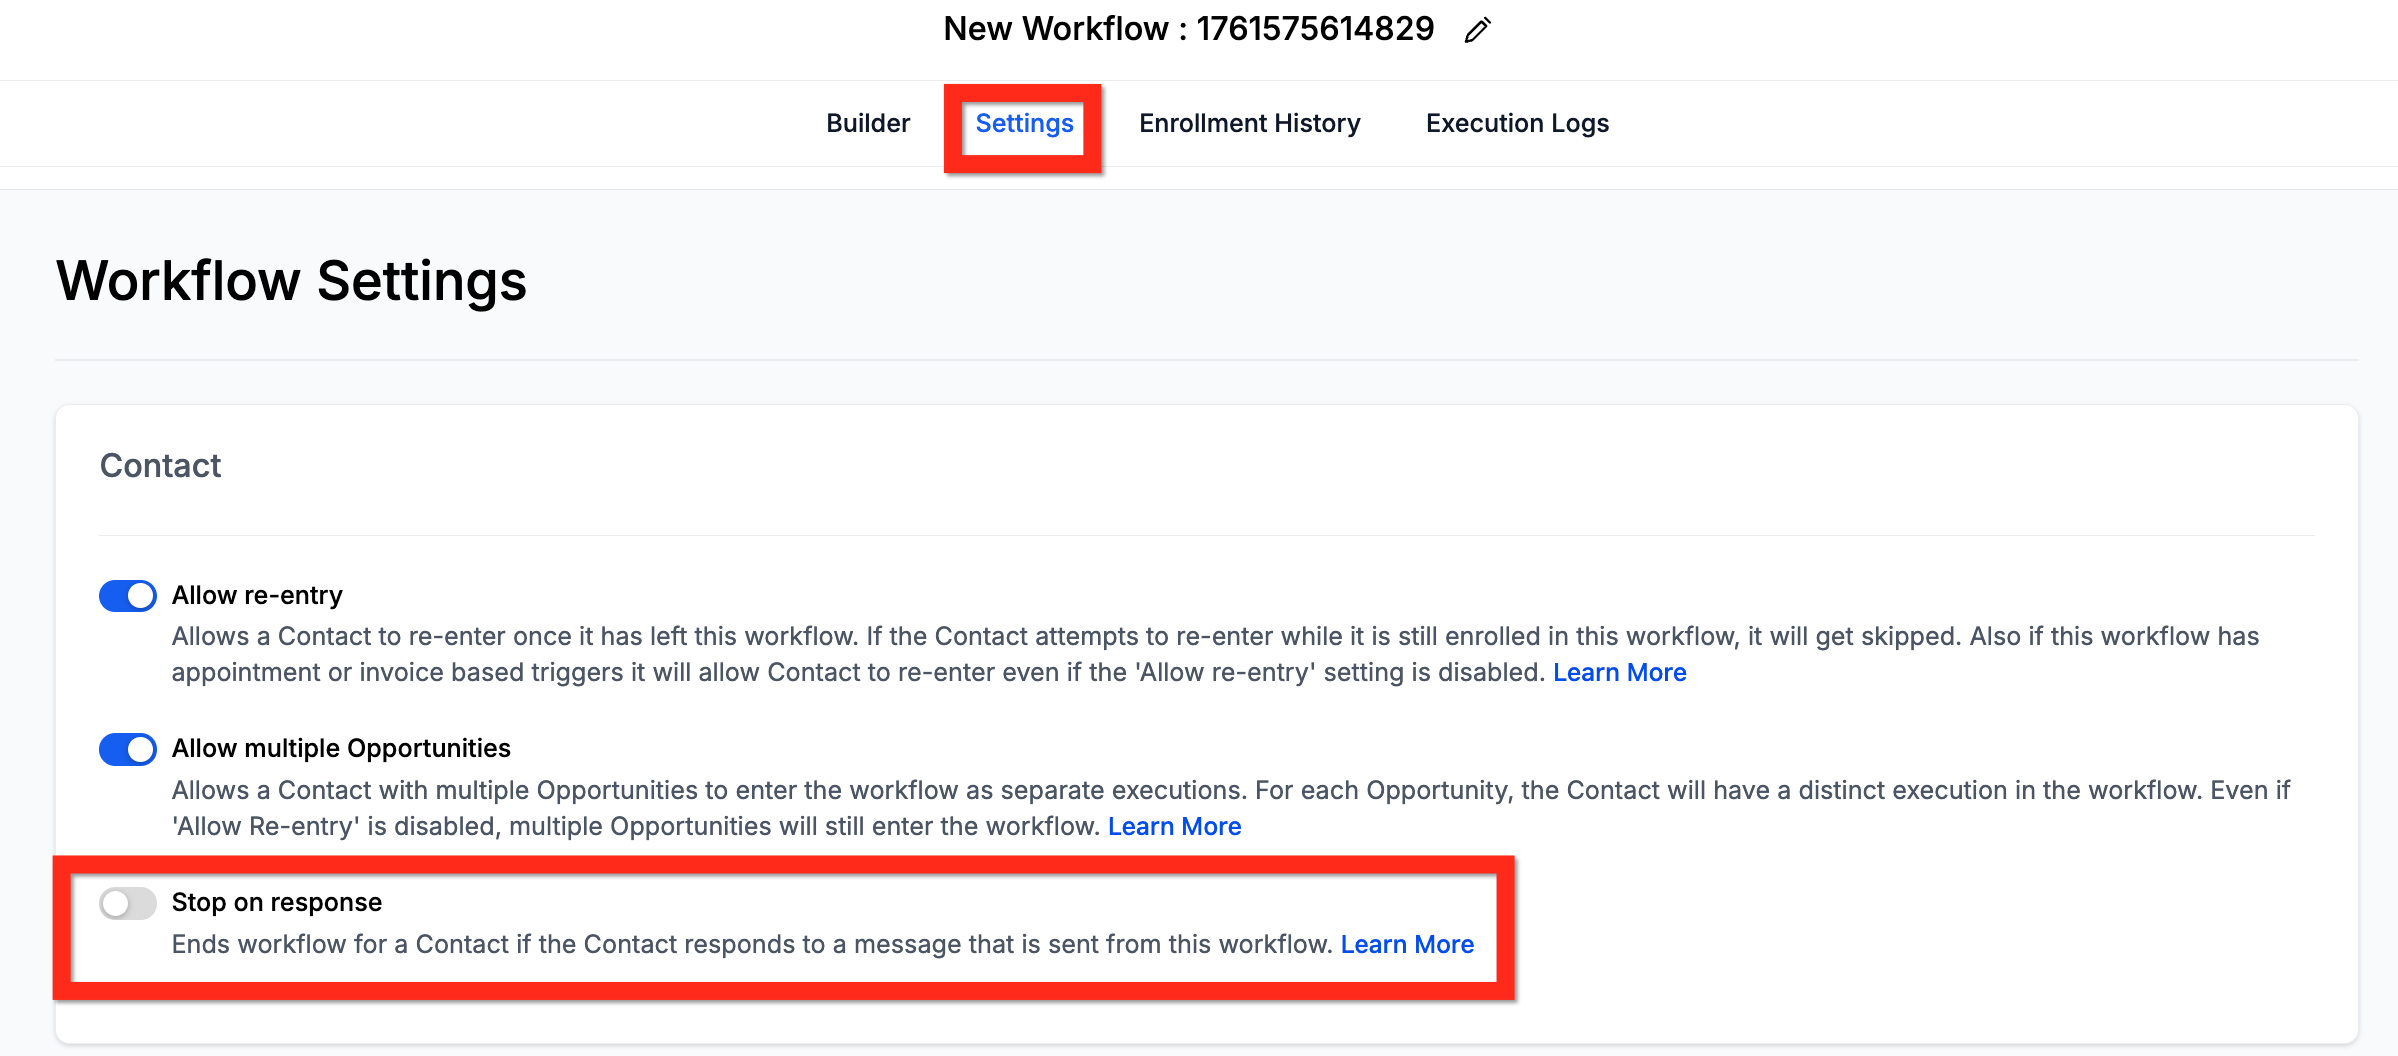
Click Settings.
Toggle off if you do not want contacts to re-enter, or toggle on to allow re-entry.
Click Save to keep your changes.
You can copy a single action or a whole block of actions from one workflow and paste them into another within the same account. This speeds up building and keeps logic consistent without rebuilding steps from scratch.
Step 1: Copy the action(s)
Navigate to Automation > Workflows.
Open the workflow that contains the action you want to copy.
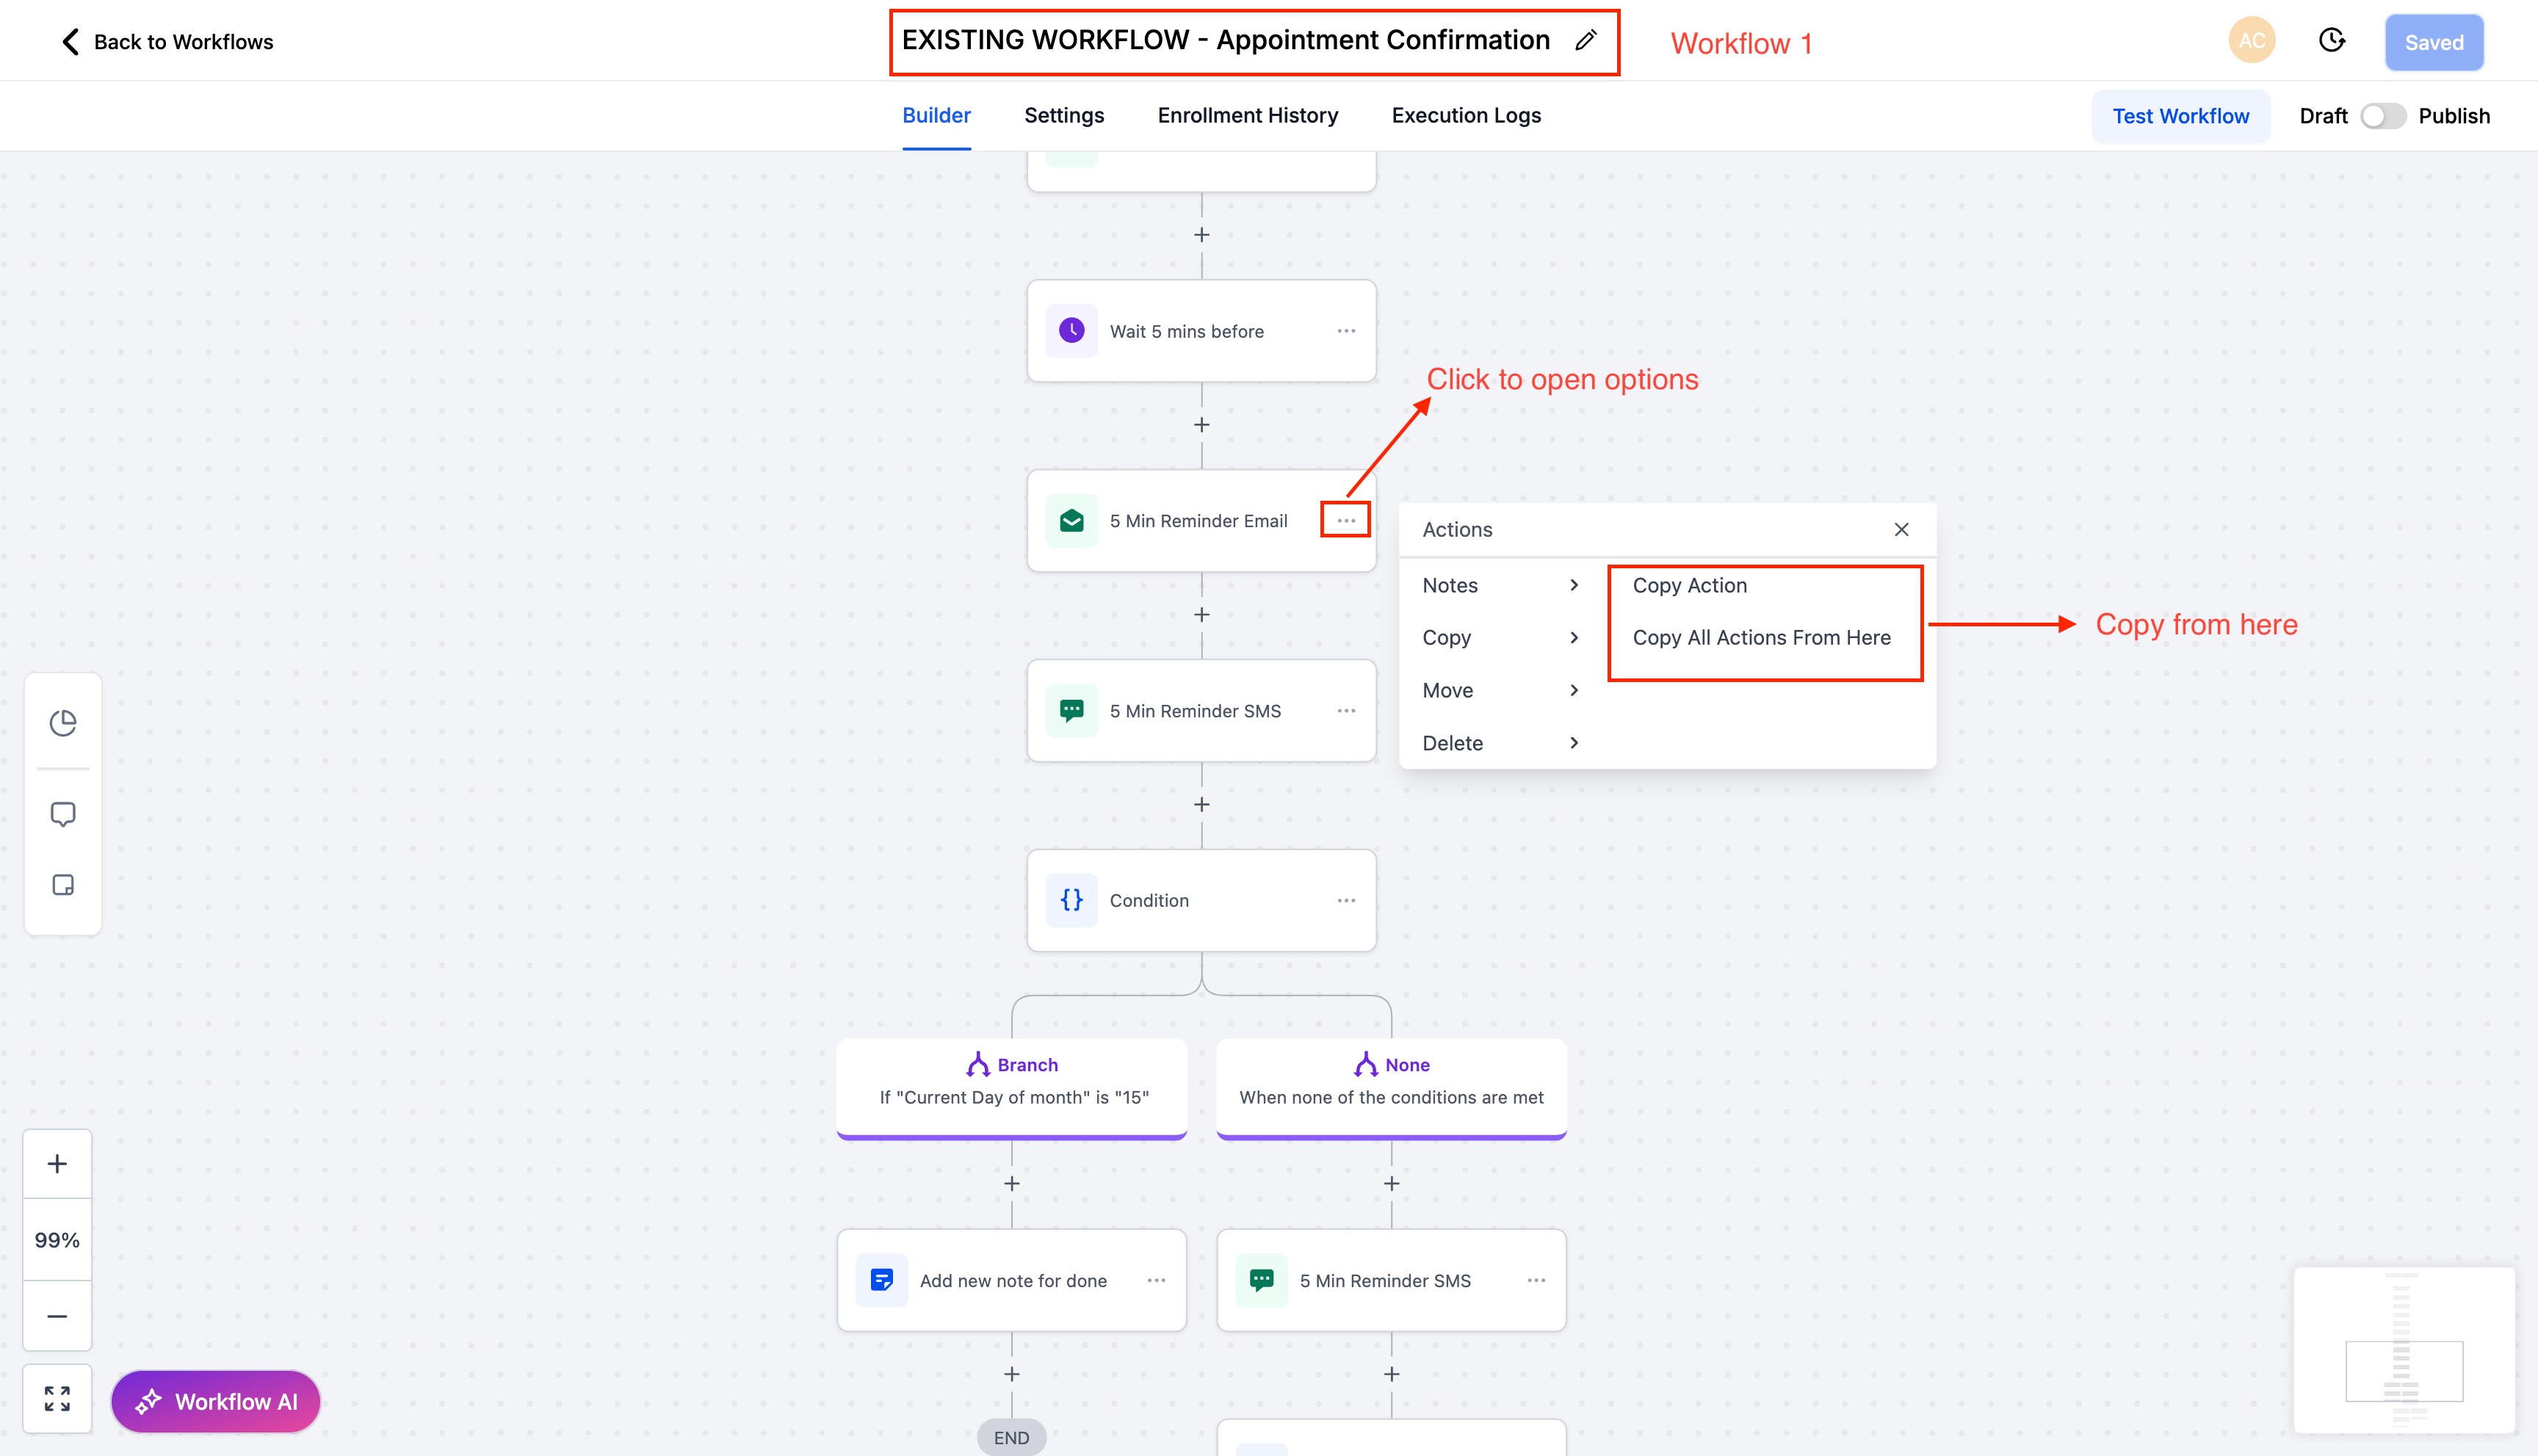
Locate the action and click its three-dot menu.
Choose:
Copy Action (single step), or
Copy All Actions From Here (copies a block starting at that action).
Step 2: Paste into the target workflow
Open the workflow where you want to paste (same tab or another tab in the same account).
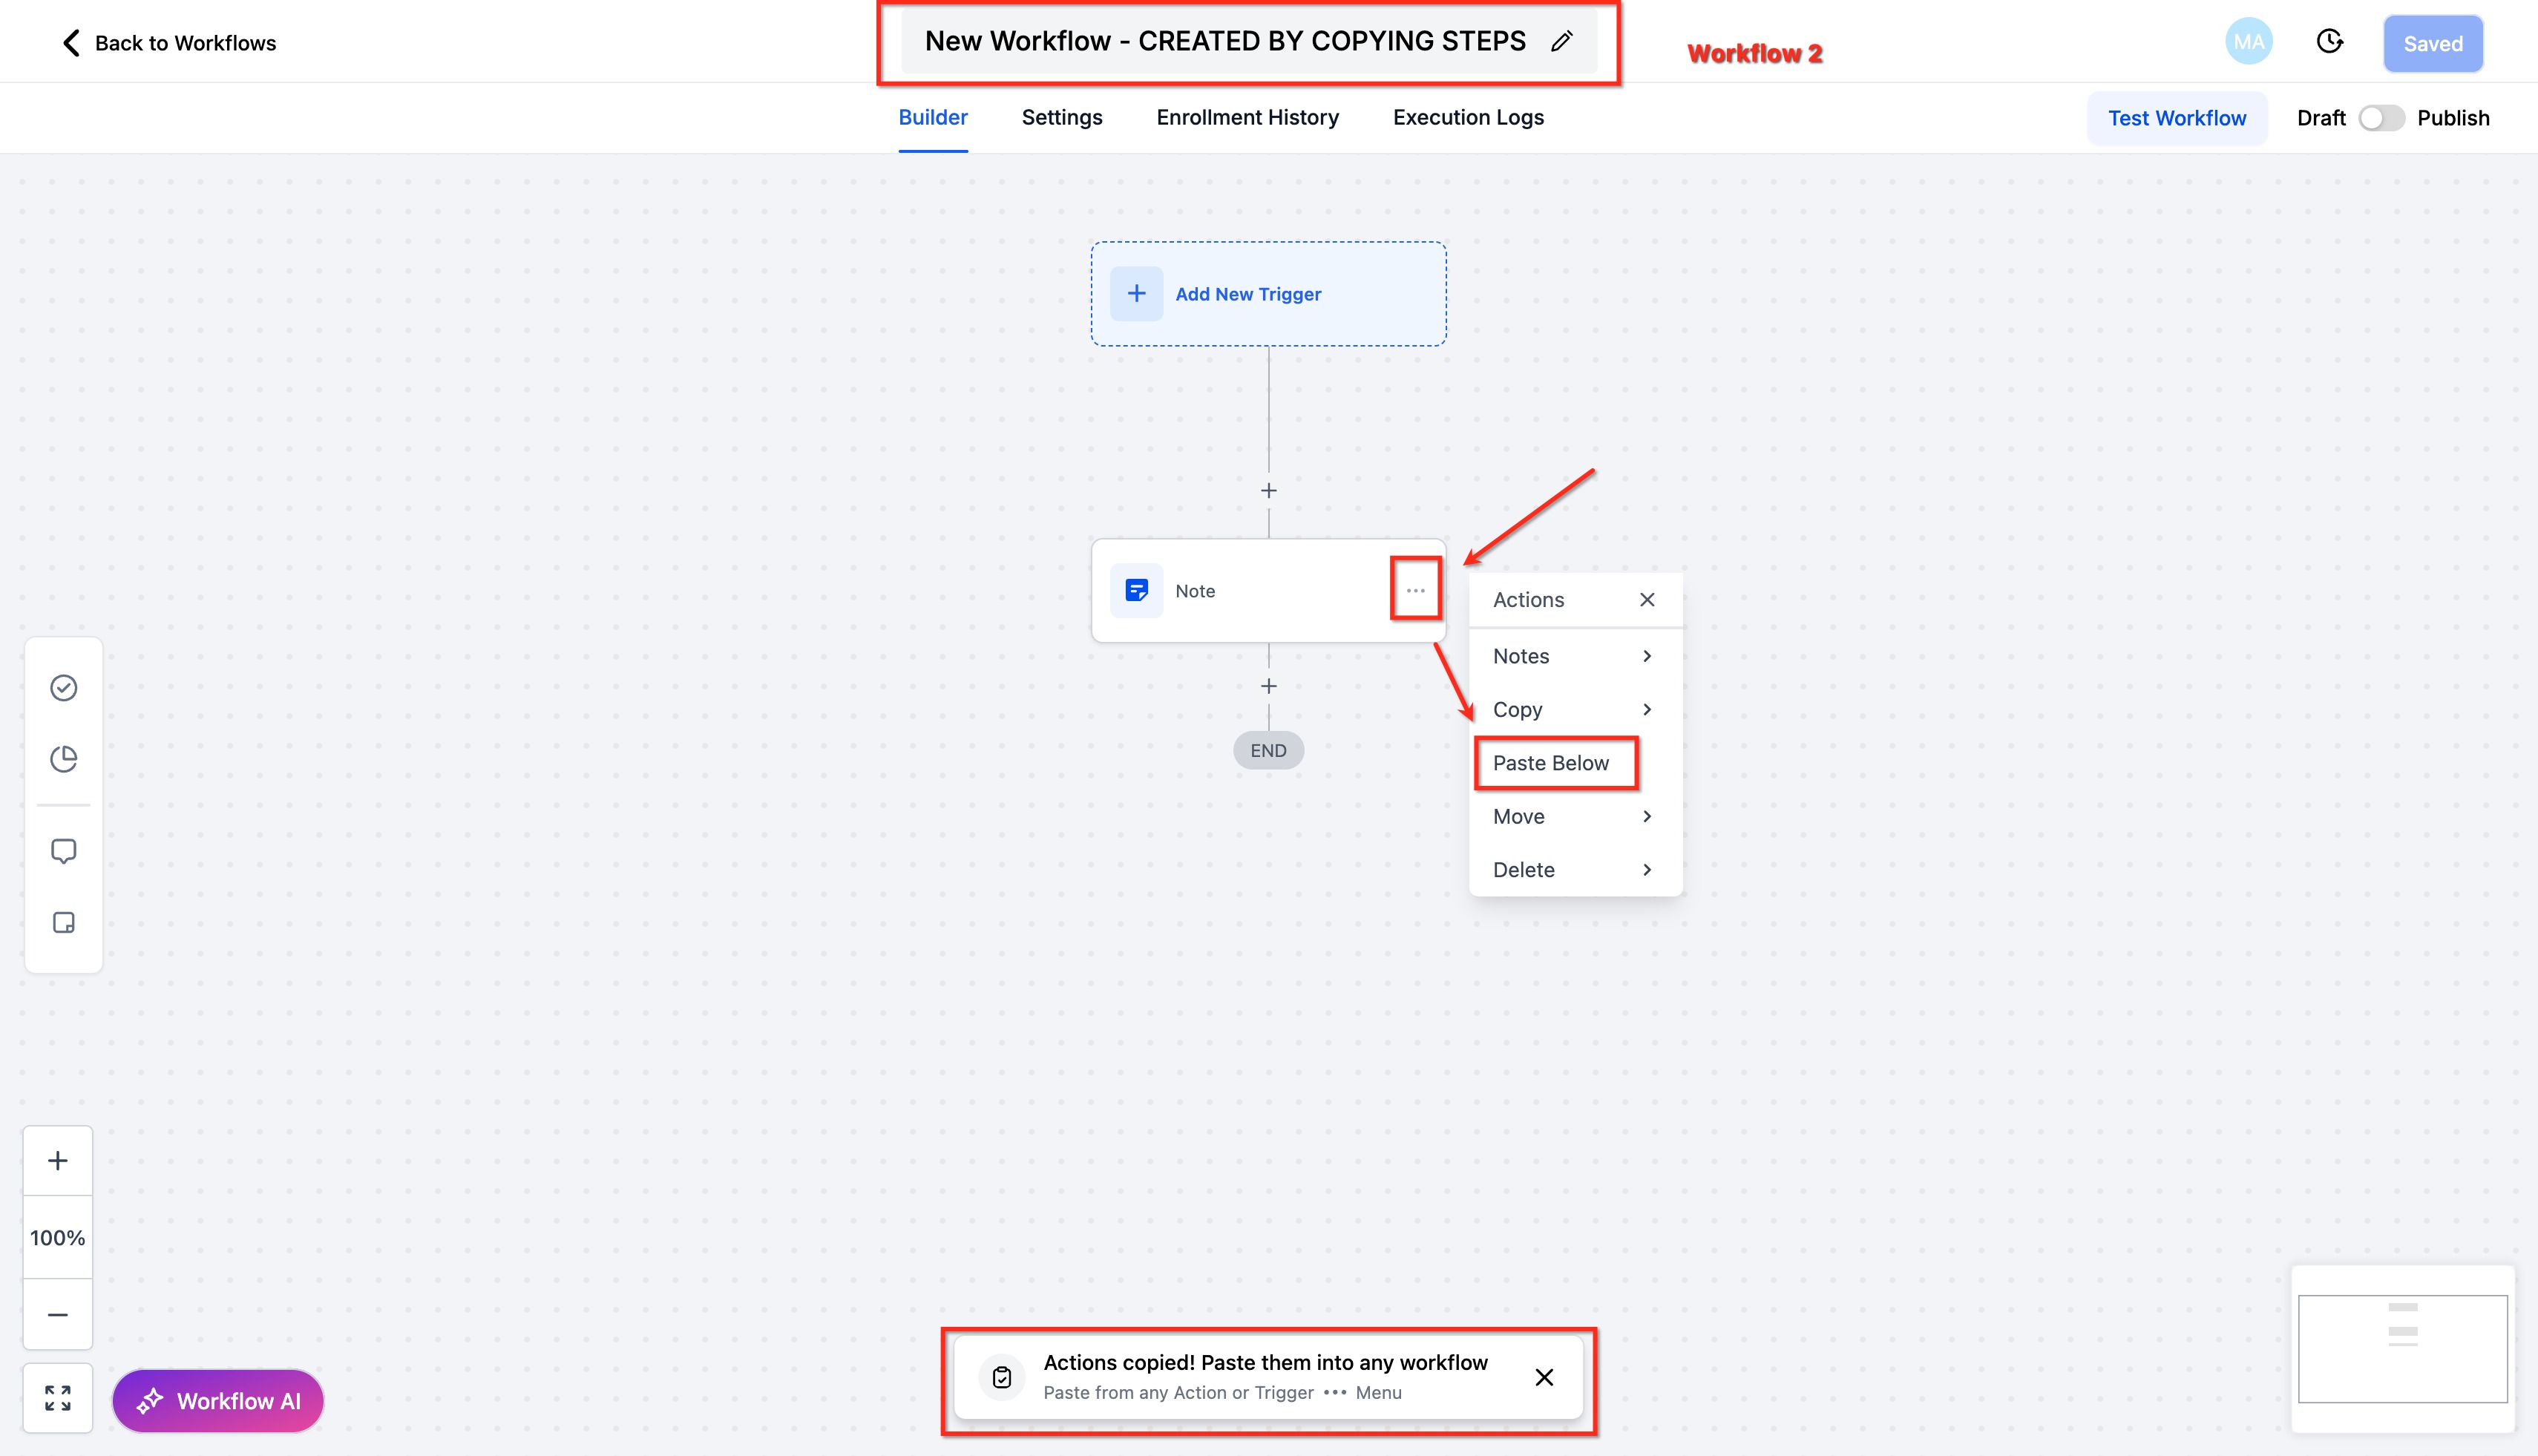
To paste, either:
Click Quick Paste next to the + button where you add new actions, or
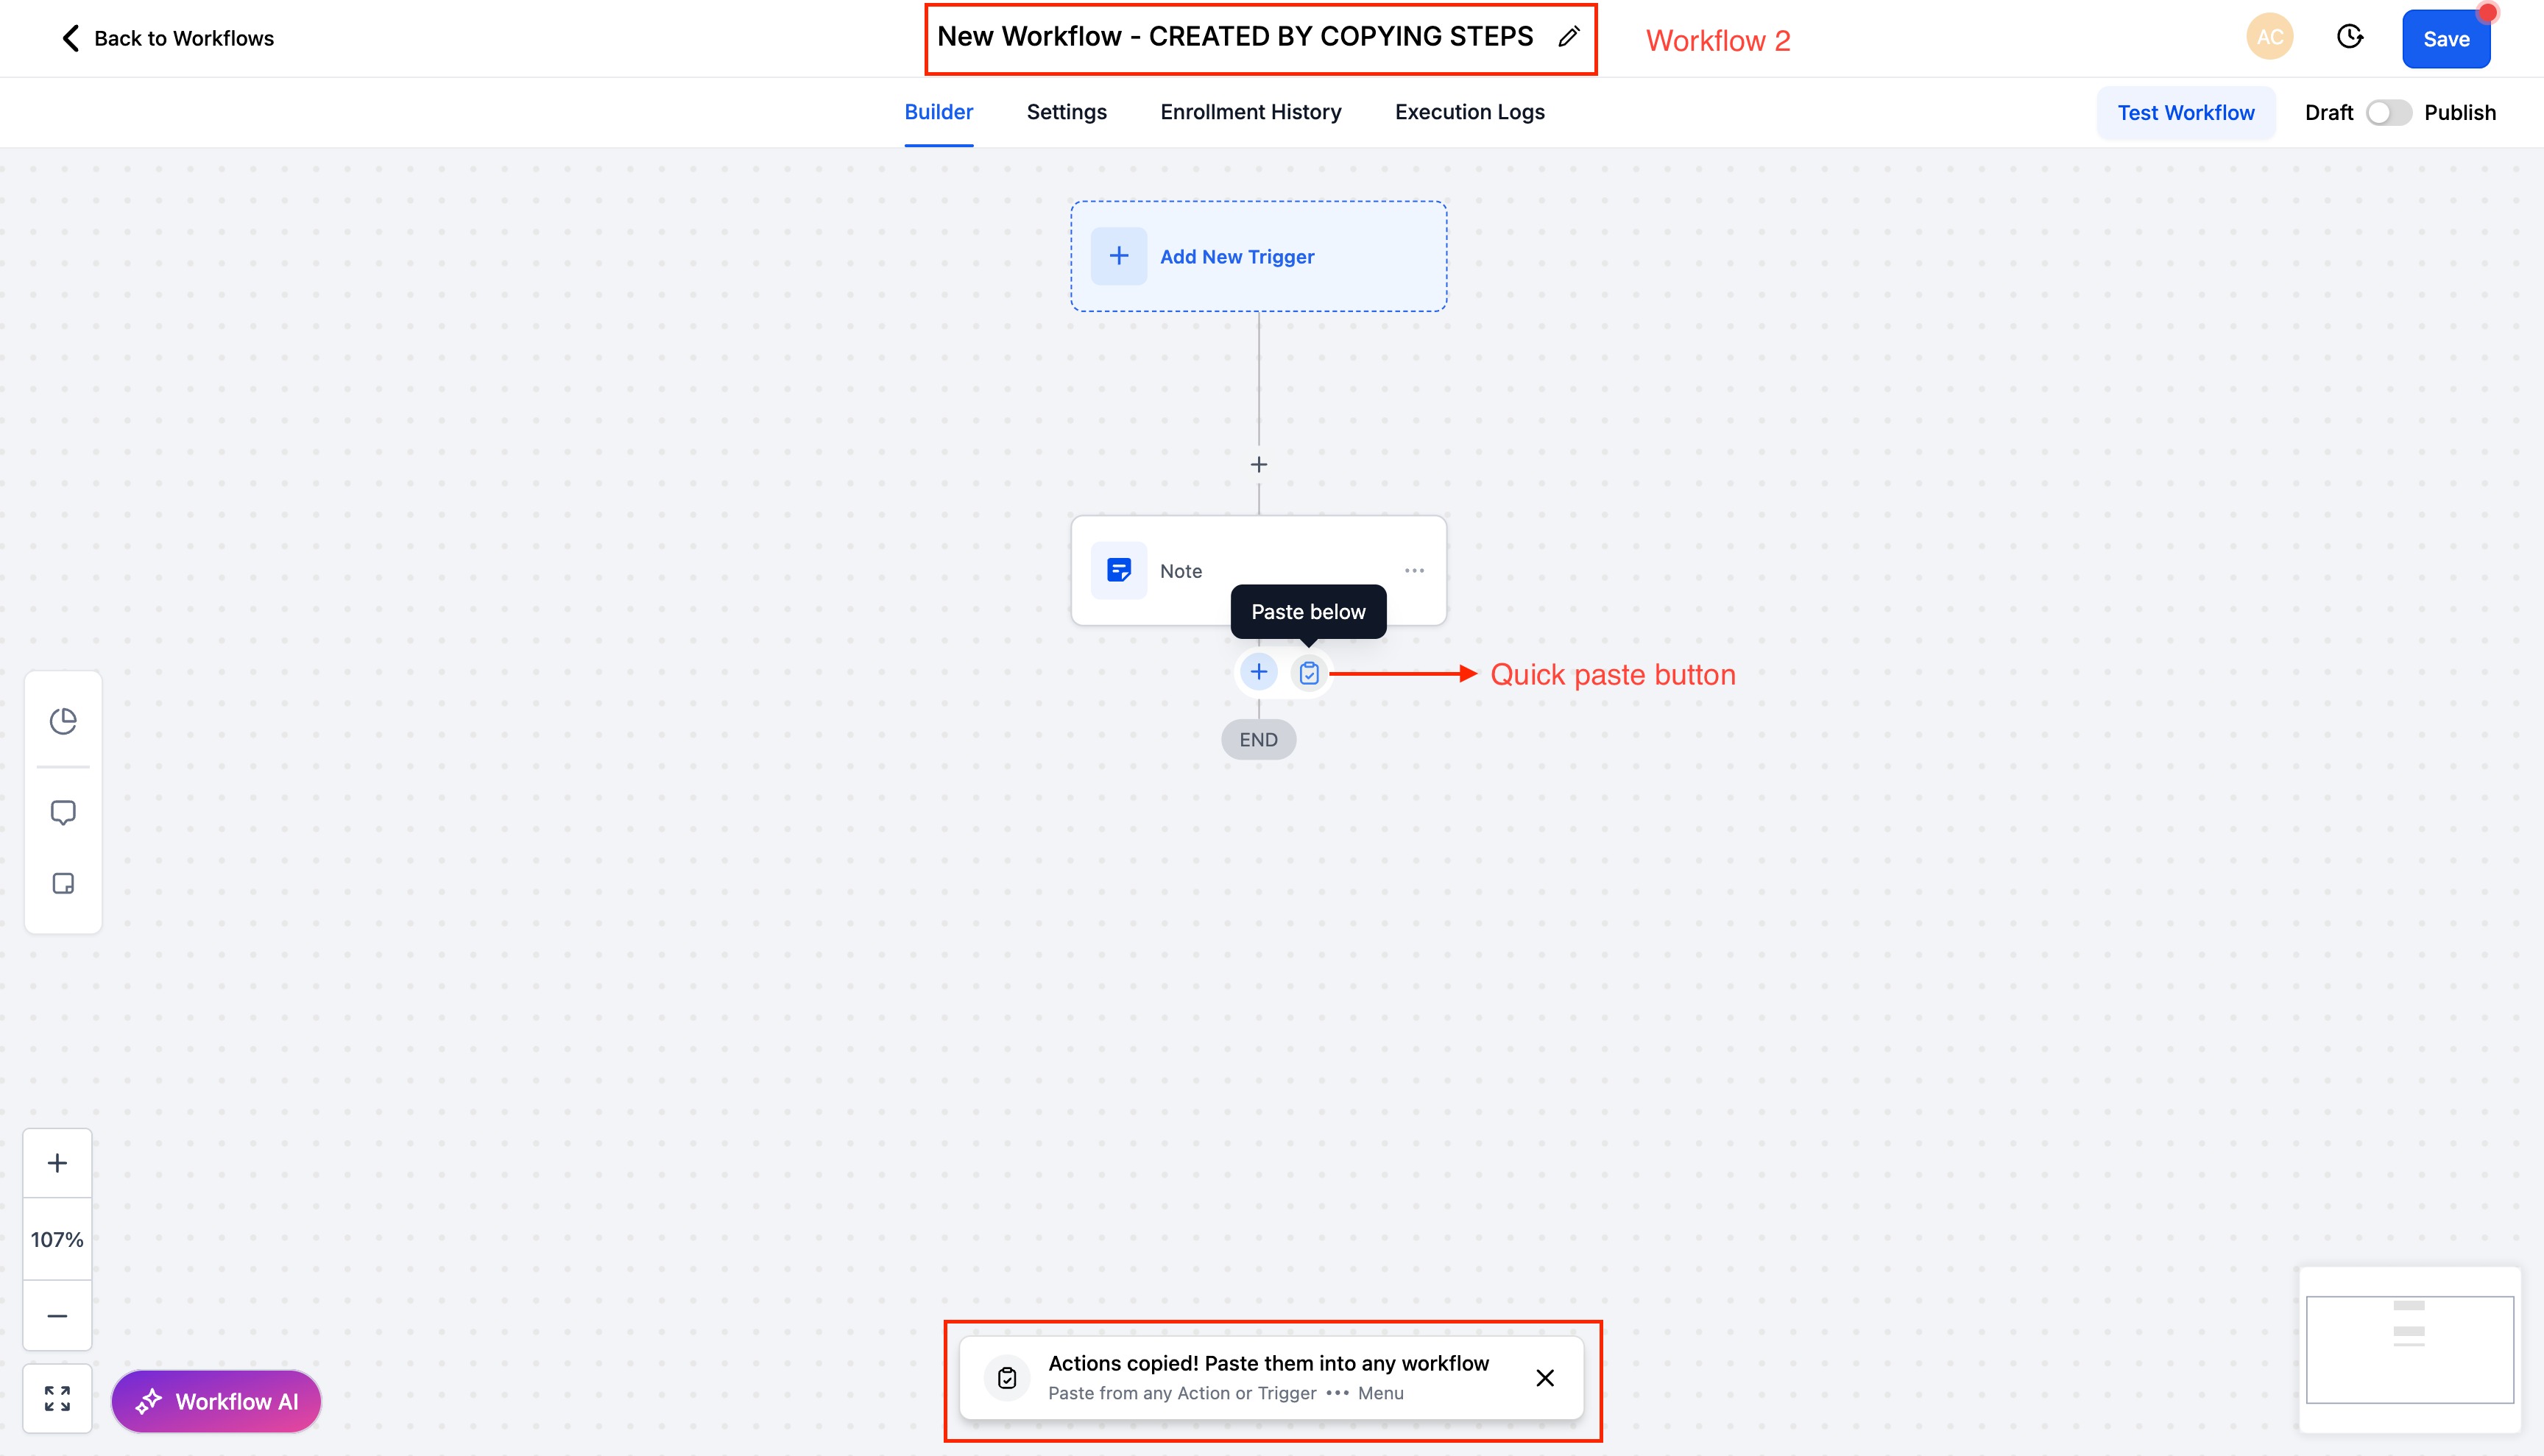
Open any action's three-dot menu and select Paste Below.
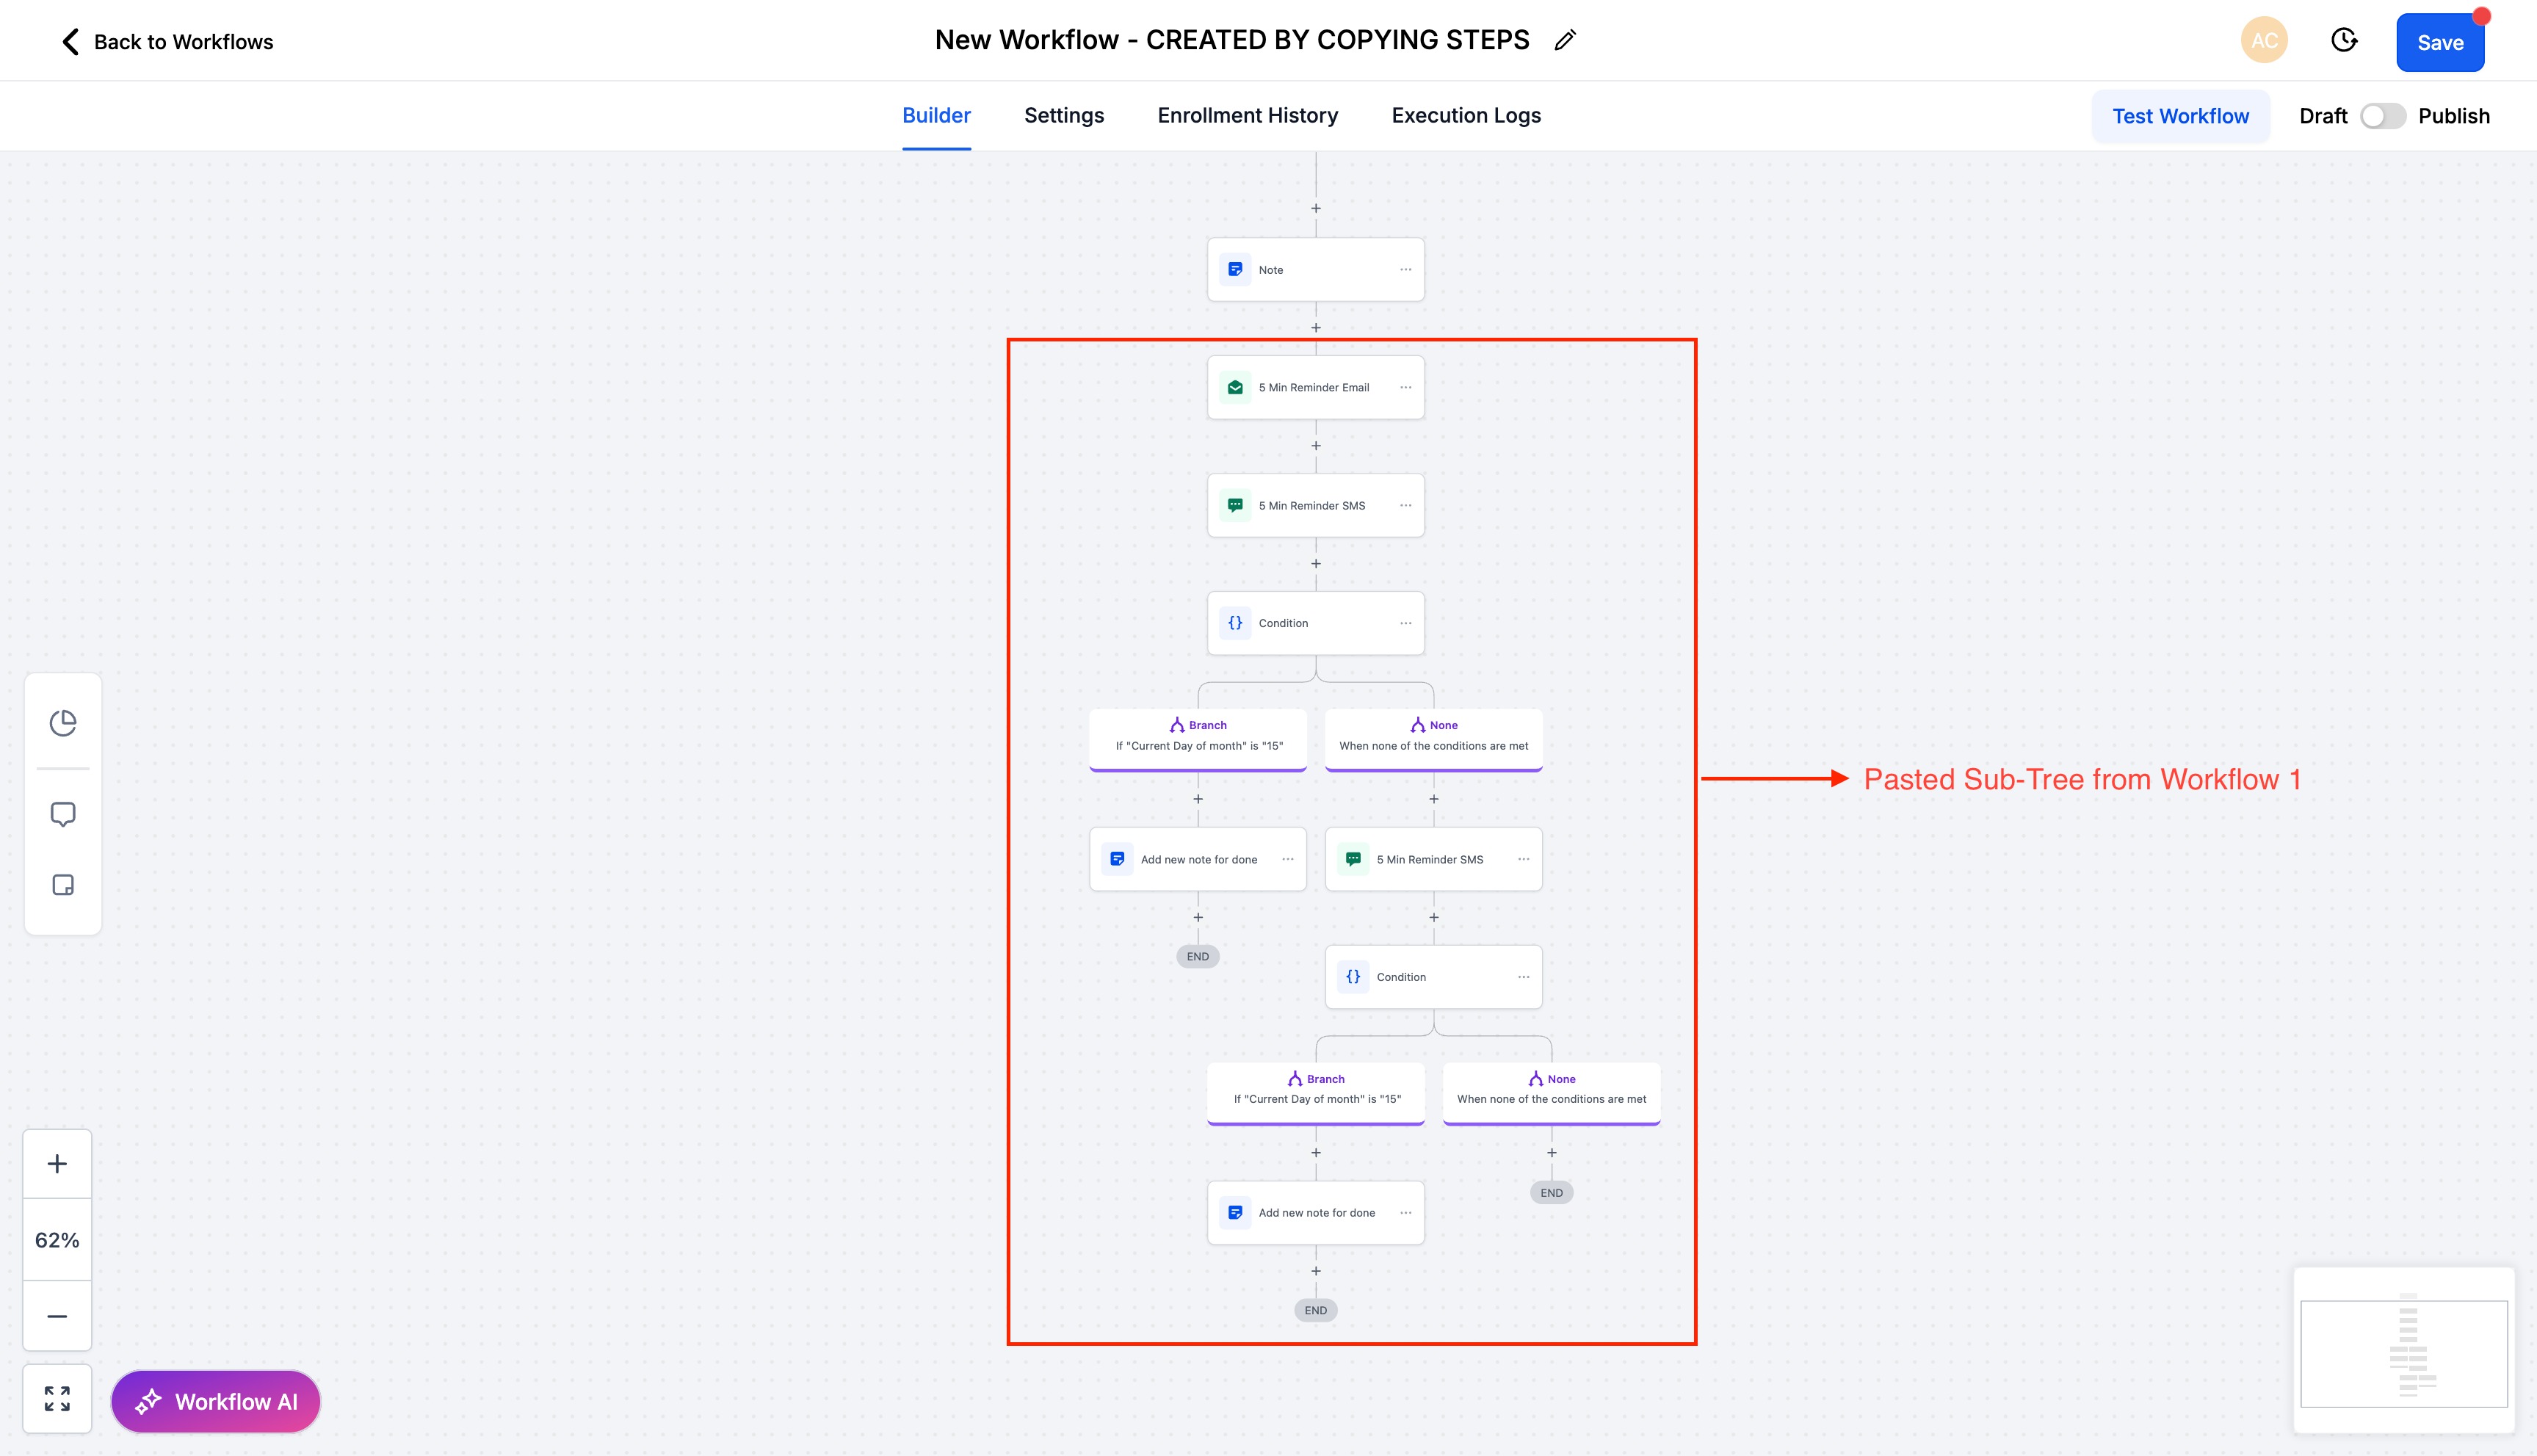
Step 3: Review and save
Review the pasted actions and confirm the assets and logic are correct.
Click Save to finalize.
Clipboard and retention rules
Copied actions stay available to paste for 15 minutes, and you can paste multiple times during that window.
When the window expires, paste options no longer insert content; copy the actions again to continue.
Copy/paste works across browser tabs as long as you stay signed in to the same account.
Triggers are not copied, only actions. If referenced assets exist in the same account, references persist, but always review after pasting.
Before saving, you can delete or move pasted actions, so confirm placement and settings first. Copy does not work across different accounts.
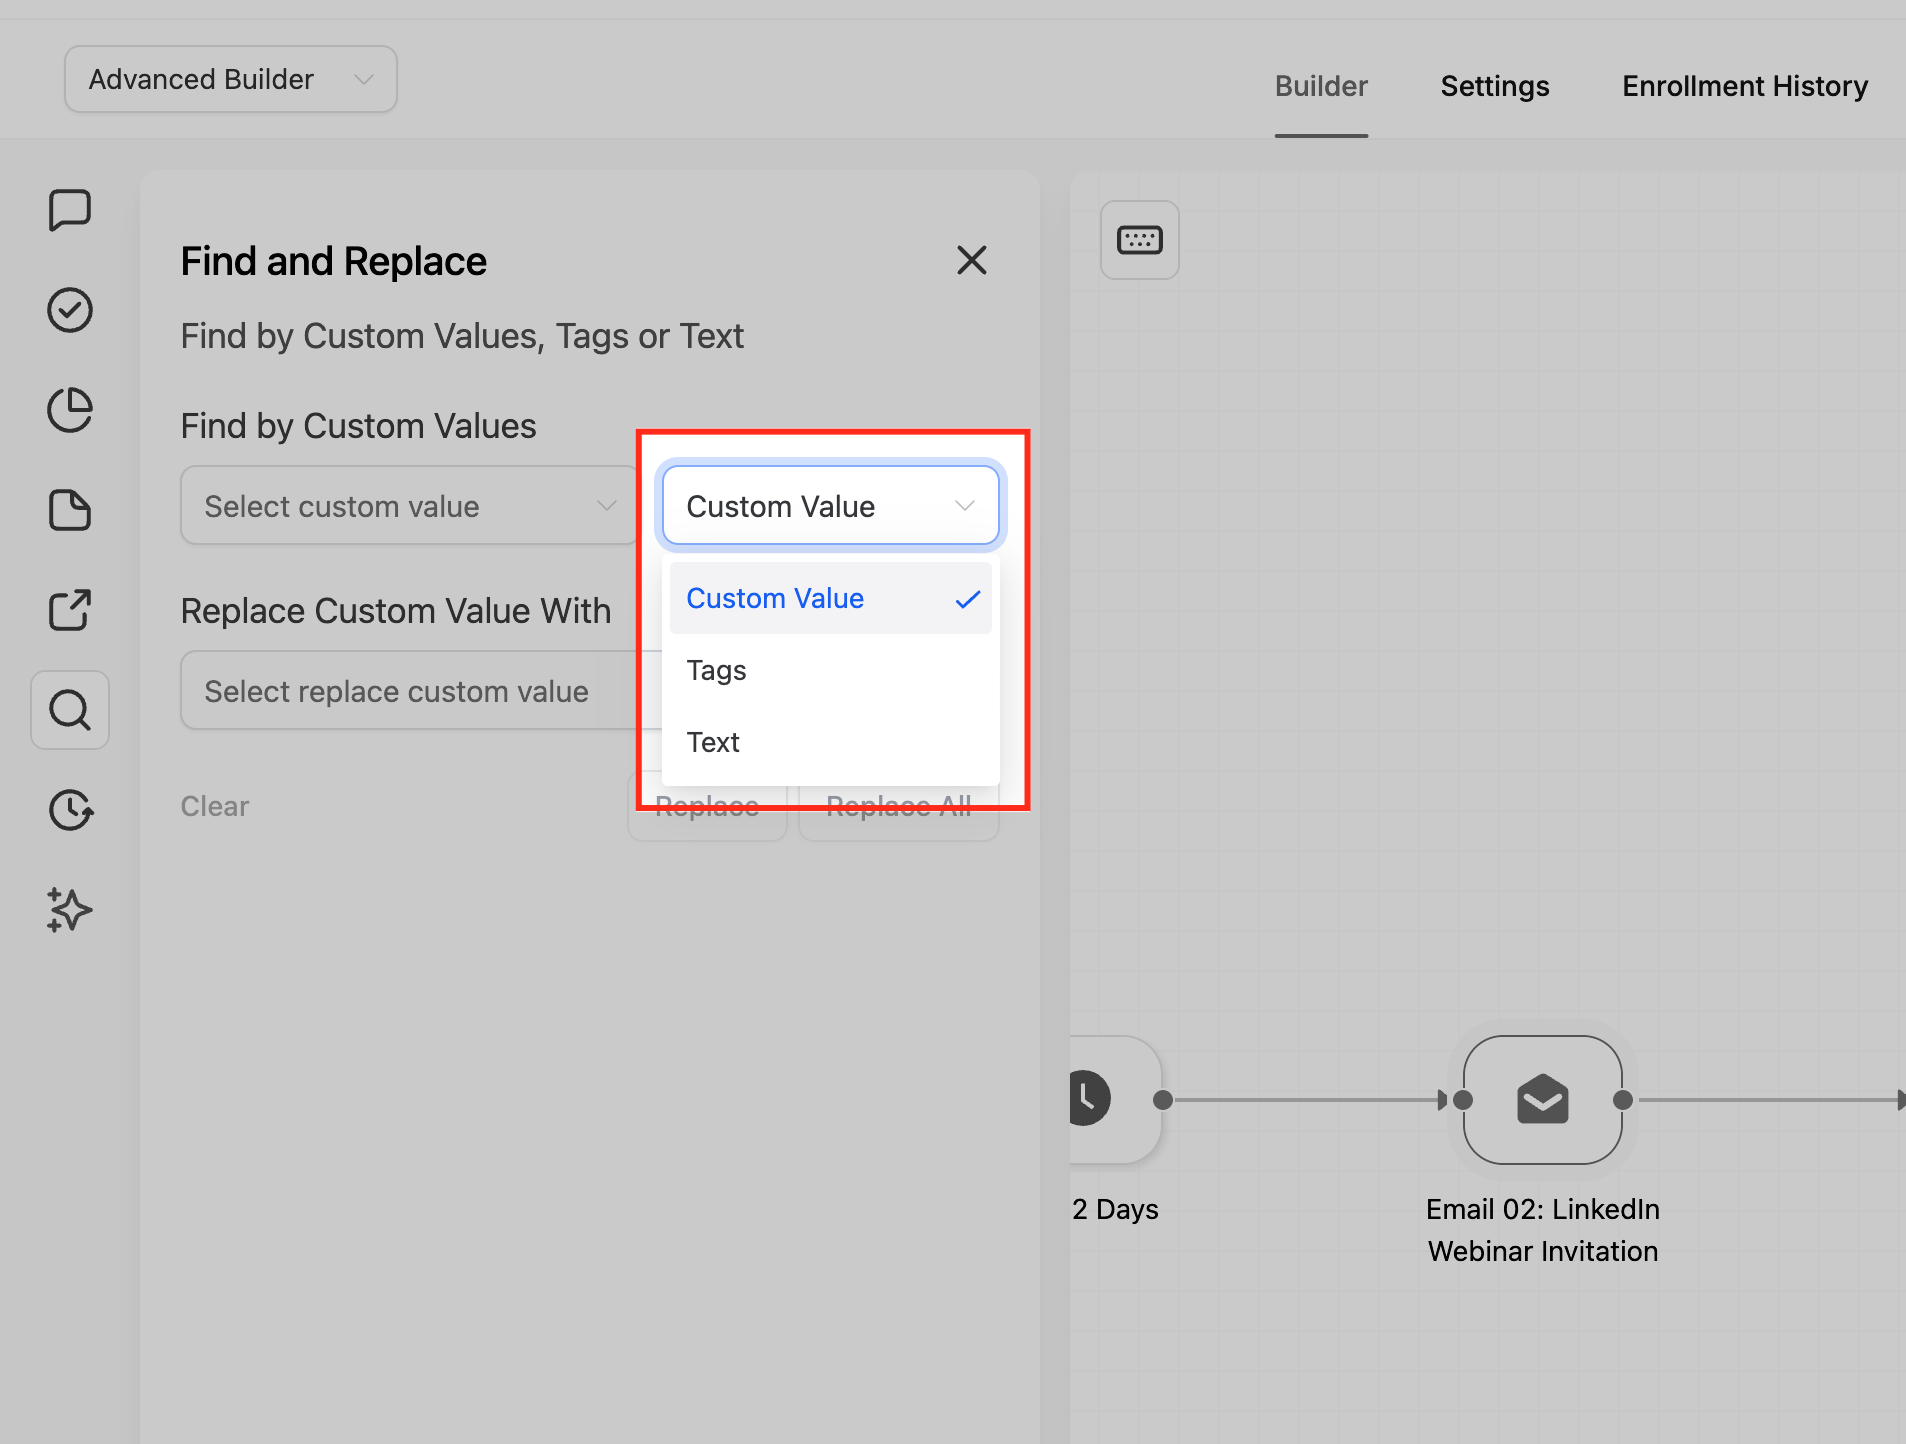
Workflow Find and Replace is a built-in search and bulk-edit tool inside the Workflow Builder. It locates where a specific custom value, tag, or text string is used in a single workflow, and can replace supported items in a few clicks instead of opening each action one by one. It works in both the Standard and Advanced Builder.
Search modes
Custom values: finds usages of custom values inside actions like email, SMS, and conditions. Ideal when you updated a global value and want every step to use the new one.
Tags: finds where specific contact tags are referenced, including add/remove-tag actions and tag-based conditions (for example swapping "HighPriority" for "Urgent").
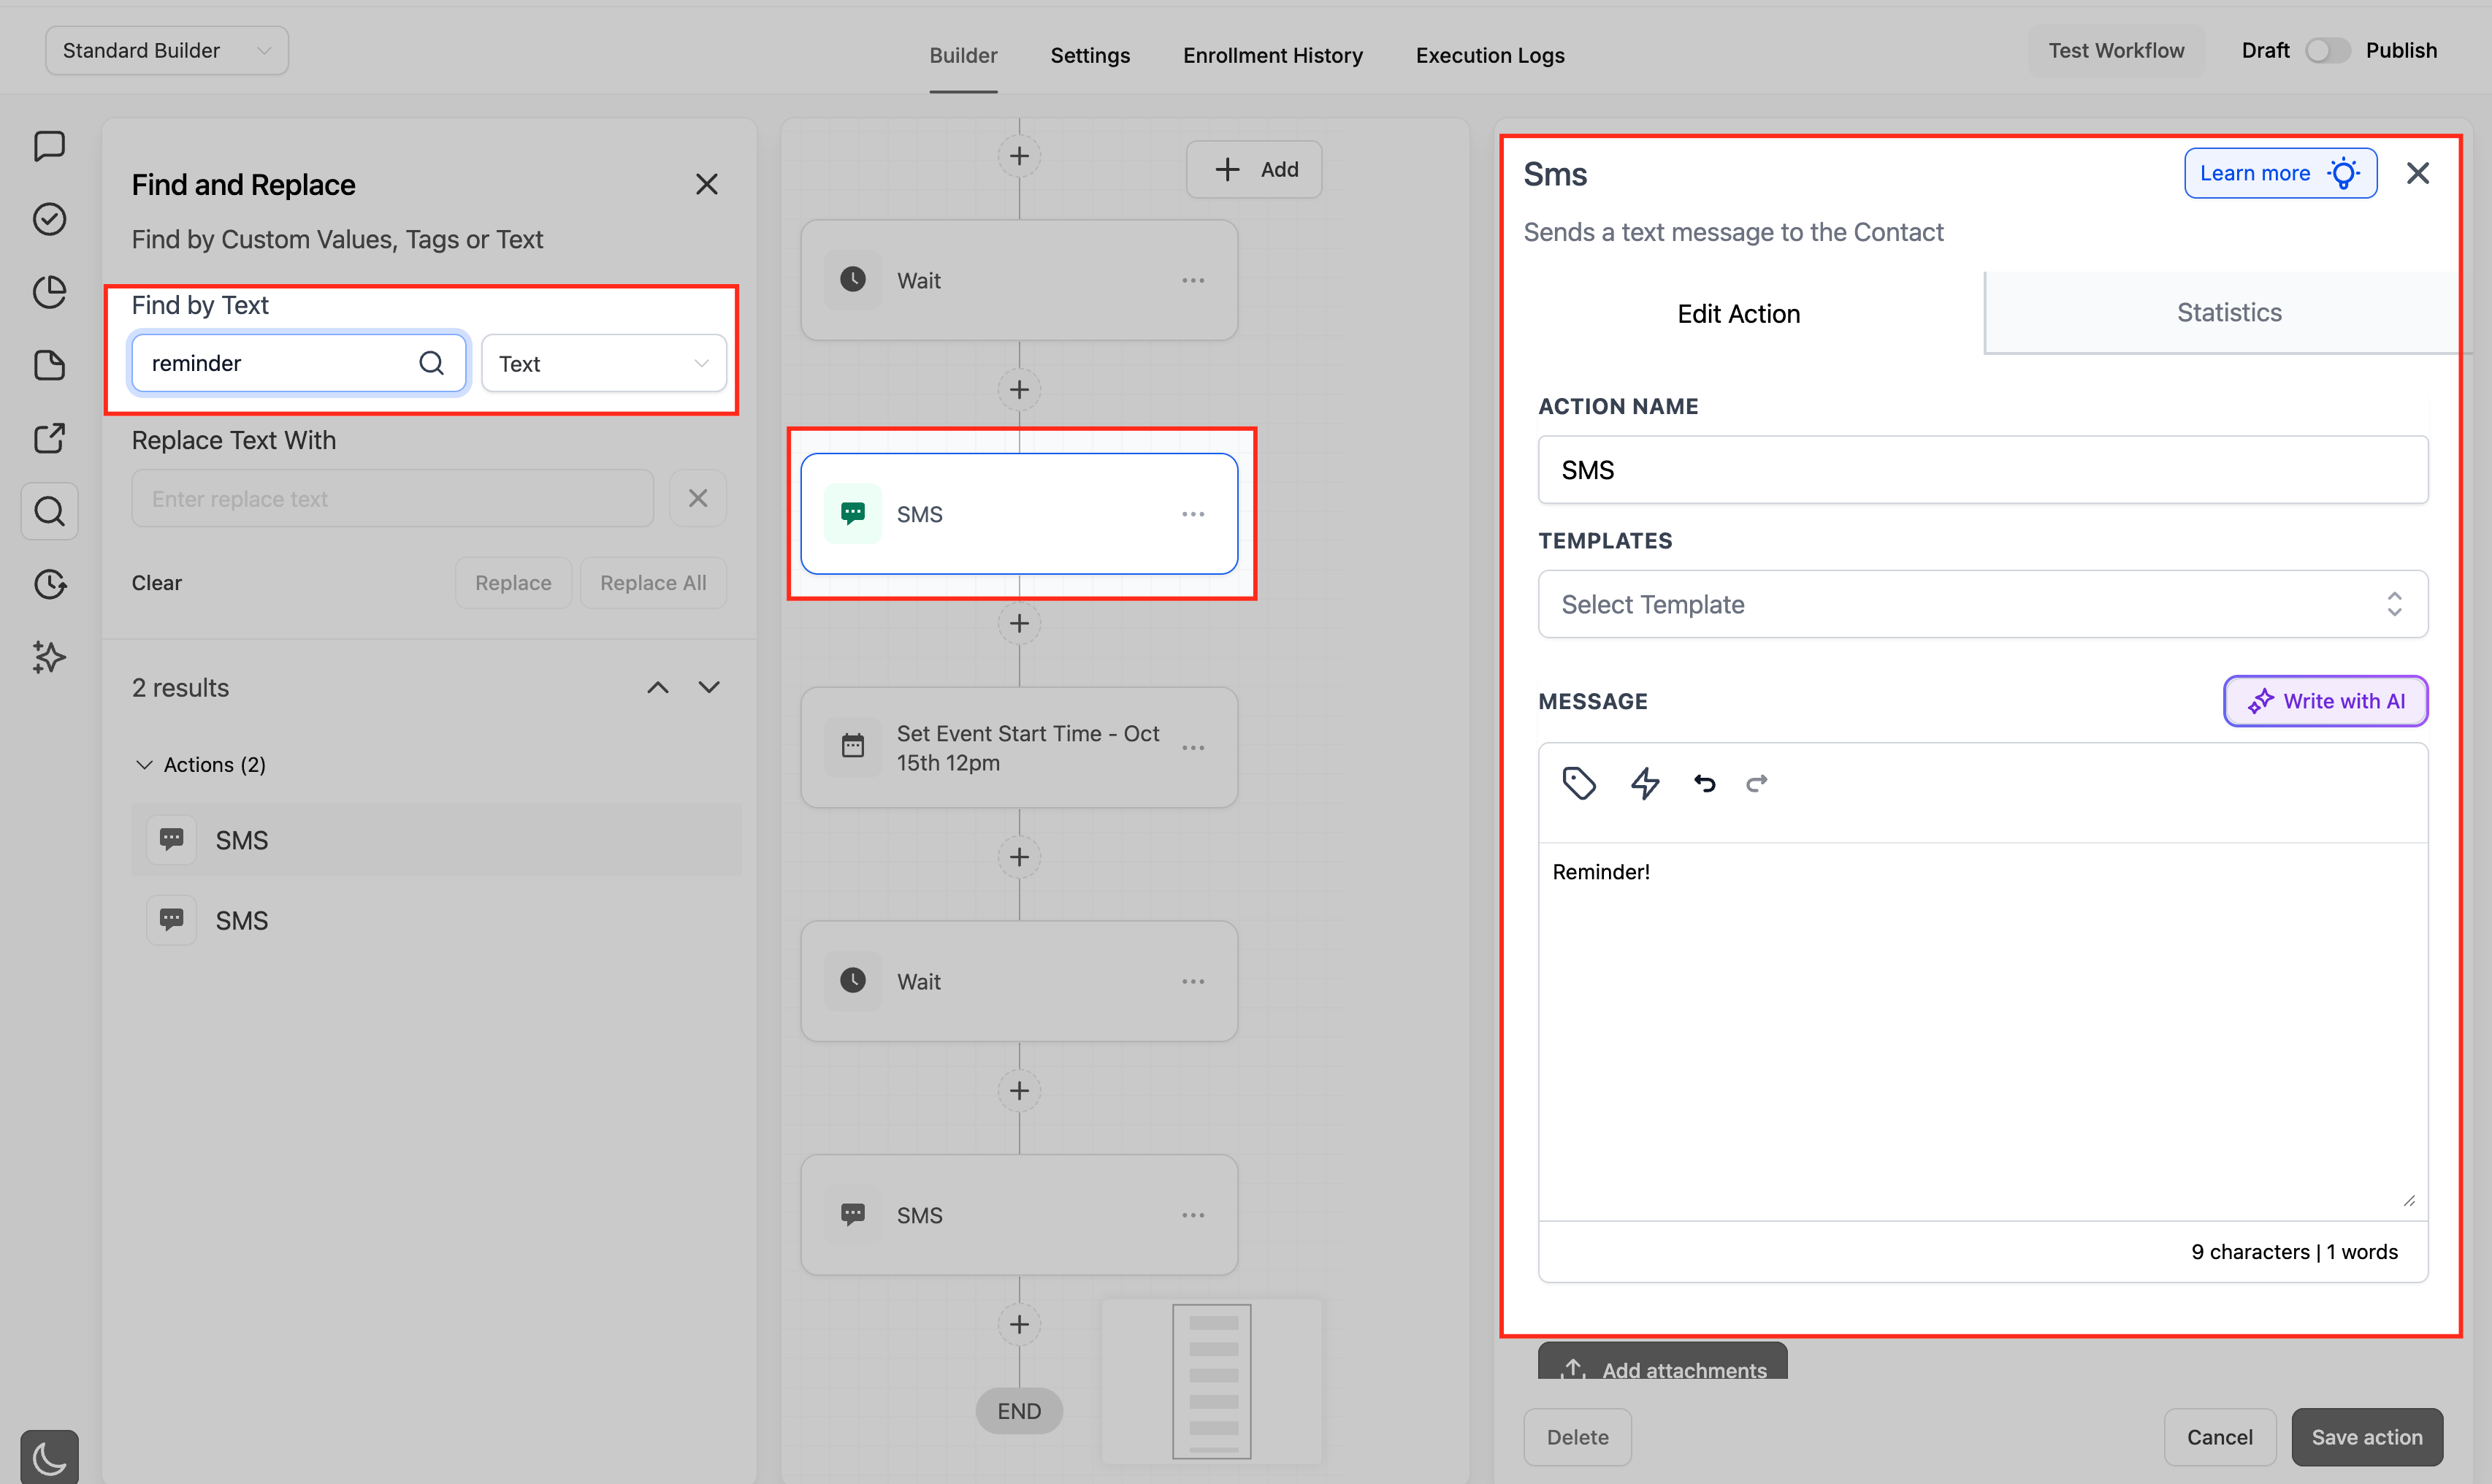
Text: searches text strings in step content and configuration, including message bodies and many field labels. Step names and trigger names are discoverable by text search but cannot be replaced in this release.
Search is case-insensitive and supports partial matches.
Open the Find panel and navigate results
Open any workflow from Automation > Workflows and switch to Standard or Advanced Builder.
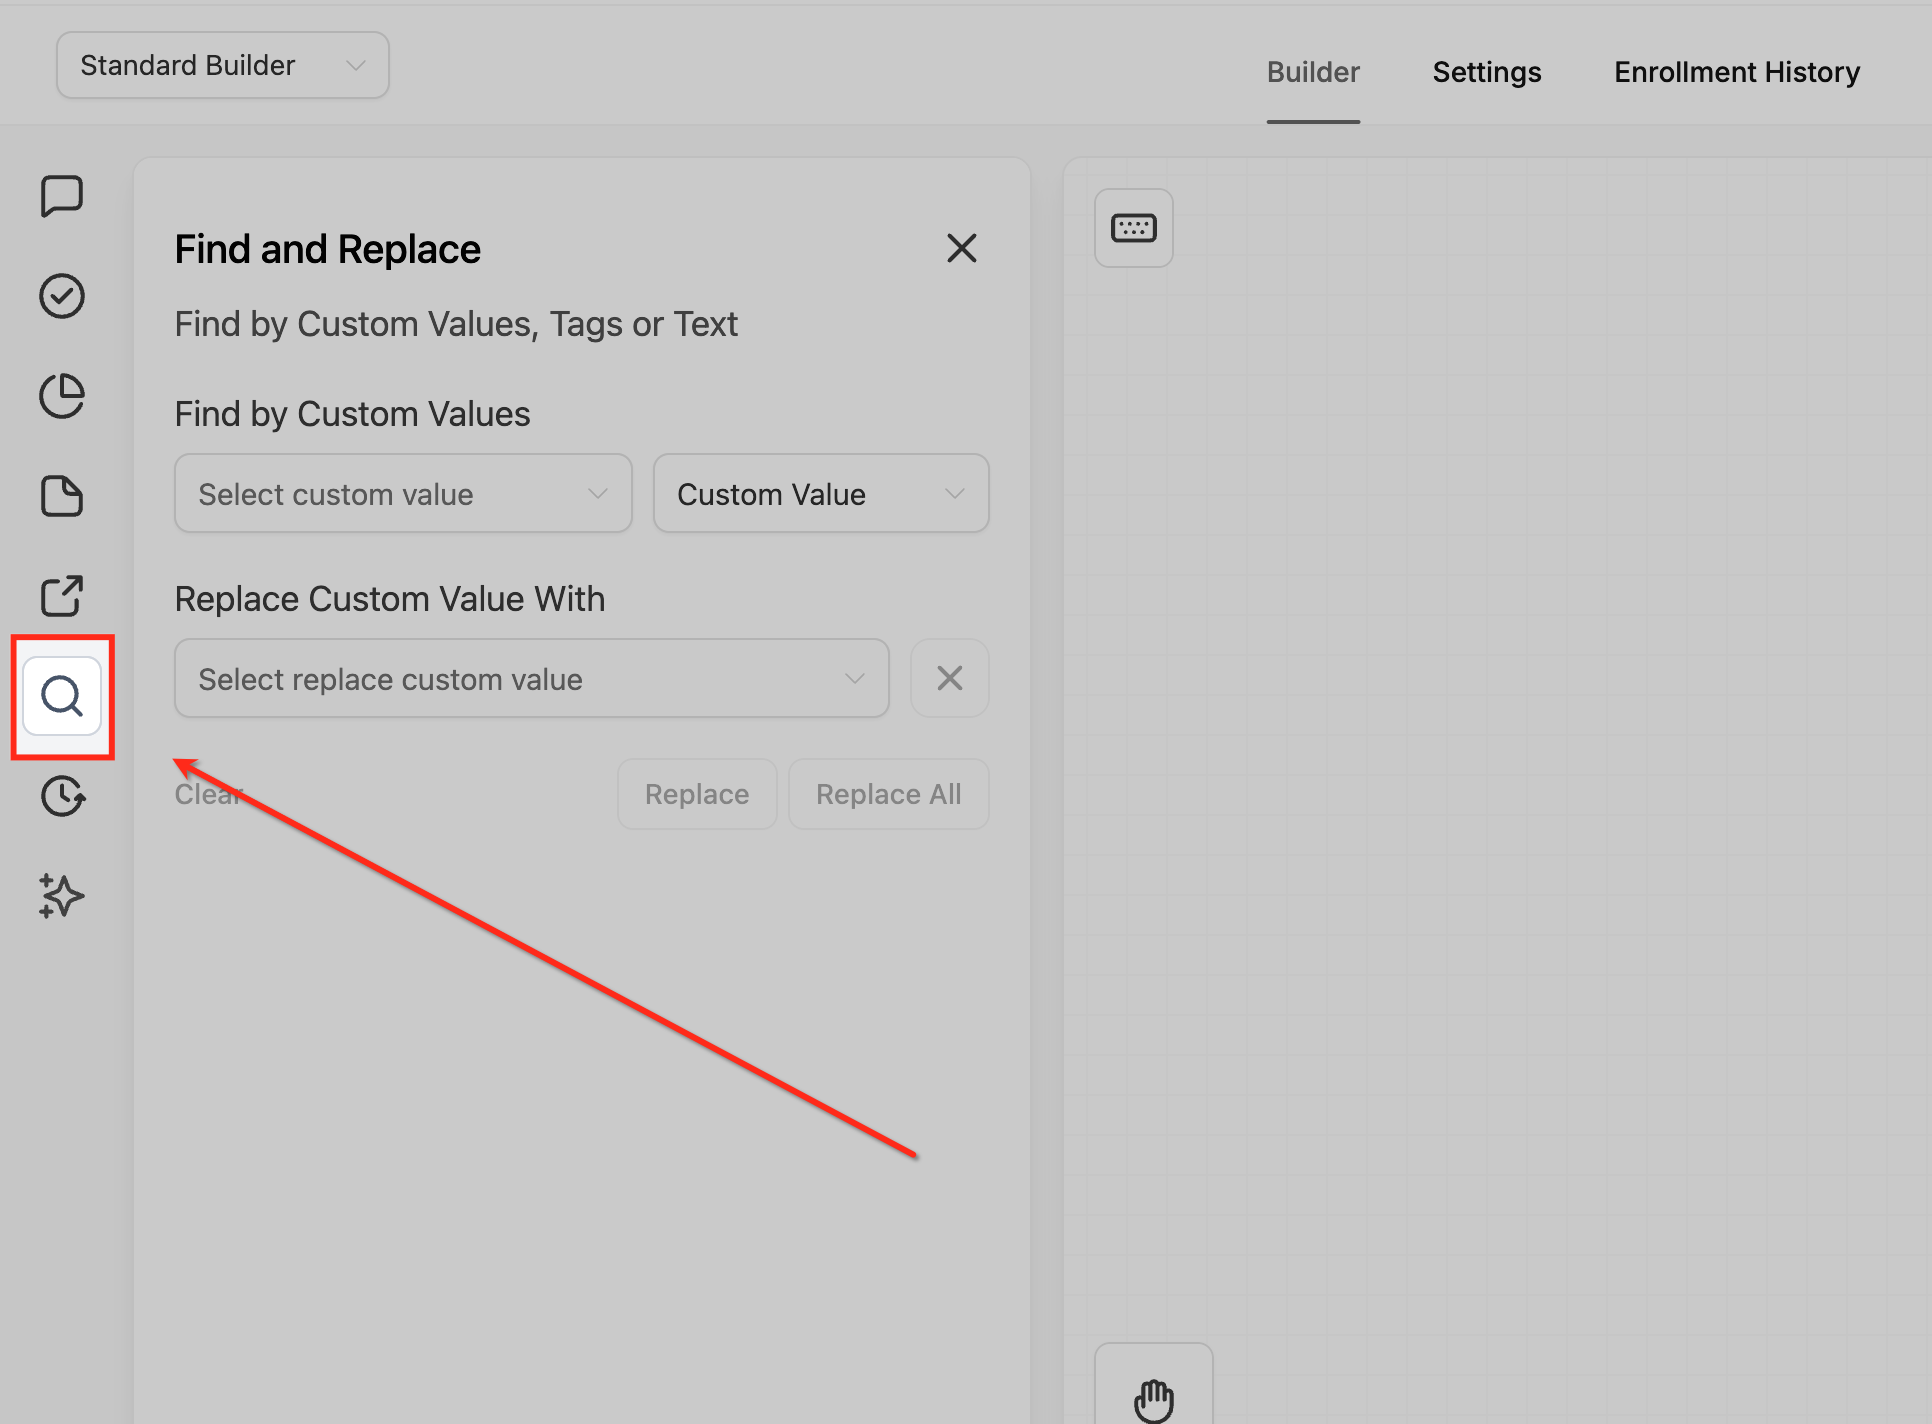
Click the search icon in the workflow toolbar, or use the keyboard shortcut:
Windows/Linux: Alt + F
macOS: Option + F
In the Find panel, choose Custom values, Tags, or Text, then enter your search term.
As soon as you search, matching results appear instantly in a list, the first result opens automatically, and the builder pans/zooms to that node. Use the Next/Previous controls to move between matches; the builder jumps to each selected step and keeps it centered.
Replace and Replace All
Enabling Replace unlocks bulk editing for supported match types:
Supported: custom values and tags.
Not supported: step names and trigger names can be found via text search but cannot be replaced in this version.

How Replace works:
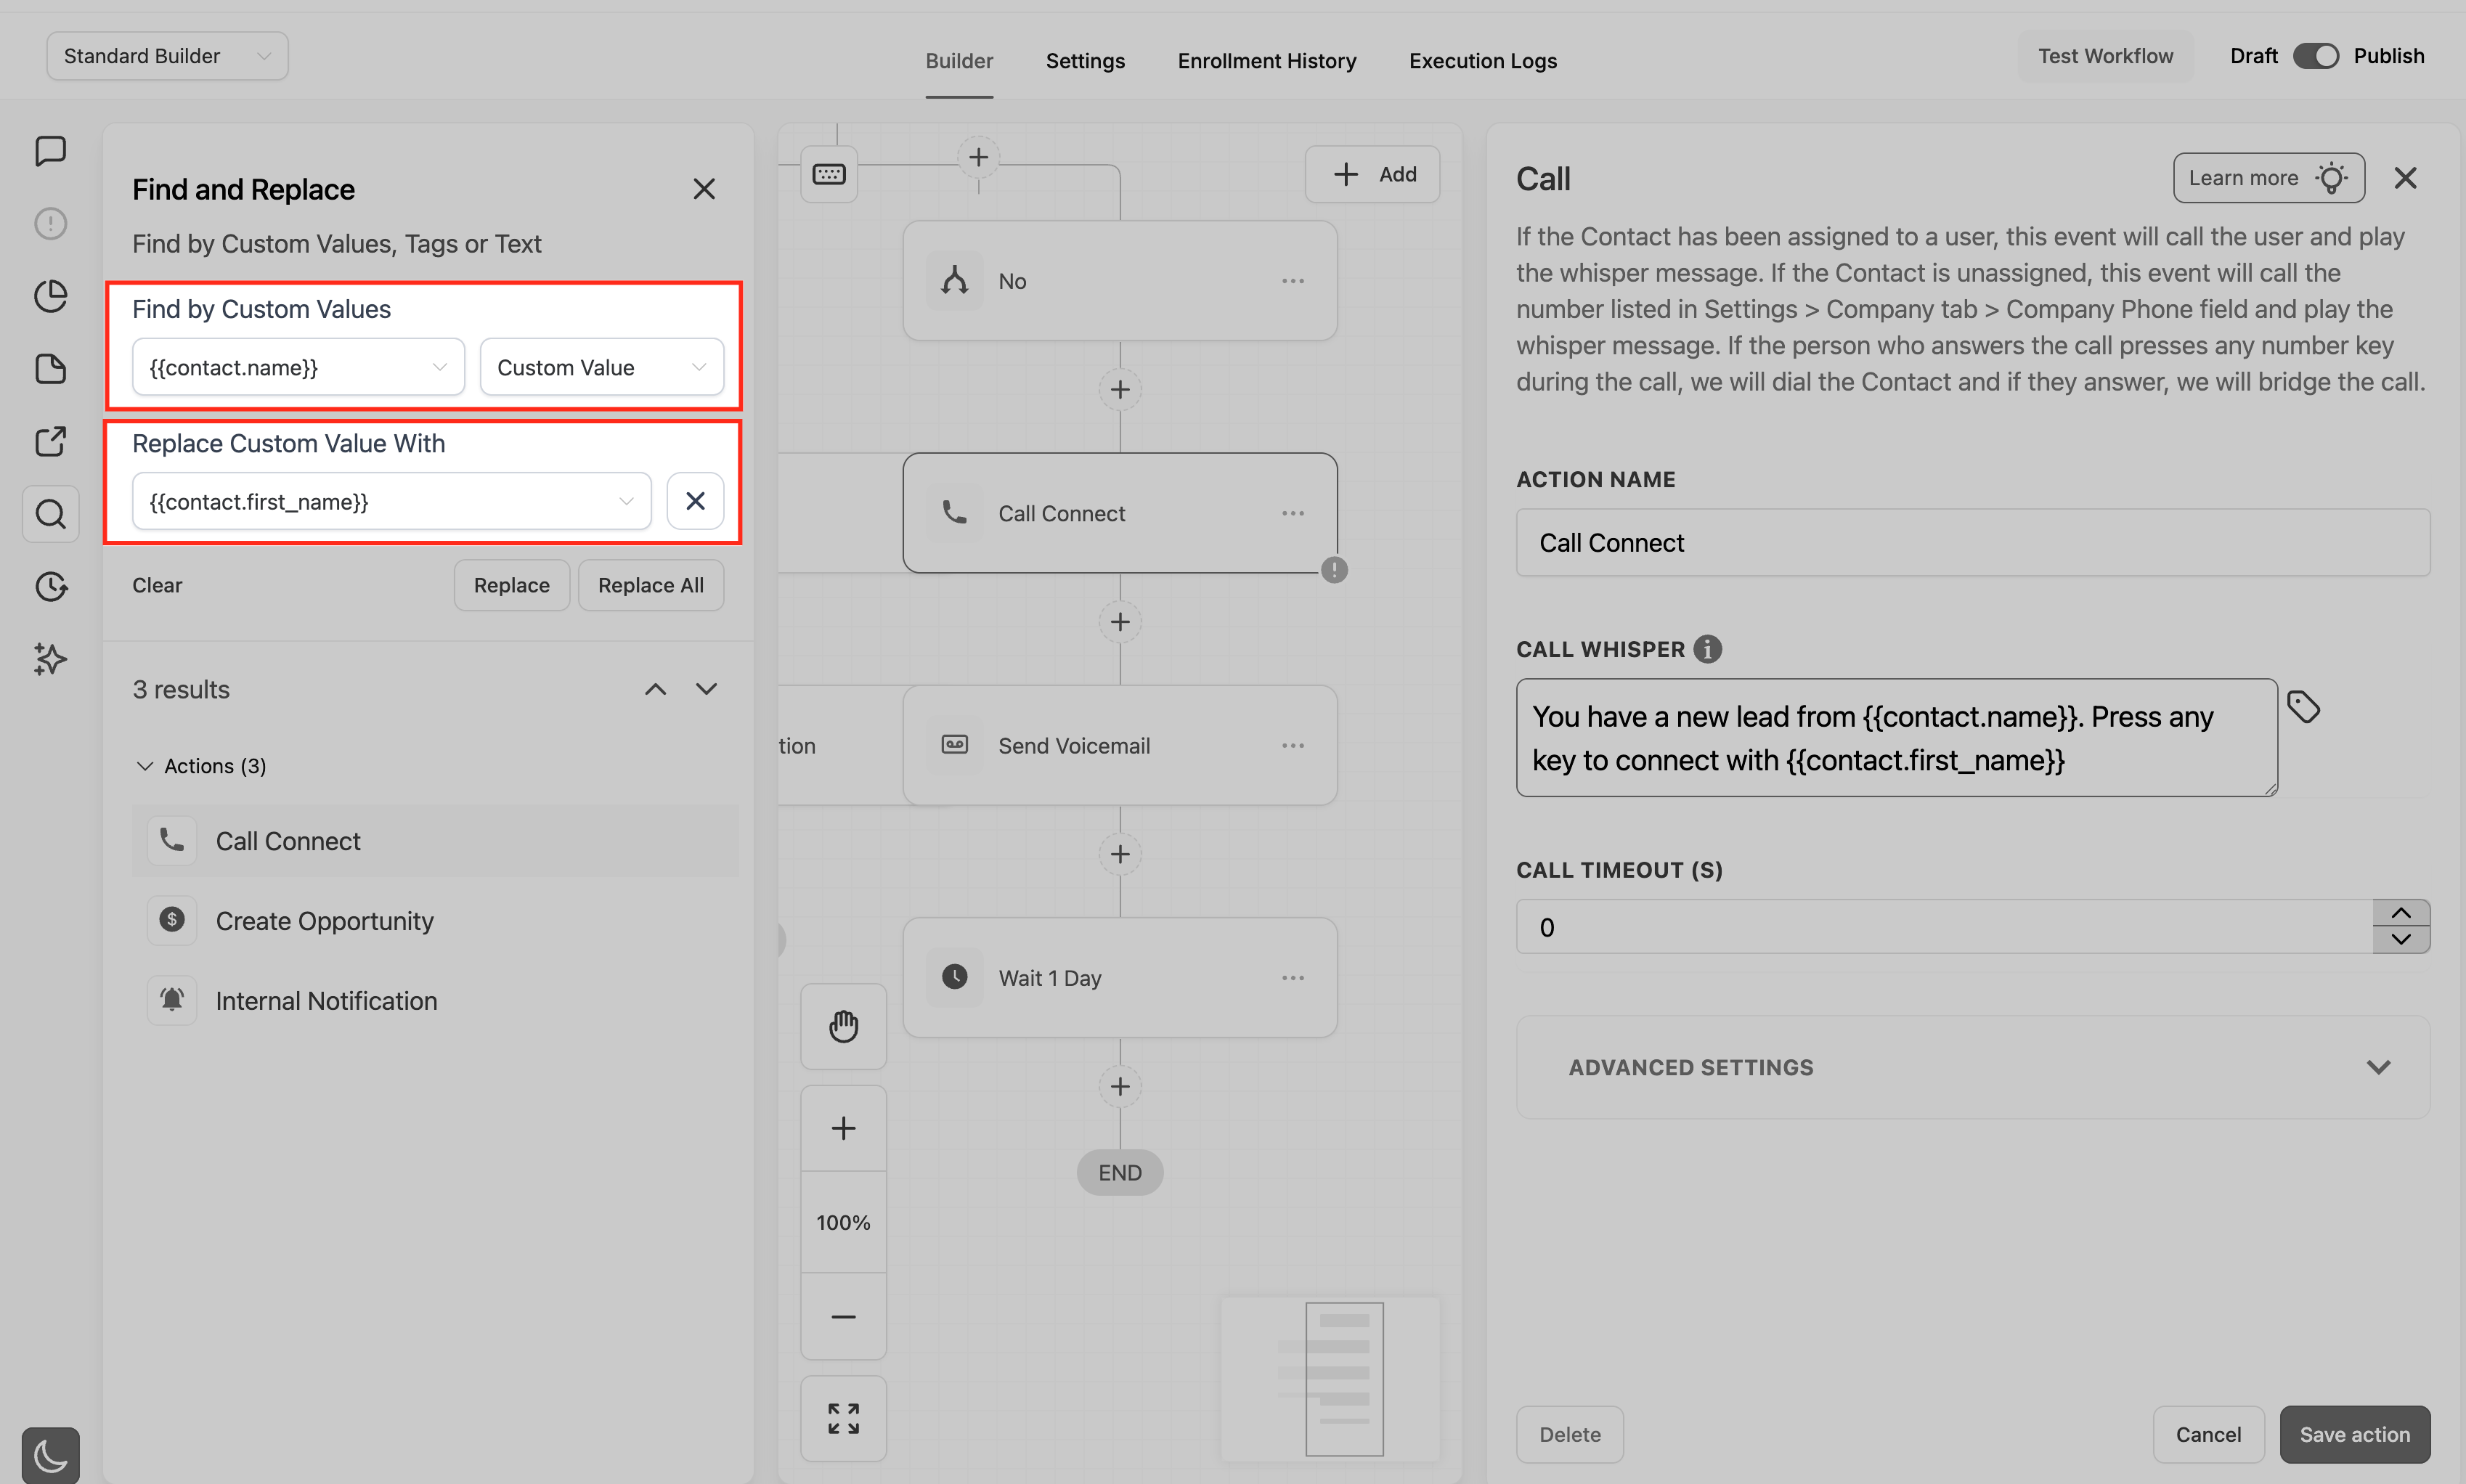
Enter what to Find (custom value, tag, or text, depending on mode).
Choose the replacement: for custom values use the custom value picker; for tags choose or type the new tag name.
Apply:
Replace updates only the current match in focus.
Replace All updates all supported matches in the current workflow that meet the search criteria.
Scope and safety
Find and Replace runs only within the currently open workflow; it does not search or replace across multiple workflows or folders. For cross-workflow changes, combine it with the Workflow Switcher and Copy Actions Across Workflows.
Replace works only for custom values and tags in this release.
Any Replace or Replace All can be reverted with Undo (and Redo) within your session, and Version History is available for deeper rollbacks. Before a large Replace All on a critical workflow, confirm you have a recent known-good version saved, and test on a clone or draft when feasible.
You need permission to edit the workflow to use Find and Replace.
The Workflow Switcher is a faster way to move between automations in the Advanced Builder. It opens a searchable panel of recent workflows and launches the one you pick in a new browser tab, so your current canvas stays put.
Go to Automations > Workflows.
Create a new workflow or open an existing one.
Switch to the Advanced Builder (the Switcher does not appear in the Standard Builder).
Click the Workflow Switcher button on the left sidebar, or press Shift + W.
Use Quick Search (which finds workflows by name) or pick from Recent Workflows.
Click a workflow to open it in a new browser tab while your current canvas remains open.
Because the other workflow opens in a new tab, you do not lose changes on your current canvas, and you can copy/paste actions or branches between the two open workflows.
The Template Library lets you start a new workflow from a professionally designed, pre-built template instead of building from scratch, helping you launch faster on proven setups.
Step 1: Access the Template Library
In the left sidebar, click Automation.
Switch to the Workflows tab.
Click Create Workflow.
Choose Select from Template.
Step 2: Browse and filter templates
Use the Filters panel to narrow by category (for example Lead Nurture, Onboarding), search by keyword, or sort by popularity. Hover over any template card to see a quick description.
Step 3: Preview and select a template
Click the eye icon or the template card to open its preview.
Read the About this Template blurb and check any Prerequisites.
Examine the complete triggers-and-actions canvas to understand the logic flow.
Click Continue to load it into the workflow editor.
Once loaded, everything is editable: customize triggers, actions, delays, and conditions to suit your process. Run a test with a sample contact or tag, then save and activate. Loading a template does not affect your existing workflows. To start fresh, re-select the original template. Creating your own custom templates is not currently available.
Aesthetix CRM gives you several ways to pause automation at different scopes: pausing entire published workflows on certain dates, disabling individual nodes inside a workflow, and the workflow-wide Stop on Response setting. These are distinct features, so choose the one that matches your goal.
This option temporarily halts specific published workflows during date ranges you set, without deactivating or deleting them. It is ideal for holidays, seasonal closures, or campaign blackout periods.
Navigate to Global Workflow Settings from the Automation section. (You can also reach Global Workflow Settings from the Automation tab inside the Settings area.)
Locate the Pause Workflow option by scrolling down within Global Workflow Settings.
Select the Start and End Date and Time: click the Start Date and Time field, choose the range, then click Confirm.
Select Workflows: click the Select Workflows field and choose one, several, or all published workflows. Only Published workflows appear in this dropdown.
Add Date: click Add Date to add more rows. You can add up to 15 different date ranges.
Run annually (optional): check the Annually checkbox on a row to pause those workflows on the same dates every year.
Clone or Delete a row: use the Clone icon to duplicate a row, or the delete icon to remove one.
Paused status: paused workflows show a Paused status on the workflow list page.
Builder settings: each workflow's builder settings include a Pause Workflow section showing when that workflow is paused; you can jump back to Global Workflow Settings from there to change pause dates.
Points to remember
Contacts still get enrolled even while a workflow is paused.
The maximum span between a start and end date is 15 days.
A workflow cannot belong to two or more overlapping date ranges.
Contacts will move through Wait and If/Else actions during a pause; for any other action the contact pauses at the trigger or the subsequent action until the pause ends. For example, if a workflow's first action is "Send Email," paused contacts enroll but wait at the trigger; if the first action is "Wait" or "If/Else," they pass through that step and pause at the next action.
Once the pause period ends, workflows resume automatically with no extra action needed.
Pause Workflow Actions lets you temporarily turn individual workflow nodes on or off without deleting or disconnecting them. Disabled nodes are skipped during execution, which makes testing, debugging, and A/B iterating safe and fast. It works in both the Advanced Builder and Standard Builder.
How it works
Hover over any node to reveal an Enable/Disable switch (click the pause icon).
Toggling off greys out the node and adds a Disabled label; toggling back on restores normal color and execution.
Disabled nodes are fully ignored during live runs and are skipped automatically, even when a disabled node is the only forward path, so downstream actions still fire and contacts never stall.
Notes and gotchas
Disabled nodes do not count toward execution limits because they are skipped.
Execution logs mark disabled nodes as Skipped for clear traceability.
Toggling is done one node at a time; bulk enable/disable is not yet supported.
To disable an entire branch, toggle off each node in it.
If you switch to the Standard Builder while disabled nodes are present, you will be prompted to delete or re-enable them before the builder can load.
This is not the same as "Pause Workflows on Certain Dates": Pause Workflow Actions pauses individual steps inside a single workflow, while Pause Workflows on Certain Dates pauses entire published workflows for date ranges.
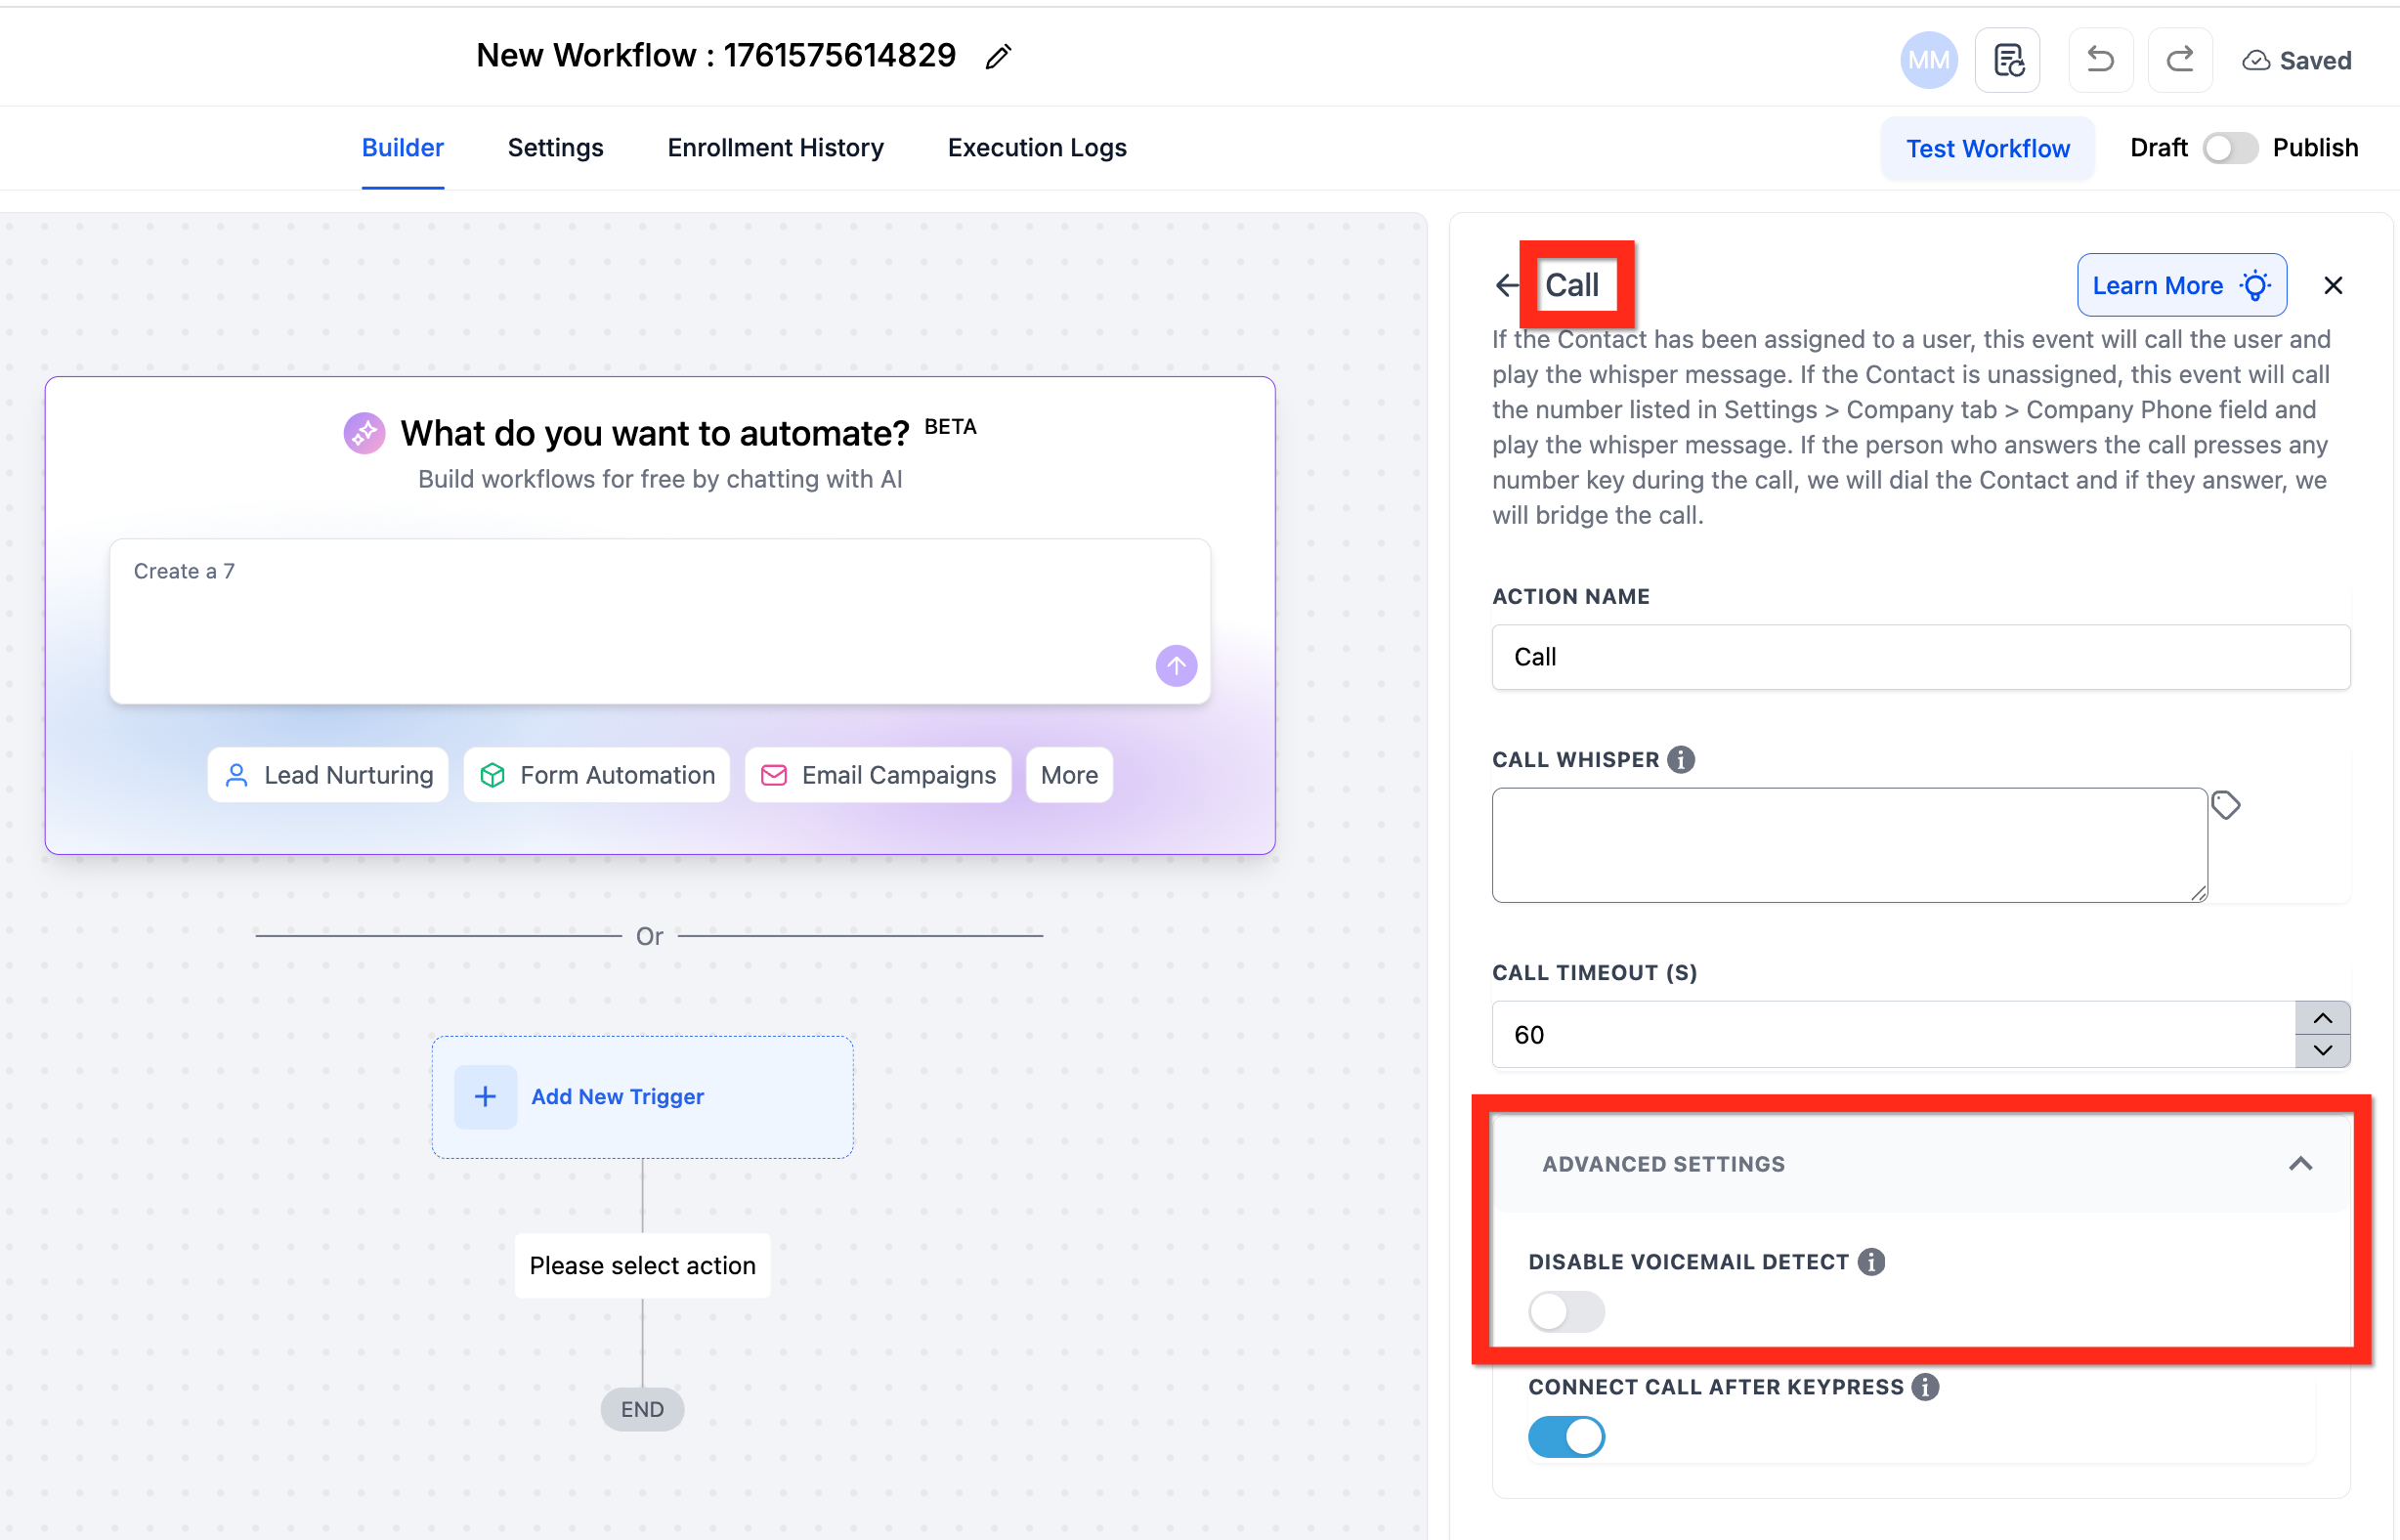
Stop on Response is a workflow-wide setting that automatically removes a contact from the workflow if they respond to any communication sent from it (SMS, email, or call). This prevents you from continuing to send automated messages to a lead who is already engaged.
It interacts with the Disable Voicemail Detect setting found inside the Call action, which controls whether the system tries to identify whether a call was answered by a person or an answering machine.
Stop on Response is | Disable Voicemail Detect is | Result |
|---|---|---|
ON | ON | The workflow stops if the contact's voicemail answers. Set the call timeout to under 20 seconds so calls do not reach voicemail. |
ON | OFF | Voicemail is detected, so calls going to voicemail do not trigger Stop on Response; the contact continues in the workflow. |
OFF | OFF | The workflow continues regardless of responses or voicemail. Slightly slower, since voicemail detection runs by default. |
OFF | ON | The workflow continues regardless of responses or voicemail. Slightly faster, since voicemail detection is off. |
Note: what the Business does in the Call action is irrelevant to Stop on Response. The Business is called first; only the Contact (or the Contact's voicemail) is relevant to Stop on Response. The setting also applies only to automated actions from within that specific workflow, not to manual calls or other workflows.
By default, only a contact's most recent opportunity enters a workflow. The Allow Multiple Opportunity toggle lets a workflow handle multiple opportunities for the same contact, with each contact-opportunity pair running as its own separate execution.
How to configure
Navigate to Settings > Objects > Opportunities.
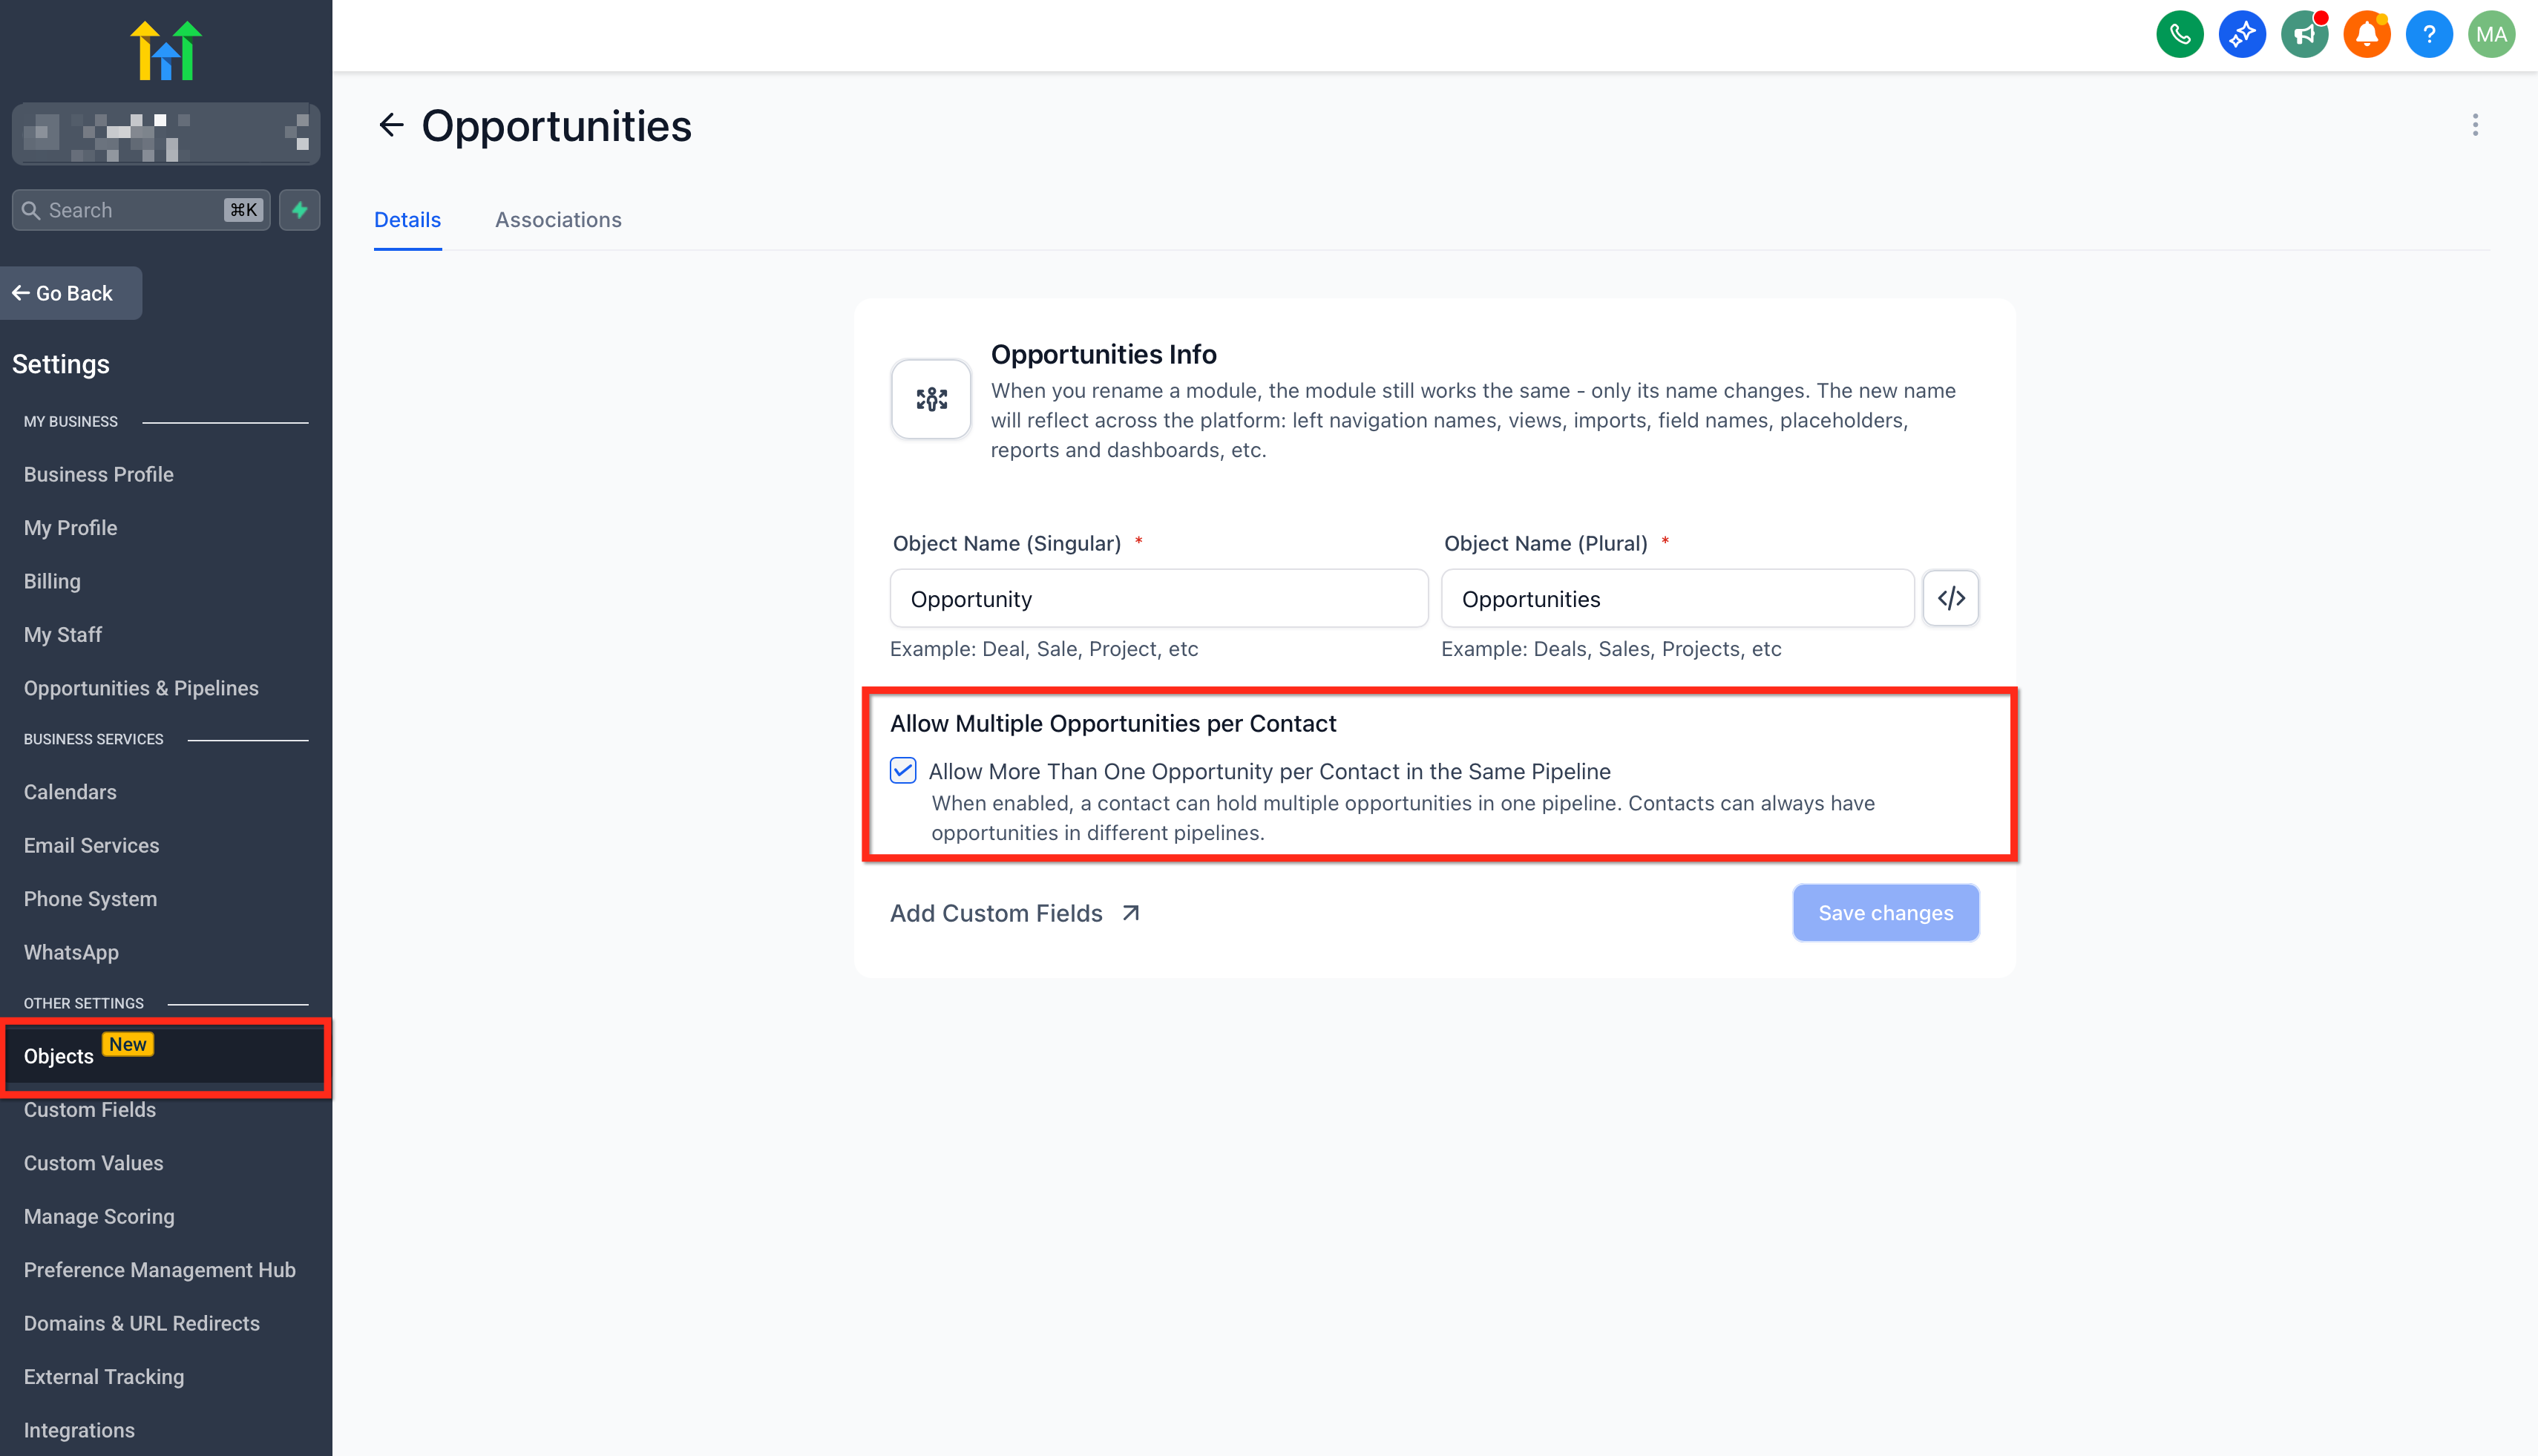
Locate the Allow Multiple Opportunity toggle at the top of the settings (similar in placement to the Allow Re-entry option).
Toggle it ON.
Save the settings.
Once enabled, each opportunity associated with a contact enters the workflow as a separate execution. Updating an opportunity does not restart the workflow; the execution continues from its current stage using the updated opportunity values going forward.
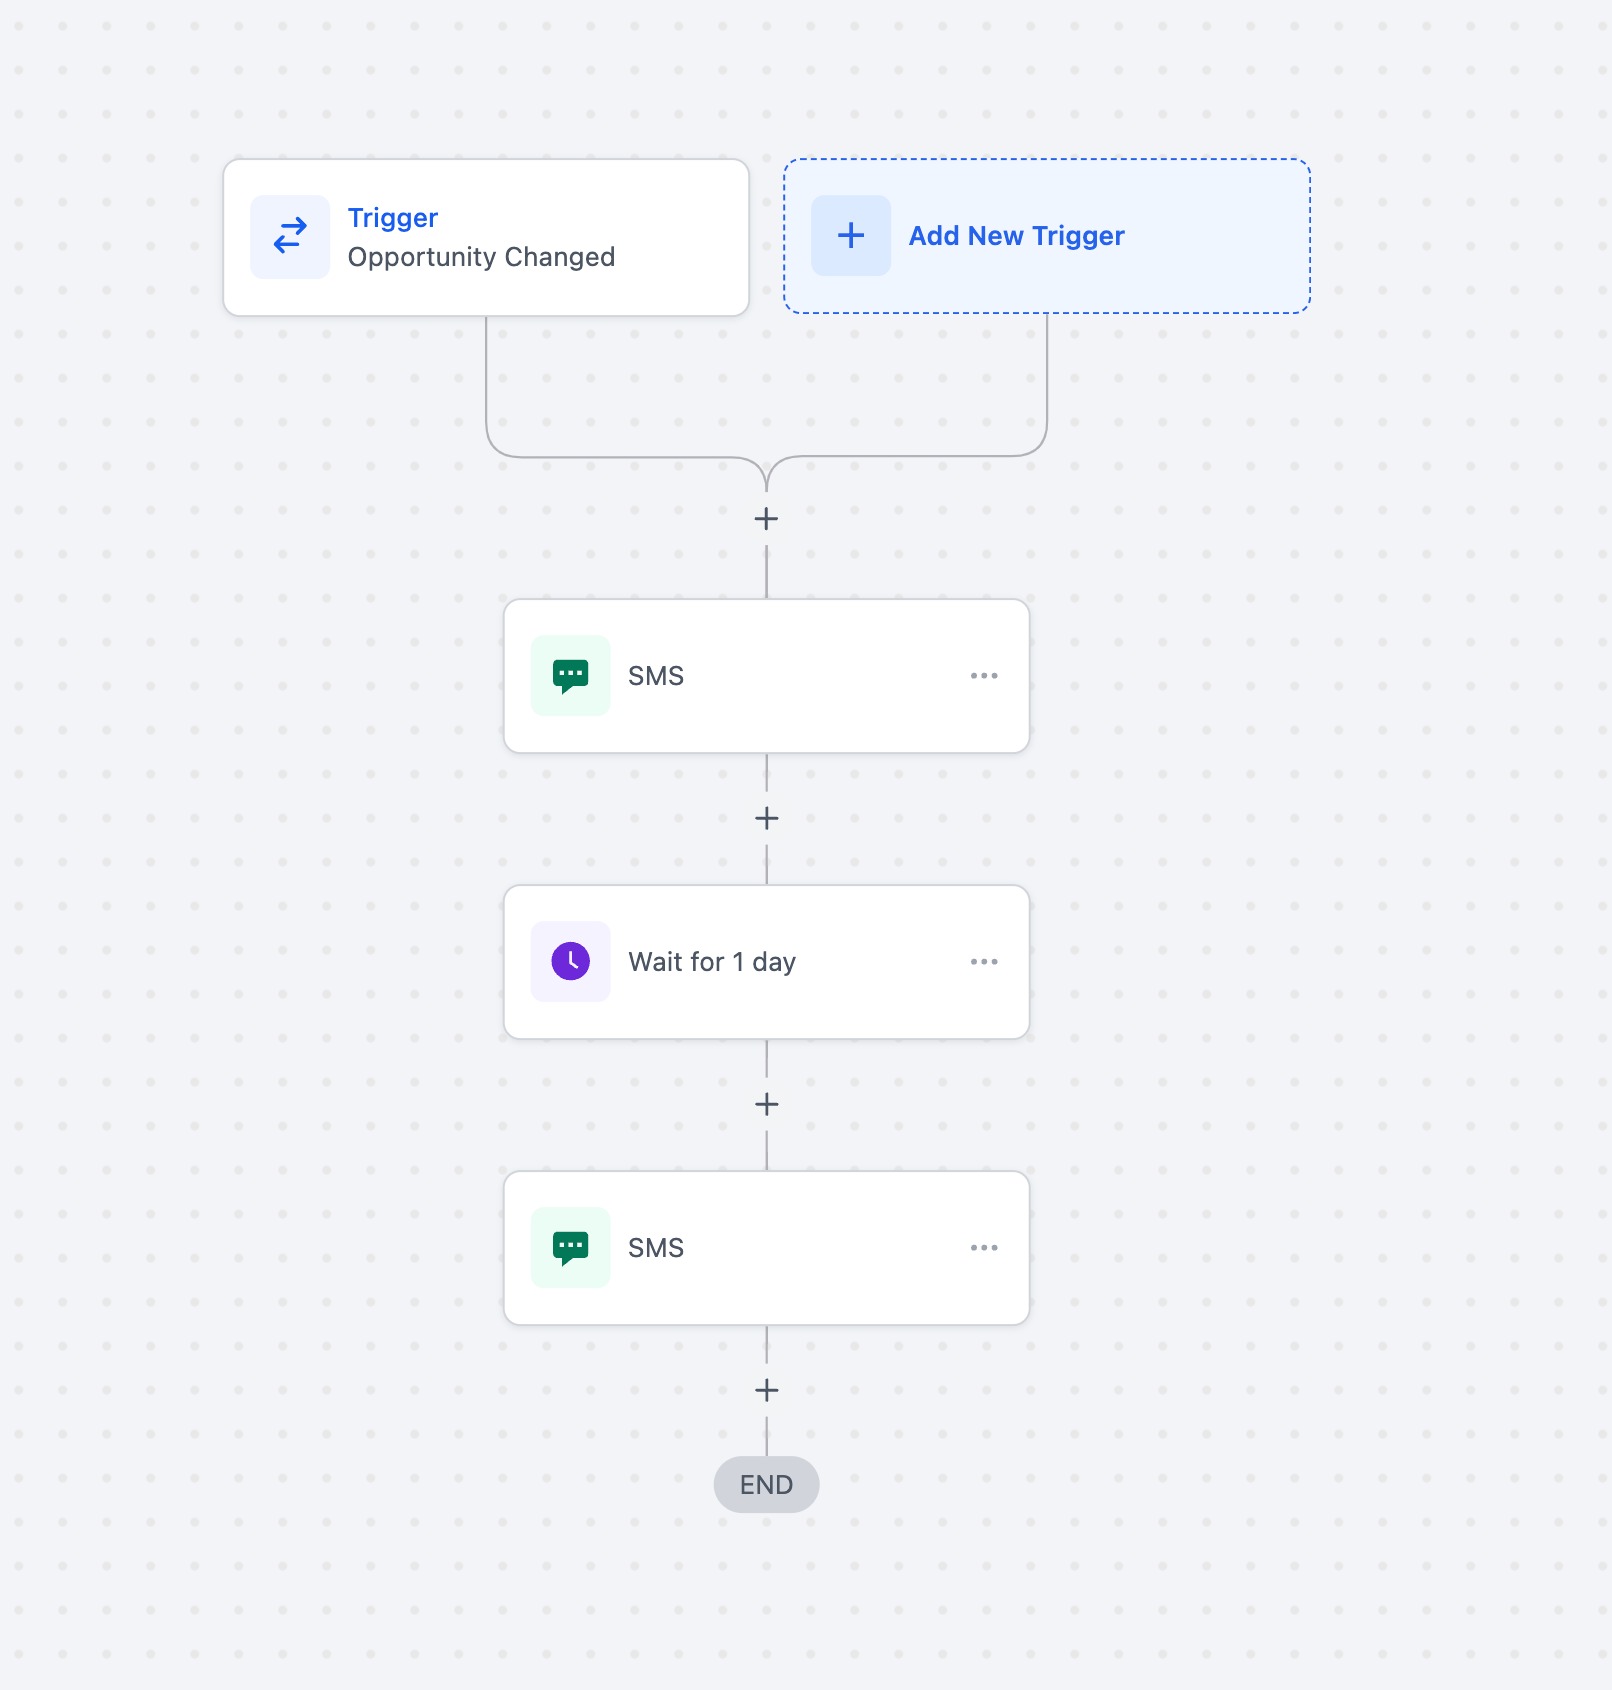
Example: a contact "John Doe" has two opportunities, "1 Madison Avenue" and "2 Nice Street," in a workflow that sends a reminder SMS when an opportunity is updated. With the toggle OFF, updating the first opportunity sends an SMS, but updating the second skips the remaining actions. With the toggle ON, each update sends its own SMS and both opportunities coexist as independent executions.
These reporting tools show you how contacts move through a workflow, which actions ran, and where errors occurred, so you can confirm everything is firing correctly and fix issues fast.
The Stats button on the workflow list page shows communication-channel performance (SMS and email metrics) per workflow, so you can compare how each workflow is performing without opening them one by one.
Go to Automations.
Open the workflow list page.
Click the accordion button next to a workflow name to expand it. The Stats button appears, letting you view that workflow's metrics.
Notes:
Stats include data from January 1, 2023 onward.
If SMS or email actions were used and later removed, their stats still appear in reports.
Stats are available for individual workflows only, not folders. WhatsApp and IVR are not currently supported.
Execution Logs and Enrollment History give a clear picture of how contacts move through a workflow and every action they experienced.
Where to find them
Log in to your account.
Click the Automations tab.
Click Workflows.
Open an existing workflow (or create one).
Click the Execution Logs option.
Quick navigation:
Fastest: Inbox/Conversations > message details > Workflow > Execution Details (context preloaded).
Standard: Workflows > open workflow > Execution Logs > View Details.
Open a specific execution from message details (deep link)
Go to Conversations.
Open the conversation and select the impacted message.
Open message details.
Under Workflow, click the workflow link (deep link). Execution Logs open with Execution Details and the contact/execution context preselected.
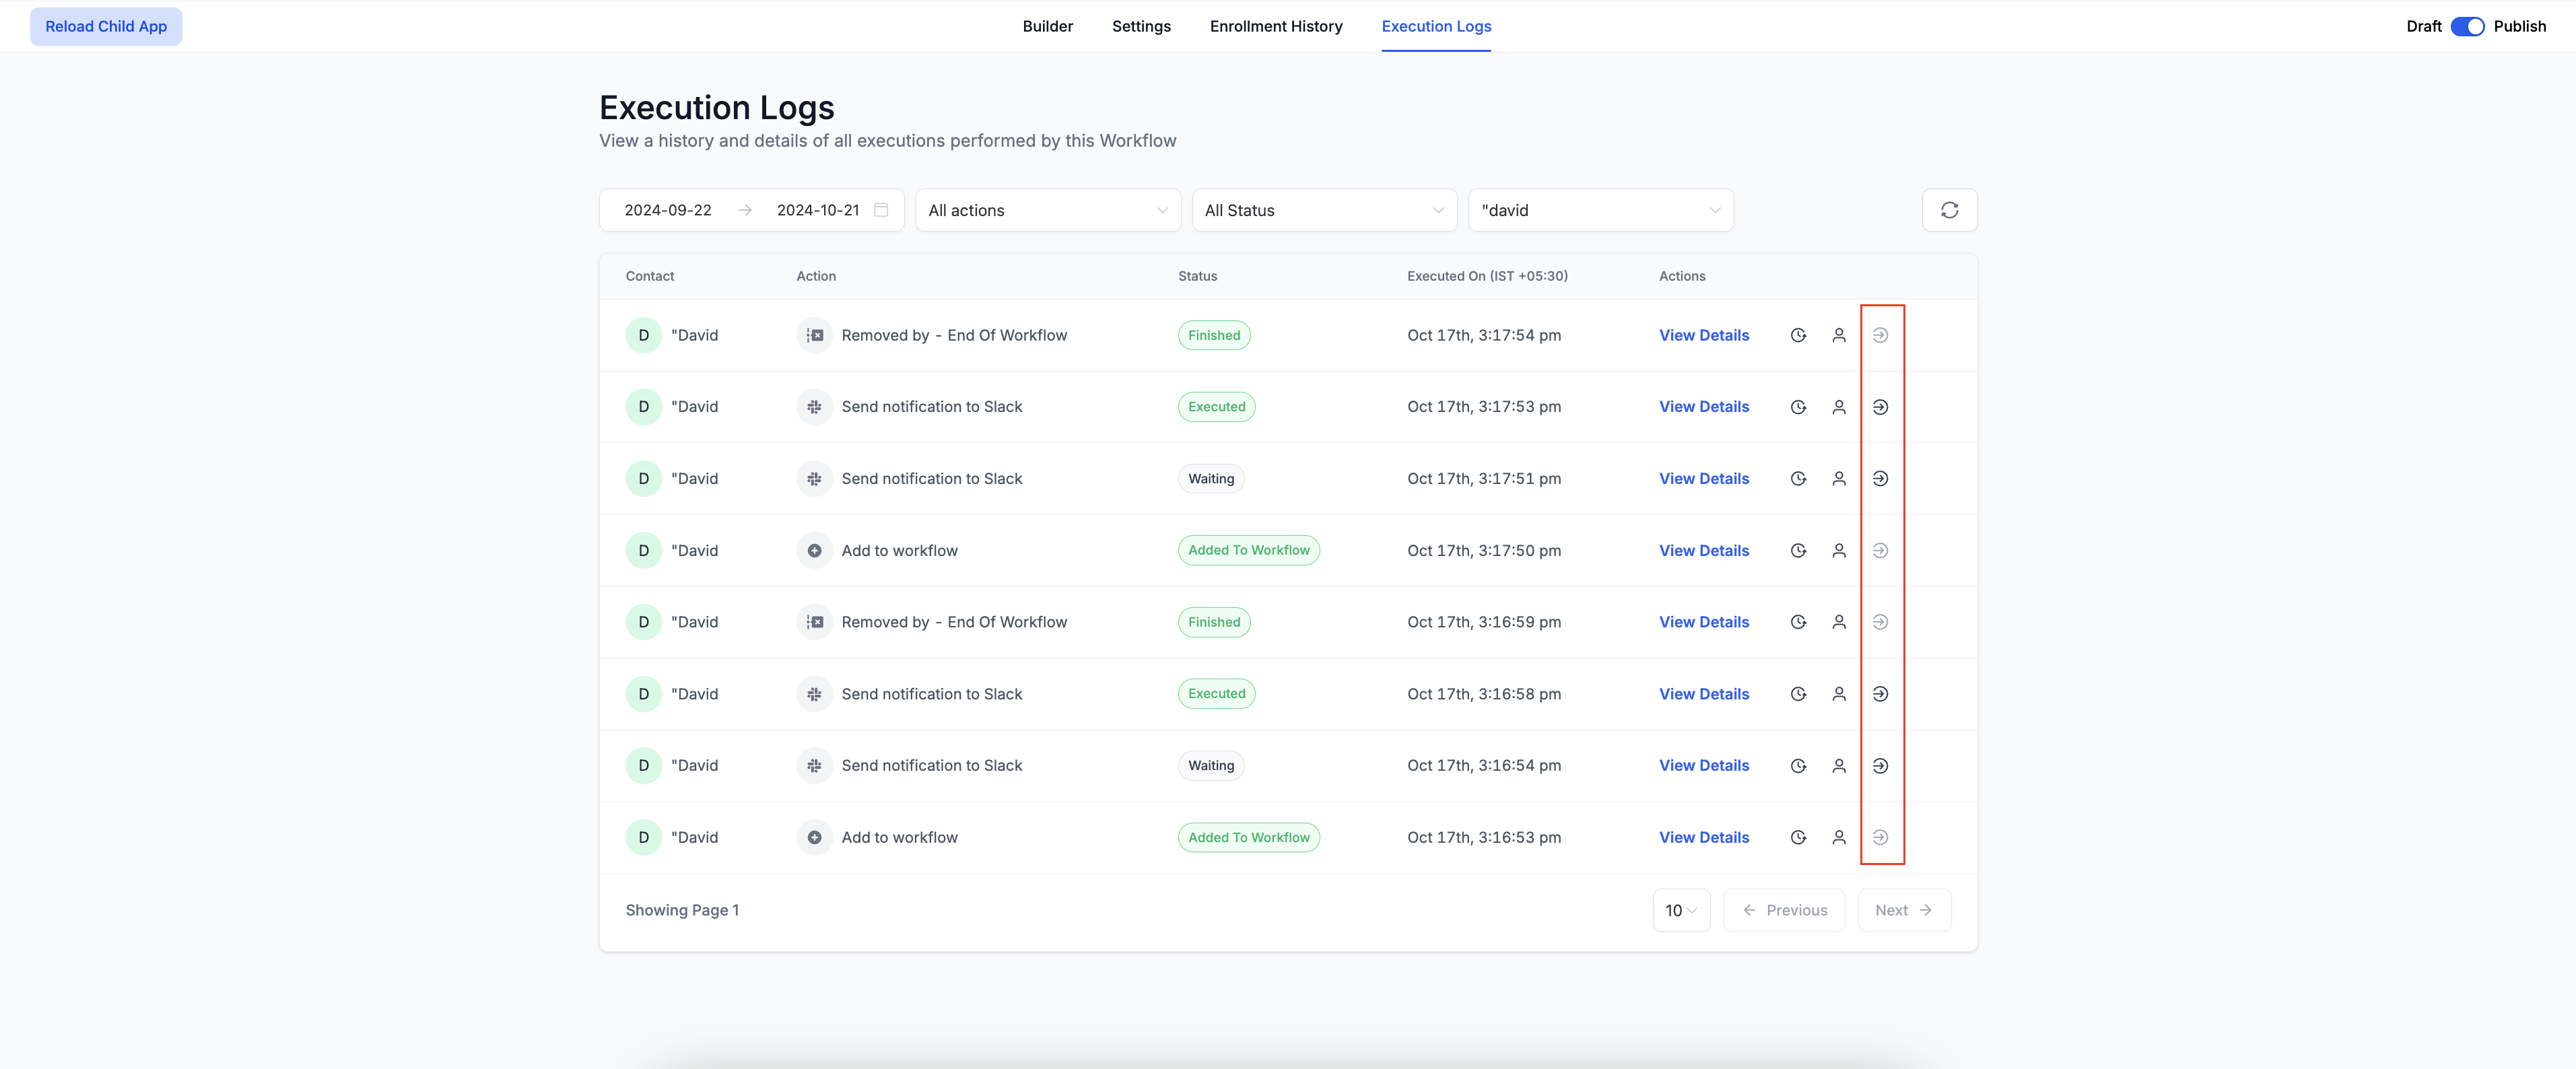
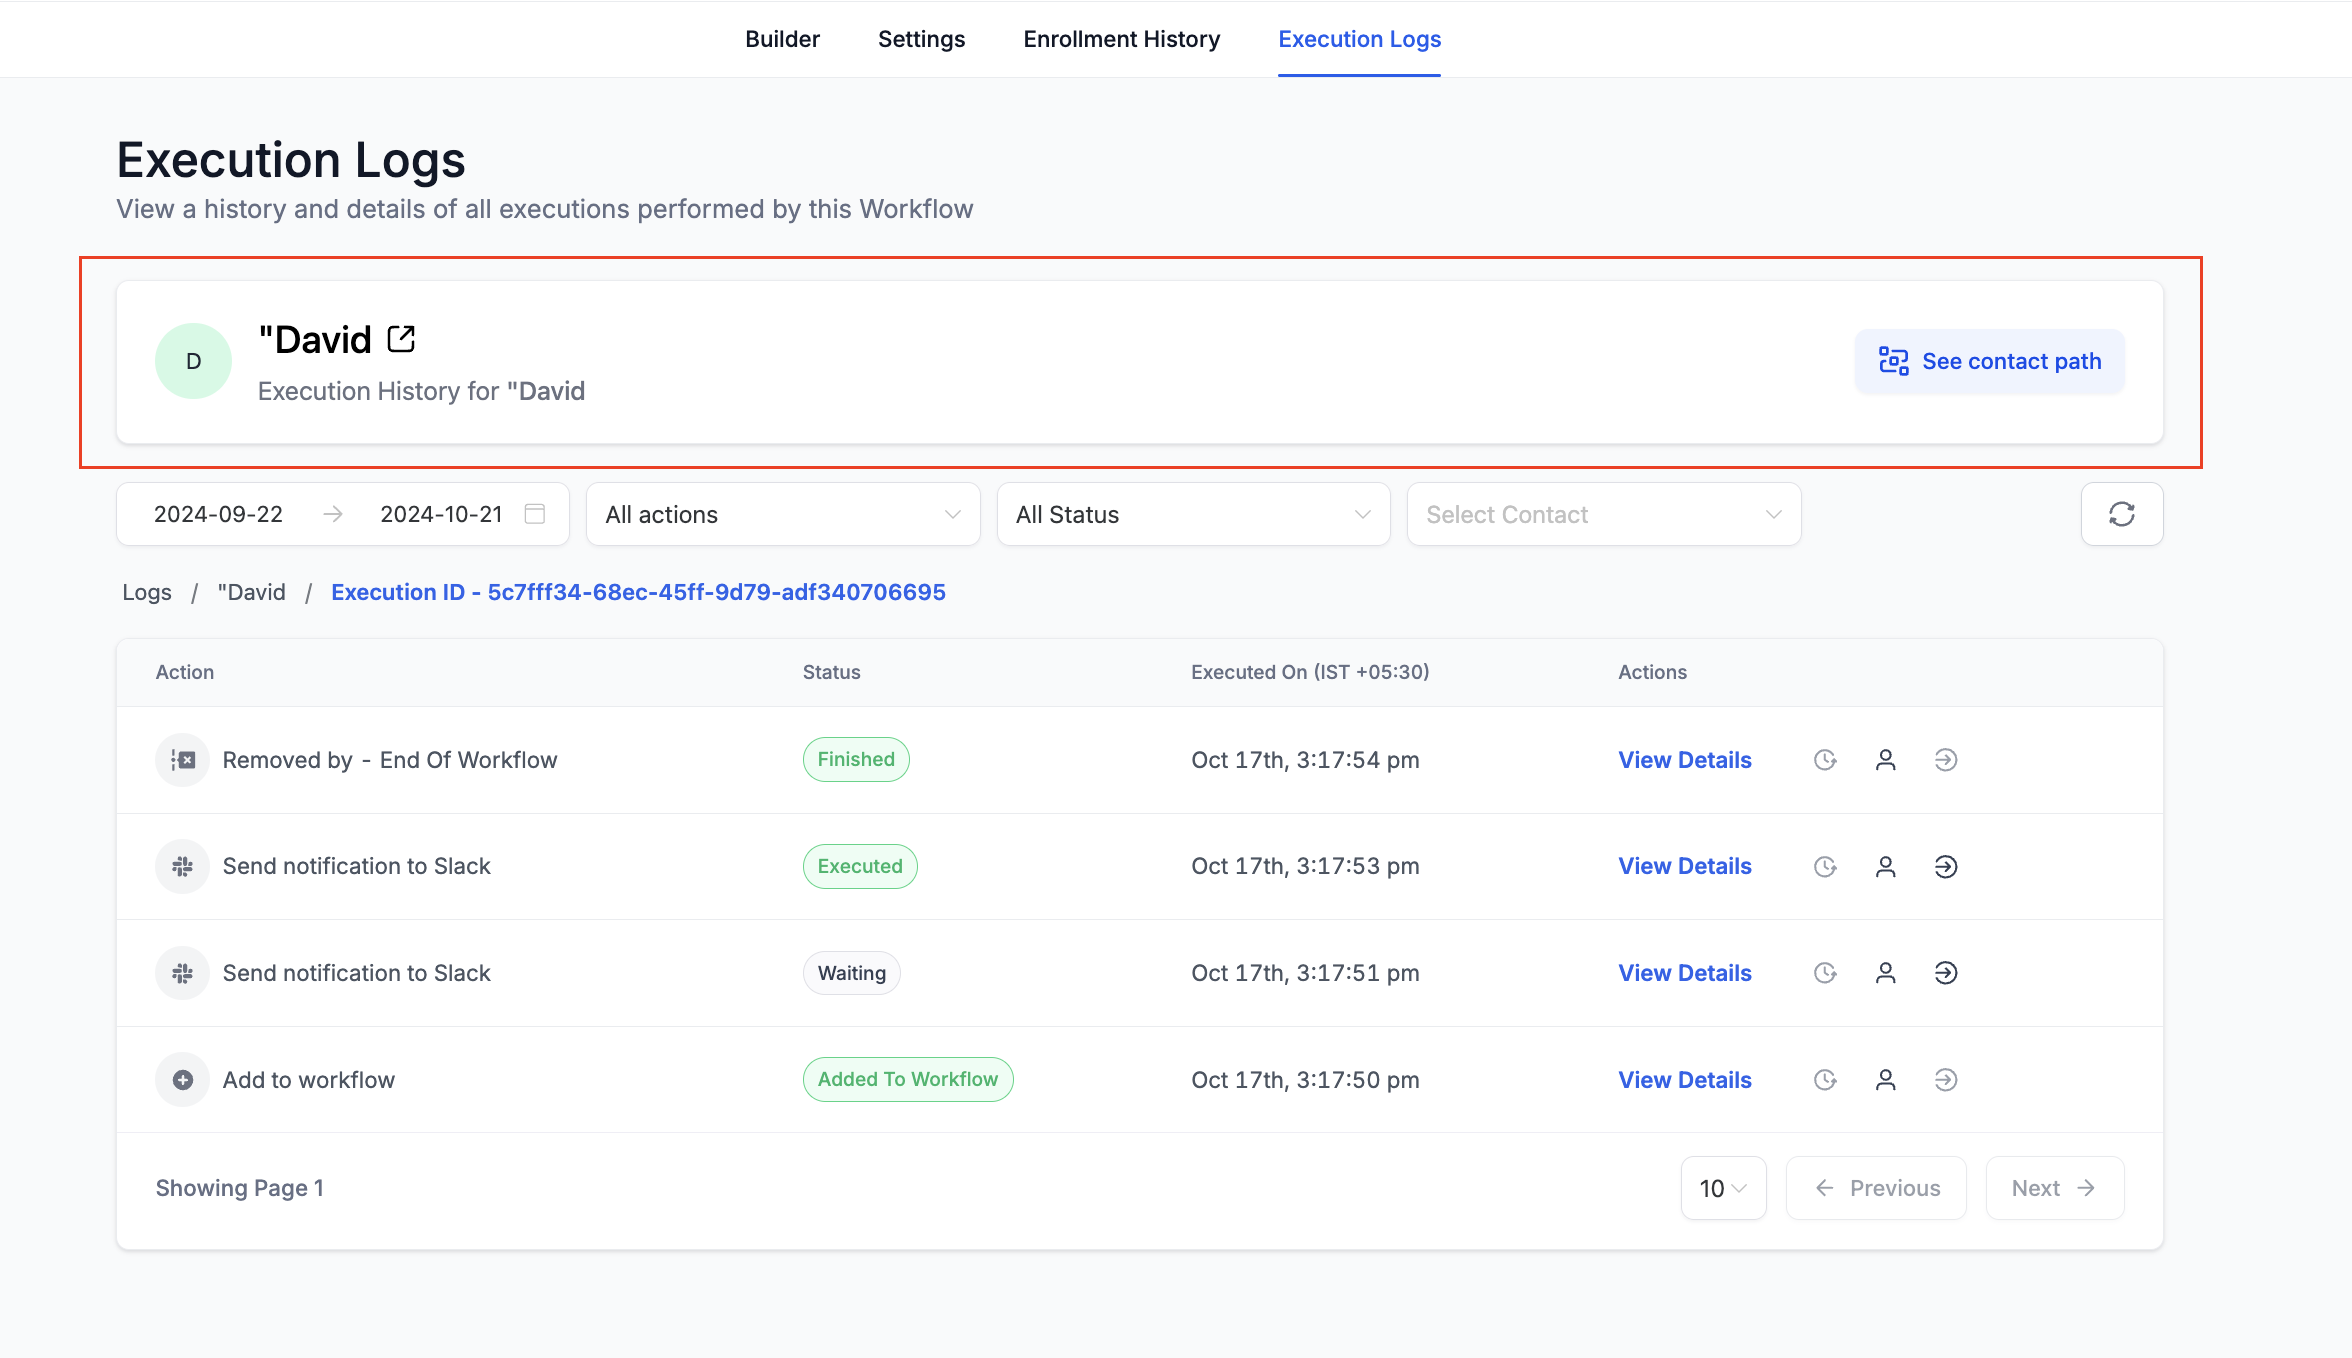
Execution Logs features
"View Details" hyperlink: the details option is a clear hyperlink (formerly an icon) for easier access to any action's execution details.
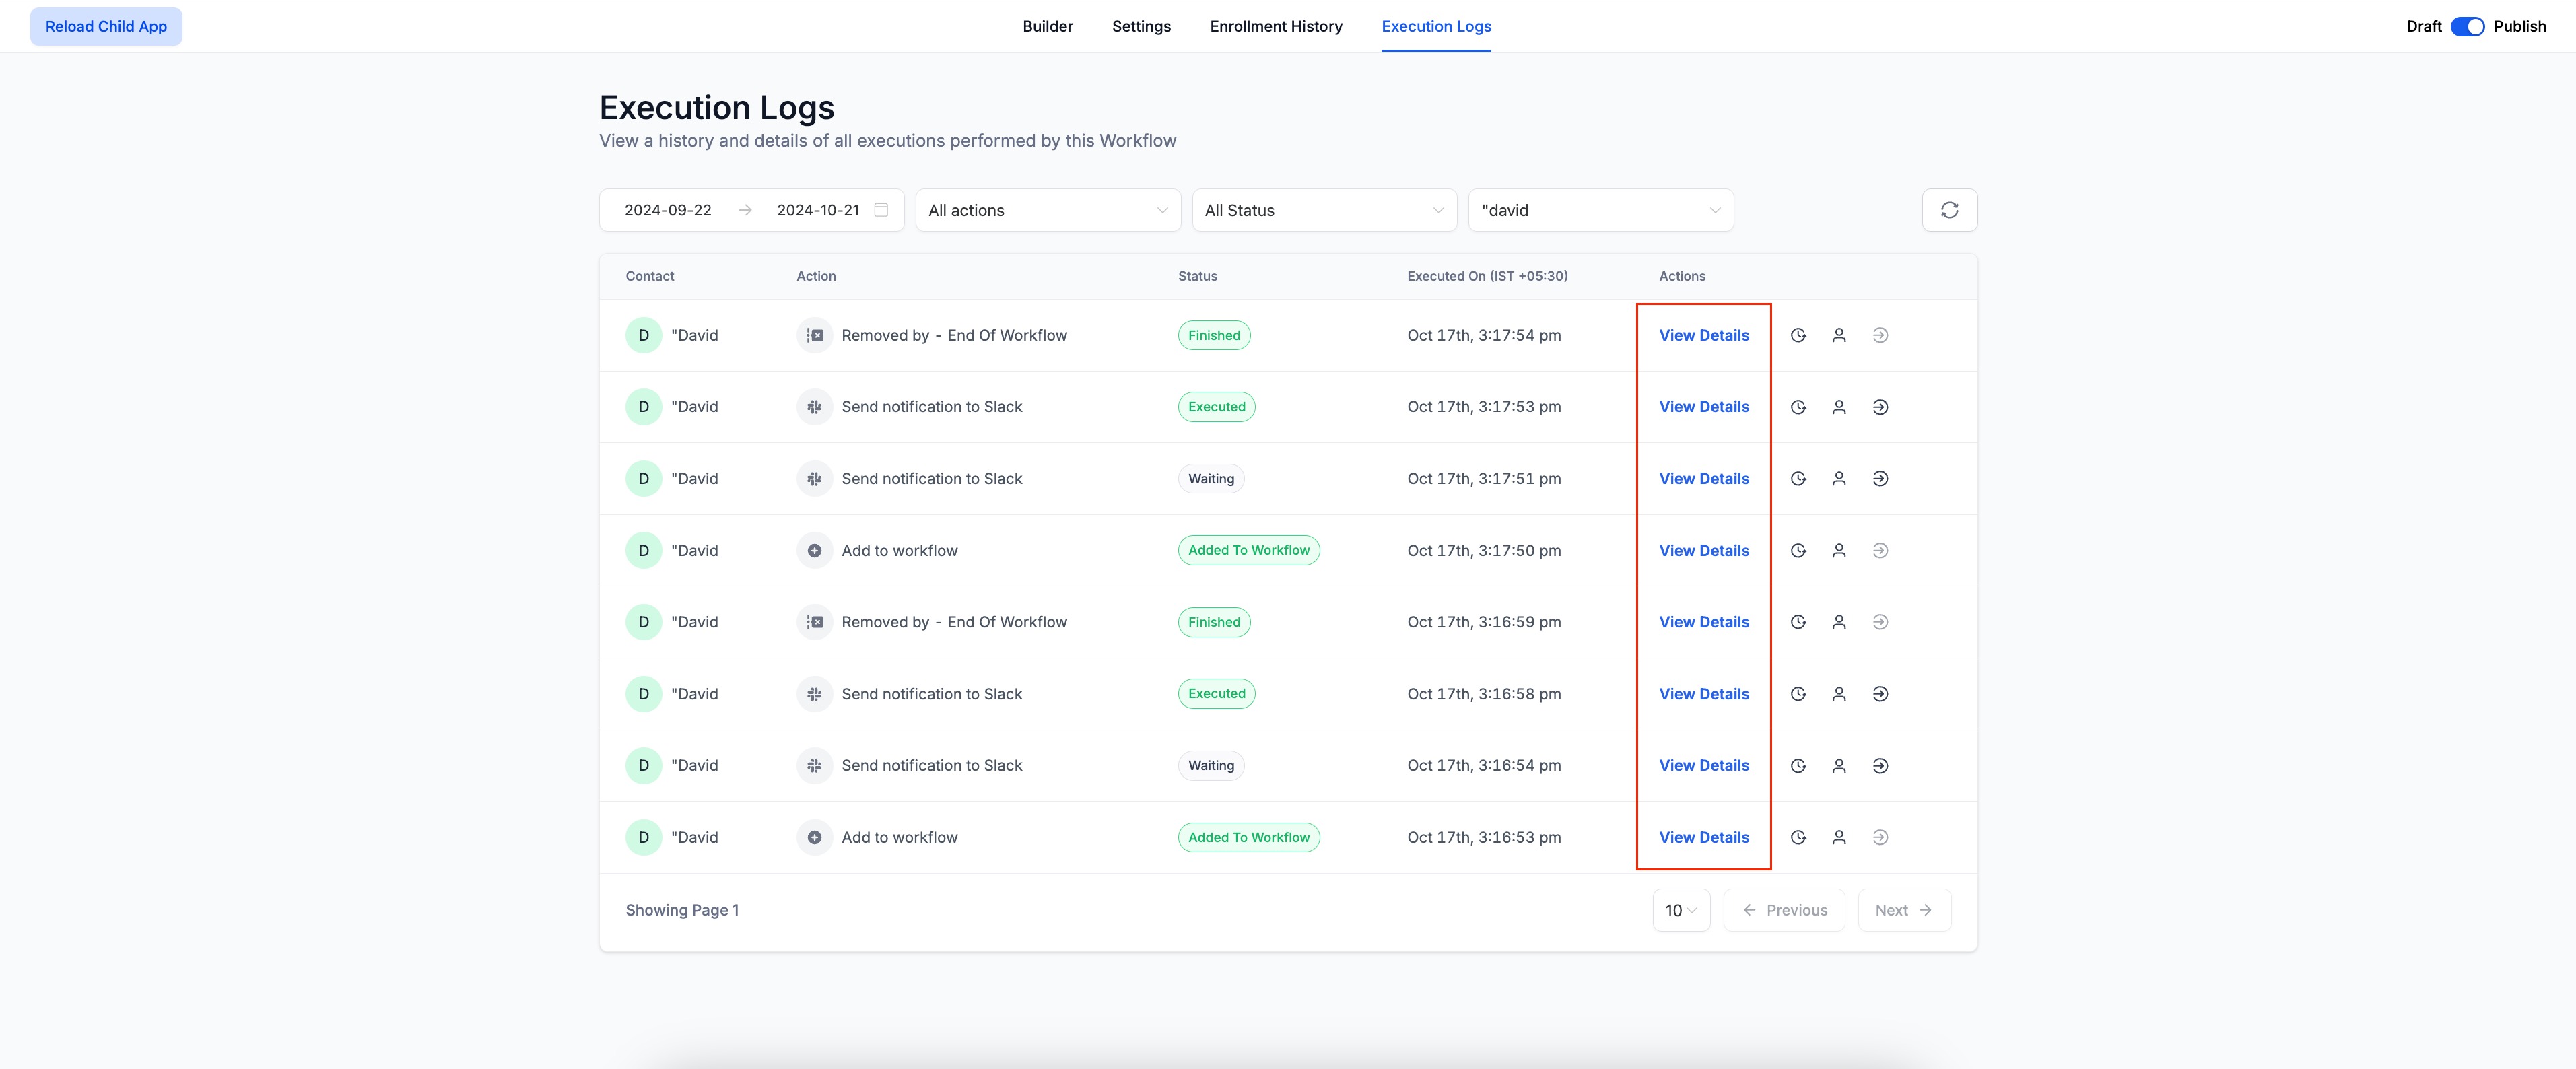
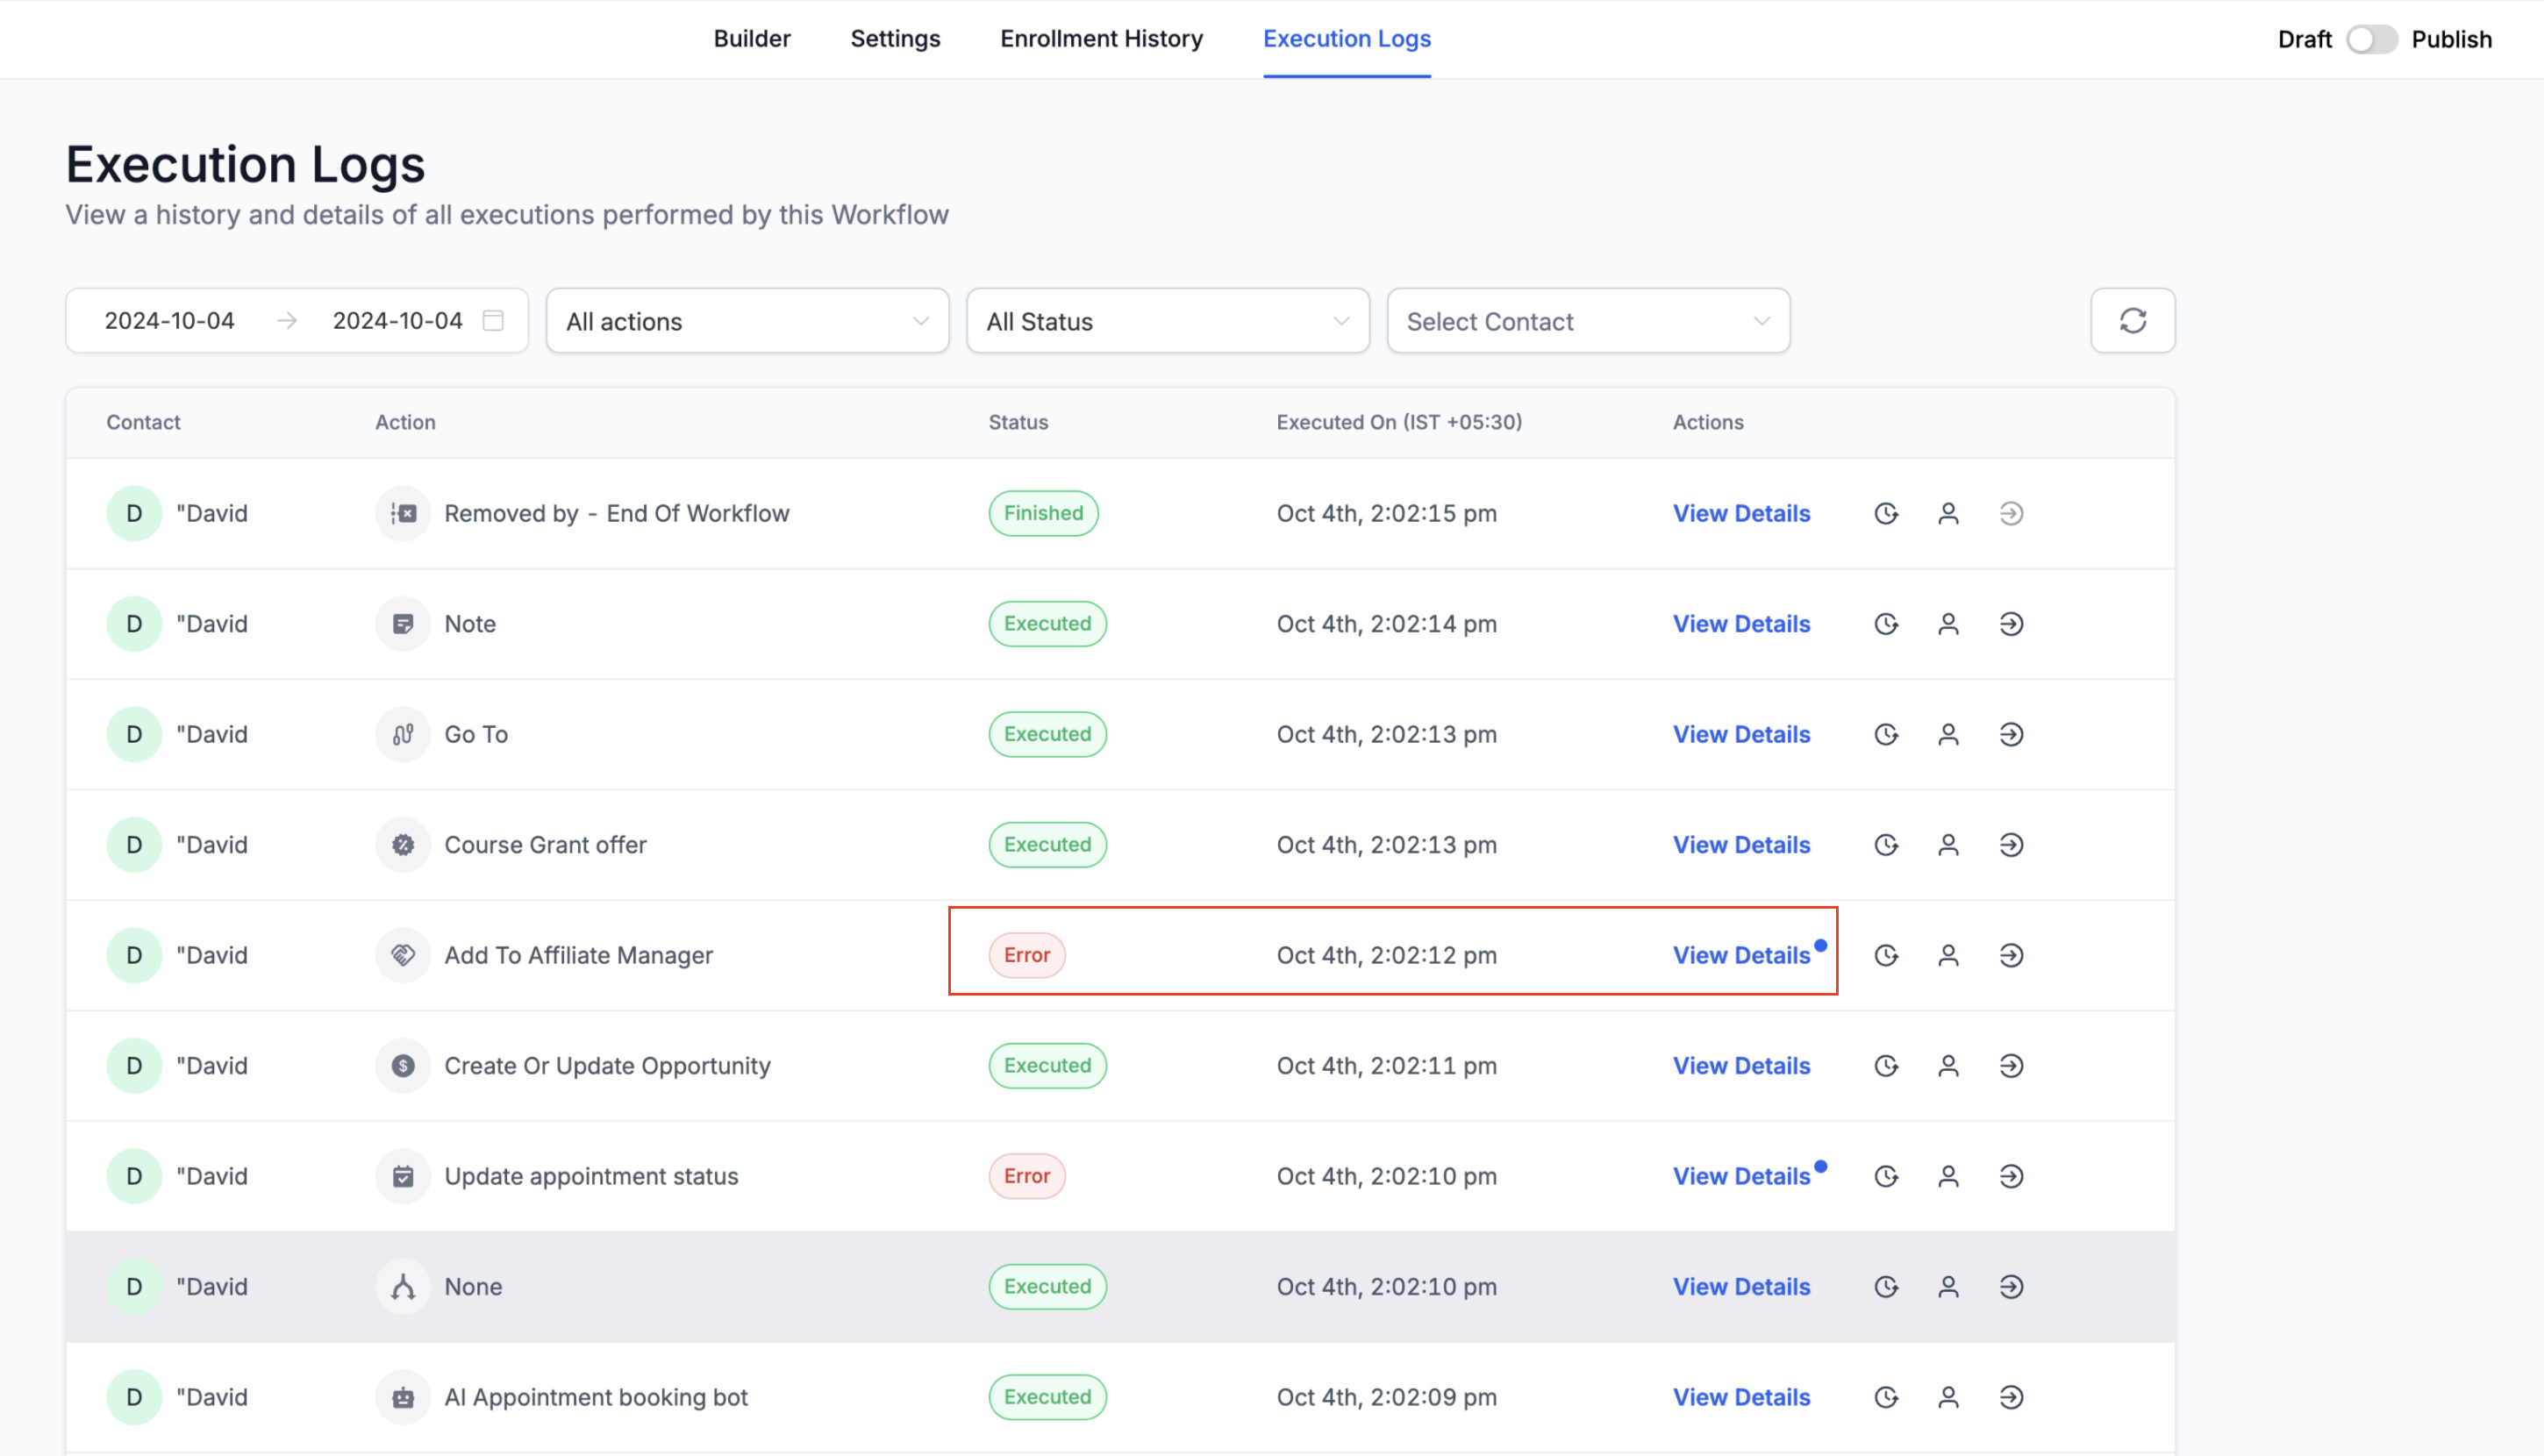
Improved error visibility: when an action errors, the Status field or the View Details link is highlighted so you can spot issues quickly.
Highlighting opened rows: opening a row's Details section highlights that row as a visual reference.
Action Name column: the column now shows the Action Name you assigned (instead of just the action type). Hover over the name to see the actual action type.
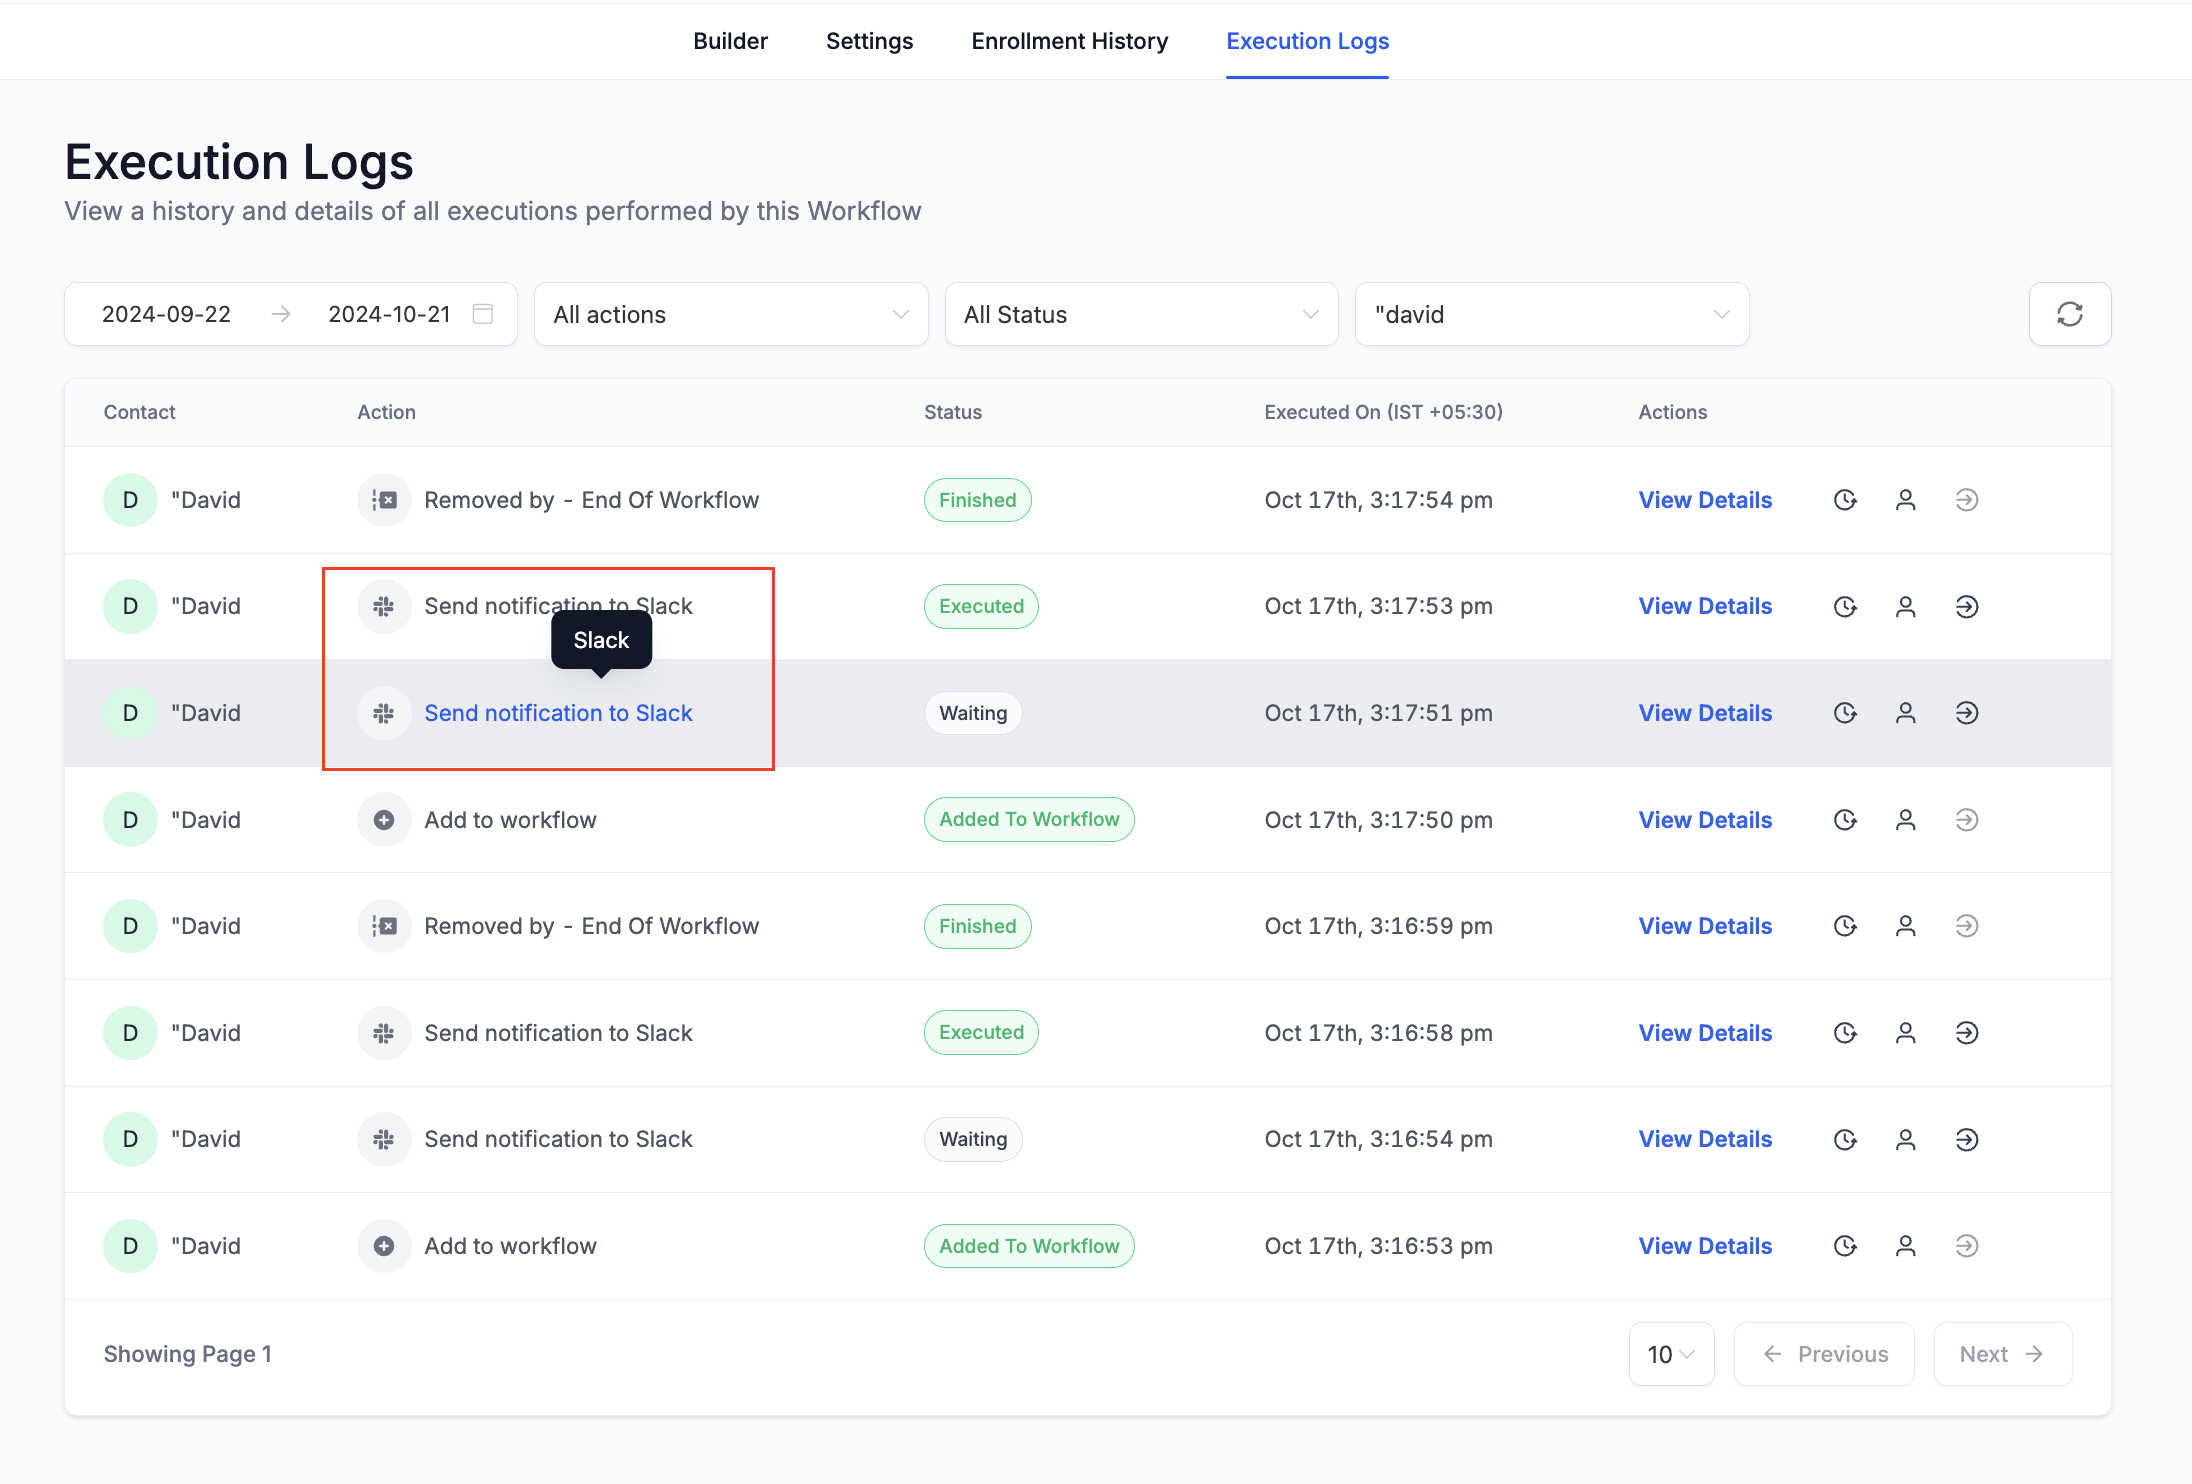
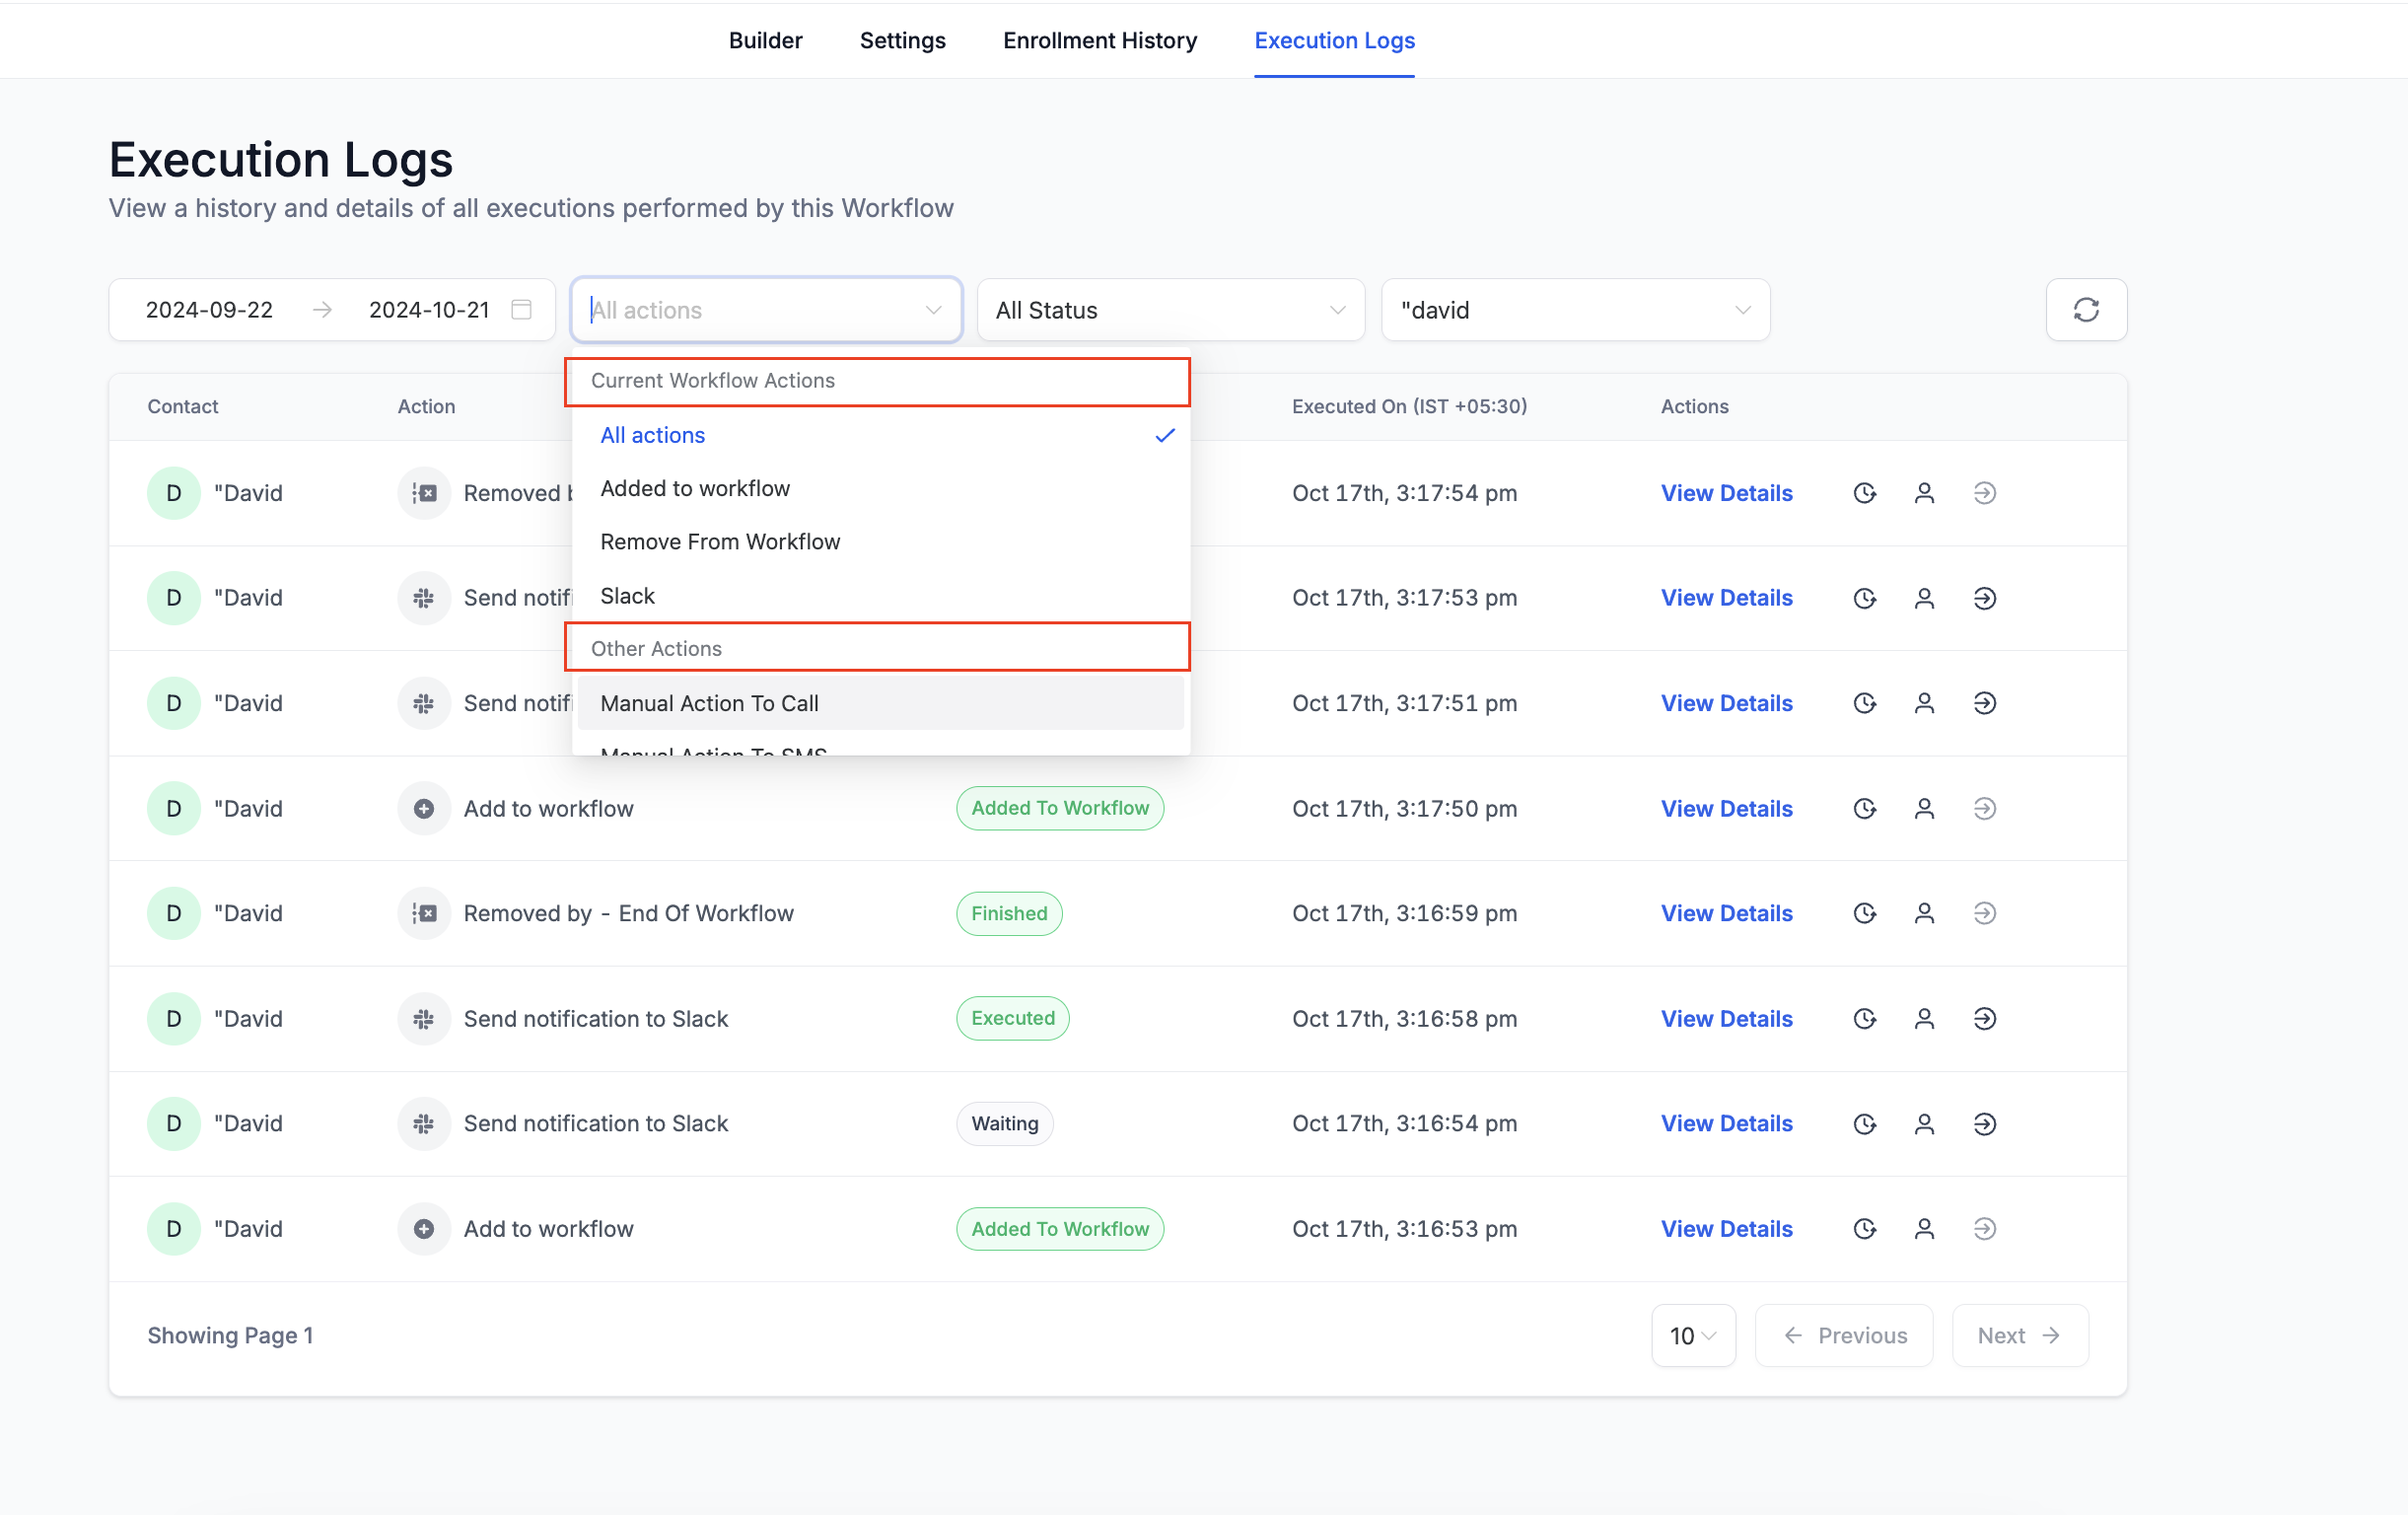
Enhanced sorting in filters: in the filter dropdown, actions that are part of the workflow appear first, with other actions in a separate section.
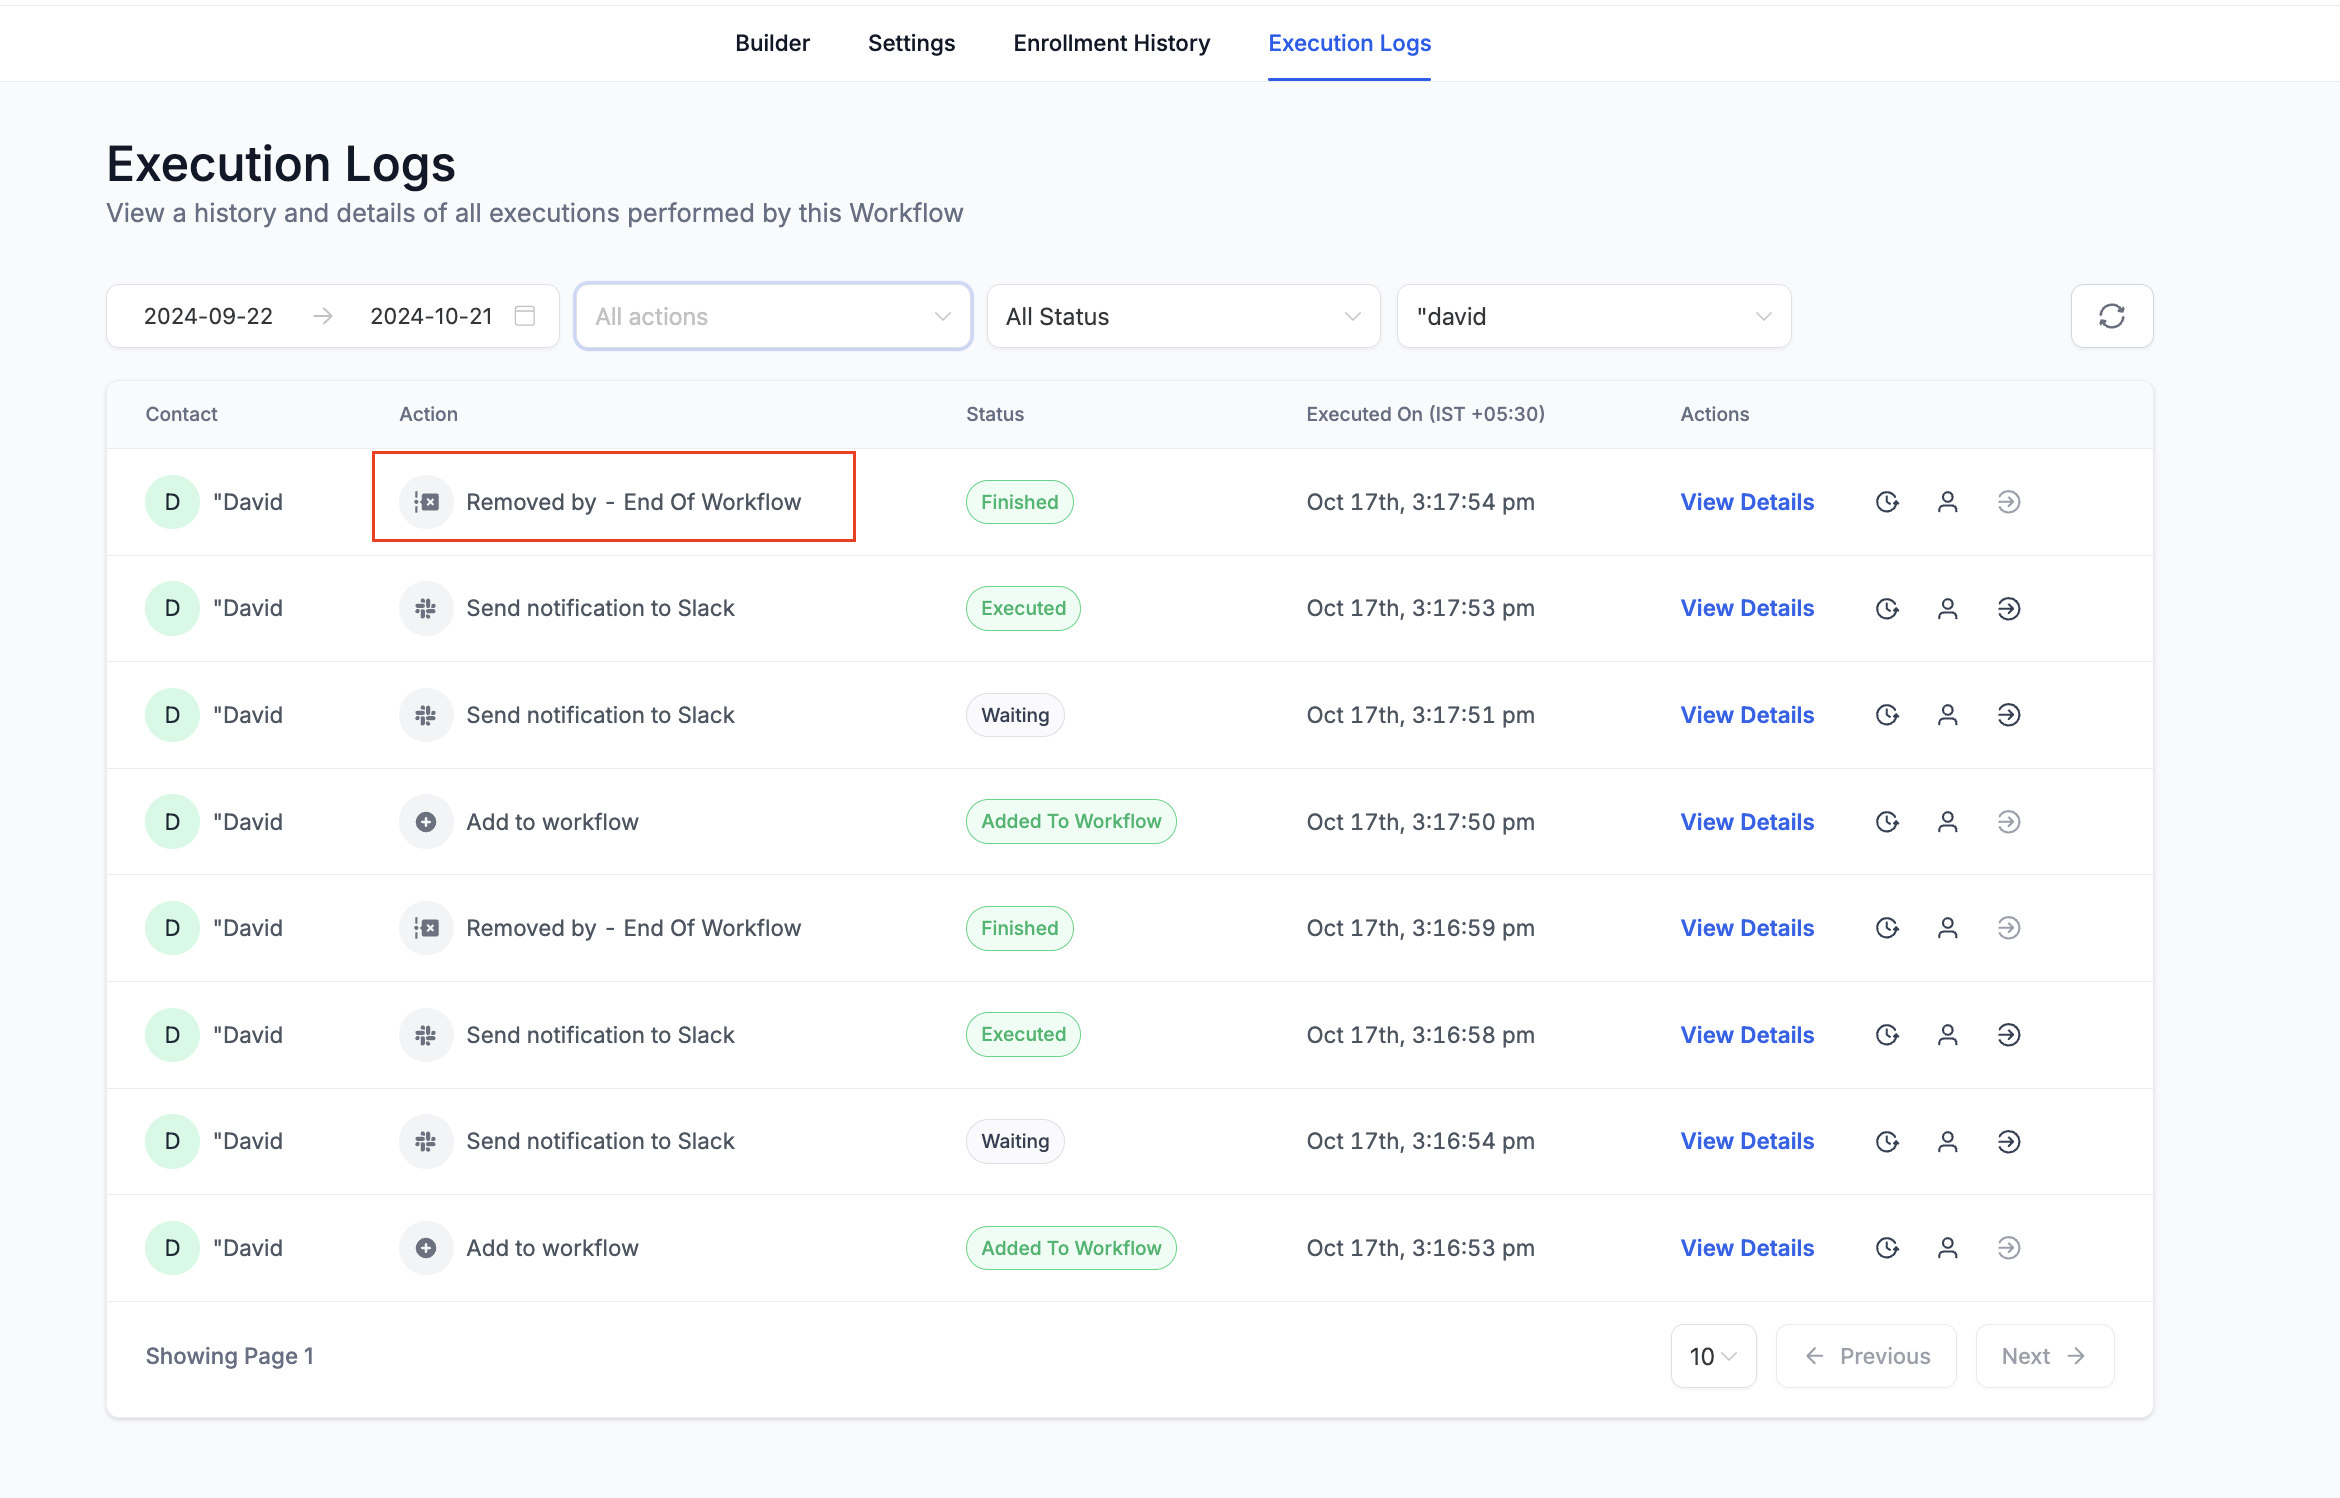
New workflow statuses in Enrollment History explain why a contact exited or completed:
Workflow Completed: the contact completed the workflow naturally.
Removed by Workflow Action: removed by an action within this workflow.
Removed by External Workflow Action: removed by an action in a different workflow.
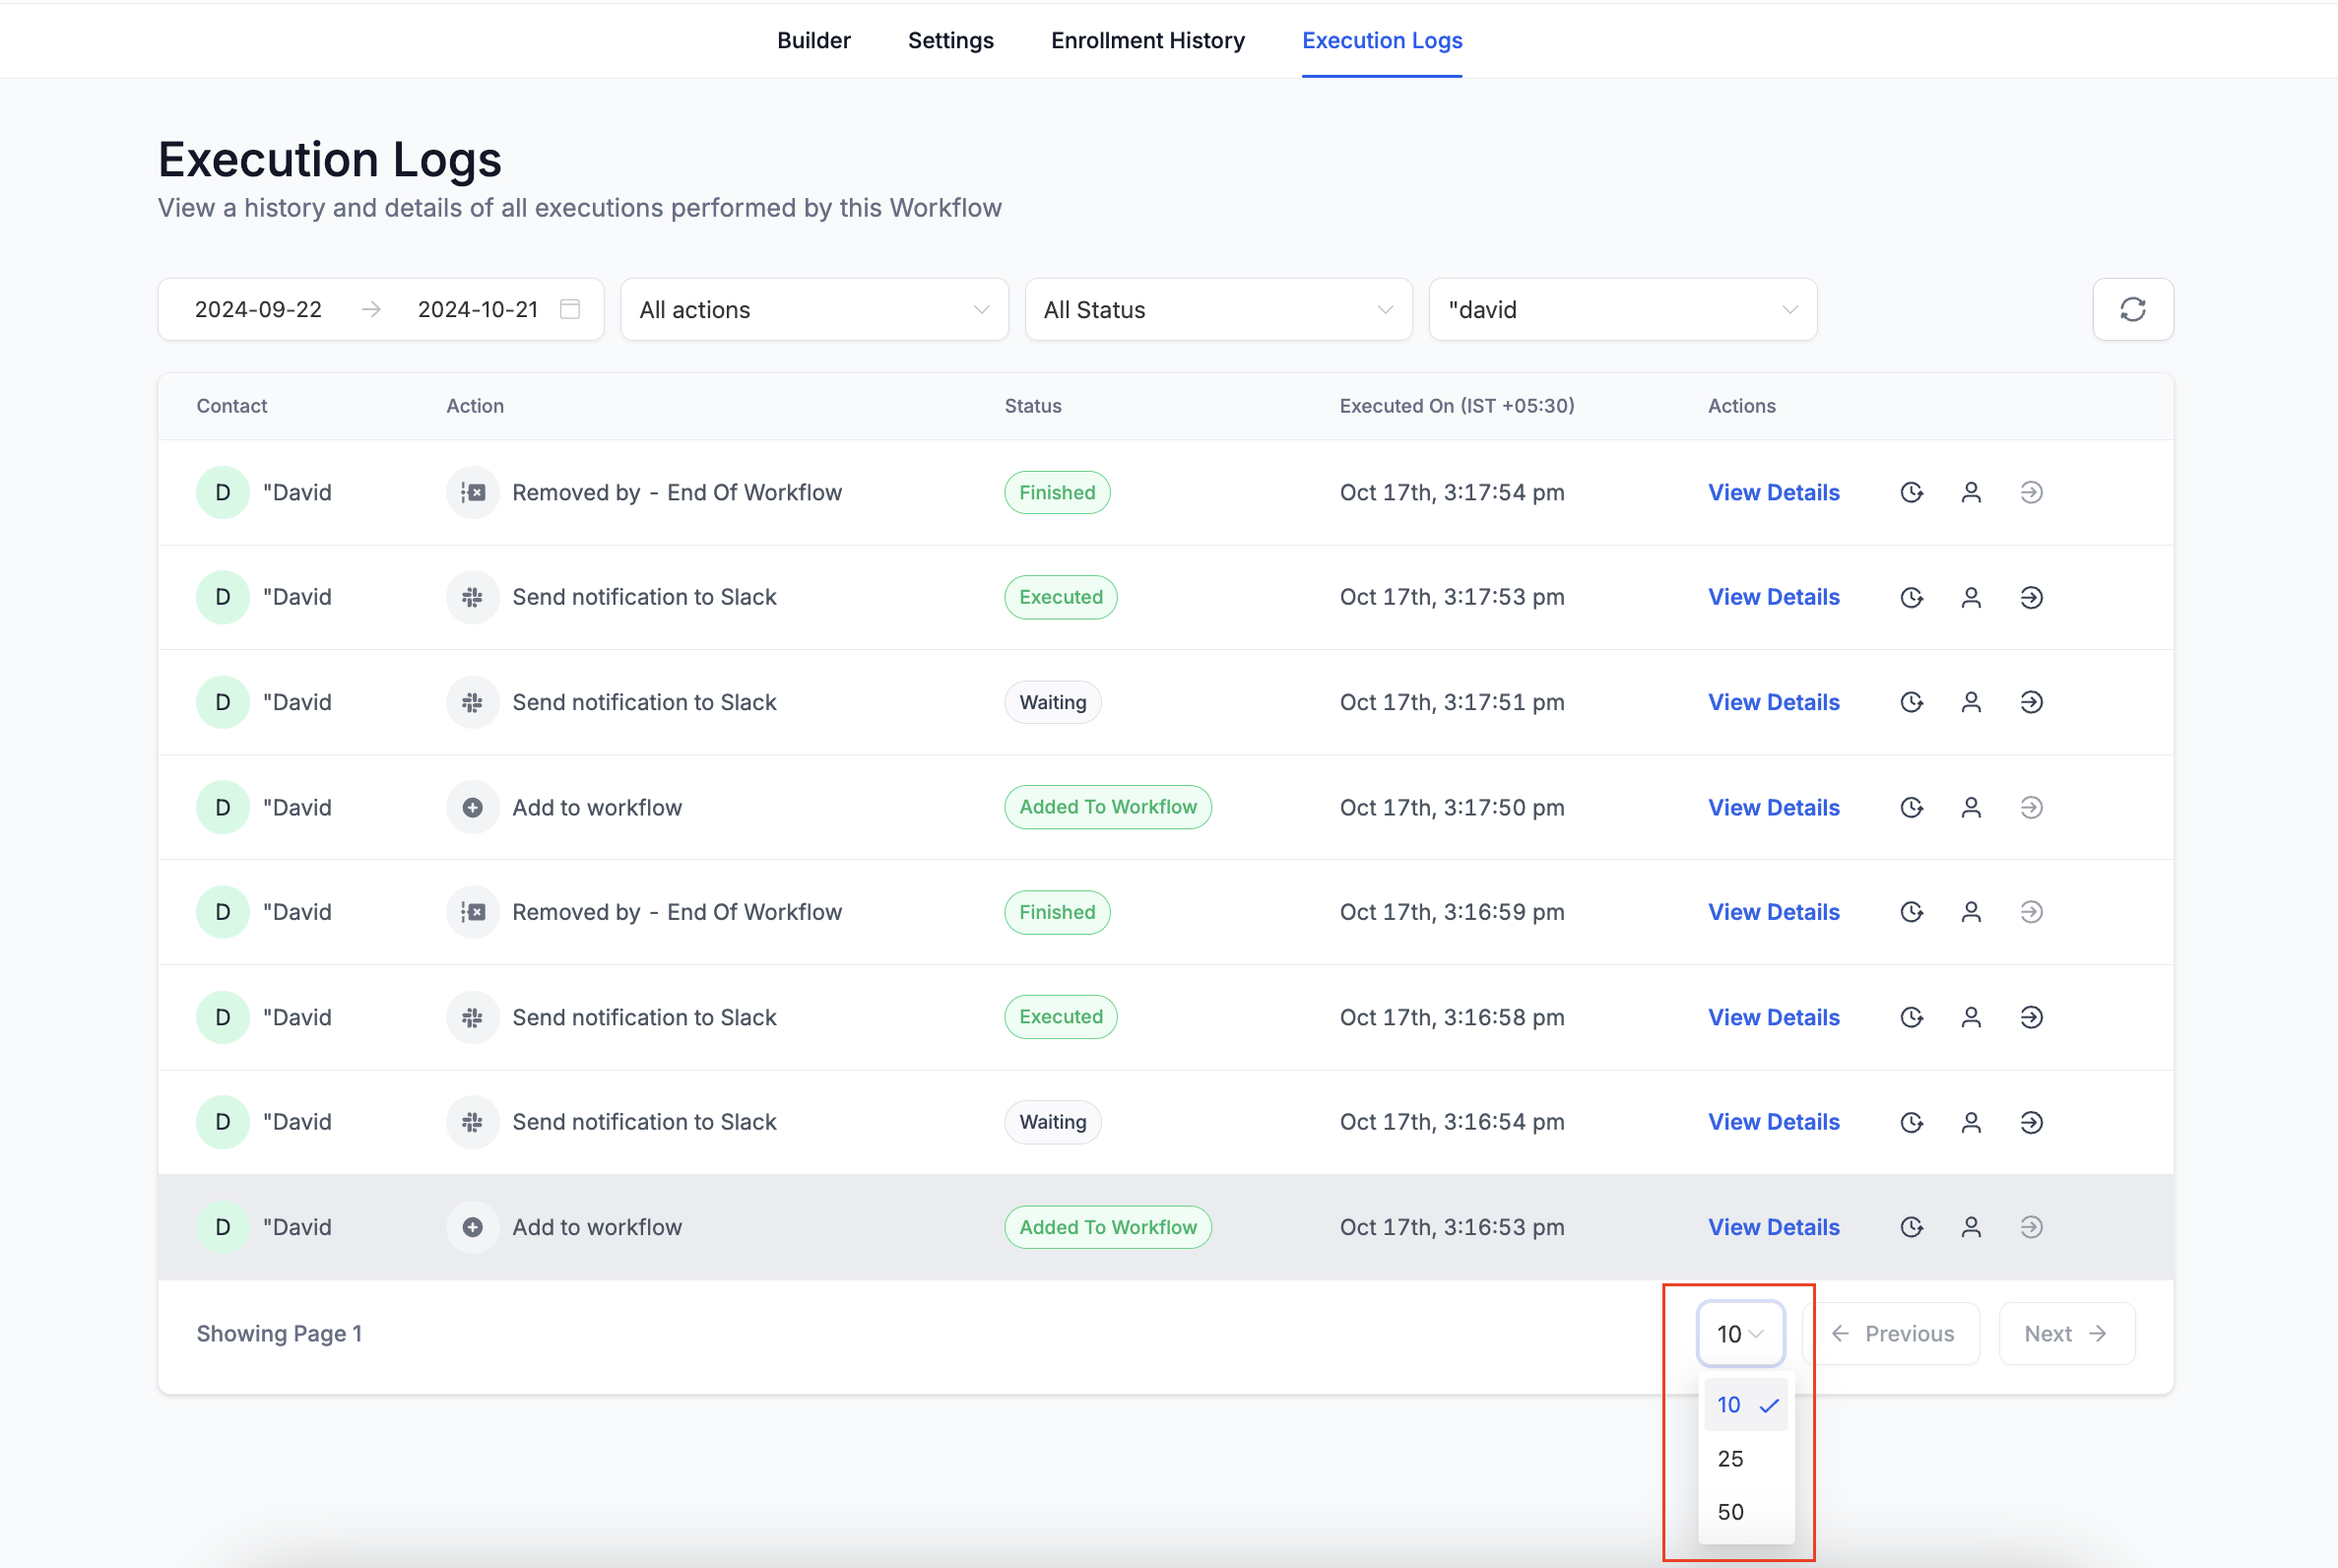
Pagination: both tabs let you display 10, 25, or 50 rows per page.
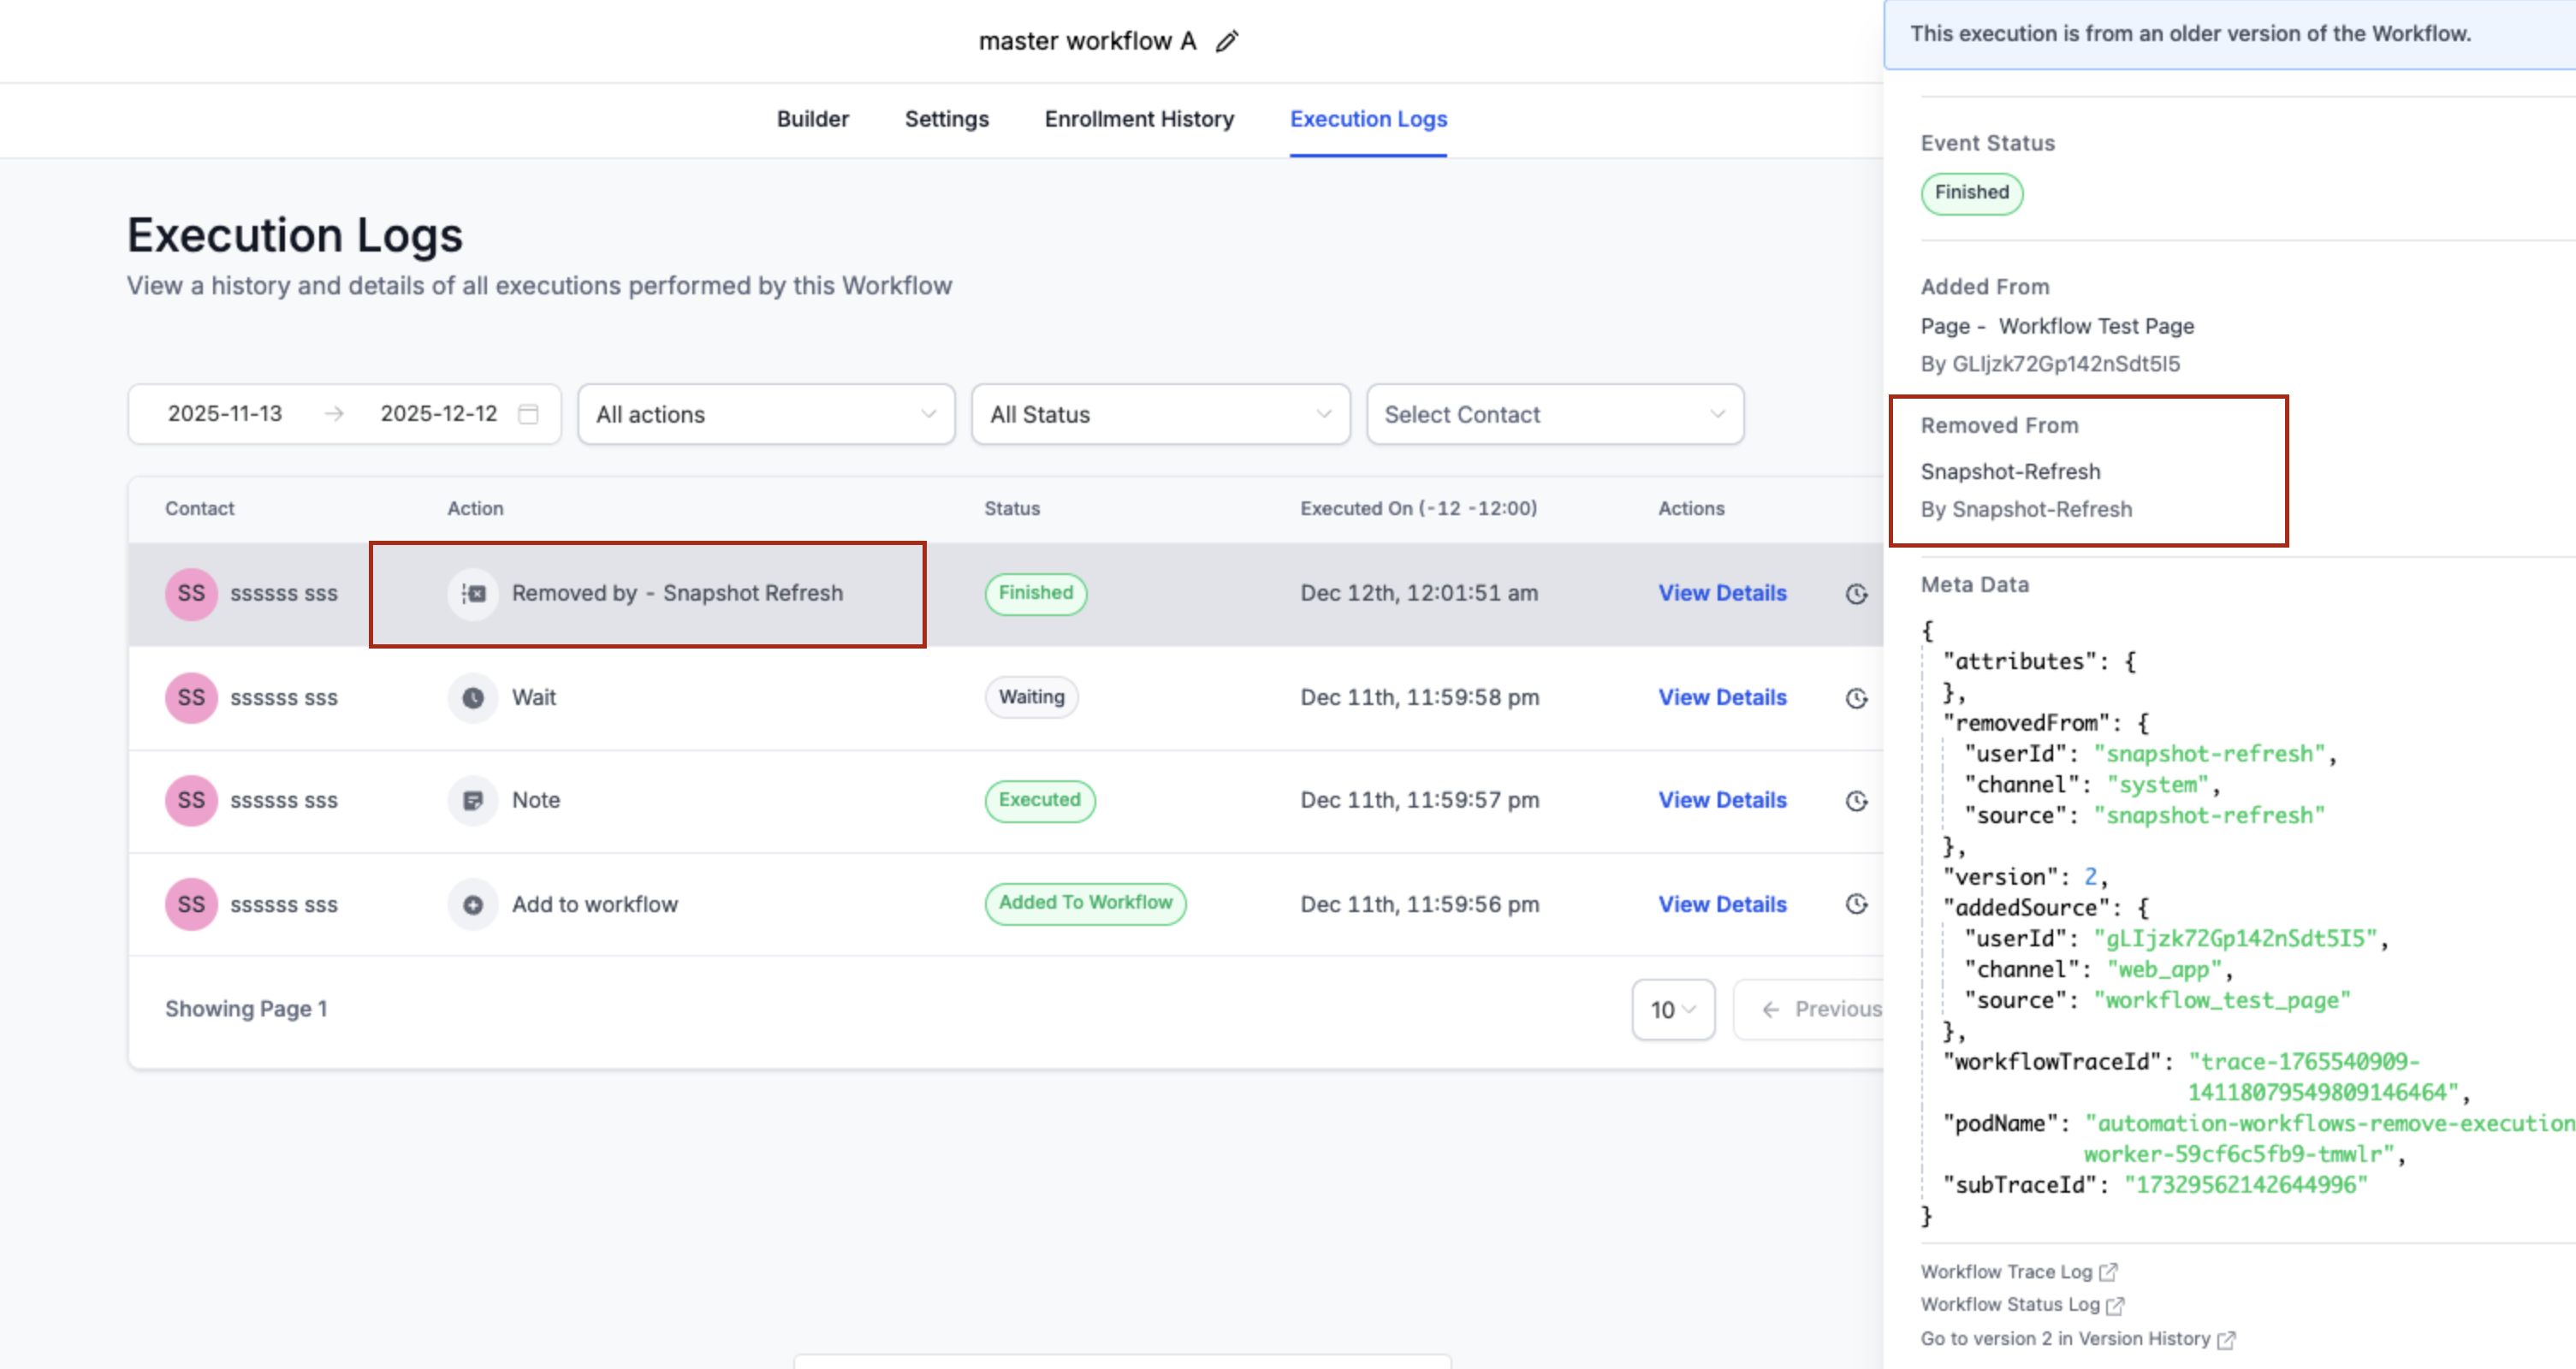
Contact merges: when contacts are merged, Execution Logs can include a Contact Merge entry so you can trace how an in-progress run was handled. For example, a live-chat "Guest" enters a follow-up workflow, is later merged into an existing contact, and the workflow continues under the master contact with no steps lost. If a snapshot refresh removes steps in a snapshot-linked workflow, contacts waiting on a deleted step may be removed automatically, shown as Removed by - Snapshot Refresh; open the entry to view details in the side panel.
Enrollment History features
Pagination: display 10, 25, or 50 rows per page.

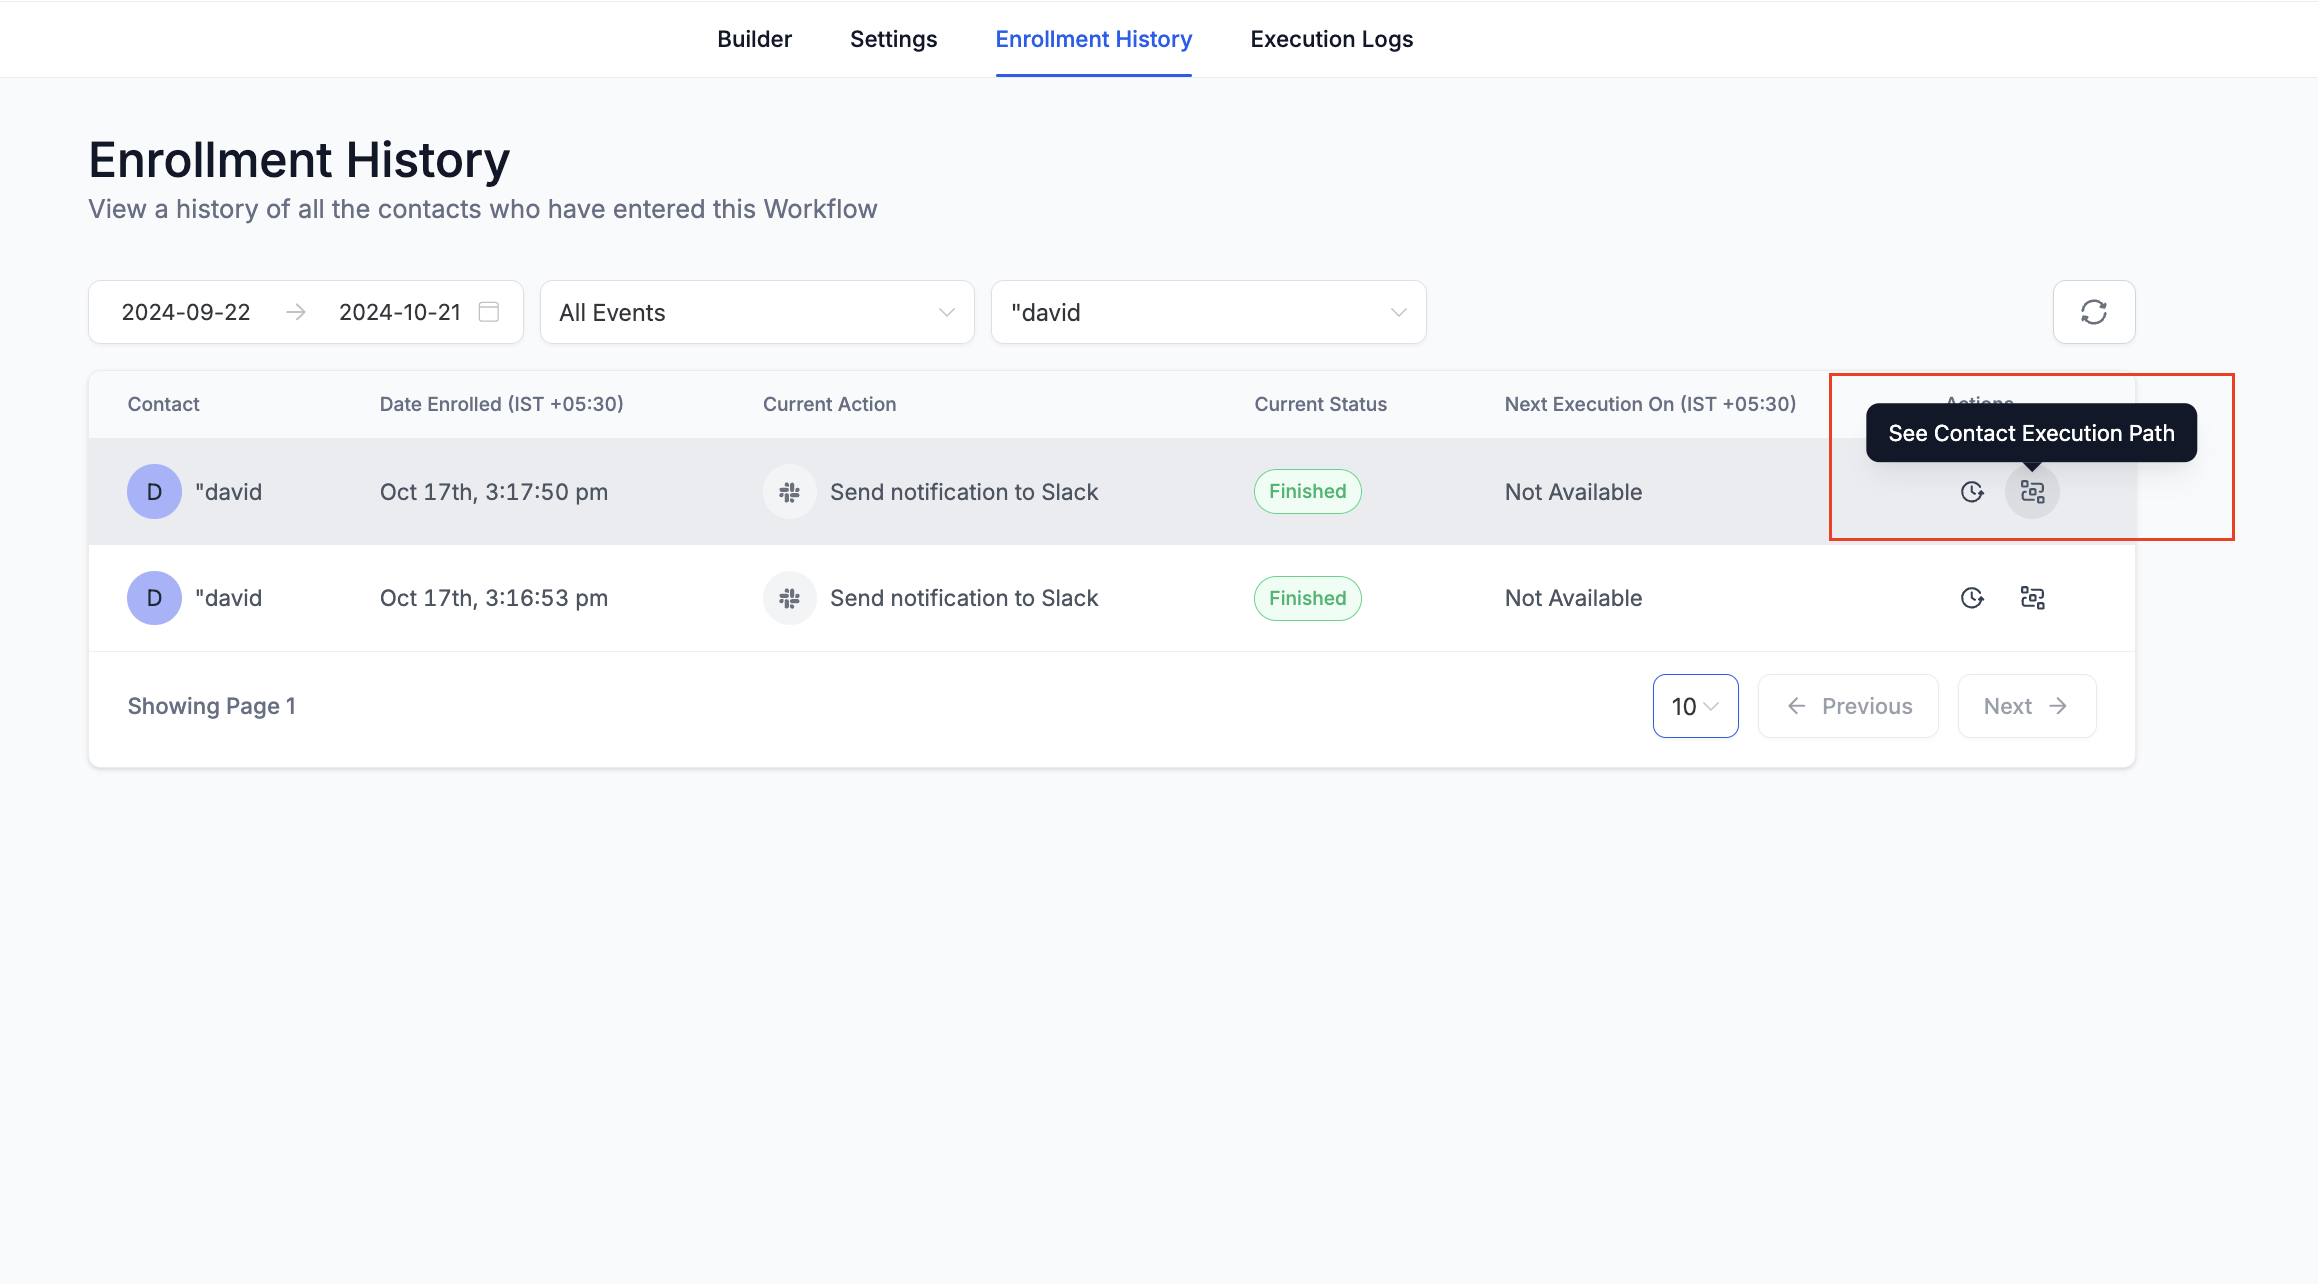
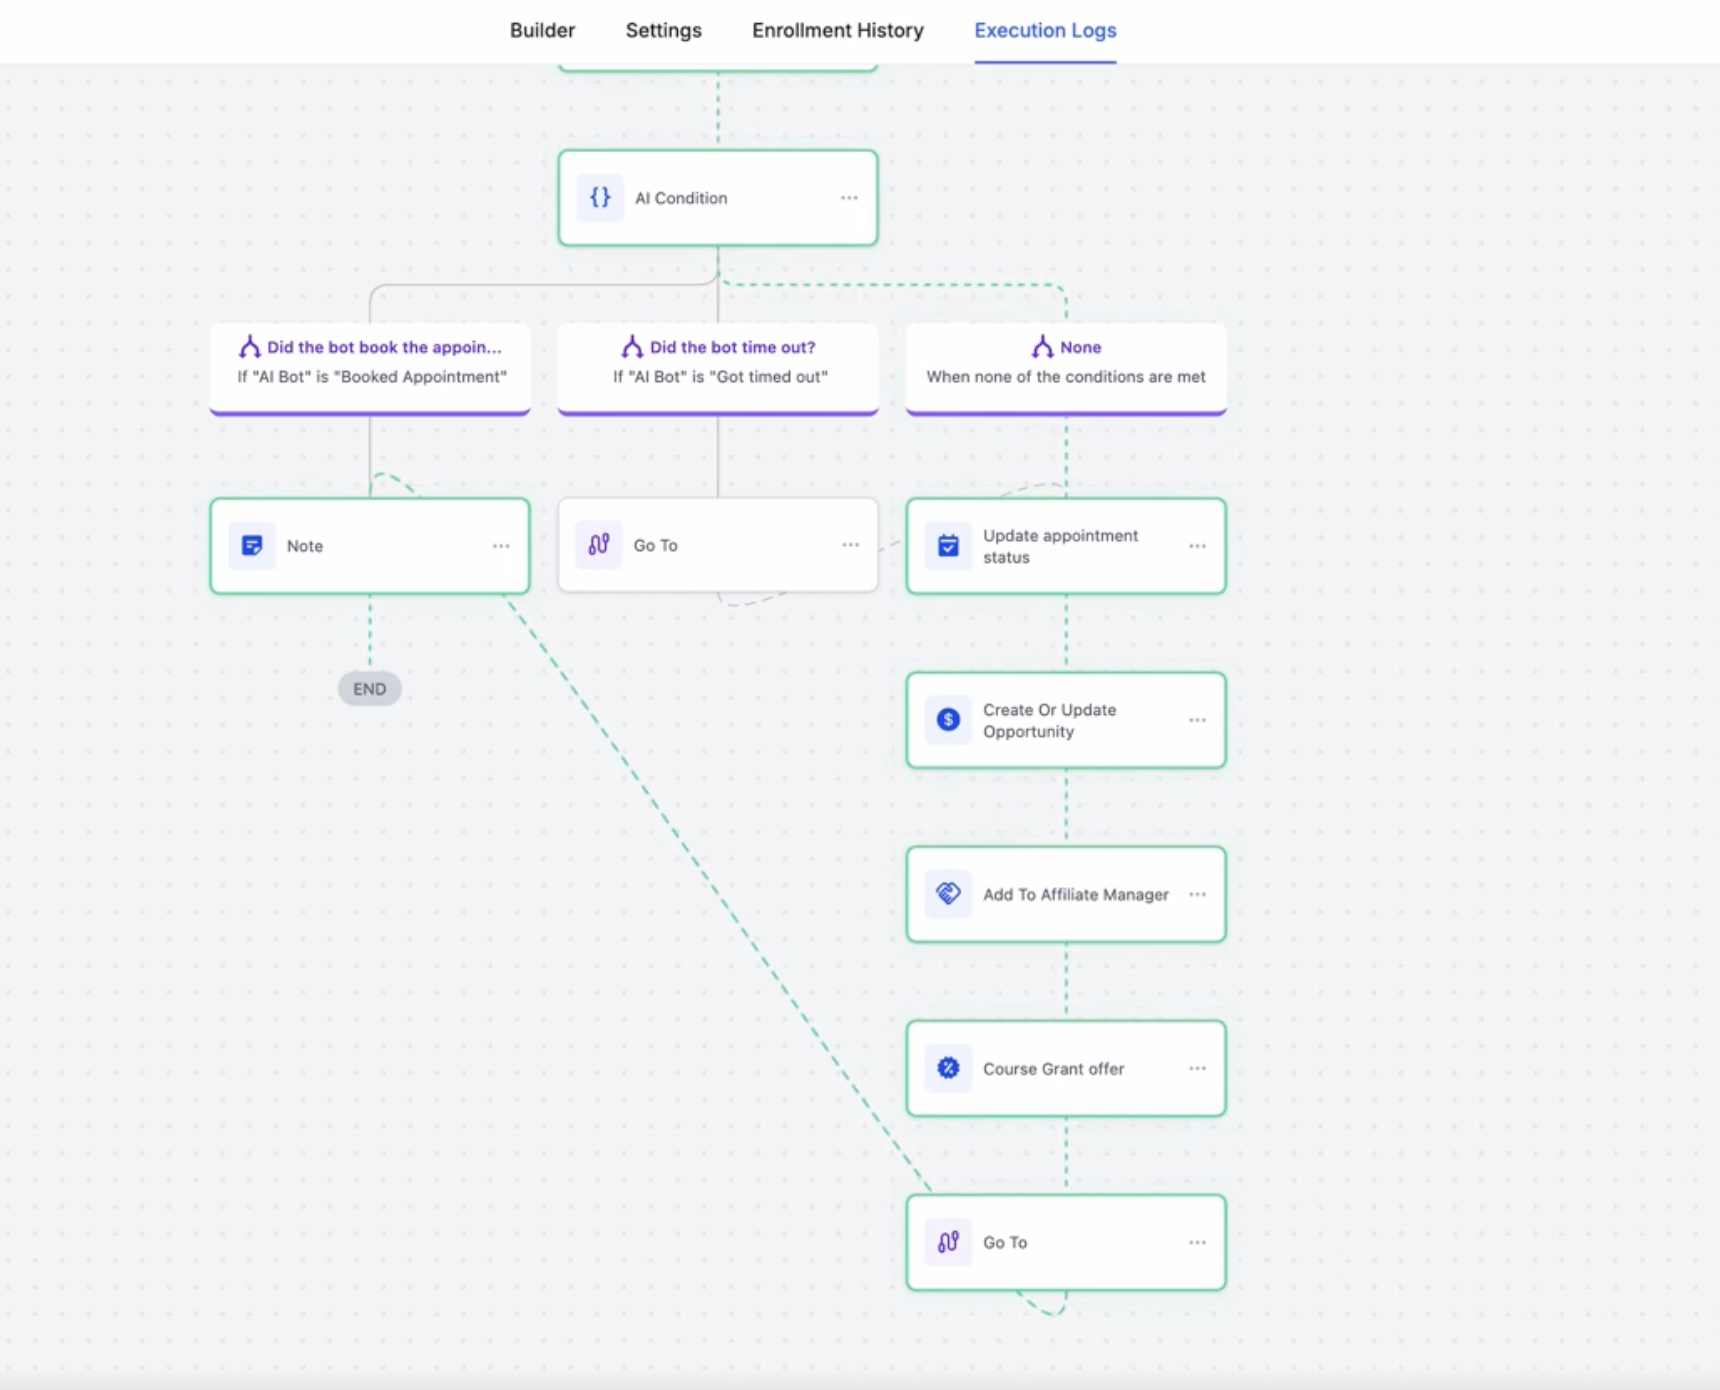
Highlight Contact Path: click the Highlight Contact Path icon in Enrollment History or Execution History to open the builder with the contact's path highlighted on the canvas. It also surfaces:
Error visibility: nodes where an error occurred are highlighted.
Skipped nodes: see which nodes the contact bypassed.
Entry and exit status: visual indicators show when the contact entered and exited.
In-progress tracking: see when a contact is still actively moving through the workflow.
Go To Action: while reviewing execution details, click Go To Action to jump straight to that action in the builder with its sidebar open, ready to edit.
Date and time enhancements
Date format: dates appear in MMM-DD format (for example Oct-21); hover to reveal the time.
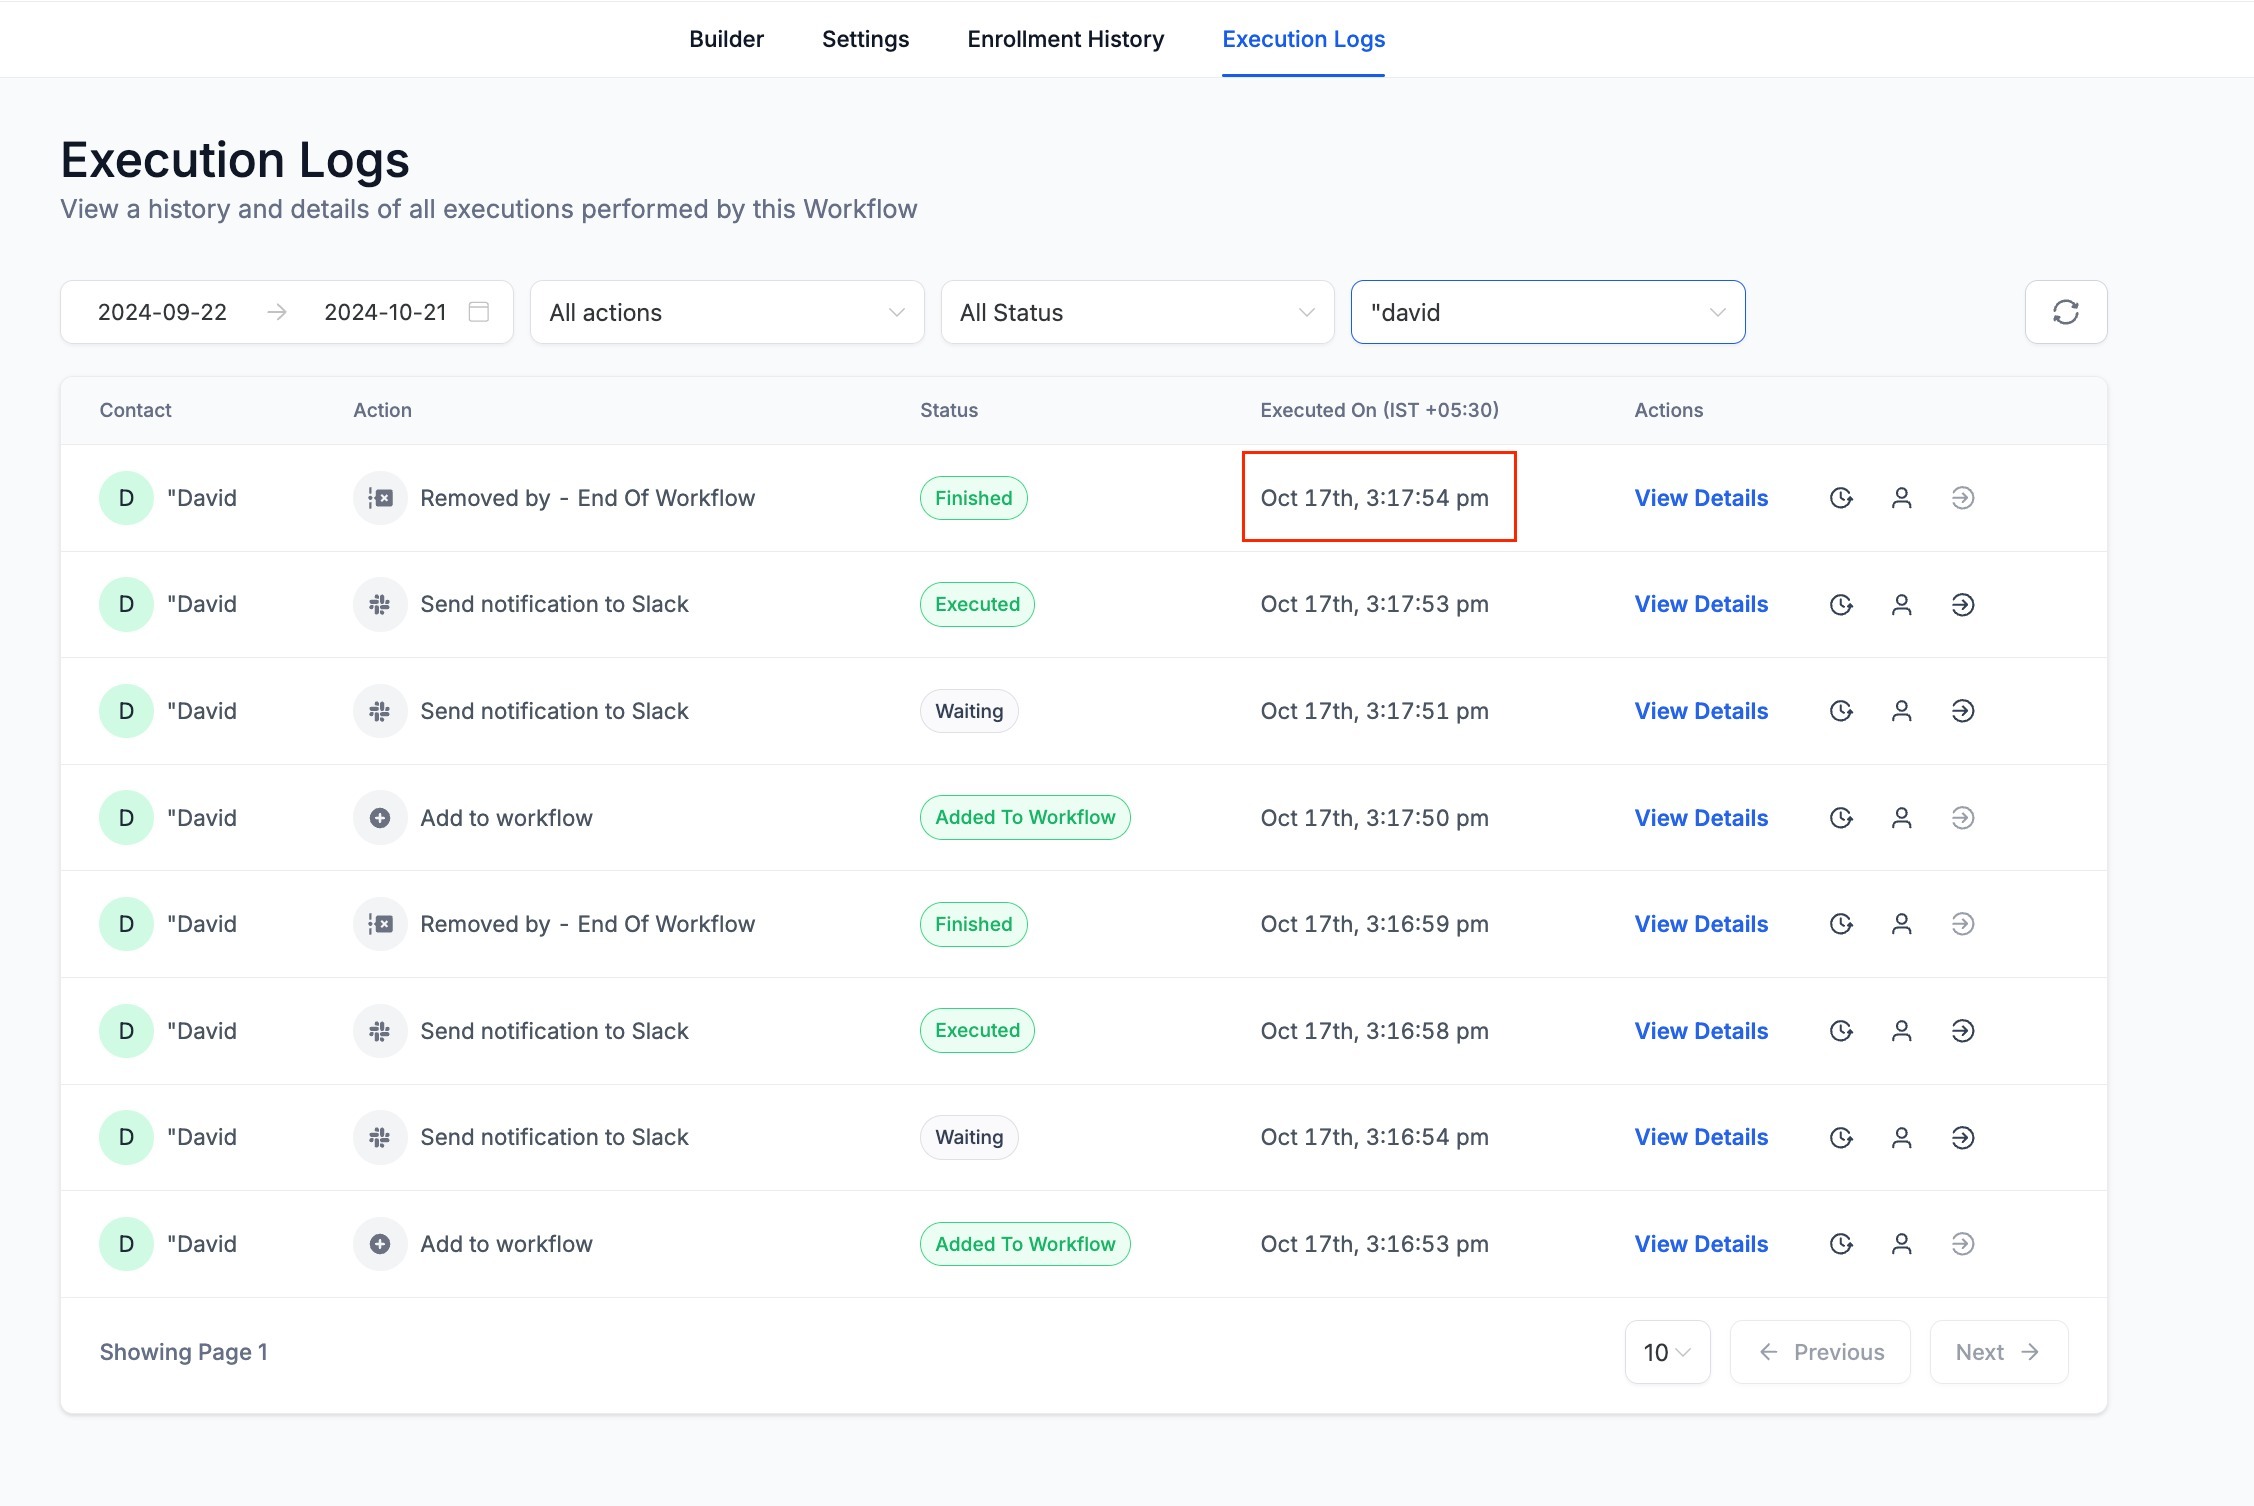
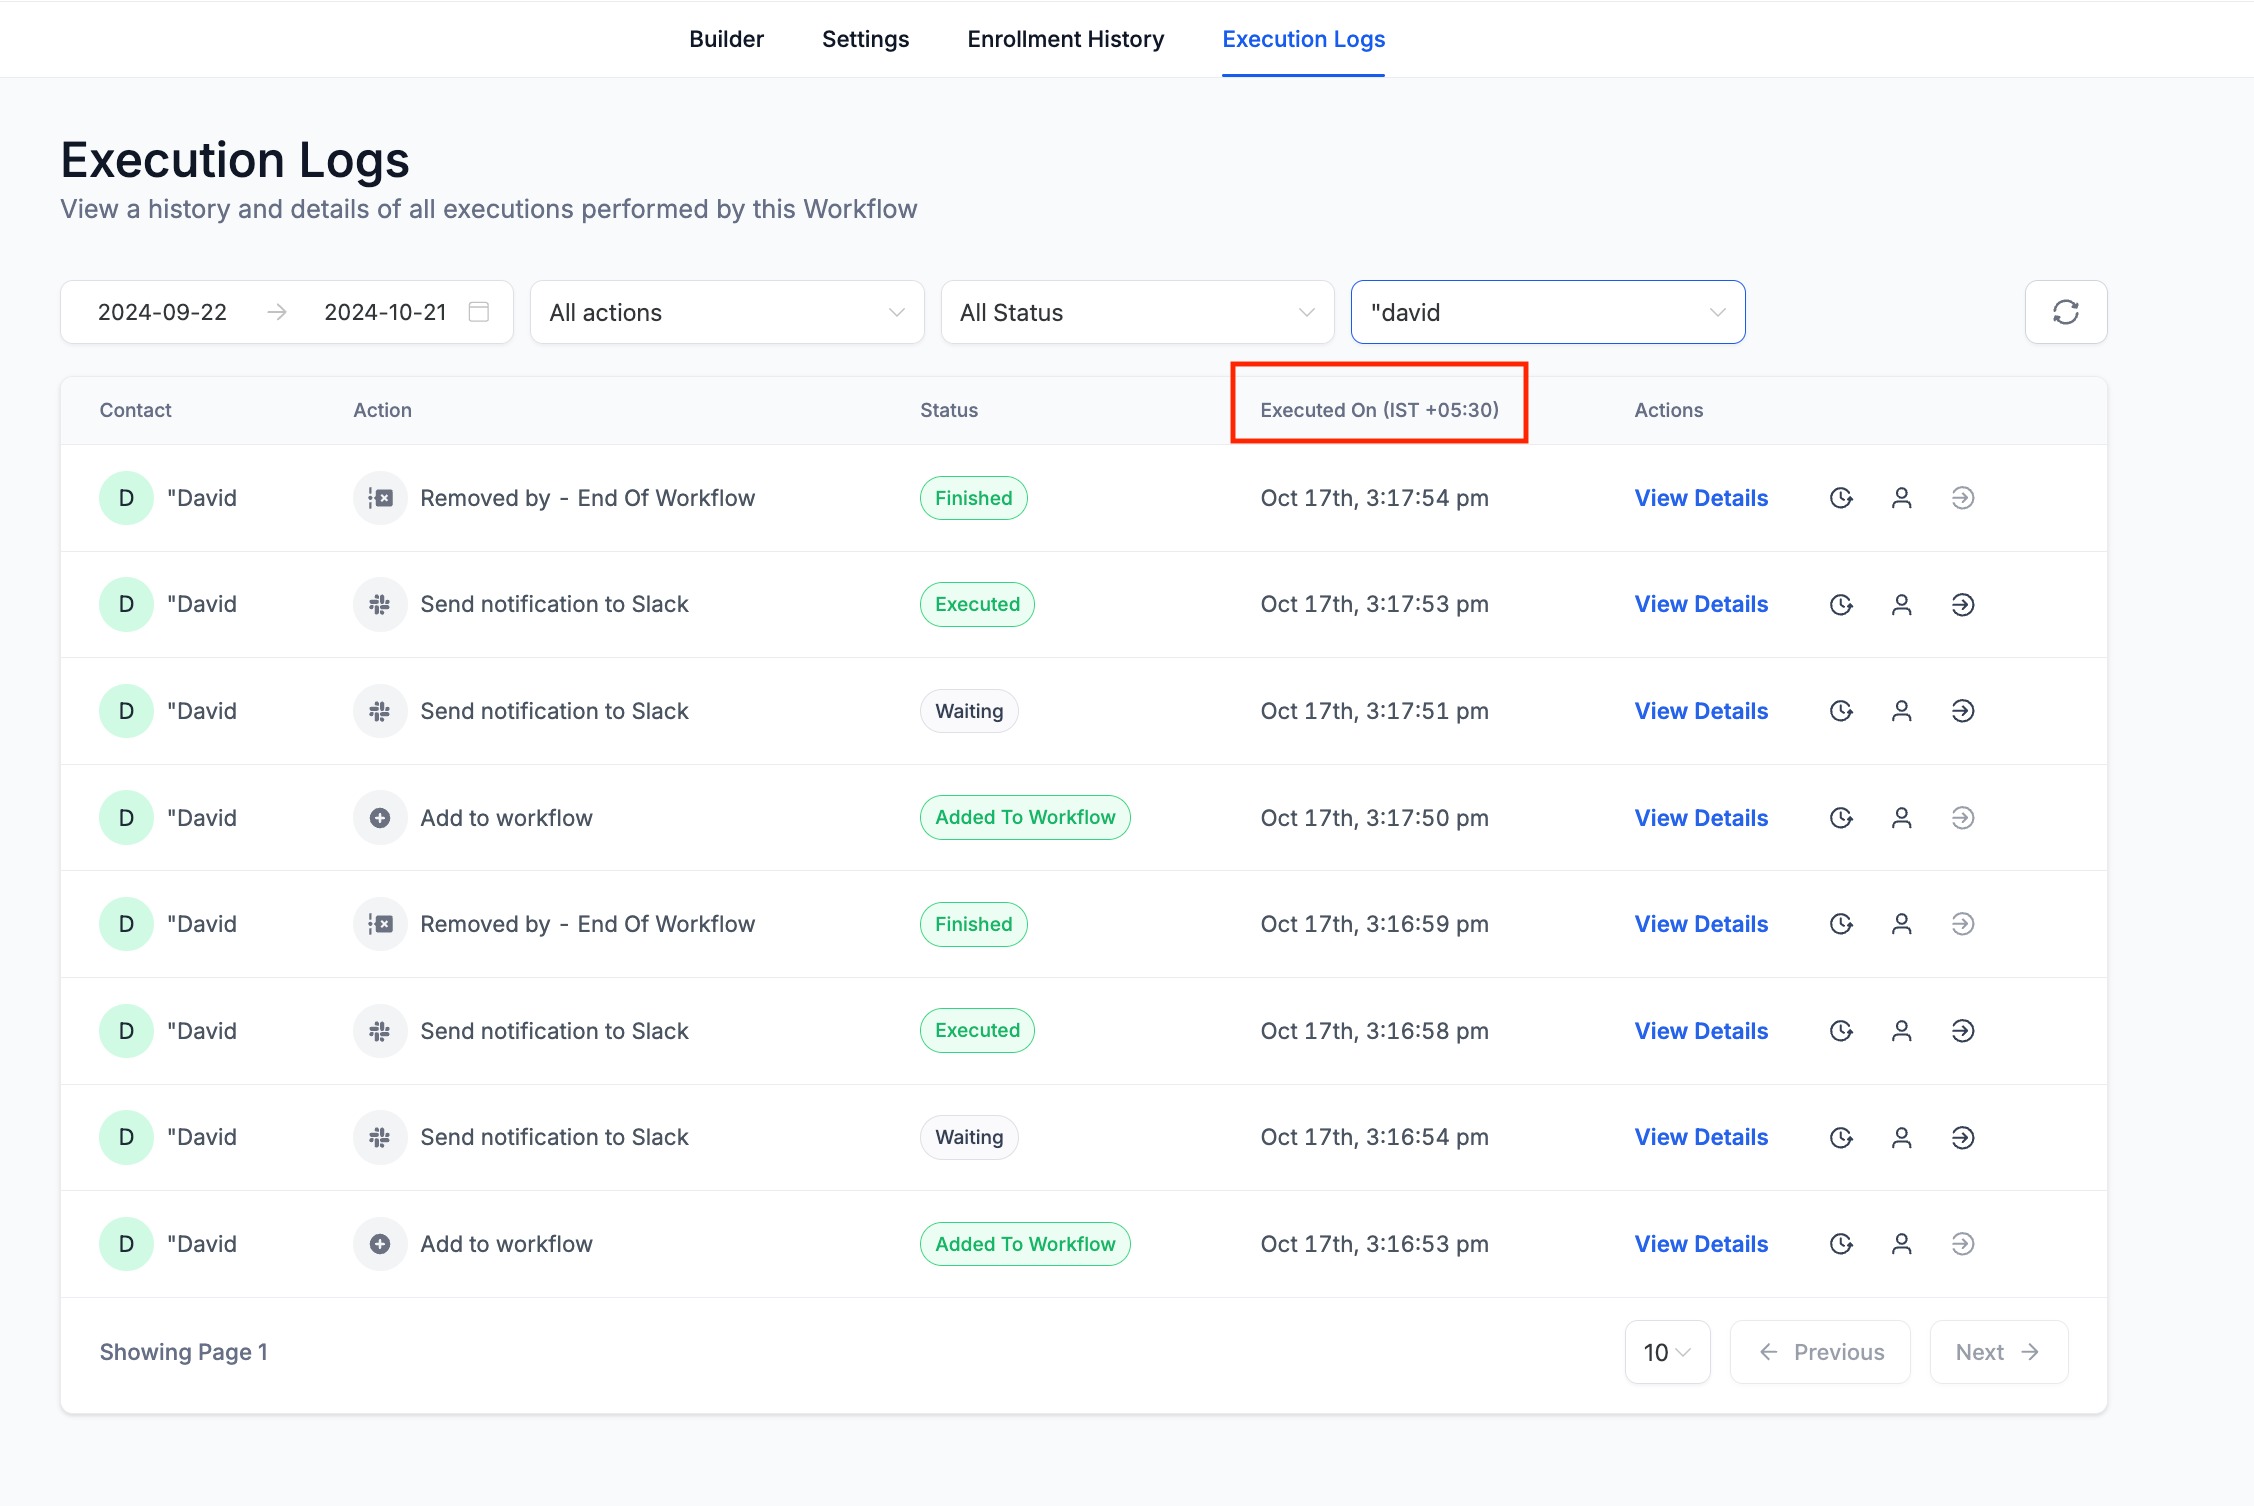
Timezone: the Executed On field now includes the timezone the action ran in.
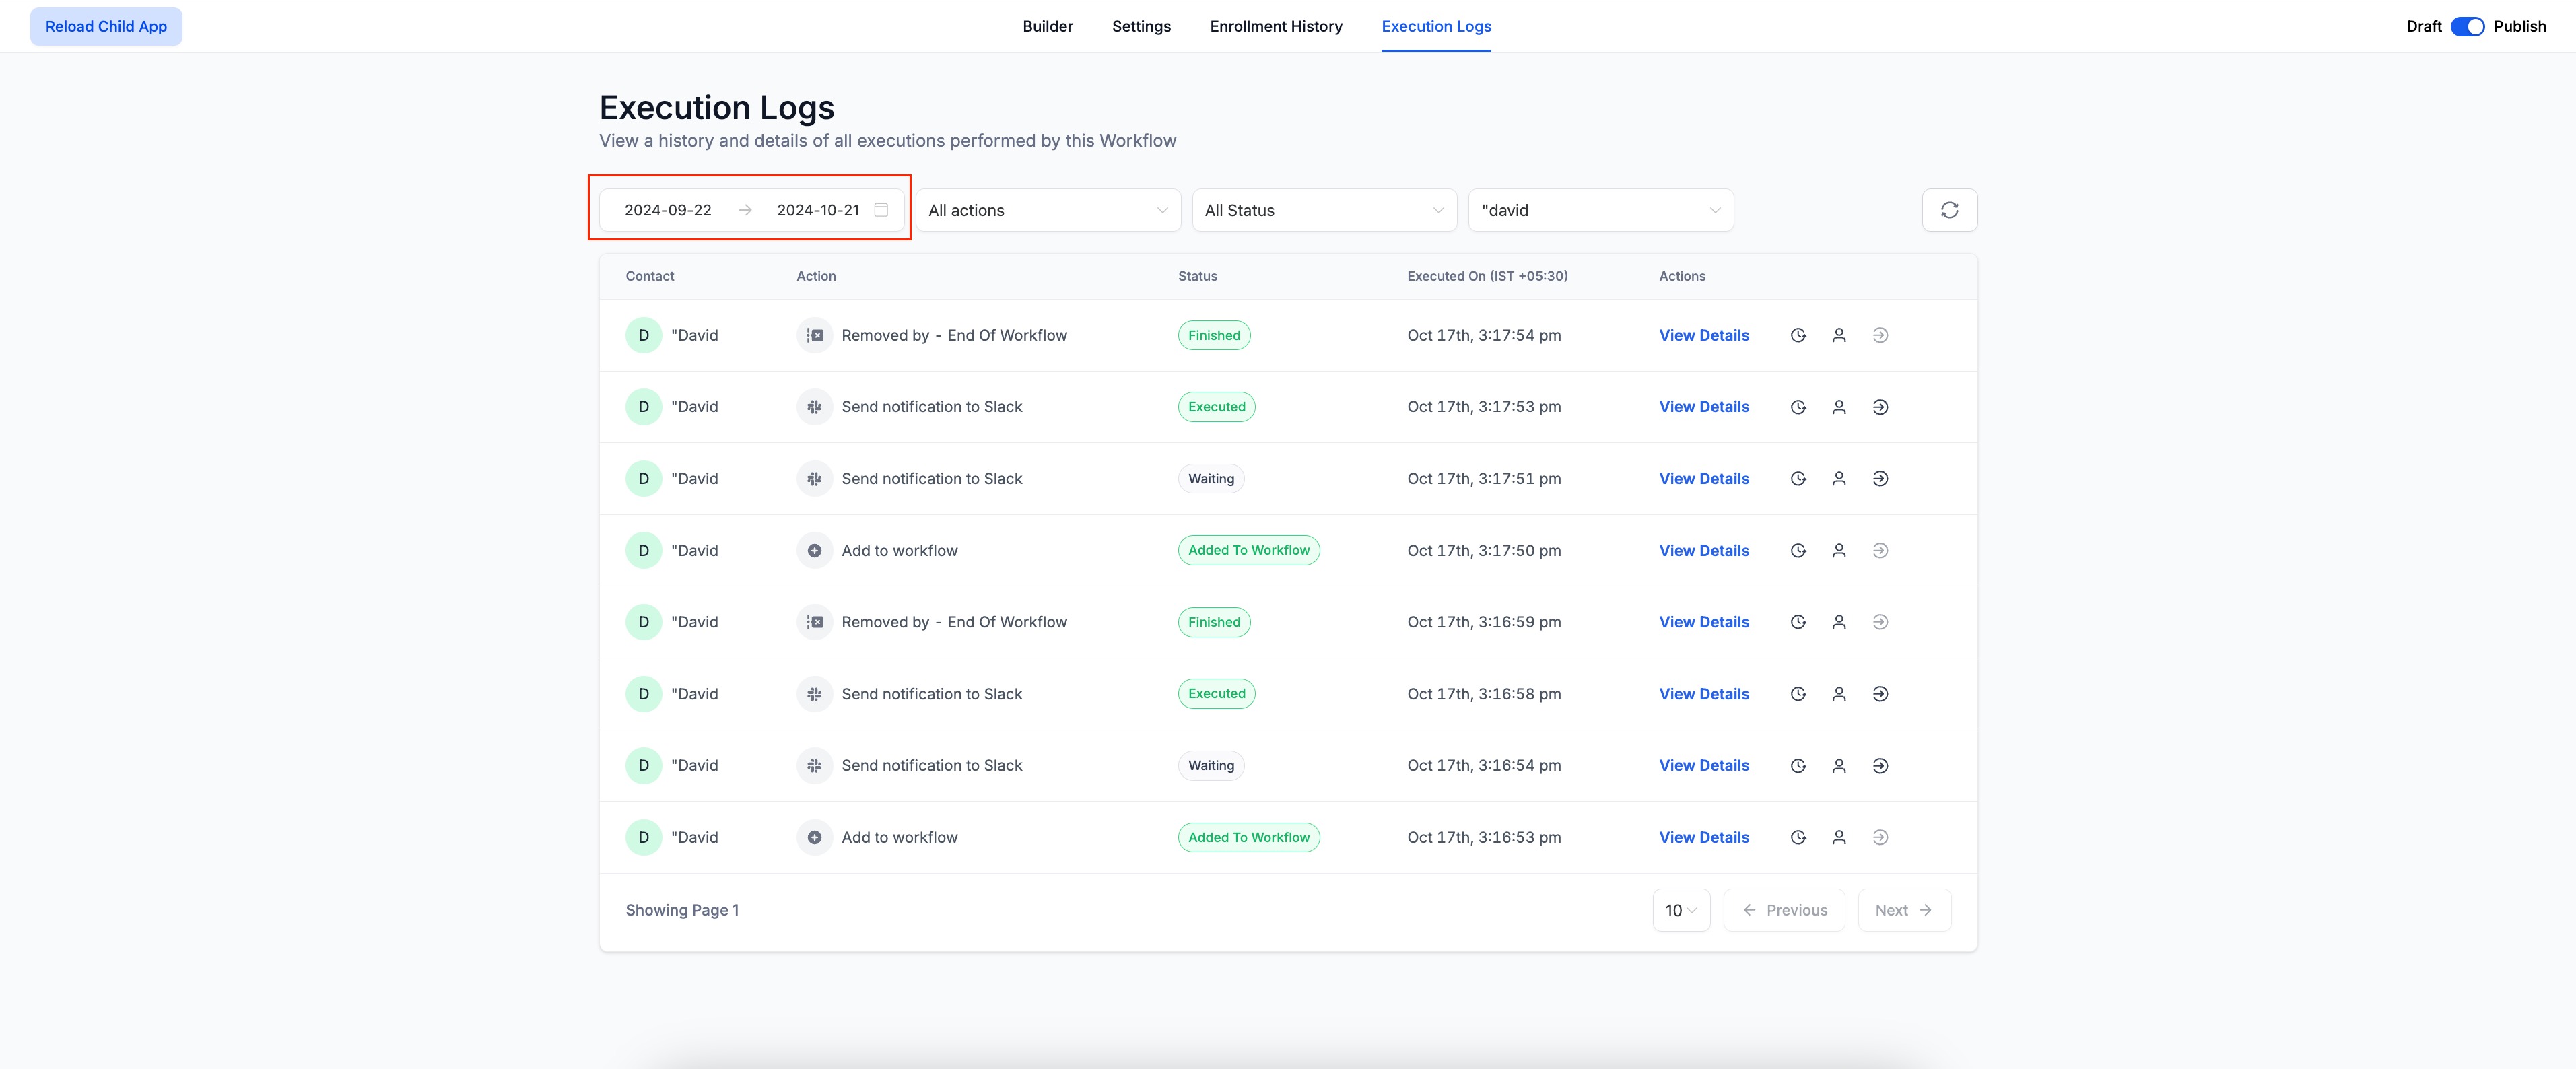
Custom date range: beyond presets (Today, Yesterday, and so on), choose a custom start and end date with time, up to a 30-day maximum range.
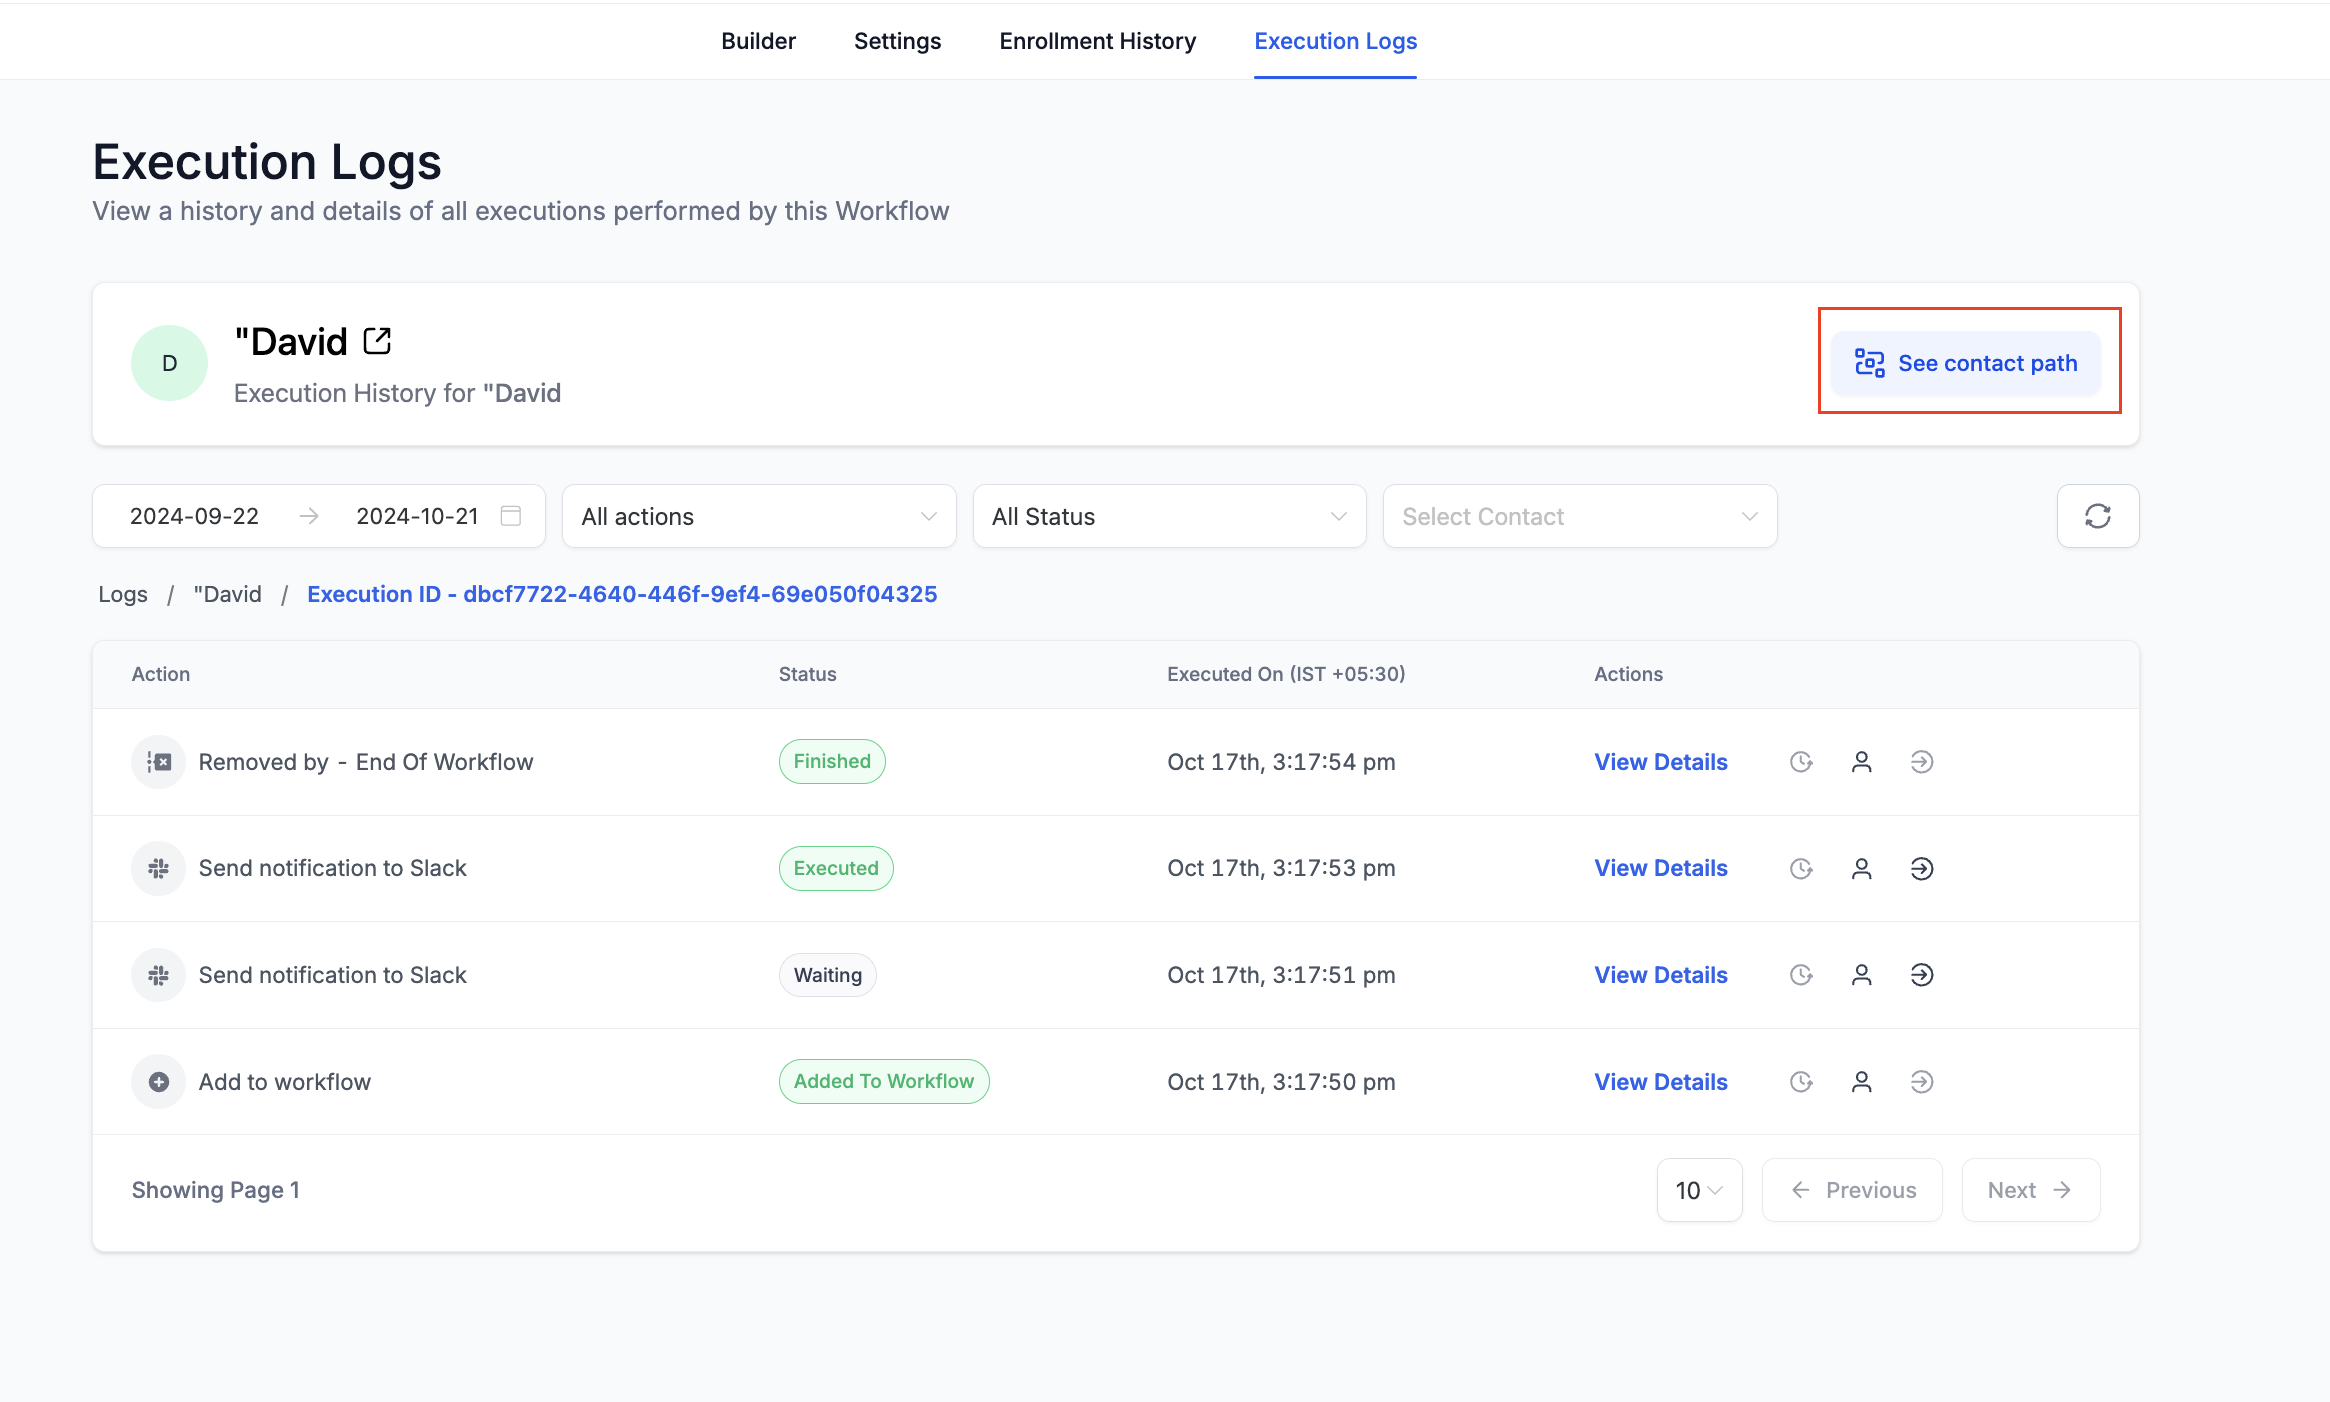
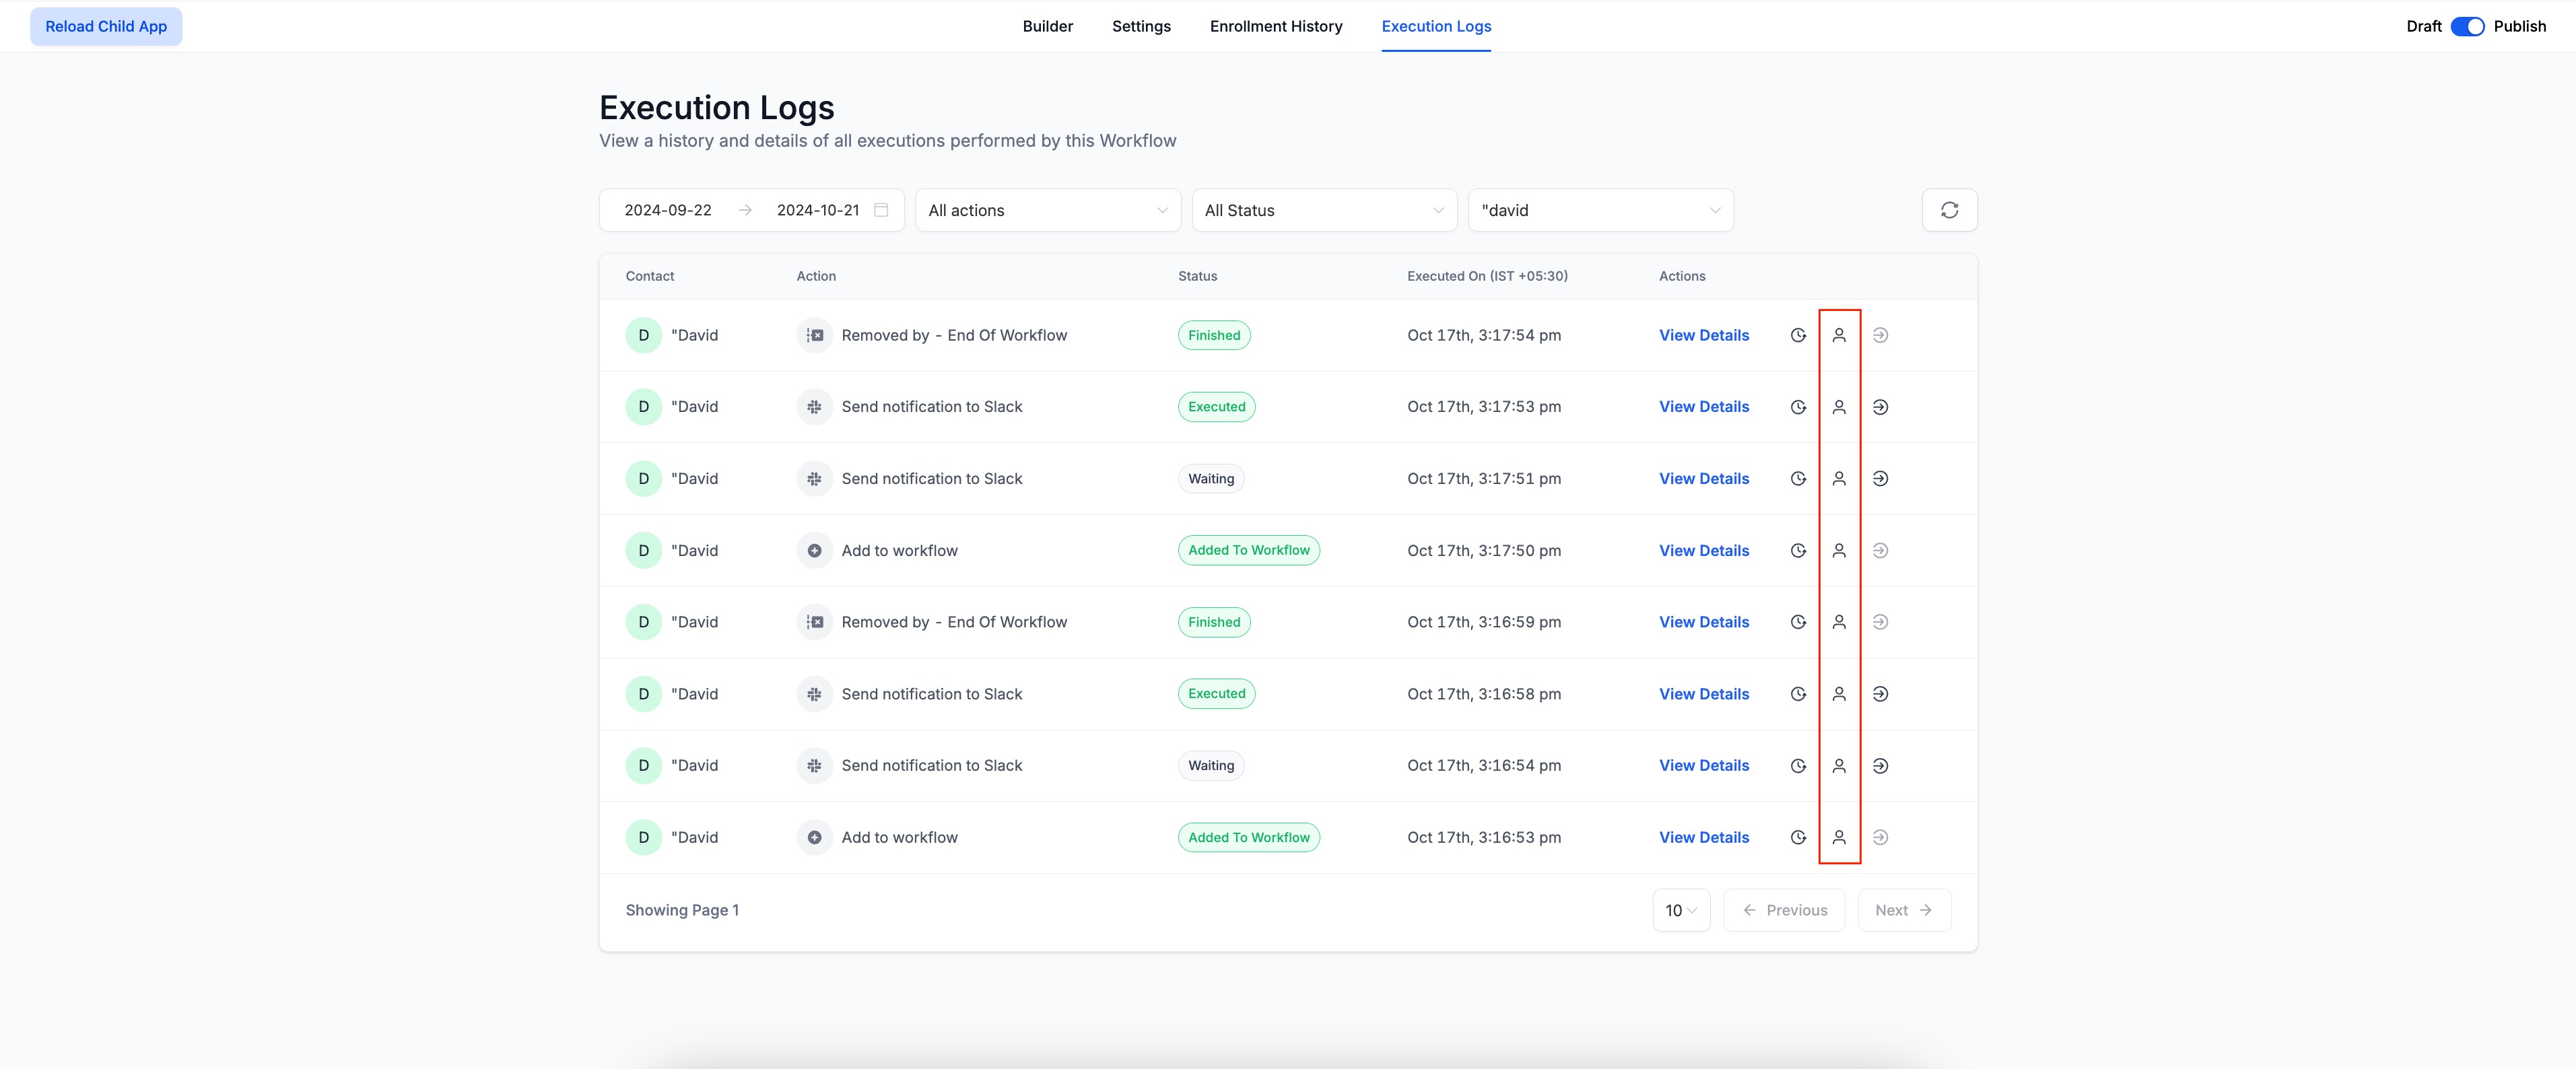
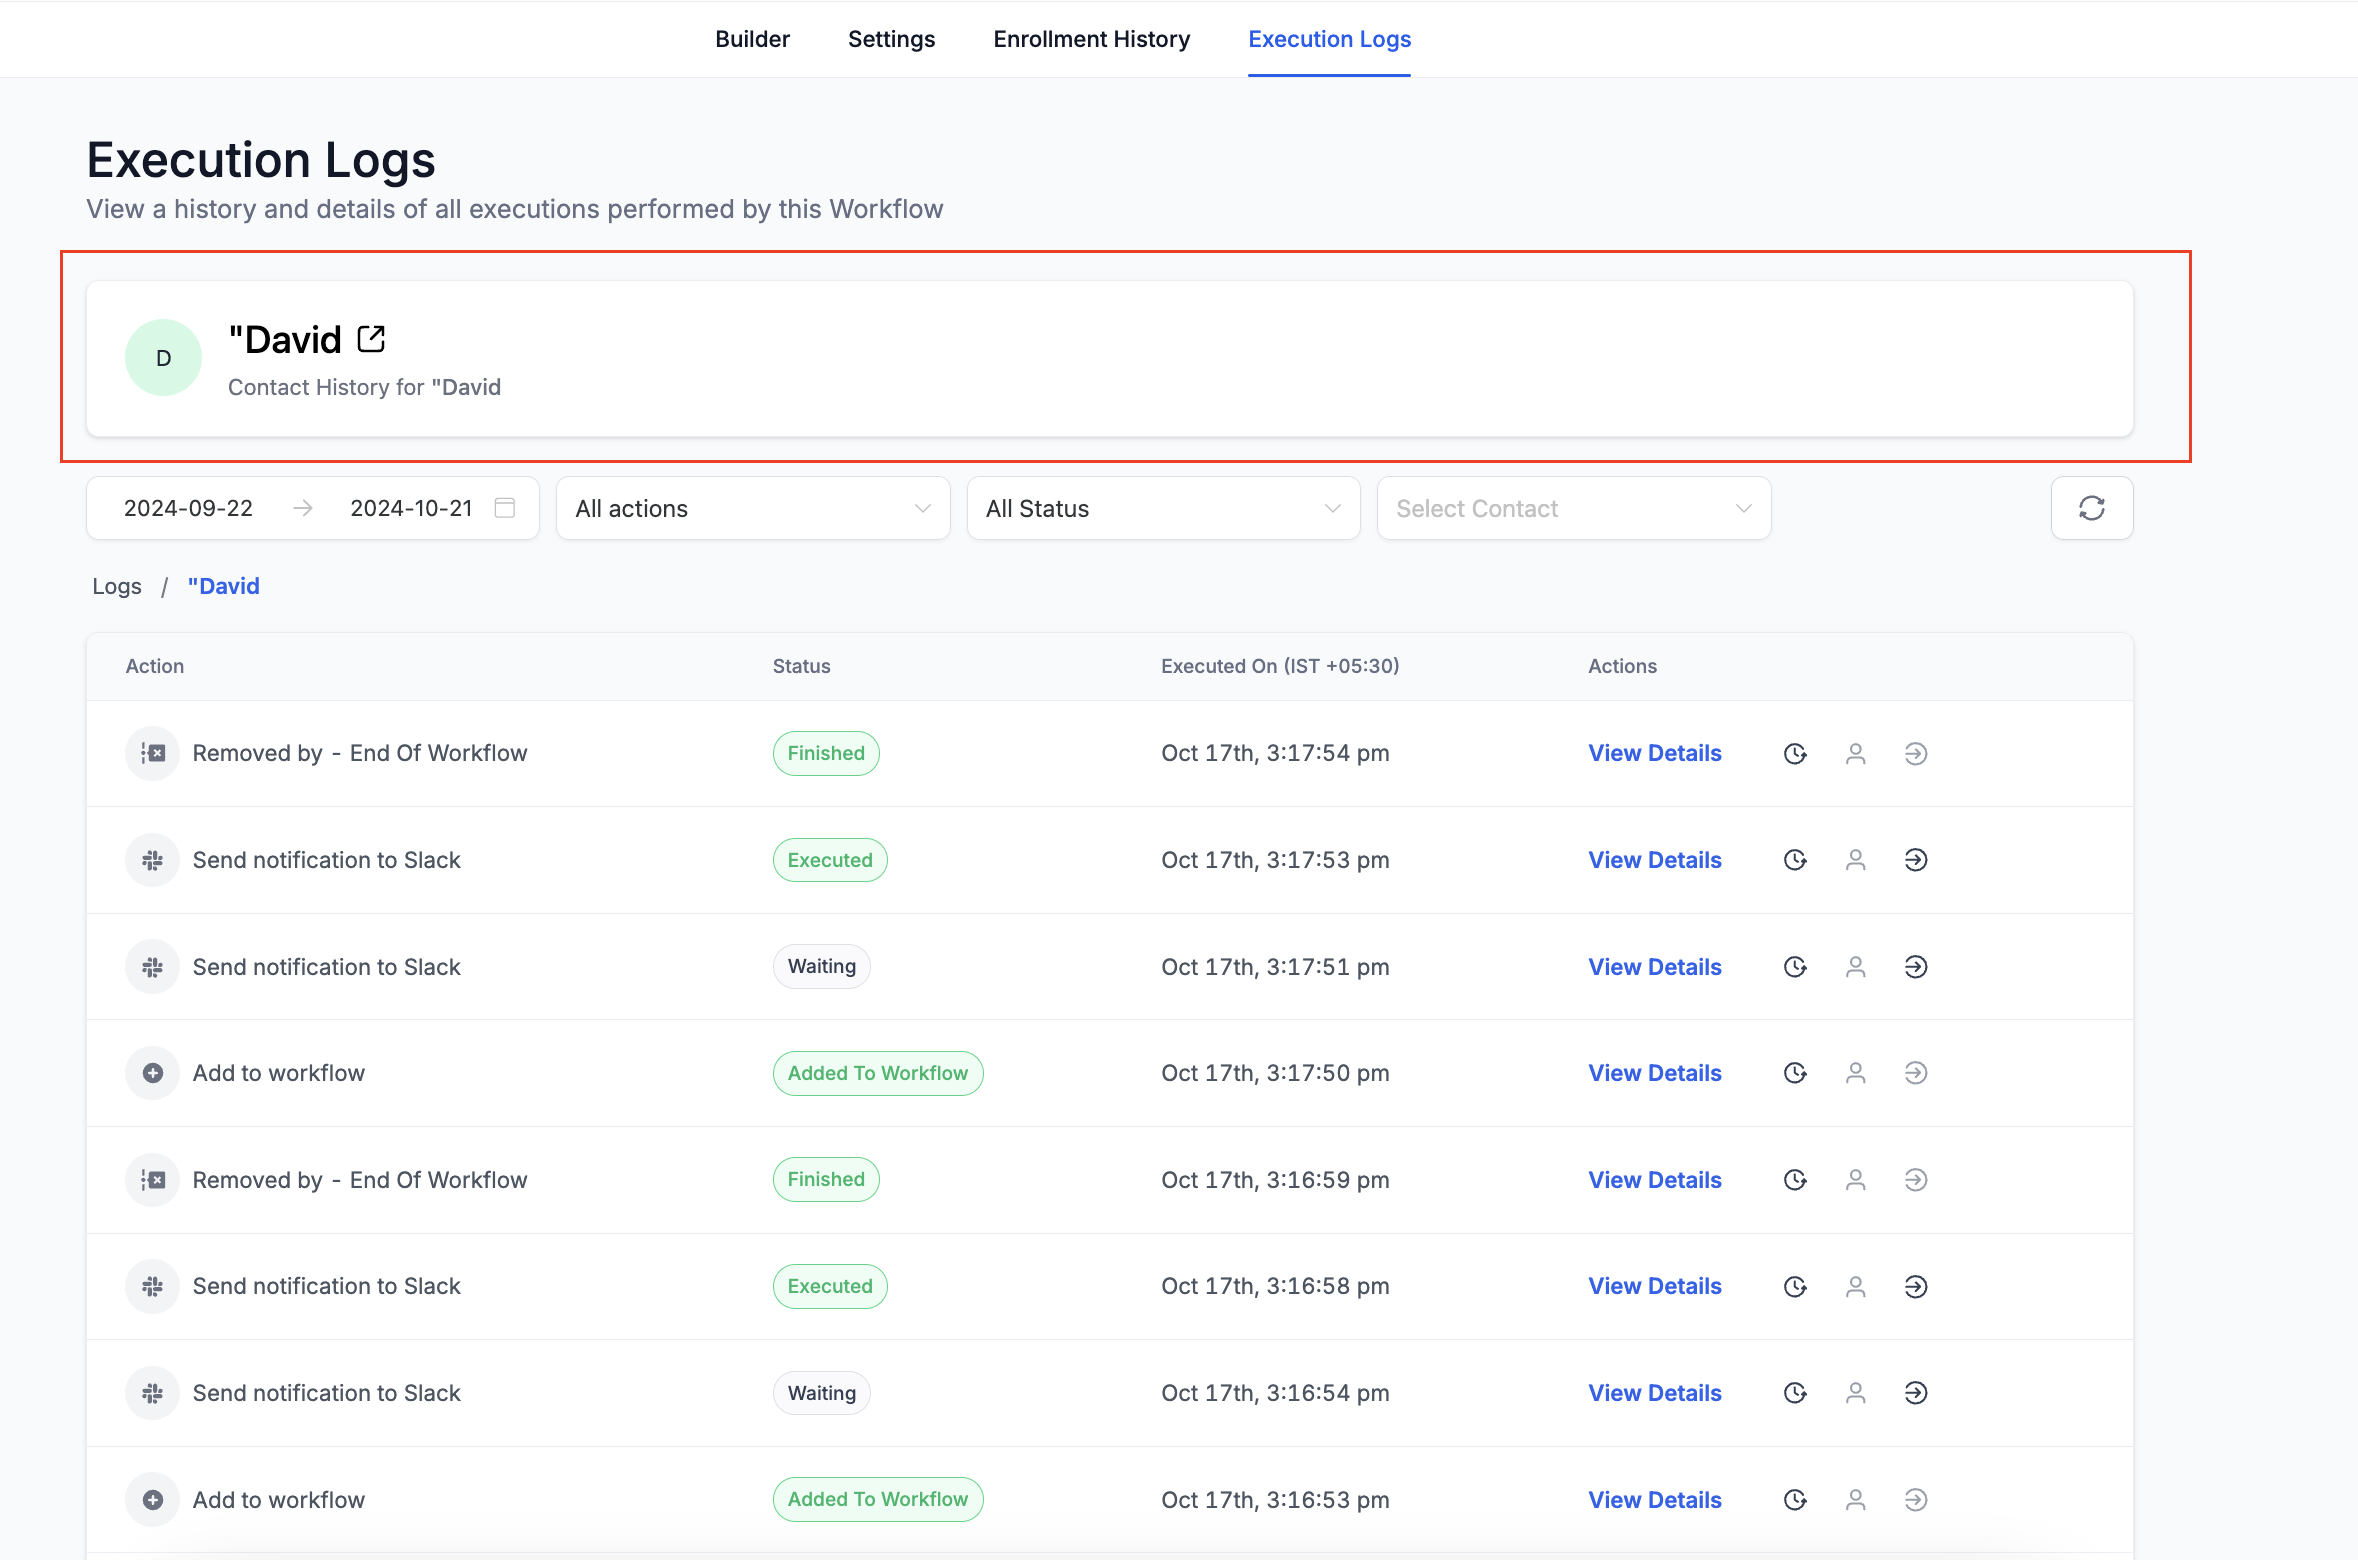
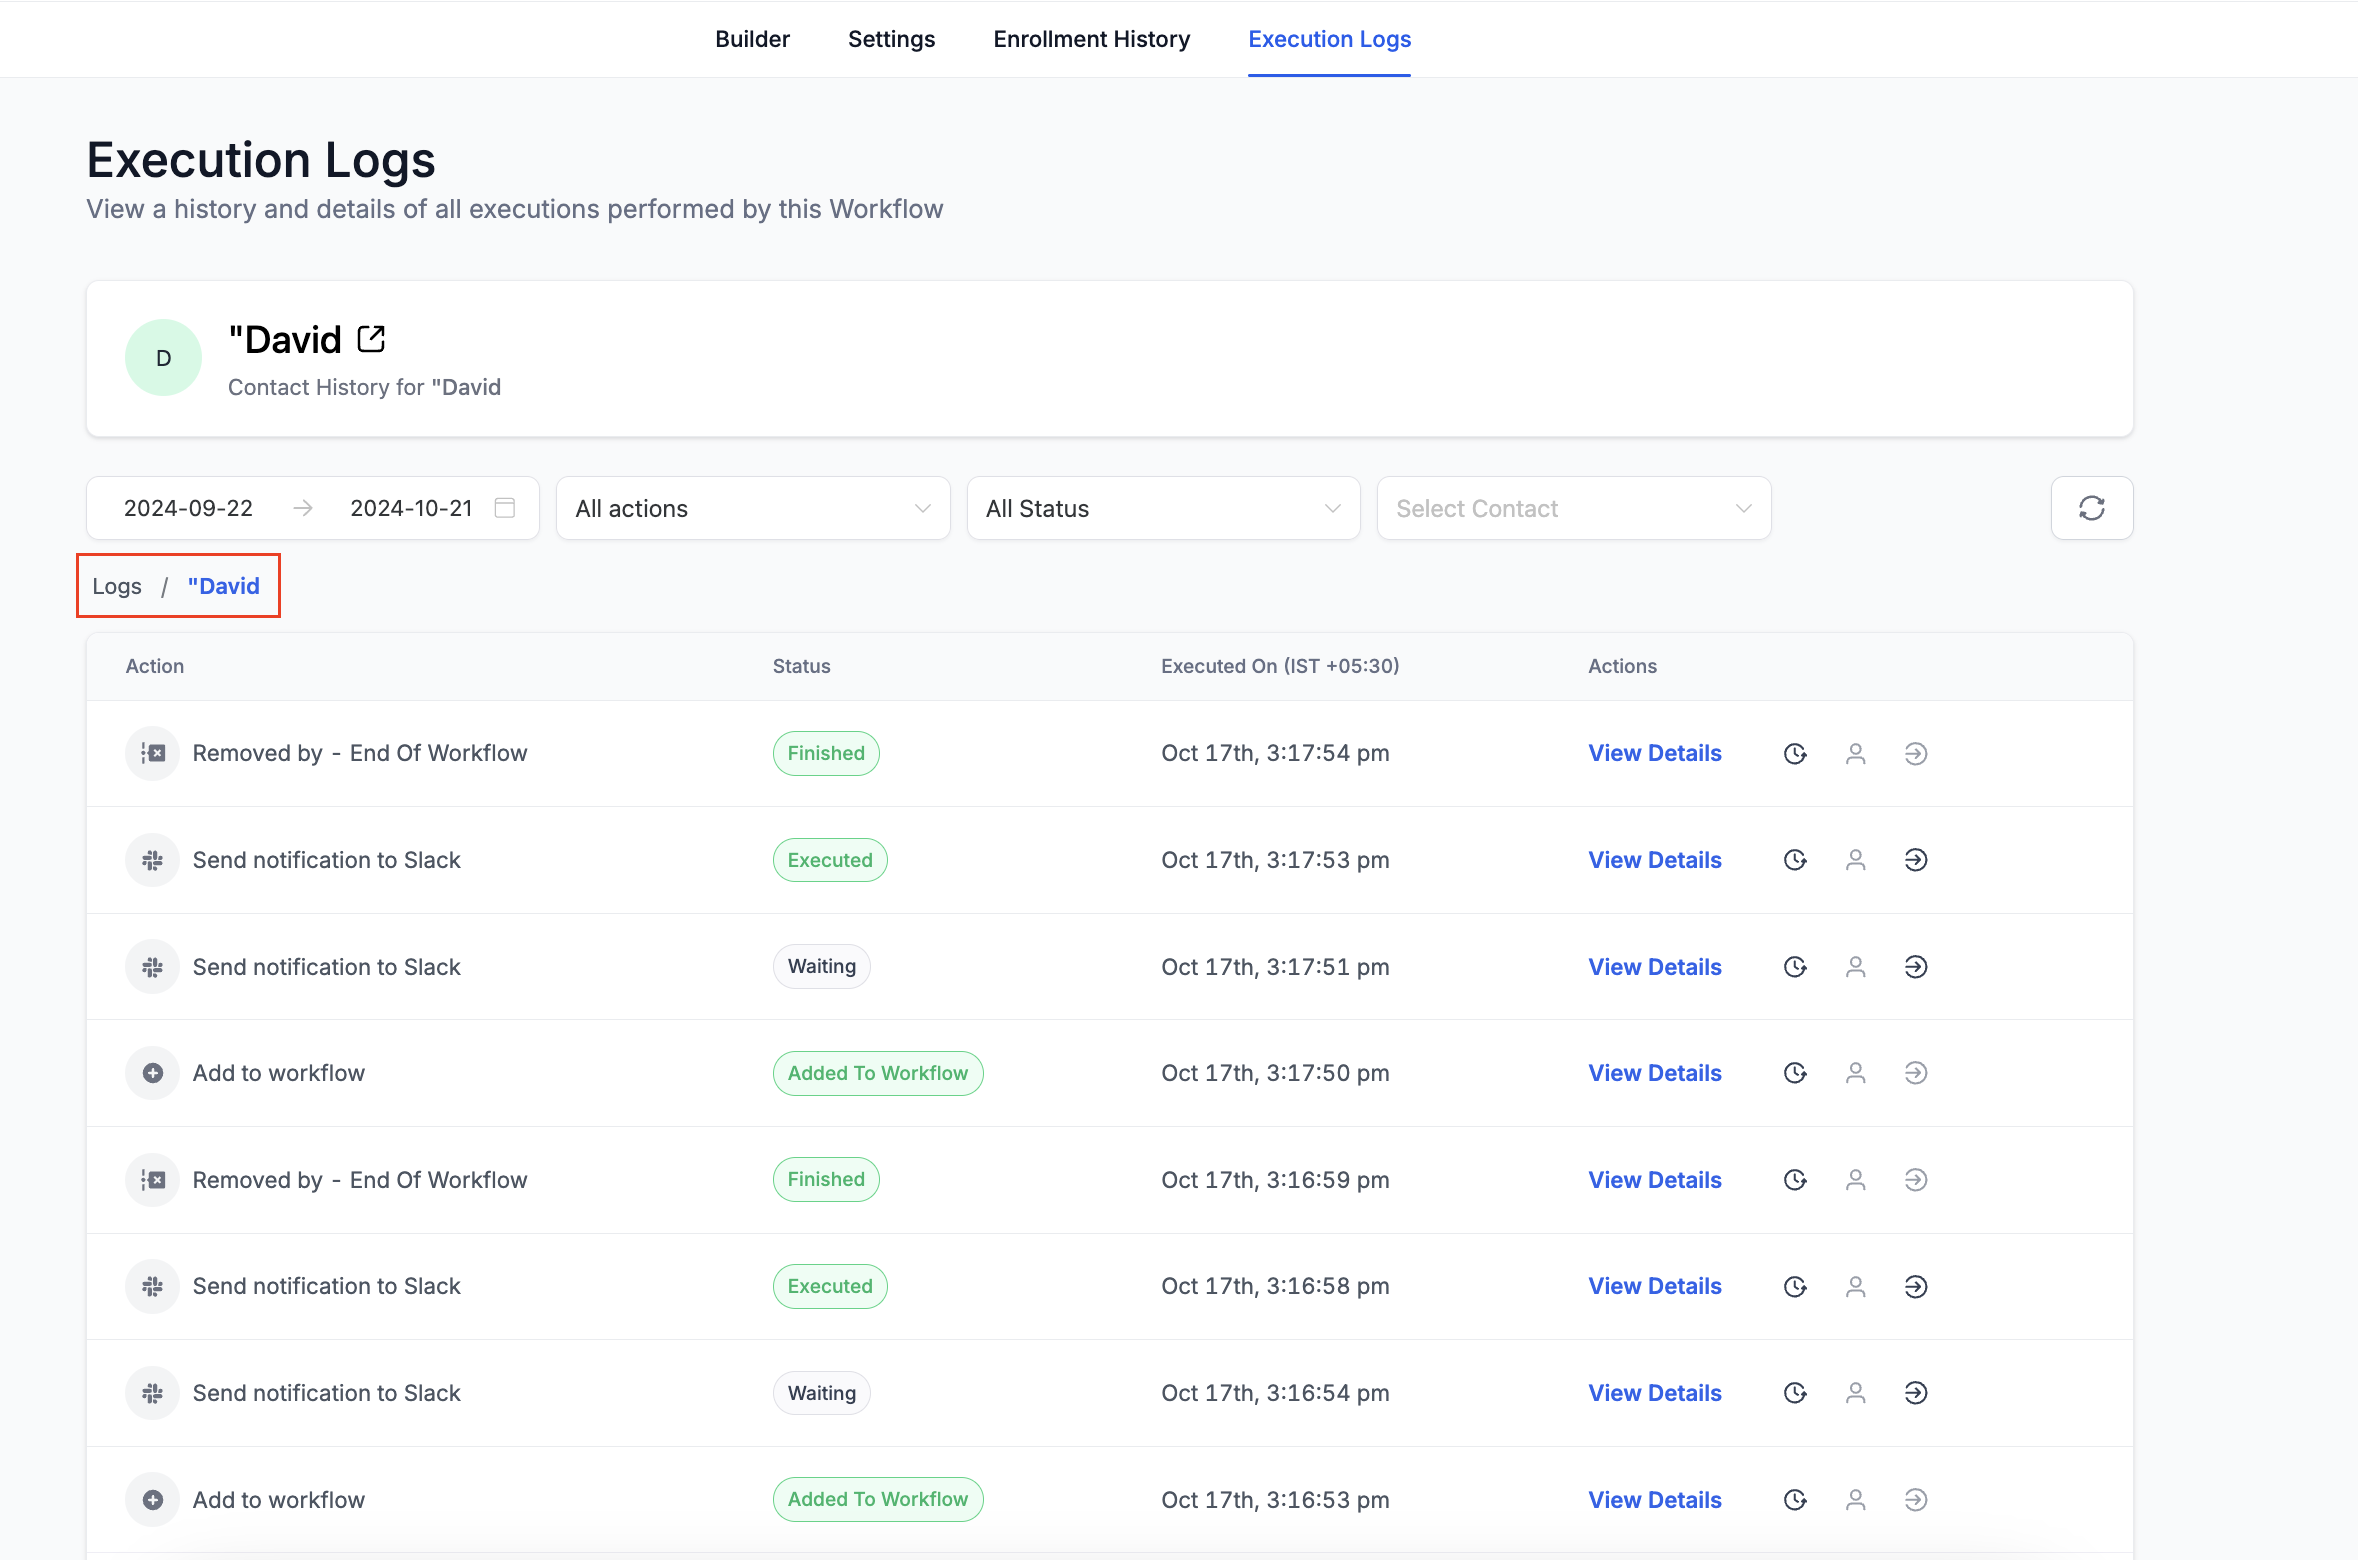
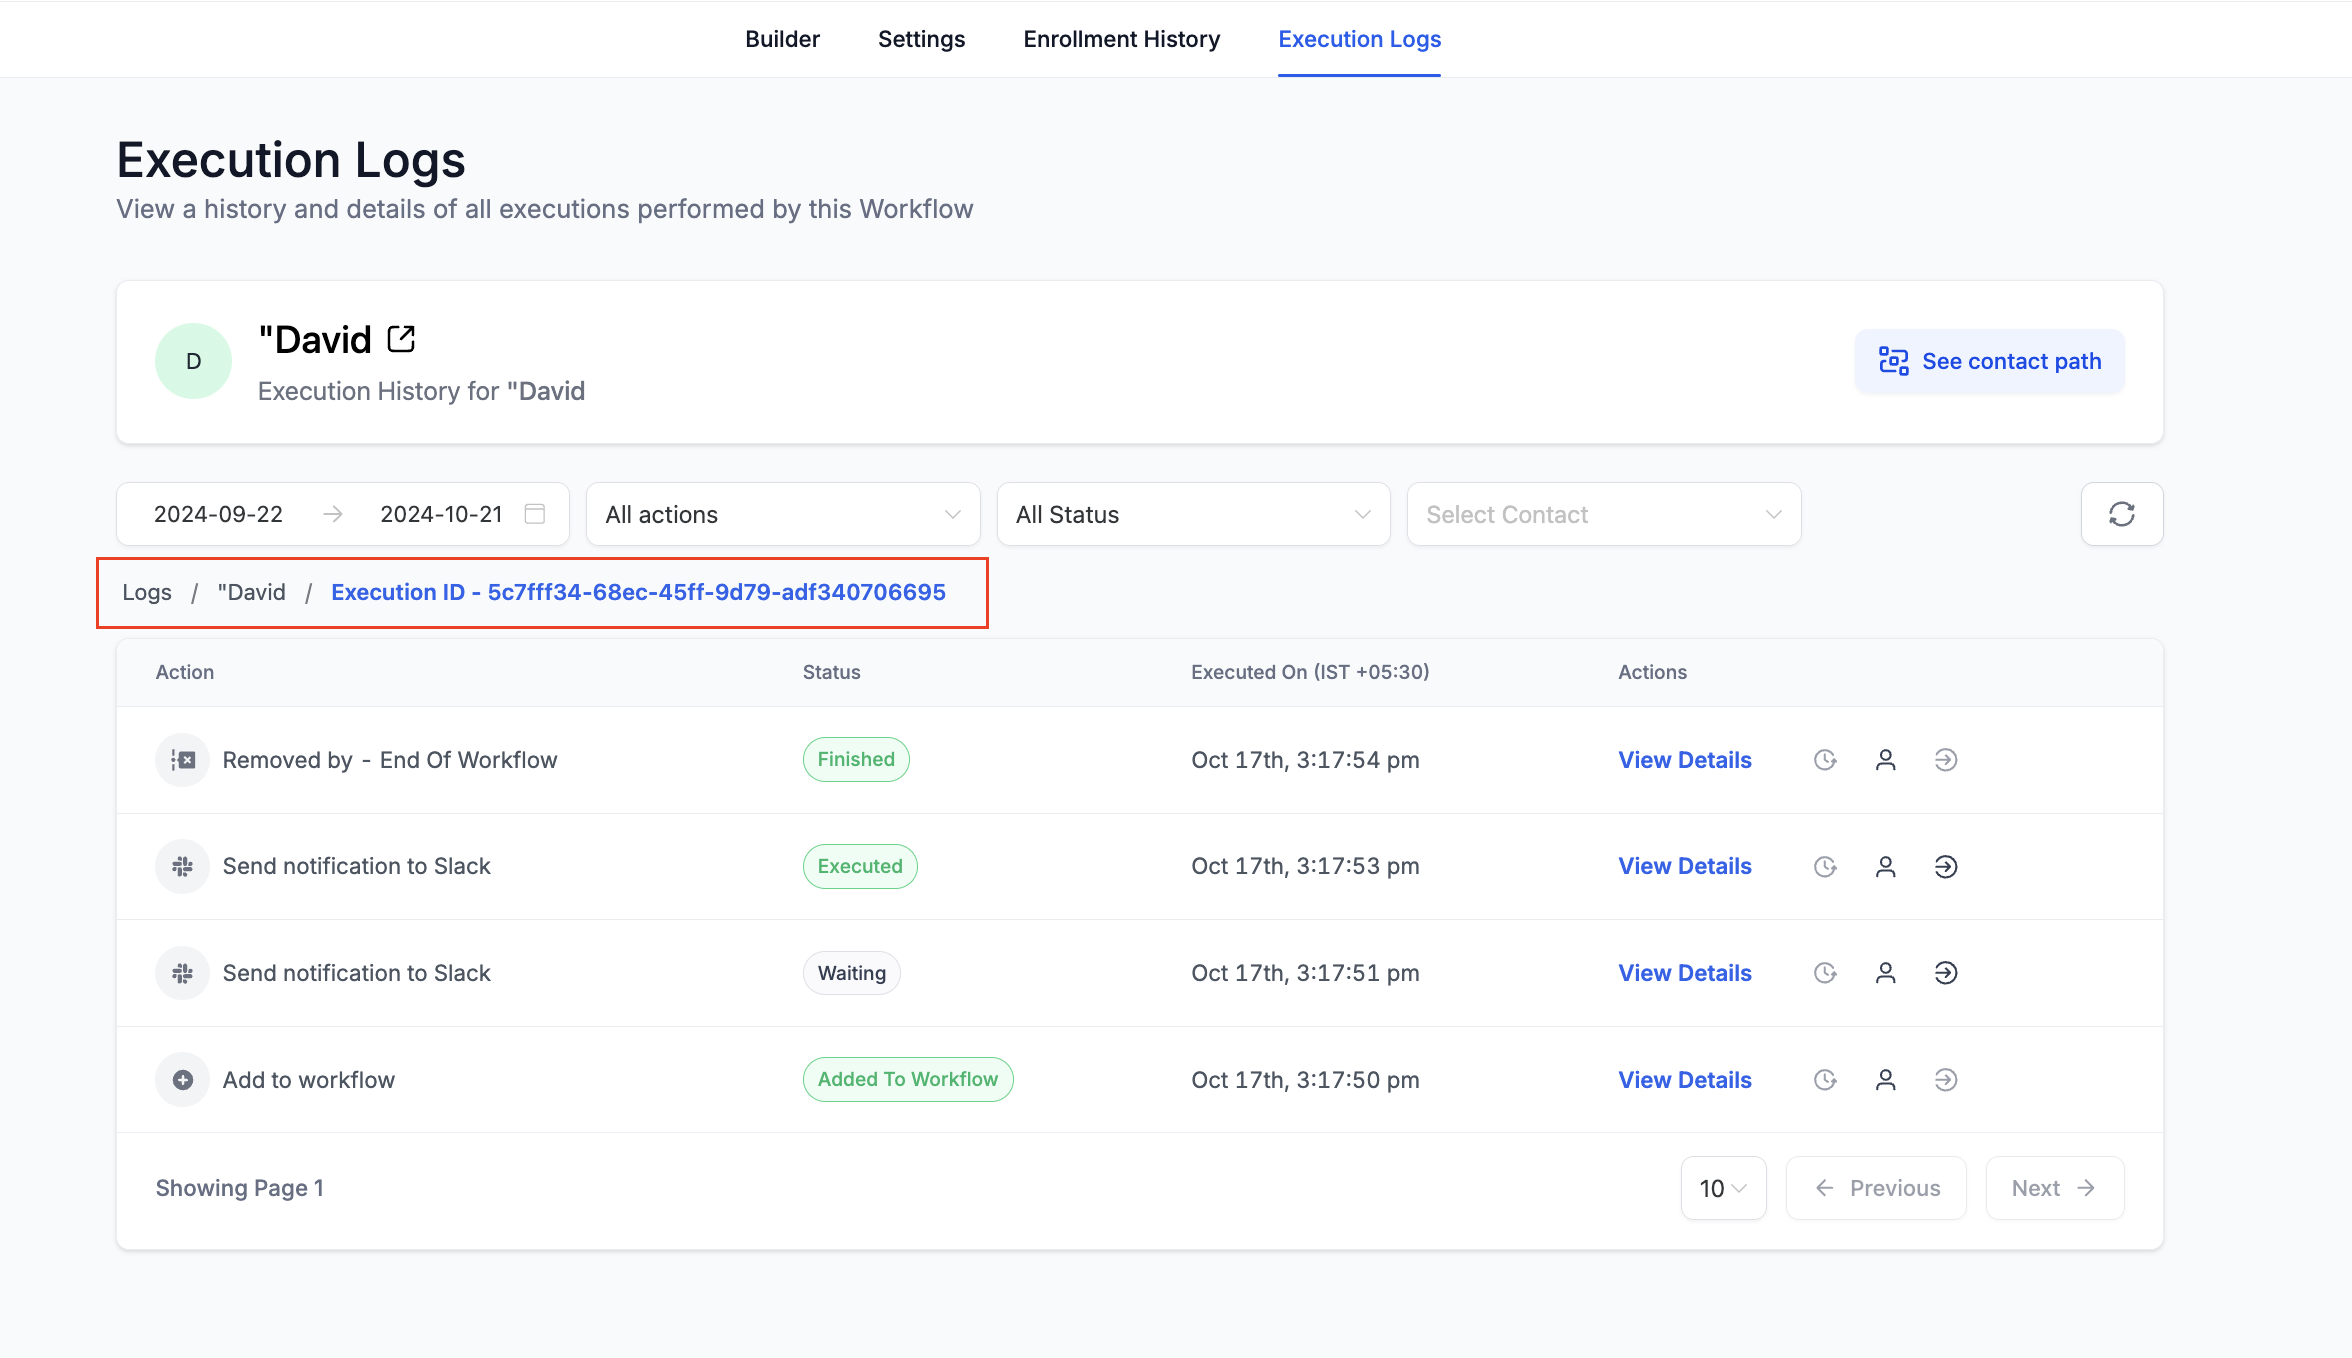
Contact History: click the View Contact History icon in Execution Logs to see all action executions for that contact across every enrollment in this workflow; contact details appear at the top, and breadcrumbs are clickable to return to the logs.
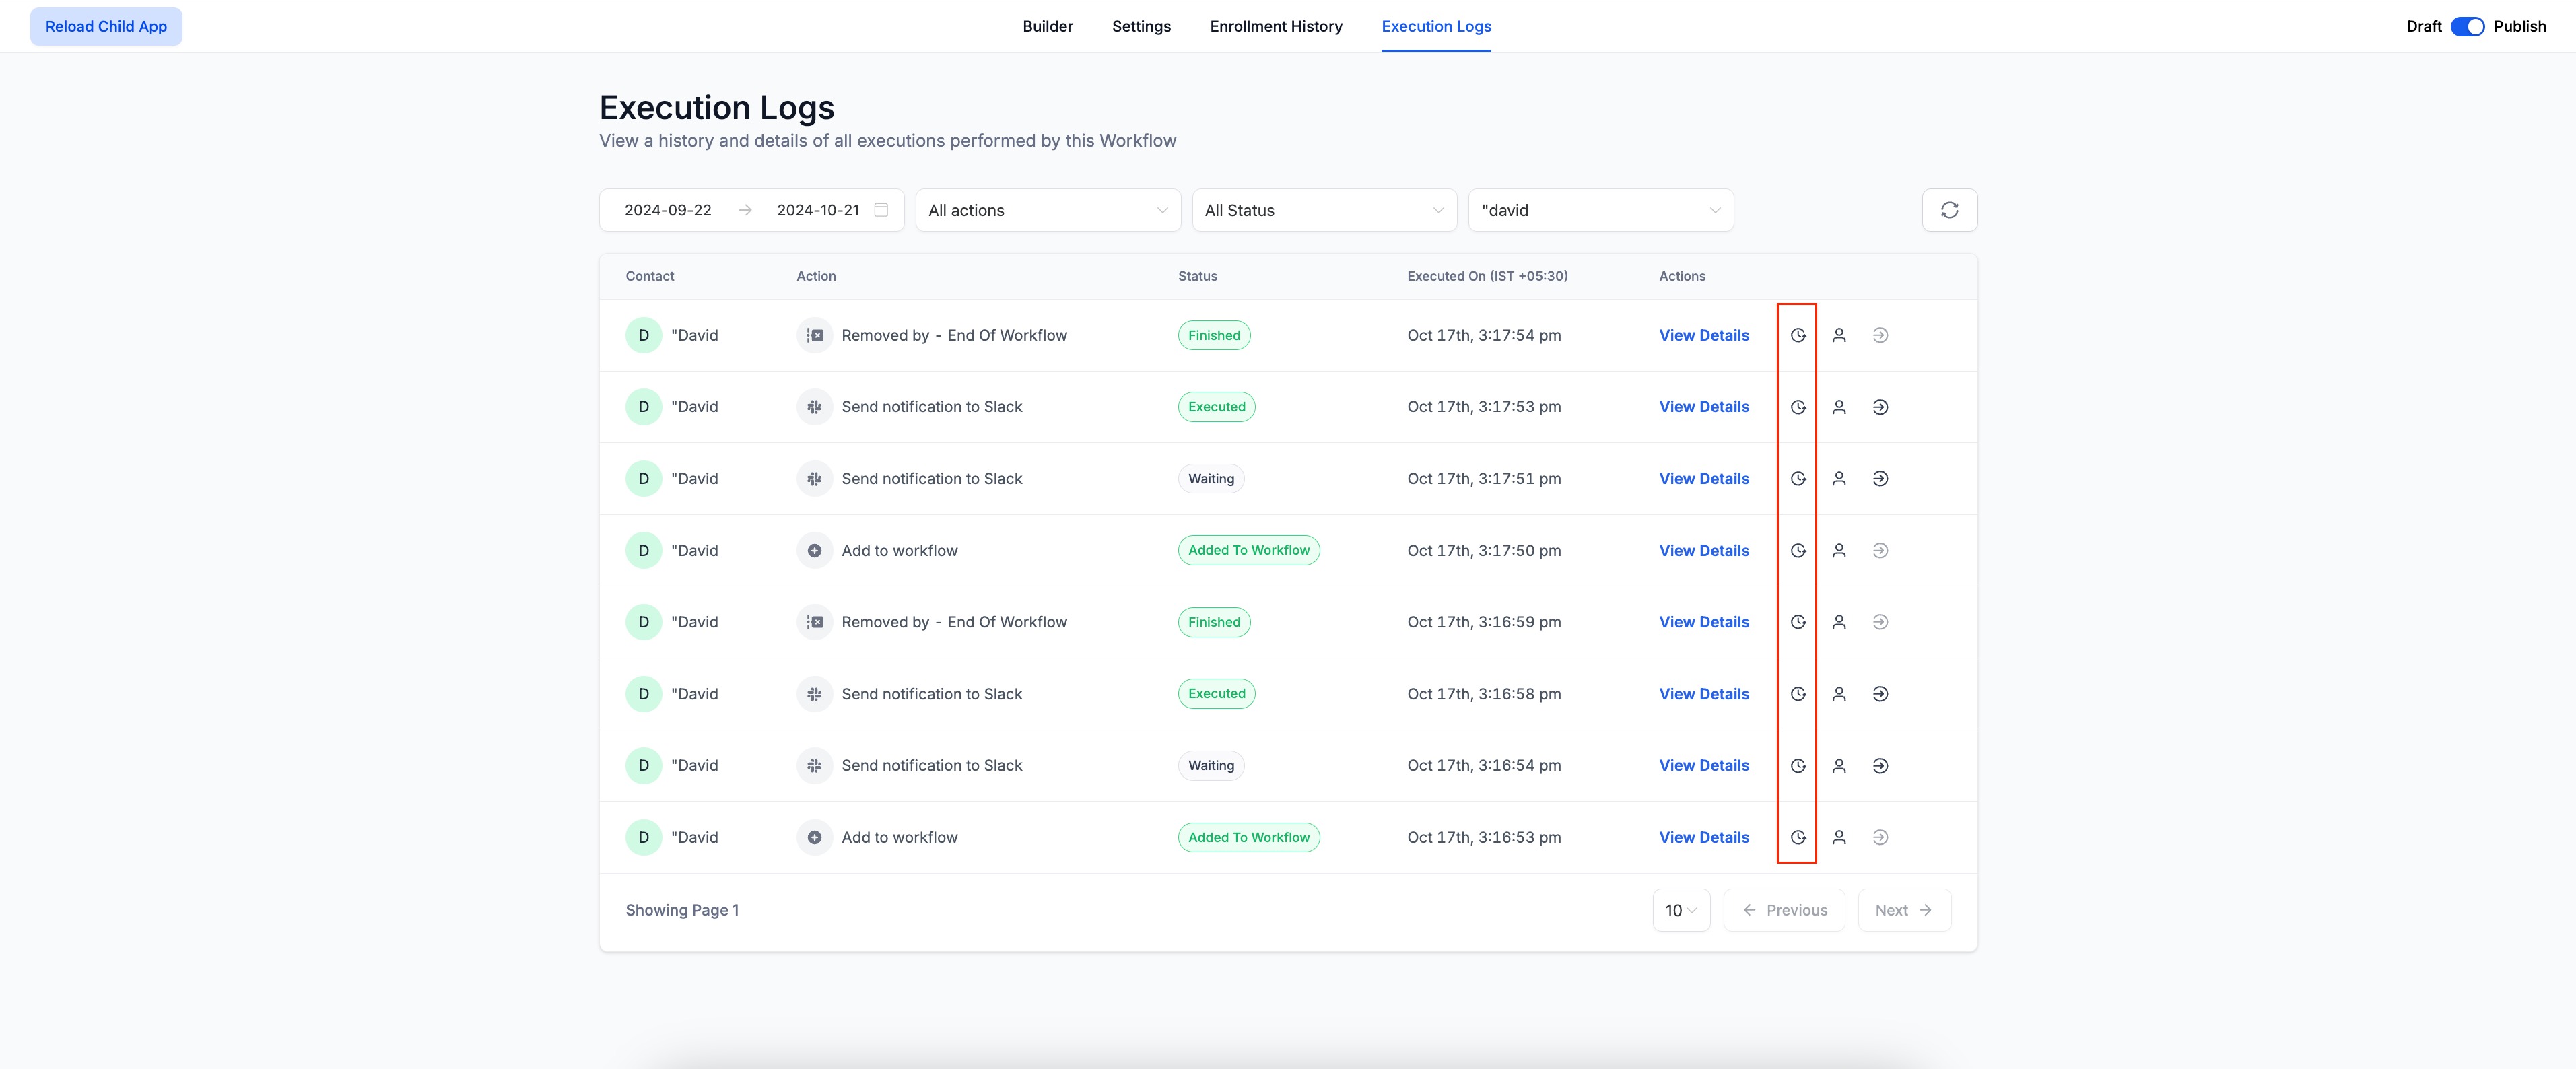
Execution History: click the View Execution History icon in Enrollment History or Execution Logs to open the execution history for that contact's specific enrollment, with a separate tab for contact details and clickable breadcrumbs.
You can receive email notifications when a workflow hits an error, with a dedicated Needs Review tab to manage them.
Workflow Settings section: open Workflow Settings to configure which email recipients receive error notifications.
Needs Review tab: a tab on the workflow list page lists every workflow that currently contains an error. Click an item to open its execution logs, then mark errors as read to acknowledge them.
Notes:
Notifications are off by default; recipients can be added or removed.
An email is sent immediately when an error occurs, and the Review it button in the email opens the Needs Review tab.
You receive at most one email every 24 hours; a follow-up email is sent only if new errors appear after that window.
Coverage includes webhooks and custom webhooks, premium actions (Slack, custom code, ChatGPT, Google Sheets, and similar), Facebook actions (custom audience add/remove, Conversion API, Messenger, interactive messenger), and Instagram actions (DM, interactive messenger).
To disable, open Workflow Settings and turn off the notifications toggle.
The Workflow Builder highlights errors and can help resolve them with AI guidance, directly from the Error tab in the side panel.
Error button in side panel: opens an Error panel listing all detected errors, divided into Integration Issues and Missing Mandatory Fields.
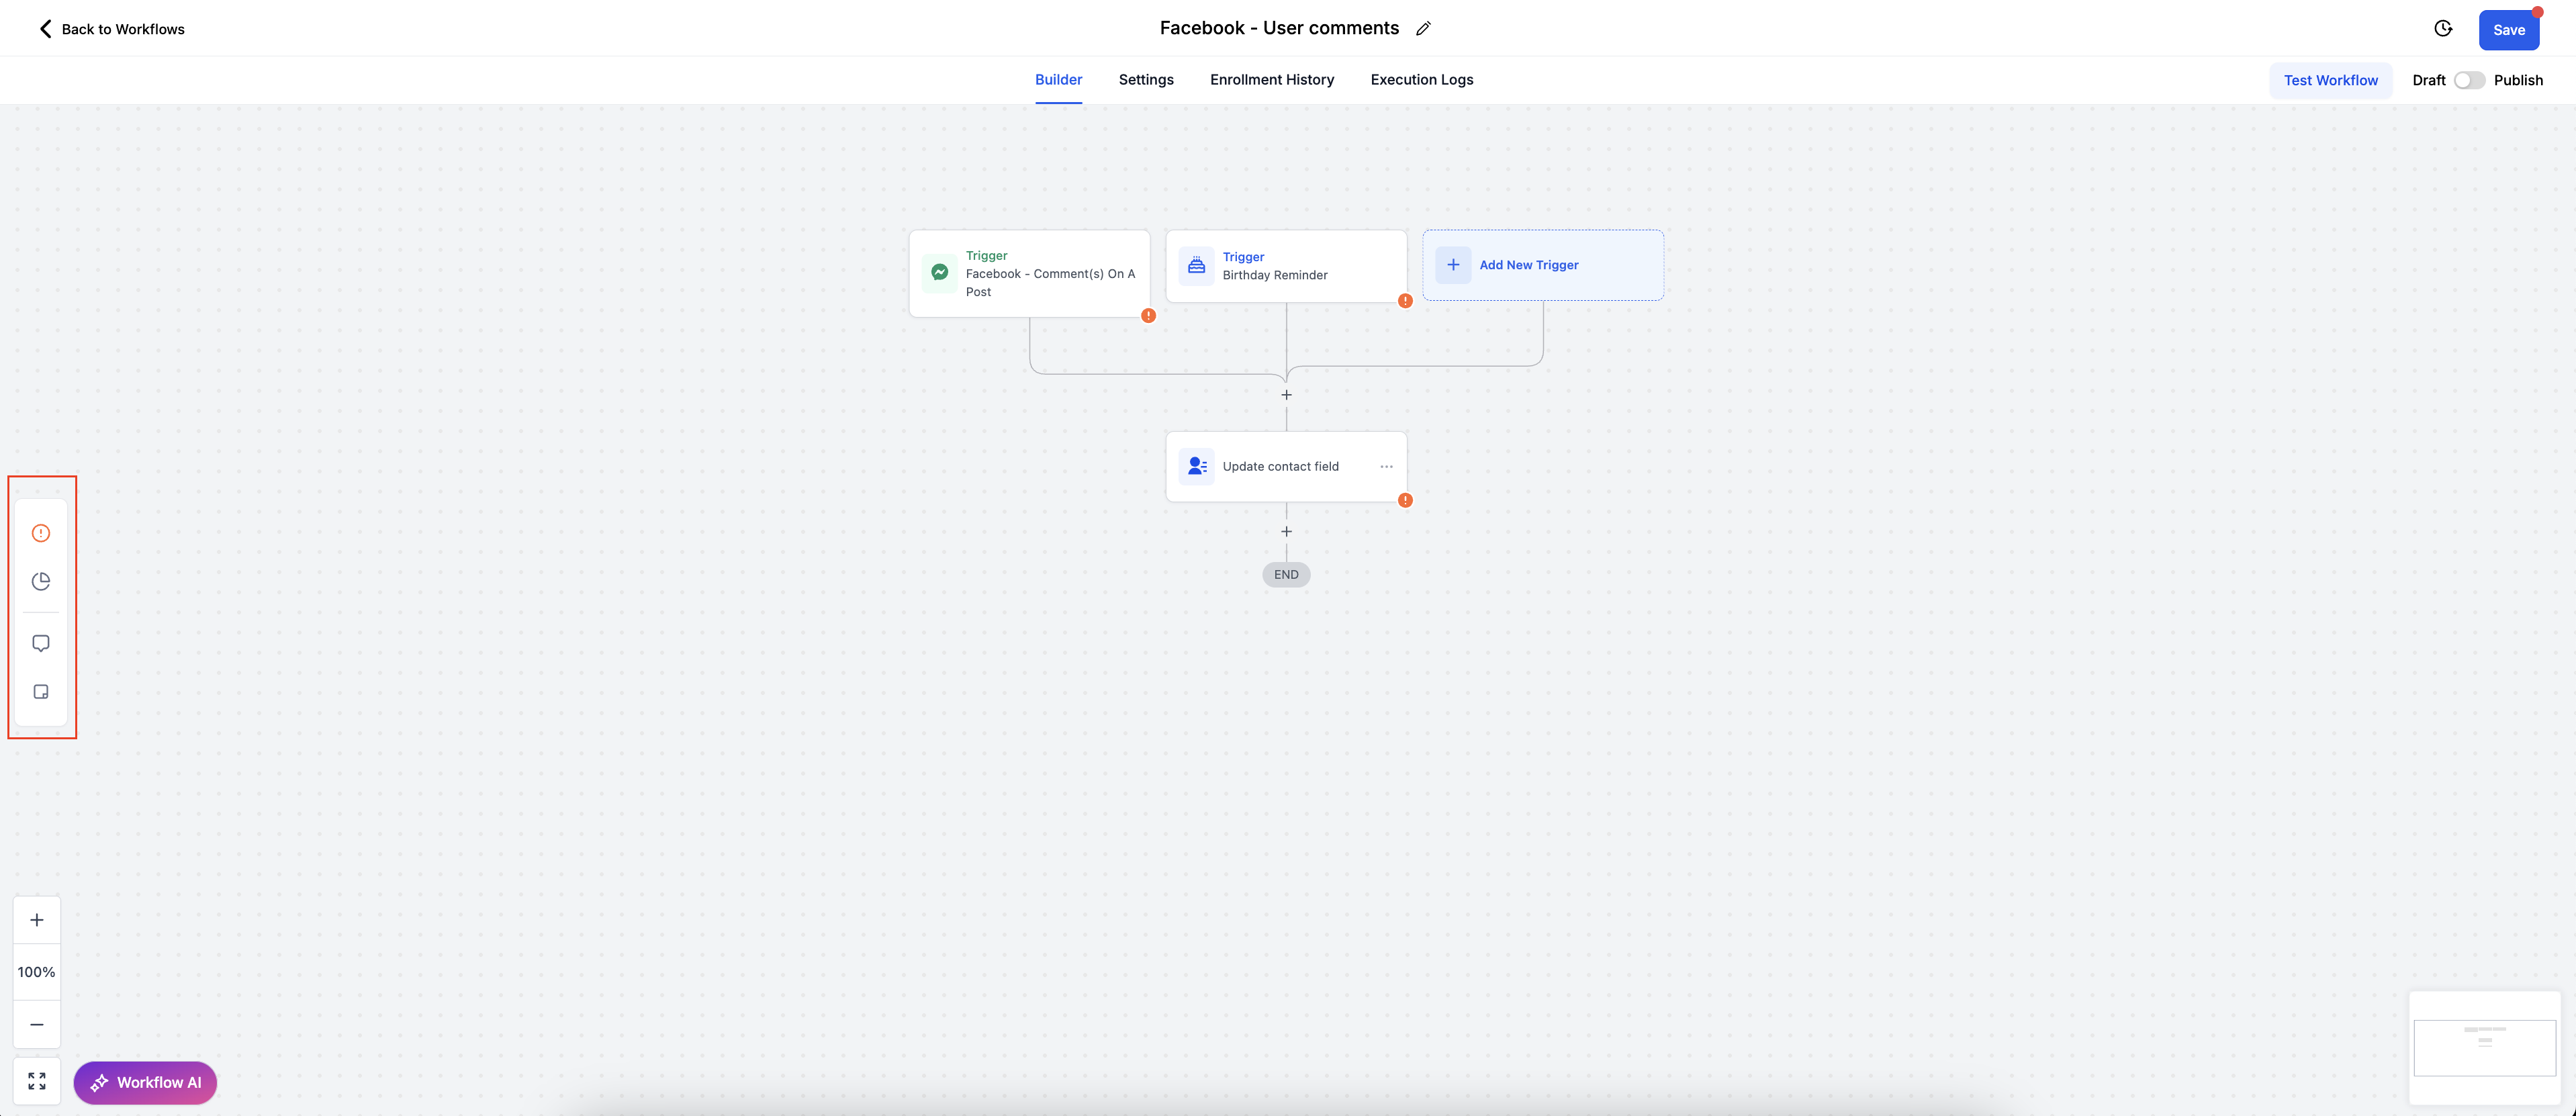
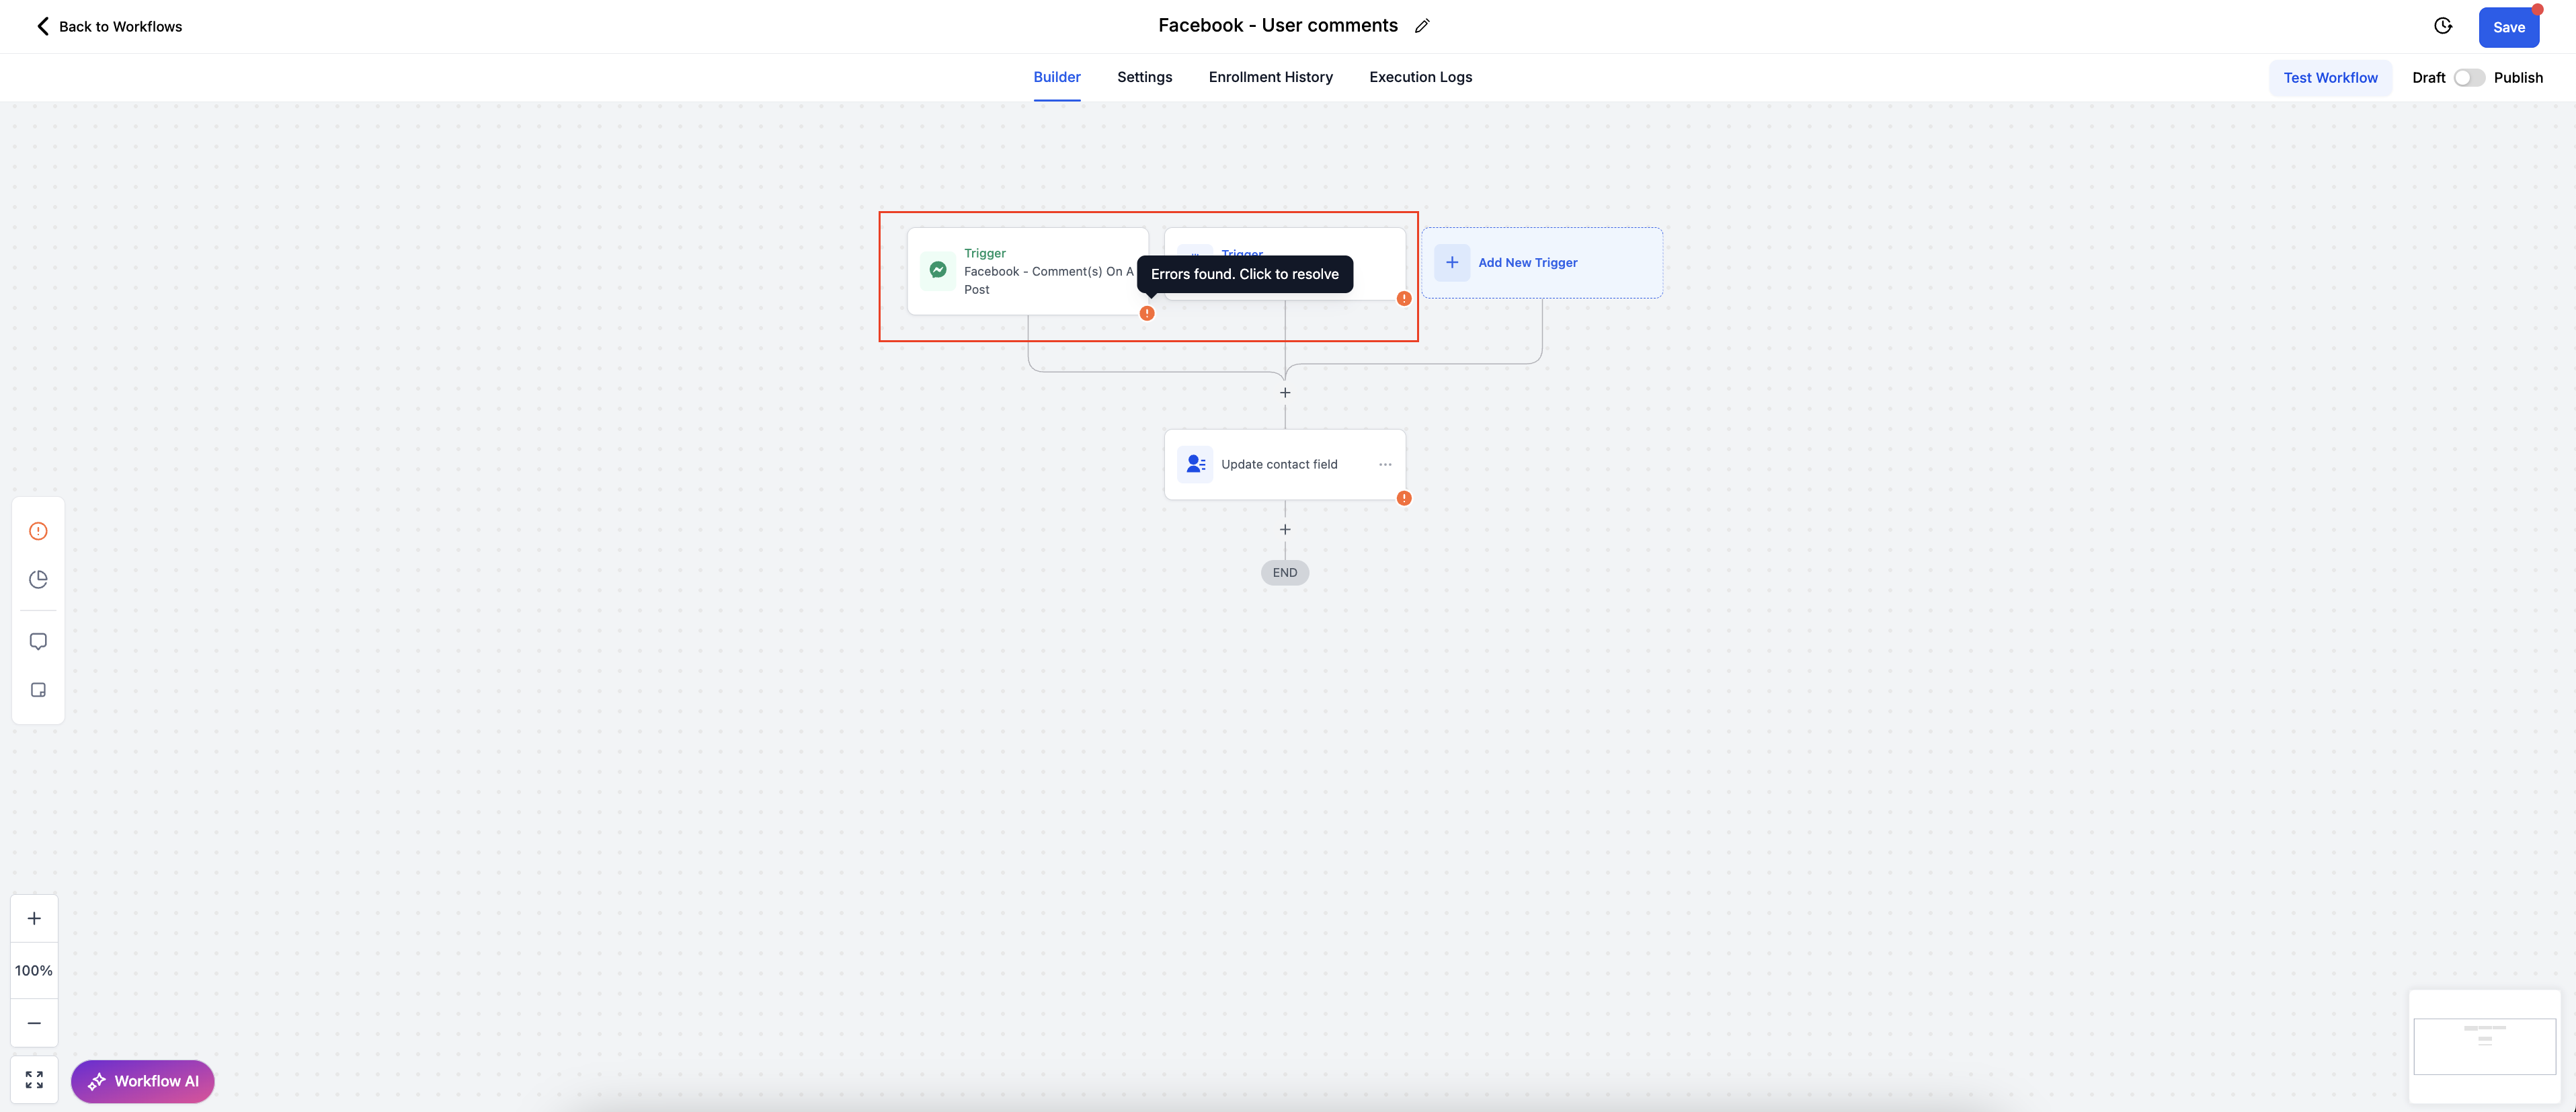
Visual highlighting: error icons appear at the bottom-right of affected actions and triggers. Validation also runs when you click Save, so misconfigured If/Else and Wait actions are flagged at commit time rather than during a live run.
Error panel: review all of a workflow's errors in one place.
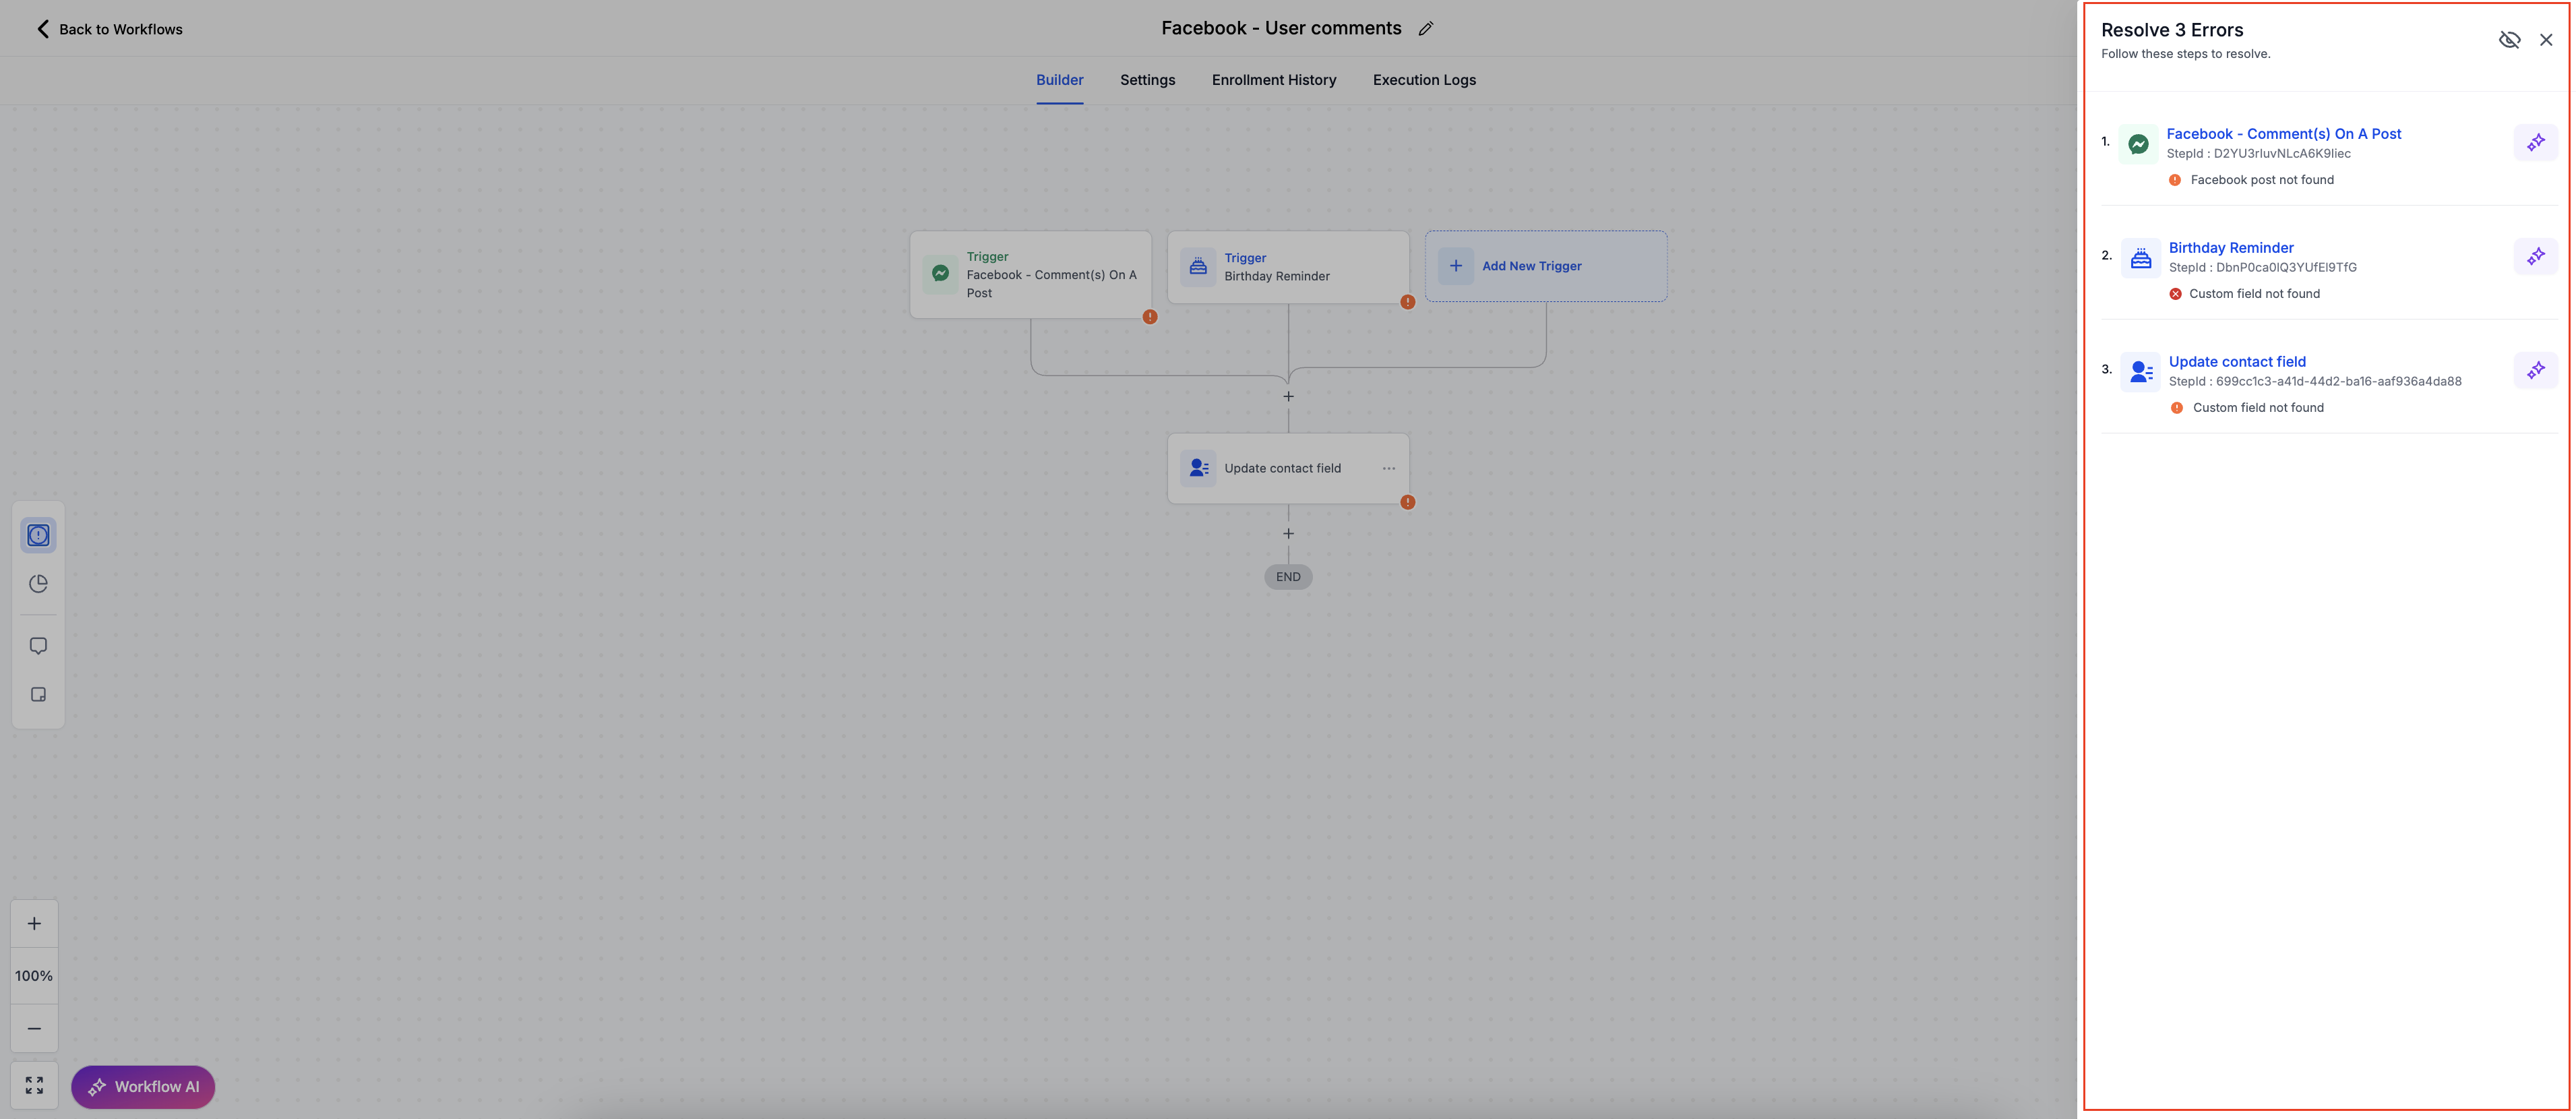
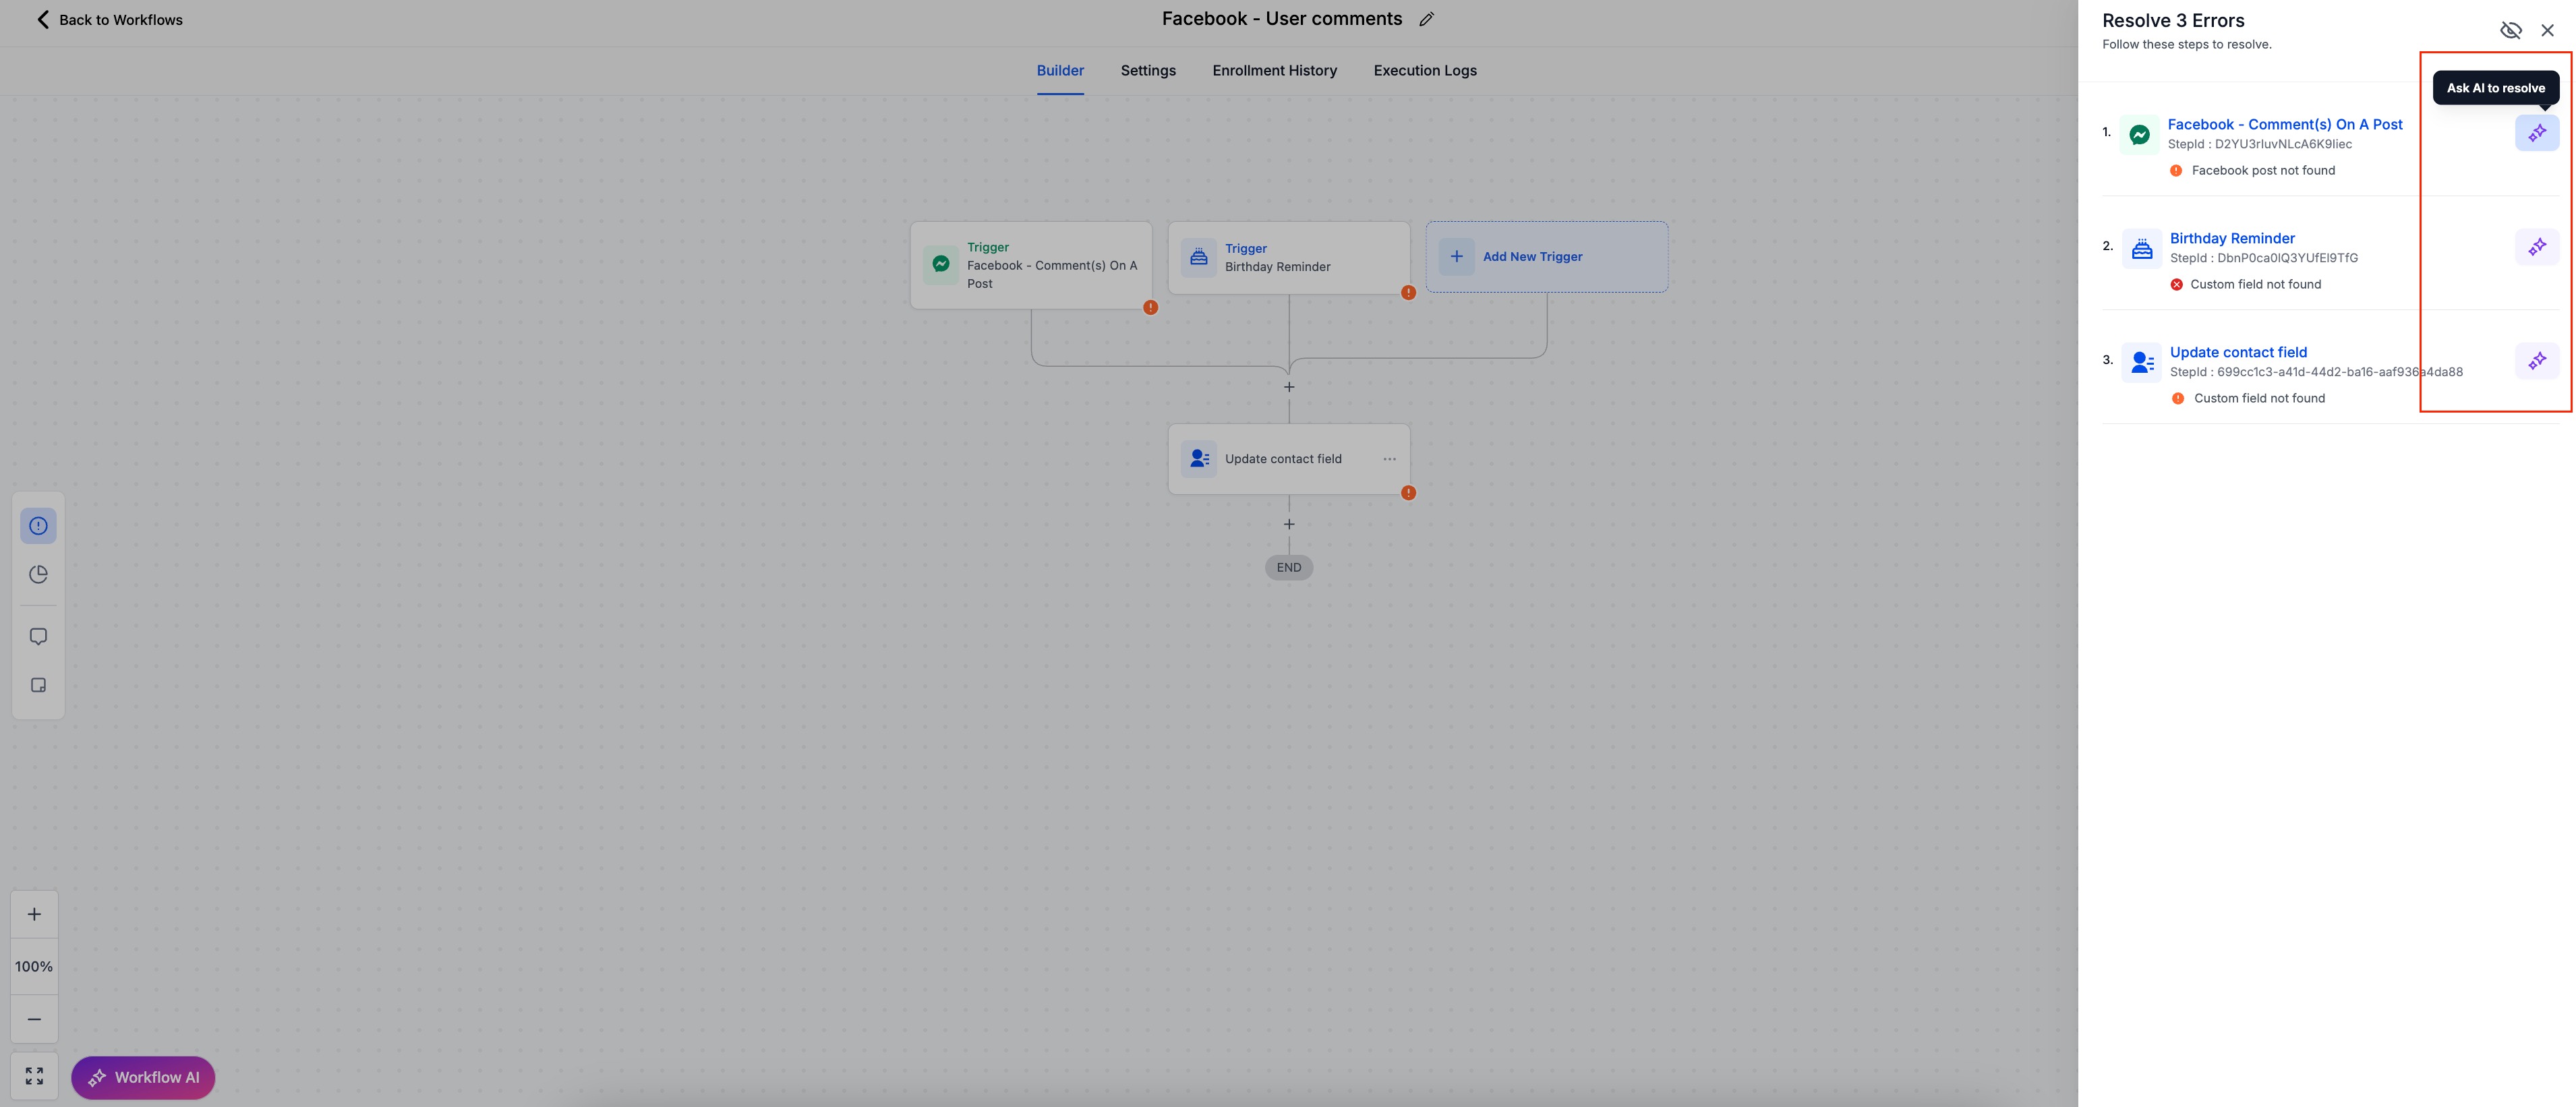
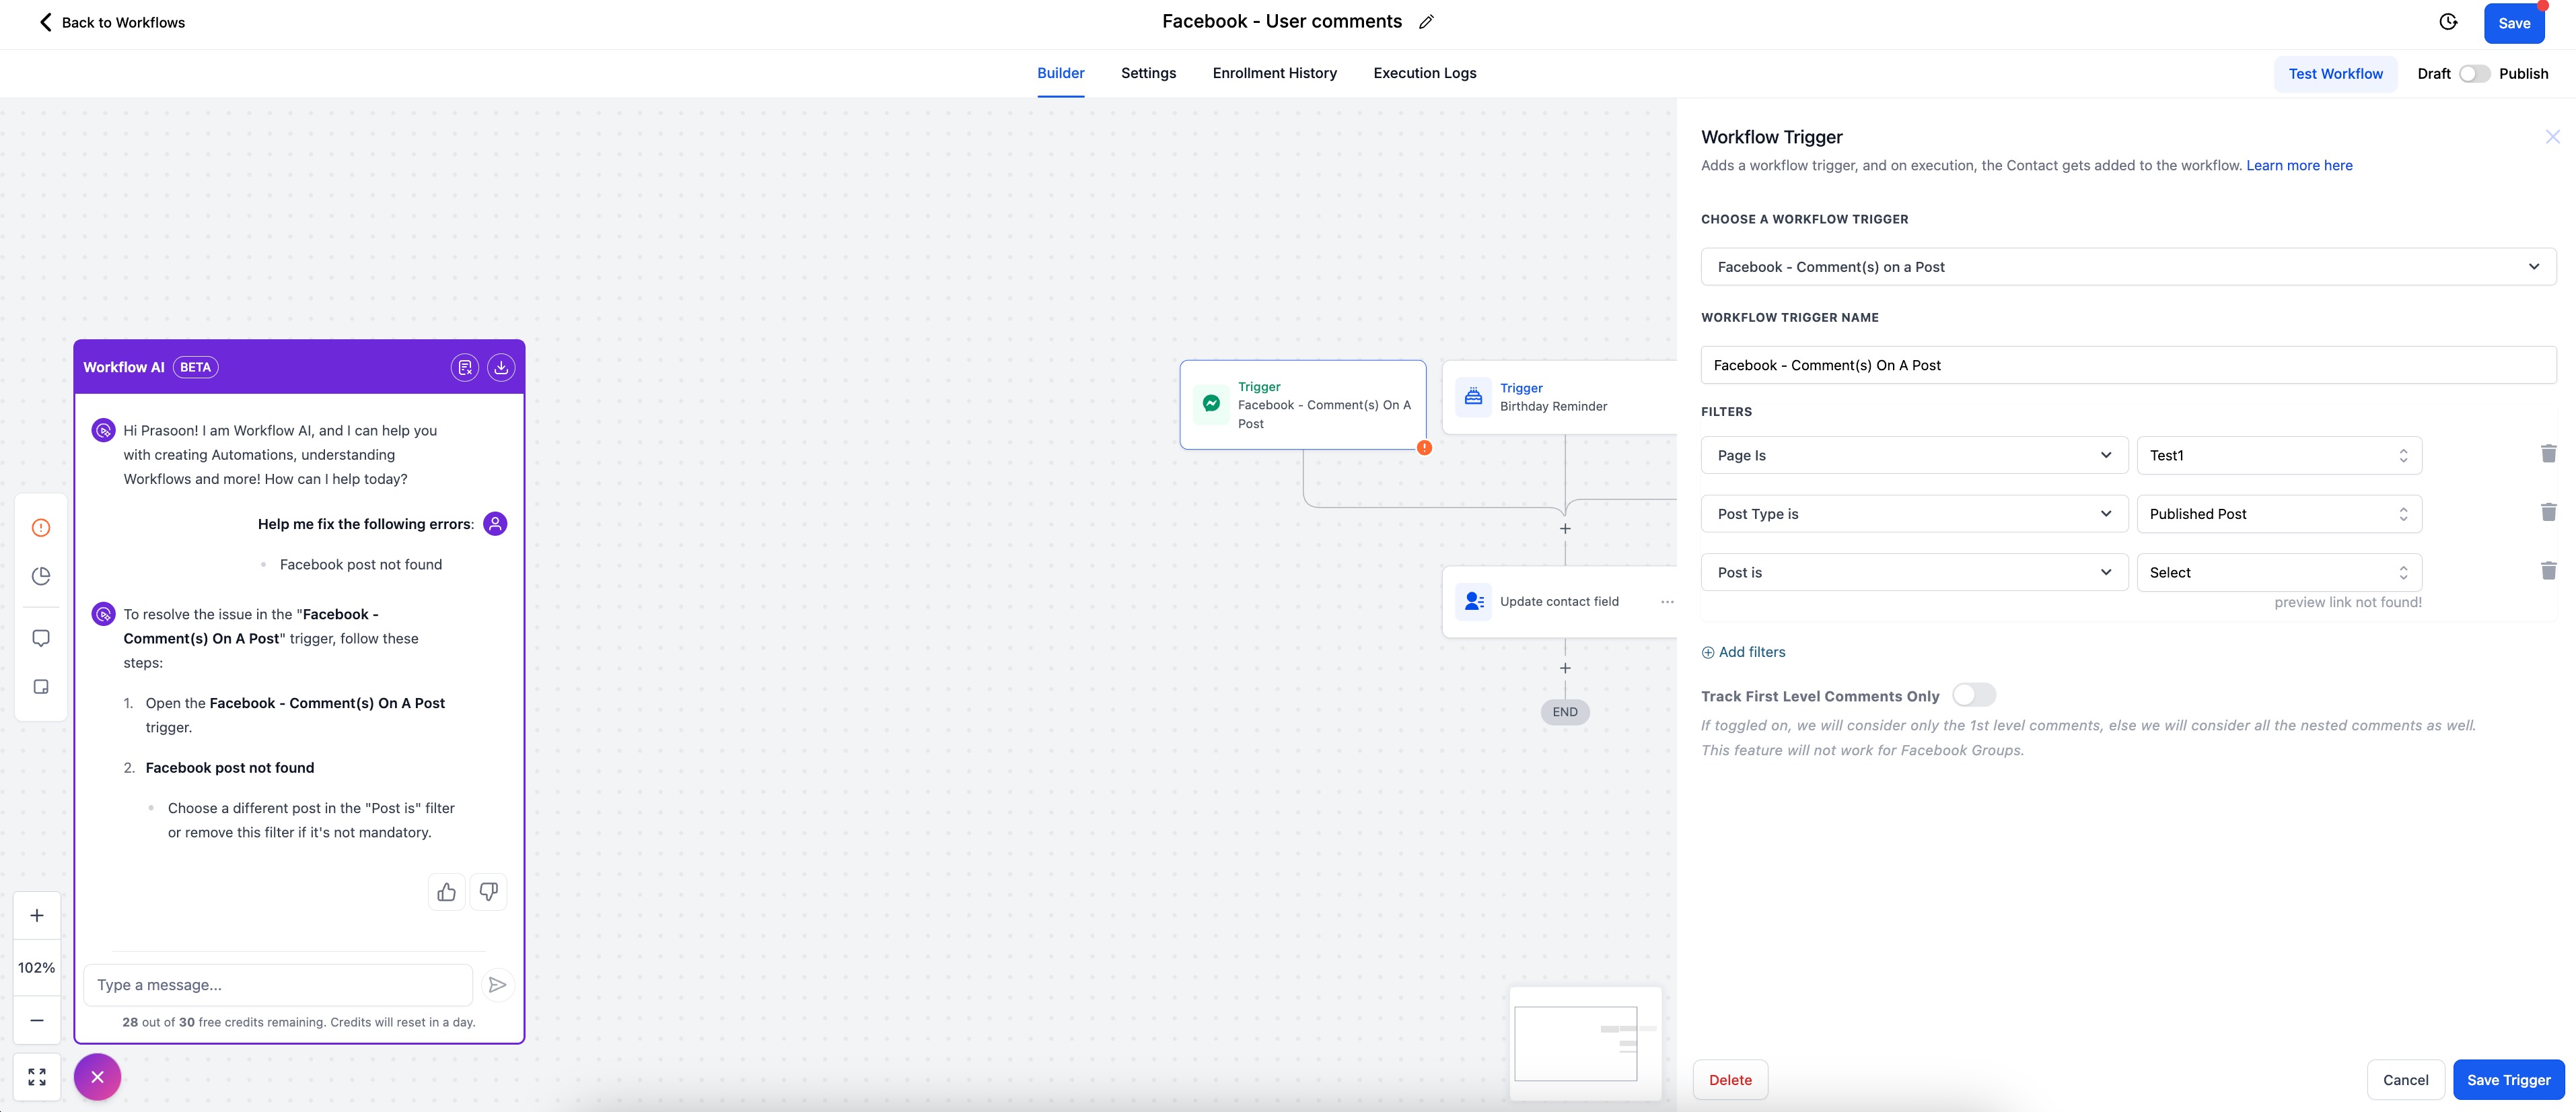
AI-powered resolution: click Resolve through AI next to an error. The AI Assistant opens in the left panel with an error explanation and suggested fixes, and the relevant action/trigger sidebar opens for configuration.
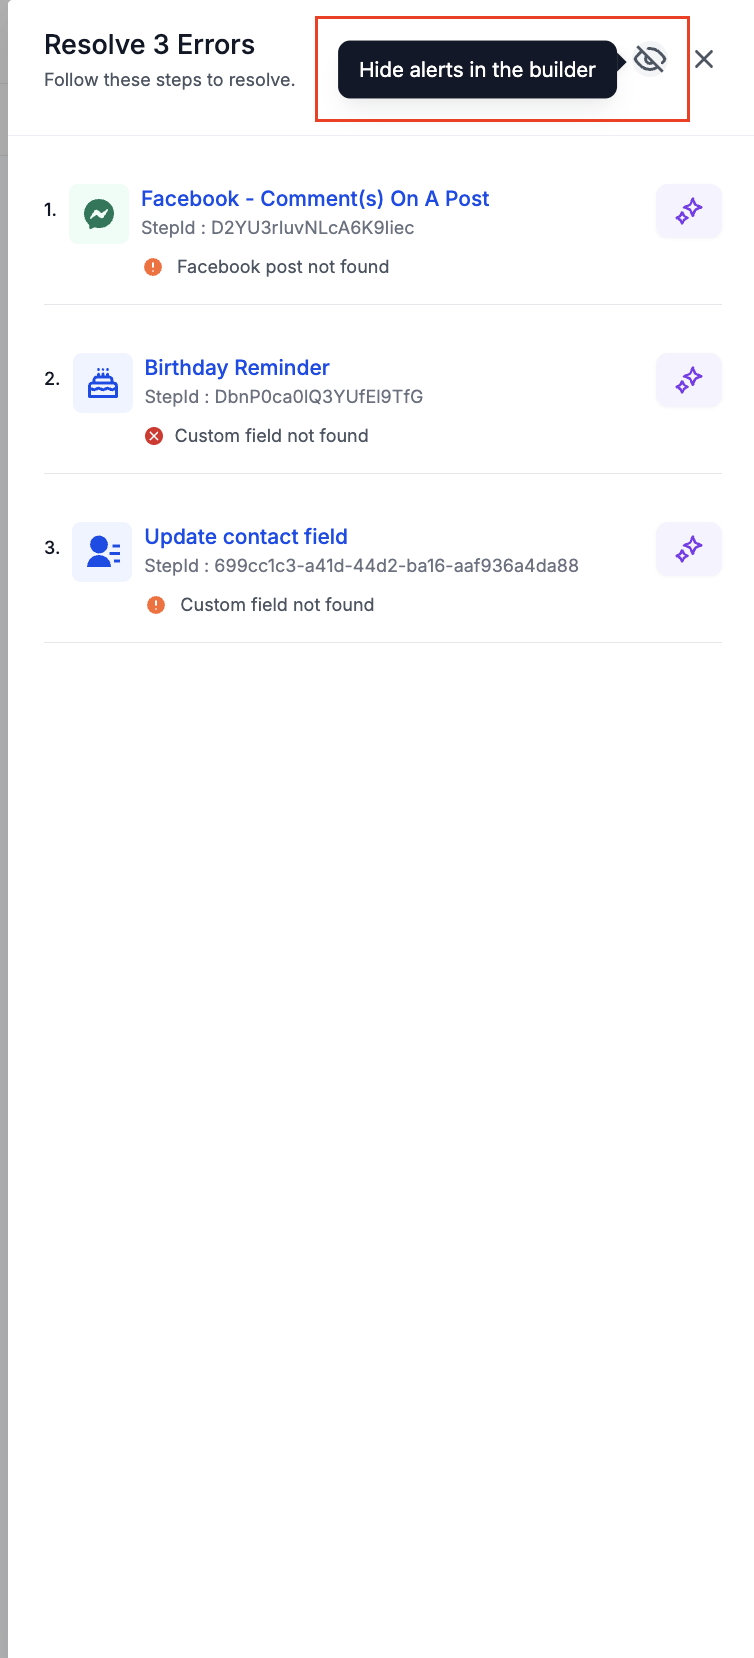
Hide the Error tab: a toggle in the side-panel settings lets you hide or re-show the Error tab.
To resolve: identify the error (a warning icon marks it), click Resolve through AI, apply the suggested fixes in the action/trigger sidebar (the AI guides you to integration settings if needed), and confirm; the warning icon disappears and the error clears from the panel once fixed. A published workflow does not drop to Draft just because an error is found.
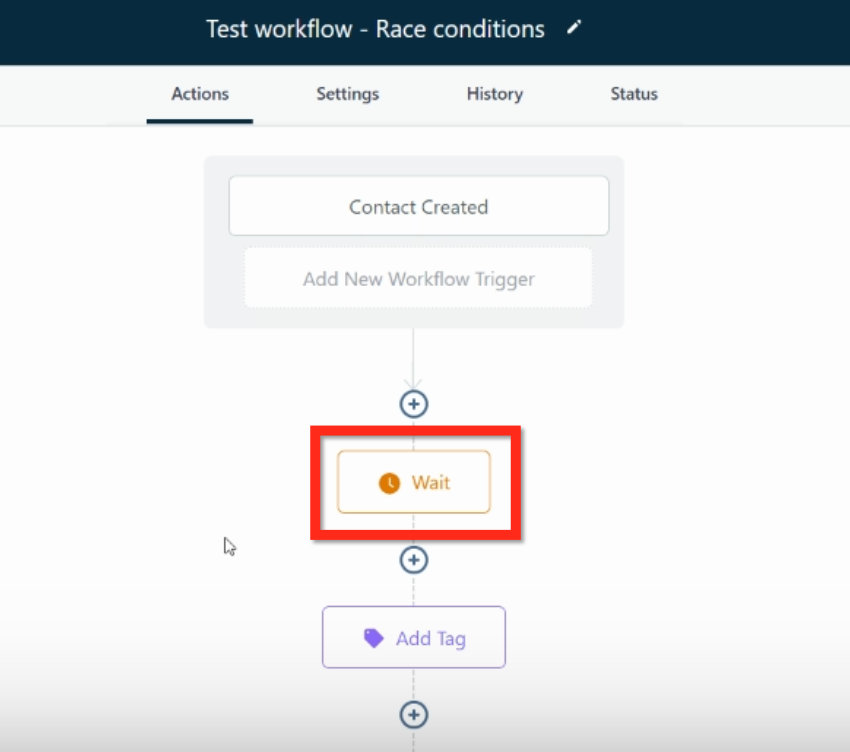
A race condition occurs when two or more updates happen within the same second. The changes "race" and may run in the wrong order, or one may report success without actually completing.
Open the exact execution
Go to Conversations and open the conversation with the impacted message.
Open message details.
Click Workflow (deep link) to open Execution Details with context loaded.
Review the timestamps and action order to see whether multiple actions fired in the same second.
If the Workflow link is not available, open the execution from logs: Workflows > open workflow > Logs, then filter by contact and the time window around the message.
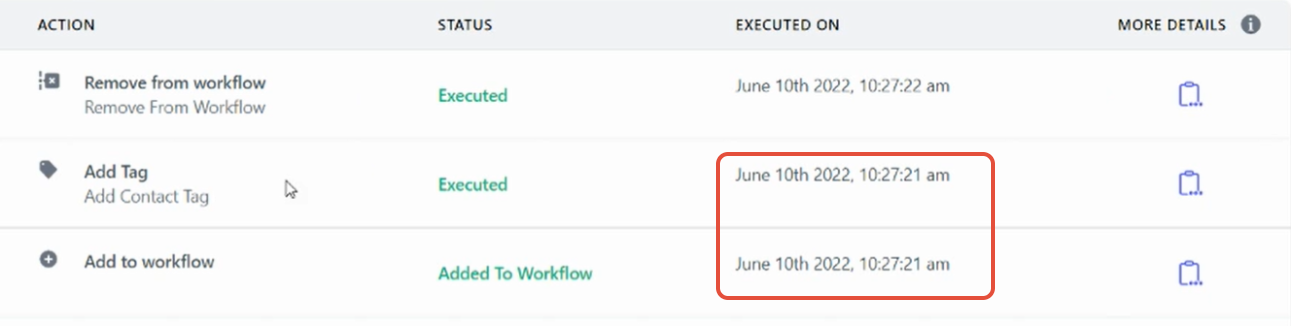
Example: Add Tag executed but not added
The logs show a tag was added successfully in the execution.
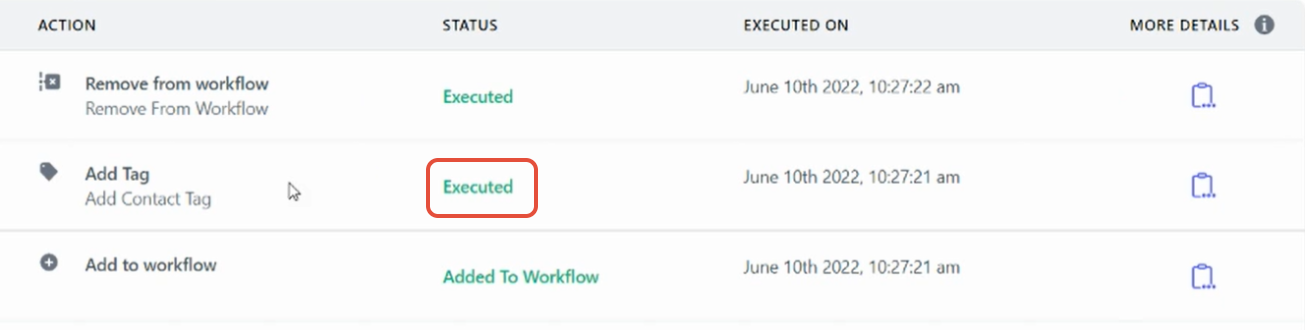
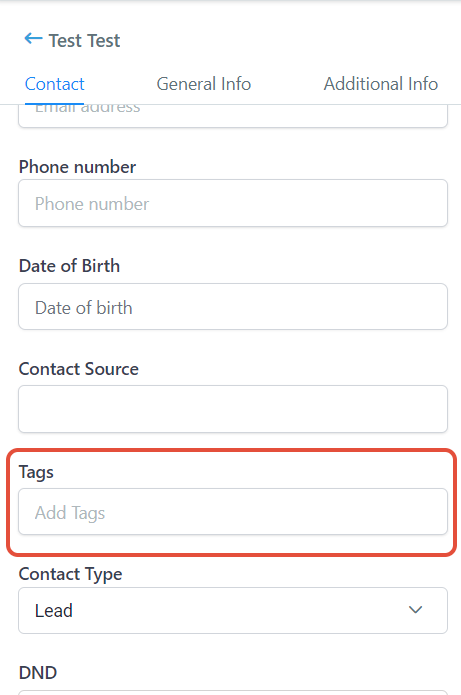
But the contact record shows no tag.
Looking back at the log timing, the "Add to workflow" and "Add Tag" actions fired in the exact same second, which is a race condition.
How to prevent it
Add a Wait action of 1 minute before the affected action.
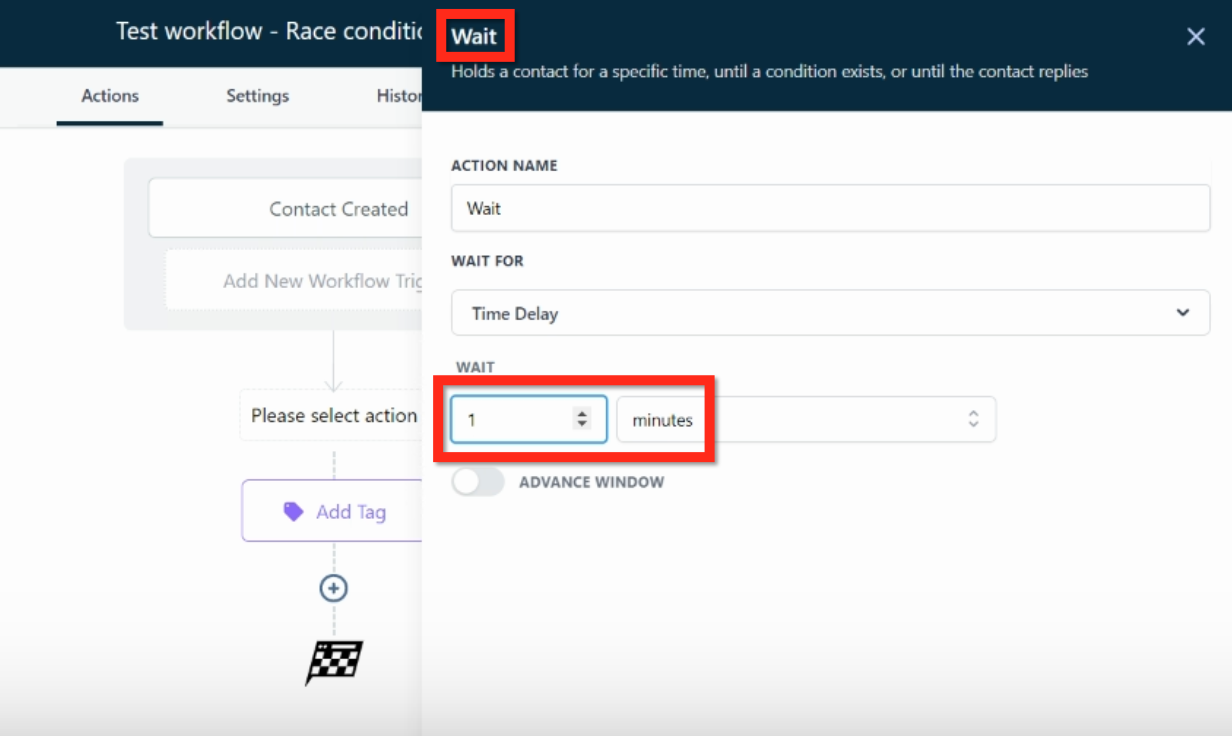
With a Wait 1 minute action in place, there is no chance of the race condition occurring.
"Workflow campaigns" are the combined email actions within a workflow. You can view their statistics alongside standalone campaigns under Email Marketing.
Go to Email Marketing > Campaigns > Workflow Campaigns to see overall and individual email statistics.
Click Edit Workflow to jump into the builder and make changes.
Click Statistics to view workflow stats, and use the dropdown to view statistics for individual email actions within the workflow.
This keeps workflow email stats and standalone campaign stats in one place, lets you break overall performance down by individual email action, and lets you edit the workflow directly from the statistics screen.
Does deleting a folder delete the workflows inside it? No. Deleting a folder moves all folders and workflows inside it up one level; nothing is deleted.
How long do I have to restore a deleted workflow? Deleted workflows are recoverable for 30 days from the Deleted tab, and a restored workflow comes back as a Draft.
What is required to restore an older version of a workflow? The workflow must be in Draft with no enrolled contacts; restoring creates a new draft and does not change your live workflow until you publish.
Does a workflow need to be published to enroll contacts manually or in bulk? Yes. Only published workflows appear in the manual-add and Add to Automation dropdowns.
What is the difference between Send at Scheduled Time and Send in Drip Mode? Scheduled Time enrolls all selected contacts at one chosen date and time; Drip Mode staggers enrollment into batches at set intervals.
How do I stop automated messages from reaching one contact? Open the contact in the Inbox, find the workflow under Active Campaigns/Workflows on the contact card, click the X, and confirm.
Does Find and Replace work across multiple workflows? No. It is scoped to the currently open workflow only. For cross-workflow changes, use the Workflow Switcher and Copy Actions Across Workflows.
How long do copied actions stay on the clipboard? 15 minutes, and you can paste multiple times during that window. Triggers are never copied, only actions.
Will contacts get stuck at a disabled node? No. Disabled nodes are skipped automatically and the workflow continues down any active path; skipped nodes do not consume executions.
Is "Pause Workflows on Certain Dates" the same as disabling nodes? No. Date pausing halts entire published workflows for a date range; disabling nodes pauses individual steps inside one workflow.
Why does my workflow stop after a call even when no one answered? This happens when Stop on Response is ON and Disable Voicemail Detect is ON: a voicemail pickup is read as a response. Set the call timeout to 20 seconds or less so the call does not reach voicemail.
Do workflow stats cover folders? No. Stats are available for individual workflows only, and include data from January 1, 2023 onward.
Will a published workflow drop to Draft if it has an error? No. Errors are flagged in the Error panel and via notifications, but a published workflow stays published.
