The Workflow Builder is where you design, test, and publish your automations in Aesthetix CRM. You add triggers and actions to a visual canvas, connect them into one or more paths, configure how the workflow behaves, and then move it from draft to published when it is ready to run. This reference covers every part of the builder interface: the canvas and Advanced Builder, how nodes connect, Go-To connections and delinked branches, the builder tabs, workflow settings, keyboard shortcuts, undo/redo, auto-save, and the draft-versus-publish toggle. Workflows live under Marketing > Workflows.
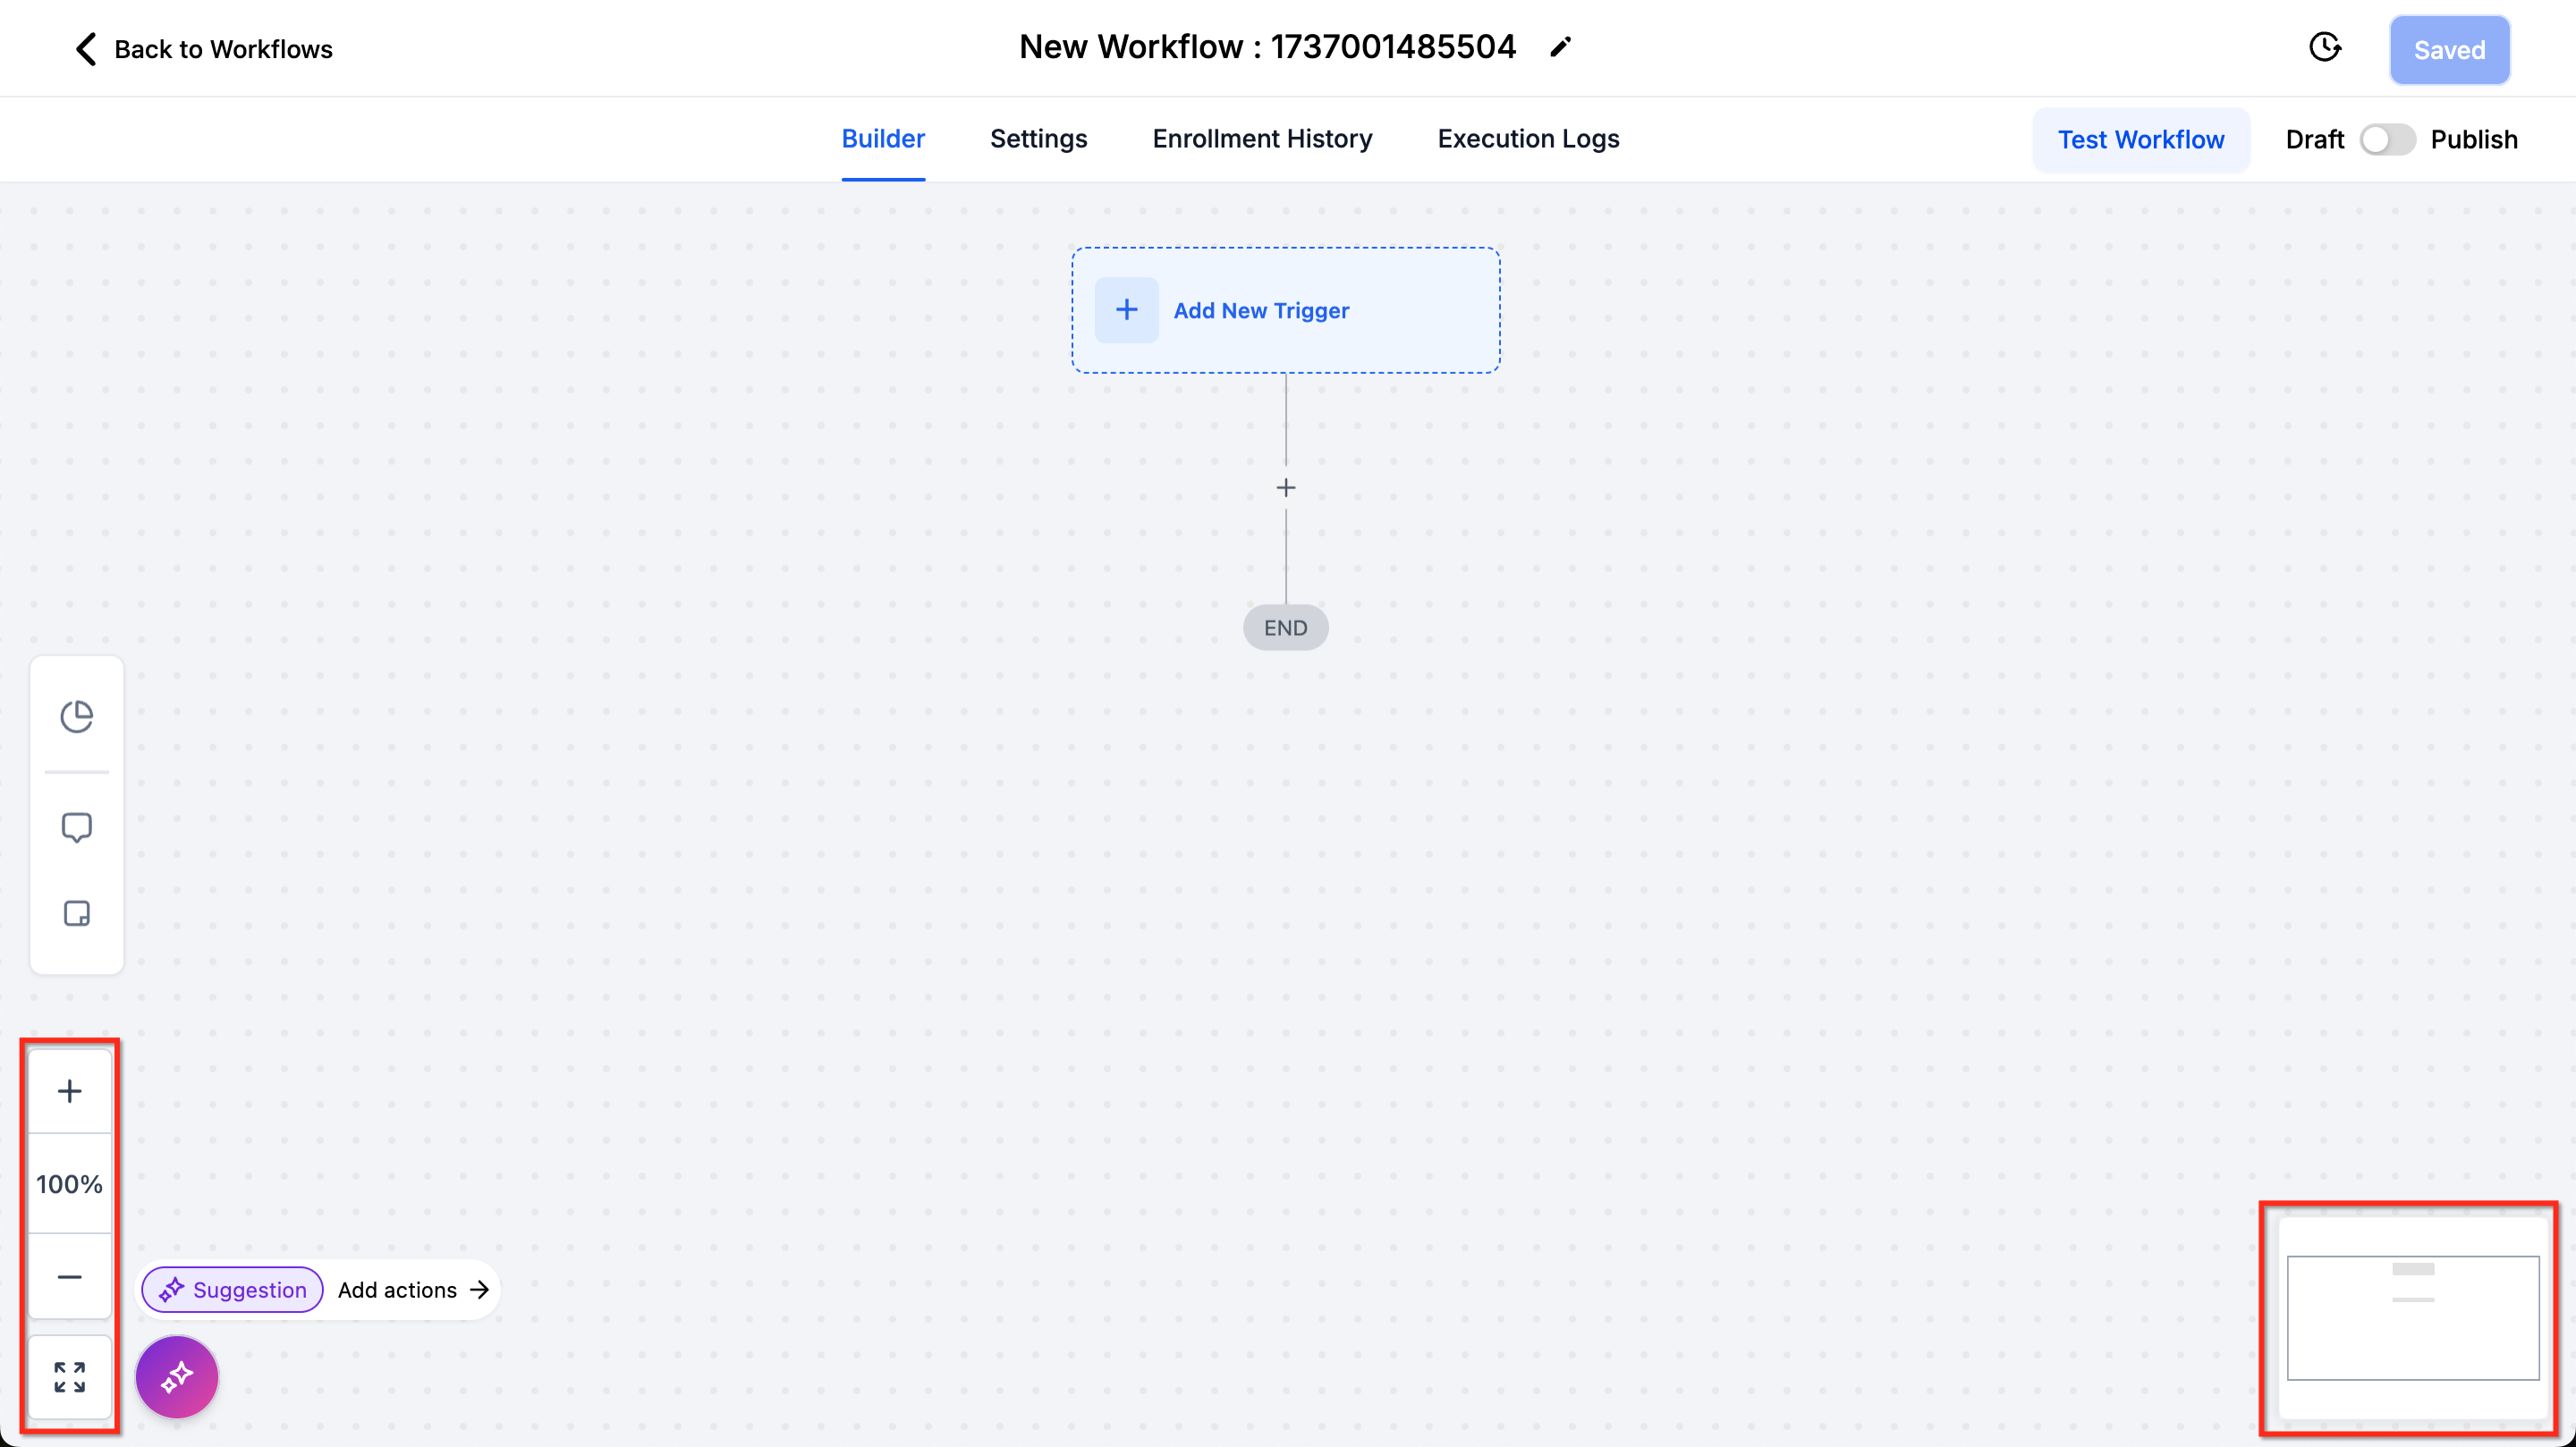
Every workflow opens on an infinite visual canvas. Triggers and actions appear as nodes connected by lines that show the path a contact follows from top to bottom.
The builder offers two views of the same workflow:
Standard Builder is the default linear layout. Nodes are chained in a single top-to-bottom flow, and you can move a node directly on the canvas by hovering it to reveal the six-dot drag handle, then dragging it to the Move here indicator.
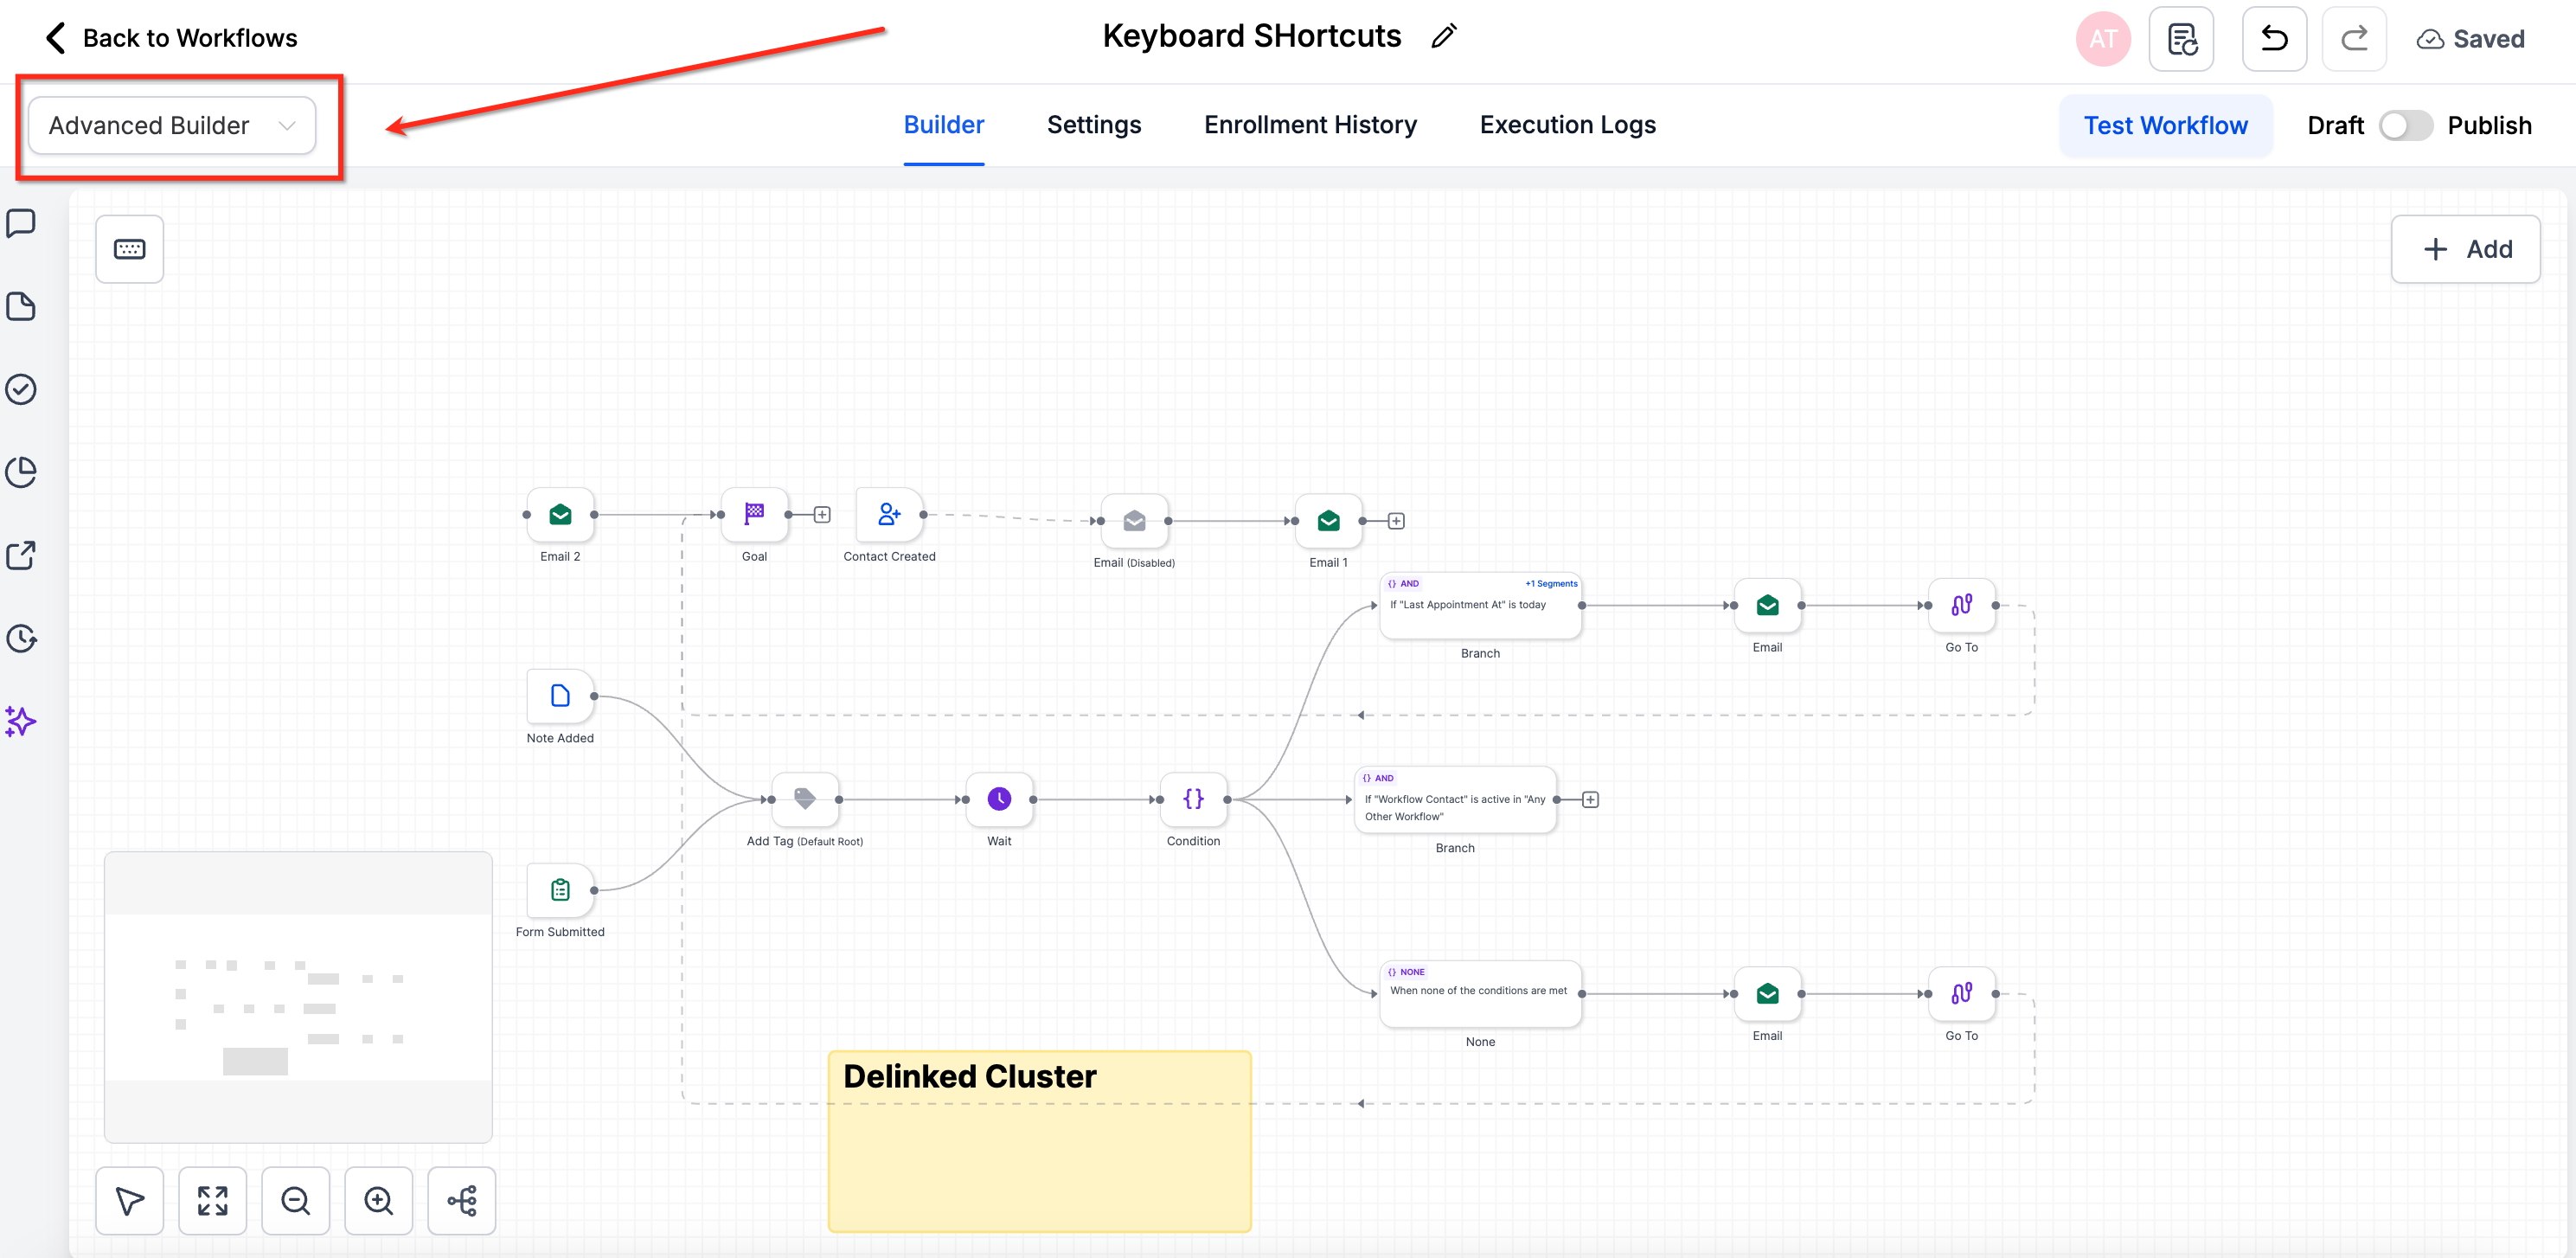
Advanced Builder is a fully visual, freeform canvas for building automations. It lets you lay out multiple trigger paths, parallel branches, and complex logic in one view without changing how the workflow executes. Toggle to Advanced Builder from the top-left of the builder. You can switch between Standard and Advanced on the same workflow, but Advanced-only features (Go-To connections, delinked nodes, and disabled nodes) must be removed before switching back to Standard.

Canvas navigation tools:
Fit to Screen and Zoom In / Zoom Out controls sit in the bottom-left corner. You can also click the zoom icon to zoom in or out of the whole workflow or a specific area.
A Minimap in the bottom-right corner shows your current position within a large workflow.
Tidy Up (Auto-layout) cleans up a cluttered canvas in one click, which is useful after heavy edits.
If a workflow name in the builder header is long, it truncates with an ellipsis. Hover the name to see the full title. Keep workflows small enough to view on one screen where possible; divide complex logic into separate workflows to make troubleshooting easier.
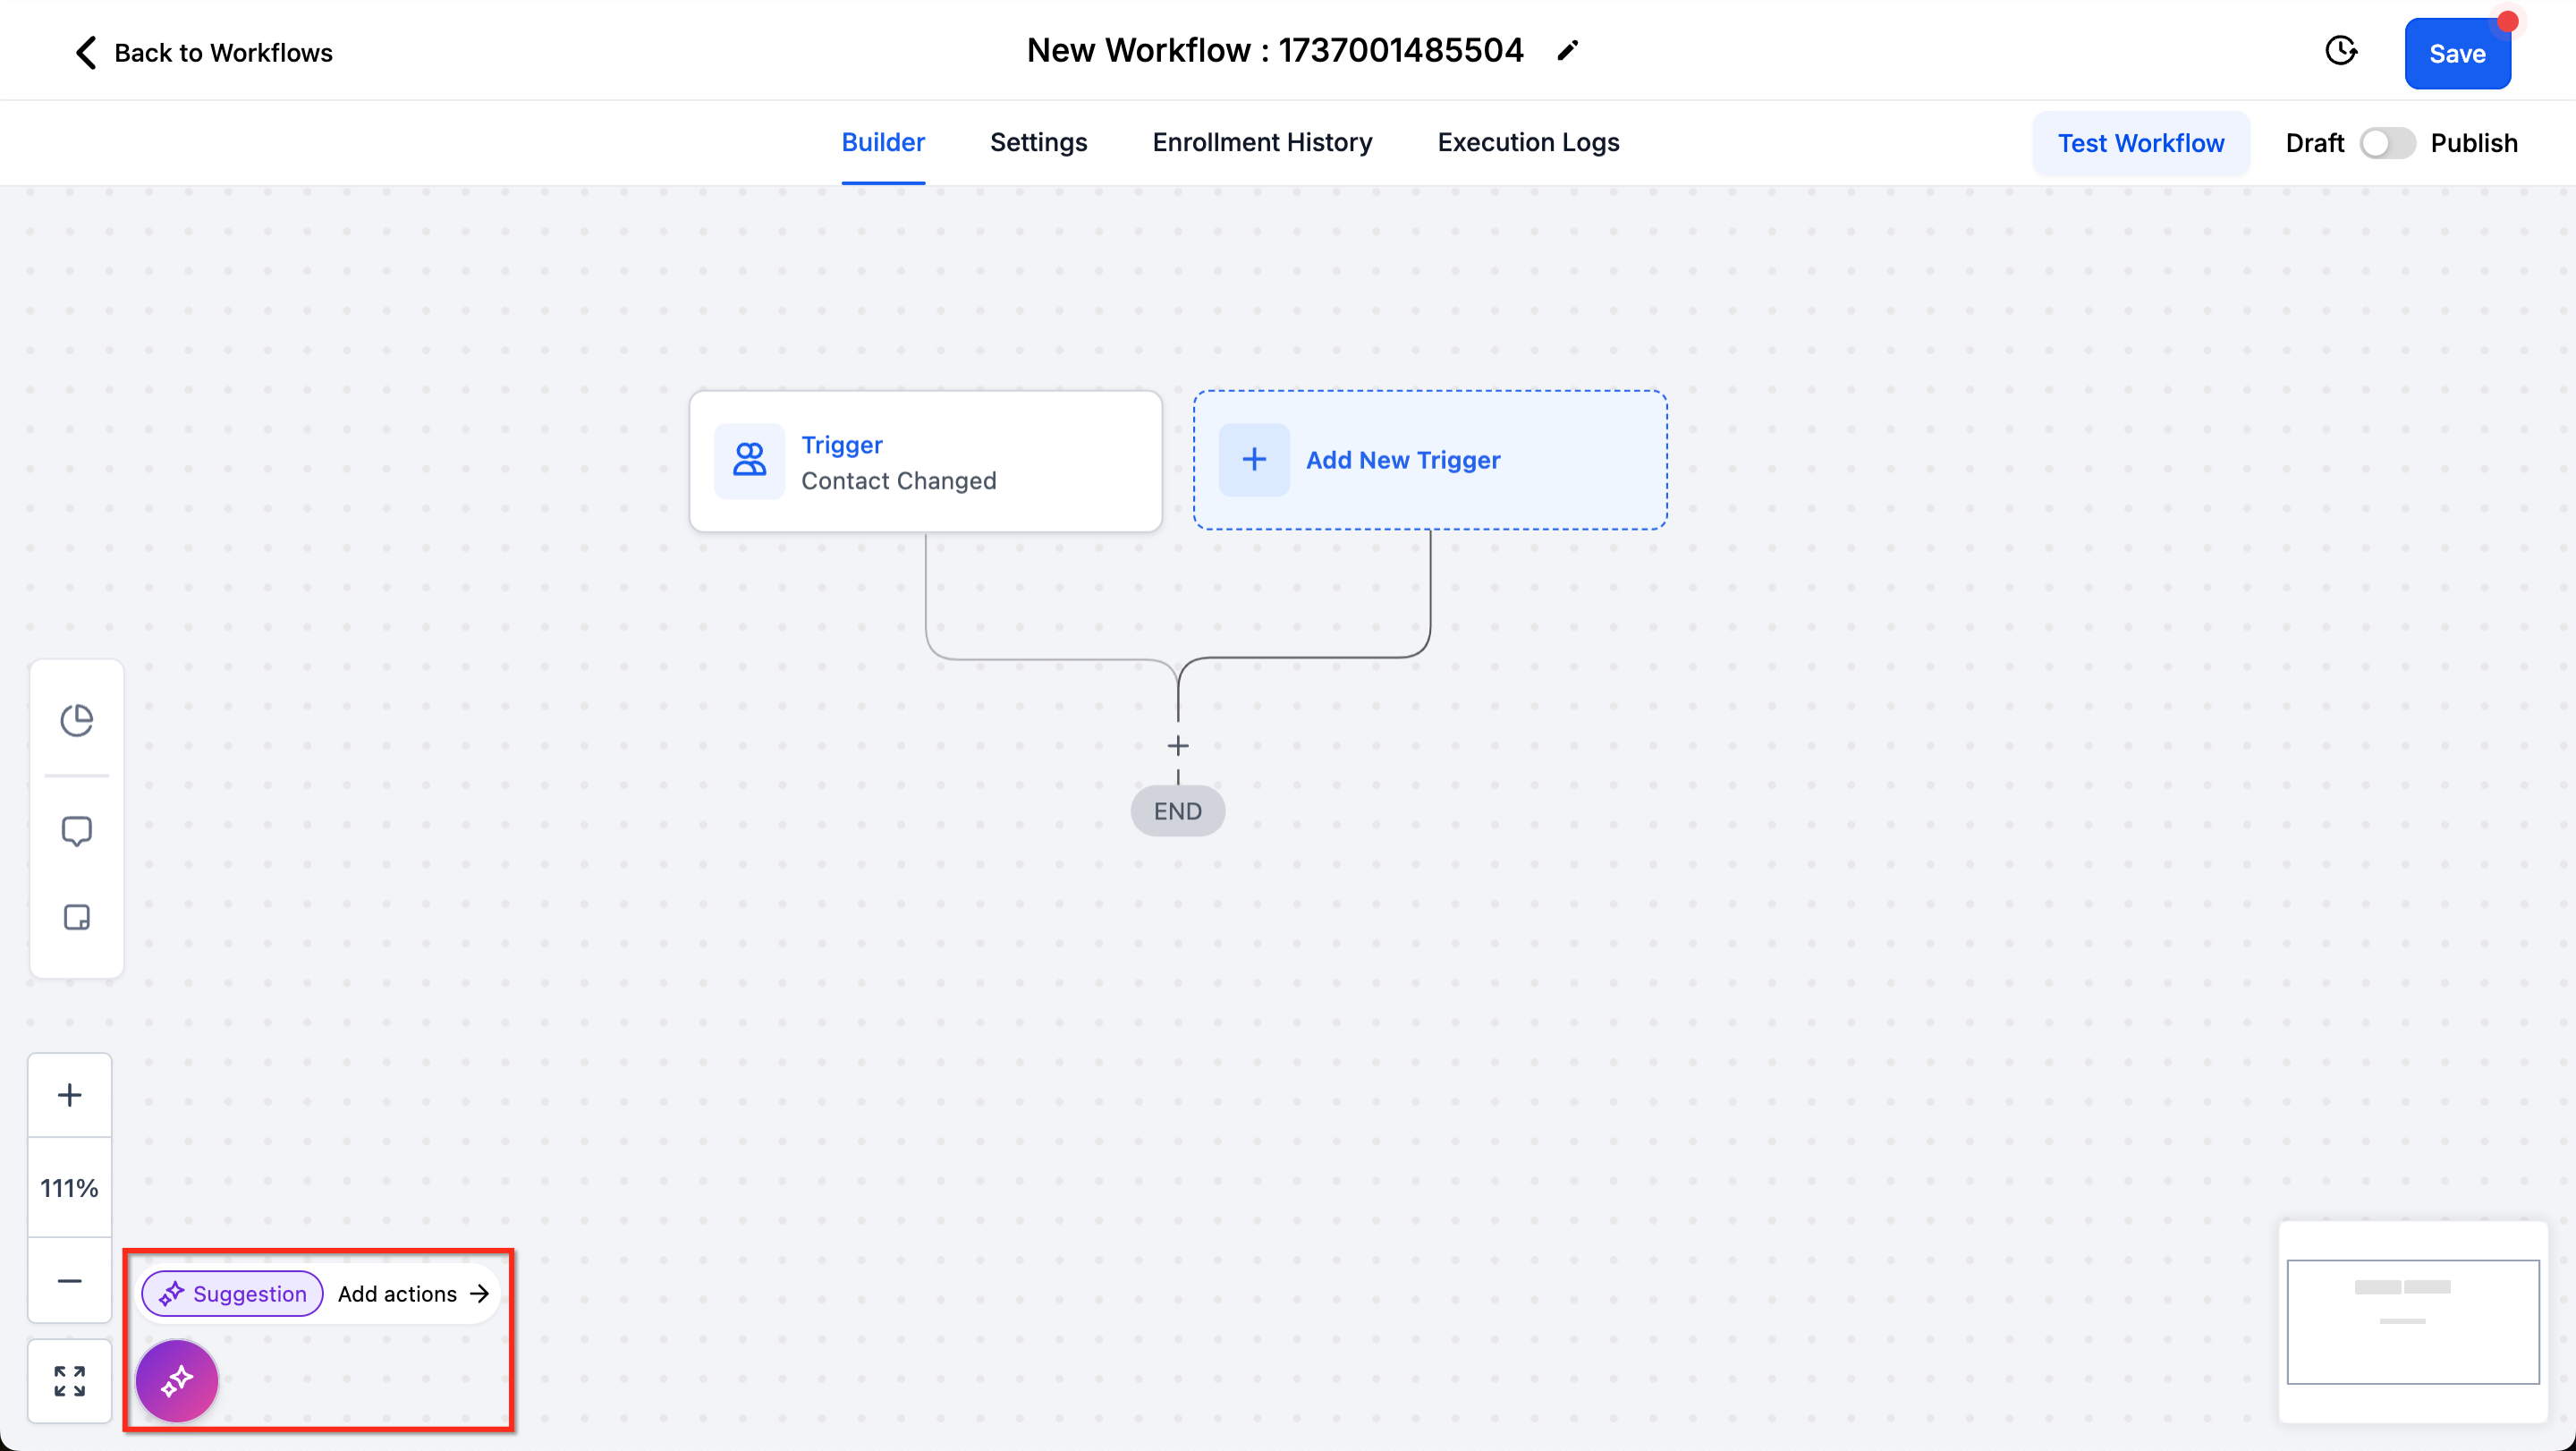
A workflow is built from two node types: triggers (the events that start the workflow) and actions (what happens once a trigger fires).
Adding a trigger:
Click Add New Trigger.
Select a trigger from the list (for example, Contact Added or Appointment Booked). Use the search bar and category filters to find triggers faster.
Configure the trigger with the relevant settings.
All triggers in a workflow activate whenever their specific conditions are met, so make sure your trigger setup matches how you want contacts to enter.
Adding an action:
Click the + button on the workflow line where you want the step.
Select an action from the list (for example, Send Email or Assign to User). Use the search bar and categories to locate actions quickly.
Configure the action based on what the step should do.
Beyond standard actions, a few action types control flow:
Drip Actions slow a contact's progress through the workflow.
Conditional Actions evaluate criteria and route contacts down different paths.
Goal Actions let a contact skip ahead to a later point in the workflow, bypassing the steps in between.
You can also use the Workflow AI Assistant to help build out a workflow and suggest the right actions.
Connecting nodes (Advanced Builder):
Open the Triggers and Actions panel.
Configure items from the panel, or drag them directly onto the canvas.
Connect nodes by dragging from the connector handle, or use the + icon.
When you drag a trigger or action from the panel onto the canvas, it can auto-connect based on where you drop it:
Extend a branch: drop the step on the last node in a branch to add it to the end.
Insert between steps: drop the step between two connected nodes to insert it in the middle.
A few connection rules and tips:
Multi-select (marquee or Shift-drag) to move blocks of nodes at once.
Copy and paste branches across workflows to reuse patterns.
Always configure and save a step after dropping it. Unconfigured actions will not run; the workflow skips incomplete steps.
Give triggers and actions meaningful names so they are easy to read on the canvas and in history.
You can turn any action or condition off for testing without deleting it or rewiring its connections.
Disable: hover a node, then click the pause icon.
Enable: hover the node again, then click the play icon.
Disabled nodes are skipped during execution while their connections stay intact.
Disabled nodes are an Advanced Builder feature and must be removed before switching back to the Standard Builder.
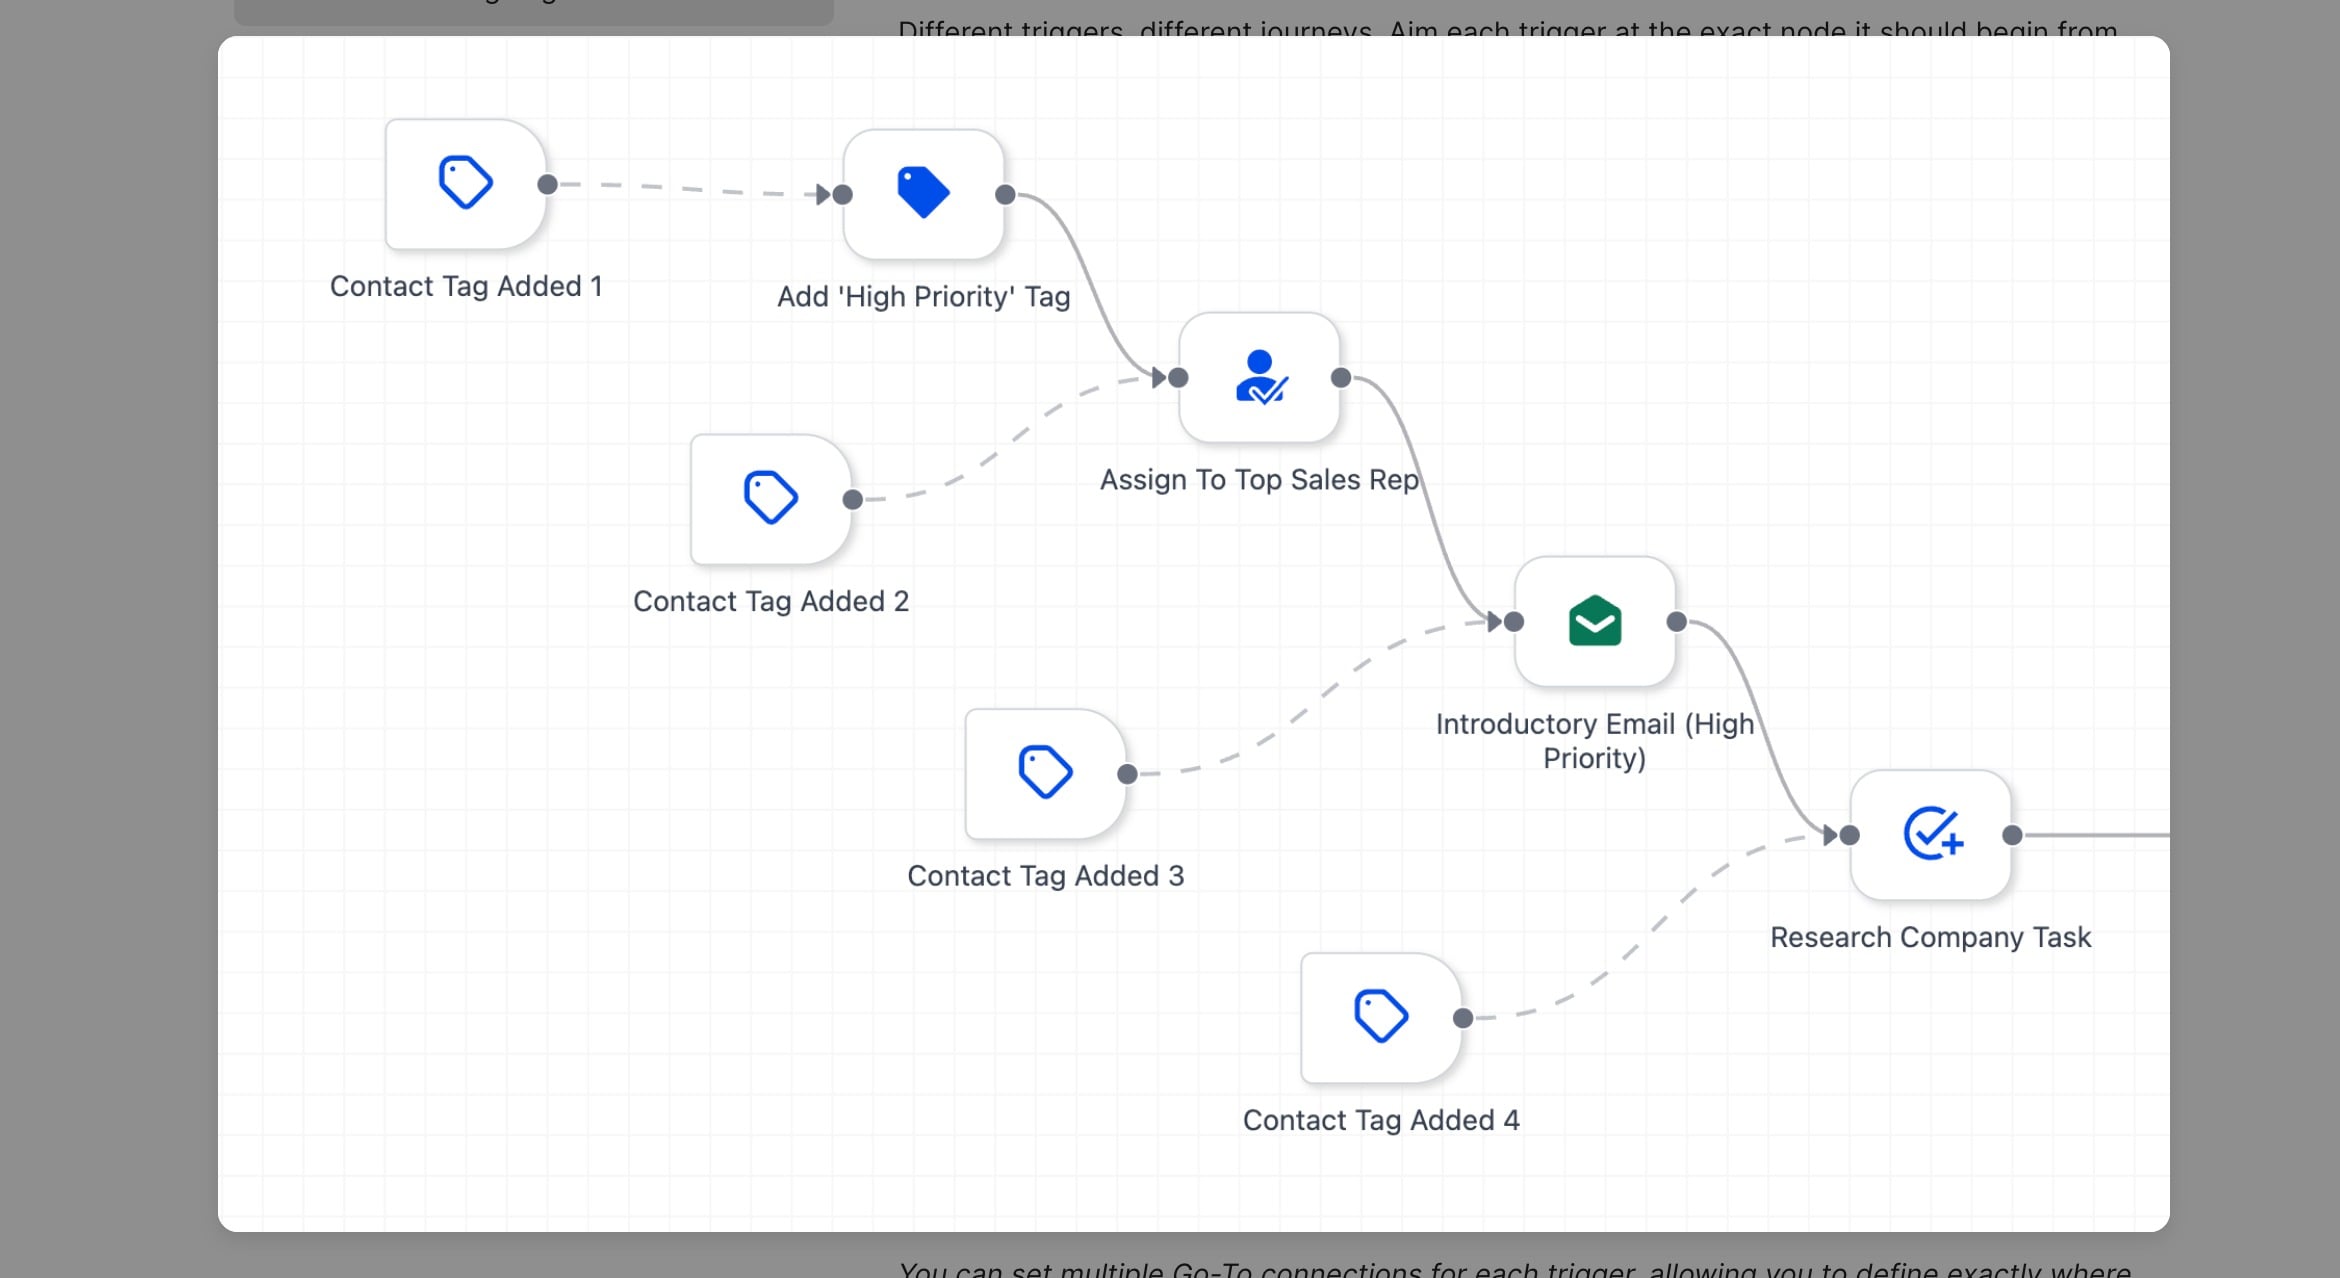
Go-To connections let you point each trigger to the exact action where its path should begin, right on the canvas. This keeps complex entry logic tidy without duplicating workflows or stacking large if/else branches. Go-To connections are exclusive to the Advanced Builder.
How it works:
Set a start action per trigger: drag the dashed Go-To connector from the trigger to the action where that trigger should begin. To connect node to node, click the small connector dot on the trigger, drag to the connector dot on the action, and release.
Visual routing: Go-To links appear as a dashed line with an arrowhead, while normal sequential paths stay solid.
Direct execution: when the trigger matches, the workflow jumps straight to the connected action and continues from there.
Connection rules:
One-to-one connections only. Each trigger connects to one next action, and each action can have one incoming connection (from a trigger or a previous action).
No branching from a single action. An action can have only one Next step. If it already points to a step, connecting it to another action overwrites the existing link.
Every trigger must connect once. Unassigned triggers auto-connect to the Root (first) action, but you should set the correct start action explicitly. A workflow will not save unless every trigger connects to exactly one action.
Reassign any time by dragging the dashed connector to a new node. If you delete the action a trigger points to, the Go-To link becomes invalid and the trigger reconnects to Root until you assign a new target.
Enrollment behavior:
One trigger per enrollment. A contact enters a workflow once per run, attributed to the single trigger that fired. Narration and statistics reflect that trigger.
If multiple triggers qualify around the same time, the workflow still records one enrollment for that moment.
If the workflow allows re-entry, the same contact may enter again later when another trigger fires; each run is still started by exactly one trigger.
Routing changes apply only to contacts who enter after you publish the update.
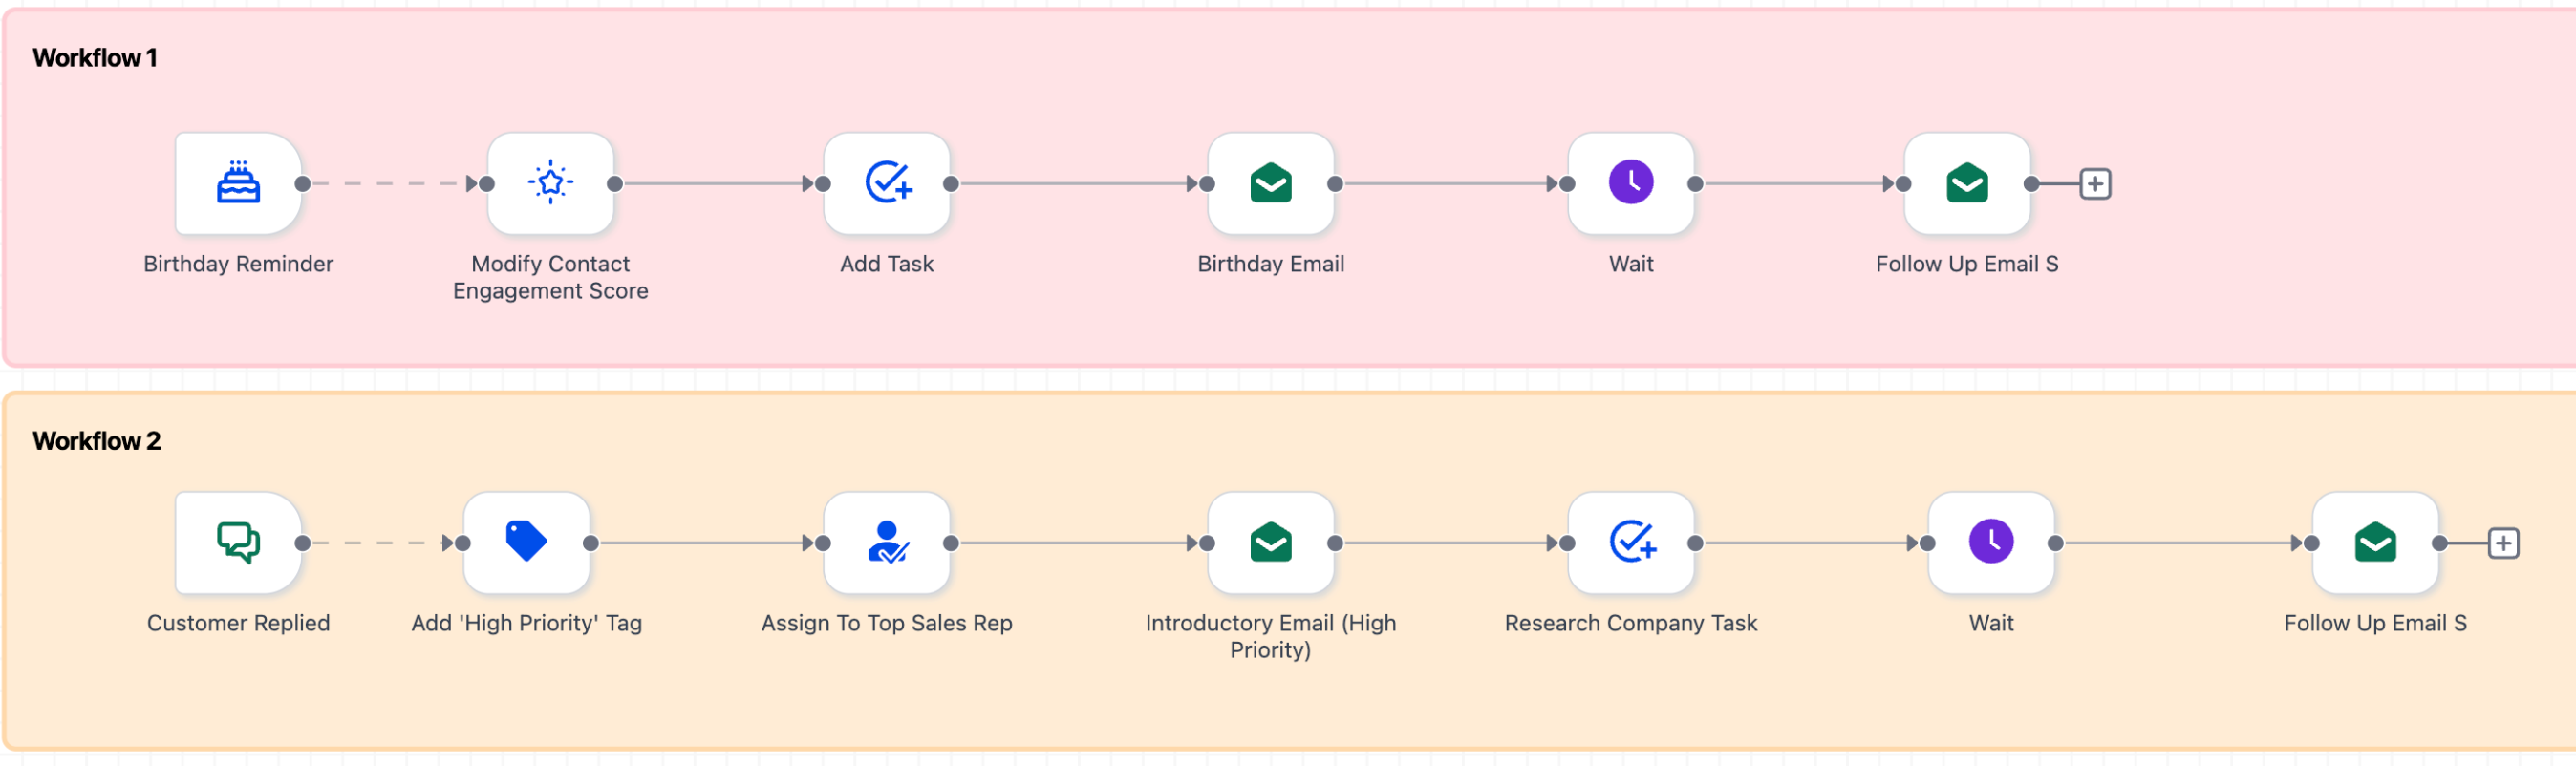
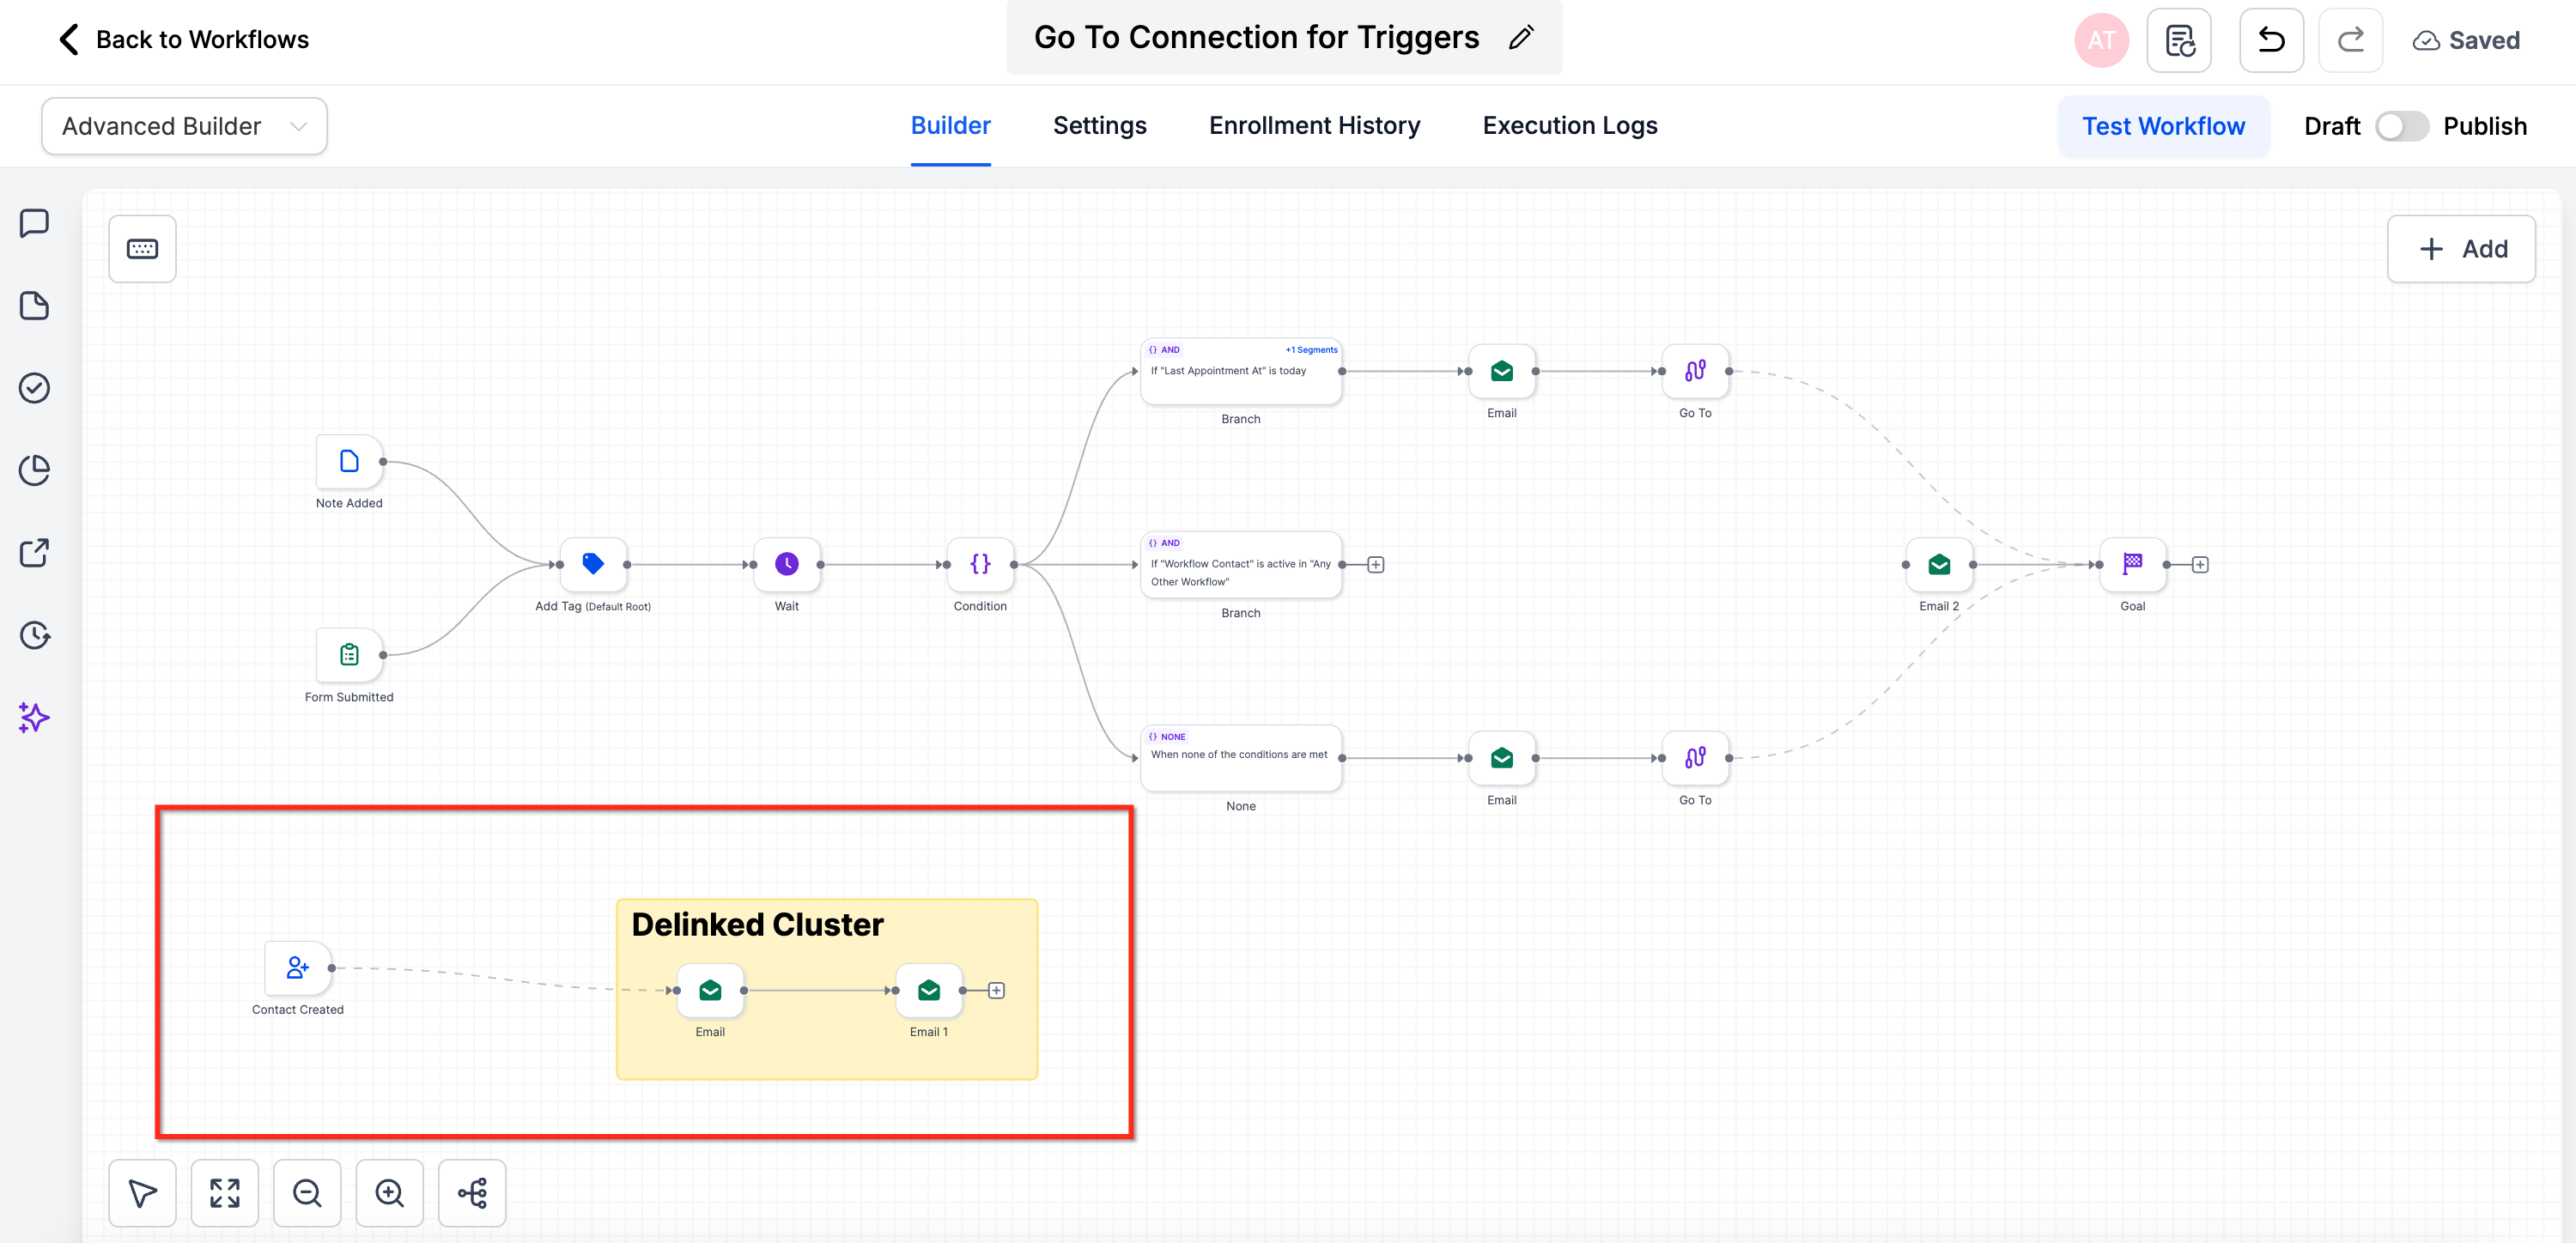
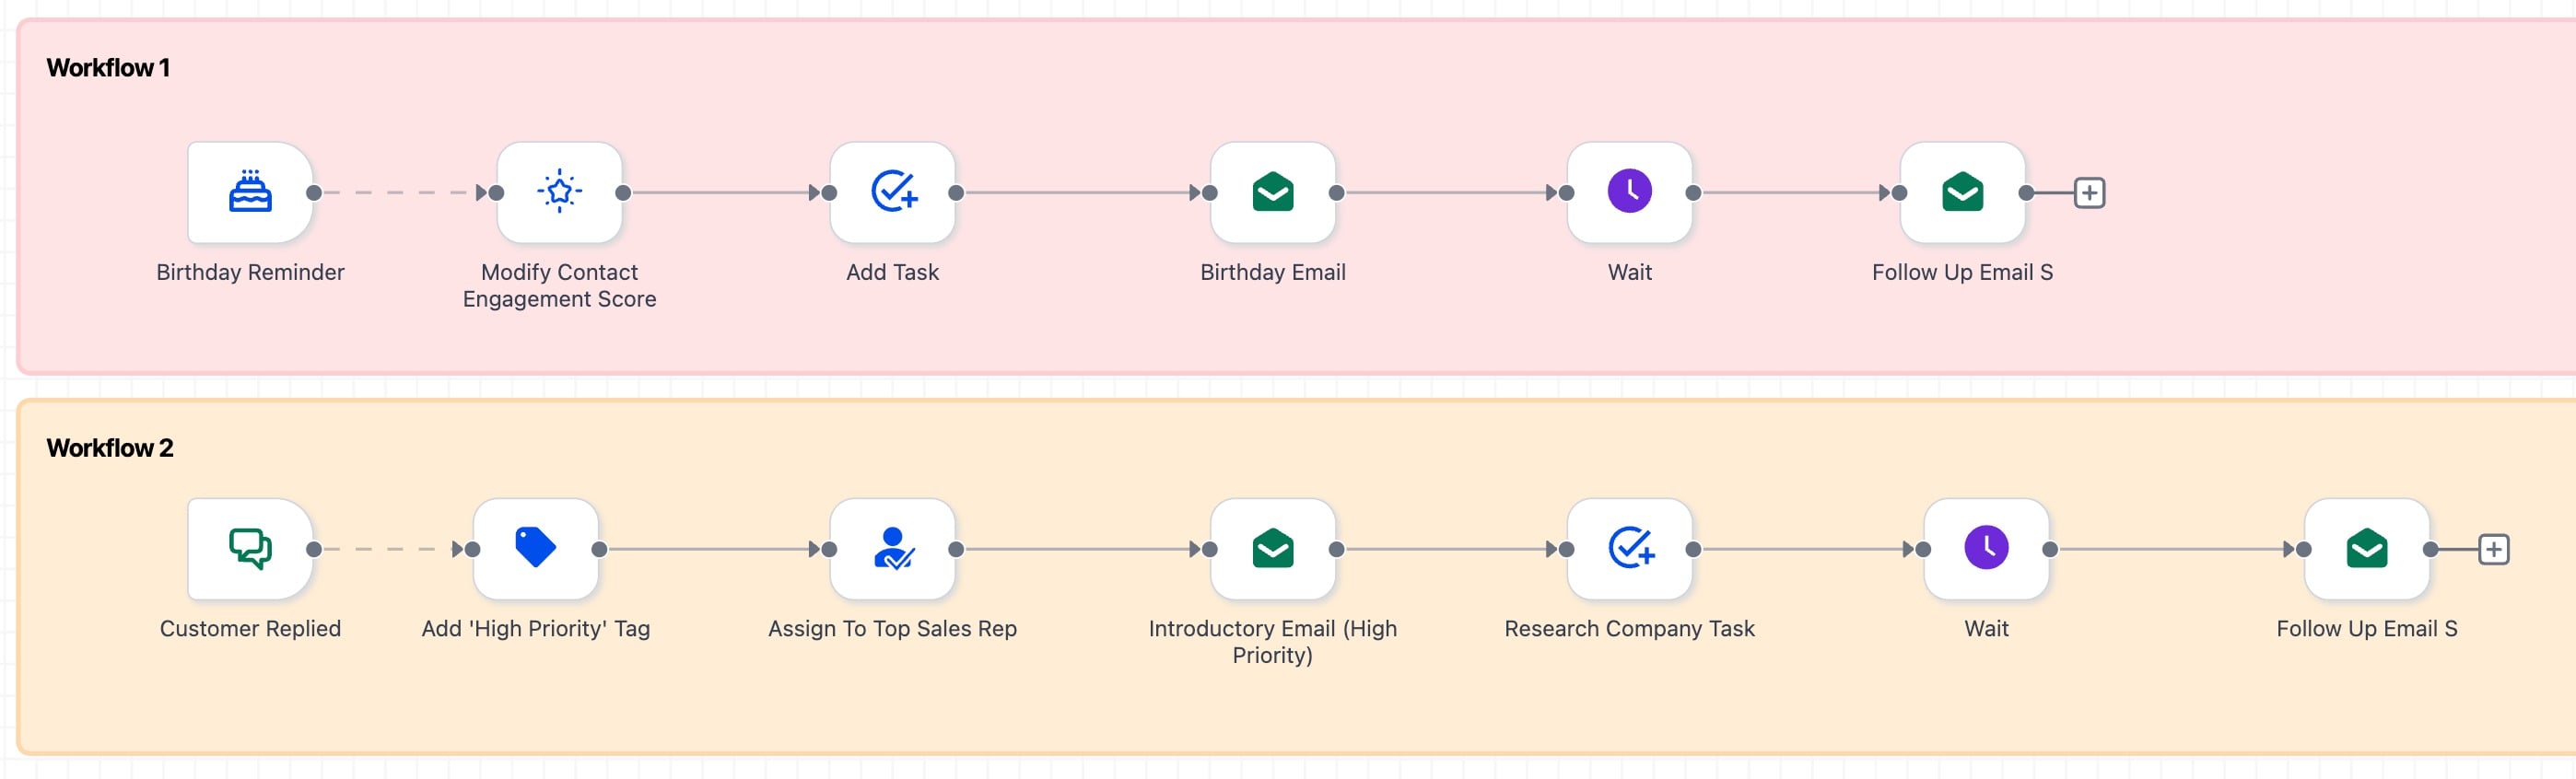
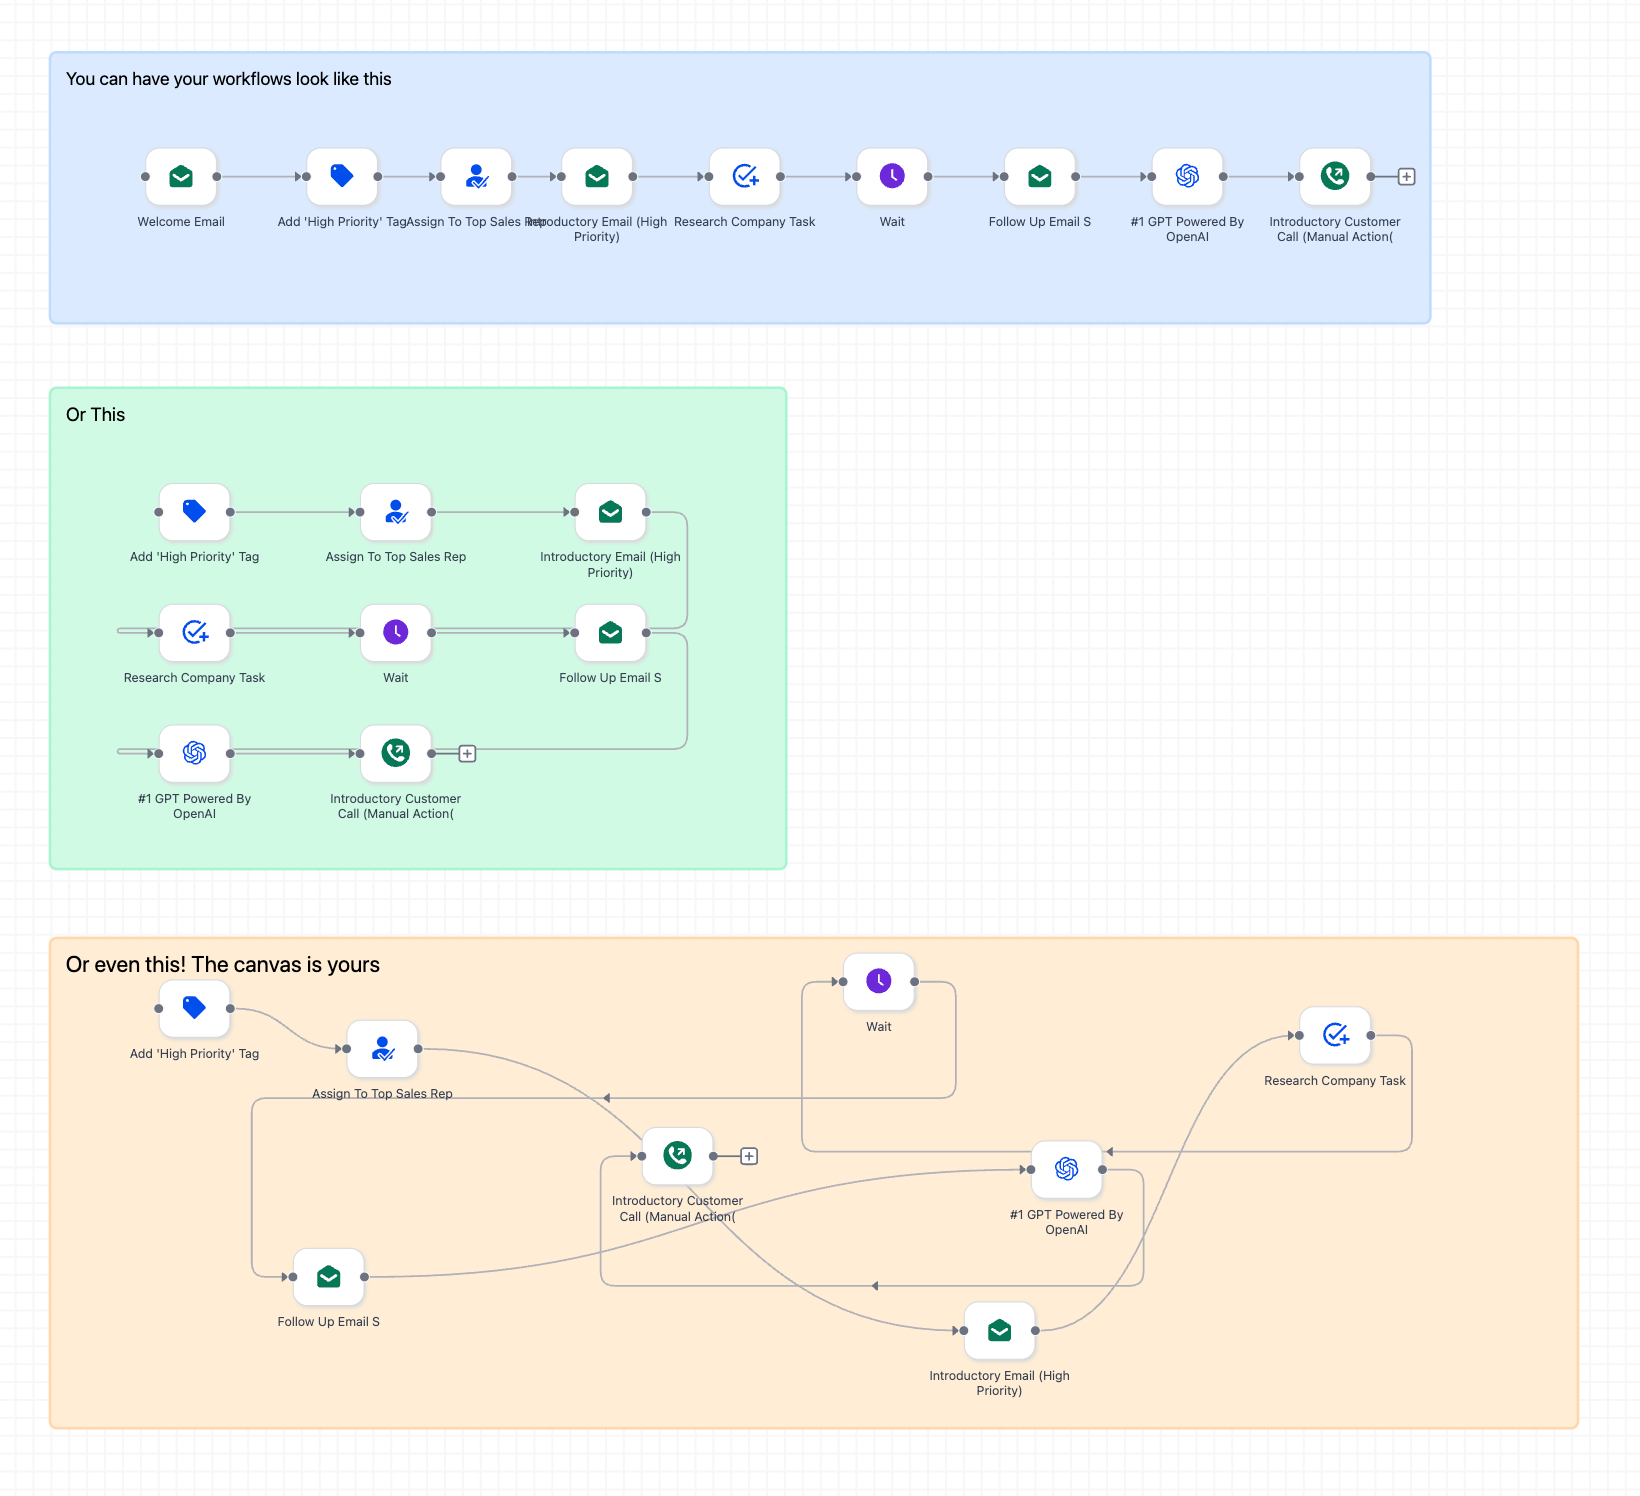
Delinked nodes let you build independent branches, or mini-flows, on the canvas that are not wired into a single main line. Use them to design parallel paths side by side and start each branch from the trigger you choose. Delinked nodes are available only in the Advanced Builder.
Key points:
Build in multiple clusters: place actions anywhere to form independent clusters; you do not have to chain everything together.
Route explicitly: a cluster does not run on its own. Point a trigger to the cluster's first action using a Go-To connection (the dashed connector) to make it executable.
Independent execution: each routed branch runs independently within the same workflow context.
To set up a delinked branch:
Choose a trigger on the canvas.
Drag the dashed Go-To connector from the trigger to the first action of the delinked cluster you want to start.
Optionally, add sticky notes and colors to label each branch, then save and publish to make the behavior live.
Visual cues at a glance:
Solid connector means a normal sequential path.
Dashed connector with an arrow means a Trigger Go-To that jumps to a target action.
An isolated cluster is a delinked branch.
Important behaviors:
Single enrollment per contact. Even with parallel branches, the same contact will not run concurrently through multiple branches of the same workflow.
Explicit routing required. A delinked cluster will not execute unless at least one trigger connects to it. Removing a Go-To link makes the branch inactive until you reconnect it.
You can draw a standard connection from any action in one cluster to the start of another to merge paths later.
Cloning a workflow preserves all clusters and Go-To links exactly as designed; retest triggers in the new copy.
Default Path for parallel branches: in an Advanced Builder workflow with multiple parallel branches, you can choose which branch contacts enter when you run a workflow test or when a contact enters from another workflow. The root node is labeled Default Path. On the first action of the branch you want, click the branch icon to set that branch as the Default Path. A solid trigger connector marks the Default Path branch; a dashed trigger connector marks a branch reached through a Go-To connection that is not the default.
Sticky notes let you document logic for teammates and your future self.
Add a note from the left sidebar.
Choose a color and style, then enter your text.
Notes support images and links.
Name clusters and branches with sticky notes (for example, "VIP Onboarding" or "Trial Nurture"), keep the intended entry node at the top or left of each cluster, and use Tidy Up and spacing so dashed Go-To lines stay easy to read.
A workflow opens with several tabs across the top that organize building, configuration, and monitoring.
Builder is the visual canvas where you add, connect, configure, and arrange triggers and actions. This is the default tab and where most editing happens. (In some views this is presented as an Actions tab dedicated to creating workflows and adding the steps that run them.)
Settings holds the workflow-level configuration that governs how the whole workflow behaves: time window, sender details, re-entry, stop on response, auto mark as read, time zone, and the event start date. These options are covered in the next section.
Enrollment History lists the contacts who have entered the workflow, so you can confirm who was enrolled and when.
Execution Logs show how the workflow ran for enrolled contacts, step by step, which is the primary tool for confirming that each action fired and for troubleshooting failures.
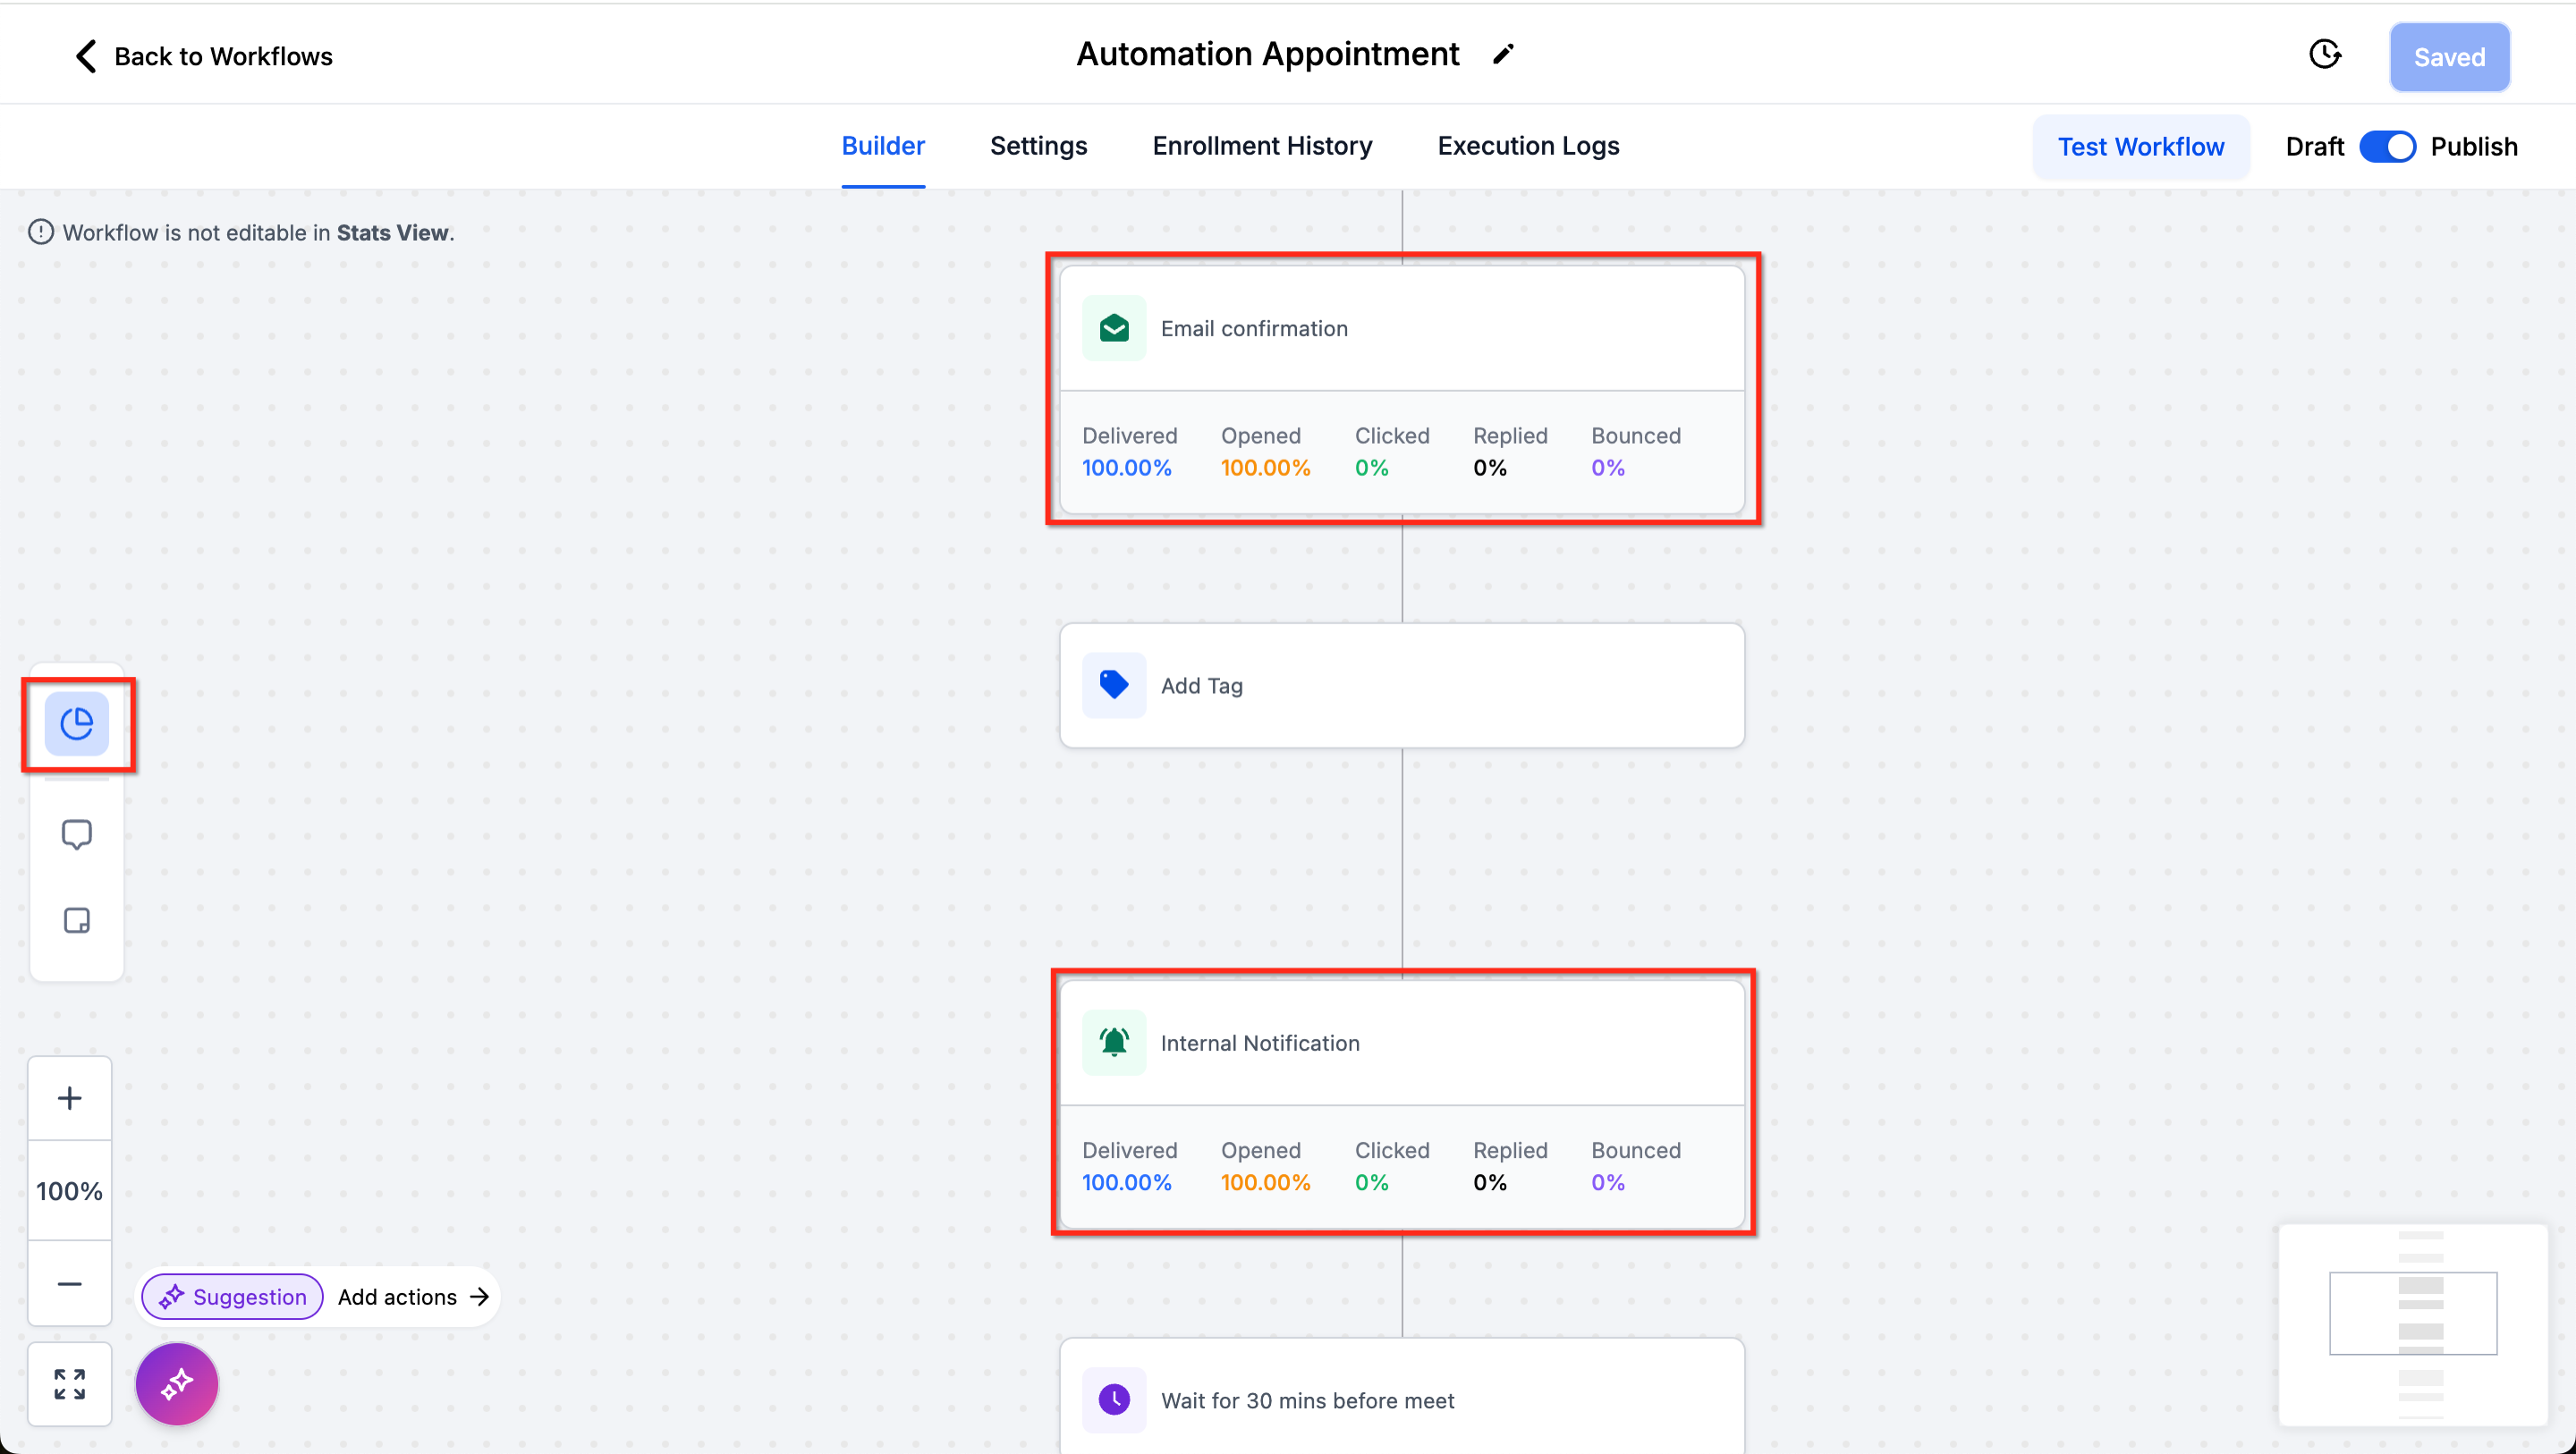
Stats View lets you monitor communication performance down to the individual action without leaving the builder.
Turn on Stats View in the top-left corner.
Communication statistics appear directly on the canvas.
Click any stat to open a detailed report.
If a communication action was used in the workflow and later deleted, its stats are still saved.
Stats are also available at the workflow level in the Workflow List. Click the expand arrow under Stats to see them.
The Settings tab controls how the entire workflow behaves. To reach it, open a workflow and click the Settings tab.
The available settings:
Setting | What it does |
|---|---|
Time Window | Controls when the workflow may send actions. Any Time lets the workflow send at any time. Specific Time sets a window so actions outside it are held until the window opens. |
Sender Address | Sets a default From name and From email for emails sent by this workflow. You can override these inside individual email actions. |
Allow Multiple (re-entry) | When on, a single contact can enter and run through the workflow more than once. When off, each contact enters only once. |
Stop On Response | When on, the workflow ends for a contact as soon as they reply to a message sent by the workflow. |
Auto Mark as Read | By default, automated messages do not mark conversations as read. Turn this on to mark conversations this workflow interacts with as read. |
Event Start Date and Time | Lets Wait events pause contacts relative to a set start date and time, which is useful for reminders leading up to an event such as a webinar. |
Time Zone | Date and time settings follow the time zone of the specified location. For example, with the location set to America/New_York, the offset is -05:00. |
After you save, the Settings tab also shows the dates the workflow was created and last updated, which helps you track changes over time.
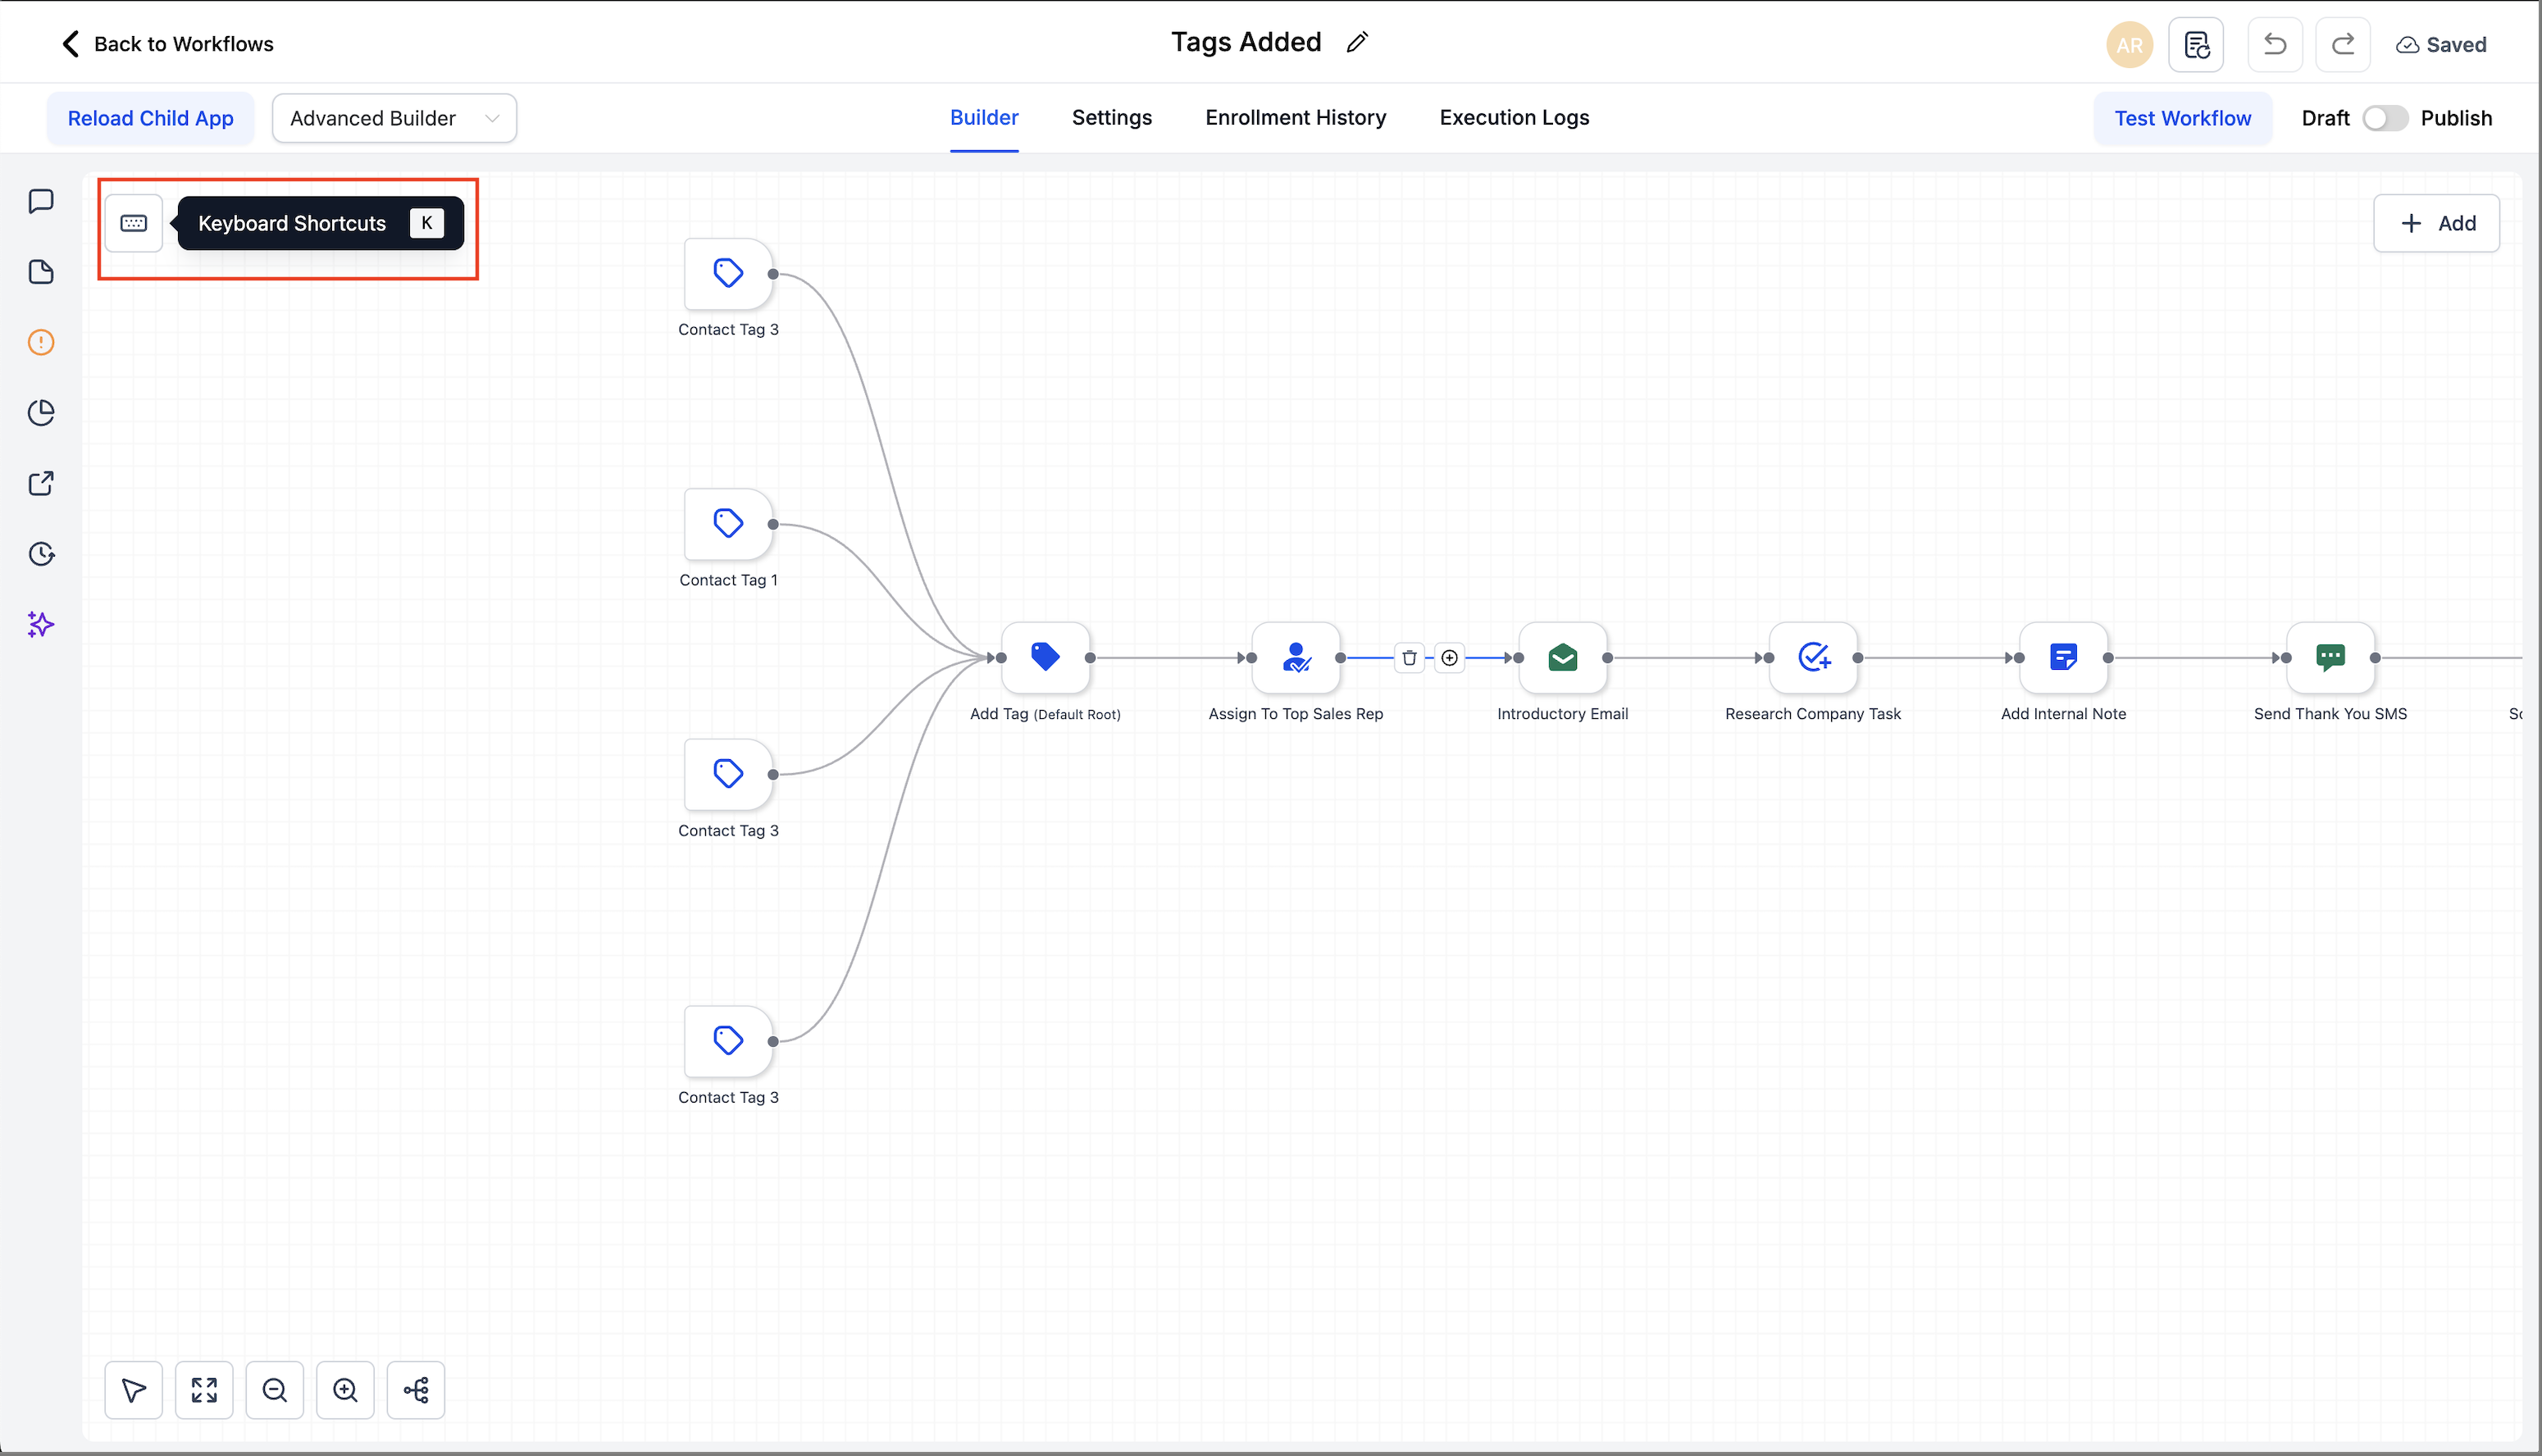
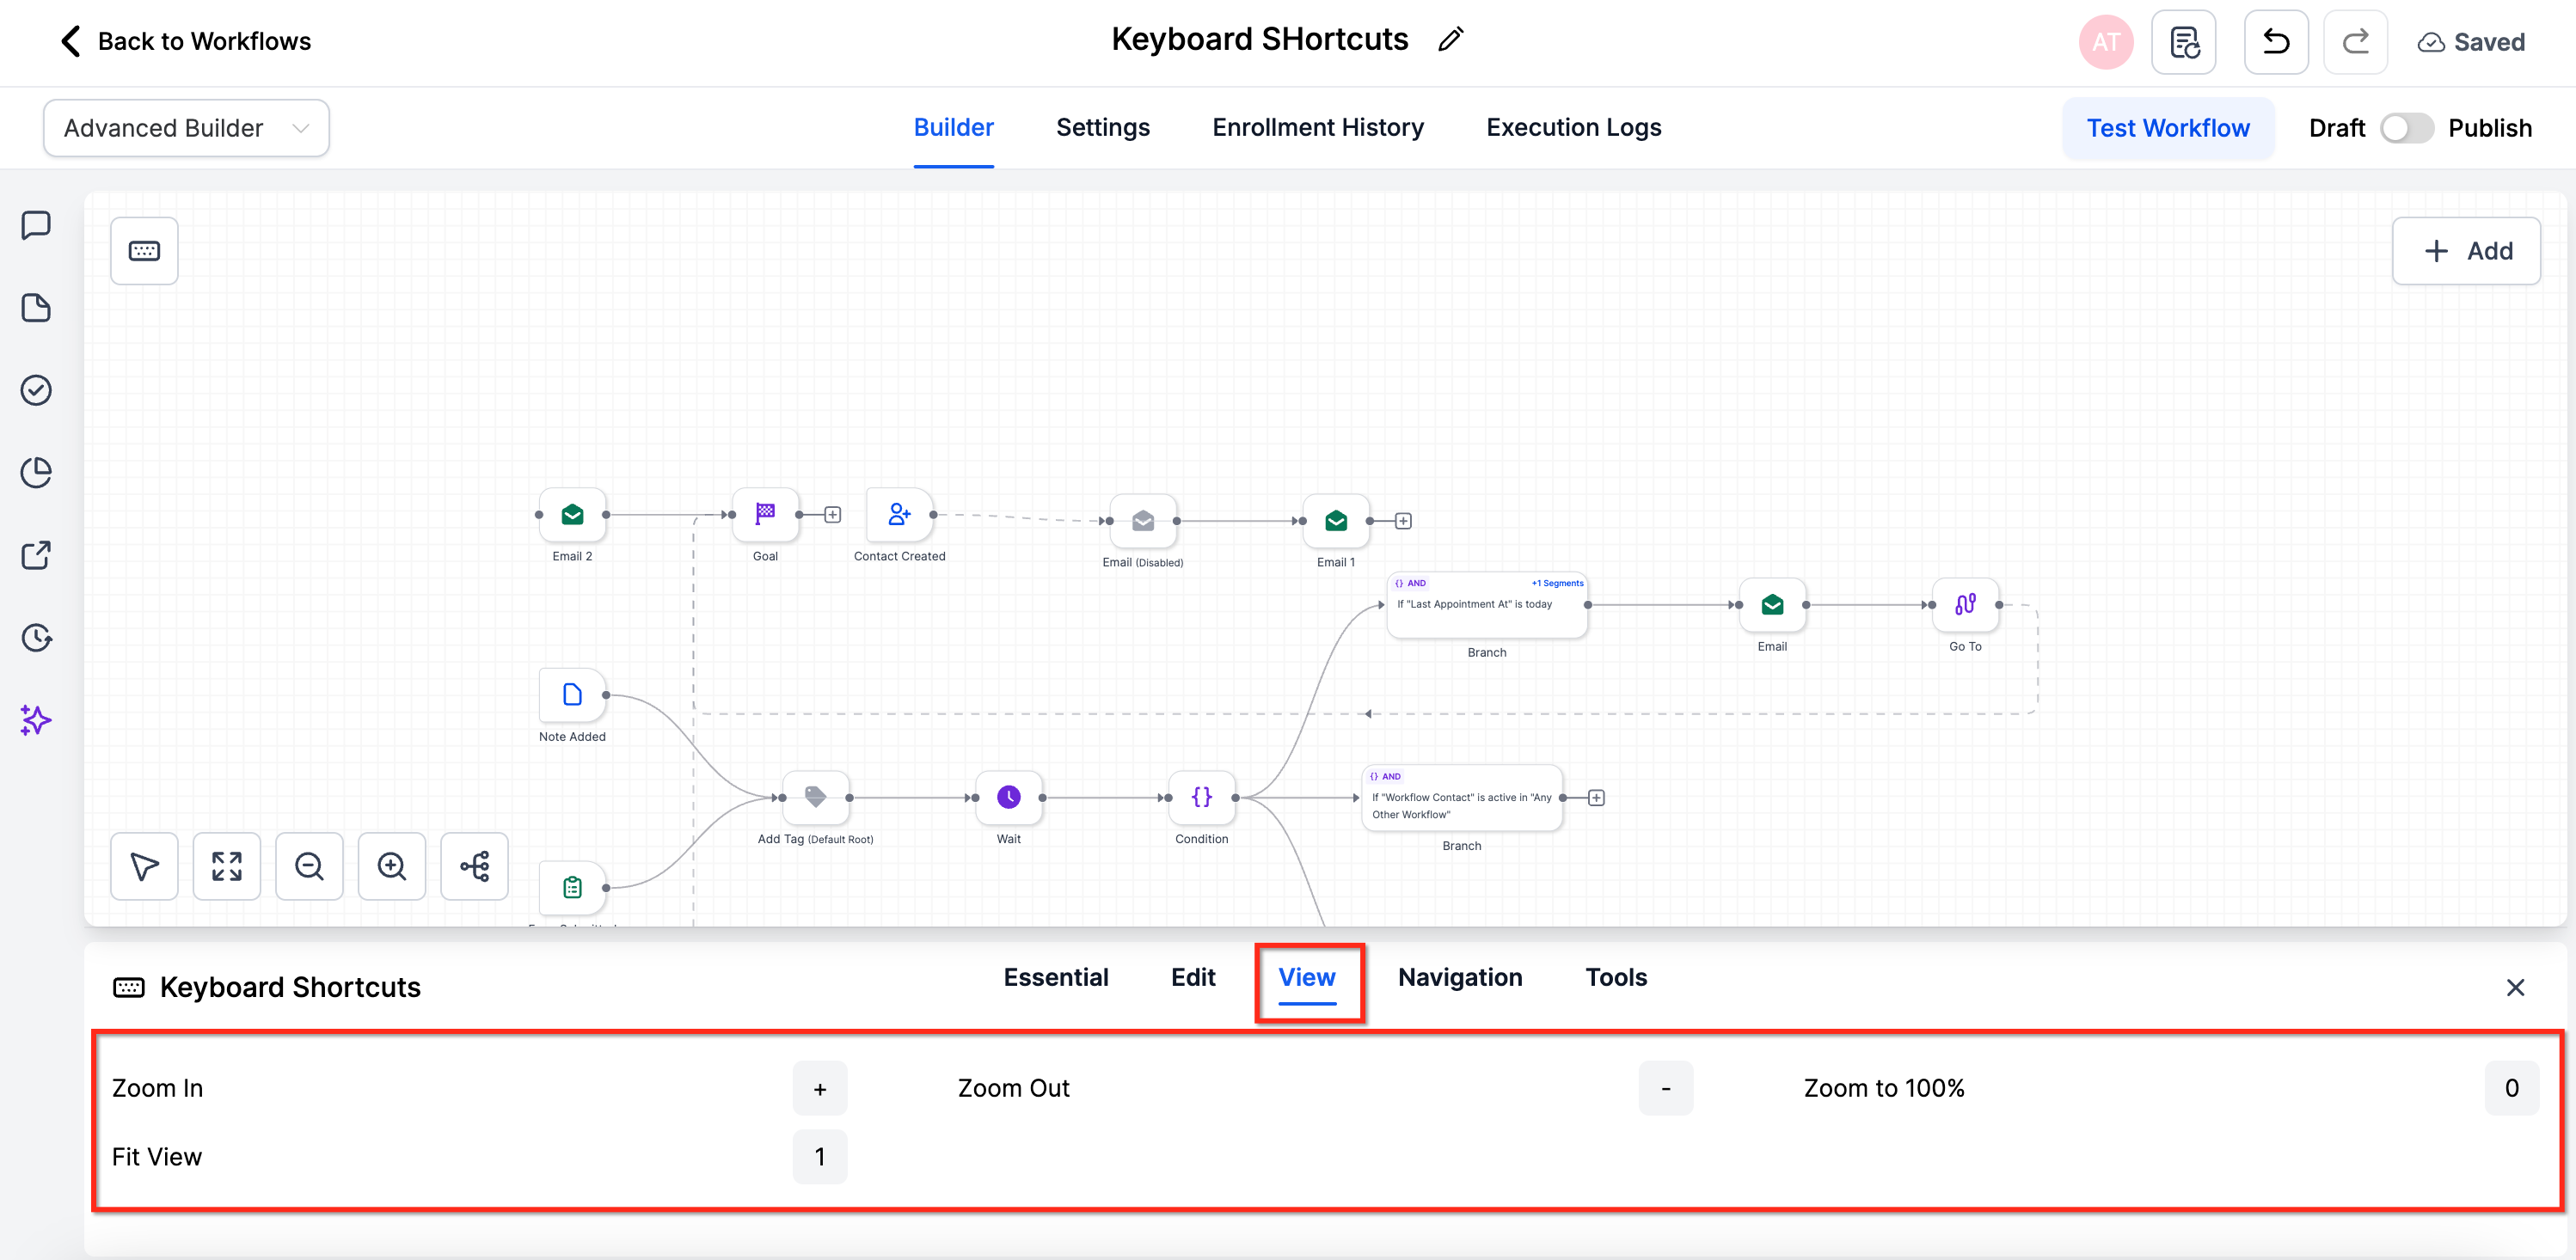
Keyboard shortcuts let you build automations quickly without reaching for the mouse: cut, copy, paste, zoom, save, and navigate large canvases by keyboard. They are available in the Advanced Builder.
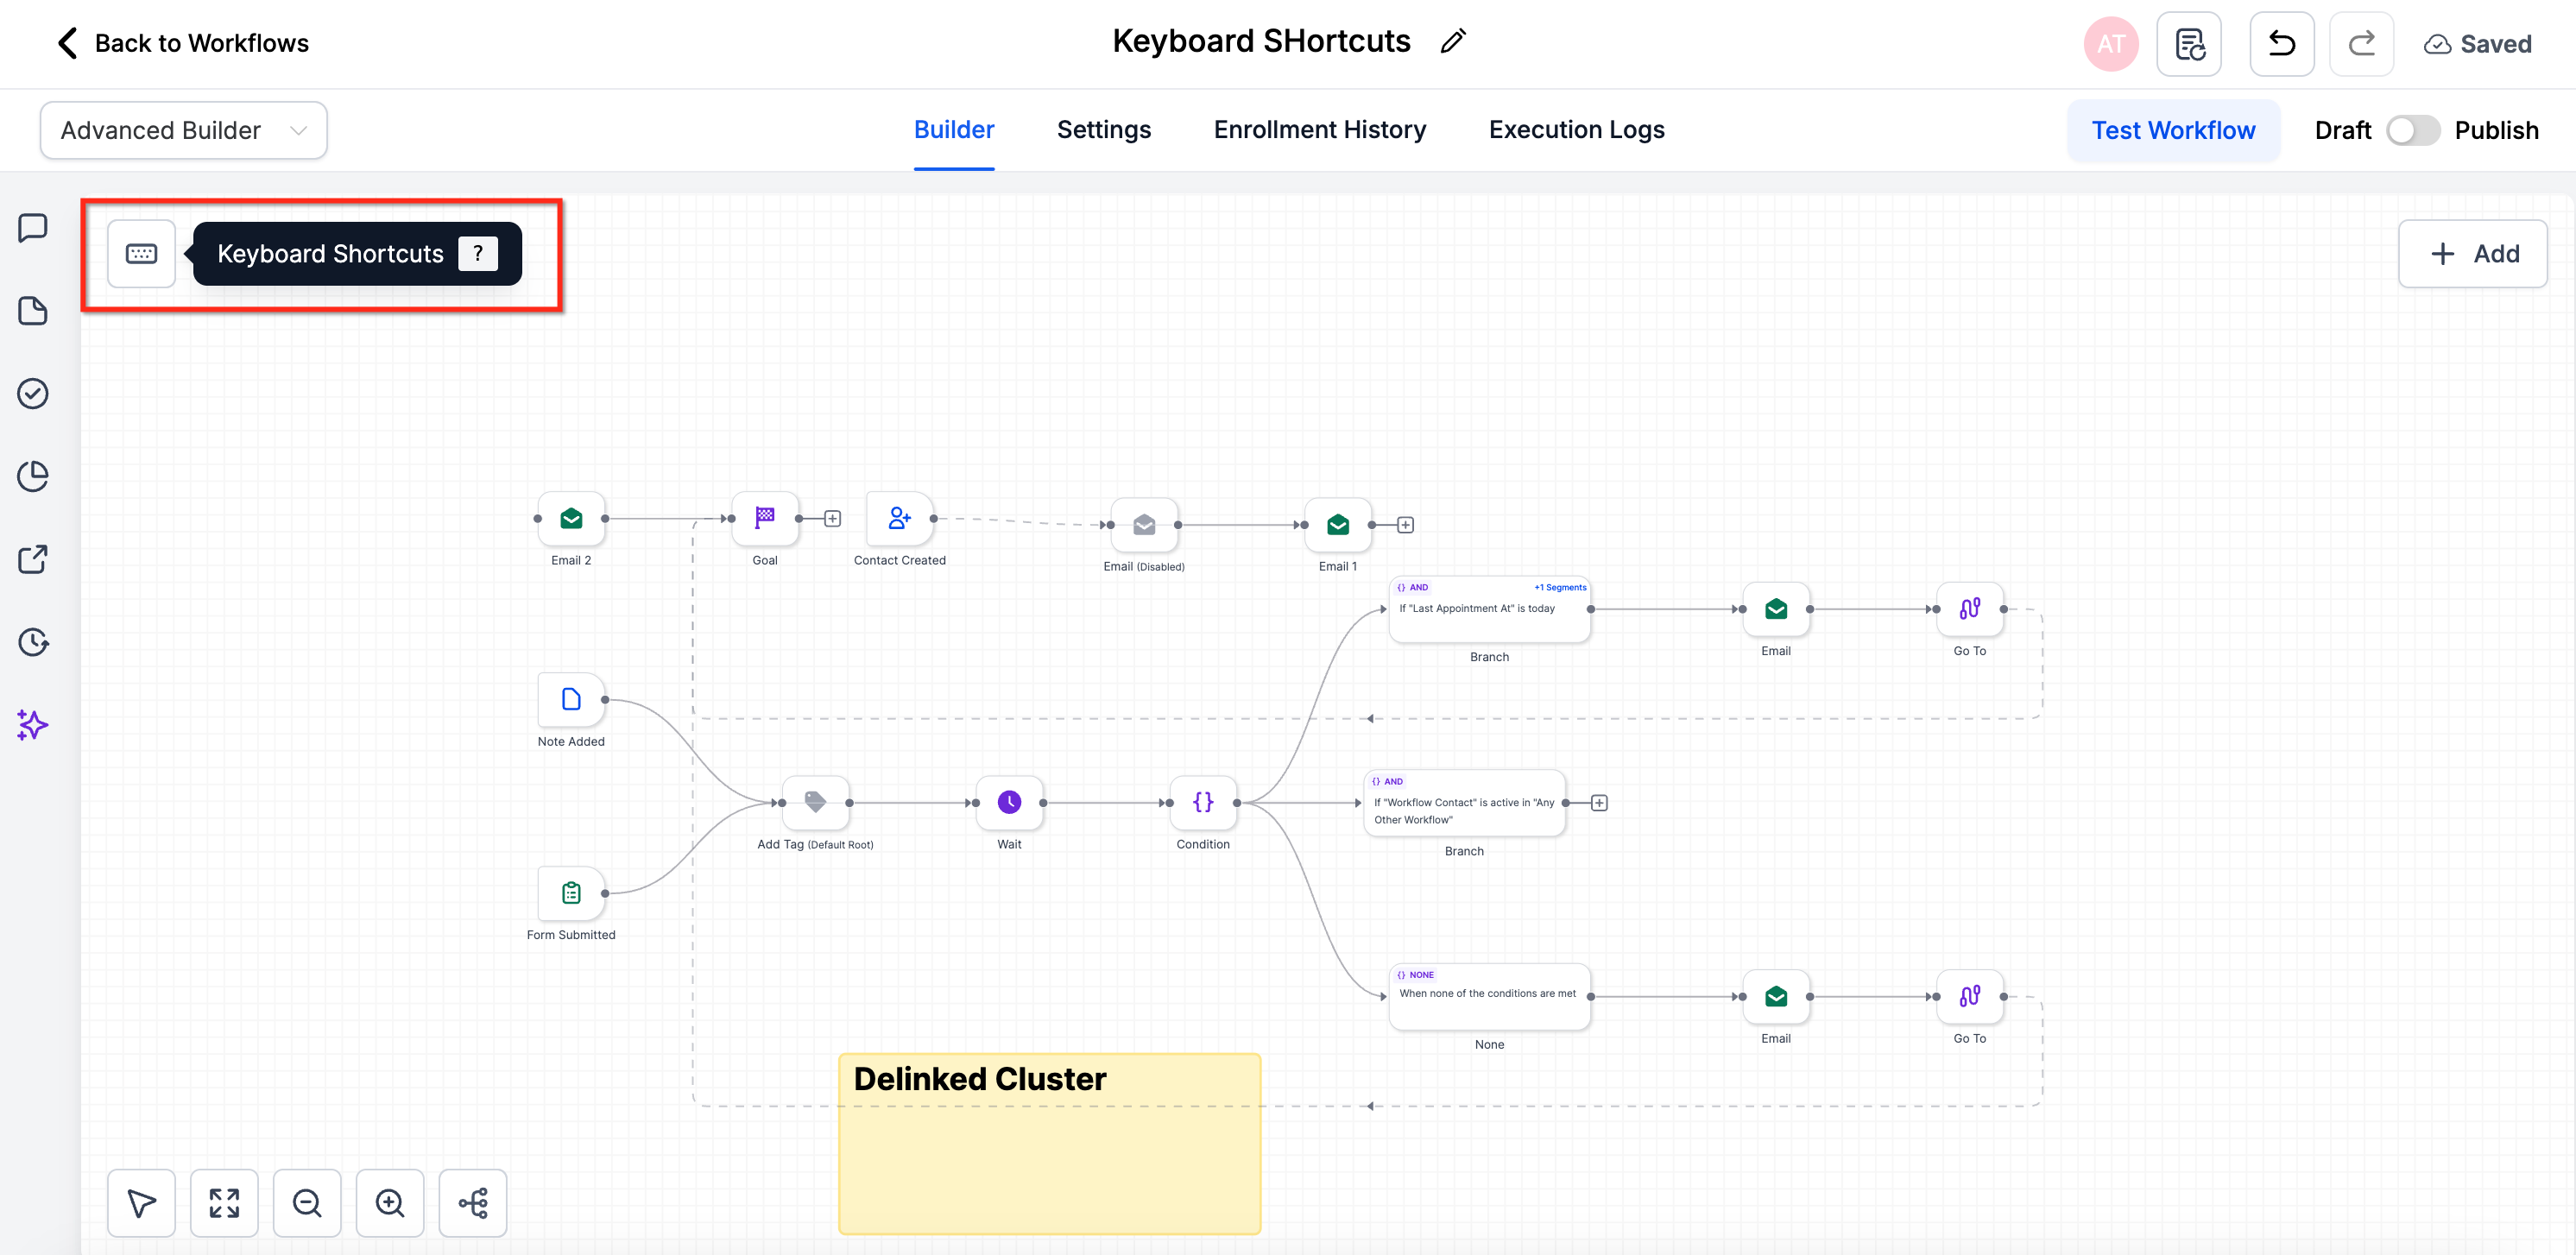
To open the shortcuts overlay, open a workflow in Advanced Builder and click the Keyboard Shortcuts button in the upper-left corner, or press K. The overlay groups commands into Essential, Edit, View, Navigation, and Tools tabs. On macOS, the Command key is shown as Cmd; on Windows and Linux, use Ctrl.

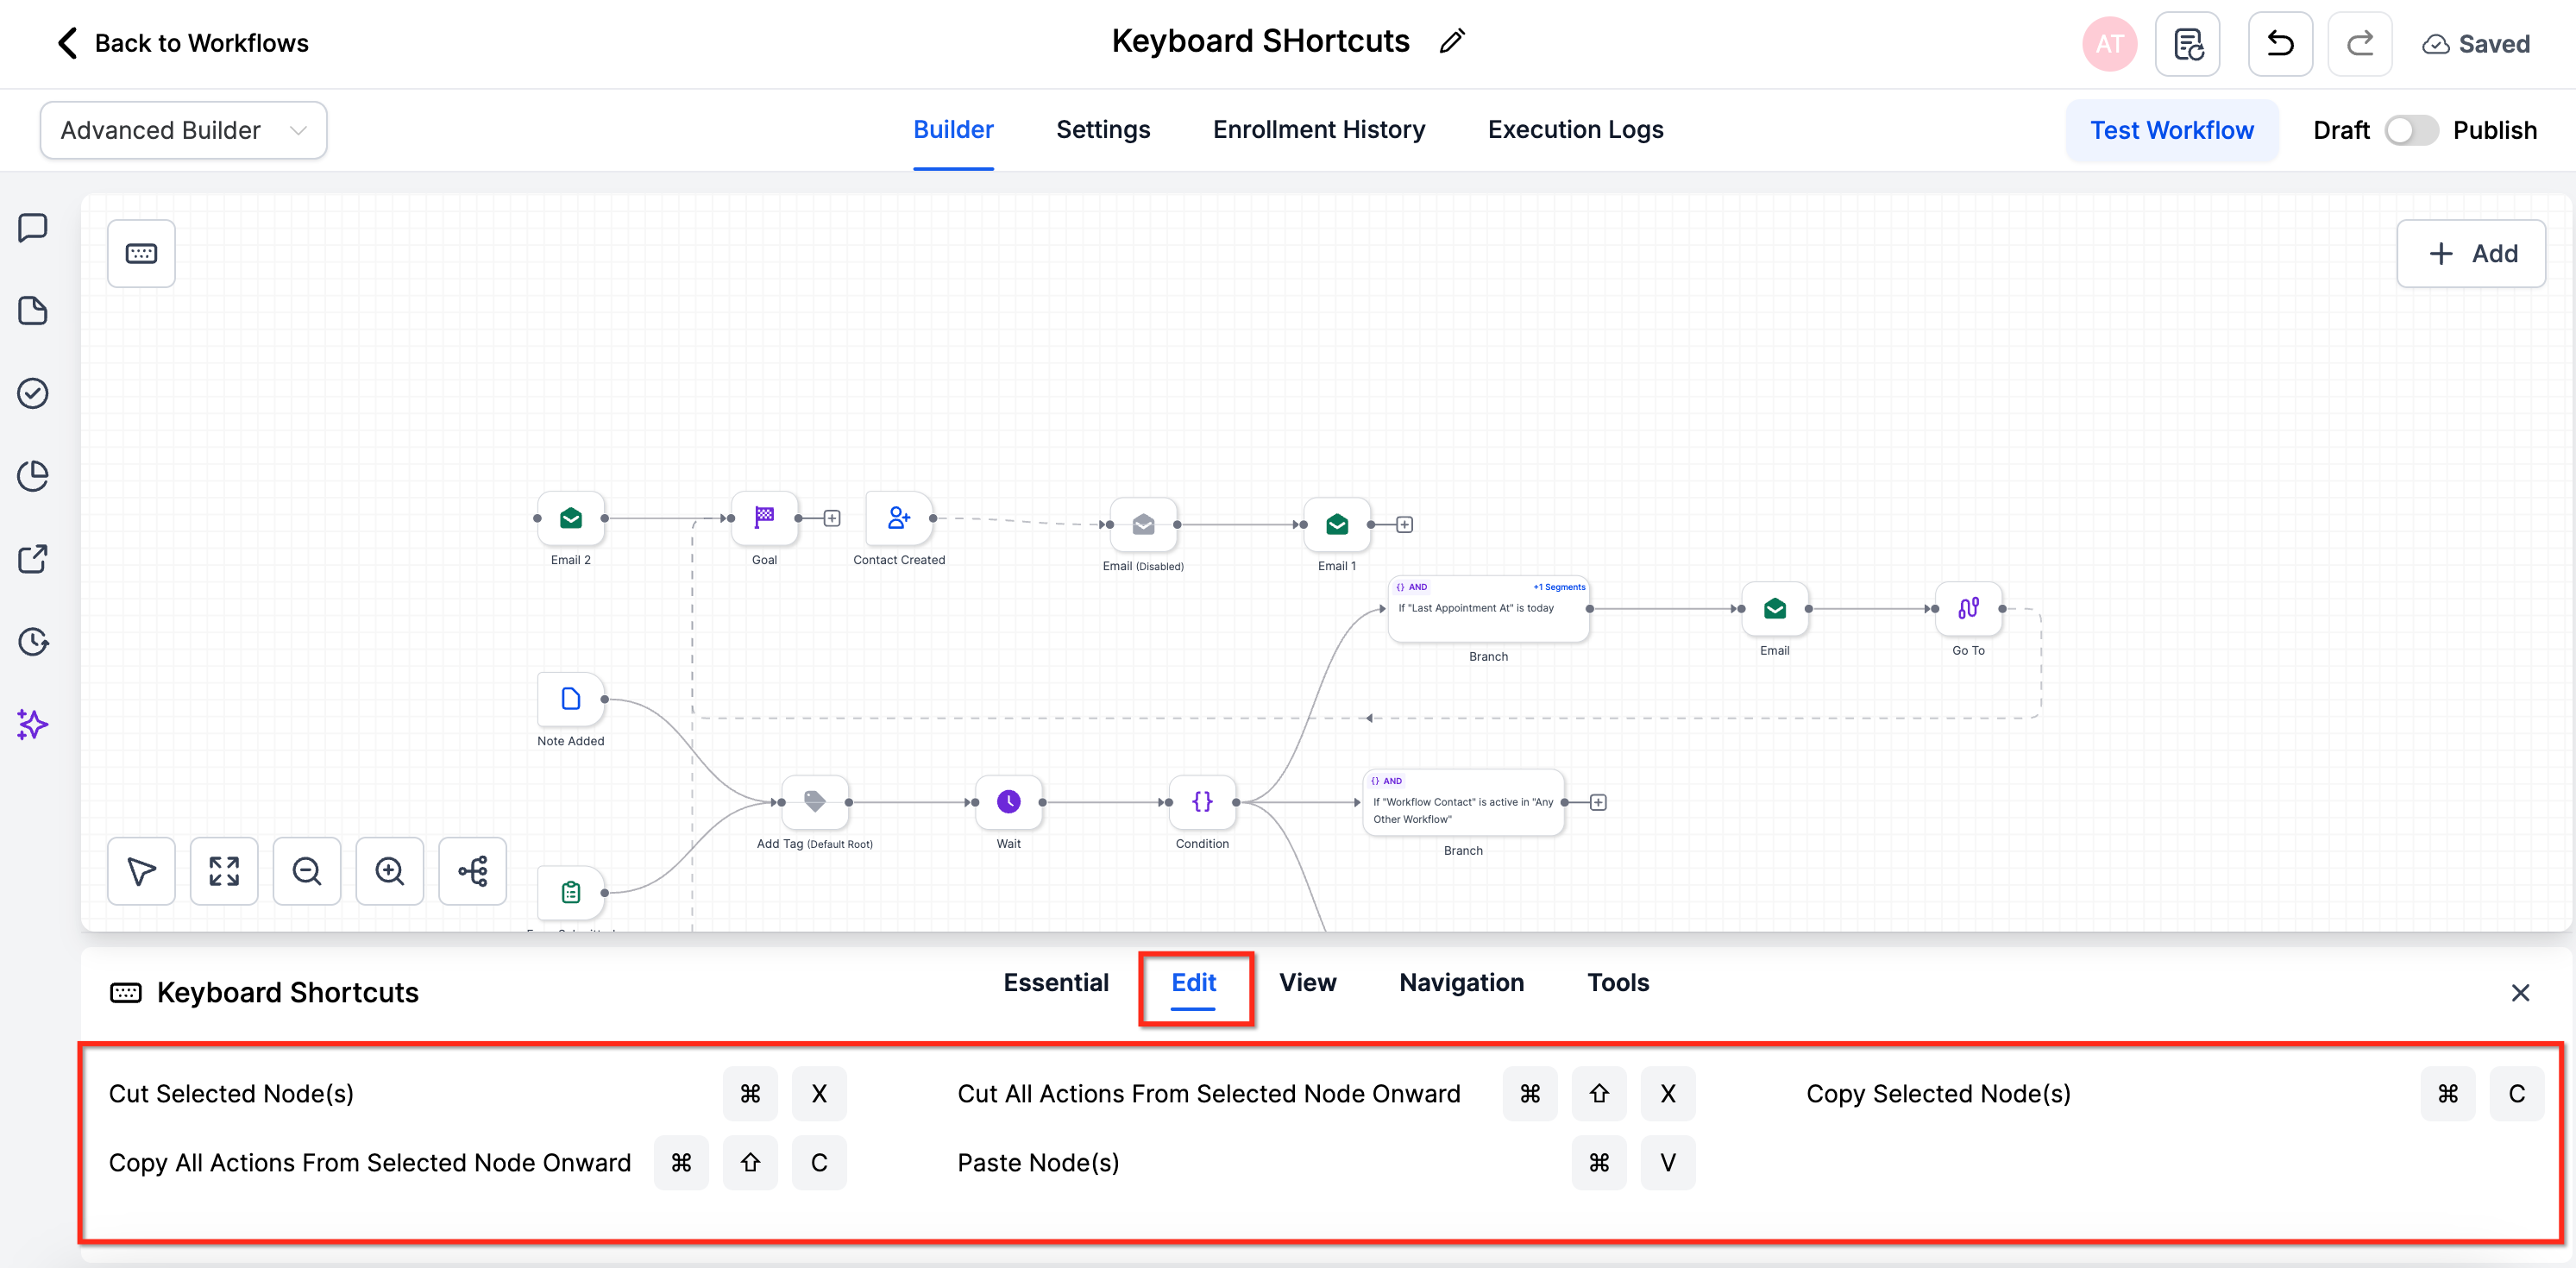
Edit (actions on nodes and whole branches):
Action | Shortcut |
|---|---|
Cut selected node(s) | Cmd/Ctrl + X |
Copy selected node(s) | Cmd/Ctrl + C |
Paste node(s) | Cmd/Ctrl + V |
Copy all actions from selected node onward | Cmd/Ctrl + Shift + C |
Cut all actions from selected node onward | Cmd/Ctrl + Shift + X |
View (zoom and framing):
Action | Shortcut |
|---|---|
Zoom in / Zoom out | + / - |
Zoom to 100% | 0 |
Fit view | 1 |
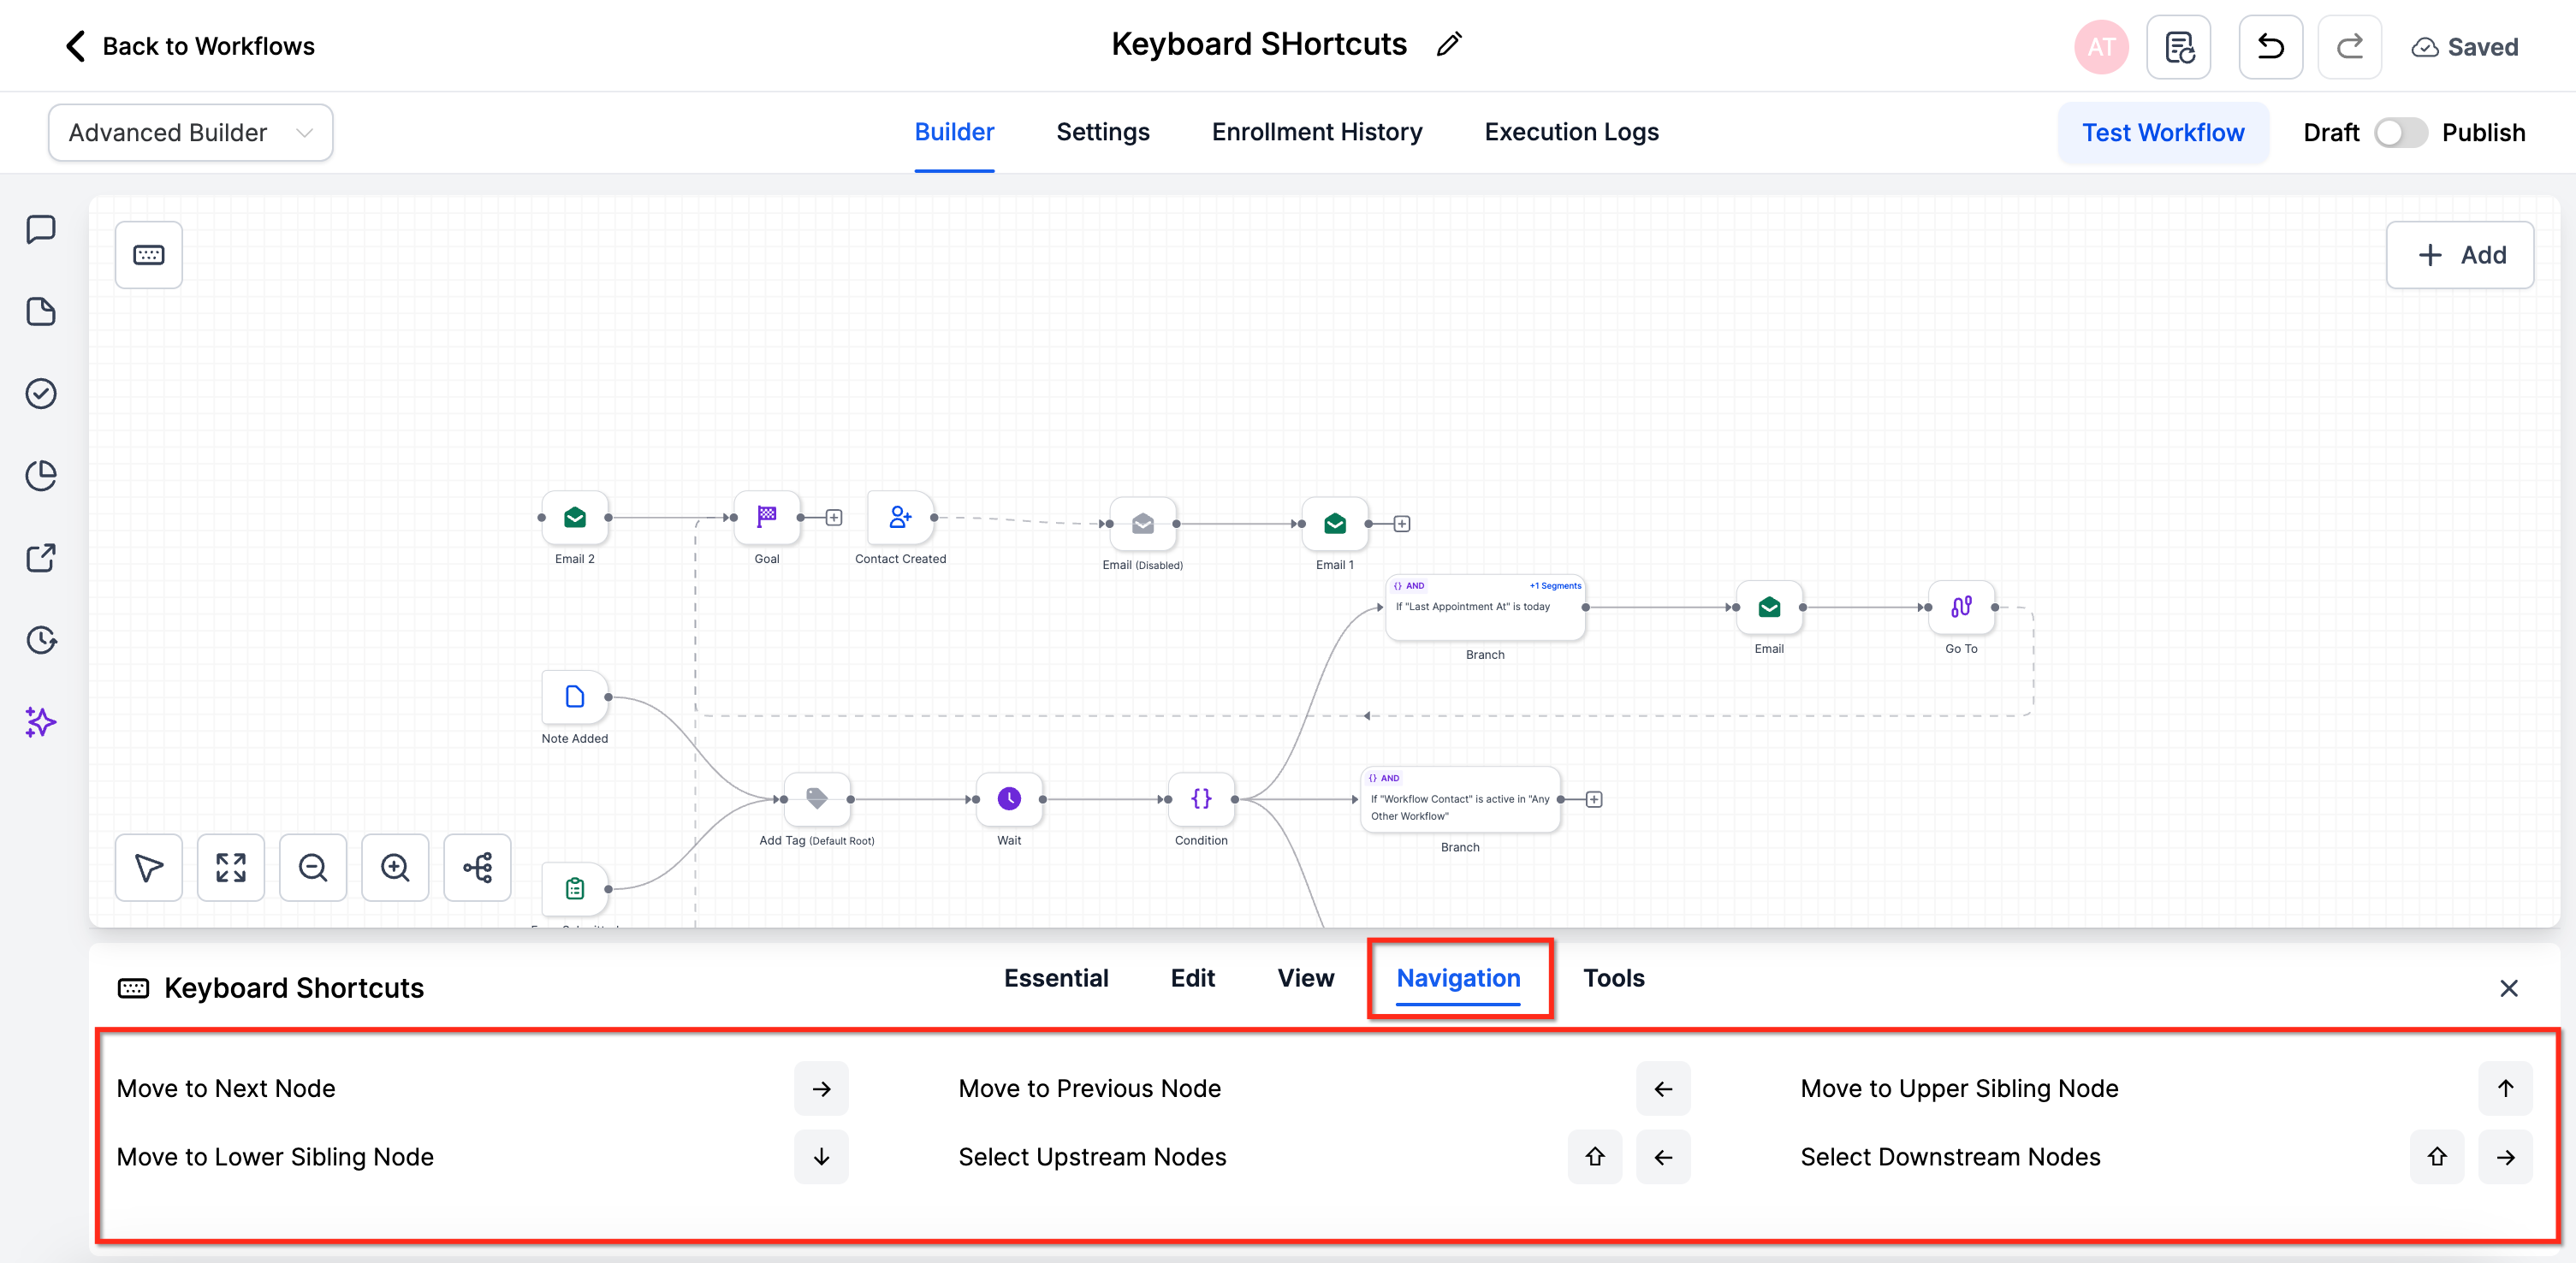
Navigation (move the selection without the mouse):
Action | Shortcut |
|---|---|
Move to next / previous node | Right arrow / Left arrow |
Move to upper / lower sibling | Up arrow / Down arrow |
Select upstream / downstream nodes | Shift + Left arrow / Shift + Right arrow |
Tools (global and panel shortcuts):
Action | Shortcut |
|---|---|
Save workflow | Cmd/Ctrl + S |
Select all nodes | Cmd/Ctrl + A |
Delete selected node(s) | Delete / Backspace |
Delete all actions from selected node onward | Cmd/Ctrl + Delete |
Open Action panel | Tab |
Open Trigger panel | Shift + Tab |
A few notes on shortcuts:
Press K or click the keyboard pill in the upper-left corner to launch the overlay.
Browse the Essential tab for the must-know commands.

Use Edit shortcuts to copy, cut, or paste nodes or whole branches.
Use View and Navigation keys to zoom and move around the canvas.
Use Navigation to move between nodes and View to zoom or fit.
Use Tools to save and open panels without leaving the keyboard.

Some shortcuts act on the currently selected node, so select a node before using them. Shortcuts only override browser defaults when the builder canvas is focused; global browser shortcuts such as Cmd/Ctrl + T continue to work. Key positions can vary by operating system and keyboard layout, so use the on-screen overlay to confirm.
The builder protects your work in two complementary ways: undo/redo for stepping through your own edits, and auto-save for continuously preserving your canvas to draft.
Undo, Redo, and Recent Changes give you session-based editing control on the canvas:
Toolbar Undo and Redo buttons sit on the canvas. Keyboard shortcuts: on Windows, Ctrl + Z to undo and Ctrl + Y to redo; on macOS, Cmd + Z to undo and Cmd + Y or Cmd + Shift + Z to redo.
Recent Changes lists your latest edits in chronological order. Click any entry to jump the canvas to that point in time.
Change history is session-based: it exists only for your current editing session and resets when you exit, refresh, or restore an older version through Version History.
History is local to your session and tracks only your edits, not other editors' changes. For team-wide or time-spanning rollbacks, use Version History.
Auto-Save continuously saves your canvas edits to the draft in the background as you build, so you do not lose progress; nothing goes live until you publish.
What Auto-Save captures:
Adding any action or trigger to the canvas.
Deleting any action or trigger from the canvas.
Changes made in the Settings tab.
Edits to the workflow name.
Changes to workflow status (Draft or Publish).
What Auto-Save does not capture: changes made inside an individual action or trigger configuration modal are not saved until you commit them. While editing a step's settings in a modal, click Save or Apply to commit the change back to the canvas; Auto-Save then captures it in the draft. For example, changing the time in a Wait step is not auto-saved until you save inside that step's modal.
To turn Auto-Save on, either choose Enable Auto Save Now from the onboarding prompt when you first open a workflow, or go to Automations > Global Workflow Settings and toggle Auto Save on. Each editing session also creates entries in Version History, and you can use Save Version any time to create a named checkpoint you can return to later. If multiple users or browser tabs edit the same workflow, the most recent auto-save becomes the current draft, so prefer a single editor for critical updates and refresh after being idle.
You can still save manually. Click Save in the top-right corner whenever there are unsaved changes (shown by a red dot), and the last saved date and time updates automatically. If saving produces an error, confirm that every required field in your triggers and actions is filled in.
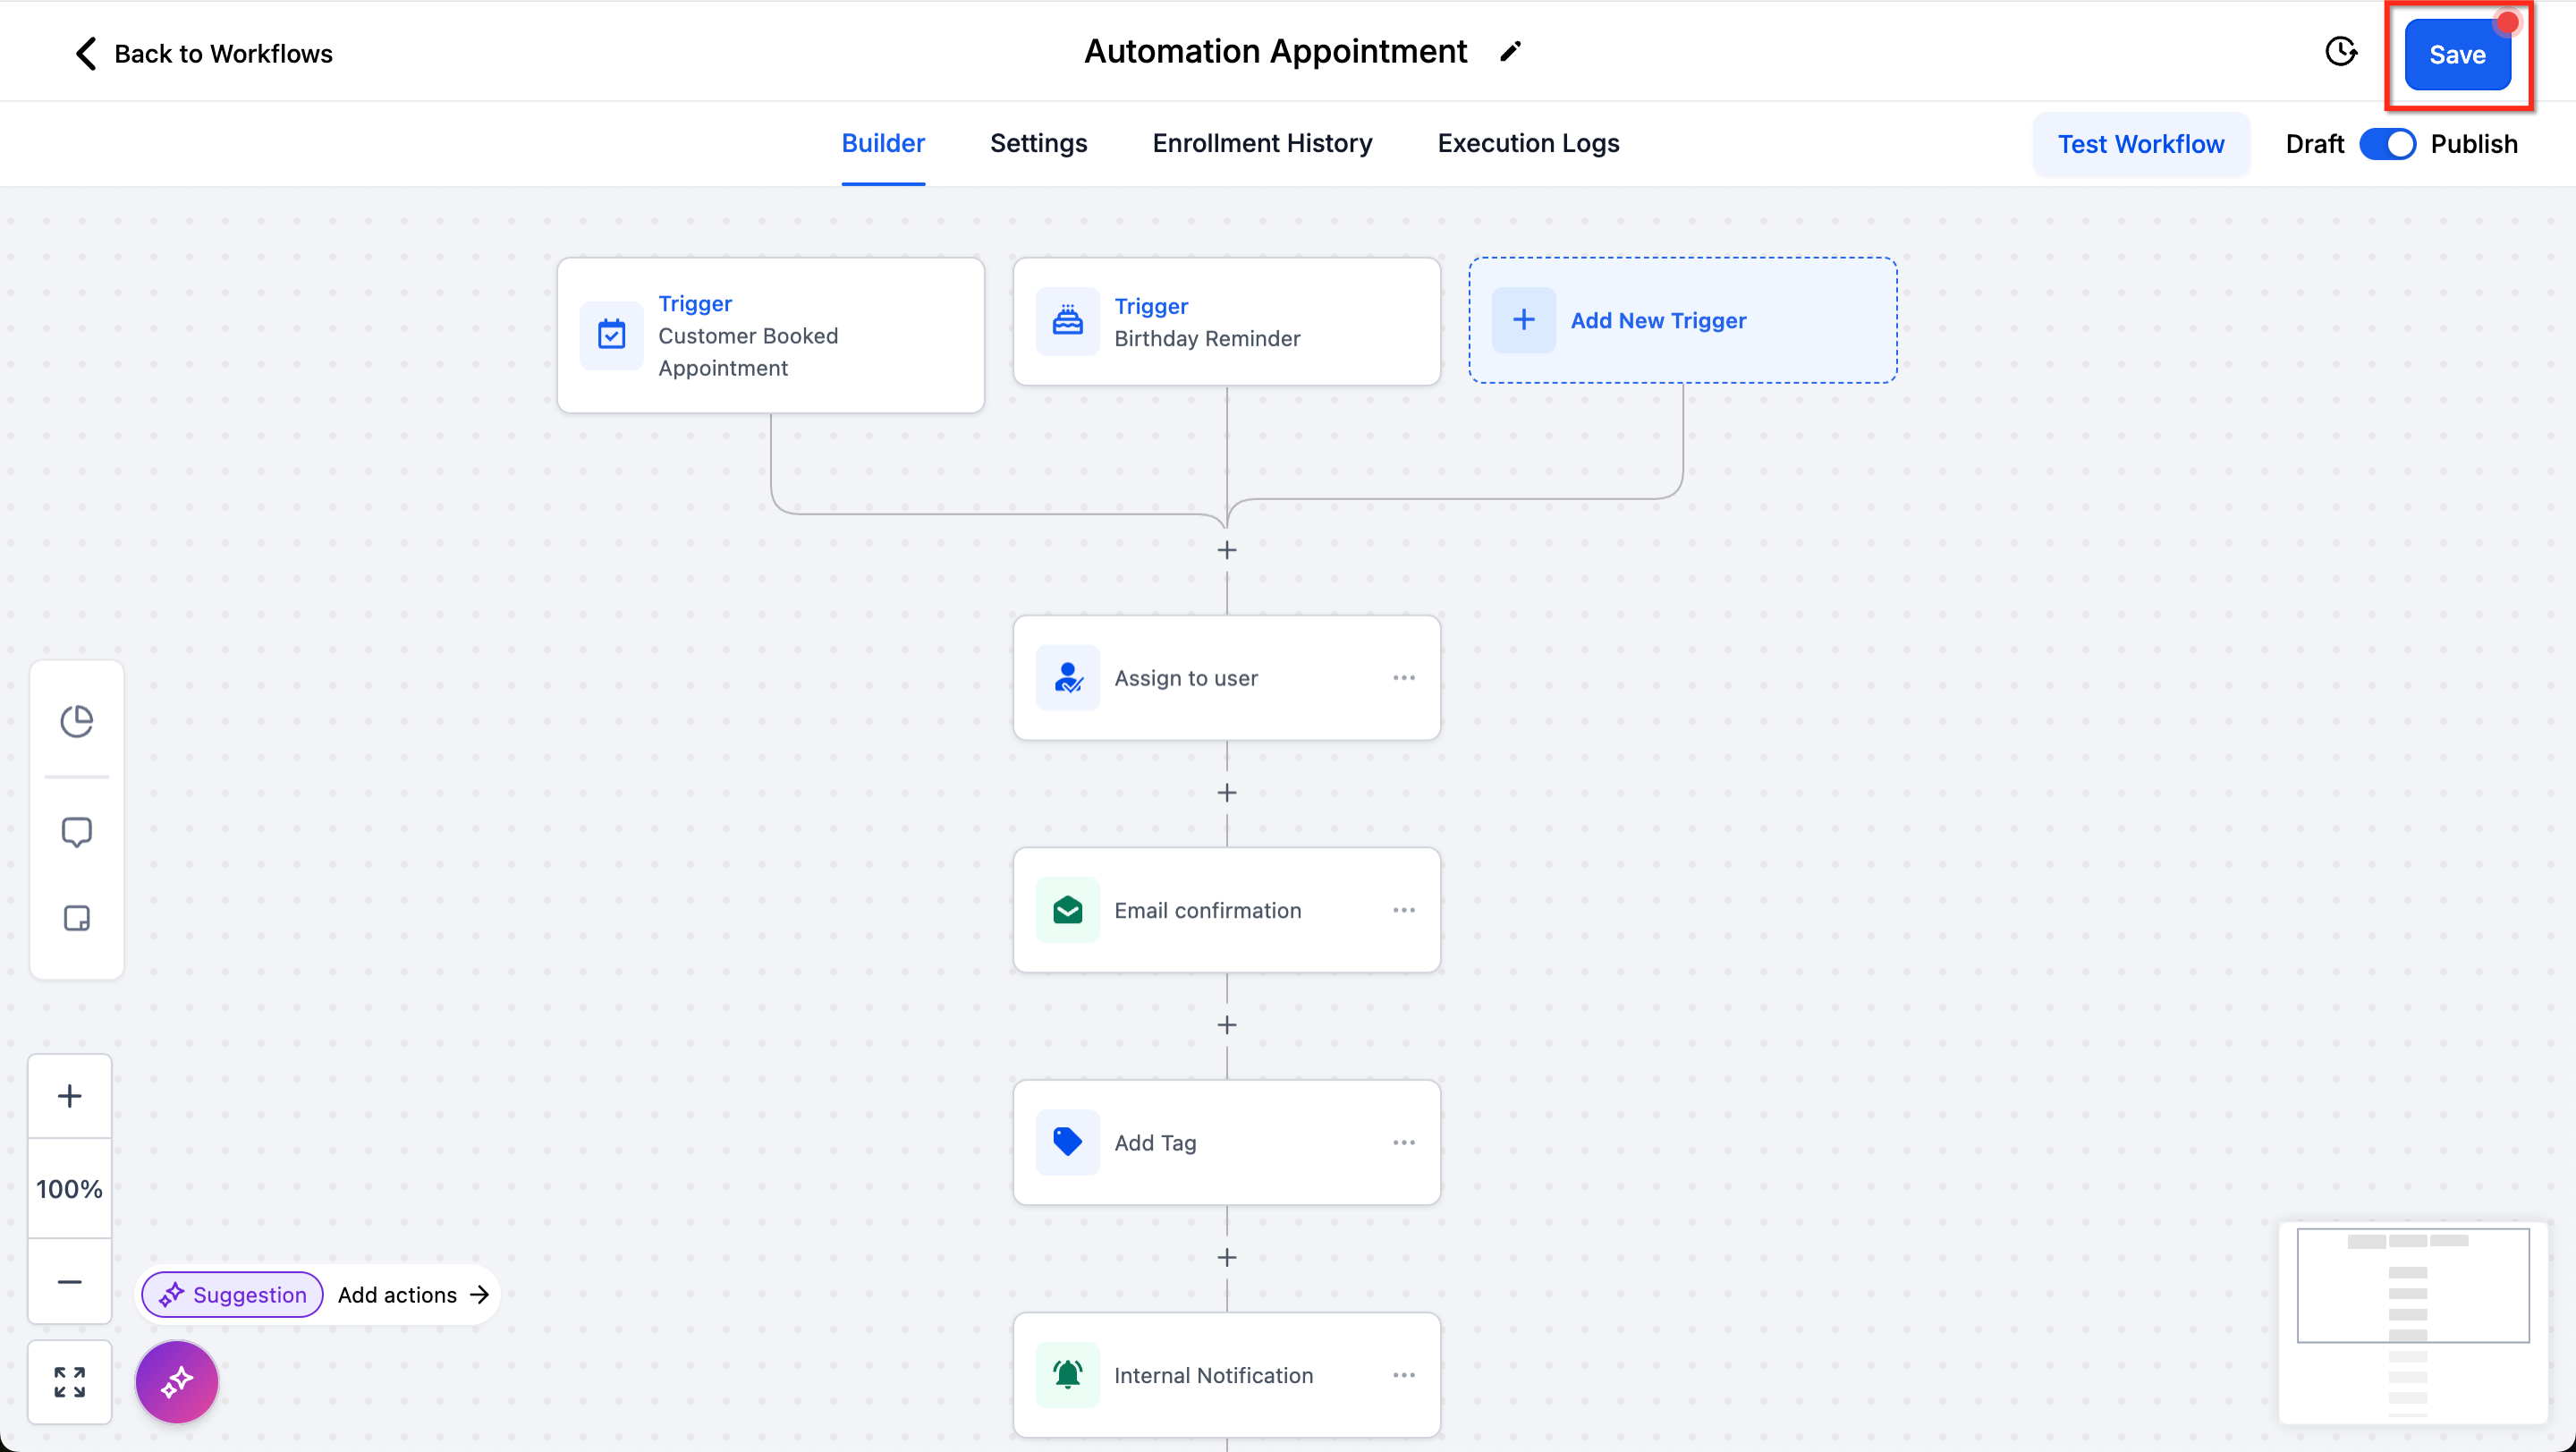
Note that saved and published are not the same thing. A workflow can have unsaved changes or be saved, and can be in draft or published, independently of each other.
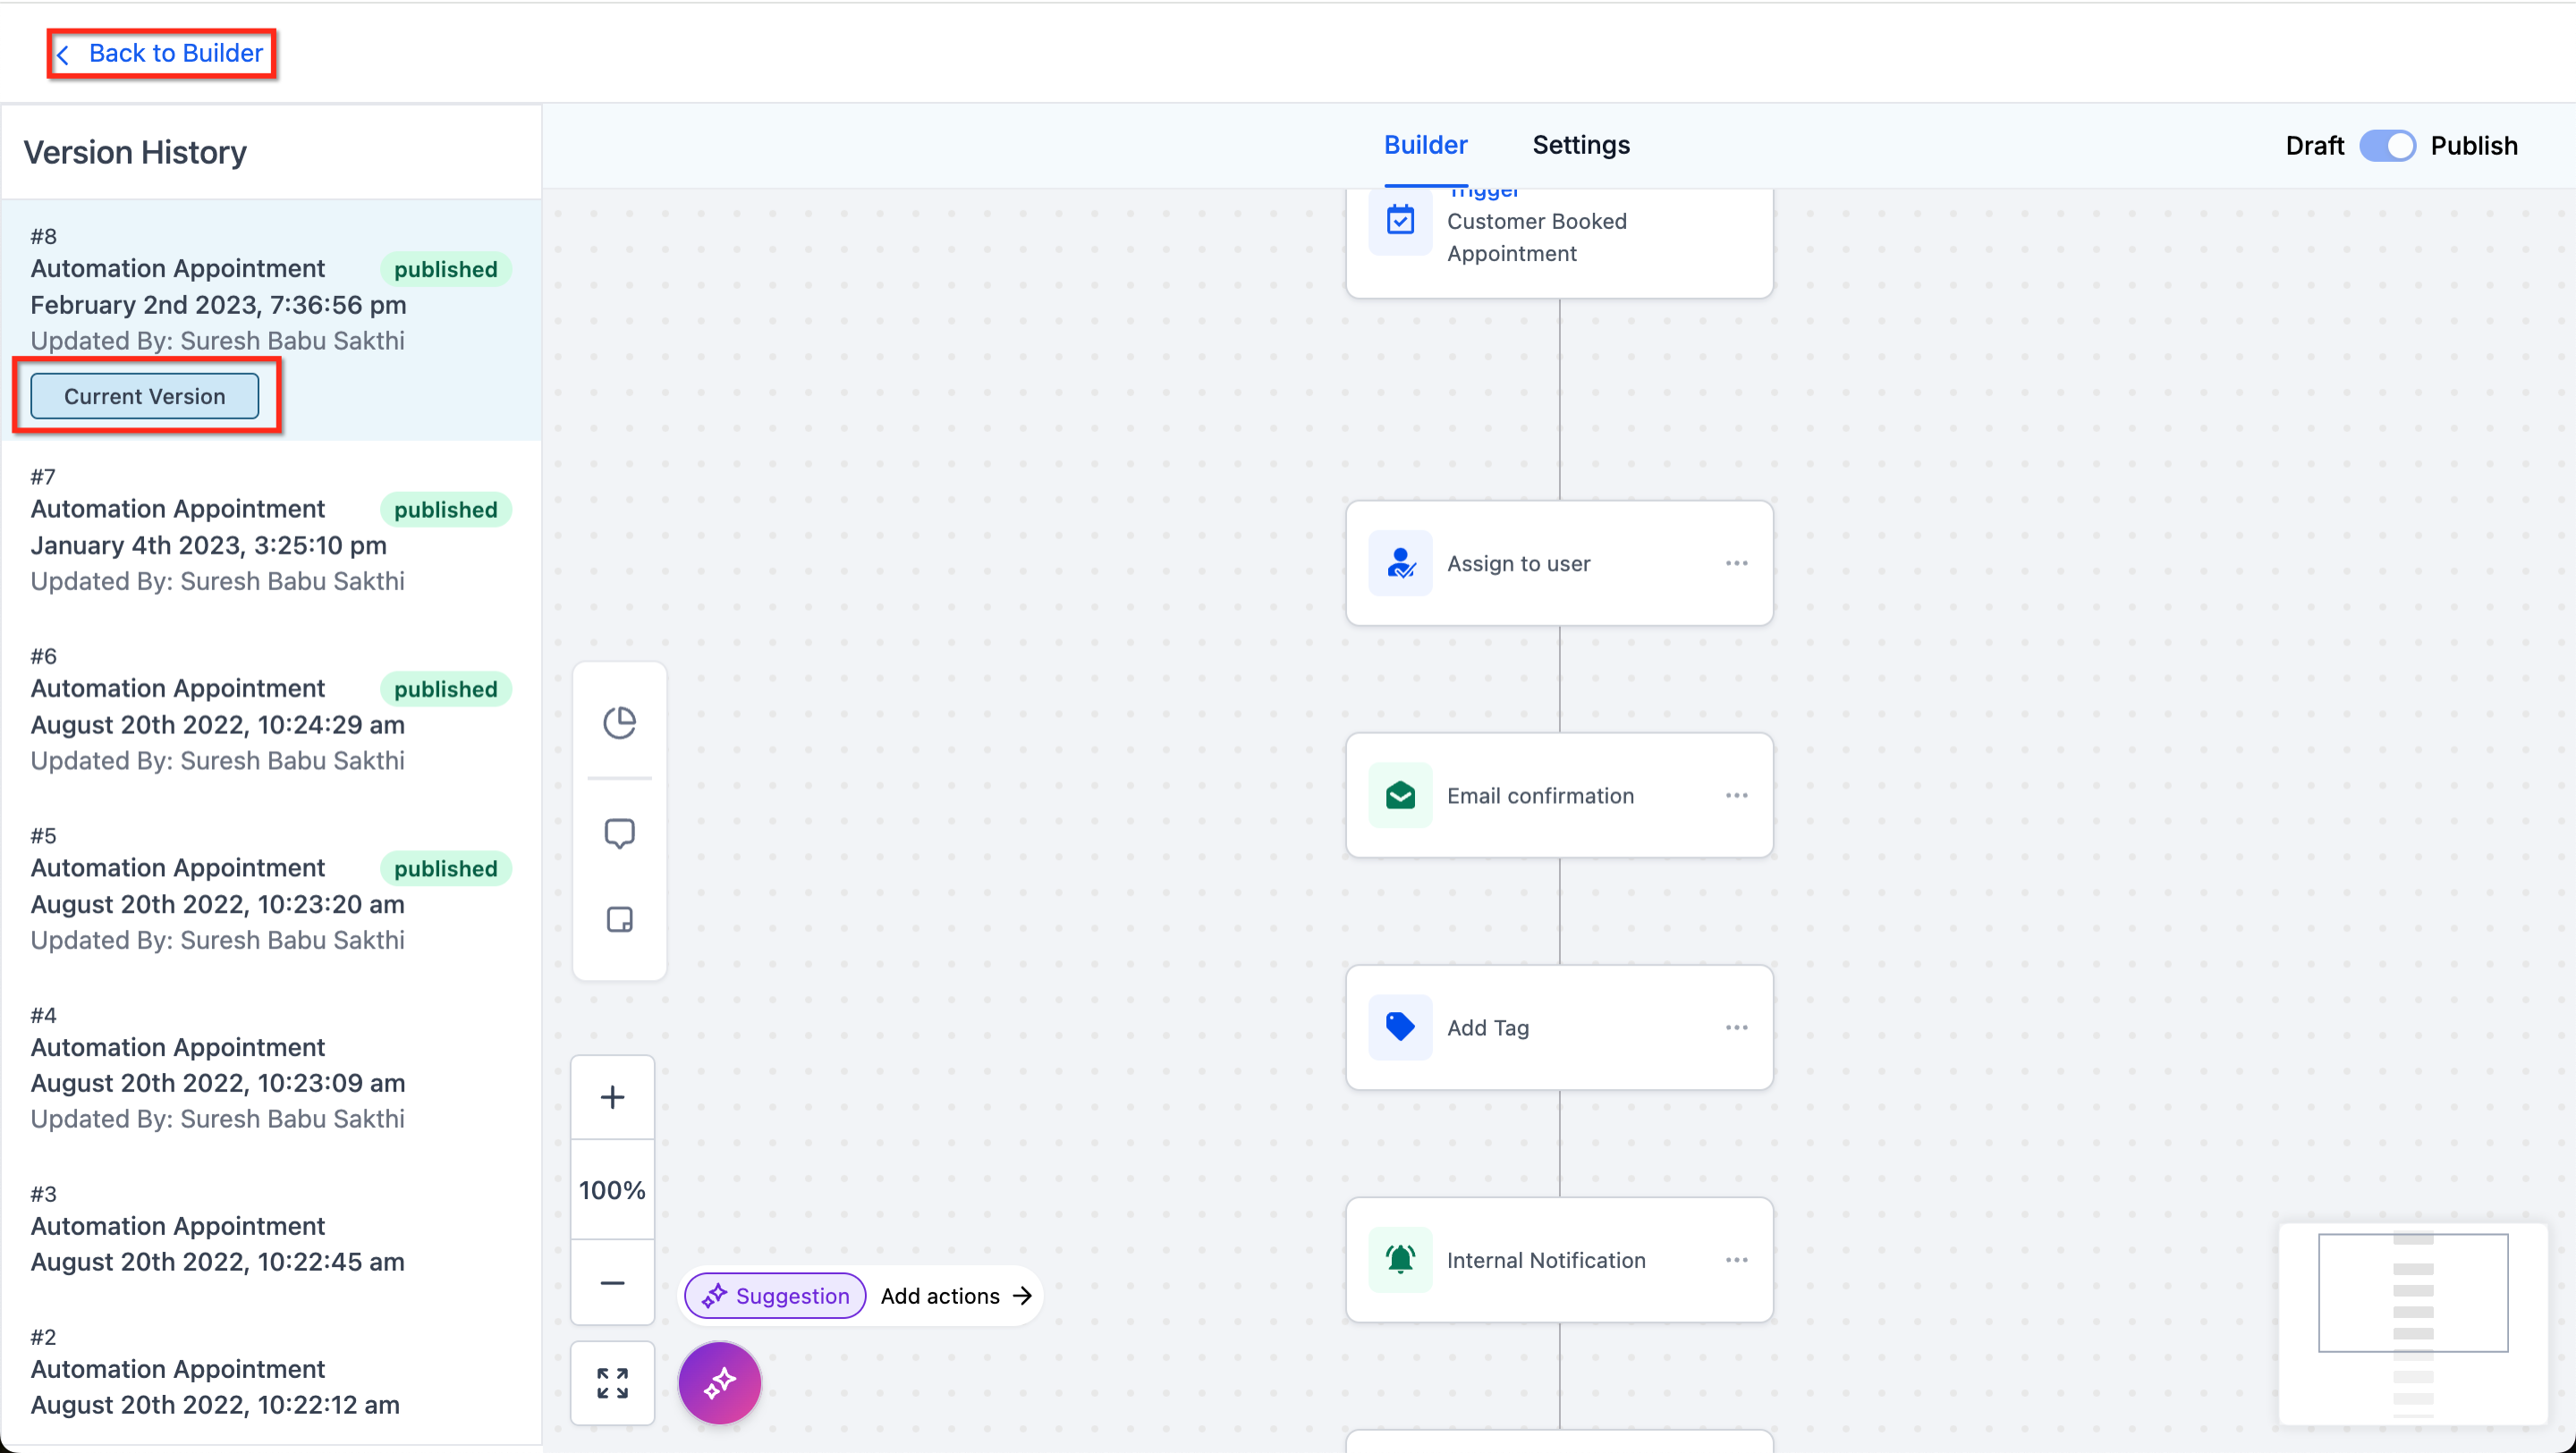
You can also review prior versions: click the History icon in the top-right corner to view previous versions, then use Back to Builder to return to editing.

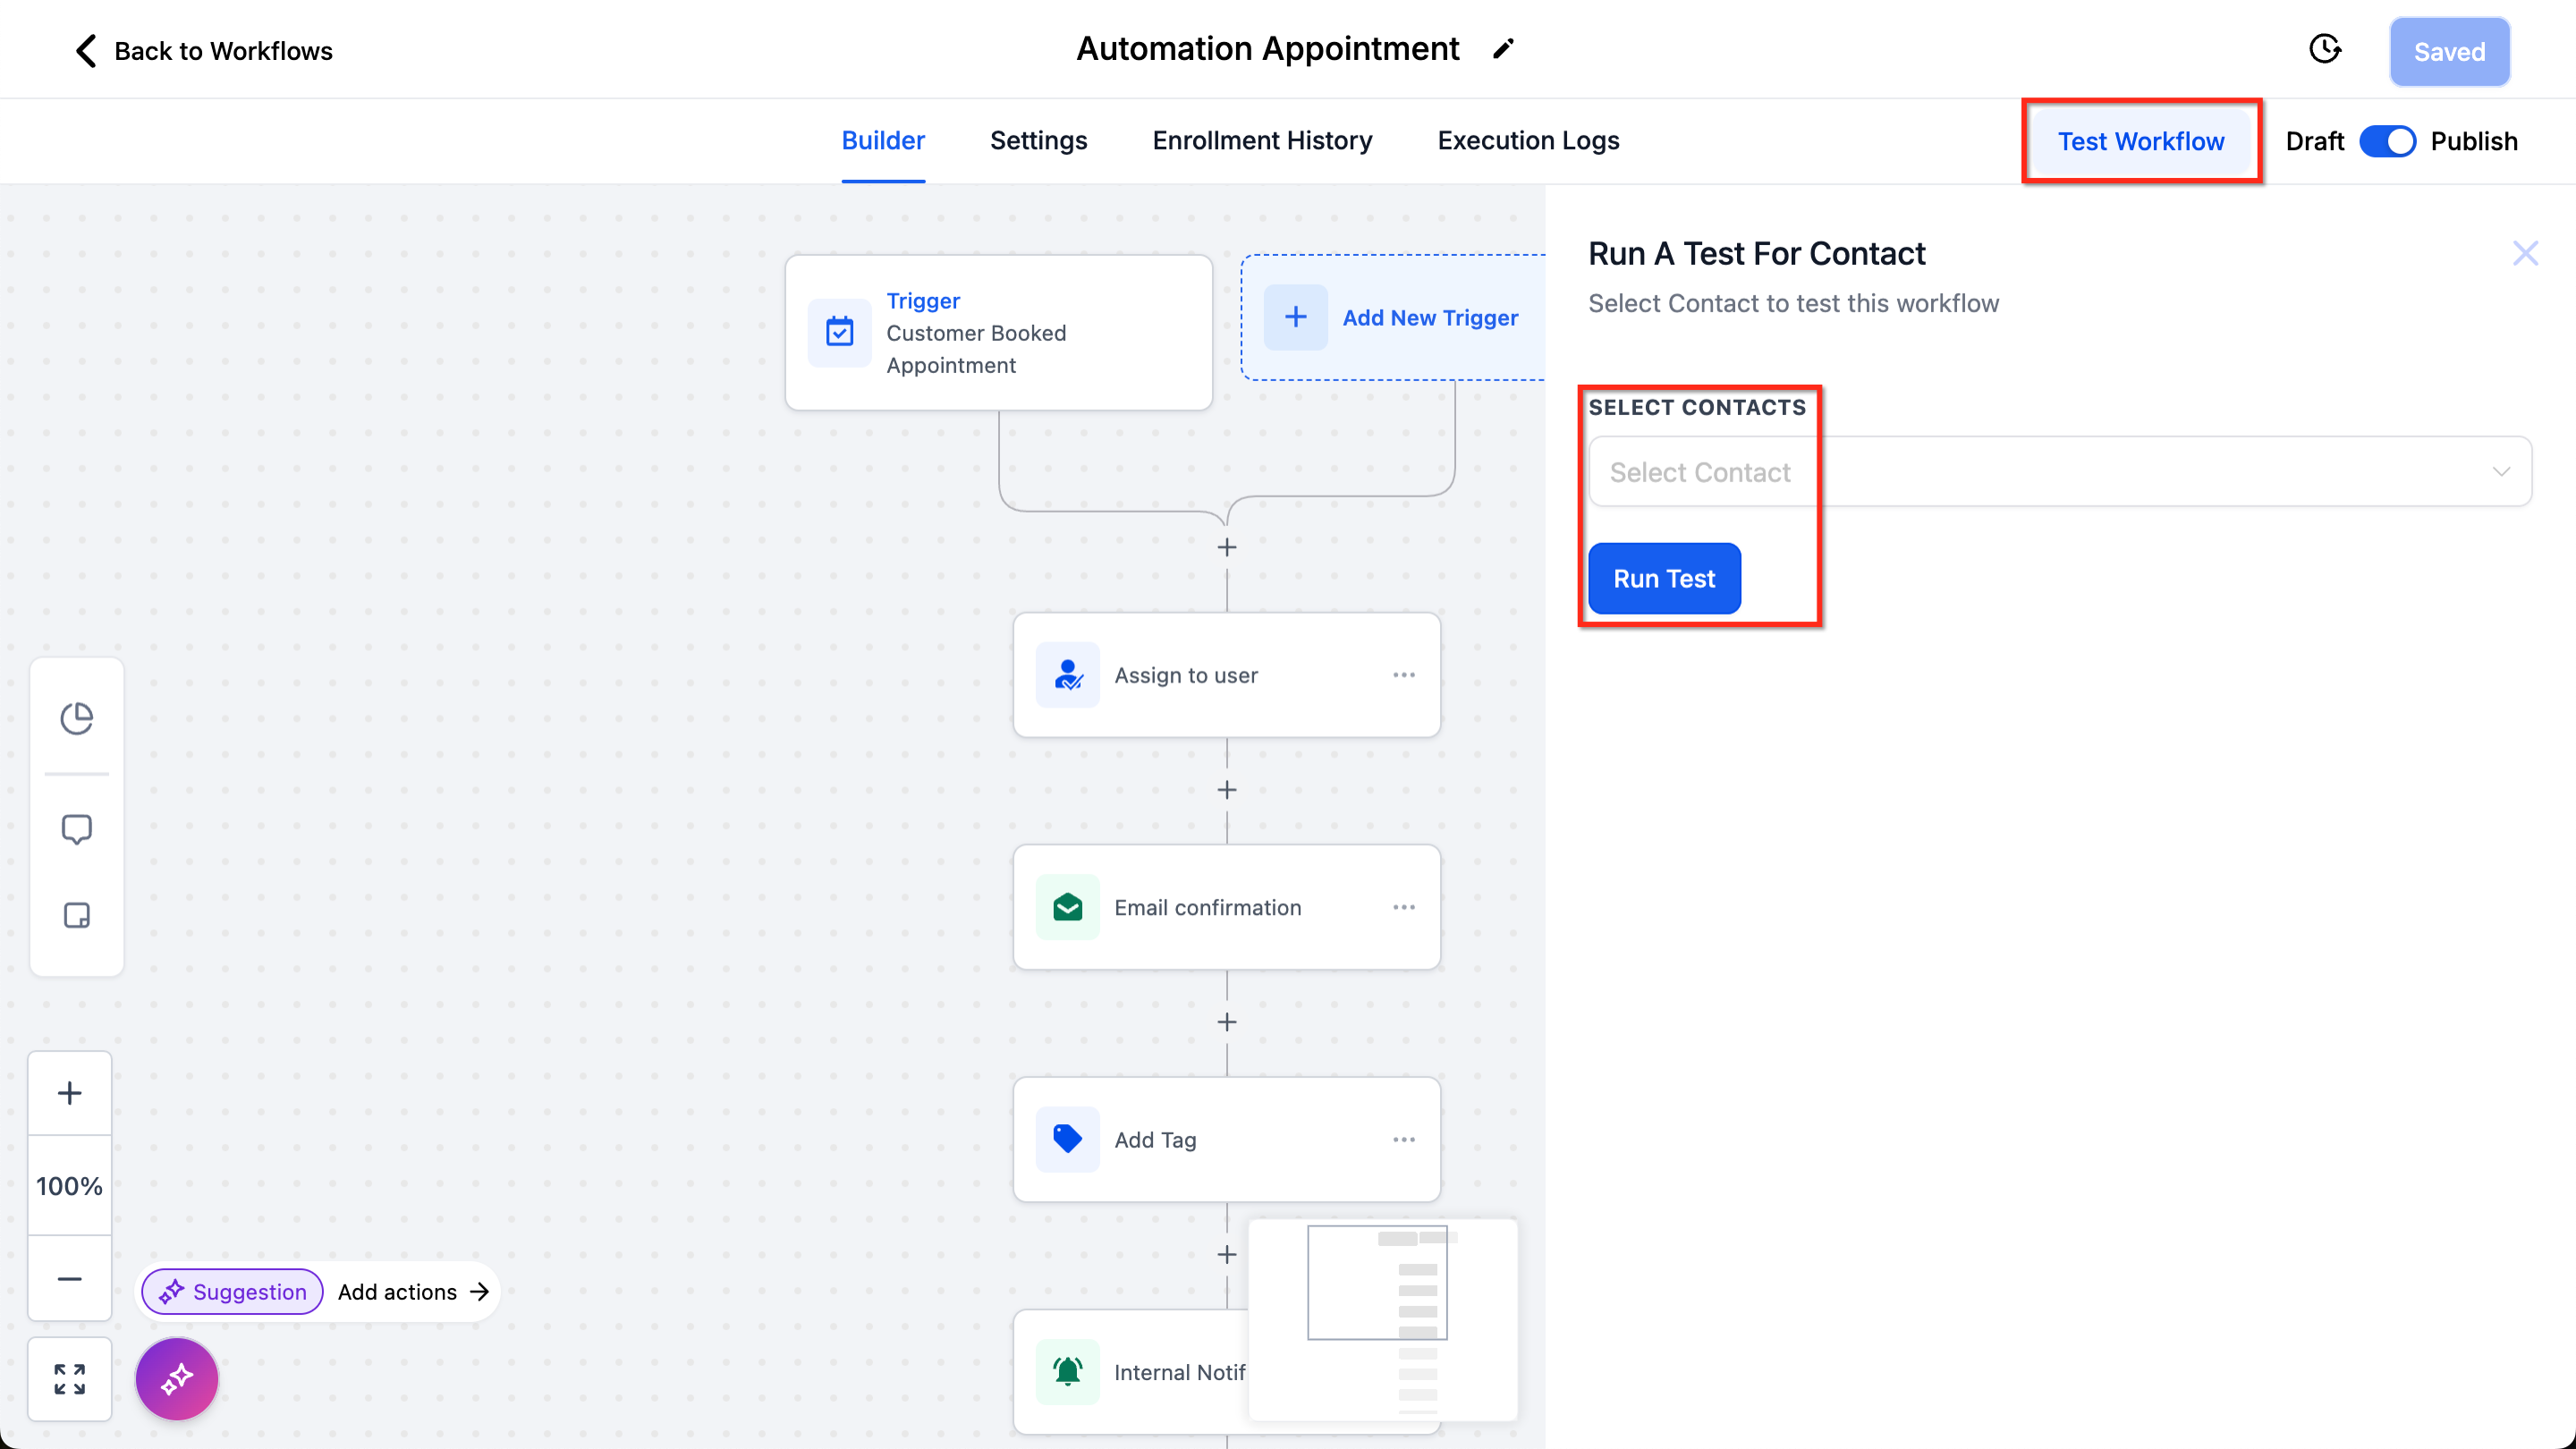
Before relying on a workflow, test it against a sample contact:
Click the Test Workflow button in the top-right corner.
Select a contact to test with.
Click Run Test to run the workflow for that contact.
Testing with a contact is not perfect, especially if you reuse the same contact across multiple tests, so the most reliable check is to publish the workflow and observe it live. If a test fails, check your triggers and actions for incomplete configurations.
You can open a workflow in its own browser tab to work on several workflows at once without losing your place.
Click Marketing.
Click Workflows.
Select the workflow you want and click the three dots next to it.
Click Open in New Tab.
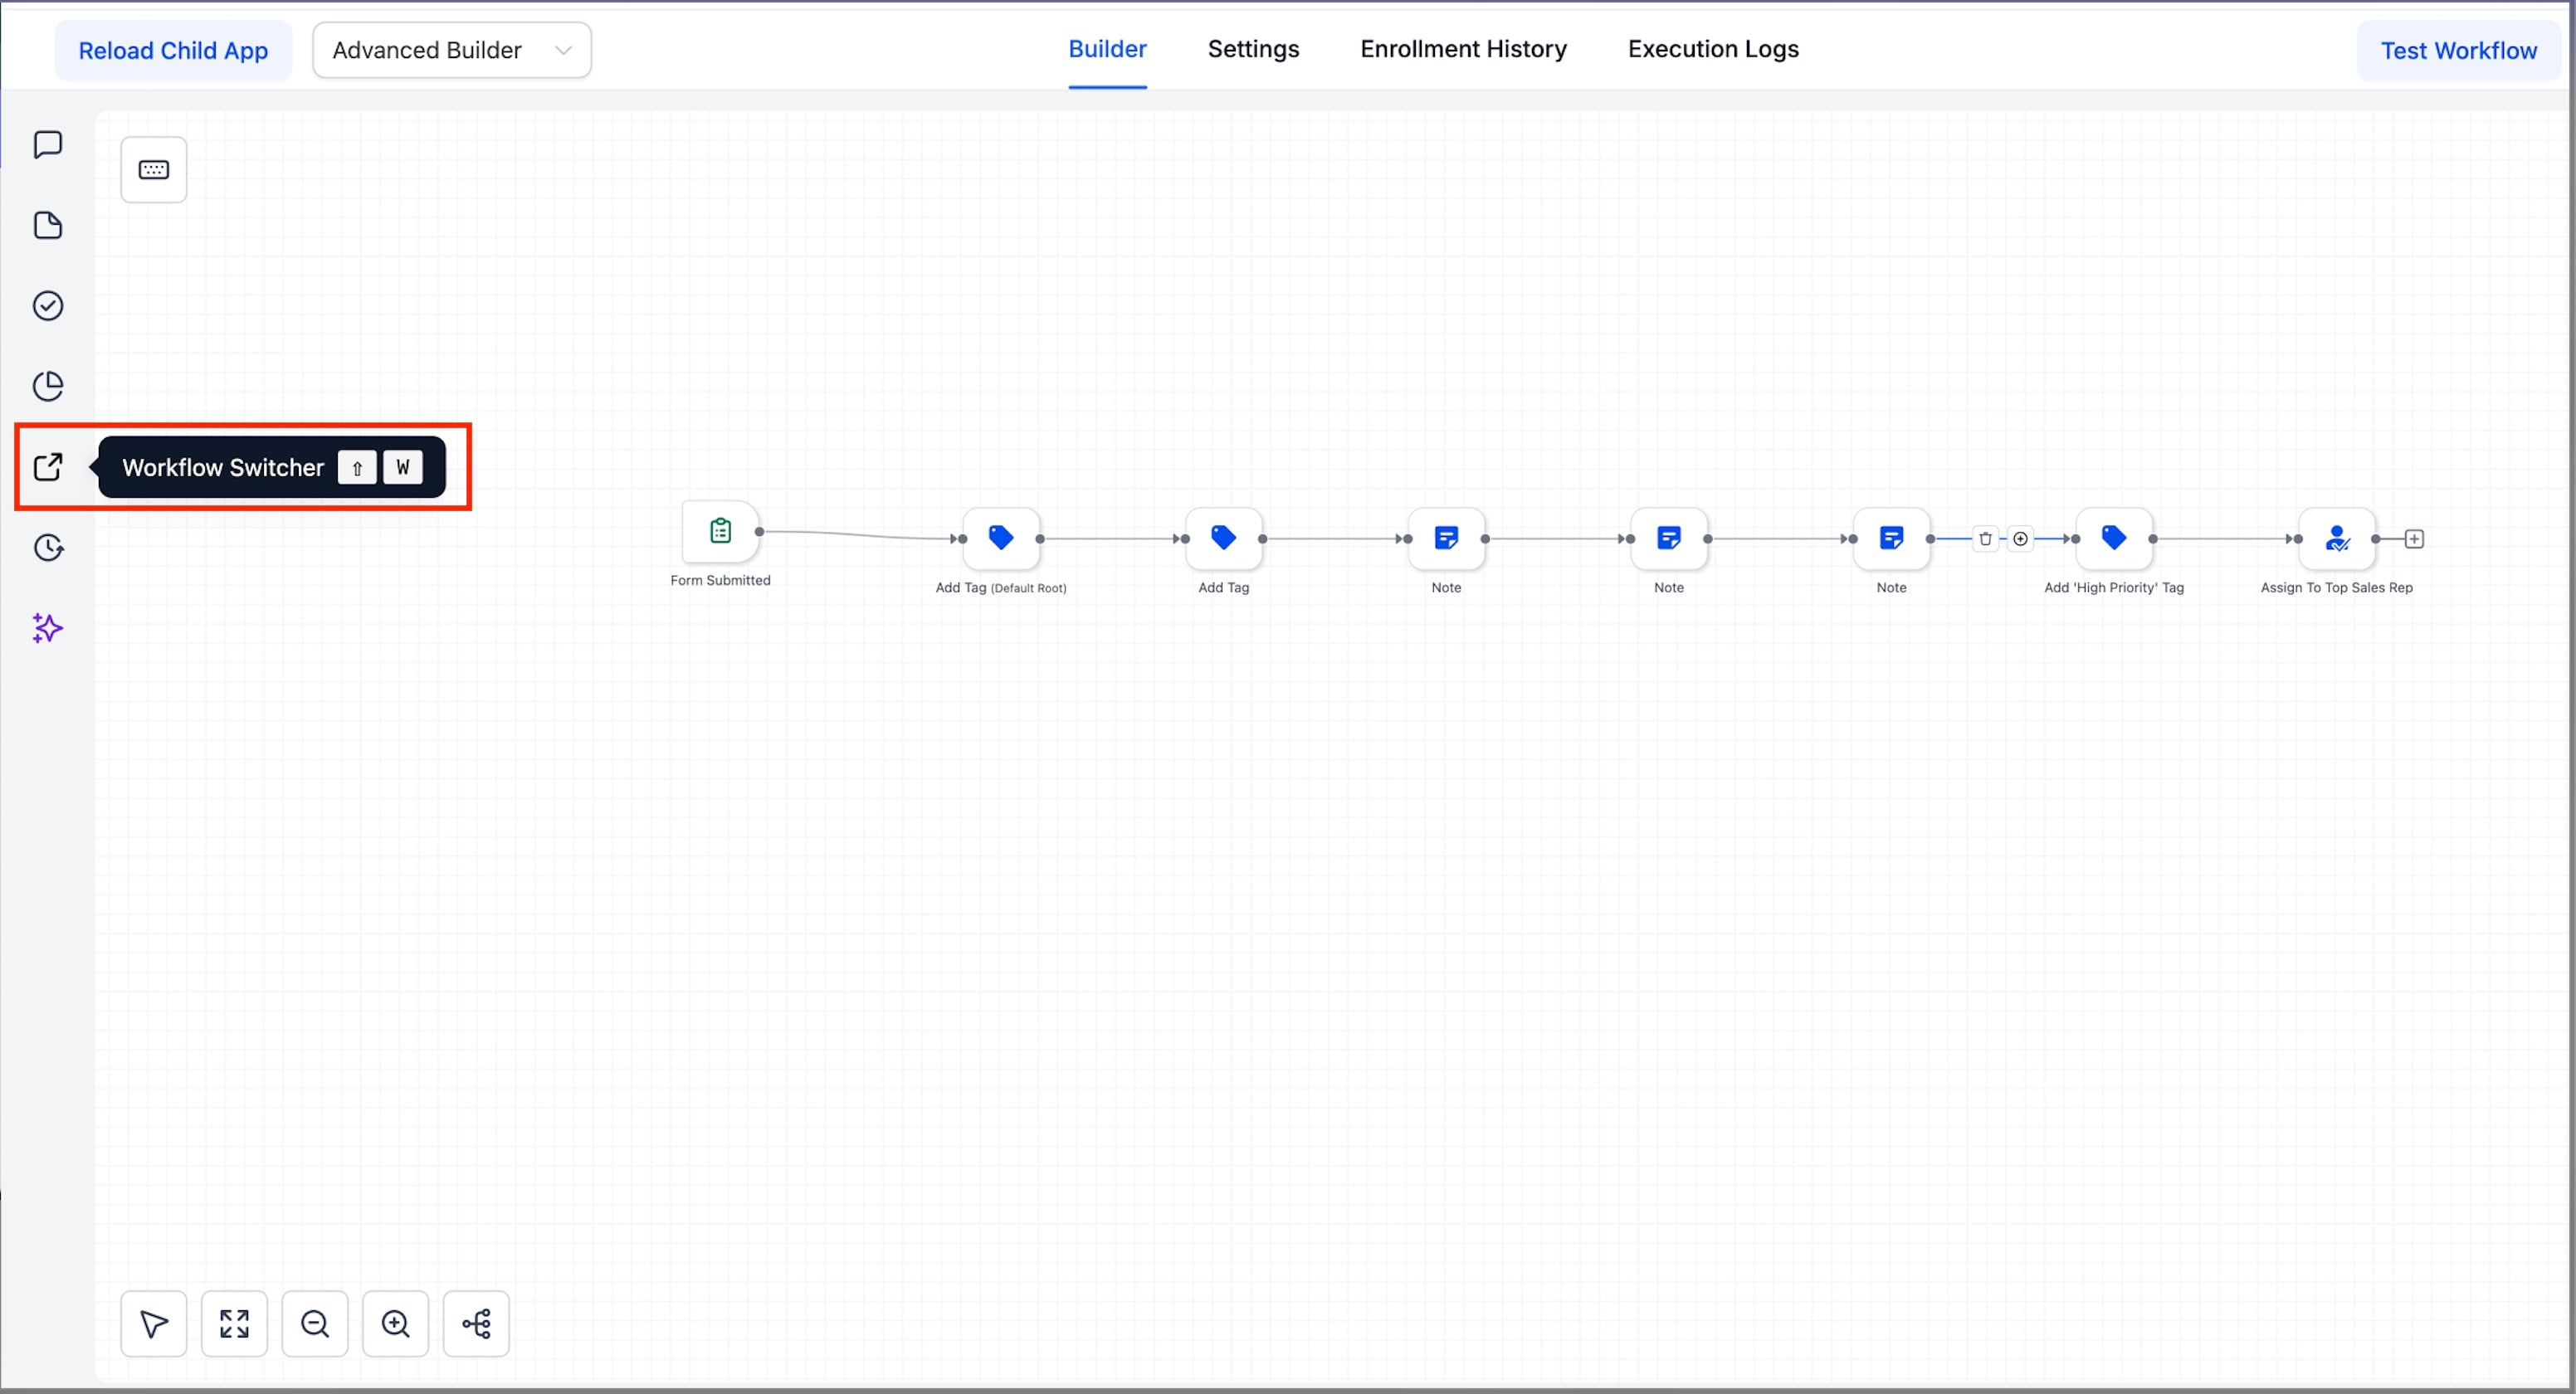
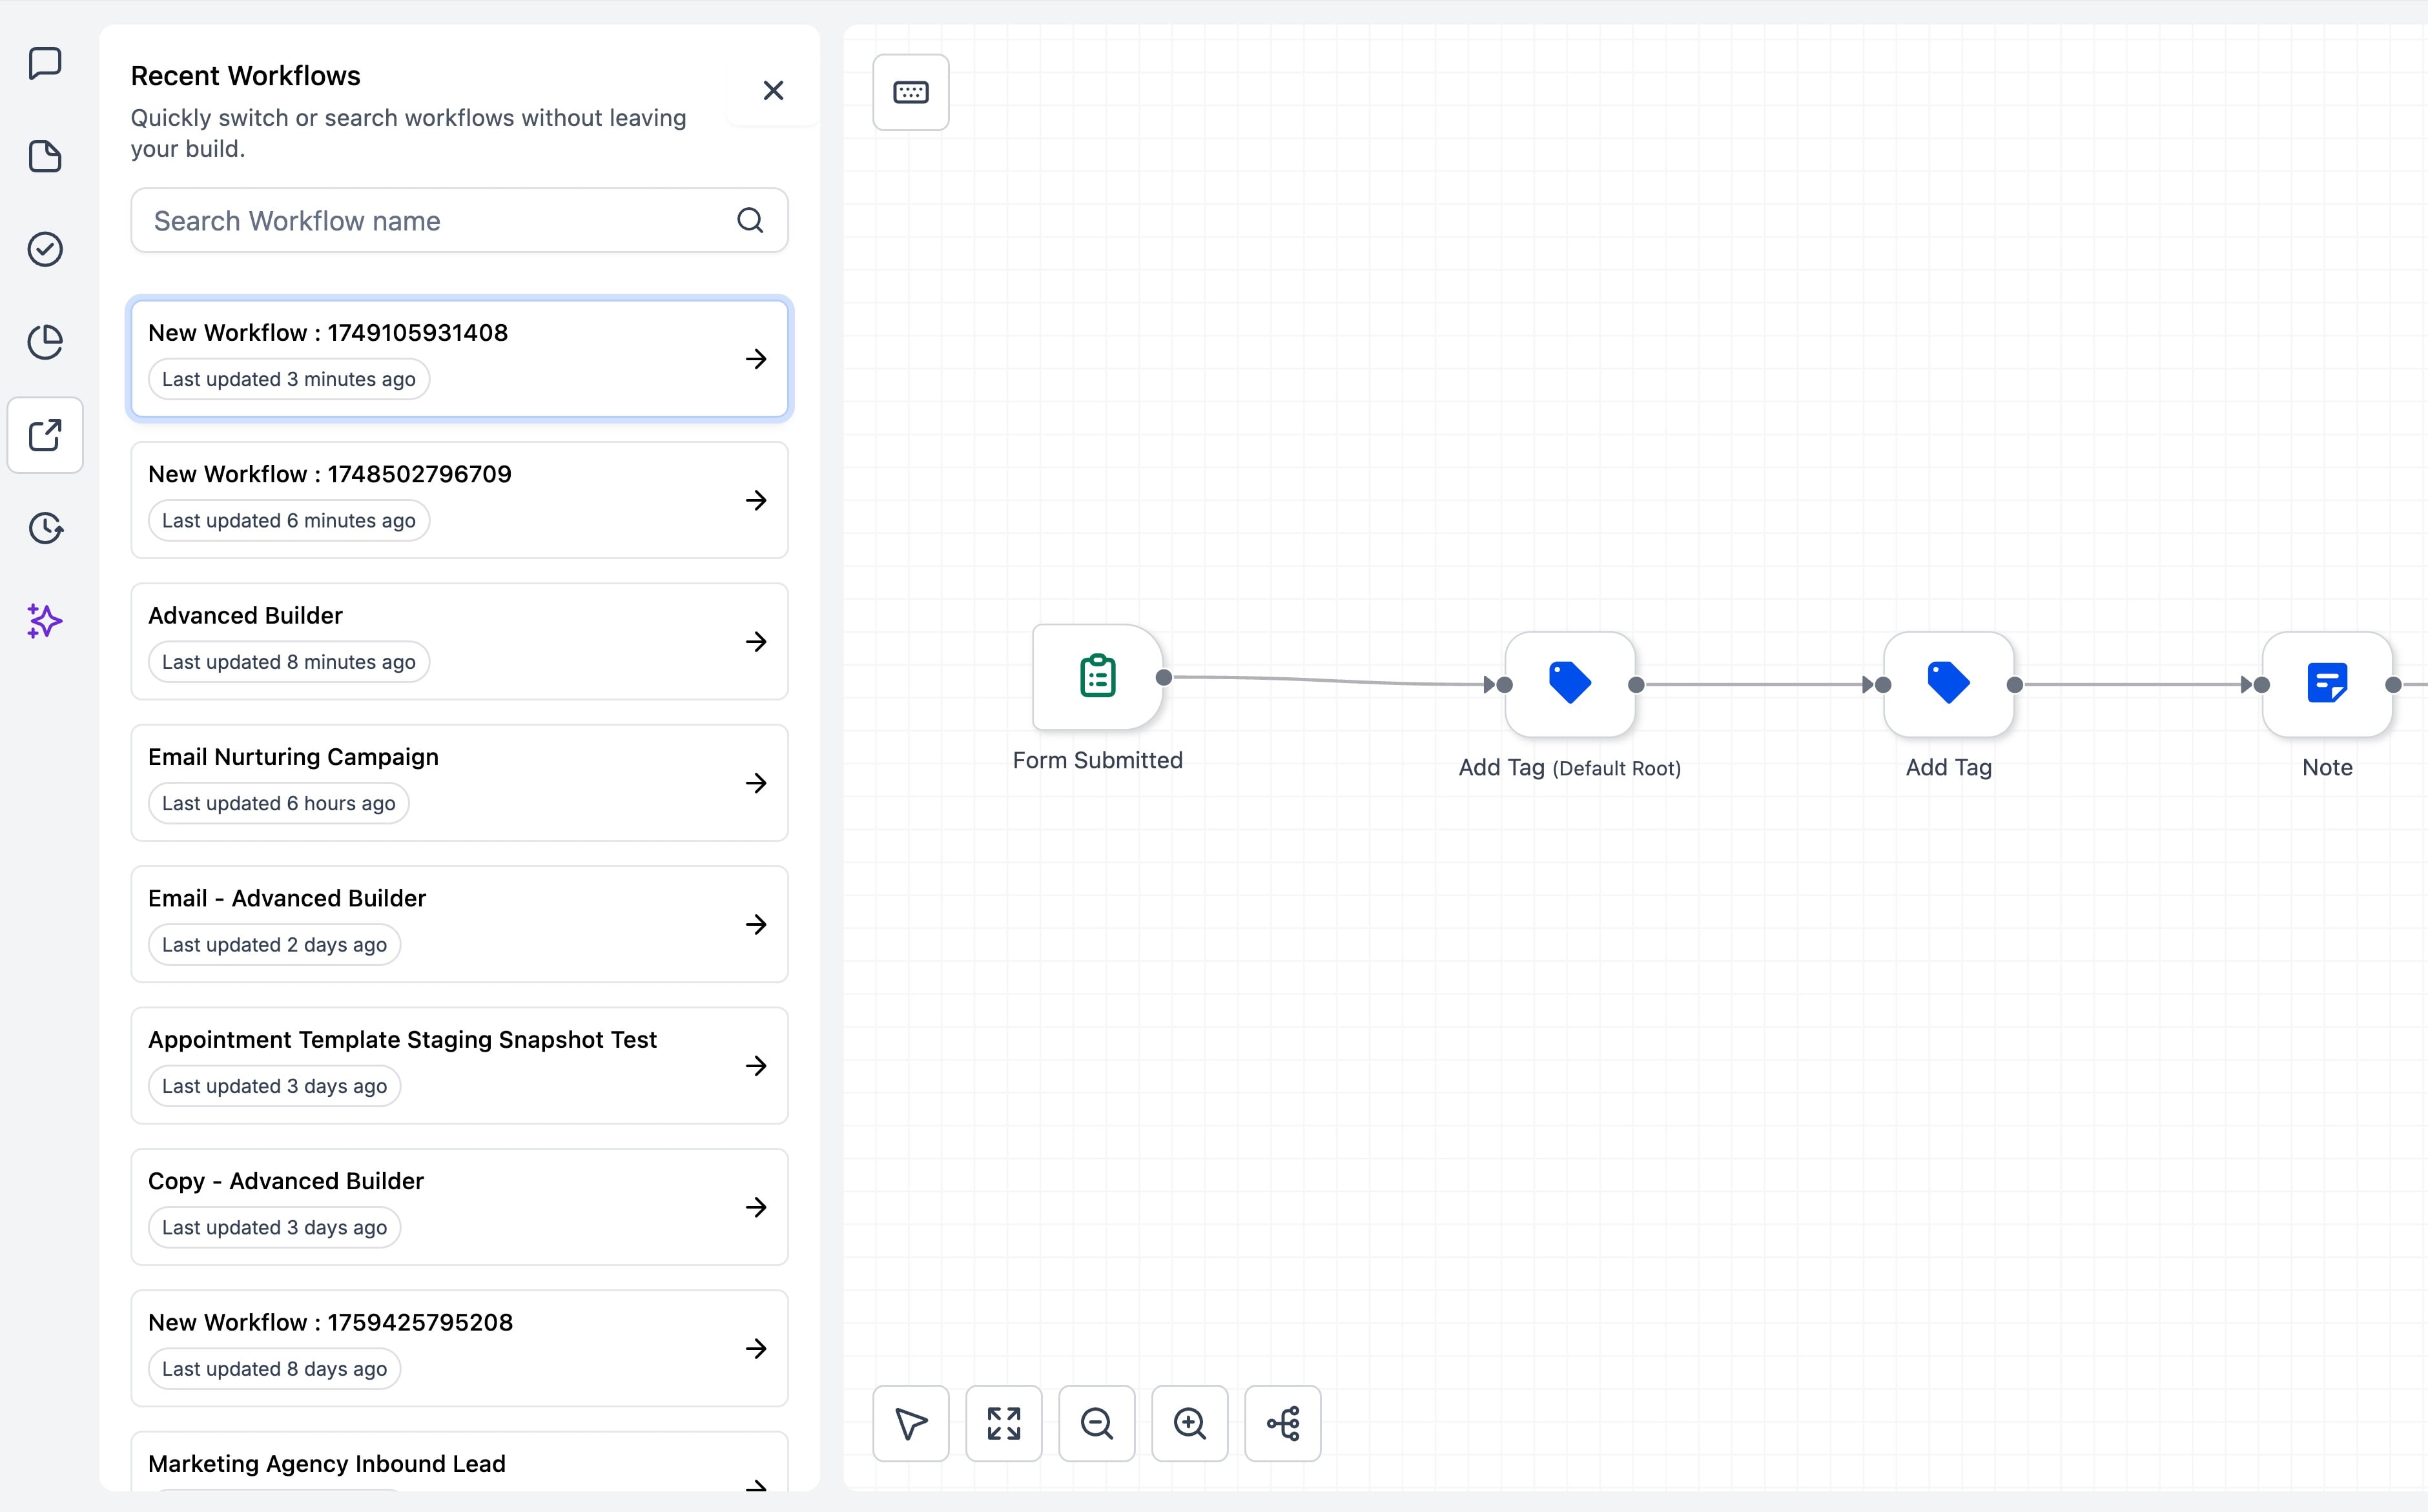
Inside the Advanced Builder, the Workflow Switcher does something similar from within the canvas. Open it from the left sidebar (or press Shift + W), then search or scroll to find another workflow by name or tag. Clicking a result opens that workflow in a new tab while your current canvas stays open.
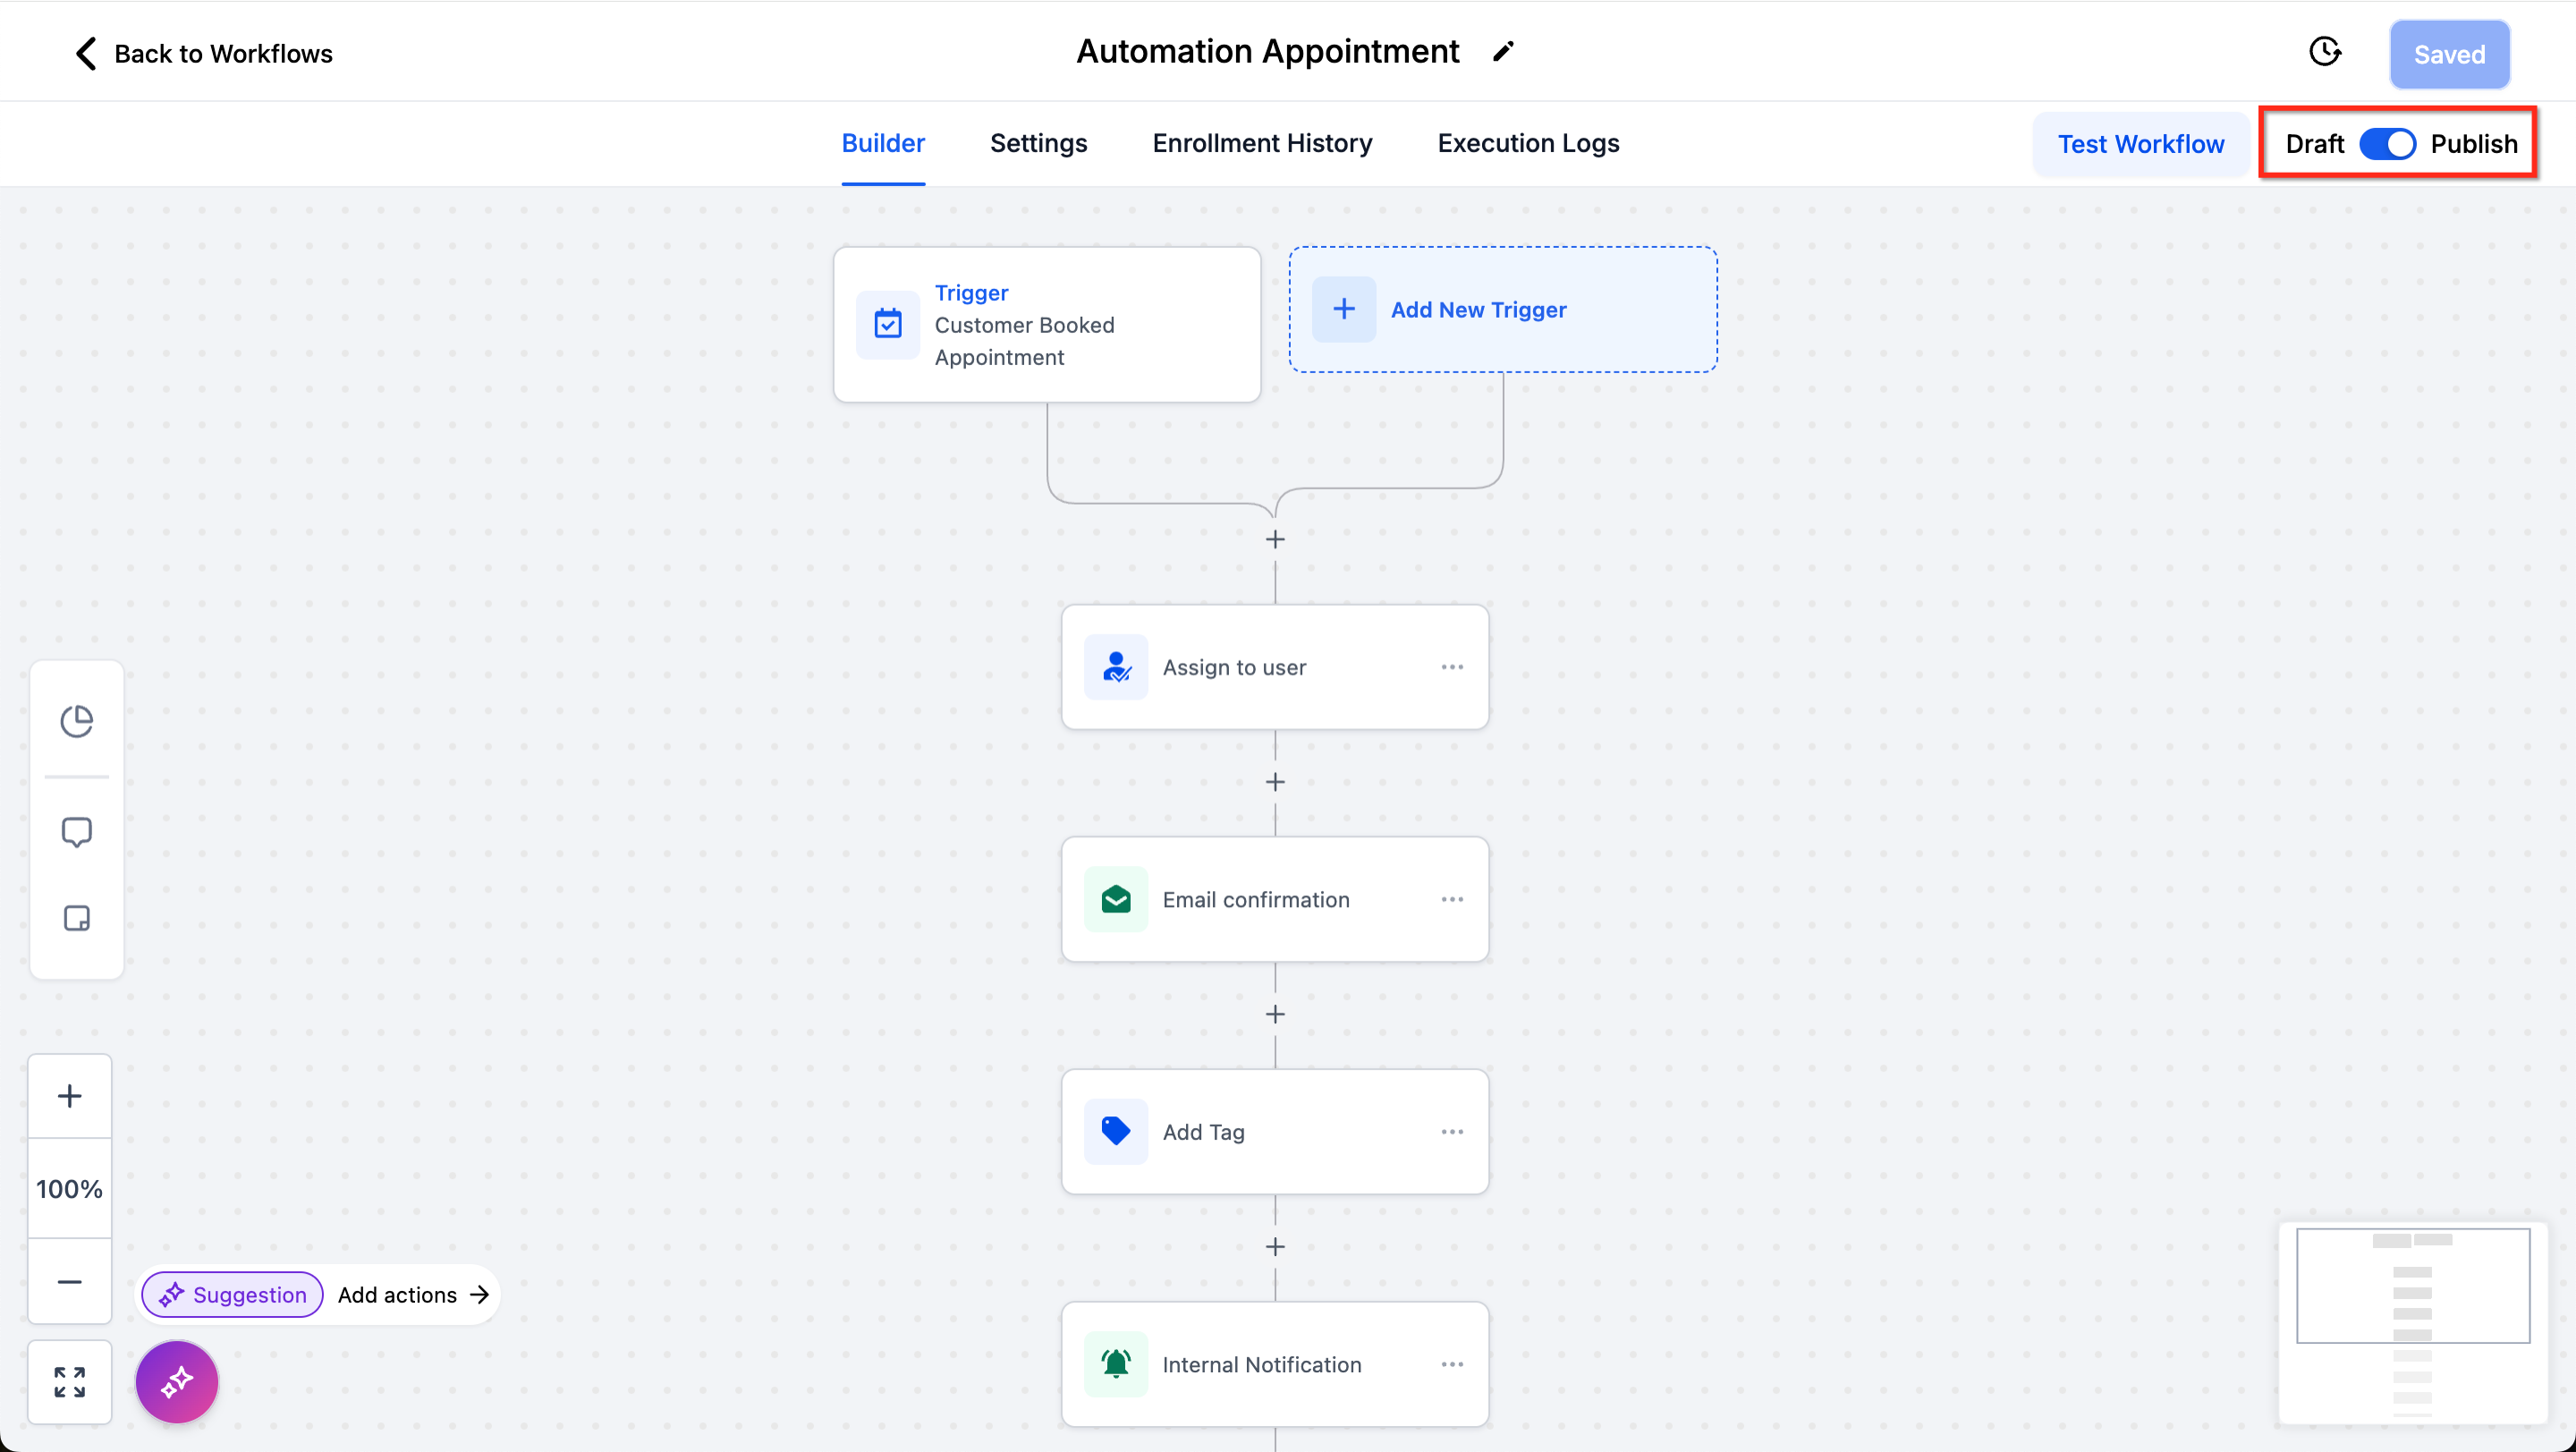
A workflow is always in one of two states. In Draft mode it will not fire triggers or take actions for real. In Publish mode it runs live. The Draft / Publish toggle sits in the top-right corner of the builder, and you flip it to activate or deactivate the workflow.
When you draft or publish from the Workflow List instead of inside the builder:
Click Marketing.
Click Workflows.
Click Workflow List.
Click the three dots to view more actions.
Click Draft Workflow to move it to draft, then click Confirm.
Click Publish Workflow to publish it, then click Confirm.
Check the current status of the workflow in the list.
A few things to keep in mind:
Auto-Save writes to the draft only. Publishing is always a deliberate action, so you can store many changes without affecting the currently published version.
Contacts sitting in a waiting step (such as Wait, Manual Call, or Manual SMS) stay at their current step when a draft workflow is later resumed.
Routing changes you publish apply only to contacts who enter the workflow after publishing.
All basic file operations start from the three-dot menu next to a workflow in the Workflows list under Marketing > Workflows.
Edit a workflow:
Click Marketing, then Workflows.
Select the workflow you want to edit and click the three dots next to it.
Click Edit Workflow, make your changes on the canvas, then click Save.
Rename a workflow:
Click Marketing, then Workflows.
Select the workflow and click the three dots next to it.
Click Rename Workflow, edit the name, then click Save.
Duplicate a workflow:
Click Marketing, then Workflows.
Select the workflow and click the three dots next to it.
Click Duplicate Workflow.
Change the name if needed, then click Create.
Delete a workflow:
Click Marketing, then Workflows.
Select the workflow and click the three dots next to it.
Click Delete Workflow.
Type CONFIRM to proceed, then click Delete.
What is the difference between saving and publishing a workflow? They are independent. Saving stores your changes (and Auto-Save does this for you on the canvas), while publishing moves the workflow from draft to live. A workflow can be saved but still in draft, or have unsaved changes while published.
Does Auto-Save publish my changes automatically? No. Auto-Save only updates the draft. You must click Publish, or use the Draft/Publish toggle, to push changes live.
What happens to contacts already in a workflow if I set it to draft? Contacts sitting in waiting steps (such as Wait, Manual Call, or Manual SMS) stay at their current step and resume from there when the workflow is published again.
Can a contact run through two delinked branches at the same time? No. The workflow enforces single enrollment per contact, so a contact proceeds down only one branch at a time.
Can a trigger have more than one Go-To connection? No. Each trigger connects to exactly one action so execution stays deterministic. You can reassign the connection at any time by dragging the dashed connector to a new node.
Do keyboard shortcuts work in the Standard Builder? At launch they are exclusive to the Advanced Builder. Some shortcuts act on the currently selected node, so select a node first.
Does undo/redo affect live workflows or other people's edits? No. Undo, Redo, and Recent Changes are local to your current session and track only your own edits. For team-wide or long-term rollbacks, use Version History.
Can I add a contact to more than one workflow? Yes. Use the Add to Workflow action to enroll a contact in additional workflows.
