Workflows are how you automate the repetitive work of running your practice. Once a workflow is set up, it runs on its own: it watches for something to happen, then carries out a sequence of actions without anyone lifting a finger. You can use workflows to nurture new leads, confirm appointments, send reminders, follow up after a visit, update patient records, and keep your team in sync.
This guide explains what workflows are, the core concepts behind them, and how to build your first one. When you are ready to go deeper, the reference guides for Triggers, Actions, and The Workflow Builder cover every option in detail.
A workflow is an automated sequence of actions that starts when a specific event happens. Every workflow is built from two essential parts:
Trigger: the event that starts the workflow
Actions: the tasks that run after the trigger fires
Here are two simple examples in a practice setting:
A prospective patient submits a consultation form, so the workflow sends a confirmation email and a text message.
A patient books an appointment, so the workflow notifies your front desk and schedules a follow-up message.
Instead of manually logging each new lead and sending each follow-up by hand, a workflow does it consistently every time, around the clock.
A trigger is the event that sets your workflow into motion. It is the "if" in the automation: something happened, so the workflow should run. Common triggers include:
A patient books an appointment
A form or survey is submitted
A payment is received
A contact replies to a message
Triggers let your workflows respond to real events the moment they happen. A single workflow can have more than one trigger, so patients can enter it from several different sources.
An action is a task the workflow performs in response to the trigger. It is the "then" in the automation: now that the event happened, here is what to do. Common actions include:
Send an email or text message
Create or update a contact record
Assign a task to a team member
Create or move an opportunity in a pipeline
You can chain many actions together, one after another, to handle an entire process from start to finish.
When a trigger fires for a contact, that contact is enrolled in the workflow and begins moving through its actions in order. If an action includes a wait step (for example, "wait one day"), the contact pauses there and resumes automatically when the time is up. Enrollment settings control whether a contact can enter the same workflow more than once, which is useful to understand when you are testing or when a patient might qualify repeatedly.
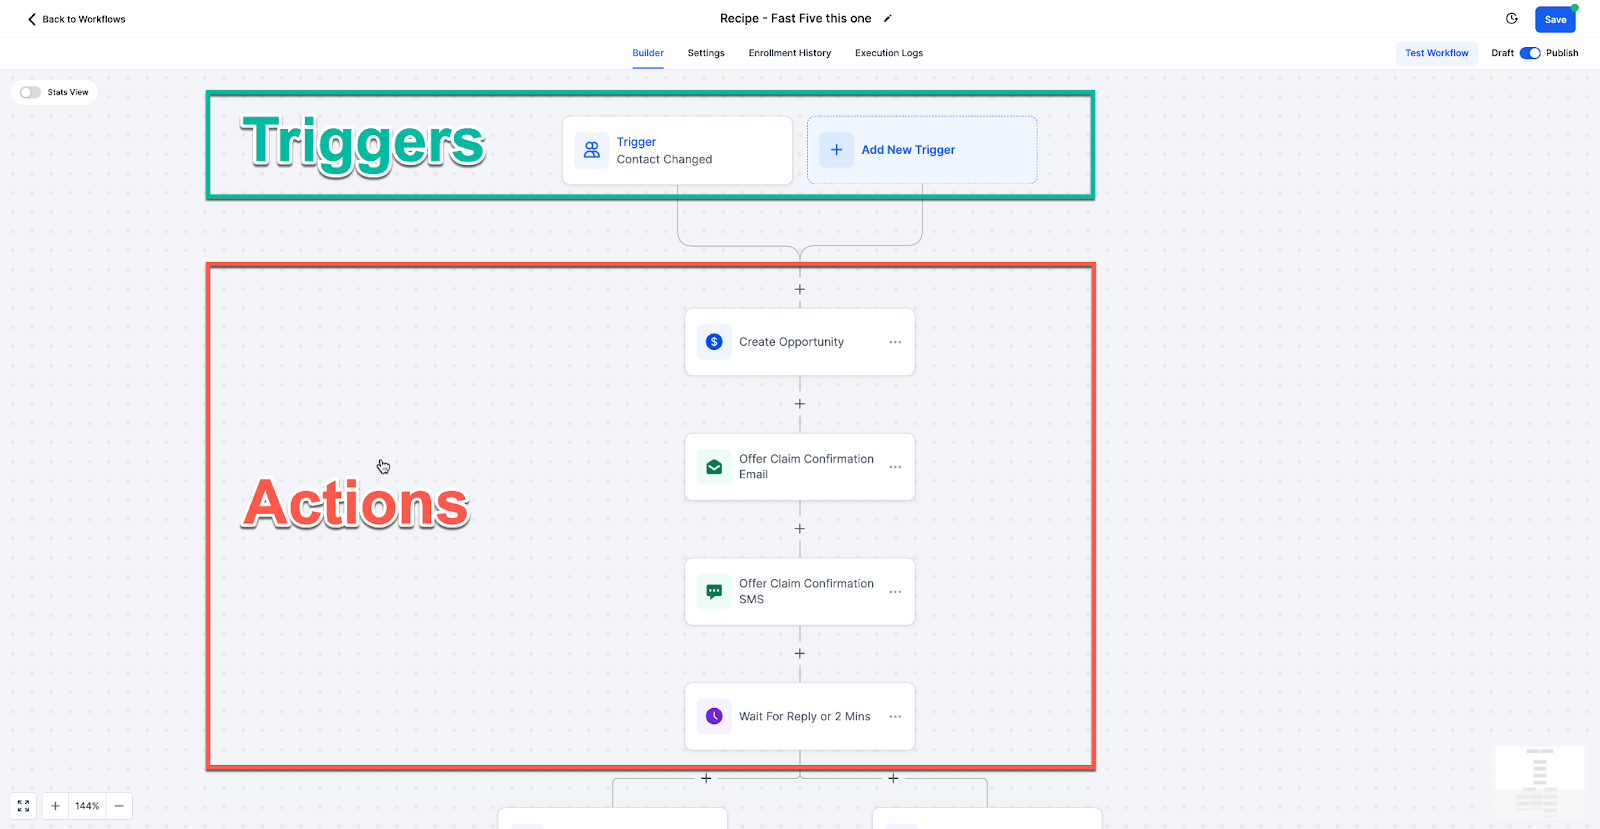
Workflows are built on an open canvas where your trigger sits at the top and each action appears as a step below it. You can zoom in and out, fit the whole workflow to the screen, and use the minimap to find your place in larger automations. You add steps by clicking the plus button between them, and you can reorder or edit any step at any time. The builder also lets you test a workflow, view version history, and switch between Draft and Published states.
Workflows shine anywhere you find yourself doing the same thing over and over. Good candidates include:
Lead nurturing and new-patient onboarding
Appointment confirmations and reminders
Post-visit and post-treatment follow-ups
Feedback and review requests
Keeping contact records and pipelines up to date
Automating these tasks improves efficiency, keeps your patient communication consistent, and lets your practice scale without adding manual work.
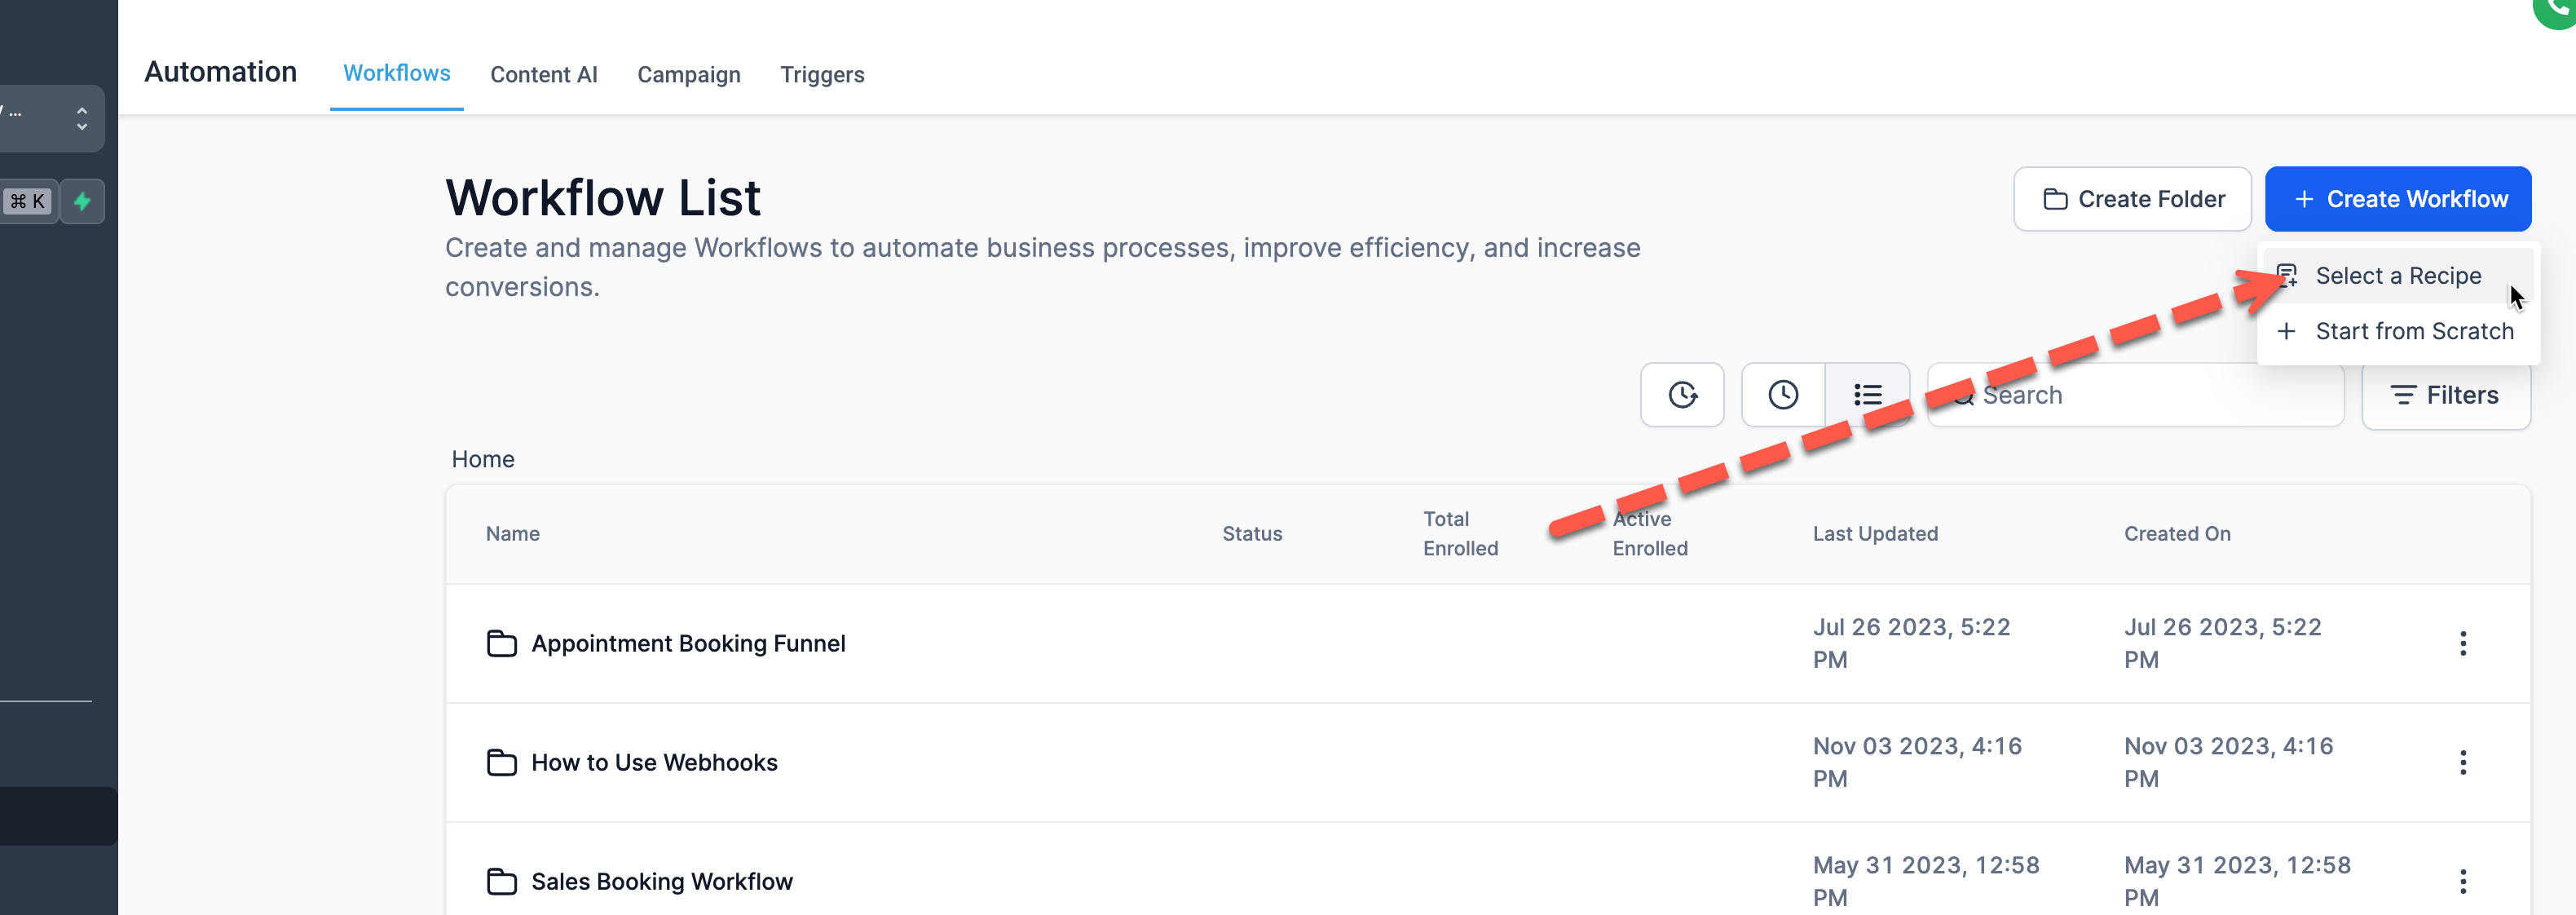
You will find workflows under the Automation area of Aesthetix CRM. When you open it, you have a few ways to begin:
Build using AI: describe the workflow you want in plain language and let Aesthetix CRM generate a starting point for you
Browse Templates: start from a ready-made workflow recipe and customize it
Create Workflow: start from a blank canvas and build it yourself
Templates and recipes give you a proven structure you can adjust to fit your practice, which saves time compared to building from scratch.
Once you are in the builder, building a workflow comes down to three steps.
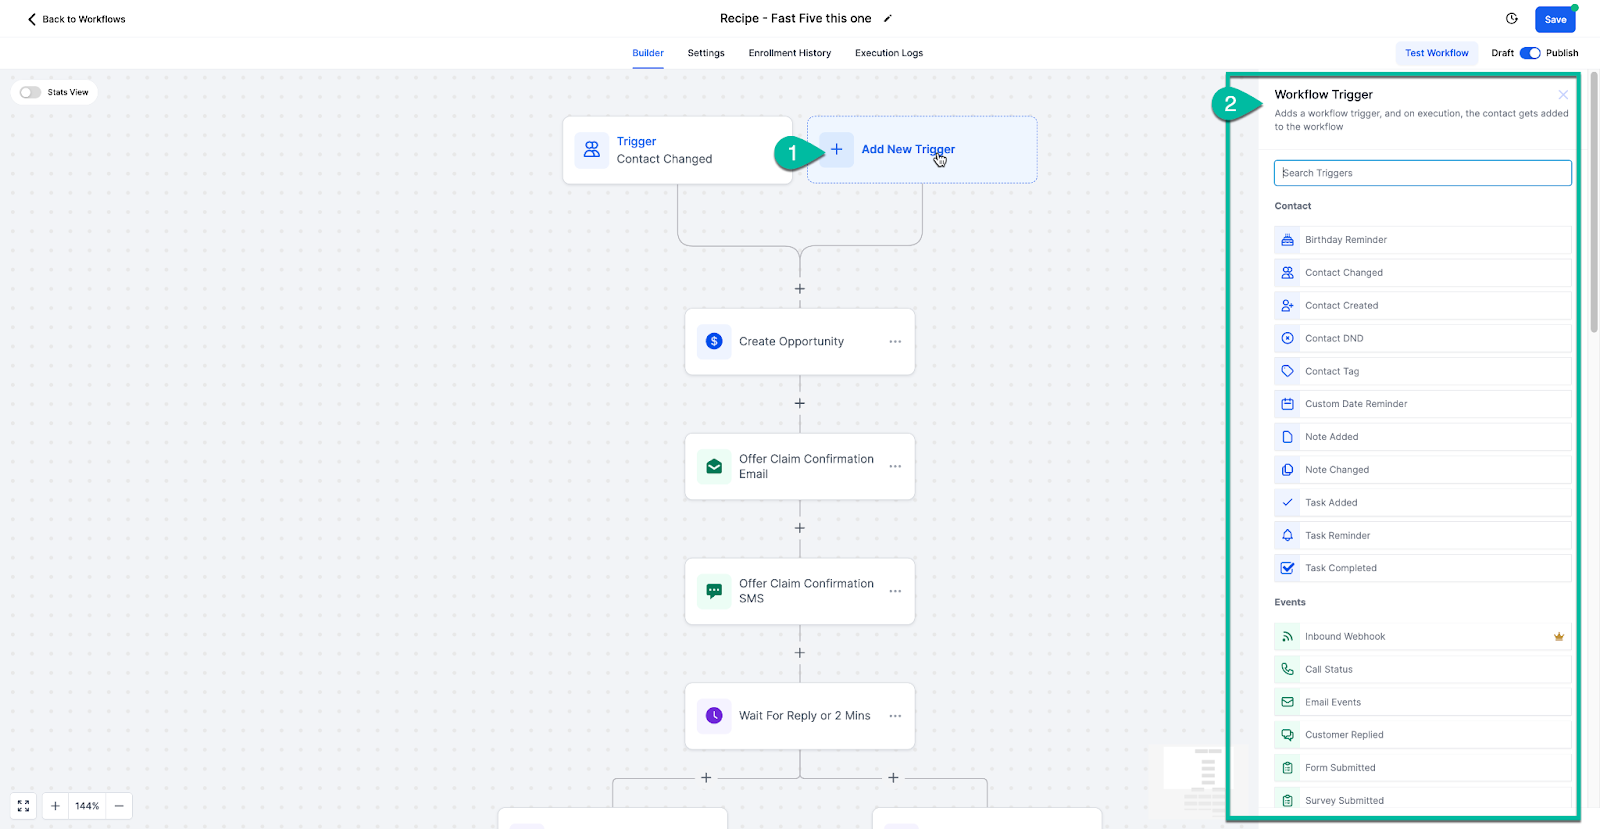
Click Add New Trigger and pick the event that should start your workflow, such as a form submission or a booked appointment. Then configure the trigger's settings.
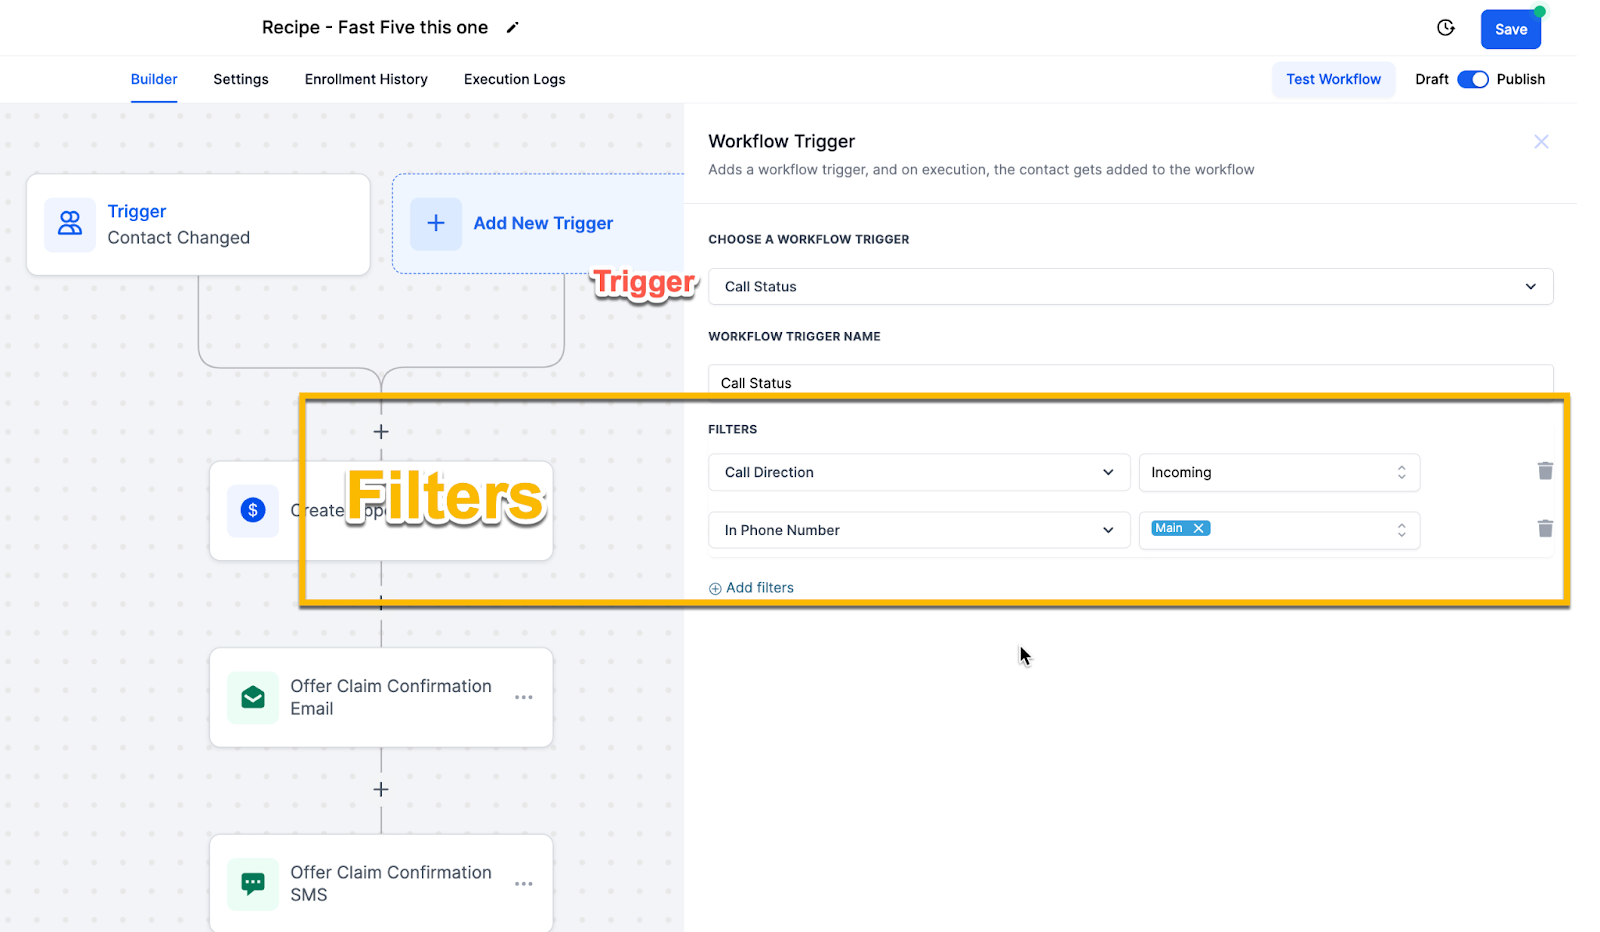
Filters refine exactly when the workflow should run, so it only fires under the conditions you want. For example, you might trigger only for a specific appointment type or a specific form. Filters are optional, but they are recommended to keep workflows precise.
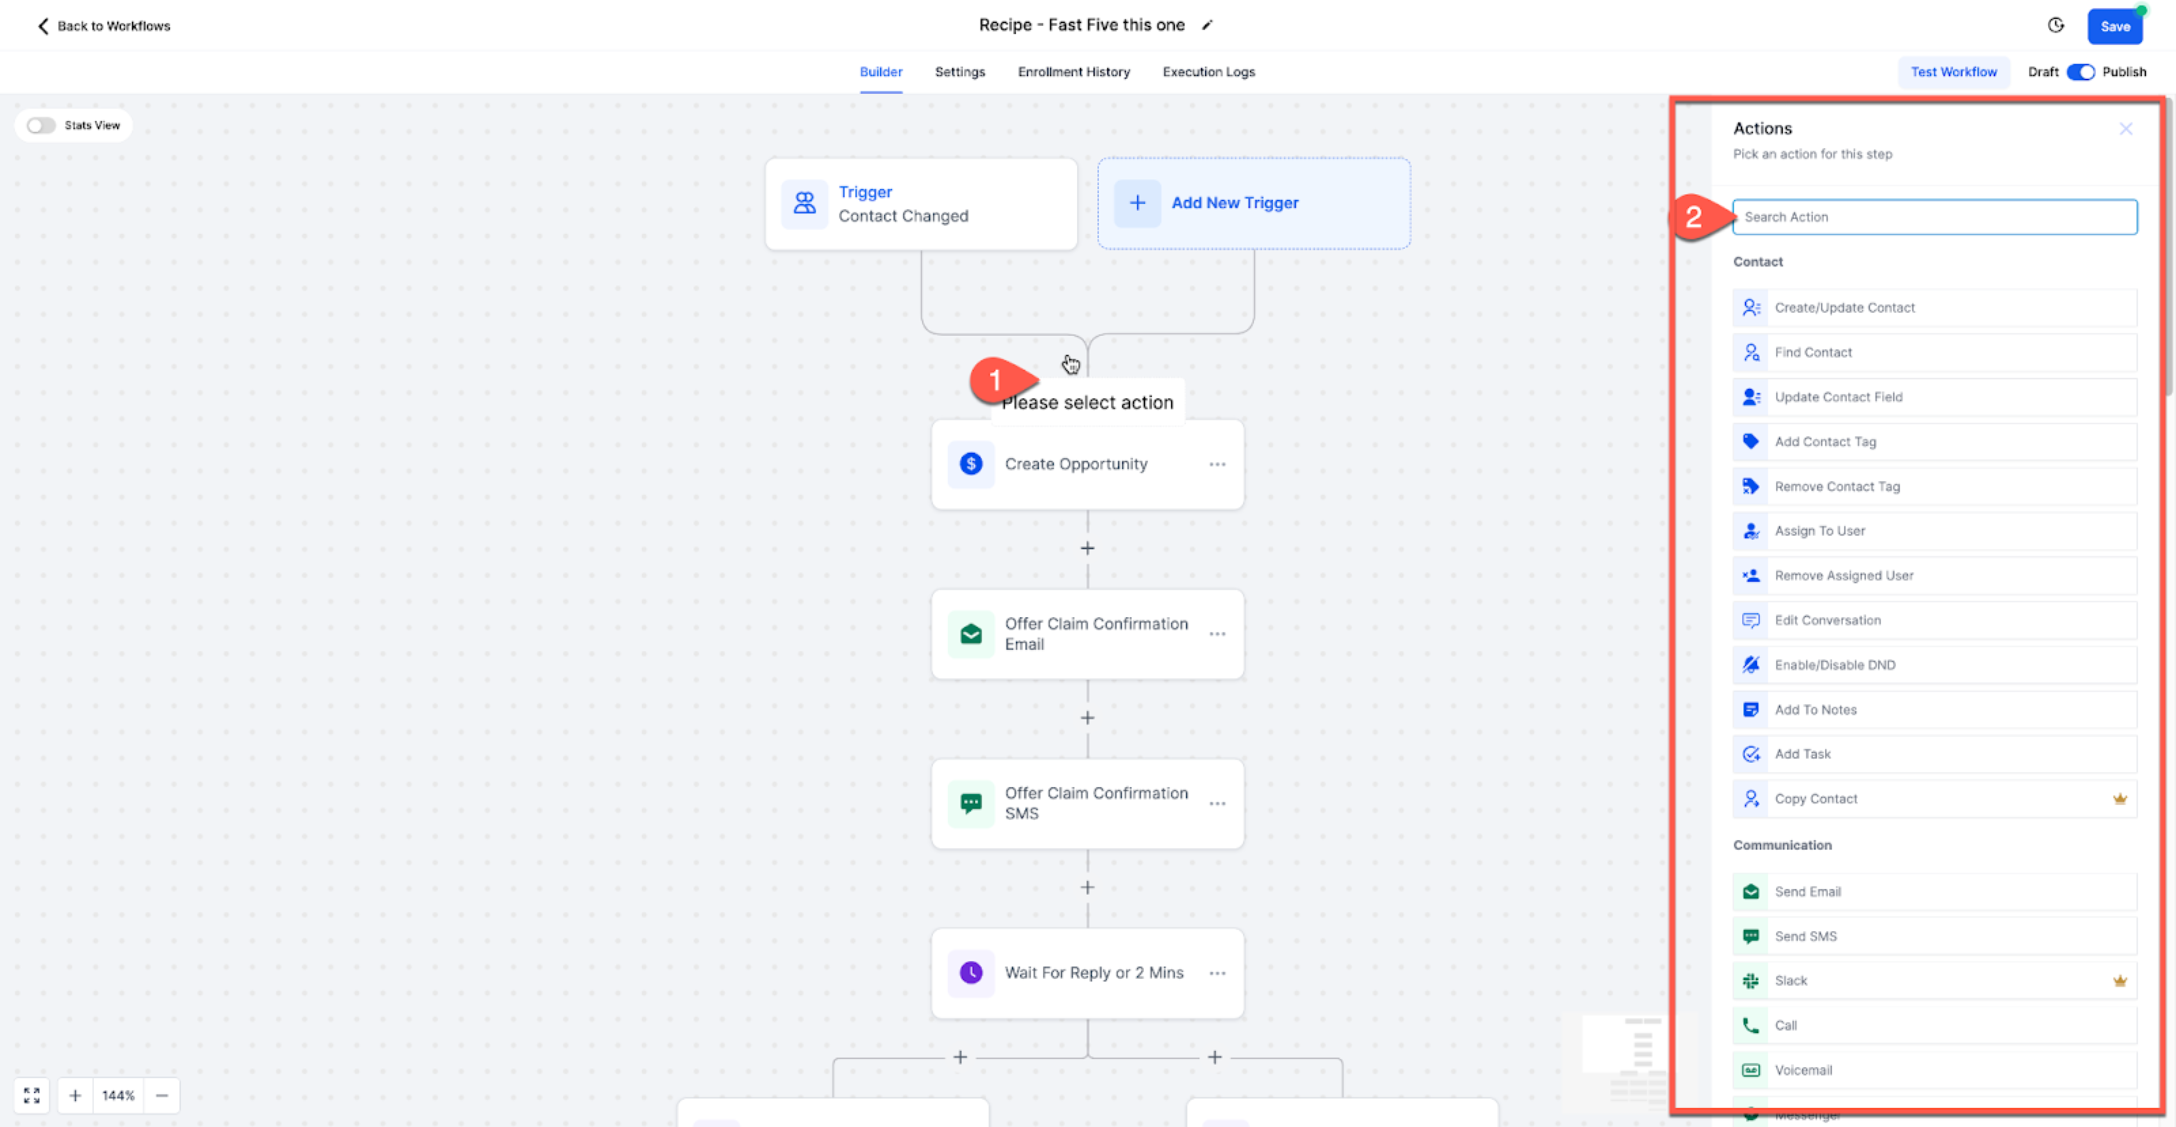
Click the plus button to add an action, choose what you want it to do (such as sending a confirmation text), and configure it. Add as many actions as the process needs, in the order they should run.
When your trigger and actions are in place, click Save. Before going live, use Test Workflow to run it against a sample contact and confirm it behaves as expected. When you are happy with it, switch the toggle from Draft to Publish so the workflow starts running automatically.
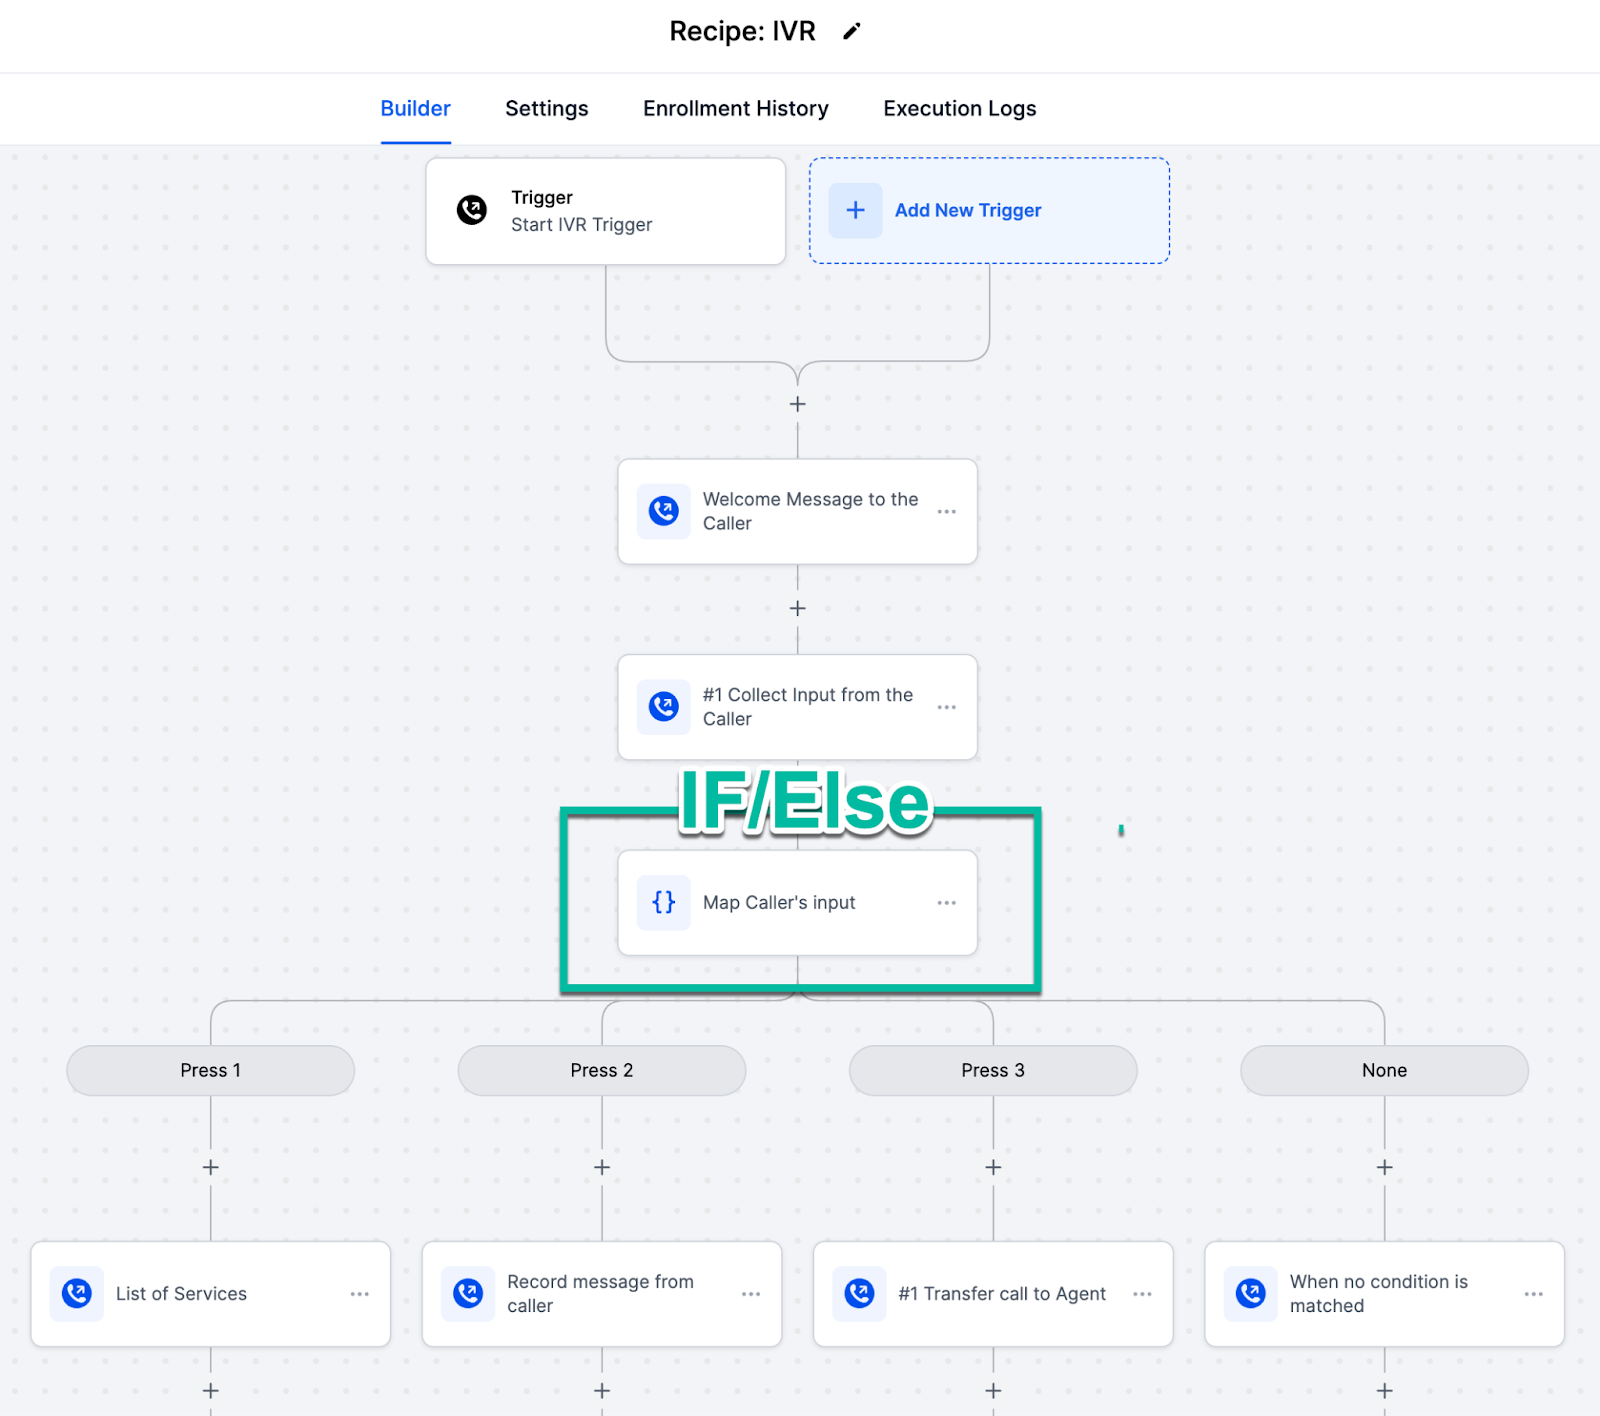
As your needs grow, workflows can do much more. You can split contacts down different paths with If/Else conditions, connect several workflows together to automate an entire patient journey, and use webhooks to exchange information with outside systems. Each of these is covered in the reference guides below.
What is the difference between a trigger and an action? A trigger is the event that starts the workflow when something happens. Actions are the tasks the workflow performs after the trigger fires.
Can I use more than one trigger in a single workflow? Yes. You can add multiple triggers so contacts can enter the same workflow from different sources.
Are trigger filters required? No, filters are optional. They are recommended because they keep a workflow from running in situations you did not intend.
Will a workflow run automatically once I create it? Yes, as long as the workflow is published and its trigger conditions are met.
Can I edit a workflow after I create it? Yes. You can update the trigger, filters, and actions at any time.
Do I need any technical or coding skills? No. The visual builder lets you set everything up by pointing and clicking, with no code required.
How do I manually add a patient to a workflow? Open the contact, choose Automation, then Add to Workflow, select the workflow, set the start time, and confirm.
My workflow is not working. What should I check? Confirm the workflow is published, review your trigger and filter conditions, check your enrollment (re-entry) settings, and run a live test with a fresh contact rather than relying on test mode alone.
If you would like help mapping out or building a workflow for your practice, reach out to our support team. For deeper detail, see the reference guides on Triggers, Actions, and The Workflow Builder, which document every available option.
