Logic and flow actions are the control-flow backbone of the Aesthetix CRM workflow builder. They live in the Internal category of the action menu and do not send messages or update records on their own. Instead, they decide where a contact goes next, when it gets there, and whether it stays in the workflow at all. Use them to branch on contact data, pause until the right moment, jump contacts to a milestone, split traffic for testing, loop back to an earlier step, pace large batches, hand contacts between workflows, and anchor timing to an event date.
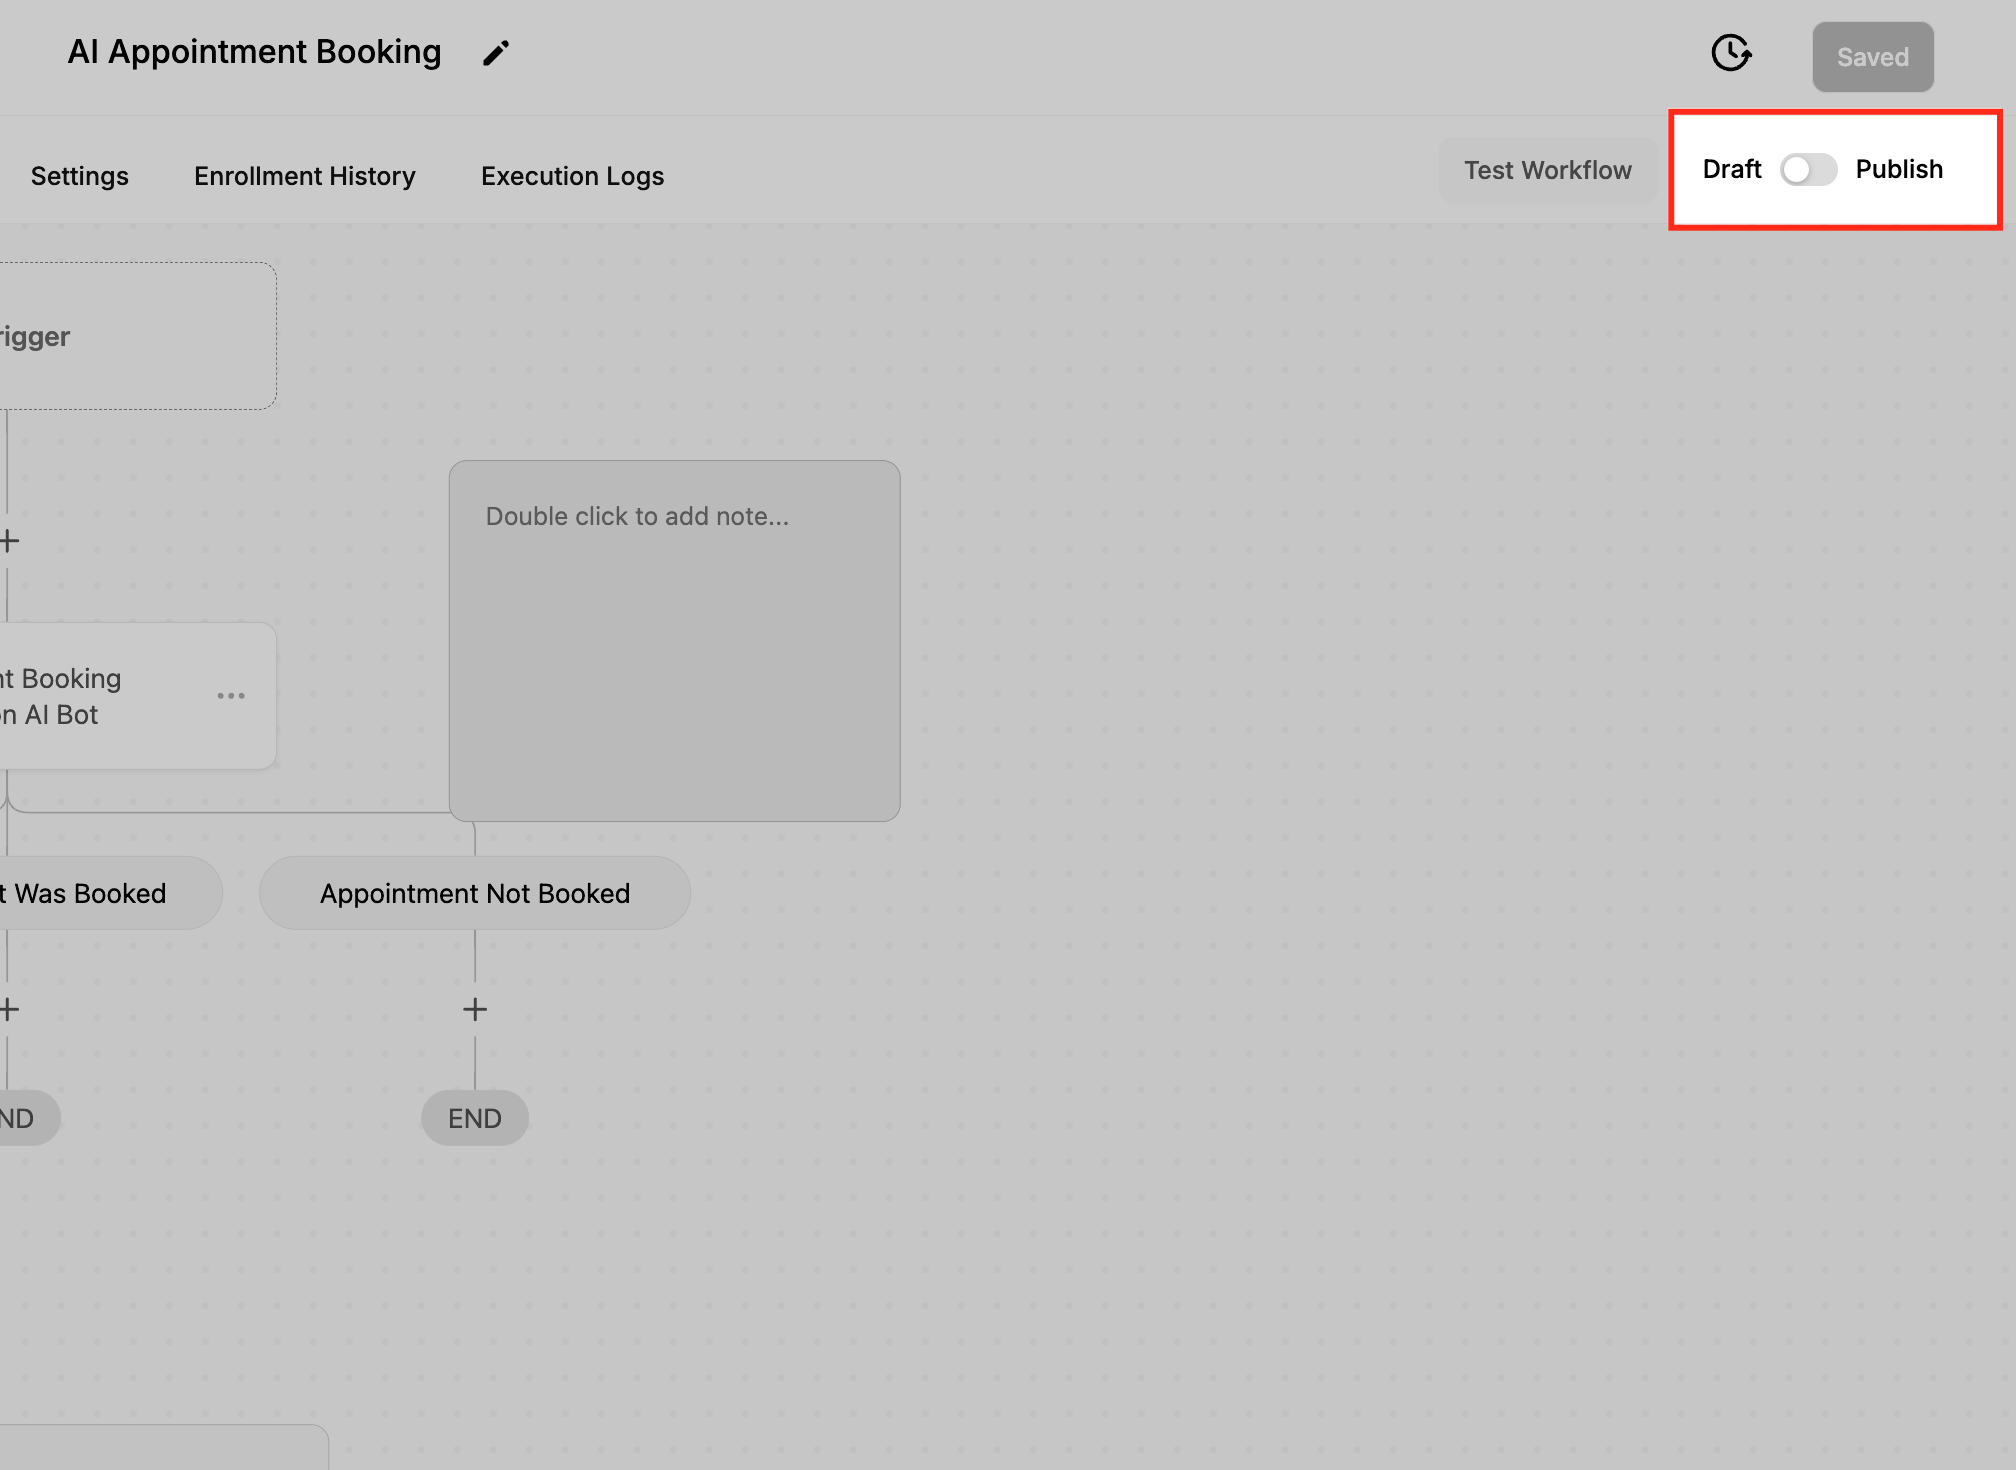
Every workflow needs at least one trigger and one action before it can be published. Until both exist, a workflow can only be saved as a draft, not set live.
The steps below add any logic or flow action. The specific configuration follows in each action's section.
Go to Automation > Workflows.
Click + Create Workflow, then choose Start from Scratch, or open an existing workflow.
Set up your trigger if you have not already.
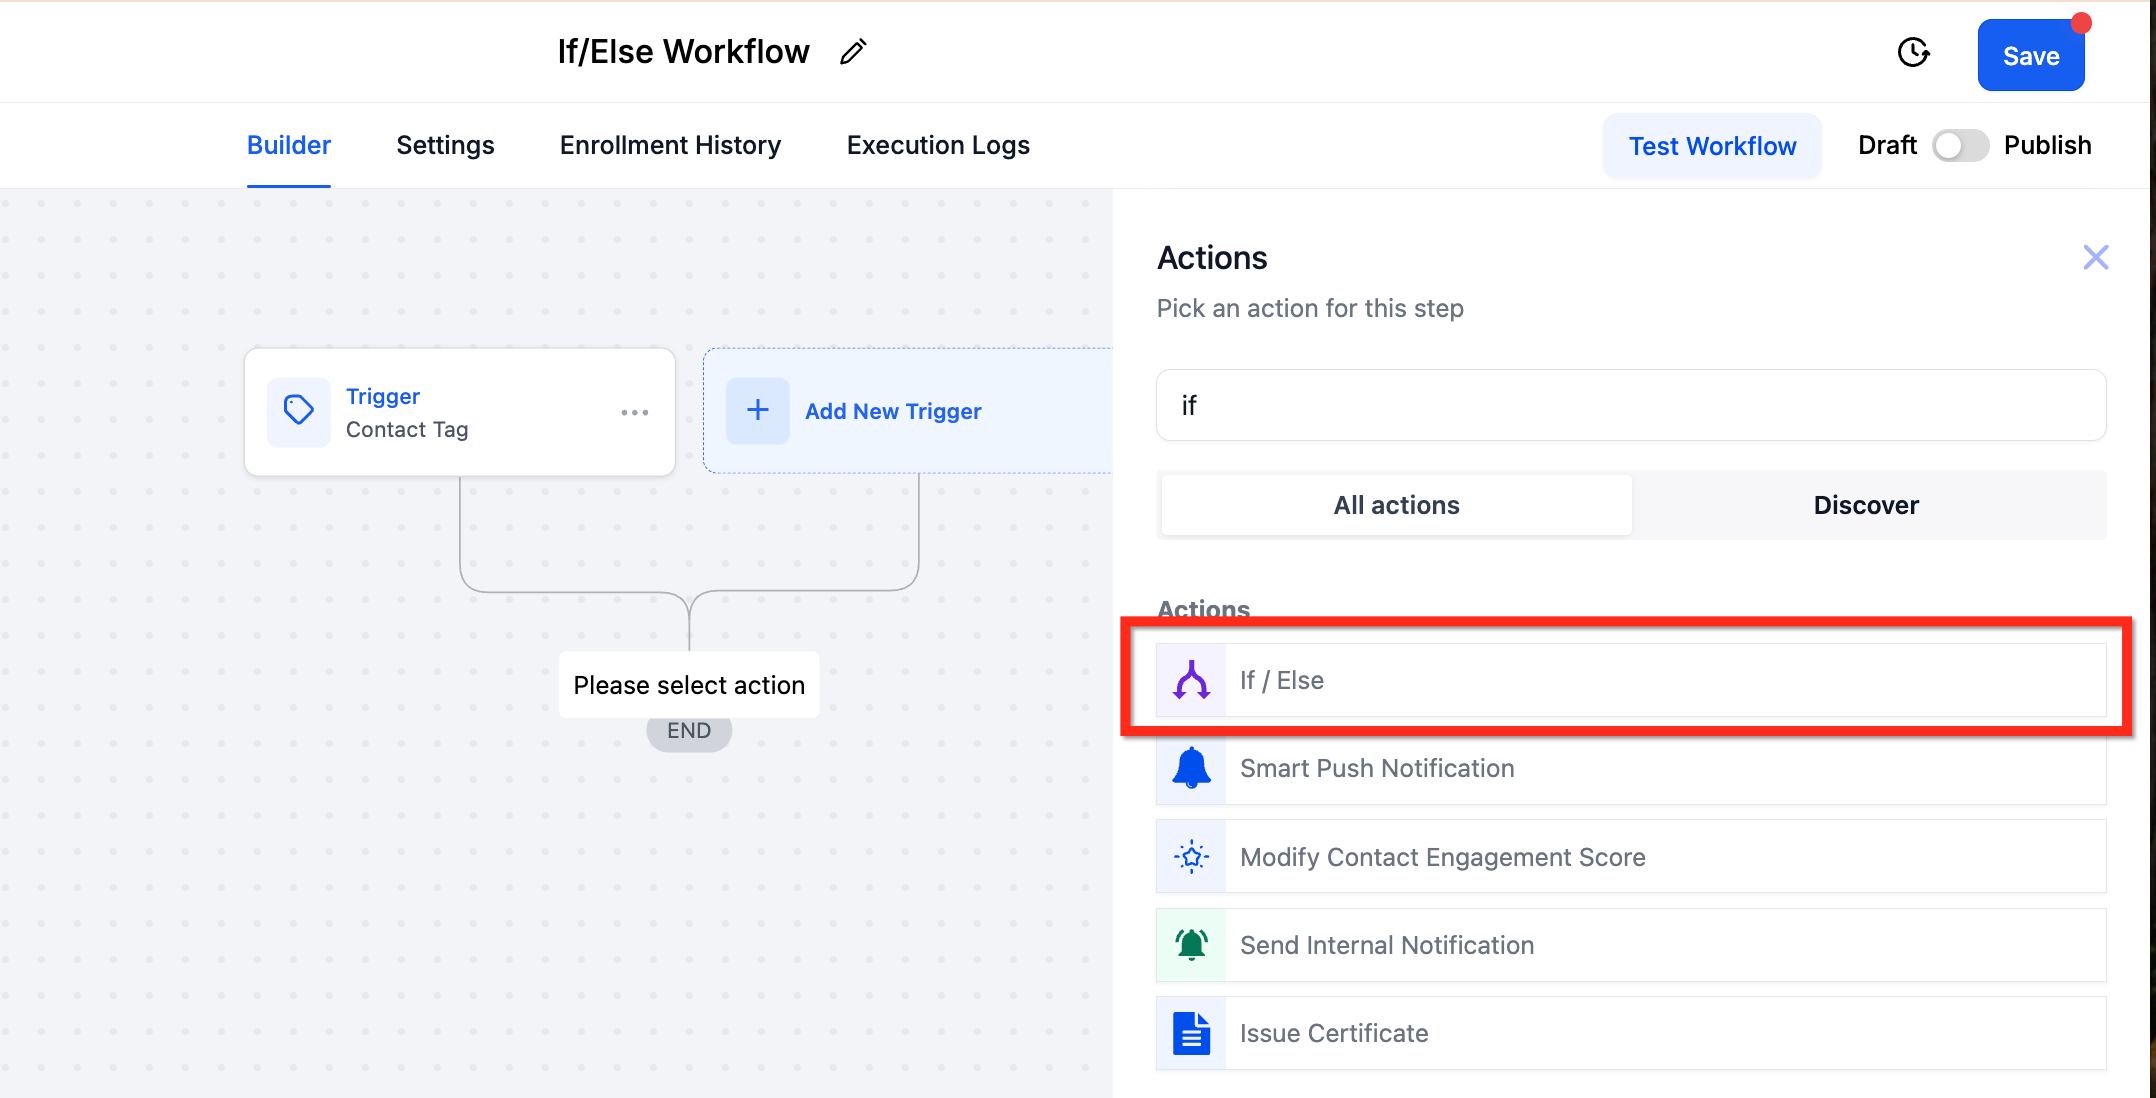
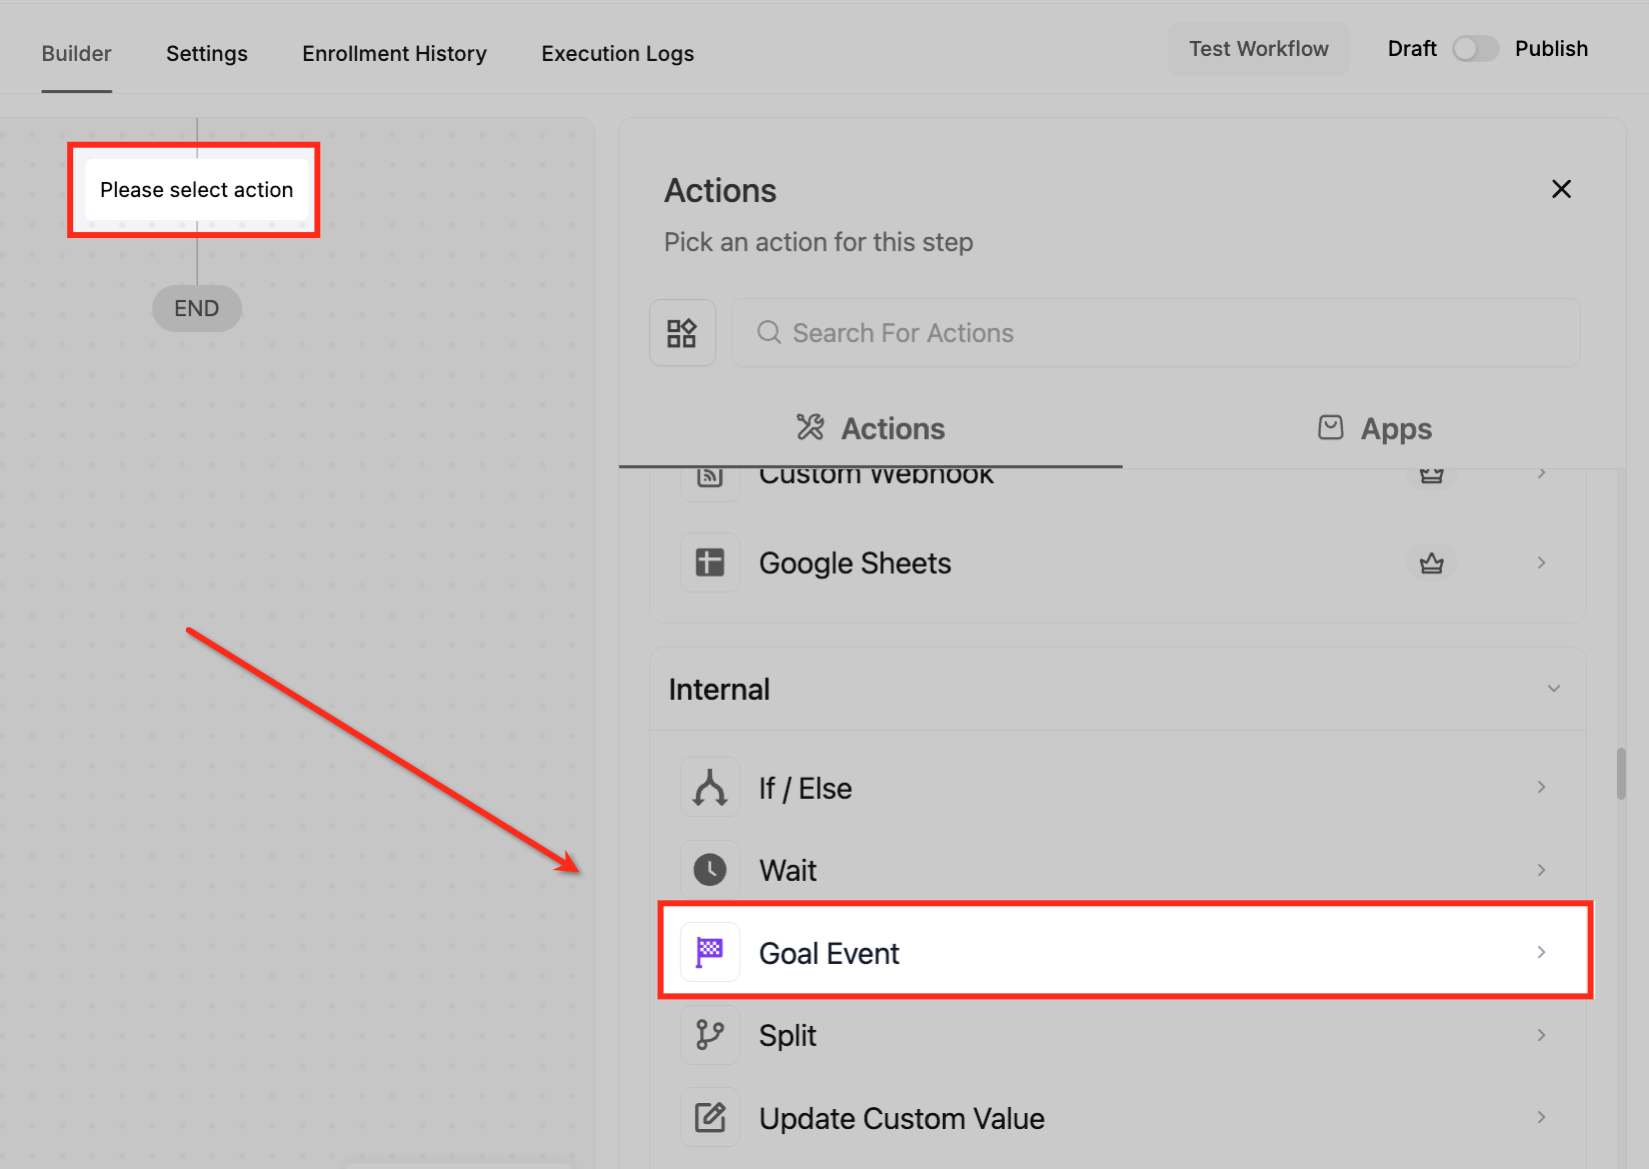
Click the + icon at the point in the workflow where the action should run.
Browse to the Internal category, or use the search field to find the action by name.
Select the action.
Give it a clear, descriptive Action Name so you can recognize it later in the builder.
Configure the action's options.
Click Save Action, then Save and Publish the workflow when you are ready to set it live.
The If/Else action evaluates contact-specific data and routes each contact down a different branch based on whether your conditions are met. Each branch is a separate path, so you can build personalized, data-driven journeys that adapt to a contact's behavior, attributes, or values captured earlier in the workflow.
Action Name. Name the condition as a question that describes what it checks, for example "Did the Client Reschedule?" or "Is the Treatment Package Over $2,000?". Clear names keep complex workflows readable.
Logic setup method. When the panel opens you can either:
Build My Own to create conditions from scratch, or
Start from a prebuilt recipe with common conditions.
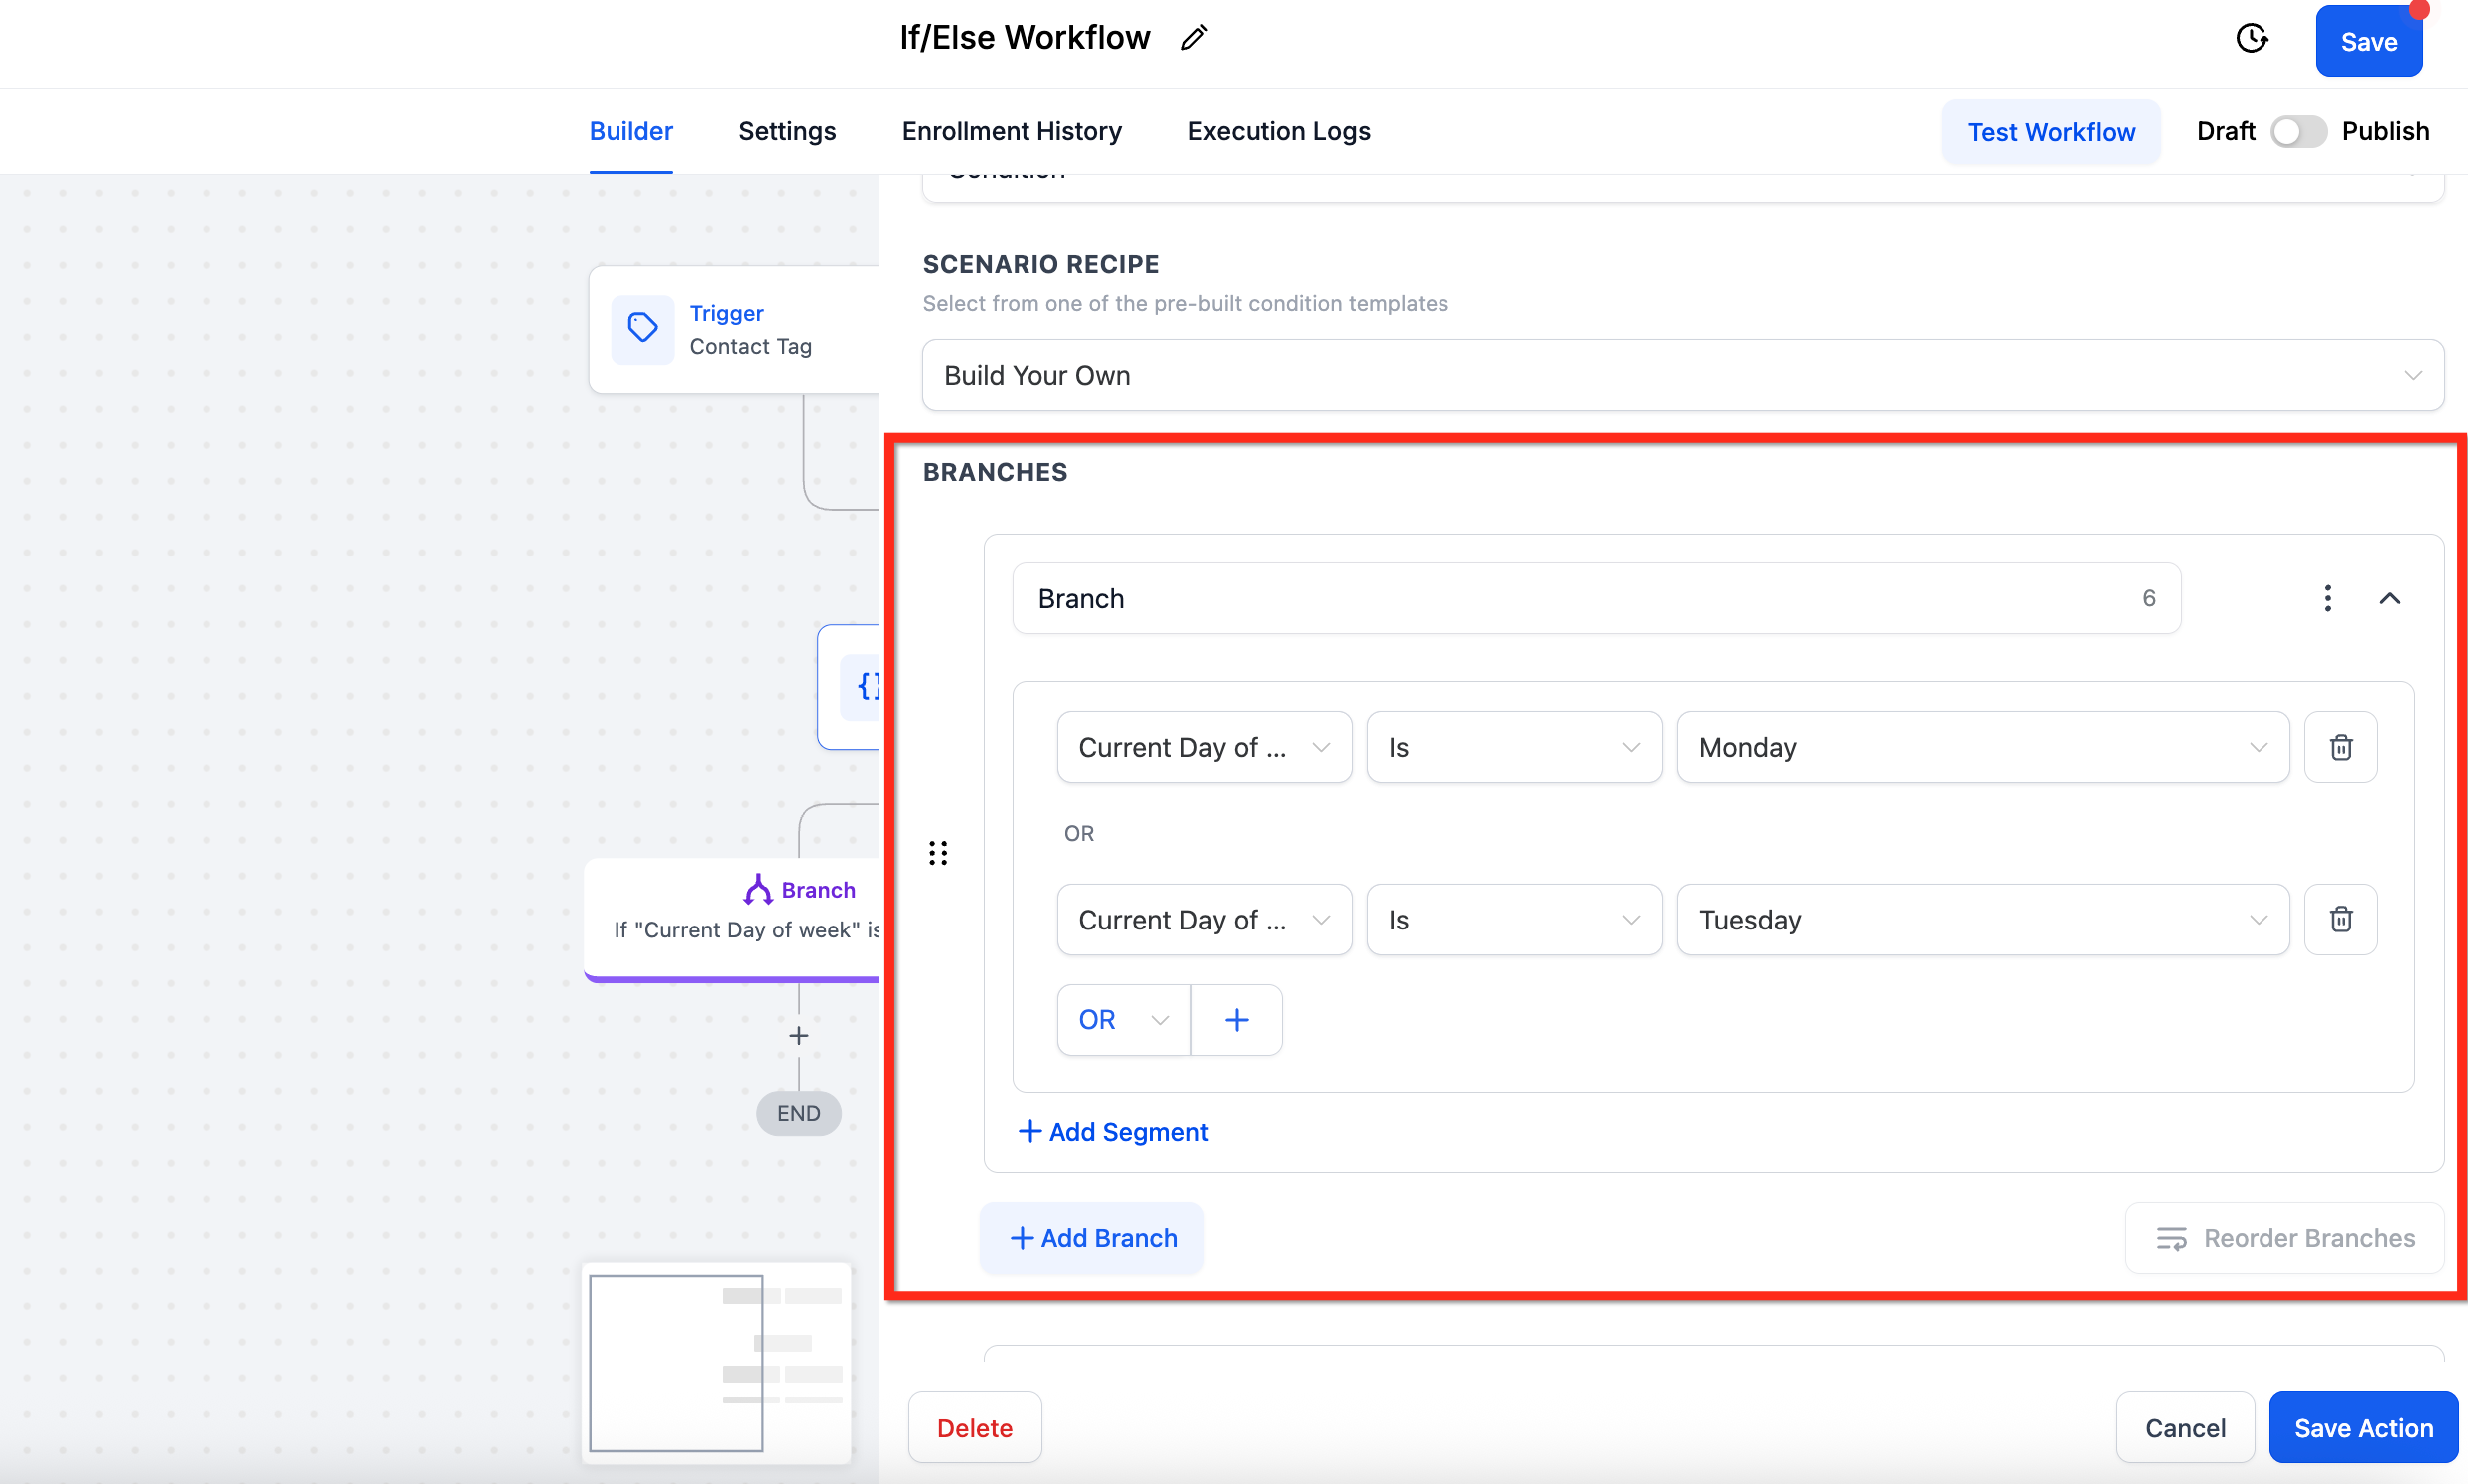
Branches. Each branch is one possible outcome and holds its own conditions plus its own downstream actions. You can add multiple branches, each supporting up to 10 outcomes. Rename each branch for the outcome it represents (for example "Rescheduled" and "Not Rescheduled").
Segments. A segment is the container that holds conditions. Within a segment you choose a field, an operator, and a value. Use Add Segment to add another group, and combine groups with:
AND to require multiple condition sets at once (all must be true).
OR to pass if any one of several condition sets is true.
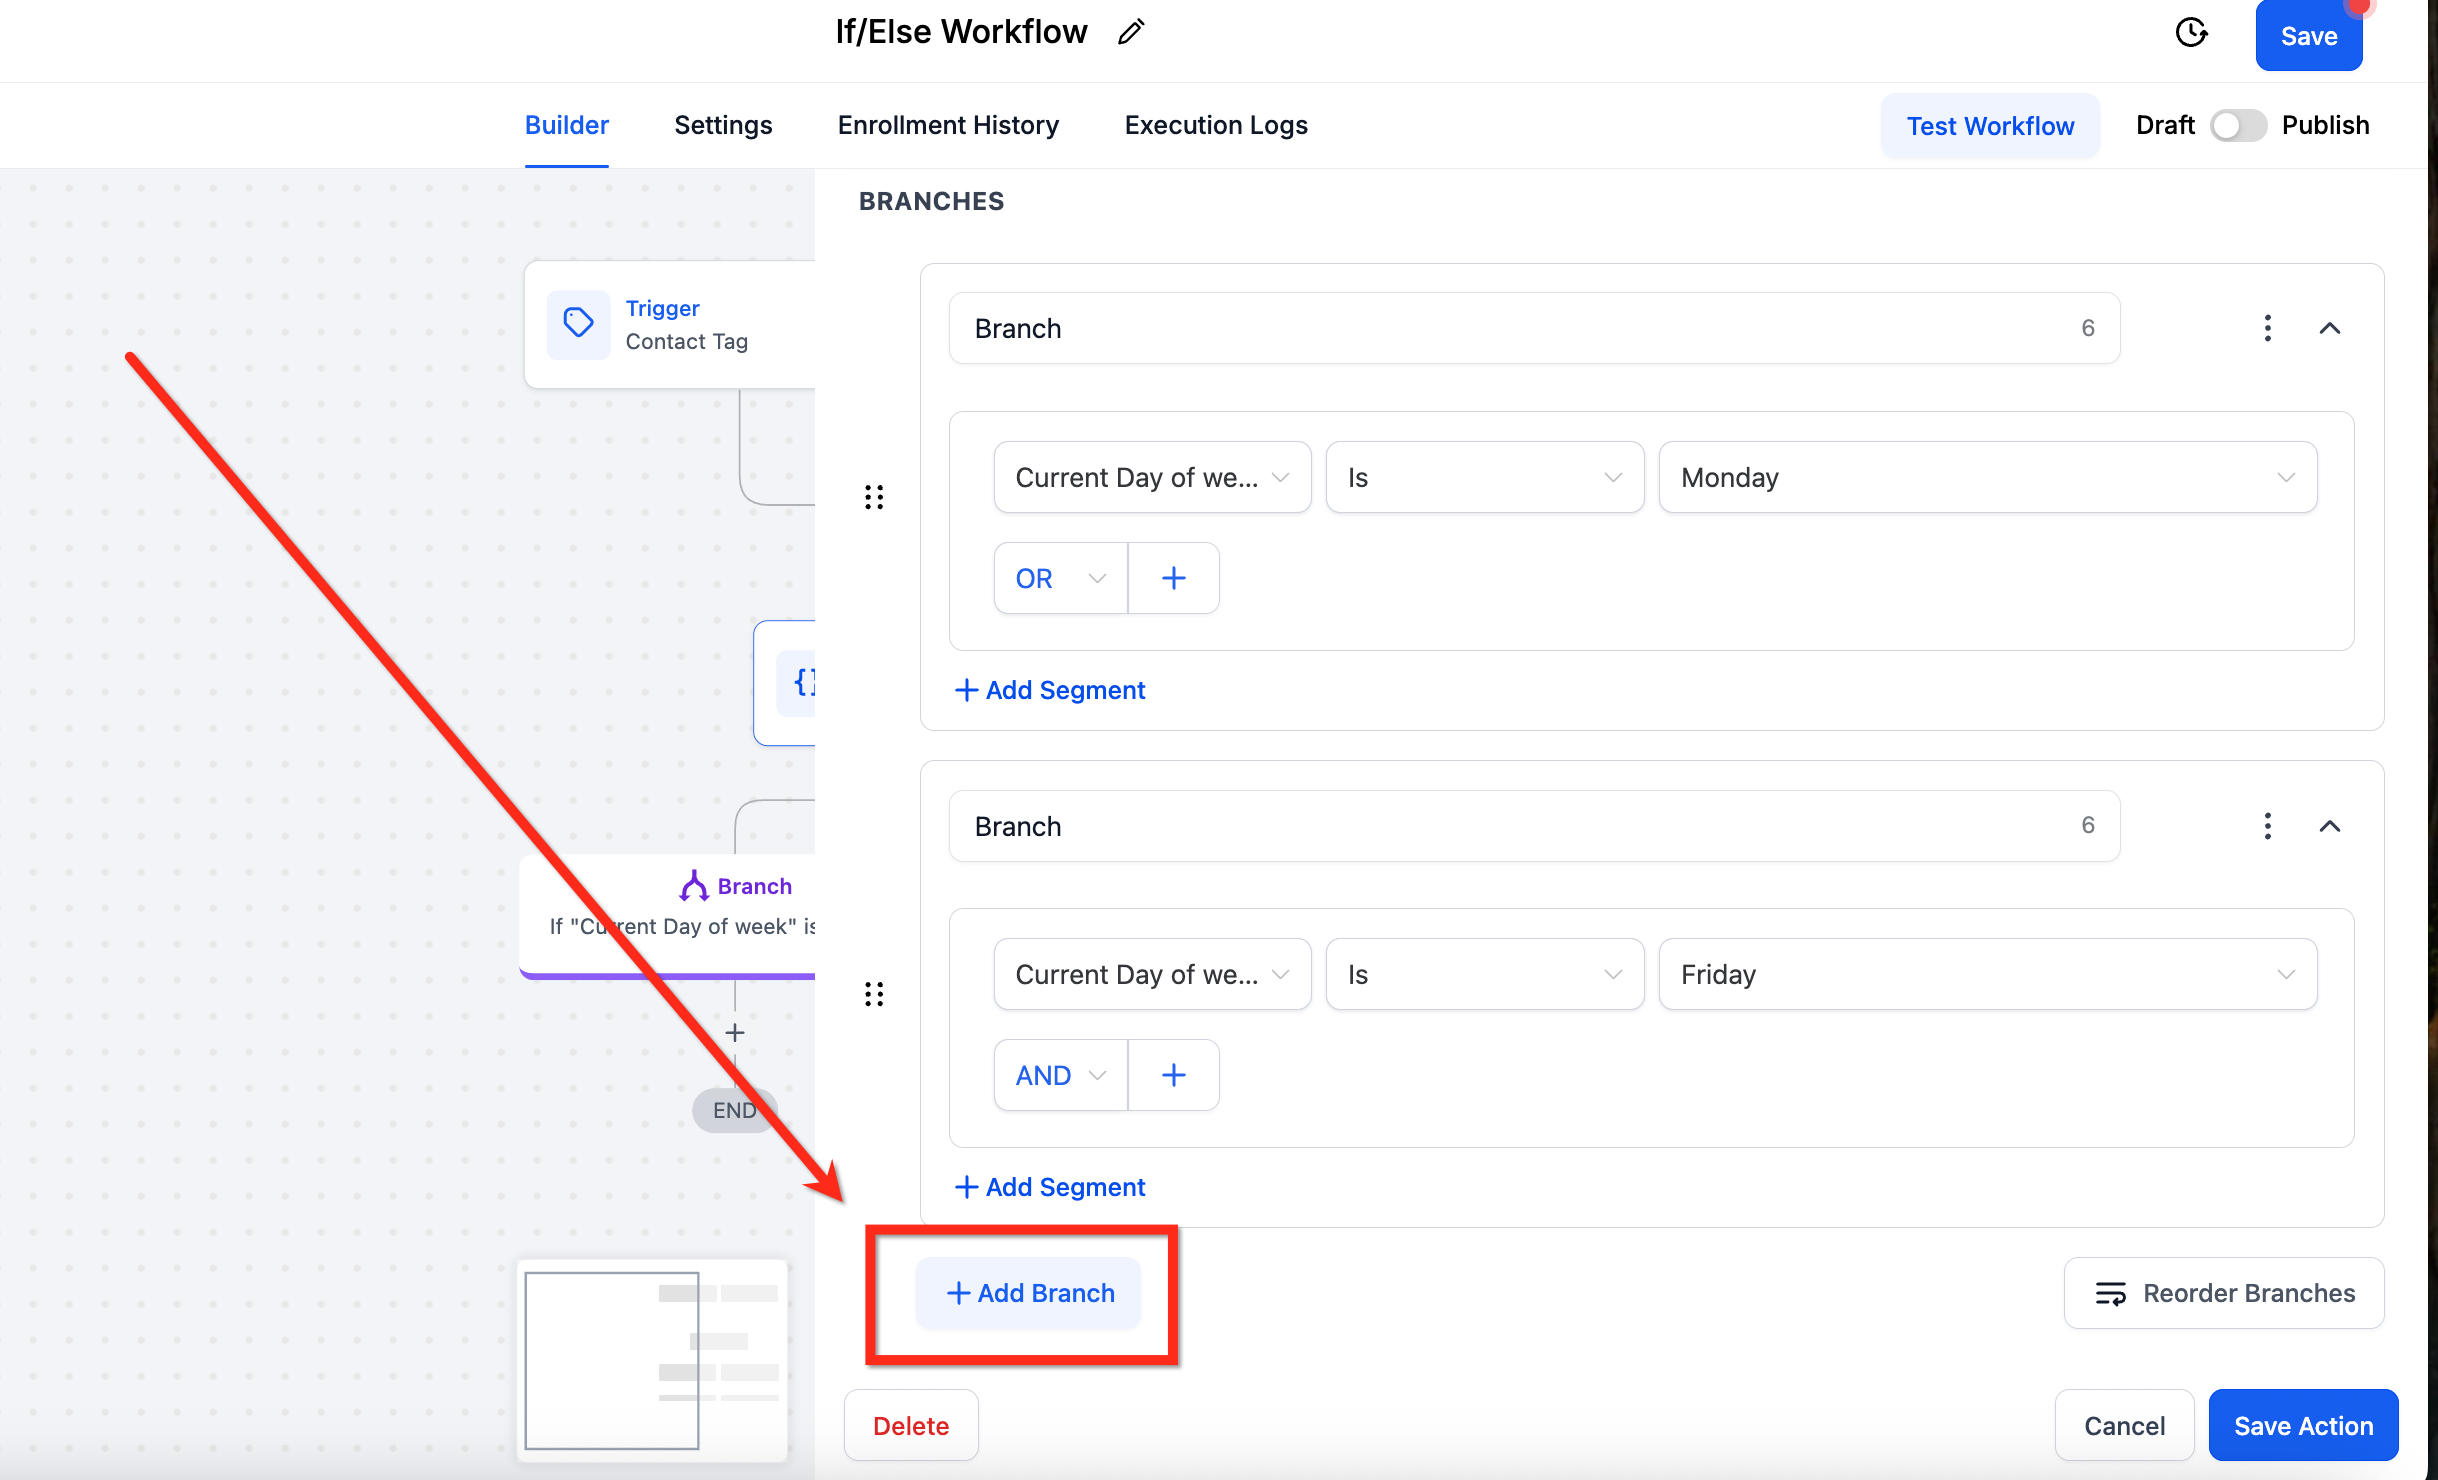
Add Branch. Click Add Branch to define more condition groups, each representing a separate path.
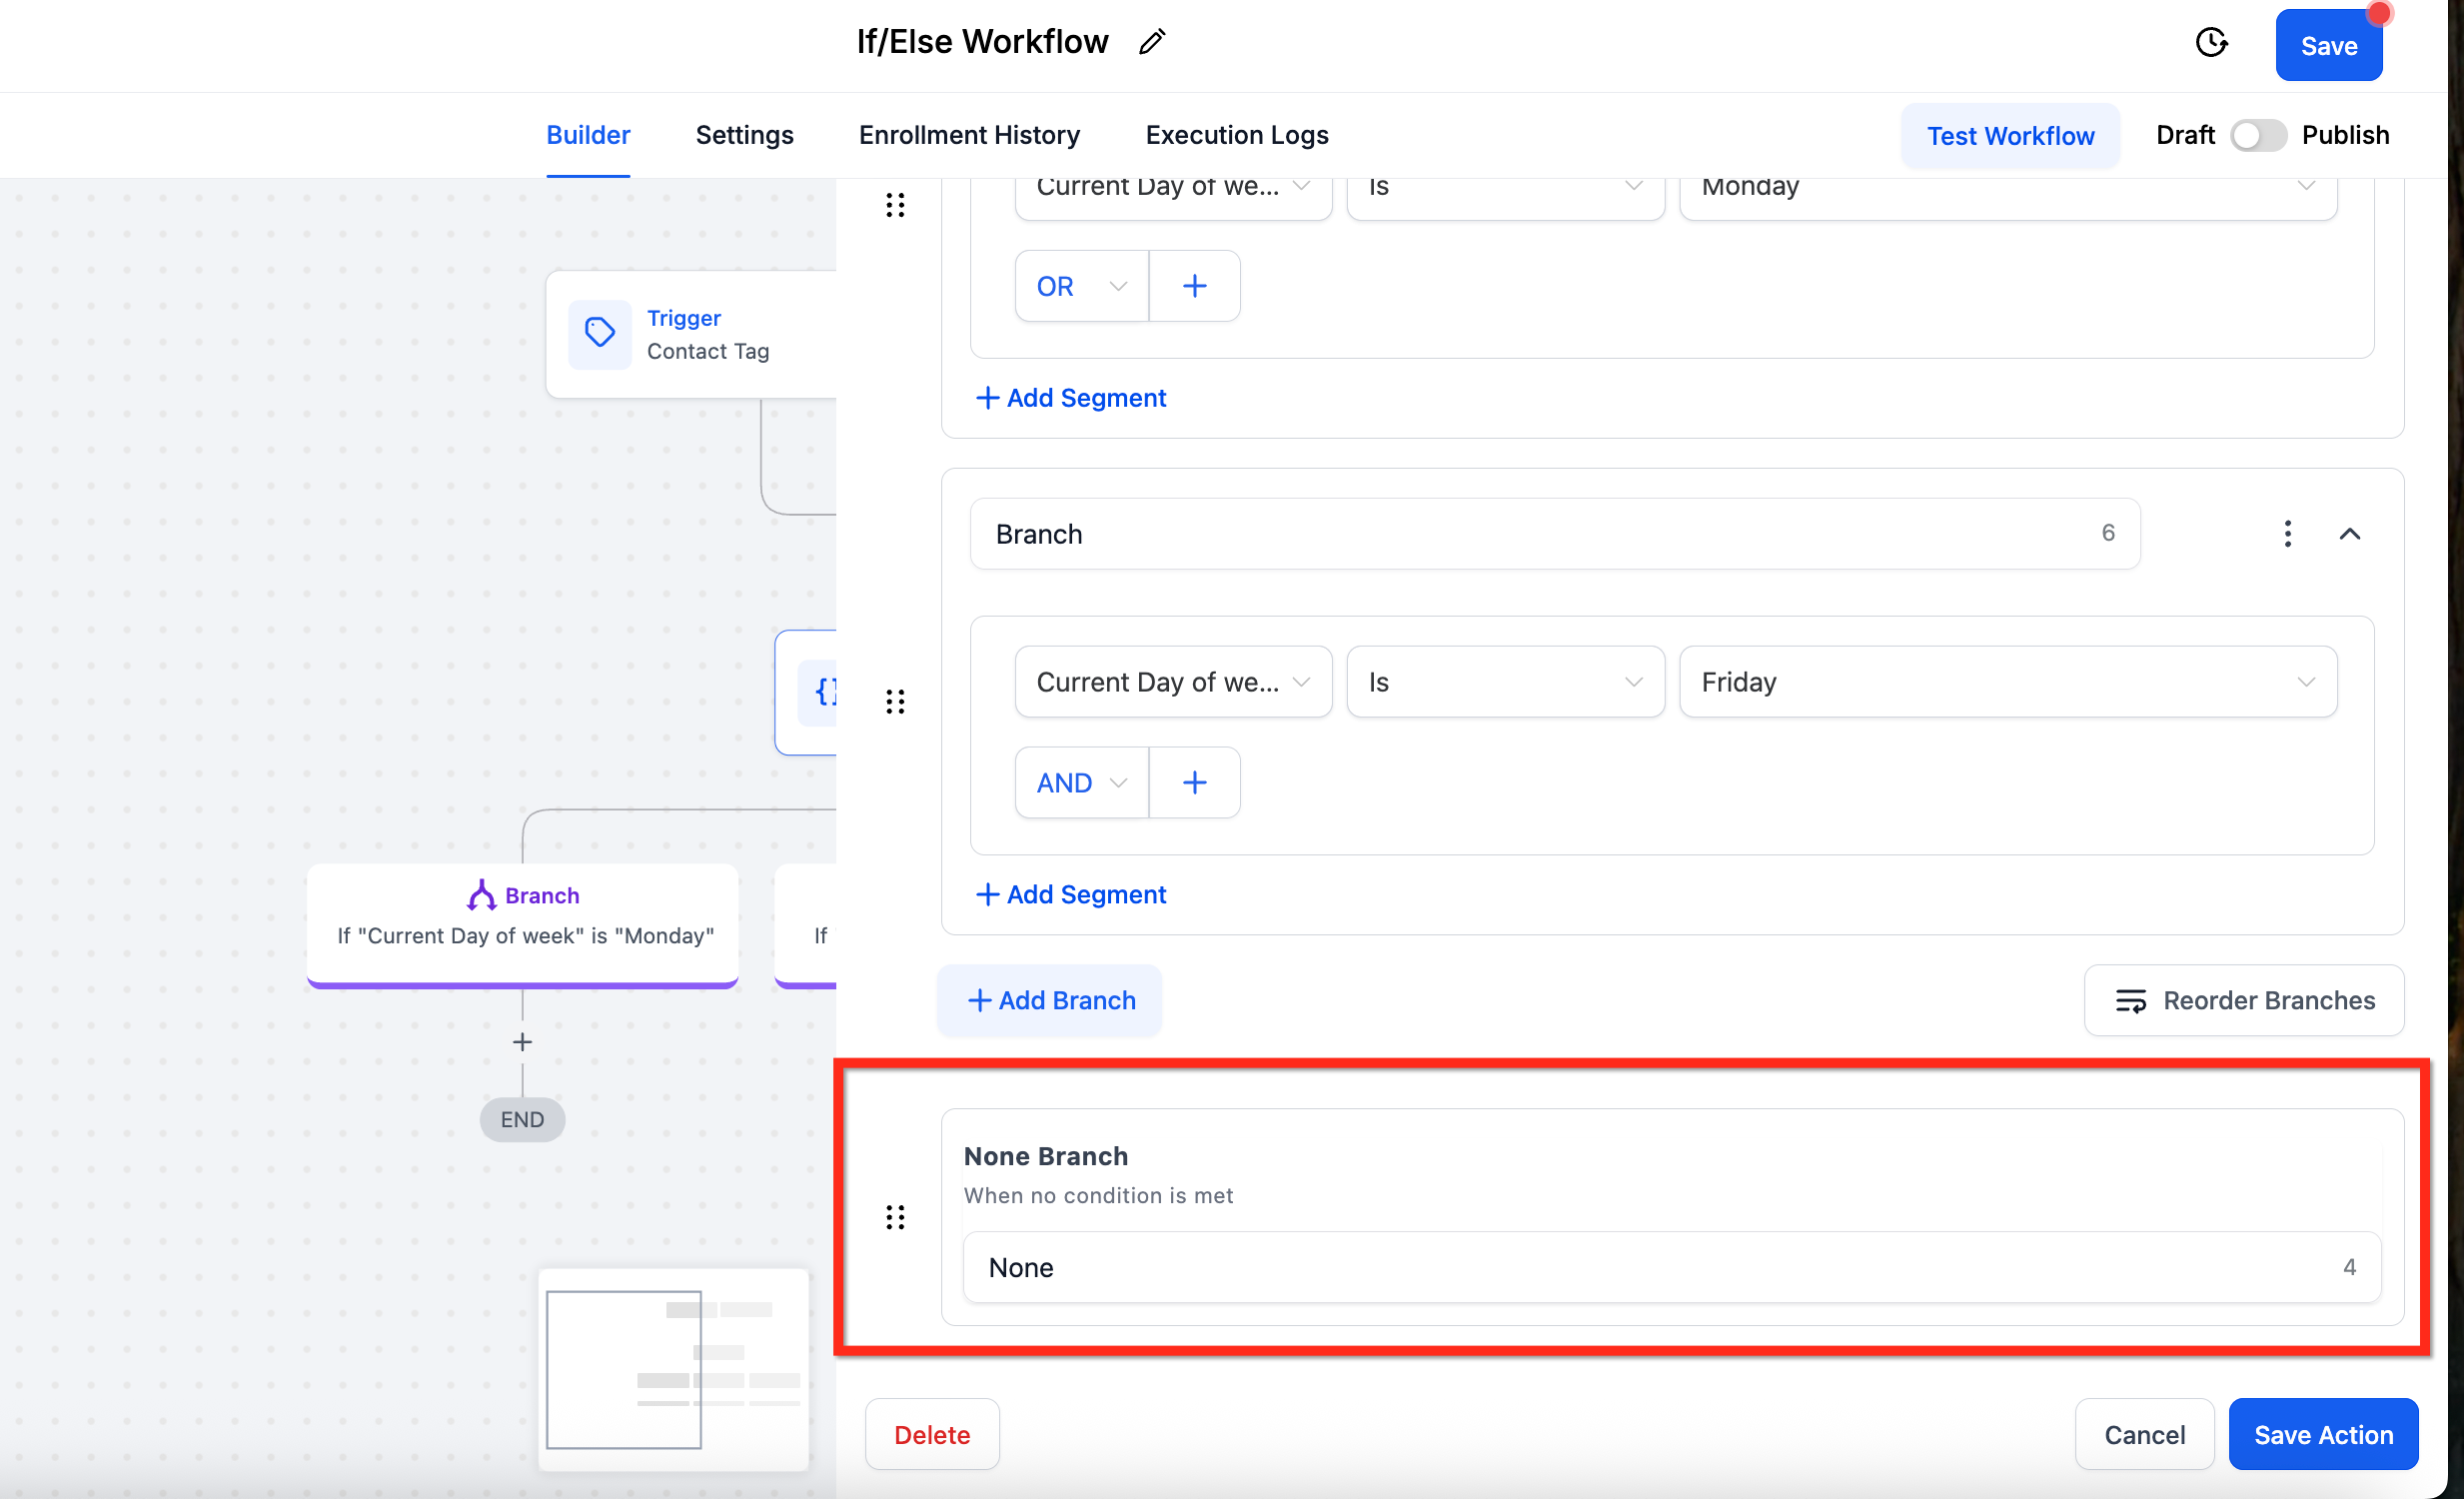
The None (Else) branch. A None branch is created automatically and runs when no defined branch conditions are met. It does not support conditions and cannot be removed, but you can rename it and add fallback actions to it.
You can branch on almost any field. Operators depend on the field type. For date and select fields the operators include Is, Is Not, Is Empty, and Is Not Empty, with time-based choices such as Today, Tomorrow, Yesterday, After, Before, and a manually picked Date.
Dynamic Values. On the right-hand side of a condition you can switch the value type to Dynamic Value and compare against a live value instead of a hard-typed one. The value can come from an earlier workflow step output or a stored field, which lets you branch on numbers and dates calculated upstream without duplicating logic. Supported types for Dynamic Values are Numeric (scores, counts, totals), Date (appointment dates, renewal dates), Select / Dropdown (advanced, requires option IDs rather than display names), and Monetary (invoice totals or amounts).
Company fields. In a contact-based workflow you can also select Company fields; they appear alongside contact fields in the picker. A company field resolves only when the contact is linked to a company, otherwise the value is blank.
Additional workflow fields. If/Else also supports context-specific fields such as Contact Engagement Score (when engagement scoring is enabled), Attribution Medium ID, Note created by (Name), and Task ID. If a value is unavailable for the current contact, the field is treated as empty and the workflow still continues.
When the workflow is triggered by an appointment event (such as Customer Booked Appointment or Appointment Status), an Appointment option appears inside If/Else with three filters:
Rescheduled (True/False): branches on whether the appointment was rescheduled for that execution. If a client reschedules multiple times, the most recent reschedule status is used.
Start Date: filters on when the appointment begins, using the operators above.
End Date: filters on when the appointment ends, working the same way as Start Date.
Only one appointment-based filter can be used per If/Else condition, but you can chain multiple If/Else actions, and you can combine the Appointment filter with other condition types in the same branch.
Field | Description | Required |
|---|---|---|
Action Name | Label used to identify the action in the workflow | Yes |
Condition | The rule evaluated to determine the branch | Yes |
Branches | Workflow paths created by the If/Else action | Yes |
Segments | Groups of conditions combined with AND / OR logic | No |
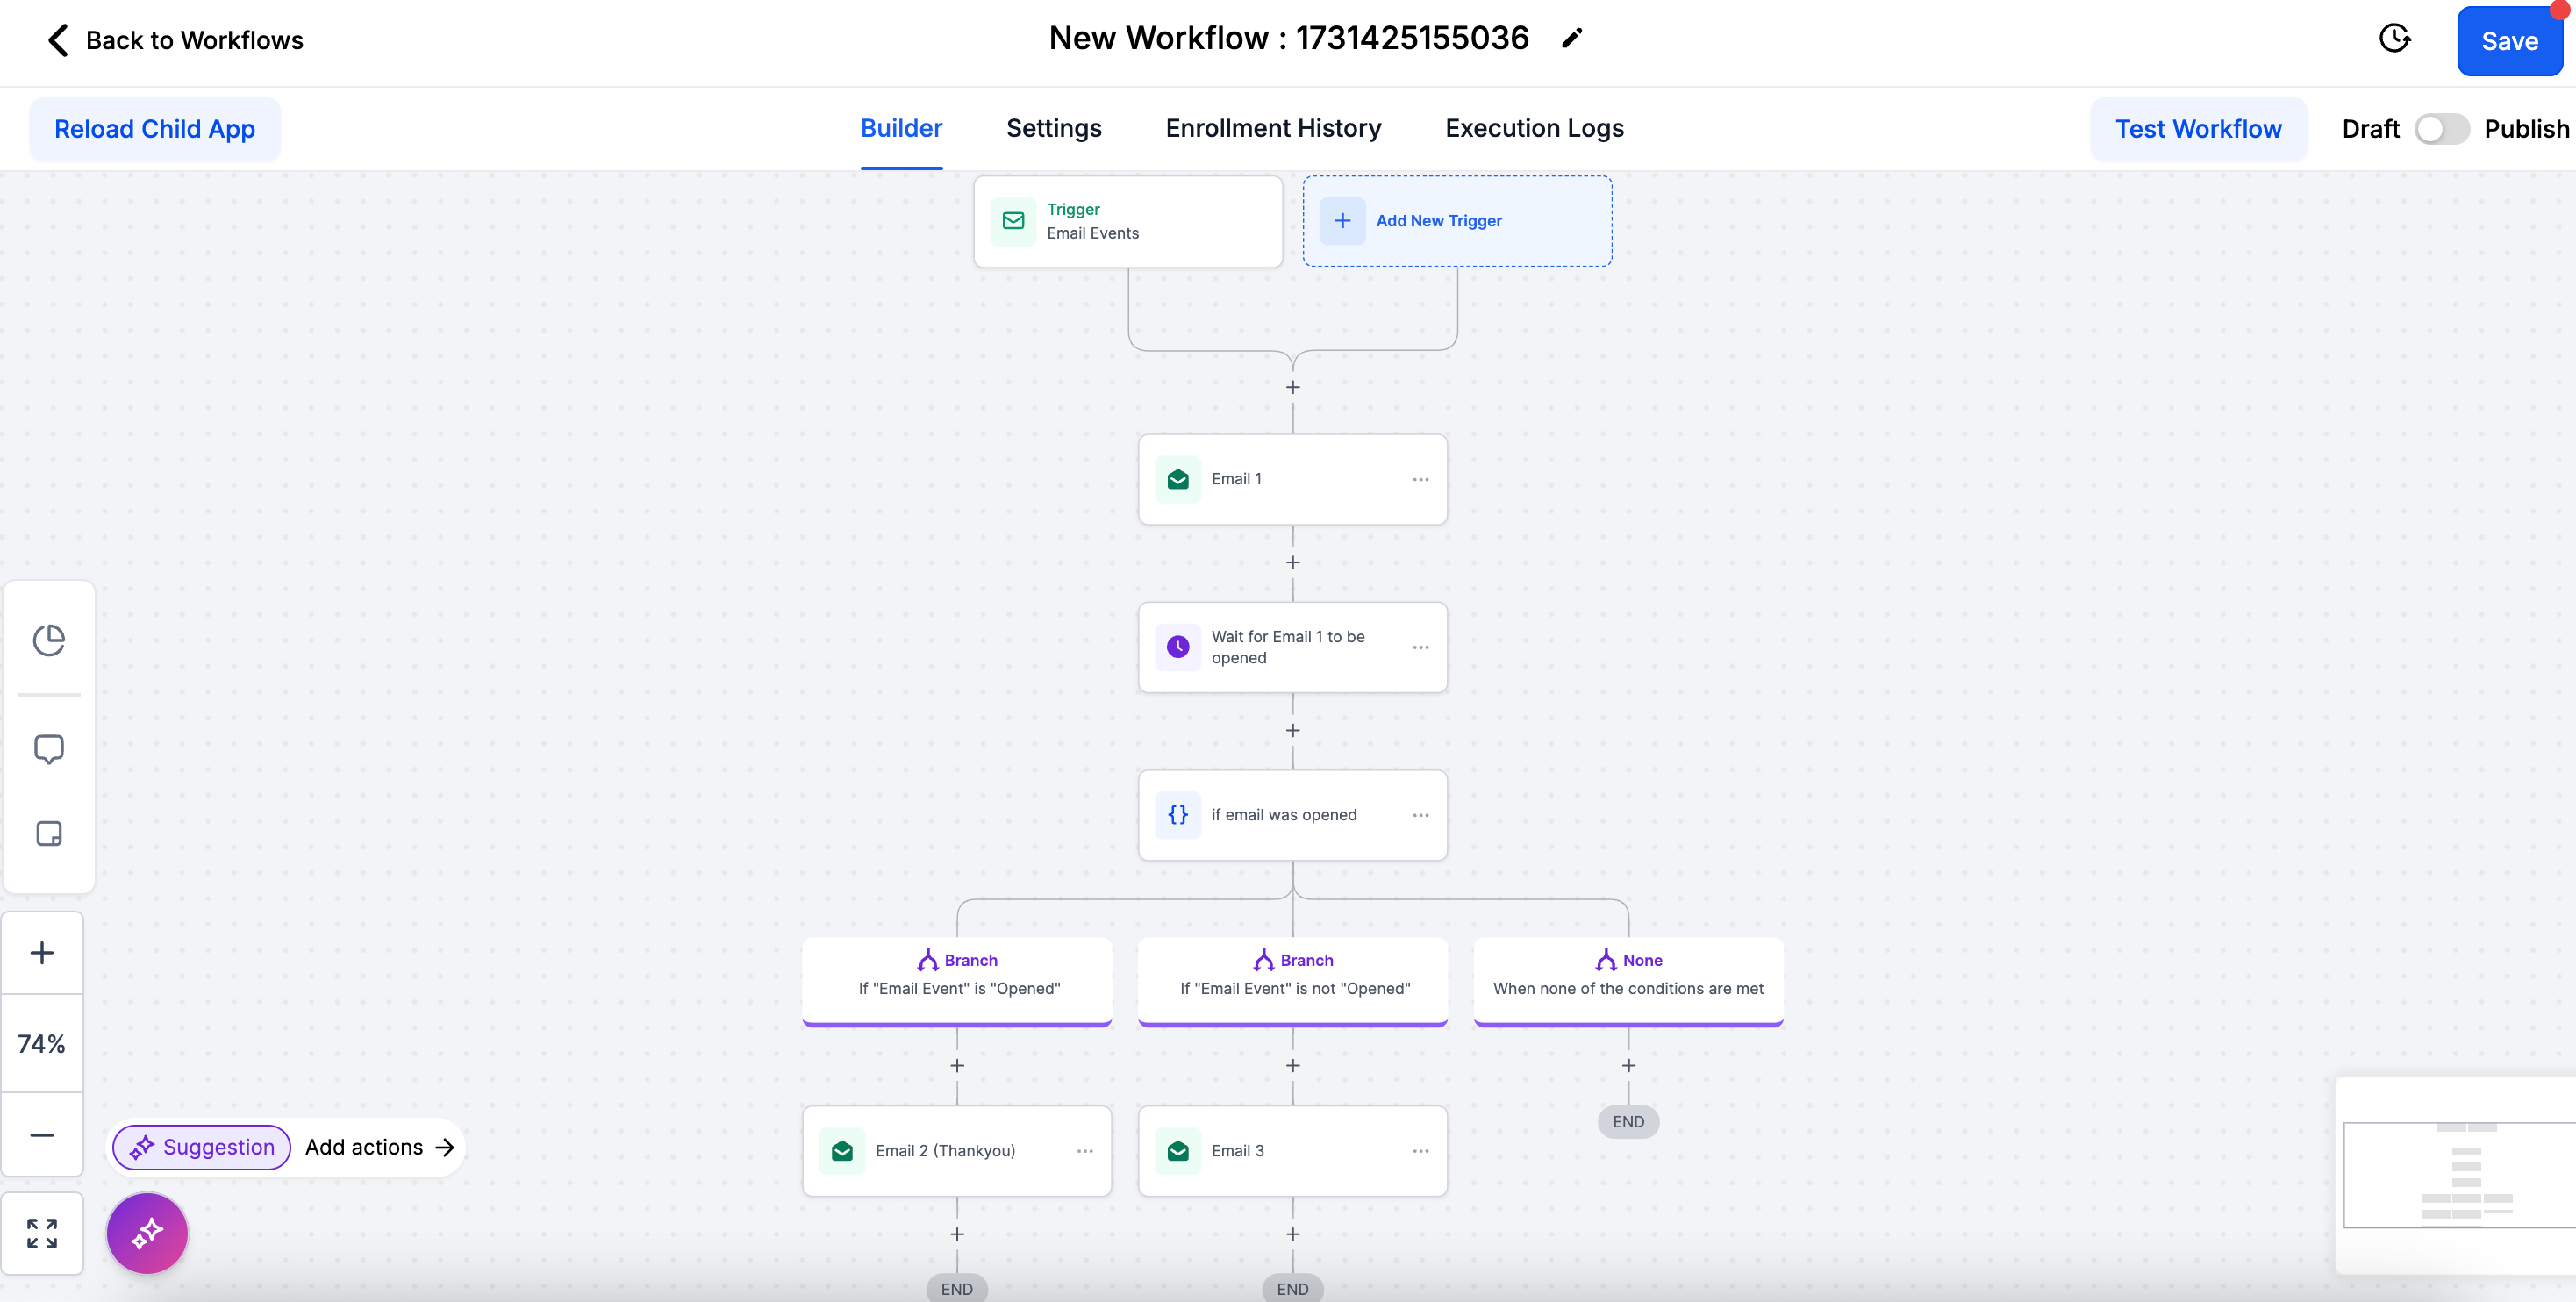
Use If/Else whenever the next step should depend on who the contact is or what they have done. In a med spa, after a promotional email goes out you might branch on Email Event "Is Opened": the opened branch sends a Botox special with a booking link, while the None branch resends the email with a new subject line. Or after a consultation is booked, branch on the treatment value (for example, route packages of $2,000 or more to a concierge follow-up while standard bookings get the regular reminder series) using a value captured earlier in the workflow.
Insert a Wait action before the If/Else step to control when the condition is evaluated (for example, "Wait until email is opened or 1 day passes" before branching).
You can edit fields, operators, and values before or after publishing.
Select/Dropdown dynamic comparisons need option IDs, not display names.
The Wait action controls timing inside an automation. Instead of running every step immediately, it holds a contact until the timing, event, reply, action, or condition makes sense, so messages and steps land at the right moment in the client journey.
After naming the action, select what the contact should wait for. The selection screen offers seven plain-language options.
A set period of time. Holds the contact for a fixed duration.
Time period and Unit: seconds, minutes, hours, or days.
Standard or Dynamic value: use the three-dot menu to switch. Standard is a fixed value you enter; Dynamic reads a custom variable at runtime so the duration can vary per contact.
Advance Window (optional): toggle on to limit when contacts resume. Configure Resume On (specific weekdays), Resume Between Hours (a window or exact start time), and Additional Filter (granular date conditions such as a specific day, month, or year).
A specific date and time. Holds the contact until an exact date and time, following the account's date format.
Standard or Dynamic value: Dynamic reads the date from a contact field at runtime.
When should the Contact proceed: On this date and time, Before this date, or After this date (Before/After ask for a duration).
If this date has already passed: Continue to next action, Exit Contact from automation, Go to specific step, or Skip all outbound communication actions till the next wait or event start date action.
A recurring schedule. Holds the contact until the next occurrence of a repeating pattern.
Frequency: Weekly, Monthly, or Yearly.
Weekly: choose one or more days and a time.
Monthly: a specific day of the month (such as Day 1 or Day 15) or the 1st, 2nd, 3rd, 4th, or Last weekday of selected months, plus a time. Ordinals can be stacked (for example 1st and 3rd Tuesday).
Yearly: a month and day every year, plus a time.
When should the Contact proceed: On this date and time, Before this date, or After this date.
A live Next 5 scheduled recurrences preview confirms the dates in the workflow timezone before you save.
An upcoming appointment or booking. Holds the contact relative to a scheduled event.
Type: Appointment / Calendar Event, Service Booking (hidden if Service Booking is disabled for the location), or Invoice Due Date.
When should the Contact proceed: At the scheduled time, Before, or After (Before/After ask for a duration in months, days, hours, and minutes).
If this date has already passed: Continue to next action, Go to specific step, Exit Contact from automation, or Skip all outbound communication actions till the next wait or event start date action.
The contact to reply. Holds the contact until they reply on a selected channel.
Reply To channel: SMS, Email, or another supported channel. A Send action on that channel must come before the wait step.
Timeout: toggle on with a duration so the contact moves forward even without a reply.
The contact to take an action. Holds the contact until they engage.
What action: Clicks a trigger link, or an Email event such as open, click, or bounce.
Trigger link or email step selection.
Timeout: toggle on with a duration.
Specific conditions to be met. Holds the contact until a custom segment evaluates true.
Build Segments of Conditions joined by AND/OR logic, using Add Condition and Add Segment.
The contact moves forward as soon as any one segment is true; segments have an OR relationship and no priority order.
Timeout: toggle on with a duration to release the contact if no segment is satisfied.
Wait For | Description |
|---|---|
A set period of time | Holds for a fixed duration; supports dynamic value and an advance window |
A specific date and time | Holds until an exact date; fixed or dynamic; handles a past-date fallback |
A recurring schedule | Holds until the next weekly, monthly, or yearly occurrence |
An upcoming appointment or booking | Holds before, at, or after an appointment, service booking, or invoice due date |
The contact to reply | Holds until a reply on a channel, with optional timeout |
The contact to take an action | Holds until a trigger-link click or email event, with optional timeout |
Specific conditions to be met | Holds until any custom segment evaluates true, with optional timeout |
Use Wait for timely follow-ups, off-hours protection, date-driven reminders, recurring touch-points, and pre-appointment nudges. For a med spa: after a new lead is created, wait 1 hour before sending a welcome email so the message feels intentional. For an upcoming appointment, wait until 1 day before to send a pre-treatment prep reminder, and wait until 2 days after to send an aftercare check-in. For active members, use a monthly recurring schedule on Day 1 at 9:00 AM to send a membership perks summary.
When a Wait is placed directly after a Send action, The contact to reply moves to the top of the option list for easy access.
When the trigger is appointment-based, An upcoming appointment or booking shows an info banner referencing the trigger appointment.
Use Standard when every contact should wait the same fixed amount; use Dynamic when the date or duration should be read from each contact's record.
If an event or appointment time has already passed when the contact arrives, the workflow uses your If this date has already passed setting rather than waiting indefinitely.
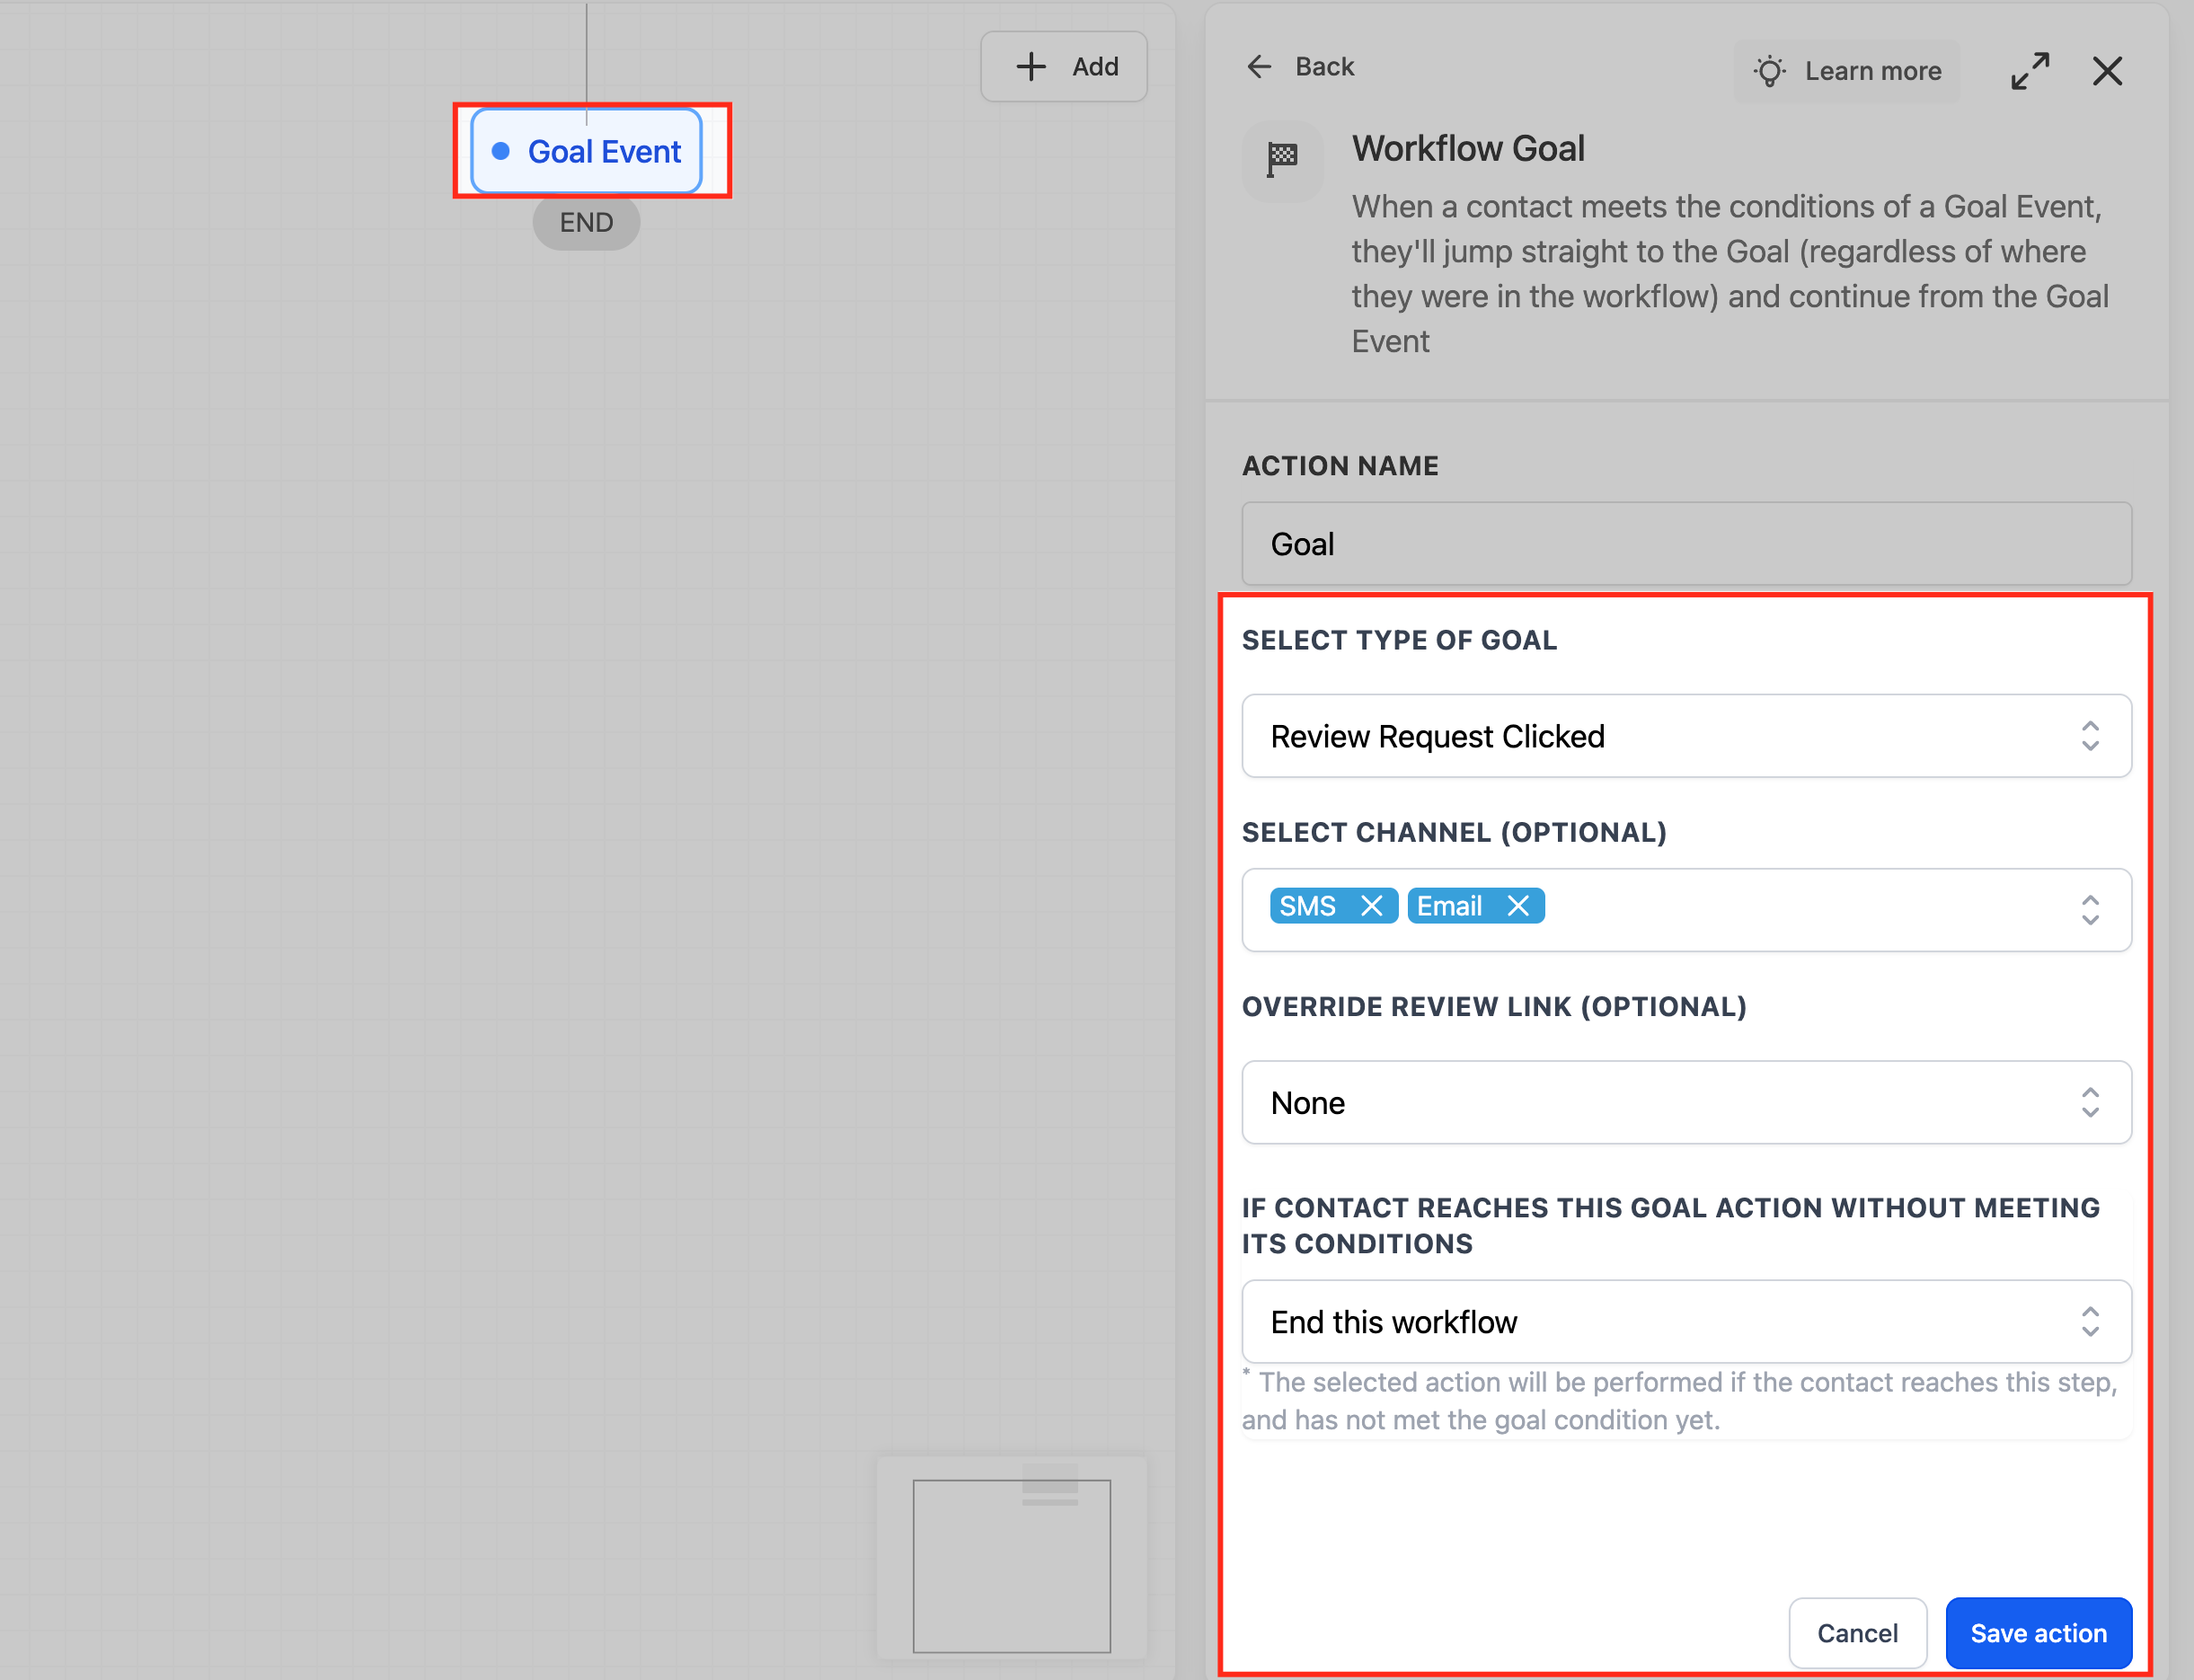
A Goal Event sets a target for the whole workflow. From the moment a contact enters, the system listens for the goal to occur, and when it does the contact is pulled directly to the Goal step, regardless of where they currently are. This turns the workflow into one with a smart shortcut, so contacts who hit the milestone skip straight ahead instead of marching through every step.
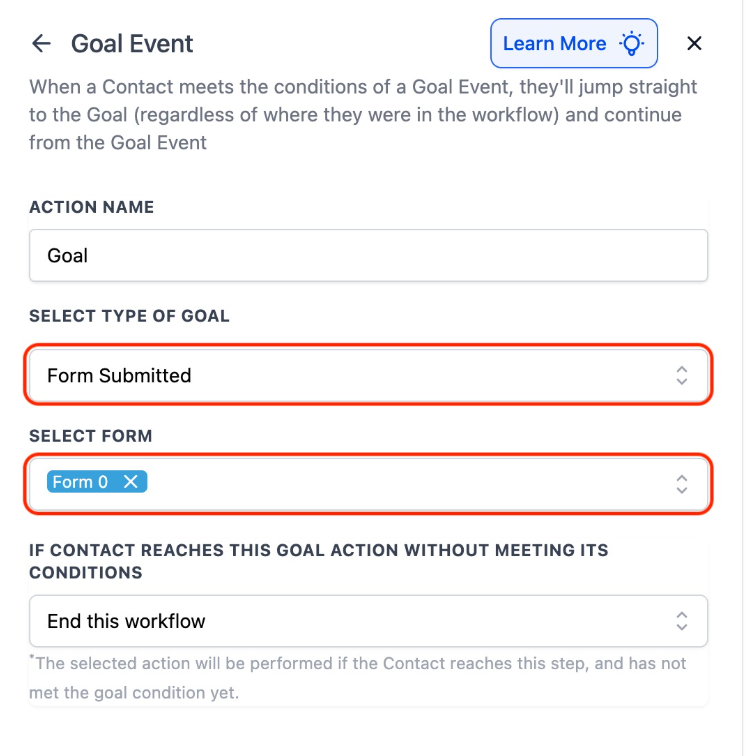
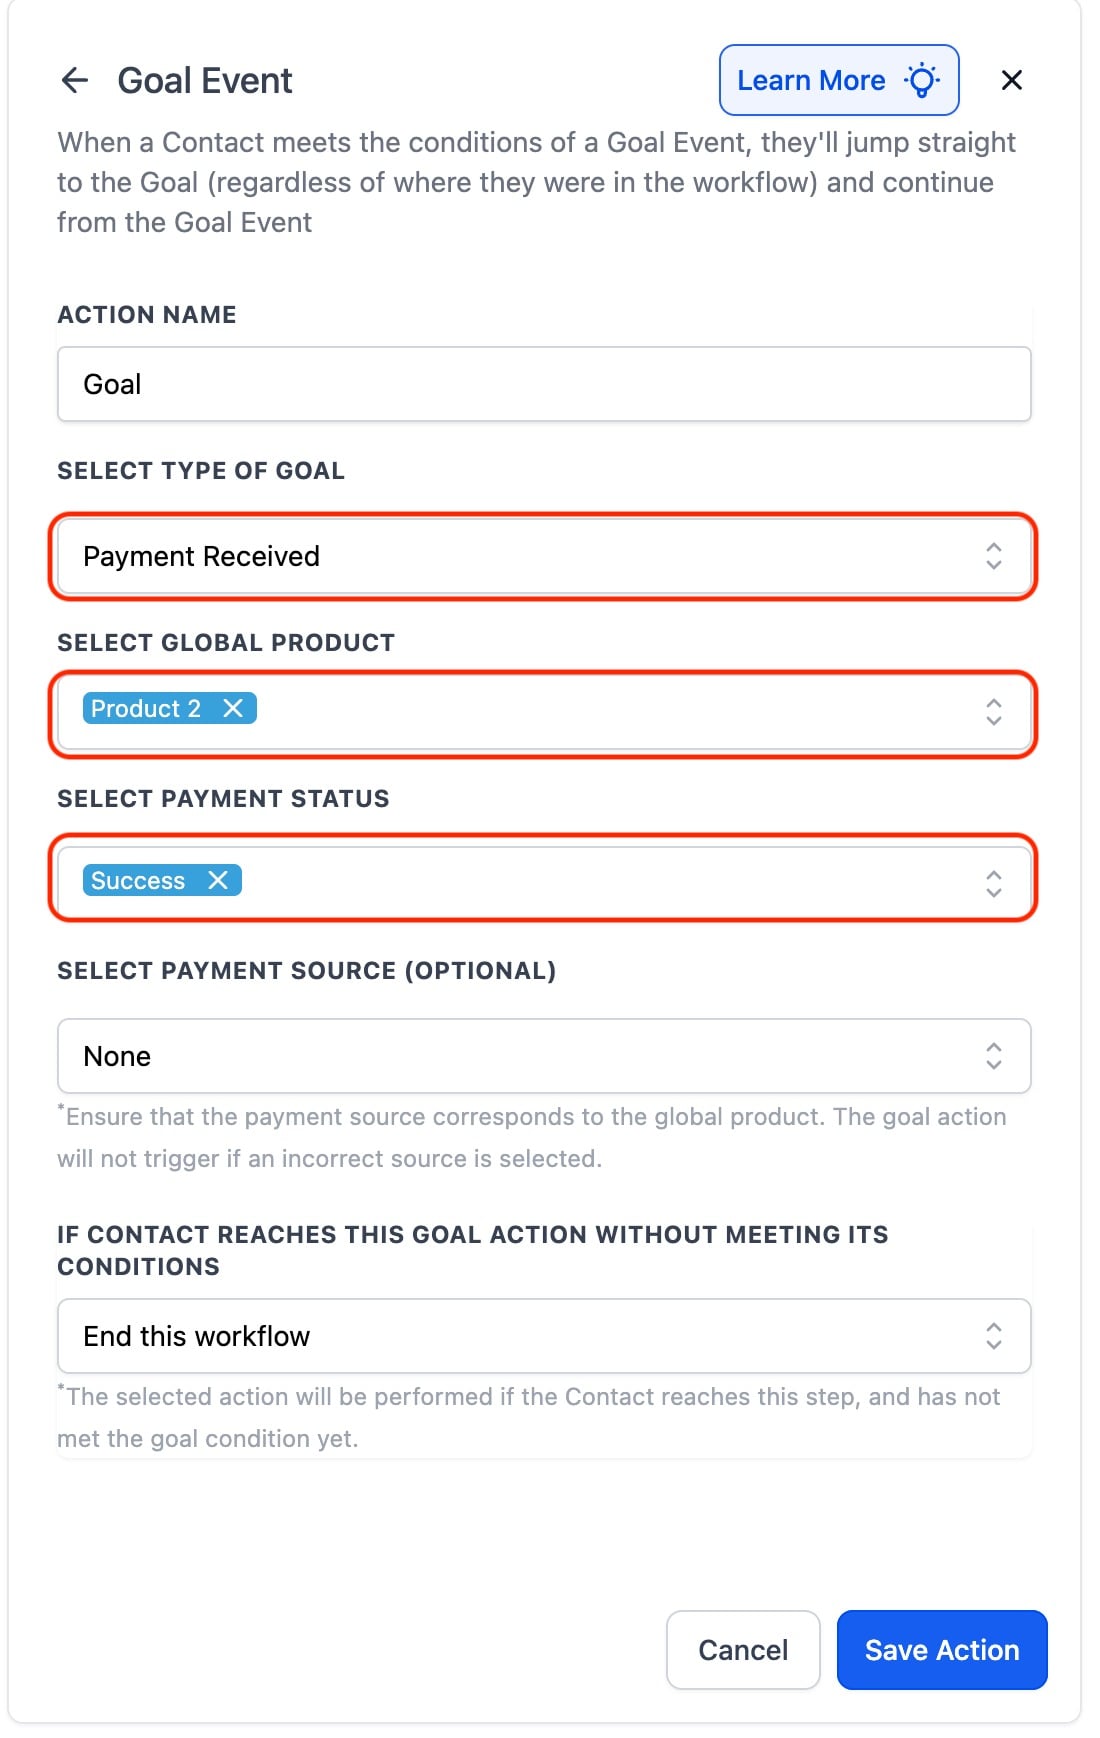
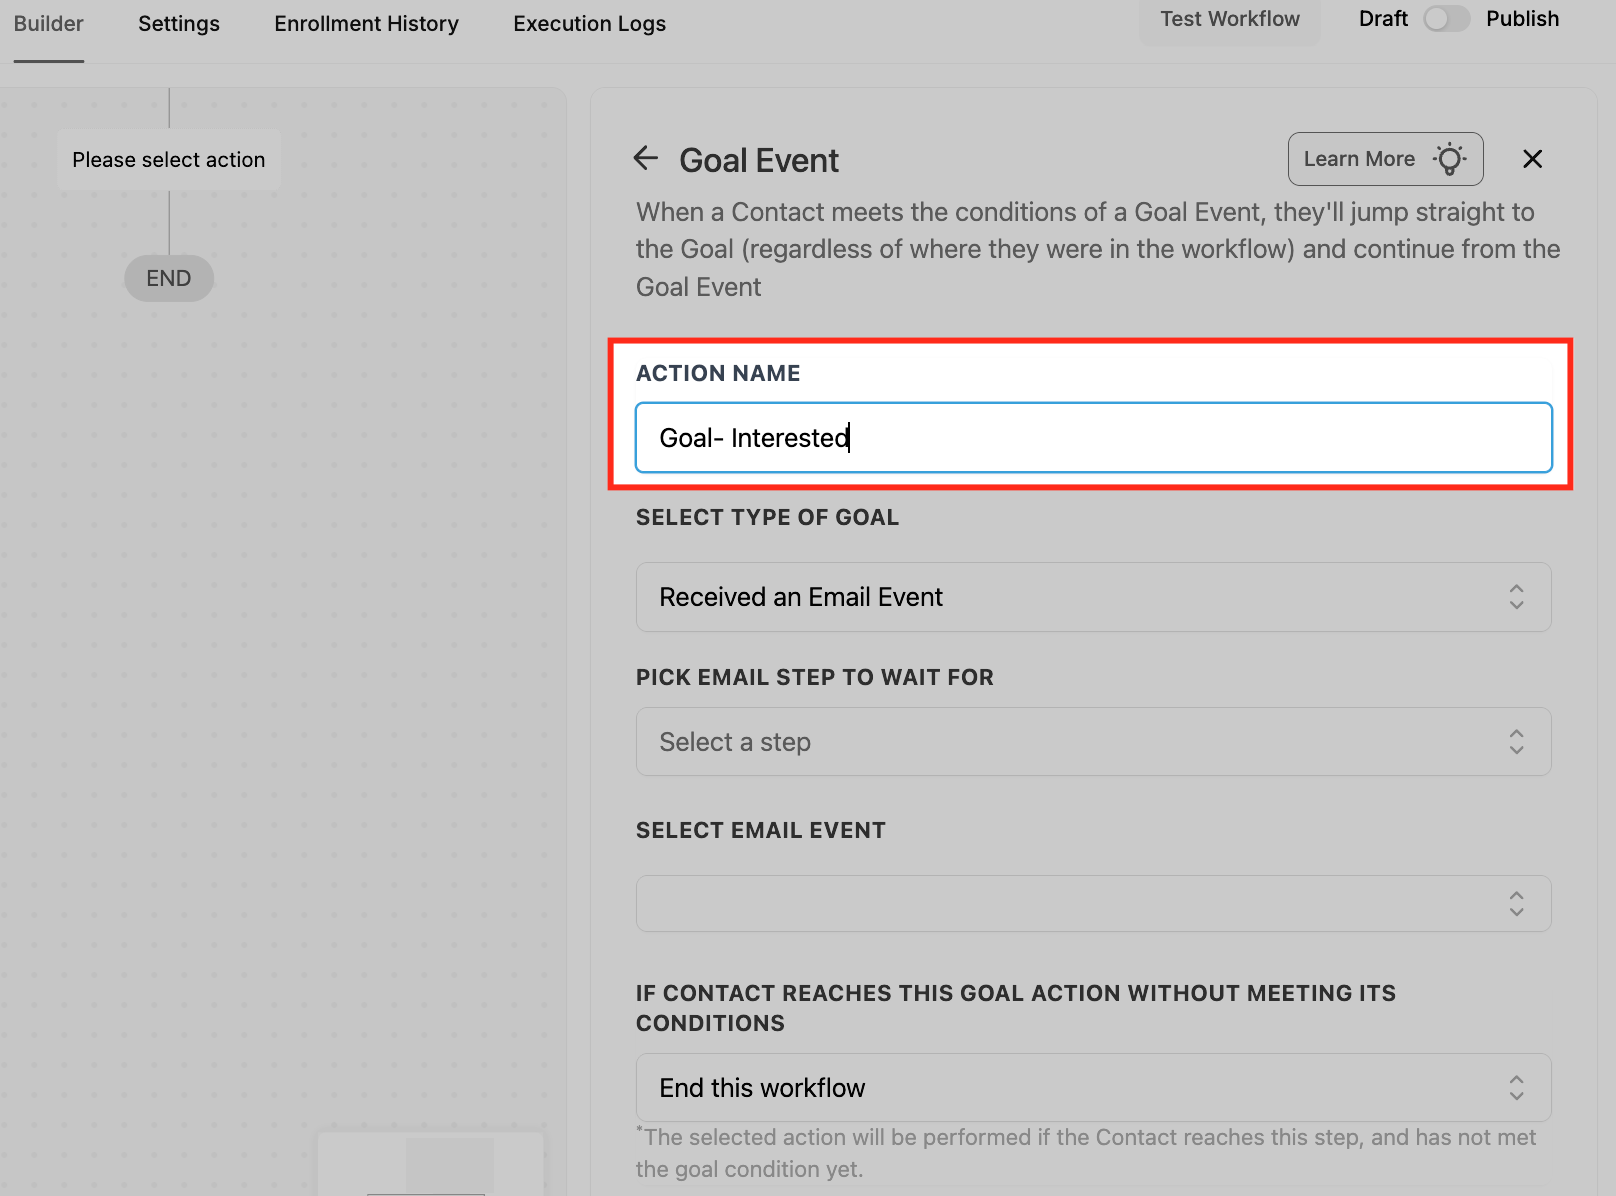
Action Name. Name the goal for the outcome it represents, such as "Lead Conversion Goal" or "Consultation Confirmed".
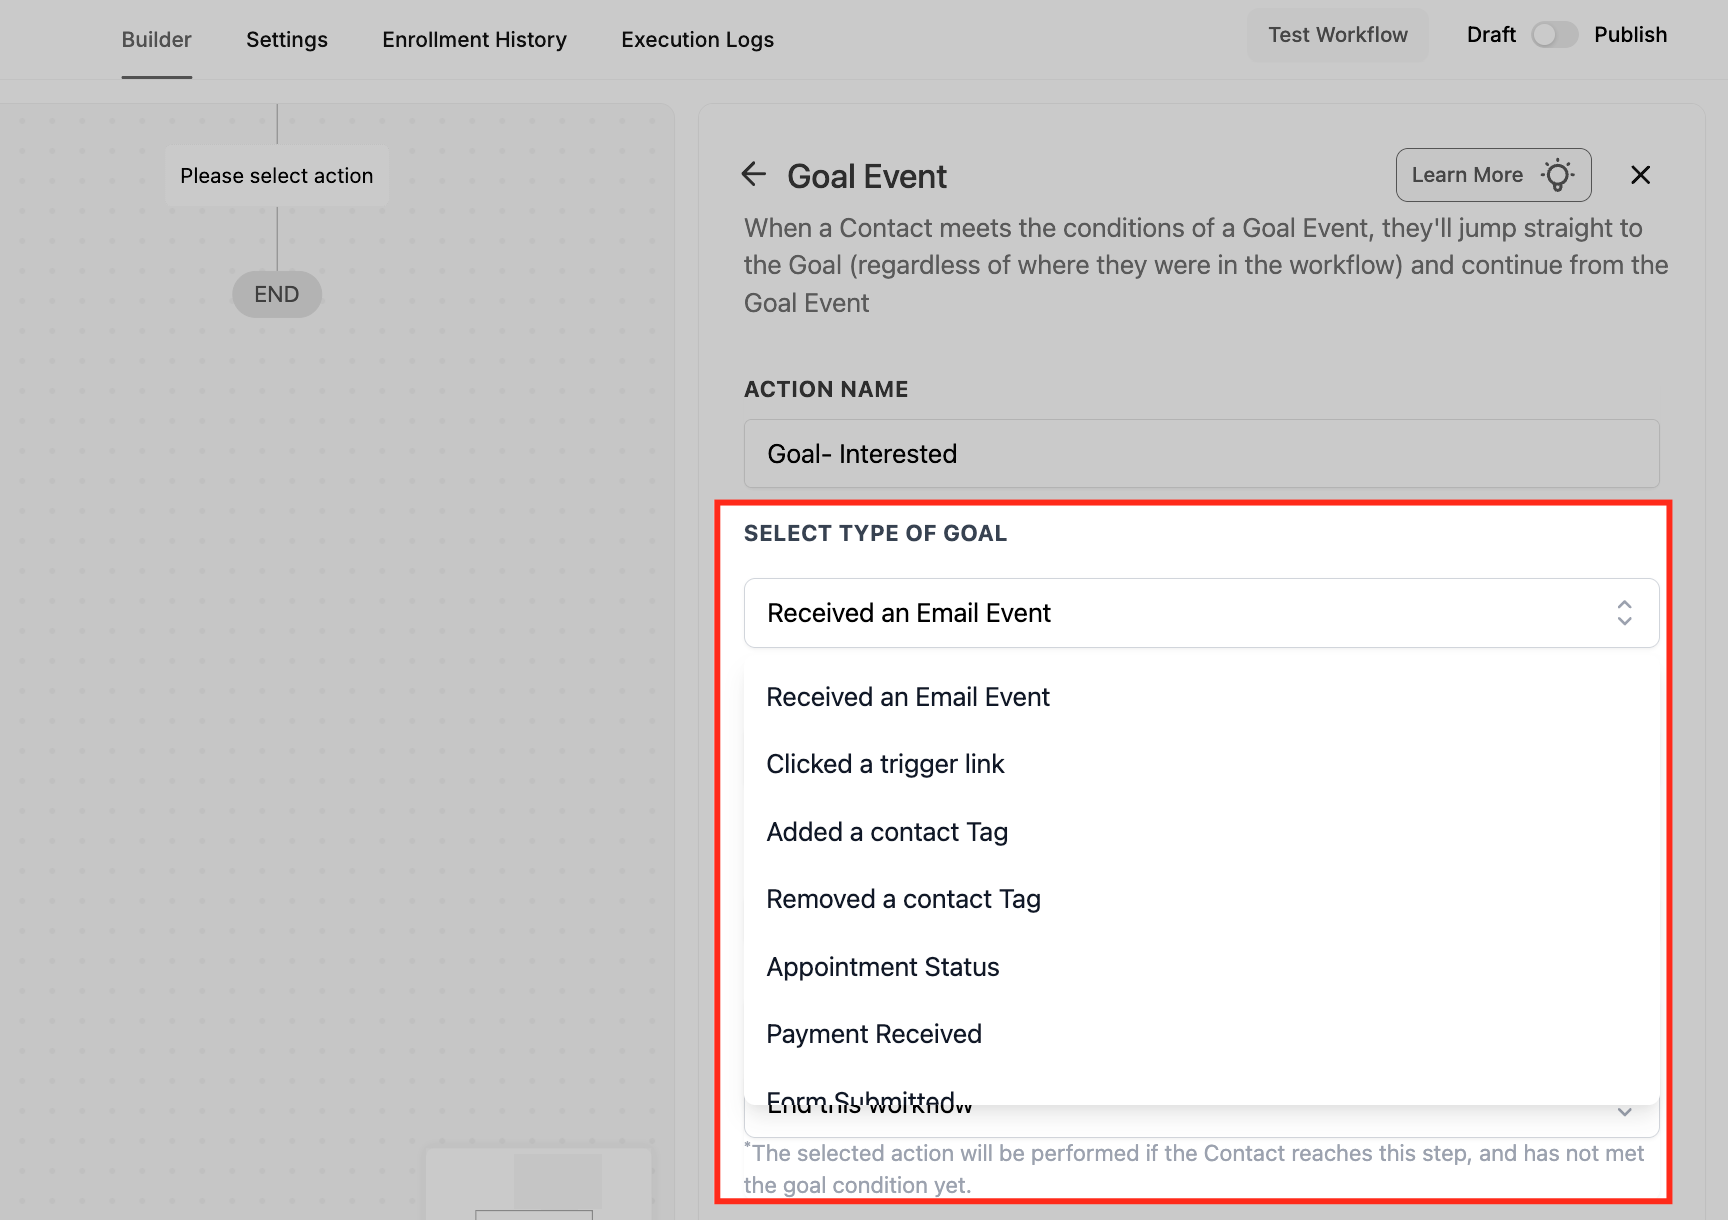
Select Type of Goal. Choose the behavior the workflow should listen for:
Form Submitted: completes when a contact submits any of the selected forms (multi-select).
Payment Received: completes on a payment event; can filter by success or failure status and by product.
Invoice Paid: completes when an invoice is marked Paid or Partially Paid; choose whether to match any invoice for the contact or only the invoice tied to a selected Send Invoice action.

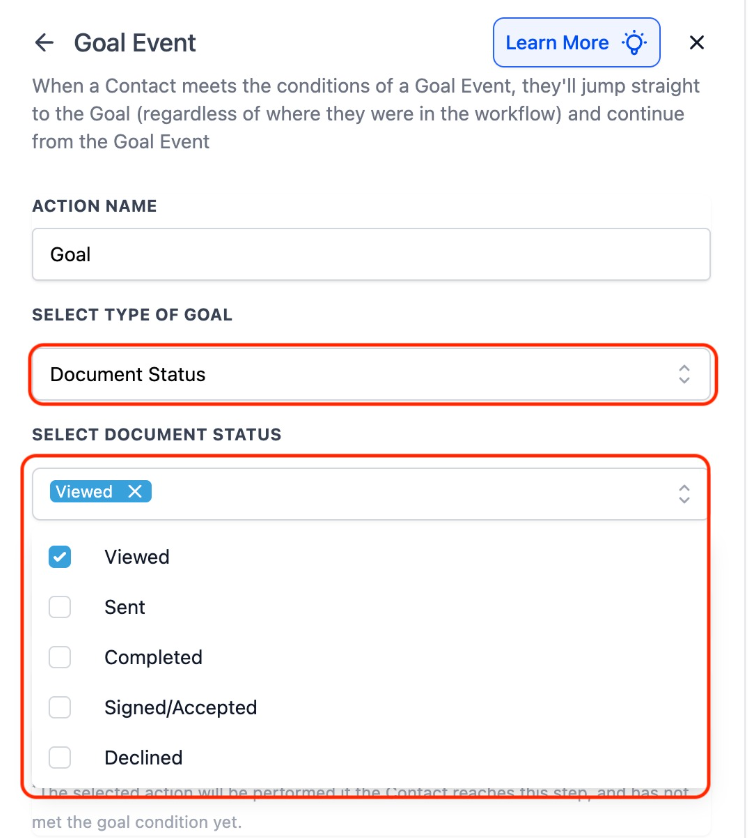
Document Status: completes on proposal or contract lifecycle events such as Viewed, Signed, Declined, or Completed.
Email Events: completes when the contact interacts with an email. Supported events include Opened, Clicked, Unsubscribed (Mailgun only), Complained, and Marked as Spam. Select the email step and one or more events.
Clicked a Trigger Link: completes when the contact clicks a specific tracked link.
Review Request Clicked: completes when the contact clicks a review request link; match any channel or filter by channel, and optionally narrow to a specific review link.
Contact Tag Added or Removed: completes when a specified tag is added to or removed from the contact, including changes made outside the workflow.
Appointment Status: completes when an appointment on a selected calendar changes to New, Confirmed, or Showed.
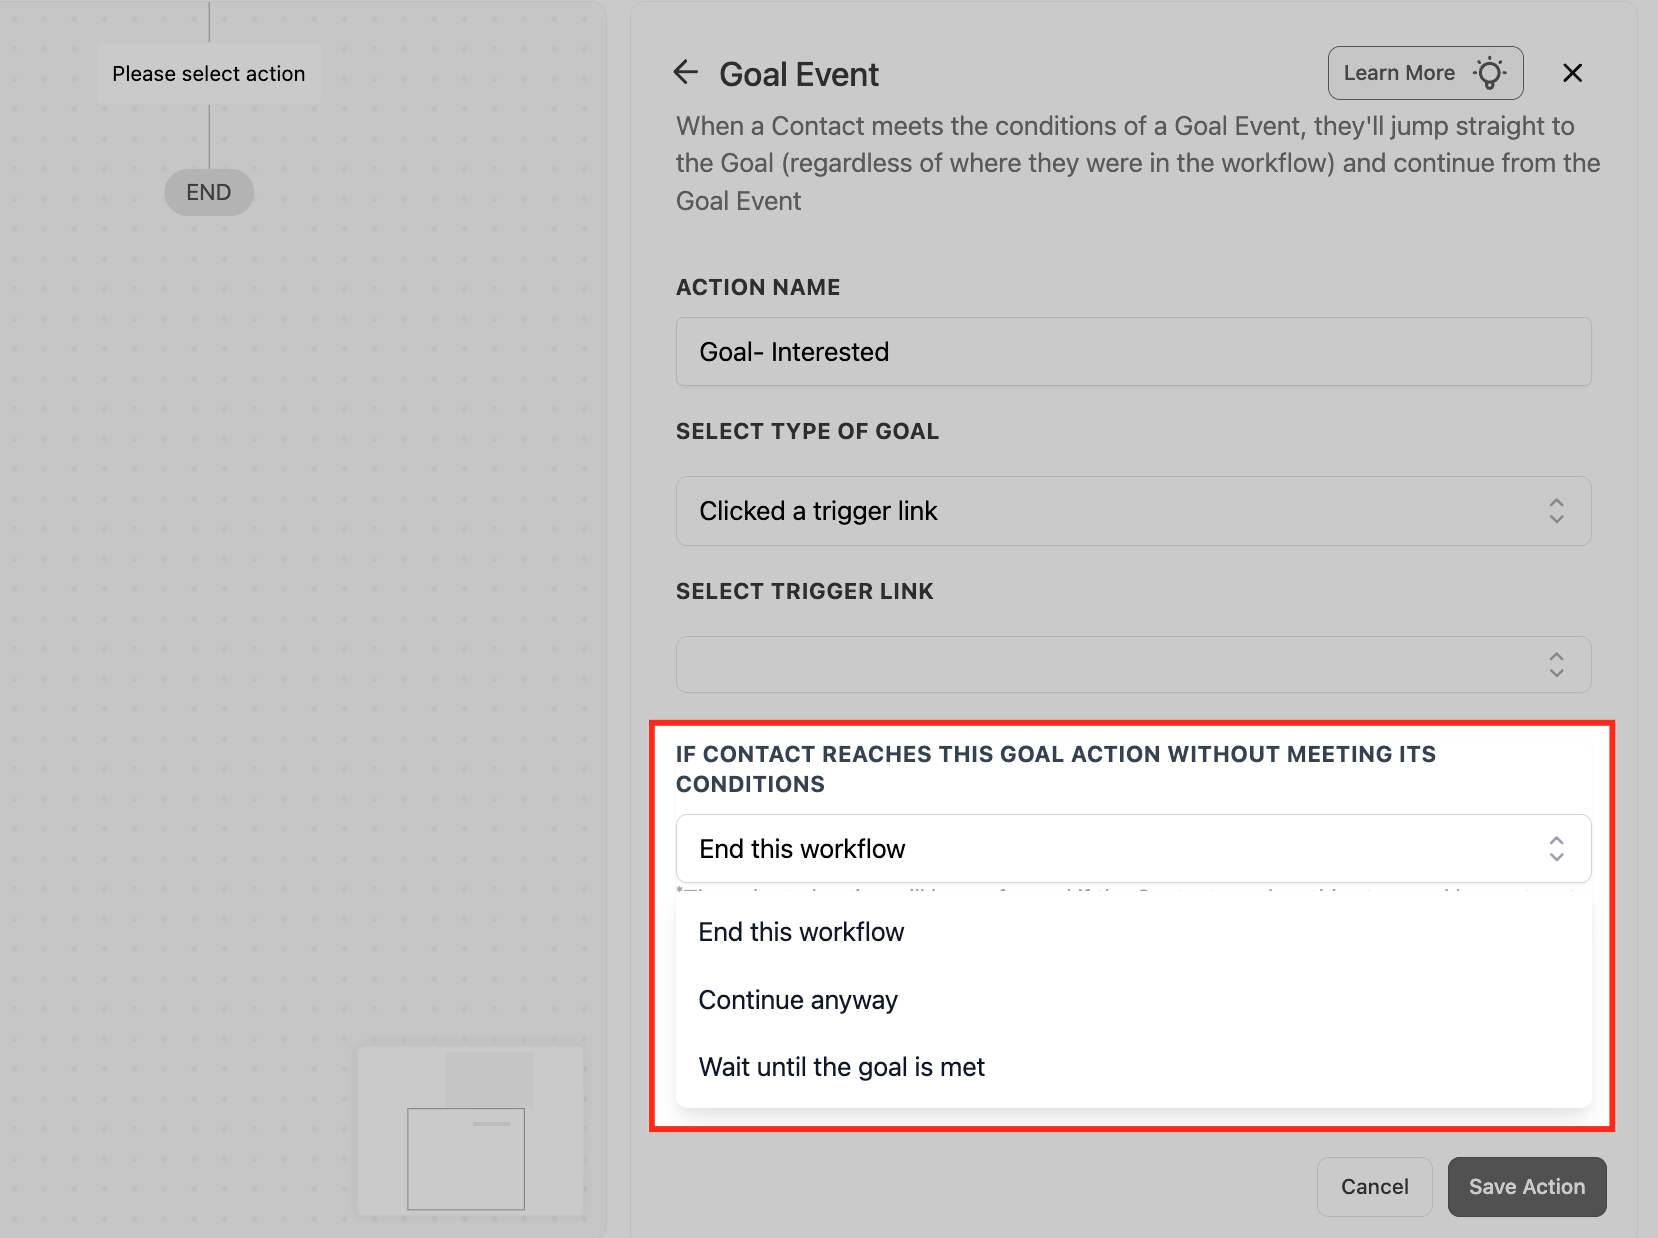
When a contact reaches the Goal step in the normal flow before the goal has been met, the If Contact Reaches This Goal Without Meeting Conditions setting decides what happens:
End this workflow: ends the workflow even though the goal was not met.
Continue anyway: lets the contact proceed through the actions placed after the goal step.
Wait until the goal is met: holds the contact at the goal step until the goal condition occurs.
Use a Goal Event to collapse what would otherwise be several triggers and If/Else branches into one smart checkpoint. In a med spa nurture workflow, set the goal to "Appointment Status = Confirmed" so the moment a lead confirms a consultation they jump straight to the pre-visit prep sequence and skip the remaining reminder emails. Or set the goal to a "Package Purchased" tag so buyers immediately leave the sales nurture and move to onboarding.
Only one Goal Event action is allowed per workflow, though that one goal can hold multiple criteria.
A contact will not be evaluated for the same goal twice within a workflow (unless, for a tag goal, the tag is removed and re-added while the contact is still in the workflow).
The system listens continuously, so goals can be met outside business hours and from changes made outside the workflow.
The workflow reacts to the initial event only; a later reschedule or status change does not reverse progress already made.
Goals support positive conditions (an action taken); they cannot fire on a contact not doing something.
The Split action sends contacts down different paths by random distribution, letting you A/B test variations or spread workload across paths and then compare performance.
Add the action from Internal > Split.
Choose Random Split from the Distribution Type dropdown. Random is the only distribution type; to split by a data value such as treatment size, use the If/Else action instead.
Configure paths: rename the default "Path A" and "Path B", add or remove paths with the X icon (up to 5 total), and set each path's percentage.
Percentages must total exactly 100%. If the total is too high or too low you get an error and cannot save. A path can be set to 0% (no contacts) as long as the overall total is still 100%.
Open the Statistics icon, or enable Stats View in the workflow, to see how many contacts entered and completed each path along with goal conversions.
There is no contact data input; assignment is purely random, like flipping a coin or rolling a die for each contact. The output is which path each contact is placed on, plus per-path statistics.
Use Split for A/B testing and load distribution. In a med spa, send 50% of new leads a "Refresh Your Look This Season" email subject line and 50% an "Exclusive Member Pricing Inside" subject line, then compare booking rates and roll the winner into future campaigns. Or route 75% of inbound leads to a senior coordinator and 25% to a coordinator in training to balance call volume.
Once a contact is assigned to a path, that assignment is permanent. If the same contact re-enters the workflow and reaches the same split, they go down the original path again rather than being reassigned.
Configuration changes apply only to new contacts entering after the update.
Split works for any workflow type, including non-marketing routing such as support distribution.
The Go To action moves contacts from one point in the workflow to another step, letting you loop back or jump forward without rebuilding steps. It is the workflow builder's connector: add the Go To action, then draw a line to the destination step.
Add the Go To action at the point you want contacts to leave.
Click the green outlined connection box on the action.
Draw the connection to the destination step you want contacts to continue from.
Save the action. The connection is now live and contacts reaching the Go To step continue from the linked step.
Use Go To to build loops and consolidate paths. In a med spa re-engagement workflow, if a lead does not book after a reminder, use Go To to send them back to an earlier "wait one week, then nudge again" segment so the follow-up cycle repeats until they convert or hit a Goal Event that pulls them out.
Go To only redirects flow; it does not send messages or modify the contact.
Pair Go To loops with a Goal Event or an exit condition so contacts are not stuck looping forever.
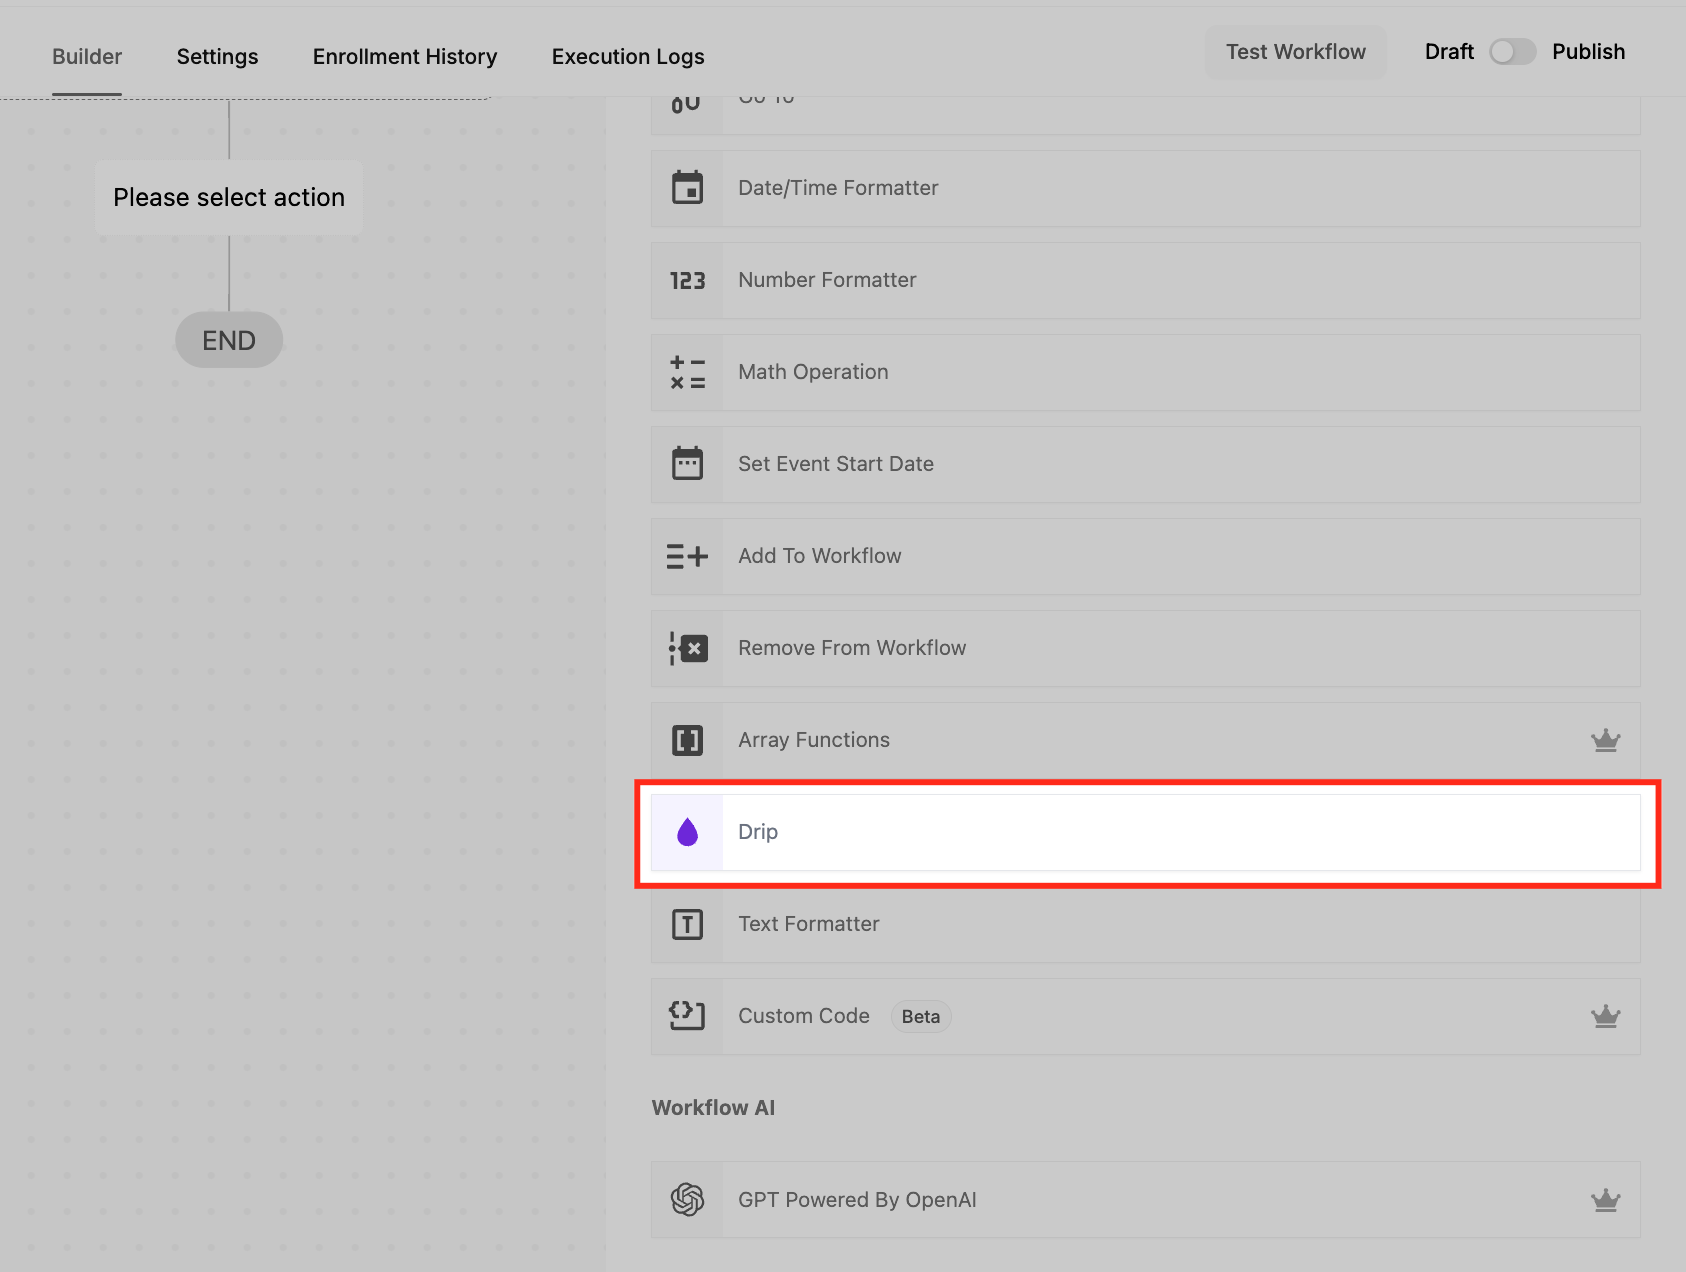
The Drip action paces a workflow by releasing contacts in batches at set intervals instead of pushing everyone forward at once. This protects sending capacity, respects provider and carrier limits, improves deliverability, and prevents system overload on high-volume workflows such as bulk email or SMS sends.
Action Name. Give the Drip a clear, descriptive name.
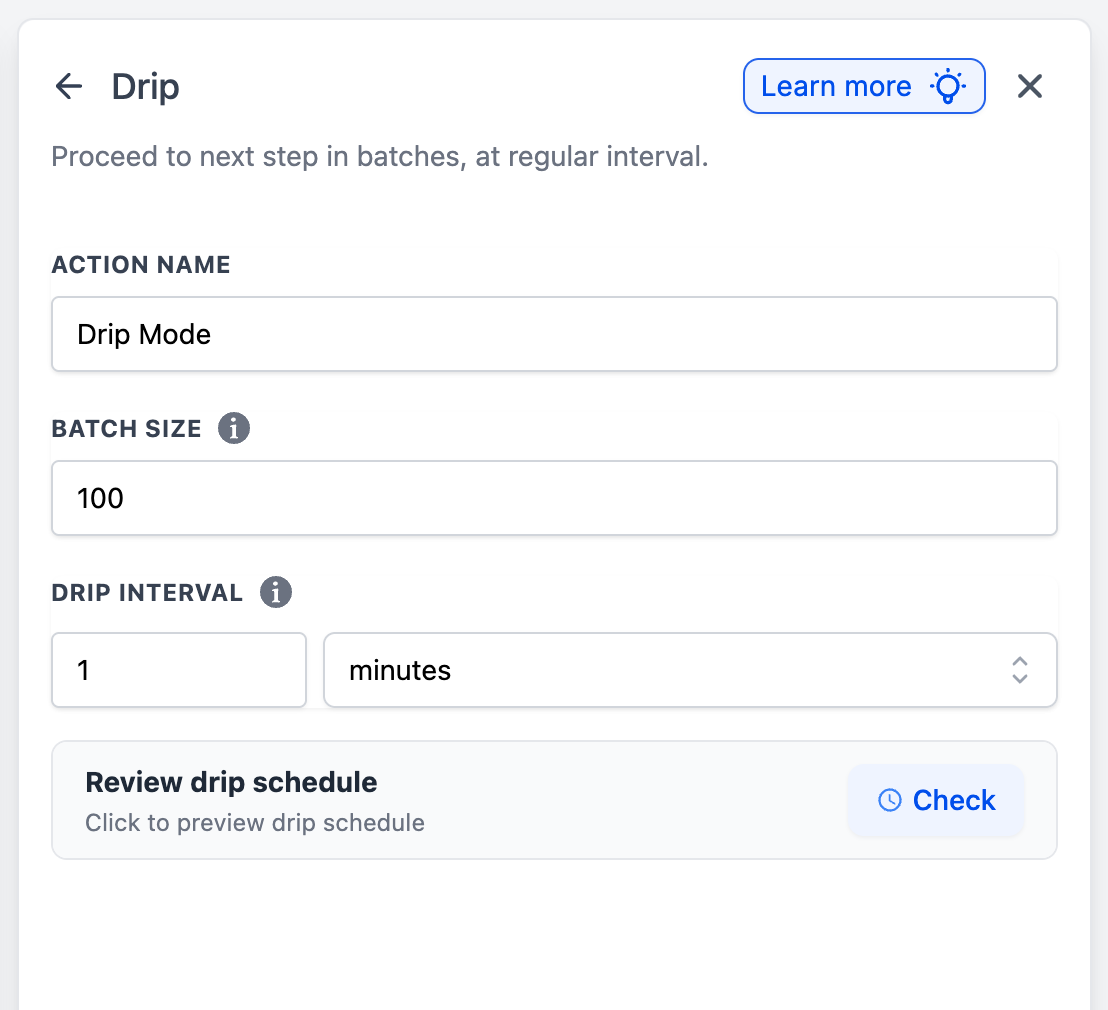
Batch Size. Set how many contacts move to the next step at each interval, from 1 to 10,000. For example, a batch size of 100 releases 100 contacts each interval.
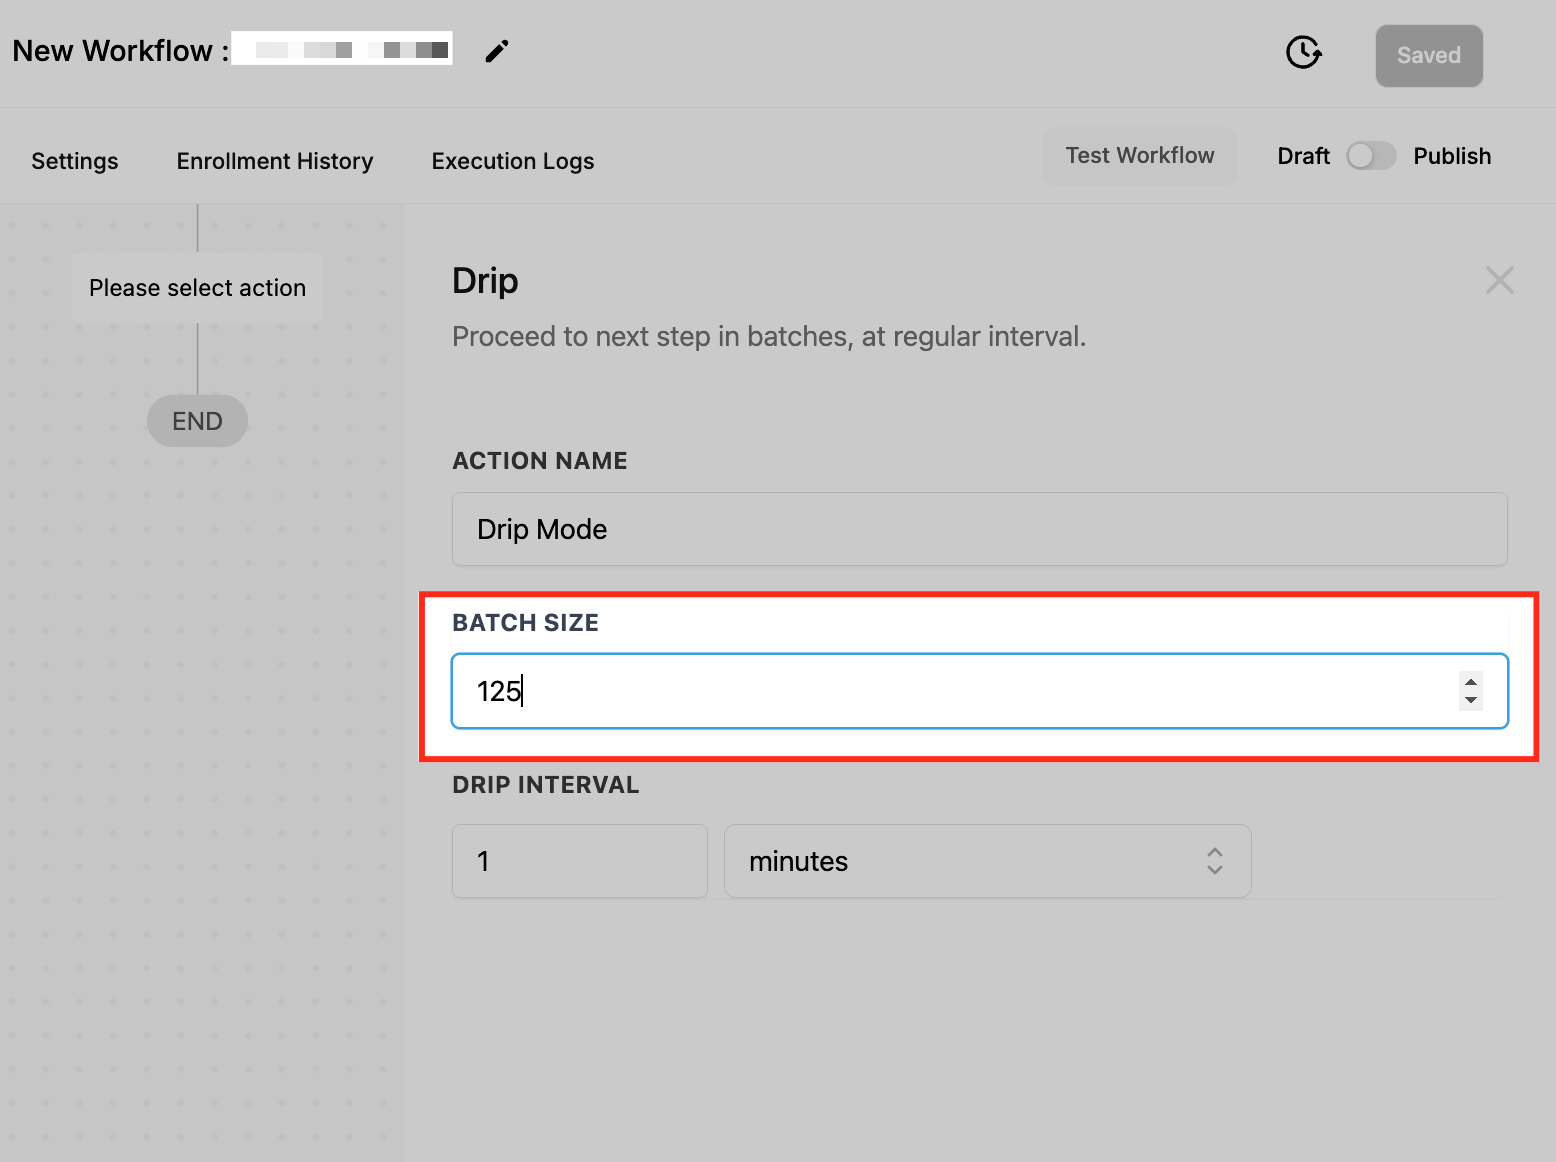
If you change the batch size on a published workflow that already has contacts queued, a note appears: contacts already queued use the previous batch size, and only newly entering contacts use the updated size.
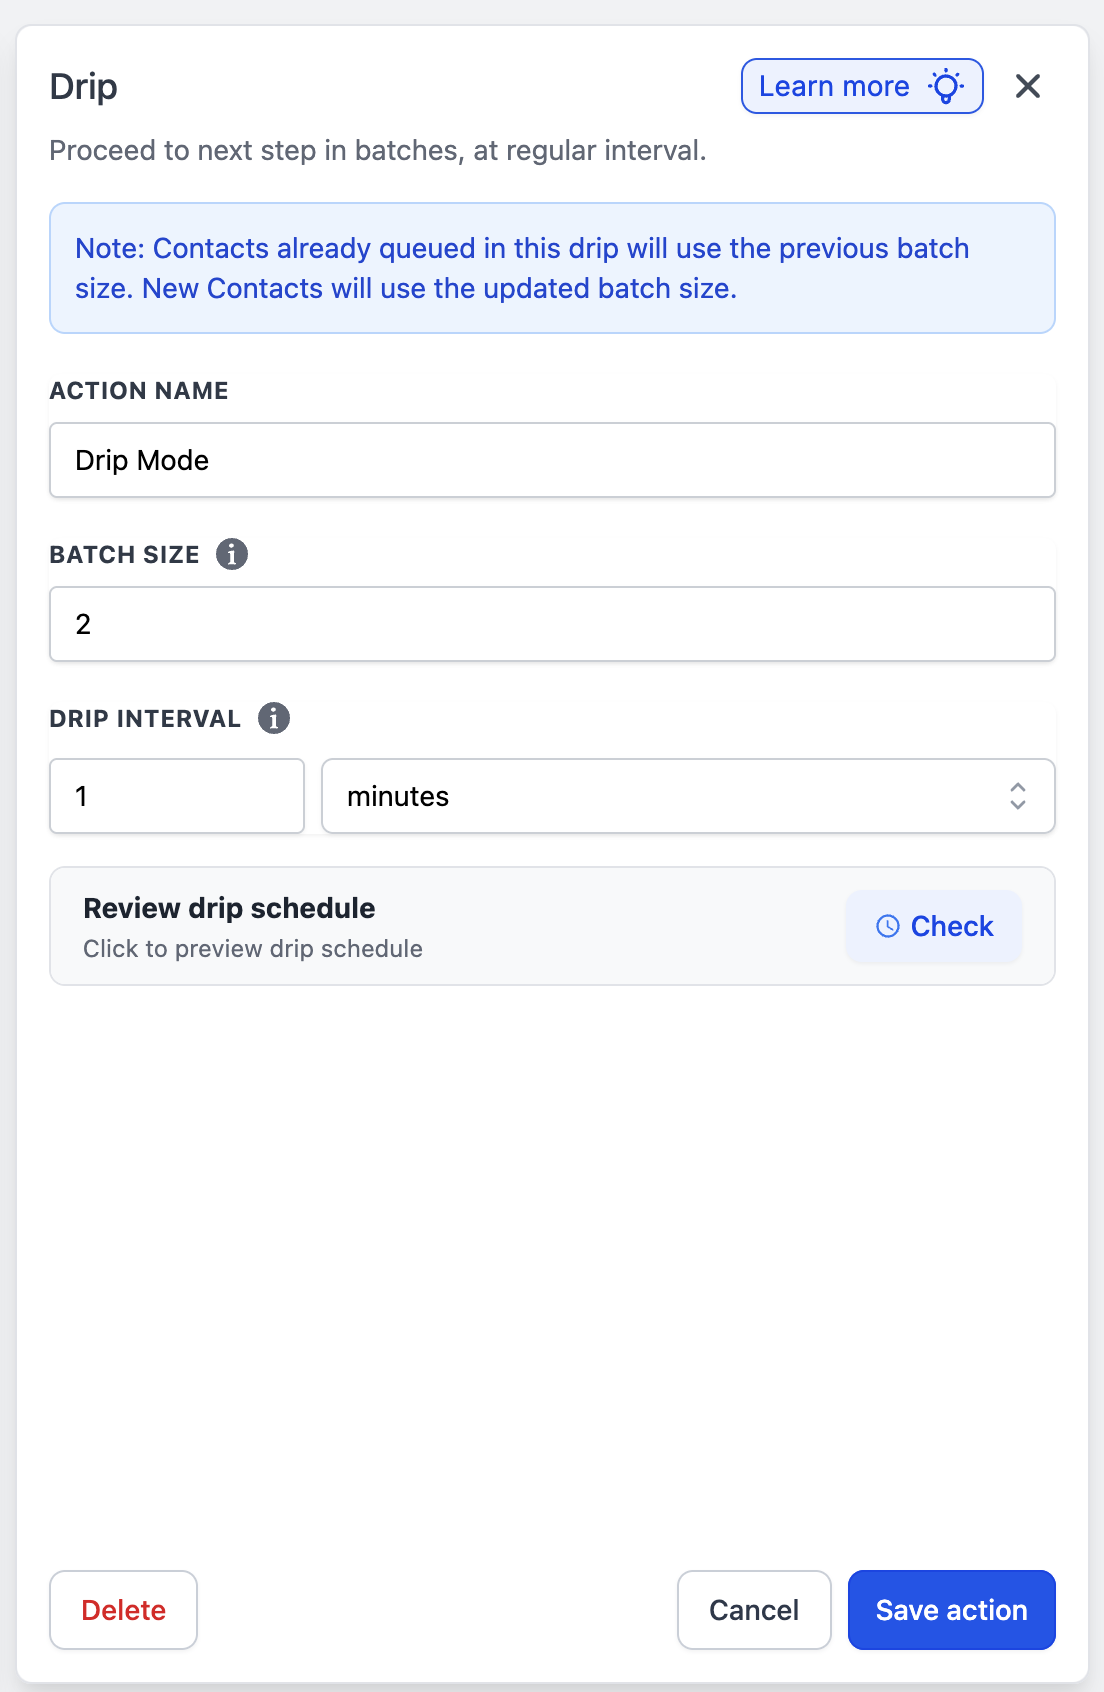
Drip Interval. Set how often each batch is released: minutes (1–60), hours (1–24), or days (1–7). For example, a 30-minute interval releases a new batch every 30 minutes.

Drip Preview. During first-time setup a live schedule preview shows the batch number and projected send time for up to 10 batches. If a Workflow Time Window is active (for example 8 AM–7 PM, Mon–Fri), an inline warning notes that some batches will shift to the next available slot, with a clickable link to the setting. The preview is hidden when you edit a Drip that already holds contacts.

The same paced, batched delivery model is used across the platform for high-volume bulk actions, where the configuration parameters are Start On (first batch date/time), Batch Quantity (1–10,000 contacts per run), Repeat After (interval in minutes, hours, or days), Send On (days of week), Process Between (allowable send hours in the account timezone), and End At (daily cutoff). Robust checkpointing records progress after each batch so a disconnect or restart resumes exactly where it left off, and schedules can run well beyond 30 days.
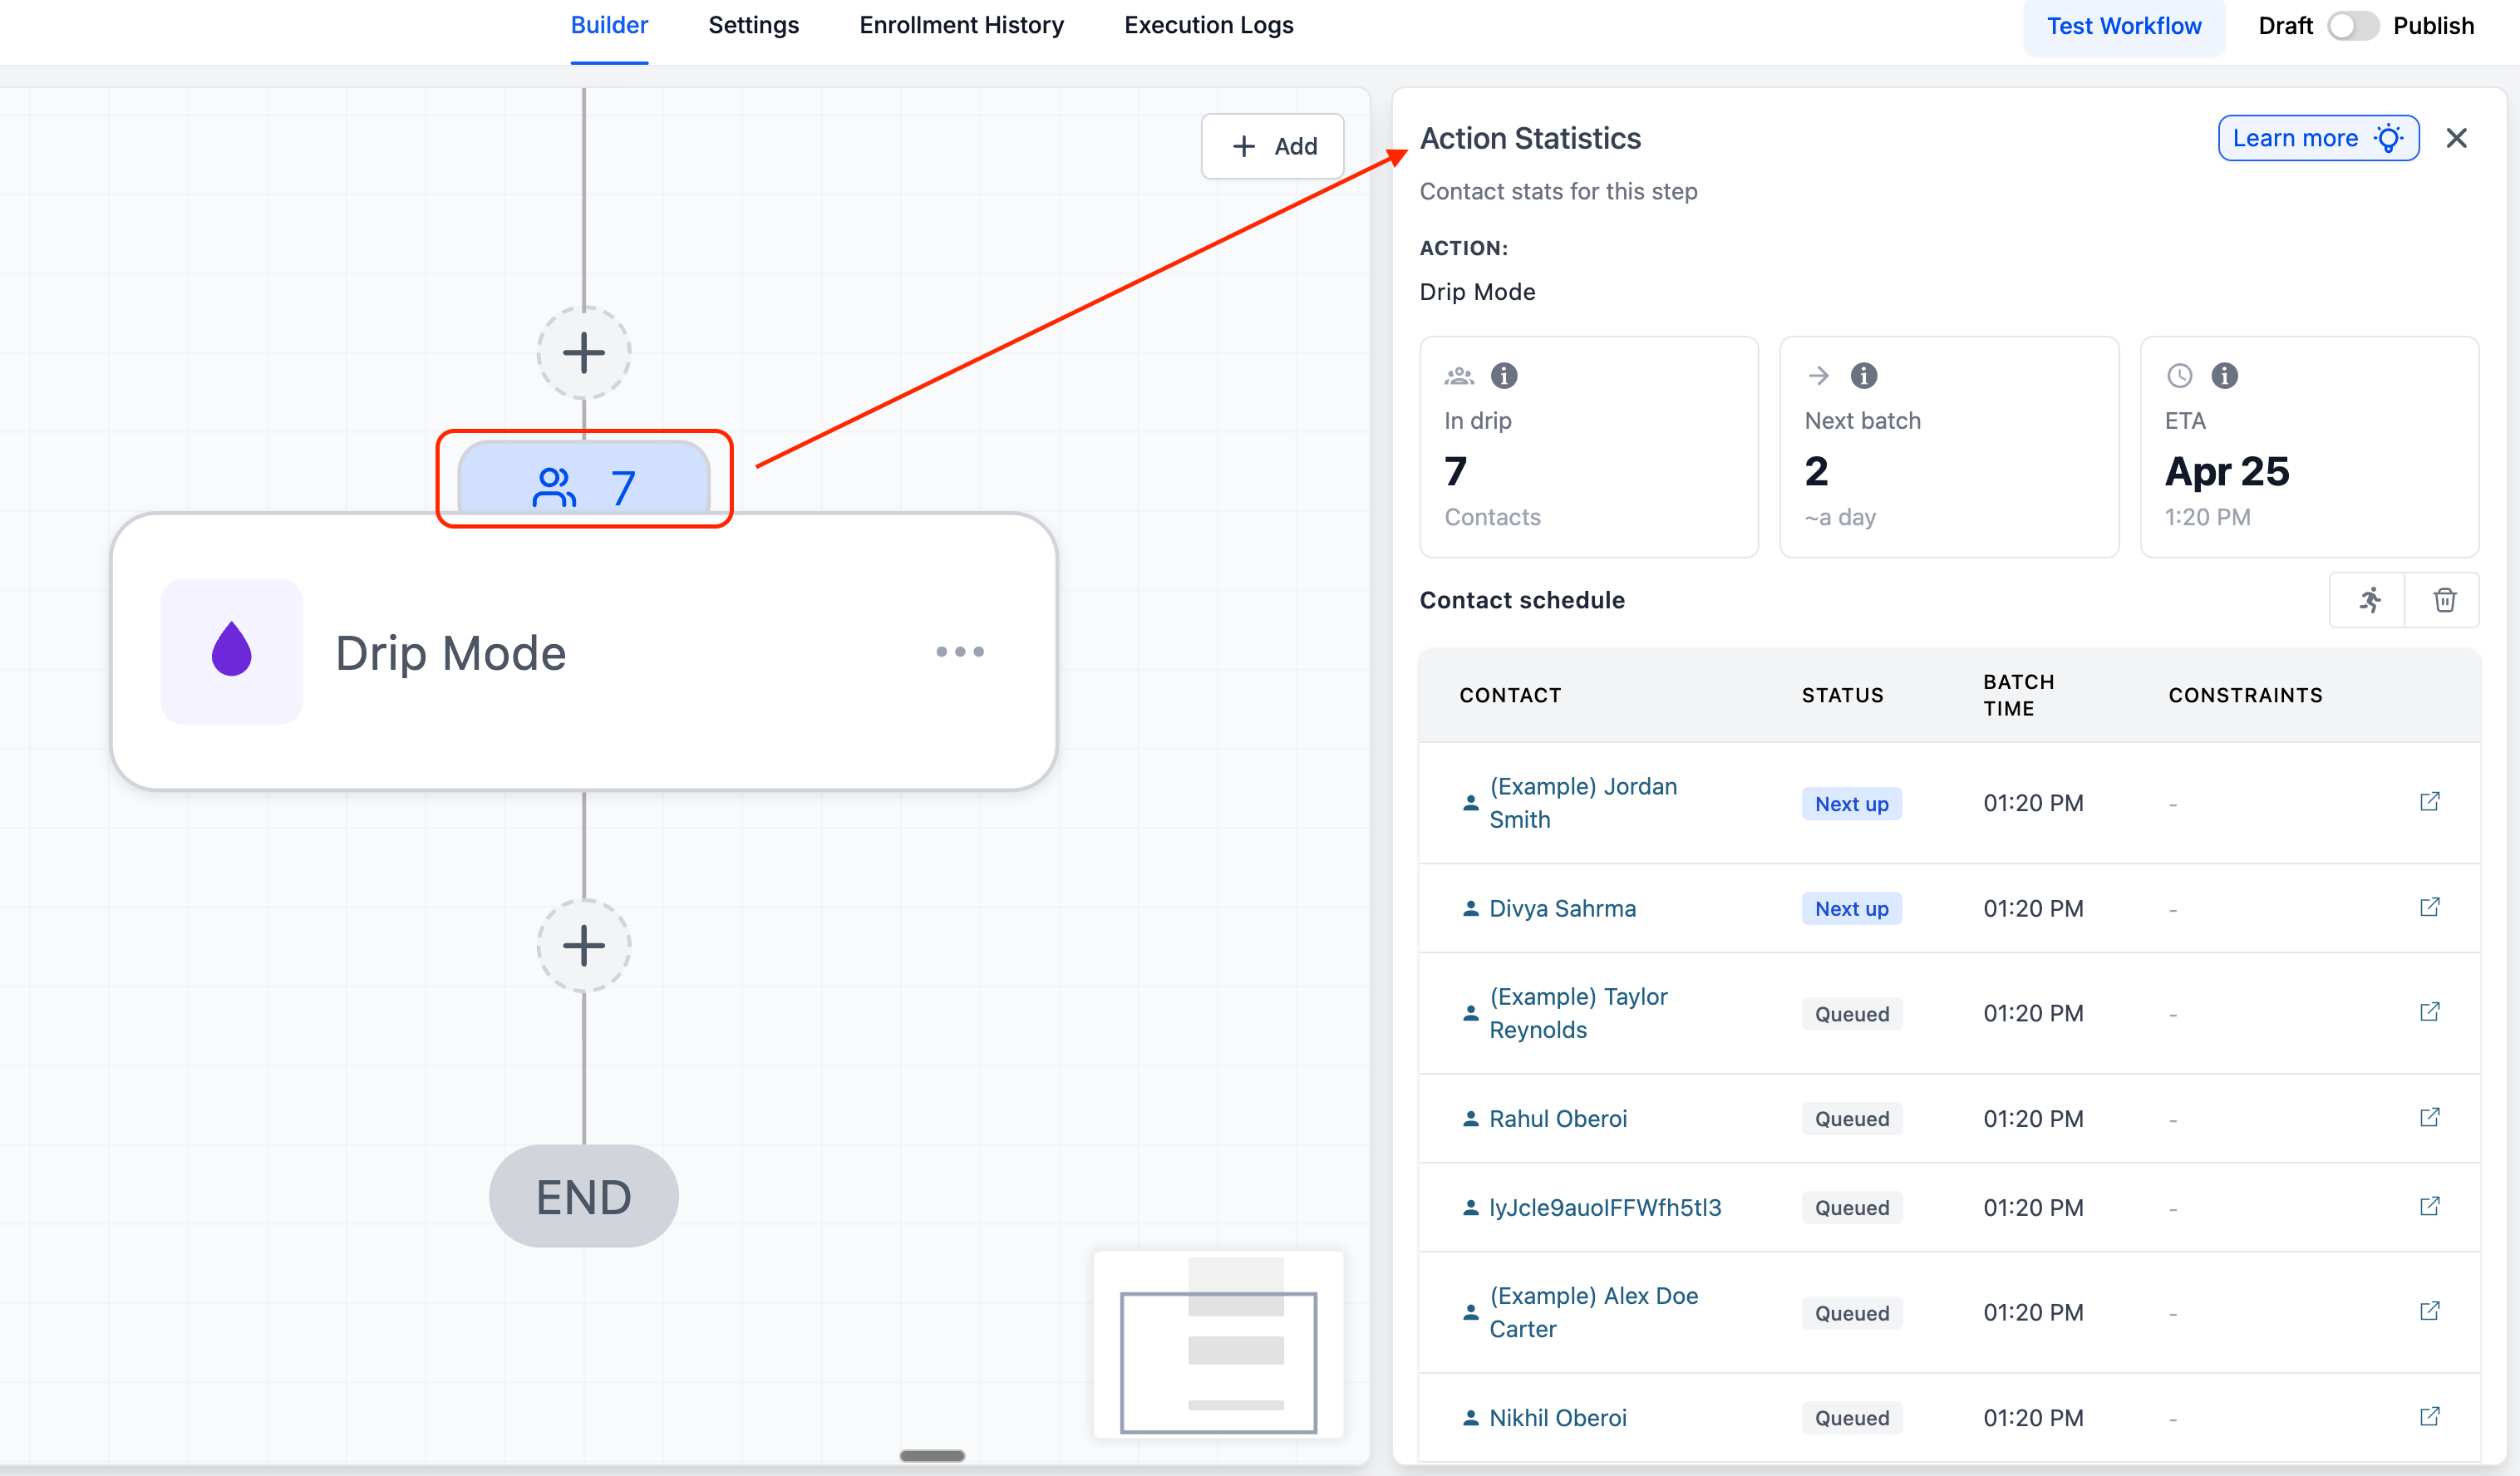
Click the statistics icon on the Drip action (the blue icon showing waiting-contact count) to open a detailed view with summary cards (contacts currently in the drip, next batch details, ETAs), a full batch schedule table with each batch's send time and any active constraints, the Workflow Time Window setting with a jump link, and a status column with pagination plus per-contact controls (move to next step, delete contact, contact link). If you return after changing settings, a warning shows how many contacts use the older versus newer settings.

The same monitoring approach surfaces a scheduled queue, sent history, backlog progress, and any failures or retries.
For reference, paced campaigns elsewhere in the platform are set up by opening the feature, confirming it is enabled, navigating to its settings, creating a campaign, setting eligibility rules, configuring pace and timing, choosing tone, and confirming the summary before starting.
When a published workflow moves to Draft while contacts sit in a Drip, those contacts are paused for as long as the workflow stays in Draft. On republish the drip resumes from where it left off rather than bursting all queued contacts out at once, preserving the intended pacing and protecting sender reputation.
Use Drip whenever releasing everyone at once would overwhelm a channel. In a med spa, when a seasonal promotion enrolls 5,000 past clients, set a batch size of 200 every 30 minutes so SMS and email go out steadily, stay within carrier limits, avoid spam filtering, and keep the front desk from being flooded with replies all at once.
A Drip differs from a Wait: a Wait holds all contacts until a time passes, while a Drip releases contacts in batches for a controlled flow.
A batch size that is too large defeats the purpose by moving everyone at once.
Drip works with any downstream step (email, SMS, tasks, and other actions).
New contacts start at the beginning of the workflow and follow their own drip schedule; they do not join an in-progress batch.
Batch-size and interval changes apply only to contacts entering after the update; contacts already queued keep the previous settings.
The schedule preview shows at most 10 batches and is hidden while editing a Drip that already holds contacts.
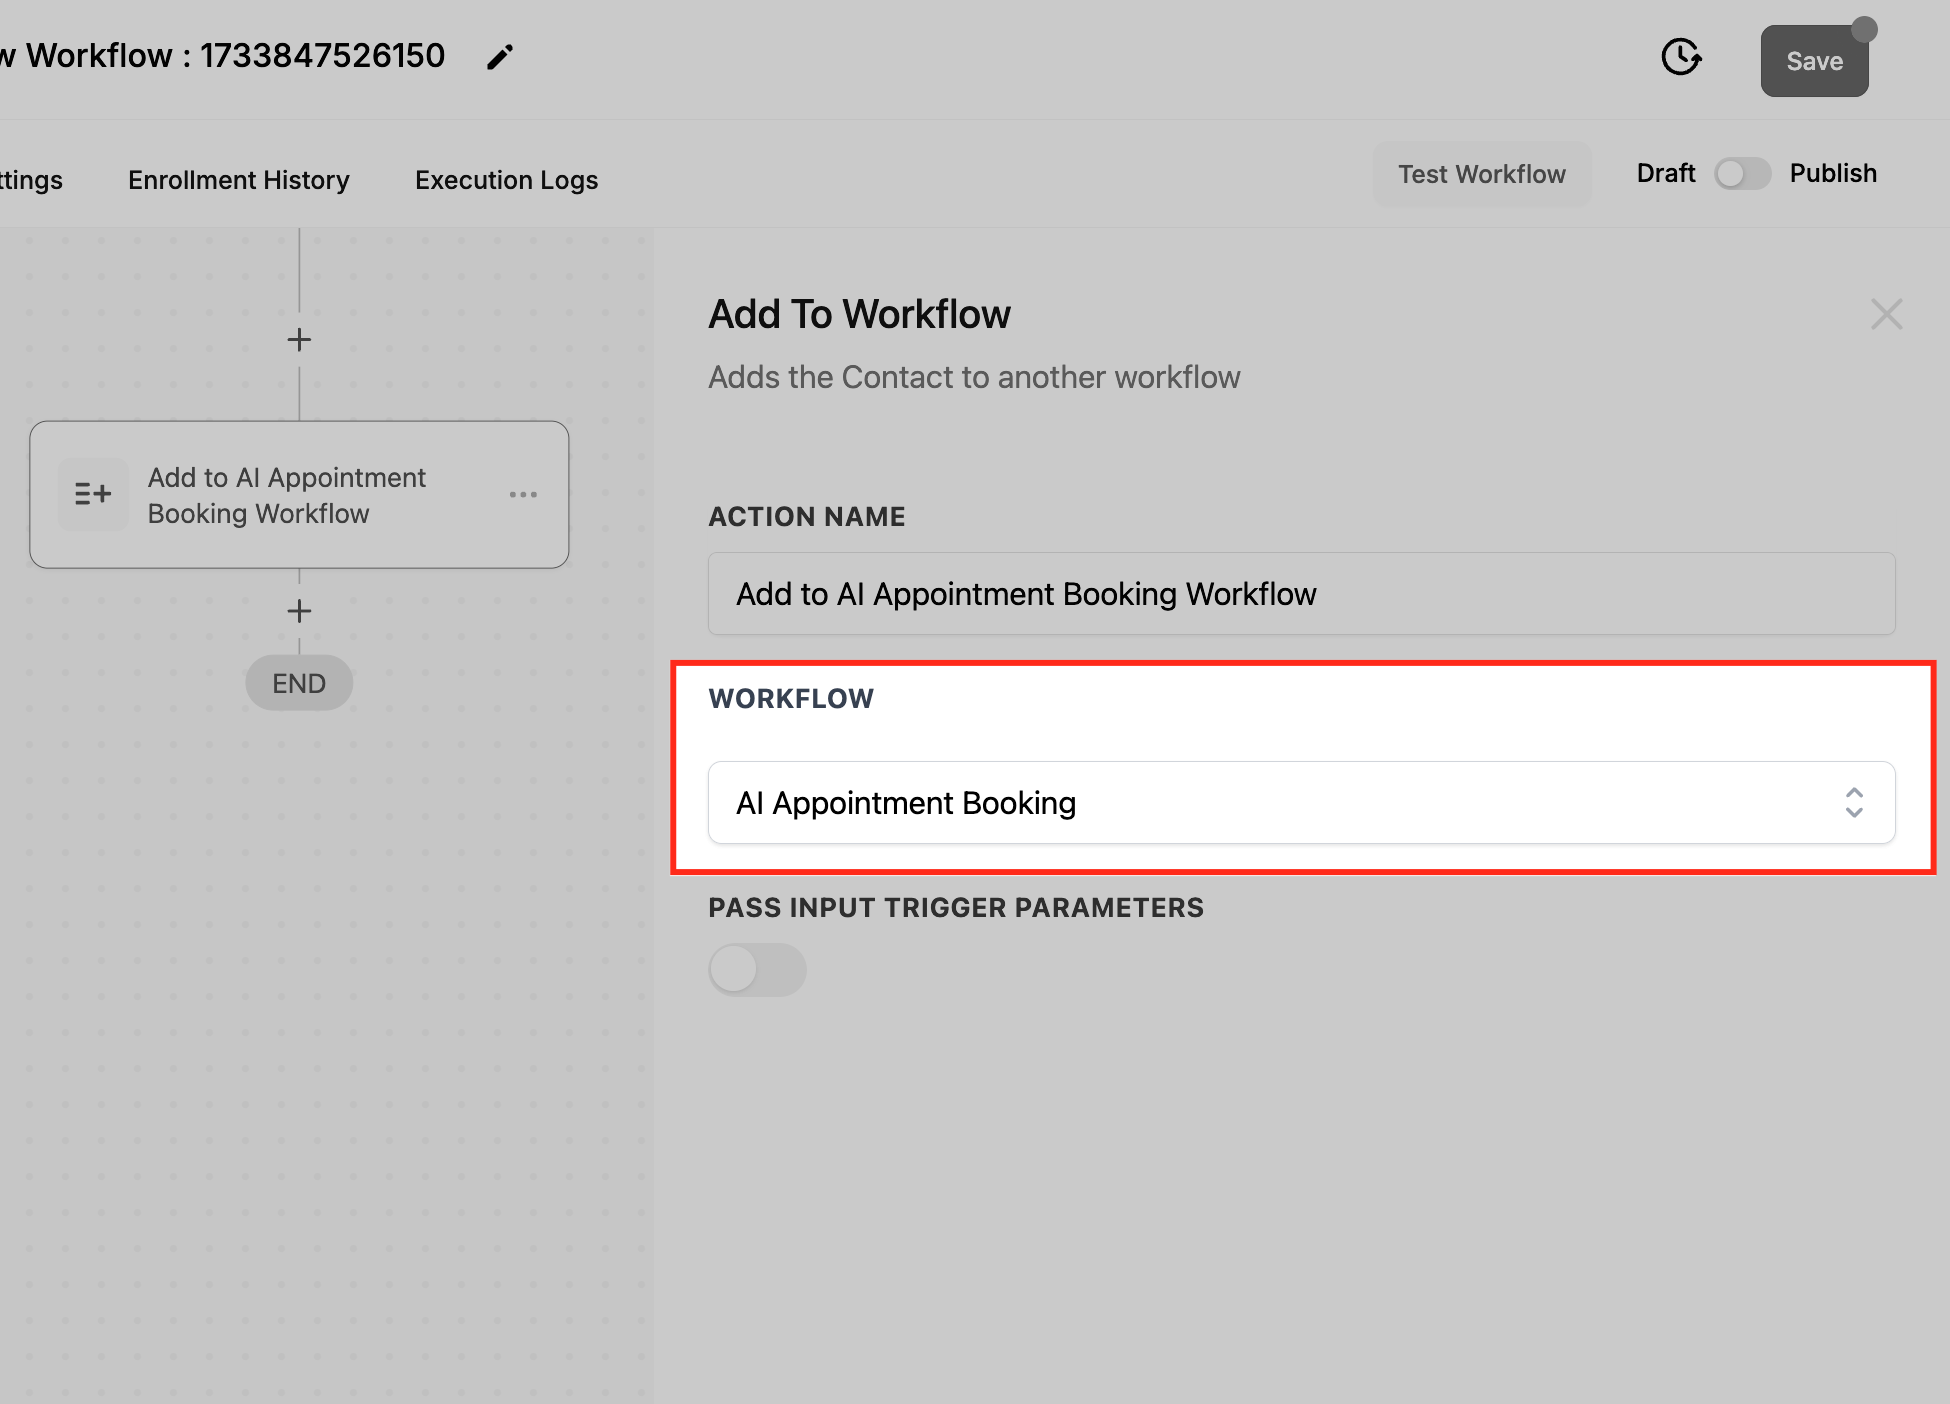
The Add to Workflow action automatically enrolls a contact into another workflow, moving them between stages of a journey without manual handoff. Optionally it can carry the original trigger's data into the receiving workflow.
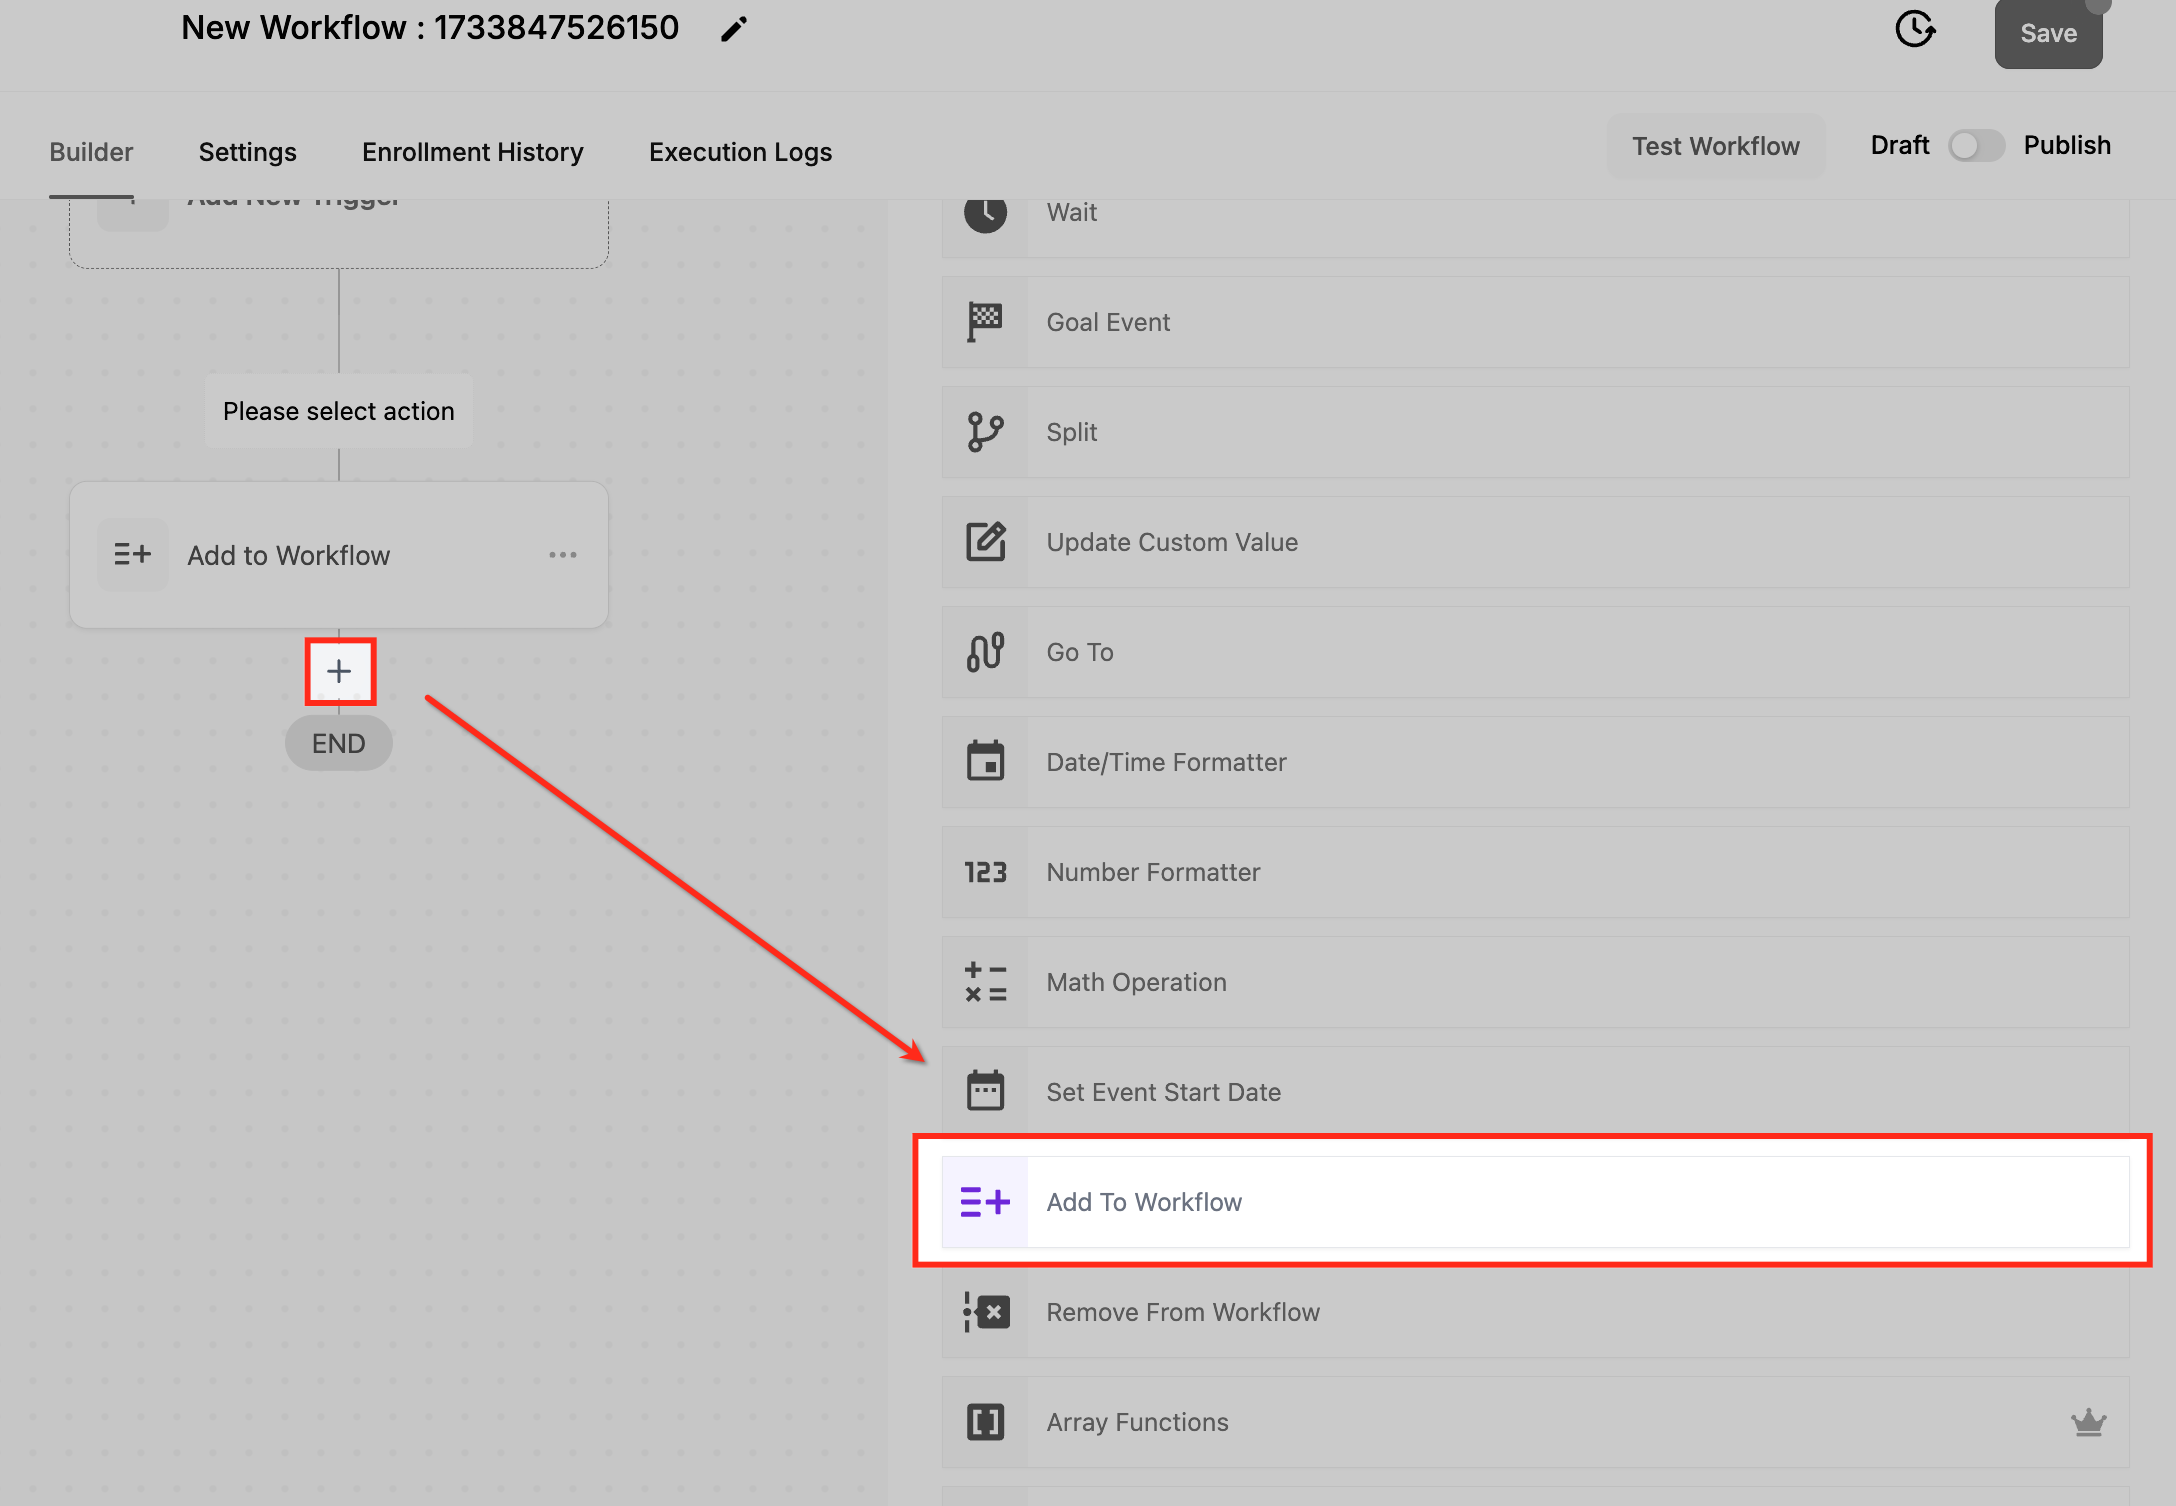
Add the action. Click +, scroll to or search for Add to Workflow, and select it.
Action Name. Name it descriptively, such as "Add to Appointment Follow-Up Workflow".
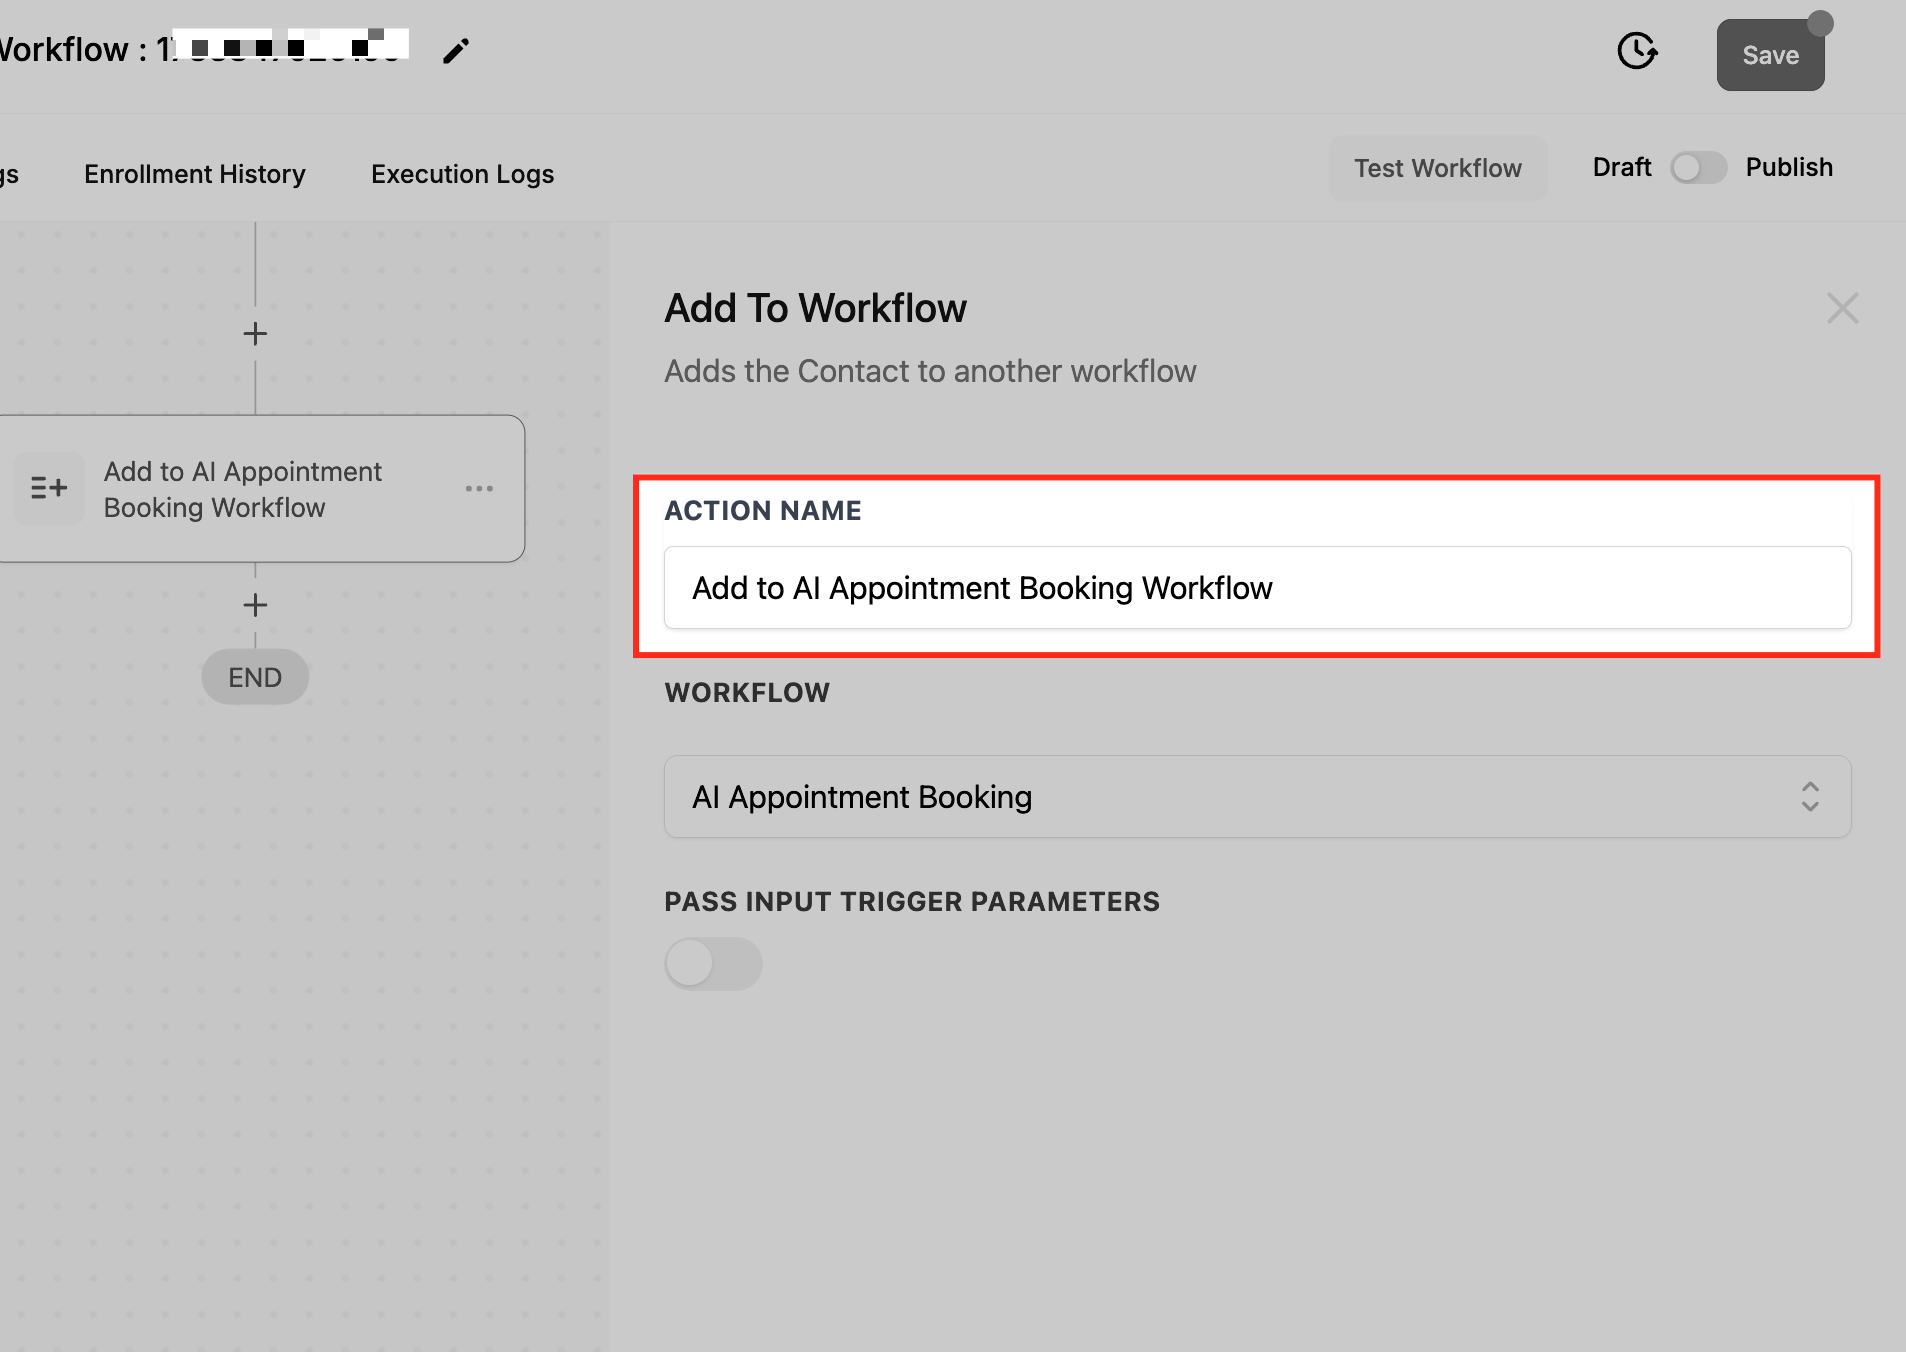
Select the target Workflow. Choose the workflow the contact will be added to.
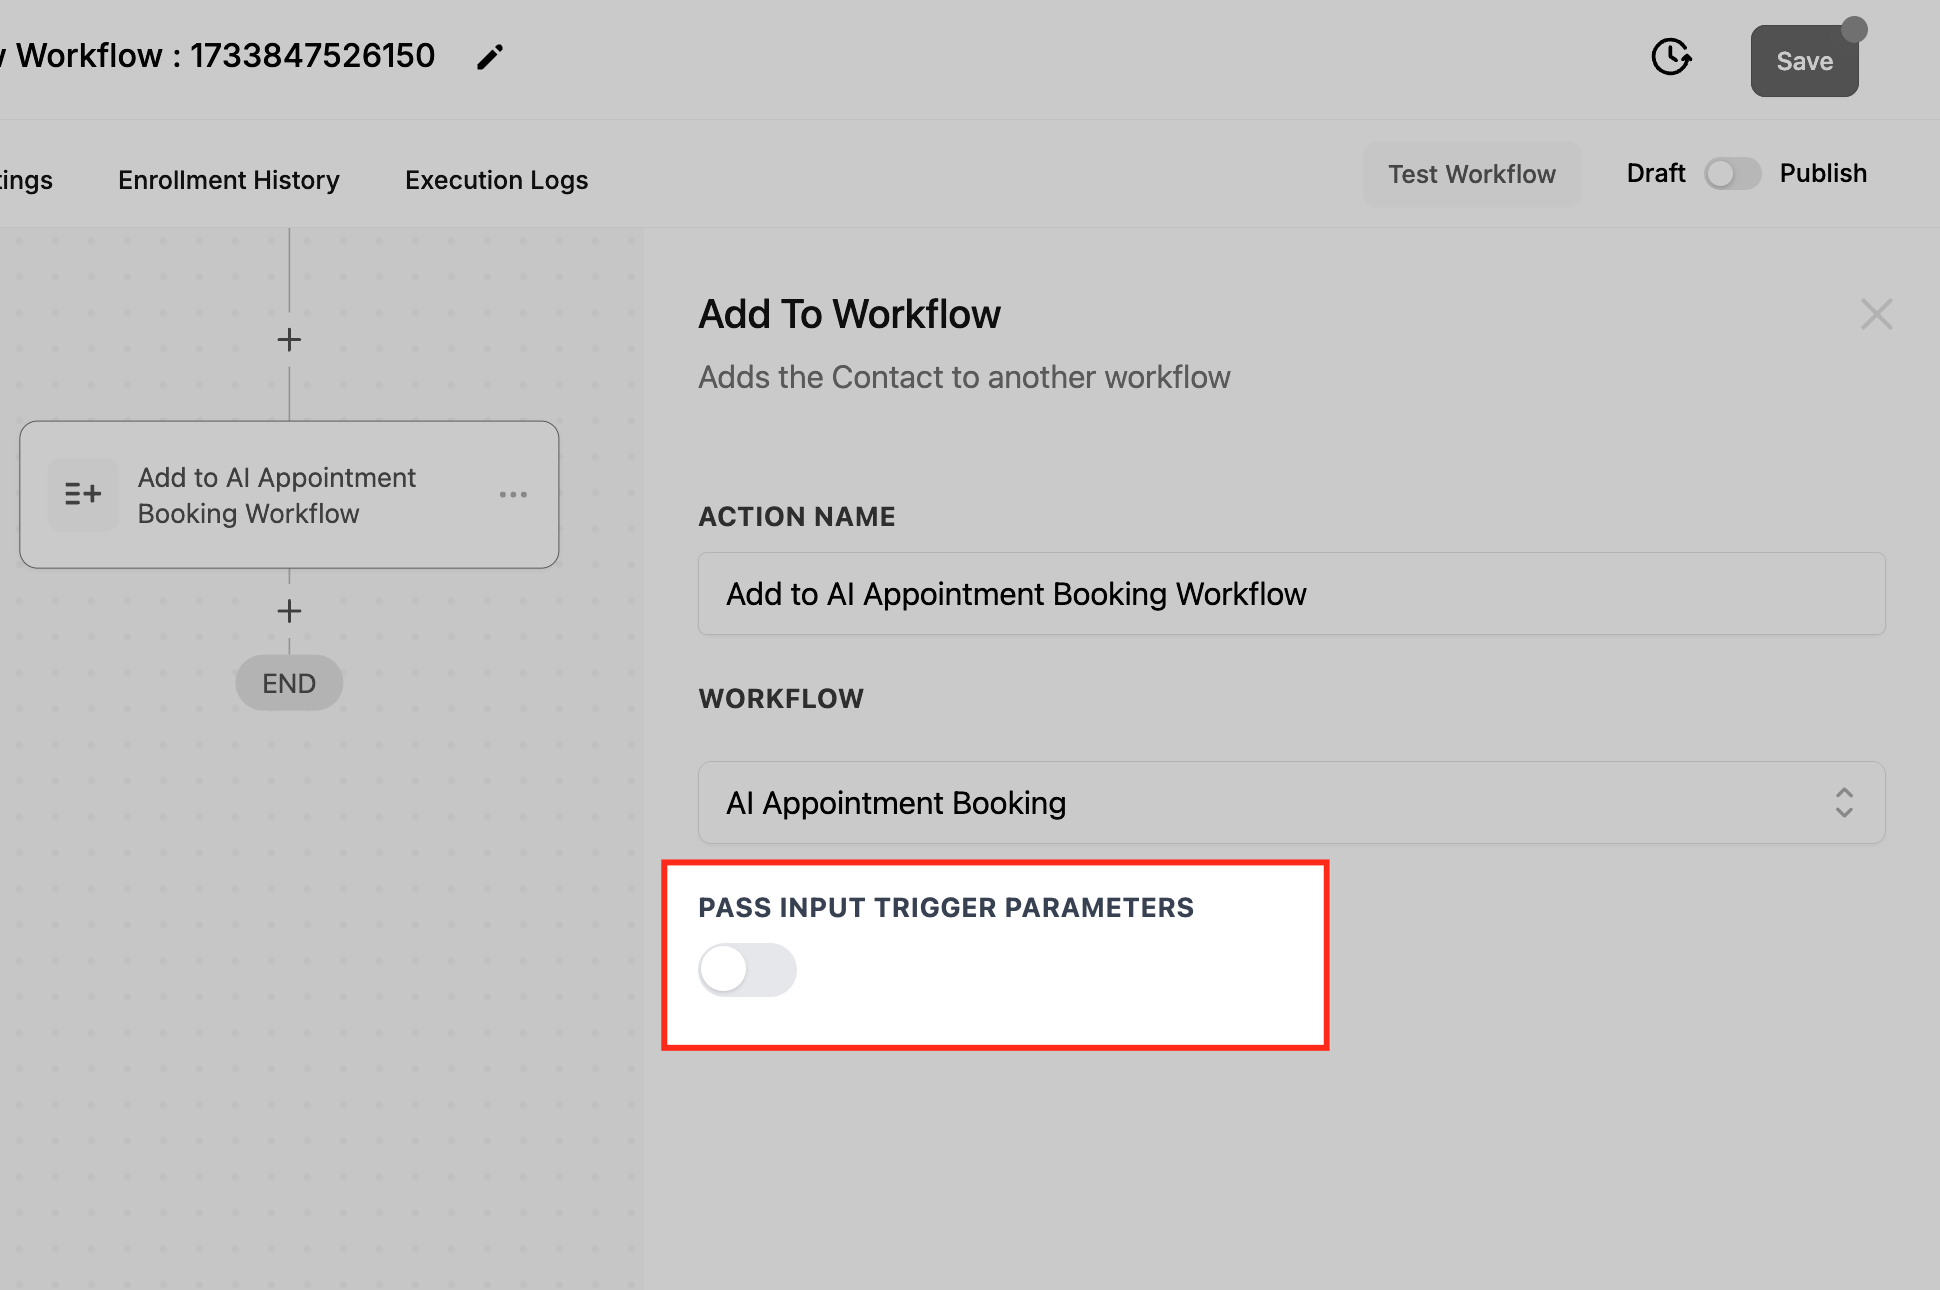
Pass Input Trigger Parameters (optional). Toggle on to carry data from the original trigger event into the new workflow. This passes only the original trigger payload, not outputs generated later in the workflow (for example, data returned by a Custom Code API call). The fields passed depend on the trigger type:
Appointment Trigger: Contact Name, Email, Phone, Appointment Date/Time, Assigned Calendar, Status, Appointment ID.
Form Submission Trigger: Form Name, Submission Date/Time, all submitted fields, Contact Details.
Survey Trigger: Survey Name, Submitted Answers, Contact Details.
Inbound Call/Conversation Trigger: Contact Details, Source, Timestamp, Assigned User.
Custom Event Trigger: any custom fields or values defined in that event.
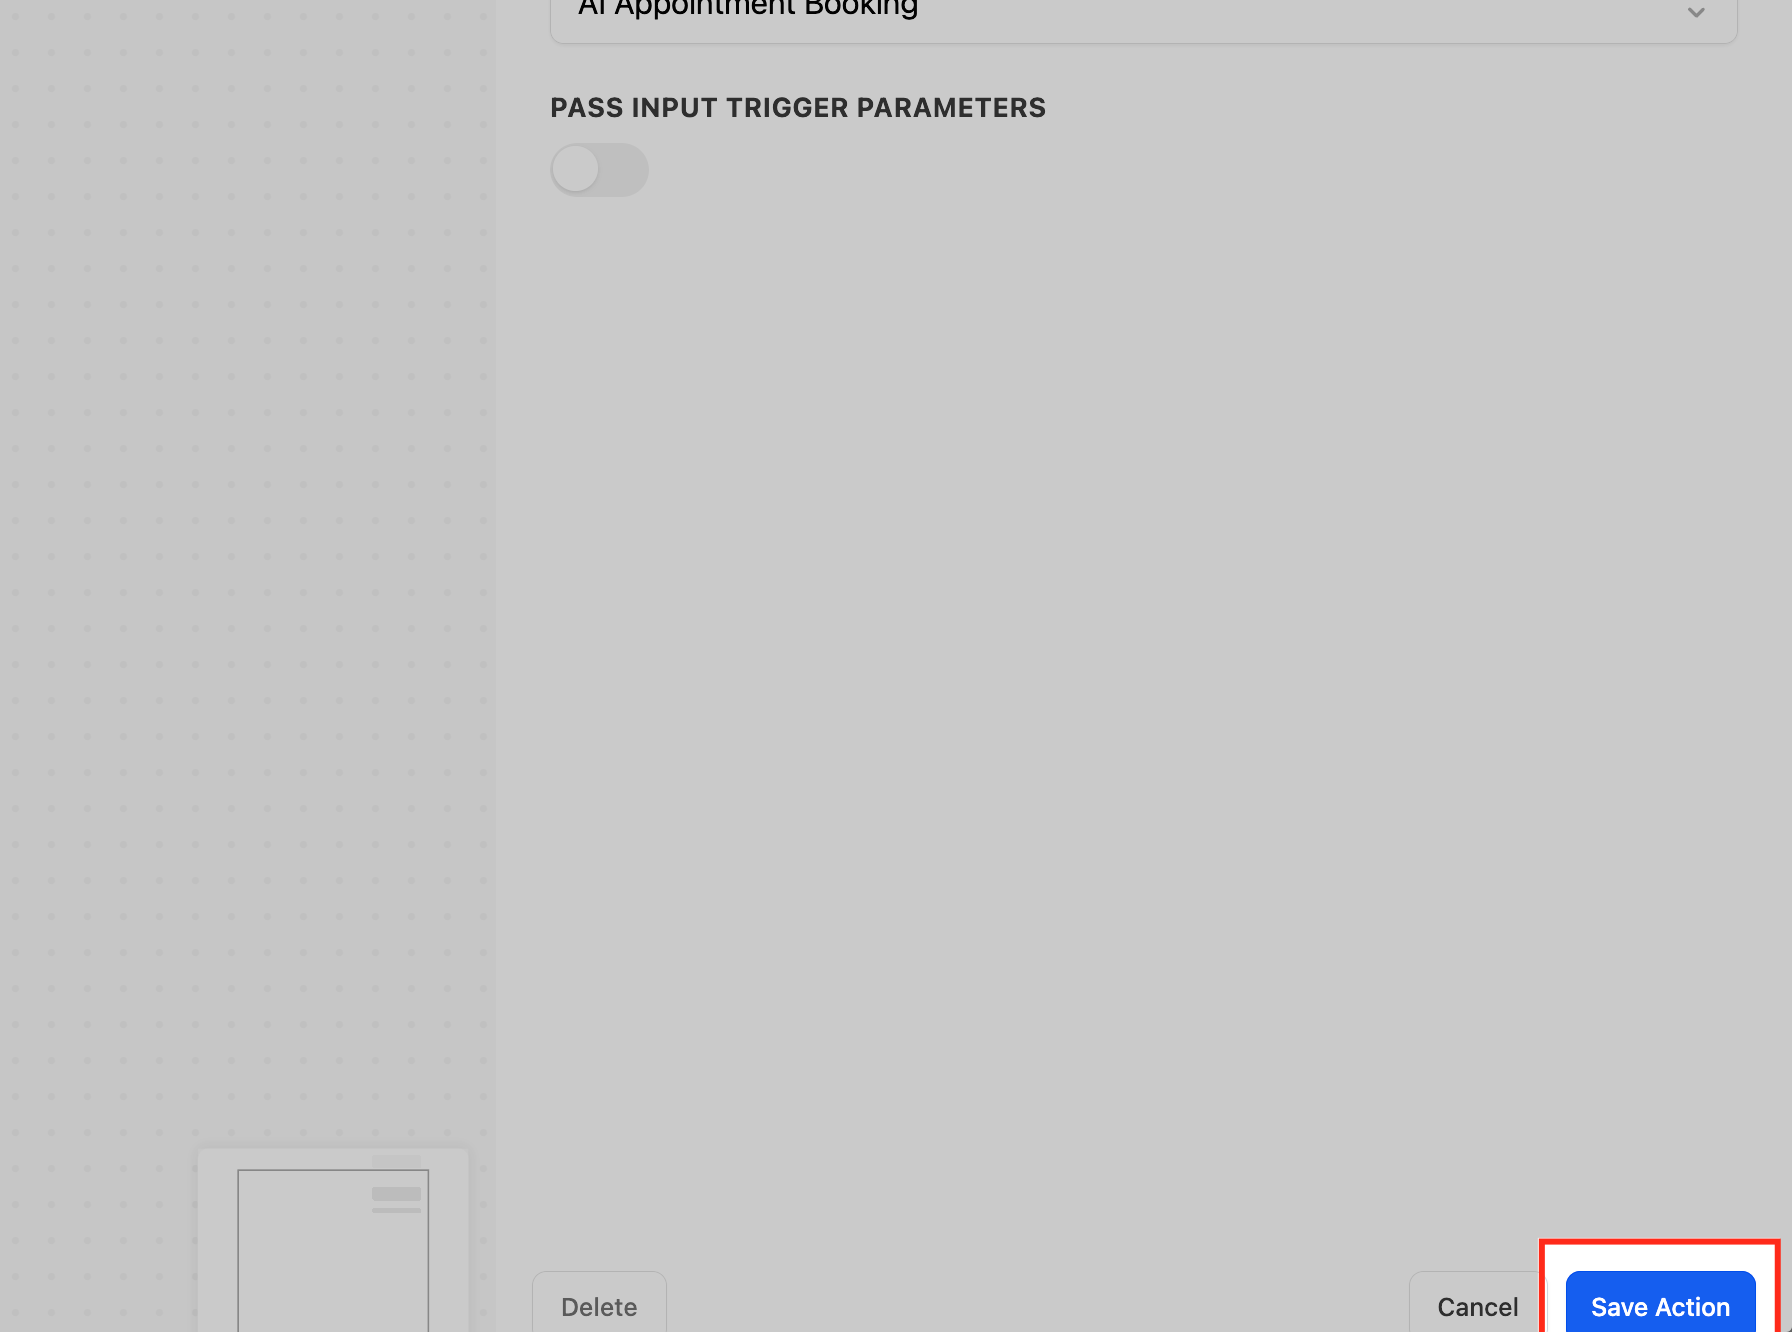
Save the action.
The receiving workflow does not need its own trigger; the contact is enrolled at its start automatically, so design it to begin with your desired first action. The contact begins the new workflow from its first step. If you passed input parameters, you can map those values into the new workflow's actions for personalization.
Use Add to Workflow to chain journeys. In a med spa, when a client books a consultation, add them from the intake workflow into an "Appointment Follow-Up" workflow that sends confirmation details, pre-visit instructions, and reminders, passing the appointment date so the reminders are timed correctly.
One Add to Workflow action adds the contact to one workflow at a time; use multiple Add to Workflow actions to enroll into several.
To pass an API response or other later-generated data, first store it on a Contact field or Custom Value, then add the contact to the next workflow.
Test before activating to confirm parameters transfer as expected, and save the draft before leaving the builder.
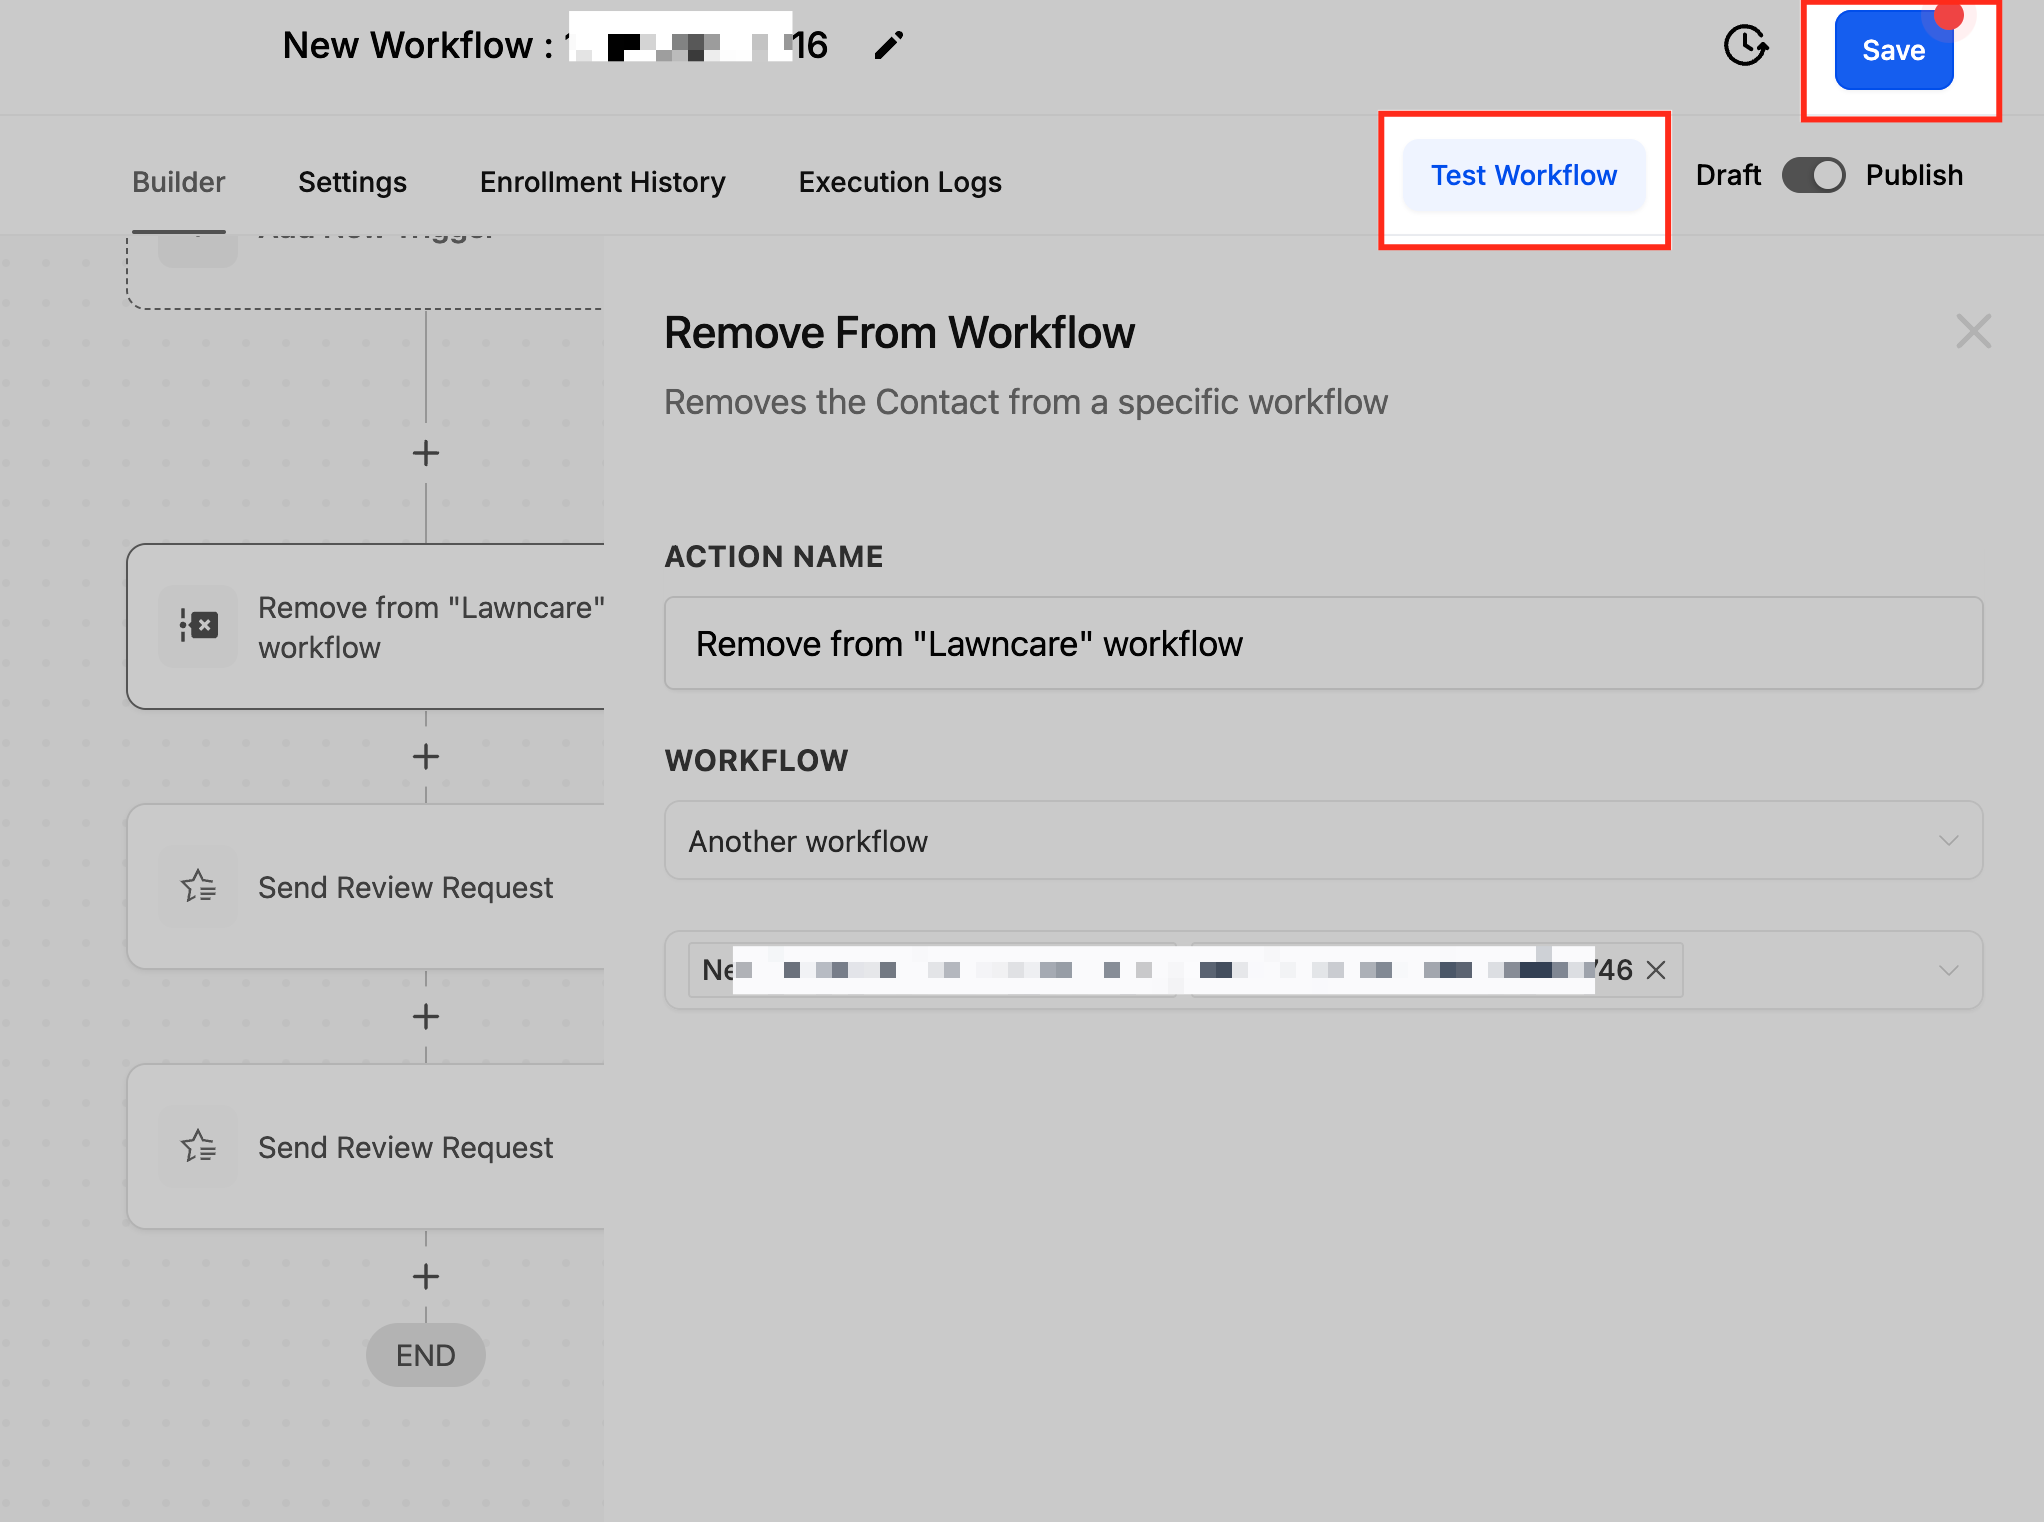
The Remove from Workflow action takes a contact out of a workflow, ending its participation there. Use it to keep contacts out of sequences that no longer apply, prevent conflicting automations, and reduce clutter.
Add the action and select Remove From Workflow.
Select the workflow you want to remove the contact from.
Click Save Action.
Removing a contact stops their progress in the targeted workflow. If the contact later meets that workflow's trigger conditions again, they can re-enter according to that workflow's own re-entry settings.
Use Remove from Workflow to stop conflicting messaging. In a med spa, when a lead books and pays for a treatment, remove them from the "Unconverted Lead Nurture" workflow so they stop receiving promotional nudges meant for prospects, while your onboarding workflow takes over.
This action targets the contact's participation in the specified workflow; pair it with a tag or Goal Event so the removal fires at the right moment.
Removing a contact does not undo actions already completed in that workflow.
The Set Event Start Date action defines a specific date and time to act as a reference point for later steps, especially Wait actions. Once set, you can hold contacts until a number of days, hours, or minutes before or after that event date, which makes it ideal for scheduling reminders and follow-ups around webinars, conferences, meetings, and events.
Action Name. Enter a descriptive name, for example "Event Start Time for Open House".
Type. Choose the source of the reference date:
Specific Date/Time: pick an exact date and time from the calendar picker (for example September 14 at 10:30 AM).
Custom Field: pull the date from a custom date field on the contact (for example "Event Registration Date"), then select that field.
Specific Day: set a recurring reference based on the current day of the month or the current day of the week.
Accepted date and time formats include MM-DD-YYYY HH:MM (24-hour) and DD-MMM-YYYY HH:MM, for example 12-21-2025 08:30 or 21-OCT-2025 08:30. Use the correct format to prevent timing errors.
Save Action. The event start date is now set as the reference for subsequent steps.
Field Name | Description | Required |
|---|---|---|
Action Name | The label for the action in your workflow | Yes |
Type | Specific Day, Specific Date/Time, or Custom Field | Yes |
Select Custom Field | Appears for Custom Field type; picks a custom date field | No |
Select Date | Appears for Specific Date/Time type; pick from the calendar | No |
Current Day of Month/Week | Appears for Specific Day type; day or week-based reference | Yes |
After setting the event start date, add a Wait action set to An upcoming appointment or booking (the event/appointment time). Configure it to pause until a number of months, days, hours, or minutes before or after the event start date. For example, set 2 days before to hold the workflow until 2 days ahead of the event. Values that exceed a unit's limit roll up to the larger unit (60 minutes becomes 1 hour).
If the event time has already passed when a contact reaches the wait, choose how to proceed:
Move to the next step: skip the wait and continue.
Move to a specific step: skip the wait and jump to a chosen step.
Skip all outbound communication actions till the next wait or event start date action: bypass email, SMS, call, and voicemail until the next wait or event start date action.
Use Set Event Start Date for any timing anchored to a known date rather than to when the contact entered the workflow. For a med spa hosting an injectables open house, set the event start date from the registration custom field, then add Wait steps to send a "see you in 3 days" reminder, a "tomorrow" reminder, and a "thanks for attending, book your follow-up" message 2 days after, all timed to the same anchor.
This action only sets a reference point; the timing happens in the Wait actions that follow it.
Custom Field type requires the field to contain a valid date value for the contact.
How do I control when an If/Else condition is evaluated? Place a Wait action before the If/Else step, for example "Wait until email is opened or 1 day passes," so the data is current when the branch is evaluated.
Can I have more than one Goal Event in a workflow? No. Only one Goal Event action is allowed per workflow, though that single goal can hold multiple criteria.
If a contact re-enters a workflow, will the Split action reassign them? No. Once a contact is assigned a path, they keep it permanently and follow the same path on re-entry.
What is the difference between a Drip and a Wait? A Wait holds all contacts at a point until a time passes; a Drip releases contacts in batches at intervals so they move forward in a controlled flow rather than all at once.
Does Add to Workflow require the receiving workflow to have a trigger? No. The contact is enrolled at the receiving workflow's start automatically, so design that workflow to begin with your first intended action.
What happens if a Wait or event-relative step's date has already passed? The workflow uses your "If this date has already passed" setting: continue to the next action, go to a specific step, exit the contact, or skip all outbound communication actions until the next wait or event start date action.
Why don't I see the Appointment option inside If/Else? It appears only when the workflow uses an appointment-related trigger such as Customer Booked Appointment or Appointment Status.
