The Send Data action category in the Aesthetix CRM workflow builder lets your automations push data out to other systems in real time. Instead of keeping every record inside the CRM, you can send contact details, appointment data, payment status, and any custom values to external apps, custom APIs, and spreadsheets the moment a workflow runs. This is how you connect Aesthetix CRM to the rest of your tech stack: integration platforms like Zapier or Make, your accounting or analytics tools, a custom-built app, or a shared Google Sheet your team already lives in.
This category contains three actions:
Webhook - a simple outbound webhook that posts a standard payload of contact and event data to a URL you provide.
Custom Webhook (premium) - a fully configurable HTTP request with your choice of method, headers, query parameters, authentication, and a custom payload. It can also capture the response and feed returned data into later workflow steps.
Google Sheets (premium) - create, update, look up, and delete rows in a connected Google Sheets document directly, with no third-party connector required.
Custom Webhook and Google Sheets are premium actions. The Webhook action sends data only; the Custom Webhook and Google Sheets Lookup actions can also bring data back into the workflow for downstream steps.
Every Send Data action is added to a workflow the same way:
Go to Automation > Workflows and open the workflow where you want to send data, or create a new one. Make sure the run reaches this step with the record context you need (for example, an appointment trigger if you want appointment data).
Confirm the workflow has at least one trigger configured (for example, Contact Tag Added, Form Submitted, or Appointment Booked).
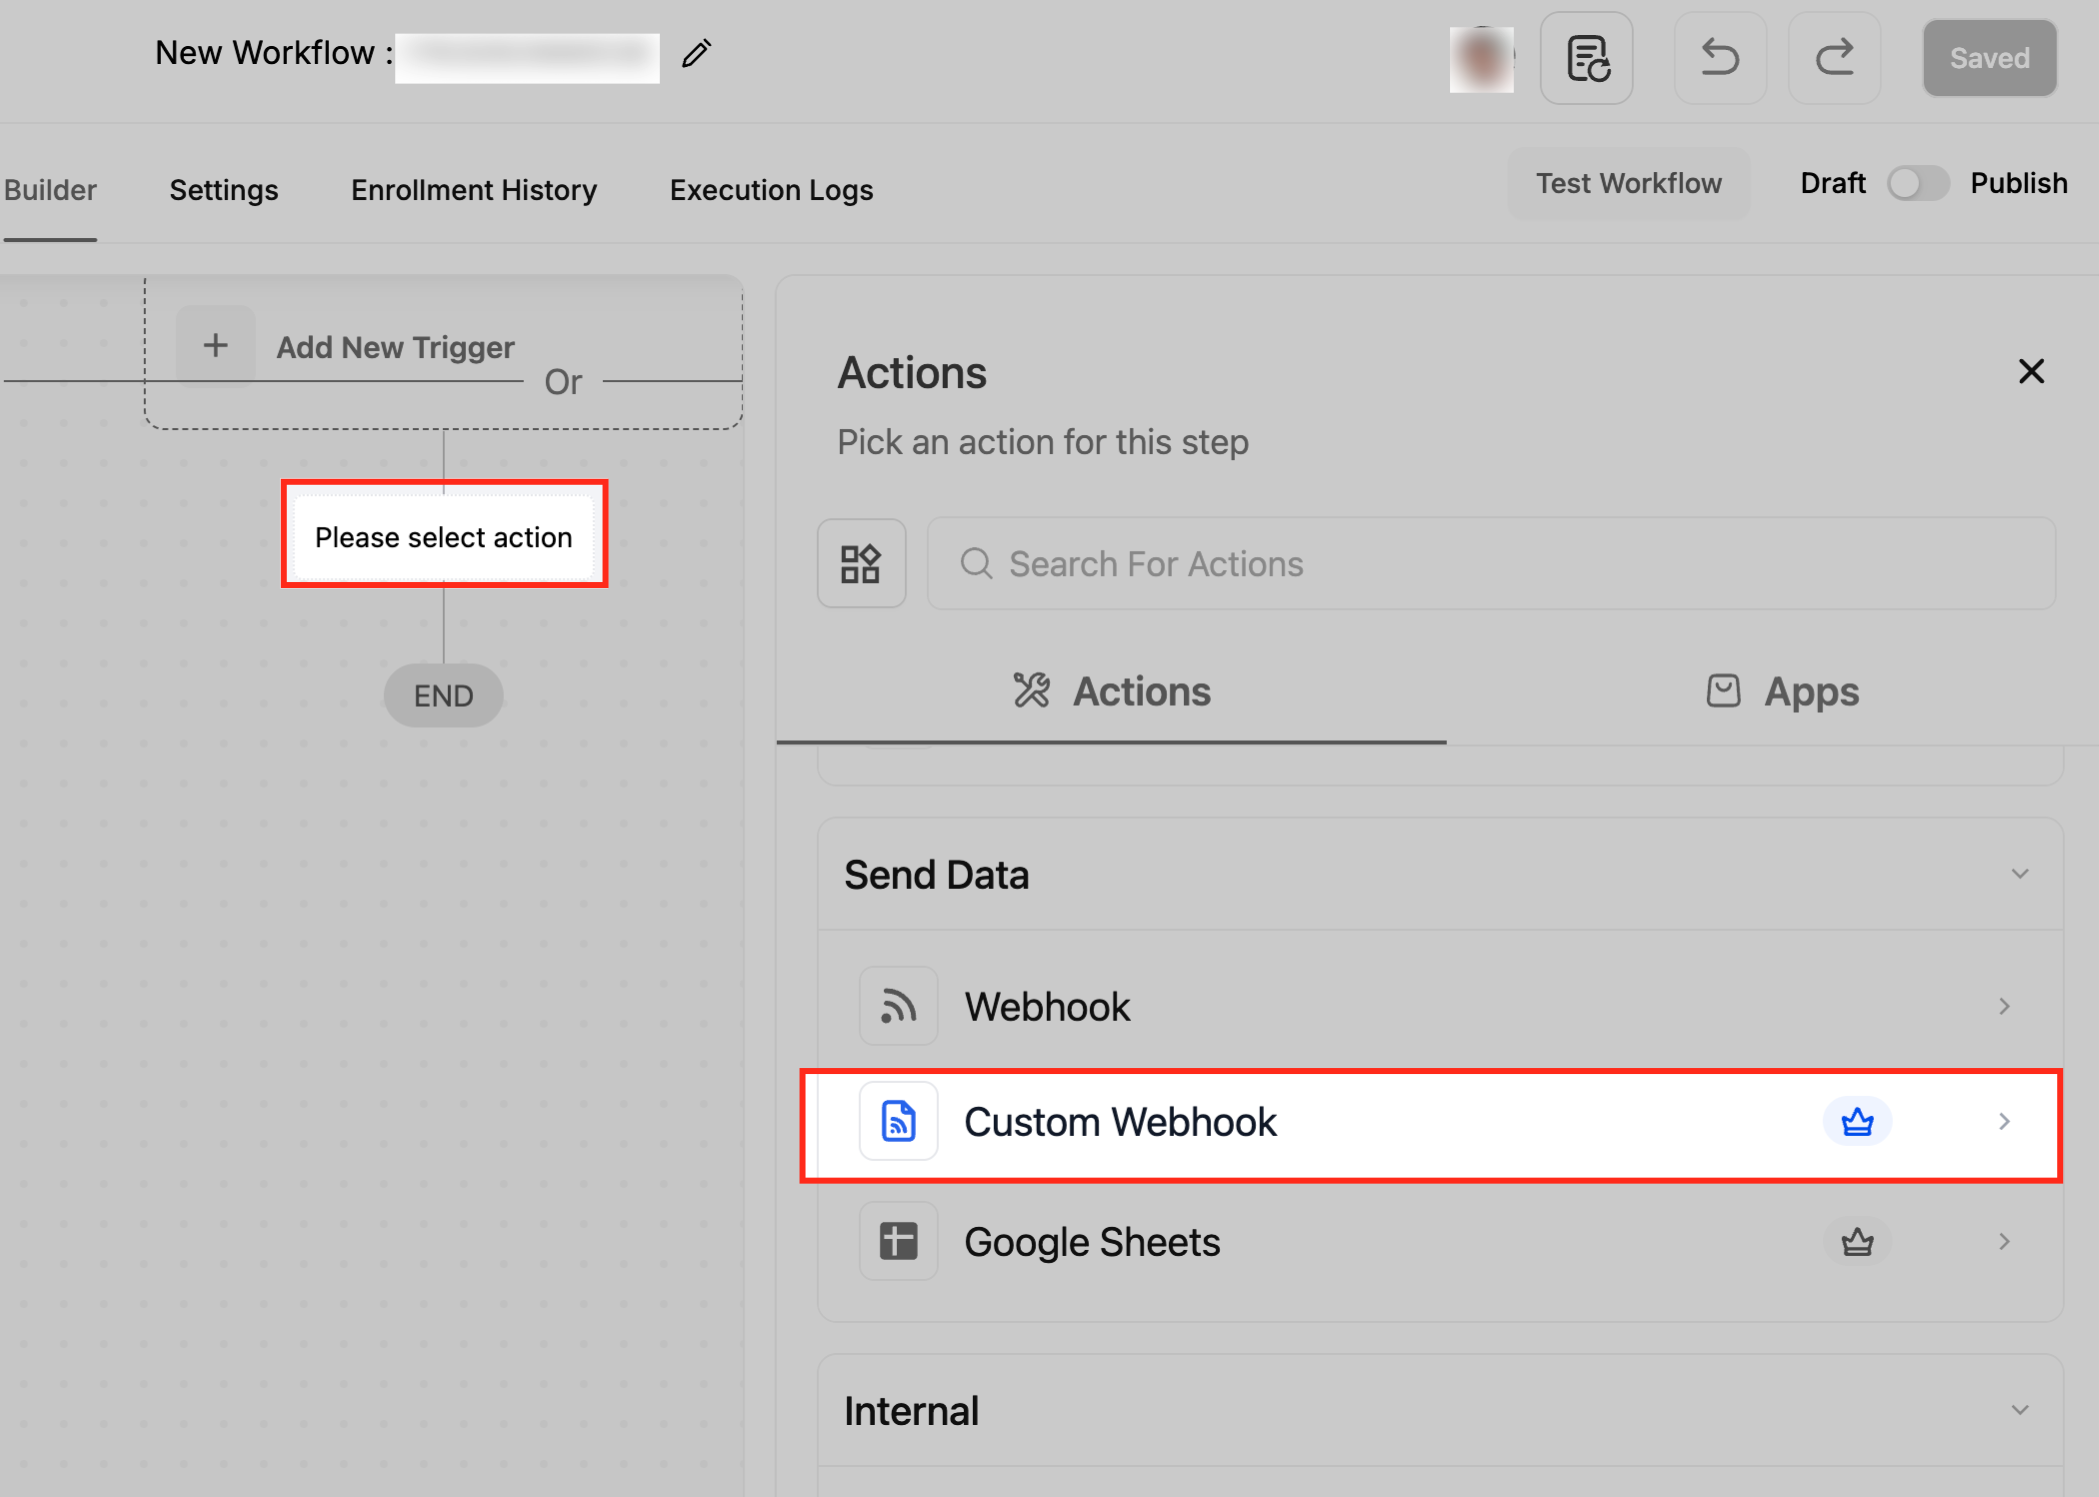
Click the plus icon (+) on the workflow canvas where you want the action. The Actions panel opens on the right.
In the search bar, type the action name (Webhook, Custom Webhook, or Google Sheets) or browse the Send Data category.
Select the action. This adds the step and opens its configuration panel.
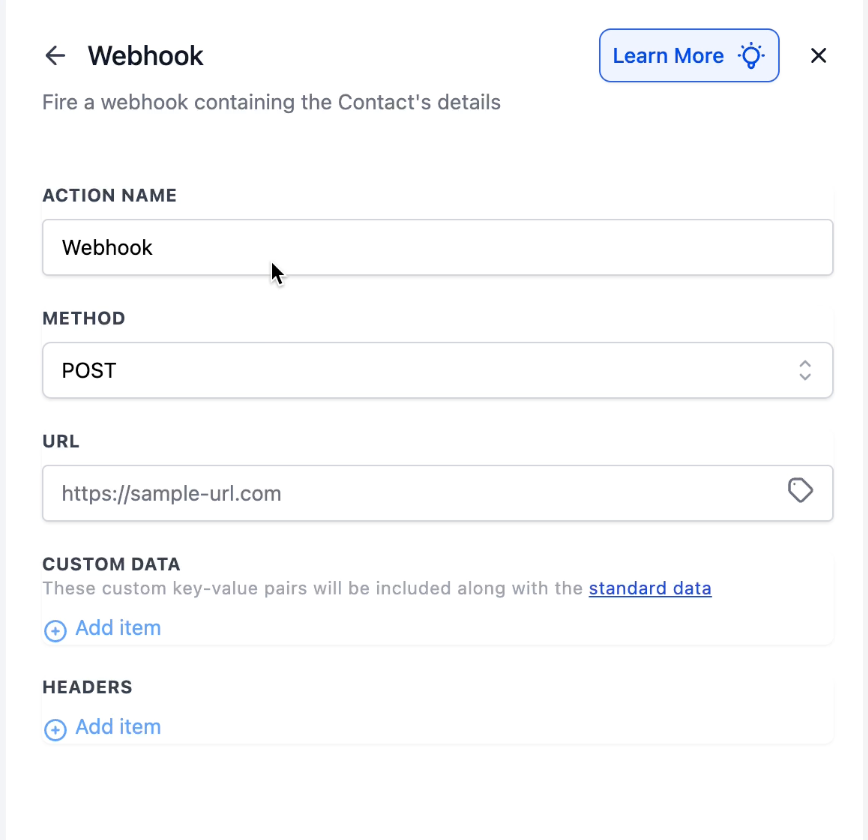
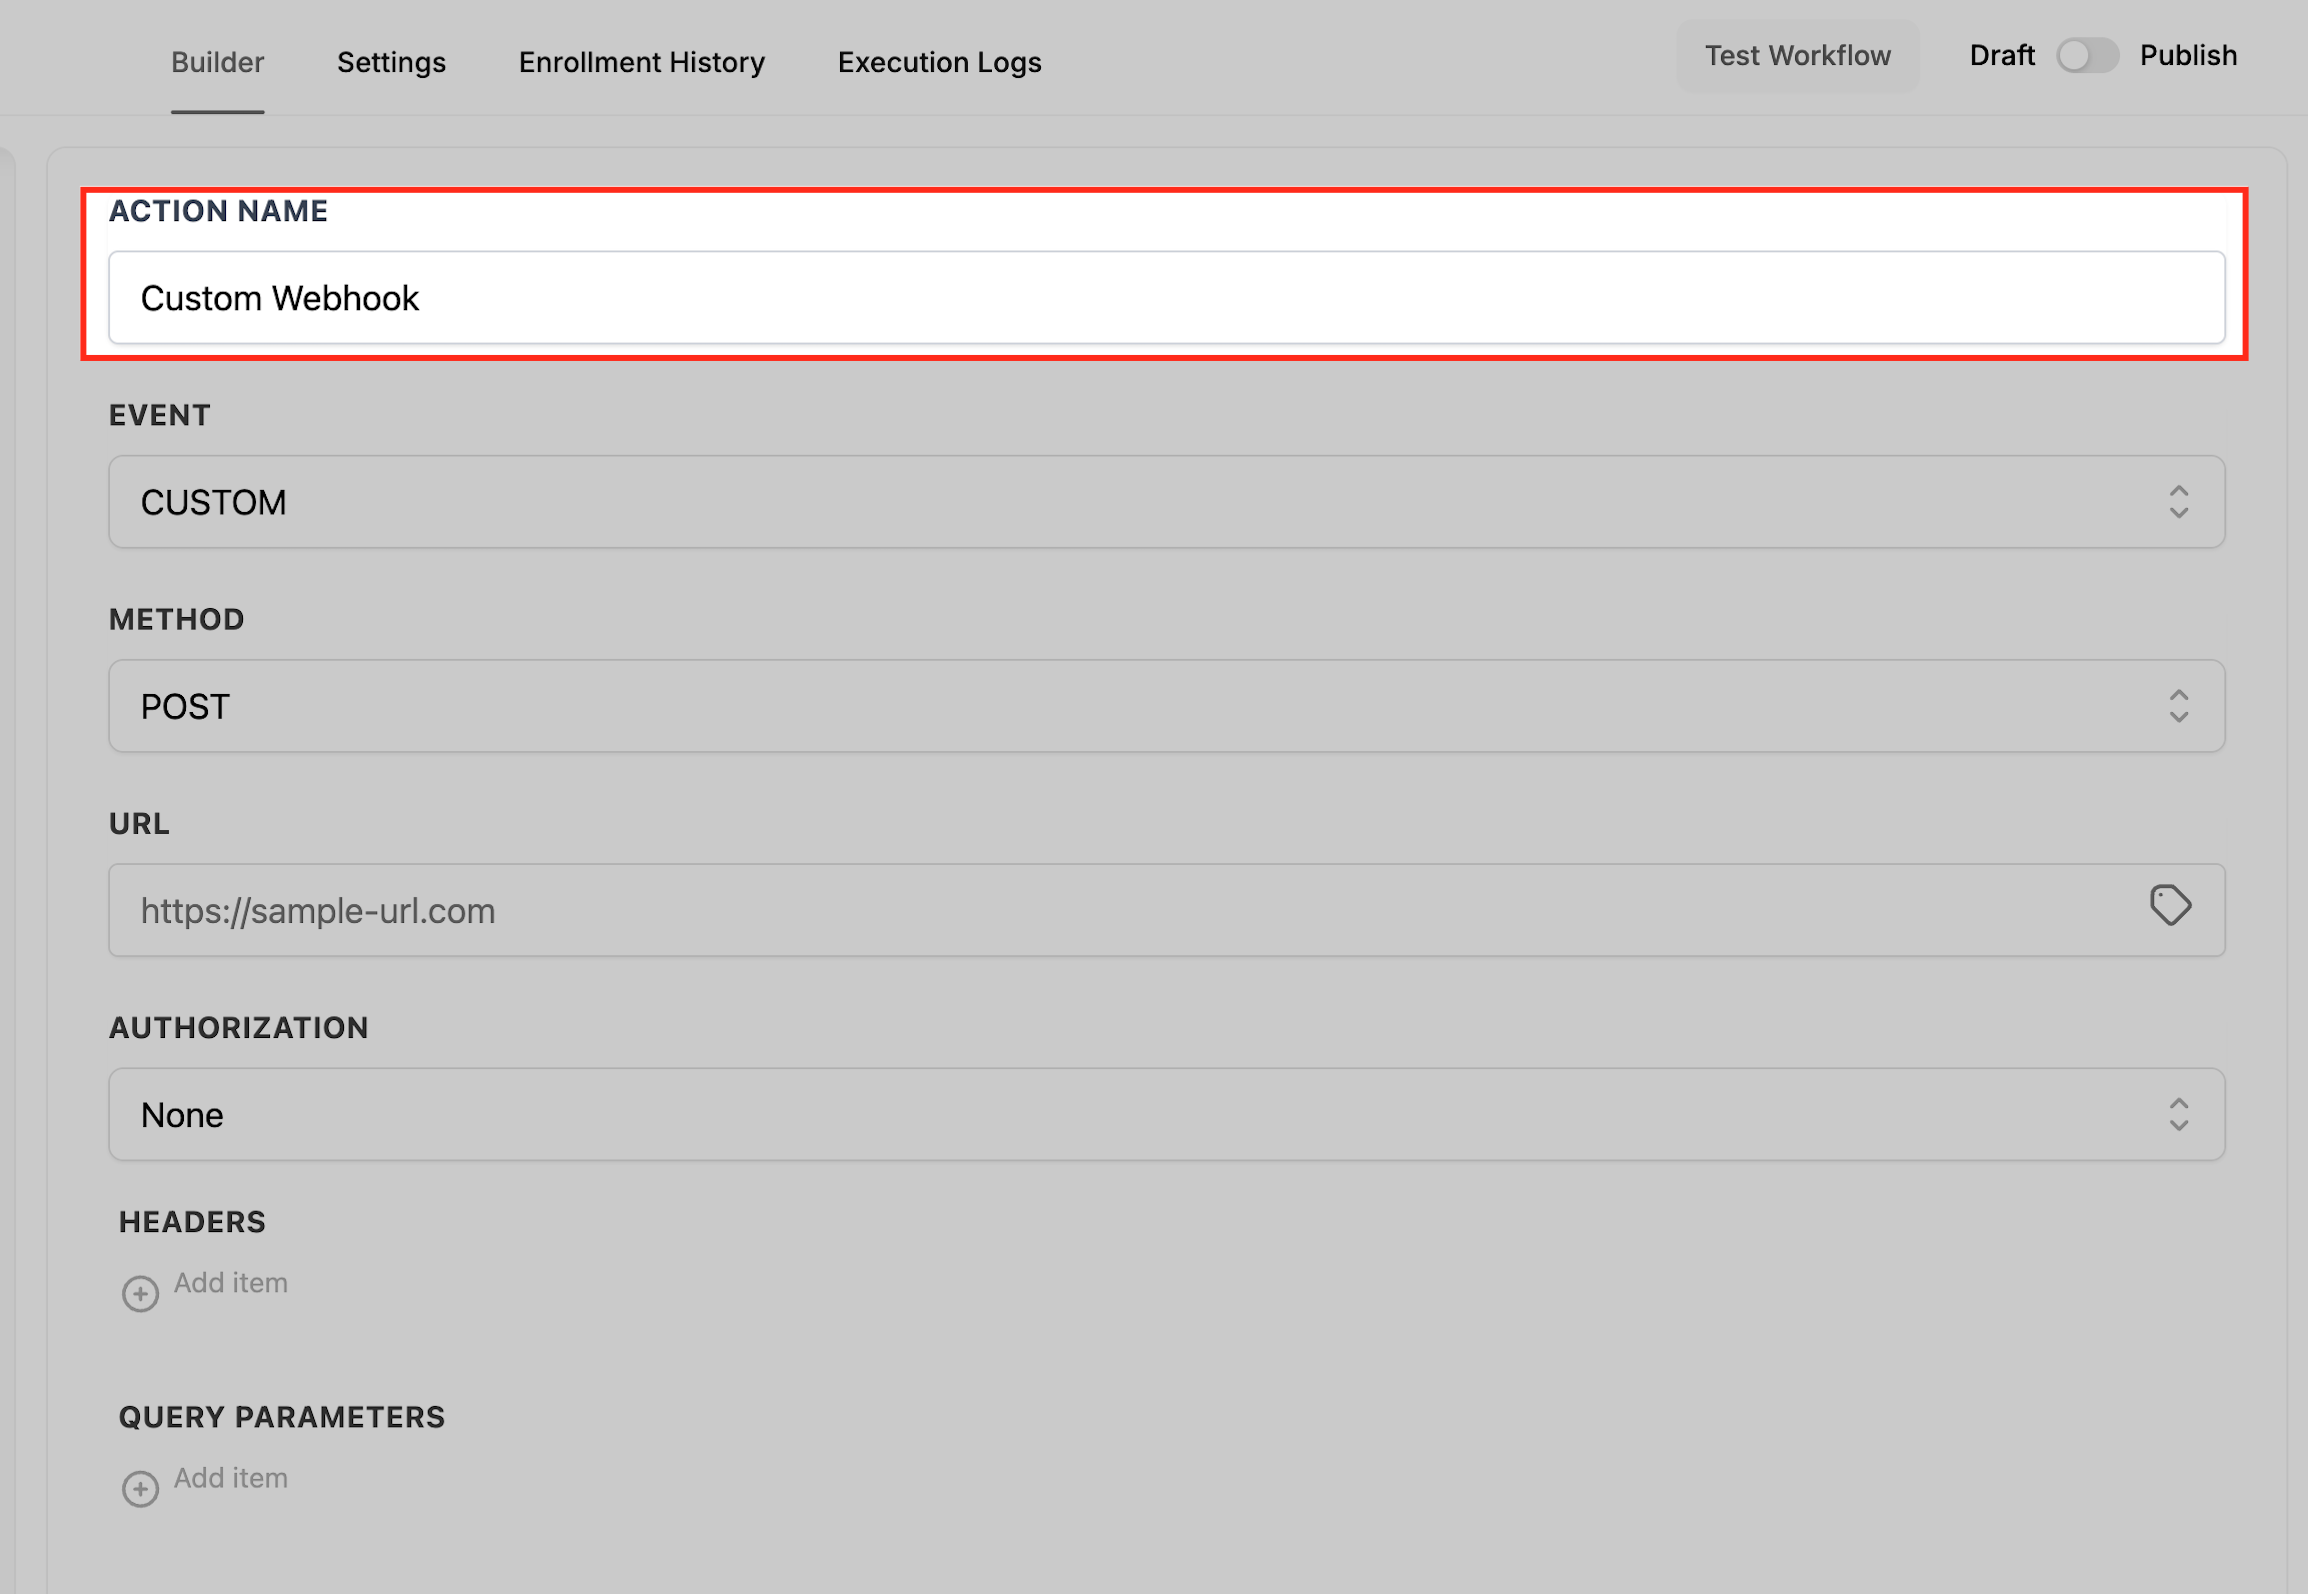
Give the action a clear, descriptive Action Name so you can identify it later (for example, "Send New Lead to Slack" or "Log Booking to Sheet").
Configure the fields for that action (covered below), then click Save Action.
A small tag icon appears next to most fields. Click it to open the dynamic value picker and insert custom values such as {{contact.email}}, {{contact.id}}, custom fields, and inbound webhook variables. These values are filled in with the contact's real data each time the workflow runs.
The Webhook action (an outbound webhook) sends information from Aesthetix CRM to an external service automatically. When a contact reaches this step, the CRM gathers data about that contact and the triggering event, packages it into a "payload," and posts it to the URL you provide. Use it to trigger actions, sync data, or start processes in apps outside the CRM without writing code.
This differs from the Inbound Webhook trigger, which receives data from an external service into the CRM to start a workflow. The Webhook action sends data out.
Reach for the basic Webhook action when you need a quick, pre-defined push of contact and event data and the receiving service can accept whatever the CRM sends. Common targets are integration platforms (Zapier, Make), Slack notifications, external databases, and analytics or business-intelligence tools.
Med-spa example: When a new lead submits your "Book a Consultation" form, fire a Webhook action that posts the lead's name, email, phone, and source to a Slack channel via a Slack-connected automation, so your front-desk team gets a real-time ping for every new consult request.
After adding the action (see How to Add an Action), confirm your workflow has a trigger configured.
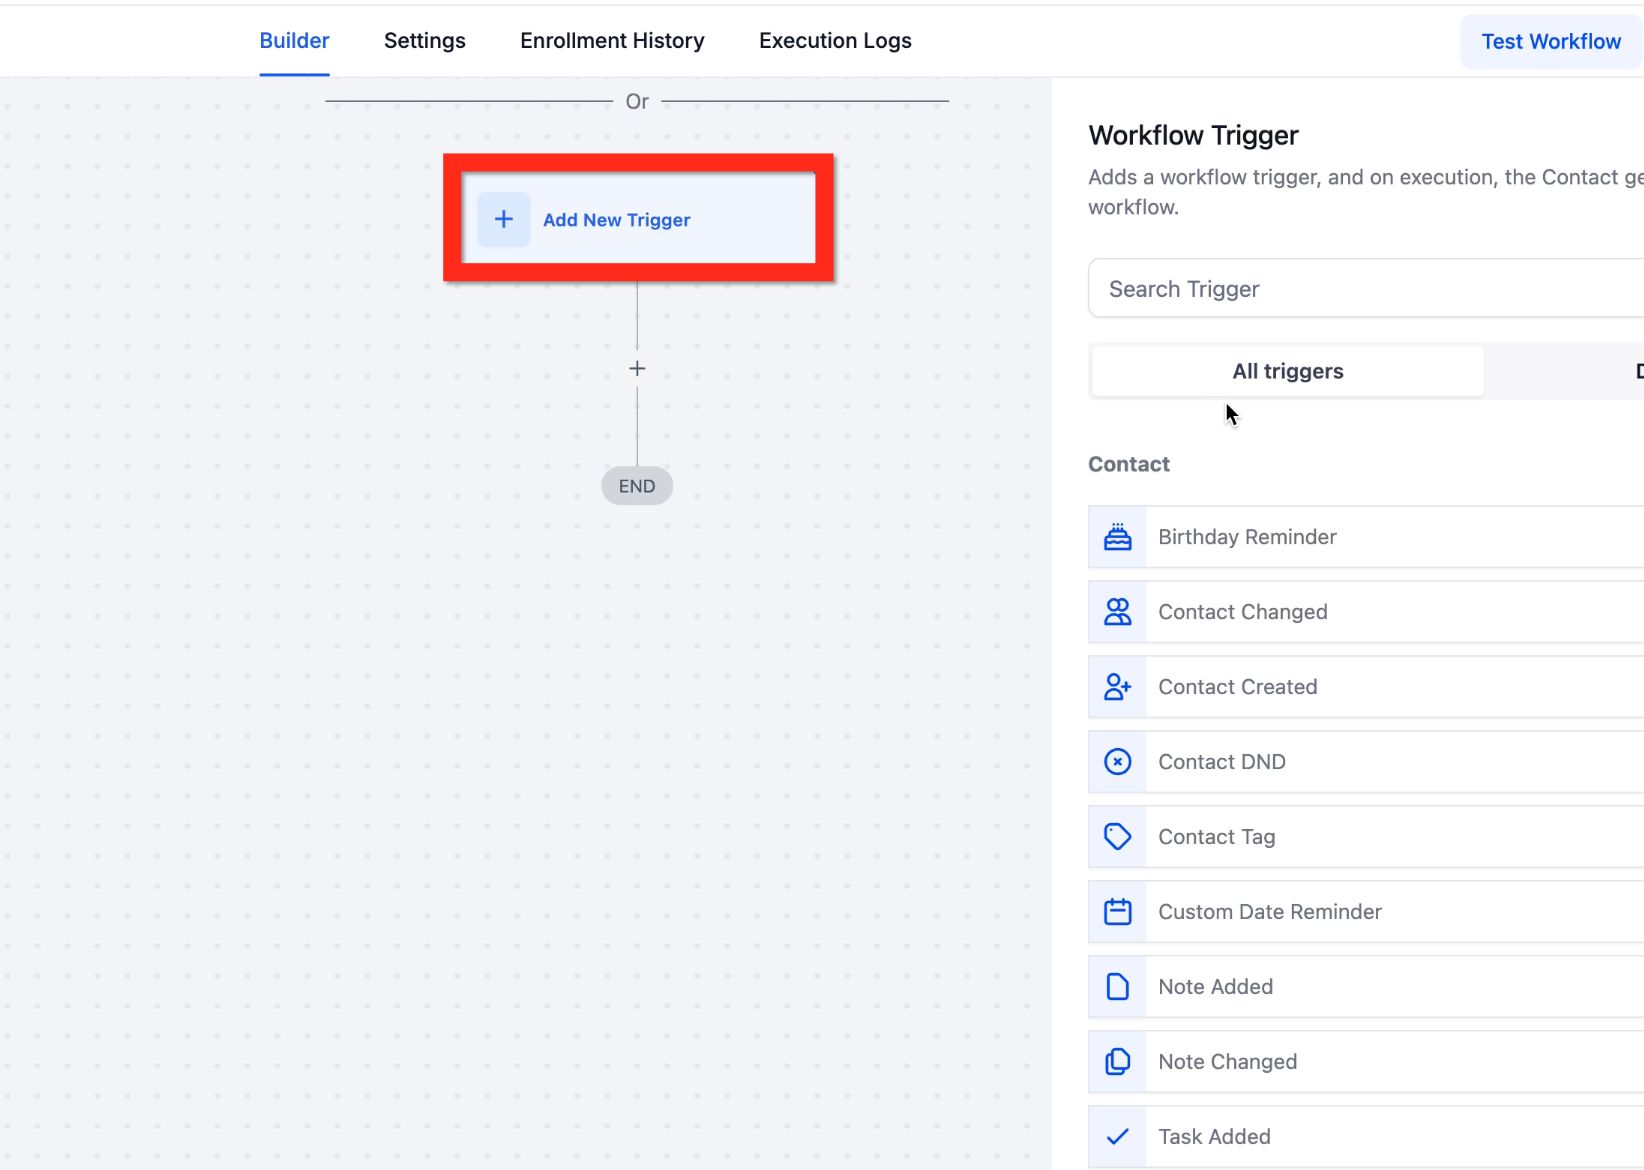
Search the Actions panel for webhook and select the Webhook option to open its configuration panel.
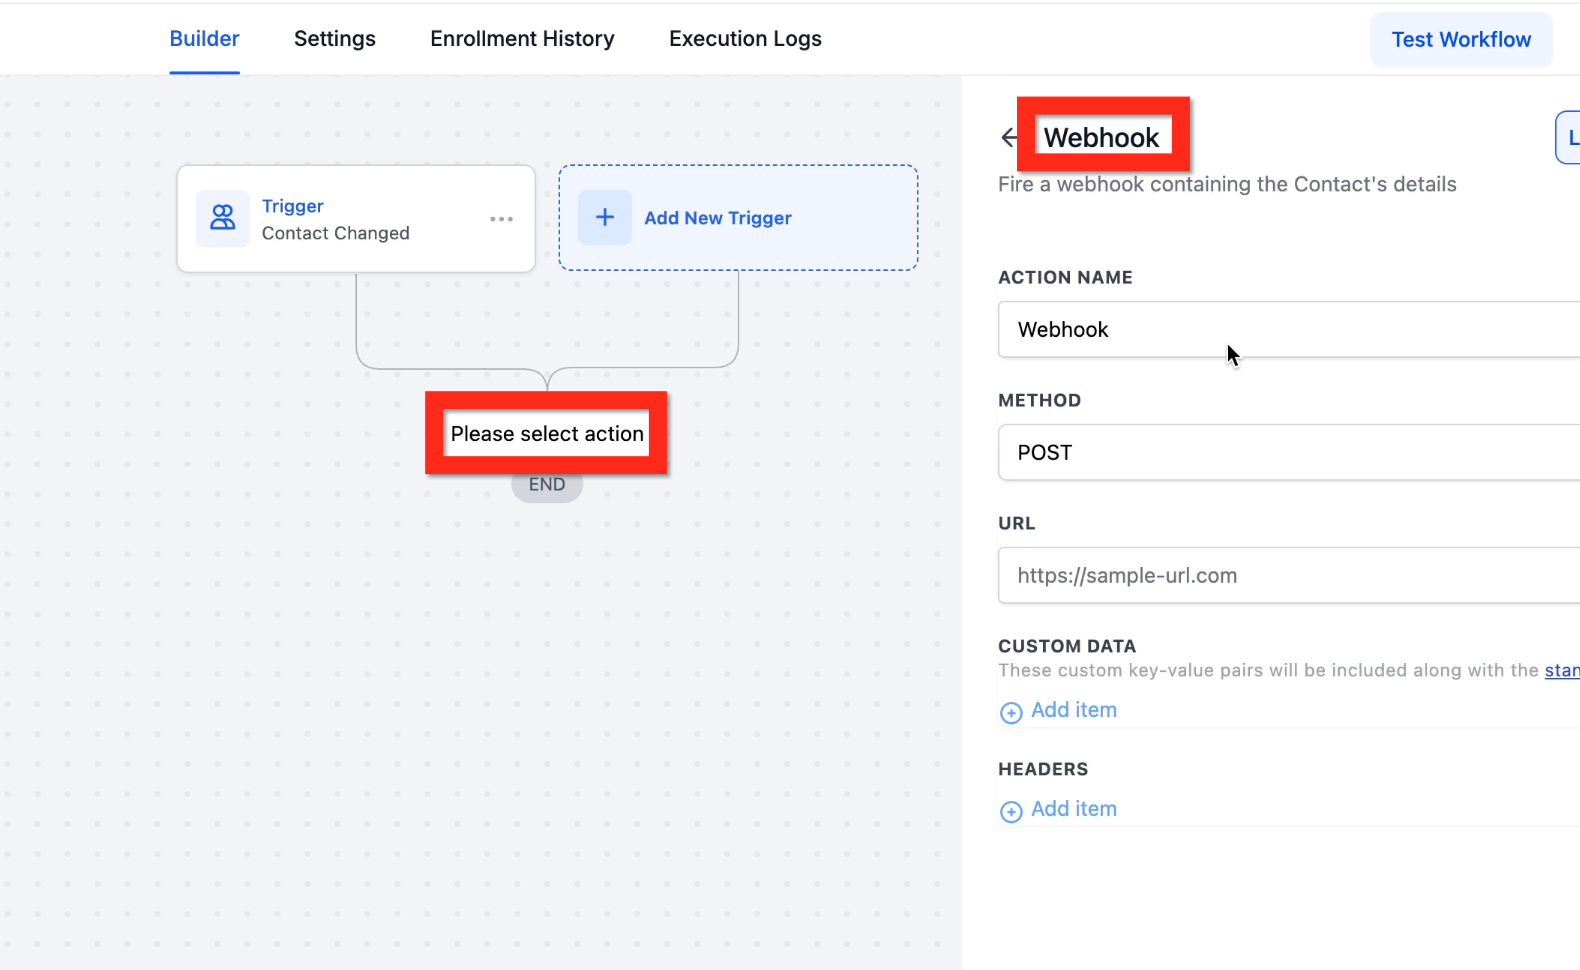
Action Name: A descriptive label for the step (for example, "Send New Lead to Slack" or "Update External DB").
Method: The HTTP method for the request. POST is the most common method for sending data and is selected by default.
URL: The unique endpoint of the external service that will receive the data. This is the most critical field. Copy and paste it exactly from the destination service.
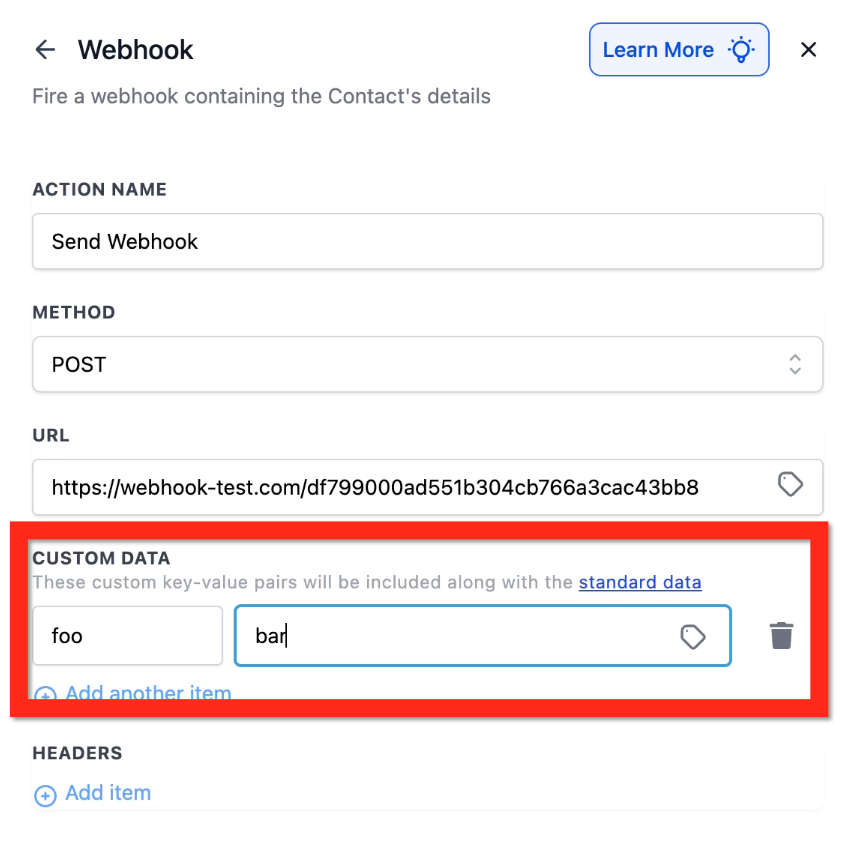
You can include additional custom information in the payload:
Under the Custom Data section, click + Add item.
A new row with a Key and a Value field appears.
Key: The label for the field you are sending (for example, lead_source or product_interest). Use a simple text string with no spaces.
Value: The data to send. Use plain text or insert dynamic data with the value picker (for example, {{contact.source}} or {{custom_fields.product_id}}).
When everything is filled in, click Save Action.
The data sent by the webhook is called the payload. Knowing what it contains is essential for processing it correctly on the receiving side.
Standard data (always included): Every webhook sends a standard set of information about the contact in the workflow, including:
Full Name, First Name, Last Name
Email and Phone Number
Address
Tags
All standard and custom fields associated with the contact
The sub-account (location) object is also included by default. Use the standard data link in the configuration panel to view the full field list.
Trigger-dependent data: The payload can include extra data tied to the specific trigger that started the workflow. For example, if the trigger is Appointment Booked, the payload also carries appointment details such as start time, calendar ID, and appointment status. If the trigger is not tied to that object (for example, Contact Tag Added), data for other objects like appointments or opportunities will not be included. Related objects such as appointments, tasks, and opportunities are carried only when the corresponding trigger is used. To get the data you need, choose the matching trigger (for example, an Opportunity trigger like Pipeline Stage Changed to include the opportunity owner).
The basic Webhook action sends data one way and does not capture a response, so it does not make returned fields available to later steps. For that, use the Custom Webhook action with response capture.
Before activating the workflow, test the webhook to confirm it sends correctly. A free testing tool such as webhook.site (set it as your URL during testing) lets you see the exact payload that was sent.
After saving the action, click Test Workflow in the top-right of the builder.
In the Run A Test For Contact panel, choose a test contact from the Select Contacts dropdown.
Click Run Test. This executes the whole workflow for that contact, including the webhook.
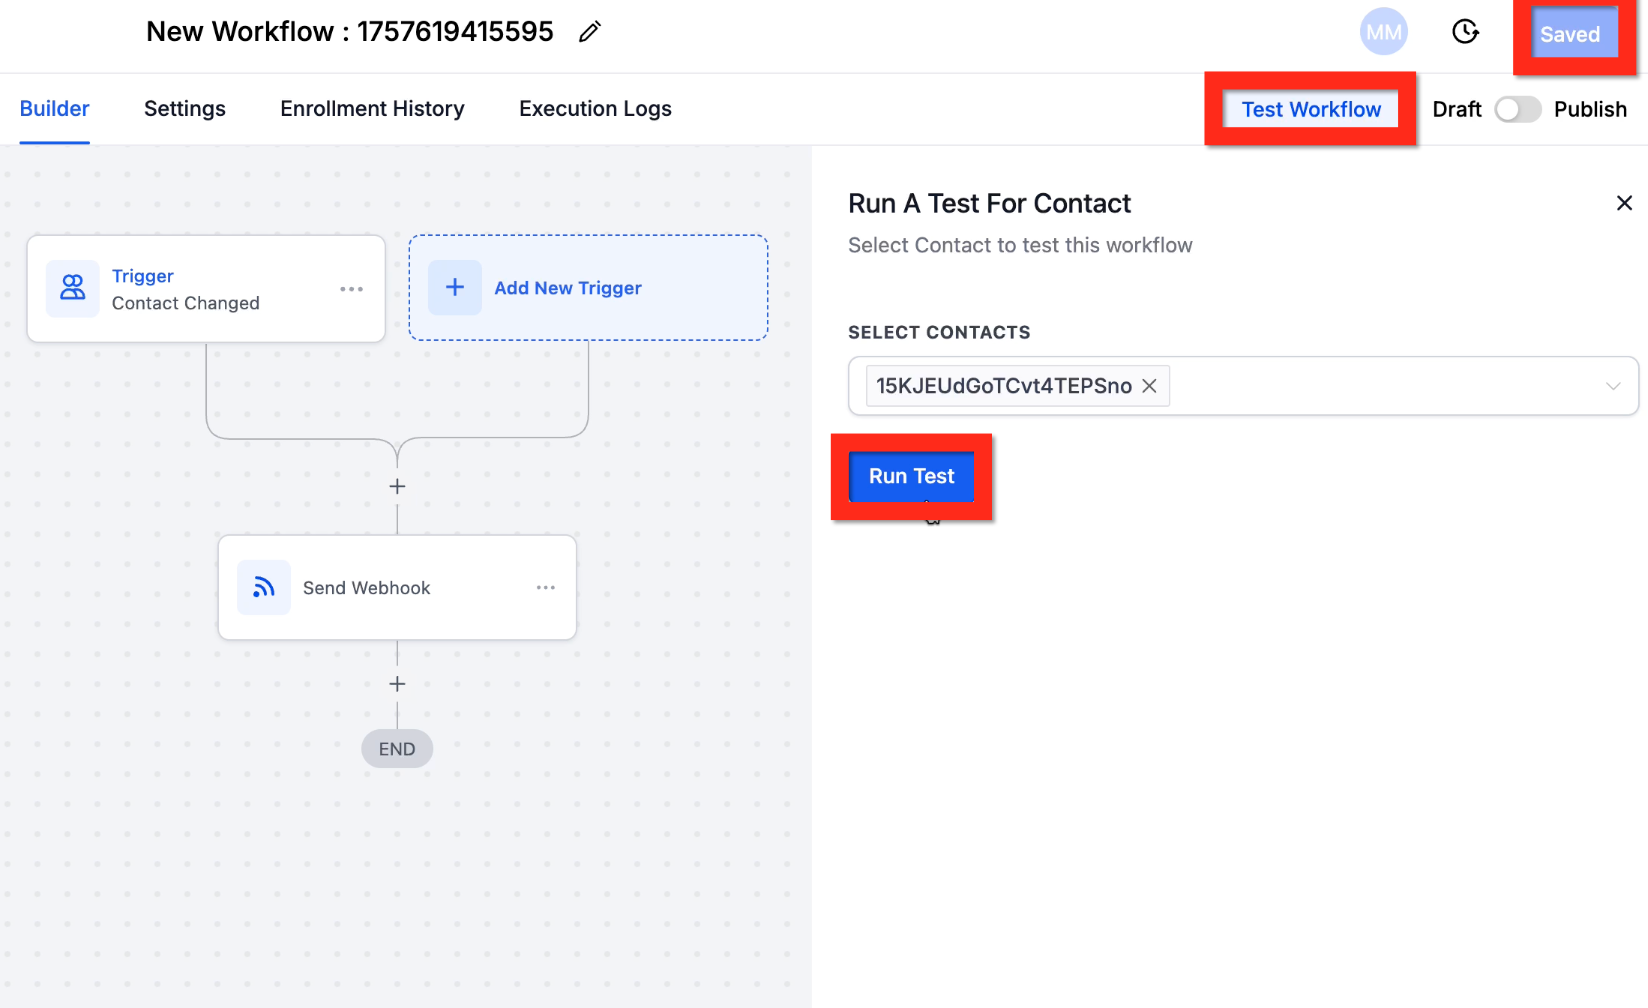
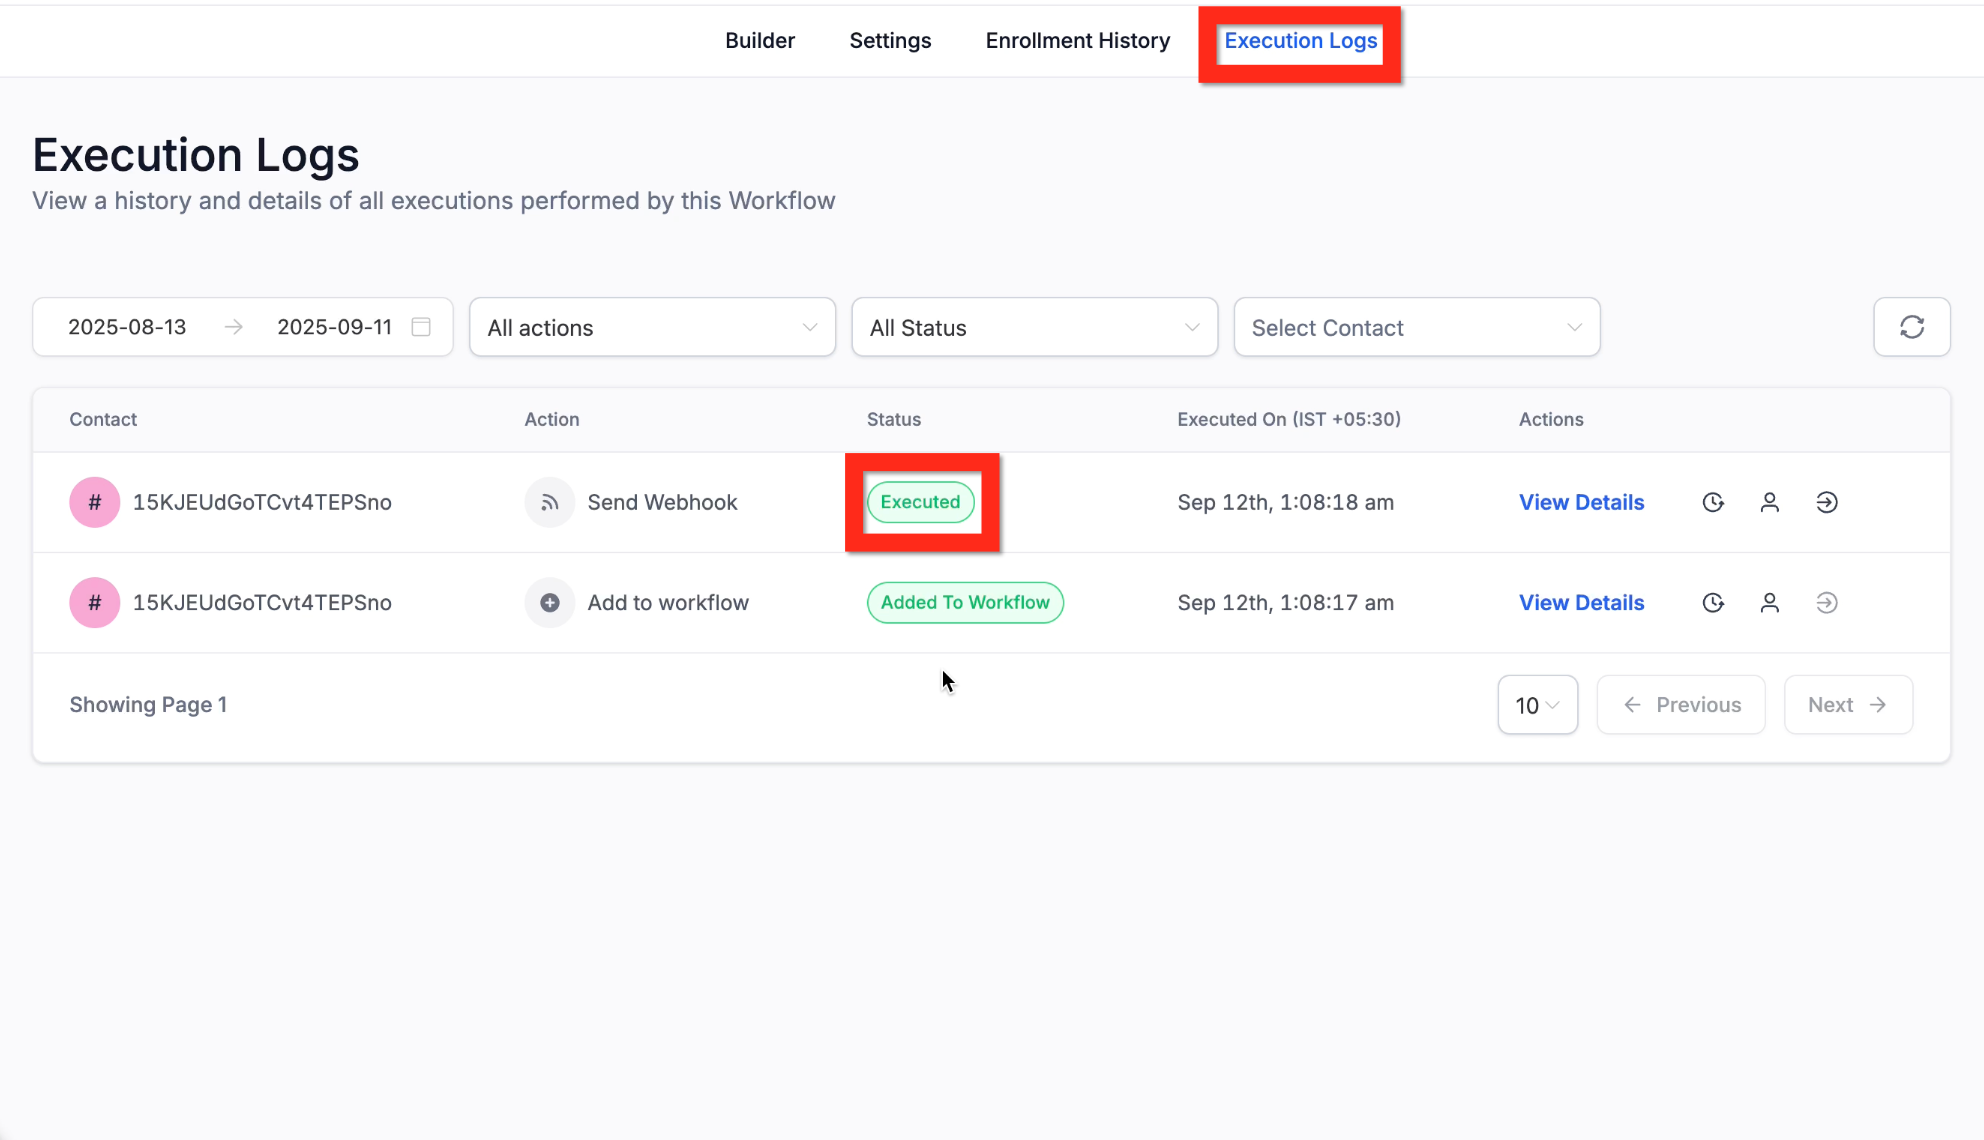
Click the Execution Logs tab to verify the result.
Find your test contact's log entry. The Webhook action should show a status of Executed, confirming the CRM sent the data to your URL.
Once confirmed, click the Publish toggle in the top-right to set the workflow live.
You cannot send images or files with the Webhook action.
The Execution Logs confirm the action ran but do not display the payload itself. Use a testing tool or the receiving app's incoming logs to inspect the data.
If the action shows an error: confirm the URL is 100% correct and active, confirm the receiving app accepts POST requests and the CRM's data format, then check the external app's error logs for specifics.
Setting up the action requires no coding, but you do need a destination URL from the receiving service and an understanding of what it expects.
Custom Webhook is a premium outbound action that makes a fully configurable HTTP request to a URL you choose. When a run reaches this step, Aesthetix CRM assembles your headers, query parameters, and payload (including mapped dynamic values) and sends the request to the external system. Where the basic Webhook sends a fixed payload by POST, Custom Webhook gives you full control over the method, authentication, content type, raw body, and response handling, so you can talk to almost any API directly.
Use Custom Webhook when the receiving API needs more than a simple POST: a specific HTTP method, authenticated requests, custom headers, a precisely shaped JSON body, or when you want to read the API's response back into the workflow. Use the basic Webhook action instead for simpler, pre-defined pushes.
Med-spa example: When an appointment is marked completed, send a PUT request to your external loyalty-points platform's API at https://api.loyaltyapp.com/members/{{contact.id}} with a Bearer token, adding points for the visit. Enable response capture so the updated points balance the API returns can be inserted into a follow-up SMS thanking the client and stating their new balance.
Open your workflow under Automation > Workflows.
Click + Add action > Send Data > Custom Webhook to create the step.
Give the action a clear, descriptive name (for example, "Send Lead to External CRM").
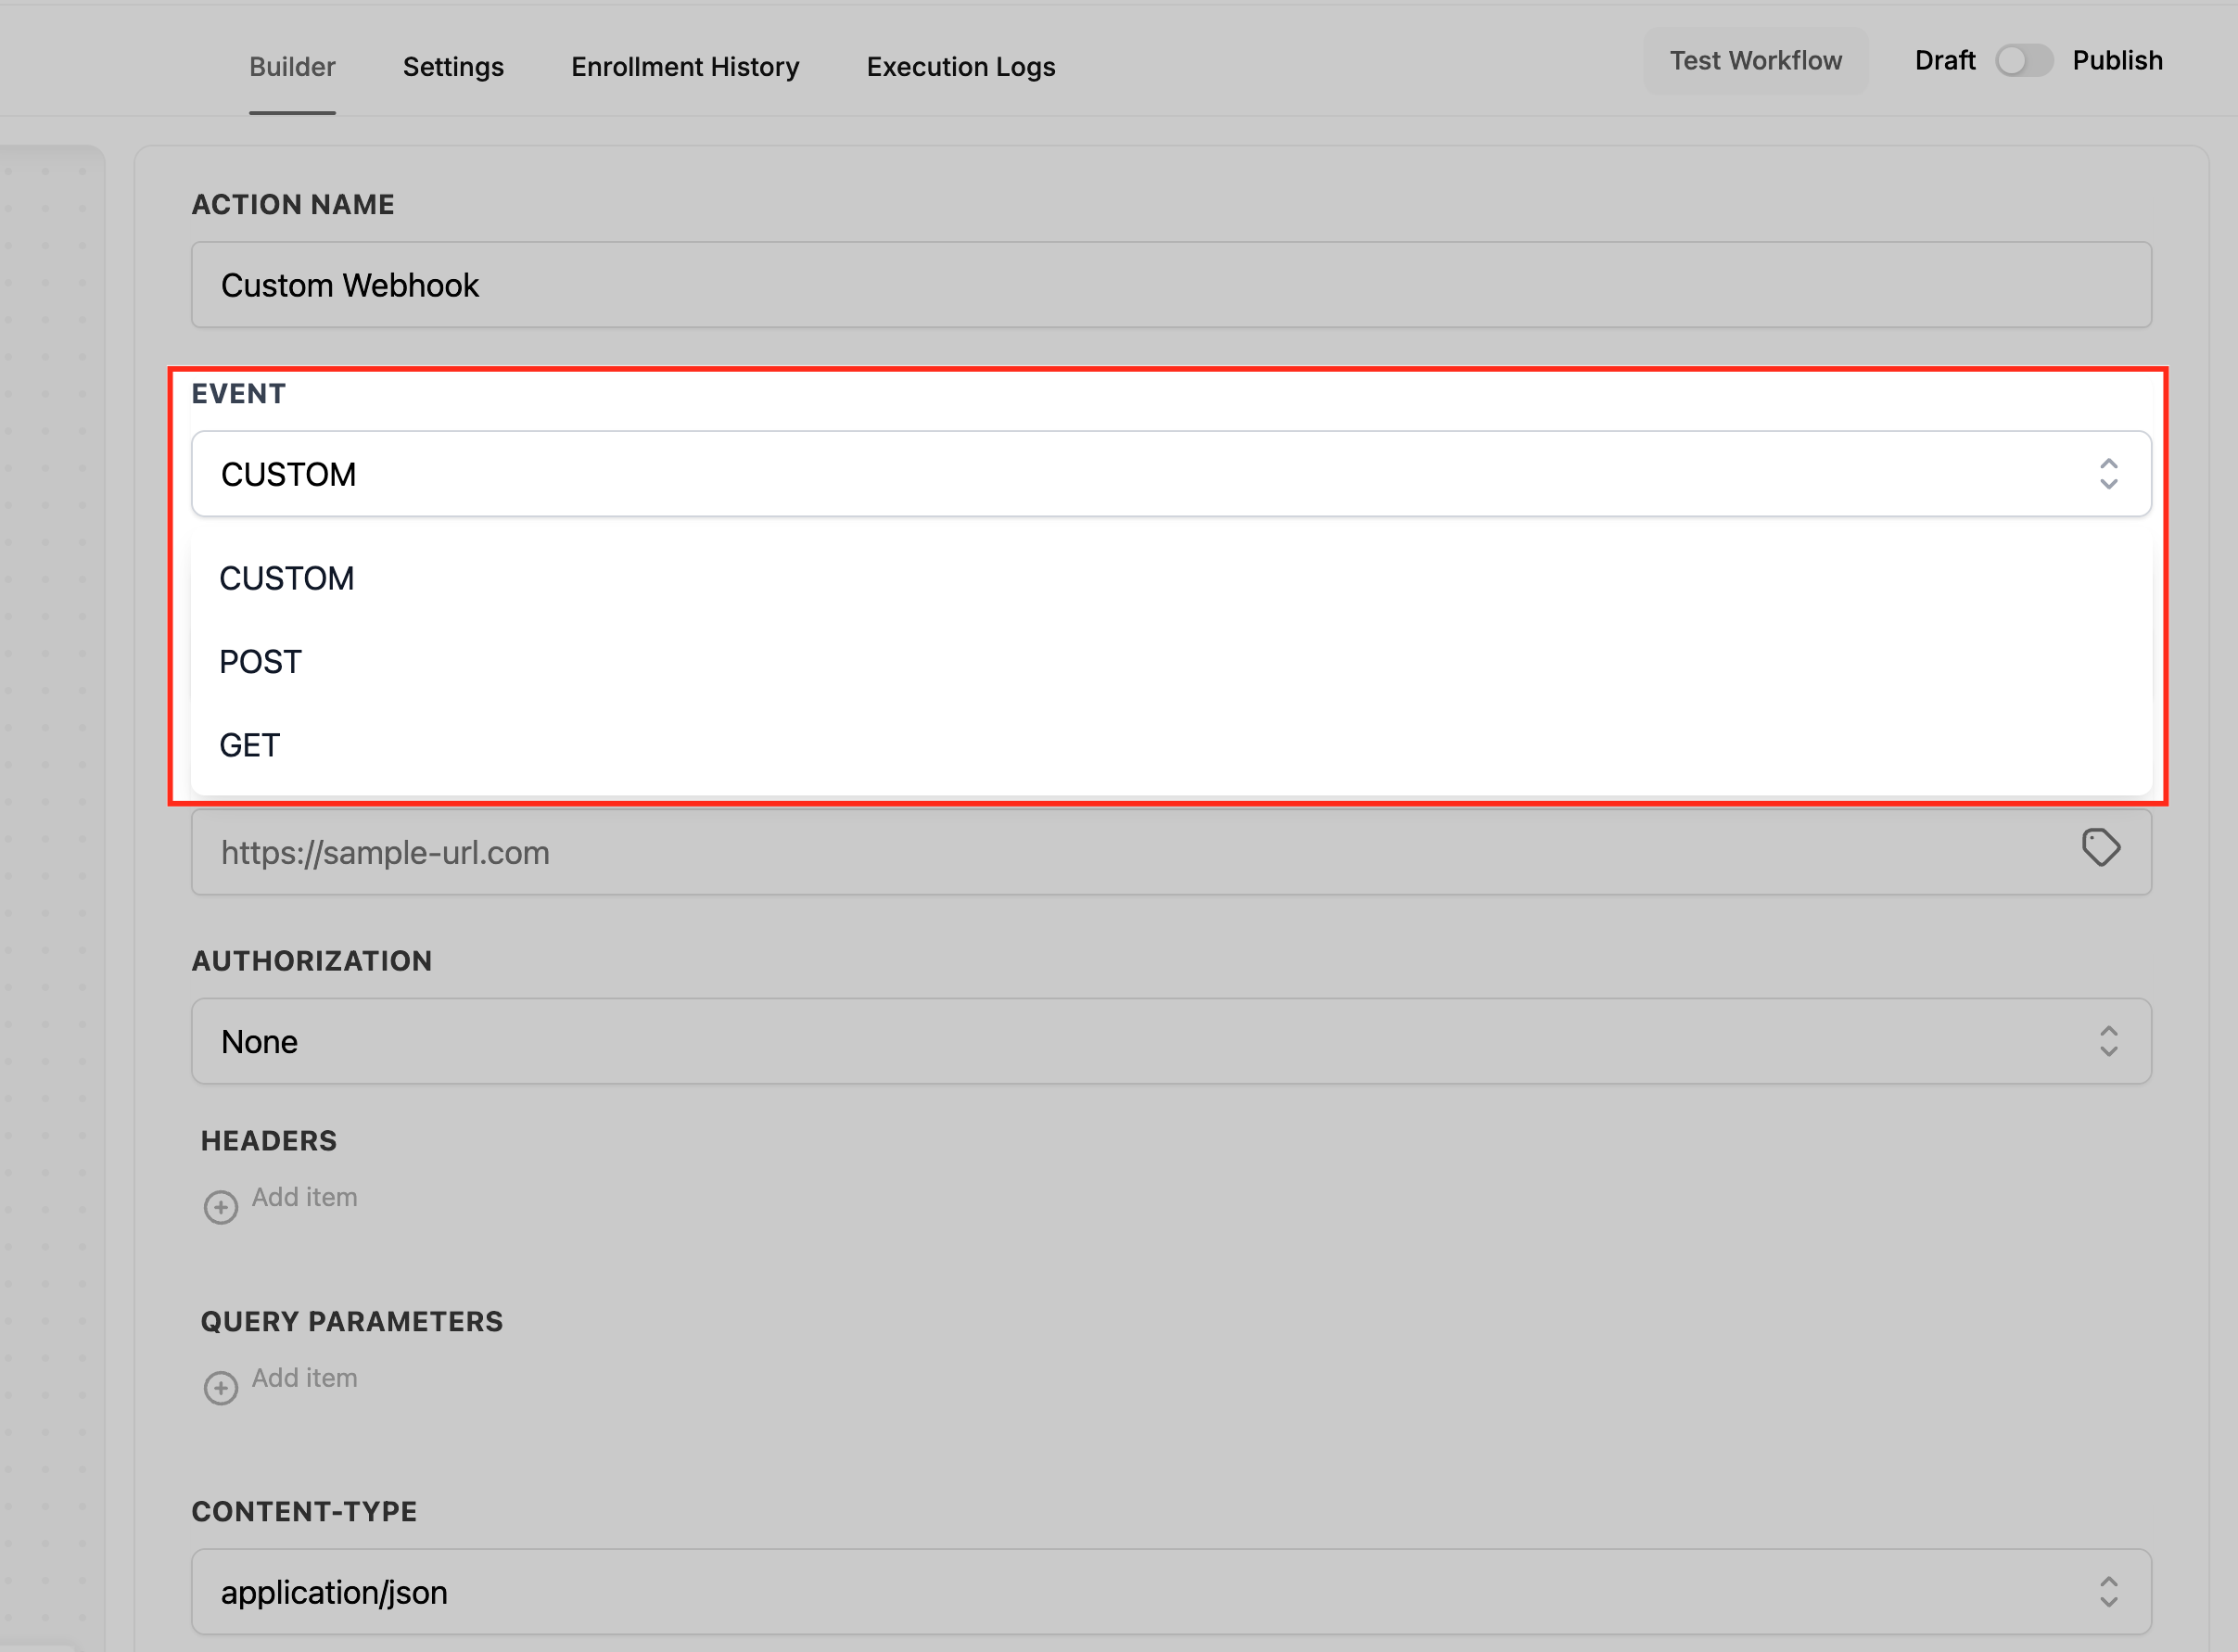
The action offers two configuration modes through the Event dropdown, which controls which fields appear:
Event = CUSTOM (advanced): Exposes the Method picker (GET, POST, PUT, DELETE), a Content-Type selector, and a Raw Body editor for JSON or other formats. Best when you need JSON payloads, non-POST methods, or explicit headers and content types.
Event = POST (simple): Shows Body (Key and Value) pairs for a form-style payload, with no raw body editor. Use it for simple key/value submissions. Switch to CUSTOM if your provider expects JSON.
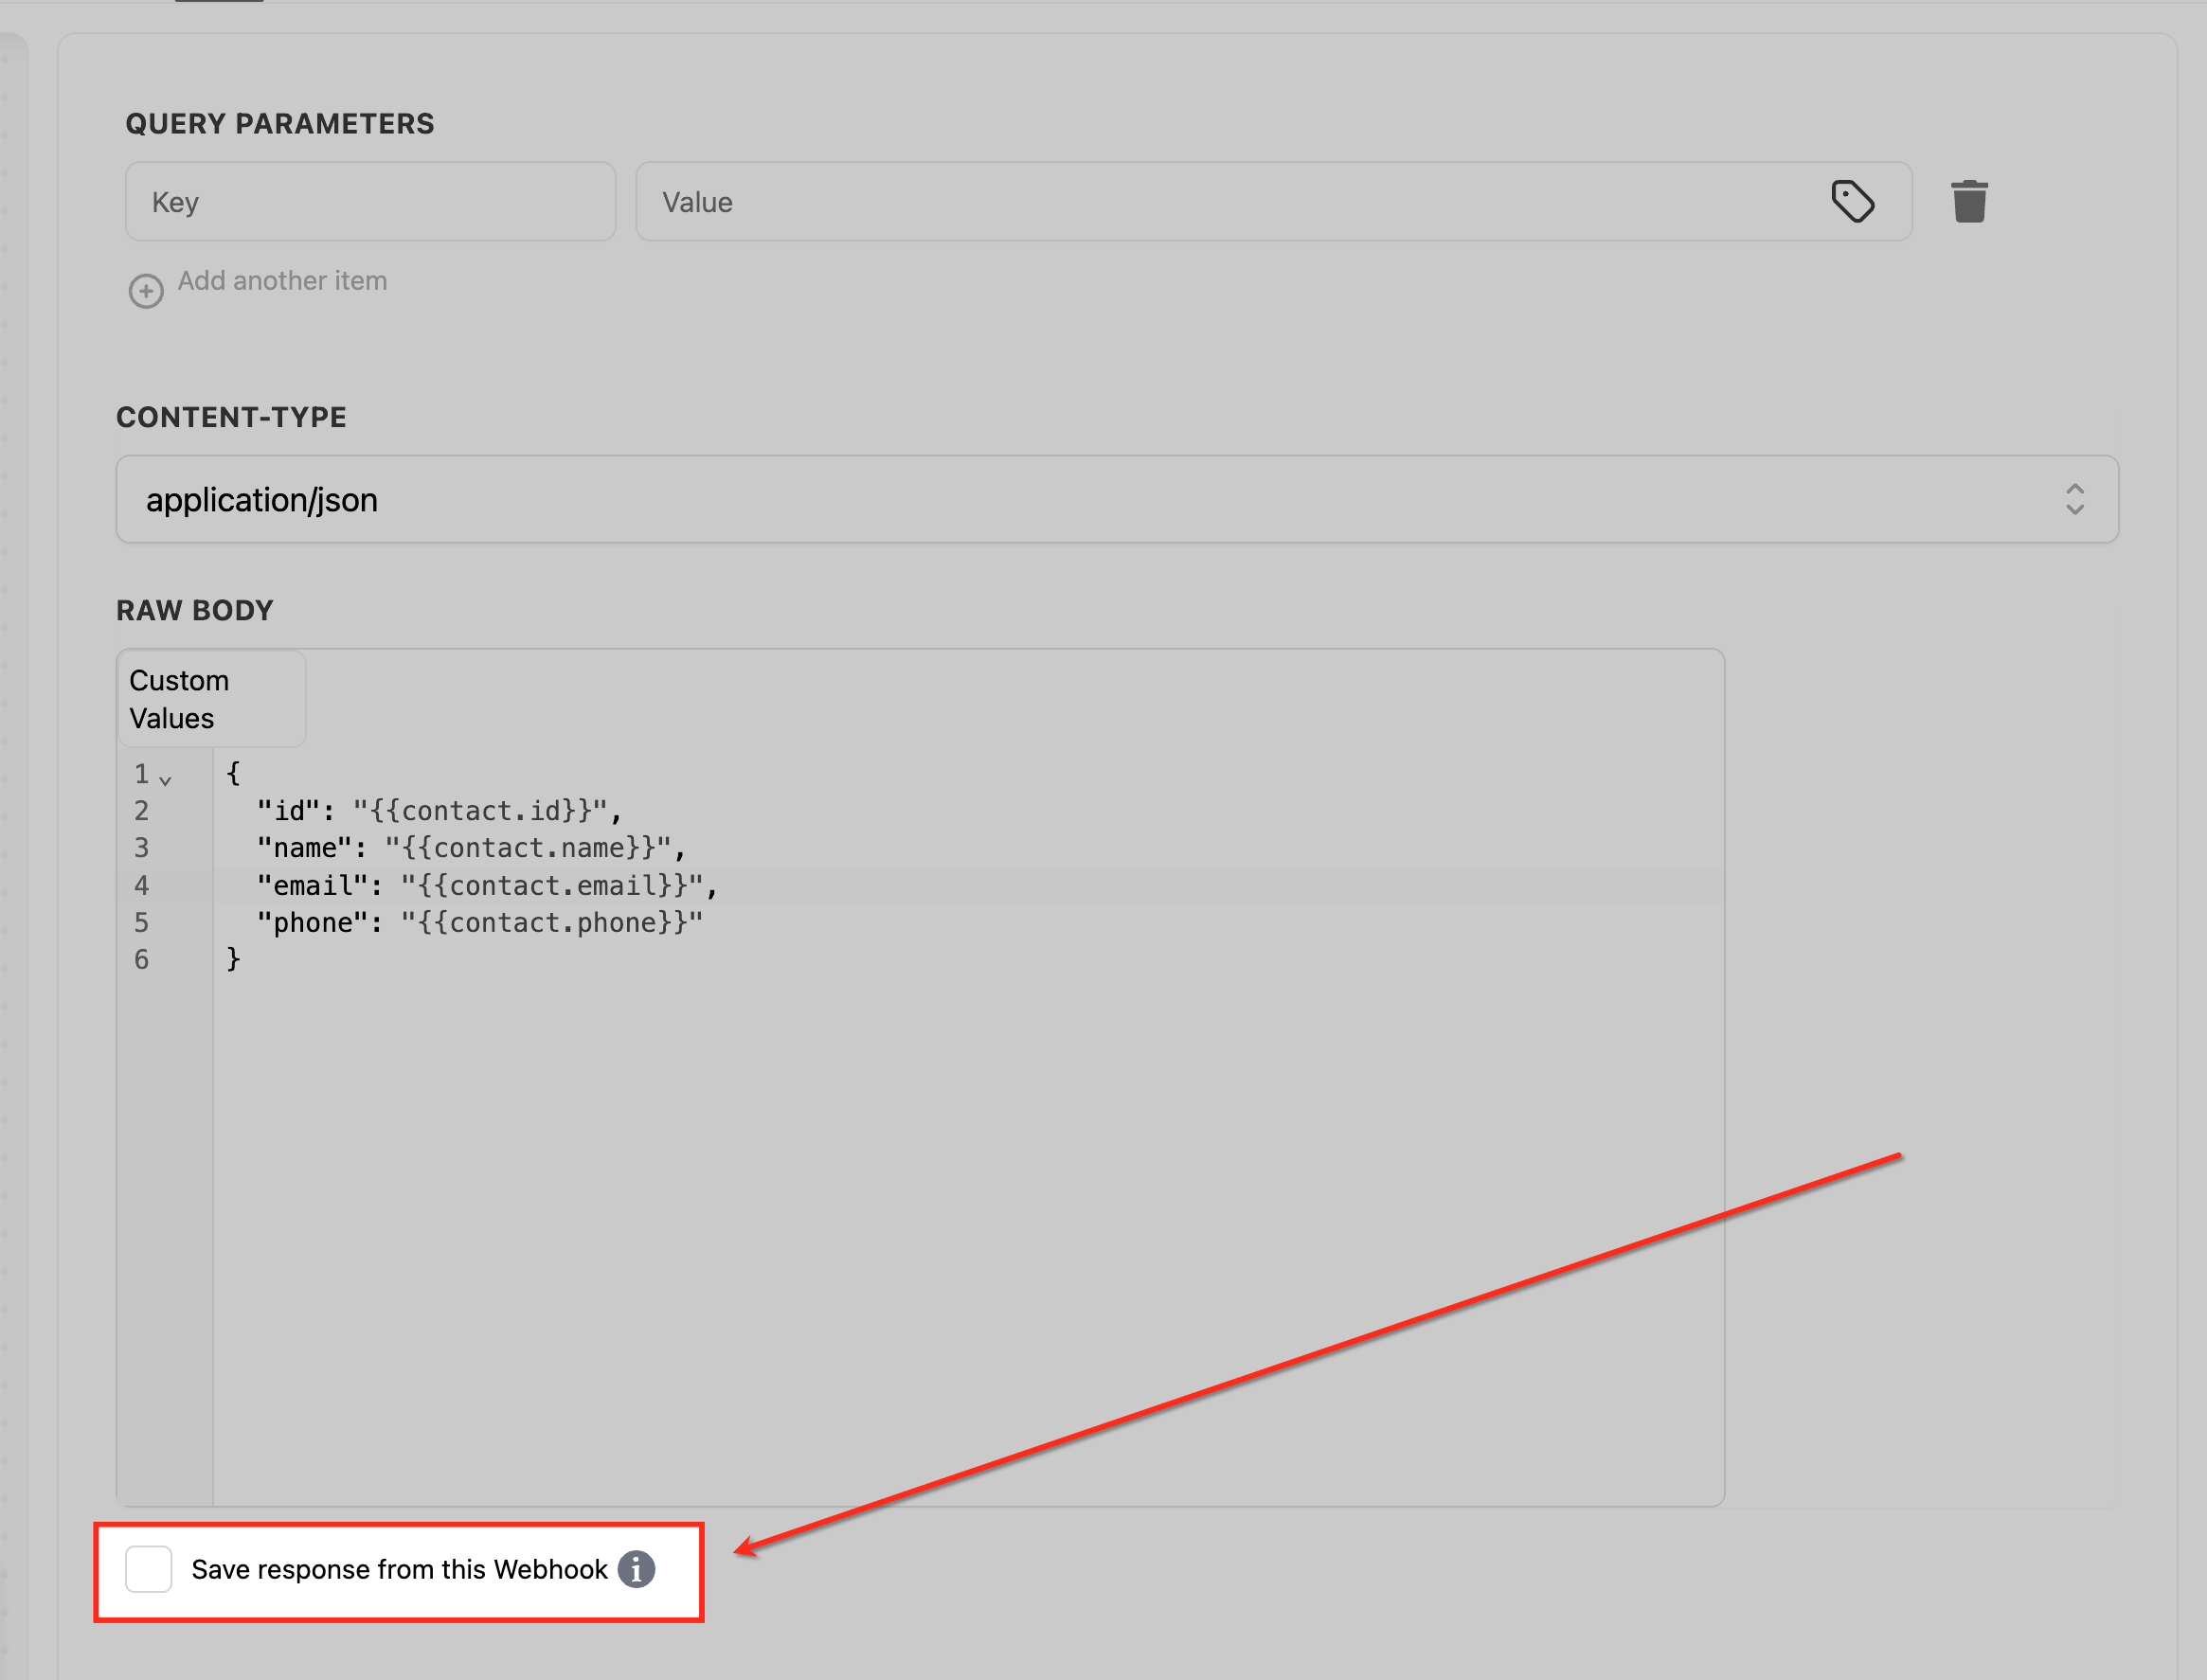
Event = GET (simple): No request body. Use Query Parameters to pass filters. Save response from this Webhook is available here.
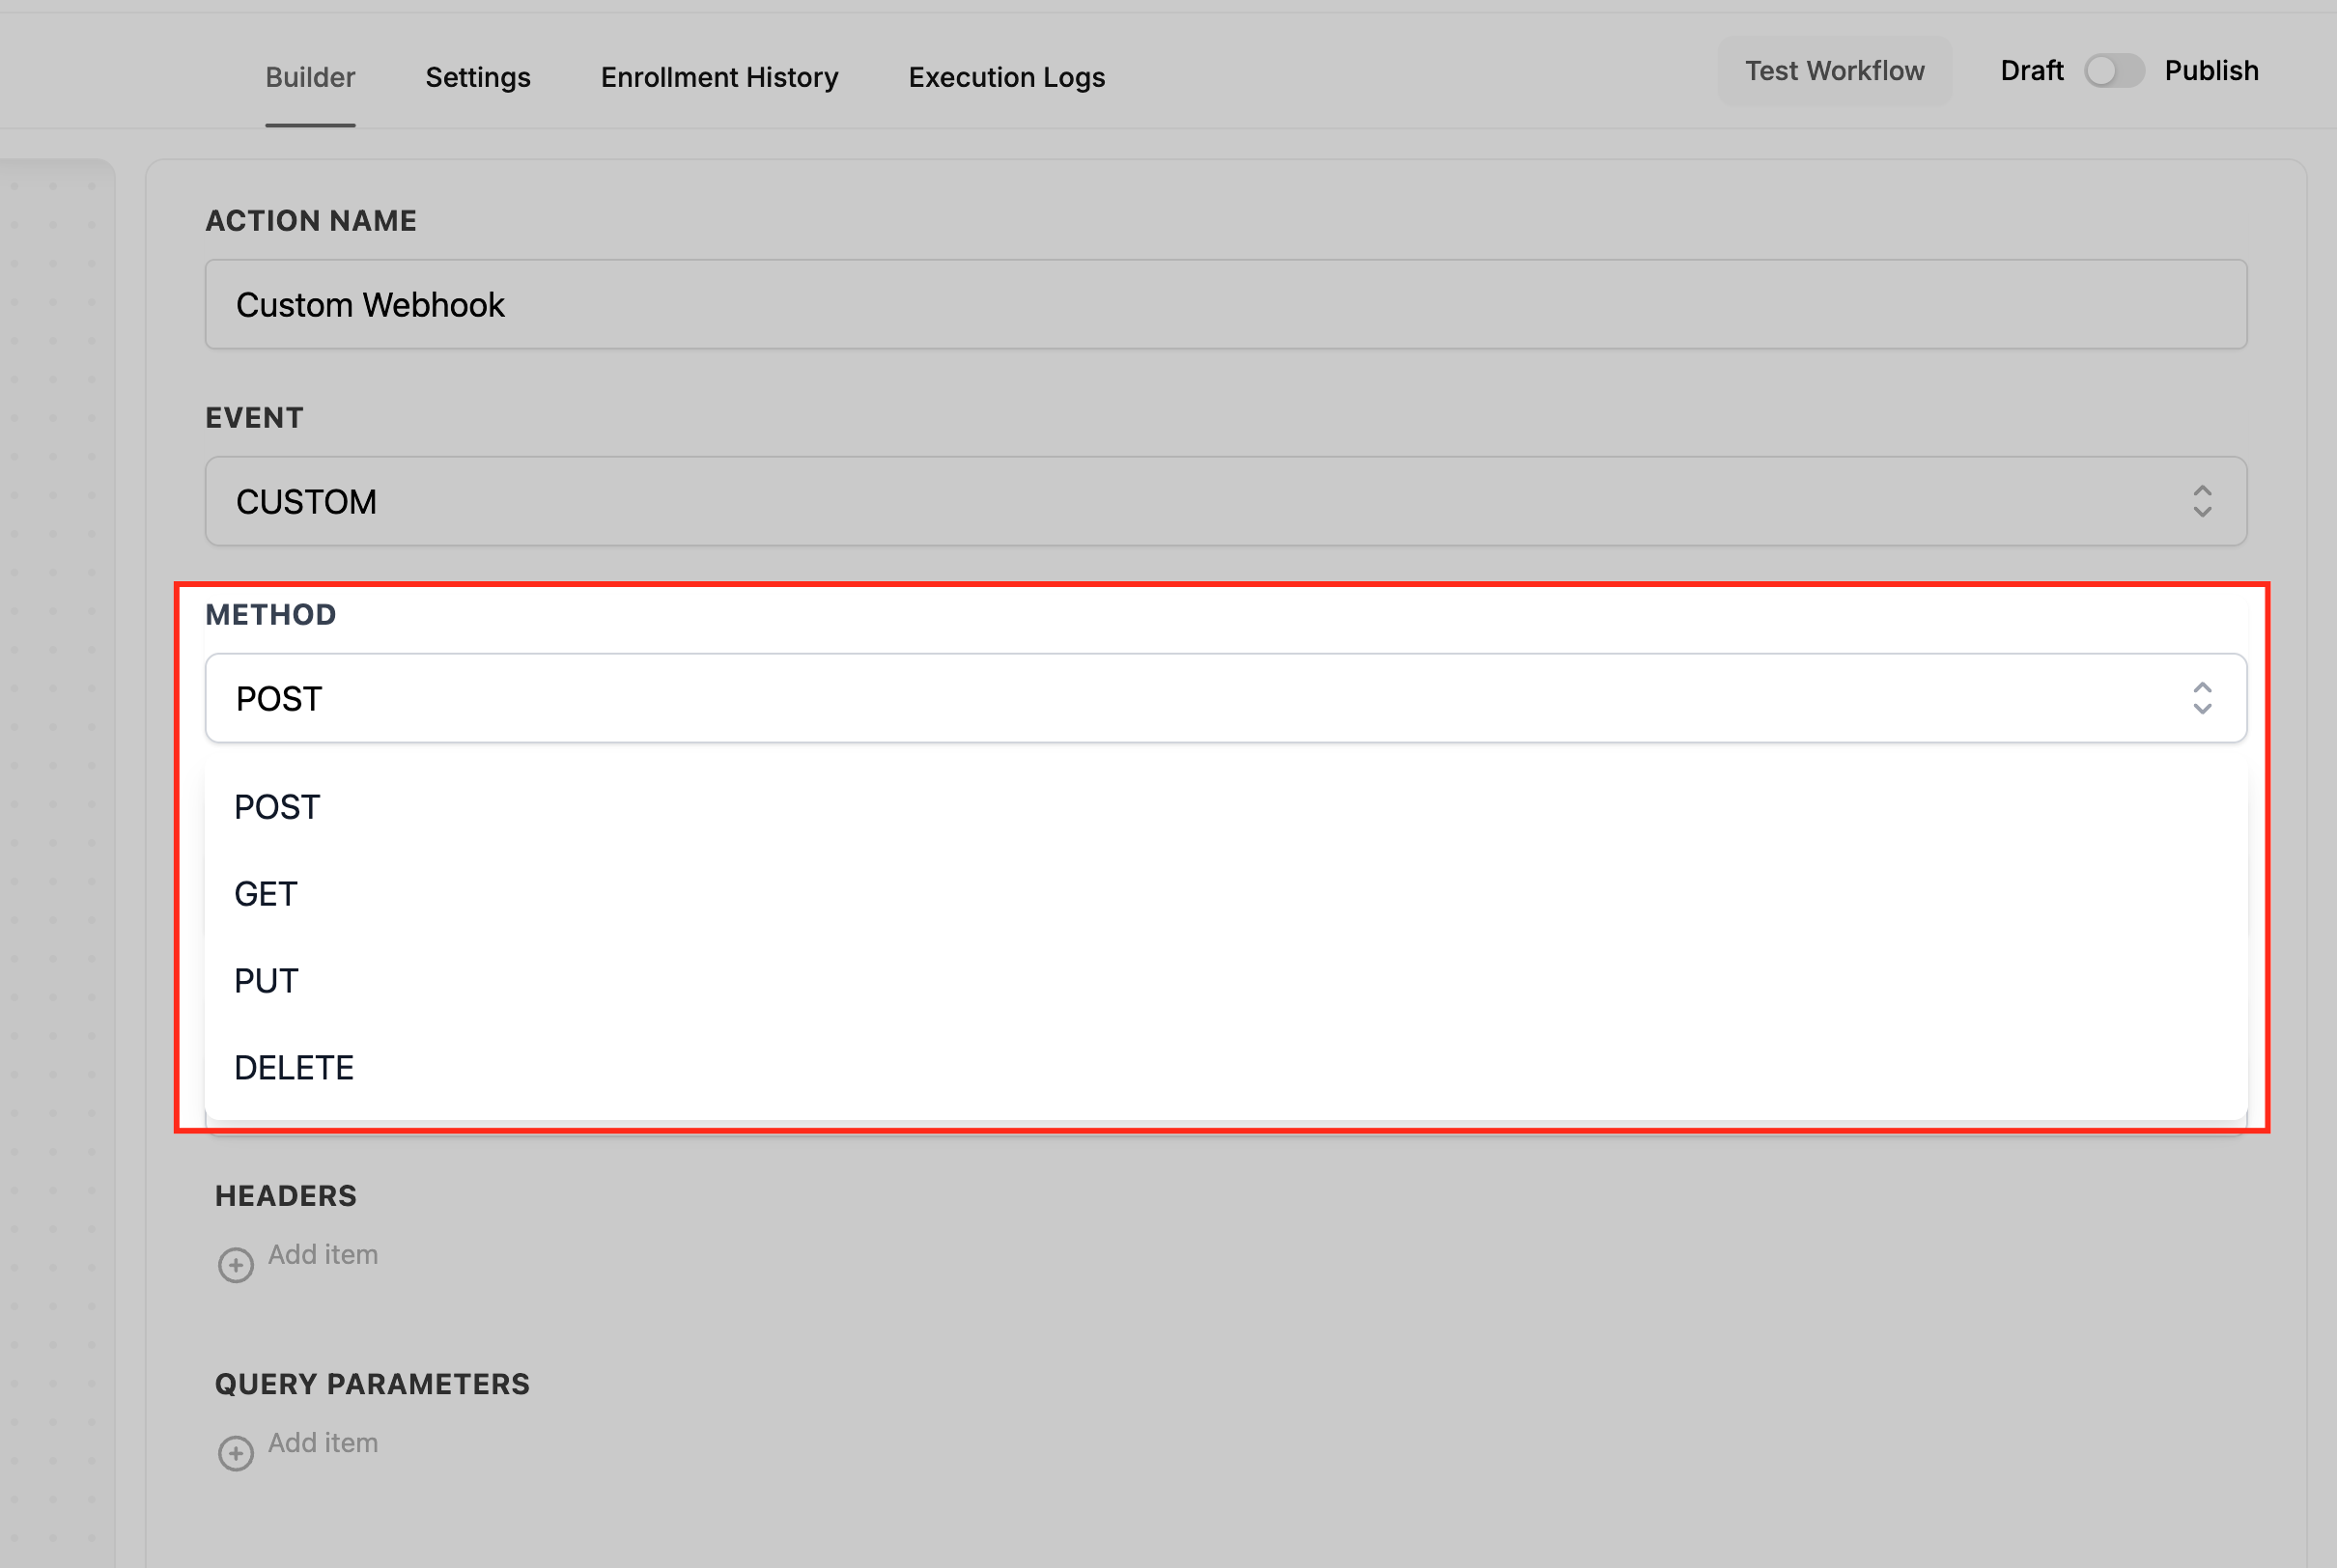
HTTP methods at a glance:
Method | Use | Notes |
|---|---|---|
GET | Retrieve data | Bodies are typically ignored; pass filters as query parameters |
POST | Create a resource | Send a JSON body or form data |
PUT | Update a resource | Usually needs an ID in the path plus a JSON body |
DELETE | Remove a resource | Often includes the ID in the path |
Paste your provider's endpoint into the URL field. You can include variables in the path so each request targets the right record, for example https://api.example.com/leads/{{contact.id}}.

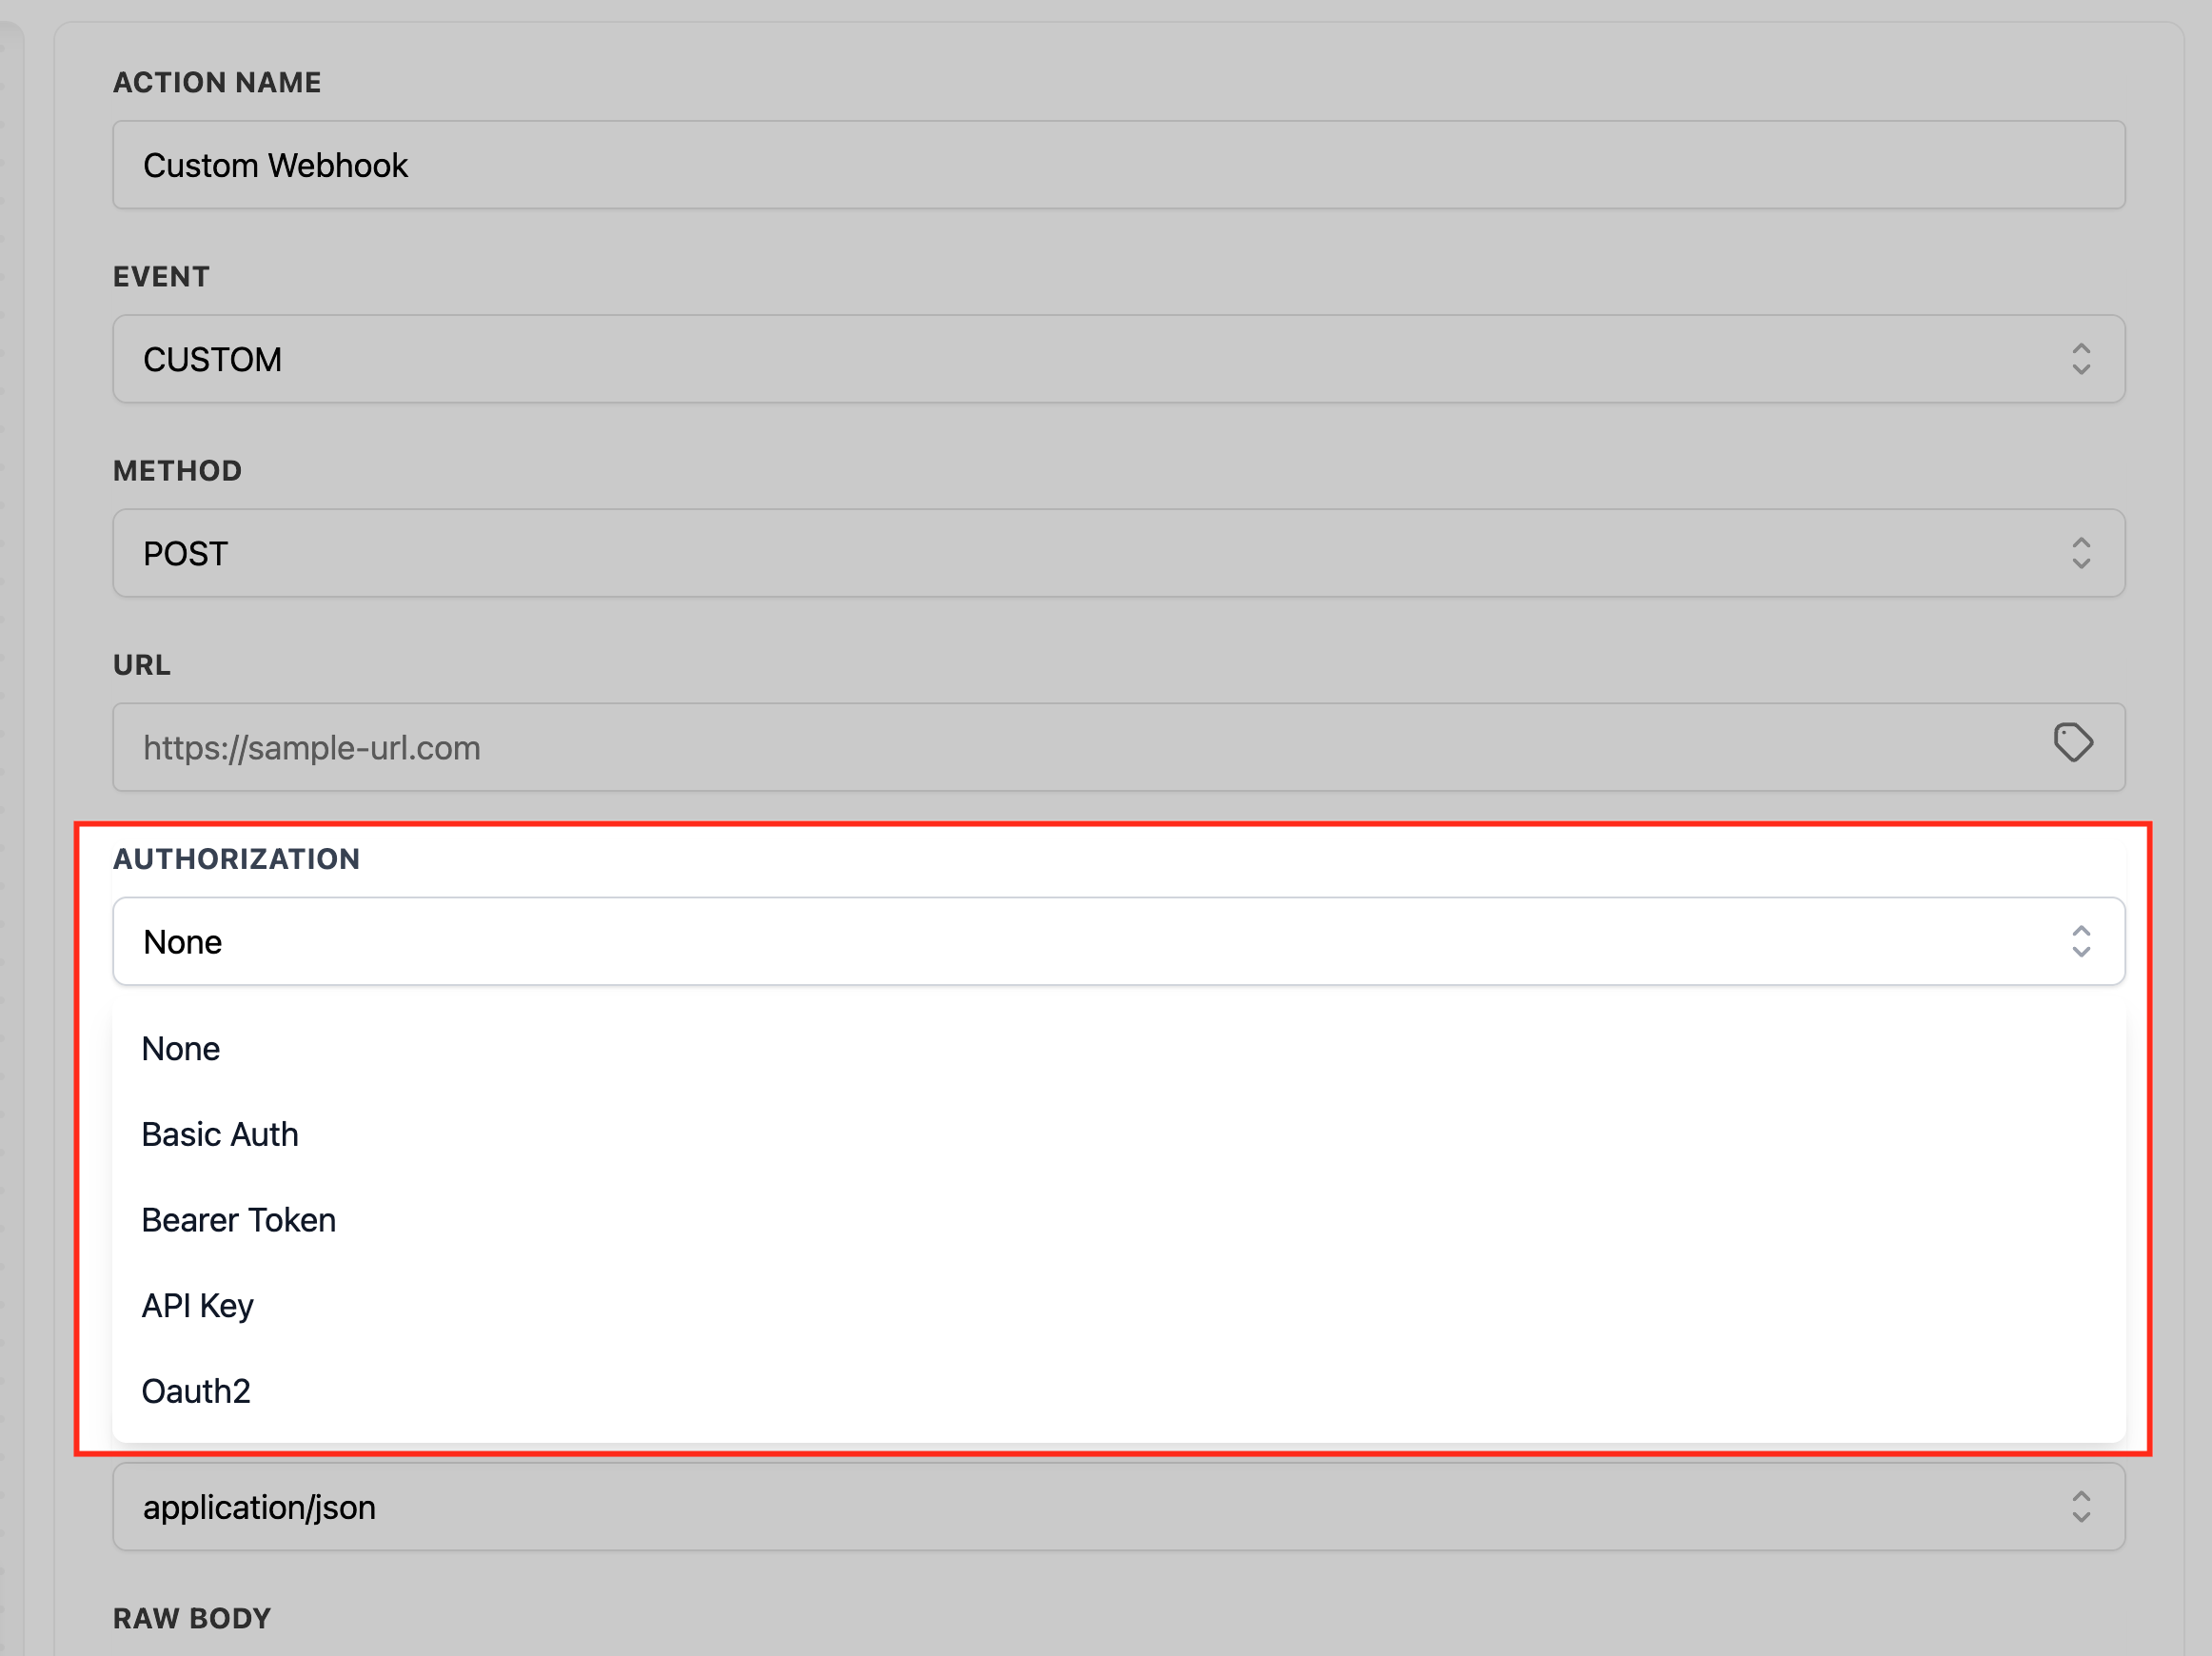
External APIs usually require credentials. Choose the method your provider supports and place secrets in headers, not URLs, for better security.
Bearer Token: Sends the header Authorization: Bearer <token>, for example Authorization: Bearer {{location.api_token}}.
API Key: Most services expect a custom header such as X-API-Key: <key> (for example X-API-Key: {{location.external_api_key}}). Use a query-string key only if the provider requires it.
Basic Auth: Enter a Username and Password in the Authorization fields. The CRM sends the proper Authorization: Basic ... header.
OAuth2: For providers that rotate or refresh tokens automatically (Google, Facebook, LinkedIn, and other large APIs). First configure the token under Global Workflow Settings > OAuth2 / Manage Tokens, then select an existing token or request a new one in the action.
No Auth + Custom Header: If the provider wants a bespoke header (for example X-Signature: <secret>), choose No auth and add the header under Headers.
Secure credential management: For Basic auth, Bearer token, and API key methods, secret keys are stored securely and masked in the interface, so they never appear in plain text. From the credential dropdown you can select an existing key or choose Create New Key, then enter a key name (for identification) and the key value (the actual credential). Once saved, the key is masked. Keys are accessible only within the location where they were created, and only the key's creator or an admin can delete one. Updating to a new key automatically removes the old one.
OAuth2 token management: To manage OAuth2 tokens, go to Global Workflow Settings, open the Manage Tokens section, and use the pop-up list to update or delete tokens.
In addition to the request body, you can include headers and query parameters. Headers provide extra information about the request such as authentication credentials, content type, and cache control. Query parameters pass values to the endpoint for filtering or modifying the response.
Header examples:
Authorization: Bearer {{location.api_token}}
Content-Type: application/json
X-API-Key: {{location.external_api_key}}
X-App-Version: 2024-11-01
Query parameter examples:
lead_id={{contact.id}}
email={{contact.email}}
source=workflow
Avoid putting secrets in query strings unless the provider requires it.
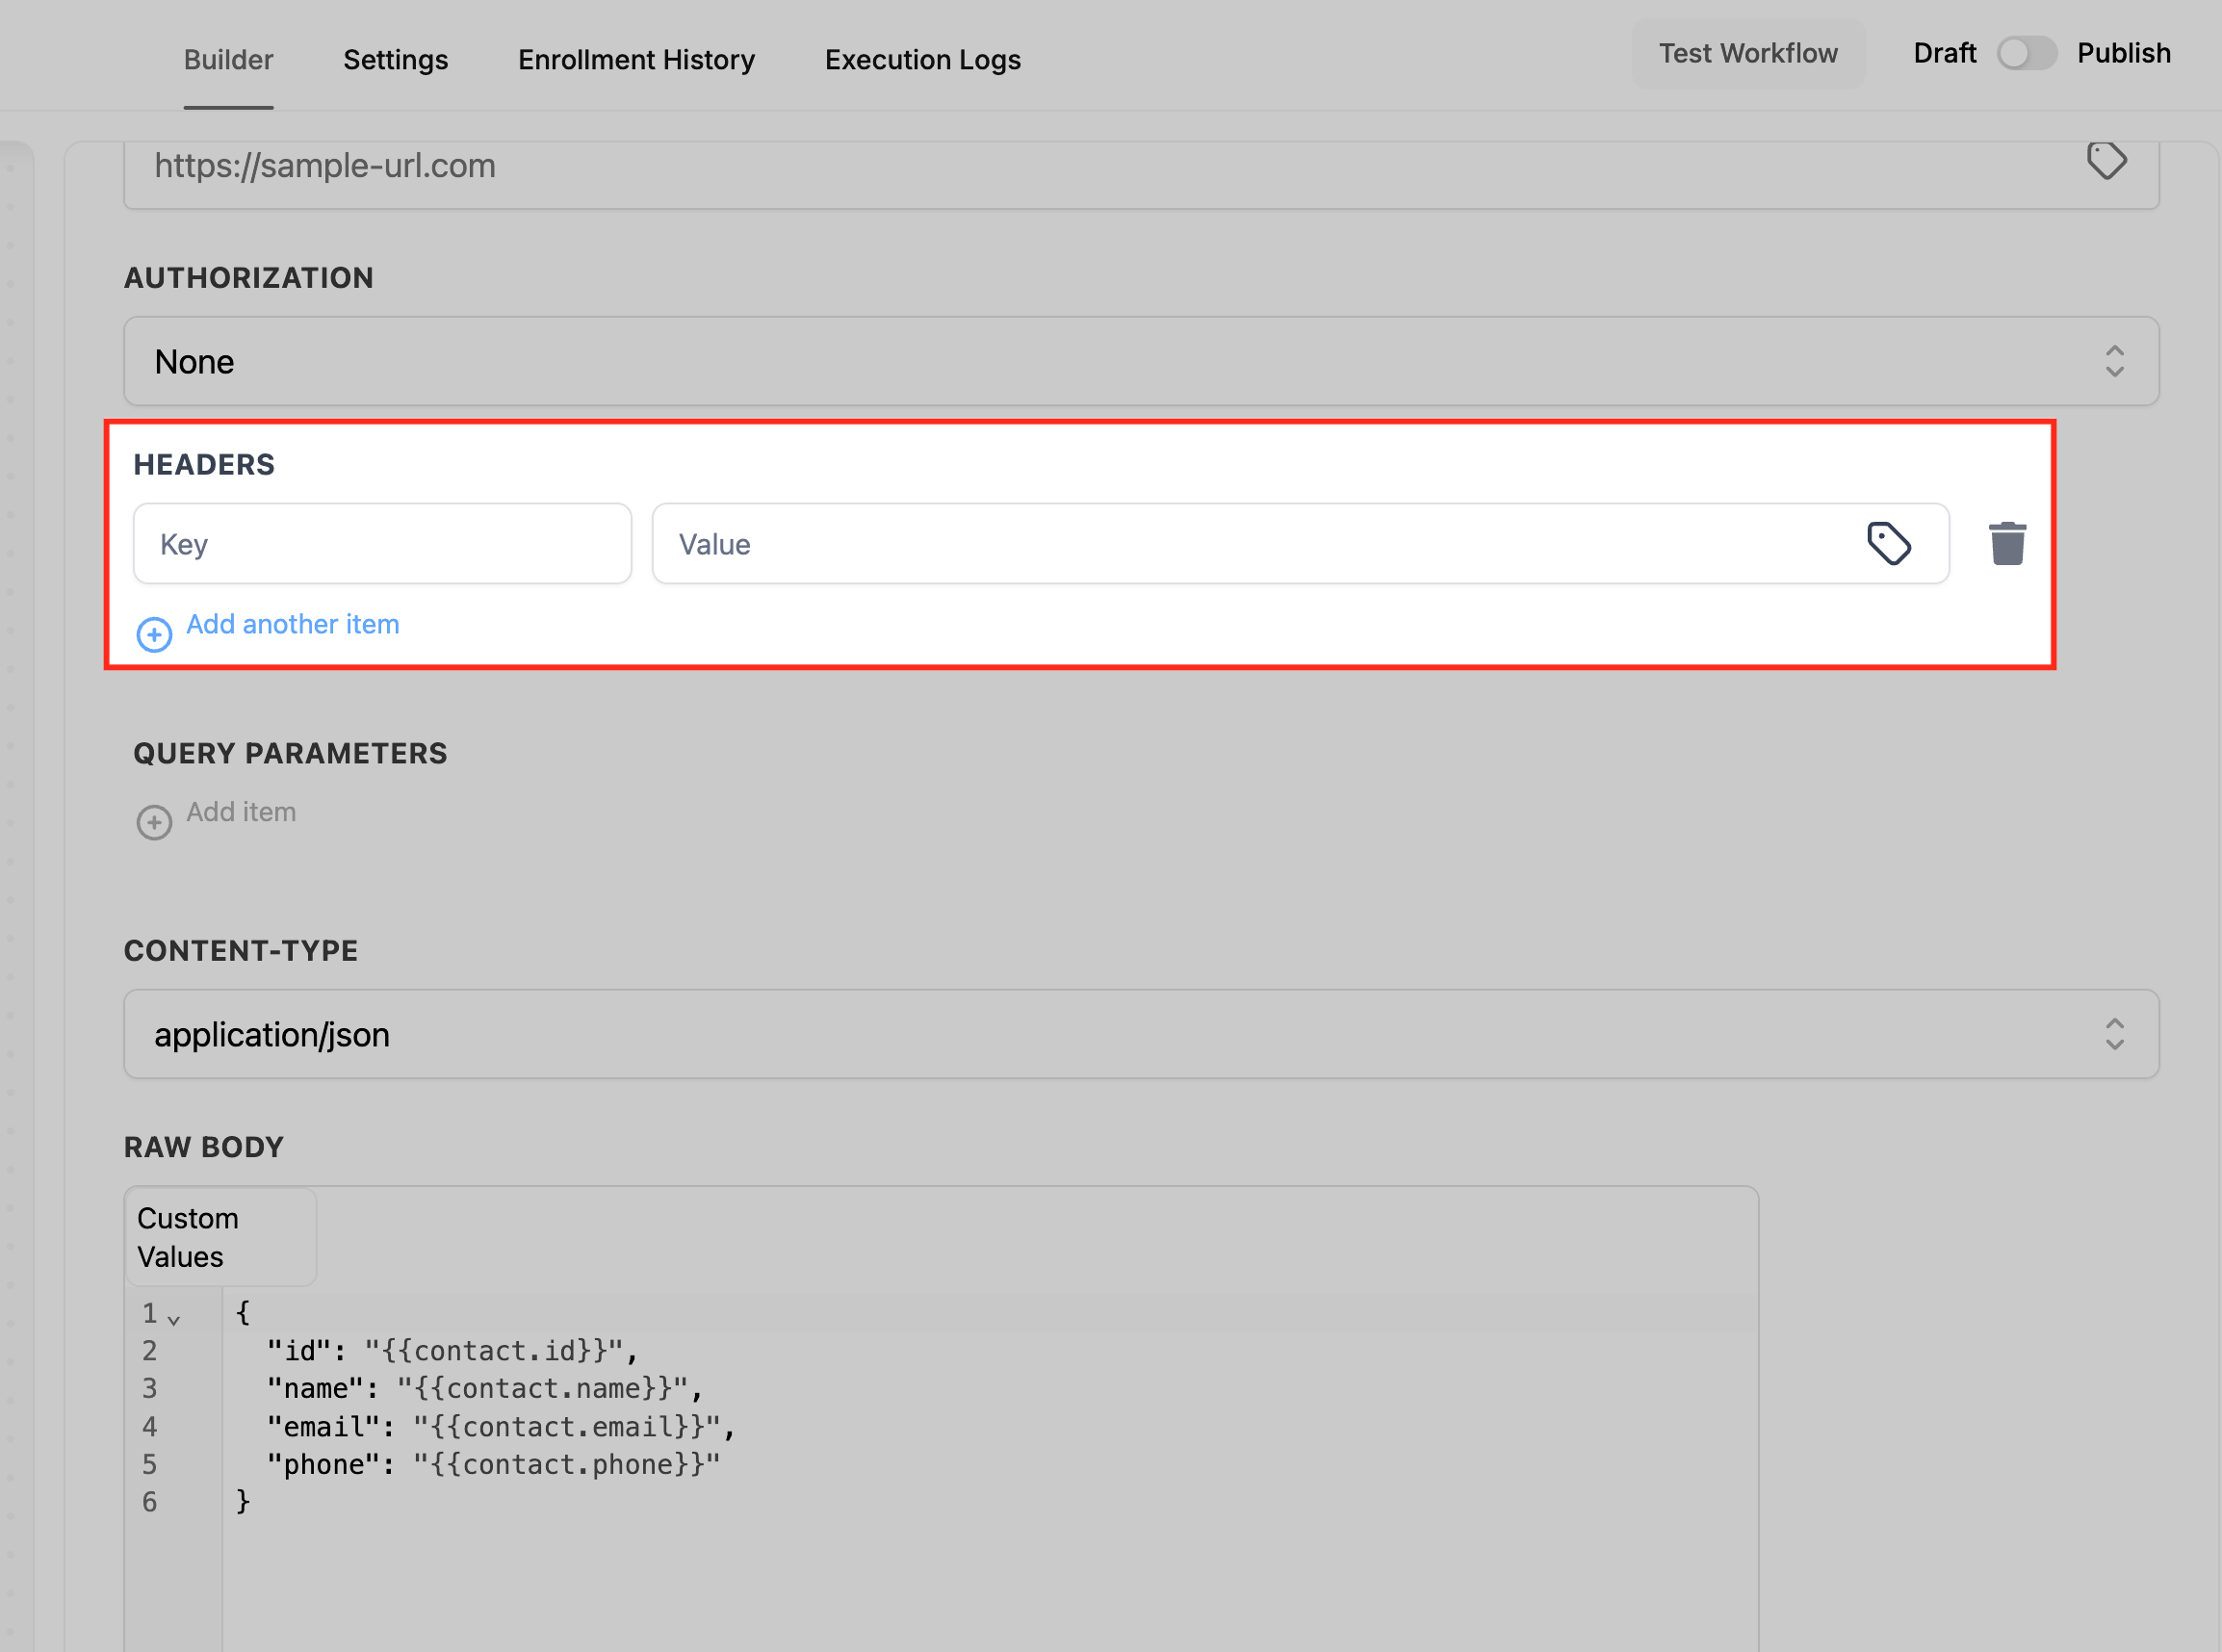
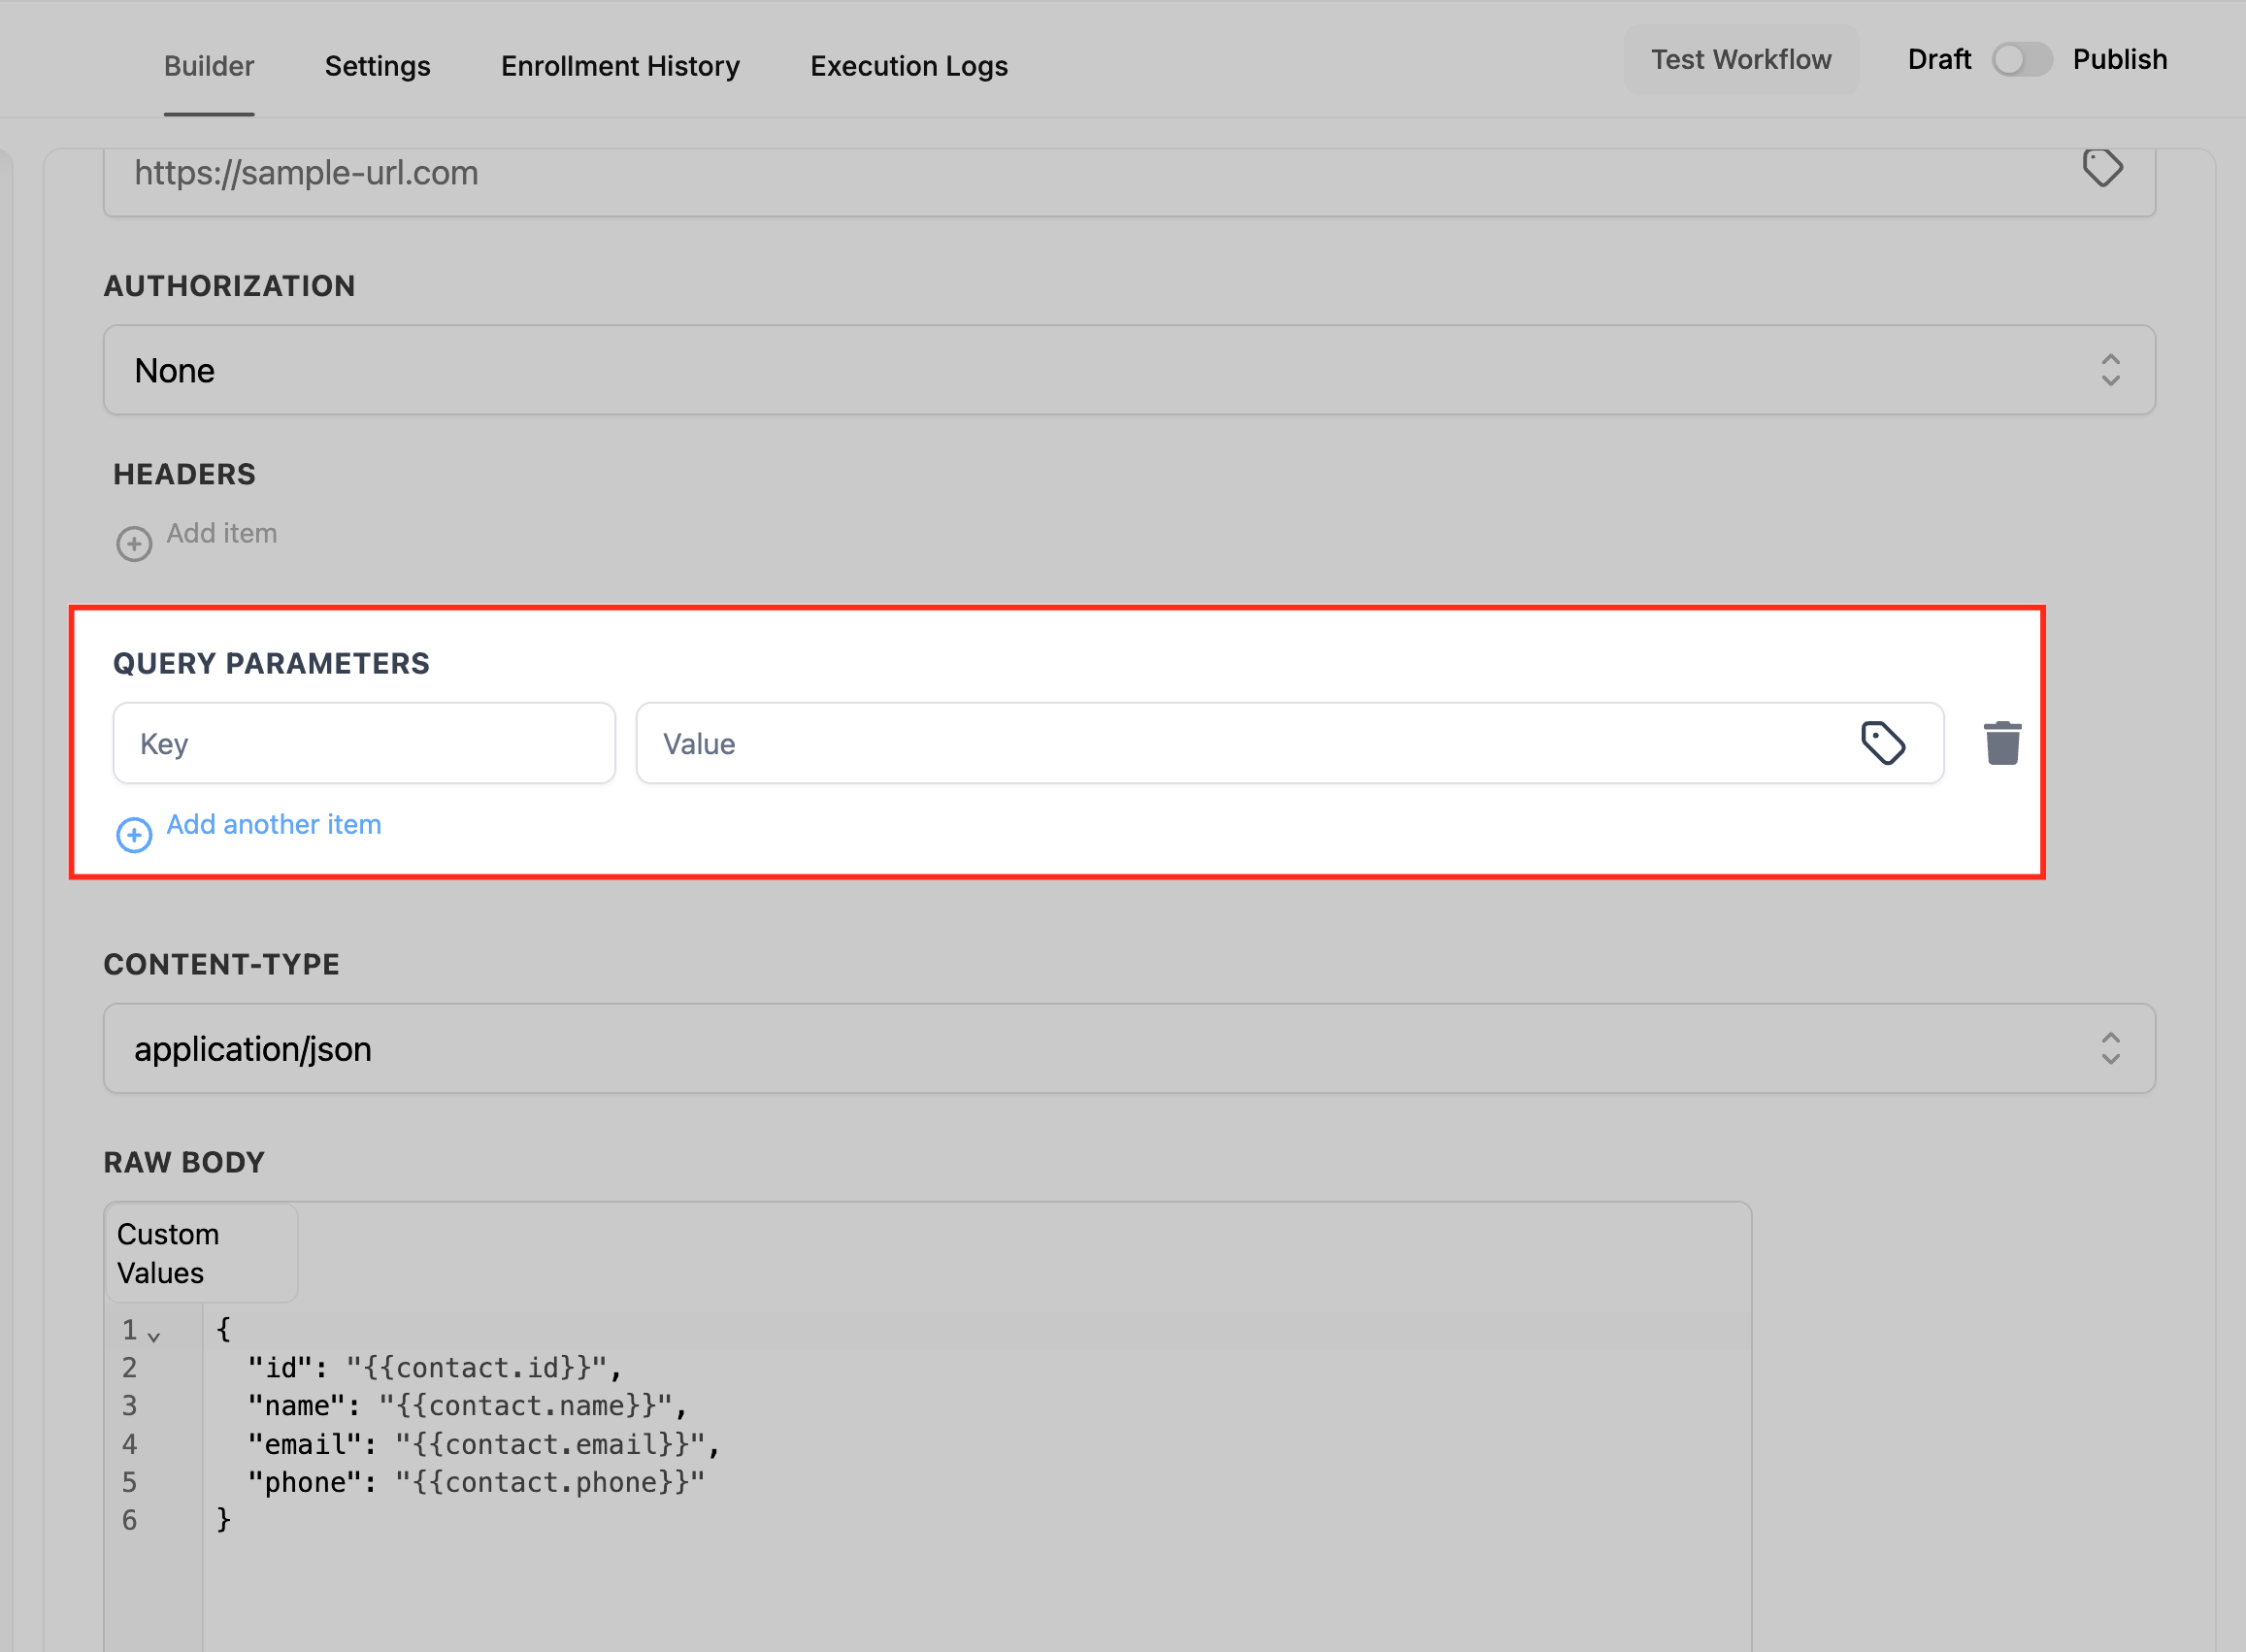
Custom Webhook lets you map custom values in any structure your API requires. The body editor provides autocomplete suggestions for all custom values, including contact fields, custom fields, and inbound webhook variables, which keeps mapping fast and accurate. Set Content-Type to match your provider: application/json for a JSON body or application/x-www-form-urlencoded for form fields.
Flat JSON payload (POST / create):
{
  "id": "{{contact.id}}",
  "first_name": "{{contact.first_name}}",
  "last_name": "{{contact.last_name}}",
  "email": "{{contact.email}}",
  "phone": "{{contact.phone}}"
}
Nested JSON (objects and arrays are supported):
{
  "contact": {
    "id": "{{contact.id}}",
    "name": "{{contact.name}}",
    "phones": ["{{contact.phone}}"],
    "tags": ["{{contact.tag}}", "new-lead"]
  }
}
For form-encoded data, set Content-Type to application/x-www-form-urlencoded and provide key/value pairs instead of JSON.
Inputs: Any custom value available at runtime, mapped into the URL, headers, query parameters, or body.
Output: Enable Save response from this Webhook (available when supported in your account, and in GET mode) to capture the API's response. Once captured, the returned fields become available to later steps in the workflow, just like contact fields or custom values. This is what lets you chain external data: call an API, read back a value (an external ID, a balance, a status), then use that value in a later action such as an SMS, an email, or an update to a contact field. Without response capture, the action sends data one way only.
Click Save Action, then trigger a test with a sample record or a sandbox endpoint such as Webhook.site or Postman. Review the Execution Logs alongside the provider's logs to confirm status codes and payload shape before going live.
Verify the basics first: correct URL, method, Content-Type, required headers, and valid credentials. If you don't see a Content-Type or Raw Body editor, check the Event selection and choose CUSTOM for JSON payloads or PUT/DELETE requests.
Common HTTP responses and what they mean:
Status | Meaning | Fix |
|---|---|---|
400 / 422 | Invalid payload | Match the provider's required fields and data types |
401 / 403 | Unauthorized / Forbidden | Fix the token, key, scope, or account permissions |
404 | Wrong path or ID | Confirm the endpoint and path variables |
409 | Conflict / idempotency | Ensure unique IDs or follow the provider's upsert rules |
429 | Rate limited | Slow down or add delays/retries per the provider's limits |
5xx | Provider error | Retry later and contact the provider |
Custom Webhook is a premium action.
Any workflow trigger works; just make sure the custom values you map (such as contact fields) exist at runtime.
The CRM does not provide a static IP for allowlists. Use header-based authentication (Bearer, API Key, Basic, or OAuth2) and share those credentials with the provider instead.
Prefer a header for API keys (for example X-API-Key). Use a query-string key only when the provider specifically requires it.
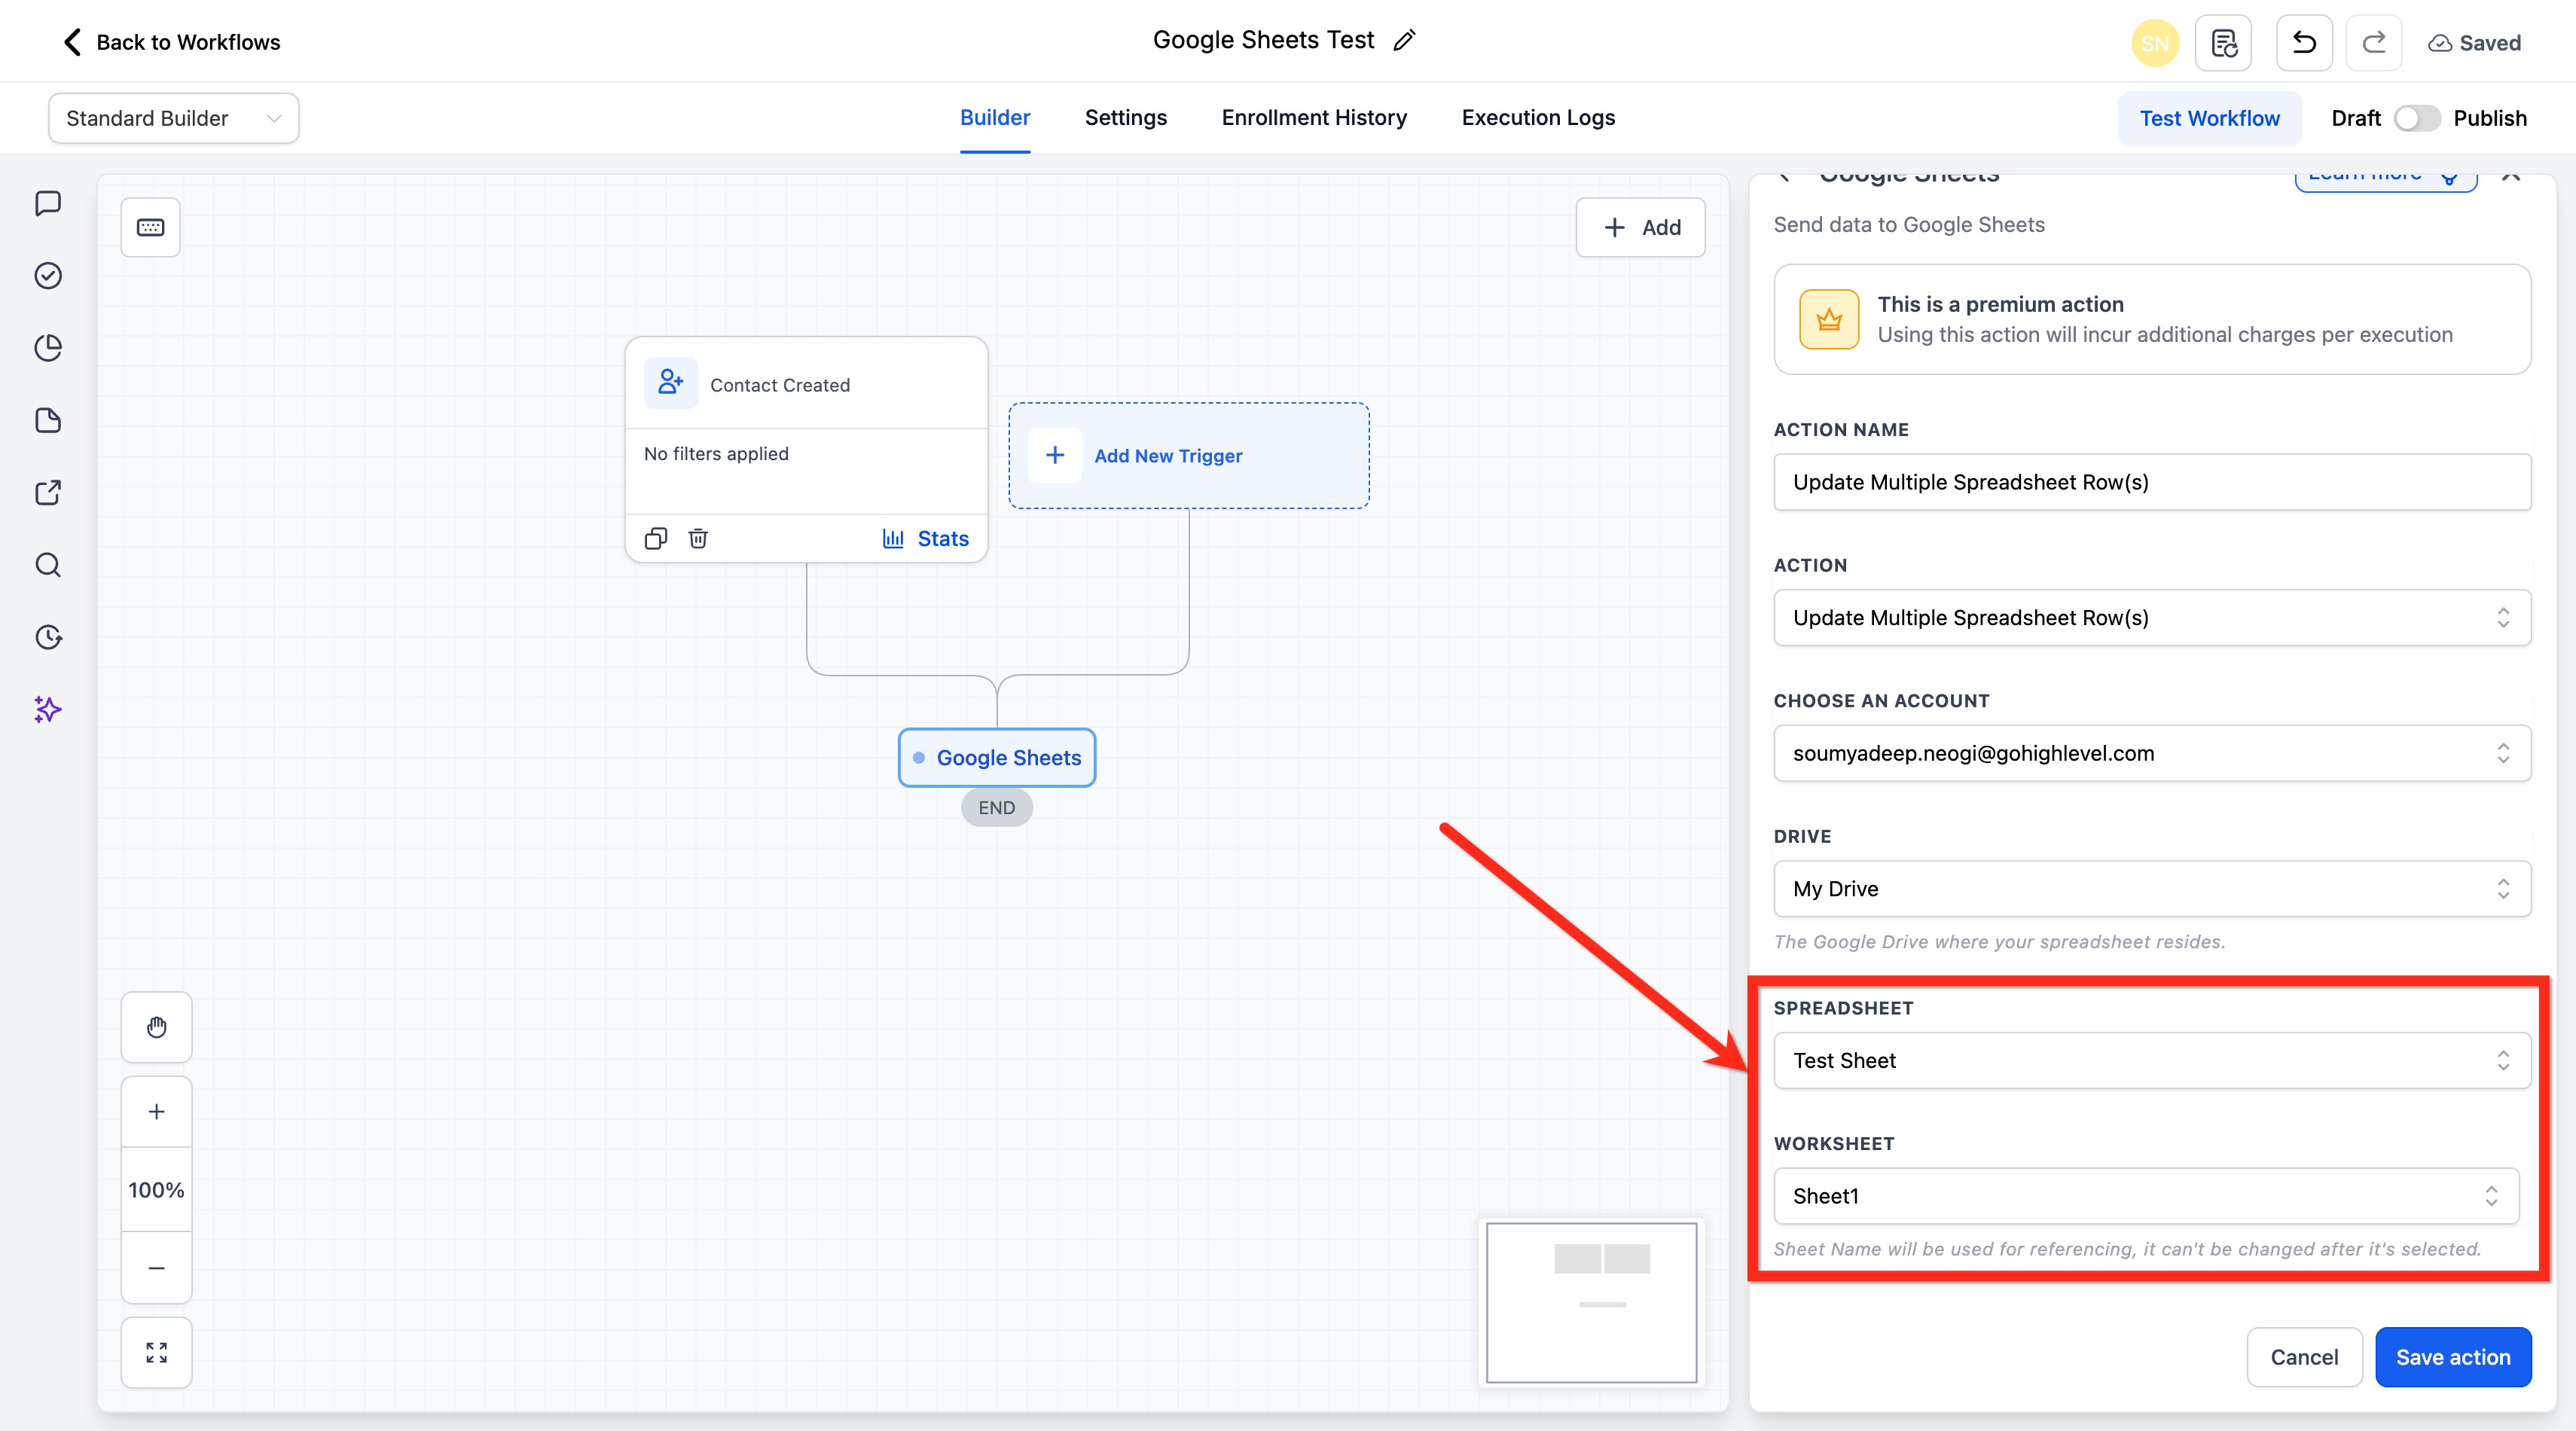
The Google Sheets action (premium) sends data to a Google Sheets document directly, with no third-party connector required. Connect your Google account, pick a spreadsheet from your Drive, and the workflow can create, update, look up, or delete rows automatically. This lets you log, sync, and maintain data in a shared sheet your team already uses, with the spreadsheet's first row treated as the header row that labels each column.
Use it whenever you want workflow data to flow into or out of a spreadsheet: logging new leads, tracking bookings, maintaining a roster, building a live report with formulas, or cross-referencing data already stored in a sheet. Because the first row is the header row, mapping is column-by-column against your real headers.
Med-spa example: Each time a client completes a treatment, append a row to a "Treatments Log" sheet with the client's name, treatment type, provider, date, and amount. A finance teammate can then run SUM and AVG formulas in the sheet for daily revenue without ever logging into the CRM.
Connect your location's Google account.
Confirm the spreadsheet is stored in the correct Google Drive.
Add clear column headers in the first row of the worksheet.
Review the worksheet (tab) name before selecting it.
Refresh headers in the action whenever columns are added, renamed, or reordered.
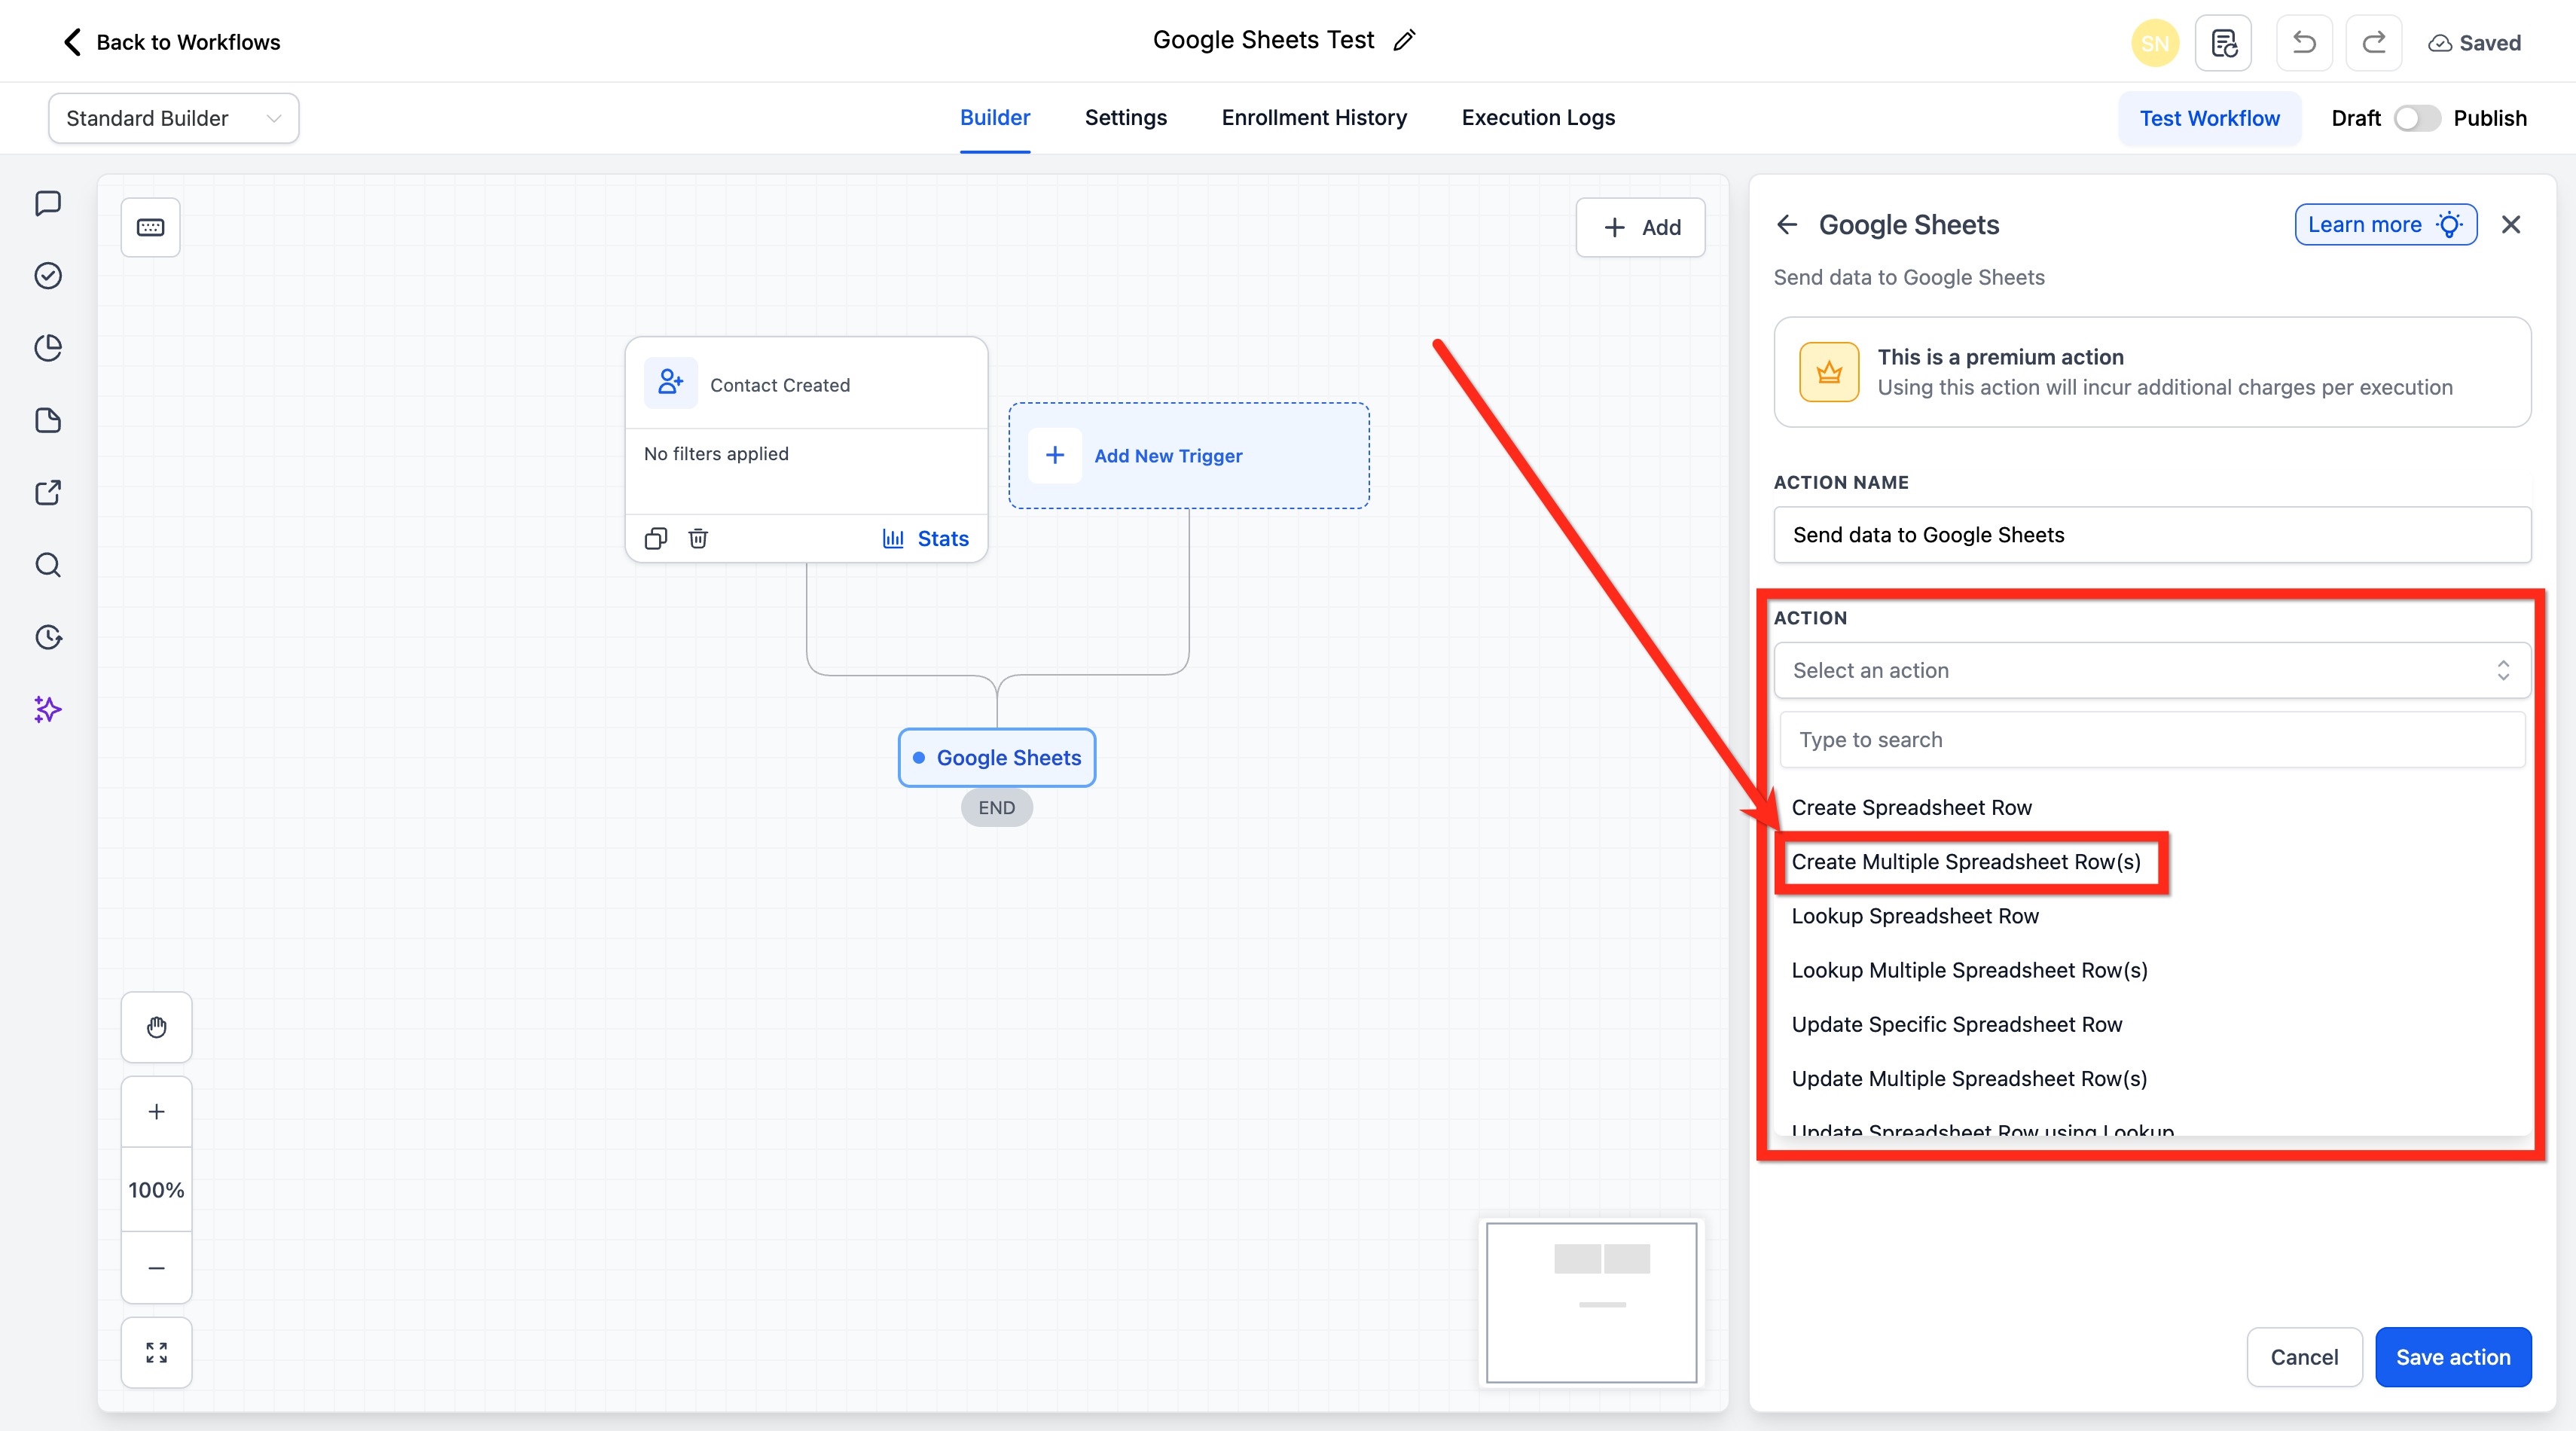
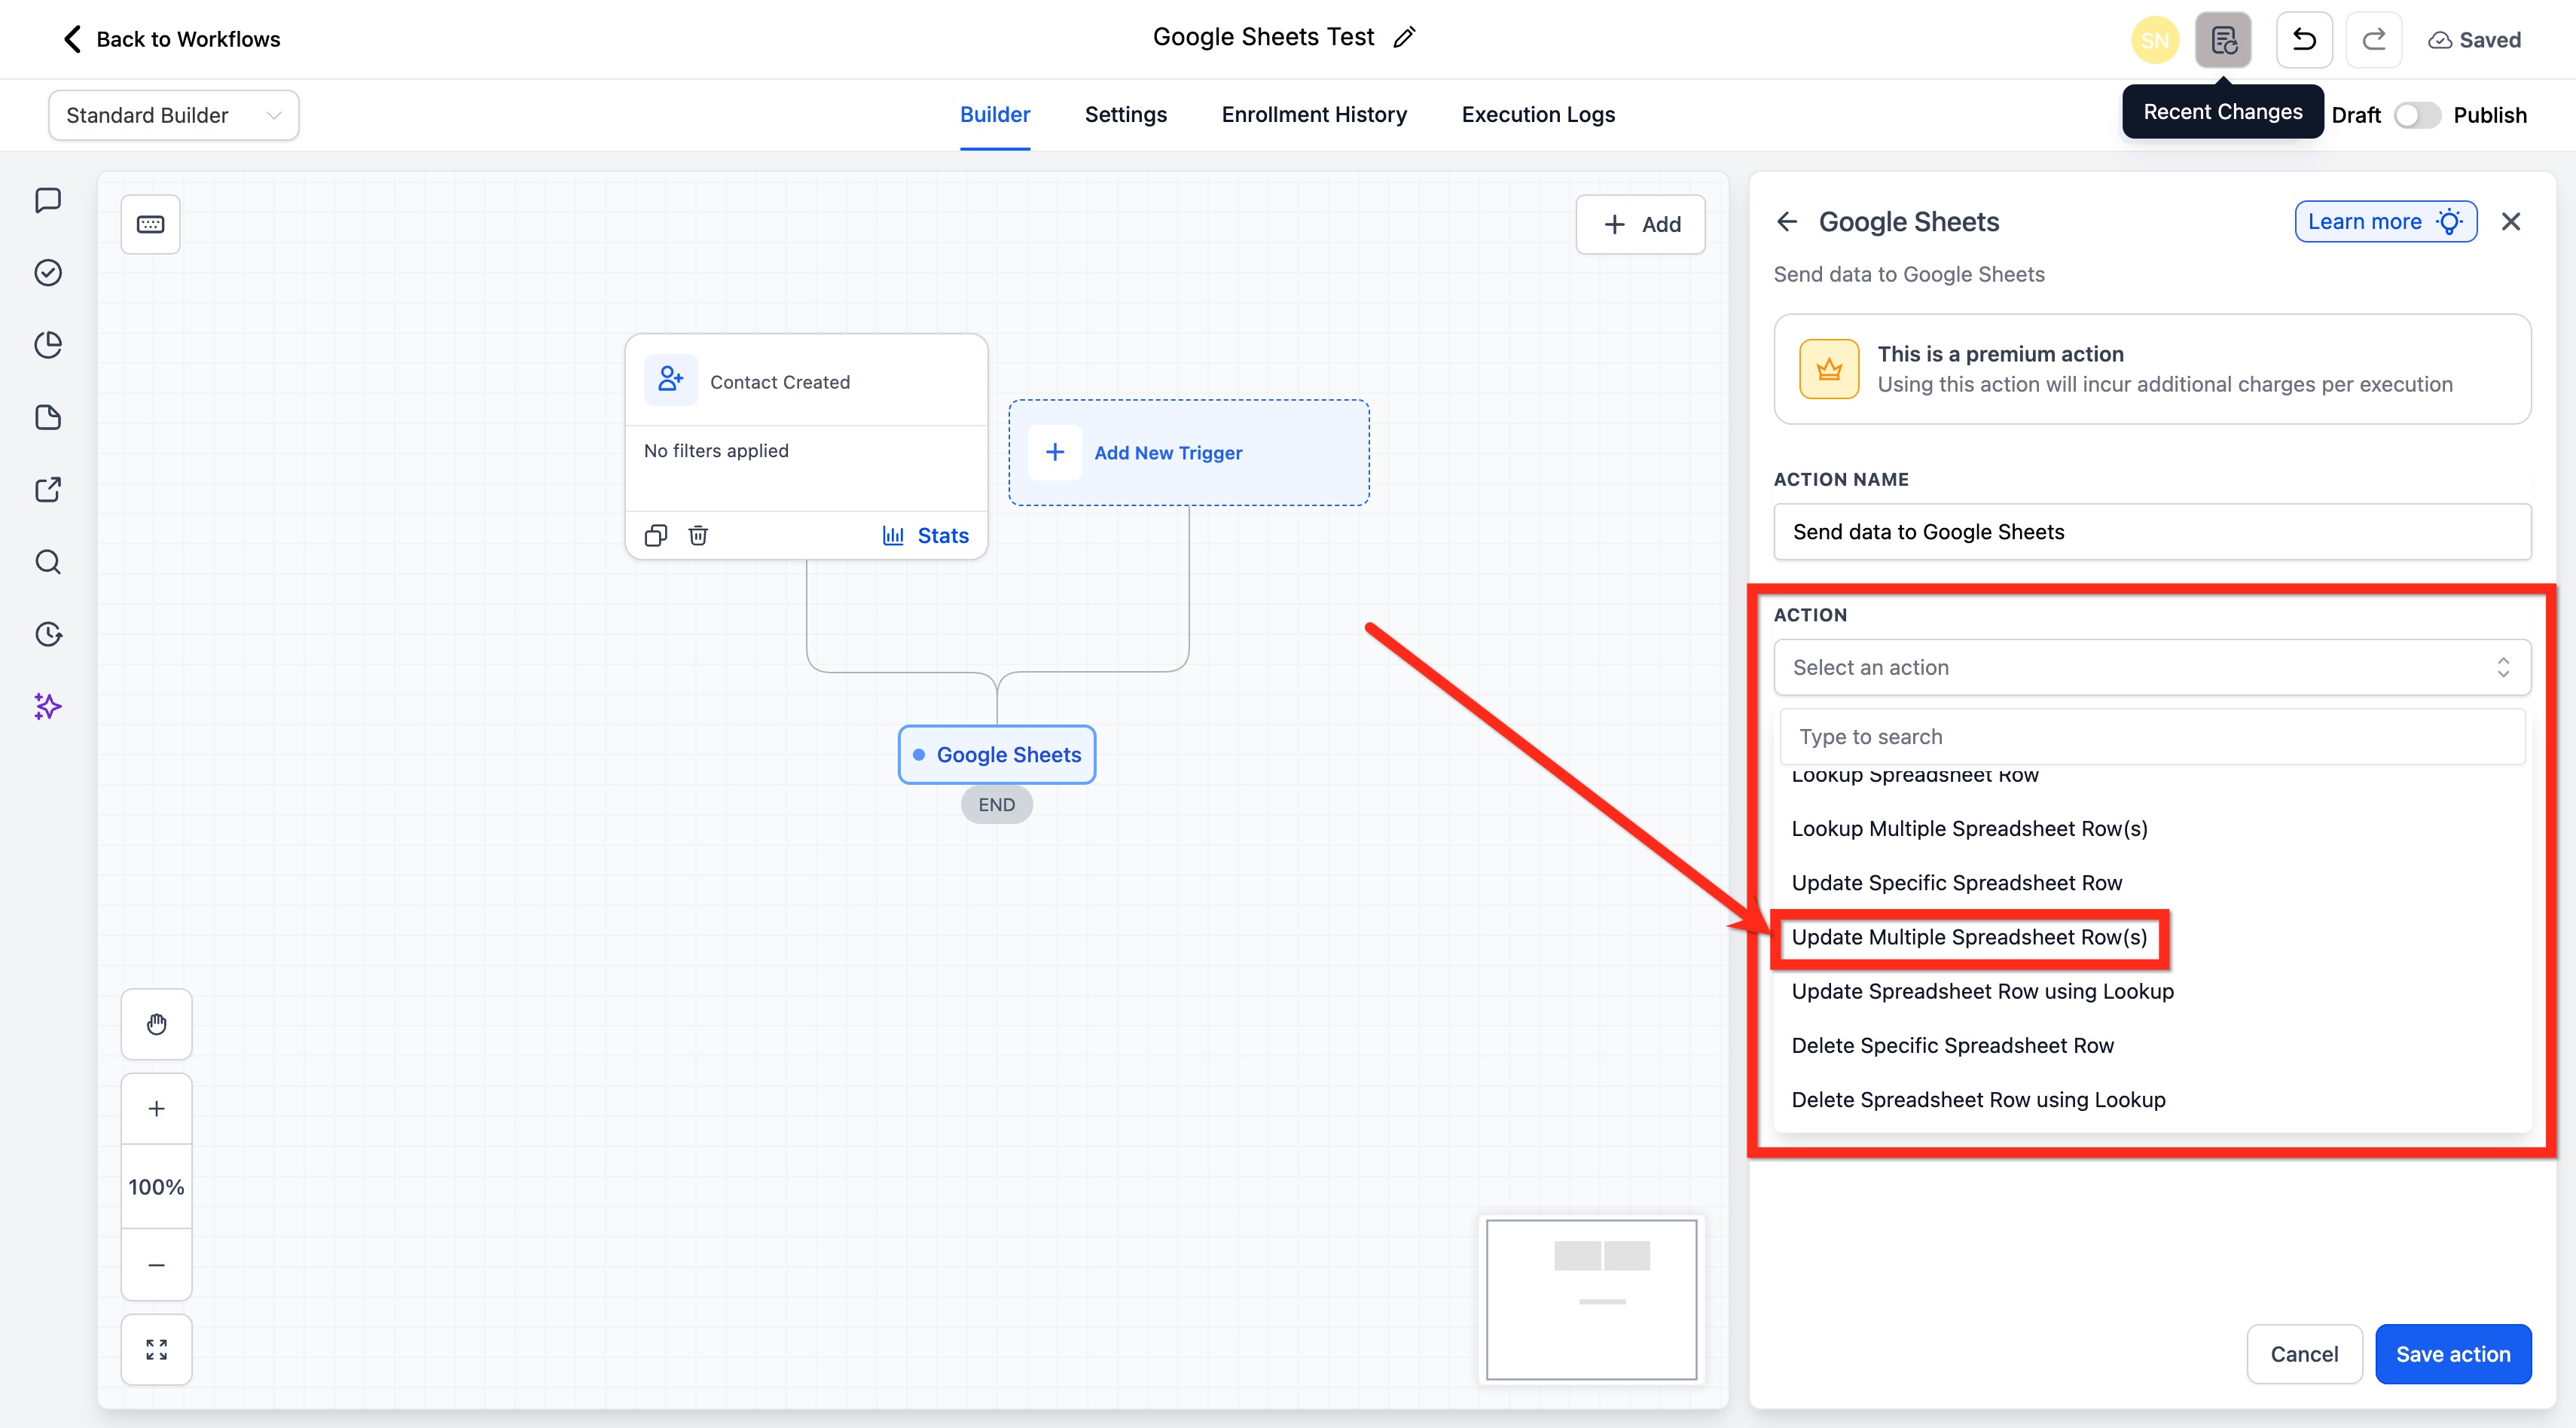
After adding the Google Sheets action, choose an action type from the dropdown. The available types are:
Create Spreadsheet Row - add a new row.
Update Specific Spreadsheet Row - change an existing row by its row number.
Delete Specific Spreadsheet Row - clear the contents of a row by its row number.
Lookup Spreadsheet Row - find a row by a column value and save its data as custom values.
Update Spreadsheet Row using Lookup - update a row found by a prior Lookup action.
Delete Spreadsheet Row using Lookup - clear a row found by a prior Lookup action.
Create Multiple Spreadsheet Row(s) - add several rows in one action.
Update Multiple Spreadsheet Row(s) - update several rows in a defined range in one action.
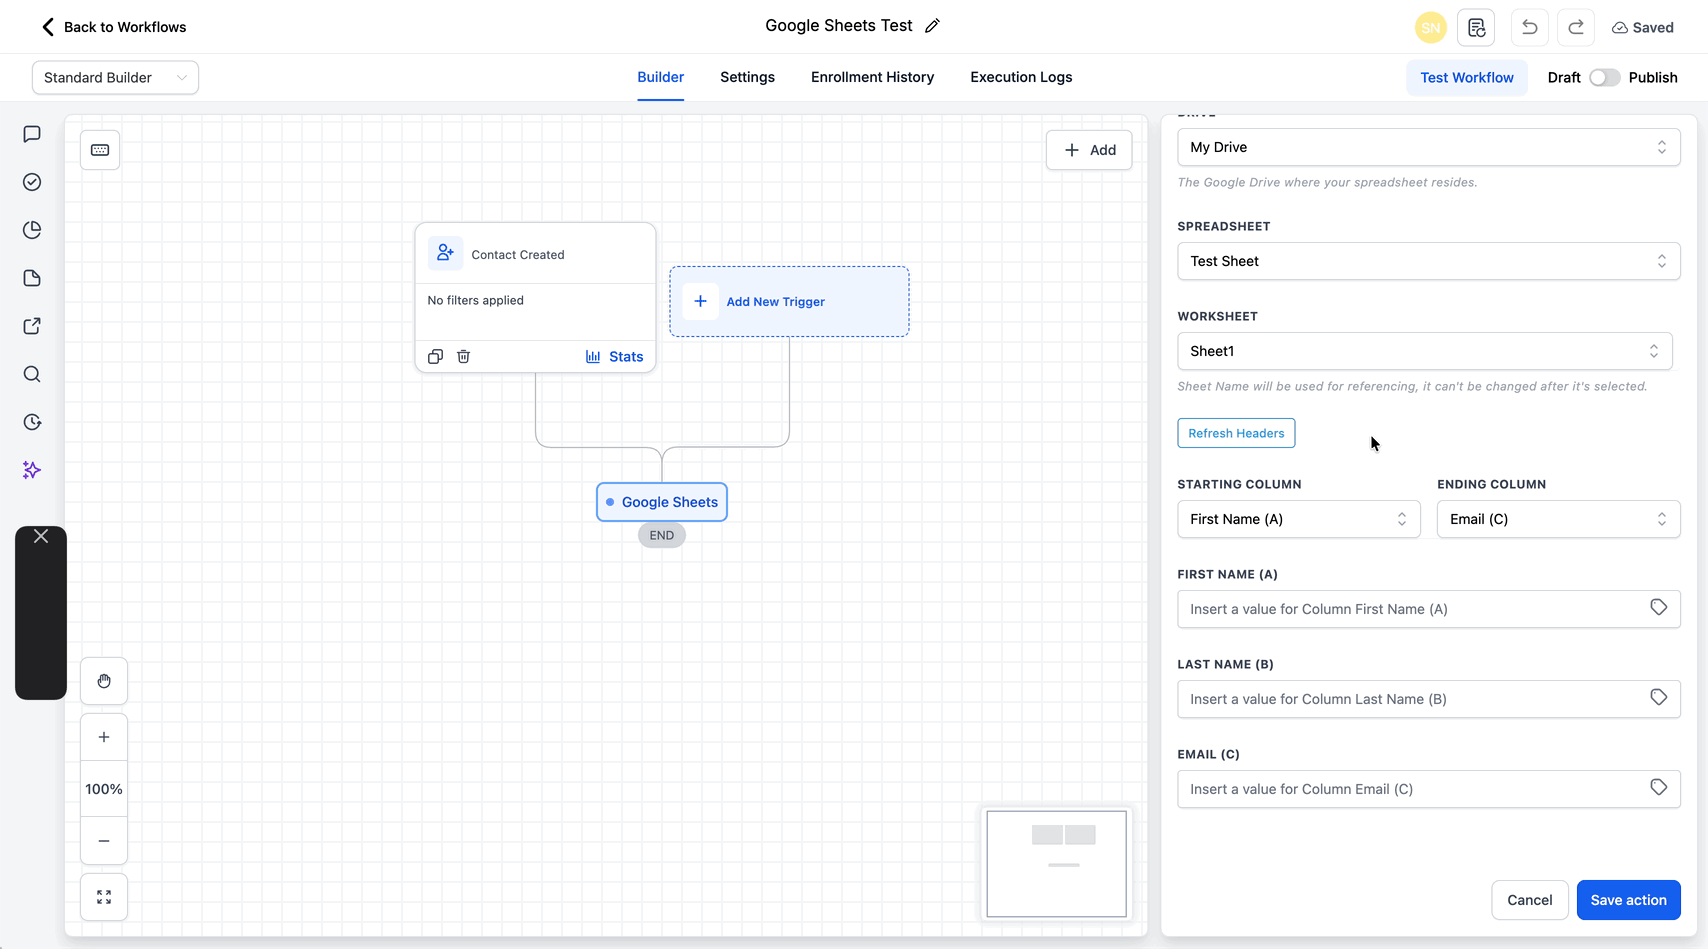
This adds a new row to your sheet. Configure these fields in order:
Account: Choose from all Google accounts integrated in your sub-account.
Drive: All Drives associated with the selected account appear; pick the one holding your target spreadsheet.
Spreadsheet: All spreadsheets in the selected Drive appear; pick your target document.
Worksheet: All worksheets (tabs) inside the spreadsheet appear; pick the tab to write to.
Starting Column and End Column: Define the column range to write. The first row is the header row, so each column is labeled by its header value. Click Refresh Headers to fetch the latest header names if you changed them.
Insert value: Enter the value for each column to create the new row. Use plain text or dynamic custom values.
Modifies the contents of one row identified by its row number, updating the values in that row's columns.
Worksheet: Select the worksheet to edit.
Row Number: Specify the row to modify. You can also supply the row number with the Custom Variable Picker to use a dynamic value.
Starting Column and End Column: Select the columns to update. Leave a column blank to keep its current value.
Clears the values in all columns of one row identified by its row number.
Worksheet: Select the worksheet.
Row Number: Specify the row to clear. You can also supply it with the Custom Variable Picker for a dynamic value.
Note: this action clears the contents of the row but does not permanently remove the row itself.
Finds a row by a column value and makes that row's data available as custom values throughout the rest of the workflow. This is the action that brings spreadsheet data into your workflow.
Worksheet: Select the worksheet to search.
Column and Lookup Value: Choose a column (labeled by its header) and the value to match. Click Refresh Headers to fetch the latest headers.
Extra Column and Lookup Value (optional): Add a second column/value pair; when used, both columns' values must match to determine the row.
Using lookup results: When a row is found, all of its data is saved as custom values you can use in any later action, just like contact fields. Each Lookup action is assigned an index automatically; this index maps the row data to the custom variables and cannot be removed or edited. To reference the matched row's number, use {{sheet.x.rowNumber}}, where x is the index of the Lookup action. This is how downstream steps chain in spreadsheet data.
Updates the row found by a prior Lookup action. You must add a Lookup Spreadsheet Row action above this step first; it locates the row, then this action modifies it.
Lookup action: Select from the Lookup actions added above this step (only those are listed).
Starting Column and End Column: Select the columns to update. Leave a column blank to skip it.
Points to remember:
You can select only one Lookup action at a time.
If the Lookup action returns no rows, the workflow skips this step and continues.
Clears the values in the row found by a prior Lookup action. As with the update version, add a Lookup action above this step first.
Lookup action: Select from the Lookup actions added above (only those are listed).
If a row is returned by the lookup, all values in that row are cleared. This clears the row's contents but does not permanently remove the row. If the lookup returns no rows, the workflow skips this step and continues.
Creates more than one row in a single action, which is faster than repeating a single-row action. Best for logging repeated workflow outputs, recording grouped entries from one automation, or saving several related data points for tracking.
Go to Automation > Workflows.
Create a new workflow or edit an existing one.
Add a relevant trigger (for example, Contact Created or Form Submitted).
Click the + button to add an Action.
Search for Google Sheets and select it.
Connect your location's Google account.

From the Action dropdown, select Create Multiple Spreadsheet Row(s).
Select the connected Google account to use.
Select the Drive where the spreadsheet is stored.
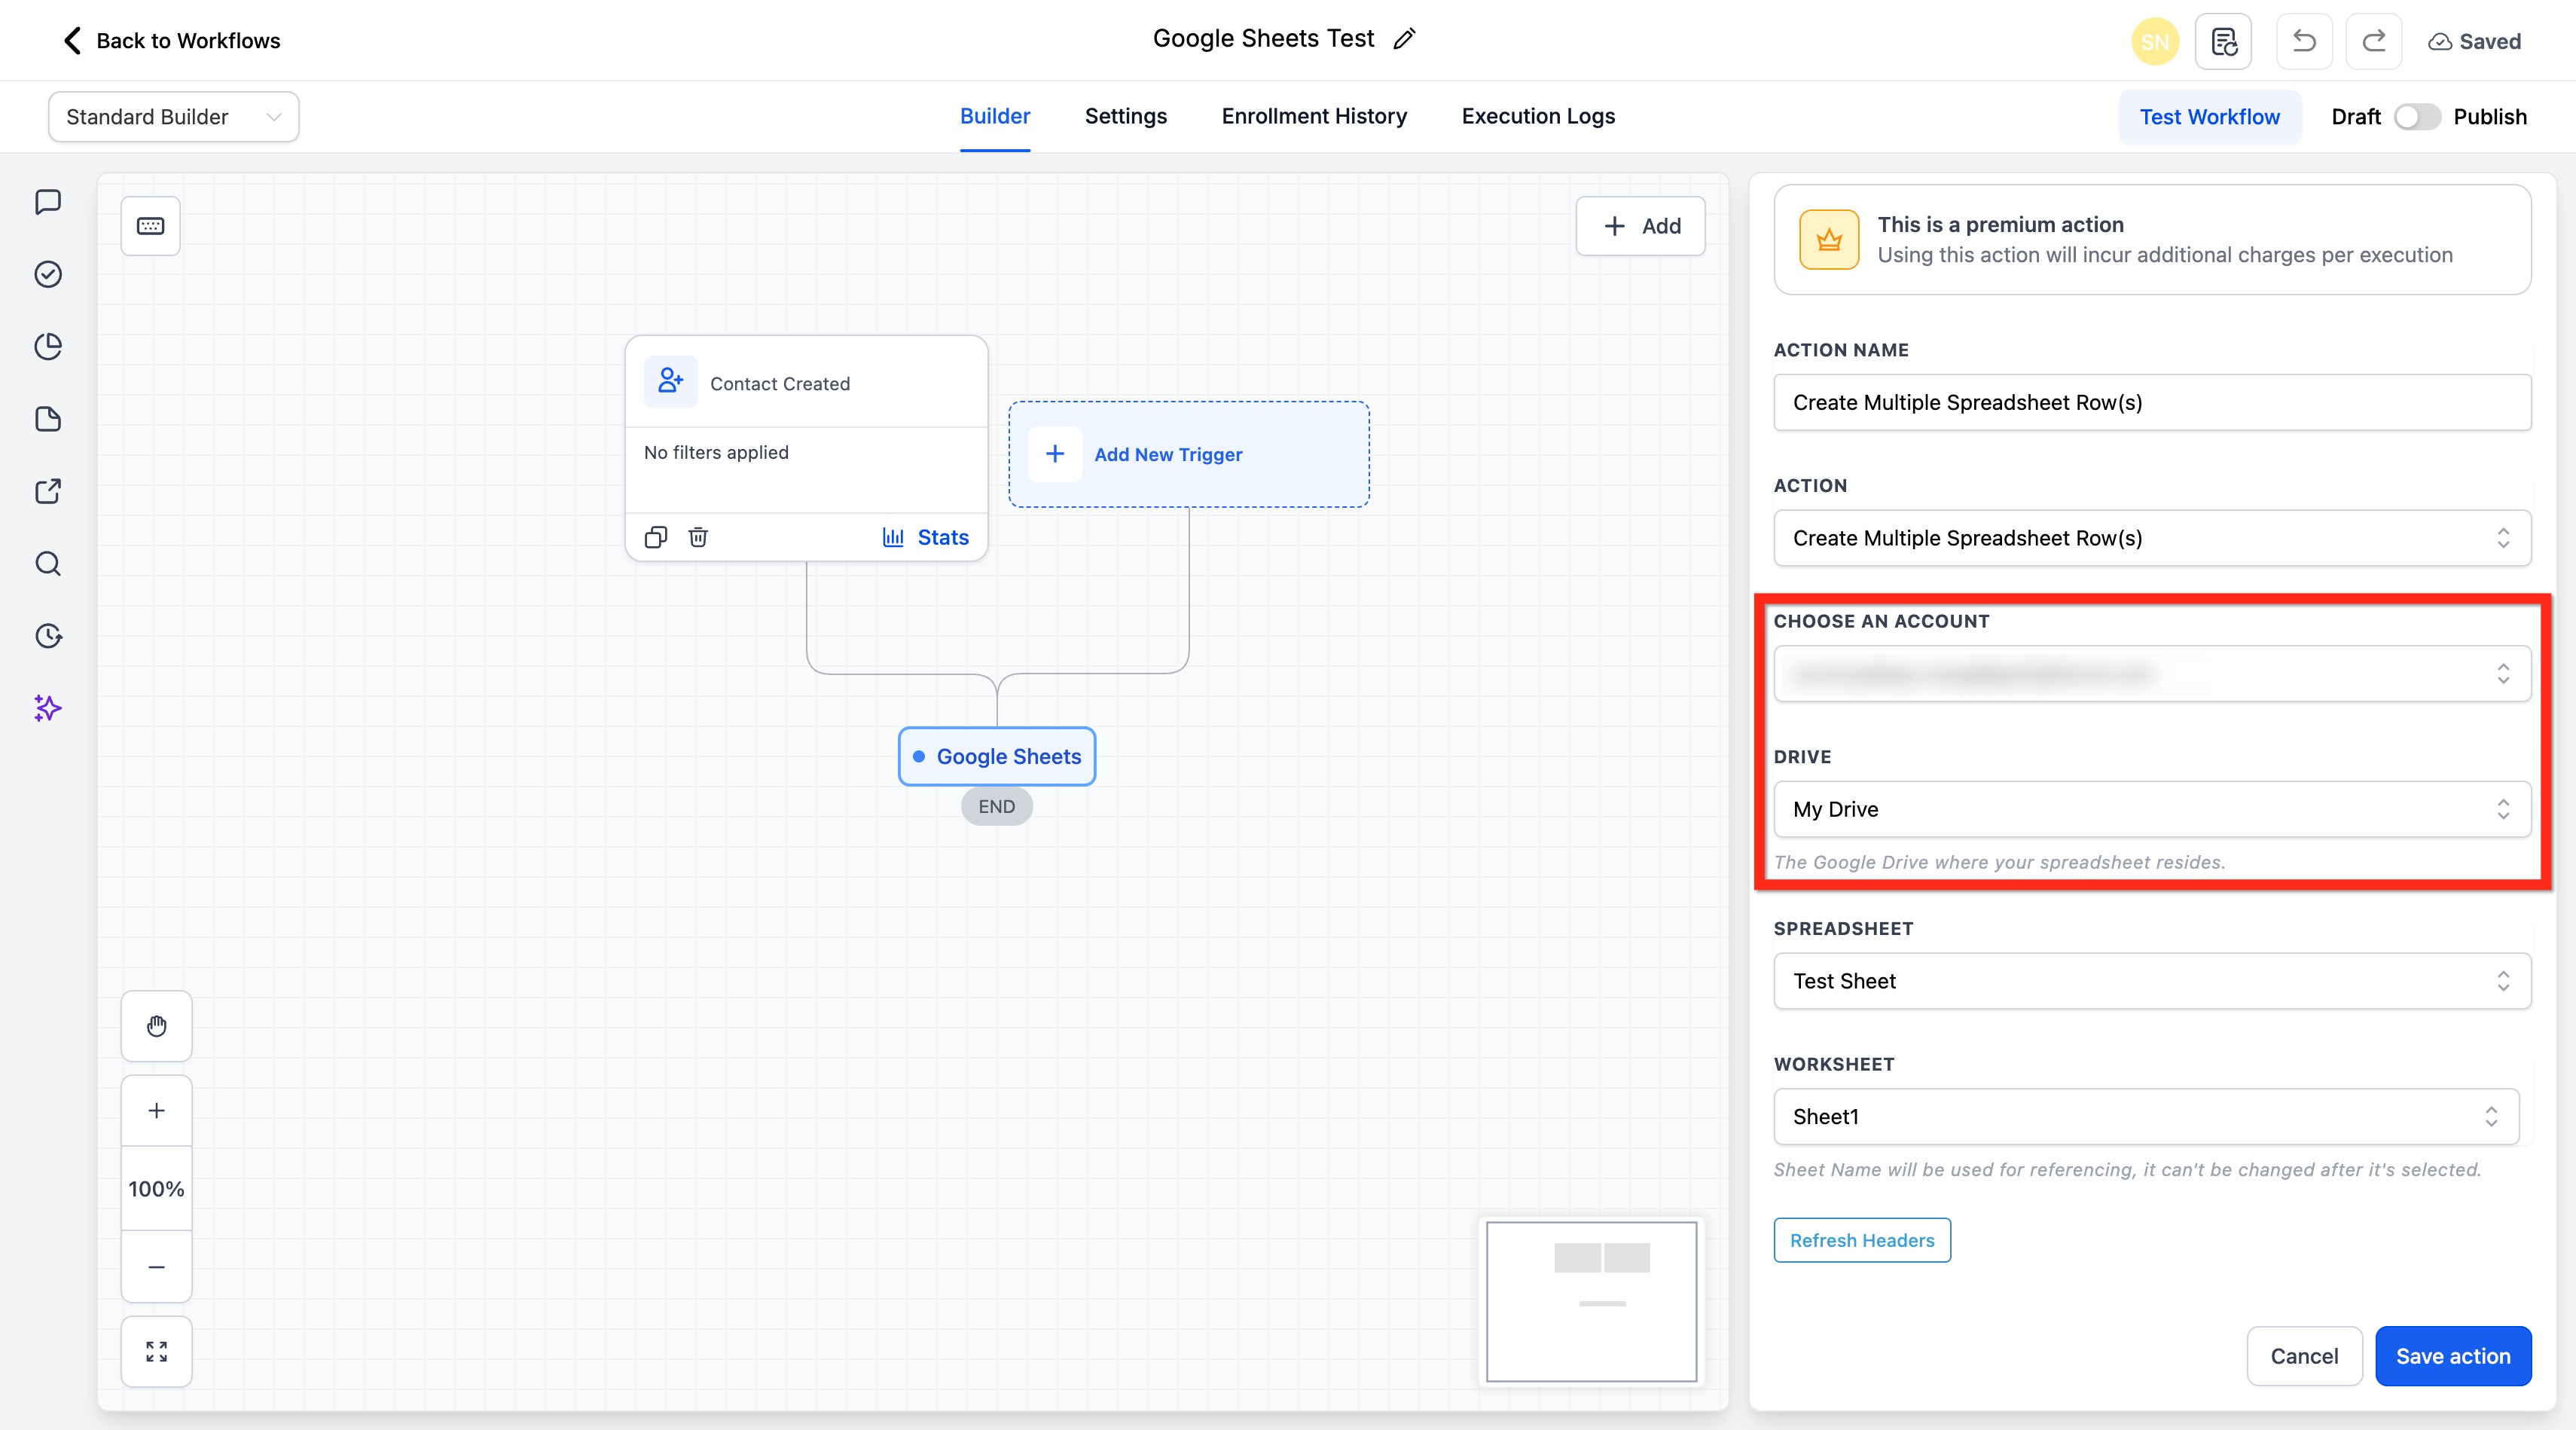
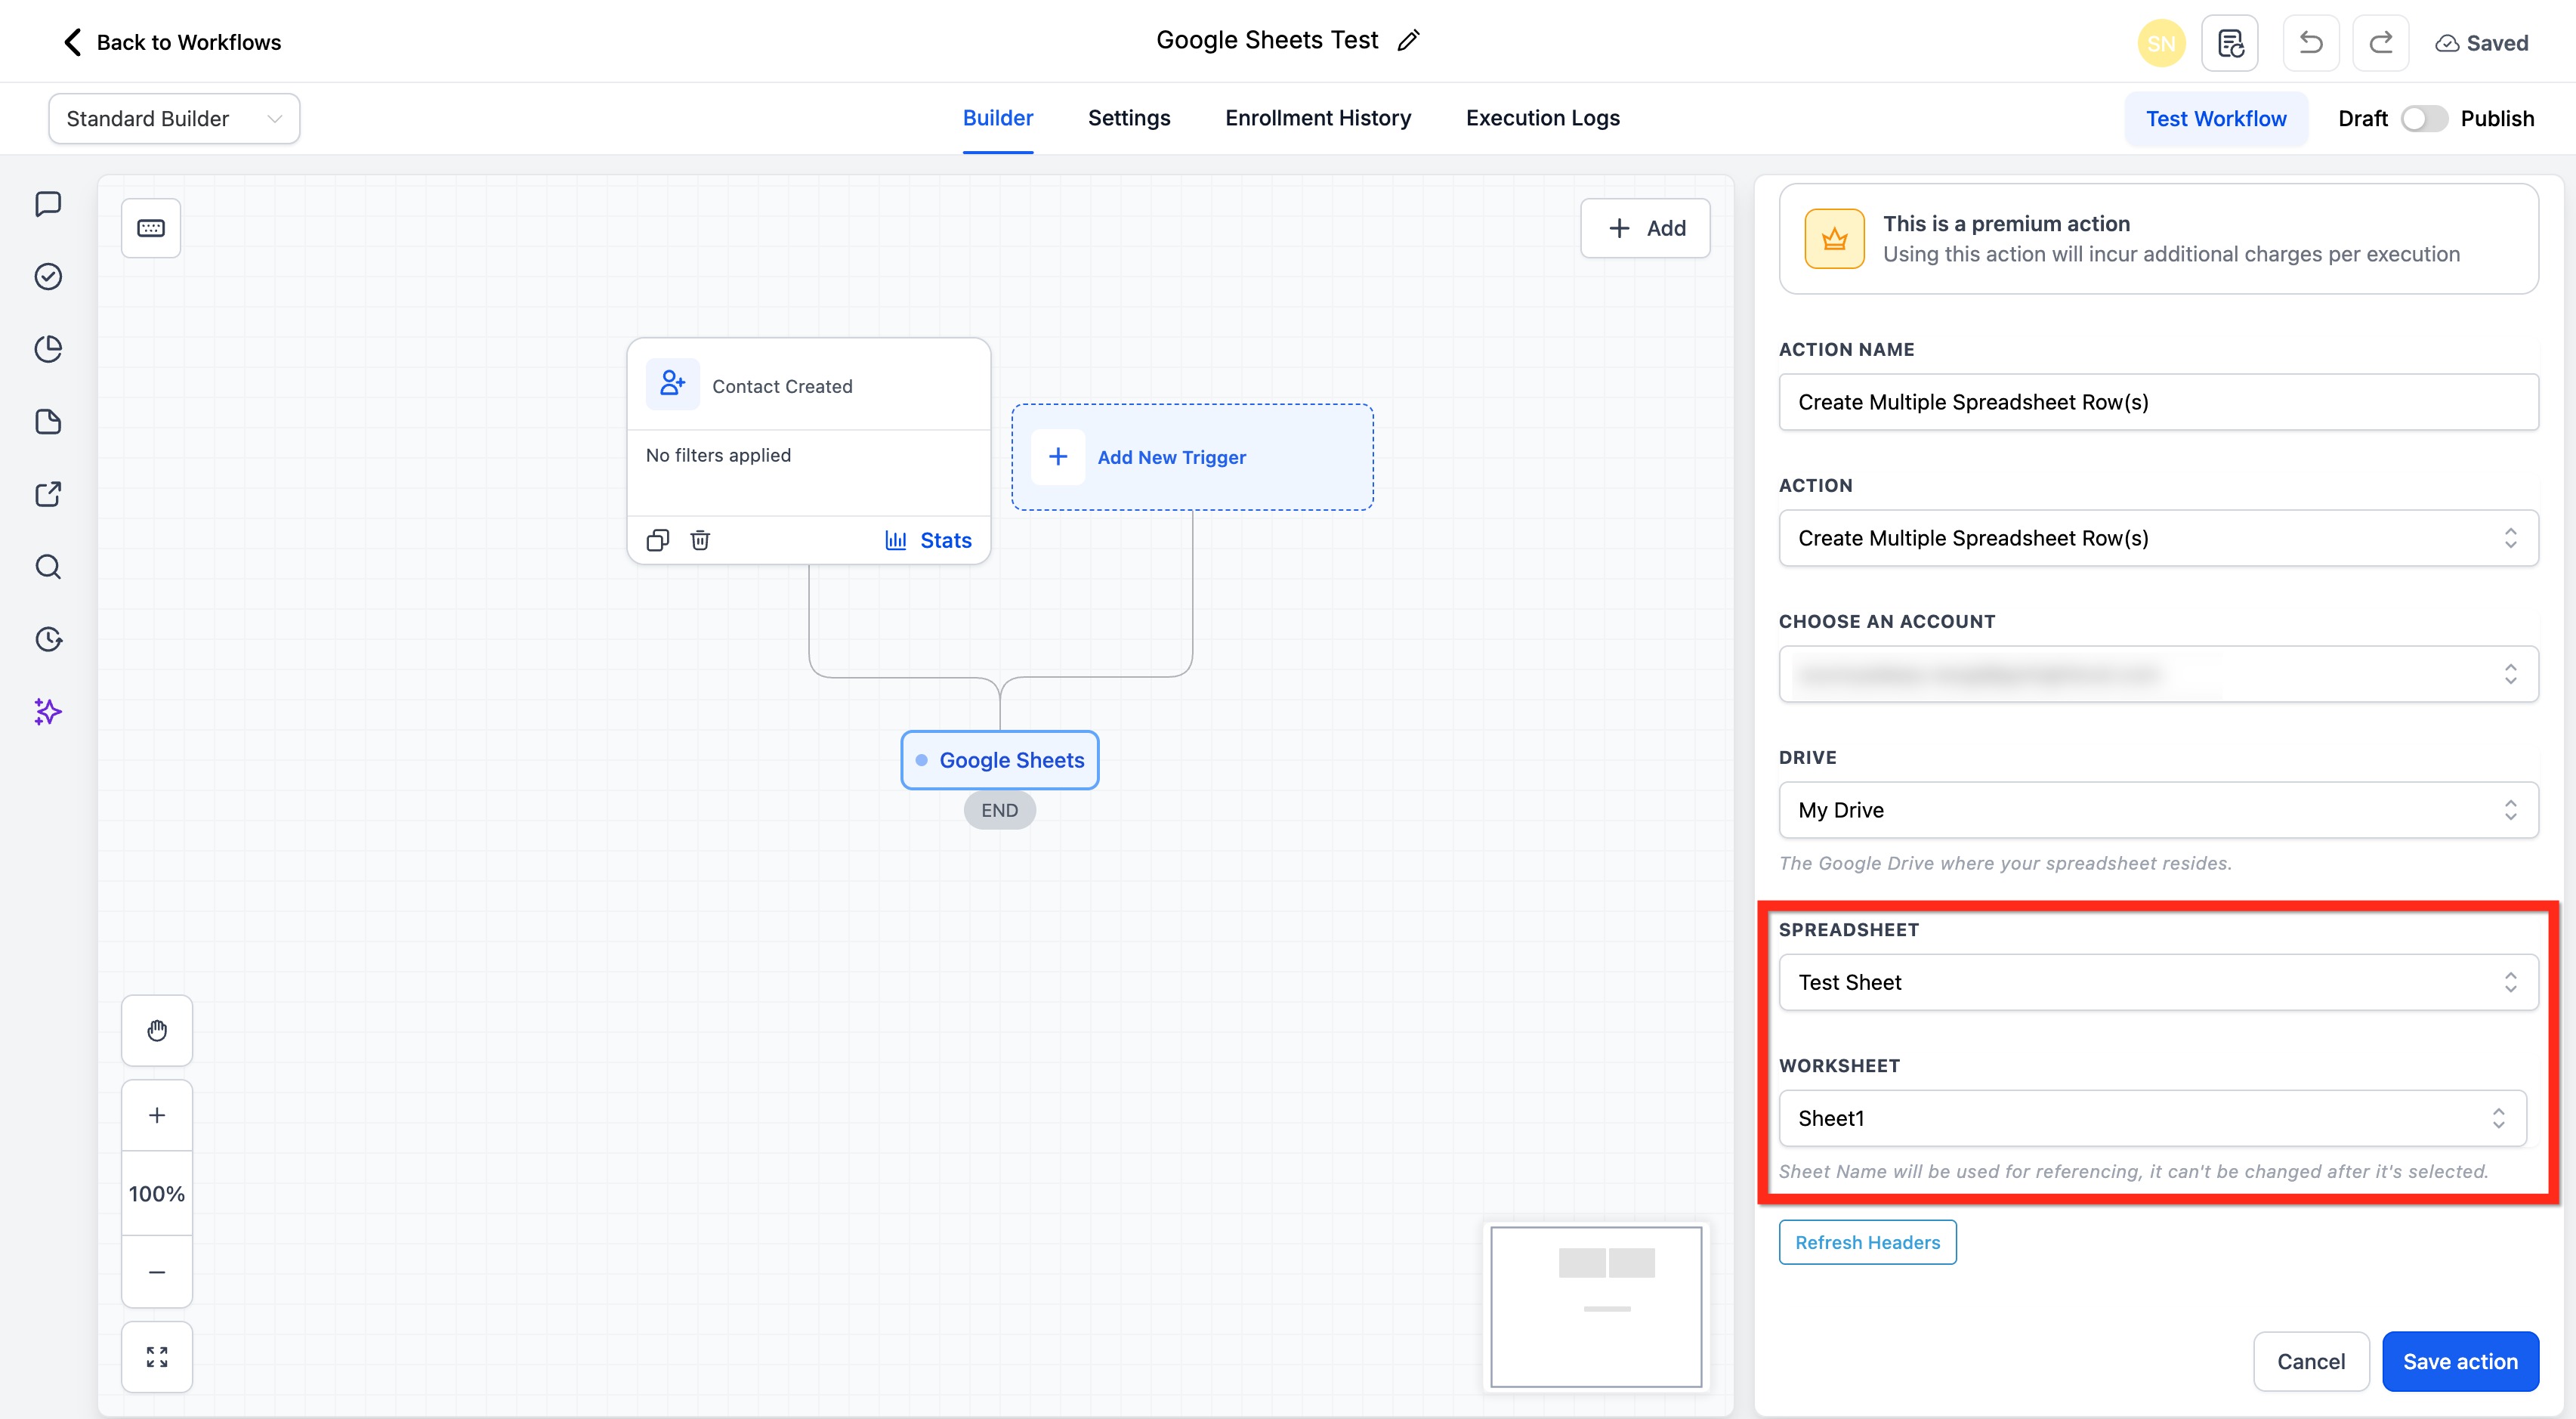
Select the Spreadsheet and the Worksheet (tab).
(Optional) Click Refresh Headers to fetch the latest header values so mapping stays accurate.
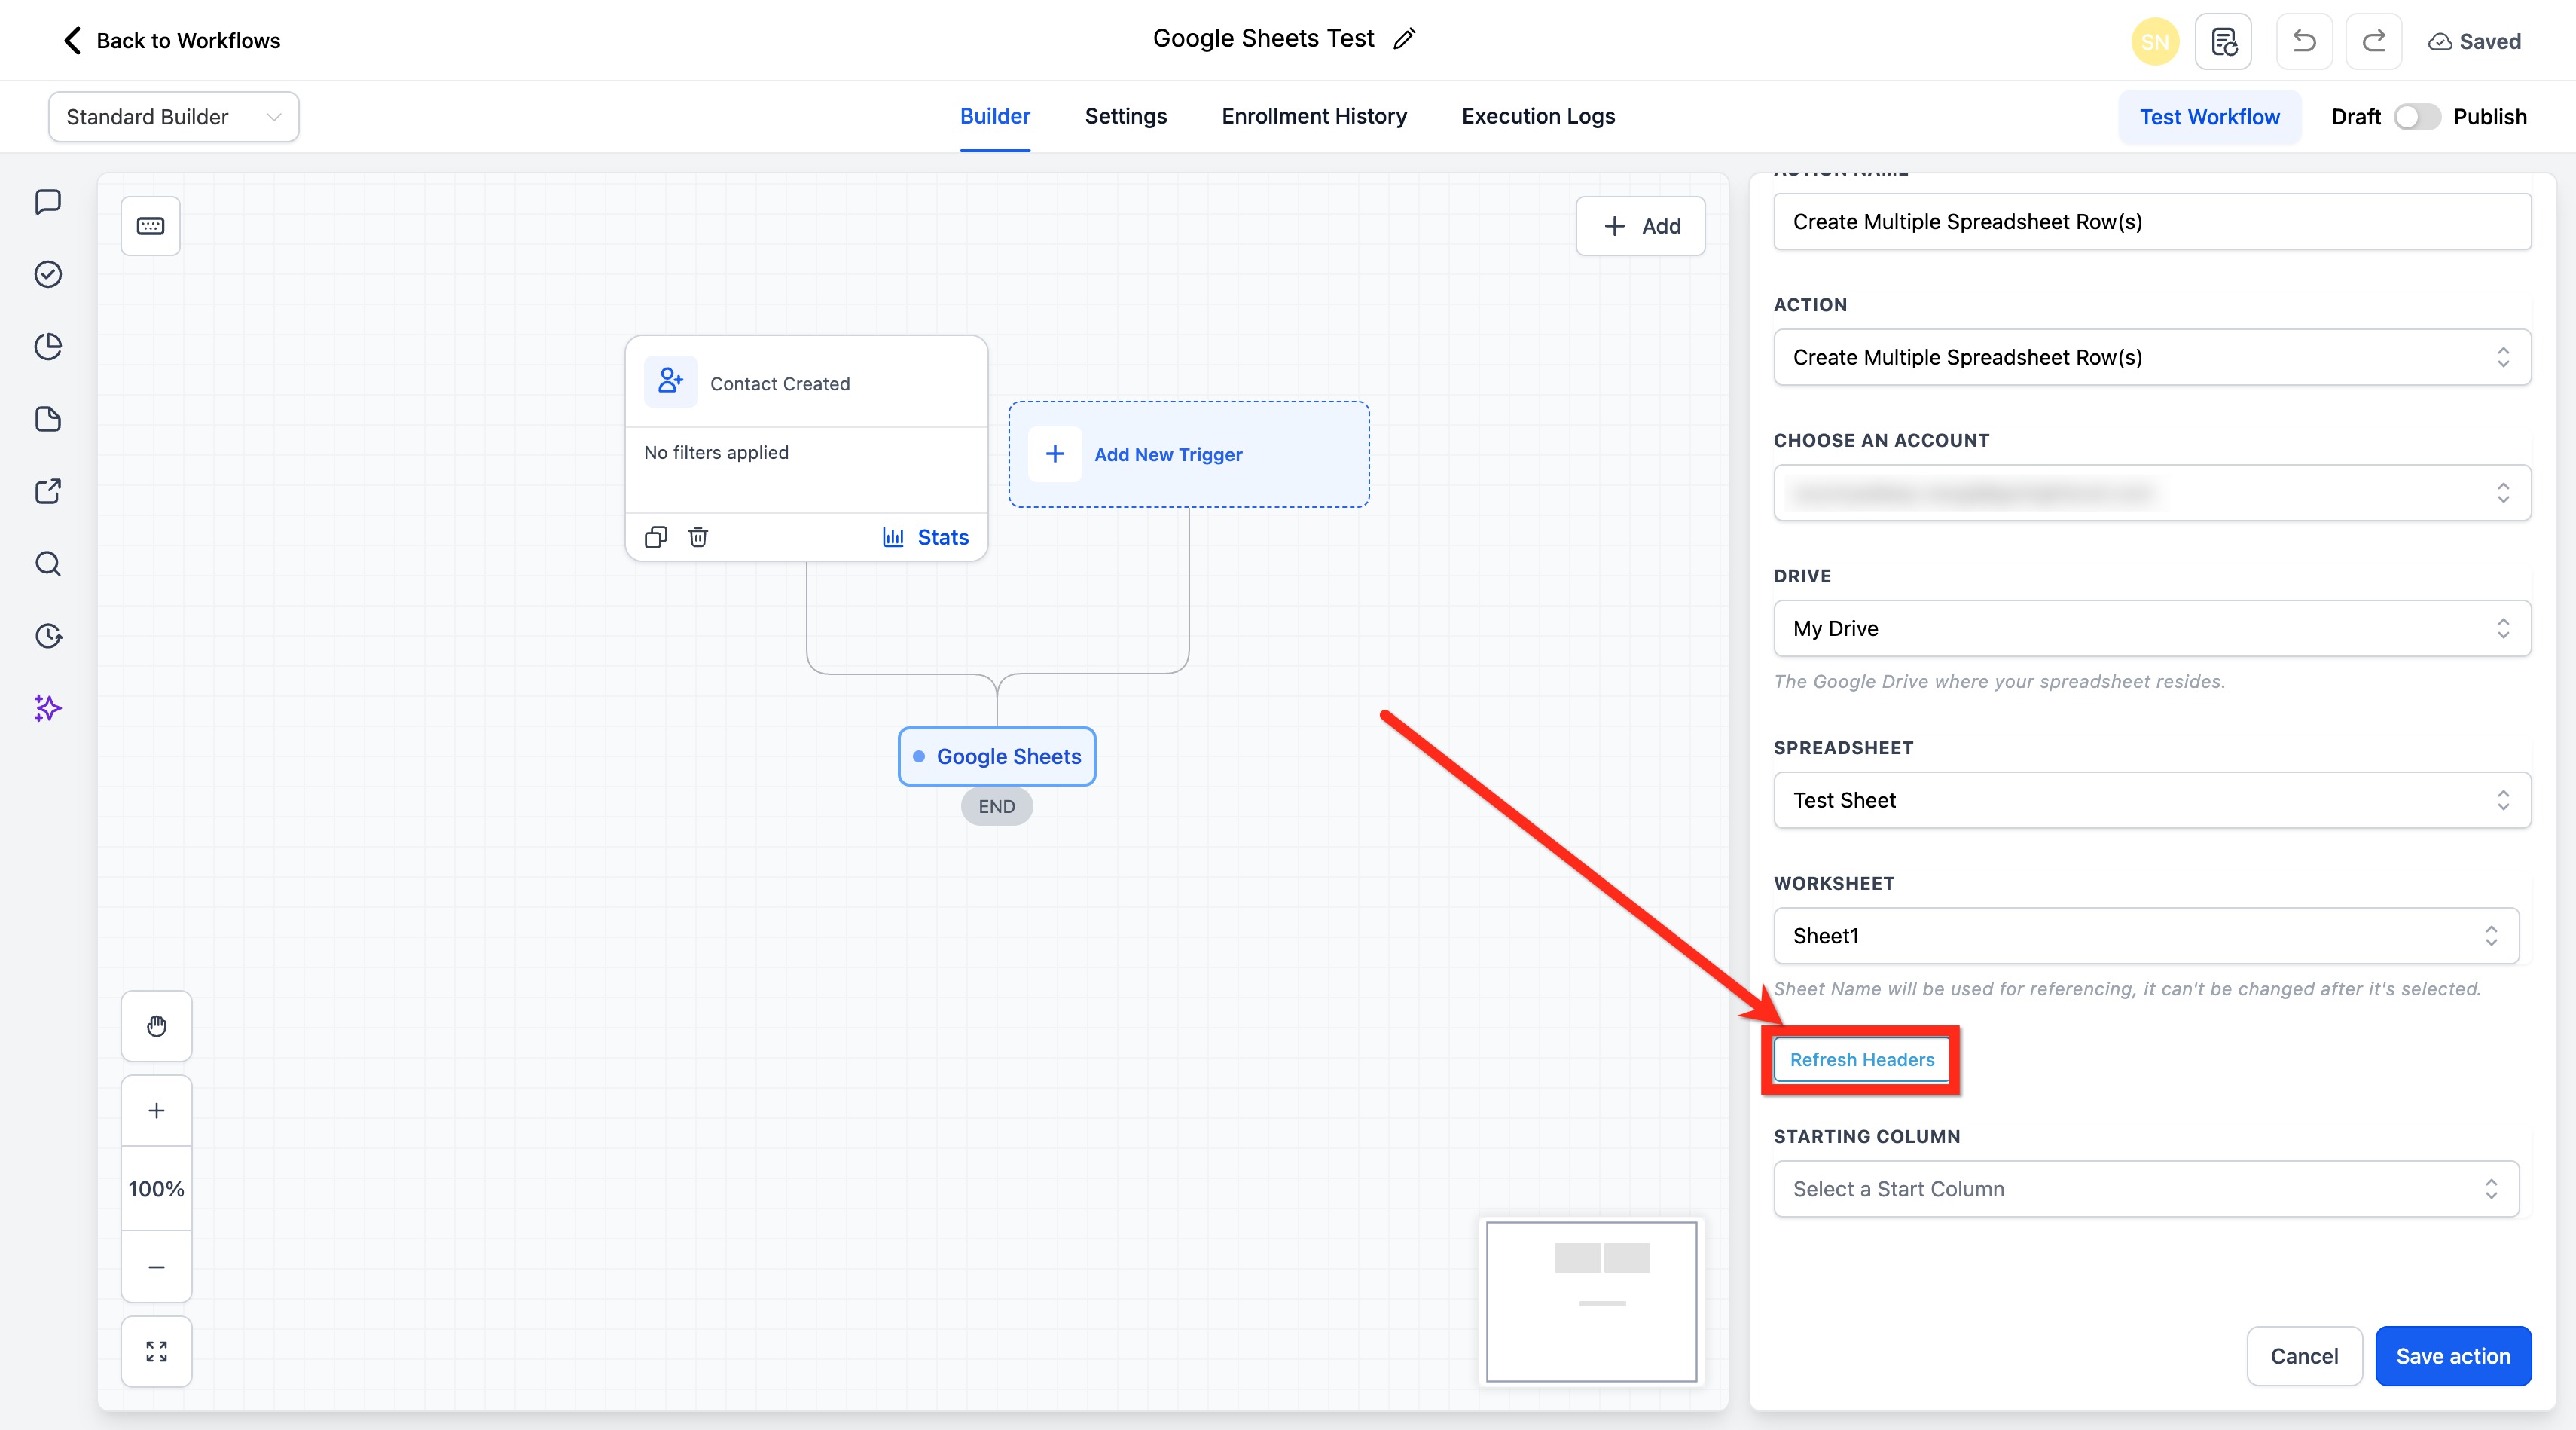
Select Starting Column and Ending Column to define the mappable column range. The first row is the header row.
Click Save Action.
Updates values across several existing rows in a selected range, which keeps records accurate without creating duplicate entries. Use it when the rows already exist and you need to replace or refresh values.
Go to Automation > Workflows.
Create a new workflow or edit an existing one.
Add a relevant trigger (for example, Contact Created or Form Submitted).

Click the + button to add an Action.
Search for Google Sheets and select it.
Connect your location's Google account.
From the Action dropdown, select Update Multiple Spreadsheet Row(s).
Select the connected Google account to use.
Select the Drive where the spreadsheet is stored.
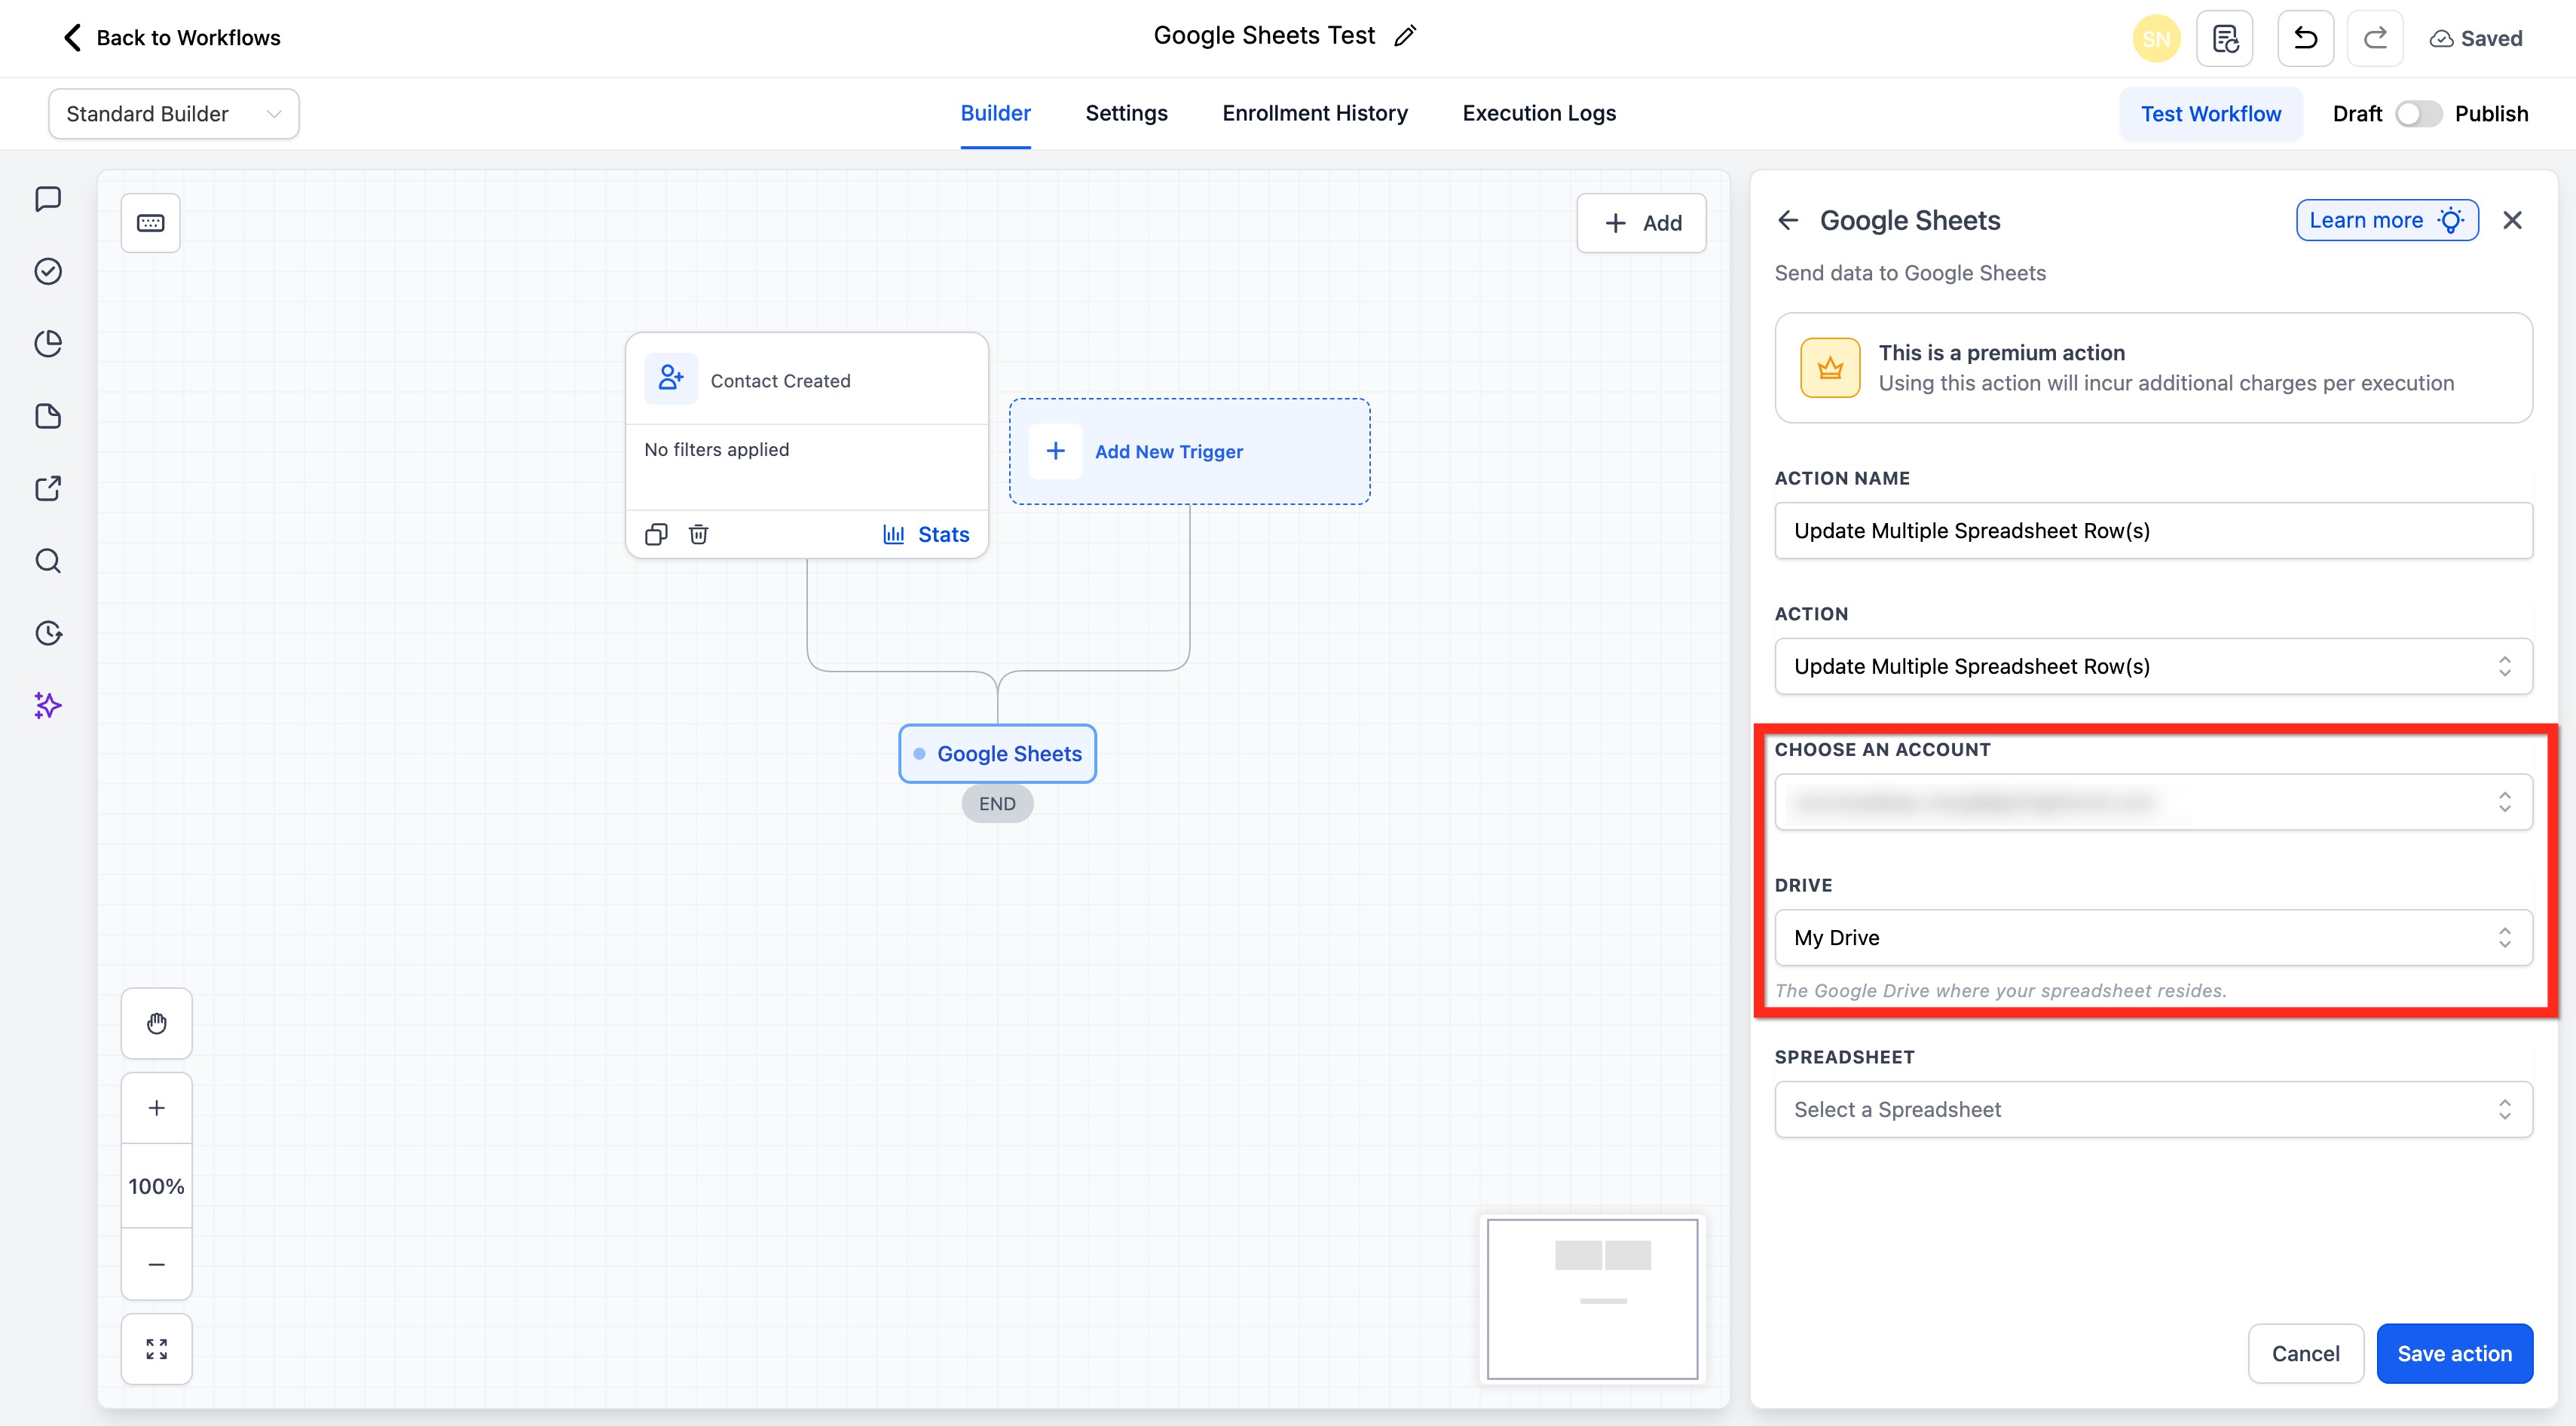
Select the Spreadsheet and the Worksheet (tab).
Enter the row number where the update should begin.
Select Starting Column and Ending Column to define the mappable range (headers come from the first row).
(Optional) Click Refresh Headers if you recently changed column names or order.
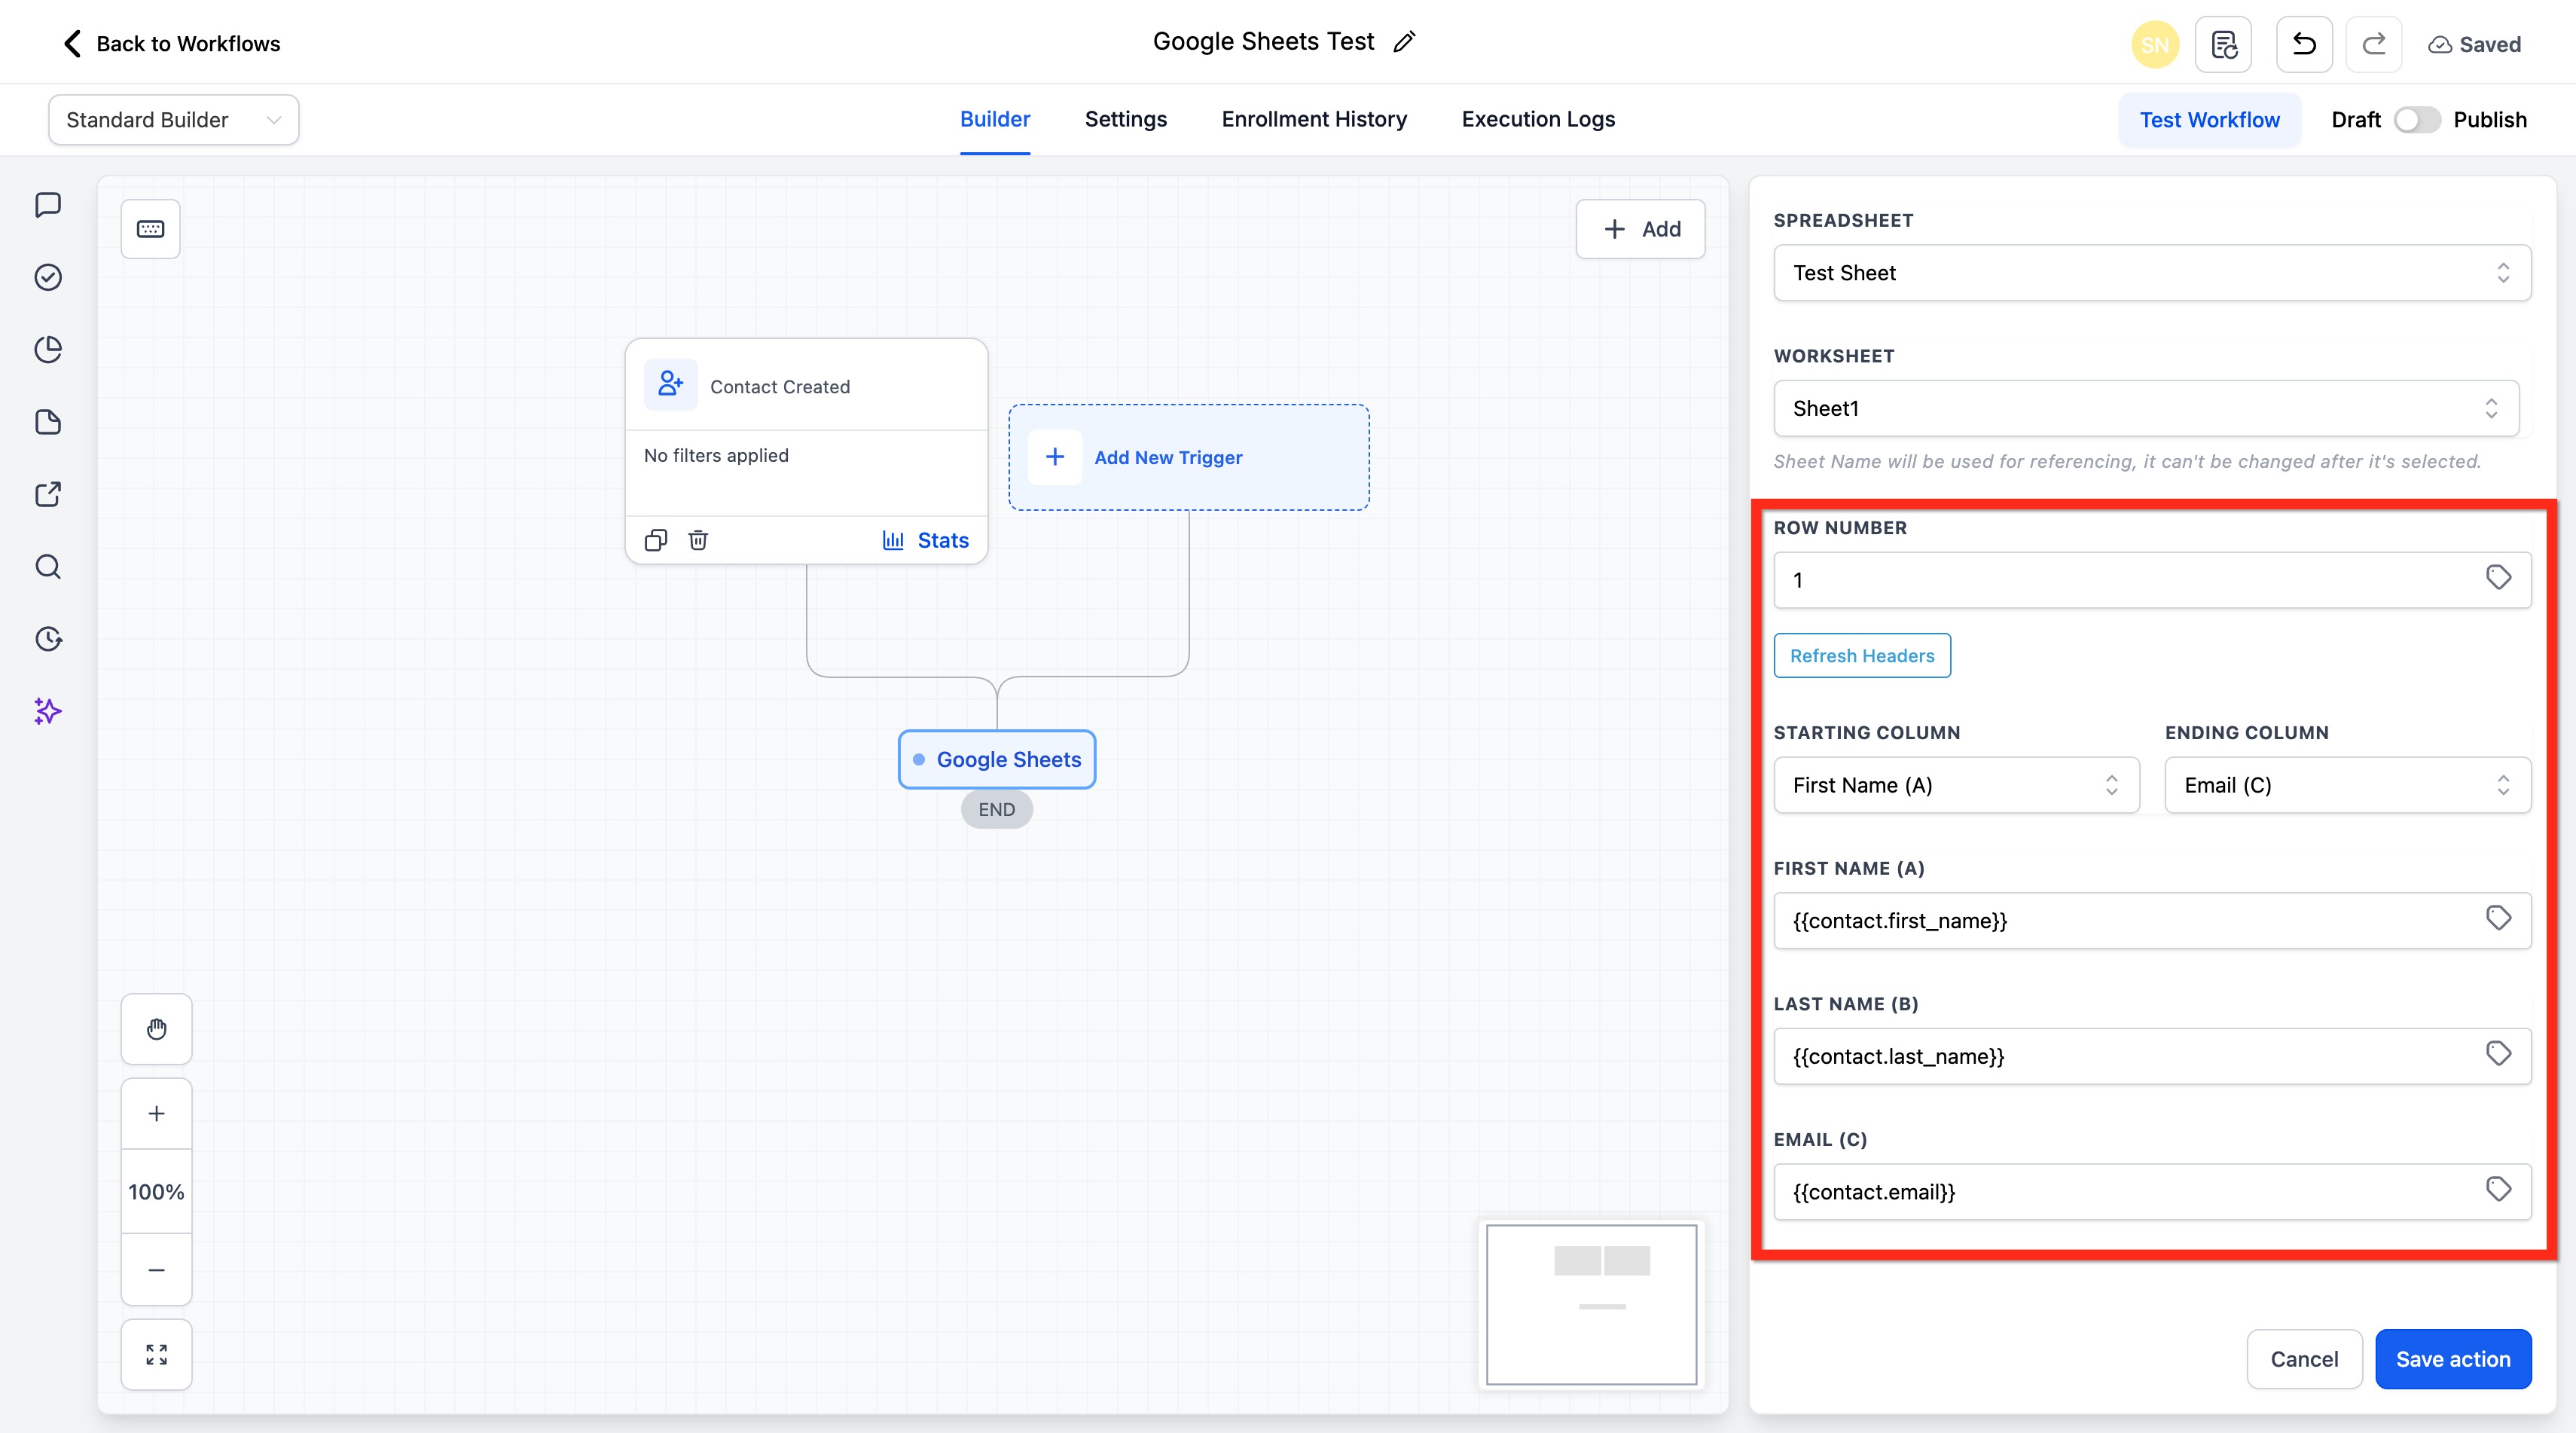
Click Save Action.
Inputs: Any custom value mapped into a column when creating or updating rows, plus the row number or lookup value used to locate a row.
Output: Only the Lookup action returns data to the workflow. Its matched row becomes custom values (referenced by the action's index, with the row number available as {{sheet.x.rowNumber}}) that any later step can use. Create, update, and delete actions write to the sheet and do not return row data.
Google Sheets is a premium action; multiple-row actions can incur additional charges per execution.
Do not change the spreadsheet name or worksheet (tab) name once connected. Renaming either breaks the link between the workflow and the document and can cause errors or data loss.
You can rename columns, but if you do, click Refresh Headers and update the column mapping in the workflow so data lands in the right columns.
You can use formulas and spreadsheet functions (SUM, AVG, and others) within rows you insert.
Delete actions clear a row's contents but do not remove the row itself.
Update-using-lookup and delete-using-lookup require a Lookup action above them; if the lookup returns no rows, the step is skipped.
A new column won't appear in the action until you click Refresh Headers.
What is the difference between the Webhook action and the Inbound Webhook trigger? The Webhook action (under Send Data) sends data out of Aesthetix CRM to an external service. The Inbound Webhook trigger receives data from an external service to start a workflow.
When should I use Webhook versus Custom Webhook? Use Webhook for a simple, pre-defined POST of contact and event data. Use Custom Webhook when you need a specific method, authentication, custom headers, a precisely shaped payload, or to capture the response.
Do I need a specific trigger for these actions to work? Any trigger works, but the data available depends on it. Object-specific data (appointments, opportunities) is only included when a matching trigger is used, and any custom values you map must exist at runtime.
Can I send images or files through a webhook? No. Webhook actions cannot send images or files.
How do I capture an API's response and use it later? In the Custom Webhook action, enable Save response from this Webhook. The returned fields then become custom values available to downstream steps.
Why am I getting 401 or 403 errors on a Custom Webhook? The credentials, auth type, token, or permissions are wrong or expired. Re-check the Authorization method and any required headers.
Why isn't my new spreadsheet column showing in the Google Sheets action? Click Refresh Headers after adding or renaming columns so the action pulls the latest sheet structure.
My data stopped writing to Google Sheets. What happened? Most likely the spreadsheet or worksheet (tab) name was changed, which breaks the connection. Restore the original names or reconnect the sheet in the action.
What is the difference between the single-row and multiple-row Google Sheets actions? Single-row actions create, update, or delete one row at a time. Multiple-row actions create or update several rows in one action, which is more efficient when a workflow produces grouped or repeated data.
