Marketing actions let your workflows push contact activity out to your advertising and analytics platforms so the events that happen inside Aesthetix CRM, like a form submission, a booked consultation, or a paid deposit, are measured where you run your campaigns. Instead of guessing which ads drive revenue, you feed real conversion data back to Google and Meta so their optimization engines learn who your best leads look like.
Each Marketing action requires the matching channel to be connected to your sub-account before it will work. Google Analytics, Google Ads, and the Facebook and Meta actions each depend on an authenticated integration; if the channel is not connected, the action either has nothing to send to or its selector dropdowns will be empty. Connect integrations under Settings > Integrations first, then build the workflow.
The steps to drop any of these actions into a workflow are the same:
Go to Marketing > Workflows.
Open an existing workflow or click Create Workflow, then Start from Scratch (or choose a recipe) and Continue.
Add a trigger that represents the event you want to measure, such as Form Submitted, Customer Booked Appointment, Order Submitted, Survey Submitted, or Customer Replied. Marketing actions need a trigger to fire against, and a workflow cannot be published with a trigger only or an action only.
Click Add your first action (or the + icon at the point in the flow where the conversion should fire).
Select the Marketing action you want from the action list.
Fill in the configuration panel on the right, then click Save Action.
Publish and Save the workflow.
The sections below cover the configuration for each Marketing action in turn.
What it does: Sends a custom event to your Google Analytics property when the workflow runs, so you can measure interactions that go beyond a page view, such as a form opt-in, a booked appointment, or a support call. This requires a Google Analytics property; supply its tracking or measurement ID in the action.
Configuration fields:
Field | What to enter |
|---|---|
Action Name | A label for the step (for example, "GA - Consultation Form"). Use the default or rename it for clarity in your workflow logs. |
Action Type / Property type | Choose whether you are sending to a Universal Analytics (UA) property or a Google Analytics 4 (GA4) property. The remaining fields adjust to the type you select. |
Tracking ID / Measurement ID | The ID of your Google Analytics property (see how to find it below). |
API Secret (GA4) | For GA4, the Measurement Protocol API secret generated in the GA4 admin, paired with the Measurement ID. |
Event Category (UA) | The category of the event, for example "Form Submission." Supports custom values. |
Event Action (UA) | The action that occurred, for example "Exit Form Opt-in." |
Event Label (UA) | A label for easy identification, for example "Black Friday Form Submission." |
Event Name (GA4) | The single GA4 event name, since GA4 has no category/action/label model. |
Event Value | A numeric value for the event. You can insert a dynamic value using the merge-field (small icon) tags so the value comes from the contact record. |
How to find your tracking or measurement ID:
For a Universal Analytics property: open Google Analytics, click the Admin tab, then in the left column click Tracking Info and Tracking Code. The ID starts with "UA."
For a GA4 property: open Google Analytics, click the Admin tab, then in the left column click Property Settings and Property ID. The ID is a number.
Inputs and output: The action consumes the trigger event plus the contact's UTM and click parameters. It outputs an event hit to Google Analytics. Aesthetix CRM follows a standard set of rules to categorize traffic into a source by checking the full page URL and the referring domain. If both utm_medium and utm_source are present, those are used; otherwise traffic is categorized by the rules below. A GCLID (Google Click Identifier) is passed to recognize each unique click.
Attribute | Rule | utm_medium | utm_source |
|---|---|---|---|
Google Organic | Referring domain is the Google search engine | organic | |
Paid Search | utm_source is google and referring domain is google.com | cpc | |
facebook.com | referral | ||
Paid Social | utm_medium contains "cpc" where utm_source is facebook.com | cpc | |
Direct or Bookmarked | No referring domain or tracking URL | none | direct |
Referral | example.com | referral | example.com |
Social Media | Referring domain is a social site (Facebook, Instagram, YouTube, Reddit, Twitter, Naver, Pinterest) | social | Social referring site |
Display Traffic | example.com | cmp, banner, display | example.com |
When to use it (med-spa example): A prospect clicks a Google search ad for "Botox special," lands on your booking page, and submits the consultation request form. Add a workflow triggered by Form Submitted with an Add to Google Analytics action that fires an event named "consultation_request" (GA4) or category "Form Submission" / action "Consultation Request" (UA). Now your Analytics reports show how many consultations each campaign and channel produced, not just sessions.
Notes and gotchas:
A Google Analytics property must exist and its ID entered correctly, or the event will not land.
GA4 and UA use different field sets. GA4 has no concept of Category, Action, and Label; every hit is an event, so design your GA4 events around event names rather than porting a UA structure.
To confirm GA4 is receiving data, open the GA4 property and go to Reporting > Acquisition reports; correctly configured events appear there, and you can filter by source and medium to confirm attribution.
What it does: Sends a conversion event from Aesthetix CRM into your connected Google Ads account when the workflow runs. This is how you record offline conversions, such as form submissions, chat replies, number-pool calls, purchases, or booked appointments that happen after someone clicks your ad. By tying those actions back to the original click, Google Ads can attribute revenue correctly and optimize bidding around the outcomes that matter. This requires a connected Google Ads account.
To match a conversion back to an ad, Aesthetix CRM uses the click identifiers that Google appends to ad clicks: GCLID (standard web tracking), GBRAID, and WBRAID (privacy-focused environments, mainly iOS/Android app campaigns). At least one of these must be present on the contact record for the conversion to attribute.
Prerequisites (complete these first):
Connect your Google Ads account under Settings > Integrations, select Google, and authenticate, linking the correct Google Ads account if you manage several. Without this connection the action will not function.
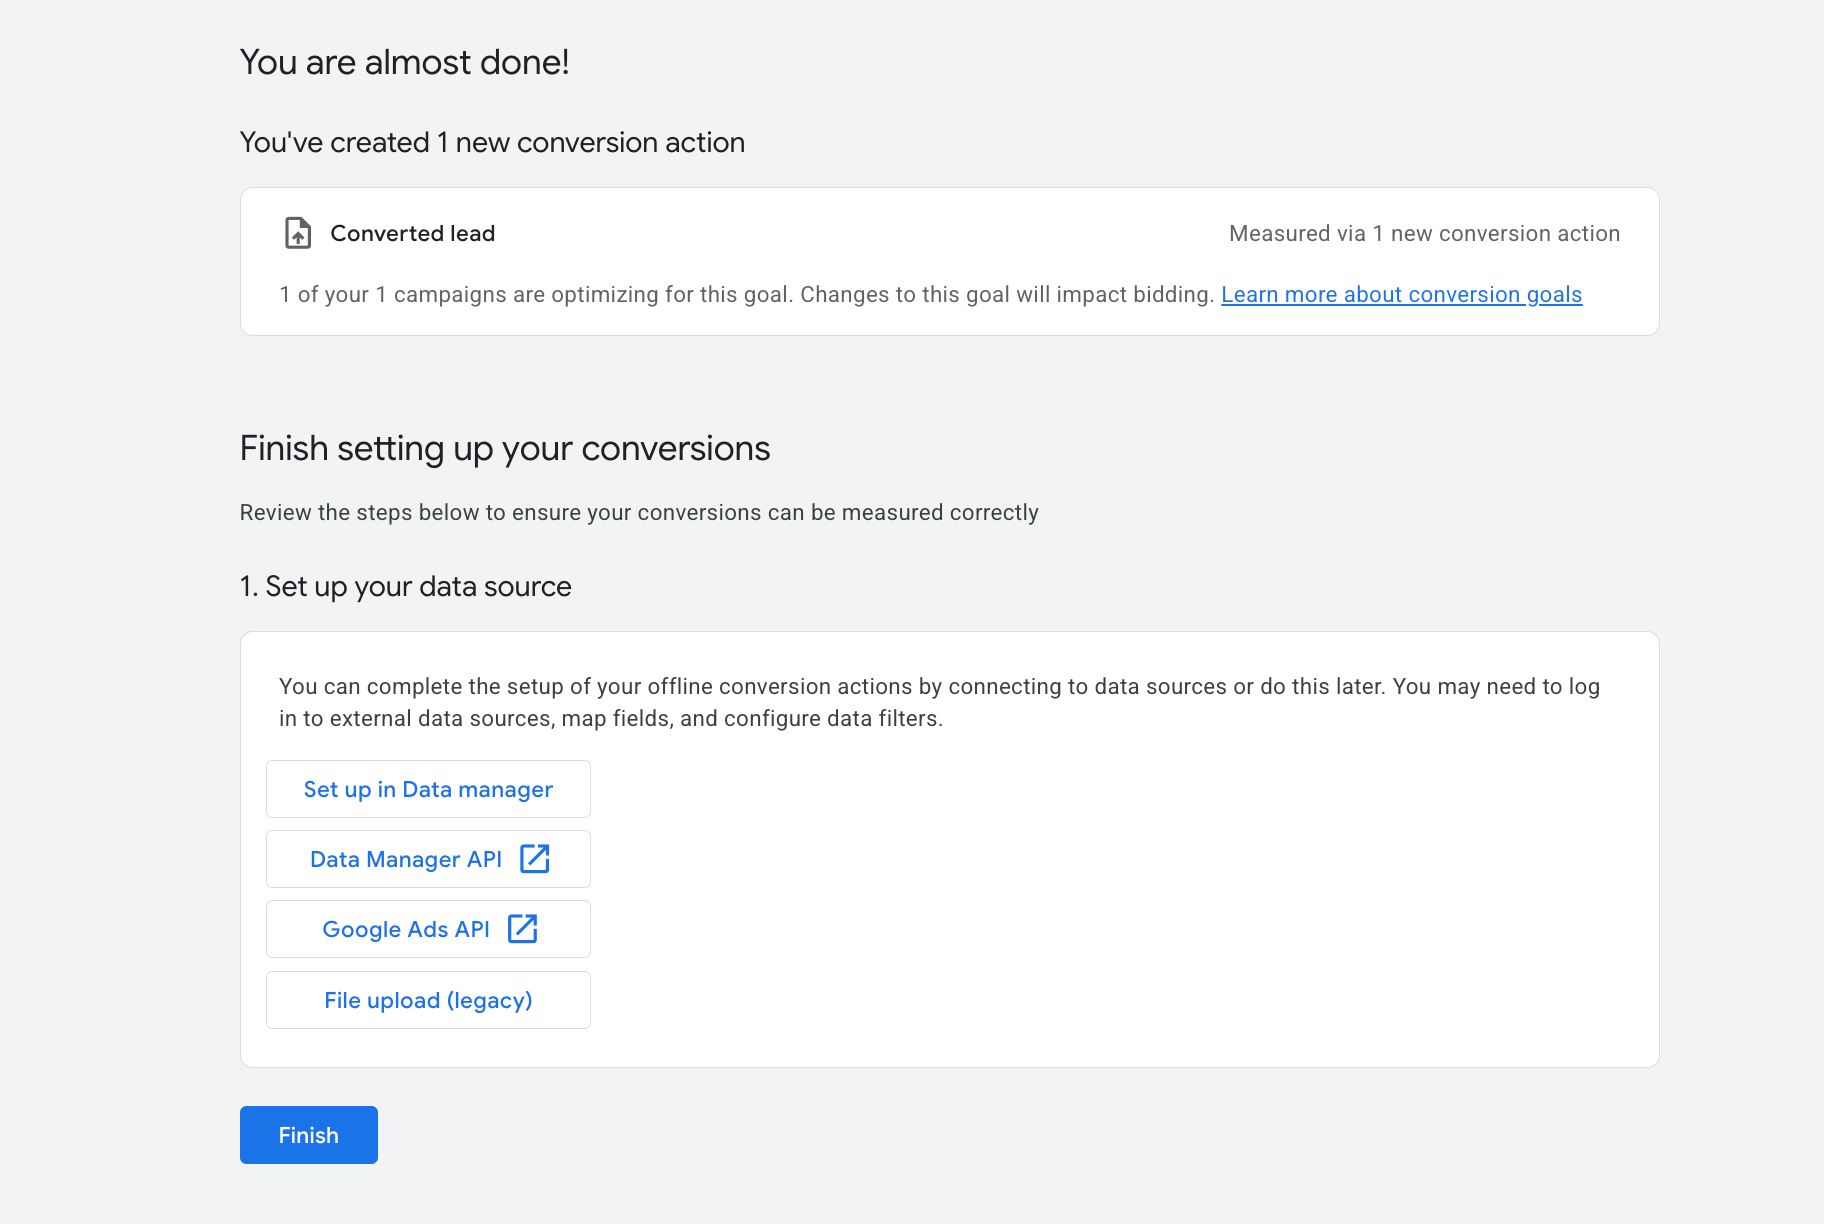
Create at least one conversion action inside Google Ads before building the workflow. Aesthetix CRM fetches available conversion actions directly from Google Ads, so if none exist the conversion dropdown in the action will be blank.
Only offline conversion actions are supported. Website, app, and phone-call conversion sources created in Google Ads are not supported by this action.
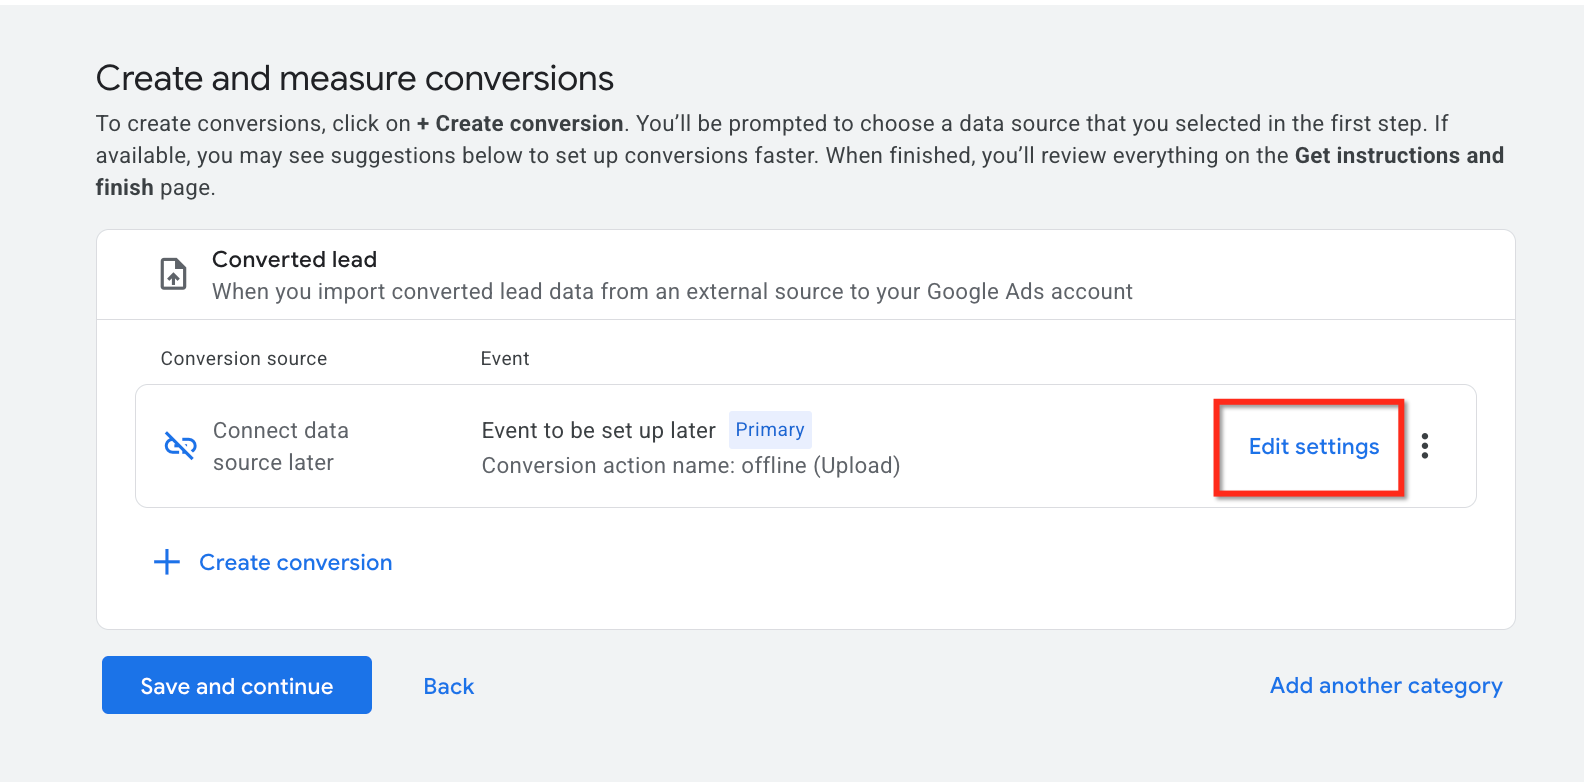
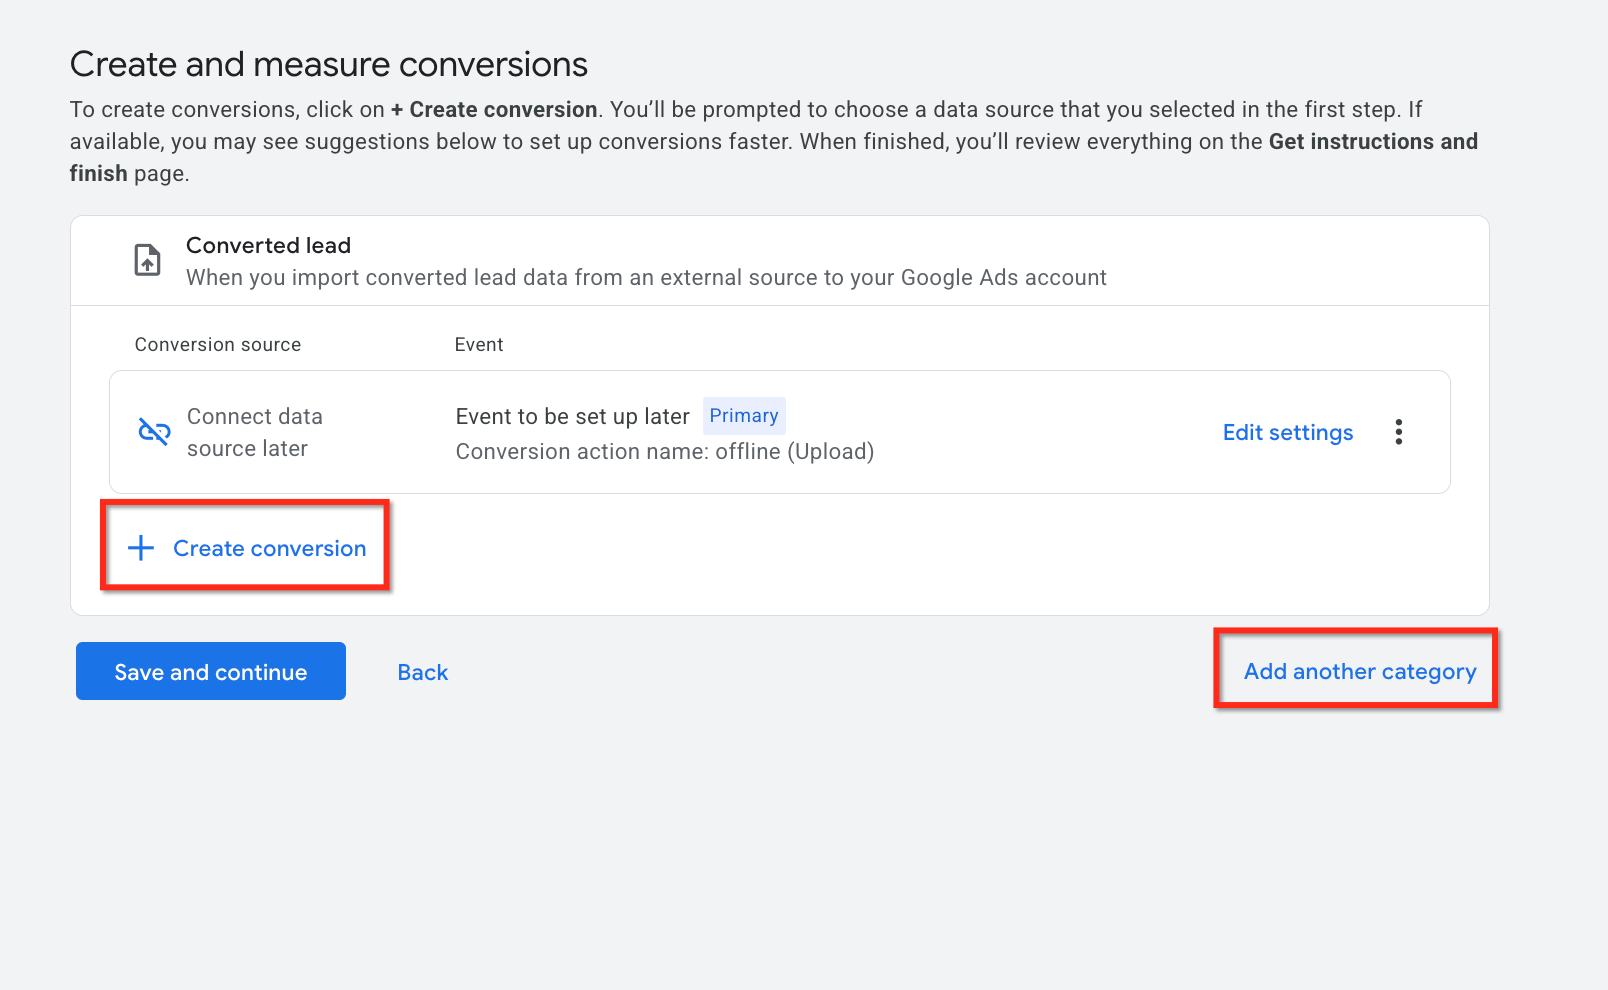
The platform-side setup (done in the Google Ads interface, not in Aesthetix CRM) runs roughly as follows: sign in to Google Ads, use the + button to create a new Conversion Action, choose to measure Conversions from offline sources, and skip setting up a data source for now.

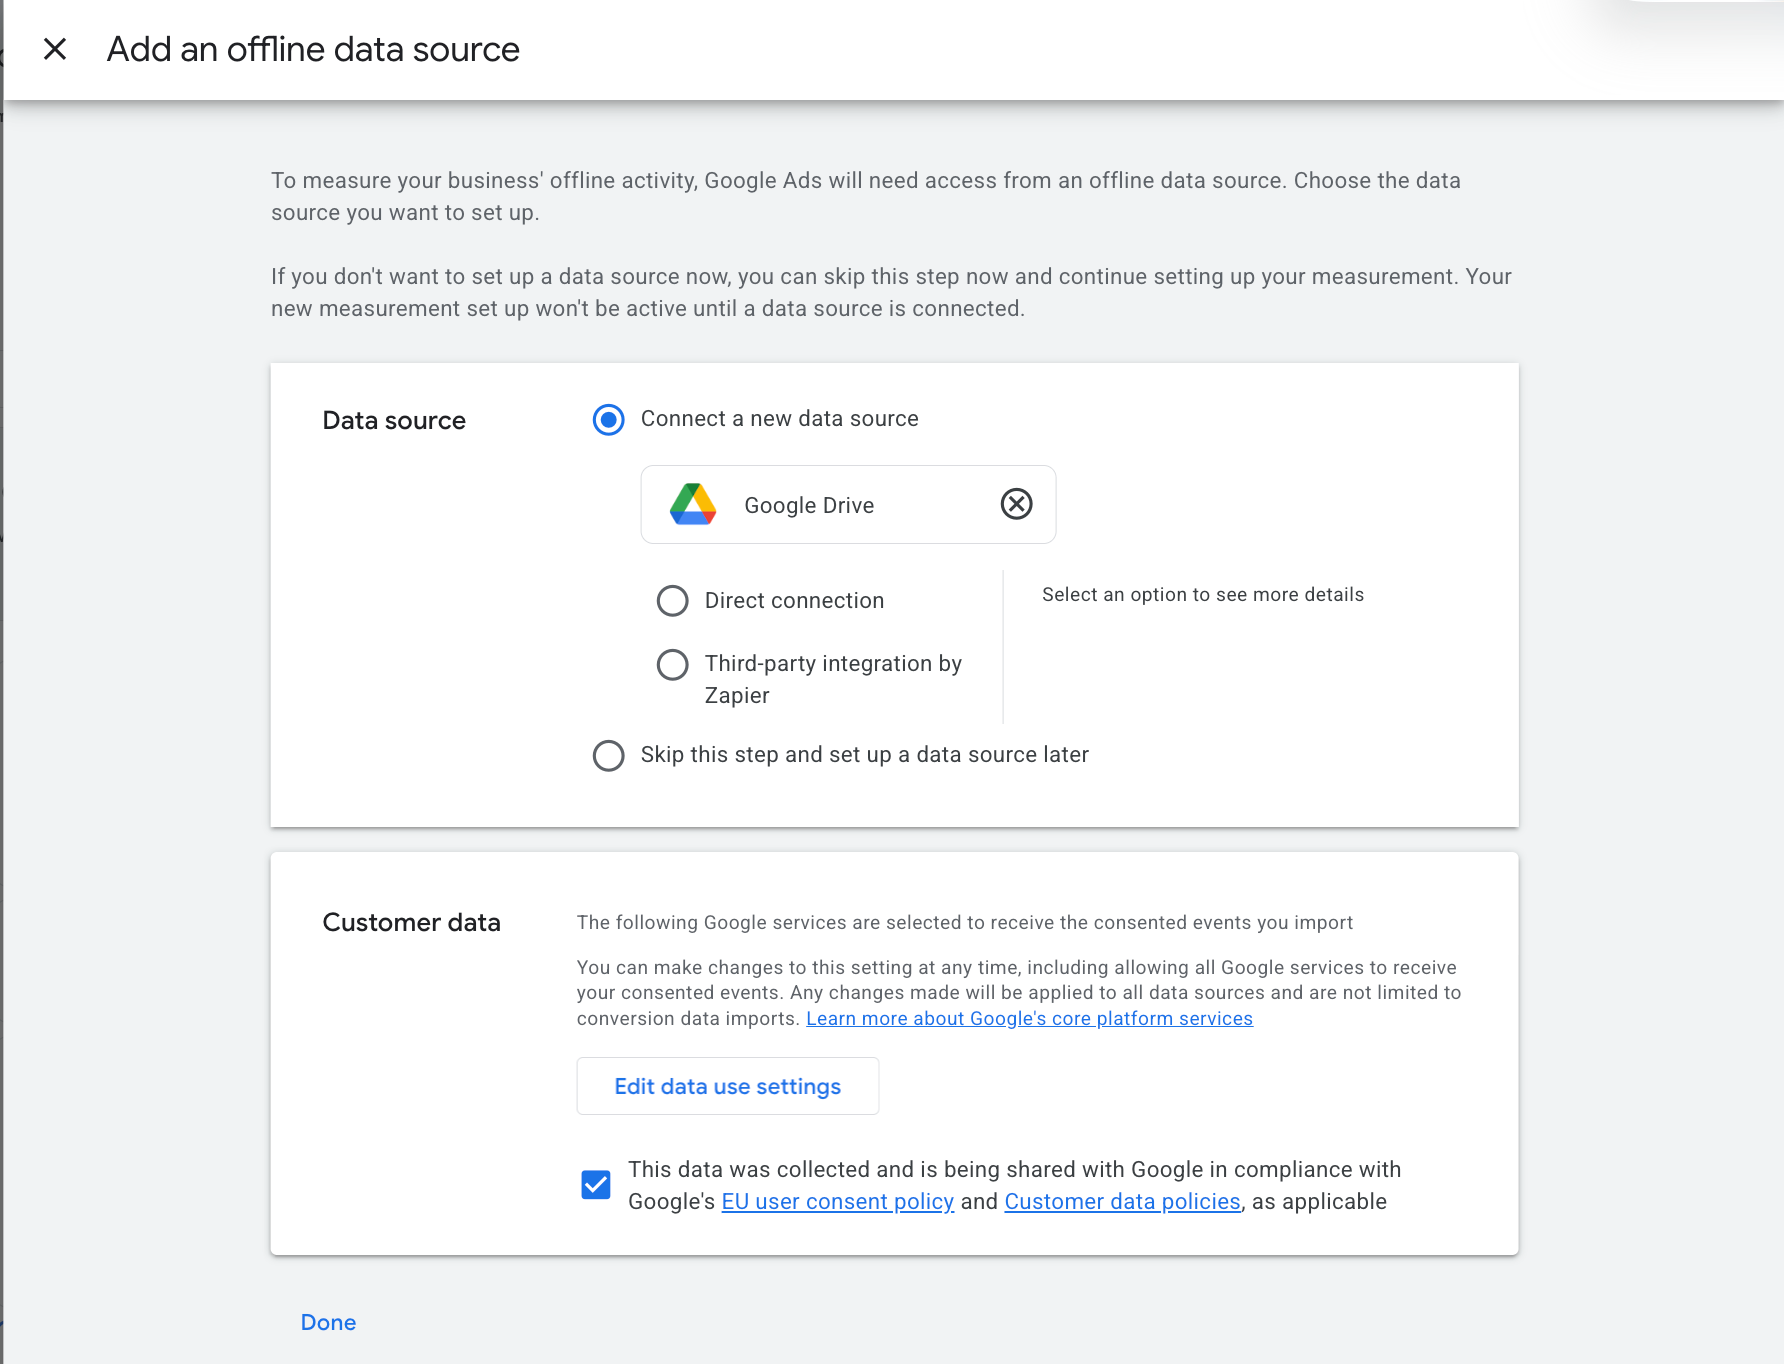
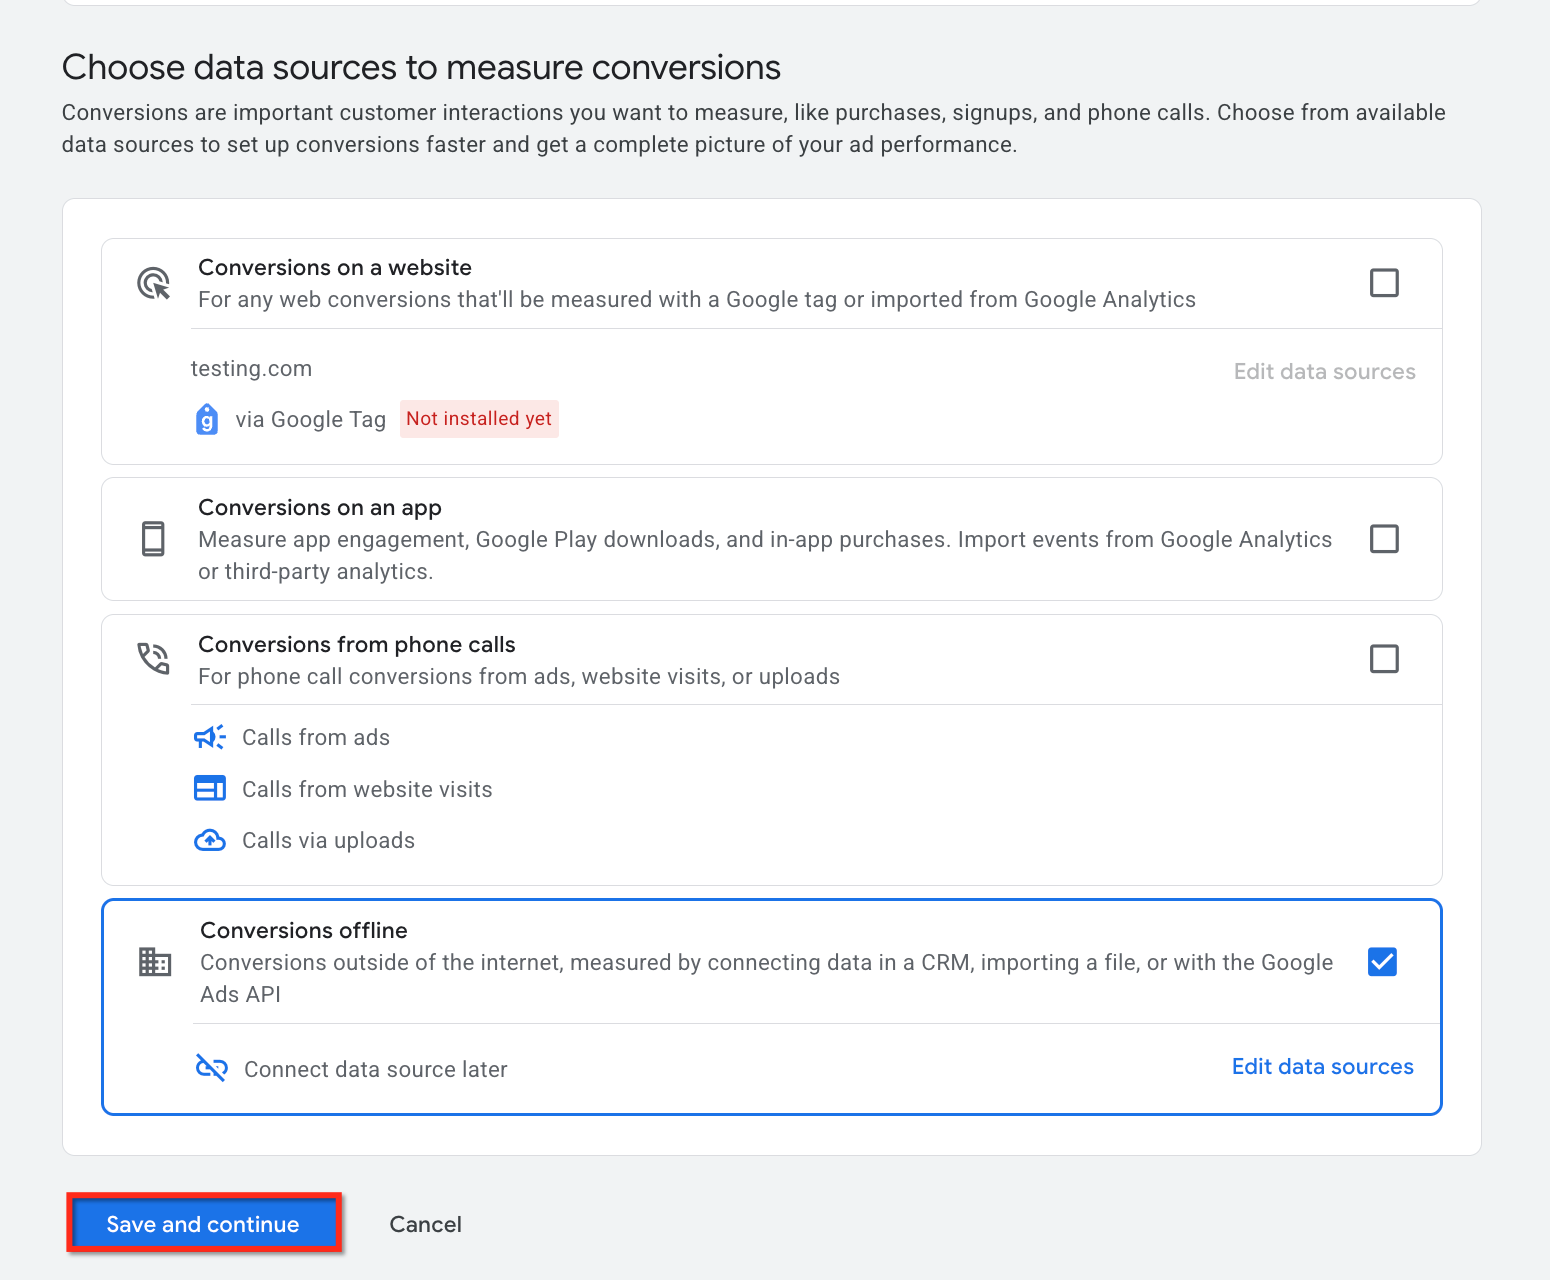
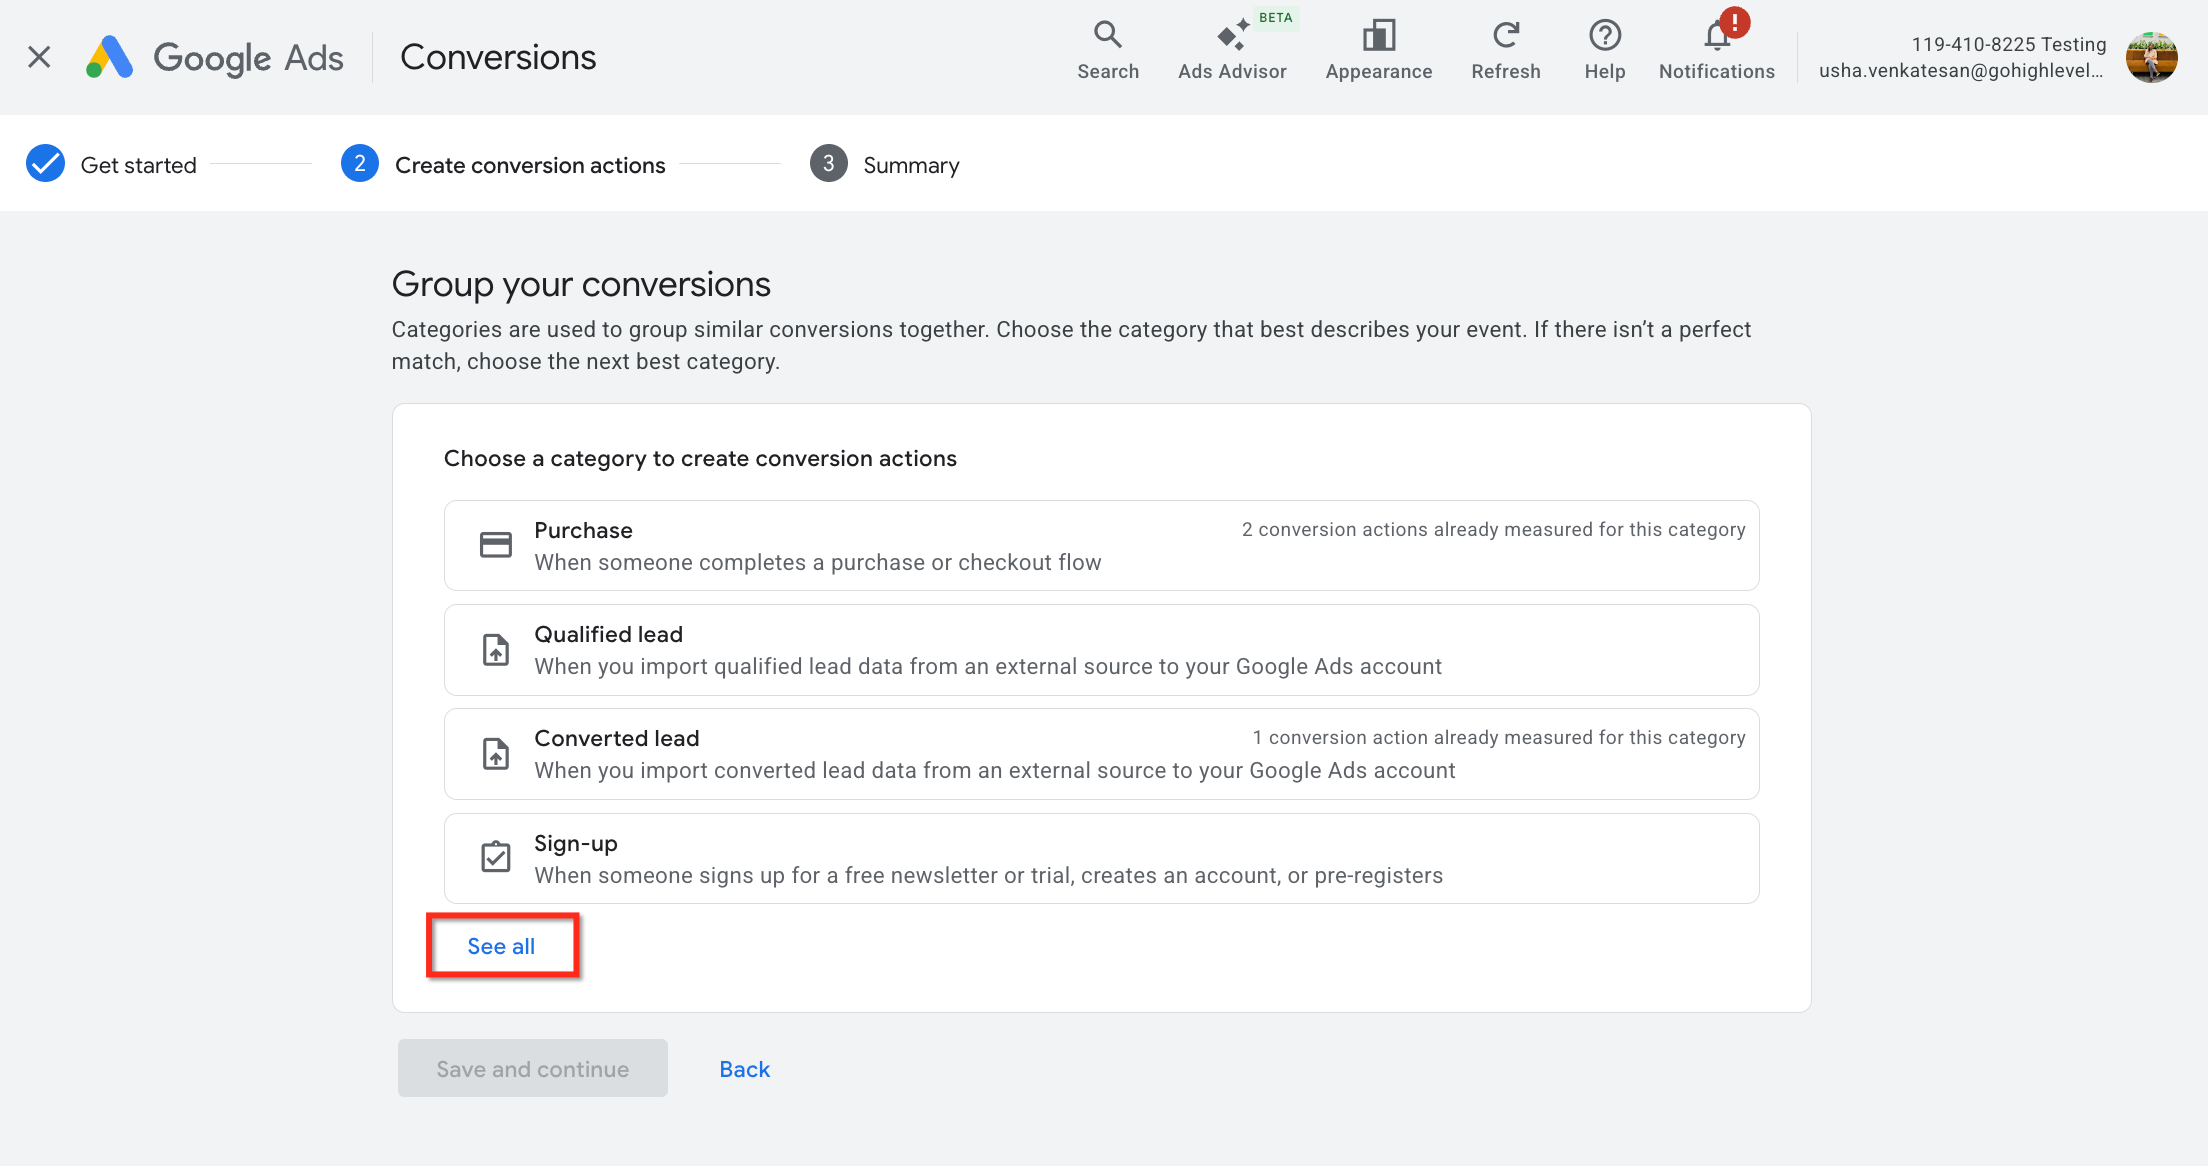
Select a Conversion Category (click See all for the full list) to define what you want to measure, then add a data source to the category.
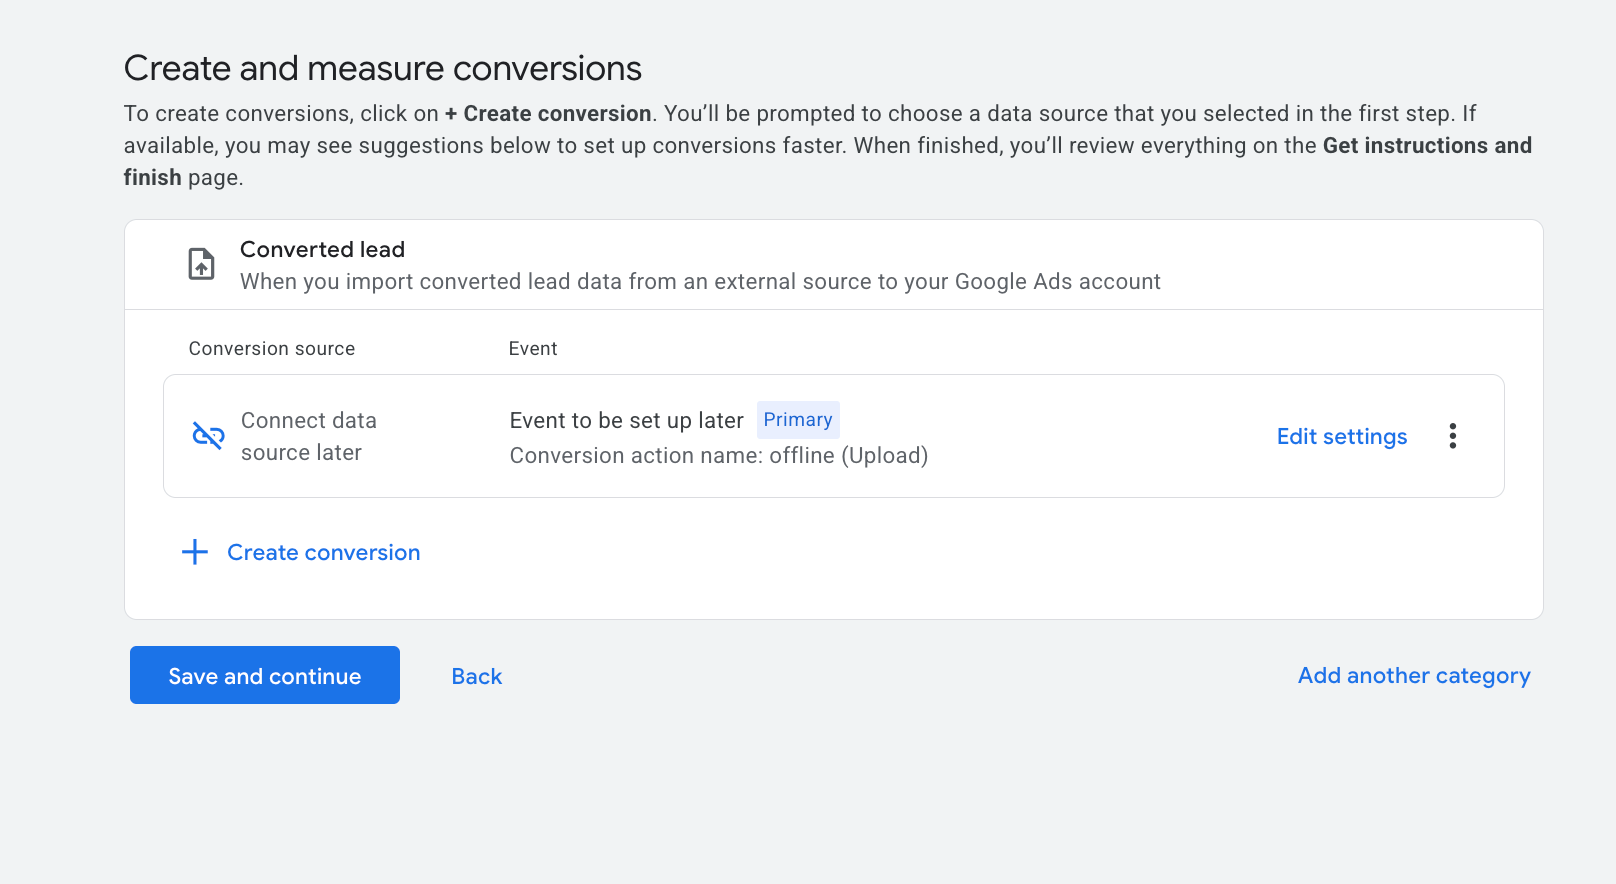
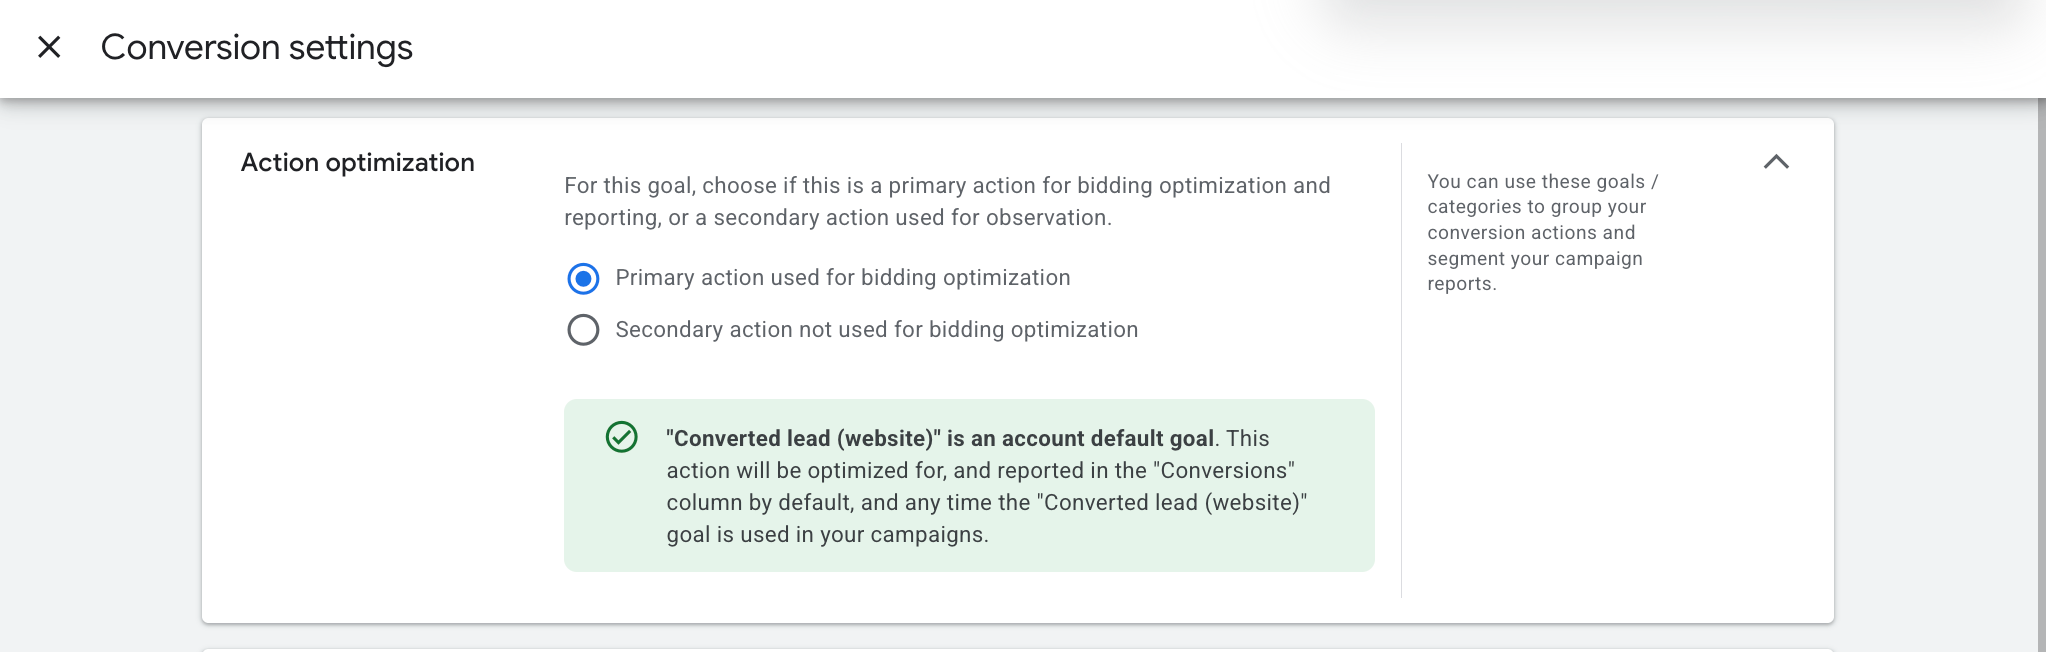
Open Edit settings to define the details. Keep Primary action used for bidding optimization selected, give the conversion a clear name, and copy that name down exactly, you will paste it into the workflow action.

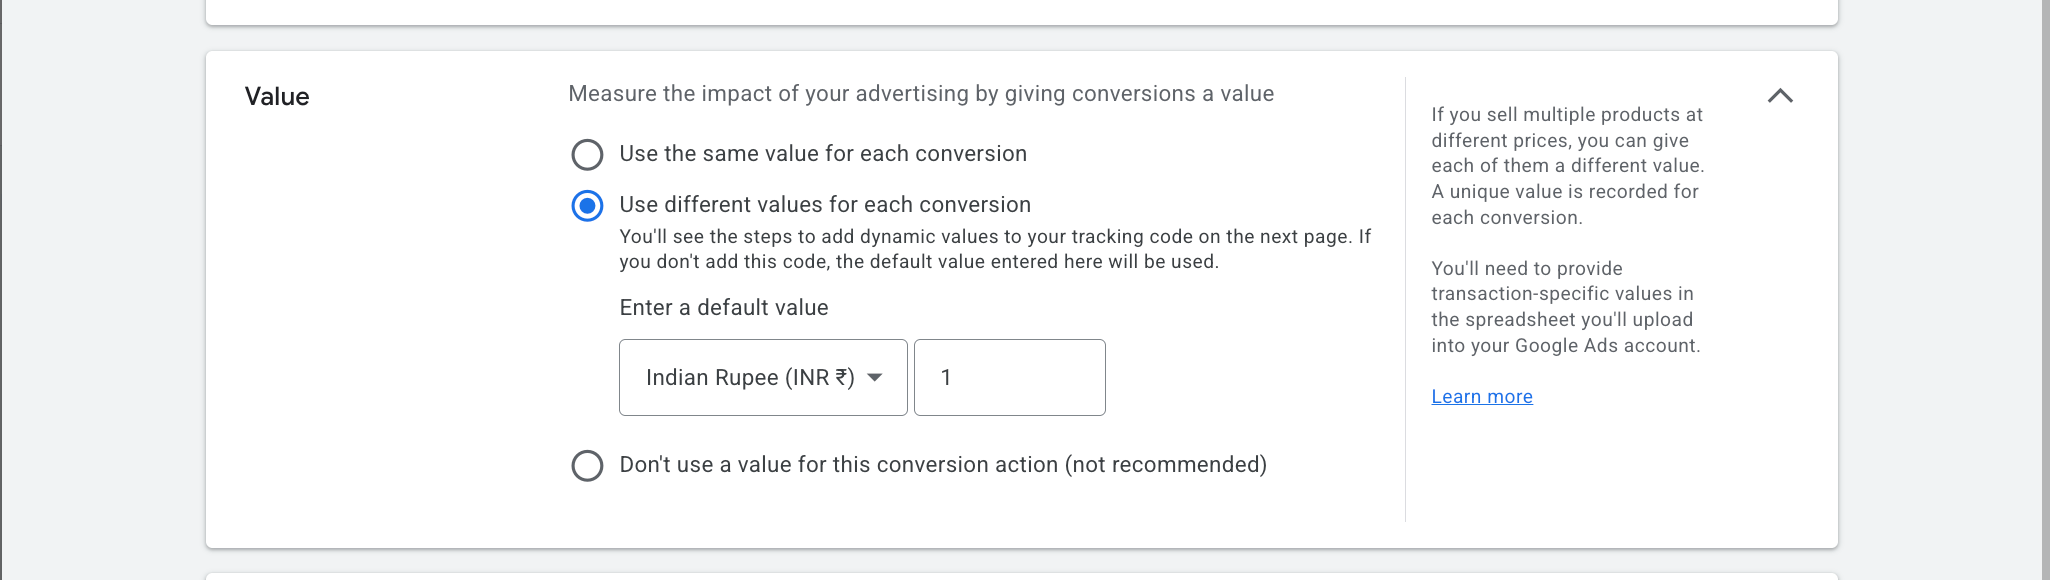
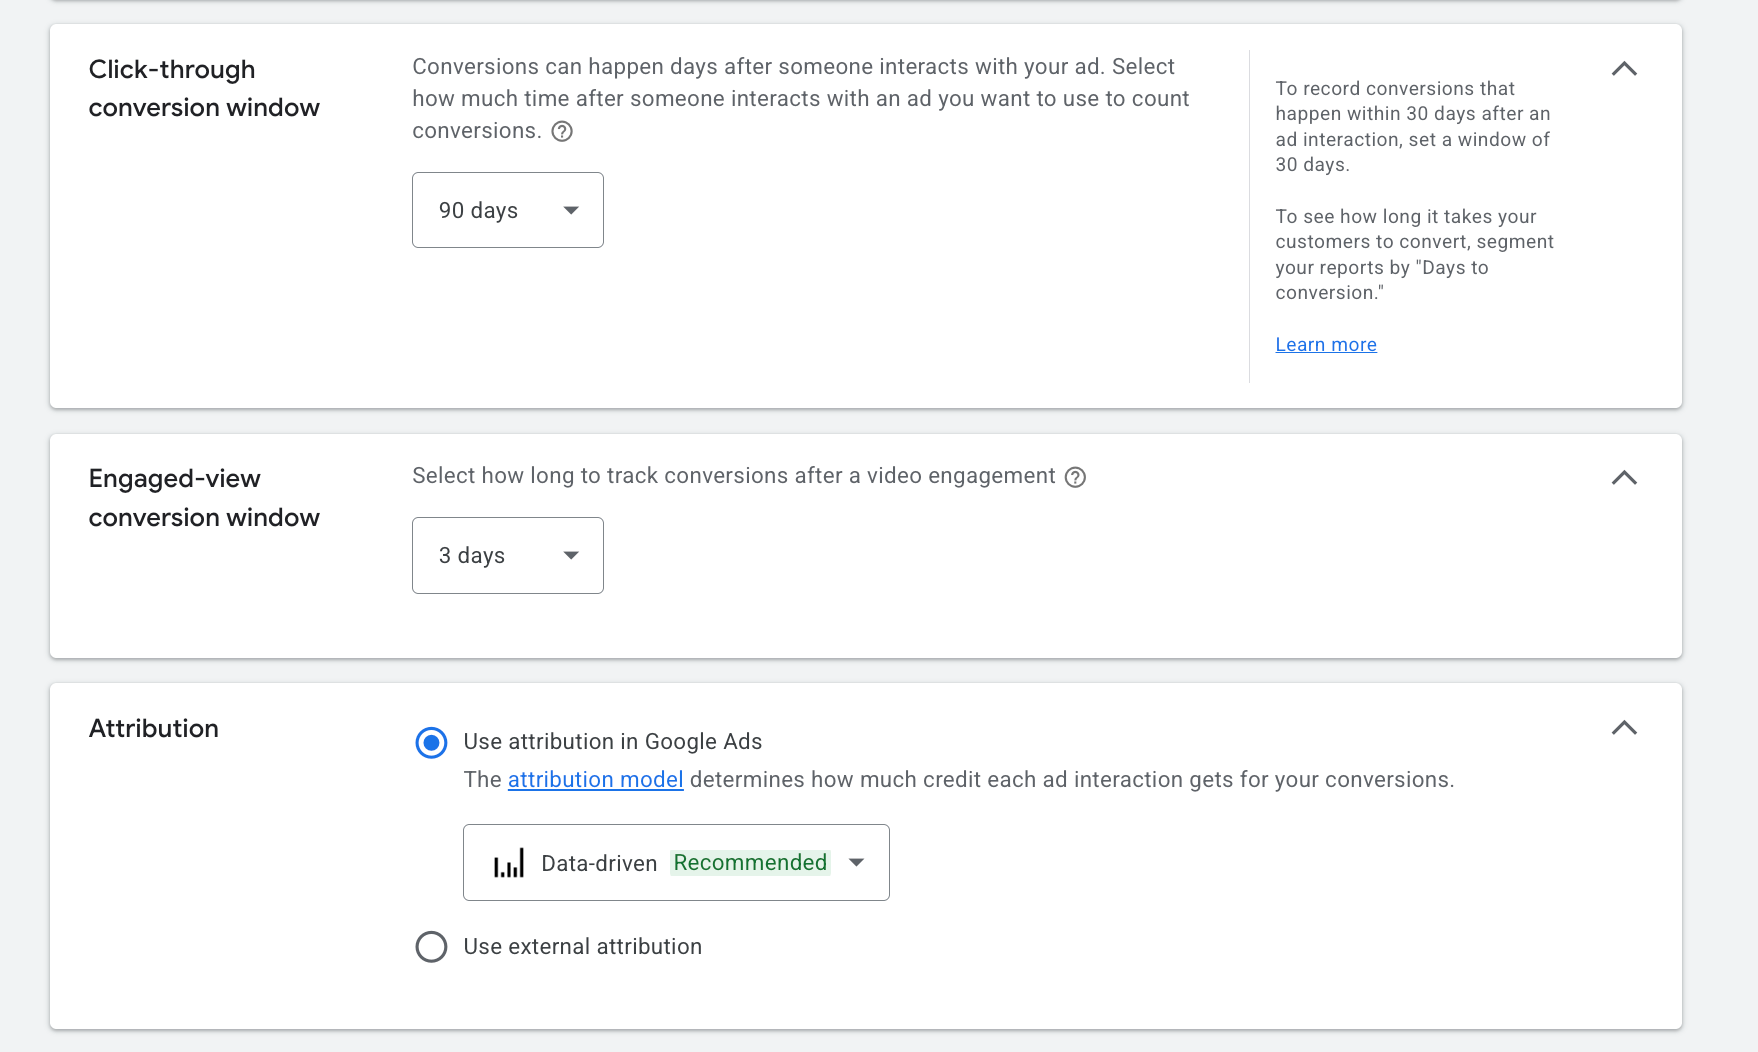
Choose how to value the conversion (same value, different value, or no value), set the Count (use Every for revenue events; see the FAQ), and configure the conversion window and attribution model (for example a 90-day click-through window with Data Driven or Last Click attribution).


Save the settings, create the conversion, and finish.
Configuration fields (in the workflow action):
Field | What to enter |
|---|---|
Action Name | A descriptive label such as "Submit Lead Conversion" or "Book Appointment Conversion." It appears in your workflow logs. |
Conversion | Select or paste the exact conversion name from your Google Ads account. It must match character for character, including capitalization, spacing, and punctuation, or the action is skipped. |
Currency | The currency the conversion value should be attributed in. |
Conversion Value | The amount each conversion is worth in the chosen currency (for example, value a booked consultation at the deposit amount). |
Custom Mapping | Toggle on to manually map Google Ads parameters (GCLID, GBRAID, WBRAID) to specific workflow fields when you need granular control over how the click ID is passed back. |
Inputs and output: The action consumes the trigger event and the contact's stored click ID, then posts an offline conversion to the named Google Ads conversion action. After the workflow runs, check the Execution Logs tab and look for the Add to Google Ads step: Executed means the conversion was sent; Skipped means something was missing, usually an absent GCLID/GBRAID/WBRAID or a mismatched conversion name.
Supported triggers: This action only fires for Form Submission, Order Purchase, Number Pool Calling, Survey Submission, and Chat Widget events.
When to use it (med-spa example): A new patient clicks your Google search ad, books a $99 laser consultation, and pays the deposit. Build a workflow triggered by Order Submitted (or Customer Booked Appointment) with an Add to Google Ads action that selects your "Consultation Deposit" conversion, sets currency to USD, and sets the conversion value to 99. Google Ads now sees which campaigns and keywords produced paying patients and shifts spend toward them.
Notes and gotchas:
The conversion name in the workflow must match Google Ads exactly, or the event is skipped.
If your conversion is set to One per click, GCLID is required; GBRAID and WBRAID only support Many per click tracking.
After a contact arrives with a UTM source and a GCLID/WBRAID/GBRAID, it can take roughly five minutes for the conversion to populate in the workflow dropdown and in Google Ads.
There is no in-builder test for this action; verify using the workflow history and Google Ads conversion reporting. Processing in Google Ads can take a few hours up to 24 to 48 hours depending on volume.
Google Tag Manager is not required for this action.
What it does: Adds the contact running through the workflow to a Facebook (Meta) custom audience, so you can target or build lookalikes from a segment you maintain inside Aesthetix CRM. This requires a connected Facebook account.
Configuration fields:
Field | What to enter |
|---|---|
Facebook Account ID | Select the connected Facebook ad account that owns the audience. |
Facebook Custom Audience ID | Select the specific custom audience the contact should be added to. |
Inputs and output: The action consumes the contact's identifying details (such as email and phone) and adds that contact as a member of the selected custom audience in Meta. Audience membership updates on Meta's side after processing.
When to use it (med-spa example): When a contact's tag is set to "Filler Patient," run a workflow that adds them to a "Filler Patients" custom audience. You can then run a retargeting campaign promoting a touch-up special to exactly that audience, or build a lookalike audience from it to find similar prospects.
Notes and gotchas:
A Facebook account must be connected, and the target custom audience must already exist in Meta so it appears in the selector.
Audience matching depends on the contact details you store; sparse records match fewer audience members.
Meta restricts what an audience can be built around. As of September 2, 2025, Meta flags and blocks audiences that are built from prohibited information, including specific health conditions (for example "arthritis" or "diabetes") and financial-status indicators (for example "credit score" or "high income"). A flagged audience is prevented from being used in new ad campaigns and is blocked from receiving new member additions, which means this action can silently stop adding contacts to a flagged list, and delivery and performance degrade over time until the issue is resolved. Med spas should avoid naming or segmenting audiences around a specific condition or treatment in a way that signals sensitive health information. If an audience is flagged, you cannot edit it clean; Meta's guidance is to remove the non-permitted information and create a new audience (and for lookalikes, fix the underlying seed audience). Affected advertisers receive in-product notifications and can request a review through Meta.
What it does: Removes the contact running through the workflow from a Facebook (Meta) custom audience. It is the inverse of the Add to Custom Audience action and is used to keep an audience current, for example dropping someone once they no longer fit the segment or once they convert. This requires a connected Facebook account.
Configuration fields:
Field | What to enter |
|---|---|
Facebook Account ID | Select the connected Facebook ad account that owns the audience. Only ad accounts on the connected Facebook integration appear here. |
Facebook Custom Audience ID | Select the specific custom audience the contact should be removed from. The dropdown lists the custom audiences that exist on the chosen ad account, so the target audience must already exist in Meta. |
There is no matching or hashing toggle to configure; Meta matches the contact to the audience using the identifying details described below, the same way the Add action does.
Inputs and output: The action consumes the contact's identifying details (such as email and phone). It outputs a removal request that drops that contact from the selected custom audience in Meta. Membership updates on Meta's side after processing rather than instantly, so a removed contact can still appear in the audience briefly until Meta finishes reconciling.
When to use it (med-spa example): When a lead finally books and pays for their first treatment, run a workflow triggered by Order Submitted or Customer Booked Appointment that removes them from your "Cold Leads" prospecting audience, so you stop spending acquisition budget showing first-visit offers to someone who is already a patient. Pair it with the Add to Custom Audience action to move them into a "Patients" audience for loyalty or rebooking campaigns. The same pattern works for unsubscribes: when a contact opts out, remove them from your active retargeting audiences.
Notes and gotchas:
A Facebook account must be connected, and the target custom audience must already exist in Meta, or it will not appear in the selector.
The contact is only removed if they were a member of the audience; the action has no effect on contacts who were never added, and it cannot remove a contact Meta could not match in the first place.
Removal depends on the same identifying details Meta used to match the contact on the way in. If a record is sparse or the email and phone differ from what was originally added, Meta may not find the member to remove.
Meta enforces data restrictions on custom audiences, and those restrictions can interfere with keeping an audience clean. As of September 2, 2025, Meta flags and blocks audiences built from prohibited information, including specific health conditions (for example "arthritis" or "diabetes") and financial-status indicators (for example "credit score" or "high income"). A flagged audience is prevented from being used in new ad campaigns, is blocked from receiving new member additions, and sees reduced delivery and performance over time until the issue is resolved. For a med spa this matters because audiences segmented around a specific condition or treatment can trip these rules. A flagged audience cannot simply be edited clean; Meta's guidance is to remove the non-permitted information and build a new audience (and for lookalikes, fix the underlying seed audience), so plan to rebuild rather than rely on this action to scrub a flagged list. Advertisers who are affected receive in-product notifications and can request a review through Meta if they believe an audience was flagged in error.
What it does: Sends web and offline events directly from Aesthetix CRM's servers to Facebook (Meta) through the Conversions API, bypassing the limitations that third-party blockers on iOS, Chrome, and ad blockers place on browser-based pixel tracking. This gives Meta more complete conversion data to optimize your campaigns. This requires a connected Facebook account along with a Pixel and a Conversions API access token.
Configuration fields:
Field | What to enter |
|---|---|
Connection Type | Select how the action connects to Meta (the available connection type for your setup). |
Access Token | The Conversions API access token. Generate it in Facebook Business Manager: open the Conversions API section of your pixel/dataset settings and select Generate Access Token, then paste it here. A brand-new business page may need to complete its "Social issue, electoral or political ads" settings and confirm identity before a token can be generated. |
Pixel ID | The Pixel (dataset) ID, found under the detail section of your data source in Facebook Business Manager. |
Facebook Event Name | Choose one of the provided standard event names (for example Lead, Schedule, Purchase). |
Value | The monetary value associated with the selected event. |
Currency | The currency for the value. |
Test Code | The test event code from Business Manager (Data Sources > select your pixel > Test Events). Use it only while testing; once you confirm events arrive, remove the code and save the workflow again so live events are not flagged as test traffic. |
Inputs and output: The action consumes the trigger event plus the contact's details and posts a server-side conversion event to your Meta pixel/dataset via the Conversions API. While a test code is present, events appear in the Test Events view in Business Manager; with the test code removed, events flow into your live pixel data.
When to use it (med-spa example): A patient books and pays a deposit for a $1,200 laser package after clicking a Facebook ad. Build a workflow triggered by Customer Booked Appointment (the booking-widget trigger) or a paid-order trigger, then add a Meta Conversion API action with the Purchase event, value 1200, and currency USD. Meta receives a reliable server-side purchase signal even if the browser pixel was blocked, improving attribution and ad optimization.
Notes and gotchas:
A workflow needs both a trigger and an action to be published; you can only save (not publish) an action-only or trigger-only workflow.
Do not use the in-builder Test Workflow button to validate the Conversions API. Save, publish, and test with a real input trigger: Form Submission, Survey Submission, Appointment Submission from the booking widget, or a 2-step order form.
For appointments, this only works with the Customer Booked Appointment trigger, not the general Appointment trigger, because the booking-widget trigger is what carries the event data.
A lead value is required if you use the Purchase event; for other events it can be left blank.
Remove the test code before relying on live data, or your real conversions will be recorded as test events.
Meta restricts what custom conversions can be built around. As of September 2, 2025, Meta flags and blocks conversions that contain prohibited information, including specific health conditions (for example "arthritis" or "diabetes") and financial-status indicators (for example "credit score" or "high income"). A flagged conversion is prevented from being used in new ad campaigns and stops matching, so the campaign stops receiving new conversion data even though this action keeps sending events. You cannot modify the conversion inside a running campaign; Meta's guidance is to create a new conversion without the prohibited information and, for an existing campaign, duplicate it with the new conversion. For a med spa, keep event names and any custom conversions generic (Lead, Schedule, Purchase) rather than tying them to a sensitive condition or treatment. Affected advertisers receive in-product notifications and can request a review through Meta.
What it does: Generates a marketing audit report for the contact or account moving through the workflow, producing an AI-assisted summary of marketing performance or readiness that can be delivered as part of an automated follow-up. Use it to turn a lead's submitted details into a tailored report without manual work. Because this is an AI/marketing action, confirm the exact inputs and output format against the live builder.
Configuration fields (verify against the live builder):
Field | What to enter |
|---|---|
Action Name | A label for the step in your workflow logs. |
Report inputs | The contact fields or submitted data the audit should analyze (for example, website, business details, or form answers). |
Output / delivery | Where the generated report is stored or returned (for example, written to a contact field or attached for use in a later email or SMS step). |
Inputs and output: The action consumes the contact's details and the data captured by the trigger, then produces a generated audit report as its output for use in subsequent workflow steps.
When to use it (med-spa example): A prospective patient fills out a "Free Marketing Audit" lead magnet form on your med spa's site. Trigger a workflow on Form Submitted, run Generate Marketing Audit Report to build a personalized audit from their answers, then follow with an email action that delivers the report, turning a lead magnet into an automated, high-value touchpoint.
Notes and gotchas:
The fields and output behavior above are authored from the action name and should be confirmed against the live builder before publishing customer-facing guidance.
Any channel or AI capability the report depends on must be enabled on your sub-account.
Do I need to connect anything before these actions work? Yes. Each Marketing action depends on its channel being connected under Settings > Integrations: Google for Analytics and Ads, and Facebook for the custom audience and Conversions API actions. If the channel is not connected, the action has nothing to send to or its dropdowns are empty.
Why does my Add to Google Ads action say "Skipped" in the logs? The contact is missing a valid GCLID, GBRAID, or WBRAID from a real Google ad click, or the conversion name in the action does not exactly match the one in Google Ads. Even a small difference in spelling, spacing, or capitalization will skip the event.
Should I set the Google Ads conversion Count to Every or One? Use One for lead-generation events so a repeat submission does not inflate counts, and Every for revenue events like purchases.
Why aren't my conversions showing up right away? Processing latency is normal. It can take about five minutes for a conversion to populate in the workflow and in Google Ads, and Google Ads reporting can lag a few hours up to 24 to 48 hours. Meta events may also take time to appear outside the Test Events view.
Can I test the Meta Conversion API with the Test Workflow button? No. Save and publish the workflow and test with a real input trigger such as a form submission, survey submission, or a booking-widget appointment. Remove the test code once you confirm events are arriving so live conversions are not recorded as test traffic.
What's the difference between GCLID, GBRAID, and WBRAID? GCLID is the standard click identifier for web tracking. GBRAID and WBRAID are used in privacy-focused environments, mainly iOS and Android app campaigns. Only "many per click" conversions accept GBRAID and WBRAID; "one per click" conversions require GCLID.
Do I need Google Tag Manager for these actions? No. The Marketing actions send data through connected integrations and APIs and do not require Google Tag Manager, though GTM can still be useful for additional client-side tracking.
