Contact triggers are the events that start a workflow based on something happening to a contact in Aesthetix CRM. When the event you choose occurs, the contact is enrolled into the workflow and your automation runs. This reference covers every contact-based workflow trigger in one place: what each one fires on (down to the edge cases), every filter and configuration option it exposes, the contact and event data it makes available to later steps, when you would use it in a med spa, and the limits and gotchas that commonly trip people up.
Read each trigger's Data made available section closely. When a trigger fires, the contact it fired for becomes the workflow's primary contact, and that contact's full field set becomes available to every downstream action as merge fields (also called custom values). Some triggers also expose event-specific data, for example the note body for Note Added or the task details for Task Reminder. Knowing exactly what is available is what lets you chain steps correctly.
Every trigger is added the same way, so this is described once here and not repeated under each trigger below.
Go to Marketing > Workflows.
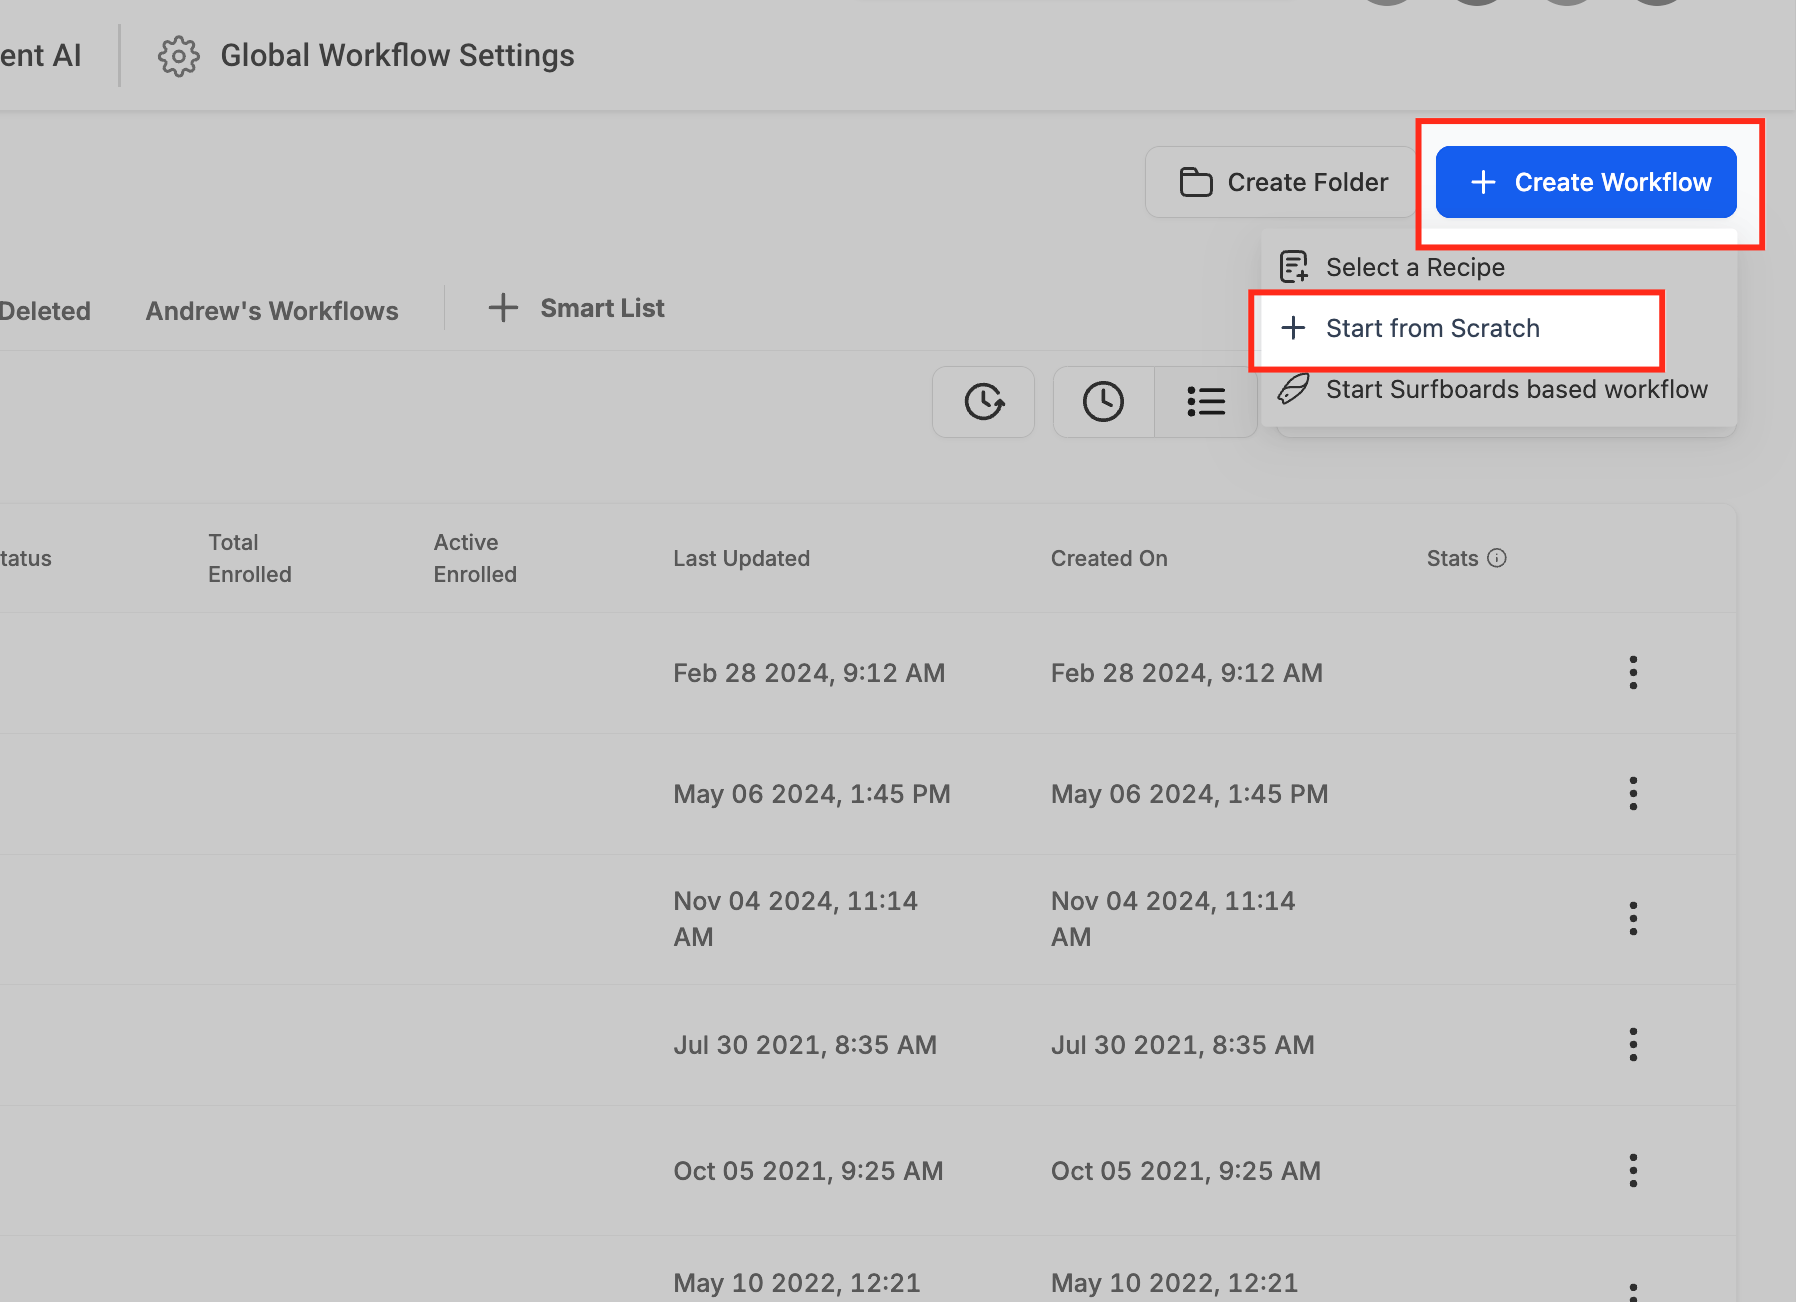
Click Create Workflow and choose Start from Scratch, or open an existing workflow to edit it.
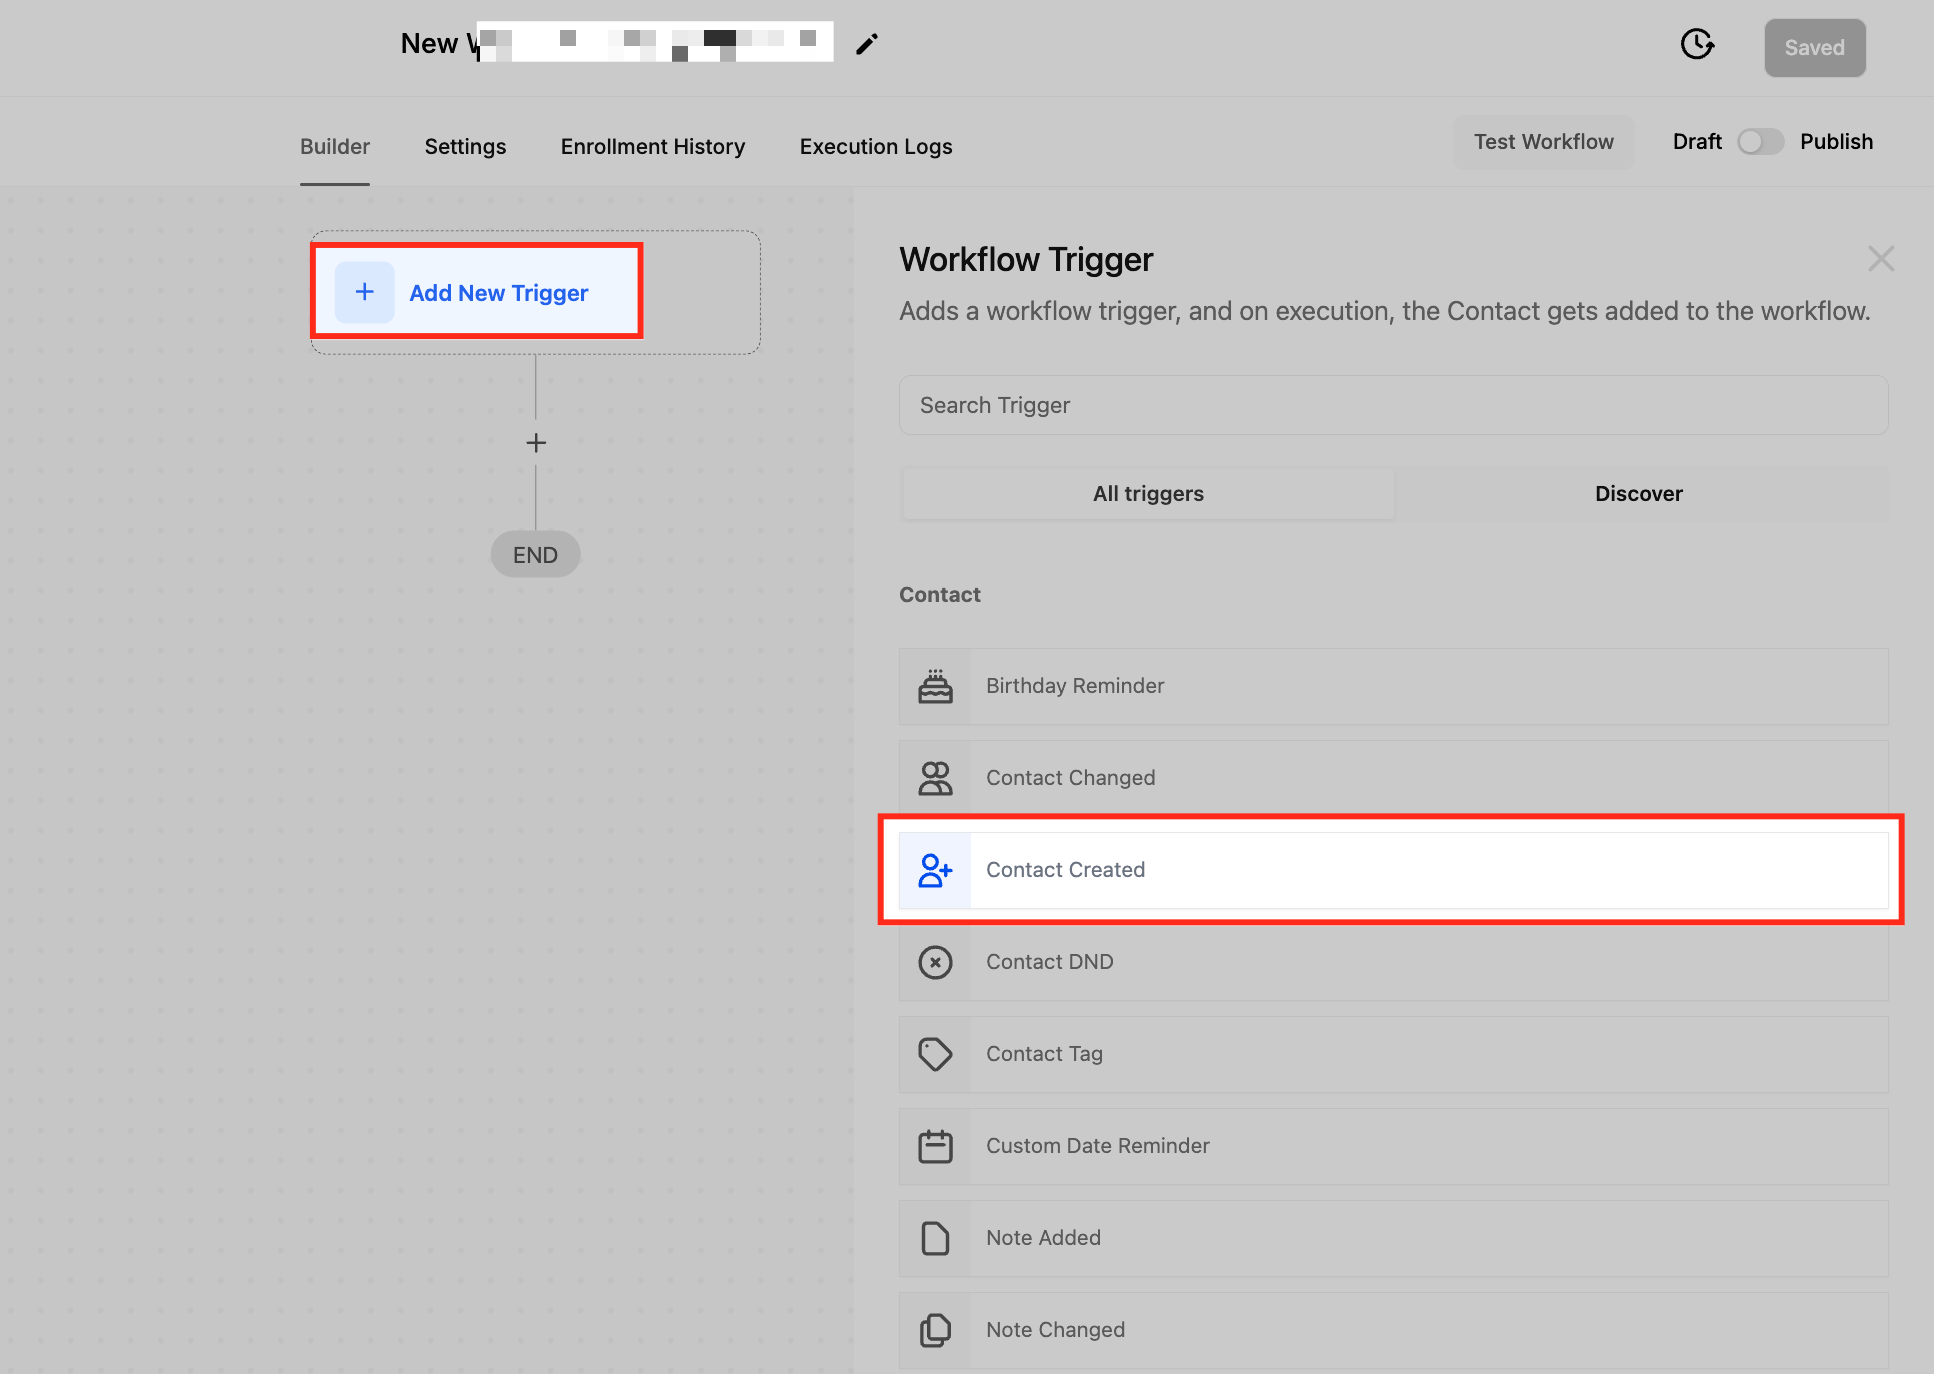
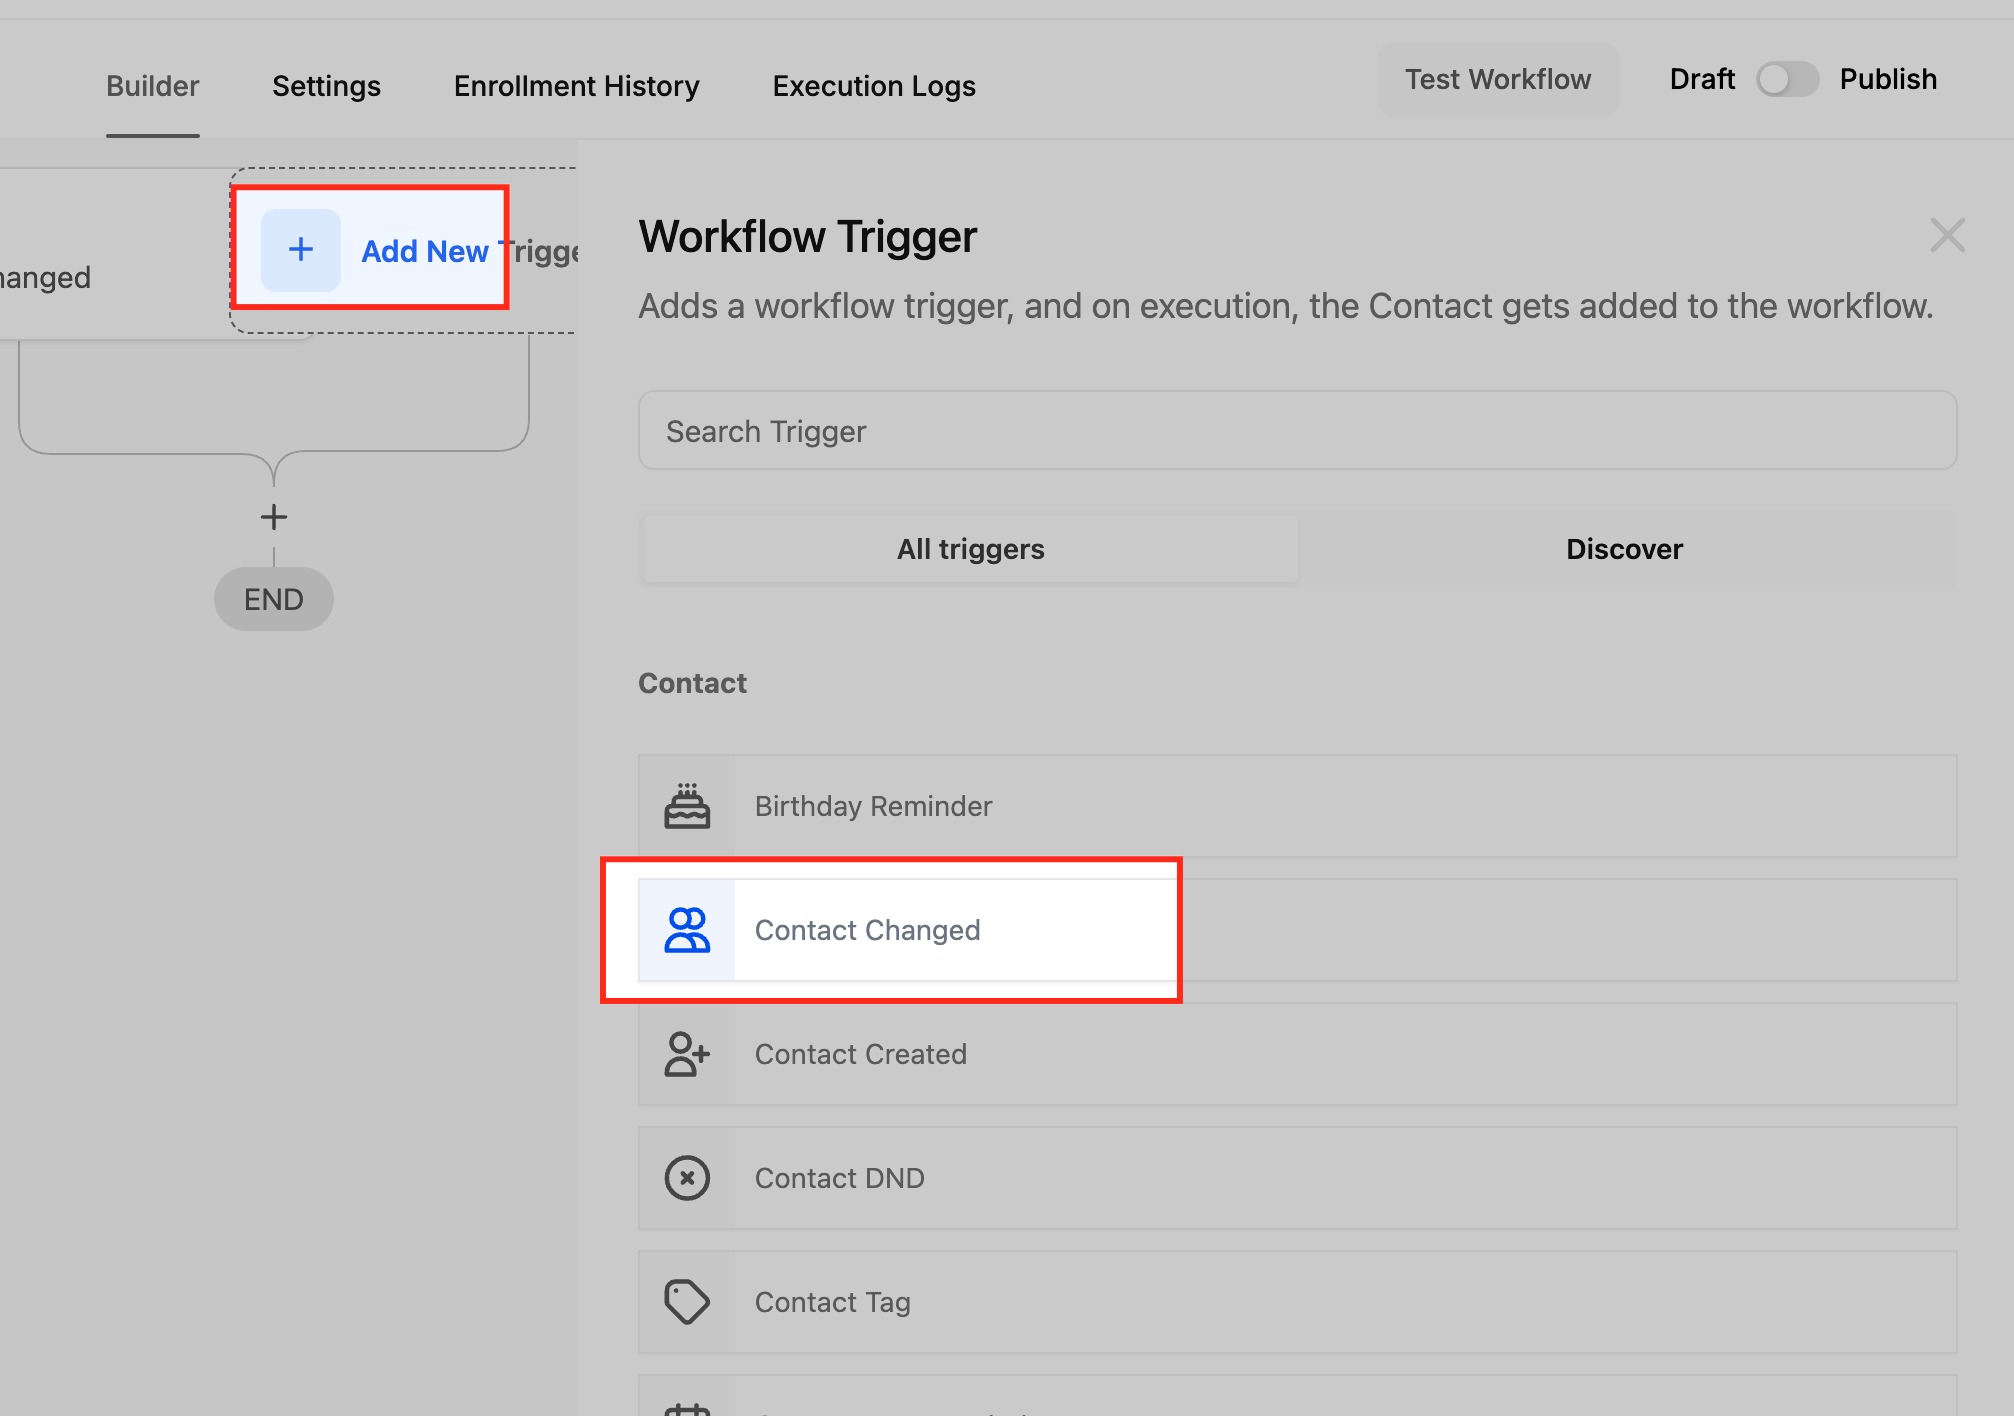
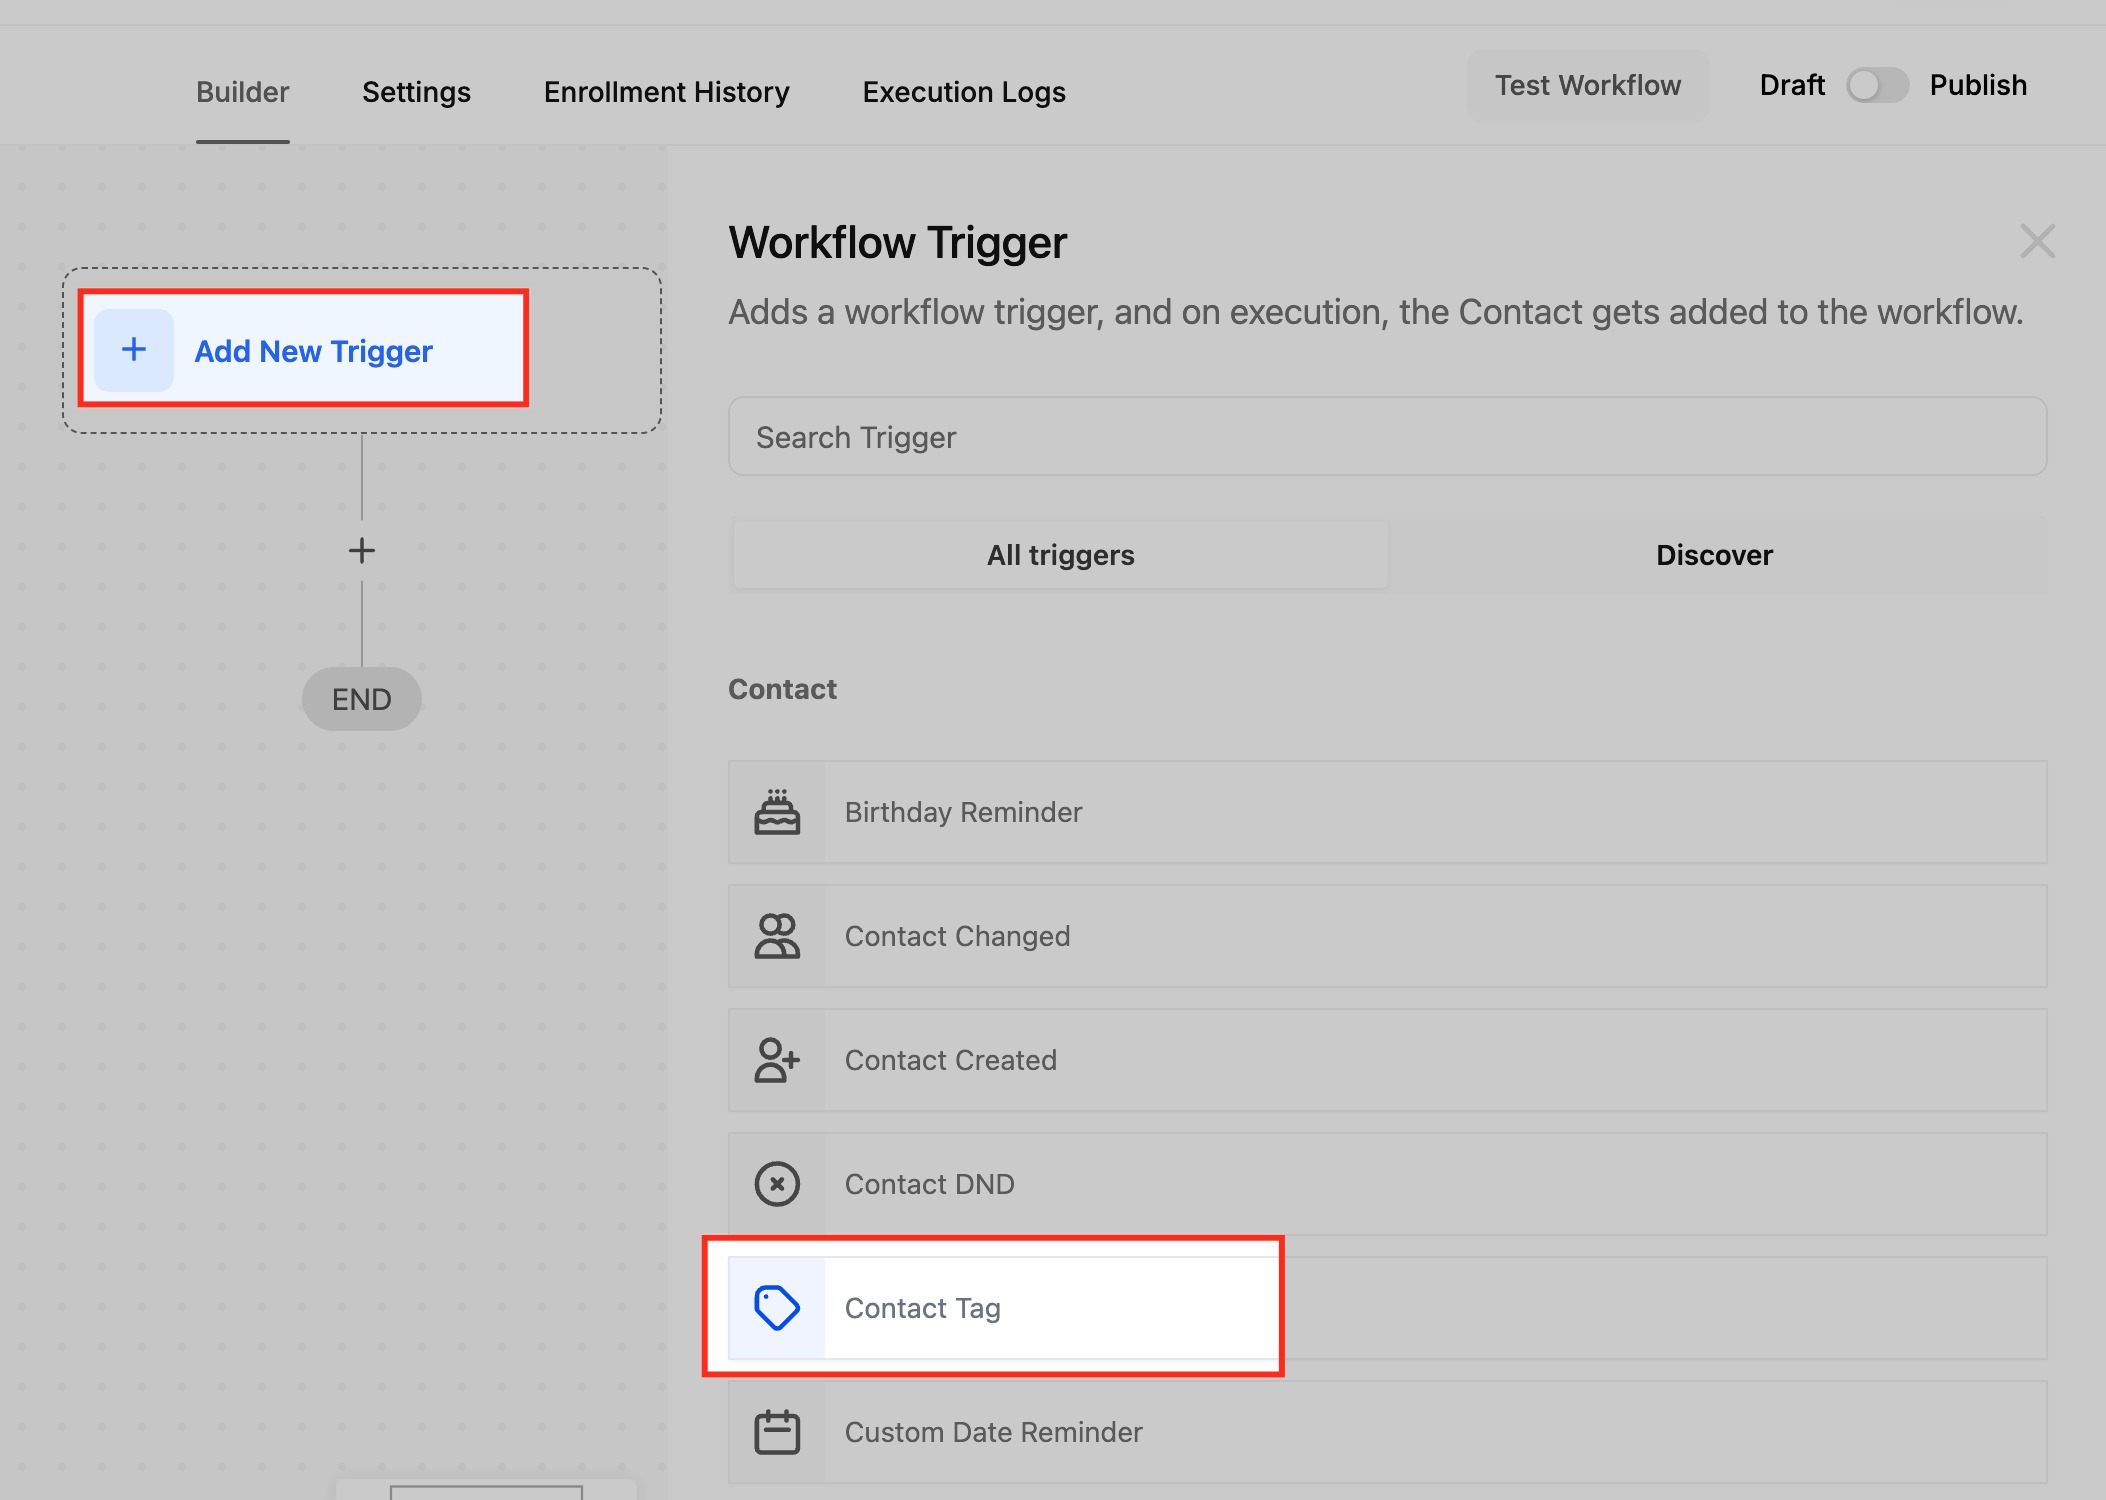
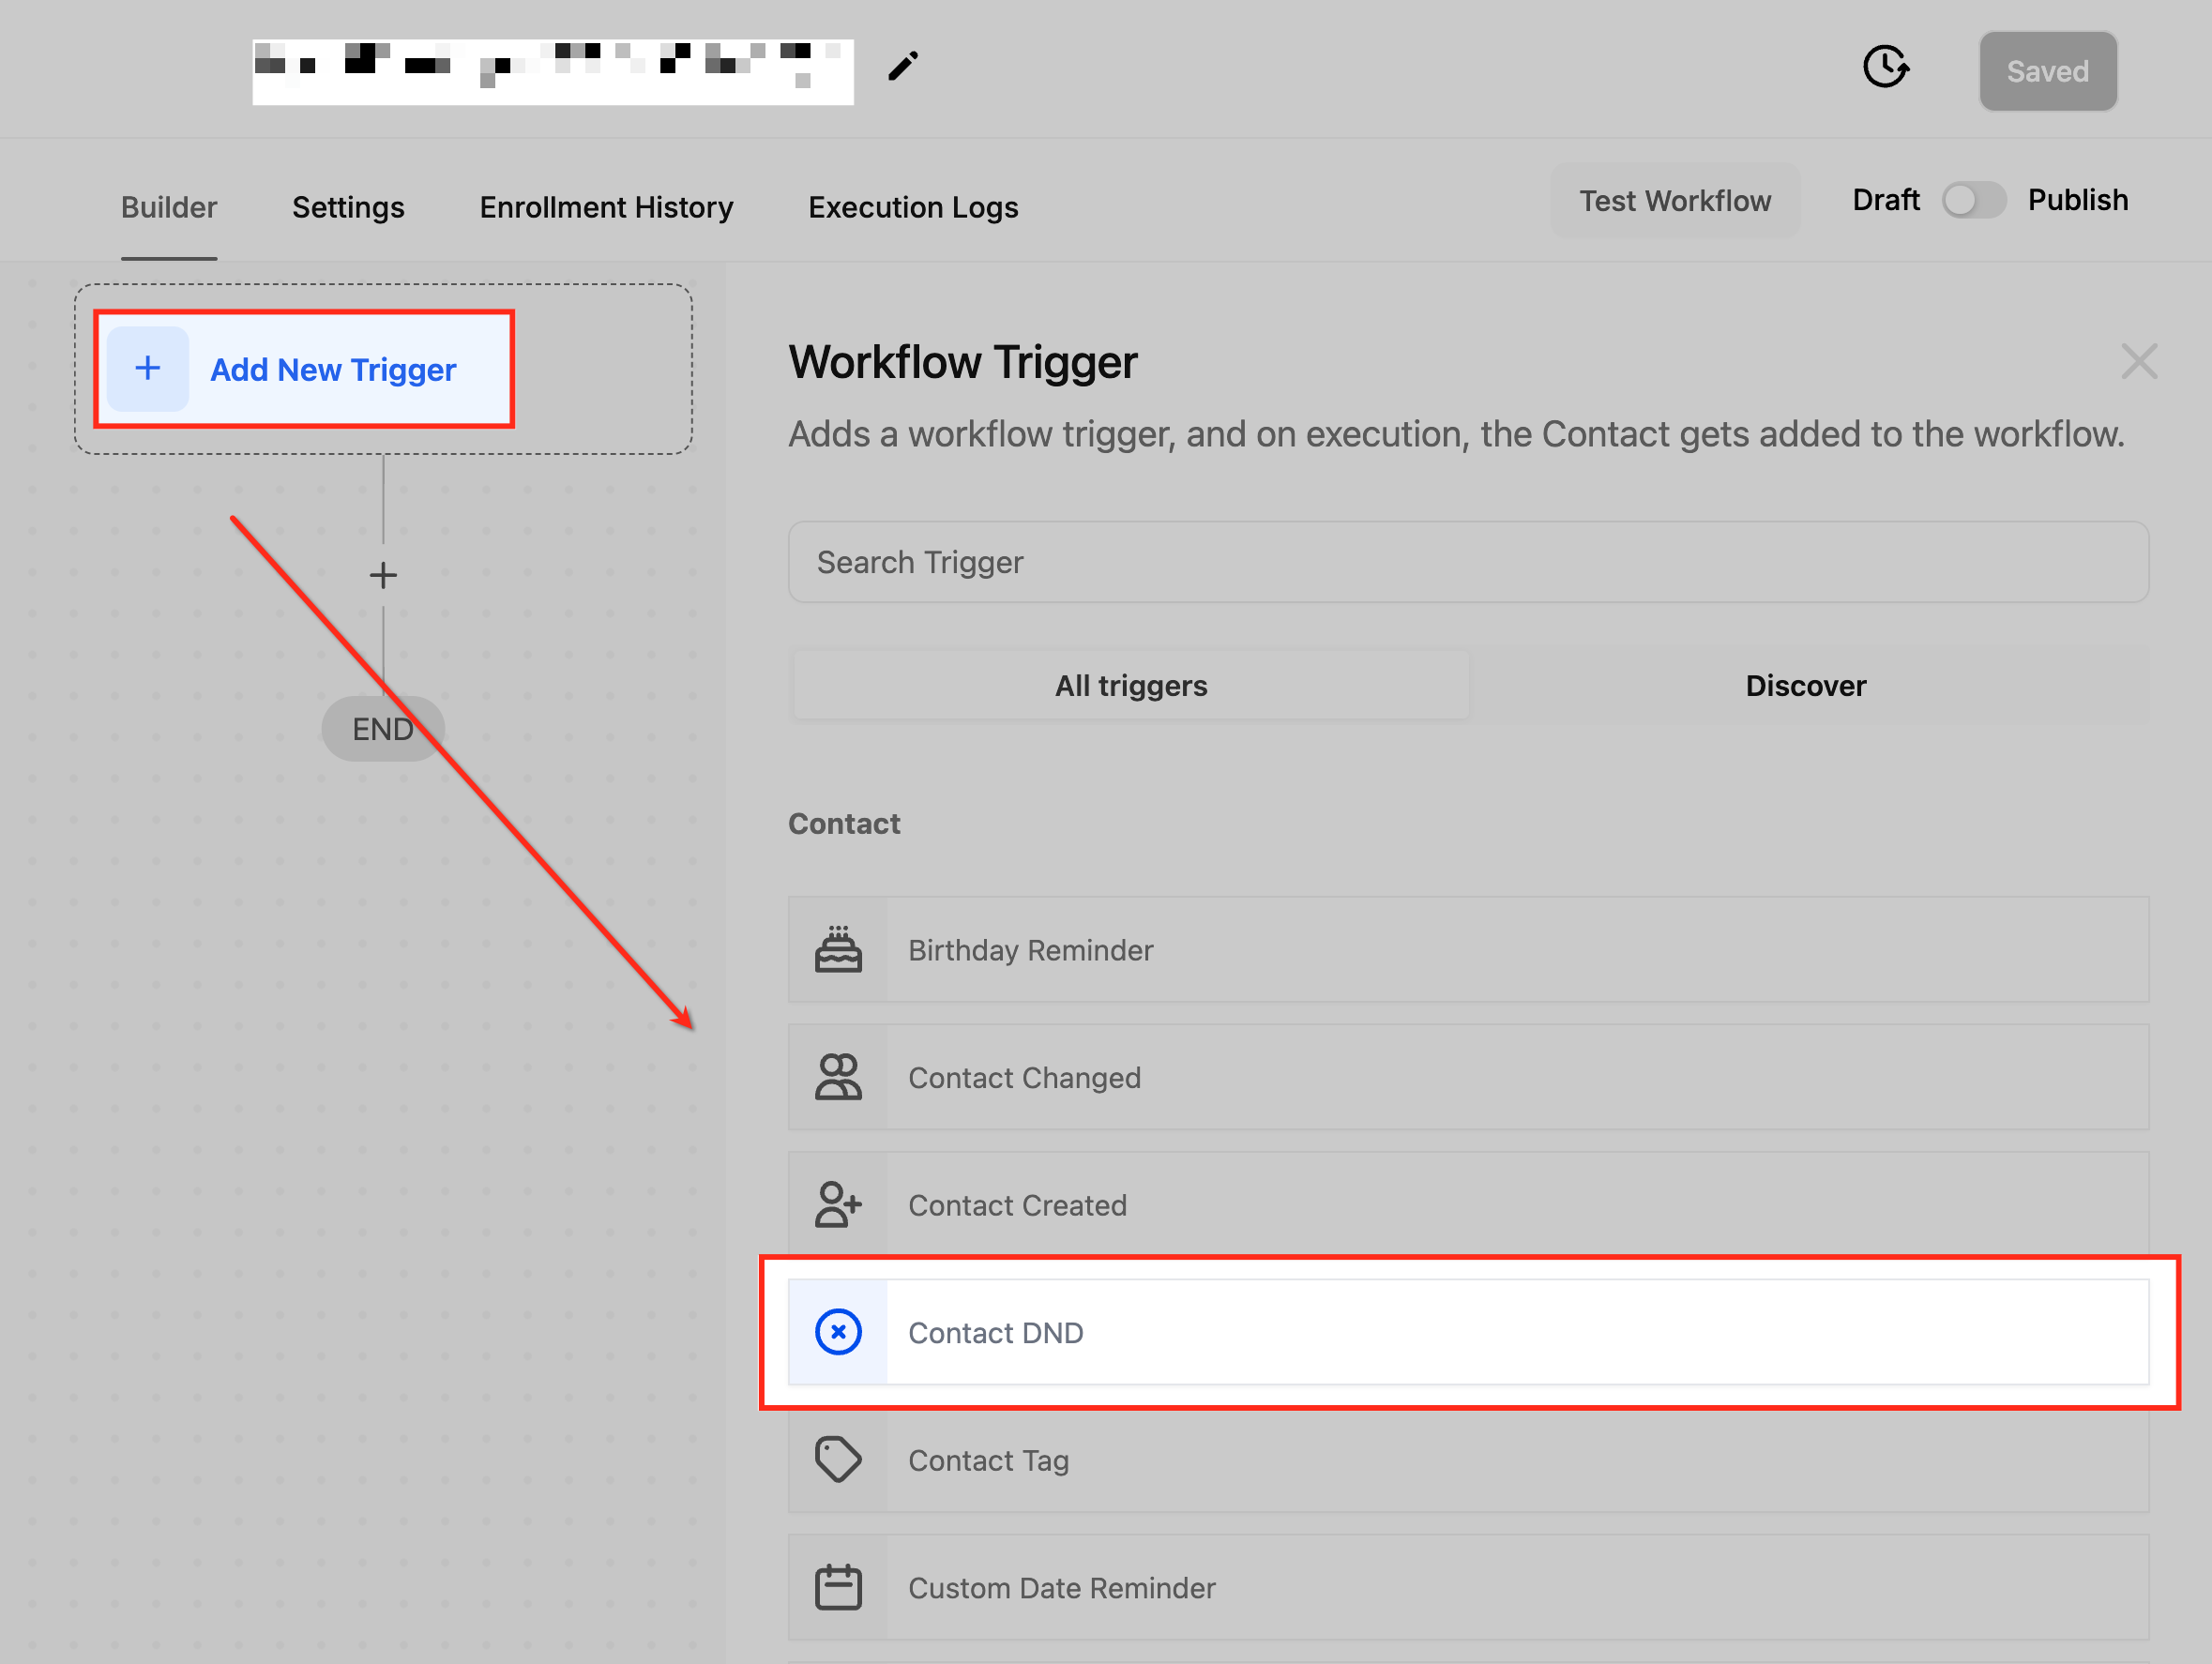
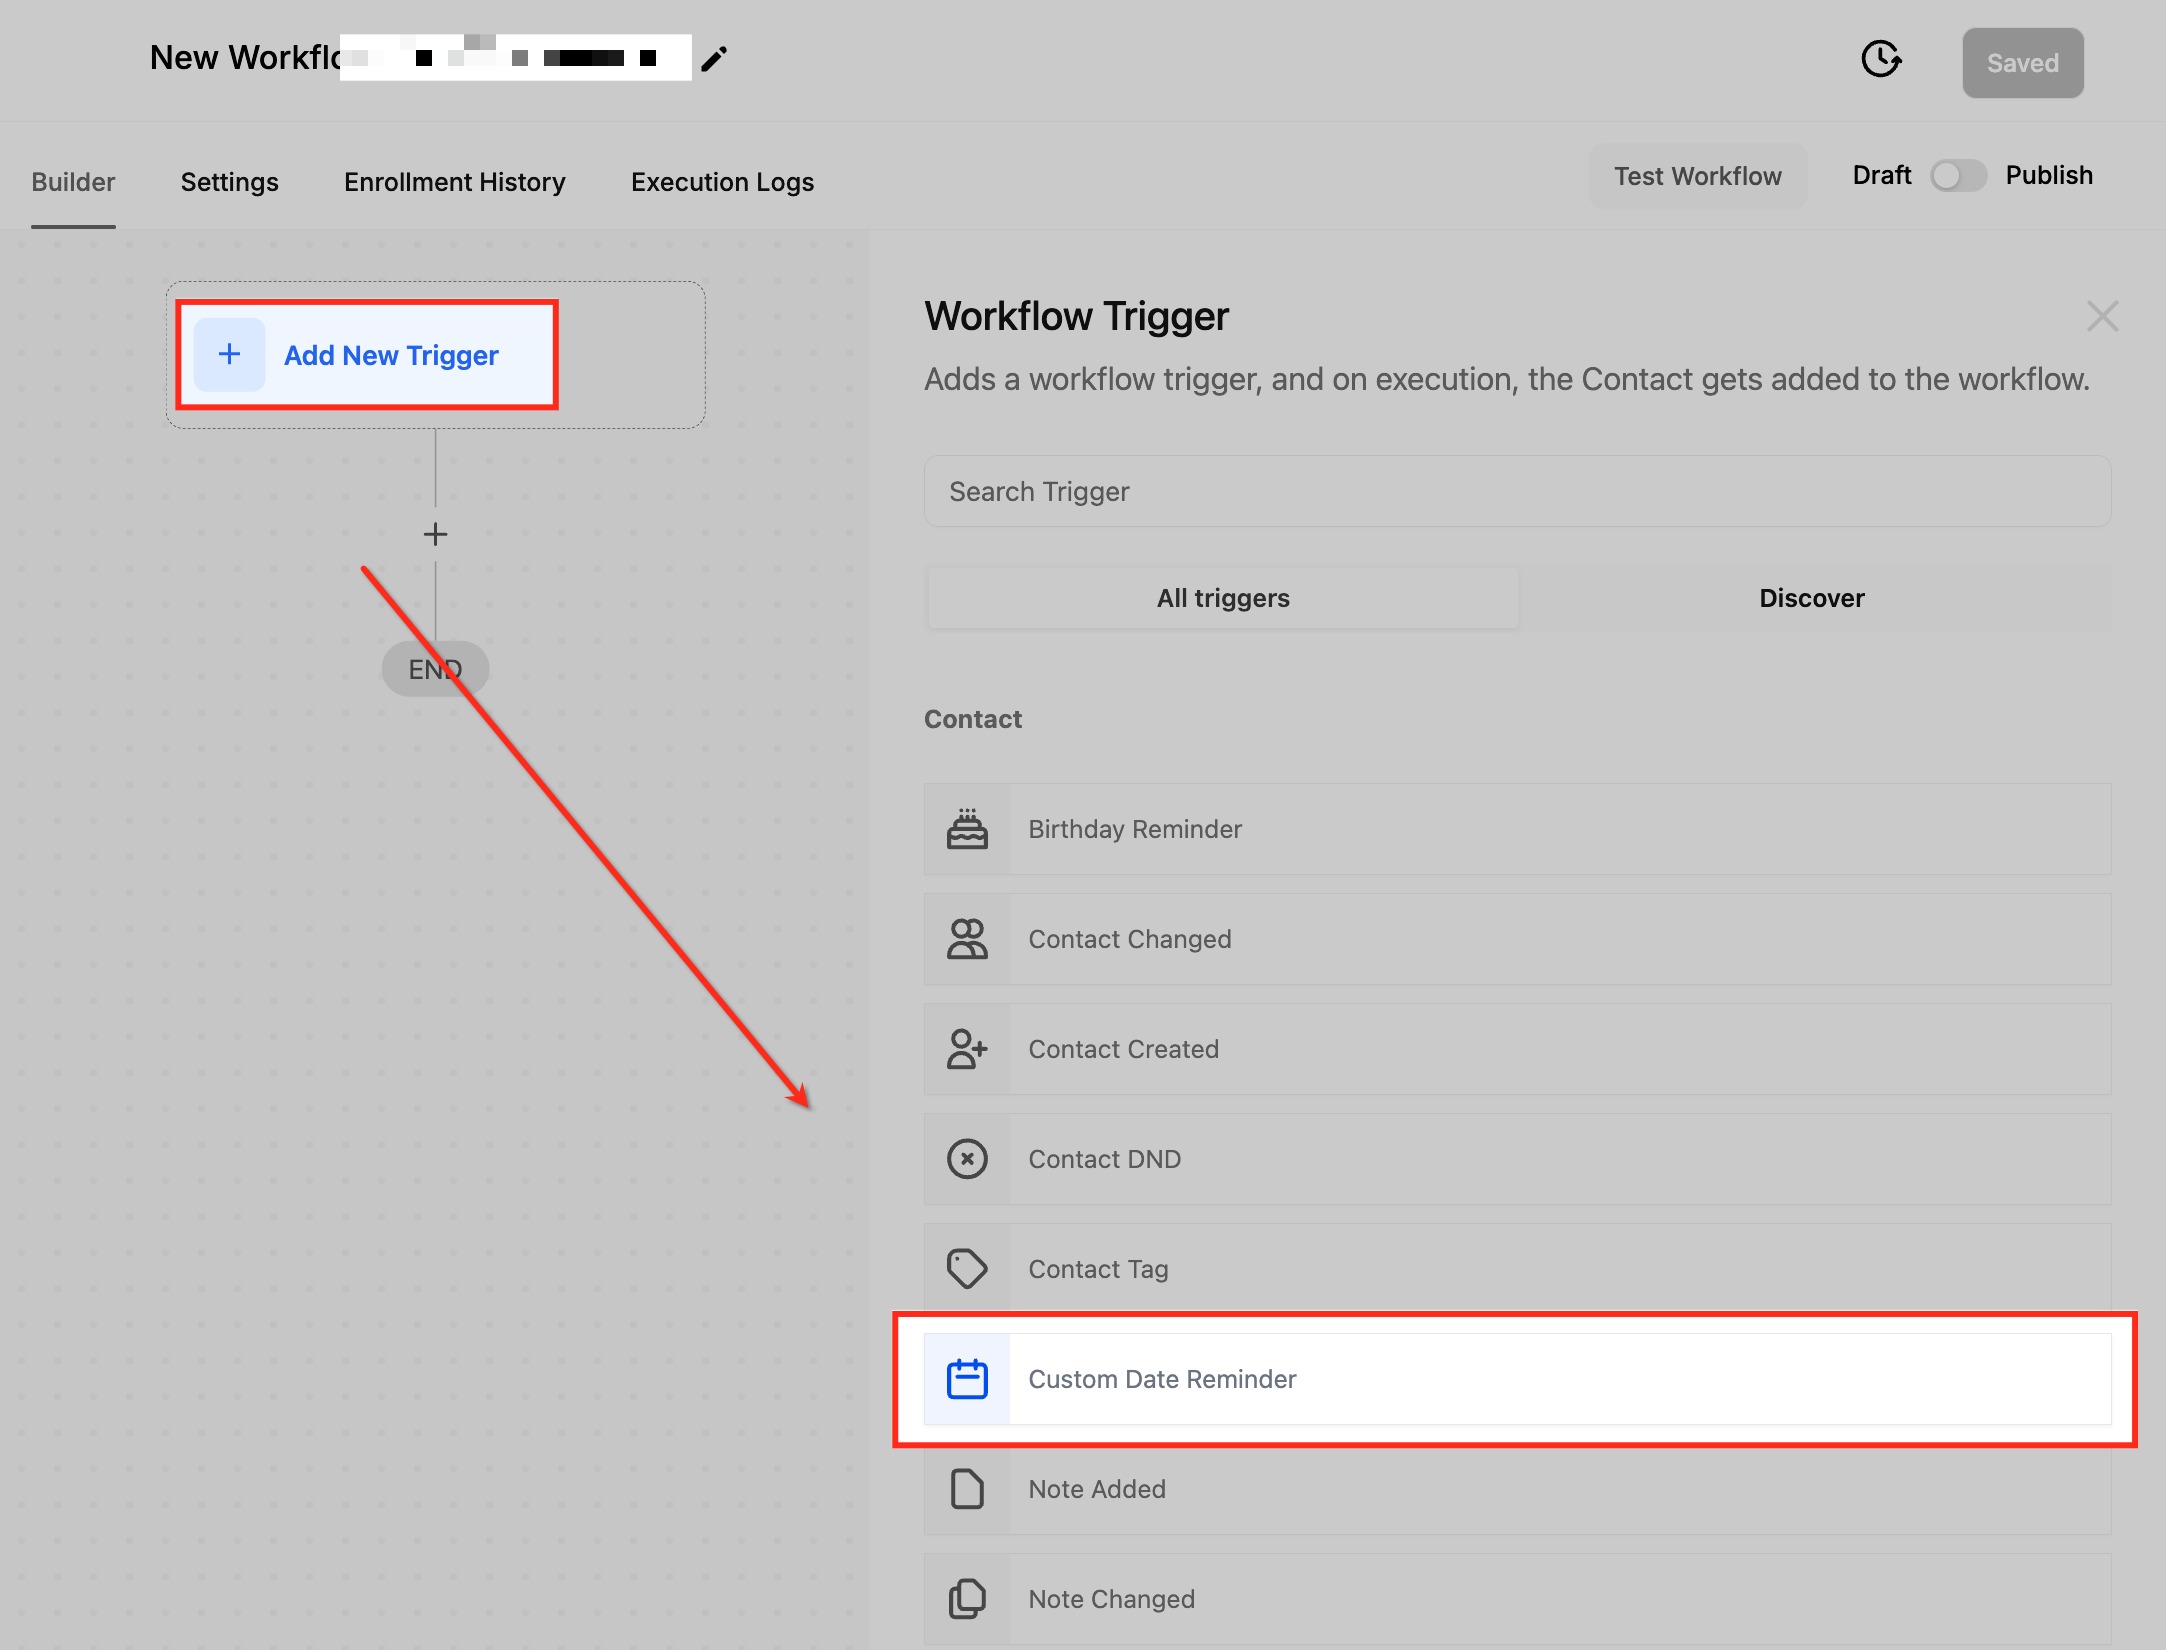
Click Add New Trigger.
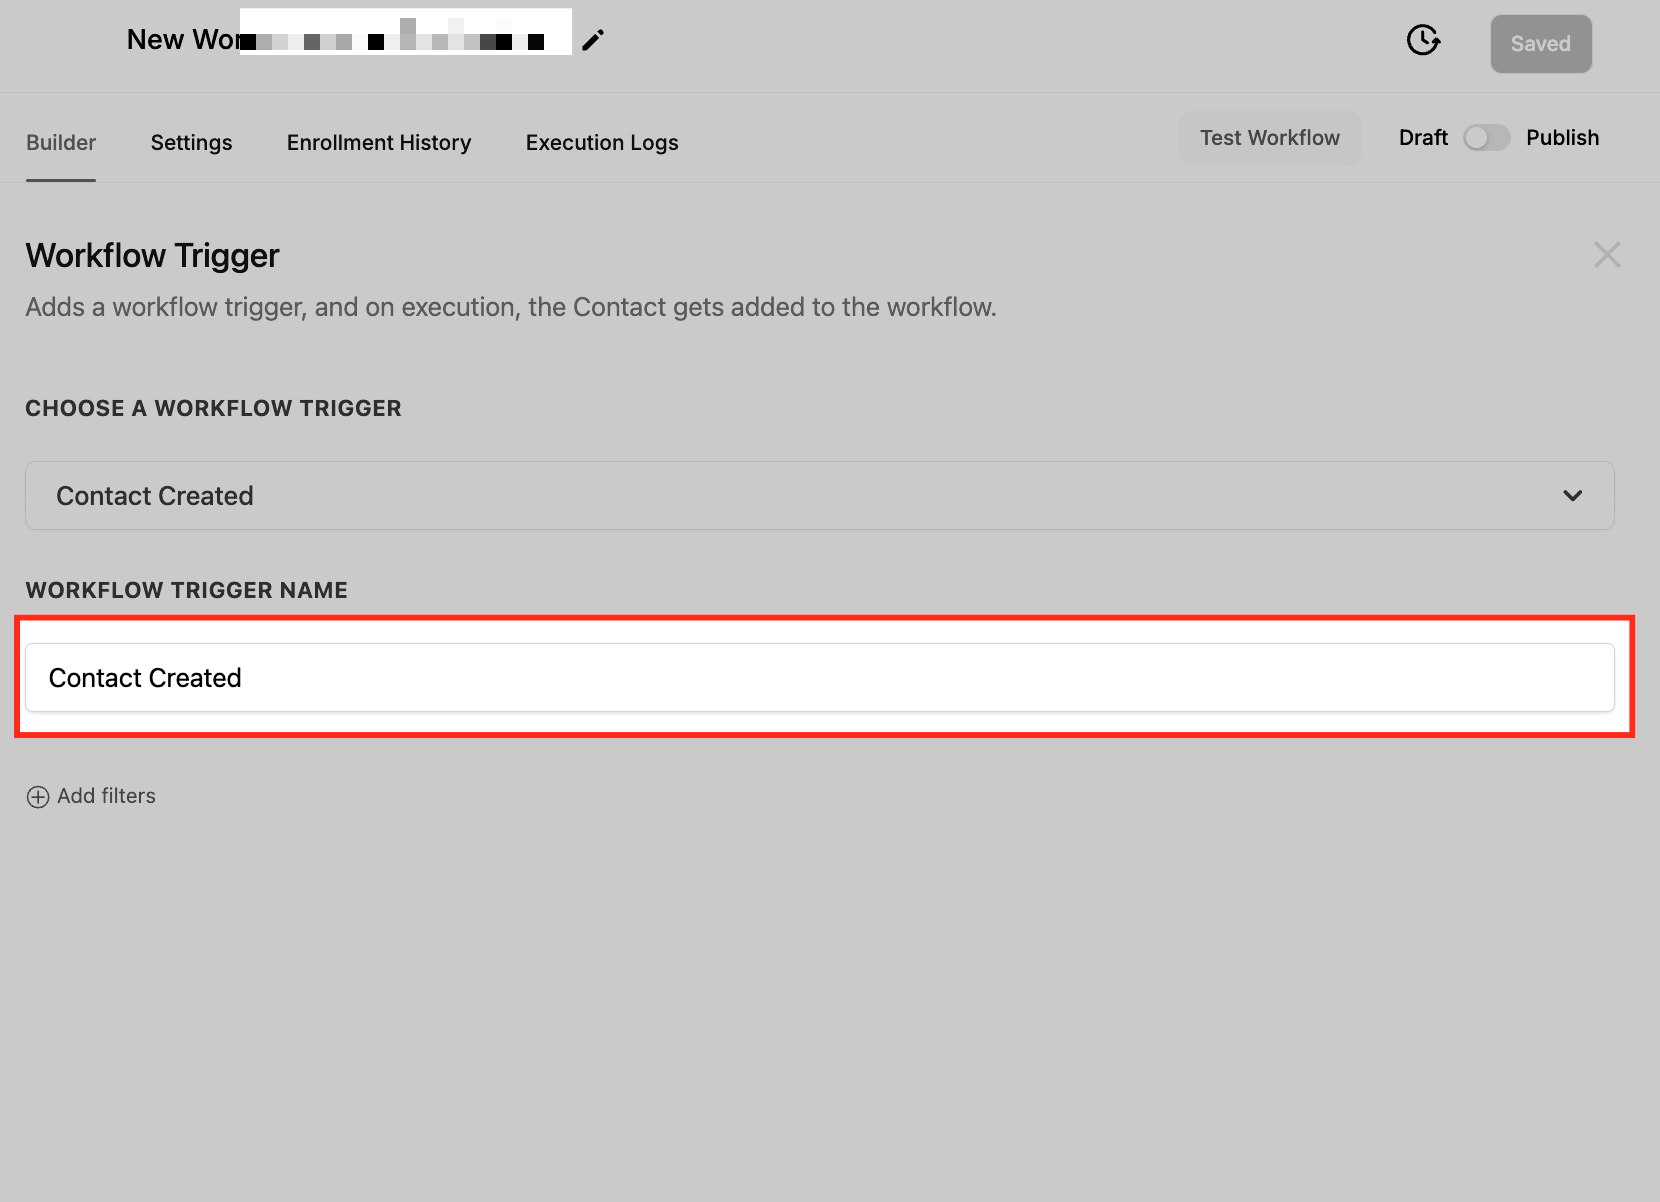
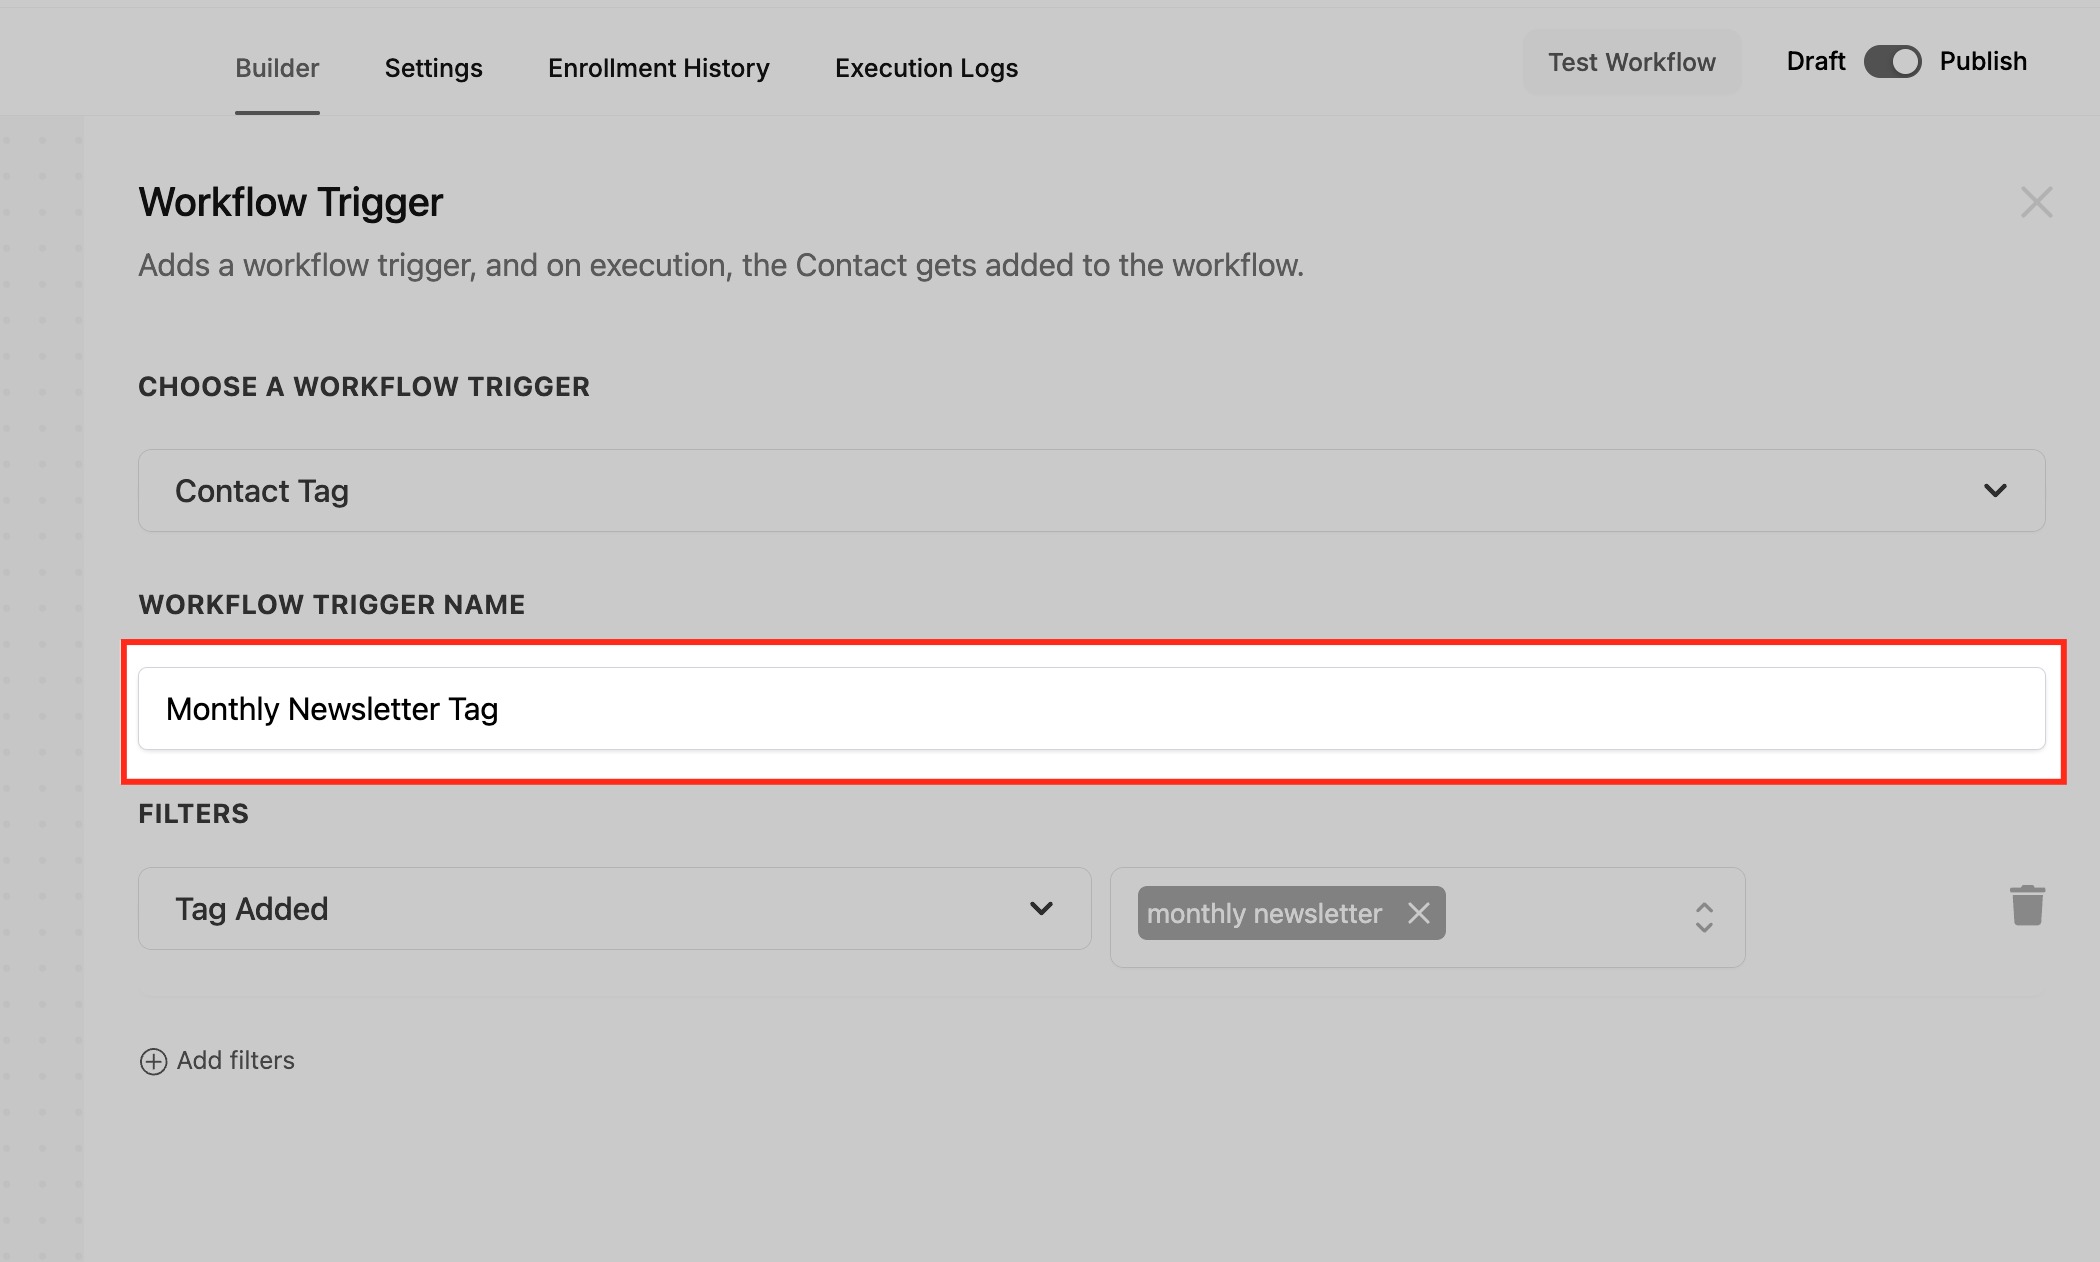
Use the search field to find the trigger you want, then select it.
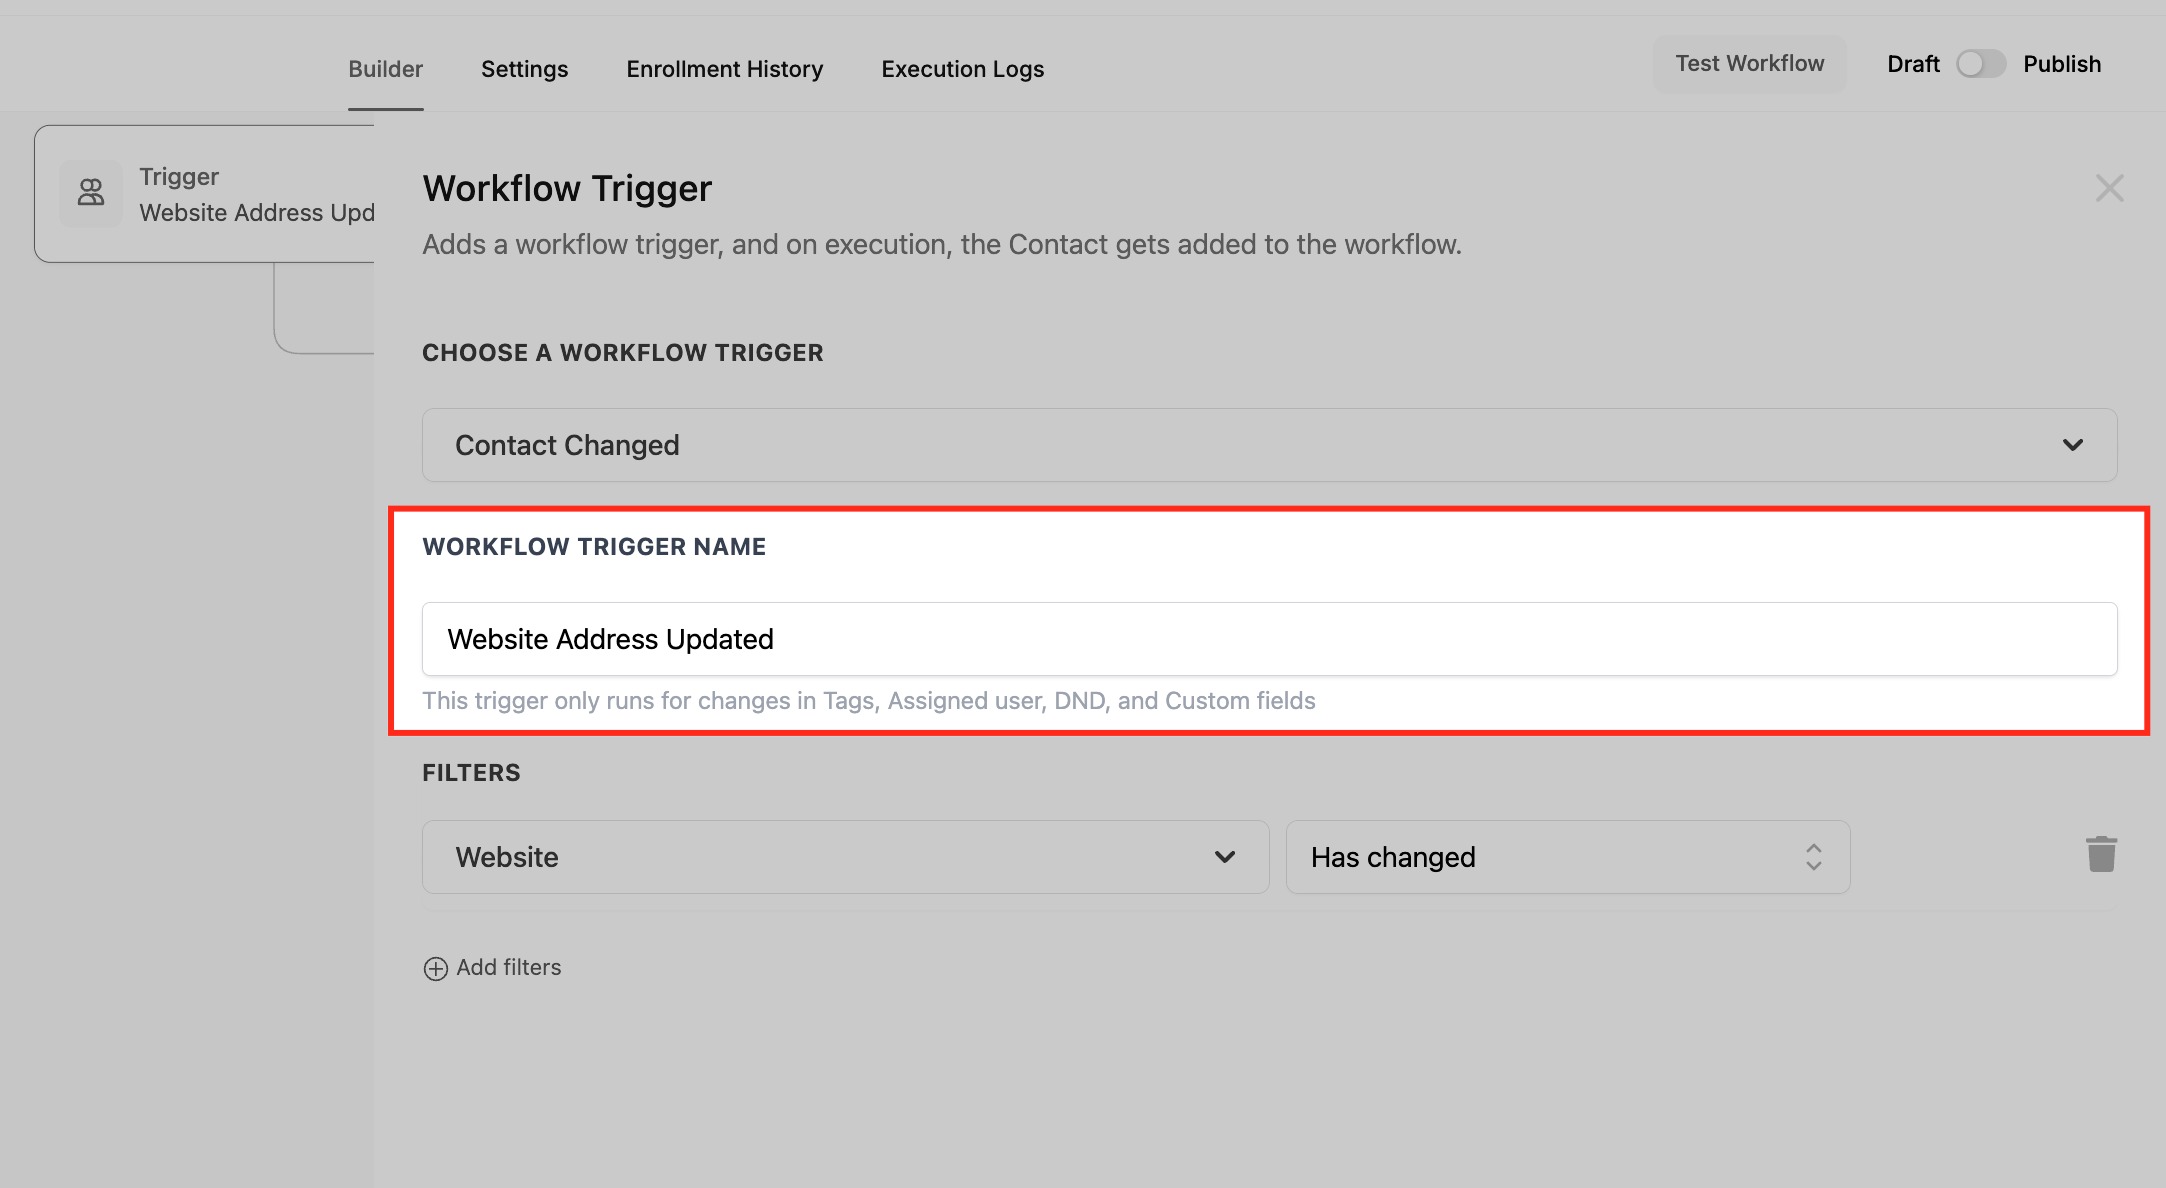
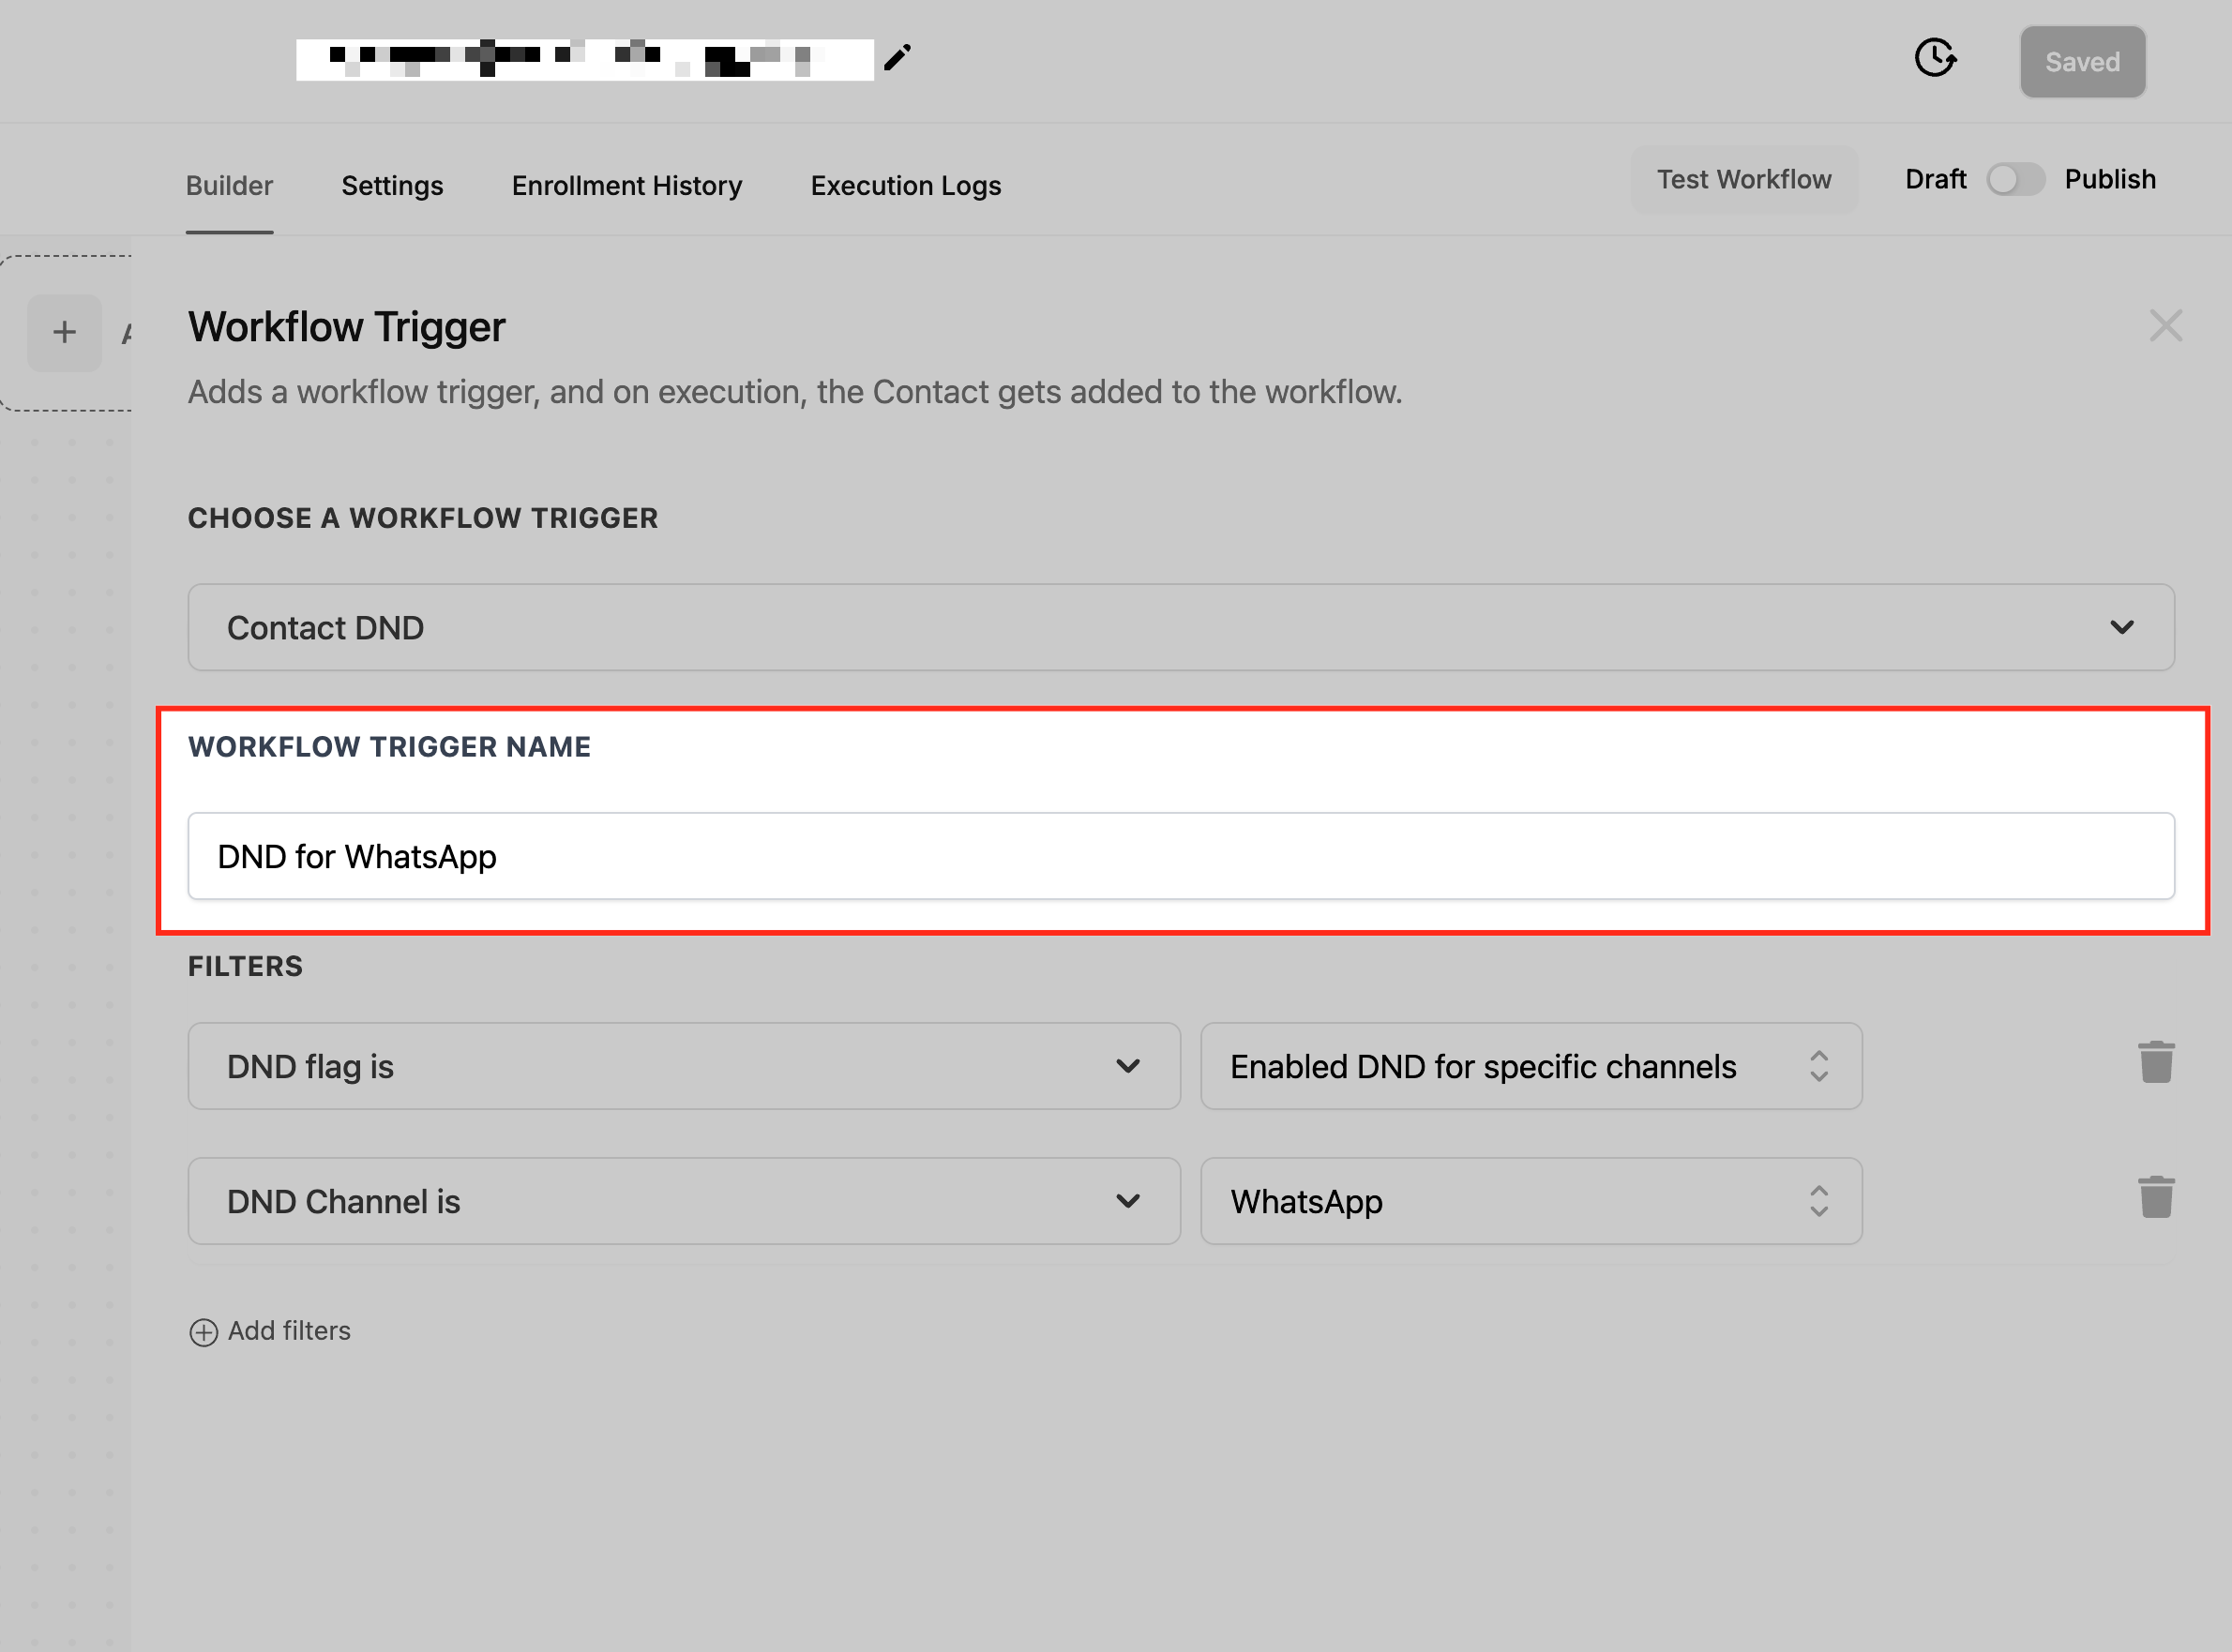
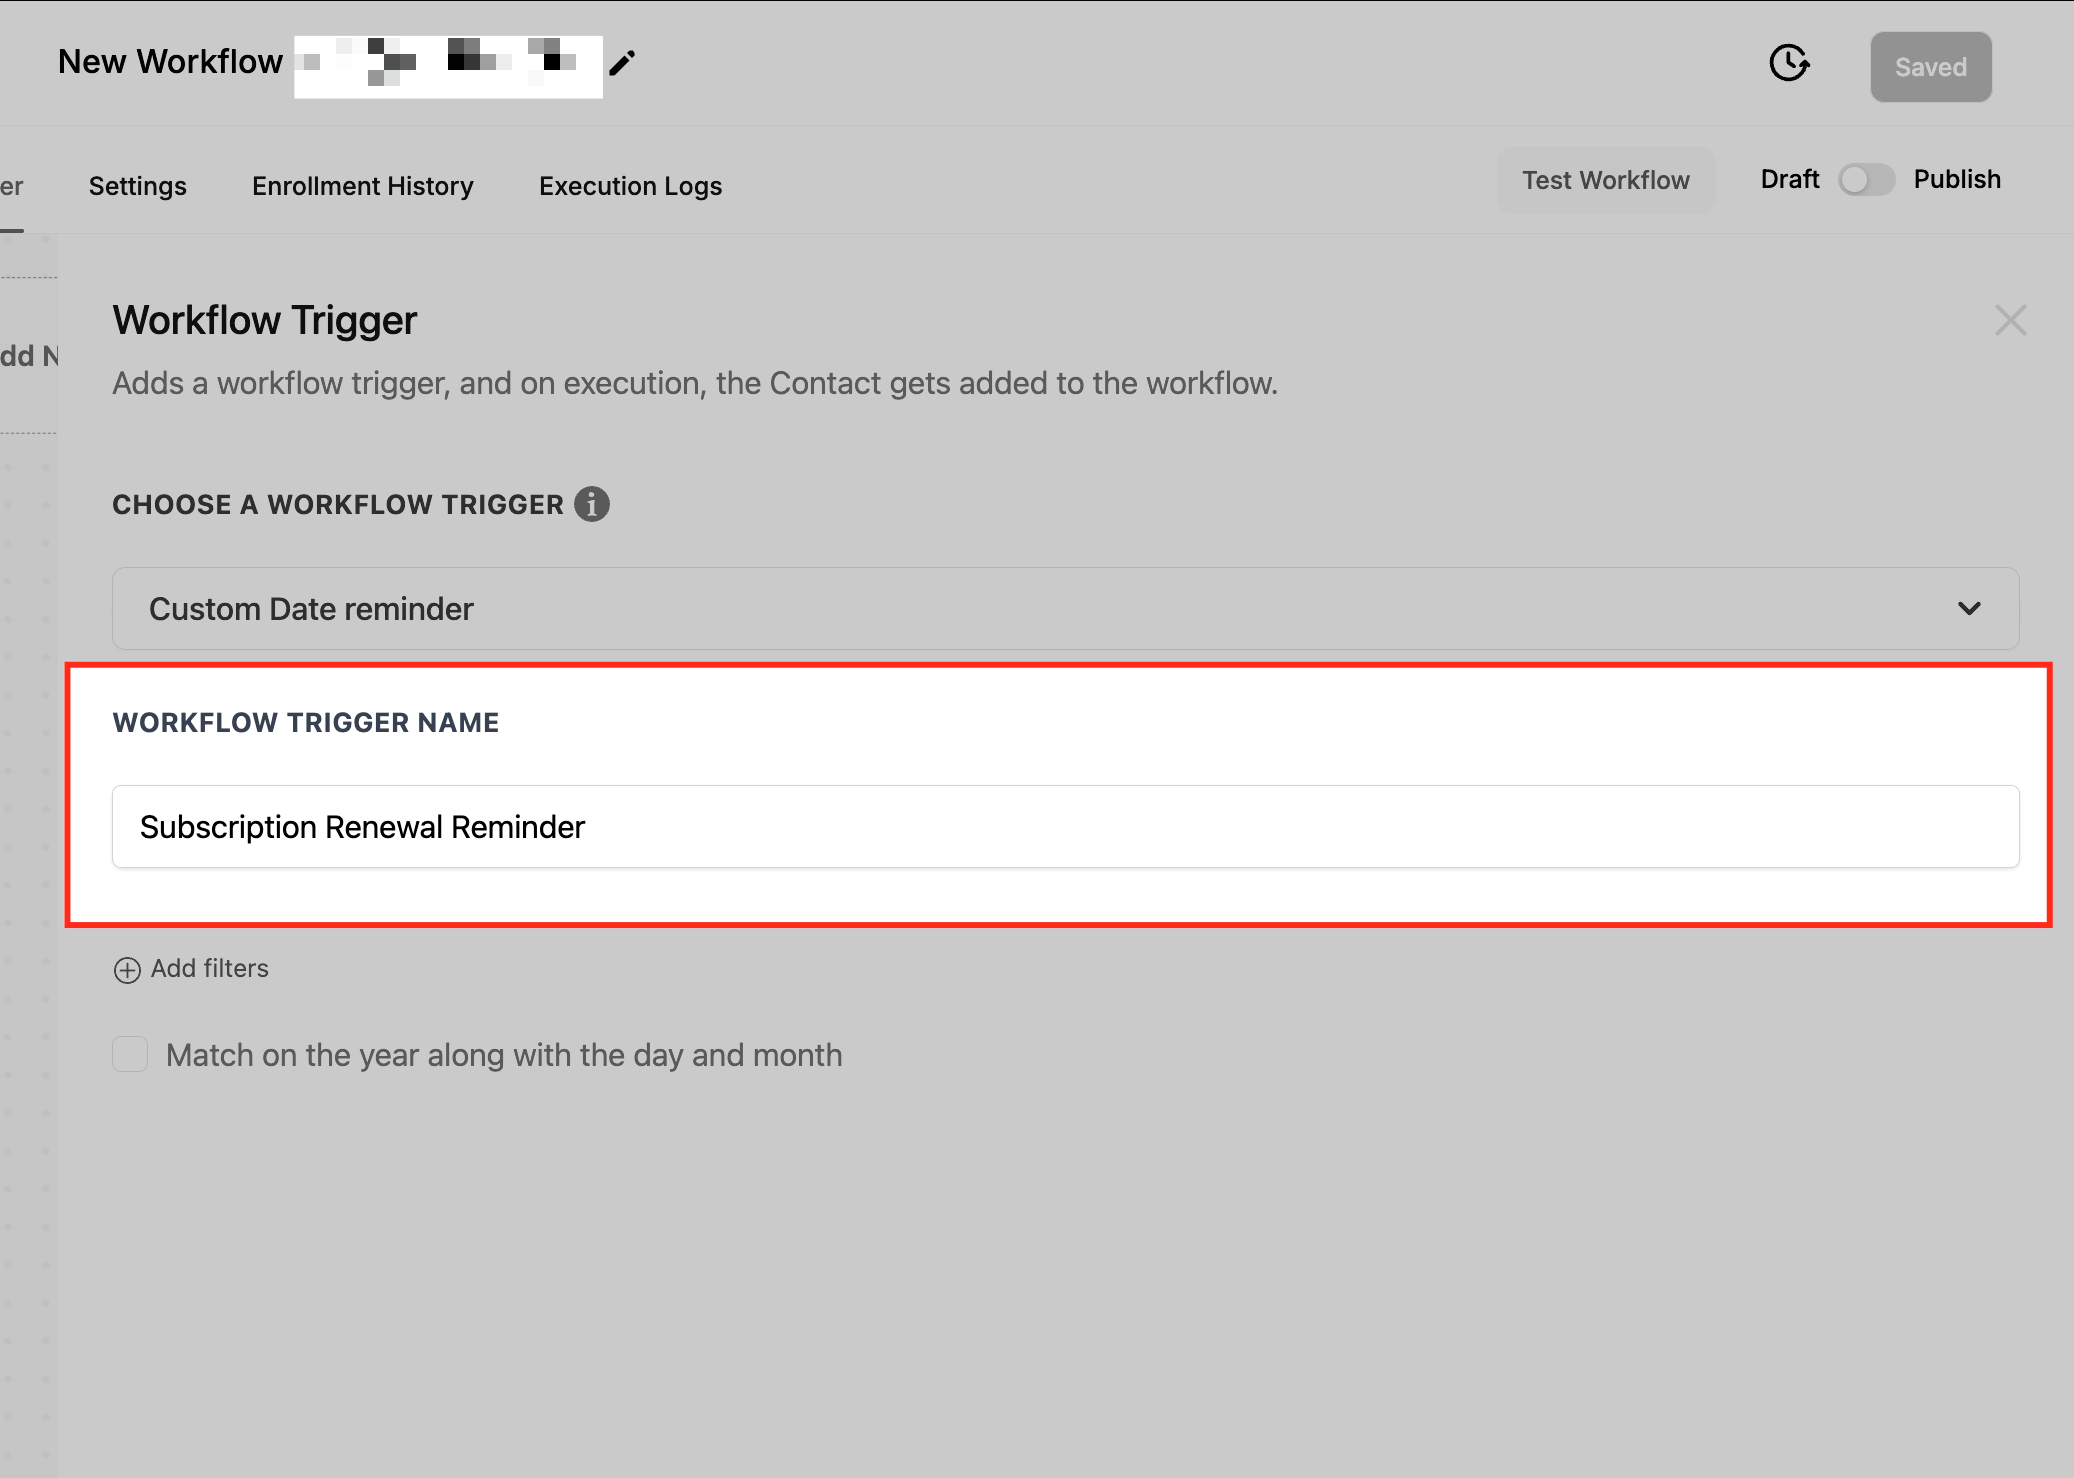
Optionally rename the trigger in the Workflow Trigger Name box. This only changes the display name inside the workflow builder and has no effect on how the trigger works or on any content.
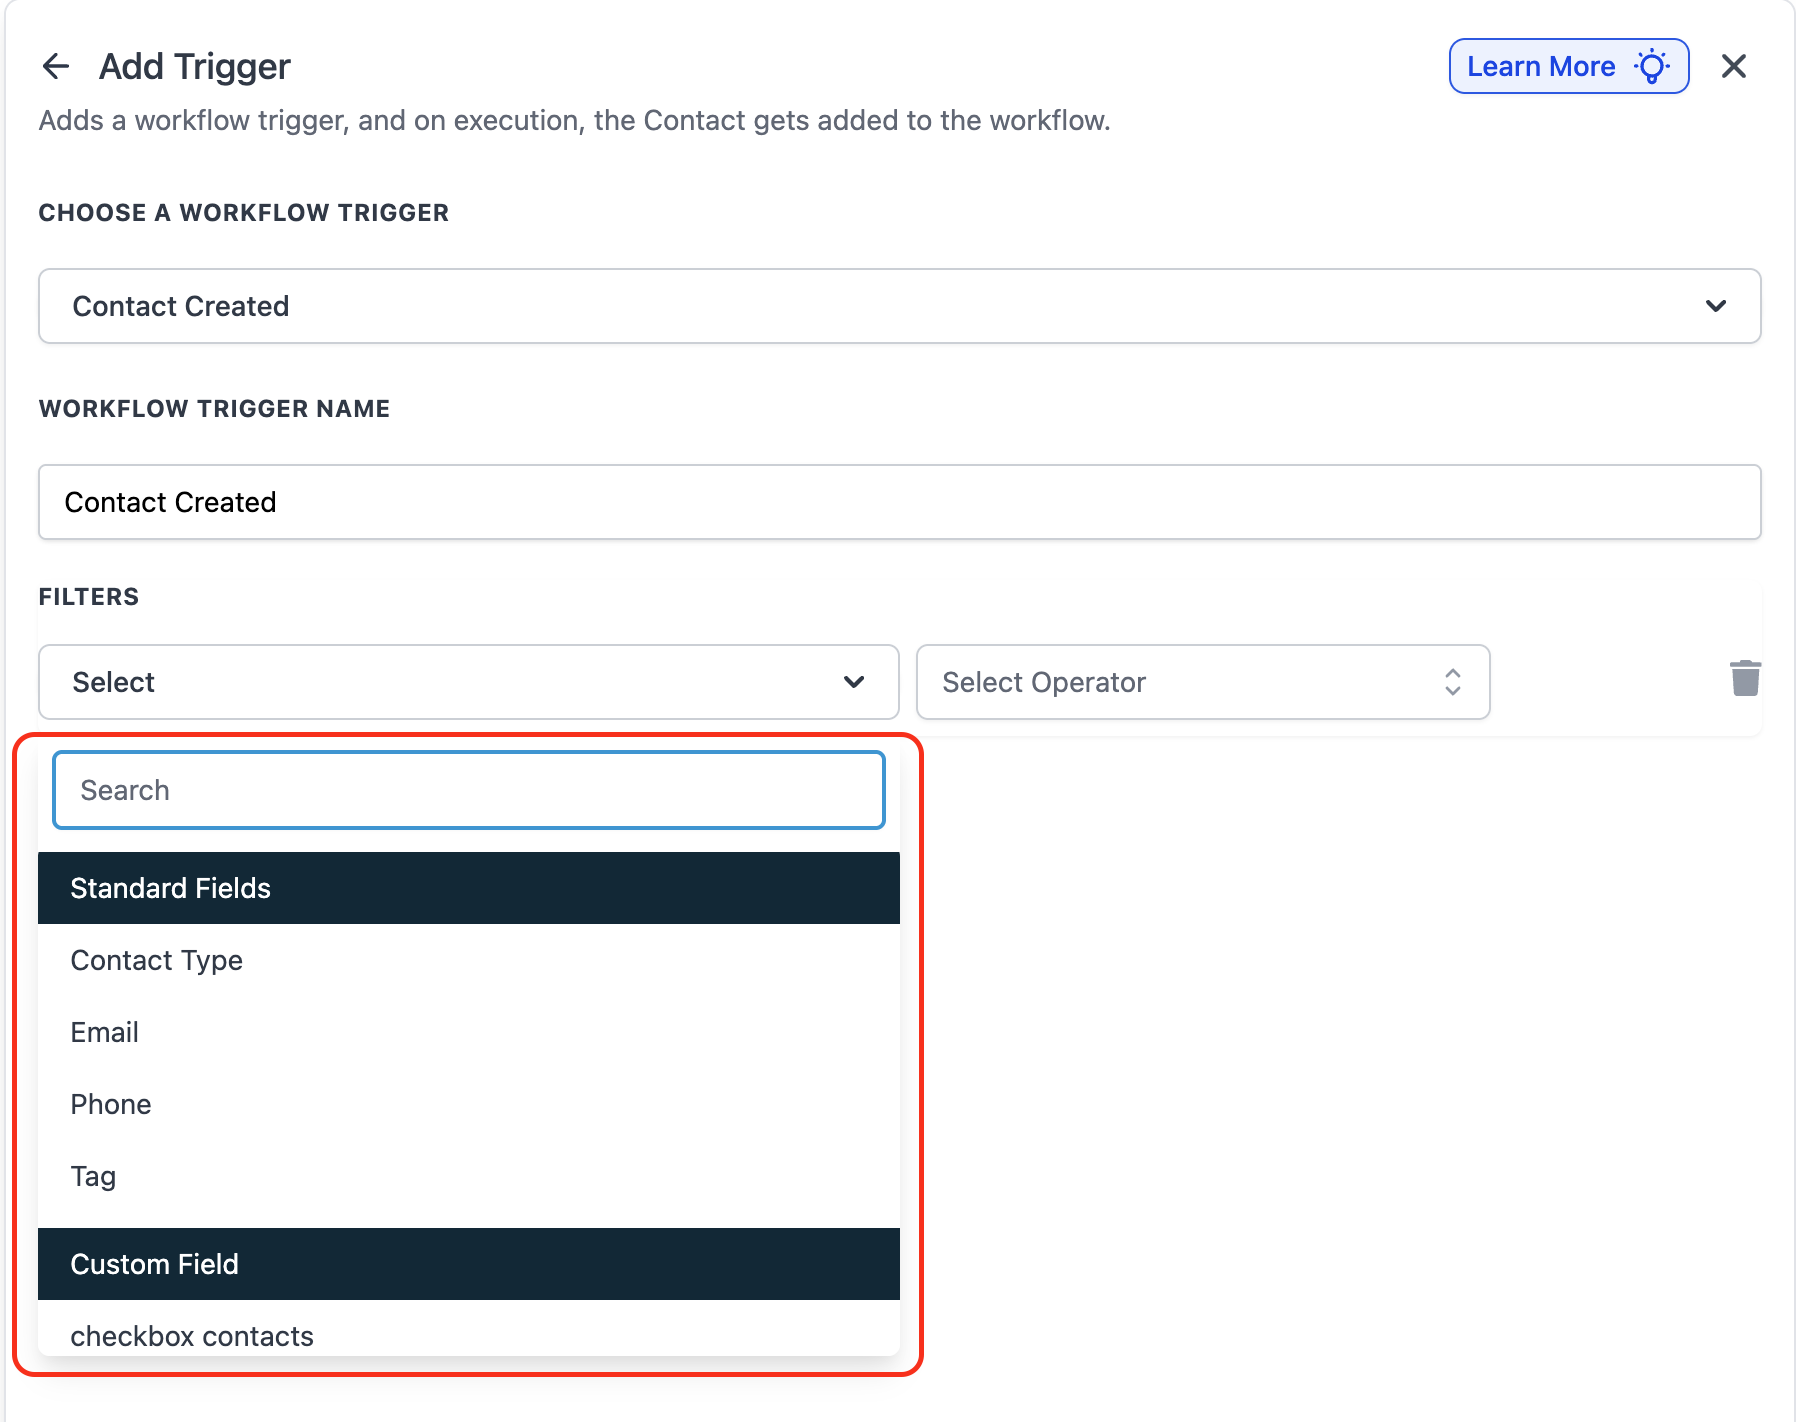
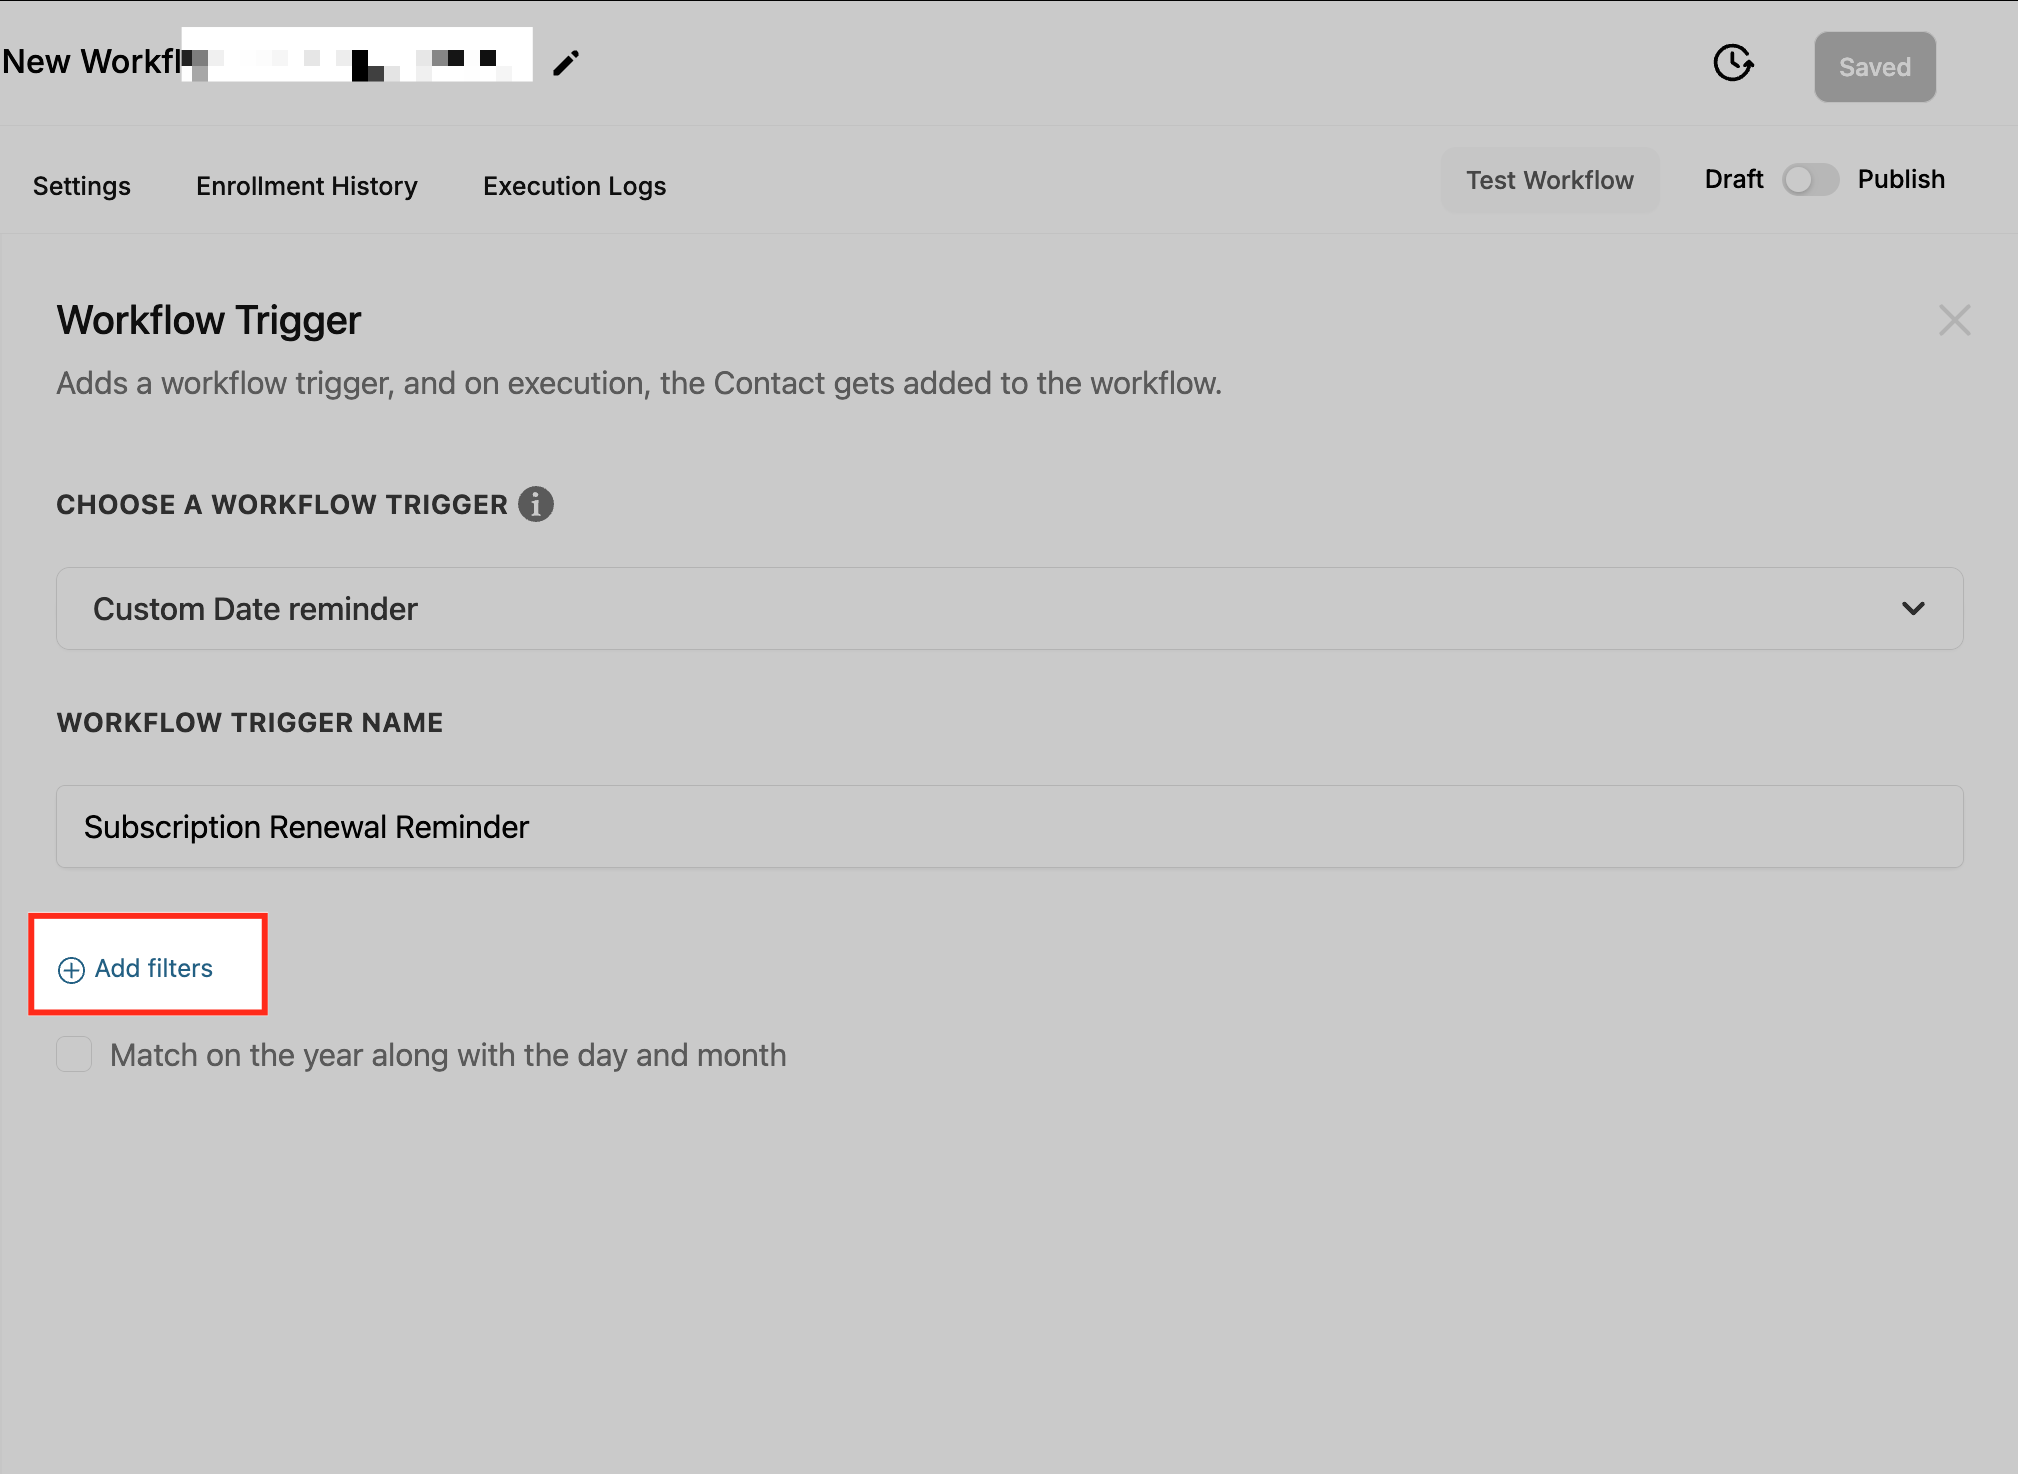
Click + Add Filters to narrow exactly when the workflow should run, then configure the filter values.
Click Save Trigger.
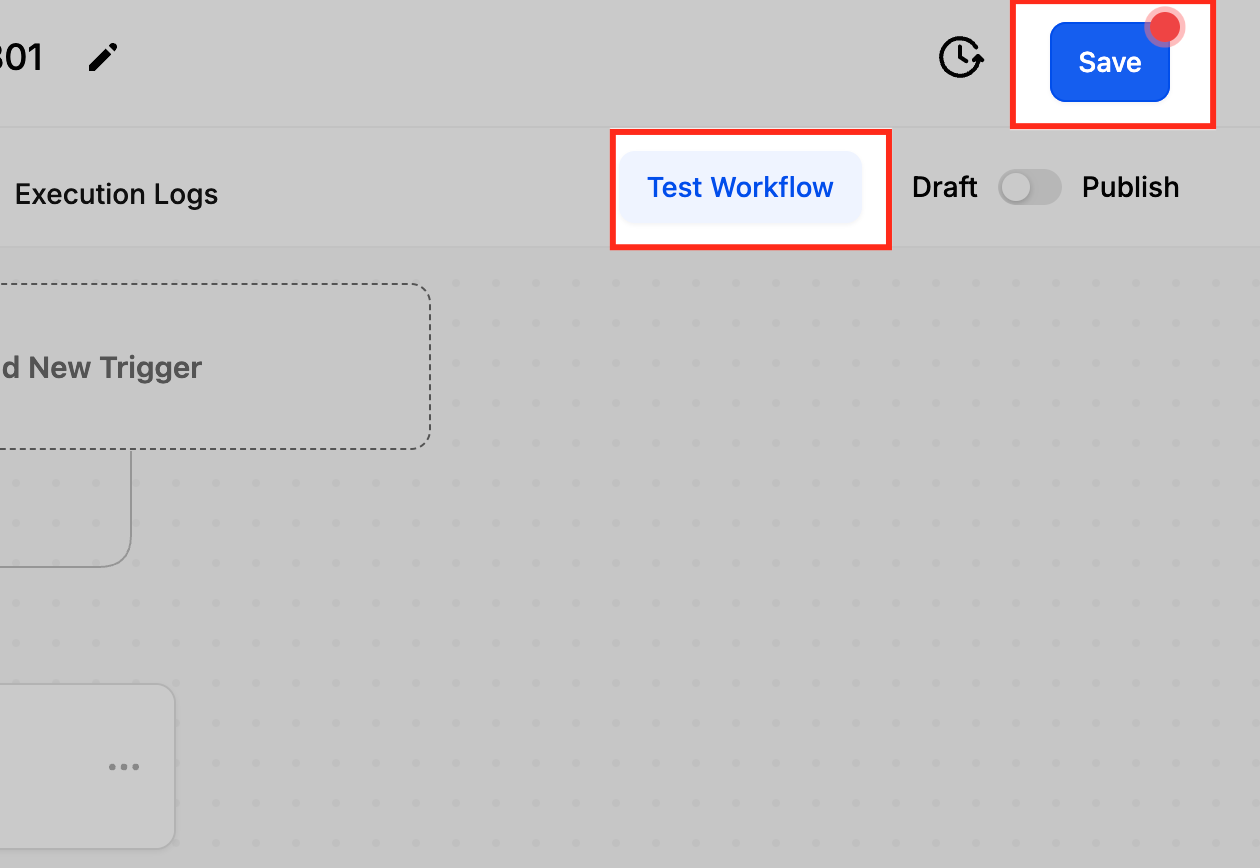
Add your workflow actions, then set the toggle from Draft to Publish to activate the workflow.
Before publishing, use the Test Workflow button next to the Publish toggle to confirm your trigger and actions behave as expected.
The rest of this article documents each contact trigger individually. You can add filters to most triggers or leave them off, in which case the trigger fires on every matching event for every contact.
Because the contact is the primary record for every trigger in this article, the following contact merge fields are available to downstream actions (emails, SMS, internal notifications, tasks, field updates, and webhooks) no matter which trigger started the workflow:
Identity: {{contact.first_name}}, {{contact.last_name}}, {{contact.full_name}}, {{contact.name}}.
Contact channels: {{contact.email}}, {{contact.phone}}.
Address: {{contact.address1}}, {{contact.city}}, {{contact.state}}, {{contact.postal_code}}, {{contact.country}}, {{contact.timezone}}.
Lifecycle: {{contact.source}}, {{contact.type}} (Lead or Customer), {{contact.date_created}}, {{contact.assigned_to}} (the assigned user).
Organization: {{contact.tags}} (the full tag list), {{contact.company_name}}.
Any custom field you have created, referenced as {{contact.<field_key>}}. This is how service interest, membership tier, last treatment date, provider preference, and similar med spa fields reach your messages.
Throughout this article, the Data made available notes call out anything beyond this baseline that a specific trigger adds (for example task fields, note fields, the reply text, or the engagement score). Assume the baseline contact fields above are always present unless a section says otherwise.
Fires on: the creation of a brand-new contact record in your account. It fires once, at the moment the record first exists, regardless of how the contact was created: added manually in the contact list, submitted through a form or survey, captured by a chat widget or funnel, created by an inbound call or message that generates a new contact, created by an integration, or created through the API. It does not fire on later edits to that contact (use Contact Changed for edits).
Edge cases that matter:
Bulk imports do not fire this trigger. This is intentional, to prevent accidentally blasting automation at hundreds of imported contacts at once. To automate actions on imported contacts, use a separate workflow with manual or bulk enrollment.
Duplicate handling. If a contact with the same email or phone number is added again and your duplicate detection merges it into an existing record, the trigger does not fire again, because no new record was created. If the system treats the submission as a brand-new contact, the trigger fires as expected.
Configuration and filter options:
After selecting Contact Created and naming the trigger, click + Add Filters to control which new contacts enter the workflow. With no filters, every new contact enters.
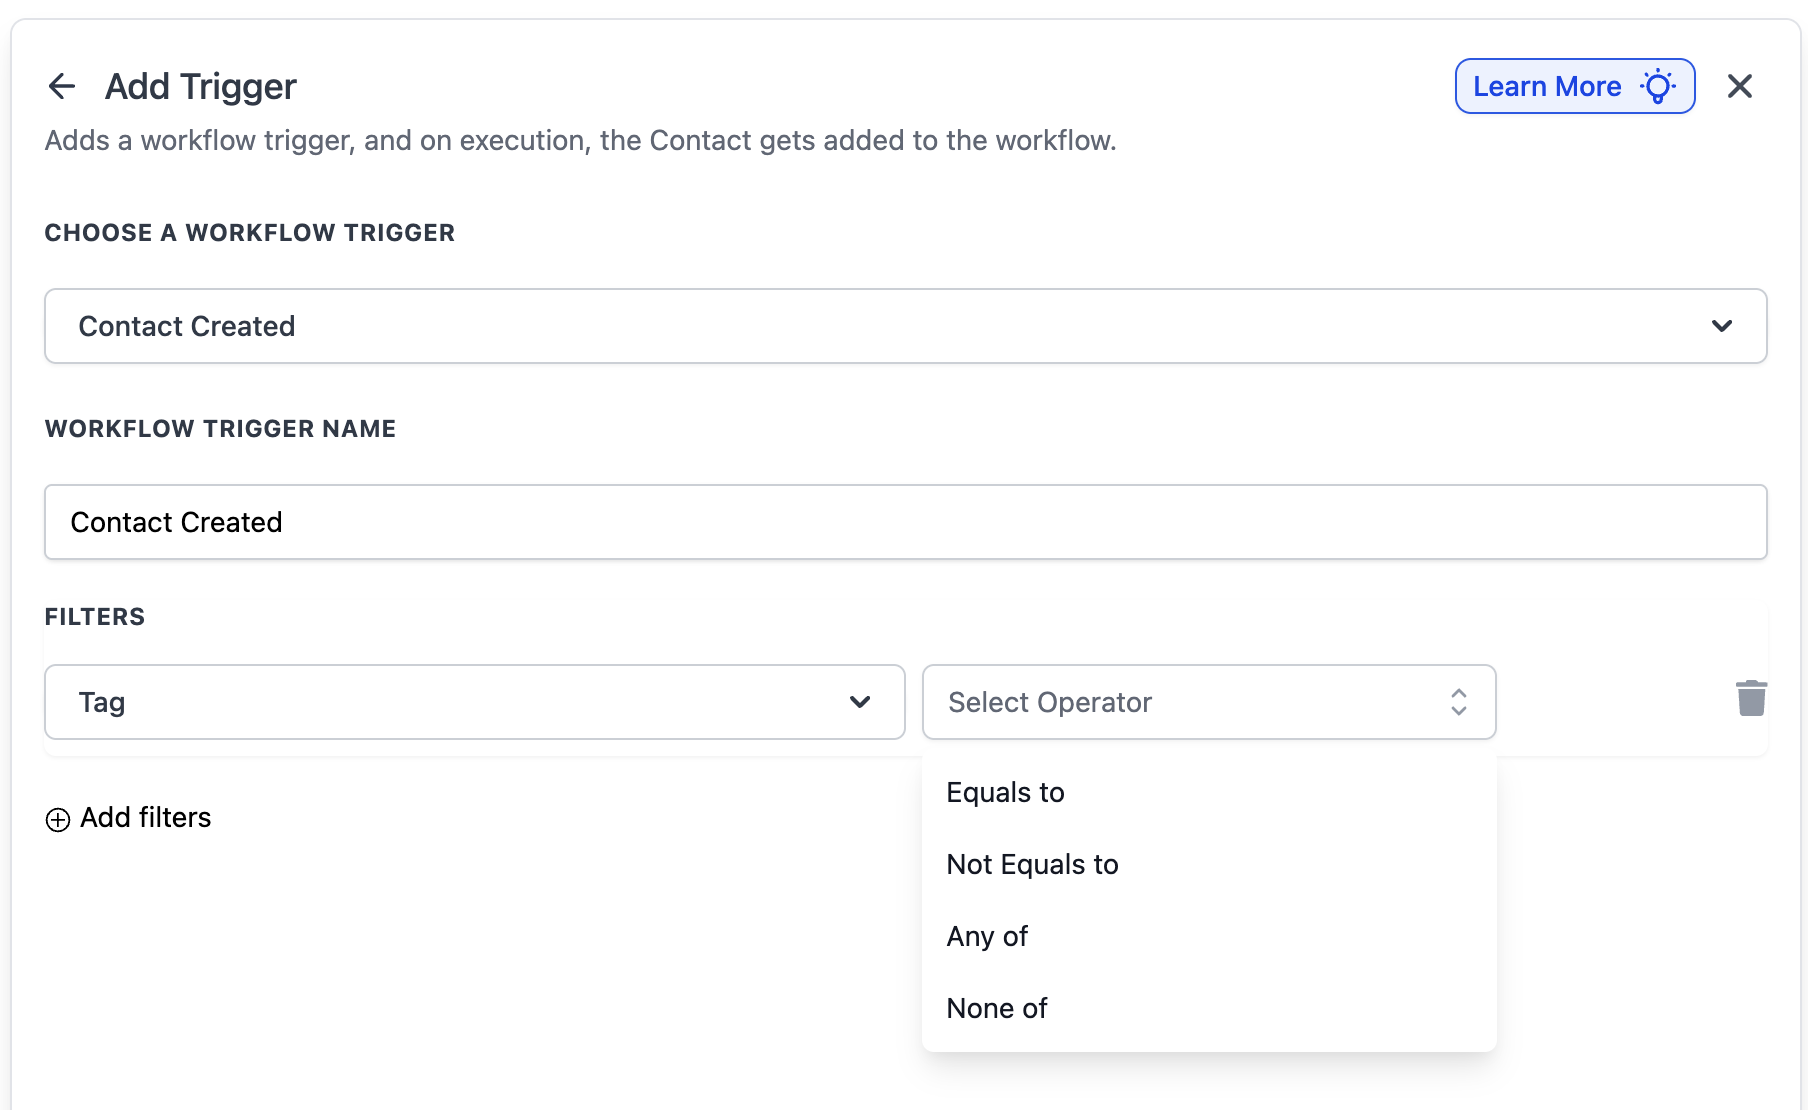
Tag: only let tagged contacts in. Operators (all support multi-select):
Equals to / Not equals to: fires when the contact's tag set matches (or does not match) the exact tag(s) selected.
Any of: fires when any one of the selected tags is present.
None of: fires when none of the selected tags are present.
Multiple Tag filters (AND logic): add more than one Tag filter on the same trigger to build advanced include/exclude rules. For example, Tag Equals to "Lead" AND Tag Not equals to "Low Quality." All Tag filters on one trigger must be satisfied together.
Custom Fields: filter so the workflow only runs when a custom field meets your criteria. Useful for segmenting new leads by the service they want or by where they came from, for example only enrolling contacts whose "Treatment Interest" is "Injectables," whose "Lead Source" is "Instagram Ad," or whose "Membership Tier" is set. The operators available depend on the field type (text, number, dropdown, date).

Data made available: the new contact and its full field set, including whatever was captured at creation. When the contact was created by a form, the submitted field values are already written to the contact, so they are available as the contact merge fields listed above. This is why Contact Created is a reliable place to read {{contact.source}} and any "how did you hear about us" or "treatment interest" custom fields captured on your intake form.
When to use it: use this trigger when you want to react the instant a new lead or client first appears in your account.
Send a new lead an instant welcome text and email the moment they fill out your consultation form.
Assign the lead to the right provider or front-desk coordinator (Contact Created pairs well with assignment actions, including round-robin distribution, to spread new leads evenly across your team).
Kick off a first-appointment nurture sequence so no new inquiry slips through the cracks.
Example workflow: Trigger: Contact Created, filtered to Tag Any of "Consult Request." Action 1: send SMS, "Hi {{contact.first_name}}, thanks for requesting a consult at our med spa! What day works best for you?" Action 2: assign to the next available coordinator via round-robin. Action 3: create a task, "Call new consult lead within 1 hour."
Notes, limits, and gotchas:
Because it fires only on first creation, you cannot use it to re-engage existing contacts. Use Contact Tag or manual enrollment for that.
If you run several Contact Created workflows at once, all of them enroll the same new contact. Keep their filters distinct to avoid overlap.
Fires on: an update to an existing contact's tracked details. It does not fire on creation; it fires on subsequent edits. The change types it can detect are Tags (added or removed), Assigned User, Do Not Disturb (DND) status, and Custom Fields. It fires each time one of the tracked changes occurs, whether the edit was made by a person, by another workflow, by an integration, or by the API. A contact going from "Lead" to "Customer" (contact type) is also a kind of change you can react to in practice by tracking the field or tag that represents that transition.
Important edge case: Contact Changed detects new updates but does not track removed values as a payload. It knows a change happened, but if you need to branch on whether a specific tag was removed, use an If/Else condition later in the workflow to check whether the contact still has the tag, or build a separate workflow keyed off Contact Tag (Removed).
Configuration and filter options:
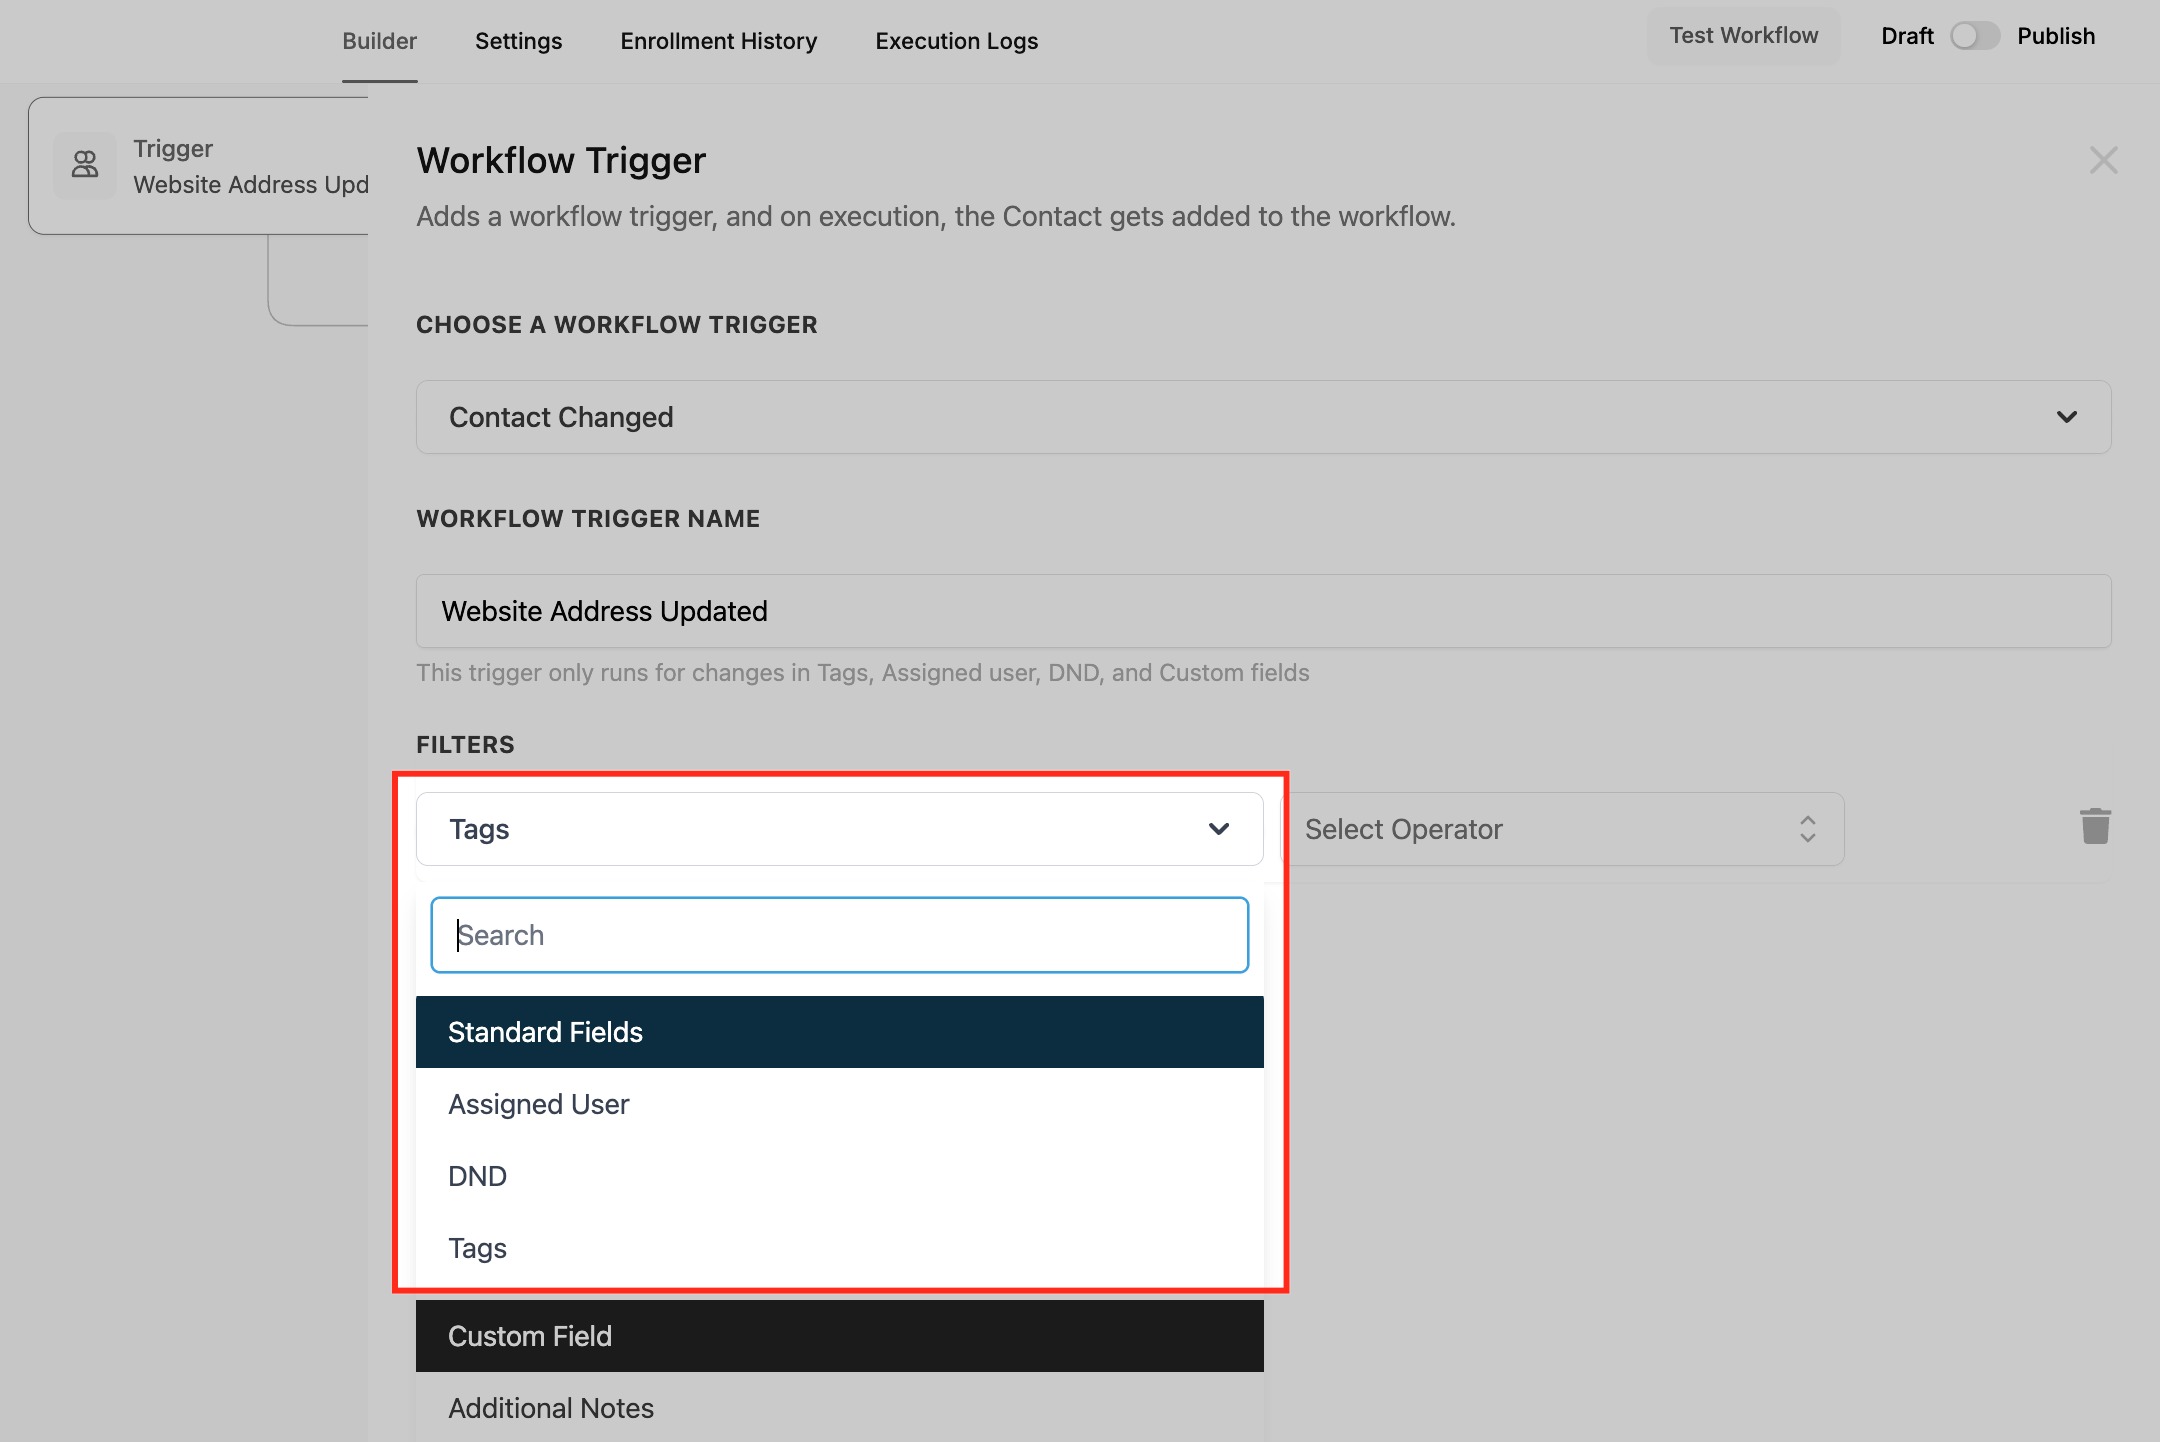
After selecting Contact Changed and naming the trigger (for example "Website Address Updated"), click Add Filters and choose what kind of change activates it. You can add more than one of these on a single trigger.
Assigned User:
Has Changed: fires whenever the assigned user changes, regardless of who the new user is.
Has Changed To: fires only when the contact is assigned to one specific user you select.
DND: Do Not Disturb is an opt-out from communication, set when a contact asks to unsubscribe from a channel they were subscribed to.
Has Changed: fires whenever DND toggles between enabled and disabled.
Has Changed To: fires only when DND shifts to a specific state you define. (For finer control over channel and direction, use the dedicated Contact DND trigger below.)
Tags: fires only when a tag is added to or removed from the contact. Select the tag(s) that should be watched.
Custom Field: fires when a specific field, such as "Website" or "Preferred Service," is updated. Select which field to watch.
Data made available: the changed contact and its full, current field set, so downstream steps read the new values. For example, after a "Preferred Service" custom field update, {{contact.preferred_service}} already holds the new value, which you can drop straight into a targeted offer. The new assigned user is reflected in {{contact.assigned_to}}. Note that the previous value is not passed to the workflow, only the current one.
When to use it: use this trigger when you want to react to a contact record being edited rather than created.
Send a follow-up email when an "Interested" tag is added.
Notify a provider when a contact is reassigned to them.
Send targeted offers when a "Preferred Service" custom field is updated.
Pause messaging when a contact turns on Do Not Disturb.
Example workflow: Trigger: Contact Changed, filter Assigned User Has Changed To "Dr. Lena." Action: internal notification to Dr. Lena, "You have been assigned {{contact.full_name}} ({{contact.phone}}). Preferred service: {{contact.preferred_service}}."
Notes, limits, and gotchas:
You can add multiple filters to one Contact Changed trigger to track several types of change at once, for example fire when a tag is added OR a custom field is updated.
It fires each time a tracked change occurs, so it can over-fire. To avoid repeat sends, use workflow conditions to check whether an action already ran, narrow your filters, or add time delays.
It does not pass removed values; branch on current state with If/Else instead.
Fires on: a tag being added to, or removed from, a contact. You choose the direction (Added or Removed) and the specific tag when you set it up, so a single Contact Tag trigger watches one direction for the tag(s) you select. Tags are labels you assign to contacts to organize them and act on their attributes or behavior, which makes them the cleanest way to move customers between stages automatically.
Edge case: tags fire workflows only going forward, never retroactively. A contact that already had the tag before the workflow was published is not enrolled; the tag must be added (or removed) after the workflow is active. Also, in the tag selector, selecting or deselecting tags does not apply until you confirm them, and the trigger fires only after the tag update is actually applied to the contact.
Configuration and filter options:
Add the trigger and search for Contact Tag.

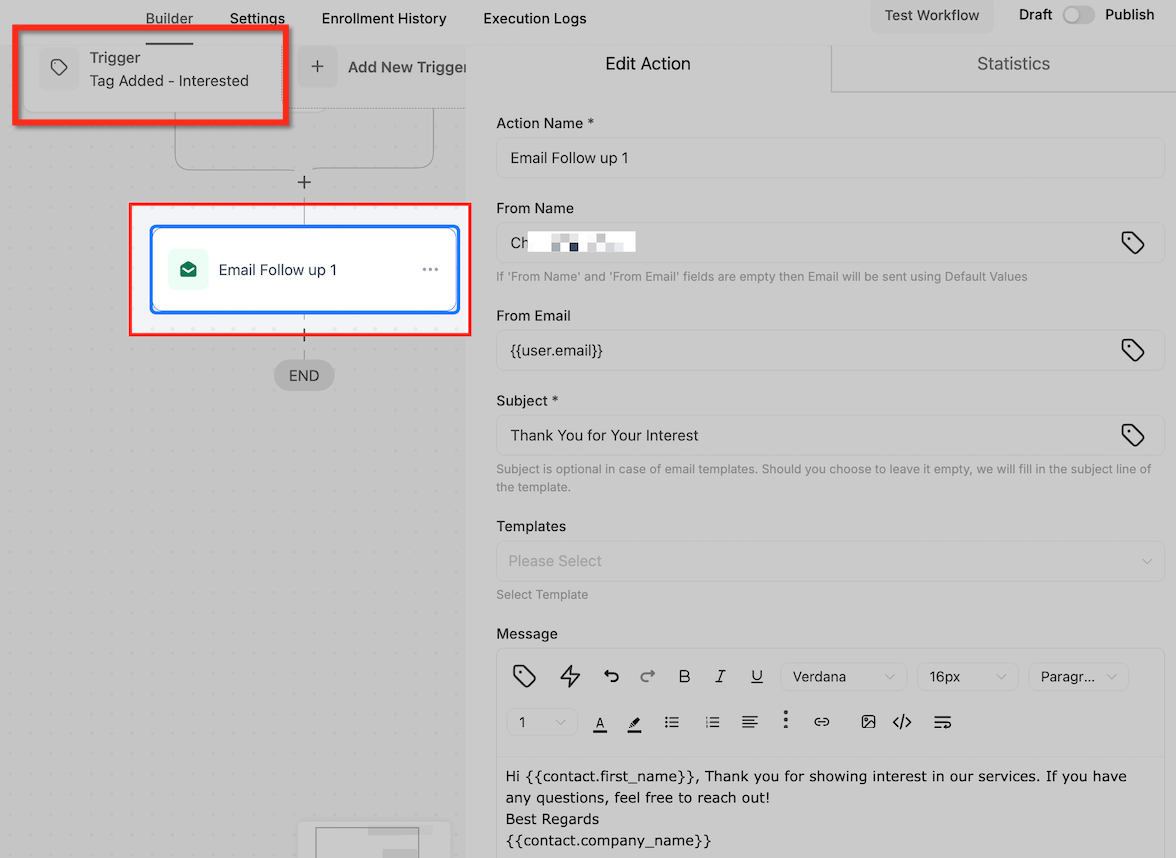
Give the trigger a descriptive name, such as "Tag Added - Interested."
Select whether the workflow should be triggered when a tag is Added or Removed. This is the core option, and a single trigger watches one direction.
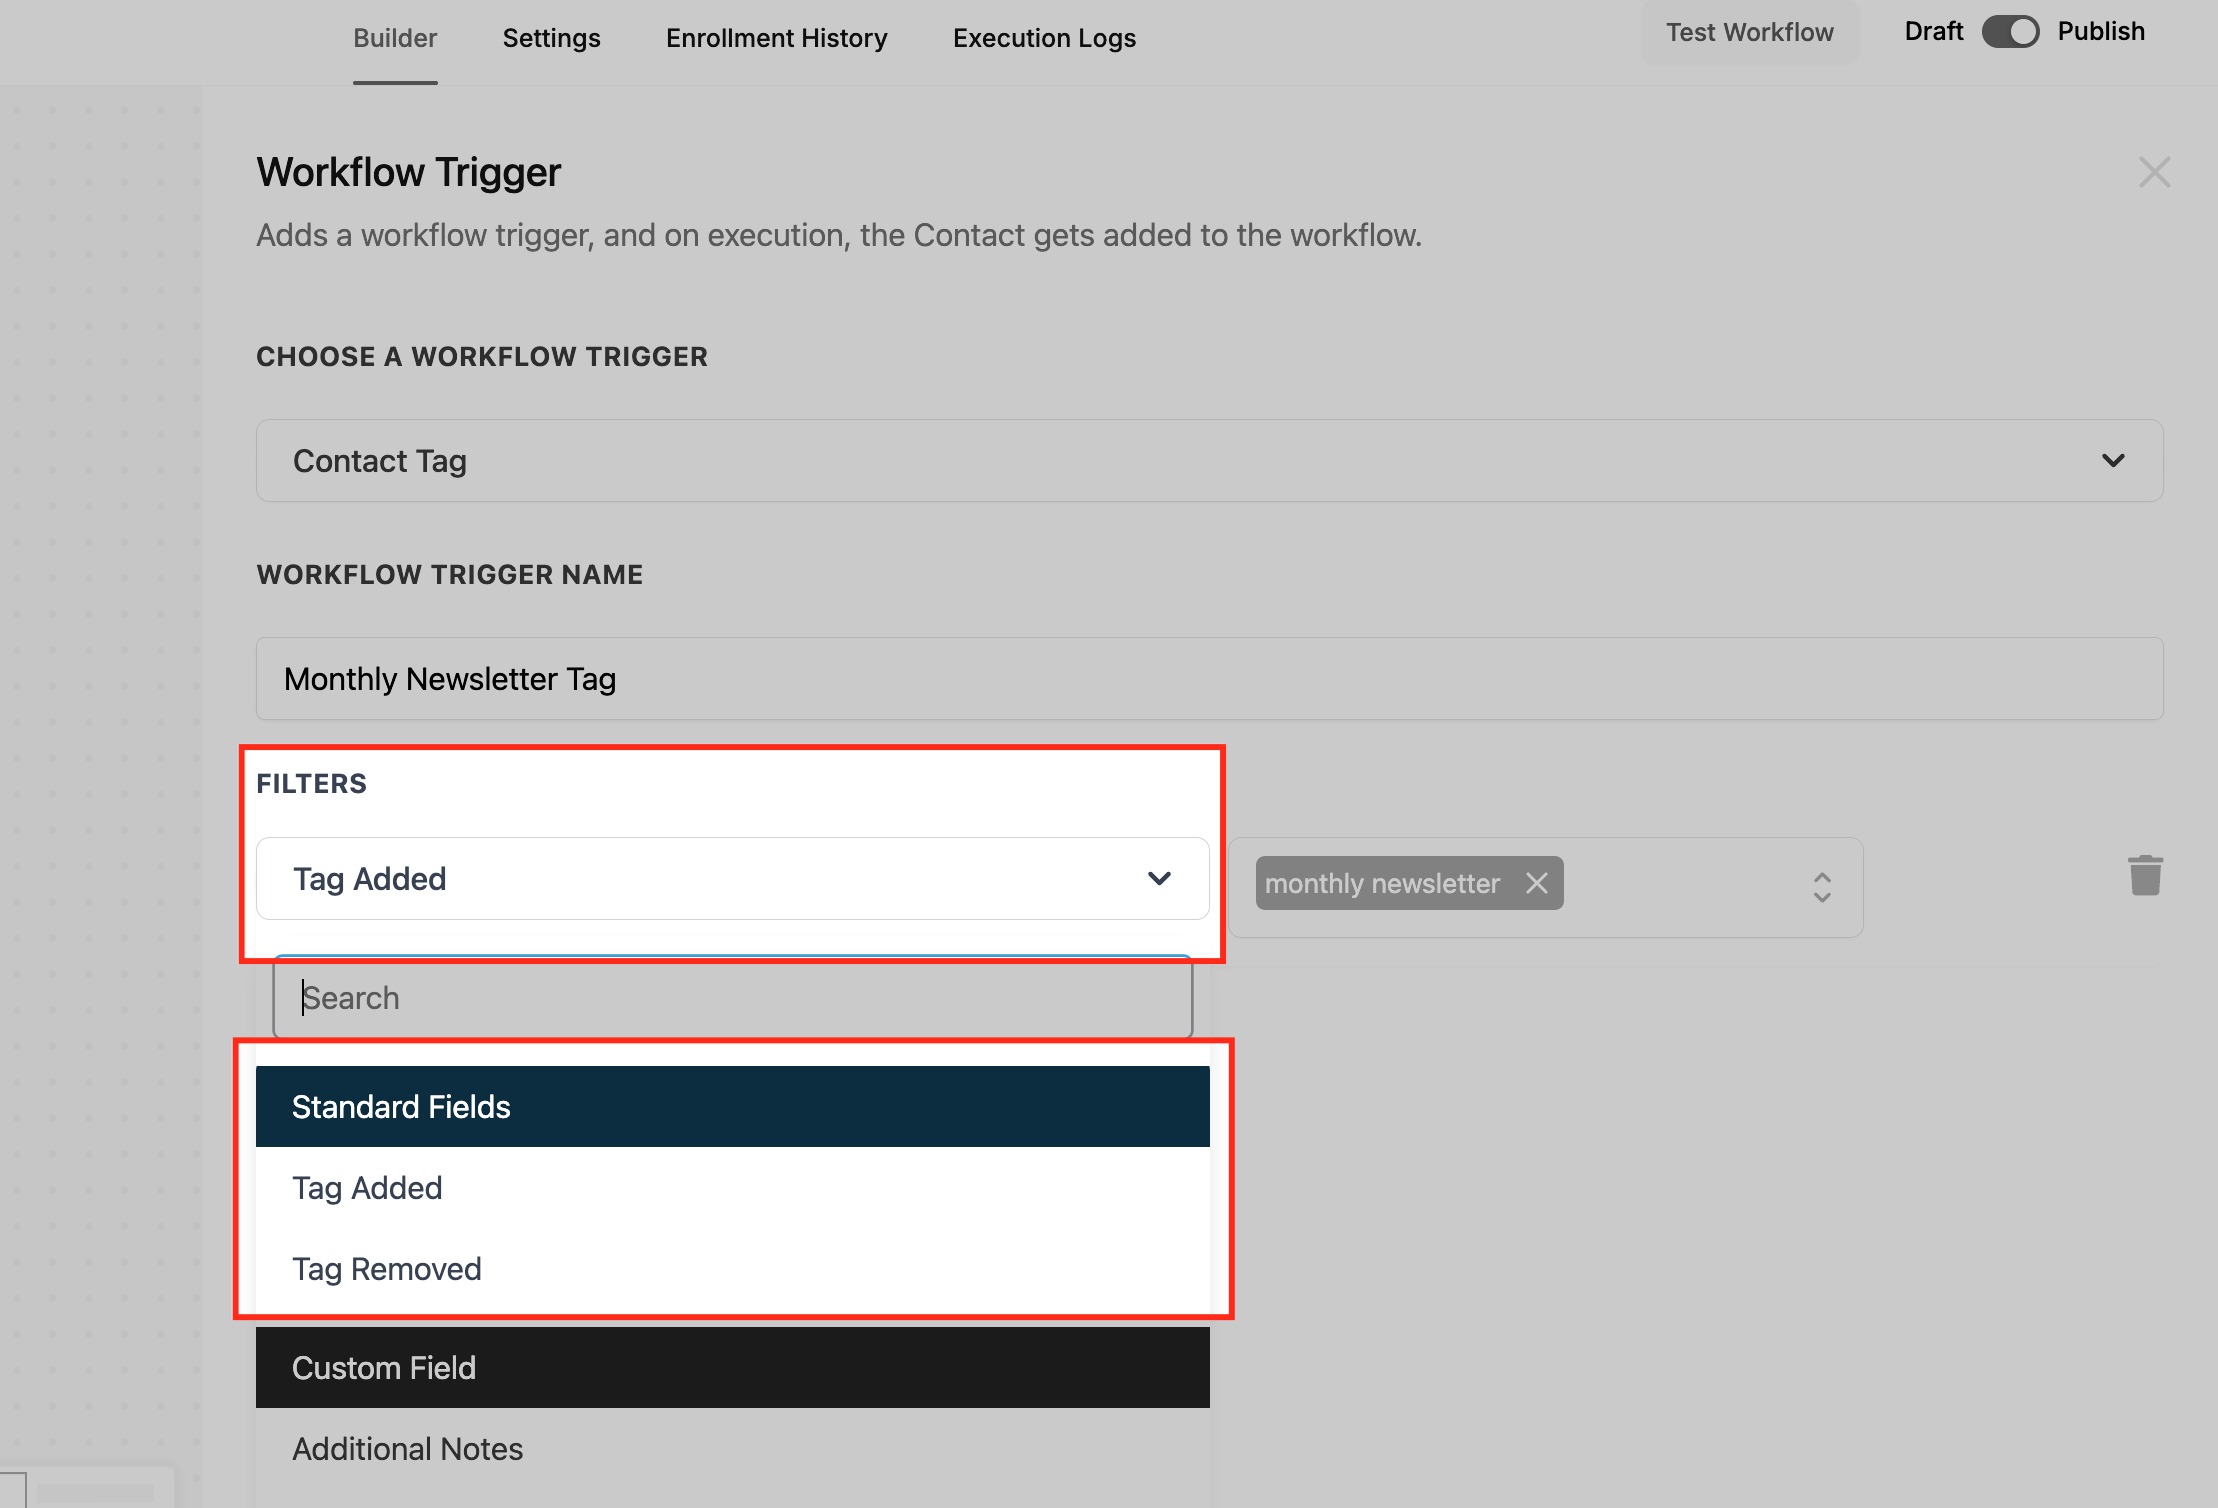
Choose the tag (for example "Interested" or "Newsletter Subscriber") that will activate the trigger. You can select more than one tag; the trigger fires when any selected tag changes in the chosen direction.
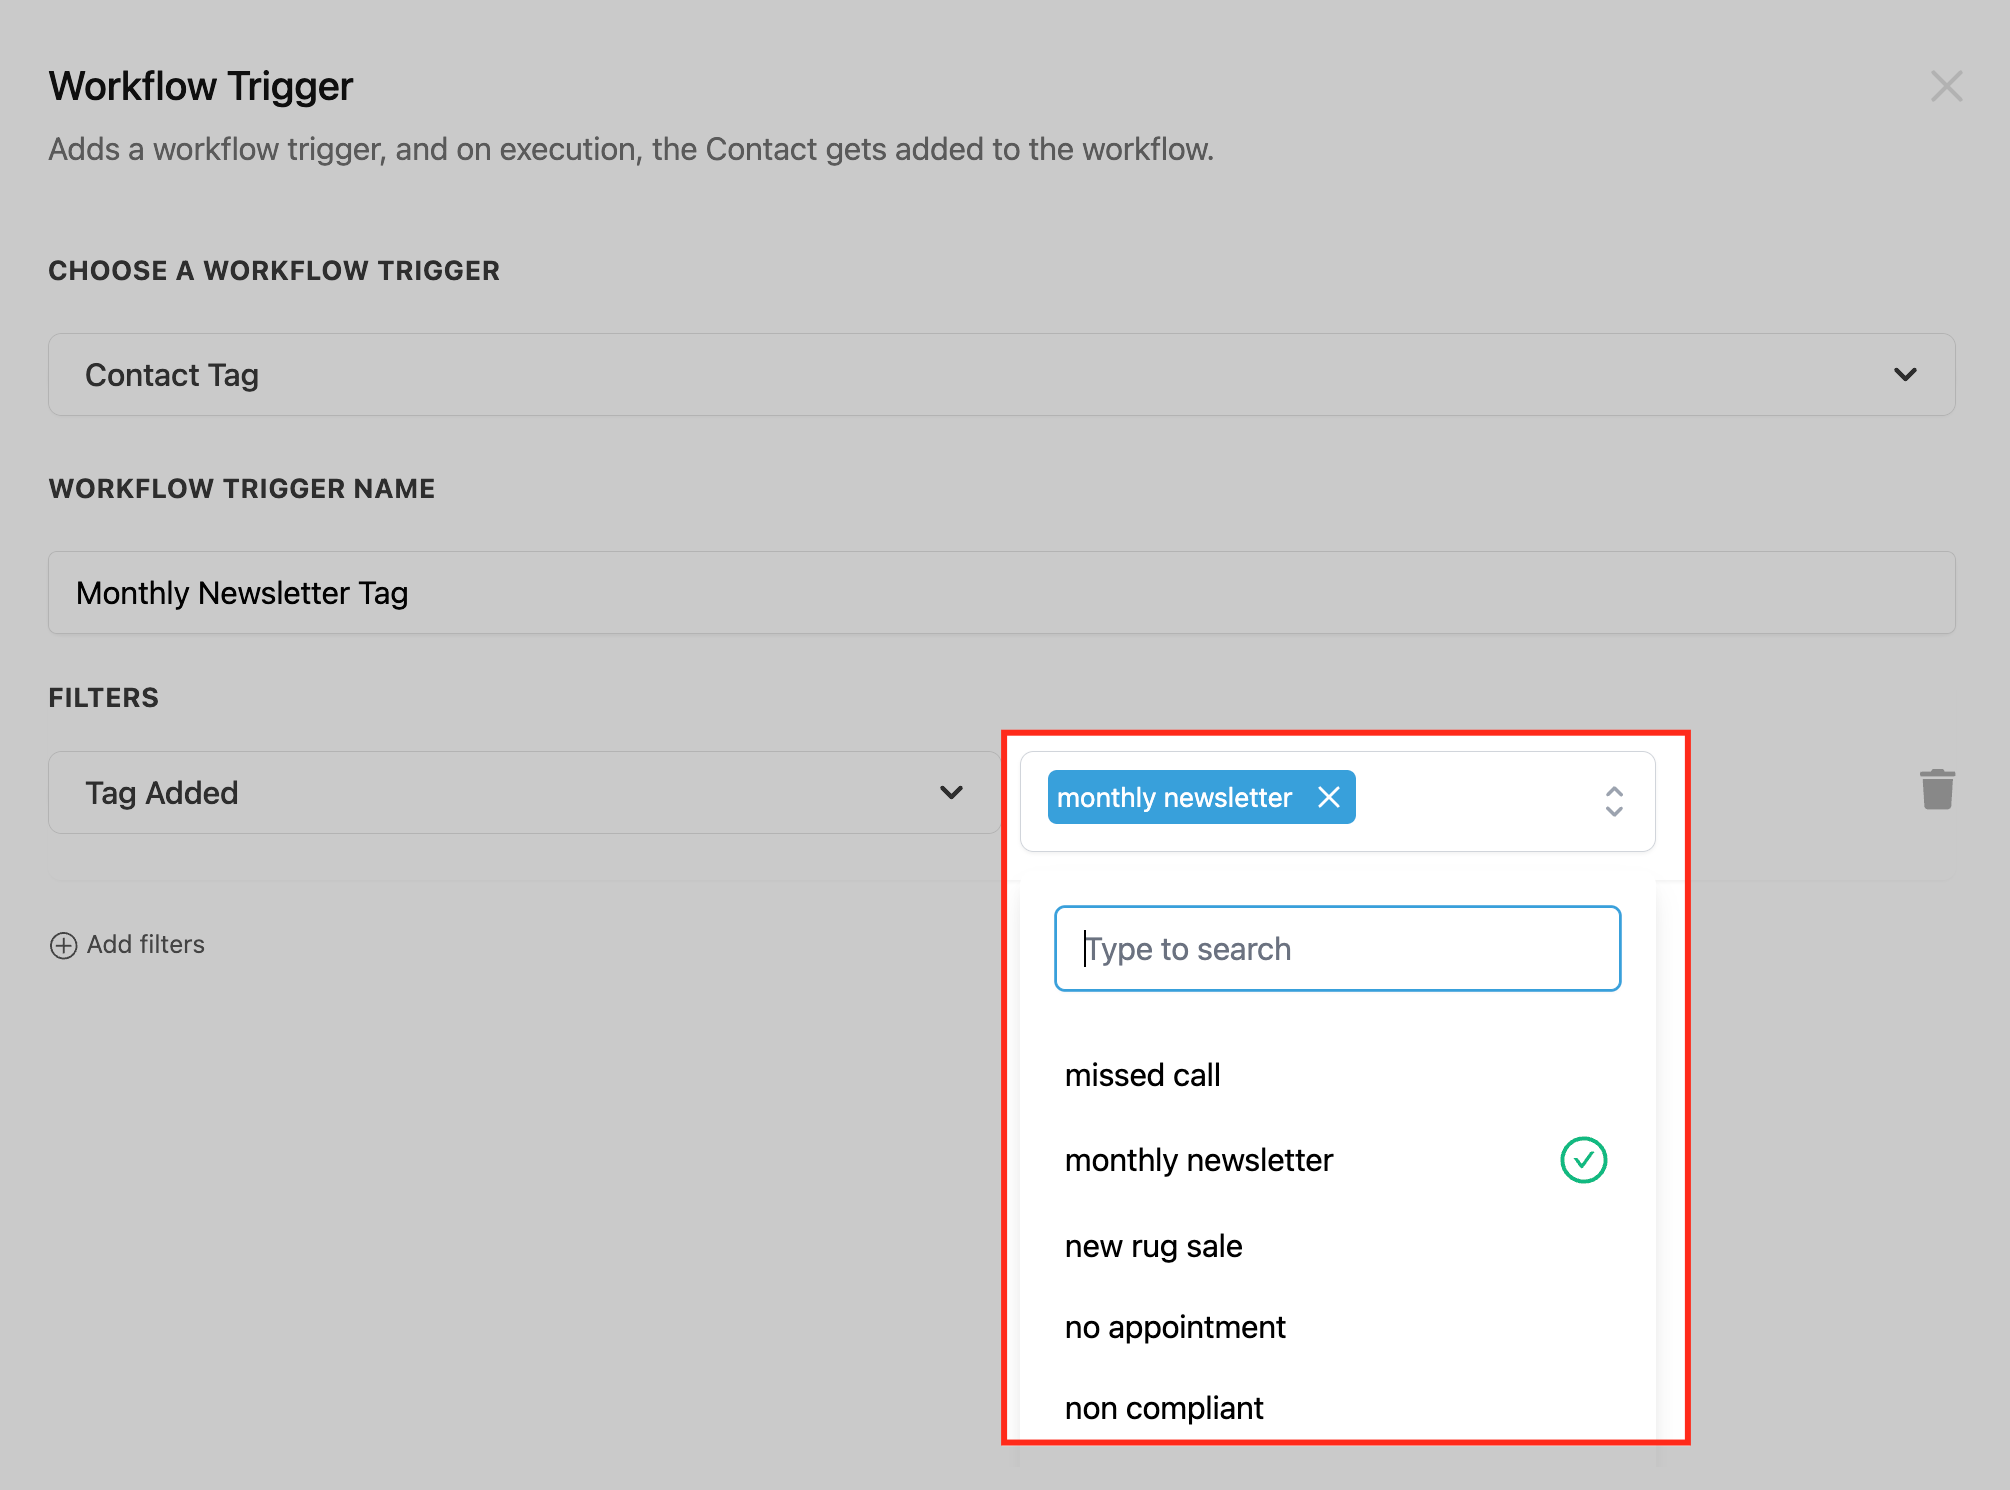
You can also use + Add New Tag to create a new tag on the spot and use it immediately in the workflow you are building.
Use clear, consistent naming conventions for tags (for example "VIP Member" or "Cold Lead") so your triggers stay easy to manage. When you are done, save the workflow and test it by tagging a contact to confirm the actions fire.
Data made available: the contact whose tag changed, with the full contact field set, including the up-to-date {{contact.tags}} list reflecting the change. The trigger does not pass a separate "which tag changed" token, because you already specified the tag in the trigger, so downstream steps know the context by design.
When to use it: use this trigger when an action should run the moment a contact enters or leaves a segment you manage with tags.
Adding a "New Member" tag launches a welcome series.
Adding "Botox Follow-Up" starts a rebooking reminder sequence.
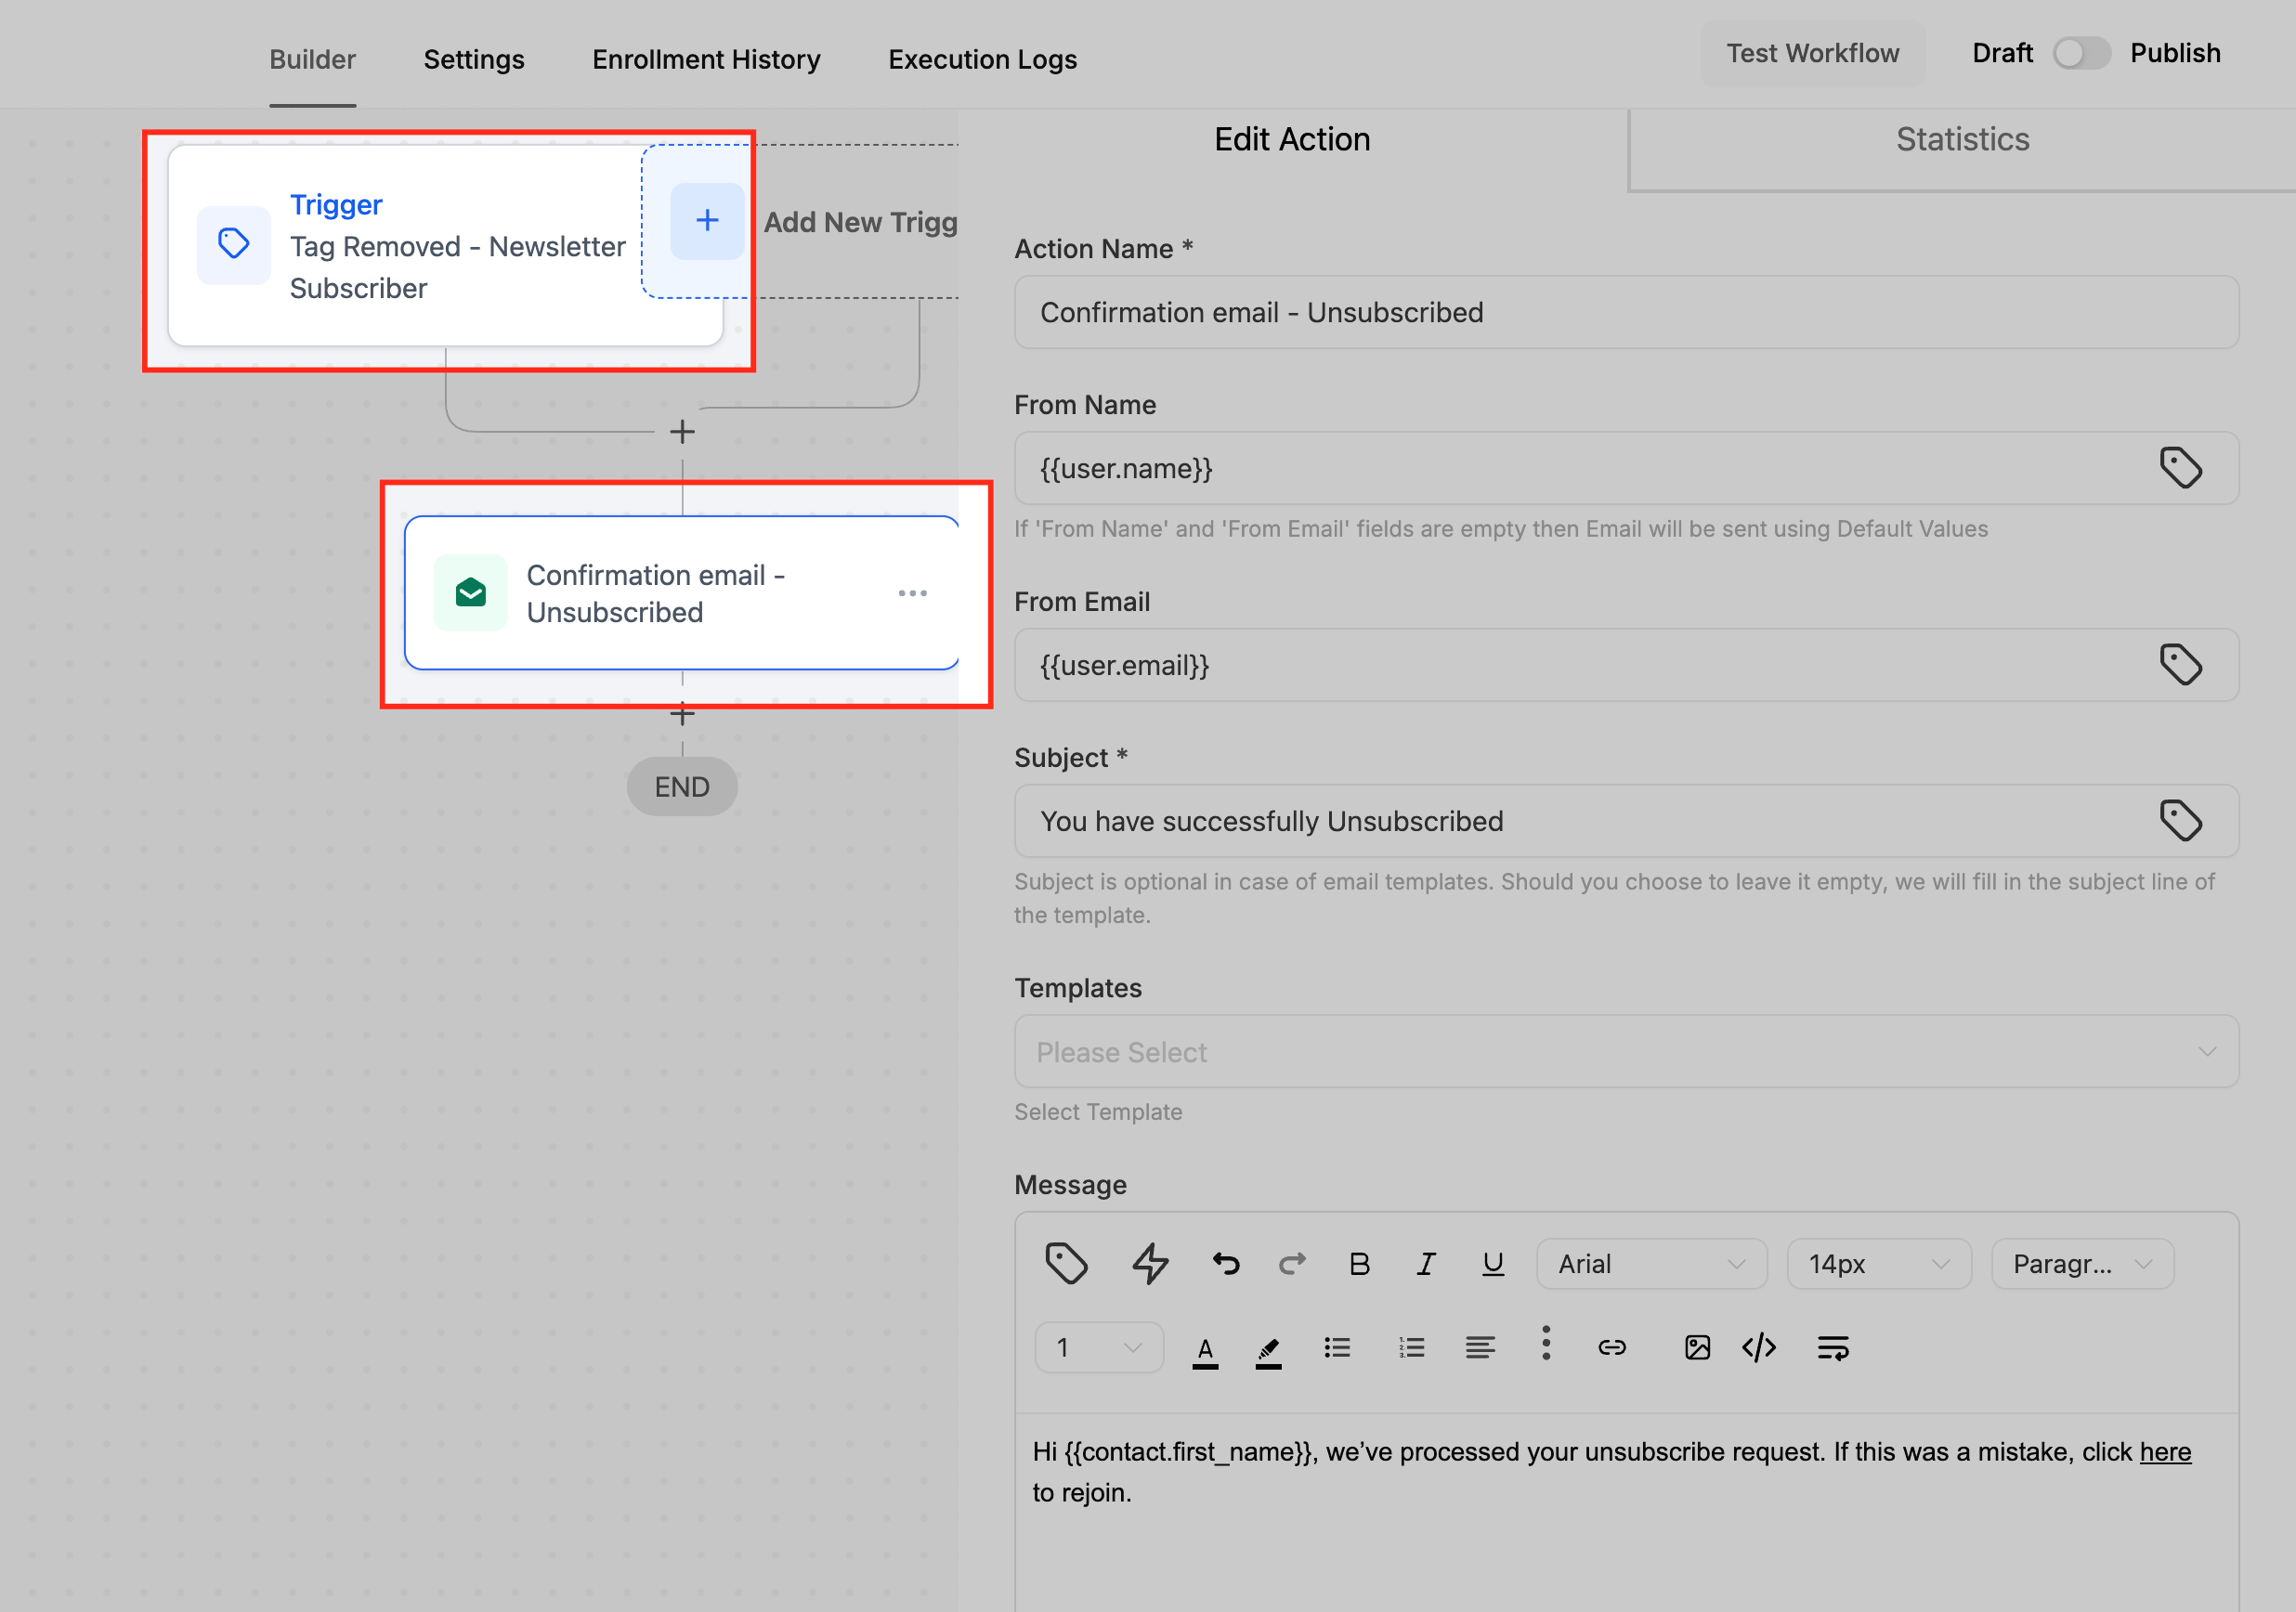
Removing a "Newsletter Subscriber" tag sends a re-engagement message or a short feedback survey to learn why they unsubscribed.
Example actions:
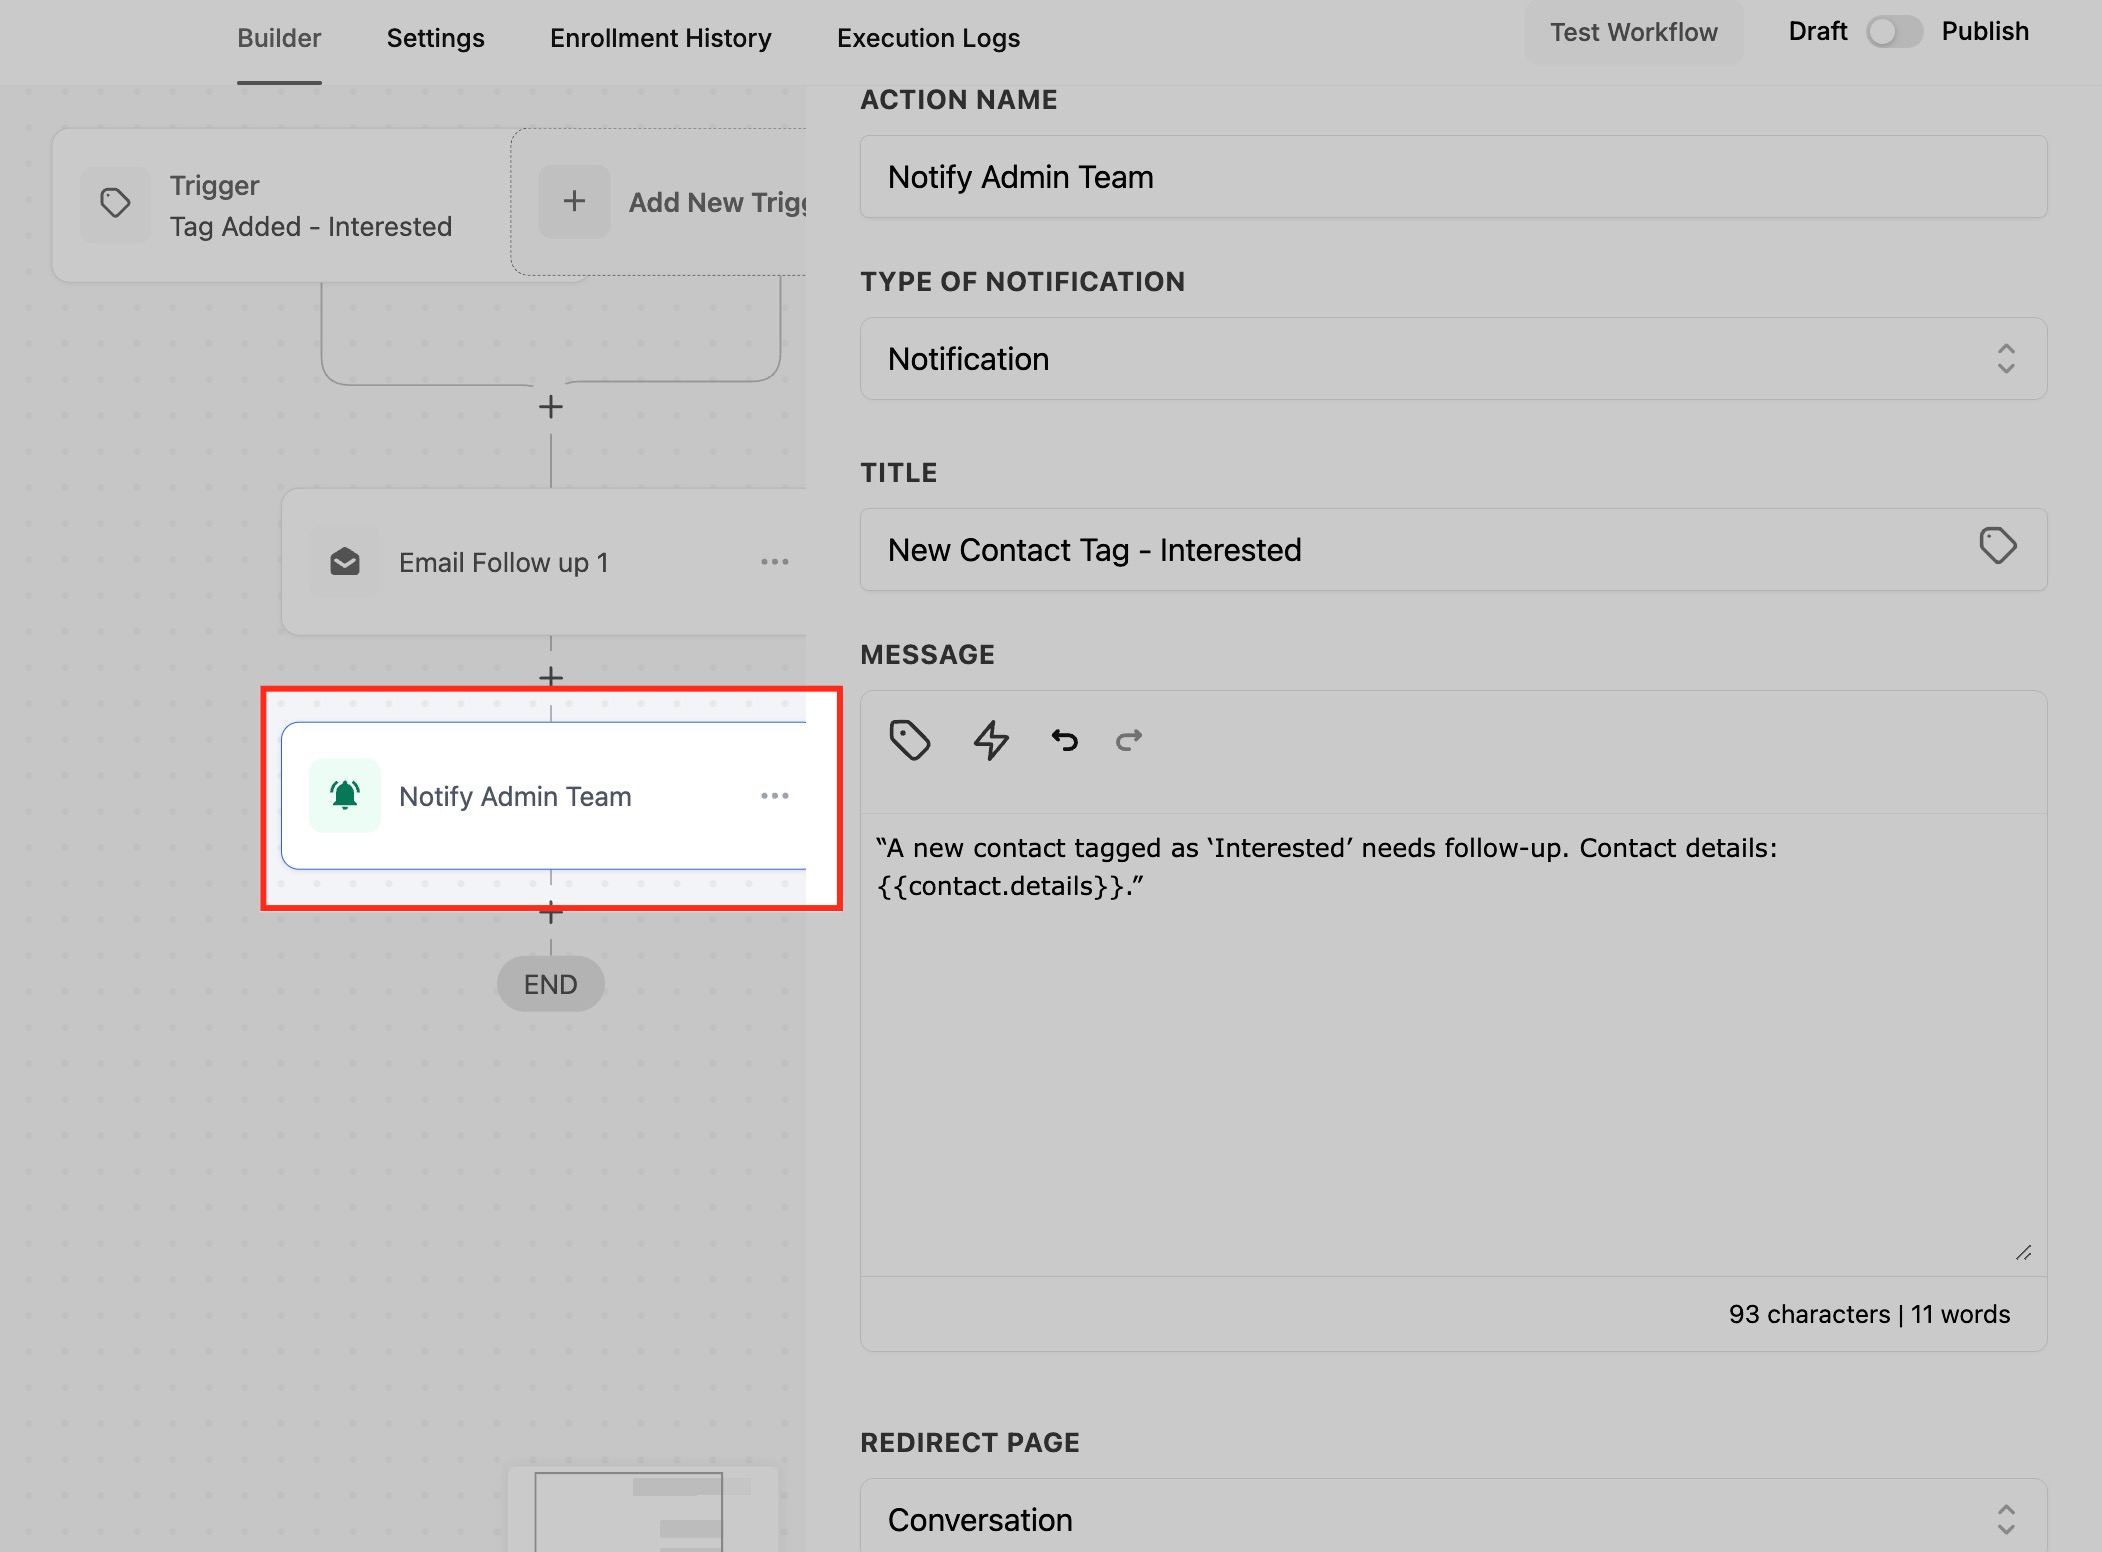
For Tag Added: send an email or SMS (for example, a "Thank You for Your Interest" follow-up using a personalization field like {{contact.first_name}}), or send an internal notification to your team that a tagged contact needs follow-up.
For Tag Removed: send a re-engagement email or SMS confirming an unsubscribe with an option to rejoin, or send a short feedback survey.
Notes, limits, and gotchas:
Keep tags unique and descriptive to avoid confusion across workflows.
Make sure the workflow is published and active, and that every action linked to the trigger is configured.
If multiple published workflows use the same tag trigger, they all fire at once when that tag changes, which can cause unintended overlaps. Plan triggers so the same tag does not drive conflicting automations.
Pairs naturally with Contact Created: Contact Created enrolls the lead, a later step adds a tag, and a separate Contact Tag workflow reacts to that tag.
Fires on: a change to a contact's Do Not Disturb (DND) status. It fires whenever DND is enabled or disabled, with granular control by direction (Inbound or Outbound) and by channel (SMS, Email, Phone Calls, and more). It runs no matter what caused the change. In Conversations and the activity log, the source of the change is recorded as DND enabled or disabled by Workflows, by a User, or by the Contact, for particular channels or all channels.
Configuration and filter options:
After adding the trigger and naming it (for example "DND for SMS"), configure the filters below.
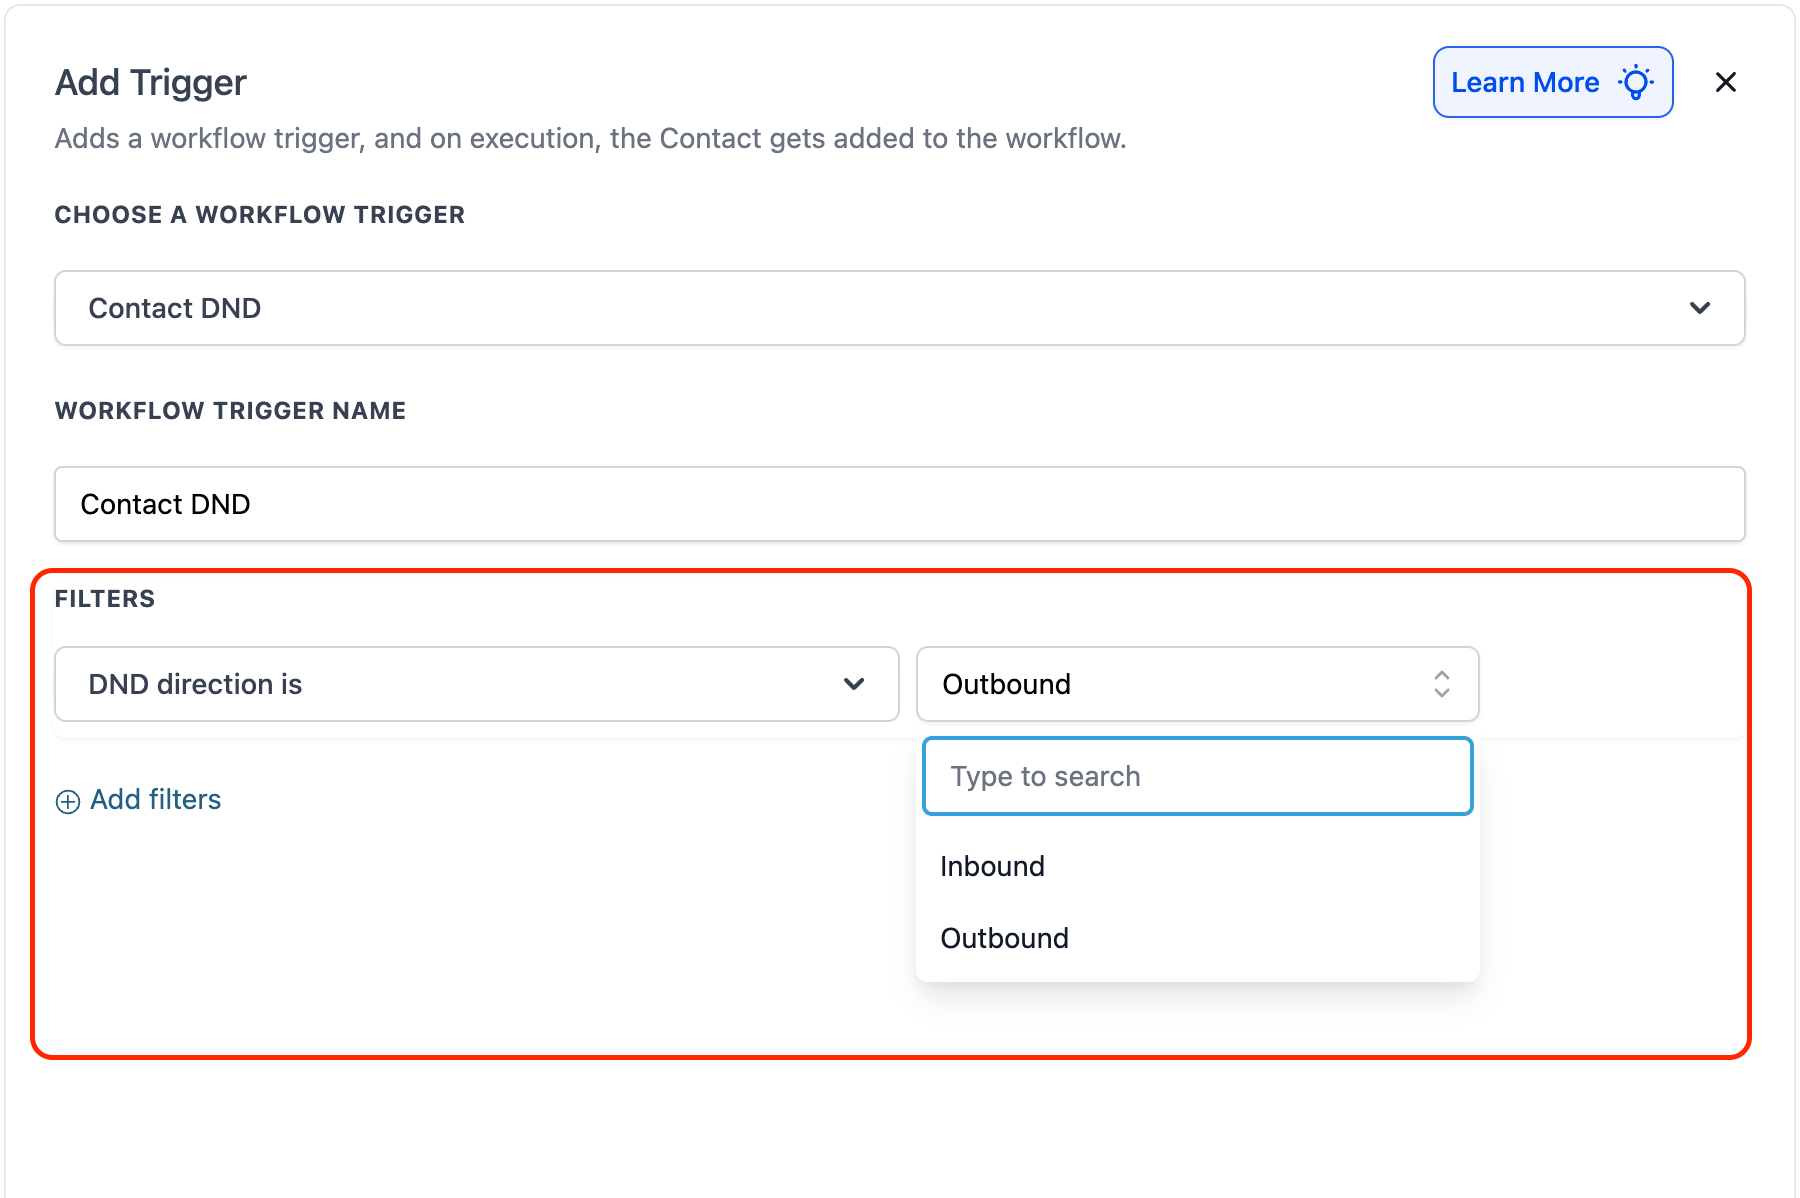
Select DND Direction:
Outbound: fires when outbound DND changes. Use this to manage contacts who opted out of receiving your communications (marketing emails, SMS campaigns, outbound calls).
Inbound: fires when inbound DND changes. Use this to manage contacts whose incoming calls and SMS should be blocked, which helps filter spam. Inbound DND applies to the Calls and SMS channels.
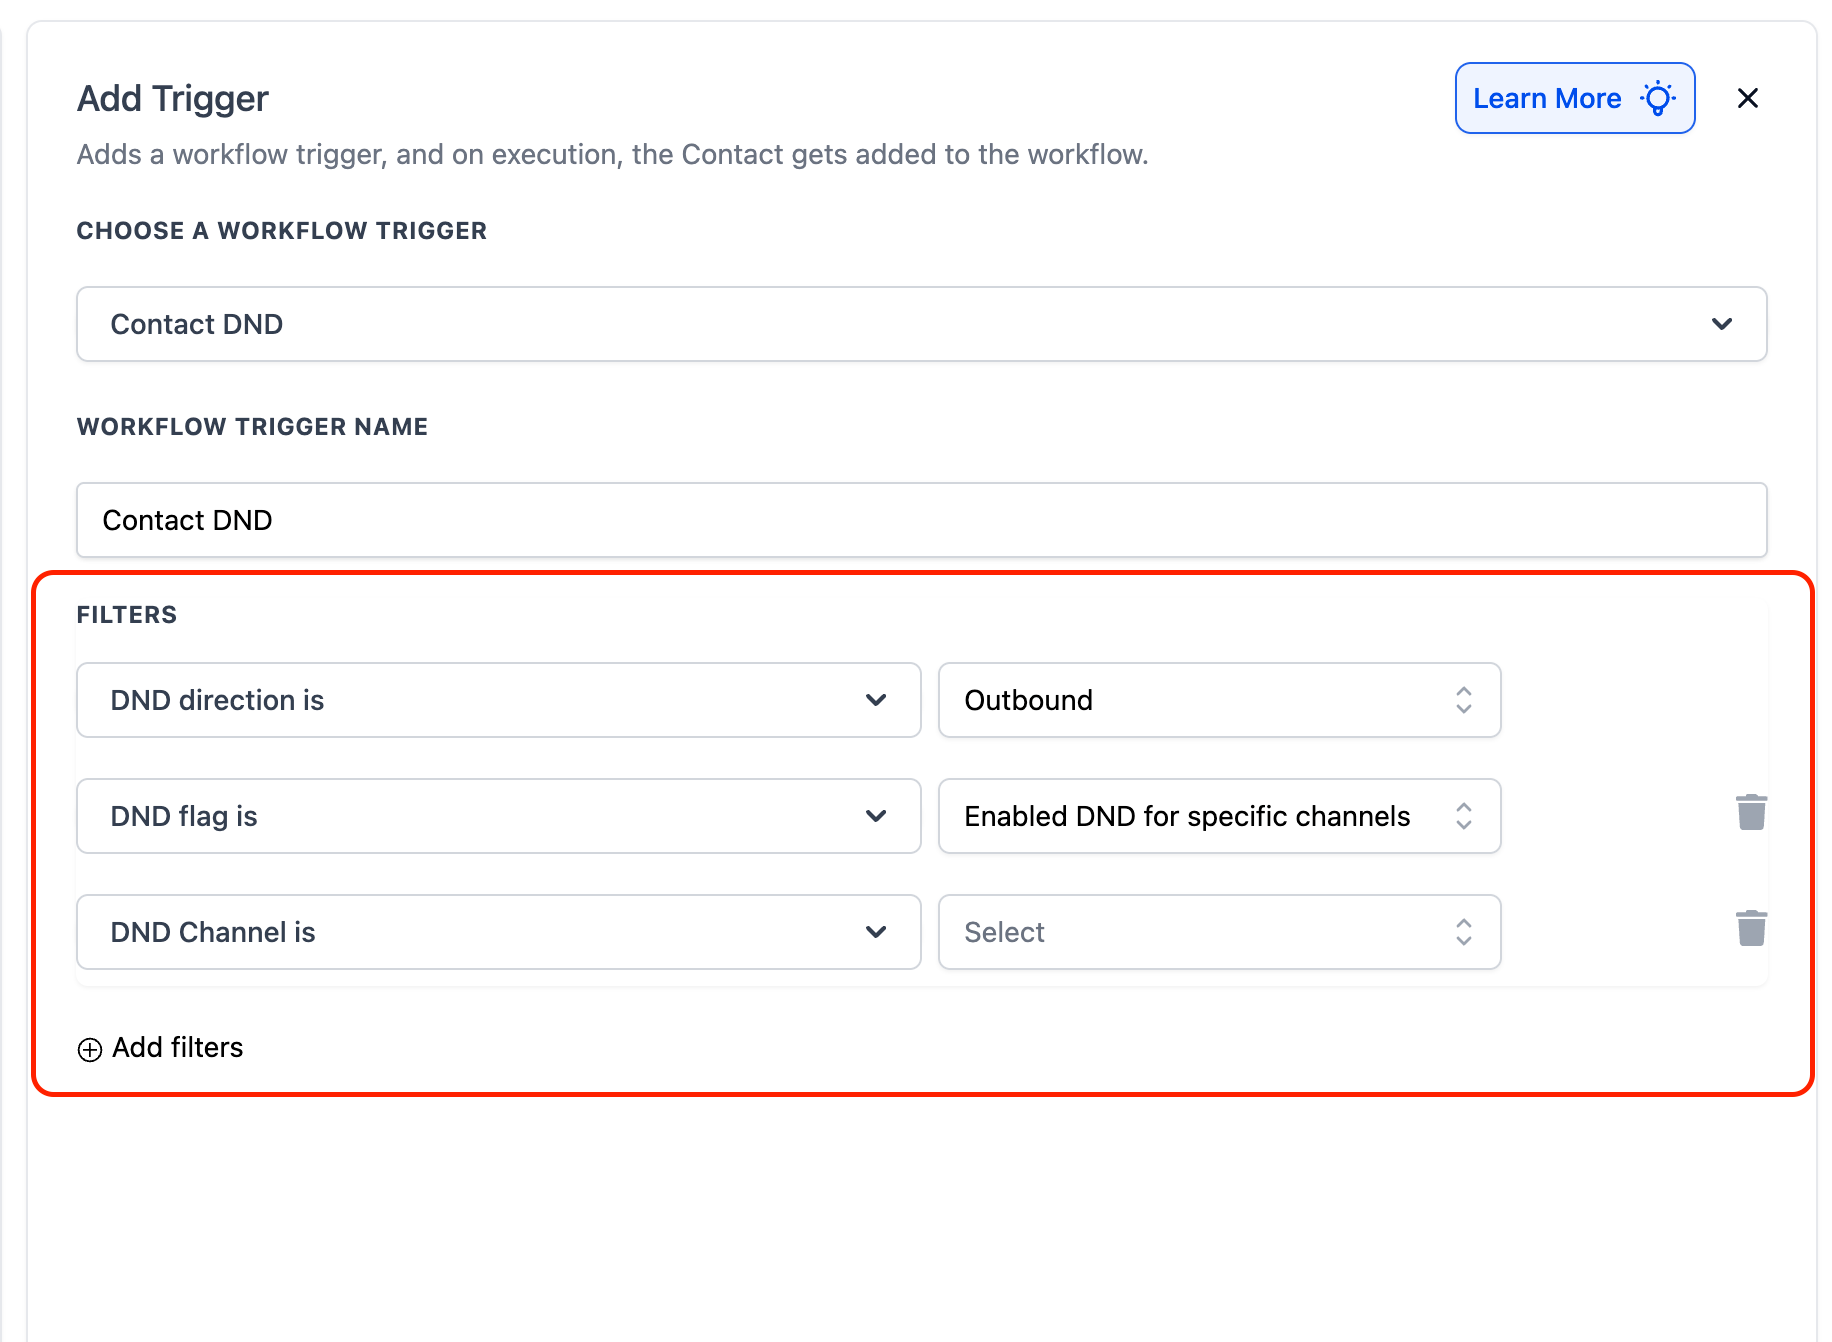
Select DND Flag:
Disabled DND for All Channels: fires when DND is turned off across all channels. Useful when a contact opts back in everywhere.
Disabled DND for Specific Channels: fires when DND is turned off for specific channels only (for example just SMS or email).
Enabled DND for All Channels: fires when the contact opts out of all channels, ensuring nothing further is sent.
Enabled DND for Specific Channels: fires when DND is enabled for one or more specific channels, blocking only those while still allowing others.
Choose Specific Channels: this refines the trigger to specific channels and only becomes available after you select one of the "Specific Channels" options in the DND Flag filter. Channels include:
SMS
Phone Calls
Google My Business messages
Facebook messages
Tag filter: restrict the trigger to contacts that match tag conditions. Operators (all support multi-select):
Equals to / Not equals to
Any of: fires when any selected tag is present.
None of: fires when none of the selected tags are present.
Add multiple Tag filters on the same trigger to combine conditions with AND logic, for example including one tag while excluding another.
Data made available: the contact whose DND status changed, with the full contact field set. The contact's current DND state (overall and per channel) is reflected on the record, and Aesthetix CRM uses it automatically to skip conflicting communication steps (see gotchas). Pair this trigger with the Add Contact Tag action to stamp a reference tag such as "SMS Opt-Out" so other workflows can read {{contact.tags}} and exclude the contact.
When to use it: use this trigger when you want to honor communication preferences automatically, or when you want to block junk inbound traffic.
When a client opts out of SMS but still wants emails, tag them "SMS Opt-Out," remove them from active SMS campaigns, and notify your team.
When a client opts back in, remove their "Do Not Contact" tag and resume relevant workflows.
Block spam callers and junk SMS (Inbound DND) so they stop cluttering your pipeline with false opportunities.
Example workflow (manage SMS opt-out): Trigger: Contact DND, Direction Outbound, Flag Enabled for Specific Channels, Channel SMS. Action 1: Add Contact Tag "SMS Opt-Out." Action 2: Remove from your active SMS campaign workflows. Action 3: internal notification to the marketing team.
Example workflow (re-enable on opt-in): Trigger: Contact DND, Direction Outbound, Flag Disabled DND for All Channels. Action 1: Remove Contact Tag "Do Not Contact." Action 2: notify the sales team. Action 3: add the contact back to the relevant nurture workflow.
Notes, limits, and gotchas:
When a contact's DND status changes while they are already in a workflow, Aesthetix CRM automatically skips communication steps that conflict with their DND settings. For example, if email DND is on, email steps are skipped while other actions like SMS or task creation still run.
You usually do not need to remove contacts from all workflows when they enable DND, because conflicting steps are skipped automatically. If a contact opts out of all communication, you may still choose to remove them from all workflows.
You can reference DND state in other automations by stamping tags like "DND SMS" or "DND Email" and filtering on them.
Enable automated compliance settings under your Business Profile so opt-out messaging and sender information are added to SMS and emails automatically.
Fires on: a contact meeting the engagement-score condition you set, so the trigger adds contacts to a workflow based on their engagement score and other criteria. The engagement score reflects how actively a contact interacts with you, and this trigger lets you automate based on that level.
Configuration and filter options:
Select Contact Engagement Score from the trigger options.
Name the trigger, such as "High Engagement Contacts."
Set your filters. The Score filter is required and filters contacts by their engagement score. Business Niche is optional and filters by the business category associated with the contact.
Save the trigger and add your actions.
Field | Required | What it does |
|---|---|---|
Score | Yes | The contact's engagement score. Apply an operator and value to define the threshold. |
Business Niche | No | The business category associated with the contact. Filter with text operators. |
Operators available for the Score and Business Niche filters:
Operator | Fires when |
|---|---|
Equals to | The value equals the input value. |
Greater than | The value is greater than the input value. |
Greater than or Equal to | The value is greater than or equal to the input value. |
Less than | The value is less than the input value. |
Less than or Equal to | The value is less than or equal to the input value. |
Is empty | The field value is empty. |
Is not empty | The field value is not empty. |
Contains Phrase | The field contains the entered phrase. |
Does not contain Phrase | The field does not contain the entered phrase. |
Data made available: the contact and its full field set, including the engagement score that satisfied the condition. A related Modify Contact Engagement Score action lets you add or subtract points from a contact's score directly inside a workflow, so you can fine-tune scores dynamically as part of your automation (for example, add points when a contact replies, subtract points after a long silence).
When to use it: use this trigger when you want to act on how engaged a contact is.
Segment highly engaged contacts into a VIP campaign (Score Greater than your threshold).
Launch a re-engagement sequence when a contact's score drops below a threshold, a sign they may be losing interest (Score Less than your threshold).
Reward your most engaged clients with an exclusive offer.
Flag contacts with an empty score (Score Is empty) as potentially inactive for review or removal from active campaigns.
Example workflow: Trigger: Contact Engagement Score, Score Greater than your VIP threshold, optionally Business Niche Contains Phrase to narrow further. Action: add tag "VIP," then send an exclusive members-only offer.
Notes, limits, and gotchas:
Score is the only required filter; without a value, the trigger has nothing to evaluate.
Combine with the Modify Contact Engagement Score action to build a self-adjusting engagement loop (reward, then reset or decay the score).
Fires on: a contact's (or team member's) birthday, evaluated against the timing filters you set, so you can send a pre-built birthday message automatically. It uses the contact's birthday field.
Configuration and filter options:
After selecting Birthday Reminder, click Add Filters to control timing. Choose the timing option that fits:
After no. of days: send the message a set number of days after the birthday. Enter how many days after the birthdate the reminder should go out.
Before no. of days: send the message a set number of days before the birthday.
Day is: send the reminder precisely on the birth date.
Month is: send to everyone with a birthday in a chosen month. Pick the birth month and send a single batch message to all contacts celebrating that month.
Data made available: the contact and its full field set, including the birthday, so you can personalize the greeting (for example, "Happy Birthday, {{contact.first_name}}!") and reference any treatment-preference custom fields to tailor a birthday-month offer.
When to use it: use this trigger when you want a recurring, date-driven greeting or promotion tied to birthdays.
Send every client a warm "Happy Birthday" text with a birthday-month discount on their favorite treatment.
Send a monthly batch of birthday greetings to everyone celebrating that month (use Month is).
Example workflow: Trigger: Birthday Reminder, Day is (on the birthday). Action: send SMS, "Happy birthday {{contact.first_name}}! Enjoy a complimentary add-on with any treatment this month, our gift to you."
Notes, limits, and gotchas:
Contacts without a birthday on file will not fire this trigger; keep the birthday field populated to maximize reach.
For greetings both before and on the birthday, set up two triggers (or two timing filters as your account allows).
Fires on: a date field you choose, evaluated before, on, or after that date according to your timing settings. It is built for time-based follow-ups such as renewals, anniversaries, package expirations, and appointment reminders.
The date fields available depend on the workflow type. In contact-based workflows you can select supported Contact date fields and supported Opportunity date fields. In custom object based workflows you can select date fields on that same custom object type. In company based workflows you can select Company date fields. The field selector only shows fields supported by the workflow type, keeping the trigger aligned to the object the workflow runs on.
Configuration and filter options:
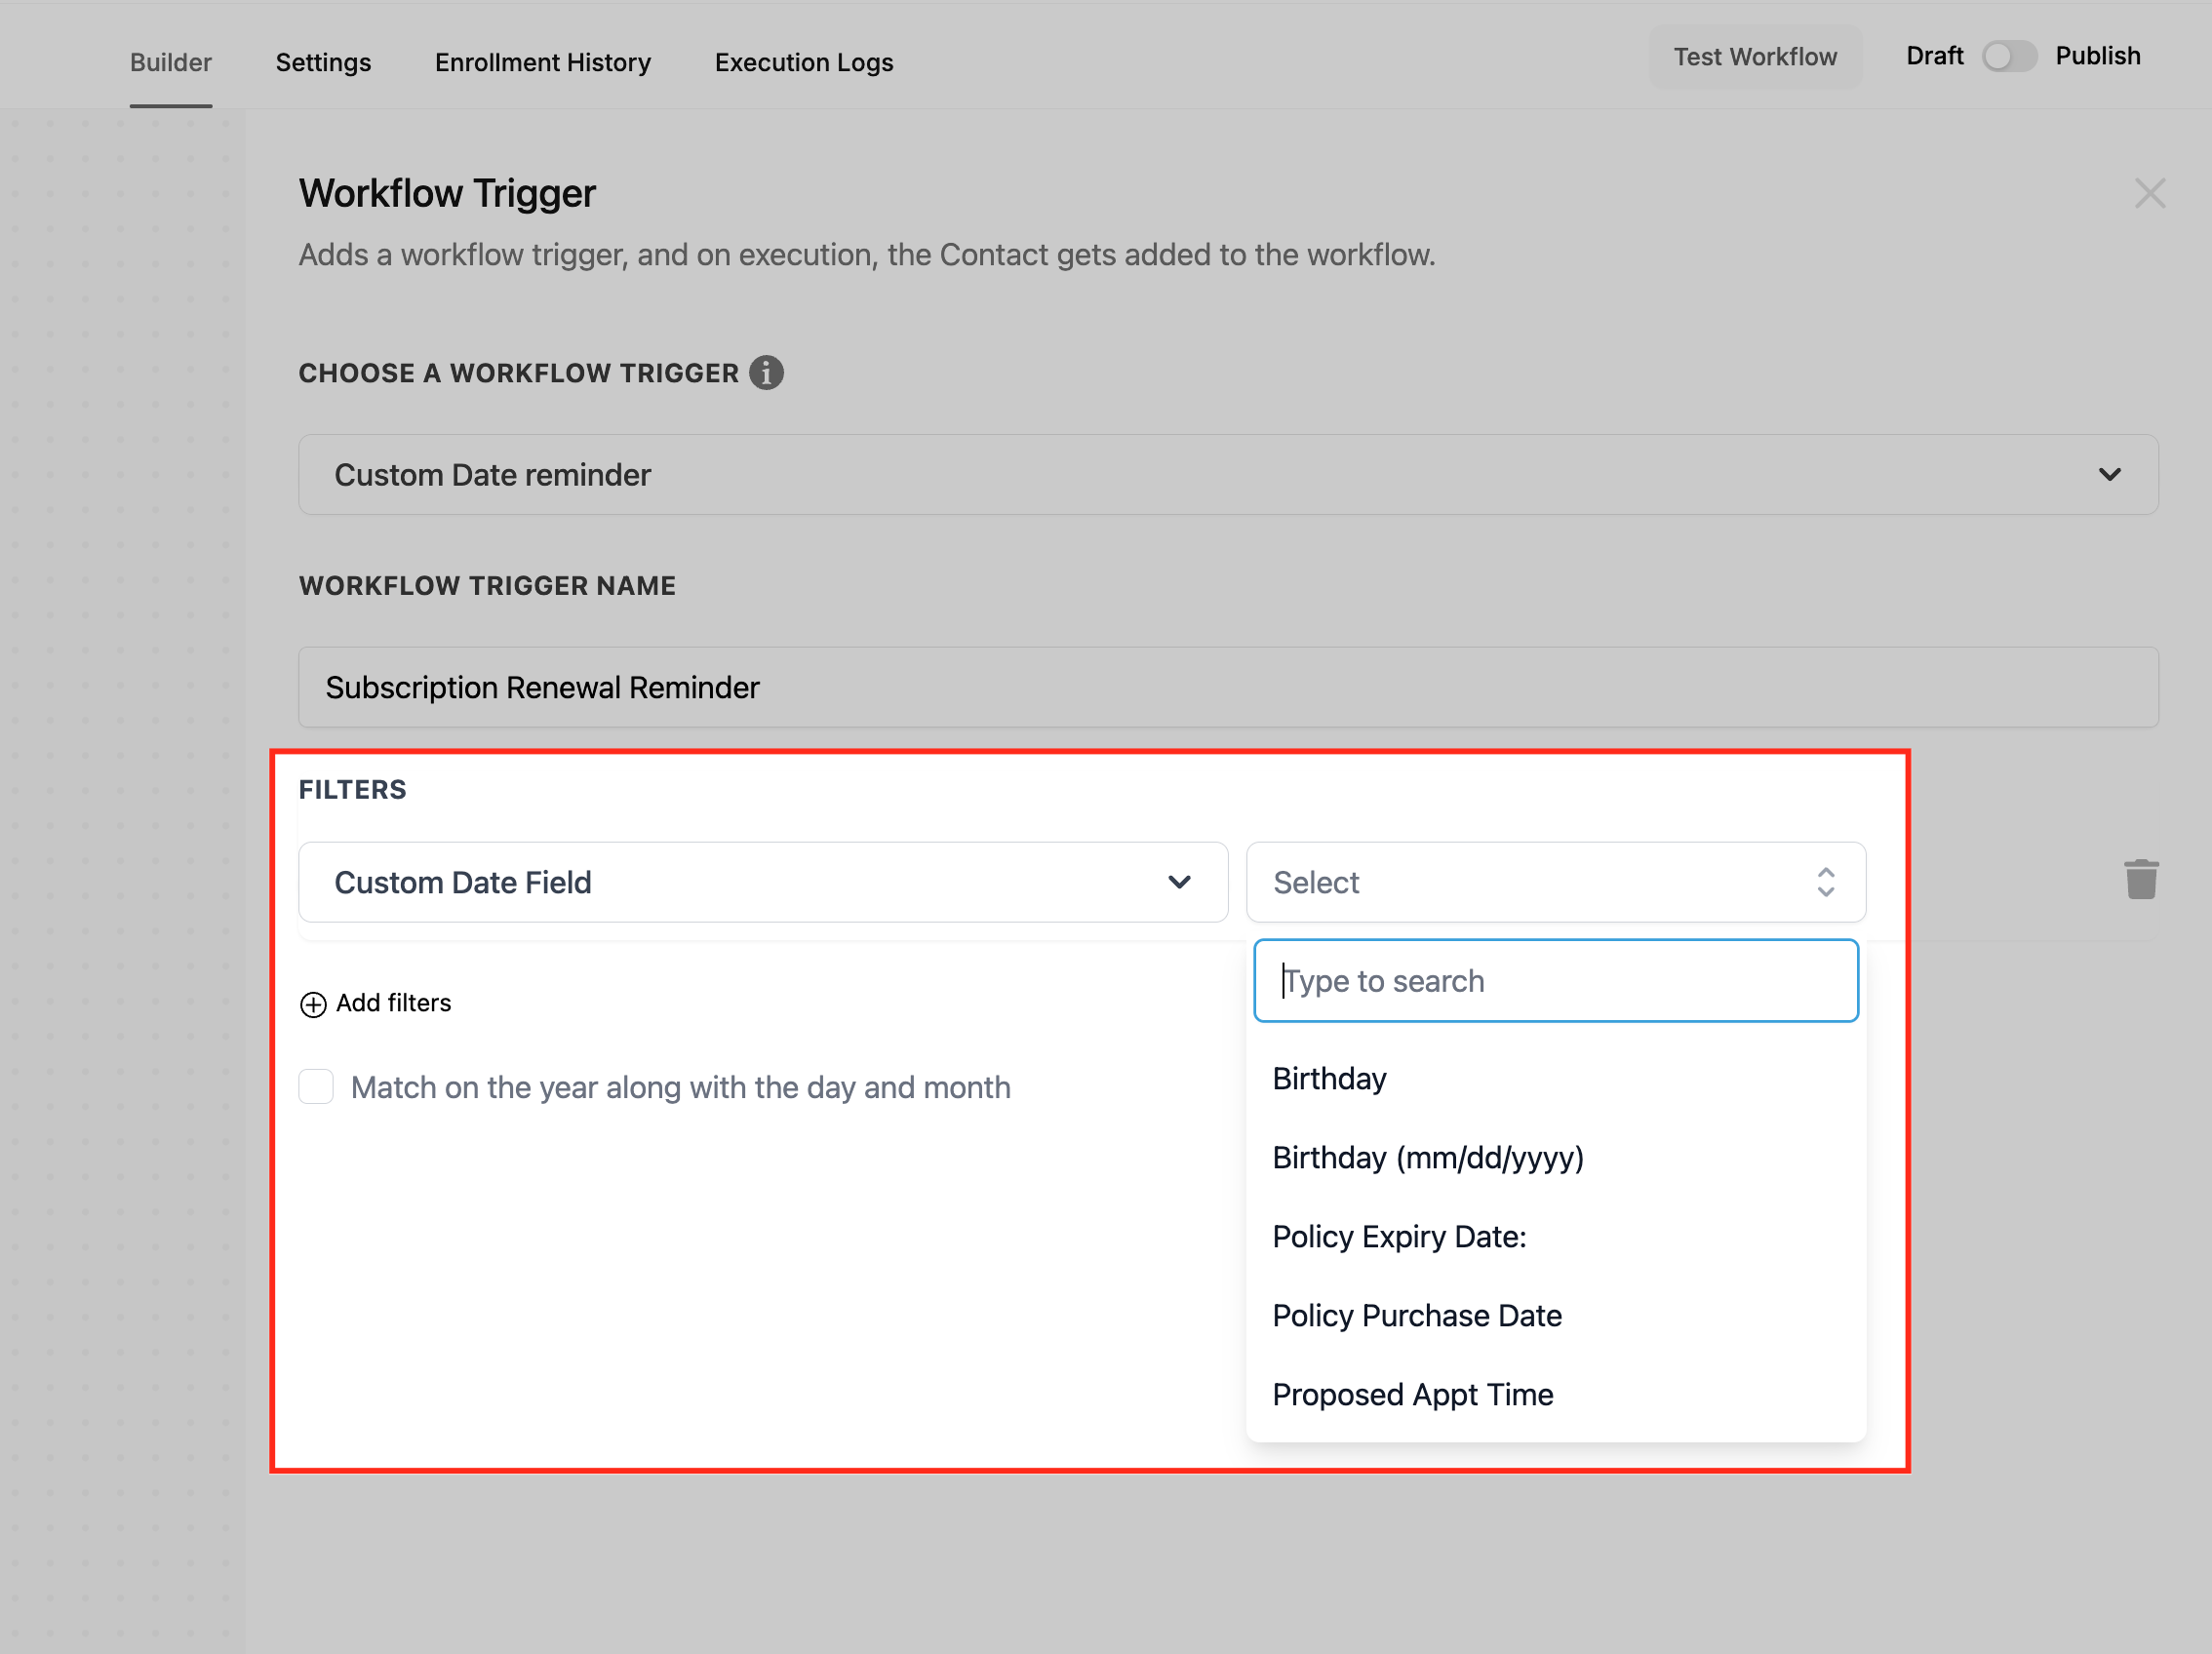
After adding the trigger and naming it, click Add Filters.
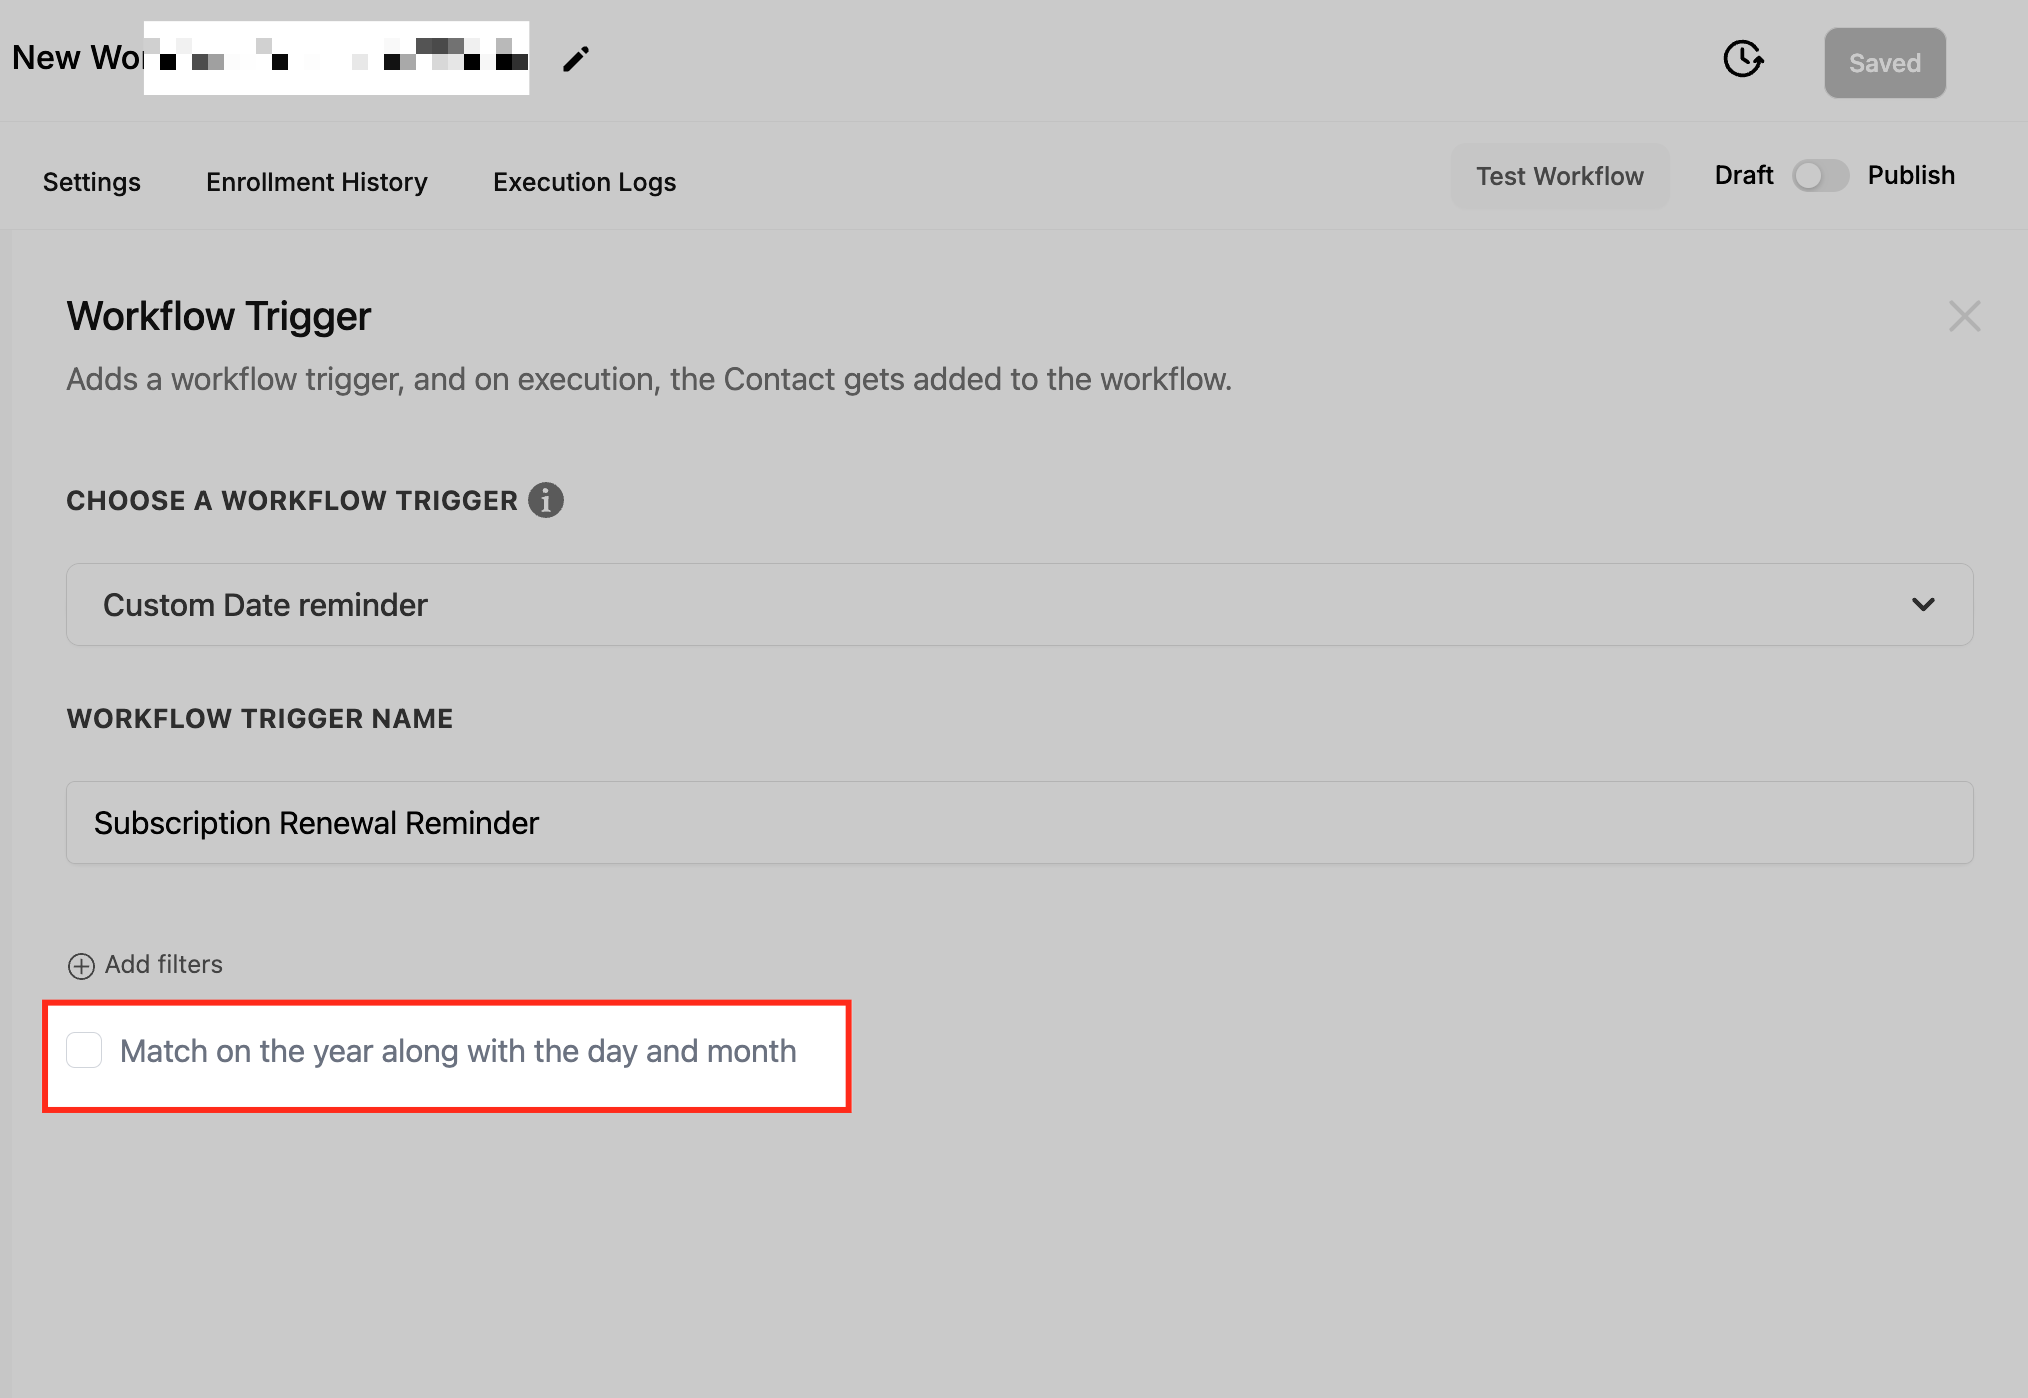
Match on Year Along with Day and Month: enable this so the trigger fires only when the year in the date field matches the current year. Leave it off for reminders that should recur every year on the same day and month (such as a birthday or annual anniversary); turn it on for one-time, year-specific dates (such as a particular expiry date).
Custom Date Field: choose which date field the trigger evaluates. The workflow starts when the reminder timing matches your settings (before, on, or after the selected date). Common fields include:
Birthday (Month and Day only, when the year is not needed).
Birthday (MM/DD/YYYY) (full birth date including year, needed to calculate or validate exact age).
Policy Expiry Date (tracks when a policy or plan expires, so renewals are handled on time).
Policy Purchase Date (tracks anniversaries and follow-up schedules based on the purchase date).
Proposed Appt Time (the date and time of a scheduled appointment, for workflows around consultations and services).
In a med spa you will most often repurpose these fields, or your own custom date fields, to mean membership renewal date, package expiry date, last treatment date, or next-due date.
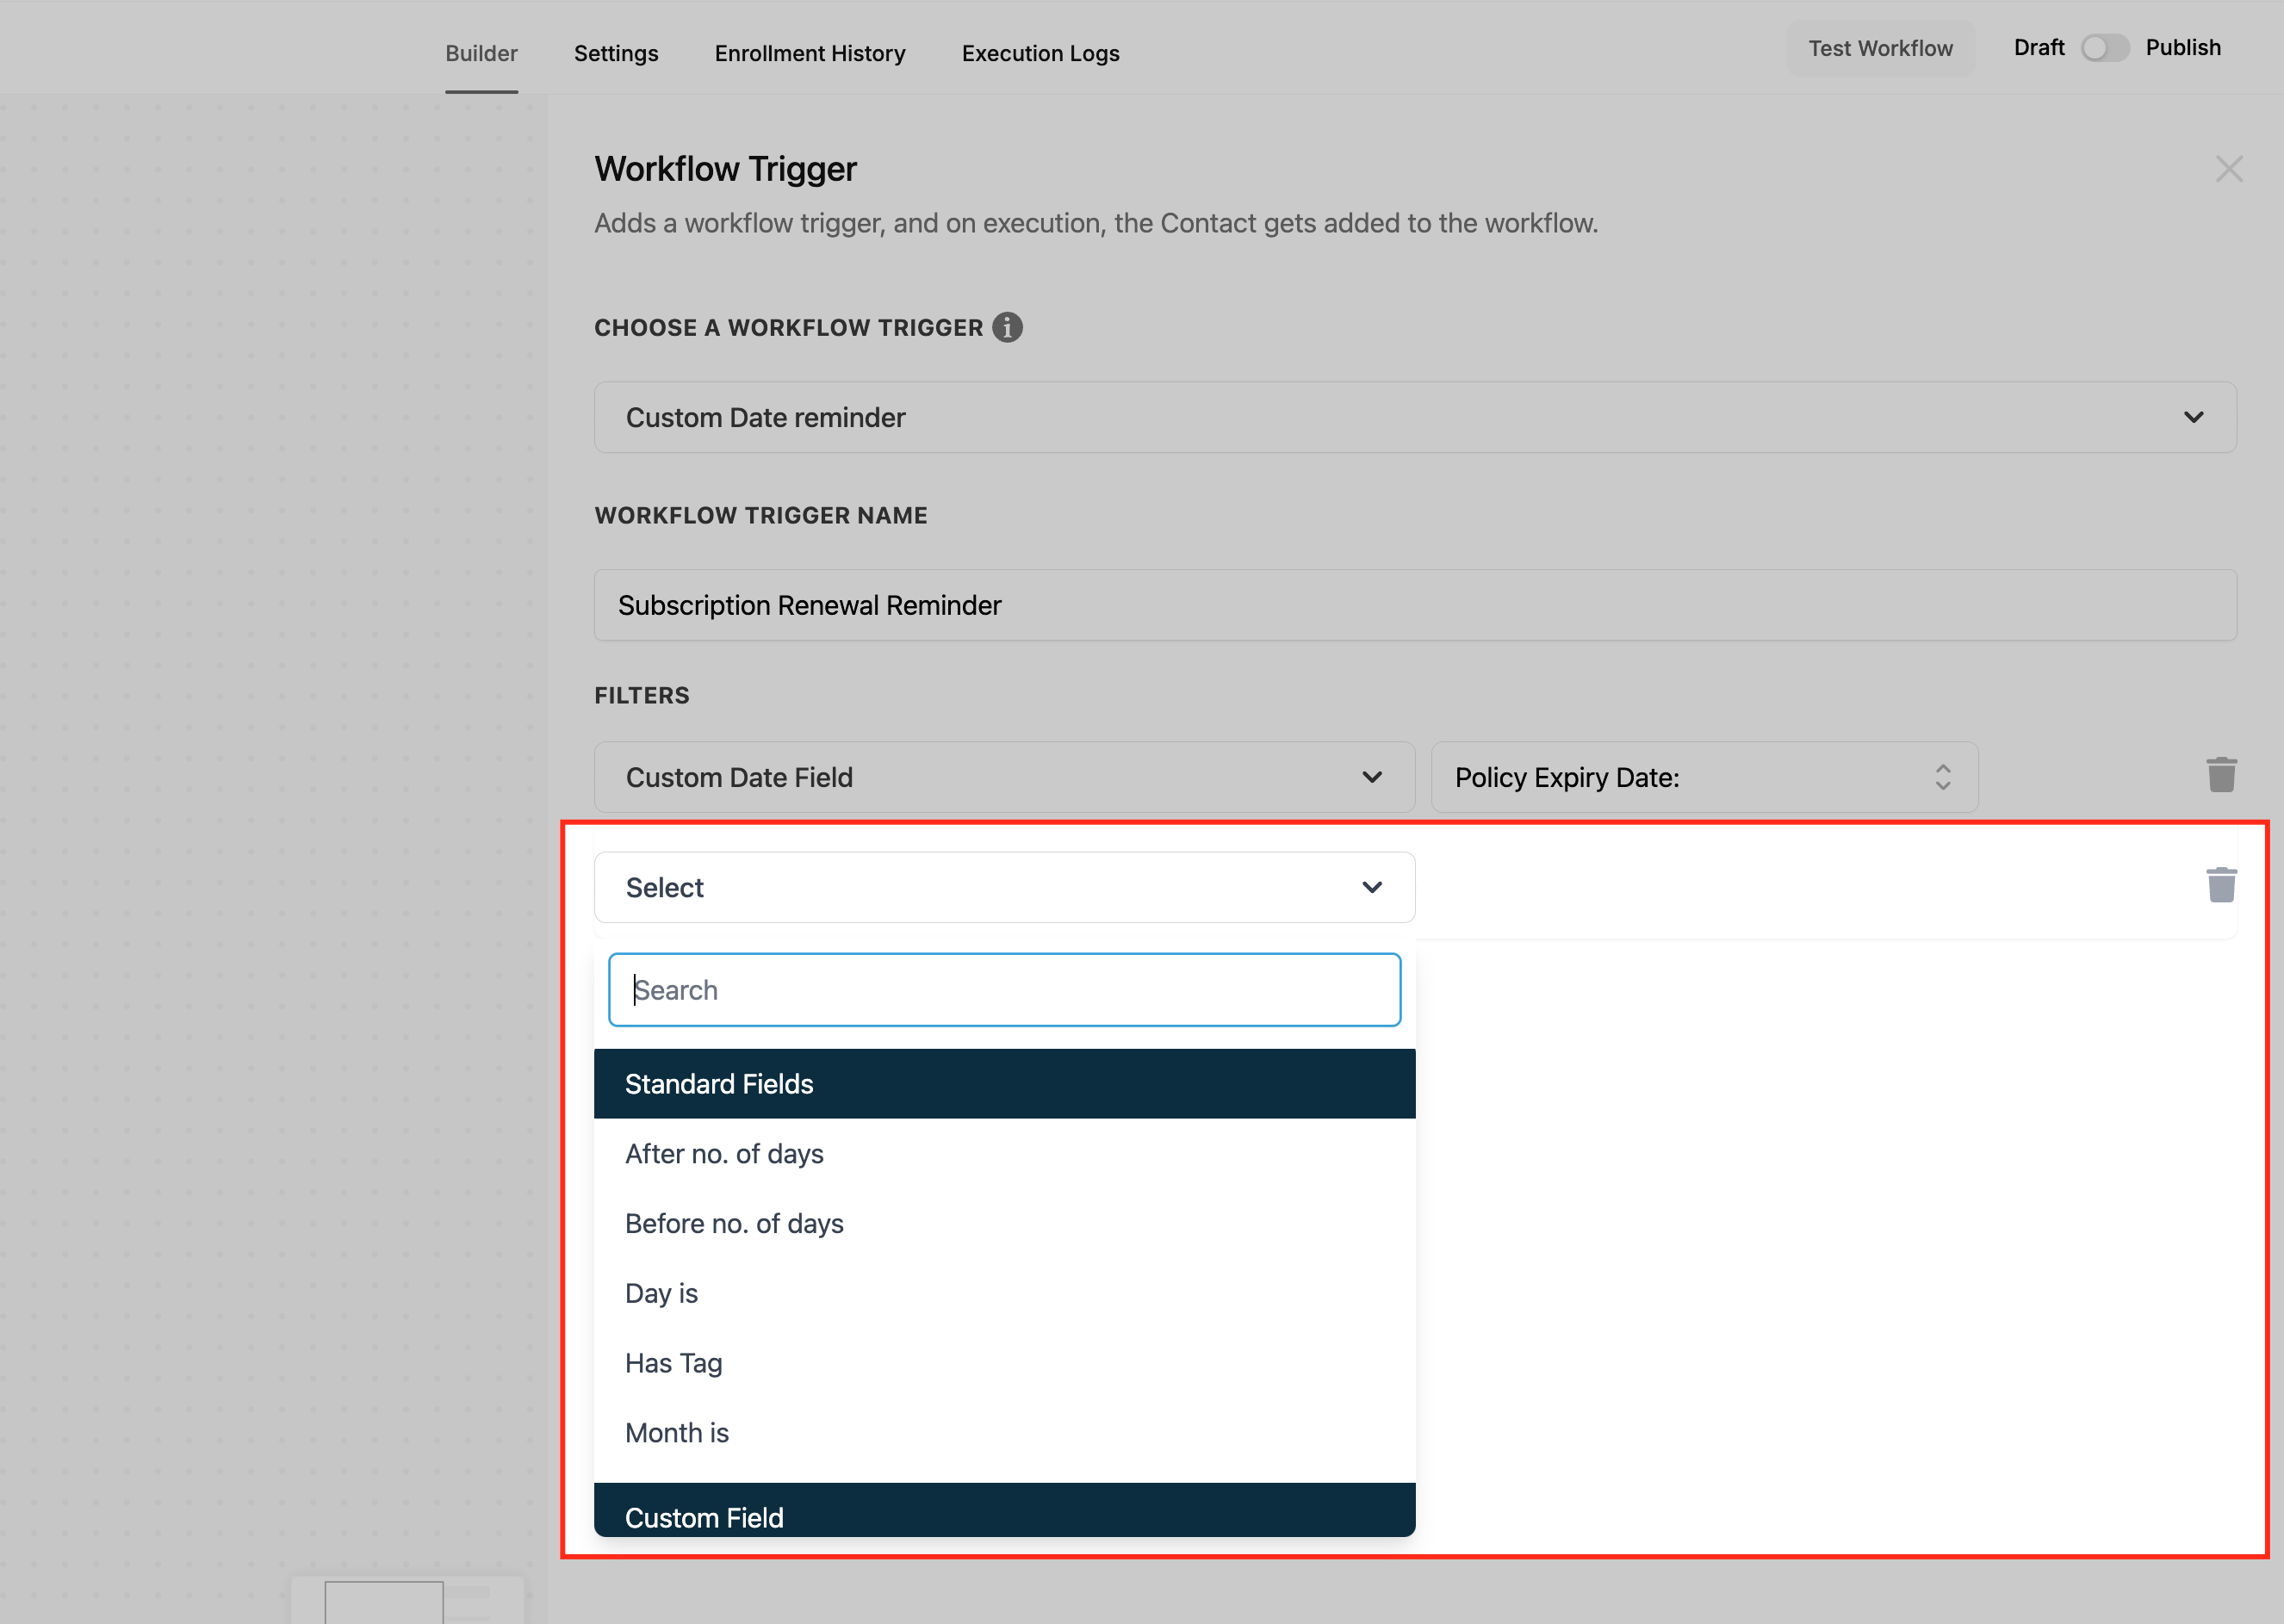
Advanced filters:
After Number of Days: fire a set number of days after the custom date. For example, five days after a purchase date for a post-event follow-up.
Before Number of Days: fire a set number of days before the custom date, such as a reminder three days before an expiry date or appointment.
Has Tag: limit the trigger to contacts carrying a specific tag, for precision targeting of a customer segment.
Day Is: specify an exact day of the week (for example Monday) for the workflow to fire, useful for scheduling calls or campaigns on a set weekday.
Month Is: specify a particular month, ideal for seasonal campaigns or recurring annual events.
Data made available: the contact (or the object the workflow runs on) and its full field set, including the date field that fired and any related fields. You can reference the date in messages and use other contact custom fields to personalize, for example "{{contact.first_name}}, your package of {{contact.package_name}} expires soon."
When to use it: use this trigger when you want to act a set time before, on, or after a meaningful date.
Remind a client a few days before their membership renews (Before Number of Days).
Send a "we miss you" message a set number of days after their last treatment date (After Number of Days).
Follow up before a package expiry date so unused sessions do not go to waste.
Example workflow: Trigger: Custom Date Reminder, Custom Date Field = Policy Expiry Date (used as membership renewal date), Before Number of Days = 7, optionally Has Tag = Member. Action: send SMS and email reminding the client their membership renews in a week, with a link to manage it.
Notes, limits, and gotchas:
To remind contacts both before and after a date, set up two separate triggers, one for each.
If the custom date field is empty for a contact, the trigger will not fire for them. Make sure relevant contacts have the date populated.
To send recurring annual reminders, leave Match on Year Along with Day and Month off so the trigger fires every year on the same date; enable it only when the year must match.
Fires on: a note being added to a contact. The contact the note was added to is the one enrolled into the workflow. It fires once per note added, regardless of who added it (a team member in the contact record, a workflow action, or an integration).
Configuration and filter options:
After selecting Note Added and naming the trigger, click Add Filters. With no filters it fires whenever a note is added to any contact. To narrow it:
Has Tag: only fires when a note is added to a contact who has the selected tag. No other contacts are enrolled.
Doesn't Have Tag: fires for all contacts except those who have the selected tag.
Custom Fields: only allows contacts with specified custom field values, which are set up elsewhere in your account.
Data made available: the contact the note was added to, with the full contact field set, plus the note context (the note body is available to downstream actions, so you can include it in an internal notification to keep a provider informed). This makes Note Added a clean way to surface a freshly logged consultation note to the assigned provider.
When to use it: use this trigger when a logged note should kick off a notification or follow-up.
When a front-desk coordinator logs a note about a client's consultation, automatically notify the assigned provider.
Start a follow-up sequence whenever a note is added to a contact carrying a specific tag.
Example workflow: Trigger: Note Added, Has Tag = Consult Booked. Action: internal notification to {{contact.assigned_to}}, "New note on {{contact.full_name}}: review before their consult."
Notes, limits, and gotchas:
You can apply both Has Tag and Doesn't Have Tag, but they can cancel each other out, so it is usually best to use one or the other depending on your needs.
You can pair Note Added with any workflow actions, or leave the workflow without actions if you only want to log the event.
Fires on: an existing note on a contact being modified. The contact whose note was edited is enrolled. It is useful for keeping your team informed when client notes are updated and for synchronizing contact information as records change. It fires on edits to existing notes, not on the creation of new notes (use Note Added for new notes).
Configuration and filter options:
Select Note Changed under the Contact section and give it a descriptive name. Click Add Filters. You can save the trigger without filters, in which case it fires whenever any note on any contact is modified, or narrow it with these tag filters:
Has Tag: fires only when the modified note belongs to a contact who has the selected tag (chosen from your predefined tag list).
Doesn't Have Tag: fires only when the modified note belongs to a contact who does not have the selected tag.
Data made available: the contact whose note was changed, with the full contact field set, plus the updated note context for downstream actions. As with Note Added, this lets you push the current note content into a notification.
When to use it: use this trigger when an edit to a client note should reach the right person.
Notify a team member whenever a note on one of their assigned clients is edited, so important updates about a client interaction are never missed.
Example workflow: Trigger: Note Changed, Has Tag = VIP Member. Action: internal notification to the account owner that a VIP client's note was updated.
Notes, limits, and gotchas:
Has Tag and Doesn't Have Tag can cancel each other out; use one or the other.
Note Changed and Note Added are separate events; if you want to react to both creating and editing notes, set up both triggers.
Fires on: a new task being created and assigned to a user on your team. The contact related to that task is enrolled into the workflow, so you can run actions as soon as a task is created. It fires on task creation, not on completion (use Completed Task for that) or on a reminder date (use Task Reminder for that).
Configuration and filter options:
After selecting Task Added and naming the trigger, click + Add Filters:
Assigned User: filter for tasks assigned to specific users only, so the workflow targets tasks based on who they were assigned to. Select the user(s) to match.
Custom Fields: apply additional criteria using custom fields you created for the contact under Settings > Custom Fields.
Data made available: the contact related to the task, with the full contact field set, plus the task details (assigned user, title, due date) for use in downstream actions and notifications. Because the task is tied to a contact, the workflow runs in that contact's context.
When to use it: use this trigger when one or more actions should run as soon as a task is created.
A coordinator named John is assigned to a lead named Kate. Whenever John gets a task related to Kate, you want Kate added to a follow-up workflow. Add the Task Added trigger and specify the assigned user John using the filters.
More generally, react to task creation by enrolling the related contact into onboarding or follow-up automation.
Example workflow: Trigger: Task Added, Assigned User = John. Action: enroll the related contact in the "New Lead Follow-Up" sequence and notify John that automation has started.
Notes, limits, and gotchas:
The trigger fires per task created; if a contact gets several tasks, it fires several times. Narrow with the Assigned User filter or add conditions to control re-entry.
Fires on: a task's due date offset by the timing you set, so the right person is nudged a set number of days before or after a task is due. It evaluates against the task's due date rather than the moment of creation or completion.
Configuration and filter options:
After selecting Task Reminder, click Add Filters to set the timing, then save:
After no. of days: fire a set number of days after the task due date. Use this when actions need to happen after a task's due date, for example following up on an overdue task.
Before no. of days: fire a set number of days before the task due date. Use this when actions need to happen ahead of the due date, for example a heads-up before a consultation prep task is due.
Data made available: the contact related to the task, with the full contact field set, plus the task details (title, due date, assigned user) so the reminder can name the task and the client.
When to use it: use this trigger when you want to remind the assignee around a task's due date.
Remind a provider two days before a client's pre-treatment consultation task is due (Before no. of days = 2).
Follow up a day after a task's due date if it has not been completed (After no. of days = 1).
Example workflow: Trigger: Task Reminder, Before no. of days = 2. Action: internal notification to the assigned user, "Reminder: task for {{contact.full_name}} is due in 2 days."
Notes, limits, and gotchas:
To remind both before and after a due date, set up two triggers, one for each offset.
Reminders fire relative to the due date, so a task with no due date cannot fire this trigger.
Fires on: a task's status changing to "completed." It is built to launch predefined actions automatically once work is finished, which is helpful for streamlining operations and reducing manual handoffs. It fires on completion only, not on creation (Task Added) or on a reminder date (Task Reminder).
Configuration and filter options:
After selecting Task Completed and naming the trigger, click Add Filters:
Assigned User: trigger actions based on the user assigned to the completed task. Choose an operator (is or is not), then pick a user from the list.
Contact Custom Fields: use custom fields on the contact to filter which completed tasks trigger actions.
Data made available: the contact related to the completed task, with the full contact field set, plus the task details so you can reference what was completed in your follow-up. Actions can include sending emails, updating contact statuses, advancing a pipeline stage, or any other action in the workflow.
When to use it: use this trigger when finishing a task should automatically trigger the next step.
When a provider marks a "Post-Treatment Call" task complete, automatically send the client a satisfaction survey or update their status.
When an onboarding checklist task is completed, move the contact to the next stage.
Example workflow: Trigger: Completed Task, Assigned User is the provider. Action: send the client a satisfaction survey, then add the tag "Post-Treatment Survey Sent."
Limitations:
This trigger does not support multi-step if-else conditions.
It operates globally and cannot be limited to specific named tasks or departments; use the Assigned User and Contact Custom Fields filters to narrow which completions matter.
Fires on: a contact replying to a message. Replies are one of the strongest signals of intent, so this trigger lets your automation react immediately and consistently, helping you follow up faster and route messages correctly. It fires on inbound replies from the contact across the channels you allow.
Configuration and filter options:
After adding the trigger and naming it clearly, click + Add Filters and choose the filters that fit your use case. You can combine filters to tightly scope which replies matter.
Contains Phrase: runs only when the reply includes specific words or phrases (for example "interested," "book," "pricing").
Exact Match Phrase: runs only when the reply exactly matches what you specify.
Has Tag: includes only contacts with selected tags.
Doesn't Have Tag: excludes contacts with selected tags.
Intent Type: uses intent detection (natural language processing) to categorize replies (for example positive response, complaint, or question), so you can handle each type differently.
Replied to Workflow: runs only if the contact replied to a specific workflow's messages.
Reply Channel: runs only when the reply came from a selected channel.
Then click Save Trigger, add your actions, and publish.
Reply Channel targeting: Reply Channel lets you build different automations for SMS, email, social messaging, and chat, which is useful when the same contact can reply across multiple channels but you only want certain replies to trigger a workflow.
In the trigger filters, open Reply Channel.
Select the channel you want to match (for example Email or WhatsApp).
When you select Reply Channel = All-in-One Chat, additional filters appear so you can narrow by chat experience and the specific widget or configuration:
Set Chat Type is to either Chat Widget or Live Chat.
If Chat Type is Chat Widget, select Chat Widget is (the dropdown lists only All-in-One Chat widgets).
If Chat Type is Live Chat, select Live Chat is (the dropdown lists only All-in-One Live Chat configurations).
Data made available: the replying contact with the full contact field set, plus reply-specific context: the channel the reply came from, the detected intent type (when Intent Type is used), and the workflow the reply responded to (when Replied to Workflow is used). This lets downstream steps route by channel, branch by intent, and reference the contact in the response.
When to use it: use this trigger when an inbound reply should immediately drive routing or follow-up.
Create an opportunity and alert the right team member when a client replies with high-intent words like "interested," "book," or "pricing."
Route Live Chat replies to a support queue.
Notify a coordinator when a client replies through a specific chat widget.
Example workflows:
Notify a team on a specific chat widget reply: Trigger: Customer Replied, Reply Channel = All-in-One Chat > Chat Type = Chat Widget > Chat Widget is (select widget). Actions: send internal notification, assign the conversation, create a task.
Route Live Chat to support: Trigger: Customer Replied, Reply Channel = All-in-One Chat > Chat Type = Live Chat > Live Chat is (select configuration). Actions: create a ticket, notify the support channel, apply a tag, assign a user.
Create an opportunity from high-intent replies: Trigger: Customer Replied, Contains Phrase ("interested," "book," "pricing") + Reply Channel (your channel). Actions: create an opportunity, notify the sales rep, send a follow-up message.
Notes, limits, and gotchas:
The All-in-One Chat option is available specifically in the Customer Replied trigger's Reply Channel filter, not in other triggers.
Existing Chat Widget based triggers and workflows continue to work as before.
To run different automation for Chat Widget versus Live Chat replies, use separate triggers or separate workflows with Chat Type set accordingly.
Intent Type relies on language detection, so review its categorizations before relying on them for high-stakes routing.
Do I have to add filters to a trigger?
No. Filters are optional on most triggers. If you save a trigger without filters, it fires for every matching event on every contact. Add filters when you want to narrow exactly which contacts or events enroll.
Can I rename a trigger?
Yes. The Workflow Trigger Name box changes only the display name inside the workflow builder. It has no effect on the trigger's behavior or on your content.
What contact data and merge fields are available after a trigger fires?
The contact that the trigger fired for becomes the workflow's primary record, so its full field set is available to downstream actions, including name, email, phone, address, source, type, assigned user, tags, and any custom fields, referenced as {{contact.<field>}}. Some triggers add event-specific context on top of that: Note Added and Note Changed expose the note, the task triggers expose task details, Customer Replied exposes the reply channel and intent, and Contact Engagement Score exposes the score.
What happens if a contact's details change several times? Will the workflow run each time?
Yes, change-based triggers like Contact Changed fire on each tracked change. To avoid over-firing, use workflow conditions to check whether an action already ran, narrow your filters, or add time delays.
Will Contact Created fire for contacts I import in bulk?
No. Bulk imports do not fire the Contact Created trigger. To automate on imported contacts, use a separate workflow with manual or bulk enrollment.
Can I react to a tag being removed?
Yes, with the Contact Tag trigger set to Removed. Note that Contact Changed detects that a change occurred but does not pass the removed value, so to branch on removal use Contact Tag (Removed) or an If/Else condition that checks current tag state.
What is the difference between Note Added and Note Changed, or Task Added, Task Reminder, and Completed Task?
Note Added fires when a new note is created; Note Changed fires when an existing note is edited. For tasks: Task Added fires on creation, Task Reminder fires relative to the due date (before or after), and Completed Task fires when the task is marked complete. Use the one that matches the moment you want to act on.
What happens to a contact already in a workflow when they enable DND?
Aesthetix CRM automatically skips communication steps that conflict with their DND settings (for example, email steps are skipped when email DND is on) while non-conflicting steps still run. You usually do not need to remove them from all workflows, though you may choose to if they opt out of everything.
How do I make sure my workflow actually runs after setup?
Confirm the workflow is toggled from Draft to Publish, verify every action is configured, and use the Test Workflow button before going live. Avoid multiple published workflows using the same trigger and tag, since they all fire at once and can cause unintended overlaps.
